#* tutorial.
Explore tagged Tumblr posts
Visit Tumblr Blog
Explore Tumblr blogs with no restrictions, modern design and the best experience.
Last Seen Tumblr Blogs


Fun Fact
China blocked Tumblr because of pornography and censorship problems in 2013.
Note
Apologies if this is a silly question as I'm still learning how to use photoshop. I love your "Etoile" template but I'm struggling to get the gifs to all play at the same time, could you possibly explain? Thank you! xo
hiya! no question is ever silly! i def still struggle with this from time to time
to make it a little easier for yourself i would suggest making sure your gifs are the same length. (if one is shorter then you'll need to cut down the longer gif)
all you need to do is once you've opened the template in photoshop ensure the timeline is activated (windows > timeline) and in timeline you should see the below screenshot:

you want to open the folder so you're able to see all the content. from there all you need to do is drag each element in the folder to match the length of your gif

i'm super bad at explaining things so i hope this makes some sense! if you need any further help or have any questions please don't hesitate to hmu in im's or sending through another ask :')
5 notes
·
View notes
Note
hi, could you do a tutorial for the graphics in your rosey carrd? or release a template for them please?
i didn't save them because they were literally made in 2 seconds. use a gradient fill layer set to color blend mode with whatever color scheme you have, white text with black outline and inner shadow and drop shadow goes above the gradient, fill text with white outline and inner shadow goes below the gradient, don't go too crazy on your psd (also below the gradient). adjust text styles listed as necessary depending on the size of your text/image. will also just drop a psd i once again made in 2 seconds lol

dropbox link.
23 notes
·
View notes
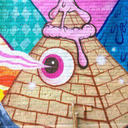
Photo

How to Decoupage Christmas Cookie Plates- fun christmas craft to make cookie plate for the kids! Xmas red truck cookie plate tutorial. Step by step instructions how to mod podge clear plates. Dollar store craft.
#How#to#Decoupage#Christmas#Cookie#Plates-#fun#christmas#craft#make#cookie#plate#for#the#kids!#Xmas#red#truck#tutorial.#Step#by#step#instructions#how#mod#podge
2 notes
·
View notes
Text
How to Use 'cat' Command in Linux
The ‘cat’ command is a powerful tool in Linux that can be used to perform a variety of tasks related to managing and manipulating files. From displaying file contents to concatenating multiple files, the ‘cat’ command is an essential tool for any Linux user. In this comprehensive guide, we’ll explore the various options and syntax available for the ‘cat’ command, as well as tips and tricks for…

View On WordPress
#cat command#command line#Concatenate Files#Create Files#Empty Lines#End of Lines#examples#File Contents#Line Numbers#linux#Redirect Files#syntax#TAB Characters#Tutorial.
7 notes
·
View notes
Note
hey! would you ever do a tutorial or walk through of one of your graphics? i love your work and would love to know your process :)
I'm not really used to share my stuff like this butttt that's the third (?) time someone asks for it so let's goooooo.
First things first my inspo was an art piece i saw on Pinterest (I've a brainstorm folder for it) with wavy, grainy and colorful shit. Also I've been CRAVING for a nice pic of lewis with the fluro gloves for me to edit him properly in them.
I used two apps: Photoroom (to erase the background easily) and Ibis paint (a mod APK 😛)
So let's go, i start opening an a4 sized archive on ibis and centralized the pic,then I used Photoroom for doing the PNG. Used a rainbow gradient map and some grain for the background, copied the layer and used this wavy effect on the background and put that layer on overlay. I liked doing it because it gives a halo effect.
In the lewis png layer i try to add a layer of a grainy gradient by hand and failed miserably, so i use the gradient effect and use the grainy over it.
To the helmet and gloves i selected the fluro color and filled it with the bucket paint on the other layer with a fluro yellow.
The spiky halo is a effect on ibis that i own my life to dkdkkdkd, also i added a rainbow grainy gradient over it to make it cohesive.
At this point i was almost done but i felt like I needed to add something to focus it all more on lewis so i added the little fluro yellow border, after that I just added some of my favorite textures and some halftones.
That's itttt i hope it's understandable and useful!!!
#tutorial.#ask answered#to the person who asked something similar and I'm taking thirteen centuries to answer....#your time will come when i discover a certain topic you asked
2 notes
·
View notes
Text
I want to tell a story to the artists and would-be artists out there.
When I was 19, I made a large oil painting of the nerd I would eventually marry. I poured all my attention and care into this painting. It's the only art I have from back then that still holds up as a work I'm proud of today.
I entered it into a judged show at the local art center. It got an honorable mention. I went to see the show with my beloved model. One of the judges came up to talk to me, and highlighted that all the judges really liked the painting. It would have placed, except, you see, the feet were incorrect. They were too wide and short, and if I just studied a bit more anatomy-
I called over my future wife, and asked her to take off her shoe. Being already very used to humoring me, she did. The judge looked at her very short, very wide little foot. Exactly as I'd lovingly rendered it. I would never edit her appearance in any way.
The judge looked me in the eye, and to his credit, he really looked like he meant it when he said "Oh I'm so sorry."
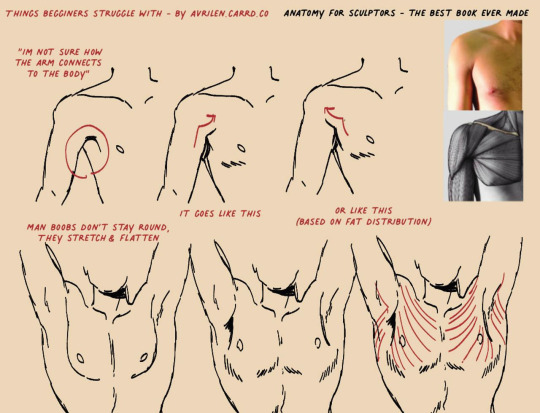
Anyways the moral of the story is that all of those anatomy books that teach you proportions are either showing you averages, or a very specific idea of an idealized body. Actual bodies are much more varied than that.
So don't forget to draw from observation, and remember that humans aren't mass produced mannequins. Delight in our variation. Because it's supposed to be there.
113K notes
·
View notes
Text
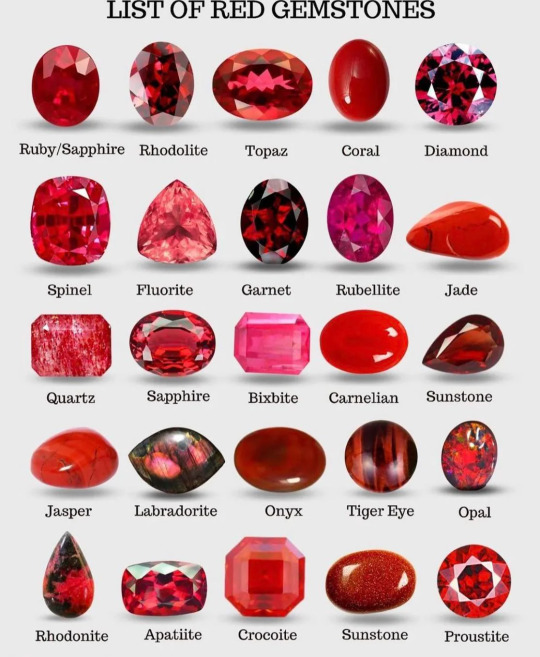
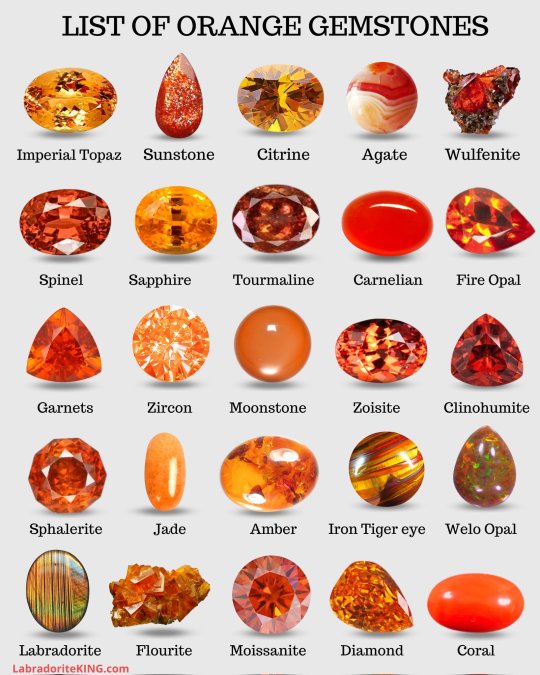
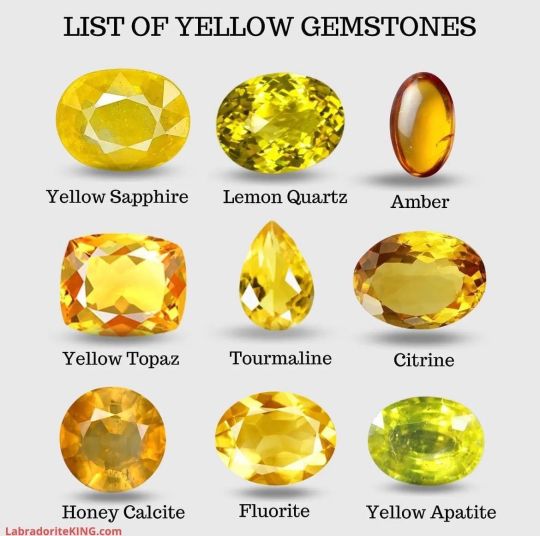
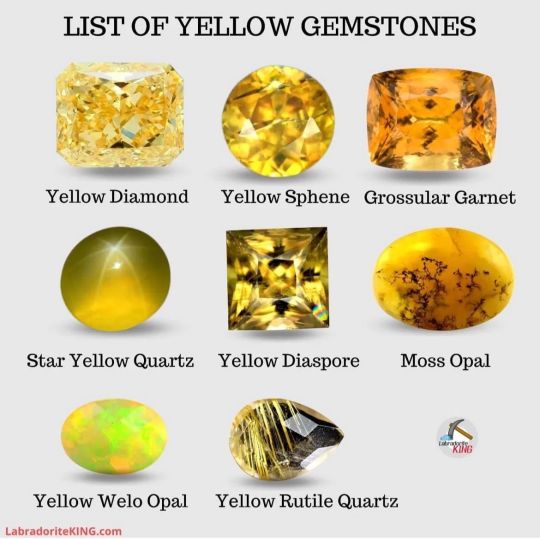

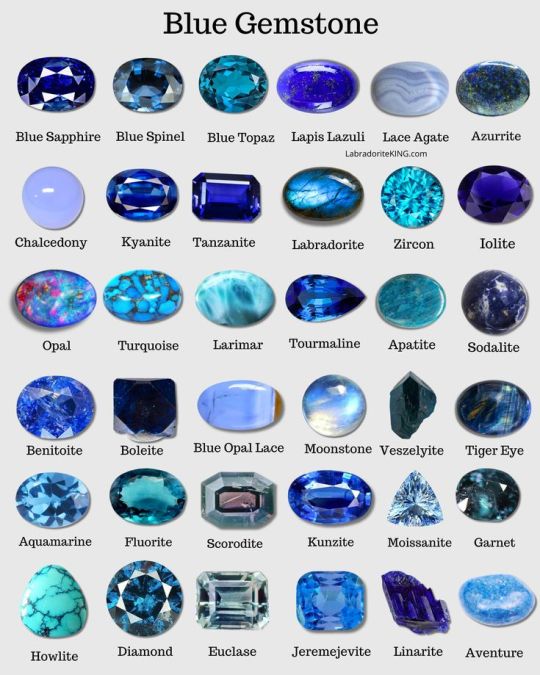
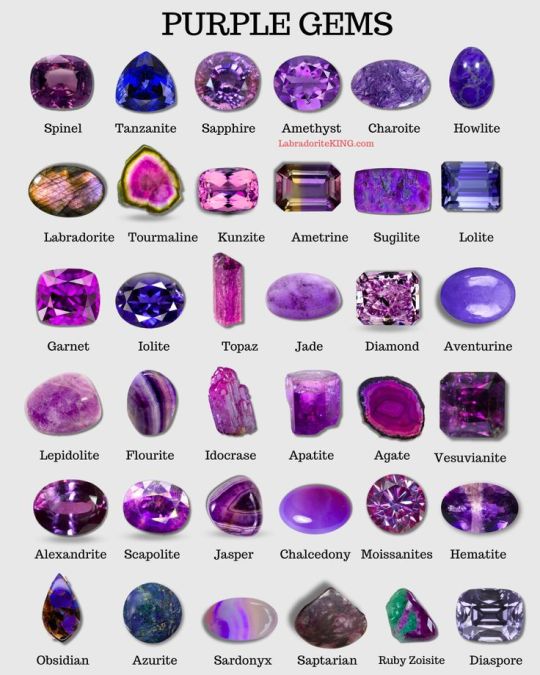
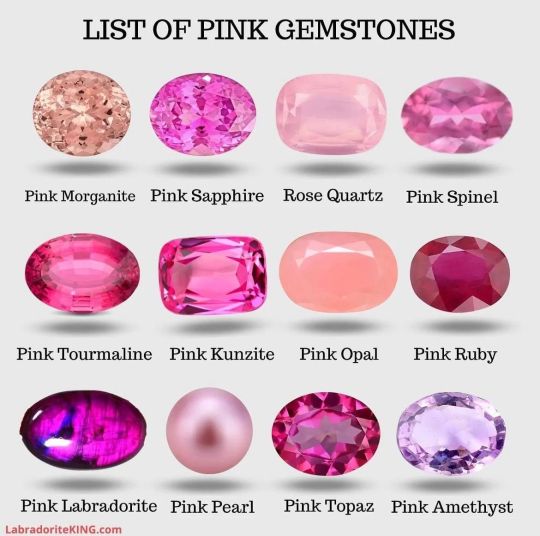
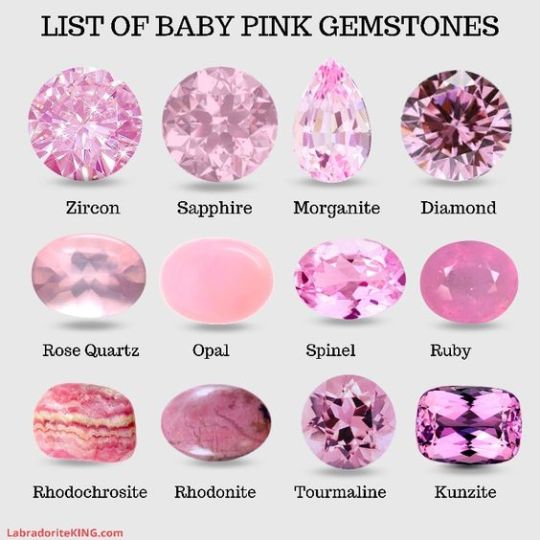
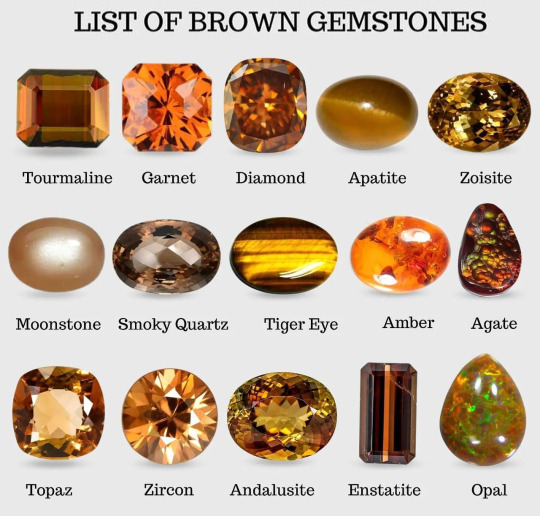


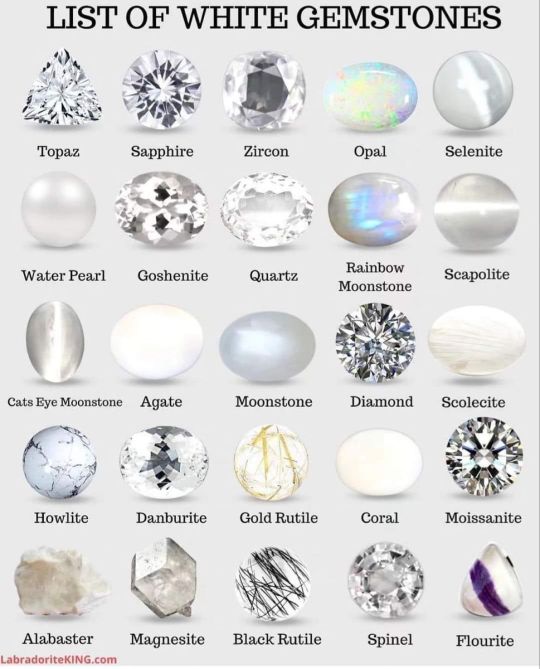
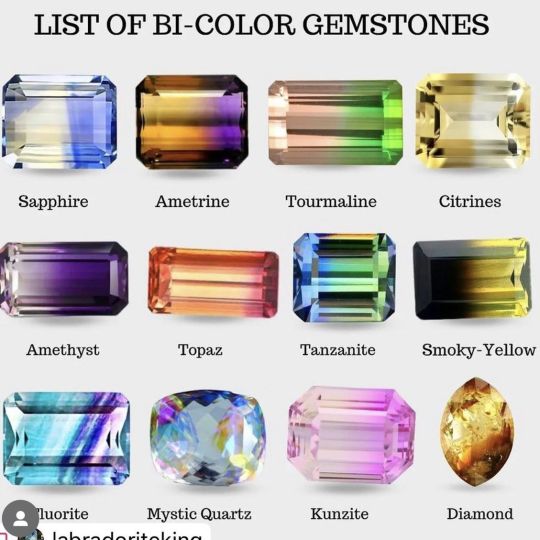
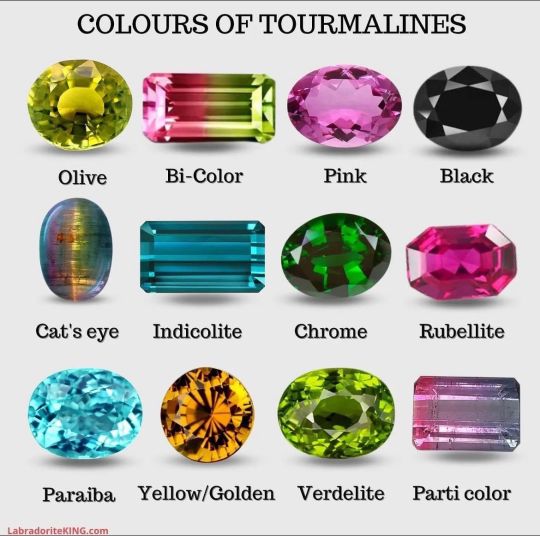
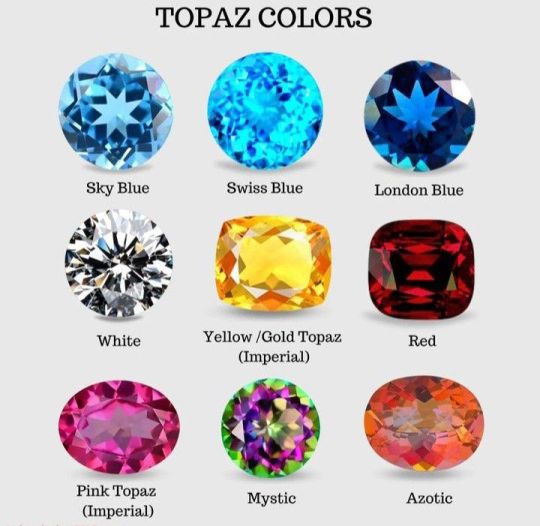

By LabradoriteKing on Pinterest
#Tutorials & References#Gemstones#Jewels#Art Reference#Writing Reference#Gemstones Reference#If the original marker wants me to take this down I will
134K notes
·
View notes
Text
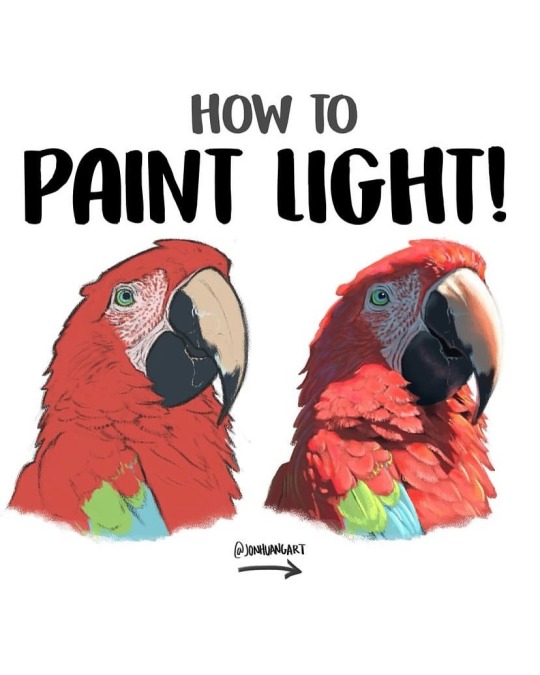

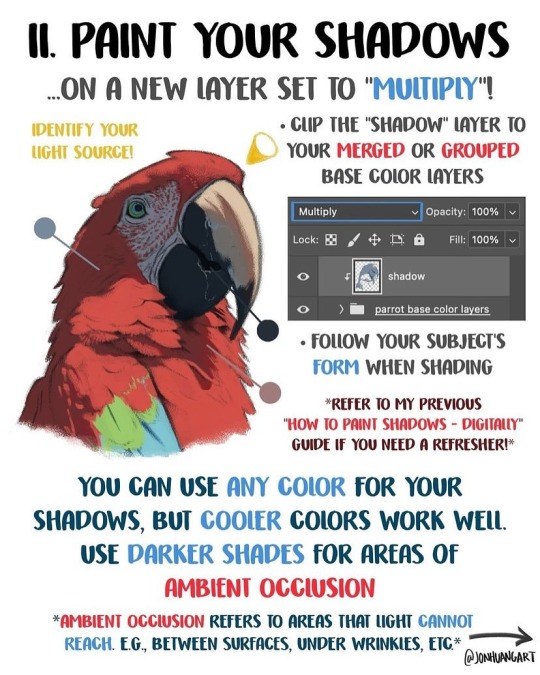
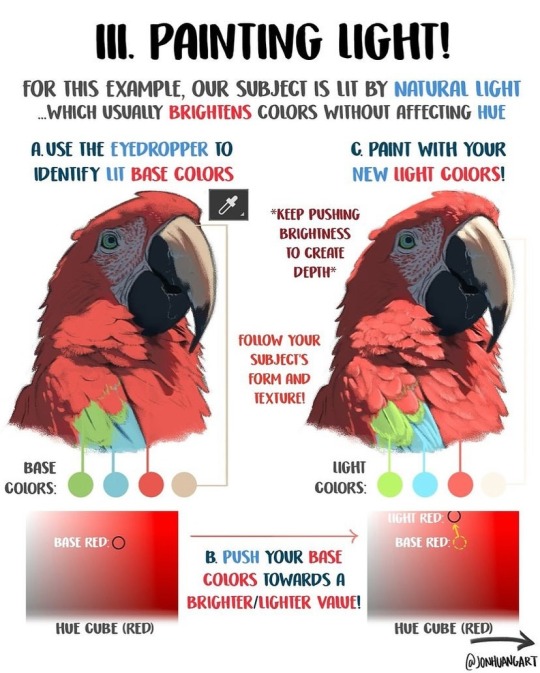
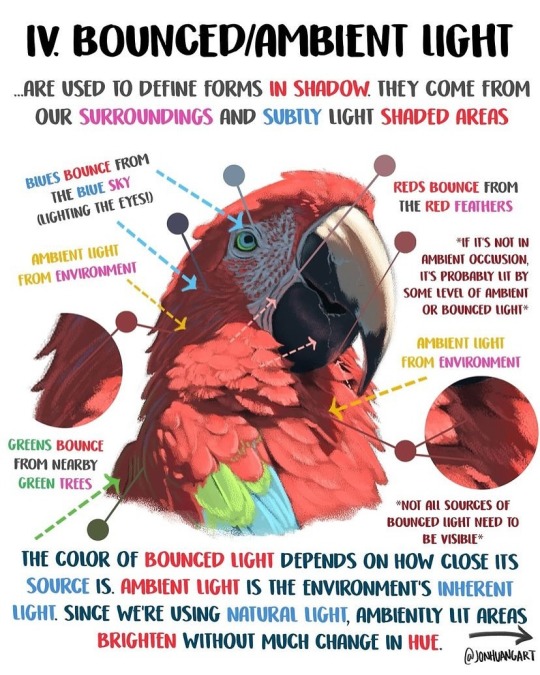
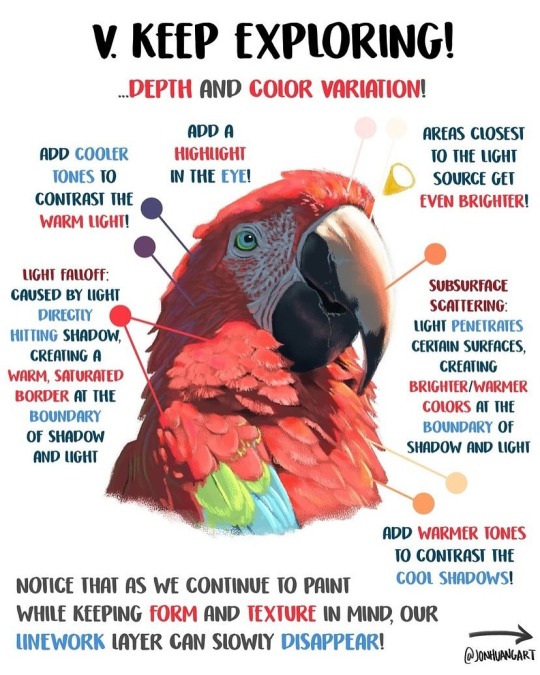
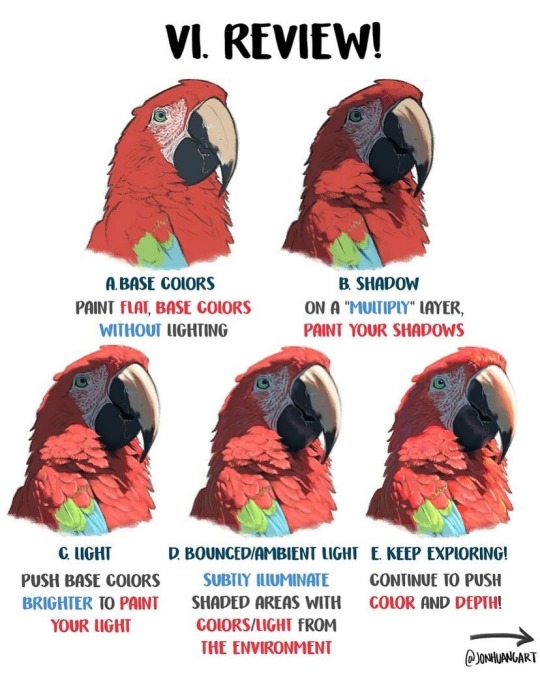
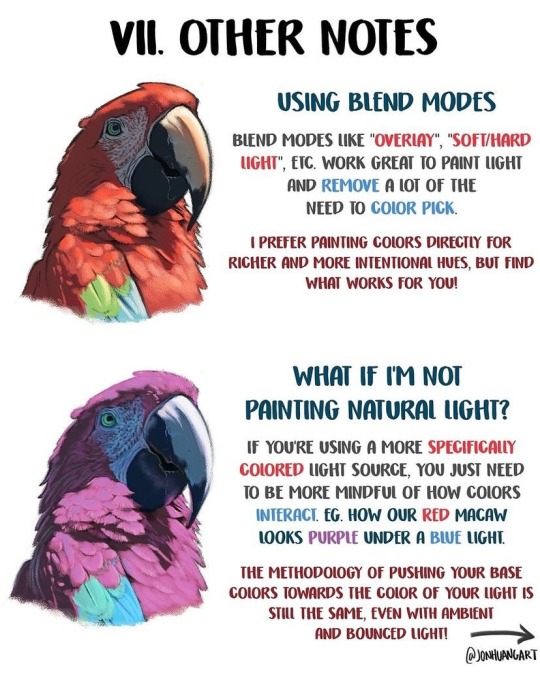

How to Paint Light by jonhuangart
32K notes
·
View notes
Text

It's in the eye of the beholder
#comic#birds#my art#I've had this idea for a while#after a lecture that talked about how traits we consider cute are traits found in babies#I feel like birds would have a very different definition of cute from us#anyway after making the bird tutorial I feel the pressure to draw perfect bird anatomy#but tbh I still just wing it a lot of the time!!#hehe “wing it”
62K notes
·
View notes
Text


Tutorial for drawing characters with Down syndrome!
DISCLAIMER... Please keep in mind that this is an introductory drawing tutorial and has some generalizations in it, so not every “X is Z” statement will be true for Actual People. It's more of an overview of features that are common in people with Down syndrome, not meaning to imply that every person with DS has all of them 👍 thanks.
If you draw any characters using this feel free to tag me!
Consider supporting me on ko-fi if you find this to be helpful.
#my art#disabled artist#artists on tumblr#digital art#id in alt text#art#personal art#drawing#drawing tutorial#drawing tips#ccartshare
34K notes
·
View notes
Text
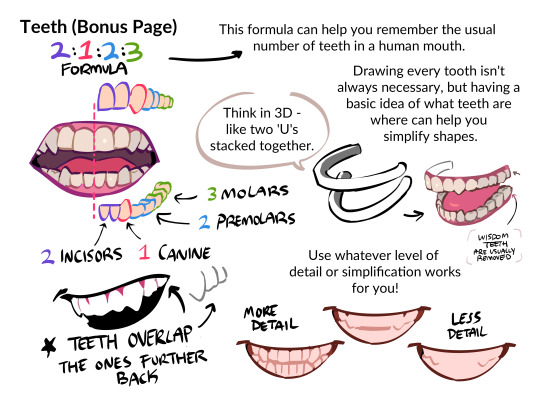
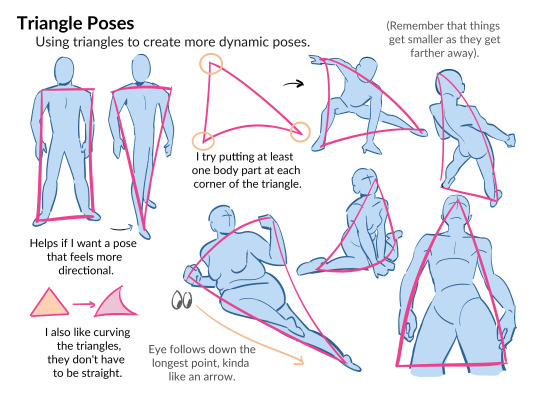
A small guide for people who struggle with this area
24K notes
·
View notes
Text
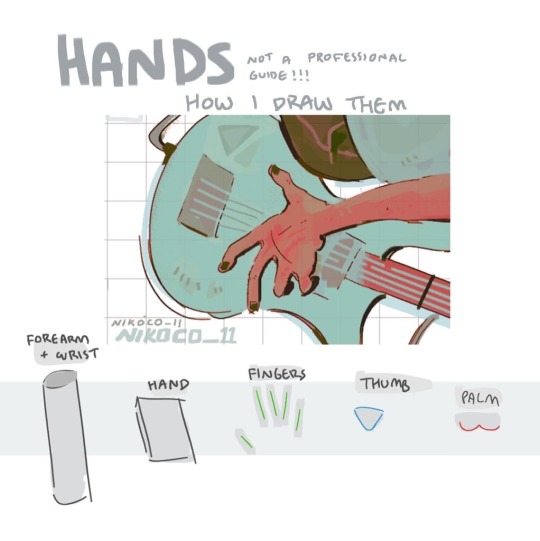


my recipe for drawing hands!
(small note that this is a shortcut that is more abt style and ease than anatomical accuracy. it helps to take time to really properly study hands, makes it easier to bend the rules a bit like this and have it still look good!!)
(learn rules b4 u break them or whatevah)
#qna#tutorial#guide#drawing tutorial#digital art#illustration#drawing#artists on tumblr#my art#clip studio paint
59K notes
·
View notes
Text
how to wave magic wand by 街头尬术师【魔法披风】
15K notes
·
View notes
Text
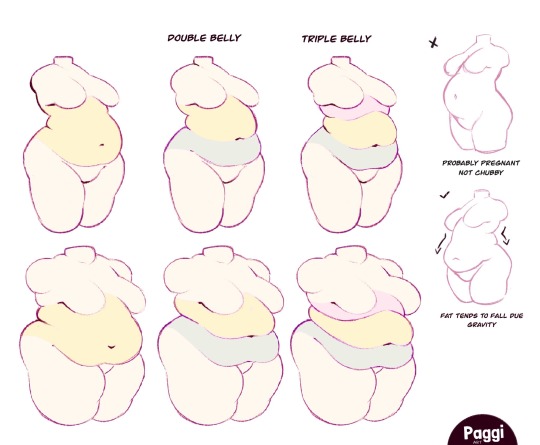
Excellent tutorial to drawing cubby body types
“Some chubby guide for y’all!”
Source: paggiart on twitter
#art tutorial#digital art#art reference#tutorial#art tips#human anatomy#drawing anatomy#drawing torso#drawing stomach
47K notes
·
View notes
Text
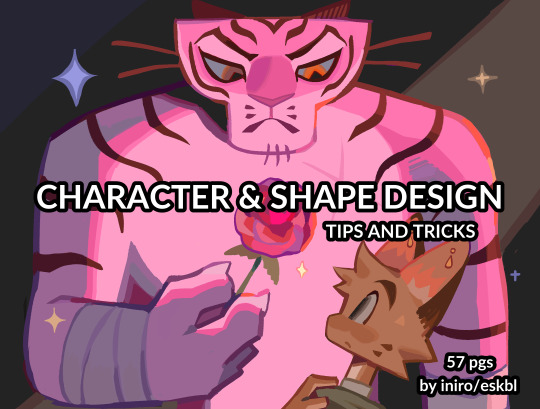

HII my character & shape design tips PDF is now available! ^_^ hope you enjoy !!
BUY HERE or HERE
#character design#art tutorial#art resources#csp brushes#art tips#shape design#myart#i beat the page count of my last pdf woo!
37K notes
·
View notes