#(but this means i have to manually delete stuff so i can FIND ANYTHING)
Explore tagged Tumblr posts
Visit Tumblr Blog
Explore Tumblr blogs with no restrictions, modern design and the best experience.
Last Seen Tumblr Blogs


Fun Fact
Tumblr was created by web developers David Karp and Marco Arment.
Text
I always double check the golden claw. you know, just in case it's changed in the last 13 years.
#bear moth owl#literally it is never not bear moth owl#and yet i check anyways yk. just in case todd wants to be funny#skyrim#im doing yet another iron man challenge bc i accidentally deleted my other one :( while mass deleting#(i save individual files bc they corrupt so often/easy)#(but this means i have to manually delete stuff so i can FIND ANYTHING)#(rip sithia the bosmer. your entire save was broken but rip anyways)#anyways rn im a khajiit named rozita#not the dragonborn and not even in any specific timeline. just kind of an adventuring kitty#i tired to make her look like a white tiger but the khajiit fur only managed to be like. very light grey :(
481 notes
·
View notes
Text
Current Plans + Musings
I don't plan on playing Exedra to the degree I did for Magia Record, or playing it at all. Because of that, I won't be taking an active role in the community and archiving anything for it. Of course, if Exedra has like amazing gameplay and stories then this is all subject to change, but for now I think I'm done with phone games.
The two youtube channels will stay up and I'll check em periodically to make sure there aren't copyright strikes against the content. I've saved all my raw files, especially for the battle animations, so I can remake them in the future if the music ever becomes a problem for some reason.
Google Drive will stay up until Google rots away. I haven't recorded footage in a long time (as in stories, I do for the character doppels and such), but I'll upload things if they're sent to me.
Magia Union Translations still plans on translating things and making videos, especially leading up to the end, but also for after the game is over for whatever wasn't made in time. I'm not sure what form this will take in the future-- if it'll be manual captions added to the videos or not, but I know it WILL happen.
As for this blog, I'm not going to delete it or anything. However I'm going to be taking a step back. I'd like to say that I'll do liveblogs but I mean... *gestures at blog* I've been saying that for years and the only one I really did successfully was the Oriko one lmao. Ahhh oh well.
I'll have more words later, but it was really fun to be part of a fandom experience like this. I'm excited to work on my own original story projects though and quiet down a bit.
...
When I started this blog, I never expected it to have people actually read it. Or look at it. I just wanted a place to gush about how much fun I was having. I didn't even want to tag the posts with "Magia Record" at first because I was terrified people would be mean at me, haha.
But I'm glad I did. I made so many good friends through this game. I'm glad it existed. And it made me happy to have a place where people cared about what I had to say. Some folks actually got their news from here, can you imagine that? They had notifications turned on for this blog. My god.
Anyways, I'm going to be here for the next two months, and tomorrow I'll start reblogging fan projects and initiatives, plus general news. Maybe this blog will turn into a dumping site for art and fanfic reblogs, who knows. I might watch the remaining stuff and add various thoughts here and there.
Otherwise, you can find me on my main blog @malignmuffin, which only reblogs stuff (I don't talk much if at all there). I have another tumblr blog for my comic, but I think I'll reshare the name once I actually have content you can look at on it. It's pretty bare bones for the moment.
Actually it'll be funny if the end of this game is what makes me finally work on it again. I was in the process of working on it when NA came out, and it totally derailed me. Stopped writing, drawing, just focused on this silly little phone game. Now it's like those five years have gone by and I'm going back to where I started, except I think my lil comic is going to be a bit better than it was before. If I actually make it, that is.
If I ever do actually make my comic and start posting it, I'll be sure to update y'all here. hah
Anyways, thanks for being on this wild ride with me. The memories have been great, and I'm glad I had this experience, even if it had to end.
105 notes
·
View notes
Note
hey ! sorry if this has been asked before , just generally curious
how do you normally get access to all of these files ? do you yourself somehow rip them from the beta or something or do you obtain them secondhand ?
sorry if this sounds weird , ive never been able to figure out how people rip files n im curious as someone really into programming n such
Haha, I actually learned how to datamine just for getting the files from this game! I was annoyed that it felt like none of the dataminers I was seeing on Twitter were posting as thoroughly as they could be, so I decided to start going through everything myself.
I've posted about my process before, but things changed a little with the open beta, so here's what I currently do. I don't know how universally applicable for other games this is, but it works for this one!
I download the latest version of the mainland China open beta. I could datamine the Hong Kong/Macau/Taiwan one instead, since that's the one I actually play, but mainland gets the updates a week sooner, so even though it has more censorship that's the one I always grab files from. If you already have the game, you don't need to download it from the site again, you can just run the game and it'll update upon startup whenever there's an update available.
I close the game once the update's done, and check which files updated (if you're downloading the game for the first time, obviously they'll all be new, otherwise you can check the date the file was modified). There are two places that could be updated: /client/bin, and/or /client/OuterPackage. In the past /bin was for bigger updates (usually story updates) while /OuterPackage was for other updates, but they've been updating /bin more and more lately. /bin is ALL the game files (stored in vfiles), while /OuterPackage is just the latest update stuff (stored in /Bundles bundle files).
a. If I just need the /OuterPackage files, great! That's way easier and faster, both for decrypting and for sorting through, since it's just a small slice of the files (I think Version 2.3.2's OuterPackage bundles were about 6 GB). I use this tool, the original upload for which was deleted so I uploaded it to share, and just put it in the /OuterPackage/Bundles folder, then double click the file to run it. b. If I need the /bin files, ugh. That means wading through all the files in the game- and a longer decryption time. I use this tool for that, and end up with a huge pile of all the stuff in the game to sort through (right now the vfiles are about 41 GB).
Either way, once the files are decrypted, I can open them in AssetStudioMod to view them and export them into a usable format. For the sake of efficiency, rather than going through every single file manually, I have a list of a ton of file name keywords to search to quickly look for anything interesting and new. The files aren't really sorted, so I do still end up having to check all 200 folders (whether from /bin or /OuterPackage/Bundles) each time to find everything, even when I know what I'm looking for.
And now I have the image files, 3D models, and fonts! It's also possible to export other stuff, like rigging and animation, but I haven't figured out how to actually implement those, and it'd probably be more time-consuming than it's worth.
For audio files, it's way easier- I don't even need to decrypt them, I can just use foobar2000 to open them directly from the game files (/client/bin/Media and /client/OuterPackage/Media). They're compressed into groups that foobar2000 can split back into separate audio files, so it does still take a bit of digging to find anything new and interesting, but it's much faster than the bundles.
There's also the Lua files, in /client/OuterPackage/Lua, though I don't actually check them much since it tends to be the less interesting data about how the game works. You can use this tool to decrypt them, though!
The more interesting stuff (like mainline quest text) is hidden in the Config files (for instance, those in /client/OuterPackage/Config), but I don't know how to decrypt those, and the people that do are very protective of it since that's the kind of serious information that the developers would probably tighten security on if they knew people were getting into it at all.
I hope that's the answer you were looking for, heh! Possibly I went a bit more in-depth than you wanted, but oh well. I try to be open about how I do all this, since it was a bit of a pain figuring some of it out on my own for the first time, when I was only seeing others post tidbits of the process at most.
#anonymous#and this is why it takes me several hours to post files from updates usually!#though I can go faster when it's just an outerpackage update thankfully
6 notes
·
View notes
Note
hi hashtagloveloses,
I'm a new user and saw your post about reblogs. Is there anything else I should pay attention to? Could you tell me if there is a post or guide or something I can consult on how tumblr works? I'm still getting really lost here and have trouble finding anything.
there’s actually an official staff blog with a bunch of good tips called @tips everybody should know about! but off the top of my head also:
1) make sure you have a profile photo. you don’t need a cover photo you can even just turn that off in your blog settings. this is to make sure people don’t think you’re a bot
2) have a different username here than you have other places and don’t share personal information of any kind here (huge mistake i made….). despite what some people say you do not need to share anything about ur sexuality, pronouns, diagnoses, opinions, etc. frankly if i could advise my younger self, i’d say just don’t make original posts or comments at all (if u wanna make commentary in reblog tags maybe?). use a diary or a journal instead of original posts about yourself or your opinions or comments on others’ posts. even if you delete your blog or change your username, the reblogs of things you say live on here forever.
4) reblog instead of like, and tag posts with what they’re about when you post and reblog (this is something i don’t do as much as i should bc im often on mobile and don’t feel like it and only do it for original posts). at least make sure you’re tagging for common content warnings and spoilers. don’t censor words in posts or tags if you’re trying to tag, bc that breaks people’s mute/blocklists. DO censor words/tags if you’re talking about something you don’t want to clog the tag for or attract attention to or something.
5) if you personally want to keep track of original posts, asks, and queued posts, create tags you use for each of those and on mobile manually tag with them every time you do one of those posts, and on desktop you can have an extension do it. in your blog settings you can make like your original post tag one of your “featured tags” if you want easy access, or other people to be able to see, which just means when they hit the search bar on your blog it’s suggested.
6) make sure you go to your dashboard settings and turn OFF “best things first”. i keep on the other algorithmic stuff like showing stuff based on likes as well, and i flip between the various feeds, but most of what you should be doing is following blogs that post or reblog what you like, following the TAGS of things you like, and those will appear chronologically in your regular dash “following” feed.
7) freely block, unfollow, and filter/mute people and topics. do not feel like you have any obligation to anyone. curate your experience on here.
8) turn off submissions on your blog, and turn off anon asks or even asks all together if you don’t want them. you are not obligated to answer every ask or even have an open ask box. you should also take a look at your settings for private messages and replies to set them to what you’re comfortable with.
9) how i use notifications is different than a lot of ppl bc i get a LOT of them but explore how the Activity and notifications page works to your favor, but turn off push notifs and as much as you can. followers, likes, etc, do not matter that much here if you’re not trying to build a following for art or something and you shouldn’t pay attention to it other than just for fun.
10) learn what T*RF, SW*RF, and white supremacist dogwhistles are and how to spot them bc they can still be prevalent on here and you may not realize. a lot of seemingly normal posts about feminism on here can be crypto t*rf shit so you need to learn how to spot it. (those kinds of posts spread to a lot of platforms and people don’t realize….)
11) do not get into discourse on here. of any kind. even if you’re right. some idiot will drain the life out of you arguing with you and people get weird. you’re not gonna convince people online of anything in a discourse fight most of the time and you will only come out of it drained or harassed yourself (frankly this is good advice for anywhere and sometimes even i slip up). in general even on here where engagement is not encouraged as much, every platform has engagement bait and discourse either purposely seeded to piss you off, or if it’s not on purpose it’s still pushed by algorithms.
12) for things like news, etc, this is general online advice but make sure you’re practicing basic media literacy to check how real a headline or a video or something is. what’s the source? how old is it? did they provide sources? etc
13) DO NOT REPOST ART. EITHER FROM HERE OR FROM OTHER WEBSITES. unless the artist says you can repost it (and you need to do so with credit, and look and see if they need to give permission). do not REBLOG reposted art either. you may find it in tags sometimes. do not encourage that behavior.
14) to that same end, do not post AI bullshit here. chatGPT, character AI, voiceover deepfakes, AI videos, etc. don’t do or support those in general but don’t post that shit here
15) in general, and this is something i try to tell people on EVERY platform, remember that what you see people discussing online is often a small minority of what most people think or feel. it may FEEL like everyone is talking about a certain thing, or fighting about a certain thing, but it does not represent the whole. there’s so many discourses where people are like “why do x always say y” and i’m like well they don’t. the very online segment of x often say y bc it gets engagement or bc they are very loud. (this isn’t the case for everything but it happens often for very stupid topics). this isn’t to dismiss important conversations had online by a minority of people that aren’t being discussed wider enough either - bc that also does happen. but that is often for things that are more important than like, the same movie sex scene discourse i see on twitter every 2 weeks.
16) don’t feel any obligation to your “followers”. you are not an influencer you are just here having fun, and your followers follow for the things you reblog, not for you. be FREE.
17) on desktop browser, get the XKit Rewritten extension and go wild with the settings. its a really nice tool and has a lot of good features, like the quick reblog and queue features that give you those auto tags and stuff. (also if you aren’t already using Ublock Origin extension as your adblocker on desktop, get that too).
18) if you have an iphone, apple store limits what they can show you within the app, so if you want to look at more NSFW, the mobile browser version of tumblr is quite decent. but also go to your blog settings on desktop and make sure your settings of what it is showing you on your dash include sensitive content (even if you set it to have a filter over it at first), bc it sometimes autoflags random shit as “sensitive”. also play with your dashboard filters with tags for nsfw content to your comfort - it wont remove it it’ll just put a thing over it so it doesn’t pop up in public accidentally before you click to look at it.
18 notes
·
View notes
Note
if ur still doing the writing meme (i've liked all ur answers even the 'unpopular' ones a haikyuu fic i loved once got rewritten and i'm still sad i never saved the first one because i didn't realize the author didn't like it and i wish i'd commented more or sth to make them know we loved the og so much) -> 13 and 34 plz
Ahh I'm sorry you went through that anon re: the Haikyuu! fic. Please don't guilt-trip yourself for it. Authors have lots of reasons for rewriting a fic, or deleting a fic, and sometimes even when it's had thousands of kudos they will still do it.
It sounds like you commented in general (since you say 'commented more' instead of just commented) which is like... really awesome. Who knows, maybe the author thought they were giving you the better version! You can always leave a comment and ask if they still have the original chapters on file somewhere if that author's still active, and if they'd be willing to share them with you somehow.
Now to the meme:
13. What is a subject matter that is incredibly difficult for you write about? What is easy?
I was going to answer this with 'easy, everything I don't write' lmao because I just avoid the stuff I find hardest. But that's kind of...not the point. So in all seriousness:
Big ensemble scenes with big ensemble casts. I don't know why I insist on writing these a fair bit, but anything that has more than two characters in a scene is a struggle. More than four is like 'OH GOD.' It's just a lot of work in a different kind of way.
Happy endings. It's not that they're difficult to write, exactly, it's that I'm often...kind of sad to be letting go of the story and I feel like I've already let it go at the point that I'm writing the happy ending. Like, I am not happiest when I'm writing the happy ending, though I want it to feel really really good for readers. I love happy endings, but I also get really noticeable lag and slow down a bit towards the end of stories, because I have less motivation. An ending means letting go of that version of the world, or that installment, and my brain is like 'dun wanna.'
Beginnings/openings. I don't really enjoy the first few pages of a first chapter and I know I'm not often good at beginnings which further preys on my 'everyone is going to hate this story' insecurity I have at the beginning of a new thing.
Action scenes used to be in this but they're not as much anymore. But I do really struggle with sex scenes too! And I think that's a reason I don't write them as much as I used to. It's not a bad thing, one of the reasons they're harder is because I want them to be good and I just don't want to do carbon copies of previous sex scenes and I've now written like 200 of them.
As for things I find easy, hmm. I'm going to go with broadscale characterisation and dialogue. I also think generating character and place names is really easy, and inventing species to populate a new world is easy. I also think describing nature is easy for me, though I sometimes feel silly or like...I'm boring people when I describe it, so I try not to do it toooo much.
I'm bad at writing description but hilariously I don't find it difficult. x.x Maybe that's why I'm bad at it.
34. Thoughts on the Oxford comma, Go:
*takes a breath*
Since you don't mind unpopular opinions I hope you don't mind this one: I fucking don't rate the Oxford Comma and try to avoid using it wherever possible. It's really easy to avoid some of the errors an Oxford Comma can prevent through context, and frankly, the Oxford Comma can create its own issues which can be prevented through not using it. You can avoid or introduce ambiguity whether you do or don't use it, basically, one solves some problems and introduces others, the other solves some problems and introduces others.
In that sense, it's understandable why it's not mandated in many style guides. It is preferable in US English, but damn, I'm not from the USA. And the Oxford Style Guide recommends it but the Oxford Style Manual recommends against it. Australian Style Guides, including the one issued by the government, generally oppose its use, but it's not mandated, so it's really at the author's discretion.
I've tried using it. Like, I've sat down and thought 'right I'm going to give this a good shot' and I just really don't like it. So you'll see a handful here and there in my writing where I thought 'okay let's try it' and then just been like nahhhh.
I have no problems with other people using it, and those people can have all the extra commas I'm not using because damn, they'll need them. :D
--
From the Weird Questions for Writers meme!
#asks and answers#memey goodness#pia on writing#i have strong anti-oxford comma opinions and it's funny because i wouldn't care one way or another#but oxford comma aficionados are generally such twerps#that i ended up with a really strong stance vs. just#'it's fine either way just do the one you like more'#and now i'm like 'NO ACTUALLY' and it's literally just because#have you ever had a conversation with an oxford comma enthusiast who finds out you don't use them?#my god i'd rather eat sandpaper#i guess i've developed a 'if you want to know how you sound when you talk about the oxford comma being great'#'i'll show you' approach lmao#especially because IT REALLY DOESN'T MATTER#and both of them SOLVE AND INTRODUCE PROBLEMS#it's such an insignificant thing and yet#here we have it in a meme fldsakfjasdklfjdsa sorry anon this is#the silliest soapbox isn't it?#*waits for oxford comma enthusiasts to get smarmy in the replies*#*and hopes that this is the innoculation that prevents them from doing it*
11 notes
·
View notes
Text
I use this software.
It's an easy way to turn off settings in windows that you'd normally have to put a bit of effort in to find. Settings like trackers and a bunch of other stuff.
It works for windows 10
Revo Uninstaller is a great program for force uninstalling programs you couldn't uninstall otherwise. Like Microsoft Edge.
If you use it to uninstall edge and its not finding the program when you search for it, you'll have to open edge, then use the target mode which allows you to select desired programs manually.
target the opened Microsoft edge window and it'll start the process.
The cool thing about this program is that is does a hard uninstall, completely wipes out everything related to the program and it's stuff in the registry.
might I add, if you uninstall Microsoft edge, it will remove copilot as well. I've done this and it's been a few months since then I think. I've updated my laptop a few times and it hasn't come back. though if you want to avoid edge from coming back with an update, here's a vid on the more indepth process of its removal.
Something I usually do is go into my app manager or program manager window and read through what all is installed. I delete anything I didn't install myself and doesn't have a purpose. If you're not tech savvy, have a web browser open to search for programs you don't recognize. if it looks necessary, leave it alone. Usually windows is pretty good about not letting you uninstall important programs but it's good to play it safe.
Doing this whenever you notice a sudden dip in pc performance is a great way to catch unwanted programs that may have slipped in with something you downloaded recently. Paired with a good anti malware program like Malwarebytes, youre pretty much golden.
last tip.
It's a pretty good practice to Optimize and Defrag your harddrive regularly. It basically does a clean sweep of your harddrive by deleting unnecessary files.
Here's a link to instructions on how to do that. When you set about this process, you should have an option of to what degree the clean up is done (meaning what files is targeted), how regularly this process happens.
It usually deletes residual files, stuff in your downloads folder, trash folder, and stuff like that. you'll get to see what all is there when you do it before you confirm the clean up.
After doing all that, you've got yourself a nice and clean pc that should work better than it did before.
All the programs I linked to are free and can be used without paying for them.
I've been super into computers since I was kid so these are pretty solid methods of pc maintainance on the virtual side. If you have a proper box pc, and I guess if you're feeling brave enough to open up your laptop, don't forget to clean use an air duster to clean out your consul.
I promise you, nothing will help more than a clean pc and cooling fans.
i thought my laptop was on its last leg because it was running at six billion degrees and using 100% disk space at all times and then i turned off shadows and some other windows effects and it was immediately cured. i just did the same to my roommate's computer and its performance issues were also immediately cured. okay. i guess.
so i guess if you have creaky freezy windows 10/11 try searching "advanced system settings", go to performance settings, and uncheck "show shadows under windows" and anything else you don't want. hope that helps someone else.
#its because the os is not properly optimized#you have to debloat it then strip it down to bare bones before doing anything#in regards to windows running like shit#you see#windows is an accordian of itself#its backwards compatibility isnt a simulator#its still got its old old code deep in there#im not sure how far back it is#but in windows 11 when it first came out#you could right click and back pedel in a sense to older option menues#meaning it just kept going into the code and you would get older option menu designs#backwards compatibility is good#but i feel like windows needs to be gutted and scrubbed clean#then new lighter software needs to be developed for backwards compatibility#i doubt it would happen but honestly windows is such a heavy and chunky os#mac and chrome os is relatively light by comparison#its because mac is office work targeting so theres not as much bloat going on there#someone correct me if im wrong though#this is in regards to windows running like shit#windows 10
213K notes
·
View notes
Text
GIF Tutorial for Beginners
People keep asking me to teach them how to make gifs and I end up writing them long confusing messages, so I figured maybe it’s time to just write up an actual clean tutorial instead! This is supposed to be for total beginners! (Or people who want to switch to a new process that I’ve curated and streamlined over 8 years of making gifs.) I’ll try to keep this as barebones as possible, and won’t include all the advanced stuff I usually add. I hope it’s easy enough to follow, and I’ll include some links at the end for more stuff. I really do think it’s better to make a few simple gifs before doing more complicated stuff though, just to get used to it!
There will be three sections in this tutorial: #1 Basics - How to make a gif in PS at all #2 Sharpen - How to use sharpen/denoise filters in an easy way #3 Colouring - Just a few very basic adjustment layers
What you need:
A video (most common formats should work, although .mkv doesn’t always)
Photoshop (I use PS CC 2018 - this one because I'm morally opposed to Adobe’s subscription model - but versions aren’t super different from each other)
In the end, you should hopefully be able to make something like this:

This is gonna be so long. Sorry. You can make a gif with just part #1! The rest is just to make it look better.
#1 Basics
If any of the tools/functions aren’t where they should be for you, your best bet is googling it, you might need to change something in your preferences!
Make sure to save your PS file... often. PS has a tendency to crash, especially on laptops.
First, you need to get the video file. I recommend a shorter video, a few minutes long, if it’s longer you might want to cut it into shorter parts beforehand. This is just because PS’s video import tool sucks.
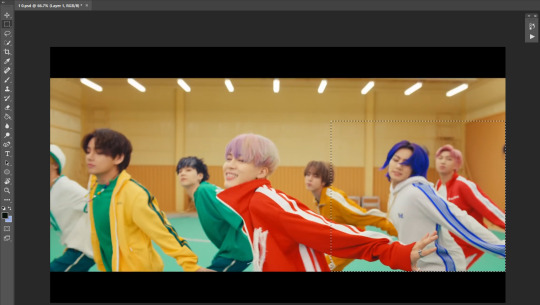
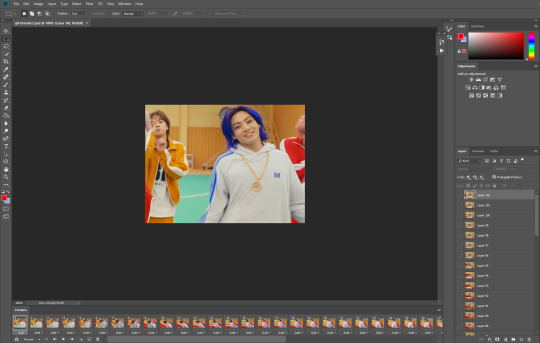
I chose the Butter MV, specifically Jungkook’s body roll at 1:24 because that’s what I want to look at for the duration of this tutorial. No further questions, thanks.
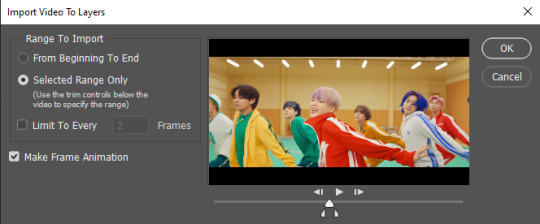
1. Open PS, go to File > Import > Video Frames to Layers

2. In the little pop-up, choose the part of the video that you want to gif. This will import every frame of the video into PS as a layer, so it has to be a relatively short part, or it’ll take ages (and gifs can’t be that big anyway). Now you can also see why it’s almost impossible to select the correct part if the video is too long.
The little controls at the bottom are for trimming, the one in the middle just for the preview. Make sure “Make Frame Animation” is selected! Then click OK.
3. Now you have your layers, and you have a frame animation! On the right are your layers, that’s where we’ll apply the colouring etc. later on. On the bottom, that’s your timeline or frame animation - that’s what the gif will be in the end! So if you delete frames, the layers will still be there, but they won’t show up in the gif. If you click on a frame, you can see the little eye checkmark on the layer that’s currently visible.
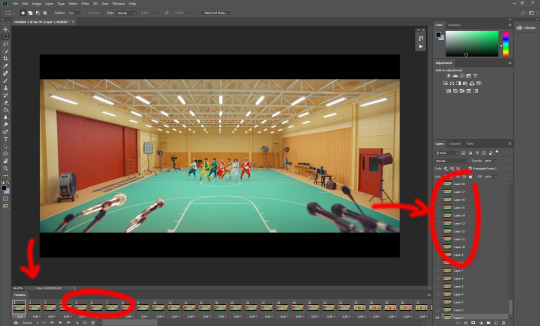
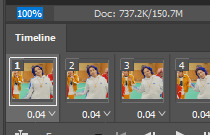
4. The timeline controls at the bottom that are relevant right now: set to “forever” so the gif will loop, you can play the animation with the play button, and you can delete the selected frame(s). The number on each frame is the speed of the gif, depending on the video I usually set it to 0.05 or 0.06 (photoshop lies to you when you play the animation, the only way to test this is to open the finished gif, preferably on tumblr or wherever you want to upload it).
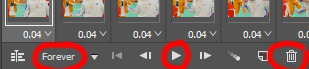
5. As you can see, the animation starts a bit before the actual part that I want, so go ahead and delete all the frames in the animation that you don’t want! You can delete the corresponding layers too if you want, to make the PS file smaller, but it has no influence on the gif. (Hold Shift to select multiple frames as usual)
6. Next, we’re gonna crop the gif however we want! You can do this with the crop tool in the left sidebar, but with gifs like this where there’s a lot of moving parts, I sometimes just use the selection tool in the left sidebar, like so:
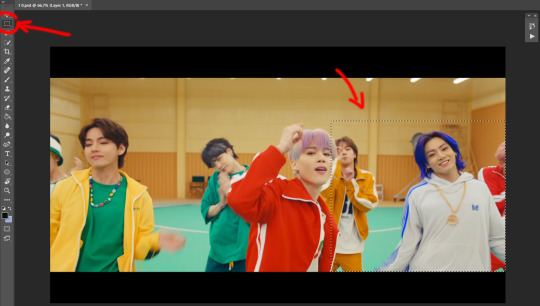
When you click on different frames, the selection stays, and you can check to make sure Jungkook doesn’t suddenly go out of frame if you crop it like that!
At this point, make sure the selection/crop isn’t smaller than you want the gif to be! For tumblr, what matters is the width (in pixels) of gifs. In the end, the width dimensions on tumblr should be 540px (1 gif per row), 268px (2 gifs per row), or 177/178px (3 gifs per row). Anything else will lead to very shitty resizing!
For this gif I’m going full sized, meaning 540px wide, so I made sure my selection isn’t smaller than that.
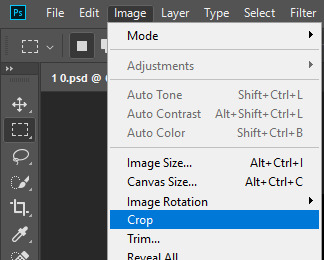
Then just go to Image > Crop, and it’s done!
7. Check to see if this is what you want, then resize: go to Image > Image Size to resize the picture. Make sure the little “link” between Width and Height is active (to keep the same aspect ratio), then set the width to 540px or whatever you chose. I always set the resample option to Bicubic.
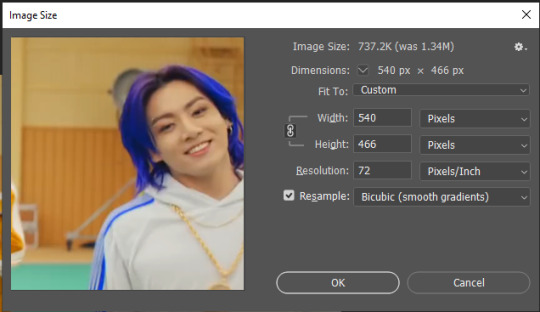
Once that’s done, set the zoom to 100% right above the timeline, to see what it really looks like.
Almost done! A little note about the sizing: width is the important part for tumblr, but if you want to make a whole gif set (especially with more than 1 gif per row!!!) make sure to make all the gifs the same height, otherwise they won’t line up and tumblr will do whatever it wants.
I ended up making mine 540 x 400 and ended up with this:
8. Time to save the gif!! Go to File > Export > Save for Web (OR just use the shortcut Ctrl + Shift + Alt + S) (or whatever it is on Mac).
In the pop-up, you can change things about the gif, but most things should already be the way you want it (Image size, Looping option forever). Selective should be the default, just like the rest.
You can choose between Pattern and Diffusion, some gif makers swear on one or the other, I go back and forth.
On the bottom left, you can see the size of your gif. Keep an eye on that! I believe Tumblr allows every single gif to be up to 10mb, but I try to keep mine under 5mb or close to it, because I think tumblr adds compression if it gets closer to 10mb?? Anyway back in my day you couldn’t upload anything over 1mb. You’ll never know our struggles.
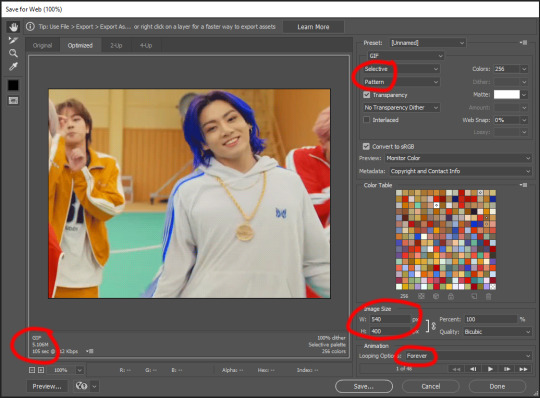
Then just save it, and that’s it, you made a gif! Well done!! Here’s the end result:

:)
#2 Sharpen
There are countless ways out there to make gifs as smooth and clean as possible! Here I’ll show you the easiest way, but it also provides a good basis for other methods. The main difficulty is that you you need to sharpen the layers, but you don’t want to 100 layers one by one. So what we’re gonna do is convert the layers into a Smart Object, which functions as one layer!
1. Convert the frame animation timeline to a video timeline with the little button right underneath on the left:
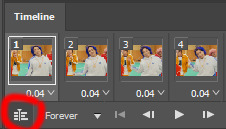
It should look like this, and I’m sorry but I can’t explain this one because I’m not an expert here, but you can just ignore it:
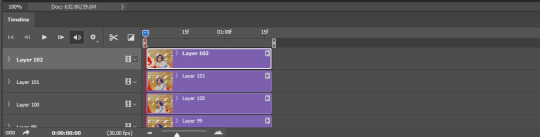
2. Select all layers: Select > All Layers, or just manually.
Then right click on the layers > Convert to Smart Object. Now there’s only one layer left, but don’t worry, the frames are still there!

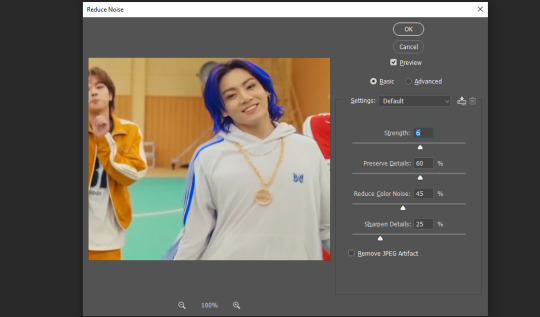
3. De-noise! It reduces noise, takes away some of that grain. More necessary in some videos. It also makes it less sharp, so I do this one first. Filter > Noise > Reduce Noise

My default settings are, Strength: 6, Preserve Details: 60, Reduce Color Noise: 45, Sharpen Details: 25, Remove JPEG Artifact: No. But you can play around, especially with the strength, and see how the little preview looks. Don’t apply too much of it! Or it will look weirdly smooth with no details in the end.
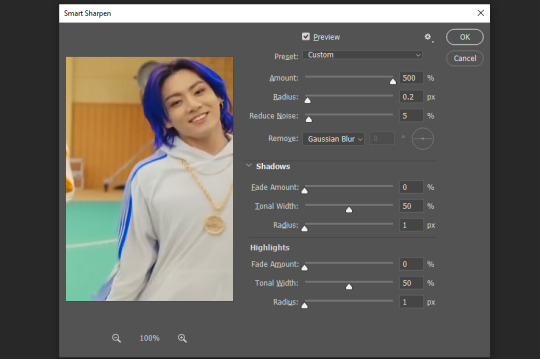
4. File > Sharpen > Smart Sharpen.
Settings: I usually have mine at Amount: 500, Reduce Noise: 5, and Radius at either 0.2 or 0.3, depending on the video. I’ll actually do 0.3 here, because I find it a bit blurry otherwise. If you sharpen more, it can quickly get grainy.
The difference isn’t huge, but here’s a little before and after denoise & sharpen:

5. Technically you can just save it as a gif (save for web) as shown above now, or you can convert it back to a frame animation, which I’d recommend especially if you use certain other sharpening methods (I’ll show you how to convert it back at the end of the colouring part), but for now, let’s go straight to the next part:
#3 Colouring
Now, you CAN do this part right after part #1, still in frame animation, without a smart object. I prefer it like this because sometimes PS acts weird, but if you want to skip the smart object stuff: select all frames, and add the adjustment layers at the very top, above all the other layers. (It only affects selected frames; and it only affects the layers under it.)
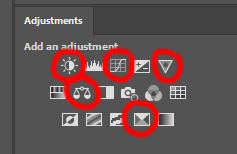
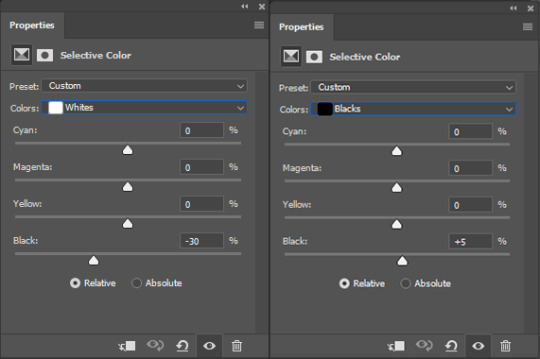
The adjustment layers should be above the layer tray, and these are the ones we’ll use today: Brightness/Contrast, Curves, Vibrance, Color Balance, Selective Color.
All of these are optional! You can do one, or all, or any combination. This is just the very most basic for me to get a gif to a point that I like. I’d recommend sticking to these for a start, but once you get the hang of it, definitely feel free to play around! It’s fun! Every gif maker has different preferences here, too, so there’s tutorials for everything.
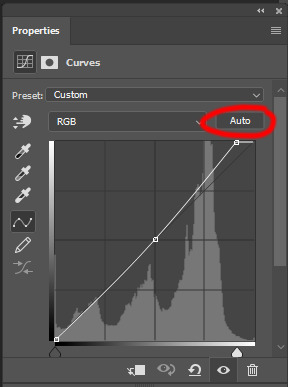
1. Curves: Just click Auto, tbh. You can play around, but Auto works fine for me as a start, just to brighten or darken some parts as a base.

2. Brightness/Contrast: Usually videos are a bit dark, and contrast can help to make it seem sharper AND cut down on gif size, so I usually just up both of them a bit (but not too much! Or it’ll look cheap). Here I put them at B: 19, C: 23


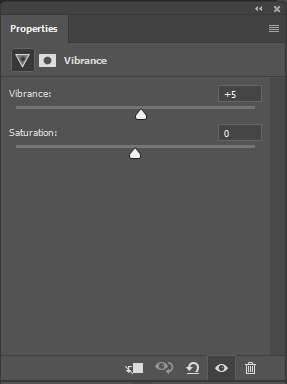
3. Vibrance: I love very vibrant and colourful gifs, so I usually up the vibrance (and sometimes the saturation). This one is already very vibrant, so I only put +5, but if you try to colour, say, a very moody tv show, this can help wonders, especially if you want to work with the colours more later.
If you prefer less vibrant gifs, you can also lower the values here!
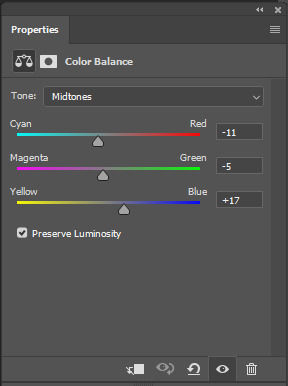
4. Color Balance: getting a bit more complicated now. Often, videos will have a slight yellow or green or blue tint, and this is where you can correct that. This video is a bit yellow, so I added +17 Blue. It was still too warm, so i added -11 Cyan as well. This neutralized the yellow tint, but I wanted some of the reddish tone back, so I added -5 Magenta. I usually do a similar process like that, depending on the tone.
Instead of Midtones, you can also do this for Shadows and Highlights individually.

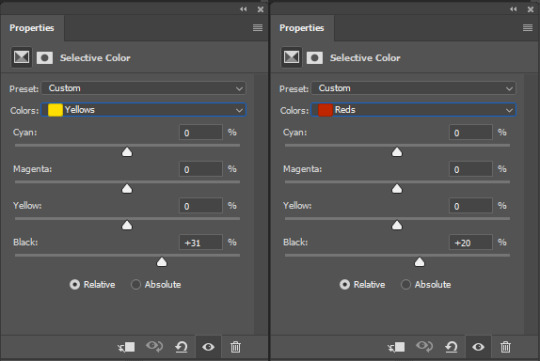
5. Selective Color: now this is the most complicated, but also the most fun to play around in my opinion! Be careful here, if you do something too extreme it’ll look like shit or make the gif super grainy. I some rough goals in mind here: make the blue hair as blue as possible, make their skin tone a bit less pale, and enhance the black and white (which I always do).
You choose a colour at the top, and then add or subtract cyan/magenta/yellow/black values for that colour.
Skin tone: yellow and red. For this gif, I just added black to both, making them darker. Sometimes, if you change one or both those colours for a different part of the gif (for example, if I wanted to make the background less yellow, I’d subtract yellow from the yellows - but then I’d add yellow to the reds, to make the skin tone natural again.)

Blue hair: Just ramp up the cyan for the blues. Be careful with putting anything to +100, but here it’s already so bright that it should be fine. His roots are more purple, so I changed the magentas by adding cyan and black, and subtracting magenta and yellow. It’s not super clean, but fine for our purposes.
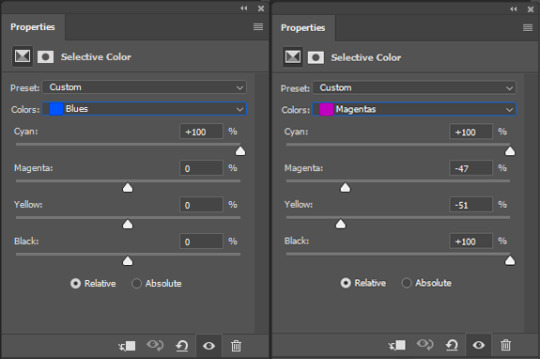

Black/white: depending on the gif, I often either add or subtract black to the whites. Adding makes the highlights less blinding, a bit darker, and flatter (I like to do that if one side of the face is bright white in the sunlight, for example). Subtracting creates contrast, makes it brighter, can wash it out. It can also lessen the gif size, and here it’s mostly just the tracksuit instead of important details, so I subtracted black. For the blacks, I almost always just add a bit of black, to make it more intense. Just like adding contrast, this can make the gif seem sharper and less grainy.

And done!
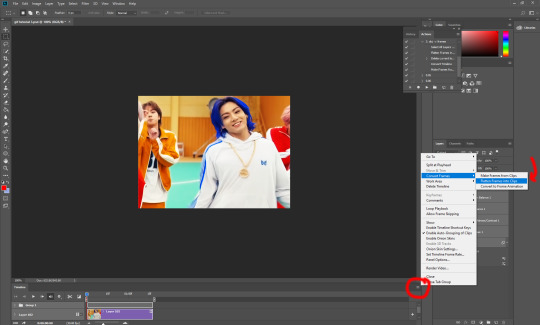
6. You could just save it as gif now, but as I said, I prefer to convert it back to frame animation timeline first, if only because I like to let it play through before I save it, and it works better for me there than in the video timeline.
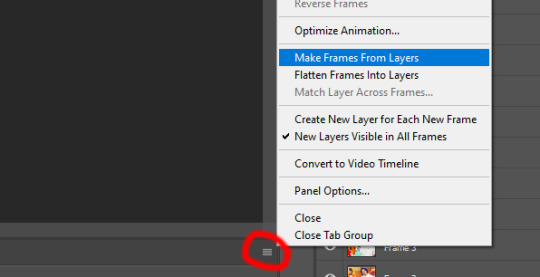
Select all frames, then click the little menu on the top right of the video timeline > Convert Frames > Flatten Frames into Clips
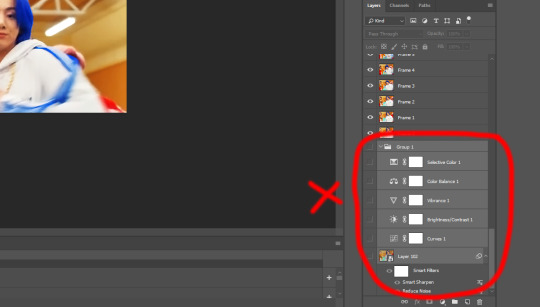
7. When you scroll down to the bottom of the layers now, the old smart object + adjustment layers should be at the bottom, under all the new layers. Delete the old ones, we don’t need them anymore.
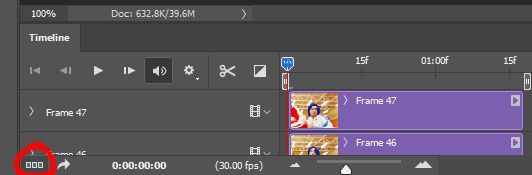
8. Convert the timeline back to frame animation, by clicking the little button at the bottom left of the video timeline:
9. Click on the menu top right of the timeline again > Make Frames from Layers
10. Now, just some potential cleaning left to do. Sometimes, there’s a doubled or empty frame or layer at the beginning or end, just delete those as necessary. The timing of the frames is probably off, too, just select all frames and set the delay time to 0.05 (or whatever).
Now your done! Save as gif, and you should get this:
I included some bonus links and tips after this but tumblr ate that whole part so I guess it’s going into a separate post. (Here is is)
Anyway, I tried to make this as easy to follow as possible for beginners, but feel free to send me an ask for clarification anytime. Hope this helps, now go make gifs and have fun!!
#photoshop#tutorial#gif tutorial#ps tutorial#btsgif#*#*tutorial#this took so much longer than i expected i'm not giffing for at least a week now
233 notes
·
View notes
Text
IV. The most useful meshing tools in Blender
(Previous: IIIb. Method II: The sneaky way)
Only in my own, very subjective opinion, of course. I bet many other creators would disagree with me on this selection, but those are the tools I use almost every time when I mesh something new.
This part is going to look a bit different that the previous ones: it won't be a step-by-step guide, but rather a short explanation of different options (some of which I already partially covered) and their possible usefulness, so that you could just implement whichever you want in your own projects.
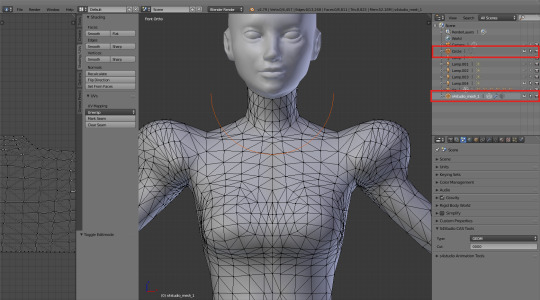
1. Snap to symmetry
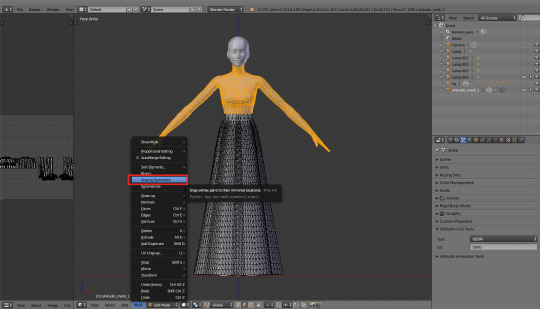
You can find this option in that dropdown (dropup?) menu hidden under the 'Mesh' button, in the bottom bar. It does just what it says on the tin: if a vertex on the left side on your mesh has it's exact equivalent on the right side (so, let's say, vertex A has x = 20, and vertex B has x = -20, and y and z are the same), Blender will recognise them as mirrored.
Make sure to use this option only on parts which really are symetrical! Otherwise you might end up with some of your vertices being symmetrised and others not, and then it'll all become a hot mess. So, in case of our dress, you shouldn't use it on the skirt, but it's perfectly safe to use it on the upper body parts, which are, by default, completely symmetrical – even if Blender doesn't necessarily know it yet. Of course, that applies only if you used the same top as me – I can't speak for others!
2. X mirror
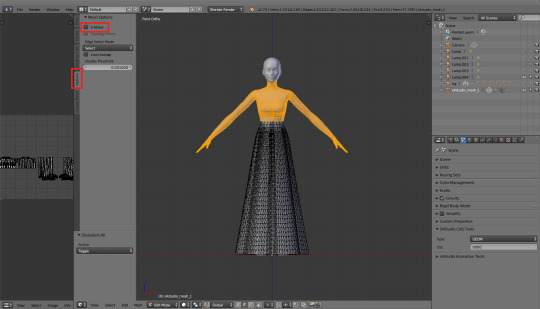
A follow-up to the whole symmetrising process. You can find that option in the toolbar on the left (T), in the 'Options' tab. Just tick it. And now select any vertex of your symmetrised top and move it wildly around. You'll notice that the same happens on the other side of the mesh as well.
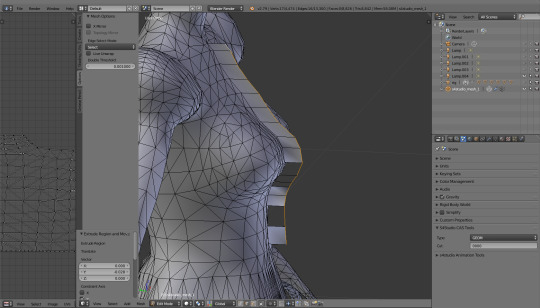
3. Proportional editing
I know, I know, we've already used it so many times...! But proportional editing is pure magic and I think it deserves another mention. Depending on the falloff type, you can use it to quickly create a variety of different shapes. Just as a reminder: you turn it on by pressing either O (for all vertices) or alt+O (only for connected vertices) and then select the falloff type in that bottom bar. By default it's set to 'Smooth', which is probably the most universal option. You can make a bigger or smaller area affected by your edits by moving the mouse scroll – by default it's set to VERY big, so probably your whole mesh will be moving. Don't panic and just scroll until you see a white circle – that's exactly the 'affected area'.

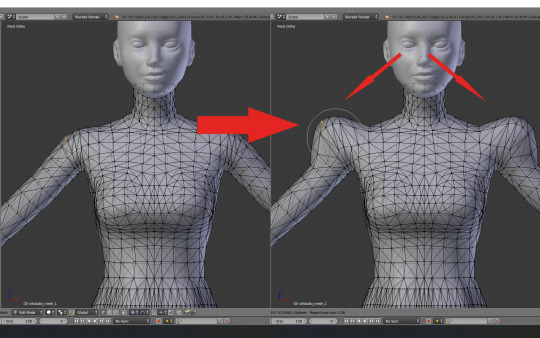
Why mention it now? Because combined with the 2 previous tools it's a perfect way to make those 1890s puffs! Let's take a look at it, shall we?
===============================
Practical Application Corner
I think by now I can admit it: the dress I'm trying to make here with you is this 1897 wedding dress:
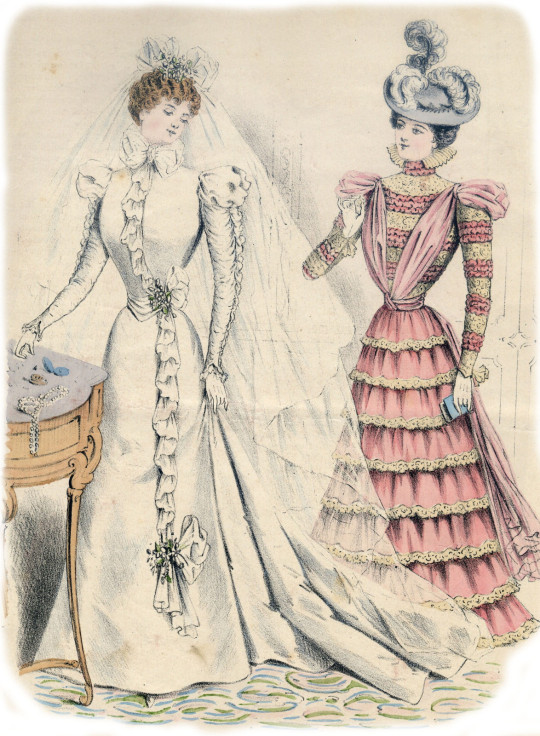
As you can see, the dress has some shoulder-puffs: moderate in volume and rather roundish, so they shouldn't be hard to make. I already symmetrised the mesh, turned on the x mirror and proportional editing. I'll just change the falloff type to 'Sphere' and I'm ready to go.
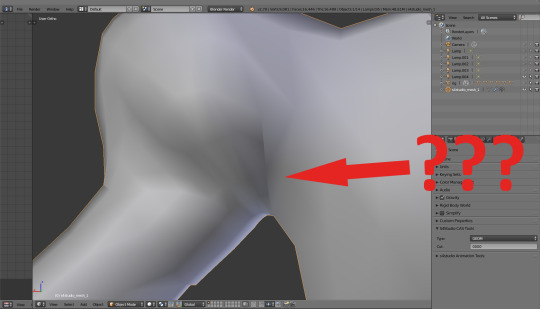
Now I'll simply select a vertex on one of the shoulders and move it up. It's probably the best to do it while looking at the mesh from the front (num 1) - that'll make it easier to see what's going on.
Doesn't look bad, but I'm aware that the puff is still very 2D. You can see it very well if you switch to top view (num 7). To solve this problem, I'll select two vertices this time, one on the front of the puff and another on the back, and scale them – still with all the same options. Much better!

If you want to, you can spend some more time fine tuning your puff. Depending on how much you enlarged it, you might also want to select both puffs, turn triangles into quads (alt+j), then subdivide it smooth (W, select from the dropdown menu) and change to tris again (ctrl+t). However, it might be quite difficult to just 'select your puff' now, so maybe wait with it till the next part, where I'll talk about uv maps...? That'd make stuff a lot easier.
===============================
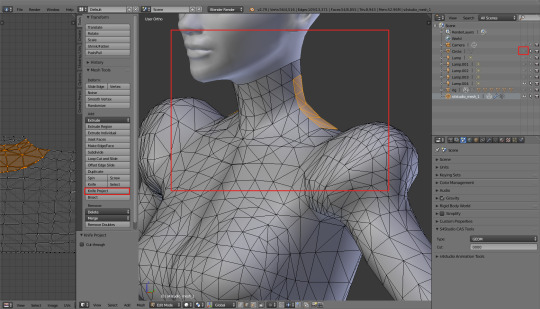
4. Dissolving
That's a very simple and very useful tool, which lets you just dissolve – but not delete – vertices, edges or faces. What it means practically is that if you use it instead of deleting, you won't get a hole in your mesh. Lets say you subdivided your puffs, triangulated them again and discovered some weird lines here and there...
When you switch to edit mode, you immediately see that it's because some of your new vertices aren't proprely connected. At the same time you see that if you let Blender do it automatically, you'll be left with very unpleasant, narrow triangles. It'd be better to get rid of those diagonal lines which I marked in red.
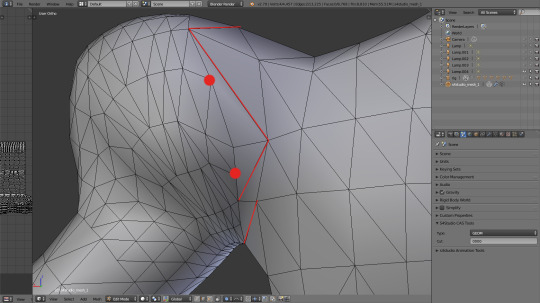
And how do you do it? Very simply: select them and either press x (or delete) and select 'dissolve edges' from the dropdown menu, or – while in edge select mode - simply press ctrl+x.
And how do you change them into sensible triangles? Well, you either triangulate them automatically (ctrl+t), hoping that Blender will be reasonable... Or you can use another simple yet super useful tool.
5. Knife
You activate it by pressing k. It's just what it sounds like: a tool which lets you cut your mesh in any way you want. You can use it to manually cut proper triangles (which I'm going to do right now), but also for a variety of other things. Cool feature: it gently snaps to existing vertices, so if you want to connect vertex A and vertex B, you can do it without much struggle. Press enter when you're done.
But why would you want to use it for anything else than correcting triangles? Why would you cut some random shapes in your mesh? Well, because then you could use another cool tool.
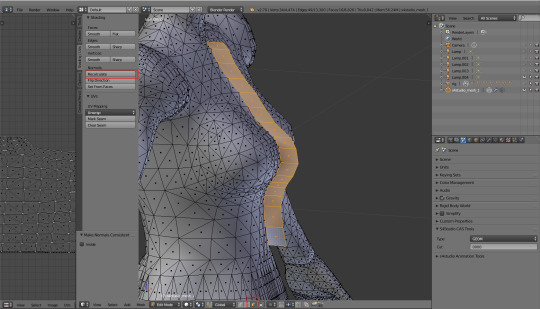
6. Extruding
The principle is very simple. You select any vertices, edges or faces you want and then press e – and suddenly new vertices, edges or faces appear. You can freely move them around, or – which is almost always a better idea – right after that 'e' you can press s to scale them, or x/y/z, to limit the movement to only one axis. You used it while making the skirt and way earlier, when you were meshing a cup. But extruding isn't limited only to this; it's also a perfect way to make 3D collars, belts, cuffs, trims, random deco – almost anything, actually.
7. Flip direction
An interesting peculiarity of Blender meshes – no idea how other software deals with it – is that meshes have only one side. In other words, if you extrude something from your main mesh – let's say, I don't know... Wings? - they will be visible from side A, but if you look from the opposite side, it'll be as if they weren't there at all. Perfectly invisible. That's why in case of such parts you have to duplicate them and then flip direction of that copy, to get the texture on both sides.
Select the part you want to duplicate. Chances are the texture is not even all on one side; in such case press ctrl+n or open the left bar (T) and, in the Shading/UV tab, choose 'Recalculate'. Now press shift+d to duplicate, press enter immediately, and from the same tab select 'Flip Direction'. Your mesh should be double-sided now.
===============================
Practical Application Corner
I want to make that weirdly shaped deco piece my dress is supposed to have on the front. I dissolved some edges and recut them, to get a pretty smooth curve, and now I'm going to extrude it. Whoops, I almost forgot to turn off the X mirror!
So I press e and, immediately afterwards, y, to extrude that part to the front.
As expected, the extruded part became a mess. I'll switch to face select, select all the faces and then hit 'Recalculate'.
And here comes the surprise: I won't duplicate it and flip direction immediately. First I'd like to adjust it, so that it sits perfectly; some subdividing, some proportional editing, moving vertices around to get a natural, smooth look. Creating the other side is usually the very last thing I do, just before taking in-game screenshots and posting my CC. Single vertices are easier to deal with, and every piece requires tons of corrections and small adjustments, long after you first think it's already done.
In any case, in some distant future, when I'm sure that this... Frill? What even is this? ...works properly, I'll select those faces again, press shift+d, enter, and then flip direction. Let's just see how it'd look now...
The frill is double-sided. Victory!
===============================
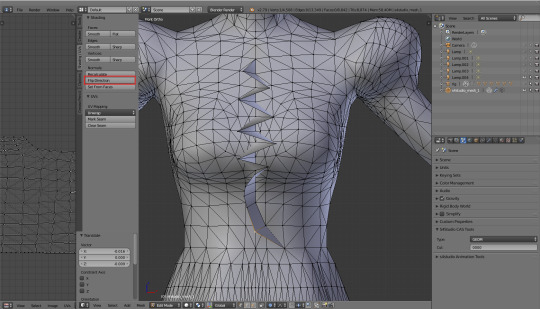
8. Knife project
My absolute favourite tool ever, which I use in almost every second mesh. Similar to knife, but way more sophisticated. It lets you project a shape of one object on another one, cutting it into the mesh. Let me explain...
So, let's say your dress is supposed to have a round collar. You could dissolve some edges, make new ones and move already existing vertices, hoping to get that perfect, round shape – but for reasons which we'll discuss next time (uv-1) I would advise against it. So what's the alternative?
Go into object mode and create a new circle (shift+a). Move it around, rotate it, scale it etc. - do whatever you have to to position it exactly in the place where you want your mesh to be cut. Watch out: your viewpoint matters! Knife project is cool, but a bit dumb and will just cut through the first layer it sees on its way. From my experience, it's the best to make two cuts: one exactly from the front, the other from the back. So press num 1 and put the circle (which you can also make into a half-circle btw, that might be easier) in the right place. Let's say we want it here...
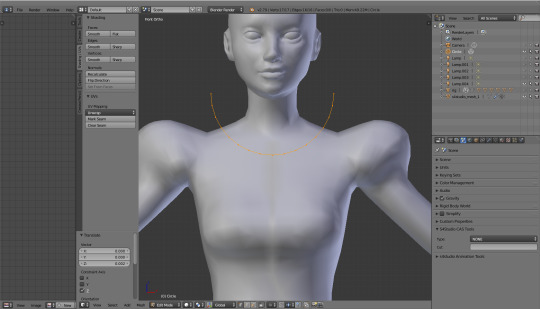
Now, go back to object mode. Click the cut called 'Circle' and then, while holding shift, your mesh: s4studio_mesh_1. Go to edit mode. You'll see that you're back to your base mesh, but the red half-circle is still floating in the air right before it.
Open that sidebar on the left (T), go to the 'Tools' tab and click 'Knife Project'. Now, before you do anything, go to back view (ctrl+ num 1) and click 'Knife Project' again. Hide the circle by closing that little eye on the right (or just right-click it and choose ‘delete’, if you’re sure you won’t need it anymore) and admire your newly cut collar.
What about all the new vertices? There's so many of them, how to clean them? Again talking from my own experience: merging (alt+m) is safe only in case of vertices which are located very close to each other. Also, if you merge after using knife, always merge at center. However, the rule of the thumb is: it's always better to dissolve and cut new edges than move the existing vertices. Uv-1 can be nasty and trust me, you don't want to deal with it more than necessary. Be extra careful if you're merging or moving anything in the breast area! In there every tiniest mistake is immediately visible.
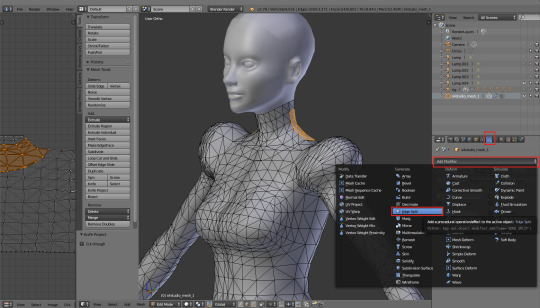
9. Edge split modifier
The last point on the list is not really a tool, but a modifier. Maybe you remember how Blender Guru was using something called 'Subdivision Surface Modifier' in his tutorial? The one we're going to use can be found in exactly the same place. Go to the little wrench on the right, click 'Add Modifier' and select 'Edge Split' from that menu.
Untick the 'Edge Angle' option, leaving only 'Sharp Edges' selected.
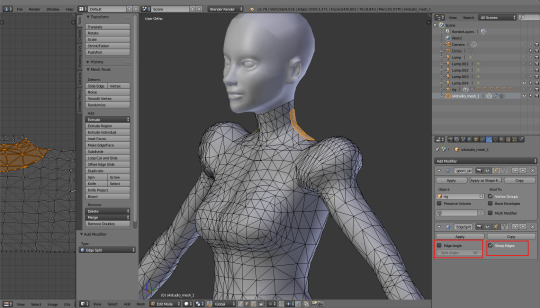
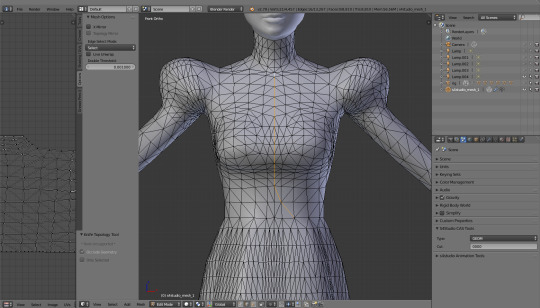
Why would you want your edges to be split in the first place? Because Blender by default smoothes any edges in your mesh. Normally it's a very welcome feature, but sometimes can be annoying. For example, if you 'close' your dress at the bottom – select the lowest row of vertices, extrude and scale them and then merge at center – the bottom edge of your dress will get slightly curved, creating an ugly, dark line:

There are two ways to fix it: either you select that lowest line, press ctrl+e and click 'Edge Split'... Or you choose, from the same list, 'Mark Sharp' and leave the actual splitting to the modifier. The immediate visual result will be the same; however, by only marking edges as sharp you don't actually split them yet, which makes it way easier in case of any future corrections. You don't have to remember to select each vertex twice, as they're not doubled. You can select all and remove doubles, and your edges still will stay marked as sharp. It's super useful and I wish I knew of its existence earlier – it would have saved me SO much work!
Just as a side note: obviously, those closing lines of skirts or sleeves aren't the only places you might want to mark as sharp. The same goes for anything that's layered, so e.g. edges between a shirt and a jacket, edges around a necktie, around a belt etc. If you're not sure what you should mark and what not, just take a close look at your mesh in solid shading. Any weird shadows visible? Mark the edges. The problem should disappear.
And you know what's the best? Even when you apply the modifier – e.g. because you want to be able to quickly select only a certain, separated part of your mesh (with L) – the edges still stay marked as sharp! So you can just do your corrections, select all and remove doubles, and then add the Edge split modifier again. It's so quick and simple.
By the way, you don't even have to click apply for the modifier to work. Even if it's left unapplied, S4S will still recognise it and import your mesh with all the sharp edges being split. Magic!
*** *** ***
I'm sorry it got so long, but I think I really managed to cover every important aspect of meshing. You know all my secrets now :P. Unfortunately, meshing is only a small part of CC making, so there are still many things we'll have to discuss – but hopefully it's somehow comforting to you that at least that part is over. I hope I helped you feel more confident in Blender and saved you some meshing struggles! I know for a fact that not knowing the majority of those things was the reason why meshing my first dress took me two months ;].
Let me know if anything isn't clear and stay tuned! We'll finally talk about uv maps next time.
(Next: V. Adding missing body parts / Frankenmeshing / Finishing touches)
472 notes
·
View notes
Text
Me: *rereads my old Portal fics*
Me: “Y’know, some of these are still pretty good! Maybe I should replay the games, and give writing these another shot...”
My brain, always ready with AUs and my latest hyperfixation: TMA crossover with Jon as Caroline, but he doesn’t lose himself in the upload process.
Me: “I... I don’t know if that would work...”
My brain, refusing to be derailed: His robot name could be “Self-aware Intelligent Machine Simulation.” SIMS for short.
Me: “That’s not a great robot name.”
My brain: No worse than “Genetic Lifeform and Disk Operating System.”
Me: “.......Fair.”
My brain: Testing is like statements; he doesn’t want to like it, but it’s addictive and eventually he kinda needs it to stay sane. He regularly gets in trouble for trying to make the tests less dangerous for the test subjects, because like... draining the acid out of the acid pit ruins the integrity or something.
My brain: It actually makes no difference, but obviously Jonah is Cave in this crossover. He’s researching immortality, and this is just one of the ways he keeps Jon under control.
Me: “Elias was his first attempt?”
My brain: Yeah, but it was just a brain transplant. Now he’s worried about the integrity of his brain itself, I mean, physically it’s getting pretty old. And it’s not like aging is fun anyway.
Me: “So, I assume Martin’s Chell then.”
My brain: Obviously.
Me: “Obviously. Where does everyone else fit?”
My brain: Daisy and Basira are trying to get the whole company shut down for horrible human rights violations, but are struggling to find evidence. They go undercover as test subjects, only to realize they’re in too deep and have to fight for survival.
My brain: Melanie’s a reporter, supposedly doing a profile on Jonah, but secretly investigating all the disappearances that keep happening amongst the staff. Georgie brought her in on the case when Jon stopped answering all calls.
Me: “Tim and Sasha?”
My brain: Scientists, were on the same team as Jon. Might get kicked down to test subjects for asking too many questions about his “transfer to the AI department.”
Me: “Wait. All of this is pre-fall-of-Aperture. Doesn’t that take a lot of the punch out of making Jon our GLaDOS equivalent?”
My brain: ..............................
My brain: Mid-fall-of-Aperture. Terribly understaffed, running out of money, the “AI department” is literally just Jon on the paperwork, Jonah’s desperately pushing the testing/experiments to figure out the limits of brain-uploading before he loses access to the equipment.
Me: “I don’t think that scans.”
My brain: Sure it does! What’s the testing in the games even for anyways? It’s all cognitive, the portal gun itself only gets used in a handful of different ways.
My brain: Now the testing is specifically there to stress Jon out and test the stability of his personality matrix; no point in uploading yourself if the first major issue you run into corrupts your code or causes a major error. It puts Jon through the wringer, even zapping him with viruses and stuff, to ensure the process works, because Jonah doesn’t have the time or supplies for more than one test subject.
Me: “......huh.”
My brain, getting more excited: Merge the Eye-pocalypse and Prentiss attacks! Some sort of biological agent gets loose in the facility, and Jon hacks the security system to try and stop it. Any hermetically sealed area of the facility gets locked down, and he gasses the rest of the facility to keep the contaminants from spreading.
My brain: But they’re underground and the ventilation system isn’t the best maintained, so he can’t risk letting anyone out for fear they’ll get poisoned too. Just has to wait for the gas to rise up out of the facility on its own.
Me: “OH! So from the perspective of everyone in the testing tracks, this AI has just gone completely rogue and taken over the facility, killing a whole bunch of people and trapping them inside!”
Me: “I bet Jonah’s office is basically a fortress, and he still has security access to cameras and intercom, so he just eggs them on. Because this is an insurance nightmare, he wants to upload himself ASAP, so Jonah tells them there’s a manual override procedure for SIMS, but he can’t do it alone. They need to get through the testing, reach the central control chamber, and help him deactivate SIMS before they’ll be able to leave the facility. But actually, he’s planning to delete Jon entirely and replace him in the mainframe!”
My brain: Like the bastard he is.
Me: “So now, everyone’s in this weird limbo of trying to figure out what to do and who to trust. I mean, obviously in the AI apocalypse you want to trust your fellow humans, and SIMS did just gas the whole facility and trapped them in the testing tracks, but on the other hand ‘Elias’ is a shady bastard and SIMS isn’t always that bad?”
Me: “Like, sure, it can be pushy about testing and you can’t expect a robot to be good at emotions, but sometimes it’ll do something like ask for a verbal check-in because they’ve been down there a while and that can be psychologically hard on most humans? Someone complains about food, and SIMS sounds almost genuine when apologizing for not having anything else that can be safely transported to the testing tracks at this time. Once, Martin found a corner away from the cameras to take a nap in, and he’d swear SIMS was actually panicking over not being able to find Martin when he woke up.”
My brain: Tim and Sasha make snide, tired jokes about Jon giving the damn thing all his social awkwardness, as well as his name and voice (for some god-awful, unknowable reason.) They don’t want to let SIMS endear itself to them, knowing it probably killed Jon.
Me: “No, no, knowing that it killed Jon. They absolutely ask at some point if Jon’s okay and are told that amongst the however-many living staff members that are left, Jonathan Sims is not amongst them. What else are they to assume, other than that Jon’s been gassed by his own creation?”
My brain: Oooh...
Me: “Martin’s the only one who actually feels endeared to SIMS by the time they meet up, partially because he’s the only one who was trapped alone. Tim and Sasha were together, and already have reason to hold a grudge. Daisy, Basira, and Melanie met up early and spend a lot of free time fantasizing about smashing the damn computer when they find it.”
Me: “Martin was alone and he hates it, so he tries talking to SIMS, and is a little surprised when SIMS talks back. They’re not always pleasant conversations, SIMS can be curt and doesn’t have much personal info to share (being a computer and all,) but Martin does start to get a grasp on the situation as it must have at least appeared to SIMS when he pulled the lockdown-tigger. And for a supposedly evil computer, SIMS can be surprisingly helpful and seems almost as upset by the situation as the humans are.”
My brain: And there was that odd moment after Martin convinced SIMS to stop calling him “Mr. Blackwood,” and SIMS seemed almost flustered before very softly responding, “...Martin, then.”
Me: “Awww... please tell me Jon’s not actually dead, I need them to take him with them at the end...”
My brain: Suspended animation. The brain is still a vital part of the machine, but it never ages or degrades thanks to whatever combo of chemicals and cryosleep Jonah used to preserve him. Part of Jonah’s “manual override” involves adding a high-powered hard drive or four to replace the need for an organic brain, making full digitization possible.
Me: “But where’s he stored? He can’t just be strung up in the middle of the machine, that’d be unsustainable and Jonah would never let anyone within a hundred yards of it lest they realize the truth! A cryotank in a fake computer bank? A stasis tube hidden amongst the wiring, which they could discover while clambering about installing the hard drives?”
My brain: A cold room disguised as a locked closet or something, with the upload chair still inside of it? Only Jonah has the passcode, technically, and he was planning to go in while everyone else had their own tasks to do, just shove Jon’s body out and plug himself in, leaving Jon to finally die on the floor just a short distance from his friends while Jonah replaced him in the machine, removed the safeties, and escaped into the internet?
Me: “Oh, and Jon gave them a universal override or something to get them out of a dangerous situation towards the end! It actually leaves half the group feeling pretty low, having the thing they’re trying to destroy just hand them the key to its destruction out of pure, innocent trust.”
Me: “Then while Jonah’s distracted giving out instructions, Martin (useless with computers,) wanders over and opens the door, letting out a gust of cold air with a hiss. Martin coughs on the escaping gasses, and Jonah rushes to say that the cold room is very delicate, and ought not to be tampered with by people who don’t know what they’re doing—“
My brain: —but Martin blinks back the stinging, shock-induced tears, eyes adjusting to the dark of the closet and gasps.
Me: “And Martin’s only ever seen Jon in passing, really, they never properly worked together. But he was a little sweet on him even back then, and he’s heard the stories from Tim and Sasha, and he’s spent the last several weeks getting to know SIMS...”
My brain: ...He quickly calls Tim and Sasha over to confirm, just in case he’s got it wrong somehow. They’re just as shocked that Jon’s in there, with all his notes tucked away behind him revealing what really happened. Jonah tries to talk his way out of it, but is quickly arrested by Basira and Daisy.
Me: “Sasha finishes the notes first and makes her way back out. She’s shaking, overwhelmed with rage and grief and horror, and punches ‘Elias’ so hard he falls to the floor.”
My brain: Jonah starts to say something about assault, but Melanie congratulates Sasha for stopping him and Basira, completely deadpan, adds, “We all saw him make a break for it.”
Me: “Jonah shuts the fuck up.”
My brain: Part of SIMS’ programming was not being allowed to answer to “Jon” anymore. He never outright denies being Jon, just corrects people that he is the Self-aware Intelligent Machine Simulation. Tim finishes the notes, makes it to the cold room door, looks into the nearest camera and shakily asks, “Jon?”
Me: “For the first time, there’s a solid three beat pause before the intercom answers, softly and less robotically than before, ‘...Yes, Tim?’”
My brain: Tim starts crying.
Me: “Of course he does! He’s been grieving Jon for weeks at this point, trying not to let it show just how sad and angry he was that it all ended like this, and now it turns out that not only is Jon alive, he never actually left them at all! All those months thinking Jon ghosted them, left them behind in R&D for greener pastures, and Jon was all-but-dead in a cold room the whole time, and none of them ever knew! The relief, the joy, the guilt, the lingering bitter grief and rage, it’s overwhelming. Who wouldn’t cry?”
My brain: It takes them a few days to figure out the download procedure to return Jon to his body, especially since Jonah can’t be trusted on this front. Tim and Sasha are the techies, and they recruit Melanie and Basira for extra hands. (Martin’s still terrible with machines, and Daisy needs to watch Jonah to make sure he doesn’t escape.)
My brain: Martin, feeling useless, stays by Jon’s side in the cold room.
Me: “When Jon wakes up, Martin’s the first thing he sees.”
My brain: Martin sees him moving, meets his eyes, and gasps, “Jon?” Jon nods and tries to say something, but his throat is dry and his voice won’t work. Martin scrambles to get him a glass of water and steadies Jon’s hands as he drinks it. When he lowers the glass, Martin cautiously asks if Jon’s feeling better.
Me: “Jon just smiles and answers, ‘You said my name.’”
My brain: Martin’s confused. “What else would I call you?”
Me: “Jon shakes his head. ‘I just... don’t think I’ve heard you say it before. Certainly not to me. It’s... nice.’”
My brain: Martin laughs helplessly and says it again. “Jon.” Jon’s smile brightens, and Martin can’t help stepping closer, repeating Jon’s name again. Jon laughs along.
Me: “It’s on instinct that Martin takes the empty glass and sets it to the side, leans over the chair, touches Jon’s shoulder, cups his cheek. He hesitates when they’re nose to nose, breathing the same air, shockingly warm even when Jon’s skin is still cold to the touch. He meets Jon’s eyes and swallows. ‘Is this okay?’”
My brain: Close enough to feel the small, inaudible gasp before Jon whispers, “Please.”
Me: “They only get one short kiss in before the door opens and Tim makes a scandalized noise before loudly declaring this unfair and blatant favoritism. Martin all but jumps away, but Jon just rolls his eyes and thanks Tim for saving him. As the others pile in —Sasha claiming she did all the work, Basira needing to know if Jon’s up for making an official statement, Melanie both needing to pass on a message from Georgie and wanting an exclusive interview for her expose— Martin can already feel himself fading into the background, even as he and Tim help Jon to his feet.”
My brain: At least until Jon lingers, fingers lightly resting against Martin’s arm, and looks up at him with hope in his eyes. “Later?”
Me: “Martin’s not entirely sure what Jon’s asking (Jon isn’t really either,) but he agrees anyway. He doesn’t even hesitate.”
My brain:
Me:
My brain:
Me:
My brain:
Me: “.....WELL FUCK.”
My brain, smug despite it being 4:30am: Told you it was a good idea.
Me: “I hate you so much.”
#tma#the magnus archives#tma fanfic#portal#jonathan sims#jarchavist#jon sims#tma jon#tma fic#portal fic#portal fanfic#my life#mine#my writing#tma: all about jon#tma: martin#tma s1 crew#tma expanded social circle#tma: the asshole in charge
28 notes
·
View notes
Text
in combo w what already said in replies: td snap have LOT more languages even ones “rare” for big name AAC. p2g only have english spanish and not sure how good spanish one is. td snap also can use 2 language same time but it kind of confuse set up (for combo that not as common as “english & spanish”) but can show you.
way td snap language set up, hard type in language that have own characters, like chinese & japanese. can still type, but just if mess up one letter, hit backspace, it stop register the remaining letters as group of pinyin/romanji etc of word you typing, so you need delete all and start over.
td snap have lot more… options of buttons? as in like have visual timer, can create steps & “first… then” stuff, because it meant to be able stand alone in dedicated device. you also get edit your message (similar to use arrow key on keyboard, they have “move cursor up/down/left/right by one letter/word/line, etc) which p2g doesn’t
^ but this also mean editing w TD snap infinitely more confusing to point really don’t like TD snap
the front page core page that come with before any editing, td snap biggest grid size is 8x10 - which feel like they recently made bigger because could swear remember it use be smaller?? p2g is 9x16.
may be less of issue now that (feel like) td snap made biggest default core larger, but compare the two, find p2g be better organized, at least for self.
td snap grid can get all way up to 10x15, but anything beyond 8x10 need edit your own.
for more “fringe” word folders, like your “actions” & “describe” & “food” etc, found p2g be confusing but td snap not much better.
for self, heavily edit p2g & scrap all what td snap had and start over - but that partially because already more use to p2g & want replicate that in td snap.
td snap can automatically grammar for you (but can turn off). for example press “i”, “is” button can automatic become “am.” but it turn off this option, or when grammar prediction not work/wrong for more complex things, may make get grammar harder: may need create whole new “word forms” folder, that include, for example, for verbs: present tense, past tense, -ing, etc. but this word form order can be use for all words not need create one for each word.
p2g don’t have automatic grammar, but manual do grammar easier (in my opinion).
default symbols they use different. see which one you like.
price. td snap so much cheaper. and also have trial app can use (all same just no voice output). p2g have no trial and very expensive, altho get half off discount during april & october.
(personally like p2g way better than td snap)
edit to add p2g also have colors for buttons. p2g have automatic color code each grammar function (noun, place, verb, adj, etc). there multiple color codes can choose from, but can also create own. colors p2g have is more gradient (e.g light blue to dark blue) & organized that way
td snap don’t have automatic color code need do it yourself. td snap have more colors in a sense…. but hard if when want gradient etc
Help I can't decide between td snap and proloquo2go
27 notes
·
View notes
Note
coming from an amateur writer, do you have any tips on writing smut?
ngl, I’m an amateur myself, having not finished much smut and still not written the actual act of sex from the perspective of one of the people experiencing it. So idk why you came to me, but I am flattered. I'm not great at advice on the act of writing, but I’ll do my best to talk about process and shit.
1. Read smut. Read lots of it, read varying qualities and varying lengths and as soft-core and hard-core as you’re up for. Read it for fun, just taking it in, and then read it with a critical eye. What works? What doesn’t? Are there any tropes (general, character-specific, or ship-specific) that you like or dislike? Why? What’s especially hot? What makes you cringe? What kind of language do you like? And so on and so forth. Ask questions and answer them.
2. What’s your setup? Like, which characters, which ship, which universe? If it’s an AU, how does the AU change things from canon (especially important if you’re doing ABO, which is its own can of worms I’m not getting into here)? What’s the relationship between your characters and what’s the situation in which they fuck?
3. How do your characters feel about sex in general and with respect to the ship you’re writing? How horny are they in general, for the other character(s) in the ship, and in this specific situation? What are they into and not into? What are their previous experiences (or lack thereof) with sex and romance? What experience do the characters have with each other? Are there specific experiences they might remember and use or is there certain knowledge they do or don’t have about their partner(s) (For established ships, I like to mention previous experiences and knowledge of what the POV character’s partner(s) are into as a way to show that there is real history there. For unestablished ships, I like to include that figuring out process some and the reactions to experiencing stuff for the first time, either in general or within the specific ship, to show that newness of the relationship. Maybe there’s mention of a certain preference the POV character already knows about, or maybe the POV character makes note of a preference they learn during the fic. Stuff like that.)? How loud are they during sex? Are there any sex acts that this ship would engage in no matter what (e.g. I maintain all smut with Jughead that isn’t a quickie should include him giving some amount of oral sex)? How many times can they orgasm? How sensitive are they? What’s their refractory period? And so on, and so forth. Note: once you come up with answers for this section for your ship once, the next time you write smut for them, you’ll really only have to make adjustments according to the universe you’re in, so that’s nice.
4. What kind of fic are you writing? Is it pwp? Smut within plot? A character or relationship piece? Basically, are there any arcs to get through, what are they, and how are they going to relate to the smut? How explicit is the smut? What language do you want to use to refer to genitals and orgasms and such? What POV are you writing in? How much do your characters talk? How “realistic” are things? Are they practicing safe sex, including safe oral sex?
5. What’s actually happening? I like to plan out a smut scene ahead of time so I know how it starts, where they are physically, what the characters are doing (hand, mouth, genital, etc location and movement), how one sex act moves into another, what can be seen/heard/felt/etc based on POV, what’s physically possible at all times, if there are any accessories or toys I need to explain them owning and where they’re kept before the smut, and how it ends. It also helps me make sure the smut doesn’t significantly overlap with something I’ve already written or am planning to write. I also write an outline, which you don’t have to do, but does help if you ever go weeks or months between working on it because then when you come back you don’t have to strain to remember what the plan was. You can also just go with the flow and just write, but definitely keep location of body parts and what the POV character can actually see/hear/etc (for example, if your POV character is blindfolded or bent over, they can’t describe their partner’s face) in mind as you do.
6. Write it. Vary your sentence structure. I find good smut includes not just physical action, but emotion and especially sensation, but you might disagree. If you're struggling with repeated words and shit, maybe look for lists of words to use when writing smut. Probably look up tips for writing smut in general, ask people for advice (which you already are, so good for you!), etc. Draw upon your own experience if you have any, and if you don’t, maybe look into people’s accounts, sex tips, etc and check if any questions you have about sensation have been answered online anywhere, e.g. on reddit. But don’t try and make it perfect all at first; just write it. One approach that’s often effective is to do writing "sprints", that is, sit down for fifteen minutes and just write; you can continue for another fifteen minutes when you're done if you want, but you'd be surprised how much you can get done in fifteen minute segments over multiple days. Also, I recommend writing in google docs with the setting of “Add space after paragraph” (go to Format, then Line & paragraph spacing) for ease of transferring to AO3. Actually, here's a good guide on working from google docs an moving to AO3; look at it before you start. Google docs is also useful for when you have a beta because it lets them make suggestions instead of straight-up changing things themselves. Also, take note of where you use italics and non-italicized punctuation together (this will be useful when you need to publish to AO3).
7. Read it carefully and with a critical eye like you would someone else’s fic up in #1. Make sure that you can follow the action based solely on what you wrote and that nothing impossible or contradictory happens (e.g. teleporting body parts, a single hand in two locations at the same time, people twisting or reaching in physically impossible ways). What do you think is missing, where, why, and how might you fix it?
8. Revise it.
9. Repeat 7 and 8 as much as you desire until you’re satisfied, or at least as satisfied as you can be without peer review.
10. Send it to beta. Like, seriously, send it to beta because, if nothing else, your beta won’t know what’s supposed to be happening in the scene, so they can tell you if you’ve successfully conveyed what happens. If you have anything in particular you are uncertain about or want help with, ask your beta to pay close attention to it. Seriously, betaing is going to be much more effective if your beta knows what they should be focusing on most.
11. Repeat steps 7 and 8.
12. Title it and write a summary. Feel free to ask your beta for help here.
12. Congrats, you’re done! Transfer it to AO3 from google docs and save it as a draft. AO3 by default puts a space between italics and non-italicized punctuation, so go through your list of those combos and manually delete the extra spaces. Now add your title, tags, and summary. Don’t tag side pairings/pairings the fic doesn’t focus on in the relationship section; if you need to warn readers of them, put them in the additional tag sedition. If you’re writing an ot3+ that isn’t an established, feel free to tag the pieces of the ship involved (e.g. Betty/Jughead/Tabitha would also tag Betty/Jughead, Betty/Tabitha, and Tabitha/Jughead). But if the ot3+ is already popular within fandom, only tag the ot3+. Don’t tag characters who aren’t central to the story. Tag all warnings and kinks involved especially.
I think that’s it? I guess I might have overly walked you through, but that’s the process I recommend. I mean, I don’t always follow all the steps (While I get the gist of character/emotional arcs before I start plotting the smut, I often really nail them down after I’ve decided on the events of the smut because the latter is generally what has me writing the smut in the first place and I tend to get ahead of myself. Things would probably be easier if I didn’t do that though), but they’re good guidelines, I think? Regardless, I hope this helps!
9 notes
·
View notes
Note
hey, i started following you recently and ur bio says ur a hacker? any tips on where to start? hacking seems like a v cool/fun way to learn more abt coding and cybersecurity/infrastructure and i'd like to explore it but there's so much on the internet and like, i'm not trying to get into anything illegal. thanks!
huh, an interesting question, ty!
i can give more tailored advice if you hit me up on chat with more specifics on your background/interests.
given what you've written here, though, i'll just assume you don't have any immediate professional aspirations (e.g. you just want to learn some things, and you aren't necessarily trying to get A Cyber Security Job TM within the next three months or w/e), and that you don't know much about any specific programming/computering domain yet.
(stuff under cut because long)
first i'd probably just try to pick some interesting problem that you think you can solve with tech. this doesn't need to be a "hacking" project at first; i was just messing around with computers for ages before i did anything involving security/exploitation.
if you don't already know how to program, you should ideally pick a problem you can solve via programming. for instance: i learned a lot back in the 2000s, when play-by-post forum RPGs were in vogue. see, i'd already been messing around, building my own personal sites, first just with HTML & CSS, and later on with Javascript and PHP. and i knew the forum software everyone used (InvisionPowerBoard) was written in PHP. so when one of the admins at my RPG complained that they'd like the ability to set multiple profile pictures, i was like, "hey i'm good at programming, want me to create a mod to do that," and then i just... did. so then they asked me to program more features, and i got all the sexy nerd cred for being Forum Mod Queen, and it was a good time, i learned a lot.
(i also got to be the person who was frantically IMed at 2am because wtf the forum is down and there's an inscrutable error, what do??? basically sysadmining! also, much less sexy! still, i learned a lot!)
the key thing is that it's gotta be a problem that's interesting to you: as much as i love making dorky sites in PHP, half the fun was seeing other people using my stuff, and i think the era of forum-based RPGs has passed. but maybe you can apply some programming talents to something that you are interested in—maybe you want to make a silly Chrome extension to make people laugh, a la Cloud to Butt, or maybe you'd like to make a program that converts pixel art into cross-stitching patterns, maybe you want to just make a cool adventure game on those annoying graphing calculators they make you use in class, or make a script for some online game you play, or make something silly with Arduino (i once made a trash can that rolled toward me when i clapped my hands; it was fun, and way easier than you'd think!), whatever.
i know a lot of hacker-types who got their start doing ROM hacking for video games—replacing the character art or animations or whatever in old NES games. that's probably more relevant than the PHP websites, at least, and is probably a solid place to get started; in my experience those communities tend to be reasonably friendly to questions. pick a small thing you want to do & ask how to do it.
also, a somewhat unconventional path, but—once i knew how to program a bit of Python, i started doing goofy junk, like, "hey can i implemented NamedTuple from scratch,” which tends to lead to Python metaprogramming, which leads to surprising shit like "oh, stack frames are literally just Python objects and you can manually edit them in the interpreter to do deliberately horrendous/silly things, my god this language allows too much reflection and i'm having too much fun"... since Python is a lot of folks' first language these days, i thought i'd point that out, since i think this is a pretty accessible start to thinking about How Programs Actually Work under the hood. allison kaptur has some specific recommendations on how to poke around, if you wanna go that route.
it's reasonably likely you'll end up doing something "hackery" in the natural course of just working on stuff. for instance, while i was working on the IPB forum software mods, i became distressed to learn that everyone was using an INSECURE version of the software! no one was patching their shit!! i yelled at the admins about it, and they were like "well we haven't been hacked yet so it's not a problem," so i uh, decided to demonstrate a proof of concept? i downloaded some sketchy perl script, kicked it until it worked, logged in as the admins, and shitposted a bit before i logged out, y'know, to prove my point.
(they responded by banning me for two weeks, and did not patch their software. which, y'know, rip to them; they got hacked by an unrelated Turkish group two months later, and those dudes just straight-up deleted the whole website. i was a merciful god by comparison!)
anyway, even though downloading a perl script and just pointing it at a website isn't really "hacking" (it's the literal definition of script kiddie, heh)—the point is i was just experimenting a lot and trying a lot of stuff, which meant i was getting comfortable with thinking of software as not just some immutable relic, but something you can touch and prod in unexpected ways.
this dovetails into the next thing, which is like, just learn a lot of stuff. a boring conventional computer science degree will teach you a lot (provided you take it seriously and actually try to learn shit); alternatively, just taking the same classes as a boring conventional computer science degree, via edX or whatever free online thingy, will also teach you a lot. ("contributing to open source" also teaches you a lot but... hngh... is a whole can of worms; send a follow-up ask if you want that rant.)
here's where i should note that "hacking" is an impossibly broad category: the kind of person who knows how to fuck with website authentication tokens is very different than someone who writes a fuzzer, who is often quite different than someone who looks at the bug a fuzzer produces and actually writes a program that can exploit that bug... so what you focus on depends on what you're interested in. i imagine classes with names like "compilers," "operating systems," and "networking" will teach you a lot. but, like, idk, all knowledge is god-breathed and good for teaching. hell, i hear some universities these days have actual computer security classes? that's probably a good thing to look at, just to get a sense of what's out there, if you already know how to program.
also be comfortable with not knowing everything, but also, learn as you go. the bulk of my security knowledge came when i got kinda airdropped into a work team that basically hired me entirely on "potential" (lmao), and uh, prior to joining i only had the faintest idea what a hypervisor was? or the whole protection ring concept? or ioctls or sandboxing or threat models or, fuck, anything? i mostly just pestered people with like 800 questions and slowly built up a knowledge base, and remember being surprised & delighted when i went to a security conference a year later and could follow most of the talks, and when i wound up at a bar with a guy on the xbox security team and we compared our security models a bunch, and so on. there wasn't a magic moment when i "got it", i was just like, "okay huh this dude says he found a ring-0 exploit... what does that mean... okay i think i got that... why is that a big deal though... better ask somebody.." (also: reading an occasional dead tree book is a good idea. i owe my firstborn to Robert Love's Linux Kernel Development, as outdated as it is, and also O'Reilly's kookaburra book gave me a great overview of web programming back in the day, etc. you can learn a lot by just clicking around random blogs, but you’ll often end up with a lot of random little facts and no good mental scaffolding for holding it together; often, a decent book will give you that scaffolding.)
(also, it's pretty useful if you can find a knowledgable someone to pepper with random questions as you go. finding someone who will actively mentor you is tricky, but most working computery folks are happy to tell you things like "what you're doing is actually impossible, here's why," or "here's a tutorial someone told me was good for learning how to write a linux kernel module," or "here's my vague understanding of this concept you know nothing about," or "here's how you automate something to click on a link on a webpage," which tends to be handier than just google on its own.)
if you're reading this and you're like "ok cool but where's the part where i'm handed a computer and i gotta break in while going all hacker typer”—that's not the bulk of the work, alas! like, for sure, we do have fun pranking each other by trying dumb ways of stealing each other's passwords or whatever (once i stuck a keylogger in a dude's keyboard, fun times). but a lot of my security jobs have involved stuff like, "stare at this disassembly a long fuckin' time to figure out how the program pointer got all fucked up," or, "write a fuzzer that feeds a lot of randomized input to some C++ program, watch the program crash because C++ is a horrible language for writing software, go fix all the bugs," or "think Really Hard TM about all the settings and doohickeys this OS/GPU/whatever has, think about all the awful things someone could do with it, threat model and sandbox accordingly." occasionally i have done cool proof-of-concept hacks but honestly writing exploits can kinda be tedious, lol, so like, i'm only doing that if it's the only way i can get people to believe that Yes This Is Actually A Problem, Fix Your Code
"lua that's cool and all but i wanted, like, actual links and recommendations and stuff" okay, fair. here's some ideas:
microcorruption: very fun embedded security CTF; teaches you everything you need to know as you're doing it.
cryptopals crypto challenges: very fun little programming exercises that teach you a lot of fundamental cryptography concepts as you're going along! you can do these even as a bit of a n00b; i did them in Python for the lulz
the binary bomb lab is hilariously copied by, like, so many CS programs, lol, but for good reason. it's accessible and fun and is the first time most people get to feel like a real hacker! (requires you know a bit of C beforehand)
ctftime is a good way to see when new CTFs ("capture the flag"s; security-focused competitions) are coming up. or, sometimes CTFs post their source code, so you can continue trying them after the CTF is over. i liked Stripe's CTFs when they were going, because they focused on "web stuff", and "web stuff" was all i really knew at the time. if you're more interested in staring at disassembly, there's CTFs focused on that sort of thing too.
azeria has good ARM assembly & exploitation tutorials
also, like, lots of good talks out there; just watching defcon/cansecwest/etc talks until something piques your interest is very fun. i'd die on a battlefield for any of Christopher Domas's talks, but he assumes a lot of specific x86/OS knowledge, lol, so maybe don’t start with that. oh, Julia Evans's blog is honestly probably pretty good for just learning a lot of stuff and really beginner-friendly?
oh and wrt legality... idk, i haven't addressed it here since it hasn't come up in my own work much, tbh. if you're just getting started you're kind of unlikely to Break The Law without, y'know, realizing maybe you're doing something a bit gray-area? and you can cross that bridge when you come to it? Real Hacking TM is way more of a pain-in-the-ass than doing CTFs and such, and you'll learn way more with the latter, so who cares lol just do the fun thing
21 notes
·
View notes
Text
20 years a blogger
It's been twenty years, to the day, since I published my first blog-post.
I'm a blogger.
Blogging - publicly breaking down the things that seem significant, then synthesizing them in longer pieces - is the defining activity of my days.
https://boingboing.net/2001/01/13/hey-mark-made-me-a.html
Over the years, I've been lauded, threatened, sued (more than once). I've met many people who read my work and have made connections with many more whose work I wrote about. Combing through my old posts every morning is a journey through my intellectual development.
It's been almost exactly a year I left Boing Boing, after 19 years. It wasn't planned, and it wasn't fun, but it was definitely time. I still own a chunk of the business and wish them well. But after 19 years, it was time for a change.
A few weeks after I quit Boing Boing, I started a solo project. It's called Pluralistic: it's a blog that is published simultaneously on Twitter, Mastodon, Tumblr, a newsletter and the web. It's got no tracking or ads. Here's the very first edition:
https://pluralistic.net/2020/02/19/pluralist-19-feb-2020/
I don't often do "process posts" but this merits it. Here's how I built Pluralistic and here's how it works today, after nearly a year.
I get up at 5AM and make coffee. Then I sit down on the sofa and open a huge tab-group, and scroll through my RSS feeds using Newsblur.
I spend the next 1-2 hours winnowing through all the stuff that seems important. I have a chronic pain problem and I really shouldn't sit on the sofa for more than 10 minutes, so I use a timer and get up every 10 minutes and do one minute of physio.
After a couple hours, I'm left with 3-4 tabs that I want to write articles about that day. When I started writing Pluralistic, I had a text file on my desktop with some blank HTML I'd tinkered with to generate a layout; now I have an XML file (more on that later).
First I go through these tabs and think up metadata tags I want to use for each; I type these into the template using my text-editor (gedit), like this:
<xtags>
process, blogging, pluralistic, recursion, navel-gazing
</xtags>
Each post has its own little template. It needs an anchor tag (for this post, that's "hfbd"), a title ("20 years a blogger") and a slug ("Reflections on a lifetime of reflecting"). I fill these in for each post.
Then I come up with a graphic for each post: I've got a giant folder of public domain clip-art, and I'm good at using all the search tools for open-licensed art: the Library of Congress, Wikimedia, Creative Commons, Flickr Commons, and, ofc, Google Image Search.
I am neither an artist nor a shooper, but I've been editing clip art since I created pixel-art versions of the Frankie Goes to Hollywood glyphs using Bannermaker for the Apple //c in 1985 and printed them out on enough fan-fold paper to form a border around my bedroom.

As I create the graphics, I pre-compose Creative Commons attribution strings to go in the post; there's two versions, one for the blog/newsletter and one for Mastodon/Twitter/Tumblr. I compose these manually.
Here's a recent one:
Blog/Newsletter:
(<i>Image: <a href="https://commons.wikimedia.org/wiki/File:QAnon_in_red_shirt_(48555421111).jpg">Marc Nozell</a>, <a href="https://creativecommons.org/licenses/by/2.0/deed.en">CC BY</a>, modified</i>)
Twitter/Masto/Tumblr:
Image: Marc Nozell (modified)
https://commons.wikimedia.org/wiki/File:QAnon_in_red_shirt_(48555421111).jpg
CC BY
https://creativecommons.org/licenses/by/2.0/deed.en
This is purely manual work, but I've been composing these CC attribution strings since CC launched in 2003, and they're just muscle-memory now. Reflex.
These attribution strings, as well as anything else I'll need to go from Twitter to the web (for example, the names of people whose Twitter handles I use in posts, or images I drop in, go into the text file). Here's how the post looks at this point in the composition.
<hr>
<a name="hfbd"></a>
<img src="https://craphound.com/images/20yrs.jpg">
<h1>20 years a blogger</h1><xtagline>Reflections on a lifetime of reflecting.</xtagline>
<img src="https://craphound.com/images/frnklogo.jpg">
See that <img> tag in there for frnklogo.jpg? I snuck that in while I was composing this in Twitter. When I locate an image on the web I want to use in a post, I save it to a dir on my desktop that syncs every 60 seconds to the /images/ dir on my webserver.
As I save it, I copy the filename to my clipboard, flip over to gedit, and type in the <img> tag, pasting the filename. I've typed <img src="https://craphound.com/images/ CTRL-V"> tens of thousands of times - muscle memory.
Once the thread is complete, I copy each tweet back into gedit, tabbing back and forth, replacing Twitter handles and hashtags with non-Twitter versions, changing the ALL CAPS EMPHASIS to the extra-character-consuming *asterisk-bracketed emphasis*.
My composition is greatly aided both 20 years' worth of mnemonic slurry of semi-remembered posts and the ability to search memex.craphound.com (the site where I've mirrored all my Boing Boing posts) easily.
A huge, searchable database of decades of thoughts really simplifies the process of synthesis.
Next I port the posts to other media. I copy the headline and paste it into a new Tumblr compose tab, then import the image and tag the post "pluralistic."
Then I paste the text of the post into Tumblr and manually select, cut, and re-paste every URL in the post (because Tumblr's automatic URL-to-clickable-link tool's been broken for 10+ months).
Next I past the whole post into a Mastodon compose field. Working by trial and error, I cut it down to <500 characters, breaking at a para-break and putting the rest on my clipboard. I post, reply, and add the next item in the thread until it's all done.
*Then* I hit publish on my Twitter thread. Composing in Twitter is the most unforgiving medium I've ever worked in. You have to keep each stanza below 280 chars. You can't save a thread as a draft, so as you edit it, you have to pray your browser doesn't crash.
And once you hit publish, you can't edit it. Forever. So you want to publish Twitter threads LAST, because the process of mirroring them to Tumblr and Mastodon reveals typos and mistakes (but there's no way to save the thread while you work!).
Now I create a draft Wordpress post on pluralistic.net, and create a custom slug for the page (today's is "two-decades"). Saving the draft generates the URL for the page, which I add to the XML file.
Once all the day's posts are done, I make sure to credit all my sources in another part of that master XML file, and then I flip to the command line and run a bunch of python scripts that do MAGIC: formatting the master file as a newsletter, a blog post, and a master thread.
Those python scripts saved my ASS. For the first two months of Pluralistic, i did all the reformatting by hand. It was a lot of search-replace (I used a checklist) and I ALWAYS screwed it up and had to debug, sometimes taking hours.
Then, out of the blue, a reader - Loren Kohnfelder - wrote to me to point out bugs in the site's RSS. He offered to help with text automation and we embarked on a month of intensive back-and-forth as he wrote a custom suite for me.
Those programs take my XML file and spit out all the files I need to publish my site, newsletter and master thread (which I pin to my profile). They've saved me more time than I can say. I probably couldn't kept this up without Loren's generous help (thank you, Loren!).
I open up the output from the scripts in gedit. I paste the blog post into the Wordpress draft and copy-paste the metadata tags into WP's "tags" field. I preview the post, tweak as necessary, and publish.
(And now I write this, I realize I forgot to mention that while I'm doing the graphics, I also create a square header image that makes a grid-collage out of the day's post images, using the Gimp's "alignment" tool)
(because I'm composing this in Twitter, it would be a LOT of work to insert that information further up in the post, where it would make sense to have it - see what I mean about an unforgiving medium?)
(While I'm on the subject: putting the "add tweet to thread" and "publish the whole thread" buttons next to each other is a cruel joke that has caused me to repeatedly publish before I was done, and deleting a thread after you publish it is a nightmare)
Now I paste the newsletter file into a new mail message, address it to my Mailman server, and create a custom subject for the day, send it, open the Mailman admin interface in a browser, and approve the message.
Now it's time to create that anthology post you can see pinned to my Mastodon and Twitter accounts. Loren's script uses a template to produce all the tweets for the day, but it's not easy to get that pre-written thread into Twitter and Mastodon.
Part of the problem is that each day's Twitter master thread has a tweet with a link to the day's Mastodon master thread ("Are you trying to wean yourself off Big Tech? Follow these threads on the #fediverse at @[email protected]. Here's today's edition: LINK").
So the first order of business is to create the Mastodon thread, pin it, copy the link to it, and paste it into the template for the Twitter thread, then create and pin the Twitter thread.
Now it's time to get ready for tomorrow. I open up the master XML template file and overwrite my daily working file with its contents. I edit the file's header with tomorrow's date, trim away any "Upcoming appearances" that have gone by, etc.
Then I compose tomorrow's retrospective links. I open tabs for this day a year ago, 5 years ago, 10 years ago, 15 years ago, and (now) 20 years ago:
http://memex.craphound.com/2020/01/14
http://memex.craphound.com/2016/01/14
http://memex.craphound.com/2011/01/14
http://memex.craphound.com/2006/01/14
http://memex.craphound.com/2001/01/14
I go through each day, and open anything I want to republish in its own tab, then open the OP link in the next tab (finding it in the @internetarchive if necessary). Then I copy my original headline and the link to the article into tomorrow's XML file, like so:
#10yrsago Disney World’s awful Tiki Room catches fire <a href="https://thedisneyblog.com/2011/01/12/fire-reported-at-magic-kingdom-tiki-room/">https://thedisneyblog.com/2011/01/12/fire-reported-at-magic-kingdom-tiki-room/</a>
And NOW my day is done.
So, why do I do all this?
First and foremost, I do it for ME. The memex I've created by thinking about and then describing every interesting thing I've encountered is hugely important for how I understand the world. It's the raw material of every novel, article, story and speech I write.
And I do it for the causes I believe in. There's stuff in this world I want to change for the better. Explaining what I think is wrong, and how it can be improved, is the best way I know for nudging it in a direction I want to see it move.
The more people I reach, the more it moves.
When I left Boing Boing, I lost access to a freestanding way of communicating. Though I had popular Twitter and Tumblr accounts, they are at the mercy of giant companies with itchy banhammers and arbitrary moderation policies.
I'd long been a fan of the POSSE - Post Own Site, Share Everywhere - ethic, the idea that your work lives on platforms you control, but that it travels to meet your readers wherever they are.
Pluralistic posts start out as Twitter threads because that's the most constrained medium I work in, but their permalinks (each with multiple hidden messages in their slugs) are anchored to a server I control.
When my threads get popular, I make a point of appending the pluralistic.net permalink to them.
When I started blogging, 20 years ago, blogger.com had few amenities. None of the familiar utilities of today's media came with the package.
Back then, I'd manually create my headlines with <h2> tags. I'd manually create discussion links for each post on Quicktopic. I'd manually paste each post into a Yahoo Groups email. All the guff I do today to publish Pluralistic is, in some way, nothing new.
20 years in, blogging is still a curious mix of both technical, literary and graphic bodgery, with each day's work demanding the kind of technical minutuae we were told would disappear with WYSIWYG desktop publishing.
I grew up in the back-rooms of print shops where my dad and his friends published radical newspapers, laying out editions with a razor-blade and rubber cement on a light table. Today, I spend hours slicing up ASCII with a cursor.
I go through my old posts every day. I know that much - most? - of them are not for the ages. But some of them are good. Some, I think, are great. They define who I am. They're my outboard brain.
37 notes
·
View notes
Photo

late ass replies but this time i have so much stuff to reply to that i actually need to split things up into categories :))))
also i apologize if any of this is no longer relevant / i am of absolutely no help :)))
otherwise, if you’ve asked a reshade related question...uh... sometime between christmas and now LMAO then it’s probably here!
nonny :
Hello Mikayla, I hope you're having a lovely year so far. I just wanted to ask this about the dove preshade (1st question here) kindlespice/tumblr/com/post/632163463099269120/ft-reshade-questions-a-theme-question-nonny i'm having the same problem, i have a new computer and after installing the game and it's last 3 updates and then the reshade it's not looking the same and it sucks bc i know how it's supposed to look (1)
the shadows are not as noticeable, the transparency between the walls is not there and the blur is gone (i have miiko´s ghibli's cloud override but i had that on my old computer and the reshade still looked normal) idk if it's the game or the reshade but it sucks bc i love how the original looks like anyways it would be really helpfull if you could answer. Take care and stay safe :))!!! (2/2)
hi hi! thanks for the kind message and i hope your year is going well! if I had to take a guess, I would say that maybe some of your settings in-game have changed? I would double check and make sure you’ve got edge smoothing off, and you could try turning off post-processing as well (im not ACTUALLY sure if turning off post processing does anything but it’s worth a shot!) otherwise i would try removing the preset and redownloading it? maybe the settings of the preset got jacked up and you can fix it by re-installing. let me know if this helps! if not, then you can always dm me so i can see pics of your situation!
nonny:
Hi! Sorry if this is worded odd but I just downloaded your Leif reshade and have completed all the steps, however there is still this blur over the screen which isn't the best for game play. If you could help explain how to toggle it for gameplay/cas that would be great :)
hi hi! the blur is the DoF (depth-of-field). it’s used for taking screenshots and is supposed to make the background all blurry. to disable it, you can use the hotkey shift-2 or open the reshade menu and manually untick the DoF option!
nonny:
Hi, i just installed the latest version of the dove preset and my game is dark. It is the MXAO that is doing it but i don't have the preprocessor definitions box. How do i fix it?
hello! im assuming you have a 4.0 version of reshade if you can’t find the box. in this version, it’s a blue tab called “Edit Global Preprocessor Definitions” beneath all the toggleable effects. if you have an earlier version, it should be under the “settings” tab at the top though.
nonny:
Hello!! Thank you so much for your work! I have a really quick question - so I am trying to work with the reshade and got it all set but when I play around with it, my objects don’t look “rounded”. If that makes sense. Other people who use it, their objects look rounded and smooth and just different (I have an image for reference) but mine just looks like the normal objects just different colors. Is there something I’m missing or doing something wrong? I have all the settings correct. :)
hi hi! hmm, im not really sure what that could be... probably something to do with mxao bc it’s always something to do with mxao lol. I would double check to make sure you have this line in your preprocessor definitions: RESHADE_DEPTH_INPUT_IS_REVERSED = 0 this line should equal 0 for the mxao to work properly. that might give you the “rounded” look. if this doesn’t fix it for you then you should go ahead and dm me so i can see what the game looks like!
nonny:
Hey, I tried your Dove preset but my game just can't handle it, it's pretty old and I just have to uninstall the reshade (even though I really loved the effect) but I'm scared to do anything in the Game folder or delete anything. Could you please help me with what to remove? I'm scared to break my game if I delete something that souldn't be deleted :( I tried searching for this in your WCIF and reshade questions and couldn't find an answear. Please help
hello! sorry to hear that your game can’t handle the preset :( here’s to hoping you can get an upgrade in the future! anyhow, to uninstall; i believe you only need to remove
ReShade - config settings (it’ll have a little paper w/ gear next to it)
d3d9.dll - application extension (it’ll have a little paper w/ gears ON it)
d3d9 - text document (little paper w/ lines icon)
reshade-shaders - folder
your reshade presets - config settings (if you remove the files above first though, you won’t be able to use/see these in-game)
that should uninstall reshade from your game! and don’t worry, if you accidentally remove something you didn’t want to, you can “verify your game files” through origin and that should restore any missing files. unless you.. *ahem*... acquired your game through other means... in which case be careful XD
@maddybarbz
Omg I don't know if you are active or not but I'm having some problems. So I downloaded the 3.0.8 and it was going smoothly but I loaded the game it said that magic bloom had issues.
i don’t know if im active either. probably not tbh XD but im here now so here ya go! i would recommend deleting the shaders you’re having problems with and then putting back the 3.0.8 shaders you downloaded. it’s really easy for things to break / be incompatible during the install so your best bet is always to delete the ones giving you trouble and put the new ones in.
@kaiamikulka
hi! I’ve been jealously stalking your page for a while, because I’m in love with the dove preset, but I’m very confused about how to download it. My computer keeps marking it as a virus, so i was kinda scared to download it. and when i finally did, it didn’t show up in my game. could you walk me through how to download it?(i have a pc laptop)
Thank you so much,
Kaia☺️☺️❤️❤️❤️
hi hi! lol im flattered for the jealousy stalk! anyway im not sure why it wouldn’t be showing up in game? unless you were so excited that you forgot to install reshade with it? i have a video here explaining how to install a recent version of reshade and set up dove with it so you can check that out here !
@bojanastarcevic
Hello, I've been trying to fix the dove reshade for a long time, but the new version just doesn't support it, and the old version spoils the game and sometimes it won't even start ... Would you consider trying to make the same preset version for the latest reshade version? I'll be very grateful because your preset is the most beautiful I have ever seen?! 😘😂Don't know if you still play of work on your game but like I said if you have time to try make new one couse everyone was looking for it!!! 😉😘😘😘
hi hi! i totally understand not using the earlier versions--these later ones are soo much more user friendly!--but i’ve been able to get the preset to work with later versions (4.7.0 is the latest i’ve tried though) and it looks, if not the same, then very close to the original. I have a video here explaining how i did it if you’re really eager to have it
in the future i guess i could try to re-release the preset? i can’t give you an eta bc im lazy and i fall off the face of the earth regularly, but i do think it would help to have updated instructions right on the face of the download.
#i think i might make another reshade video#one that's not an hour long and is more put together LMAO#like#i should actually go IN GAME to show people how busted reshade really is#XDD#rereleasing dove is probably the play too...#god i really wish i had put a read more on that post#:((((#asks#reshade
13 notes
·
View notes
Text
games i have tried on project 64 in the three days i’ve had it working, in order:
kirby 64 - this is why i downloaded the emulator to begin with. kirby 64 is the ultimate feel-good game and i was really surprised at how easy it was. there are 6 planets with 4-5 stages each and each stage also has the requirement of collecting 3 crystal shards apiece. in just two hours i breezed through the first three planets and got almost every single collectible along with way with no do-overs
snowboard kids - not just a favorite of my brother and me but THEEE heavyweight champ as far as n64 racing games were concerned, even beating out mario kart 64. i also have snowboard kids 2, which improves upon the original in every possible way, but if i started playing that i would never have gone back to the original. it’s basically mario kart without brakes; you ride downhill, you can shoot other players with missiles, etc. it’s also a lot fucking harder than i remembered. i have no idea how we beat this at age 10 or whatever. it’s amazing that two decades and change later my muscle memory still tries to hit the c buttons when i’m holding a ps4 controller (i tried to get my gcn controller working, but i have a shitty adapter :/). i had more luck going back to the early courses and replaying them; they were easier than when i started, so i guess it’s kind of like riding a bike. i still haven’t gotten the gold on the last course though which means i have not unlocked the three hidden courses. they look really familiar so my brother and i must have gotten them, and if a couple of elementary school kids can do it, i can do it. no snowboard kids 2 until i finish the original :| and no save states either!!! however tempting it is. we didn’t have save states in 1997!!!! what’s funny about this game is that my brother’s favorite character to play as (spiky haired kid) and my favorite character to play as (girl wearing pink) are siblings in-game.
aerogauge - basically a rip-off f-zero except you can play in first person and your car can fly. this one aged VERY badly...my brother and i LOVED playing vs as kids because of the aforementioned first person flying cars and it’s definitely the reason we got so hooked on the gcn f-zero later in life, but playing solo against the AI is a form of self-punishment. also, i don’t remember how to boost and the game won’t tell me LMAO so i keep coming in last place. i may google up an instruction manual later and give it another try, but all the comments on that youtube video say it’s a notorious dumpster fire (something i never suspected as a kid) so maybe it’s just better with another real human being to play with :(
bomberman 64 second attack - this is another one that might be better with a second real human. my brother and i used to do the co-op with me as bomberman and him as pommy (a BLATANT kirby rip-off) but it’s another case of me not remembering all the controls and the game not explaining them very well. so far i’m finding it tedious that you have to move very far away from your bombs after planting them but i seem to remember the gameplay after the tutorial level being downright addicting. will have to come back later
dk64 - absolute CLASSIC that i really wanted to replay ever since i got my hands on the dk dlc of mario + rabbids. dk rap is exactly as charming as i remembered. the cutscenes are HILARIOUS and i keep getting surprised by things like the word butt, the word hell, voice acting, etc - thank you, rare. so the experience is wonderful but i got a little frustrated with the constant tutorials and i’m having a lot of trouble with the controls. the stick feels way too sensitive and i keep falling, the x and y axis are reversed from what i’m used to, etc. i think i just need more practice. my brother beat this as a kid but i never did
harvest moon 64 - my first harvest moon game EVER. we used to rent this all the time from our grocery store’s rental area (lol yes really the 90s were a Time) and my brother and i kept getting devastated when other people who rented it deleted our files, so finally my mom gave into begging and bought us our own copy (probably saved her a ton of money). this one is like. it’s harvest moon, high king of farm sims, but also i never have enough time or energy to get anything done, which also makes it a very realistic mental illness simulator. it is INCREDIBLY tedious to take things out of your pack and put them in the little harvest box and the music restarts itself every time you change areas. it’s still fun as hell but the quality of life improvements made in the gcn version and other games like stardew valley means when i am playing this i kind of just want to be playing those instead. it did not age well. and there’s so much missable stuff!!! it makes me feel like i need to be having a guide out 24/7 and i can’t just...get lost in the game. i forgot what i used to name all my animals and the farm etc (except obviously the horse was epona) so i went with scooby for the dog and aces for the farm name (not enough character for rainbow, smh). may or may not go back to that one.
anyway so far i am unsurprisingly spending most of my time on kirby and snowboard kids but i’m really looking forward to some other platformers i never finished as a kid like the banjo kazooie games, rocket robot on wheels, and FUCKING glover. i remember dying a LOT on that one :|
#personal#liz plays n64#i feel like it'd be stupid to have a liveblog tag for each of these games separately so...#hopefully i won't have to go back and make new ones later.
3 notes
·
View notes
Text
omegafrisk is om-over-frisk, apologies, and unreleased stuff
i want to preface this by saying that every time i admit to a mistake i get people trying to minimise it. if you’re getting ready to do that, please don’t. it makes me feel terrible. even if you don’t agree with how i feel, i violated my own morals, and that means a lot to me!
so, omegafrisk is definitely over. it’s partially that i was in a bad bad place when i started this comic and it’s always gonna be tied to that for me, partially that i’ve just become a much better writer since then and i’d have to reboot the whole thing to be satisfied with it, and partially just that i’m not into undertale enough to make a whole comic anymore.
and speaking of being in a bad place: letting that bleed through into my writing is what i want to apologise for. i’ve come to realise i was a victim of grooming when i started this comic (and as i continued to write it). it messed me up, and i wrote messed up stuff because i just didn’t know better. the child gore, the flippant use of suicide, the extremely inappropriate jokes about kids, probably other stuff i don’t remember - it all disgusts me now. i’m so sorry i put that out into the world and that it took me so long to address it.
i thought about password protecting this blog and shutting it down altogether, but i’ve decided i won’t do that. after wrestling with tumblr a bit i think i’ve deleted the worst stuff, but if you think there’s anything else i should get rid of please bring it to my attention through IM, or through the submit box if you’re shy (you can submit anonymously if you log out).
again, don’t defend me. if you don’t agree keep it to yourself. i will block you if you try to minimise this.
heavy stuff out of the way, onto the content, which i’m sure most of you are much more interested in.
ABOUT THE STORY
i thought about releasing my entire plot outline, but... it sucks. that thing predates mad mew mew. it’s terrible. there’s barely even any detail. whatever you’ve come up with yourself is more interesting.
i do have plenty of stuff to share though! this summary got long as hell, so the rest is going under a cut.
since it’s so long, i’ll put the one thing i am mostly happy with here (obviously sui/child death implications):
https://docs.google.com/document/d/1modE5IQiwNIwRPHBBkwADAEbPttbpIzJBWFaBZlvYHY/edit?usp=sharing
this is the script for an ask i was planning for ages. first written in 2016 apparently?? with the help of the fantastic emouse. it’s a look on what was going on in the original timeline while frisk and chara were off gallivanting through spacetime.
the one thing i’m not pleased with is i don’t think it’s totally ic for flowey to start resetting again. i left it in though ‘cause i don’t feel like updating it.
another thing i’ll leave you is the playlist of instrumental themes i collected for chara and frisk, which i don’t think i ever released. this must also be from about 2016.
https://www.youtube.com/playlist?list=PLVSr-S6q61wCF5IFuBO2Ipl0Nb-u3r4xo
it starts out with frisk’s themes, life/universe and high score are shared themes, and after that chara’s themes begin.
summaries of the rest of the event and the ending under the cut!
A WRINKLE IN TIME
i can at least summarise the rest of the event i had planned. mettaton was about to turn the tables on everyone by having a camera crew burst through the ceiling (which were gonna be some people’s cameo’d ocs). he’d broadcast the debate over who got the soul live to try and bully everyone into giving him it. he had some fair points - he’s the only one of them that’s literally indestructible (at least to monsters and small children) - but both asgore and undyne were determined that they would be the ones to take it.
flowey would then pop up with his own plan. he’d kill everyone in the room except for charadyne (and mettaton just because, again, indestructible to magic). it would’ve been a cool little animation that scrolled past everyone’s shocked faces as bullets appeared behind them with that jarring sound effect they have in game, then cut to black with a cacophony of them all turning to dust.
this was all to force charadyne to load their save. he thought they’d be able to load to before undyne absorbed chara’s soul, which would be impossible as that moment would’ve been undyne’s first save point. (i’m only now realising the hole in this - surely he would’ve known that after his fusion with chara? but wait, he didn’t know about resets until he was revived, can beasts just not save? fucking undertale man)
regardless, chara and undyne would try to reset to, in chara’s words, “the last time you were... filled with... determination”. i wanted to do an animatic to half of [this song]. sweet chimes as undyne rifles back through her memories for that moment, building up to her getting ready - a blast of sound as it rips the timeline to shreds.
chara’s soul is so fragmented, only exacerbated by being in a foreign timeline, that they can’t reset properly. i was thinking of styling the catastrophic glitch that resulted after an undertale corruption because those things scare the shit out of me and also can be fucking hilarious. love me some comedic horror.
chara and undyne would eventually figure out they had to leave the timeline and manually straighten it out. because it was knotted. it was wr. there was a wrinkle. in the timeline. a wrinkle in time. because the event is called. it’s c. a wrinkle in time
that’s where i was hazy on details - you can see just how much was made up as i went along. somehow, they’d be separated, and undyne would have left enough dt in chara’s soul that they’d be able to go down to the human village and yoink some souls from the mausoleum there. (i had worldbuilding stuff around that - the soul jars used in the underground are based off what humans use for burial in general. burying your body in a grave = having your soul stored in a mausoleum. there’d also be equivalents to cremation and such)
i hadn’t really thought much about that - the actual idea was that chara would find their old house and we’d get a flashback sequence about their backstory (eugh, glad i didn’t get around to that). and then, idk, the mausoleum would be empty or something? i didn’t think about what might happen if they were actually able to get all those souls. that is to say, i didn’t think about the story implications - i totally thought about chara becoming a cool shapeshifting rainbow beast because i’m like that.
THE ENDING
rest assured there was gonna be a happy ending. chara and frisk were gonna have a big cool battle bursting through various timelines where frisk tried to talk chara down and chara tried to kick frisk’s ass. at the end, frisk would’ve given up and let chara kill them. but chara wouldn’t have been able to. as viciously as they attacked, they could only do a single point of damage - they and frisk are both made of magic now, and magic works on emotion, and chara cannot truly hate frisk enough to end their life.
so they would’ve made up, broken the barrier in their original timeline together, and lived happily ever after with no more resets.
i remember daydreaming an animatic of the two of them trying to break the barrier, stumbling a few times and gradually achieving synchrony, to [this song].
you might notice i don’t mention flowey here. i was kind of struggling to figure out what to do with everyone else in regards to like, actual methods of character development. i had some ideas about chara bringing wrinkle-in-time flowey along with them on their adventures and him somehow getting his memories spliced with og-timeline flowey’s near the end but didn’t really think them through.
here’s a shittily-sketched old concept of what i might’ve done with him though:
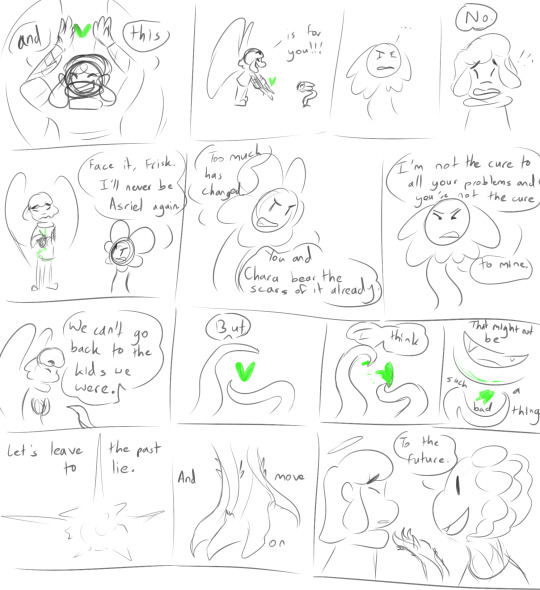
not exactly my most beautiful work but it’s all you’re getting. it’s just visual notes, so i didn’t think it through much.
i daydreamed a lot about a cute ending animatic to [this song]. i don’t remember my thoughts well enough to summarise, but i hope you can come up with something cute yourselves!
aaand that’s all for this post. thanks for reading!
11 notes
·
View notes