
Don't wanna be here? Send us removal request.
Statistics
We looked inside some of the posts by freshrecipesbycass and here's what we found interesting.
Average Info
Notes Per Post
10
Likes Per Post
8
Reblog Per Post
2
Reply Per Post
0
Time Between Posts
13 days ago
Number of Posts By Type
Text
7
Last Seen Tumblr Blogs


Fun Fact
There were a total of 171.5 billion posts on Tumblr in 2019.
Text
Pasta La Vista Foodie Followers
Well, this is it.
I can't believe we've made it to the end. The chef in me has always wanted to put together a food blog and this has been such a gifting experience. I've learned things and discovered new ways to share my love of cooking.
Throughout the semester, I've given you all 5 recipes. Each of these recipes came from a base and was tweaked to fit my personality and preferences.
What I love about cooking it thats exactly what it is: you start with the basics of a recipe and along the way, you make it your own.

In the past 10 weeks or so, I turned the traditionally heavy Fettuccini Alfredo into something you could dare call healthy, swapped real meat for a tofu based product, added some flair to a peach pie, got in touch with the holiday season with caramel apples and created warmth from within with blended butternut squash.
Honestly, its hard for me to choose a favorite post because I loved making (and eating) each of these recipes.
If I had to, though, I think I would go with the caramel apples. Due the nature of caramel, I needed to assemble a team of sorts to ensure that everything ran smoothly down to the final sprinkle.
Cooking is something we should share with the people we love and being able to create something delicious while having a lot of fun is just as rewarding as getting to dive in to the final product.
I don't have a least favorite recipe, but when looking back at each blog I would say that my first post would be the one I liked the least. I learned a lot through this process of how to photograph food as well as creating an aesthetic and easy to read piece which really shows when comparing my first blog to my last.
If I were to redo this project, I would definitely use a different platform. I used Tumblr because I used to have one and figured that it would be easier to go with something that I know rather than try to figure out a different blog site.
After reading through my classmate's blogs, I so wish I would've gone a different course. It's just harder to create something sleek with the way that this site works.
My main takeaway from this project is that sometimes things don't work out exactly how you want them to. There are failures in cooking and in blogging, especially when I limited myself to farmer's markets as the season was dying.
However, there's always a way to get around a problem that you find yourself in.
I truly enjoyed every part of cooking and blogging for each post and I hope that I was able to inspire all of you to venture into new recipes with the same passion as I have.
There won't be a next time, so as you leave, please remember to eat and live well!
0 notes
Text
This Soup is Proof That Food Can Heal
If we can count on one thing, it's that cold weather will always bring stuffy noses and sore throats.
The common cold has returned for another year and seems to be reeking havoc on nearly everyone around me.
After it came and went through everyone in my immediate household, I was confident that I had made it through the cold season unscathed.
Yet, as soon as my boyfriend started sneezing a little more than usual, I knew it was unlikely that I would be so lucky as to stay healthy.
The both of us have been under blankets and drinking tea for the past couple days while we suffer through the sickly symptoms. Thankfully, we both tested negative for Covid-19.
On day three of our cold, we were both craving something warm and hardy. My boyfriend wanted pasta with Italian sausage but I was firm on a vegetable soup.
Eventually we compromised on a classic recipe with a few tweaks:
kale sausage soup with gnocchi.
Gnocchi is a soft, potato based pasta that acts somewhat like a dumpling. They're pillowy and melt in your mouth once fully cooked.
Kale sausage soup comes from the Portuguese recipe Caldo Verda and is traditionally made with potatoes and collard greens. It's enjoyed during celebrations like weddings or birthdays.
You could say we are celebrating being sick.
***
I had to make some exceptions this week with my source of produce.
As I wrote about in my last blog, farmers markets are quickly closing for the season. By the start of November, every fresh fruit and veggie stand in Boise appeared to have packed up shop until Spring.
The next best thing, I thought, would be to find produce from a local co-op. A co-op is a nonprofit organization where members get to decide what is stocked in the store. It's essentially a grocery store that is run by the people who shop there.
The Boise co-op is a grocery store that has a deep love for healthy and organic food. The Boise co-op describes itself as "a trusted, go-to source for healthy, delicious foods and natural body care products that intentionally has a big impact on the community."
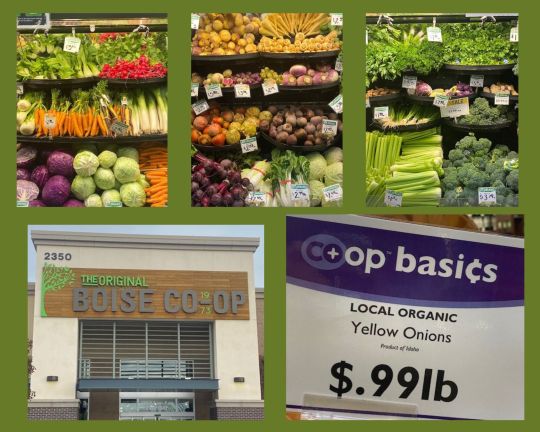
I gathered all of my ingredients from the co-op, making it a one stop shop for this healthy meal.
***
This soup is quick and easy to make. It's a fast chop, throw everything in one pot and boil kind of dish that will satisfy everyone.

*I used a tofu based Italian sausage to make this dish vegetarian.
To get started, chop your onion and the kale. If buying fresh kale, you'll need to remove the spine from each leaf. Just cut around the spine until it's completely detached from the rest of the kale.

We do this because the spine is tough and bitter; not very fun to eat.
Cut the kale into bite size or smaller pieces.
Next, put a large pot over medium heat and add in the olive oil. Place the sausage in the pot and break it up into bite-size pieces.

Once the sausage is nicely brown, add in your onion, garlic, and Italian seasoning. I also splashed a little bit of the stock in to keep everything loose.
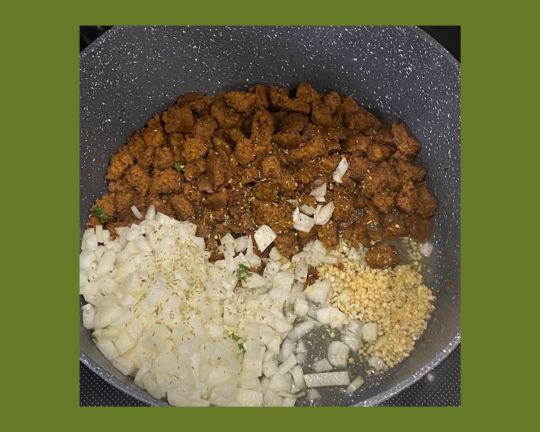
Stir to combine and let everything cook down for about 5-10 minutes or until the onion starts to turn translucent.
After everything is nicely familiar, add in the stock and gnocchi.
I bought my gnocchi from the store, but here's a recipe if you want to make is from scratch.

Stir until the gnocchi is completely immersed and raise the heat until the soup comes to a boil. Let it boil for about 8 minutes so the gnocchi can cook fully.
After the gnocchi is soft, add in the kale and cream.

You can add as much or as little cream as you want. The soup doesn't necessarily need it, but the cream does bring it to another level of luxuriousness.
Reduce heat back to medium and stir for a few minutes until the kale softens slightly but still holds its shape. This is where you can taste for salt or any other seasonings that you want to add.

Serve immediately with your choice of side. This soup goes great with Acme's rosemary focaccia bread that can be found at the Boise co-op in the bakery.

Trust me when I tell you that this making soup is one of the best things you can do for your body, mind and soul this season.
Kale is rich in vitamins B6 and C as well as packed with calcium and potassium that all fight hard to keep our immune system running smoothly.
I don't particularly enjoy eating kale by itself or even in salads, but the bitter flavor it can take that turns me away most of the time is completely absent in this soup. Despite being submerged in broth, it still keeps a fresh crunch that is almost addicting in combination with the soft gnocchi and tender sausage.
If you're feeling unwell (and even if you're feeling perfectly healthy), this soup is the perfect combination of health and comfort food that will surely make you feel better no matter your ailment.
Please let me know if you try this recipe and what alterations you would make to personalize it! You could sub the gnocchi for chunks of potato or even add other vegetables like carrots or zucchini.
Until next time, live and eat well!
0 notes
Text
The Caramel Apple of Your Eye
I promise that this recipe will be much better than that pun.
Greetings ghosts and gouls! For this blog, I'll show how to make one of my favorite halloween-era treats.
Caramel apples may seem daunting, but hopefully this easy step-by-step guide will make the process a little less spooky.
I got my apples from Reggie's Veggies produce stand. This is Reggie's second appearance on my blog. If you remember, I purchased pie filling ingredients from them for this blog.
Unfortunately, as it gets colder, more and more farmer's markets are closing for the season. I was hoping to showcase a new one each blog but there may be some repeats.

Reggie's looks more like a pumpkin patch this time of year than a produce stand, but don't let the plethora of festive squash fool you. They still have plenty of fruit and veg!
************************************************************************
Alright, lets get down to business.
This recipe comes straight from my grandmother and we'll be making our own caramel. It's a labor of love but completely worth it.
If you don't have the patience for homemade caramel and you want a slightly simpler recipe, I suggest this one.
This is what you'll need to prepare:

*You'll also need a number of supplies. This includes wooden sticks (I suggest using chop sticks or popsicle sticks because they are a little more sturdy), wax paper and toppings of your choice.
To start, you'll need to wash and dry your apples. Make sure the apples are completed dry. Any moisture will stop the caramel from sticking to the apples.
Once your apples are cleaned and dried, it's time to spear them.
Simply center your stick at the stem of the apple and push through. You only have to go as far as you need to be able to hold the apple on the stick.

Your apples can now be put in the fridge to chill.
************************************************************************
Now, lets start on the caramel.
Melt your butter in a large pot over medium-high heat.
After it's liquified, whisk in the brown sugar, corn syrup, sweetened condensed milk and salt. Bring to a boil.
Once you've reached a rolling boil, whisk constantly to avoid any burning.

And now you wait. The caramel needs to reach the "soft ball" stage. If you have a candy thermometer, wait until the temperature reaches 230-240 degrees fahrenheit.
If you don't, you can test the caramel by dropping a sample into some cold water. Once you can form your caramel into a soft ball (playdough like malleability), it's ready to be taken off the heat.

This could take anywhere form 15-25 minutes. I started testing samples at around 13 minutes.
Once your caramel has reached this stage, take it off the heat completely and whisk in your heavy cream and vanilla. It will start bubble but will turn smooth within a few seconds.

Let it sit for 2-3 minutes, but no longer. As your caramel cools it will start to thicken and become difficult to dip the apples into.
*If you find your caramel becomes thicker than you'd like, you can put it back on the stovetop for a few minutes to loosen it up.
************************************************************************
Organize an assembly line with your apples, caramel, a wax paper lined tray (or two) and your toppings.
I suggest having a partner to help with the decoration because the caramel starts to set quite quickly and you'll need to add your toppings as soon as your apple is dipped.
Tip your pot to one side and, holding the stick, begin to turn your apple in the caramel. Think of drawing a circle with your hand.
Do this until the apple is completely coated.

Hold the apple above the pot for a few seconds to let the excess caramel drip off.

Then, place your caramel covered apple on the wax paper lined tray.

Have your assistant add the decorations before the caramel starts to set. Move fast!
*Dip your next apple while your assistant adds the toppings to the previous one. Your caramel apple assembly should work like a fine-tuned machine.
I chose halloween inspired sprinkles, but you can really add anything you want! Chocolate chips, peanuts, crushed candies, etc.

Repeat with the remainder of your apples.
************************************************************************
Not only were these so much fun to make, they were absolutely delicious.
The caramel came out to the perfect chewy consistency and balanced out the sour apples like a match made in heaven.
Just like all the recipes on my blog, you can really make this one your own. Add a different flavor to the caramel or customize your toppings. They can be made to order based on any preferences in your household!
Here are some more extravagant ideas that you might want to check out.
I sincerely hope you enjoyed this recipe and give it a try. Caramel is not as spooky as you may have perceived!
As always, live and eat well!
0 notes
Text
The Soup You Need to Warm Your Soul
Brrrrrrrr, it's getting cold!
If you've heard anything about Idaho seasons, you've probably heard that fall is more of a blip in time than a fourth of the year. Boise makes the transition from summer to winter VERY quickly and by mid October, you'll find yourself shivering while you watch the leaves fall.
I always find this time of year the hardest because the cold comes at such a shock that I feel I'll never warm up.
My favorite solution to the bitter chill of an Idaho fall? Soup.
Yes, I know, how cliche. Soup in the cold whether. However, this soup will truly warm you from the inside out and leave you feeling as cozy as you do under a fuzzy weighted blanket.
************************************************************************
For this recipe, I've revisited the farmers market which I used for my first recipe.
Old Fashioned Fruit and Veg on Broadway redecorated for the holiday season since the last time I went. They put pumpkins and an especially spooky selection of squash on display.

I decided to stick to fall flavors for this recipe and went with a holiday appropriate butternut squash soup.

The first order of business, like every squash based recipe, is to prepare the squash.
Halve, hollow, peel and cube into roughly 1 inch pieces.

I didn't to overcomplicated this post by diving into the details of how to prepare the butternut squash but if you want some further instruction, here's a guide on how to prepare one.
Squash is done and can be set aside.
************************************************************************
Now, roughly chop your onion and mince your garlic.
Because everything is going to be blended at the end, we don't really need to be concerned about the fineness of the chopped aromatics.
Add your olive oil, onion, garlic, thyme, pepper and 1 tblsp of salt to a large pot and heat on medium heat until the onion is translucent.

One your your onion mixture is nicely sautéed, add your squash cubes in and stir until everyone is nicely acquainted.
Then, pour your vegetable stock into the pot. The amount of stock you'll need is relative to the size of your squash. You should have enough liquid so that some of the squash is slightly uncovered.
It should look something like this:

Raise the heat, bringing the pot to a boil and then lower and let simmer for about 20 minutes.
**********************************************************************While the squash is hot-tubbing, you can prepare the coconut milk.
When you buy canned coconut milk, it's going to split between the water and the cream. We need to combine these to get the velvet texture that coconut milk is so famous for.
If you open the can with the cream side up, pierce through to the bottom of the can with a knife. It'll have the texture of butter.
Gently poke into the cream a few times until it starts to chunk into the water under it.
Once it's loose, you can pour the contents of the can into a bowl and use a fork to combine the cream and the water until it's smooth. It should look like this:

************************************************************************
After 20 minutes, check your squash with a fork. It should be soft when pierced with a fork. If it's still slightly firm, let simmer for a few more minutes.
Maker sure to check a few pieces of squash especially if your cubes came out to different sizes.
Once the squash is done, add your coconut milk.

Stir to combine.
If you have an immersion blender, blend the ingredients in your pot until smooth.
************************************************************************
If you don't, use a ladle to transfer the ingredients of the pot into a blender. You'll have to go in batches so have a large bowl aside to pour the blended soup into so that you can refill the blender.
After your soup is blended, pour back into the pot.
************************************************************************
This is the time to check for seasoning. Taste test!
I added more salt, a tsp of powdered ginger and garlic powder, and just a dash of cinnamon.
You season as you see fit. Make it your own.
Serve immediately and garnish if you're feeling as fancy as I am.

Unless you have a small army to feed, I suggest halving this recipe.
Or, if you have hungry friends like me, you can gift it! Soup makes a great present, especially when everyone is feeling the bitterness of the looming winter weather.
I sincerely hope this recipe fills you with warmth and prepares you for the holiday season.
Until next time, live and eat will!
0 notes
Text
Feeling Occu-pied? Let's Bake Your Stress Away
"We must have pie. Stress cannot exist in the presence of pie." - David Mamet
Is anyone else feeling overwhelmed, burnt out, or strained as of late?
I have found myself awfully tired of my workload and routine these last few weeks. When I feel like this, I know it's important prioritize my mental health. This means taking some time out of my schedule to do something that makes my heart happy.
Baking makes my heart awfully happy. Especially when there's fresh, local fruit involved.
***
This week's fresh, local fruit is sponsored by Reggie's Veggies, an adorable roadside produce stand in Meridian, Idaho.
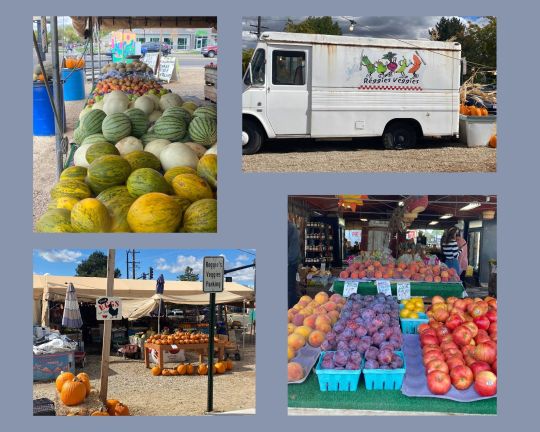
Reggie's Veggies is somewhat of an illusion. When you drive up, it doesn't look like much. But once you enter the tent, you are completely surrounded but a plethora of fresh, locally sourced fruits and vegetables.
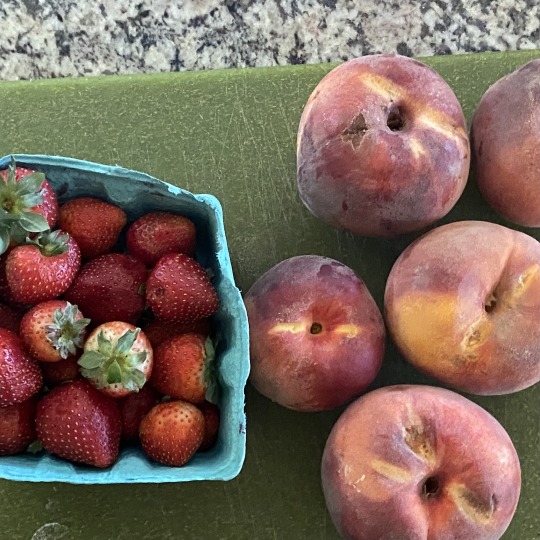
As I toured the stand looking for inspiration, the fresh strawberries caught my eye right away. They looked as sweet as candy and were picked right down the road.
While I reviewed those, the smell of peaches filled my nose. My inspiration had been found: a peach strawberry pie.
And, without further adieu, here is a step-by-step guide to a pie that will surely help bake your stress away:
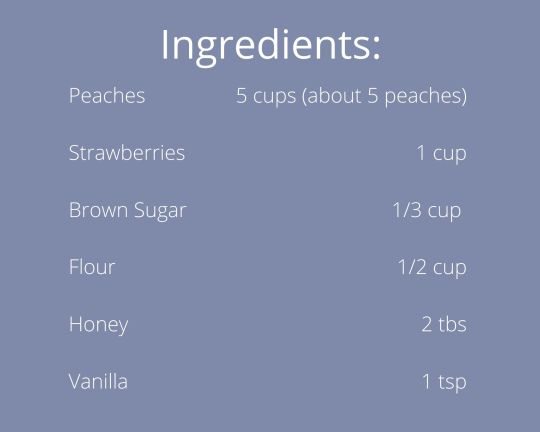
The thing I love most about pies is that you can fill them with pretty much anything. As long as you have these simple basics stocked in your cupboard, you're ready to go.
I went with peaches and strawberries this time but you can use any fruit you desire.
***
First order of duty: preparing the fruit.
After washing the strawberries, I cut the tops off then quartered them. When handling the smaller of the bunch, I just left them halved.
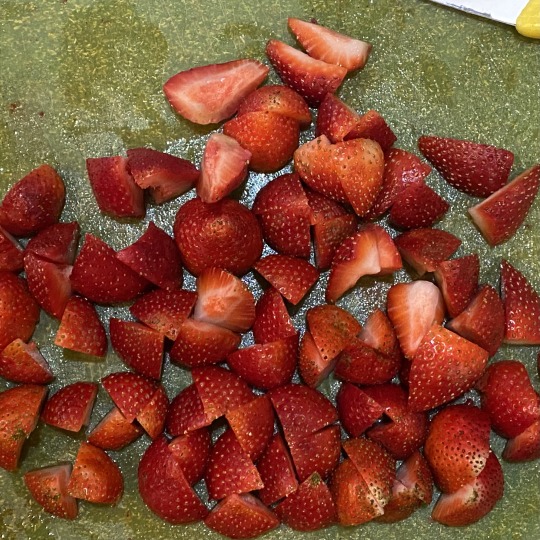
Easy peasy.
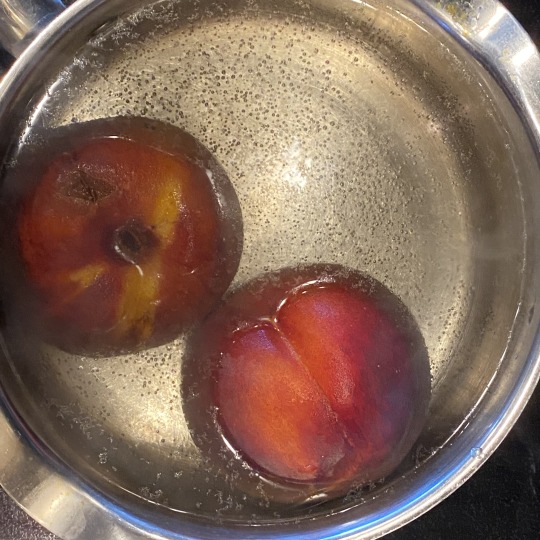
Now the most difficult part of this recipe: pealing the peaches. (That was for effect, it's really not that hard.)
Start a pot of boiling water. While you wait (DON'T WATCH THE POT), slice an X at the top of your peaches. Once the water is rolling, drop in two at a time and them sit for a minute or two depending on their ripeness. More ripe = less time in the hot tub.
Then, pull them out and plop them in a bowl to cool to touch. Once you can handle them, peel the skin off with your fingers using the X you drew at the top. The skin should come off easy. If it's being stubborn, use a pairing knife and cut whatever skin refuses to come off.
Here's a quick video with extra tips on peeling.
Once your peaches are naked, it's time to cut them open and slice them up. (Sorry peaches.)
To pit, use a spoon and dig under the middle part of the peach. I like to get the entire center out, red flesh including, to avoid bitterness.
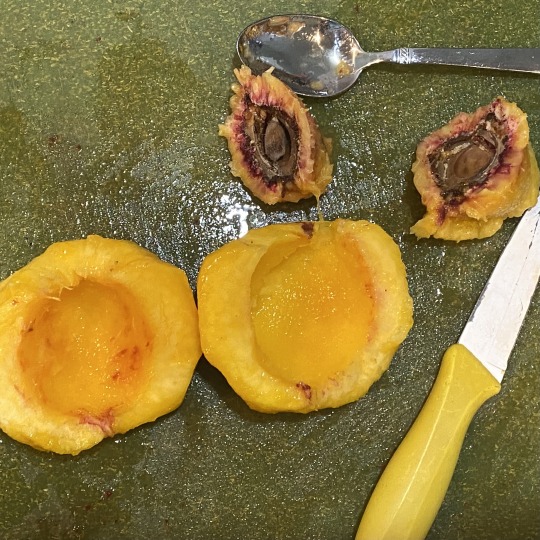
After the peaches are hollow, slice them however thick or thin you want. I wouldn't recommend cutting thicker slices than 1/3 of an inch, though, in order to make more room in your pie dish.
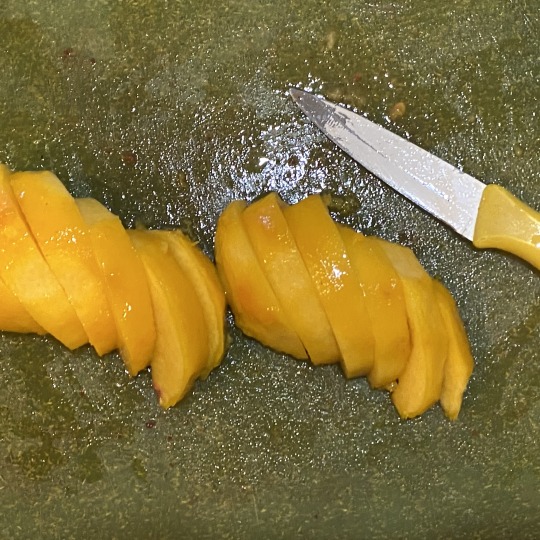
Peaches: DONE.
Now we can put everything together.
In a large bowl, add your prepared fruit and the rest of your ingredients.
Give everything a good fold over with a spatula until it looks something like this:
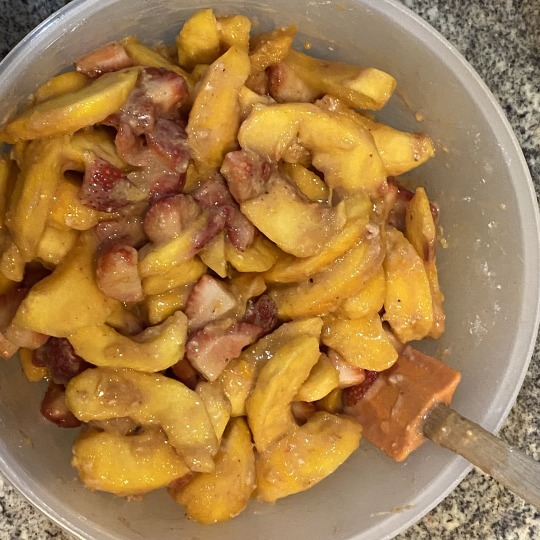
The main contents of your pie is done.
***
Now, onto the crust.
I typically buy frozen pie crusts because they're as easy as... well, you know. They're already rolled out to size and ready to be baked.
This time, however, my sweet grandmother made me some pie crusts. All credits to her ode.
If you want to make your own pie dough, all credits to you. Here's a link for an easy recipe.
Once your dough is rolled out to size, place in your pie dish and tuck the hanging edges under.
After your base is laid, you can fill the pie dish with your peaches and strawberries (or whatever fruit your using).
For the pie top, I decided to go with a lattice. You can leave your pie open or place an entire 2nd pie crust over top (just make sure to cut an X in the middle for air flow).
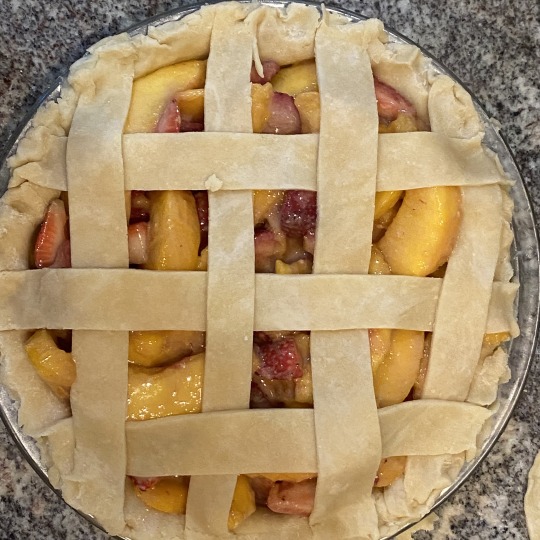
Here's a link to how to make the lattice design (it's not rocket science).
And here's some more extravagant crust designs for those feeling adventurous.
If you are topping your pie, make sure to brush with egg wash and dust course sugar over top before putting in the oven.
Once your pie is done to your liking, put it on a baking pan and then into a 375 degree oven for 50 minutes - 1 hour.
Watch your pie. When it's finished, it should be bubbly (peach pies especially) with a slightly tanned crust. Browned but not dark.

***
I sincerely hope making a pie eases your worries as much as making this pie eased mine.
I feel refreshed, and full of pie, so life doesn't seem so daunting anymore.
What are some things that you do that help you prioritize yourself? What do you like to do to get away from the stress of your everyday? Let me know in the comments.
Until next time, live and eat well!
2 notes
·
View notes
Text
Spaghetti Squash to End the Summer
Has anyone ever asked you the "if you could only eat one thing for the rest of your life, what would it be?" question?
My answer will always be pasta.
From boxed mac and cheese to the fanciest carbonara, noodles and sauce has always been my meal soulmate. And even though I love to eat pasta, I really hate the way that it makes me feel.
The problem? Noodles.
Complex carbs are not the best for our bodies and especially for those of us who's stomachs lean on the more sensitive side. For myself, often one bowl of those gluten sauce vessels will have me holding my stomach in regret.
The solution? Trying something lighter and non traditional.
Enter the spaghetti squash. Even if you've never heard of it before, you can tell just by the name that it's going to be a good pasta noodle alternative.
Golden and oval shaped, you can spot a spaghetti squash pretty much anywhere that you find produce.
Like most squashes, they aren't hard to grow don't take much work to prepare.
When I was craving fettuccini alfredo but flinching at the thought of digesting thickly cut noodles after dinner, I knew exactly what sub I was going to throw in.
Here is my spaghetti squash alfredo:
The easiest thing about spaghetti squash? Preparing it.
Heat your oven to 400 degrees.
Using a large, sharp knife. Cut your squash in half by starting in the middle and pushing down until your knife hits the cutting board.

Using a spoon, scoop out the guts and seeds until it's clean.

Wash the inside of the squash with olive oil using your hands and sprinkle generously with salt and pepper.

Place each half onto a baking sheet face down and then into the oven.

Cook time varies per squash. After 30 minutes in the oven, poke the top of the squash with a fork. If the fork punches into the skin with little effort, it's done. If the flesh of the squash still feels firm, leave in for 5 more minutes and check again. I caution you against over cooking, this will make the squash mushy and the texture will be ruined.
After your squash has been roasted, take out of the oven and flip on the pan so they're open-side up. Let sit for 15 minutes to cool down.
Then, using a fork, start to shred the meat of the squash. It should come off in strings that look a lot like spaghetti noodles.

After you've collected most of the meat from the inside of your squash, put it into a large bowl and toss with a tablespoon of butter to loosen the noodles.
*I added 1 minced clove of garlic at this step for more intense flavor.

I bought fresh alfredo sauce from my local grocery store, but feel free to make your own. (It's fairly simple, here's a link to one of my favorite recipes.)
Toss your squash noodles with the sauce, add 1/4 cup of parmesan, and taste test to determine if it needs salt or pepper.
For protein and a little more substance, I sliced some mushrooms sautéed them in a large fry pan with 3 tablespoons of butter and a clove of minced garlic over medium heat for about 15 minutes.
*For meat eaters, I would suggest grilling a chicken breast and serving mouth sized pieces over for a lighter version of chicken alfredo.

Place your desired portion size of the alfredo'd squash noodles in a bowl, top with your protein and a little more cheese and enjoy!

I collected my produce for this post from the Old Fashioned Fruit & Veg market on Broadway, Ave in Boise, ID.

This market is the epitome of fresh, seasonal and local. They feature as many fruit and vegetables as you can find in a grocery store and their own brand of salsas, jams, syrups, sauces, and canned goods.
My favorite part about Old Fashioned (besides the smiling cantalopes)? The prices. I picked up a spaghetti squash, 20 mushrooms, and a head of garlic for $7.50. Add the price of the alfredo sauce from the store, I only spent $11 on dinner that fed my boyfriend, his roommate, and myself.
Not only will you spend less money getting your produce at a local market like this, you have the opportunity to enjoy the flavors that are local to you at a much fresher rate.
Shopping at farmers markets have benefits like these and so many more. Read this article to find out more on why supporting your famers markets are so important and will benefit you as well as your community.
Leave a comment to let me know how your spaghetti squash comes out or ask any question that I wasn't able to answer in the recipe!
Let me know what kind of fruits or vegetables you'd like to see featured in my next post. I'd love suggestions of preference, or any fruit and veg that you might be intimidated to cook.
Until then, live and eat well!
5 notes
·
View notes
Text
Welcome to My Kitchen!
Greetings to those who have stumbled across my site. Whether it be by accident or on purpose, I am delighted to have you here.
For the first post on this blog, I’d like to introduce myself as an ametuer chef with a lot of promise and passion in cooking, specifically with fresh and locally sourced ingredients.
I live in Boise, Idaho and have for my entire 22 years on this planet. I consider Boise to be the perfect location to base a cooking blog out of souly because of the resources available from *literally* my back yard.
There’s lots of farmer’s markets within walking distance to my house, including the locally famous Boise Farmer’s Market that features local farmers and gardeners who bring the sweetest, ripest and most aethetically beautiful bounties to downtown Boise every weekend.
This blog will follow my adventures to various farmer’s markets (or to the occasional neighbor’s garden). I will post pictures of my experiences and each week will choose one ingreident to star in a recipe I’ll write from scratch.
I’ll include a step-by-step guide for each recipe, keeping it simple and easy so that you won’t be spending more than 30 minutes in the kitchen before you’re ready to sit down at the dining table.
I’m hoping that each post will encourage everyone to skip the produce section at your next big grocery store and visit the local markets at your disposal.
I’ll also throw in some evidence as to why shopping at farmer’s markets is better for our planet, starting with this article from the Farmer’s Market Coalition.
*Disclaimer: I am vegetarian so all of my recipes will be sans meat. Even so, I’ll still add some suggestions for what could be added to each recipe to satisfy my meat-eaters.
3 notes
·
View notes