#yarn dyeing basics
Explore tagged Tumblr posts
Visit Tumblr Blog
Explore Tumblr blogs with no restrictions, modern design and the best experience.
Last Seen Tumblr Blogs


Fun Fact
Celebrities use Tumblr as well.
Note
pls recommend a true beginners first crochet project
I really like washcloths because they're small and you can start with a single crochet stitch and work your way from there. Cotton yarn is pretty cheap too, though it isn't stretchy. If you're struggling too much with cotton, blanket squares are another option that can use any yarn.
This tutorial has good pictures.
What I did to learn each crochet stitch was use wikihow because each step is in gif form. Videos were too fast for me and still images didn't make sense. They have guides for everything from making a chain to more complicated ways of starting a project like Magic Loop.
#you can also get white or natural cotton yarn for this#and learn dyework while you're at it!#pro chemical and dye has good samplers that have the basics in small jars
28 notes
·
View notes
Text
#adventures in knitting#knitting#yarn stash#yarn stash questions#yarn dyeing#does dyeing existing yarn in your stash#count as acquiring more yarn??#I would have to actually purchase a pattern to do what I want with the alpaca#and it’s more complicated than a basic top down raglan#idk#i am not sure the alpaca is really the same as a basic merino#the merino is hardier#hmmmm
46 notes
·
View notes
Text
& now i get to bind off that sock tomorrow yippeee even tho ill prolly frog it if the second one comes out different from having yarn with actually consistent twist
#but like. im knitting to get better at knitting basically#and its just a vanilla sock so who care#ik it made my rows per inch larger/i had to do more rounds that i shouldve with this yarn comp but this is also my first pair from this dye#so maybe but like. i think its the same base
1 note
·
View note
Text
fiber arts really is such an insane category of Things in how it can draw you in. like, 6 or 7 years ago i learnt to crochet and made a few terrible hats and scarves. then i learnt to knit because i wanted to knit a scarf for my friend (now fiance :D). then i realized it should be a woven scarf so i picked up weaving instead, but i still really liked knitting so now i was doing 3 crafts. somewhere along the way i started dyeing yarn as part of my kitchen experiments, and then i was like fuck it i wanna make my own yarn ! and that is where the problems happened. in the span of like 5 years ive acquired like $2000 of various tools (spinning wheel, combs, cards, blending board, several looms, etc), bought dozens of fleeces, and now my bedroom is basically a craft room with a bed, i have wool covering every flat surface in there as well as a huge dresser full of wool and several large drawers full of wool, i meticulously scrape every last bit of avocado out of the peel so i can use it to dye fleece, and i don’t go anywhere (including in my own house) without at least 2 knitting projects and a spindle.
im not complaining or anything, but the rapid shift from ‘guy who does stuff, idk’ to ‘guy who is worryingly obsessed with wool and will infodump at length about medieval sheep husbandry and the history of nettle as a textile if you give him half a chance’ is like. extremely funny to me.
#this is what happens if you mix adhd autism and wool i think#its got the Textures. its got the stimmy movements. its got the Things To Do Idly With My Hands So I Don't Start Dislocating My Thumbs#like. its crazy#sorry the edible hit like halfway thru writing this#idk where i was going with it xD#spinning#and yes ives youre to blame for 90% of this i think#<3
9K notes
·
View notes
Text
Preface this that this is about Destiny 2, a video game, so none of this actually matters. Just hypothetical ravings of a fiber artist with a bit of knowledge about historical things. So like I keep having thoughts about textile production during the dark ages after the collapse. (Specifically at Felwinter's Peak, but hold that thought). We have such varied descriptions of what survived the collapse. People are depicted as wearing basic tunics and dresses that would not look out of place at an SCA event. Technology is primitive, except they still have guns that they up keep and have ammo for, Shaxx is described as sealing his keep with an artificial sealant. So things are so varied and random. Like did spinning wheels exist still? They obviously don't have access to industrial machines, but are they just spinning everything on drop spindles? (Making me question how much work it would take to keep all the freaking iron lords and wolves on that mountain clothed.) For that matter, do they still have acid dyes? Or are they relying on natural dyes? Dye materials used to be highly valued, you can't tell me warlords wouldn't be fighting over this stuff (which also brings up Spices being fought over likewise). I mean you could hand wave everything by saying "golden age technology", but that shouldn't be half an interesting. We do have the Strand lore book where Osiris talks about using a spindle when during the dark age they had to make everything from scratch, which supports that line of reasoning. So no spinning wheel, only spindles. Cloth production takes so much freaking time when doing everything from scratch. With a spinning wheel it takes me hours to produce a few hundred yards of a thicker yarn for knitting, I'm not incredibly experienced, but it takes so incredibly much more time on a spindle. And you need so much yarn to be able to weave cloth of any yardage. There's a reason women in paintings used to be depicted with spindles and distaffs so often. For that matter, what sorts of looms were they using? If they didn't have spinning wheels I'm guessing advanced looms are out as well. So rigid heddle looms? Warp weighed looms? The second would make more sense, but also takes so much time and you can only weave cloth so wide. It's limited by the arm span of the weaver. So narrow fabric, so even more yardage needs to be made. We're not even at the sewing stage yet. I discussed dyes earlier, but it would be important. Even in the actual medieval times clothes weren't all brown. Natural dyes tend to fade faster though. Black dyes were really hard to produce, and they fade fast. Then sewing would be by hand, I doubt there are sewing machines if they don't even have spinning wheels. Sewing by hand takes *forever* even if you are fast. There are tricks to making it go fast, but you're not producing an entire garment in a day, especially if you have anything else going on. For that matter you really care about mending in this environment. Also knitting and crochet? Technically those take longer to produce a garment than weaving and sewing. I know Zavala learned knitting from Safiya in the dark ages, so it did survive.
I think I'm at the end of my ramble, I'll add if I can think of anything else. I'd love to hear other people's opinions.
#destiny 2#this is a stream of thought sorry in advance#fiber arts#sorry for all one paragraph I'm on mobile
61 notes
·
View notes
Text
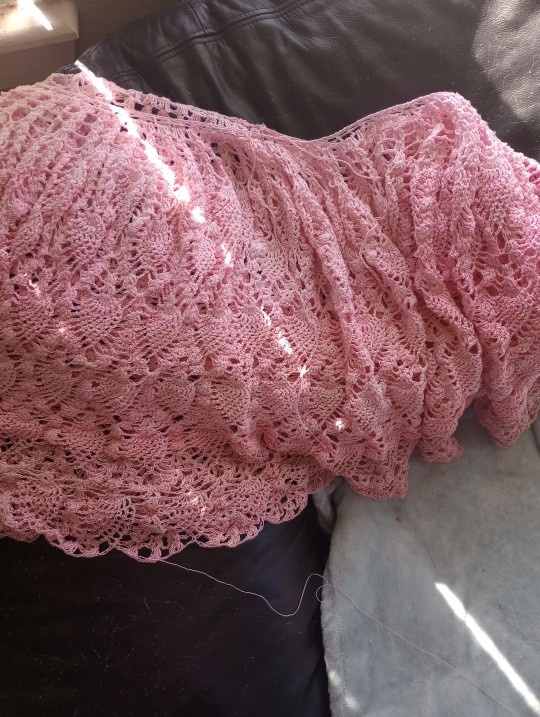
So, here's an update on the crochet skirt I'm working on.
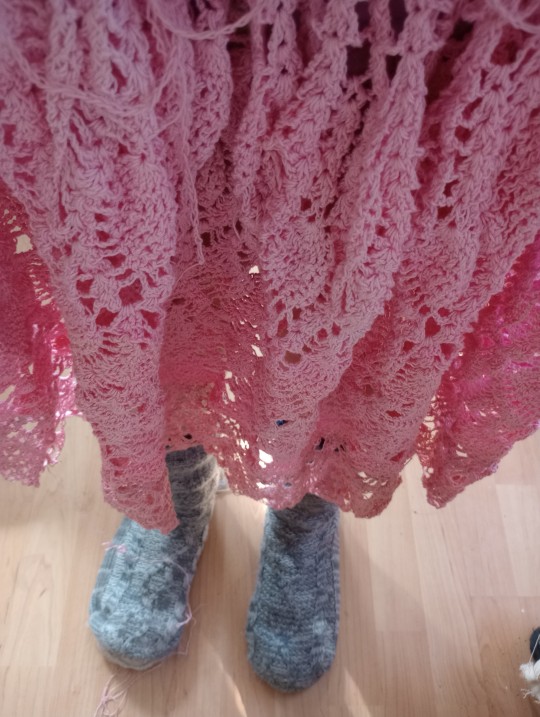
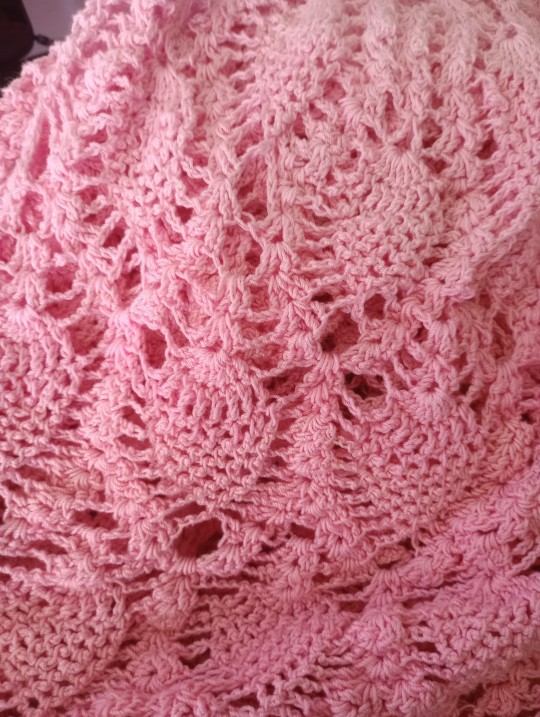
It's almost mid-calf length. I want this skirt to be long so I'm almost done but not quite. If you were to ask me when I started and how long it took? I genuinely don't remember. It's not perfect, I got confused up at the top (I can't read crochet patterns very well, but I can figure out what they mean by looking at images) but I think that works in its favor.
Here was a picture I took from the last time I updated it.
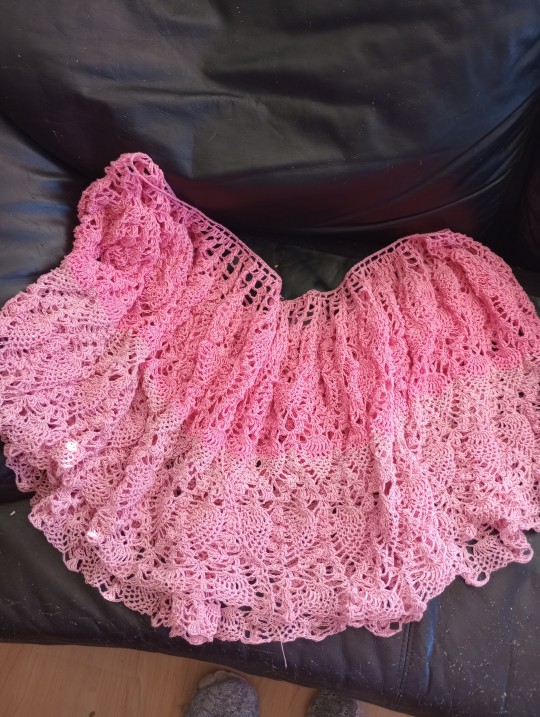

I had this darker pink yarn around and I used it, and I was planning to use dye remover and diluted bleach to lighten the pink. I accidentally removed damn near all the pink, which caused me to go to Michaels, buy more dye and correct it. And it came out to a gorgeous gradient, so I'm excited.
I don't know how long I've been working on this (I can't remember when I started) but I make a point to put in stitches every day. My goal is to have it done by the summer.
It's very hard, very intricate but worth it. I've been crocheting since I was nine years old (almost 30 years!) so while it's pretty hard, the stitches are pretty basic, lots of chain and double crochet stitch (half treble if you're in the UK).
223 notes
·
View notes
Text
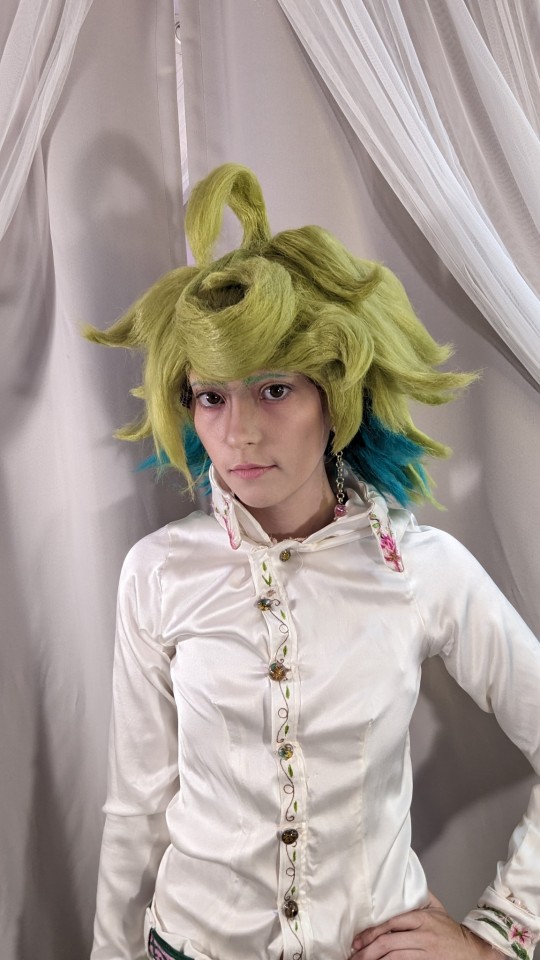
Pst! You know what time it is? New cosplay time! I decided to remake one of if not my favorite cosplays in my collection, Naven Nuknuk from Epithet Erased


This has been by far my most time consuming build (as well as expensive). this cosplay took a total of 279 hours over the span of roughly 8 months to make. That time doesn't include redoing sections or details that didn't make it into the final look.
And now for a detailed look at this whole outfit because dang, I put so many tiny details in.
Starting off with the earring and beads, I used a tequnic called lampwork to make them. The best way I can explain lampworking is like miniature glassblowing
Lampwork uses glass rods heated in a flame to create generally small pieces like beads or buttons. Lampworking can be incredibly detailed. While I'm still fairly beginner at all of this I was able to learn a tequnic called implosion to make the flowers look more 3 dimensional. I also used lampworking to make the buttons on the undershirt!
I did all the 3d modeling for parts like the glasses and the belt buckle. (Stealing pictures from my Instagram because the progress tracker i use corrupted my images)
While I don't usually focus on the 3d modeling in my builds it's a huge passion of mine. After making a model of the belt buckle I put my 3d print into casting clay. After carefully removing it I poured tin in to make the final belt buckle.
I also taught myself basic leather working and tooling to add some apple blossom inspired designs onto the belt and painted it.
Next thing I think I should talk about is the embroidery. I wanted to incorporate more details about naven into his outfit. After asking jello some questions we came to the conclusion that the embroidery should be lillies and carnations. Because of my constant insanity I hand embroidered everything. I also did some embroidery on the pants and used an embroidery floss that changes colors in the sun for fun.
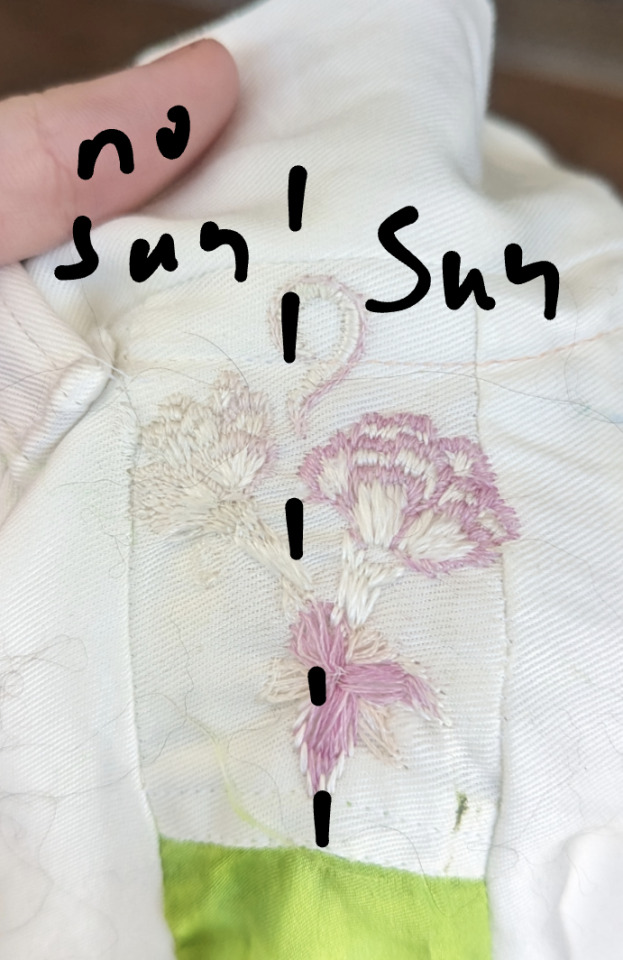
Before I get any questions about materials I'll add in, the white shirt and embroidery are both silk. I struggle to embroider with cotton dye to the sound and feeling it makes, and I felt like being fancy so silk shirt too. The pants are a cotton twill (pretty much jean fabric without the indigo) and the green strips are silk. A perfect Segway into the tatting and knitting!
For those who don't know tatting is a traditional form of lace making found in many different places around the world. There are 2 main forms of tatting, needle tatting and shuttle tatting, I tend to use shuttle tatting due to how nice and portable it is. I thought tatting would be fitting to add to navens outfit due to it's other name, farmers lace.
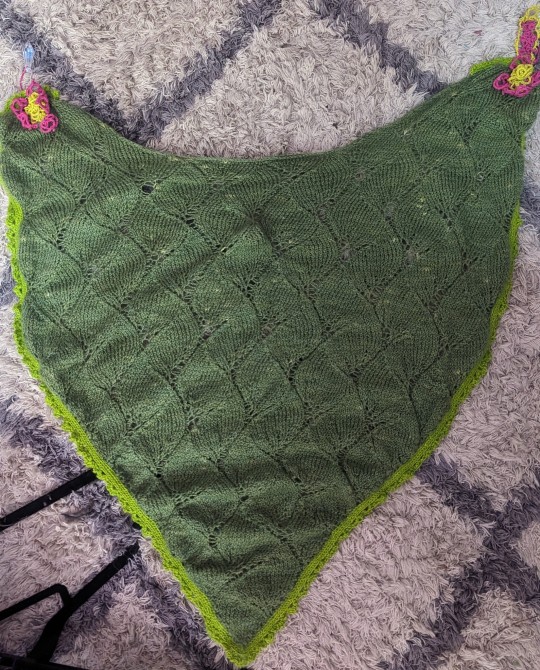
And now for the big beast of this outfit, the knitting. Like with everything else in this outfit I dyed the yarn myself. It's 80 percent wool to 20 percent silk blend.
Huge thanks to jello for suggesting so many ideas, this outfit wouldn't be nearly as cool as it is otherwise.
Anyways I hope all y'all like the outfit! I had so much fun making this insanity
#naven nuknuk#naven nuknuk cosplay#ee naven#epithet erased#epithet erased cosplay#prison of plastic#prison of plastic cosplay#anime campaign#anime campaign cosplay#cosplay
503 notes
·
View notes
Text

@yeetbean hello! Iris Complex is a horror mystery webcomic written by Josh Tierney that I worked on! :0 it's about a girl who wakes up in a field with no memories and has to figure out what the heck is going on. there's worms, a guy who's a smash hit with the guitar, and demon noodle dogs! you can also read the whole thing now on webtoon :O

I got these back to back haHA and yes I have I enjoyed it a lot :'D I loved seeing weird little creatures/speculative biology

@pien-art hullo and awhh thank you! and ooohh nice! and oh man I don't know anything about dyeing haha; I've gotten my yarns from daiso, ebay, etsy, facebook market, local thrift shop, WEBS yarn website (basically lots of different places haha) for the wool strips/sari ribbon I've only gotten them from etsy so far. I tend to try and get yarns that are variegated/multicolor (noro yarn has some really gorgeous multicolor yarn but they can be pretty expensive hence me looking on etsy/ebay people will sell them at a discount sometimes) plus in general you can find a lot of good deals/discounted yarn on etsy

oh! :O congrats on finding me ahaha omg and yeah course! it's up on inprnt over yonder
speaking of rug hooking I stg there was another ask about rug hooking but I might've accidentally deleted it? >:'D apologies. it was something about do I tend to buy multicolored yarns only/how many different types of yarn go into a piece (I think). and yes I tend to get the multicolored/variegated yarns (which I chop up and wind into little balls of the individual colors to make it easier for myself when I do projects haha). as for how many types I honestly wouldn't be able to say ahhsa; the leafy one the main body was pretty much all one type of yarn with some minor details in another yarn while the background was made up of a lot of types but it honestly depends.
#saturday asks#you can't unsend asks right? hdffhgkj#unless my dumbass brain already answered that ask but I don't think so#asks#I was cackling when I was typing out the iris complex blurb mjhg#if you've read it you know
93 notes
·
View notes
Text
Alrighty so this is the post on lichen dyes!
this particular bath of lichen dyes was originally started over a year ago scraping a tentatively-ID'd lecanora and/or ochrolechia genus lichen off of a fallen branch (remember, don't gather lichen when it's still growing! it's very slow growing and easy to overharvest)
to start off, this particular type of dye is made through the ammonia-fermentation method, also known as ammonia maceration. No actual bacterial fermentation occurs though. Rather, the compound orcinol (and precursor compound to orcinols) react with ammonia (N2) and oxygen to form the compound orcein (also called orchil/archil) which is what makes the final dye!
this process takes anywhere from 3 weeks to 16+ weeks depending on the lichen species, its constituent acids, the temperature, and the frequency of aeration.
This batch was set aside for several months and neglected a good bit, but it still works. I strained out the crumbled lichens (which i set aside for later) and diluted it 1:4 as instructed by a very good book called Lichen Dyes: The New Source Book by Karen Diadick Casselman. This book is basically omnipresent everywhere you see lichen dyes mentioned, especially the orcein-based dyes. I also used several websites/videos/papers and such that i've hunted down over various internet crawls.
I use an old coffee pot for this as it's both a non-reactive material (glass) and is built to withstand heat. Ironically i also scraped the lichens off the branch using a tool i made out of a metal band from the broken handle of this same coffee pot!

I decided to dye some eri silk cakes that i fluffed up and scoured. these have been very good at absorbing dye in the past so i would hopefully get a good result from them. As lichens are a substantive dye i don't have to put a mordant on them, but i did soak them in an alum solution just before adding them to the dye bath to hopefully maximize dye uptake as well as improve fastness as lichen dyes are also fugitive and can fade in sunlight.
Substantive dyes contain mordants already embedded in them; fugitive dyes are a bit fuzzy to me but my understanding is they end up trapped in the fiber instead of actually bonding to the fiber in a stronger way. Mordants are used to help the dye "bite" onto the fiber better, improving both fastness (the ability of a due to resist fading from sunlight/washing/time) and the brightness of a color. Alum is useful in that it typically doesn't affect the end color of a dye more than simply making it slightly more strong!
it was pretty successful i'd say! i warmed up the dyebath, added the silk, let it simmer for a few hours, let it cool down overnight, and then warmed it back up the next day for a few hours; then, when it cooled, i took it out, let it dry, then rinsed it, and let it dry a second time. At that point, it was ready for spinning!
It was a lovely pink color that's not fully captured by the camera like most dyes, and eri silk is lovely because you can spin the clouds directly and easily without carding and make lovely relatively threadlike yarn

this was the first skein i got! i love how shiny the silk is. Some dyes can get really purple or even magenta-like!
next, i had the leftover lichens that i had set aside. They were a crumbly texture and dark black and i dried them out, crushed them up more, set them back in a jar, added more ammonia and water, and did the ammonia fermentation method a second time! this was after reading about the method for making french purple, and while this is definitely a very pale imitation of the method, the double-soak is the key feature here
here it is (on the left); it was already way darker purple than an in-progress lichen dye i had yet to crack open and use

speaking of which, heres a shot of various test lichens i had while working on this, you can see the blue-capped jar that has the second-soaked lichens. the foam will often give a preview of whether or not the dye will be red/purple or not!

Here it is, i forget how long i let it soak but i think it was a bit over a week. i strained the material out, diluted it, and then repeated the same warm/cool/warm/cool/dry/rinse/dry method with more eri silk

And below you can see the difference, it's definitely slight but still cool!

the left is from the original dyebath, the right is the second-soaked one. the first one is more salmon-colored while the second is a tad more blue-purpled!
I'm extremely excited about this, these dyes have such a fascinating history and have multiple historical uses everywhere from florentine orchil to norwegian korkje to scottish cudbear and more, and it was often used in tandem with the roman murex/tyrian purple dyes that come from a mussel. Some folks used the lichens to pre-dye the fabric before dyeing with tyrian purple, both to stretch the expensive tyrian purple and to make the end color more vibrant. It's all such a great topic that's mightily confusing and could take up a post of its own, same with the underlying chemistry of what makes these dyes work in the first place!
Anyways that's all for this post, i have more i'm working on involving actually turning these dyes into paint that i'll hopefully turn into a post on its own soon! I've also got other lichen dyes I'm waiting to get through the ammonia fermentation process that will hopefully give other colors, whenever that may be!
#lichen dyes#ammonia fermentaion#handspinning#natural dyes#eri silk#yarnmaking#fiber arts#vegetable dyes#orcinol#art#orcein#archil#crafts#yarn#silk#drop spindle
684 notes
·
View notes
Text
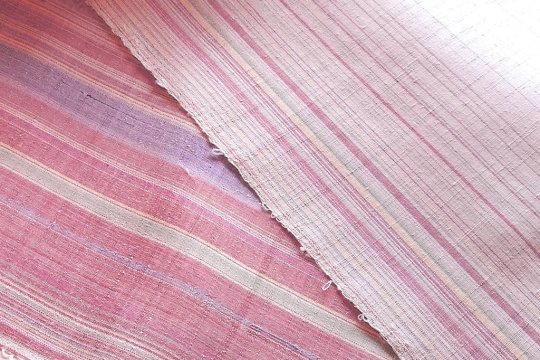
I want to talk about the stripes I make.
According to a book, there are 270 names for striped patterns in Japanese. Thousand stripes (sen-suji), ten-thousand stripes (man-suji), with kids stripes (komochi-jiima), twin stripes (futago-suji), fall stripes (taki-jima), bonito stripes (katsuo-jima), benkei stripes (benkei-jima), wickerwork stripes (ajiro-jima), etc., etc., etc.
Among these, I basically make random stripes, called “yatara-jima”.
Yatara-jima have no regularity in the arrangement of the stripes, and were originally woven to finish off the threads left over from weaving, and originated mainly for women's kimono.
Yes, weaving always produces surplus threads, but that does not mean that a regular number of threads can be taken.
If that were the case, it would be more fashionable to arrange them randomly... nowadays, but I think it's amazing that the people who first made them ( I suspect that they were everywhere in private kimonos) and put them on the market are so amazing.
I think there were people who thought it was interesting and stylish... but I wonder through what channels it spread. I wonder if it was a marketing strategy at the time to have ukiyo-e paintings of beautiful women drawn, or if the models happened to be wearing them. It’s similar to influencer marketing or buzzing on SNSs!? I can imagine all sorts of things.
Taking these cloths as an example, I used 19 different threads in total: three red, three yellow, five green, three grey, three purple, one off-white and one non-dyed white.
In my case, I of course use leftover thread, but basically, as in normal weaving, I have a design first and then prepare the thread. To be more precise, I have the design, dye the necessary colours, take some yarns out of the chest, lay them out, look at the colours and readjust the design. I use two or three threads of the same colour to create shading or variation in the slightly thicker stripes.
But sometimes I feel that I have made a mistake, because when I add the weft yarn, there is not much difference, and in some cases it is a newly dyed yarn, and I feel like, "Wow, give me back my time!" Sometimes I feel like, “Wow, I want my time back!” I'm not experienced enough …
It is actually very difficult to distinguish between the two types of red cloth.

It's not so much about making stripes, but more about the colour composition of the kimono or the shape of the cloth, so it may be a slightly different way of making it.
The right two madders look different, but...
-------
I used the same warp (silk) as this cloth and hand-spun ramie yarn as the weft, and of the 19 colours... 15 are included.
Red: Indian Madder (strong&pale), Sappanwood
Yellow: Amur Corktree (strong&pale), Gardenia
Green: Ōbaku x odour wood (two light varieties), Green leaf extract powder, Japanese Pagoda Tree x Indigo (strong&pale)
Grey: Cochineal (strong&pale), Sawtooth Oak
Purple: Cochineal, Lithospermum Erythrorhizon (strong&pale)
Off-white: Walnut
267 notes
·
View notes
Text
Things are hard. Things will be hard for a while, but you are never alone. This blog was just for art, but as an LGBT adult invested in community and support, I wanted to make this for whoever may need it.
Very simple crochet pattern for a 4 color pride flower in the situation which it may not be safe for an individual to wear explicitly pride items.
I sincerely hope that some of you may find this helpful in some manner. You do not have to give up who you are when you are afraid for your safety. This can be passed along as a simple rainbow/colorful/etc flower in times when you wish to still show pride colors but not necessarily be recognized as such by general public.
Continue beneath the break if interested for steps and pictures
Most pride flags can be simplified into 4 colors, and if not just know you can add a number of extra base magic ring stitches to equal the number of petal colors you desire, though be aware they tend to become quite crowded. For this, let's assume the 4 petal / 4 color standard.
You will need any size hook, any color yarn such as white (which can be colored with marker) or the pride colors of your choosing, no stitch markers and assumed extremely basic experience. These can be made singly or in bulk in a very short time. I have tried to describe the steps in as much detail as I can to allow for readers who may not be proficient at crochet, I apologize if I tend to "over explain" the steps. I will include images.
1: with scrap yarn or a color that will not be the same as the petals, create a magic circle (this can be a little difficult at first but Google is a great help in getting a visual guide)

In that, place 4 single crochet stitches. Pull the tail and tighten. You can put a slip stitch in the next (what would have originally been the first of the magic circle stitches before you tightened it) and change the color of your yarn to the first petal color.


You will have a little circle with 4 stitches in it. In each of these 4 you will repeat these steps exactly, changing the color of the yarn if needed:
ALL WORKING IN ONE OF THE 4 MAGIC RING STITCHES
1. Chain 3
2. In the base magic ring stitch, Double crochet
this is essentially a single crochet but you wrap the yarn around the hook before entering the base magic circle stitch. After you pull through, you will have 3 loops on your hook. Pull through 2 at a time (pull through 2 loops, 2 times) until you are left with a single loop on your hook. This creates length, looking like a chain of vertical stitches.
Wrapping the loop around the hook and after pull through, before finishing the stitch:


3. In the base magic ring stitch, Treble stitch
this is essentially the same a s a double crochet but you wrap an extra loop (for a total of 2 wrapped loops plus the loop of the last stitch) around your hook before entering one of the four magic ring loops. Pull through 2 at a time (pull through 2 loops, 3 times) until you are left with a single loop on your hook. This crates length, looking like a slightly longer chain of vertical stitches.
After pulling through and having 4 loops on the hook, before finishing the stitch:

4. Double crochet as in step 2, then chain 2 on the end

5. Bring the yarn back to the base stitch and Slip stitch,
6. In the NEXT of the 4 base magic ring stitches you made, place another slip stitch in which you switch the color of the yarn to the next color, or remain white if you intend to dye, color in the petal using other methods, want to keep the same color, etc.

Repeat this process in all 4 base magic ring stitches. The end product will look something like this:

I sincerely hope that some of you may find this helpful in some manner. You do not have to give up who you are when you are afraid for your safety. This can be passed along as a simple rainbow/colorful/etc flower in times when you wish to signal to other LGBT people but not to those who may be anti lgbt.
#im not very good at this but i wanted 5o put it out there#especially for lgbt youth#we will not go back#art#crochet#flower#crochet flower#yarn#craft#crafts#trans#lgbt#lgbtq#lgbt community#lgbtq community#america#2024#election 2024#2024 election#trump#harris#kamala harris#donald trump#aesthetic#help
24 notes
·
View notes
Text
Headcanon Crafts for the House of Finarfin
Earwen: a sailor. Yes, I know, the Teleri are the sea elves, but while most of them can manage in a rowboat, only a few are true sailors; able to navigate the Teleri's finest ships, even in rocky bays or stormy waves. And Earwen was the best of the best. She was particularly fond of venturing out where no one had before, seeing everything there was to see on the ocean, though she always turned back to Valinor eventually.
Finrod: a bard. While Maglor's focus was always on the oral history of the Quendi, Finrod preferred to learn folktales and lays, which were often preformed more casually and retold with somewhat improvised lyrics on the fly. By the time of his death, he knew more myths and legends (elvish, mannish, and dwarfish) than anyone else, though most of it remained unwritten and died with him.
Angrod: a spinner. Well, he didn't just spin wool into thread– though he did keep a few sheep, and was very fond of them. He spun thread and yarn from various materials, and then hand made dye to turn it various colors. He valued his work for its rich hues and remarkable resistance to fraying. He was basically the only person whose thread was high quality enough for Caranthir; the two of them really bonded over fiber work.
Aegnor: a dancer; more in-line with traditional Vanyar work than most Noldor crafts. He had the strength and precision for the most complex dances, though he was sometimes a bit awkward when it came to dancing with a partner. Some speculated that he would swear his service to Nessa, as one of the few dancers skilled enough for a place in her halls, but he never did. He always felt there was more for him in life than endless routine.
Orodreth: a gardener. Look, a garden is an amazing work because it's always growing and changing, and it's made in collaboration with nature. Orodreth loved that sense connection with the world around him, and tried to make garden that looked more natural and weren't bound to beds or boxes. His favorite flowers were always tulips. Though it was underground, Nargothrond still had beautiful gardens thanks to some creativity on his part.
Galadriel: a baker, like Finarfin. As a child, she wanted to follow in her father's footsteps and make something that everyone would be able to enjoy; she learned a lot of her craft directly from him. Aredhel would often bring her fresh ingredients from the Valinorian woods. After going to Middle-Earth, she set her craft aside because she had no use for fancy craft work when she had to deal with fighting hordes of orcs and trying to deal with Sindar-Noldor political relationships. Also Finarfin and Aredhel weren't around anyone. She came back to it in the Second Age, and was able to find peace and happiness in her craft once again, although she never lost any of her warrior's skill.
Bonus! Although he wasn't aware of it, Finrod actually managed to make his way into legends and folktales throughout the peoples of Middle-Earth. Though his story was changed over time, he's always remembered as a faithful friend and a ray of light in dark times– and as having a rather impressive amount of fancy jewelry. He learns this all in Valinor, from his conversations with another famous keeper of tales: Bilbo Baggins.
Headcanon Crafts for Finwe and his Children, the House of Feanor, the House of Fingolfin, and the rest of the House of Finwe.
#silmarillion#silm headcanons#house of finwe#house of finarfin#noldor#noldor crafts#finarfin#earwen#finrod#angrod#aegnor#orodreth#galadriel#caranthir#aredhel
99 notes
·
View notes
Text
HEY guess what you can do with wool? That's right!

DYE IT
With food coloring and kool-aid!! And also acid dyes, which are designed for this, but acid dyes can't be used with cookware you put food in, and Kool-Aid packets are 50 cents.
.. did they go up in price? Didn't they used to be 20 cents? Anyway
Tbh a big part of the allure of spinning my own yarn is dying either the fibers or the final product. I just like the sense of independence that comes from going "ah, I need a color, and I have a lot of white and a handful of dyes!". I did this a lot with my posable critters too, though acrylic and polyester are a lot more strict about what dyes will actually work.
(Though tbh? Soaking acrylic faux fur in watered down acrylic paint, waiting for it to dry, and then taking a slicker brush and brushing out the clumps will get you pretty far!)

The evidence of crimes past with that paint permanently on there. I think this fucker is almost old enough to make its own Tumblr account (but not in Australia 8()
I digress! Because I haven't been dyeing acrylic, but KERATIN!
I did actually try dyeing a chunk with the same semi-permanant magenta dye I use on my own hair, cos like. Hair is also keratin.

Actually, it was supposed to be a bisexual gradient from pink to blue, but when it came time to heat set the color, the manic panic blue just fucking vanished.
Lesson learned: Ion Color Brilliance is a good brand, Manic Panic is not.
My bestie has inquired about me spinning the yarn and knitting them a scarf, so I wanted to make what was basically a mockup of the different ways you can spin the fibers to get different colors effects. And also I got Kool-Aid this past grocery visit and have been chomping at the bit to use it.
@sivilityy enables me <3

BEHOLD, MY CHILDREN!
Dyeing wool with kool-aid or food coloring is very easy!
Step 1: Soak wool in warm to hot water with about a 1/3rd of a cup of white vinegar for 15 to 45min. The vinegar is a mordant, something that helps the fibers take up the dye.
Step 2: Mix your dye of choice into a pot of warm to hot water, close in temperature to the soaking bath. The more kool-aid or food coloring, the stronger the color. I was going for pastels, so I used half a pack for the blue and pink, and a single drop of yellow food coloring for the yellow. The purple... 8') We won't talk about the purple.
Step 3: Fish your wool out of its soak, give it a gentle squeeze, then plop it into the pot. I like to scoop out some of the vinegar water and pour it into the pot as well. For insurance!
Step 4: Heat your pot to just below boiling. You want steam, but little to no bubbles. Agitation + heat or sudden temperature changes = felt. You can't spin felt. If you want to to make felt, though, now you know.
Step 5: leave your wool at simmering for around 30 min. How do you know when its done?

it fucking sucks all the color out of the water. How sick is that?! In the few batches I've done, I haven't always gotten it to be clear like that but don't stress it. About 30 min seems to be good even if there's still some color in the water.


Turn off the burner and let your creations cool down in their soup. Or, if you're impatient like me, run your hottest tap water into a different pot, then pour your wool into the slightly cooler but still hot water, so it doesn't get a HUGE temperature shock. Don't use cold water, or you're gonna get felt! Give em a rinse in the hot water to get any extra color out.
Let 'em hang and dry, and you're done!
So far all of mine have felted a little bit? Which hasn't been so bad, I've just needed to fluff them up a little once they're dry. I want to try indirect heat with a steamer basket and see if that helps, but I only got the one basket and 4 colors this time, so I used the pots.
SCIENCE
#Technically art#Hey butters how is chapter 19 coming along#*flips water pitcher* YARN#If you want to try this yourself please look up a tutorial that wasn't written on a phone on Tumblr#I haven't skipped any steps but I didn't elaborate as much as I could have#Tbh I just wanted to show off how the color got complete sucked out of the water#But then my Adderall kicked in
17 notes
·
View notes
Text
fiber arts tutorial links!
I’ve gotten quite a few asks about spinning, fiber prep, and dyeing, and since I’m utterly incapable of answering a question without writing an essay, they often turn into tutorials. I’ve compiled them here for easy perusal ! More will be added as I find and/or write them.
SPINNING
The basics of getting into drop spindles
A comprehensive guide on how to spin on drop spindles
Processing fleece on hair combs to get perfect hand combed top (a cheap fleece processing tool)
How to get your yarn off your spindle
How and why to block handspun yarn before using it
Niddy Noddy sizing
Blocking linen and cotton yarn
How to tell if your handspun yarn is over or undertwisted
Moving from park and draft spinning to suspended spinning
Debugging: roving twists and knots around the edges while spinning
Debugging: compressed roving
The visuals of 2 ply vs. 3 ply
Whittling supported spindles
Very short video-centric guide for supported spinning
FIBER PREP AND/OR DYEING
Steps of fleece processing, including the many methods and tools you can use
What prep to dye in
20 questions of natural dyeing
Dyeing with onion skin
How to clean a blending board
All about mordants
KNITTING
Knitting with chronic pain (more advice from others in notes)
3K notes
·
View notes
Text

The (almost complete) locked tomb mini skein set! Based on the houses.
From left to right: second, third, fourth, fifth, sixth, seventh, eighth, ninth
I am making a first house mini skein, it's just uhhh in the pot.
You can read my notes below the cut and here.
No idea what I'm going to do with these, a scarf has been suggested.
I'm also planning on making socks sets with full skeins of these colourways, but this time that will actually take a while.
Second: Half scarlet red-half white. I wanted it to be perfectly split down the middle but didn't end up getting a sharp enough divide. I also tried to but some greeny - brown in the middle Pyrrha's eyes (and so it doesnt look so candy cane) but I don't really like it so we're cutting it out. That might be the mini in the sock set. Otherwise I just need to do a better job of keeping the white clean. Who decided red and white were good colours for a uniform! It's a logistical cleaning nightmare when the red inevitably bleeds!!
Third: Heavily speckled gold and lilac on a white base. These colours are right up my alley, I love this one. When I make a full skein it'll be on a gold stellina sparkle base.
Fourth: Navy, white and orange variegated yarn. I did re-dye this. Another one where I love the colours, the method of twisted skeins then hand painting then speckling was really fun.
Fifth: Brown base with thick gold speckles. Not really speckles but the technique is called reverse speckling. I need a deeper brown dye and to add more gold veins throughout and it'd be perfect.
Sixth: Boring, pretty grey tonal. No notes, it fits with the house, it turned out nice.
Seventh: Pretty pale green yarn with brilliant blue speckles. I would like to add more blue (and maybe some other pastels) speckles just to make it more flowery. Also because being between the sixth and eighth I want it to stand out more. Tempted to speckle as heavy as the third but I'll restrain myself. Maybe.
Eighth: White base with some silvery patches. I was so determined not to just use undyed white yarn and give the eighth house some love. But I kept overdoing it! When I make a full skein it'll be easier not to accidentally add too much dye but on a mini ... I was basically dipping the back of a spoon into the dye powder, then into the water and it was too much.
Ninth: Handpainted orange and then dyed over in black. I love how dark the black is and how you can see orange and yellow peeking through. It was sitting in the dye for a long time, you really can't hold the Gideon colours down!
59 notes
·
View notes
Note
This might be an odd or personal question, but could I ask how you started knitting and where you started as a beginner? Or what would you recommend? I’ve tried to join clubs and groups irl, but there’s so much drama and gossiping. When I said I didn’t want to take part in that aspect, they started ostracizing and gossiping about me. Any websites, yt channels or books you’d recommend for a beginner?
--
Haha.
My friend, this does not even register on the scale of deeply personal or odd questions people have sent me.
I've been trying to remember exactly how I started and why (like, even before this ask). I think it was on a family vacation to Scotland the summer before I started college. That would have been in 1999.
I taught myself from one of those awful 90s pamphlets with the line drawings. They're a nightmare compared to being able to see someone do the motions in person or even in a video. I had some awful plastic needles and no guidance on yarn and just knit with what I found at some shop there. Do not recommend!
I achieved what I wanted during college, which was to make a nice cable-knit sweater that I still wear, and then I got frustrated with crappy acrylic yarn and drifted away from knitting until a year or so ago.
The fact is, I basically didn't do beginner projects. I moved straight from making one rectangle to making grandiose sweaters or whatever else struck my fancy. (But if you want to know, I was using Viking Patterns for Knitting and a bunch of Alice Starmore books, all of which you can still buy.) I know plenty of people who did it this way, but you certainly don't have to.
And you definitely don't need to learn from a terrible 90s printed pamphlet!
Luckily, nowadays, you can find a tutorial on just about anything on Youtube. I enjoy watching the technical and historical types discuss quirks of knitting you might not think of without years of practice or research.
Roxanne Richardson is great, for example.
Look for somebody old, not wearing a lot of makeup, and not talking about their indie dyeing/yarn business and you'll avoid most of the clowns who learned to knit five minutes ago and now want to be knitfluencers.
When I want a super simple technique tutorial, I usually end up looking at either Nimble Needles or VeryPink Knits. I find her super annoying, but her tutorials are spot-on. Norman's voice is much more soothing and I just enjoy his presence more, but both of them have good ultra close-up shots of what they're doing (which lots of vloggers don't because it requires special equipment).
I'd just figure out what kind of finished products you want to use knitting for and then find patterns and tutorials geared towards those.
Cables are relatively easy. Stranded colorwork requires a fair amount of physical coordination and some people find it rather difficult at first.
Circular needles are far more popular than traditional straight ones for people starting today.
Cotton yarn is relatively less nice to knit with than wool for most people, but it tends to be the natural fiber available at a low price point from major retailers.
Picking up general tips like that by watching various youtubers will help you pick a project that won't be too painful to work on.
People who naturally knit loosely should consider grippy bamboo or wooden needles. People who naturally knit tightly should consider slippery metal ones.
My biggest piece of advice is that you're usually better off with something "hard" that you actually like rather than a "practice" project you don't care about, at least after you've made like one rectangle to practice doing a knit stitch at all.
--
Finding community can be hard, and yes, some crafting hobbies are infested with drama.
But if you just want to know how to knit, you're way better off with some video tutorials and a nice pattern you like.
136 notes
·
View notes