#woodworking magazine
Explore tagged Tumblr posts
Text


DIY Simple Sofa, 1980
#80s furniture#diy furniture#80s style#80s home#1980#1980s#80s#eighties#do it yourself#doityourself#retro style#diy plans#woodworking plans#knack magazine
20 notes
·
View notes
Text

"Lady Craftsman" an article about a woman woodworker from a 1960 issue from Workbench Magazine. Despite Workbench having a small section in the back of each issue called the "Women's Page" that details small decorative projects presumably suitable for women (which feels a bit patronizing), Workbench was quite positive about women in the workshop, stating:
How many women are do-it-yourselfers with home workshops? We are convinced that there are many more than most men — and many manufacturers — believe.
Shoutout to women in the shop! I'm jealous of her lathe!
4 notes
·
View notes
Video
1950 illustration from Popular Mechanics by totallymystified
#woodwork#carpenter#bandsaw#Popular Mechanics#1950#1950s#fifties#illustration#magazine#retro#vintage#nostalgia#flickr
6 notes
·
View notes
Text
By the way, you can improve your executive function. You can literally build it like a muscle.
Yes, even if you're neurodivergent. I don't have ADHD, but it is allegedly a thing with ADHD as well. And I am autistic, and after a bunch of nerve damage (severe enough that I was basically housebound for 6 months), I had to completely rebuild my ability to get my brain to Do Things from what felt like nearly scratch.
This is specifically from ADDitude magazine, so written specifically for ADHD (and while focused in large part on kids, also definitely includes adults and adult activities):
Here's a link on this for autism (though as an editor wow did that title need an editor lol):
Resources on this aren't great because they're mainly aimed at neurotypical therapists or parents of neurdivergent children. There's worksheets you can do that help a lot too or thought work you can do to sort of build the neuro-infrastructure for tasks.
But a lot of the stuff is just like. fun. Pulling from both the first article and my own experience:
Play games or video games where you have to make a lot of decisions. Literally go make a ton of picrews or do online dress-up dolls if you like. It helped me.
Art, especially forms of art that require patience, planning ahead, or in contrast improvisation
Listening to longform storytelling without visuals, e.g. just listening regularly to audiobooks or narrative podcasts, etc.
Meditation
Martial arts
Sports in general
Board games like chess or Catan (I actually found a big list of what board games are good for building what executive functioning skills here)
Woodworking
Cooking
If you're bad at time management play games or video games with a bunch of timers
Things can be easier. You might always have a disability around this (I certainly always will), but it can be easier. You do not have to be this stuck forever.
#actually autistic#executive dysfunction#neurodivergent#adhd#not news#hope#at least it's been very hopeful for me
62K notes
·
View notes
Text
Dream bedroom ideas~

#romantic aesthetic#beautiful#beautiful photography#interior design#interior decorating#interior decor#bedroom#dreamy#gorgeous#woodwork#beautiful bedroom#cosy#cozy aesthetic#cozycore#picturesque#picture perfect#photography#color photography#magazine photography#home decor#wishlist
5K notes
·
View notes
Text
Hola! We share the publication of our Diox stool in the Spanish online edition @tureforma. We are grateful for the attention to our new product, the editorial team and editor-in-chief María Jaén Palomino
#levantin#levantindesign#design#interior#stool#furnituredesign#furniture#wood furniture#wood working#woodwork#wooden#woodworking#wood#bar stools#mobili#interni#publication#magazine#revista
1 note
·
View note
Text
I miss getting/reading game magazines
0 notes
Text

0 notes
Text
Double Scratch Stock
A scratch stock is a simple but effective tool for cutting moulding patterns. However, when you scratch against the grain as is often necessary, the tool shatters and leaves behind a rough surface. This double scratch stock solves that problem. Grind or file mirror images of the desired pattern on a cabinet scraper. File the edge to 45°, then turn the burr. Fix the blade in a hardwood block that…

View On WordPress
1 note
·
View note
Note
Any tips on learning to make buttonholes? I've been putting it off for.... *checks notes* like three years.... but better late than never and all that. I don't have any fancy machines so I gotta do it by hand but that seems right up your alley.
Thanks!
It IS up my alley, yes, I do most of my buttonholes by hand!
I'm actually part way through filming an 18th century buttonhole tutorial, but I expect it'll be a few more weeks before I finish that and put it on the youtubes, so in the meantime here's the very very short version. (The long version is looking like it'll probably be about 40 minutes maybe, judging by how much script I've written compared to my last video?)
Mark your line, a bit longer than your button is wide. I usually use a graphite mechanical pencil on light fabrics, and a light coloured pencil crayon on dark ones. (I have fabric pencils too, but they're much softer and leave a thicker line.) You may want to baste the layers together around all the marked buttonholes if you're working on something big and the layers are shifty and slippery. I'm not basting here because this is just a pants placket.
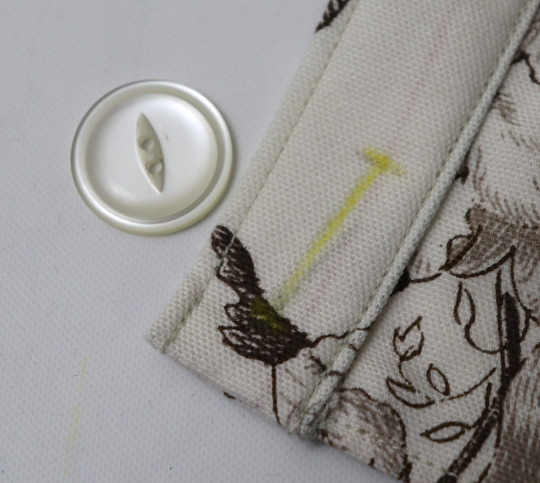
Do a little running stitch (or perhaps a running backstitch) in fine thread around the line at the width you want the finished buttonhole to be. This holds the layers of fabric together and acts as a nice little guide for when you do the buttonhole stitches.
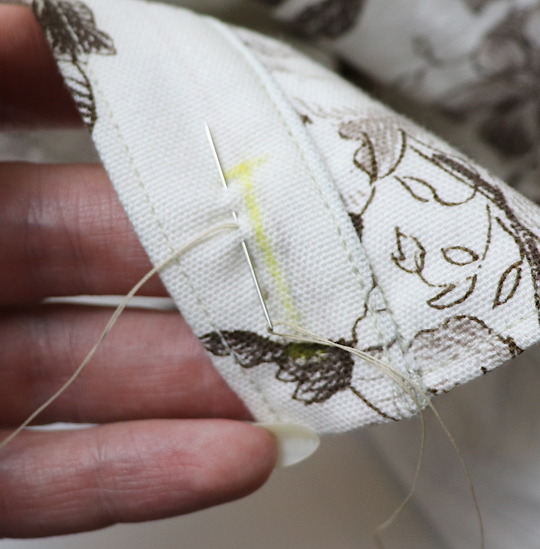
Cut along the marked line using a buttonhole cutter, or a woodworking chisel. Glossy magazines are the best surface to put underneath your work as you push down, and you can give it a little tap with a rubber mallet if it's not going through all the way.
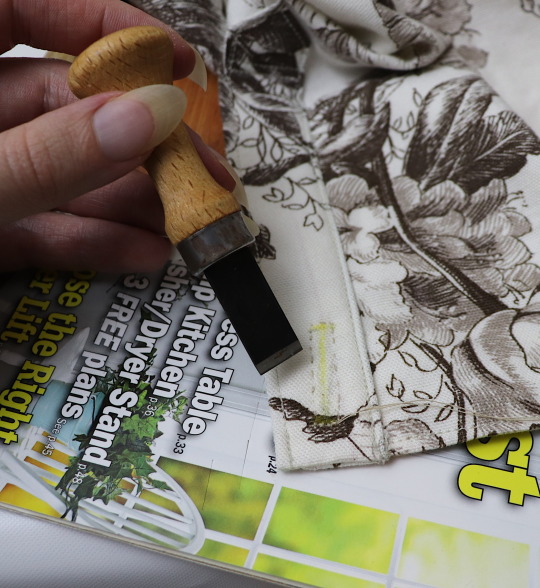
I'm aware that there are some people who cut their buttonholes open using seam rippers, and if any of them are reading this please know that that is abhorrent behaviour and I need you to stop it immediately. Stop it.
Go get a buttonhole cutter for 10 bucks and your life will be better for it. Or go to the nearest hardware store and get a little woodworking chisel. This includes machine buttonholes, use the buttonhole cutter on them too. If you continue to cut open buttonholes with a seam ripper after reading this you are personally responsible for at least 3 of the grey hairs on my head.
Do a whipstitch around the cut edges, to help prevent fraying while you work and to keep all those threads out of the way. (For my everyday shirts I usually do a machine buttonhole instead of this step, and then just hand stitch over it, because it's a bit faster and a lot sturdier on the thin fabrics.)
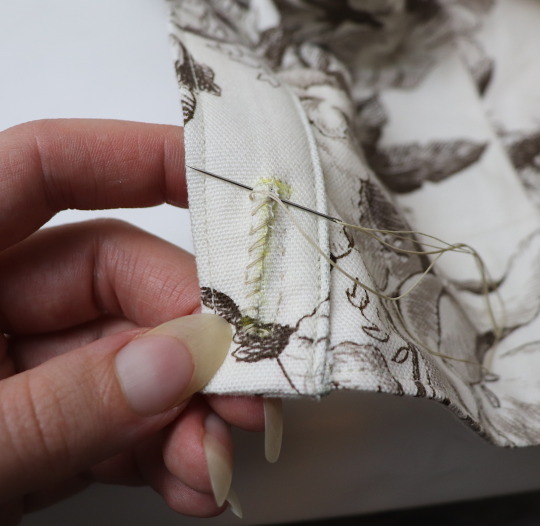
I like to mark out my button locations at this point, because I can mark them through the holes without the buttonhole stitches getting in the way.
For the actual buttonhole stitches it's really nice if you have silk buttonhole twist, but I usually use those little balls of DMC cotton pearl/perle because it's cheap and a good weight. NOT stranded embroidery floss, no separate strands! It's got to be one smooth twisted thing!
Here's a comparison pic between silk buttonhole twist (left) and cotton pearl (right). Both can make nice looking buttonholes, but the silk is a bit nicer to work with and the knots line up more smoothly.
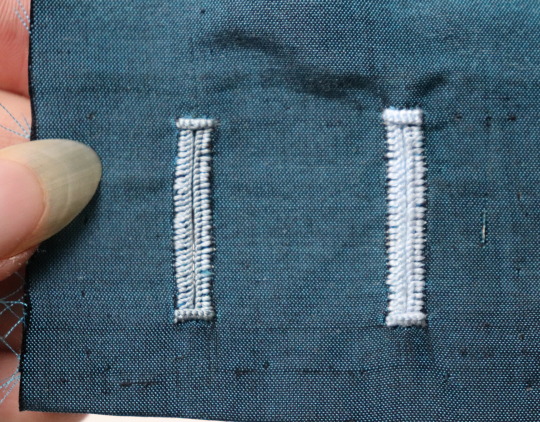
I've actually only used the silk for one garment ever, but am going to try to do it more often on my nicer things. I find the cotton holds up well enough to daily wear though, despite being not ideal. The buttonholes are never the first part of my garments to wear out.
I cut a piece of about one arm's length more or less, depending on the size of buttonhole. For any hole longer than about 4cm I use 2 threads, one to do each side, because the end gets very frayed and scruffy by the time you've put it through the fabric that many times.
I wax about 2cm of the tip (Not the entire thread. I wax the outlining/overcasting thread but not the buttonhole thread itself.) to make it stick in the fabric better when I start off the thread. I don't tend to tie it, I just do a couple of stabstitches or backstitches and it holds well. (I'm generally very thorough with tying off my threads when it comes to hand sewing, but a buttonhole is basically a long row of knots, so it's pretty sturdy.)
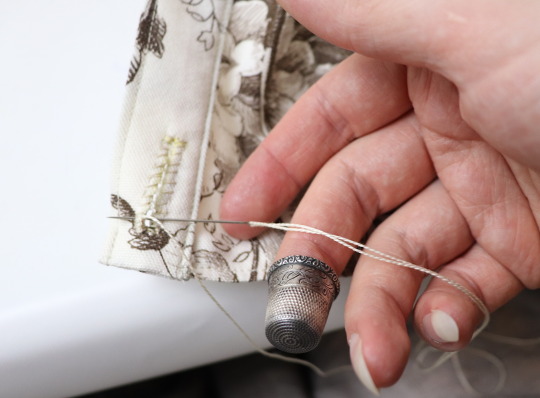
Put the needle through underneath, with the tip coming up right along that little outline you sewed earlier. And I personally like to take the ends that are already in my hand and wrap them around the tip of the needle like so, but a lot of people loop the other end up around the other way, so here's a link to a buttonhole video with that method. Try both and see which one you prefer, the resulting knot is the same either way.
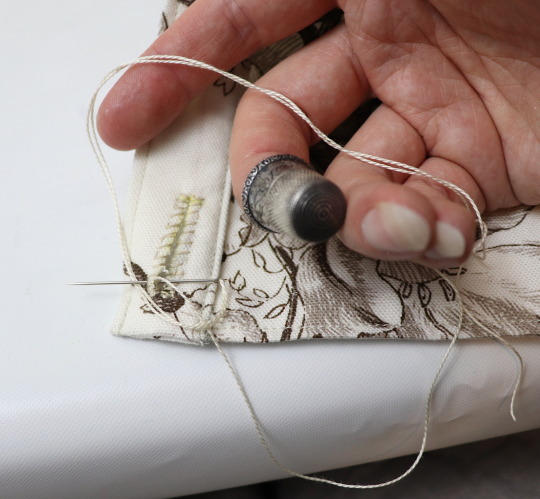
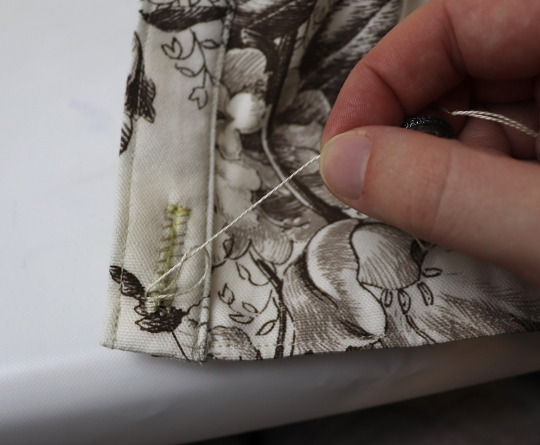
Sometimes I can pull the thread from the end near the needle and have the stitch look nice, but often I grab it closer to the base and give it a little wiggle to nestle it into place. This is more necessary with the cotton than it is with the silk.
The knot should be on top of the cut edge of the fabric, not in front of it.
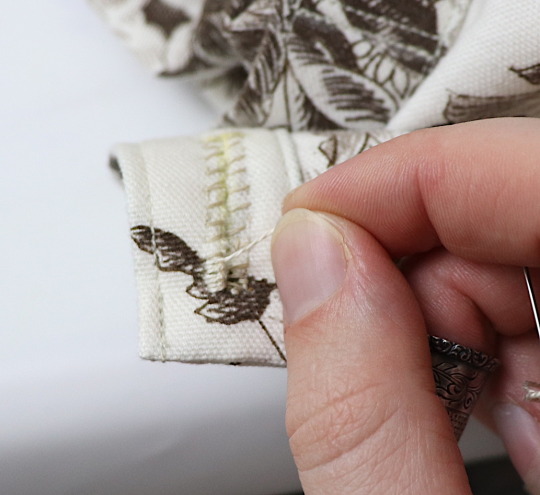
You can put your stitches further apart than I do if you want, they'll still work if they've got little gaps in between them.
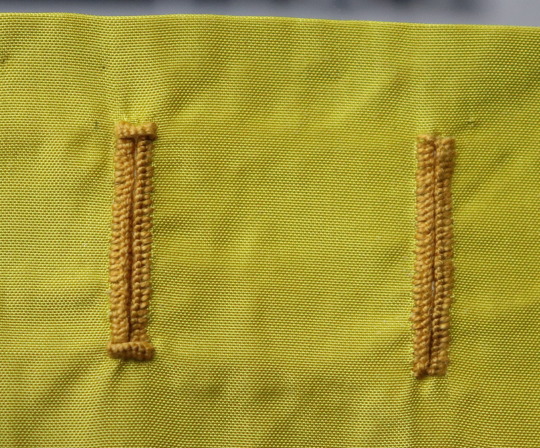
Keep going up that edge and when you get to the end you can either flip immediately to the other side and start back down again, or you can do a bar tack. (You can also fan out the stitches around the end if you want, but I don't like to anymore because I think the rectangular ends look nicer.)
Here's a bar tack vs. no bar tack sample. They just make it look more sharp, and they reinforce the ends.
For a bar tack do a few long stitches across the entire end.
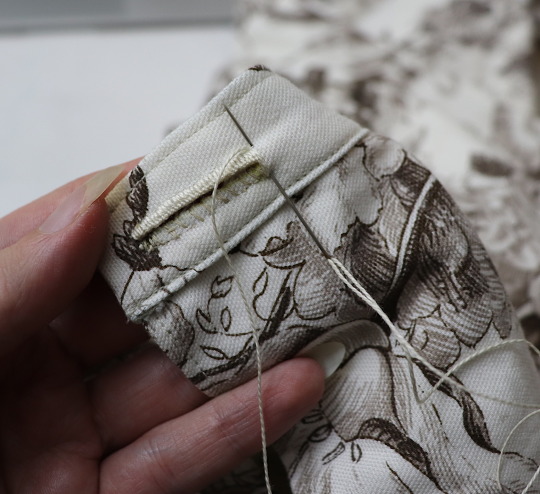
And then do buttonhole stitches on top of those long stitches. I also like to snag a tiny bit of the fabric underneath.
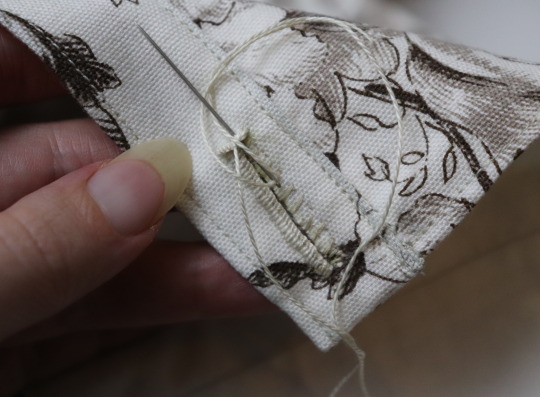
Then stick the needle down into the fabric right where you ended that last stitch on the corner of the bar tack, so you don't pull that corner out of shape, and then just go back to making buttonhole stitches down the other side.
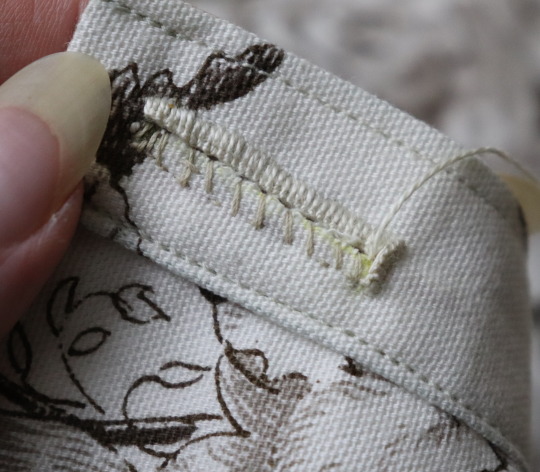
Then do the second bar tack once you get back to the end.
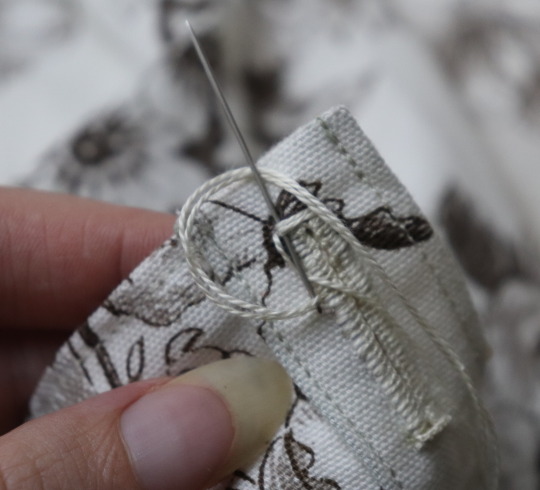
To finish off my thread I make it sticky with a bit more beeswax, waxing it as close to the fabric as I can get, and then bring it through to the back and pull it underneath the stitches down one side and trim it off.
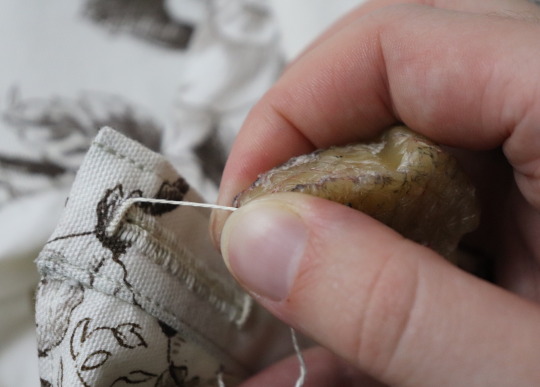
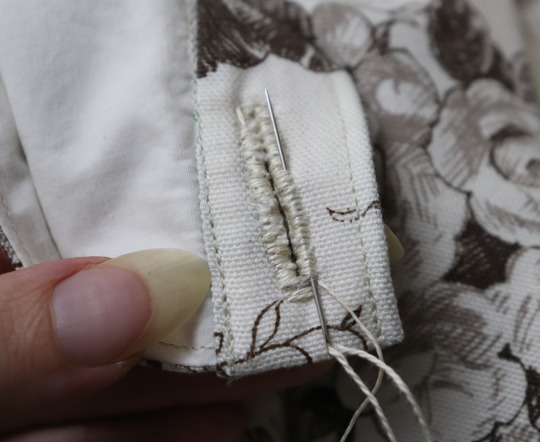
In my experience it stays put perfectly well this way without tying it off.
Voila! An beautiful buttonholes!
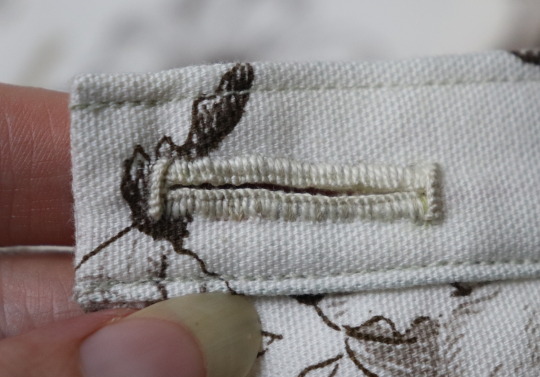
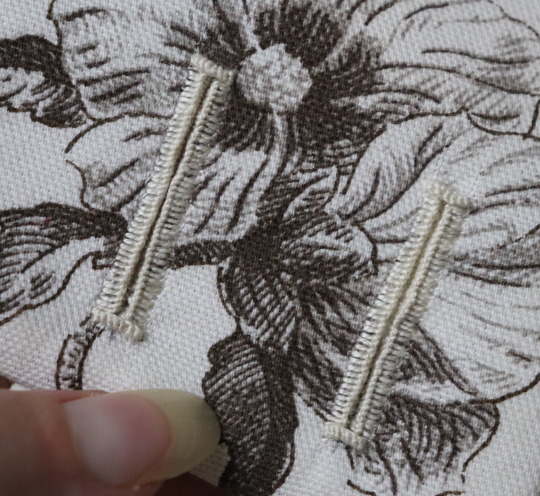
If you want keyhole ones you can clip or punch a little rounded bit at one end of the cut and fan your stitches out around that and only do the bar tack at one end, like I did on my 1830's dressing gown.
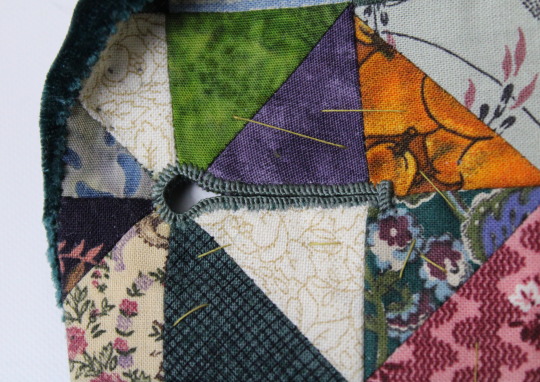
(I won't do that style in my video though, because they're not 18th century.)
Do samples before doing them on a garment! Do as many practice ones as you need to, it takes a while for them to get good! Mine did not look this nice 10 years ago.
Your first one will probably look pretty bad, but your hundredth will be much better!
Edit: Video finished!
youtube
And here's the blog post, which is mostly a slightly longer version of this post.
#ask#buttonholes#sewing#hand sewing#sewing tutorial#I've been procrastinating on the video this week#I want it done! I don't want to work on it I want new projects! I want to cut out more gloves!#currently forcing myself to do the last few buttonholes on these pants and then maybe I can cut out new gloves? as a treat?#but I hope I get some filming done tomorrow too
4K notes
·
View notes
Text
for all my crochet friends (or those who are interested in beginning) i just found a ton of scans of magic crochet magazine which feature gorgeous patterns and easy-to-follow diagrams along with stitch and row explanations for the trickier parts. mostly decorative household flat pieces but they also feature patterns for clothing, some other needlecraft work, along with other random craft patterns here and there for things like like appliqués, pressed flowers, basic woodworking and so on
#i really like the 2 issues i got from the antique mall i'm so glad i found more online!#the 3 pieces i finished were all from issue 57 if anyone wanted to do those in particular lol
160 notes
·
View notes
Text

1895 Victorian in Chicago, IL was voted Best Renovation in Chicago by Curbed Magazine. 6bds, 4.5ba, 7,000 sq ft, $1.75m.


I have never seen an entrance like this one. It has to be one-of-a-kind architecture.


The fireplaces in this home are exquisite. Isn't this is a gorgeous sitting room? The fireplace is stunning.

Very large home office. Since the 2013 restoration, the home has been impeccably maintained.


The dining room is incredible. The wood is so beautiful and look at the ceiling details. Have you ever seen built-in cabinetry like this in a Victorian dining room?


The kitchen is huge. It's modern, but so stunning. And, look at the fireplace.

The dark wood combined with the white cabinetry strikes a perfect balance of old and new. I love the marble counter on the island and the backsplash tile.

This actually looks like it could be a newer addition. Judging by the vintage part of the home, I don't think that they would've done a completely modern remodel like this.

It looks like they would've preserved anything that was original, like dark wood. However, they did put some Victorian style elements in this room, like the built-in window seat.

Maybe they decided to brighten up the bedrooms, b/c Victorian bedrooms could tend to be dark.

This bath is gigantic and combines elements of both old and new.

The original door, woodwork, and fireplace in this child's room indicate that it was renovated and brightened.

Nurseries and children's rooms really need to be cheerful.

Very chic black and white bedroom.

Super-chic matching bath. Love the sink and tile, but the gold fixtures really make it pop.

Up in the new lofted space they've got a home gym, but it can be a family room or anything the new owner would like.

How classy is the vintage looking home theater? I don't think I've ever seen one with a fireplace. Love the ceiling.

And, this looks like a renovated basement. For a room w/o windows, it's very light and bright.

What a lovely place to entertain.

They spared no expense on this bar, right down to the gold backsplash.


And, look at the wine cellar. They even have an antique wine press.

Love the terrace.


There's also a deck and the beautiful yard even has a small patio. TBH, a home like this, under $2m seems like a bargain. They really made the most of a 0.17 acre lot.

https://www.compass.com/listing/4518-south-drexel-boulevard-chicago-il-60653/1682096781908098609/
#victorian mansion#victorian renovation#victorian restoration#houses#house tours#home tour#old house dreams
131 notes
·
View notes
Text


Workbench Magazine, 1961
0 notes
Note
So you've established what Maru, Sam, Sebastian, and Alex would be like later in life. Do you have a headcanon for future Haley?
xoxo
So... 👉🏼👈🏼 these were supposed to be quick sketches but Haley is SO fun to draw that I fully lost control of the situation - anyway, I present you Fashion Photographer Haley ✨ thank you for the ask bby

I definitely picture our Haley in an artistic yet stylish environment, I just know that she would absolutely thrive as a photographer who works for fashion magazines and brands!! Imagine her being so bossy around the set, with the crew AND the commissioners, but everyone put ups with her because her work is that good. She would definitely also keep doing some personal photography as well, that would be more niche and intimate.
By the way my hc is that Haley wears contacts, but I think that with age she would grow more confident in wearing her glasses again!
Finally, as a Haley/Leah lover, I think they would marry and have a very private and tranquil home in Pelican Town (maybe they upgraded Leah's cottage!) where they would work from - Leah creating her art and Haley working on post production after her jobs. Imagine a home in the woods, full of artsy stuff and good lighting like PLEASE adopt me 🥹 On this topic tho I don't see them ever wanting kids! Which is kind of a shame for the sole reason that Haley would look great as a soccer mom and Leah could teach woodwork to her children - but there is only one princess in the family and that happens to be Haley ✨ And they would travel a lot to fuel inspiration!
context for people who are new to my madness regarding the SDV timeskip: this is the Sambastian photoset mentioned lmao
#stardew valley fanart#sdv haley#stardew haley#sdv fanart#stardew valley#stardew fanart#sdv#sdv au#sdv timeskip#Older!Haley#art#fanart#ask#lily-alphonse#SHES SO BARBIE CODED#FEMME QUEEN#if I ever end up with no drafts or ideas for new art Im just gonna start playing dress up with Haley#I feel like no one will be complaining shes so unf#btw if you see me being so fixated/fastidious on the whole editorial thing it's because it's part of my job so once again bear with me
83 notes
·
View notes
Text
TOM GLYNN-CARNEY INTERVIEWED FOR NERDIST MAGAZINE.
I'M TOLD YOU'RE ON HOLIDAY IN A REMOTE AREA, SO I HAVE TO ASK THE OBVIOUS QUESTION: ARE YOU CURRENTLY VACATIONING IN BRAVOS?
"[Laughs] No."
"No, I’m not."
INTERVIEWER: I’m in [actual location] — which Nerdist can confirm is beautiful — withheld so Aemond Targaryen doesn’t find out.
DO YOU KNOW EXACTLY WHERE LARYS IS TAKING AEGON? IS IT REALLY BRAAVOS?
"Can’t disclose that information at this point, I don’t think."
"But wherever it is, it’s somewhere."
"Sorry, I just made that up. I don’t know."
DOES AEGON HAVE ANY DOUBTS ABOUT LARYS OR DOES HE FULLY TRUST HIM AT THIS POINT?
"He’s the best of a bad bunch in the Red Keep."
"I think there is a certain amount of trust that he has towards Larys just because there’s common ground."
"They’re both physically impaired now, and Larys has lived his entire life in that state."
"So there’s some sort of connectivity going on there, but also it seems like he does have Aegon’s best interests at heart at this point."
"I don’t think Aegon wants to look too much into that at the moment."
"He will find cracks in the woodwork."
"So yeah, he’s a lifeline at the moment."
"And he shall be used accordingly."
AT THIS POINT HOW DOES AEGON FEEL ABOUT HIS MOTHER ALICENT?
"That’s a good question."
"I think he feels there’s this undying love that he has for Alicent."
"Aegon, he’s her first born son, and yet there’s never been this kind of understanding or eye-to-eye that they’ve had."
"He knows she’s flawed, and she knows he’s flawed, and I think they expect a lot from each other that neither of them are able to give."
"But at this point, he’s not thinking that rationally."
"He likes to point the finger and he needs to find somebody to blame."
"He blames Aemond, of course."
"But also for it to get to this point, Alicent has sort of steered the ship in a certain way."
"So yeah, there’s a lot going on there."
"It’s quite a complex relationship."
I KNOW AS AN ACTOR YOU HAVE TO FIND AEGON'S HUMANITY, BUT DOES THE KING HIMSELF RECOGNIZE, IN ANY WAY, HE'S A MONSTER?
"I think he’s dancing with the idea of being loved and feared at the same time."
"I know I’ve said that in interviews before, but I think it’s a good way of putting it."
"Those two things don’t really go together."
"He’s trying to work out a way for his approach to being the king and to ruling."
"He’s trying to strike a balance where he remains effective, but also people listen to him."
"At the moment he hasn’t been listened to, which is kind of why he’s had to force himself into this position of being proactive in a way that he was not ready to do."
"So, no, I don’t think he thinks he’s a monster because I don’t think he is a monster."
"I think he’s somebody who’s very tortured and traumatized by his own making really."
"But I also think it makes somebody more dangerous when they don’t realize potential."
"I don’t think he does quite just yet."
CONSIDERING I KNOW HOW IMPORTANT AEGON IS TO THE STORY, I WAS VERY FRUSTRATED BY HOW LITTLE THE SHOW FEATURED YOU IN SEASON ONE. DID YOU KNOW BACK THEN JUST HOW BIG YOUR ROLE WOULD BE IN SEASON TWO?
"I was warned it was an introduction."
"Just in terms of the time jump."
"We couldn’t really have the older versions of our characters, myself and Helaena and Aemond and the likes, because of the time jump we were making."
"I understood season one was always more of an introduction to our versions of these characters, and season two would really lift off."
"And season three and onwards would just get tastier and tastier as time went on."
"So no, I didn’t feel shortchanged or let down or anything."
"I was always updated with the plan."
THE SHOW IS CHARTING IT'S OWN COURSE AND MAKING SOME BIG CHANGES TO THE DANCE OF THE DRAGONS. HAVE (SHOWRUNNER) RYAN CONDAL AND THE WRITERS GIVEN YOU A HEADS UP ON WHAT AWAITS AEGON IN SEASONS THREE AND FOUR?
"Yeah, I’ve spoken to Ryan and writers Sara Hess and David Hancock a lot about their ideas, about the trajectory that they want Aegon to go on."
"They have been quite… there’s been details, but not too detailed because of giving things away and not locking things in the writing room."
"It’s exciting to listen to and it’s exciting to understand where their thoughts are and include me in that as well, which is great."
"It feels very collaborative that they want to know my thoughts and the rest of the actors on their own characters journeys really."
"It’s great."
I THINK THIS IS REALLY SAYING SOMETHING ON A SHOW THIS WELL ACTED: YOUR PERFORMANCE THIS YEAR WAS A REVELATION FOR MANY AND HAS RIGHTFULLY EARNED VERY HIGH PRAISE. WHAT'S IT BEEN LIKE PERSONALLY HEARING THAT KIND OF RESPONSE TO YOUR WORK?
"It’s very kind."
"Thank you."
"To be honest, I try and stay away from all of the conversations about it."
"It feels like my work, for now anyway, has been done."
"And I want to sort of put it to bed and move on and not really dwell on it."
"I think if I get too engaged with what people are saying, and the noises people are making, I’ll get too in my head."
"That’s not really the way I like to work."
"But I’m really glad to hear that people are responding well and they’re seeing lots of different colors to Aegon that they didn’t anticipate."
"That was my job from the first day on set, to bring this character to life in a multidimensional, varied, color palette kind of way."
"And he’s an absolute gift to play."
"I think you’d do well to do a bad job of a character like Aegon."
"He’s a gift that keeps on giving."
YOU HAD TO DO A LOT THIS YEAR AS AEGON. WHAT IS MORE CHALLENGING AS A PERFORMER: THE BIG PHYSICAL, LOUD, EMOTIONAL SCENES FROM EARLIER IN THE SEASON OR THE QUIETER ONES AFTER AEGON'S INJURIES?
"Both for different reasons."
"I dunno, that’s like comparing badminton with tennis, two very different sports."
"In terms of stamina, probably the louder, more kind of theatrical scenes."
"They require a lot of focus and a lot of energy and usually emotional depth and agility."
"But saying that, when I’m in the bed, covered in all the prosthetics and stuff, that’s tiring in its own way and difficult to remain focused on the task at hand."
"So yeah, both have their own challenges, but I revel in both arenas."
MY LAST QUESTION, AND I WOULD NOT FORGIVE MYSELF IF I DIDN'T ASK THIS, WHAT HAPPENED TO AEGON'S TERRIBLE LITTLE MUSTACHE FROM FIRE & BLOOD?
"[Laughs] Good question."
"You know what? I had this conversation with Amanda Knight, the wonderful hair and makeup designer on the show."
"We spoke about this at the start, about whether we could bring that to life, because I remember seeing pictures of him."
And she was like, 'You know what? You might not want to sustain that for the amount of time that we do this show. So maybe let’s go clean shaven and see where we get from there.'
"But that’s not to say that it might not come at some point, even though he has had his face burned, it might be half a mustache, but we’ll see."
#house of the dragon#hotd#hotd s2#tv shows#team green#aegon ii#king aegon ii targaryen#aegon ii targaryen#tom glynn carney#the greens#hotd aegon#hotd s2 spoilers#hotd spoilers#interview#aegon x larys#larys strong#hotd larys#aegon x alicent
94 notes
·
View notes
Text

Photo by Henry Diltz.
“What does [Peter] want to communicate? ‘Love. I don’t mean it to sound corny,’ he said pleadingly. ‘Dogmatism is leaving the scene. Youth is examining all the old-time premises that used to be taken totally for granted — sexual mores, artistic mores. And in Russia, the revolutionary clichés. I think there’s a genuinely democratic society just over the horizon. I hope so. I hope it achieves freedom and peace.’” - The New York Times, October 2, 1966 “The world situation is something in a mess today. I’d like to see it all get straight. It’s working on it now though. I can see it happening. There’s always going to be another challenge the world will always go on. But I’d like to see us solve all our problems like poverty, war, pain and all that. Christianity as it is now practiced by most people who call themselves Christians in this country is pretty shabby. Sometimes the true Christian spirit seems dead. But I can see it coming out of the woodwork now. I think the flower children are an example of the true Christian spirit. That means love and participation.” - Peter Tork, Fave, March 1968 “I won't go nearly so far as to say that everything that came up in the 60's was valid, but as far as I'm concerned, the 60's were to what will come as Greece was to democracy. Remember that in the 60's the political officeholders had lost all touch with the needs of the nation…kind of like the Bush administration now. Back then the voice of the establishment, Life magazine, was discovered to have doctored photos falsely indicating that LSD caused chromosomal damage. That proved what we (then) kids already knew: that those at the top preached fair play and honesty, but had no more need to honor those concepts than what would give them the next dollar without too much trouble. We saw perfectly clearly that we were on our own, that no one in authority cared about us. Now, like any bunch of kids left to their own devices, some, many, went off the rails. Every false step by somebody walking around under the cloak of the liberal hippy 60's was used as a pretext for dissing the entire generation. Those of us who were truly interested in liberty, fraternity and equality, however, knew we were onto something good and real. What had been called democracy was, and to some extent still is, a pretext for wrapping the will of the greedy and aggressive in a mantle of public acquiescence. Now, the business of wresting power away from those who make a specialty of wielding it will be a long and protracted struggle, with a lot of setbacks along the way. The outlines of the new style of governance are only dimly perceivable, and won't become clear for a long time to come. In the meantime, our job is to practice the principles of fairness and service to the extent possible. One thing is clear: there is a much higher joy in service than there is in acquisition of wealth. (Remember that it isn't money that's the root of all evil, it's the love of money.) Hanging together in brother — and sisterhood is so happy-making you want to sing right out loud. Yeah, I feel the same about those ideas as I did then…in case you couldn't tell. heheheh, Peter” - Ask Peter Tork, 2008
#Peter Tork#Tork quotes#60s Tork#00s Tork#long read#more for the solid Tork advice files#The Monkees#Monkees#can you queue it
29 notes
·
View notes
