#unity tutorial
Explore tagged Tumblr posts
Text
youtube
One of the easiest ways to add combat into your top down games!
This video shows both melee and ranged combat implementation in a quick, clean and easy way!
Check it out :-)
#unity#unity 2d#top down#top down combat#2d game combat#2d#pixel#unity tutorial#how to add combat to 2d game#melee combat#ranged combat#Youtube
10 notes
·
View notes
Text
Aprenda a construir e publicar seu primeiro jogo de adivinhaçao na Unity
O post Aprenda a construir e publicar seu primeiro jogo de adivinhaçao na Unity ensina como voce pode construir e publicar o seu primeiro jogo de adivinhaçao utilizando a Unity Aprenda a construir e publicar seu primeiro jogo de adivinhaçao na Unity Quem nos ensina a criar esse super game e o nosso querido fundador Danilo Filitto do canal DFILITTO Super dicas Se inscreva em nosso canal e…

View On WordPress
0 notes
Text
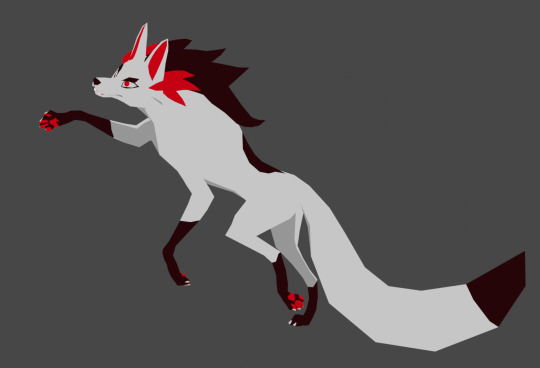
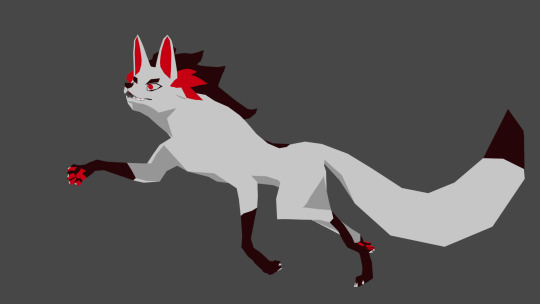
Low Polys your Mystery
#I wanted to do more with this but I can not for the life of me figure out shader and setting up a good animating rig#Im following tutorials and nothing it working#I might say screw it and just do the shading and animating in unity cause at least I can just use poiyomi#Shader nodes make me want to eat glass#Mystery skulls#Mystery skulls animated#3d model
185 notes
·
View notes
Note
If I may, how do you typically approach choosing colors in your art? It always has just a lovely feel to it, so I was a bit curious; don't feel pressured to answer ofc :]
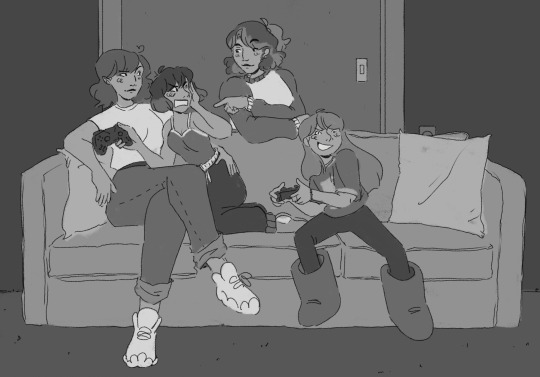
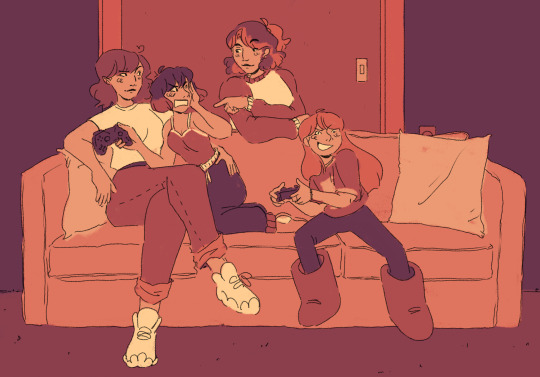
I’ve been using a lot of gradient maps lately, they work by switching the greys in your piece with a corresponding colour according to its value. Basically, I colour in black and white, grab a gradient map, and then I adjust the colours by hand until I’m happy with it. This isn’t the only kind of colouring I do, but it works great if you’re in a rush or you’re struggling to find a good starting point for your colours. I’ve been operating under a time crunch for these Sketchbook Week drawings and the Plenism promo stuff I made, so for all except one I used gradient maps. I’m actually in a bit of a funk with my colours right now soooo I’ll come back and do a proper colouring tutorial for my style once I’m happier with how my non gradient mapped colours are looking !
#after sketchbook weeks over I wanna sit and do some colour studies to find palettes I’m more happy with#even these gradient map ones I’m not thrilled with#they’re fine! but I could do better#in terms of other tricks I use I’ll often adjust the hues and saturations if the whole piece to give things more unity if I’m struggling#and/or add a new layer on top of everything and fill it with one base colour#and play around with different layer settings and opacities on top#I’ve found a luminosity layer on a low 5-10% setting is quite nice#basicslly I fuck around and find out#and if I’m in a rush I use a gradient map#they’re not neccesarily a quick fix! if you’re like me you’ll still want to do some tweaking after it’s been applied#and you need to pay attention to your values when you’re colouring in black and white#but that’s another good thing about gradient maps - they force you to focus on value over hue which is an important skill to build#so yeah I’ll come back to this and make an actual colouring tutorial once I feel like I have actual good advice to give#cause rn I’m just very meh in my colouring and I don’t think I have anything very helpful to add#need to find some tutorials myself first !#ty for the ask!#ask#art#my art#bpcol-reblogs#textpost#blethering#for this piece the adjustments were minimal in comparison to what I usually do btw#because I was rushinggggg lol#I did more for my Plenism posters n such#but I can’t really show good comparisons because I. didn’t save them like that#I usually smush all my layers together when I’m drawing sooo yeah makes it hard to go back my bad whoops#but I saved as I was going whilst drawing this so I could provide examples yipee!#if I’d been smarter and remembered more I could’ve had more process screenshots butttt oh well lmao
17 notes
·
View notes
Text
Me when my dad tried to talk me into learning how to code: no thanks I already tried that a few years ago and failed miserably :)
also me after I played isat: TIME TO BOOT UP PYTHON BABY!
#Someone should've told me in middle school going straight into the unity tutorials w/ no knowledge was a bad idea#It's going significantly better now that I understand how to actually go about learning things lol#coding#relatable?#isat
8 notes
·
View notes
Text


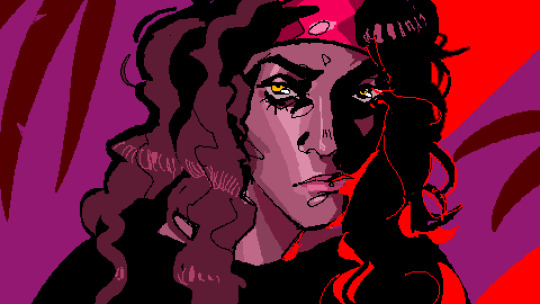
doodling some fake screenshots and thinking some thoughts. ideas. concepts, if you will. based on a fictional game setting i made years ago for my bachelor that i don't want to give up on just yet.
#original art#pixel art#fake screenshot#neon moon#i am not giving up on this concept i am still thinking of ways to turn it into something#i also miss gamedev a whole fucking lot rn#reinstalled unity and gonna get back into it again. do some tutorials. make some boring walking simulator prototypes maybe.#pixel art intrigues me rn.. it fits the setting but i am unsure about the vibe. might fit another project i have in mind better idk.#mayhaps still 3d but make it simple and retro look
120 notes
·
View notes
Text
Week 2
Overview and thoughts
I decided I want to try to make one post a week with progress on my project, so I figured I should be more transparent on what these posts should look like and some more insight into what I am working towards.
Each post should be up on Monday to highlight what I been working on for this system/game. I intended to release a playtest of the system that will be open to the public. I currently have only myself on the project so progress will be slow but once I have some sort of Alpha test or something I'm comfortable having people run with I'll post a link to a pdf and host it in a pinned post. I know that this will require a lot and my goal is to have a simple adventure module to test out along with some handfuls of additional monsters to play with if you don't want a module. This is ambitious but I need to shoot for the moon
Beginning on the System - TTRPG stuff to be used for my game
I mentioned briefly in last week's post that I wanted to do a point buy based system and I figured I should go into some depth about what I currently have so far.
I like the idea of loosely placing abilities/features into one of three categories based on traditional MMO style features: Tank, Damage, and Support (I am going to change these names, they are not final). I also want some semblance of balance, so trees or pathways make sense, invest more into something and it gets better. I also want things to overlap so it's more a Venn Diagram and less a defined category. I was also thinking to split based on archetypes but that would be limiting I think. I would want my favorite archetypes to work (spell sword, life as a resource) along with other traditional (fighter, ranger) and non traditional styles (using magical objects rather than magic itself, specific weapon oriented builds).
I also think the point buy idea should help with encounter balance since encounters of specified difficulties will be using a specific amount of points and a Game Master can make encounters based on those points (kinda like armies in war games like Warhammer)
The fear here is that the point buy system will lead a player down a rabbit hole of poor build optimization or choice paralysis. I feel poor build optimization can be solved with allowing players to rebuild their character somewhat with a narrative beat (or in game mechanic for when I bring it over to the rpg but a system like that is common across RPGs so it's not a design flaw imo). The choice paralysis is. I think I need to guide players to cool endcap abilities or features along with features that require investing in multiple areas, like let's say applying poisons in combat without taking up turn resources is an investment in some kind of rogue aligned tree and an alchemy based tree. I think I am finding both Pathfinder and Fallout: New Vegas as inspiration for Horizontal Progression.
Now onto what I have so far for Character Creation. I think I am going to be giving the player about 50 total points they can use for creating a character but are required to use 20 for statistics (I am going to be running with D&D/Pathfinder stats) and 10 for Saving Throws as a minimum. I think players should be able to spend more on these if they would like but it would limit how much depth they get at level one. A player's "Heritage" will either cost points, give points, or be point neutral since if one Heritage gives more benefits or Horizontal potential I think it should cost a player and if a Heritage is very flavorful but punishing, the player should be able to try to use their points to help circumvent these issues or play into their strengths.
My issue I see with this could lead into ridiculous brews since how wide the system is. But that also might not be an actual issue. I need to nail down my specific demographic since this is an indie project and won't have wide appeal, I should find a niche and stick to it rather than trying to take on the juggernauts.
Some notes about my research into non-western piracy
I have begun my initial dive into non Caribbean Piracy and I have found some areas of interest I need to dig into, like the Chen Zuyi, a pirate from the 1400 to 1407 and the Wokou. Forgive me for spelling anything wrong as I am so far working off of Wikipedia as a help to find some primary sources.
Chen Zuyi seems like a very interesting character with little info in the West (unsurprisingly). He seemed to rule over Palembang which I happen to know where that is due to EU4 and my love for naval/trade gameplay as I have played the nation of Palembang and I knew they had an event to reform into a pirate republic. So it's really cool to actually learn a bit about this. I need to find some more primary sources about this man but it seems a bit hard with how little there is in English.
The Wokou were pirates who raided Korea and China from the 13th century to 17th. Again similar to Palembang, in EU4 you can play the Daimyo of So on Tsushima and reform into a Pirate Republic with an event referencing the Wokou, so I knew there was something in this region but that was it going into my initial research. Wikipedia has alot more info on this group but it seems to a bit controversial to claim that The Wokou are all Japanese, when there is evidence to point that the early Wokou were from several different ethnic groups where people whole lived on the fringes of society. Which makes me want to draw parallels to pirates during the golden age of piracy but I need to do more research.
Recommended Reading for this week
I noticed that the whole book Elusive Pirates, Pervasive Smugglers: Violence and Clandestine Trades in the Greater China Seas show up during my reading about the Wokou so I am going to try to read that this week off of some kinda of online library or archive (or get it from my local library's inter library loan)
Previous Post
#game dev blog#ttrpg#indie ttrpg#pirate ttrpg#pirates#game dev update#indie dev#game development#video games#Anyone have any suggestions to make my posts more appealing? They seem kinda blocky to be honest#I promise to move onto some game dev stuff at somepoint this week - I downloaded unity and that will be on the post for next week hint hint#speaking of unity - anyone got some good unity tutorials? I plan on using the inbuilt ones#ttrpg design#ttrpg dev
4 notes
·
View notes
Text
Part 6 of my lowpoly avatar tutorial series is now up on my patreon!! In this episode I cover importing a fbx file into unity and setting it up for streaming. https://www.patreon.com/voxid

51 notes
·
View notes
Text
My experience in impulse buying game development software has given me great knowledge
#my knowledge....#rpg maker is THE tool for a simple rpg#you can go pretty far with it#not too far but enough for a simple rpg#specially if you are a beginner#Game Maker is good for people who know a little code but not enough to go all out#but it wants your money soo bad#the one that fnaf was made in is also pretty easy#Unity has everything youve ever dreamed of doing but it's difficult. for pros only#All Lua based software is in the middle ground. very code heavy#The golden rule: if you see a software that doesnt have an active and supportive community RUN AWAY#LOOK AT ANOTHER ONE#a lot of these tend to be very limited and cause you trouble down the line#trust stuff thats known to be used. like ren'py. Godot. Pico8 even#that also means theres a lot of tutorials out there
21 notes
·
View notes
Text

My OC, Uni-T.
#her name is unity love but that's not her actual name#she doesn't know how human names work#neither of them do#they just named themselves things#her stage name is universe thunderstorms#so to her it makes sense#oc art#original character#my art#I spent like three hours making this cause I wanted to paint it in a really cute painterly way#failed miserably as usual no matter how many tutorials I watch my tools just suck and I have a serious children's hospital level+#color theory problem that doesn't go away#so I got neck pain for nothing#and this was supposed to be a FUN drawing for me to TEST stuff out#never test things#I wish I knew how to paint tbh#sighhhhhhhhhhhhhhhhhhhhhhhhhhhhh#wmp.txt
4 notes
·
View notes
Text
youtube
Another quick 2min video!
This one will show you how to get started with a top down game and add top down movement to your player!
Check it out if you're interested in game dev :-)
#programming#youtube#2d game#code#game development#gamedev#tutorial#unity#pixel art#top down#indie game#video games#Youtube
42 notes
·
View notes
Text
Playtest Early Playtest Often 🎮

I created a short build of my game for friends and family to check out and see what they think about the game.
This wasn't easy to do emotionally!
I couldn't help but think of all the problems my game still has, or the rough edges that I am sure would annoy people. It felt to raw to really show people... But I did it anyway.
Here is why
I found out that a number of players were confused by the numbers placed over the towns. This number indicates how many passengers on your train want to go to a certain location. It was obvious to me, the person who designed and coded it. But not to others. If I continued on and waited to test my game, this information could have been lost and lead to further player confusion. But early playtesting nipped it in the bud.
Now I know I need to make this information more clear and change how it is displayed. Then in the next update not only will the game be more fun, and less buggy. It will also be more intuitive and understandable, thanks to my playtesters.
#game development#tutorial#unity game development#game design#cute#trains#playtesting#thanks for playing!
7 notes
·
View notes
Text
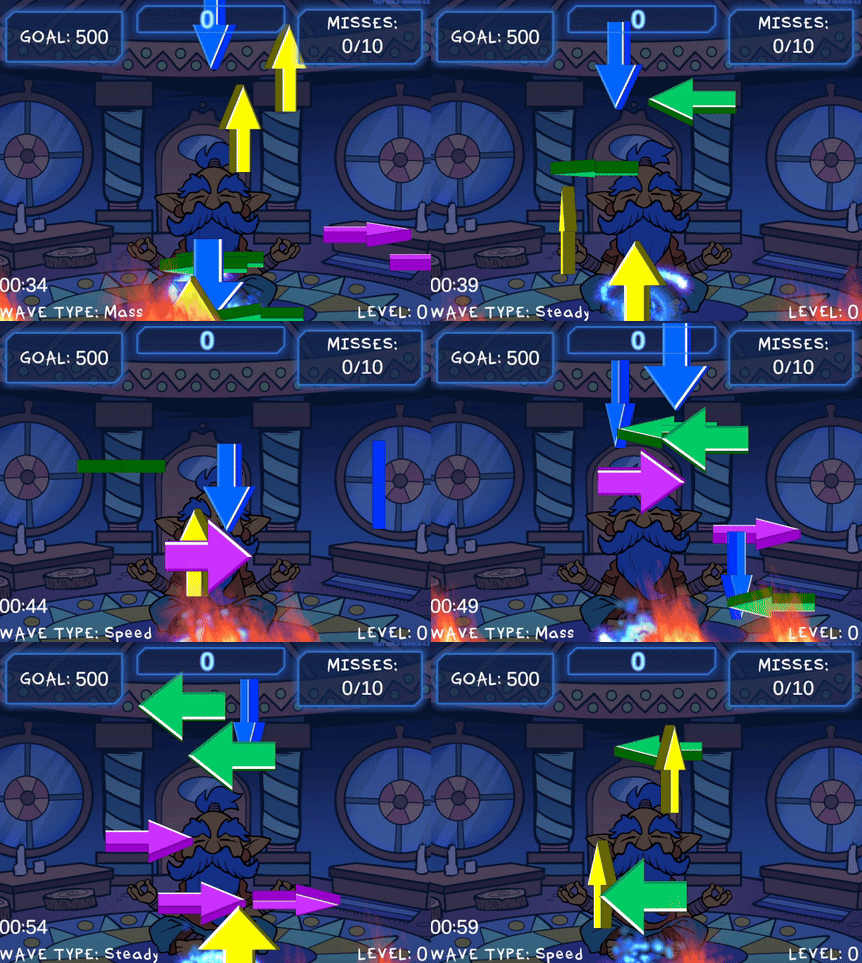
I dislike using rigidbodies to move my objects because physics interactions can sometimes go ham and while that can be very amusing, I prefer things to be predictable. So for moving arrows in this game I handled the movement math myself via coroutine. Let's take a look-see, shall we? :3

The goal of this coroutine is to move its symbol object in an arcing motion from its initial position, moving it upward and to either the right or left. Then it will fall downward. Rather than having each symbol object run this coroutine from an attached script, I am using a central script (my GameManager) to apply this movement to a given object, so the first thing I do is make sure the symbol still exists before proceeding with the coroutine:

If we find that our symbol has been destroyed, we exit the coroutine with "yield break". You wouldn't need this check if the script is running this movement on its own object, as coroutines are ended upon an object's destruction.
There are a bunch of variables we'll define within our coroutine to calculate our desired motion; we'll start by defining an arcDuration:

This determines how long the object will take to move in the arc shape. A shorter duration results in faster movement. Using a random amount between a min and max duration creates some variance in how fast different symbol objects will move. I have my minArcDuration set to 1 and maxArcDuration set to 2.5 for quick bouncy movements.

These variables referencing the outermost bounds of the camera's view will be used to ensure that symbols remain within the visible area of the camera at all times. I'm not using a topBound because I'm fine with symbols possibly going off the top of the screen, but I use a maxArcHeight variable that is set low enough that they never do.

For even more spawn variability, we add a little randomness to our starting point. My spawnPointVariance is set very low at 0.3; my initial symbol spawn position is low on the screen, and due to how the rest of this coroutine works, it's important that the symbols are never allowed to spawn below the bottomBound or else they will be instantly deleted (and result in a miss!)

The height here is, of course, how far up the symbol will travel, and the distance refers to how far it will move to the left or right. We calculate the peak of the arc by adding our distance and height to the x and y values of our starting position. Randomizing between negative and positive distance values for our x position adds another layer of variability which includes the possibility of moving either left or right, even though our minArcDistance and maxArcDistance are both set to positive values for clarity (mine are set to 1 and 6).

This is the part of the code that decides upon our symbol's speed by calculating the distance it has to cover from its start to its peak. By dividing our horizontalDistance by our arcDuration (distance divided by time), we calculate how fast the symbol needs to move to cover the entire distance in the given duration. Mathf.Abs is used to ensure that horizontalDistance is always positive, lest we get a negative value that causes us to move in the opposite of the intended direction.

We'll also want a speed variable for when the arcing motion ends and the symbol starts falling, that's where downwardSpeed comes in. In earlier versions of this function, I used downwardSpeed alone to transform the object's position, but I've since refined the logic to take the current horizontalSpeed into account for more consistent motion; we'll see that later. (Also you can see I've been tweaking that arbitrary range a bit... the fall speed was brutal during those mass waves ;o;)

Here we create an elapsedTime variable starting at 0. In our while loop, we will use this variable to count how much time has passed, and if it becomes greater than or equal to arcDuration, we'll change isFalling to true and begin moving down.
We create a Vector3 moveDirection which gives the vector pointing from the startPosition to the peakPosition, and then turn it into Vector3 horizontalDirection, which retains only the X-axis direction. Both values are normalized to ensure consistency. Without normalization, the magnitude (or distance) of the vector would vary depending on the distance between the start and peak positions, which could result in inconsistent speed. Normalization caps the magnitude at 1, meaning the vector represents just the direction, not the distance, allowing for consistent speed calculation later.
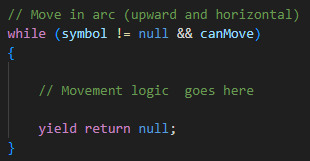
Here's how we start our while loop: as long as our symbol object is not null and the game says we canMove, we say yield return null, which will instruct our loop to occur every frame. If either the symbol becomes null or canMove becomes false, the while loop will end and so will the coroutine - for this reason, I only set canMove false when the game ends and the symbols will never have to resume movement, rather than in cases where I want them to pause movement and resume later, such as when a player pauses the game or during level-up periods. For the latter I use an isLevelingUp bool in my while loop that waits until that bool is false before proceeding (yield return new WaitUntil(() => !isLevelingUp)), and for the former I actually change the game Time.timeScale to 0, which is not typically recommend but fuck it we doin it live, because I don't have a mechanism for resuming this function with appropriate variables if it is stopped. It could surely be done if you just store the local variables somehow.

This is the first part of our movement logic that we put in the while loop; remember we already set isFalling false, so this part will proceed with the rising motion.

We count our elapsedTime here by adding Time.deltaTime, a variable which represents the time in seconds that has passed since the last frame, ensuring that time calculation is frame-rate independent. Do NOT use Time.time in cases like this unless you want your users with varying computer specs to all have different experiences with your game for some insane, villainous reason
The variable 't' is looking at the elapsedTime divided by arcDuration, a ratio that tells us how far along we are in the arc movement. If elapsedTime equals arcDuration, this ratio would be 1, meaning the arc is complete. We use Mathf.Clamp01 to clamp this value between 0 and 1, ensuring that it won't ever go higher than 1, so that we can use it to calculate our desired arcPosition and be sure it never exceeds a certain point due to frame lag or some such. If 't' is allowed to exceed 1, the arcPos calculation could possibly go beyond the intended peakPos. We are going for predictable motion, so this is no good

We define our Vector3 arcPos with Vector3.Lerp, short for "Linear Interpolation", a function for calculating smooth transition between two points overtime. Ours takes our startPos and peakPos and moves our symbol between the two values according to the value of 't' which is incrementing every frame with Time.deltaTime. As 't' progresses from 0 to 1, Vector3.Lerp interpolates linearly between startPos and peakPos, so when 't' is 0, arcPos is exactly at startPos. When 't' is 1, arcPos reaches peakPos. For values of 't' between 0 and 1, arcPos is smoothly positioned between these two points. Very useful function, I be lerping for days
Then we alter the y coordinate of our arcPos by adding a calculation meant to create smooth, curved arc shape on the y axis, giving our object its rounded, bouncy trajectory. Without this calculation, you'll see your symbols rising and falling sharply without any of that rounded motion. This uses some functions I am not as familiar with and an explanation of the math involved is beyond my potato brain, but here's a chatgpt explanation of how it works:
Mathf.Sin(t * Mathf.PI): This calculates a sinusoidal wave based on the value of t. Mathf.PI represents half of a full circle in radians (180 degrees), creating a smooth curve. At t = 0, Mathf.Sin(0 * Mathf.PI) is 0, so there’s no vertical displacement. At t = 0.5, Mathf.Sin(0.5 * Mathf.PI) is 1, reaching the maximum vertical displacement (the peak height of the arc). At t = 1, Mathf.Sin(1 * Mathf.PI) returns to 0, completing the arc with no vertical displacement. This scales the vertical displacement to ensure the arc reaches the desired height. If height is 10, then at the peak, the symbol moves 10 units up.

With those positions calculated, we can calculate the "newX" variable which represents where we want our symbol to appear along the x axis. It adds the horizontal movement to the current x coordinate, adjusted for the time passed since the last frame.
We use Mathf.Clamp to ensure our newX value doesn't exceed either the left or right bounds of the screen. This function limits the given value to be between min and max value.

Finally we tell our loop to actually reposition the symbol object by creating a new Vector3 out of newX, arcPos.y, and using our symbol's own z coordinate. That last bit is important to ensure your sprite visibility/hierarchy doesn't go out of whack! If I used arcPos.z there instead, for example, it's likely my sprites would no longer be visible to my camera. The z position the symbol spawned at is the z position I want it to retain. Your needs may vary.

This part tells us our arcDuration should end, so we set isFalling to true, which will cause the secondary logic in our while loop to trigger:
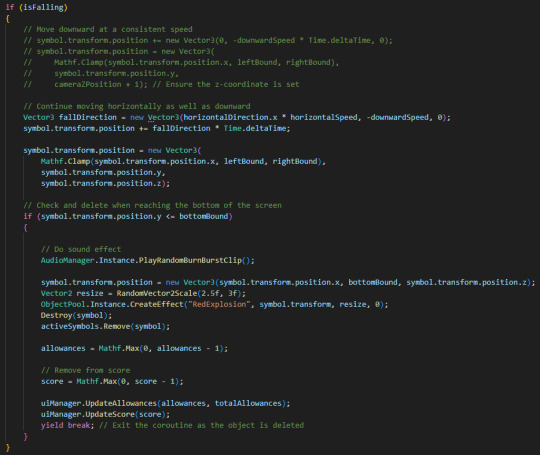
Previously, objects retained their x position and only had negative downwardSpeed applied to their y position, but I didn't like that behaviour as it looked a little wonky (symbols would reach their arc peak and then suddenly stop and drop in a straight line downward).

By creating a new Vector3 fallDirection that retains the horizontalDirection and horizontalSpeed from the arc phase, we're able to apply smooth downward motion to the symbol that continues to the left or right.
Just below that, we once again clamp the symbol's x position to the left and right screen bounds so the symbols can't travel offscreen:

The loop would continue causing the symbols to fall forever if we didn't have this check:

which triggers some project specific logic and destroys the symbol, then exits the coroutine with "yield break". Although the coroutine already exits when the symbol becomes null, which it will see is the case in the next frame as we destroyed the symbol here, adding an explicit yield break is an added layer of security to ensure predictability. Once again, not super necessary if you decide to run this code from the moving object itself, but just be sure you move your Destroy() request to the bottom of any logic in that case, as nothing after that point would be able to trigger if you destroy the object which is running the coroutine!
and that's all folks. If this helps you make something, show me!
HEY, did you really make it all the way to the end of this post?! ilu :3 Do let me know if this kind of gratuitous code breakdown interests you and I will summon motivation to make more such posts. I personally like to see how the sausage is made so I hoped someone might find it neat. If ya got any questions I am happy to try and answer, the ol' inbox is always open.
#gamedev#solodev#made with unity#c sharp#tutorial#coding#programming#clonin game#code explanation#code explained
2 notes
·
View notes
Note
I love that you're making a game, I've always wanted to make a game. Give me a month I'm gonna start to learn how make one :)
OMG THAT'S SO COOL !!!!!!
Yesyesyes you should !!!!!!!!!
Please give me as much information as possible about it hehe
#pixies rambles#asks#salsa-is-good#my advice? youtube unity tutorials preferably from 2022 onwards are your friend
3 notes
·
View notes
Note
Who’s making you cry I’ll fight them
some dude in a game dev server 🥲
#like!!! YEAH i might wanna get into game dev BUT this was just because i use unity (game engine)#as platform for my ai/machine learning thesis#he basically mansplained how it's so complex and i need to take a step back#when all i did was ask for tips on why his outdated tutorial wasn't working for me#ask#anon
5 notes
·
View notes
Text
If you ever wanted to learn Unity...
I just bought this Humble Bundle of Unity courses on Zenva and went through the first of them. It's amazing! I don't think I've ever seen a better course on anything, the explanations and pacing work so well. At the end of the first course you have your first mini project and build it so it runs in your OS. And all of it without no prior programming experience needed, which is admirable. (I'm originally a programmer, but I really liked Daniel Buckley's way to introduce the basic concepts and I imagine it could be very nice intro to coding)
I know about the problems with Unity and I'm still unsure if it's worth risking to let my future projects rely on their support and conditions. Still, I hope that learning one tool makes other tools easier to learn and it's always worth it to train.
20-30$, 44 hours worth of lessons, still available until around the end of 2023. I'm not paid by anyone, just wanted to share this in case someone also struggled to find a proper tutorial. Good luck with your projects!
#gamedev#rpg#zenva#unity#course#tutorial#resources#game design#indie games#2d games#humble bundle#coding#programming
6 notes
·
View notes