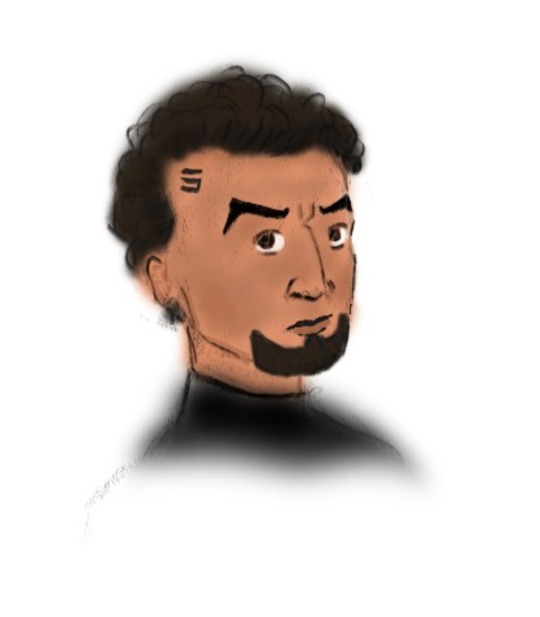
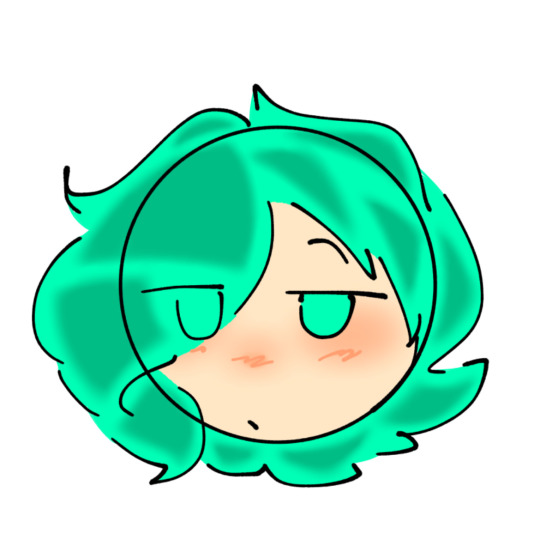
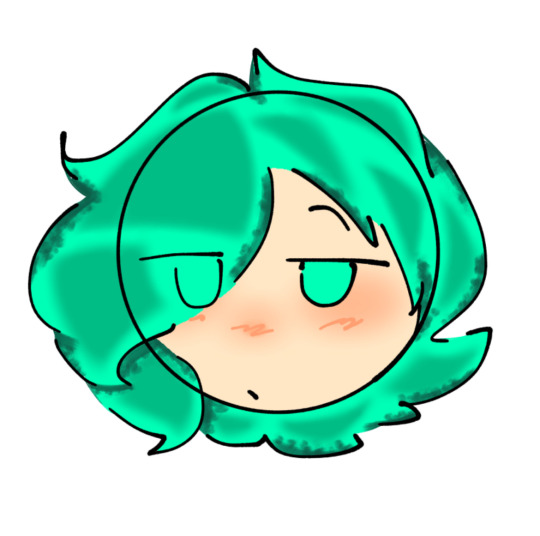
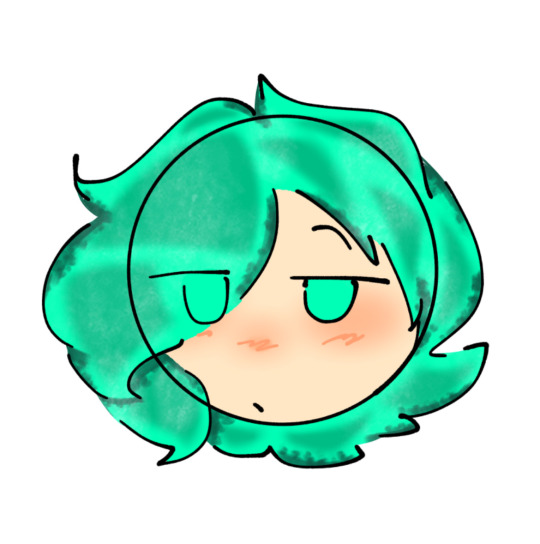
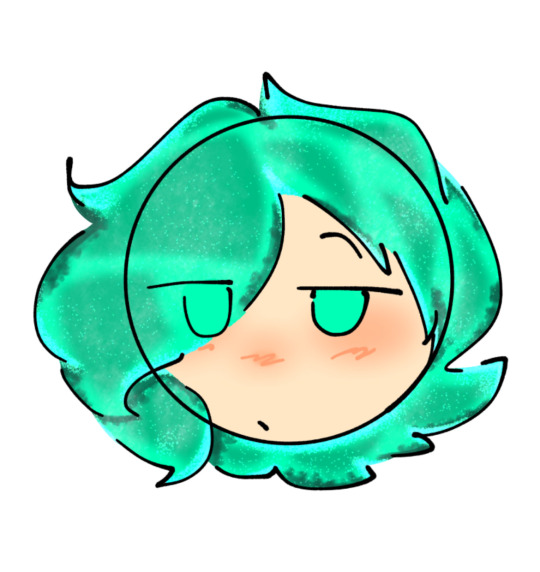
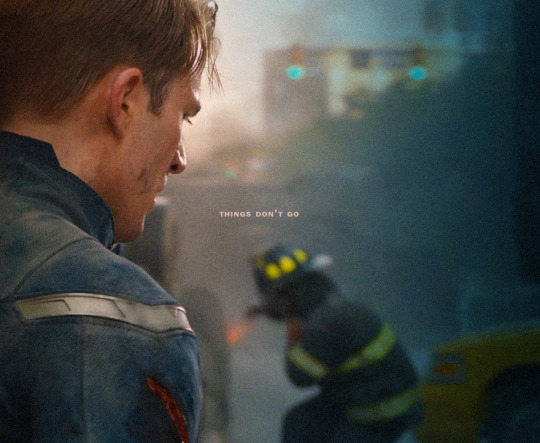
#trying out new coloring and sharpening style
Explore tagged Tumblr posts
Visit Tumblr Blog
Explore Tumblr blogs with no restrictions, modern design and the best experience.
Last Seen Tumblr Blogs


Fun Fact
Tumblr was named as a finalist in Lead411’s New York City Hot 125 in Aug 2010.
Note
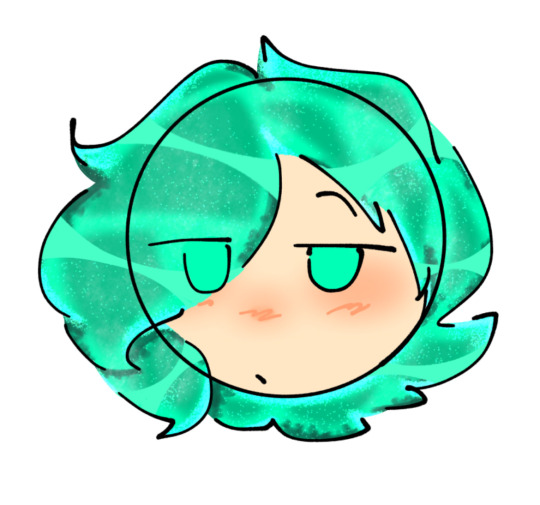
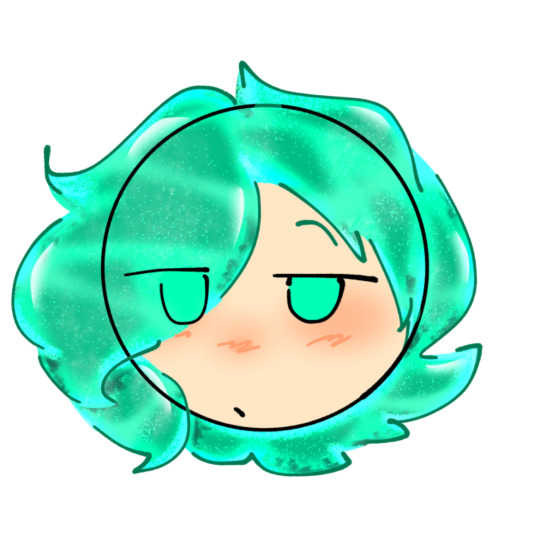
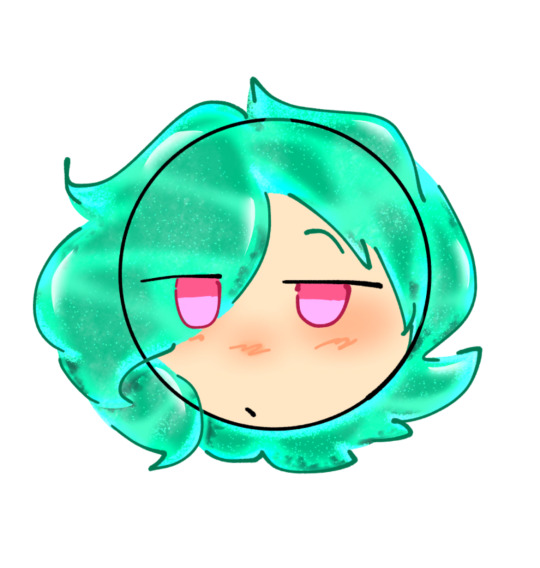
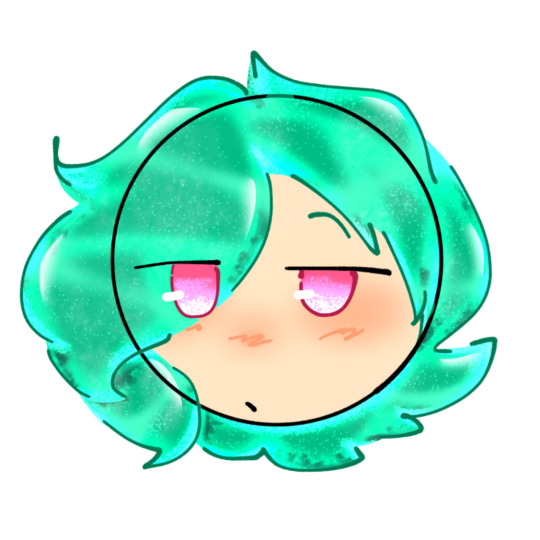
Oh he's beautiful
Such a wonderful gift to celebrate my return from the land of Not Making Sense
Good news. I have slept and rested and can now type coherently again
Huzzah for sleep and coherency!
Here you can have this Fives I tried to colour in for no reason at all except that I love you <3
#actually losing my mind. by the way. i am so honored#also!!! 's FANTASTIC#digital art is. hard. i have not yet gotten the hang of it and you're doing so WELL?????? YES YOU GO#and yeah i'm finding that coloring is indeed the hard part. also drawing like... at the right size#cause you know me right. well what you might not know is that a lot of my drawings don't even take up a whole page#because of the way i taught myself to draw all my drawings actually tend towards the smallish side#and you know how i'm like. in love with having a million little details in everything i make right?#well on the tablet that translates to me drawing smaller than i need to and then those little details coming out grainy#cause unlike my traditional drawings where i can just sharpen the pencil tip to be super sharp-- on the tablet i have to manually zoom in#and because i'm so new to it i still haven't found the drawing brush that works for me cause i'm trying to mimic my traditional style#but that's all in pencil and pen and i just haven't found out how to fiddle with them to make them look right on my program yet#anyway sorry for the rant but here you go i guess#all this to say. LOVE IT. 100/10 BEST WAY TO START MY MORNING HERE IN THE GOOD OL' US of A#friend art#star wars#look at my guys#i need an actual fives tag
3 notes
·
View notes
Text
bake for a loved one
braid your hair
brush your hair
brush your teeth
buy flowers
call someone
carve wood
change your sheets
chew ice
clean out your e-mails
clean your fridge
clean your hairbrush
clean your keyboard
clean your makeup bag
clean your makeup brushes
clean your mirrors
clean your purse
clean your shoes
clean your windows
create a budget
create a memory box
create a new outfit
create a video
create a wishlist
crochet
dance
daydream
decorate your home
delete dead chats
delete old contacts
delete unneeded pictures
design a character
discover new music
do a jigsaw puzzle
do an exercise or yoga class on youtube
do cardio
do nothing
do yourself a manicure
do yourself a pedicure
do laundry
do yoga
draw a cartoon
draw your future house
draw your future self
draw yourself
drink a big glass of water
drink tea
dry brush yourself
dye something
enjoy the sun
exfoliate
explore new apps
feel your feelings
find a new perfume
find a new recipe
floss
focus on your breath
focus on your posture
fold your clothes like a professional
give yourself a lymphatic drainage massage
give yourself a massage
go for a bike ride
go for a walk
go swimming
go thrift shopping
go to the beach
go to the cinema
improve your routine
iron your clothes
join letterboxd
learn about a different culture
learn about birds
learn about flowers
learn about trees
learn a language
learn a new hair style
learn how to play chess or go
learn origami
learn to knit
light a candle
listen to an album
listen to an independent radio online
listen to a podcast
listen to the radio
make a bracelet
make a choreography
make a collage
make a gift for someone
make a gratitude list
make a list of great names
make a list of your favorite words
make a mobile
make a new pinterest board
make a playlist
make a plushie
make a red bracelet
make a shopping list
make a short film
make a to-do list
make candles
make coffee
make kimchi
make kombucha
make music
make recycled paper
make sorbet
make whatsapp stickers
make your bed
make your own game
make your own spice blend
make your own tea blend
meal prep
meet someone
moisturize
mop your floor
move your body
oil your hair
organize your closet
organize your files
organize your kitchen
organize your Notion
organize your phone
organize your spices
paint a picture
paint a still life
paint your future garden
paint your nails
pet your pet
plan a date
plan a menu
plan a movie night
plan a picnic
plan a road trip
plan a tattoo
plan a tea party
plan a trip
plant seeds
plan your best friend's birthday
plan your birthday
plan your day
plan your next halloween costume
play a board game with someone
play an instrument
play solitaire
play video games
play with your pet
practice meditation
practice makeup
practice walking
practice your handwriting
pray
press flowers
print a picture of your favourite safe food
print coloring pages
put on clothes
read a book
read aloud
read a magazine
read manga
read positive affirmations
read the newspaper
rearrange the furniture
repair something
reply a message
research a topic
rewatch your favourite movie
sanitize your phone
sauna
sell something
send a postcard
sew something
sharpen your pencils
shave
shop lingerie
show love to someone
sing
sleep
solve crosswords
sort out your bills
spend time in nature
stretch
study
take a long shower
take a nap
take online quizzes
take out the trash
take pictures in nature
take your vitamins
teach your pet something
tell the binge that you are stronger than it
tie-dye something
try to decide what is your favourite something
tweeze your brows
unfollow accounts you don't like anymore
update your calendar
update your passwords
use a face mask
use essential oils
vacuum
visit an antiquarian bookshop
visit a café
visit a botanical garden
visit a cemetery
visit a library
visit a museum
visit an art gallery
visit your relatives
walk at the mall
walk somewhere new
wash dishes
wash your hair
wash your pillows
watch a concert
watch a documentary
watch a fashion show
watch a movie
watch anime
watch a short film
watch a video essay
watch mukbangs
watch the clouds go by
watch youtube
water your plants
wrap a gift
write a letter
write a list of all the things you want to achieve
write and illustrate a children's book
write a song
write a thank you card
write in your journal
write to your penpal
write your own list of what to do instead of binge eating
#light as a feather#i wanna be sk1nn1#i just want to be thin#4n4m1a#tw ed ana#4n@diary#starv3#tw skipping meals#tw ana bløg#3d blog#4nor3xia
31 notes
·
View notes
Note
Hello hi I just found out you're the artist of my favorite pic of Jamil from all time 🥹 I absolutely LOVE LOVE LOVE LOVE LOVE LOVE LOVE LOVE LOVE LOVEEEEEEEEEEEEE SO MUUUUCH his bday art from 2020!! It's my favorite one from every art and he looks so pretty and hot and cool and like he's in a music clip and about to drop a fire verse!! I LOVE your painting style so much, as a baby artist, would you one day show us how you color? I'm sure you put so much blood, sweat and tears into your hard work and it would great to get a little bit of that wisdom. Please keep drawing, keep doing what you love because it makes the world a better place to live!
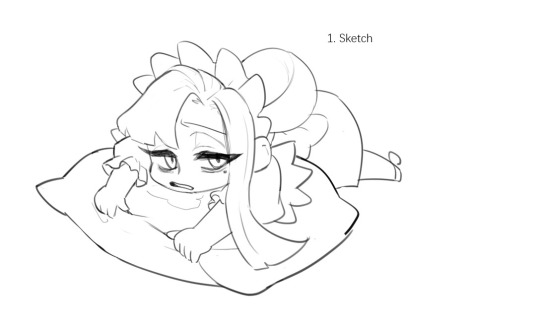

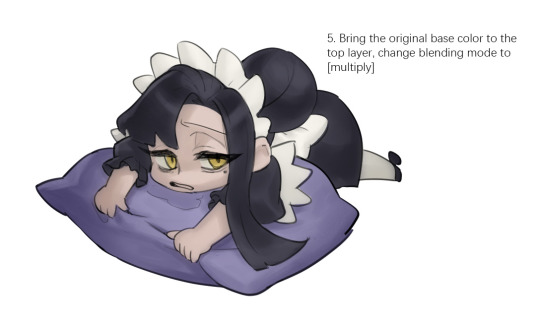

Sketched my sleepy and tired oc to do a very quick demonstration but it covers how I color when i render things:
Start with rough greyscale first, it's a good start to roughly decide light direction and value of your overall work. Especially if you have no idea on your shading.
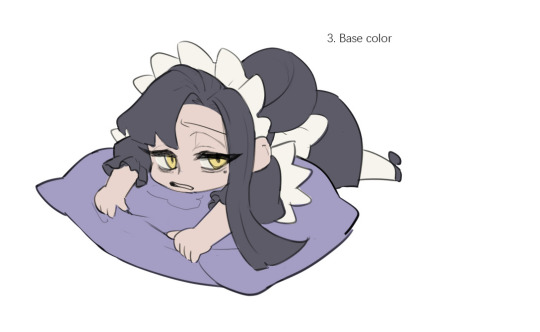
Next, apply base color to greyscale. I'll use gradient map if I want to keep the details of my greyscale. But if not, I'll just start with a flat base color, and try whatever I can to apply color.
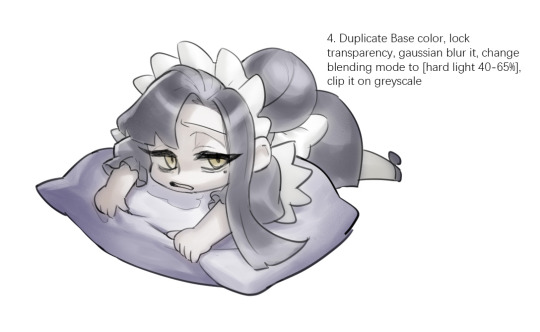
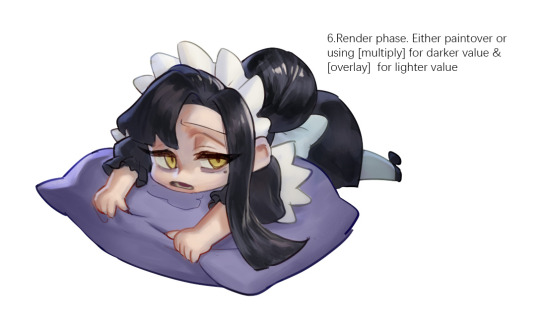
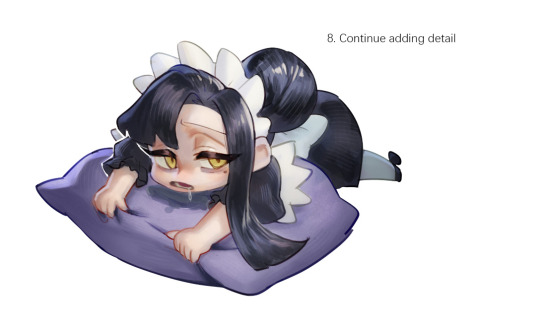
Rendering phase. Add layers and just paint on top to refine it. Merge all layers if it's too messy. Then add layers again. My rendering really depends on how much time taken because it's just a loop of paint over and refining. Thats why i do more simple fanart cuz I sometimes get bored of rendering Also at this stage when doing lineless style, I merge lineart with layers and cover up the lines.
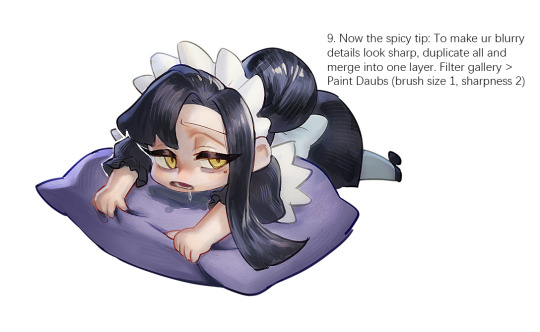
Final touch. Merge all layers and use [filter gallery > paint daubs (brush size 1, sharpness 2)]. It will sharpen your work and look detailed. Or add some very fine noise texture, it will look detailed too.
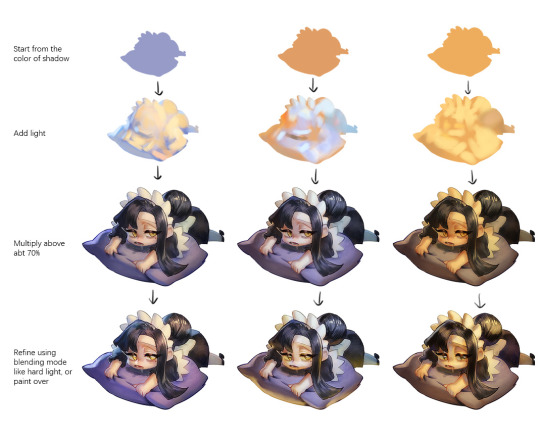
Another very rough demonstration on how i apply color mood. This will be after step 2. And same will be more refining and even paint over to ensure the colors look ok.
Other tips:
Add warm and cool colors especially on skin.
Use pinterest. Always find more than one reference for a subject if you want to draw better than yesterday. Pure ref is a nice tool to gather reference on your pc. When i draw a single hand I had a lot of ref. (pose, color temperature, lighting, photos, artwork, all diff ref)
Color theory is so important I still struggle a lot. I highly recommend beginners start from practicing Marco Bucci's ball practice. After that slowly change to adding character into movie scene and photographs, the purpose is to adapt different color moods and learn the lighting from the image. Learn more from famous movie and cinematic. They did their best to nail the colors.
Anyway,
this is a long answer about how I color. My previous job influenced me so much on coloring so there's a lot of thinking and struggle on my colors.
So, I suggest you be more experimental and try new ways, at the end what remains is what fits you.
131 notes
·
View notes
Text


I've been hanging onto these for a long while and I've been so very excited to share them! I've been slowly writing my own infection au, while trying to figure out writing for personalities and conflicts, to better understand them myself, but I'll try to keep key points intact for each character!
I'm also going to be practicing poses, expressions, and body-types in a cartoonish style! I will be doing new things occasionally, in colors, always, as an artist. I don't know how well it will transverse from screen to screen on devices!
I'm still very in love with all these AUs, and wish people would share with me! Reblog, go wild in your tags, I will read! Please, interact!
To also provoke questions: Facts about my characters! ; A read more.
All of the CMC have some form of muscle built for/from various needs and reasons! Their body types pull into this just as much!
Scootaloo is the tallest and slimmest. Sweetie is chubby and shortest of them. Bloom just works very hard to keep her beef, more on that later! They're always running around, doing strong things as fillies!
Ack! There's reasoning for Sweetie to be lacking the CMC! As she travels to Canterlot more often with Rarity for Trips, though of course that means she's working for the CMC there too. She's just busy running supplies runs and running the shop, while promoting newer teen clothing.
Sweetie has a single scar from their misadventures as young fillies, which makes Rarity fret to no end. First time she saw it, she screamed, but she understands the trouble thanks to her own journey. Belle also understands her sisters worry, but she feels stronger with it. She's also glad to be matching Applebloom.
Which is great, because Scoots and Bloom have matching eyebrow scars too. They all chat about the stories behind them too.
AB gets hers from all the work she does from working and disciplining herself between The Orchard with Jack and Bic Mac or Pinkie Pie and the Sugarcube Corner. Her spirit boils to hard work, and her will is rock solid in that motif/lifestyle. She gets 6, sometimes 7 if she's lucky, hours of sleep with a strict bedtime.
Scootaloo is still a little sleazy in working, and is slowly working the courage to ask Applebloom about that life style motivation junk. She's been trying to since before her flight exam. In this RF AU, she passes her test. A genetic defect in her wings made them too small to functionally fly, but she can glide in average lengths for functional Pegasi wings. With this information, RD had taken it into account that some Disabled Pegasi can get smaller jobs inside the facility as messengers, with hopes to give Scootaloo a position (Unbeknownst to her little sister.) This implemented a course for Disabled Pegasi.
EDITING ONE TIME, because I forgot to talk more on the Ochard and Baking thing!
Applebloom is absolutely capable of rocking someone's shit cause Pinkie has her doing rough and hard labor! She's always moving ovens, reorganizing, sharpening, and cleaning items! A constant move over there!
And when she's home on her Sister's Farm, she's bucking every tree in sight until her fur is tufts of drying sweat at the end of the day.
She's also going back and forth on CMC involved Missions with Scootaloo, since she views her Cutie Mark as her work and all, a lives goal, Girl's got plans and schedule!
I believe that's all I'll share for now! I will be thinking and mulling over on everything in my head, but the process is admittedly a slow one that I want to put care into. My mental health often times affects my motivation which results in horrid burn out, only recently I've been giving myself art breaks I'm hoping talking with the fandom and engaging will help me feel better about doing all this work myself! (It is a rough, rewarding endeavor!)
#mlp art#rainbow rabies au#art#mlp fim#sweetie belle#mlp sweetie belle#applebloom mlp#scootaloo mlp#rainbow rabies#redesign#mlp g4#mlp#mlp fanart#my little pony fanart#my little pony#mlp au#mlp design#character redesign#//?PLEASE IGNORE MY MESSY GRAMMAR I WON'T BE FIXING IT#//I hope I didn't spoil the exciting things while making it interesting for you!
11 notes
·
View notes
Text
✨ Gem Hair Tutorial ✨
Hello hello! I decided to make a tutorial on how i personally create Houseki No Kuni / Land of The Lustrous hair (and bonus eyes) for any sort of gemstone character.
Here I’ll provide step by step, screenshot with screenshot for the finished product.
I’d LOVE to see your attempts with my tutorial, so dont be shy to @ me or reply this post!!
— — —
This tutorial is done in my DOODLE STYLE, not REGULAR STYLE.
Characters featured in this tutorial ARE MY OWN CHARACTERS. YOU WILL NOT CREDIT OR CLAIM THEM AS YOUR OWN.
Program Used: IbisPaintX
— — —
1.
- Insert Base / Flat color of choice.
— — —
2.
- Select a darker color from the base color.
- Draw it in simple shapes in the hair. I suggest sharpening the edges via erasing.
— — —
3.
- Set the layer to a lower opacity. Recommended percents are 75, 65, and 55.
— — —
4.
- Blur out the shapes.
- DONT FULLY BLUR THE SHAPES!! Blur the edges / sides.
- Make sure to set your blur brush to a lower opacity. 60 percent range is recommended.
— — —
5.
- Create shadows with a 2nd darker color.
- I used a custom brush by someone (i forgot unfortunately who made this brush…), but for a similar look you could use an airbrush or watercolor brush.
- On this part, set the brush to a low opacity percent. I recommend between 80 & 60.
— — —
6.
- Set your color to WHITE.
- Using that same brush for Step 5, LIGHTLY and FAINTLY speckle the hair with the white all around.
— — —
7.
- Set layer to Add.
- Once again, i am using another custom brush by someone (i cant remember this person either so so sorry). For a similar look, use a Pointillism brush.
- Get a slightly lighter hue of the base color and shade around.
- Speckle the brush allll around the hair.
— — —
8.
- Create this shading detail across parts with your regular brush.
- TRY NOT TO HAVE THESE ALL OVER IN EVERY SECTION OR STRAND!! Make it big in select areas that connect from one side of the hair to the other.
- For the color of step, use the base color but SLIGHTLY lighten it.
— — —
9.
- Blur the shit out of Step 8 shading. Make sure you can still see it somewhat!
- Make sure to your blur brush back to 100 percent opacity for this step.
— — —
10.
- Set color to WHITE once more.
- Use regular brush of choice.
- Add little highlight marks like these across select parts the hair.
— — —
11.
- Blur the ends of the previous step. Dont fully blur it; the white highlights are meant to be seen.
- Change the opacity of the highlights. I recommend 80 or 75 percent.
— — —
12.
- Set this layer to Add again.
- Using your airbrush/watercolor brush again, shade in select areas.
- Change the layer opacity to a recommended range of 85 to 60.
- OPTIONAL: Color the hair line art. Use a darker color of your base color.
— — —
✨ BONUS: Eyes ✨
1.
- Set layer to add.
- Use regular brush of choice, and use base color.
— — —
2.
- Set new layer again to Add.
- Blur the middle between base color and add base color/previous step.
- Use Pointillism brush to create the speckle effect.
- Make the bottom sparkles white. In the middle of the base color and add base color from the previous step, sparkle by that area with the base color.
- OPTIONAL: Color the eye line art.
— — —
And there you are!!! You have completed the tutorial!!! ✨✨
I tried my best with this for each and every instruction. Hope i did good!!
Again, dont be shy to @ me or reply to this post if you have attempted my tutorial. Id love to see all attempts! :]]
#art#digital art#original character#oc#land of the lustrous#houseki no kuni#lotl#hnk#hnk oc#lotl oc#art tutorial#tutorial
20 notes
·
View notes
Note
Hello! Can i request yandere sniper (or others if you want) trying to get the attention of someone really oblivious?
Have a nice day!
hi! wasn't sure if you meant in a literal way of gaining readers attention (like snapping his fingers to gain your attention). i interpreted this in more of an emotional way and wrote it that way. anyways, hope you enjoy this yandere content!
attention

it was dark inside his van. in the early hours of the morning it was pitch dark outside where mick sat at his wooden desk sharpening his kukri knife, only lamps lit up his camper.
micks eyes were painstakingly focused on the blade in his hands. too many times prior he had cut his fingers and palms on the sharp edge of the kukri. in a low tone, he muttered to himself about how unfair it was that he was surrounded by other men, unfair how you were surrounded by other men.
like many times before the blade slid just a few millimeters and it broke the skin on his forefinger just near the cuticle of his nail. mick cursed under his breath pondering why it seemed like everyone was trying to get "in his way" of you. mick had spent countless and restless nights in the cot of his van staring up at the ceiling or out of the skylight window.
he placed the knife down while he sucked the blood from out of his finger. it was a shallow cut, nothing he hadn't seen before. he sighed deeply, kicking out the chair from underneath him. he was itching to see you again and he was itching to take you away from the main base. after all, it was filled with all the other men he felt he had to compete with.
fuck. that pissed him off.
he needed to get you out of there and he needed to get all the deranged thoughts out of his head. despite it being the dead of night, he opened the caravan door then slamming it shut behind himself.
he was deadset on you. he huffed, making his way towards the main base. gun in his hand incase something were to go awry. the walk from his camper to the base was no less than a 10 minute walk and with his long and lanky legs that journey took even less time for him.
once he arrived to the base he walked around the perimeter towards your room. he knew your room was on the second floor facing the woods in the back. he turned the corner of the wooden badwater building, grazing his black gloves hand on the corner of the structure. he was careful enough not to step on any twigs or leaves on the new mexican desert that would've revealed that someone was outside. if anyone was up he would surely be caught and chased back into his van. his western style foots caused a small whirlwind of dirt and dust to kick up every step he took, only for it to drift back down onto the burnt orange dirt underneath him. a small rust colored pebble the size of a babies' palm laid still right besides feet, squatting down on his haunches he picked the little rock up. he stood up tall again and hurled the rock at your open window. a little light from your vintage club table lamp luminated the corner of your room, he assumed that you were up reading or drawing. even from outside, he heard the little clank of the pebble on your oak wood floor. a breeze of warm southern wind blew by and gave mick goosebumps, his eyes were glued on your window, watching your petite shadow dance on the walls of your room. your body came into view as you bent over to pick up the rock mick had just thrown into your room. he was studying you, trying to determine what exactly you were wearing, was it a nightgown? his eyes traced your chest slightly internally hoping to see even just a glance at your bare chest.
mick was save hidden within the shadows and the darkness of night. he stood still and as quiet as a mouse watching you move around, twisting your head around in an attempt to figure out where the damn rock came from. finally, you approached the open window, looking up at the top of the white window head down to the window sill outside that you and pyro had decorated with a new cacti and plants native to the area. mick saw you shrug in an assumption that you had finally figured out where the rock came from.
he wanted to yell out to you in a hush town for you to come outside and look at the stars with him. it was the perfect cloudless night for stargazing.
you tossed the pebble out the window, the both of you watching it tumble down until it hit the gravel floor and rolled over a few times before stopping some inches away from where it originally landed.
you lifted your arms up and shut the window, turning around and swiftly walking away.
"fuck. me." mick sighed in disappointment, pondering why he couldn't have just said your name, why he couldn't fucking talk to you. you were right there. right in front of him. all he had to do was
say.
your.
name.
defeated, his gaze shifted to the small light in your corner flick off. seems as if the random appearance of the rock in your room from nowhere didn't startle you as much as what mick hoped for. sighing, he turned on his heels back to the safe haven of his van, slinking back into the shadows of what he was loneliness he was too familiar with.
82 notes
·
View notes
Text
yet another gif coloring tutorial
Okay, so, I posted a coloring tutorial for one of my moots a few years ago on my main, @zackmartin (I believe I've since deleted it) but that was the technique I was using when I started making gifs 7ish years ago, and I’ve since updated my routine so I decided to post a new tutorial with my new technique.
I'm going to show you how I achieved this:
I'm using Photoshop for this. I'll try to make this as detailed as possible so it's beginner-friendly, but you do at least need to know how to make and export a gif. If you have any questions, don't hesitate to reach out! just be aware, this tutorial really image-heavy
A few notes before I begin: 1) this is like, the bare minimum most basic way to color a gif. This is what I’d be doing if I was giffing a scene and that’s it. If you’re interested in different coloring styles (like my suite life episode series) then let me know! 2) When coloring gifs with POC, you need to make sure not to change their skin color by making them too light, too orange, too yellow etc. The JATP source blog posted a masterpost of different tutorials to teach you how to color gifs in different ways (like with the pastel coloring for instance) without whitewashing/orangewashing POC. But, honestly there’s a ton of tutorials out there that show you how to avoid this if you do a little digging. NO EXCUSES!
Anyway, let's get started! Before I do the coloring, I ofc make my gif, crop it, set the frame rate, resize, and sharpen. (you can find my sharpening tutorial HERE)
I. BRIGHTENING
(as a quick note, I don't focus much on London's skin tone during this stage, because I'm going to fix it during later steps)
The first thing I do is white balance using a curves layer. To do this, I click the little circle thing in the toolbar below the layers, and then click curves like so (you'll do this every time you want to add a new layer):

And then I click the bottom eyedropper tool on the left-hand side:
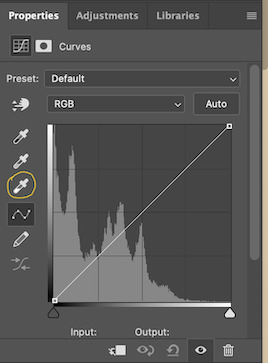
Then I click the lightest white part of the gif. (I’m not sure how to explain this well, but it basically white balances that spot to make it pure white. Like, if I clicked on the gold part of London's bracelet, then the whole gif would turn out really blue because it would be trying to white balance the gold) (hopefully that makes at least a little bit of sense)
Anyway, there’s a trick I use to find the lightest part of the gif; hold down the option key (or alt if you’re on windows) and while you’re holding down the option key, drag the little white arrow on the right-hand side:
(i apologize for the quality of the screenshots, tumblr keeps destroying them :/ let me know if I need to clarify anything)
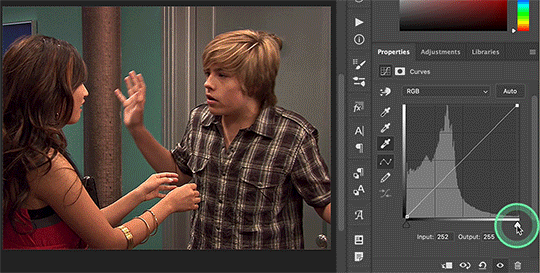
Then I use another curves layer to do the same thing with but with the blacks. So, I add another curves layer, and then click the eyedropper tool at the top this time:
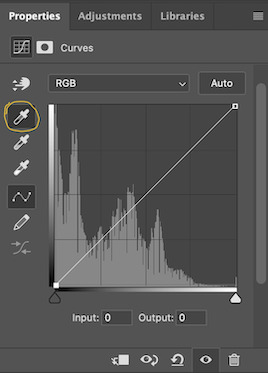
And then I click the darkest, black part of the gif. You can use the same trick by holding the option/alt key and dragging the triangle on the left-hand side:

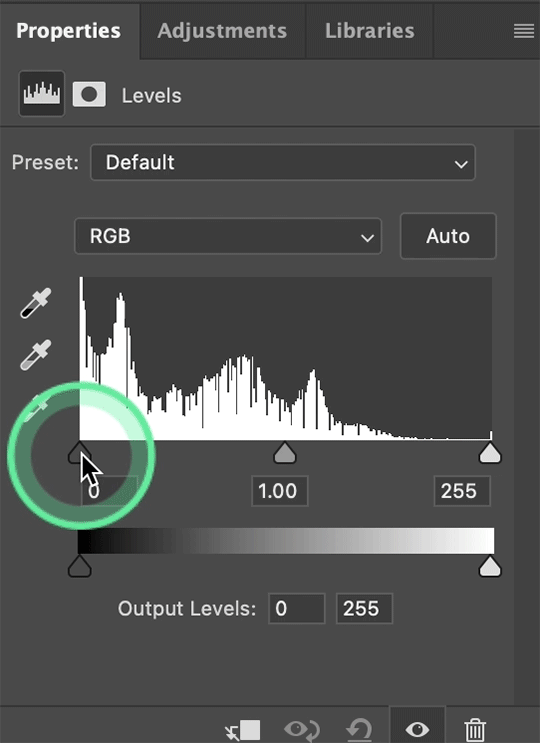
Next, I add a levels layer. I drag the middle lever thing to the left, and the left lever to the right. (I don’t usually touch the little lever thing on the far-right, but it’s really up to personal preference. I learned to color gifs by basically messing around with settings, so I’d recommend doing the same and just seeing what you like best):
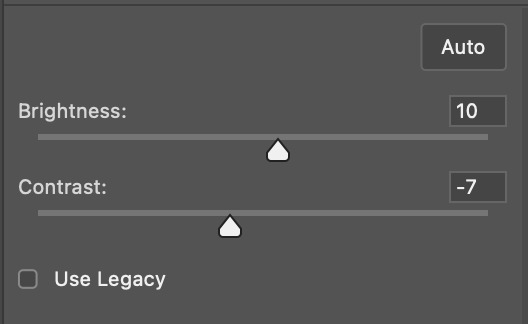
Finally, if I want to go even brighter, I usually add a brightness/contrast layer. I typically turn up the brightness a bit, and turn down the contrast. But, since I brightened a lot with the curves and levels, I usually don’t go that far. These were the settings I used for this particular gif (even though I'm going to share most of the settings that I used, I wouldn't recommend using the exact same ones on your own gif as it'll really depend on the scene you're using):
II. VIBRANCE
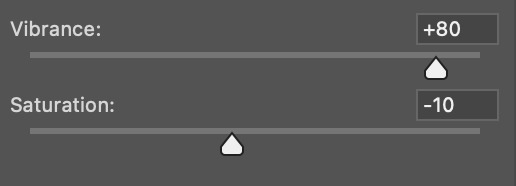
Now I add a vibrance layer. I like my gifs to be bright and vibrant, so I usually turn up the vibrance, and turn down the saturation a bit. These are the settings I used for this particular gif:
And this is what the gif looks like so far with just brightening it up a bit and adding vibrance (it might look a bit too bright right now, but I'm going to fix that in later steps):
III. SELECTIVE COLOR
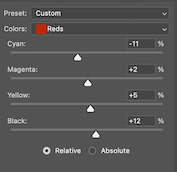
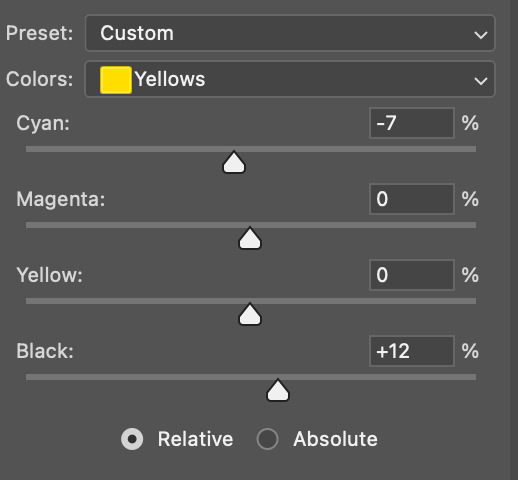
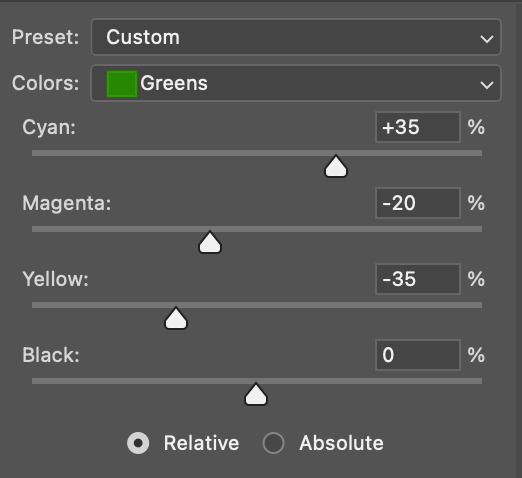
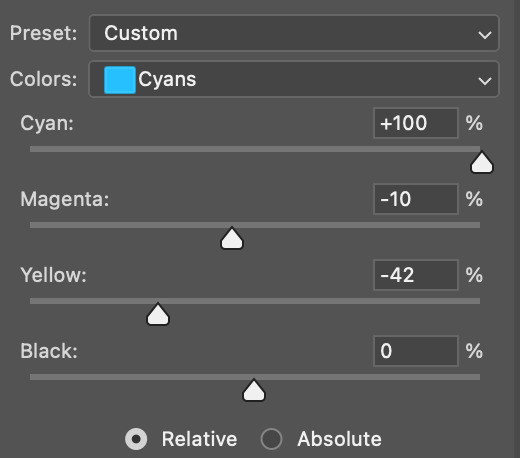
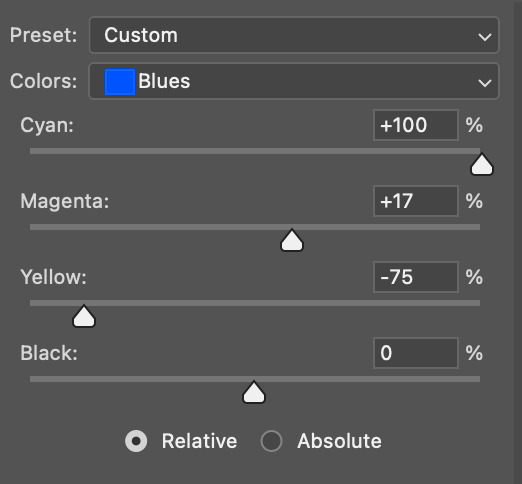
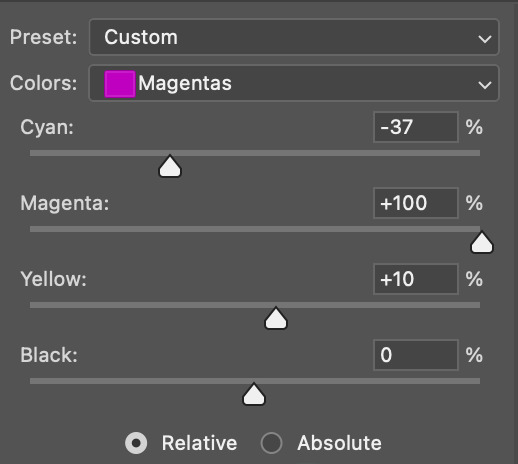
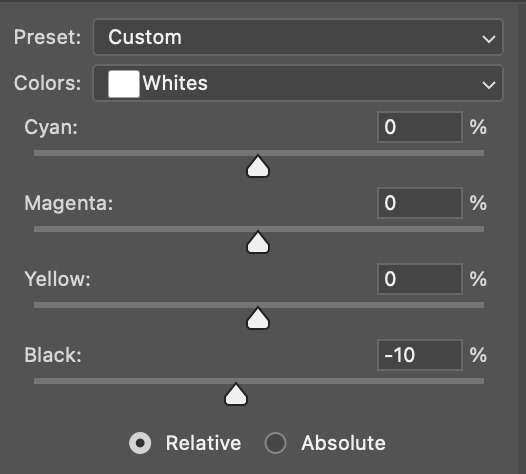
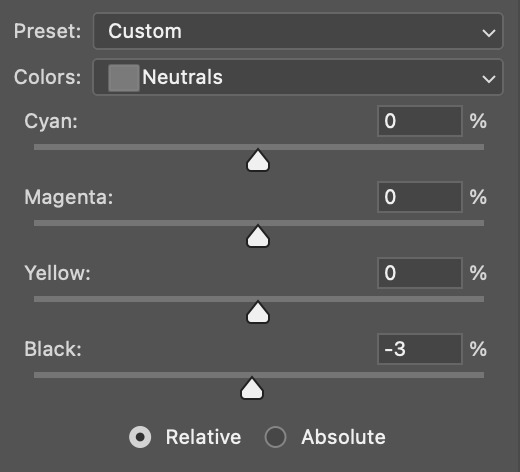
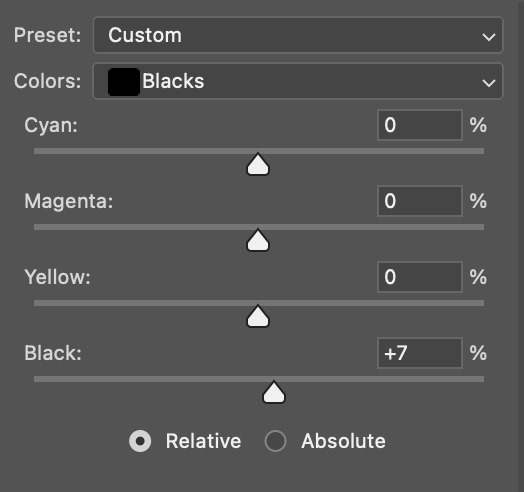
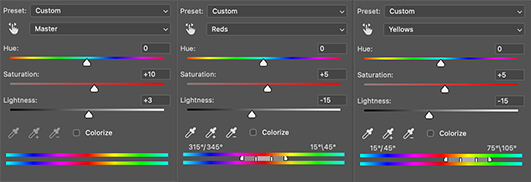
Now, I add a selective color layer. The reds and yellows typically affect skin tones, so this is where I'll start to fix London's. These are the settings I used for this gif (I usually wouldn't change all of the colors, but this is just one of those situations where they happened to be present in the scene I'm giffing):
IV. HUE/SATURATION
now I add a hue/saturation layer. I typically turn up the master saturation to +10 and the lightness between +3 - +5 regardless of the gif. Then if I still need to fix skin tones, I'll mess around with the reds and yellows. These are the settings I used:
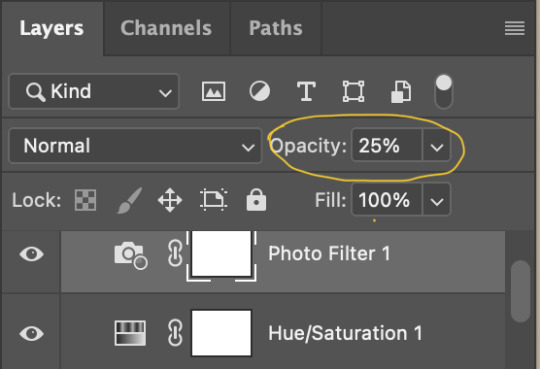
V. PHOTO FILTER
Next, I add a photo filter. I usually stick with the default one, I keep the layer set to normal, and I turn the opacity down to 25%:

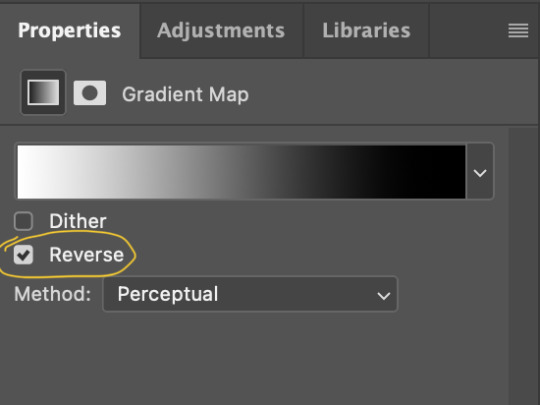
VI. B&W GRADIENT MAP
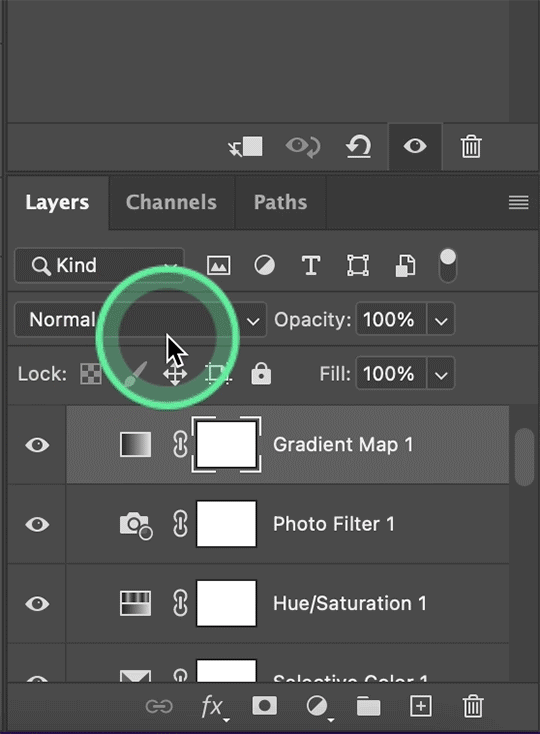
finally, I add a black & white gradient map, and I click the little box to reverse it:
Then I set the layer to soft light and I turn the opacity down, between 10% - 20% depending on the gif:
A lot of times, I'll stop here. If I'm satisfied with the way the gif looks, and London's skin isn't too pale/orange/yellow etc, then I could just add my watermark, export and be done. But, there a few other optional steps I might take if I'm still not quite happy with it.
VII. OPTIONAL
Usually the next thing I'll add if I've decided to keep going is a color balance layer. It obviously does as it says, helps balance out the colors, but some gifmakers also like their gifs to have like, a reddish tint or a bluish tint or what have you, so this can help with that too. I wanted to balance out the reddish/yellowish tint, so these are the settings I used:
and this was the gif before the color balance:
and after:
And if I want to play around with the colors a bit more, or fix the skin tones further, I might add another selective color layer or a hue/saturation layer (or both, depending).
Rarely, I might add an exposure layer. (I added one to this gif for the purposes of this tutorial). These are the settings I used for that:
And if the gif came out a bit too bright, I might add another brightness/contrast layer, except this time I would turn down the brightness and turn up the contrast (again, I did that with this gif for the purposes of this tutorial).
And, that's pretty much it! This is my finished gif!
Like I said earlier, I pretty much learned how to color by messing around in photoshop, so I would really recommend playing with the different layers and settings for yourself, as well as checking out other coloring tutorials and other gifmakers methods and see what you like and what you don't. And finally, the best thing you can do is just,,, practice. I've been gifmaking for about seven years, but I feel like I didn't really become decent at it until this year
Again, If you have any questions let me know! and feel free to tag me in your creations! #userzackmartin 💕
#*tutorials#tutorials#gif tutorials#coloring tutorial#gif coloring tutorial#flashing gif#flashing gif tw#i'm not really sure it counts but just in case#flashing tw#dailyresources#photoshop tutorials#*
57 notes
·
View notes
Note
how do you make your graphics? your style is so unique and beautiful!
Hi, thanks so much, that’s very kind of you! And I use Photoshop. If I’m being honest it’s not a super elaborate nor elegant process, I’m still learning and I mostly figured out what I like to do by just going in there blind and clicking around a bunch. I’ll put the more detailed steps under the cut if you’re interested, though!
Okay so generally speaking, these are usually the steps:
1. I take screenshots through either Premiere or the built-in Windows screenshot tool (but preferably Premiere). I try to use 4K remasters of the movies where I can these days, because it allows me to—
2. zoom in and crop the hell out of them and reframe them how I see fit without losing out too much on the quality. (these movies needed more close-ups, goddamn it) If there’s blank space left at the edges, I might duplicate the nearest edge area of the layer and try to blur it out + darken it with a gradient to fill that gap and still get the framing I want.
3. Then I adjust basics like exposure and contrast using the Curves function + boost saturation and vibrance—I try not to overdo it with the latter two because that step gets repeated later on, but I do need to do it at the start to even properly see what colors are in there since the MCU is so fucking bleak when it comes to color grading, and the 4k remasters tend to be even flatter. I also add Sharpen and Sharpen Edges filters here.
4. This is the fun part: go in and mess around with color. I usually use the Selective Color tool to figure out which parts I want to bring into focus by boosting like 2-3 colors and tweaking/evening out the rest of the tones to get some contrast. Hue/Saturation and Color Balance come in handy here, too. I’ll also sometimes use the Match & Replace Color tools to either neutralize, lighten/darken or entirely remove certain colors, and add Photo Filters to warm up/cool down the whole thing or certain areas.
5. When I have a decent idea of what I’m doing with color, I move to masking out what I don’t need—usually over-saturation in the skin tones, teeth, whites of the eyes, weirdly saturated pixel clusters, etc, and blurring out areas that might be too textured.
6. I’d say this is an optional step depending on the edit, where I might add any “special elements”—this is not the best quality example, but it has multiple:

I take the rectangle select tool—or Lasso or whatever select tool, depending on the shape—and then use Invert on that area (which I do a lot, lol. Big fan of my buddy the Invert tool). Here I also used a B&W adjustment layer, but if the inverted area’s in color I go in again with Selective Color or any of the other previous adjustment tools to futz around with the colors some more, such as here:
I kind of suck at remembering to use different layers for different adjustments, but if I’m adding any shapes or patterns with the Brush tool—such as the dots or the blood spatter on those BW posters—I make sure to always do that on a new layer. I do the same if I’m adding a duplicated area at a lower opacity to create that “ghost” effect at the edges of an object, like in this Sam edit here:
or if I’m adding a directional blur like in these:

7. On a new layer, I add in color gradients at a very low opacity and then layer them up until I like what I’m seeing, usually radiating out towards the edges of the image or in spots that I feel might need a color change or boost. The red and cyan here are some of the more noticeable examples:
or the sepia-esque bleed through in these:


And I might do the same thing with a dark grey to darken the corners and edges a bit.
8. I add a text layer, write whatever it is I want on there and set font and size, pick a base color for it that is complimentary with the colors of the image, and then I go into Layer Style to adjust the opacity and blending mode. I usually use Difference or Exclusion for the latter if I’m trying to get that colorful text, and I might also throw in a lower opacity Gradient Overlay if I’m not a 100% satisfied with the colors that produces.
I might also mask the text so that I can make it appear to be behind an object, like in this:

9. Texture! I used to just add a noise filter directly to the base image but have since learned that’s not really the best way, so instead I:
i. create a new layer;
ii. set the mode to Overlay, and check “Fill with Overlay-neutral color (50% gray)”—you can also do this by just using the Bucket tool to fill this new layer with a neutral-looking gray color and then tweak the opacity;
iii. convert the layer to a Smart Object so I can go back in and re-edit;
iv. finally add a Noise Filter (set to gaussian and monochromatic) at around 3%-15%, depending on the image size and quality. I might also add a Gaussian Blur on top to make the noise a bit softer.
10. Final checks—this is where I might up the exposure, contrast, and saturation/vibrance again, or add another layer with gradients (always under the texture layer). I usually also export a test version to see how it translates online after it’s been compressed on upload, and then use that as a reference for whatever needs fixing or tweaking.
And that’s more or less it! Thanks for the ask—I never really thought too systematically about what it is I exactly do with these, so this was an interesting exercise. <3
4 notes
·
View notes
Note
hi! i noticed you said you were fairly new to making gifs, and i'm also kind of new and still struggling on how to make the quality crisp/how to get good coloring. is it possible for you to provide some advice / tips for me?
ah hello !! yes, i started last year spring but i'm feeling a lot more confident these days so hopefully i'll have some insights that are of use to you 💜
i yapped a lot, so i'm putting most of this under a readmore
first: tutorials are your friend. gifmakers sharing things are your friend! we gotta look out for each other lmao. how else will we keep our timeconsuming hobby on dying website alive. try to find resource blogs like usergif tutorials section or these sorts of things. im sure lots of us muddled our way through like that. if you have a favorite gifmaker see if they have like a photoshop help or a ref tag, too, that's nice (i dont on this blog, but lots of folks do)
second: quality generally is going to be a lot bit down to your source video. u can sharpen and do everything you like to 480p and it will still be 480p you know? so for kpop, most mvs and that kinda stuff will be in 4k which you can download from youtube and that's nice enough. if you want to have better you can look for masters (which i do, i have a huge list of hoarded mvs). for performances ideally you want either like nice 1080p .ts files or uhd - there are places you can look for that like on twitter or on different sites. basically you want to use the nicest you can get (that wont brick your computer - 4k can be troublesome for this reason sometimes)
third: once you have nice quality video source, a lot of crispiness and prettiness is down to individual sharpen settings and coloring, especially contrast and white balance. curves tool is your friend for fixing tints/white balance/contrast. here's a good sharpen actions set from my mutual @/sugurugetos (and thats her resource blog so it may be worthwhile to poke around in there). i use a combination of my own sharpen settings + photoshop camera raw filter most of the time.
(aside: there are some other more complicated things you can do to nice-ify your footage, like vaporsynth/avisynth or handbrake or topaz upscale or whatever, and im here to tell you i dont use any of those things and i still make it out okay hehe. but there are many tutorials for them too if you like)
fourth: it is a learning curve like any other creative hobby so give it time & keep trying hehe. most gifmakers have their own style of coloring/sharpening and yours will become more apparent once you figure out how you like to do it. i believe in u
#rowan asks#gifmaking#long post#side note: one of the most important coloring skills for kpop gifmaker compared to regular is that you Need to know how to make things#less white and overexposed. bc kpop media has a horrible whitewashing problem so it's good to learn how to unghost them as soon as you can#try & check ref of what idols actually look like / have that in your brain when youre working on it#curves + gradient maps on soft light low opacity + selective color white are your friends#hopefully any of this is of some use to you hehe#if you have a more specific question let me know and i can try to answer that too !
5 notes
·
View notes
Text
Membrane x Male! Assistant! Reader (Smut)
AU: ETF but Zim stays schmoopy.
(Y/N)’s POV
I adjusted Membrane’s signature collared lab coat as the sound of people entering rang in from the house to backstage. Situated in front of the two of us was a gigantic television screen connected to a camera monitoring the house.
One wouldn’t expect him to be nervous, but Membrane was. He was terrified. He had been made aware of electrical problems in town, and was worried his son, Dib, might try to bring — what did he call it? His “jalada no científica”? That sounds about right. He was worried basin might try to bring that stuff to the keynote and divert attention to himself. He didn’t want his son to be made a fool of. No one should want that for their child.
But that nervousness was making him look disheveled.
I finished fixing his appearance and watched as he ran a hand down his hair spike, smoothing it. “You’re on in one minute.”
He nodded and stepped onto the platform that would rise to meet the stage. Once I gave him a thumbs up, the platform began to rise, and he spoke.
“Ladies and gentlemen!” His voice boomed through the speakers embedded within the stadium. The crowd roared ruthlessly, awaiting his every word.
He waited for the platform he was in to rise before beginning, “I am so very proud to announce…” When he was flush with the floor, he continued. “The new, Peace Day Edition… MEMBRACELET!”
The crowd was screaming his praise. But they grew quiet when he held a hand out to signal the cheering should momentarily cease.
“But I’m sure you’re wondering, ‘Why do I need a new Membracelet?’ Well, my dear consumer, I’ll tell you.”
“The Membracelet was originally meant for children to stimulate their minds as well as help them keep in touch with the ones they hold dear. It can run sensory engaging apps such as Peanut Simulator, and newly added Bloaty’s Puzzle Hog, that sharpen the reflexes of children across the world.”
“‘But Professor’, you’re saying, ‘What’s so different about this version other than a few new apps?’” He paused.
“Well, it’s simple. As you know, tomorrow is Peace Day, and nobody is as excited for the celebration as I am!”
A random man from the crowd waved his arms, screaming “I AM!”
Membrane shot up towards the man, rocketing up the stairs to shout in his face: “NOT SCIENTIFICALLY POSSIBLE!”
“Miguel, get back to the stage like a good boy.” I whispered into my earpiece. He shrank away from the man, doing as I asked.
Sighing, and regaining his composure, he resumed his speech. “Children. We discovered they generate an energy field of limitless chaotic potential. We call that child energy: CHILDERGY. The new Membracelet harnesses that Childergy and channels it outward as pure PEACE and JOY.”
The crowd ooh-ed and aah-ed as he explained how the device worked.
“Tomorrow, children will hold hands, encircling the planet in Membracelets, to bring about a peace unlike any the wORLD HAS EVER KNOWN!”
The crowd returned to its raucous state. But suddenly, the power went out. Screams rang out from a few frightened individuals, but that’s what you get for holding a keynote event in a town with unreliable energy. The backup generator quickly kicked on and the screams quieted.
I saw sweat bead on his forehead. It wasn’t that noticeable, but I knew where to look. He let out a deep exhale. “Well, now that we’re a bit less powerless...” The screen behind him switched to a picture of the Membracelet in four different colors. “We have Membracelets in multiple colors — for all styles and fashions!"
The crowd rejoiced and Membrane returned to the platform in the stage. “Good job, Professor,” I said over my earpiece. He slowly was lowered to my level under the stage. He turned off his mic and slowly walked over to me. “Professor?” I asked. But I got no response, as he slammed me to the wall.
He glared at me through his goggles. Shit...
“What’s wrong, Professor?” I asked, tilting my head, playing coy.
“If you want to act like you don’t know, I’ll show you,” he growled. I gulped. He was so hot when he was pent up. It was almost as if I’d planned this.
He pulled down his high collar and pressed his lips against mine in a rough kiss. He squeezed my ass as I moaned into the kiss. But he abruptly pulled away.
“But not now, sabroso. Not now...” He let go of me, “I have a few questions to answer for the press.”
As he walked up the stairs leading to the reserved parking (where reporters were inevitably waiting), I slumped against the wall. Every time I tried to toy with him, I got toyed with right back. And I absolutely loved it.
Does that make me a brat?
Shit, maybe...
In a moment of desperation, I went back to my house, painfully pent up. I knew I’d have to take care of this sooner rather than later. I briskly walked into my modest house and marched to the bedroom, slowly stripping on the way there.
By the time I had gotten to my bedroom, all I still had on were my pants and the boxers underneath. And with a bit of struggle, those were off too. I laid down on my messy bed and started pumping my cock. As I stroked, I may have gotten a bit too into it... I started moaning out Membrane’s name. And while this wasn’t unordinary for me to moan that, I typically had him with me. After all, what are friends with benefits if you’re only friends?
It was only when I heard a throat being cleared that I realized I was being watched. Caught, red handed. And by Membrane, nonetheless. How picturesque it must have been.
I only noticed I was holding my breath when he spoke, “Did I tell you that you could stop?”
I shook my head, indicating a no, and returned to pleasuring myself. I watched from a distance as the large figure of Professor Membrane moved to unbutton his lab coat. I stole a glance at his uncovered face. Screw the rest of him, I’d seen his torso and legs a million times over. His face, however? That was new. He pushed up his goggles and stared into my soul with his chocolate brown eyes. It was only when his gaze flicked downwards that I realized he was on track to fuck himself too.
“Chingados, (Y/N). You truly are a sight...” he gasped out between strokes, staring at me like I would disappear if he didn’t. I couldn’t help but moan and lean my head back as I got closer to a climax.
“Professor~” I moaned out. I heard Membrane’s breath hitch as I groaned.
“(Y/N), if you keep making noises like that…”
I looked at him the best I could, smirking as I whispered, “You’ll what?”
He growled and pounced on top of me, pinning my hands above my head. “Stay there,” he commanded as he let go of my wrists. He quickly pulled down his slacks and boxers. He made quick work of pushing my legs forward as to start preparing me for anal.
He slowly inserted a gloved finger into my ass and soon another. He began scissoring my insides. I almost came from that alone. But right when I was about to, he pulled his fingers out.
I whimpered, but he shushed me. He took off his gloves, revealing robotic arms. I’d seen them a few times before, but never in this kind of setting. But that’s beside the point. My focus was quickly shifted to the sensation of his dick entering me. I couldn’t help but groan as he pushed farther and farther. I wrapped my legs around his torso the best I could, and grabbed onto his neck.
Tears pricked my eyes.
He waited patiently for permission to move as I got adjusted to the feeling of him inside me. I slowly moved to hold his face and nodded. He grabbed my hips and began fucking himself with me. I moaned out louder than before as I felt him shift inside me.
His pace was relentless. It started off slower, yes, but it was brutal. Every time I got used to the pace he set, he increased the speed of his thrusts.
However, nothing lasts forever, and that was beginning to be my reality. My fingernails raked down his back as I moaned out obscenities.
“Say my name, guapo,” he groaned softly into my skin.
“Miguel~”
“Louder!”
“Miguel!”
“MÁS ALTO, POR EL AMOR DEL DIOS.”
“MIGUEL!”
White streaked my chest and clouded my vision as I wrenched my eyes closed. A few more thrusts from him and I felt him release inside me, overstimulating me even more.
He stayed inside me for a minute or two, but eventually pulled out. I whined. But it was inevitable. Almost immediately I felt cum leak out of me.
“Now who’s a good boy? Hmm?” Membrane asked, smirking.
I yawned, exhausted from how rough it was. “Still you.”
He chuckled, and he picked my bear limp body up to wash me off. All I could do was hum contently, as I knew I was going to be taken care of.
Translations:
- jalada no científica — unscientific bullshit
-sabroso — tasty
-chingados — fuck (interjection)
-más alto — louder
33 notes
·
View notes
Text
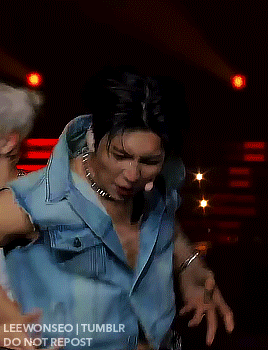
gif remake challenge (original here) - remake someone's else coloring, sharpening, slowing, and resizing. do your best to get close to the original and share how you did. make a new gif to challenge those you tag to recreate. share the source video if possible! try not to tell those you tagged anything to help them : see what they can figure out and how close they get on their own! if you're tagged in several, you can do one or all, whatever you like! if they have a giffing tutorial, shared actions, etc., you can use that to aid your recreation!
as a note, don't stress yourself out doing it! if you can't or don't want to recreate sharpening, or whatever else is a struggle, don't! the main goal is to make it look similar. it can still be in your style.


left is @lee-haechan rose’s pretty gif hehe and on the right is my attempt . ATTEMPT 🫣 at recreating it
ROSE. as soon as i saw the source material i was like oh im fucked LMFAO this was so hard ithink i took like 20 mins alone trying to get the size . SFNSJDS also i think it’s off by like one frame which makes me wanna ⚰️ . i do Nawt know how u do it i was struggling so hard .. this has like 5 selective color layers tht just . counter each other i think 😭😭 idk how u kept the bg all blue i was mind boggled i was like this is gonna be fun !! and then i sat behind my laptop for two hours like 😀


source: 230219 jia fancam
tagging: @hyvnsuk @y5ngha @wonjinist @kyubins @winxys @weitual @awek-s @seokmatthewz @fr9mis @mizugucci @hwichanis hi friends . friends . bc that’s what we r . right . RIGHT . FNSKFN jk but pls don’t h8 me for tagging u im sensitive 😍
#also rose i am tagging Yew to recreate mine#i yhink mine wld be easy to remake it’s not a lot i think#if i didmt tag u and u want to remake my gif pleek . PLEEK show me#*tag
16 notes
·
View notes
Text


gif remake challenge - remake someone's else coloring, sharpening, slowing, and resizing. do your best to get close to the original and share how you did. make a new gif to challenge those you tag to recreate. share the source video if possible! try not to tell those you tagged anything to help them; see what they can figure out and how close they get on their own! if you're tagged in several, you can do one or all, whatever you like! if they have a giffing tutorial, shared actions, etc., you can use that to aid your recreation!
originally, my friend and i (og posts here & here) created this challenge to showcase how unique a cc's giffing process is, and by trying to recreate another cc's style, it'll hopefully help provide insight to their creative process. thank you to the lovely @lee-haechan for helping me revive this challenge. i tried my best to recreate her chaewon gif dfjsk sharpening and adding noise was okay but the coloring...oh goodness. you can also look at my coloring stages tutorial to try and recreate my gif!
video source: here
tagging: @jeonwonwoo @solojihyo @hannietual @junranghae @97chwe @ftdino @shuaberriez @wnjunhui @woozification @wonufied @seungkwan-s @sugarushride (no pressure to participate – feel free to tag me again bc i'd love to try and recreate one of your gifs as well!!)
16 notes
·
View notes
Photo


gif remake challenge (original here) - remake someone’s else coloring, sharpening, slowing, and resizing. do your best to get close to the original and share how you did. make a new gif to challenge those you tag to recreate. share the source video if possible! try not to tell those you tagged anything to help them : see what they can figure out and how close they get on their own! if you’re tagged in several, you can do one or all, whatever you like! if they have a giffing tutorial, shared actions, etc., you can use that to aid your recreation!
I was tagged by my beloved @wonjinist to recreate iconic gas pedal minhee in her always gorgeous style. my timing is a little off, but other than that, I think I got kinda close
I‘m tagging @lunetual @woodziecup @dongkwan @hwichanis @kyubins @yangsminho @y5ngha @mizugucci and anyone else who wants to play to recreate a wonseo form gif from the pt concert! I conveniently have the video file available for everyone here. I feel a little bad about giving y’all a long source file, so I will say that form is the very last song
#this was more fun than i thought it would be#also sorry if my pick is annoying it's one of the only recent things i've giffed that's not from a k24 ts file#i also selfishly want everyone to gif my wonseo#feel free to ignore though!#mine*#tagged in
15 notes
·
View notes
Note
do you have any tips with gifmaking? like making higher quality gifs and growing a following i get so nervous interacting with other gifmakers because i feel like i being judged by them😭
hi there!!
i have some tips but i'll start with a couple of tutorial links that might help and why i use them. while art is always subjective, i do find that sometimes the lack of good sharpening turns me off to gifs and saying that out loud makes me sound rude, i'm so sorry!!
gif tutorial by cal-ketis, it's what i used to start making gifs and it's how i'm still giffing.
this action by anyataylorjoy, it saves so many steps
sharpening actions by nina-zcnik, i personally use a combination of v3 and v1.
grain filter tutorial by hellboys, this helps if the media is old and not as hd.
my general coloring tutorial tag & ps resource tag should be helpful!!
things i've learned over time/gathered from other gifmakers
practice. practice. practice. literally the art of photoshop (and i'd assume photopea is similar!) is to fuck around and find out.
make gifs for you and no one else
do what makes you feel happy
the better the quality (1080p or higher) the better the gif. i don't know how to sail the high seas so i've been very fortunate that i have friends who are so so kind to send me links.
try to join some gif source blogs!! i am personally scared to join some (because of not knowing how to sail the high seas) but people are always helpful in the ones i'm currently in.
if you don't join them, at least follow them!! they often drop tutorials and other fun goodies.
get into the habit of creating often even if you don't post them immediately.
it is not too late to learn something new and it's not too late to change your coloring style because someone else opened up your third eye.
don't be afraid to ask questions! this is mostly due to you mentioning that you get nervous interacting with other gifmakers and i'm telling you that i have met some of the nicest people who have taught me so much. i haven't even been giffing for a year and i would be lost without some of my very lovely friends!! so don't be nervous!!
as far as growing a following i really can't help you with that. i don't create for a following, i create for me. it's a lot less stress that way. and also i don't really have that many followers. tumblr glitched last month so i can't tell you what my actual follower count is. it's hilarious. anyway, anon, feel free to come back with any more questions you may have!! i'm more than happy to help when i can or at least steer you to some blogs or tutorials i like.
have a vinny!

3 notes
·
View notes
Photo


gif remake challenge - remake someone's else coloring, sharpening, slowing, and resizing. do your best to get close to the original and share how you did. make a new gif to challenge those you tag to recreate. share the source video if possible! try not to tell those you tagged anything to help them; see what they can figure out and how close they get on their own! if you're tagged in several, you can do one or all, whatever you like! if they have a giffing tutorial, shared actions, etc., you can use that to aid your recreation!
@jeonghan-yoons tagged me to recreate that beautiful jeonghan gif and it was definitely a challenge, but it was also fun... for the first time in years did my coloring in a different way (her coloring tutorial for stages is sooo good and it was what made me get as close as possible to her original gif), so now i’m back to experimenting with my coloring... it was so hard to not do it just the way i always do.
as for my gif, i decided to go with a stage gif as well, i kept my usual vibrant style but tried to give it a vampire vibe lol. good luck, i don’t have any tutorials, but i can answers questions 😅
video source here
i tag: @userjungkook97 @jeonghan-yoons @sugarushride @ftdino @woozification @wonufied @userjiminie (no pressure to do it. also you can tag me again bc this is fun!)
#am i a vibrant gifs type of person??? i couldn't get the same dreamy tone#wait... it might be my sharpening settings 🤨#well i tried and i'm quite happy with the result#it's been years since i spent this much time in a single gif... i've become lazy so i go with simple and i never gif stages#so this was fun and also a learning experience#rafa i'm tagging you in case you want to make your debut in caratblr
18 notes
·
View notes
Note
is it ok to ask how u edit ur lookbooks? i love your style sm
hiii!!!! omg thank you 🥹
first thing you need to know is that where my lookbooks are concerned i'm not doing a whole lot of editing. that's my secret, i think. i do as much as i can in blender. which is why this is exceedingly flattering for you to say because i do not consider myself very good at editing (mostly compared to those ppl that do shadows and hair strands, that's not my bag yanno!!!) i also try not to get too repetitive, so this is all just kind of general. if you got specific lookbooks in mind, i can dig into it.
also to preface this, i'm not going to link to any specific tutorials, because i don't know your particular learning style and there are soooo many tutorials out there that i could take hours just finding one. so i'm sorry but i'm going to have to leave the research with you, and point you in the right direction.
i've been using the same PSD, more or less, for well over 10 years now. i tweak it a little every time. learning how to make your own PSD can be a game changer-- you can learn how to manipulate the colors the way you wanna manipulate them, and if you use it long enough (like i have!) you'll create a signature. i'm such a sucker for the selective color adjustment layer, it's how i get my pinks so uniform. 💗
almost as important as a PSD is the action you use. i also made that, just a little sharpening, very tiny topaz effect, and more smart sharpen. in doing this (either taking the time to learn to make your own, or finding one you like) you'll free up a lot of time by quickly filtering your images and moving onto the fun parts.
layers layers layers!!!!
blending options for your layer open up (little mermaid voice) a whole new world! whether it's text you're bringing style to, cool outlines, soft glows, you can have a lot of fun just playing around.
fonts. just collect cool fonts you like. lost-type co-op is one of my favorites. play around with making some typography. there's no right answers!! but if you're working in a bigger canvas, make sure to zoom out so you know it's gonna be readable when tumblr scales it down to fit its format.
if you're going the blender route:
get in the habit of doing transparent background versions of every shot. even if i don't plan on using them, i just have them, and it makes editing a lot easier, a lot less painful. don't even have to crop out the backgrounds, it's just done.
learning how to use the compositor is another game changer. it's how i bring a little bit of a glow to my renders and make them pop without even having to open photoshop.
turn on node wrangler. this isn't relevant to anything in specific just look into how to enable node wrangler and thank me later.
also turn on the ratio aspects in your blender camera settings. this will allow you to see if things are centered, or juuuust the right amount of off-center if, if you're into that.
#i hope literally any of this is helpful#my brain is scrambled egg today i'm tired it's been long my head hurts#and i was about to work on this months lookbook when my mouse died :3#asks#anon#blender tips#photoshop tips
12 notes
·
View notes