#trying 4k downloader to see what the quality difference is like
Explore tagged Tumblr posts
Visit Tumblr Blog
Explore Tumblr blogs with no restrictions, modern design and the best experience.
Last Seen Tumblr Blogs


Fun Fact
Kazakhstan’s Minister of Communications and Informatics has blocked the Tumblr site because it contained 60 sites of terrorism, extremism, and pornography in 2015.
Text


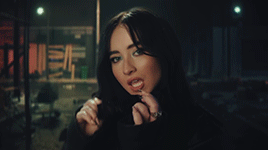
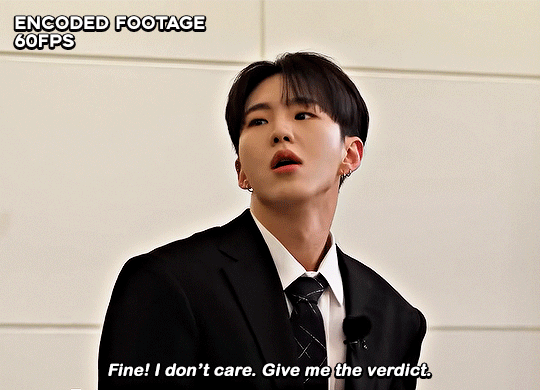
damn, DS Swain 1/?? Coronation Street
Bonus:

#who gave her permission to run her fingers through her bangs#and then didn't allow final looks???#continuity is screaming at you#but... I am also screaming for different reasons#you ever just look so hot while interviewing your future lovers husband for murder?#I didn't bother with what she was saying cause that's not what this series is gonna be about lesbereal#lisa swain#coronation street#damn ds swain#minegifs#minegif#trying 4k downloader to see what the quality difference is like#corrieedit#damndsswainseries#swarlagifs
17 notes
·
View notes
Note
hi i'm sorry to bother you but do you have any tips on giffing dark indoor scenes? yours always look so good!
hi there! not a bother at all :) i can definitely try to explain the steps i usually take under the cut!
this tutorial will assume that you already know the basic steps of gif-making — if you don't, there are lots of great tutorials floating around on this site that can help you out! :)
here's the gif i'll work with to explain my steps, the bottom being the original and the top being the coloured/brightened version.

before we start, a general tip i recommend keeping in mind: if you want to brighten a dark scene, you'll want to get your hands on the highest quality download you can find. 1080p is decent, but if your laptop can handle 2160p 4k hdr files* without sounding like it's about to explode, that'll get you even better results!
(*colouring hdr 4k files requires a different set of steps — the scene will appear washed-out on photoshop, so you need to make sure that you don't end up whitewashing anyone if you do choose to work with this type of file.)
since most of my downloads are 1080p, i'll use this type of file in this tutorial.
the first step of my gifmaking process with 1080p files is almost always the same no matter what scene i'm giffing. i make a brightness/contrast layer and set the blending mode to screen:

now my gif looks like this:

depending on the scene and how washed out it looks after this layer, i'll play around with the opacity. for this gif, i didn't touch the opacity at all. use your best judgement for this, because every scene is different!
i find that dark indoor scenes are usually tinted in yellow or green. one of my first goals is to try to fix the undertone of this scene before focusing on brightening it any further. i go to colour balance for this, and play around with the midtones, shadows, and highlights.
again, every scene is different, so the amount to which you use colour balance will differ, but for this specific scene, my goal was to neutralize the yellow. i focused particularly on the midtones and shadows of the colour balance layer, moving the scales to the opposite of the reds.


doing so will help with neutralizing the yellow. the only reason i moved the scales towards magenta and blue (therefore making it a bit more red than less) rather than green and yellow in shadows was because i wanted a darker contrast in the blacks. moving them to green and yellow made the overall scene more yellow since there were so many dark spots that shadows affected. (you'll see what i mean when you start experimenting with your own gif — this part of the process really just depends on your preferences!)
our gif might not look that much better yet, but it will soon! our best friend channel mixer is gonna help us out. for an in-depth post about how to use this adjustment layer, i recommend checking out this tutorial.
i'm someone who prefers to make more than one layer for the same adjustment layer for a reason i can't even explain (i just find that it helps me stay more organized). so don't think of this process like i can only use this layer once so i MUST fix it NOW. you can create multiple layers of the same adjustment layer, because every layer on top will affect the ones underneath it.
since my priority is getting rid of the yellow tint, i went to the Blue section of the channel mixer and increased it in all of the scales:

this step alone has helped us out so much, because look at our gif now!

not only does the background look less yellow, but so does izzy's skintone.
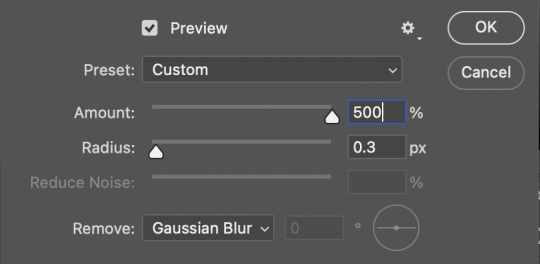
now i'm going to focus on trying to brighten the scene even more without destroying the quality. the levels layer can actually help out a lot with this.

the amount to which i move each toggle differs per scene, and i think experimenting depending on your gif works best for this layer.
side note: i prefer not to use the ink droppers on the side because the contrast in the result usually ends up feeling too strong for my preferences, but if you find that this works better for you, then go for it! basically, the first dropper with the black ink should be clicked before you select the darkest part of the scene that you can find, and vice versa for the third dropper with the white ink — click it, and then select the brightest part of your scene.
curves is the next layer that does fantastic work! unlike the levels layer, i do actually use the ink droppers for this. it's the same concept, with the first dropper being used on the darkest part of the scene, and the third dropper on the brightest.
try to think of curves as something that not only further brightens your scene, but also helps with the colour neutralizing process.
i grab the first dropper, then click the darkest parts of the gif that i can see. depending on the undertone of the blacks that you're clicking on, the tint of your gif might actually change significantly. this is why i prefer to click once, then undo the action if i don't like what it gives me. izzy's leather jacket was the sweet spot for this gif.
when i'm satisfied, i make another curves layer and use the third dropper to click the bright/white parts of the scene. for this gif in particular, the lights in the background were a good fit because they carried a yellow undertone — this meant that my curves layer actually helped to further neutralize the yellows in the scene as a whole!


(i manually dragged the curves graph upwards for the third dropper to make it brighter. i don't need to do this if the dropper does this for me automatically, but since the lights were pretty bright, it only changed the tone of the scene and didn't increase the brightness — hence the manual step.)
pat yourself on the back, because this is what our gif looks like now!

this is good, but it's not great — there's still just a bit too much yellow in the scene for my liking (sorry, i'm picky! :P)
i created another channel mixer layer and played with the toggles until i was satisfied:


ta-da! the gif as a whole is much less red/yellow now:

this is when i start fixing the colouring now — namely, his skin tone. selective colour will be your best friend here. i wanted to make his face just a tad brighter and less of a yellow-ish magenta shade, so i focused on the reds and yellows.


then, out of habit, i created another selective colour layer and took out more of the "yellow" in the whites to make them whiter, and increased the black (just by +1, since the contrast is pretty good enough already).


note: i switched to "absolute" for these two colours. basically, relative = less vibrant colour manipulation, and absolute = more vibrant/stronger colour manipulation. i prefer to stick to "relative" for fixing skin-tone since "absolute" can be a bit too strong for that.
our gif looks like this now!

his face looks brighter and much less yellow, so i'm satisfied!
this next step is not mandatory at all — again, i'm just picky and despise yellow-tinted scenes. i personally believe that indoor scenes that are yellow/green tinted make them look more dark than they actually are, so i do my best to get rid of these colours.
i also don't always do this, but for this gif, i just simply went to hue/saturation, selected the yellows from the drop-down menu and decreased its saturation.

be careful not to do this too much. depending on the quality of your download, this can significantly decrease your gif quality. i tend to worry less about this when i'm working with 2160p files, but again, those files require an entirely different set of steps when it comes to brightening/colouring.
since this was a 1080p file download (and one that was actually less than 1GB, oops, don't do that), i played it safe and decreased it by -39 only.
note: you also want to be cautious of colour-washing skintone when it comes to this step. i find that another selective colour layer can help perfect the skintone in case the yellow drains out of it too much, but skip the hue/saturation step if it's too difficult to work with — better to be safe than sorry.
anyway, this is the final gif!

that's usually what i do when it comes to colouring dark indoor scenes! i hope this tutorial makes sense, and if you have any further questions, don't hesitate to reach out! :)
#tutorial#gif tutorial#resources#completeresources#coloring tutorial#allresources#dailyresources#userraffa#userdean#uservivaldi#alielook#usercats#usermoonchild#usernaureen#userbarrow#userabs#useraish#useralison#userisaiah#*mytutorials#i am so sorry if this is incoherent#it’s so hard to explain things coherently 😫
737 notes
·
View notes
Text
*Pay Attention*
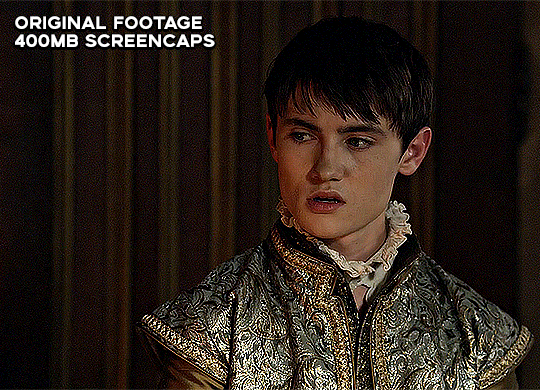
I might lose some popularity over this, but I'm not entirely concerned over that - what I am concerned about is people who play this game who aren't creators or who don't test every piece of content they put in their games, and their computers which they paid good money for.
I know as a creator how quickly polycount can rise, and I also know how much it sucks to lose details because you're trying to keep polycount low. But let me show you something -

Do you see a difference in these? Look closely, really study it for a second.
One has 14,077 poly. One has 4,014.
You tell me which one is which.
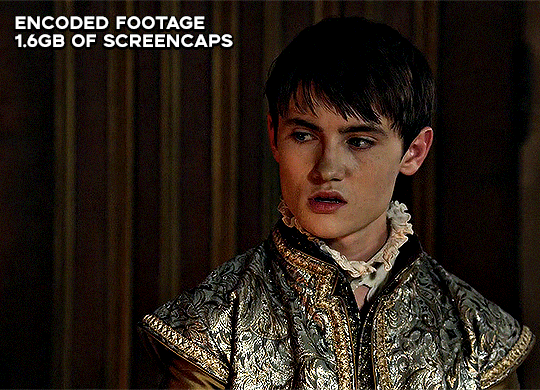
Here's the thing, I downloaded a beautiful set that I knew had to be high poly simply by looking at it. I always drool over this particular creator (and others) BECAUSE their stuff is beautiful, I get it. I'm an addict like all the rest of ya. Knowing this, I checked each mesh and was disappointed to yet again find thousands of polys on these meshes. One was over 35,000 polys for a decorative item.
That's stupid.
I decimated this object down to 4K without it losing any quality. I've done this with several items in my game because there's NO POINT in having 10,000 extra faces or more for the game to carry for absolutely no purpose whatsoever.
Please, creators - converters - players and downloaders, pay attention to what you're putting in your system. If you can lower the polycount when you're converting to TS3, take the extra step and do so. I have a tutorial on my page - it takes a few minutes to click a button a few times and maybe separate parts of the mesh to help it out a bit. If you're going to put it out for download as is, PLEASE for the love of all things holy put a disclaimer on it TELLING people that it has thousands of polycounts in it, so they can at least be aware of the bomb they're adding to their mods folders.
We all like to cram a bunch of crap into our games and decorate to our hearts content, but stuff like this puts our systems and save files at LITERAL risk. If you have an amazing computer to handle it (I have an amazing computer to handle it) great, but not everyone does. Keep that shit in mind before you release something with the digital weight of an elephant.
That is all, feel free to unfollow me if you have a problem with me probing into your shit. Have a great day.
694 notes
·
View notes
Note
Your GIFs are so good! I keep looking at them. Would you be willing to give advice on learning how to make good GIFs?
ah thank you so much anon you're so sweet 💙💙 I'm more than happy to help! these are some of the biggest things I can think of at the moment, but if you have specific questions I'd be happy to answer those as well
1. The Download Quality:
2. Cropping:
this is the first thing you need to focus on. always work with 1080p (or 4k if you want but honestly it isn't that huge of a difference unless you're brightening up very dark scenes, super zooming in and doing multiple effects. I personally don't work with 4k at all because I don't have the space or the bandwidth 💀 but if you do go for it!) the bigger the size of the file the better the quality is, I usually go with something around 2-4 GB for shows with 42 min episodes. look for AMZN in the file link, those tend to have the best quality (don't worry too much if you can't find those, god knows I rarely do)
but if you can't find big files, just go for it lol. like for the earlier seasons of 911 I don't have large files because I couldn't find them at the time plus I don't have that much space, so I'm working with files that are less than 1 GB in size. and I've not had any complaints. for visuals, gifs number 3, 4 and 7 are from large files that are around 2.5 GB in size. the rest of the set is all from under 1 GB (those can be difficult to do too much color manipulation and effects with so I don't 100% recommend them unless you can't find anything else. just don't make it the thing that stops you from giffing yk?)
make sure you're following Tumblr's width guidelines when cropping. so 540 if you're planning on putting one single gif in a row. 268 and 268 for two gifs. and 177, 178, 177 if it's three. the closer you crop to the edge the better the quality is. so unless you're trying for a specific effect or wanting to zoom in on something, stick to the edge
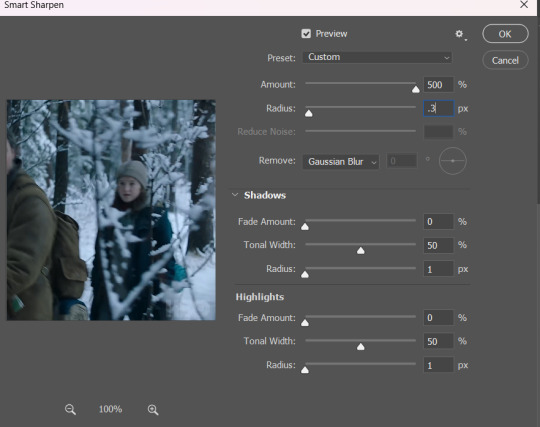
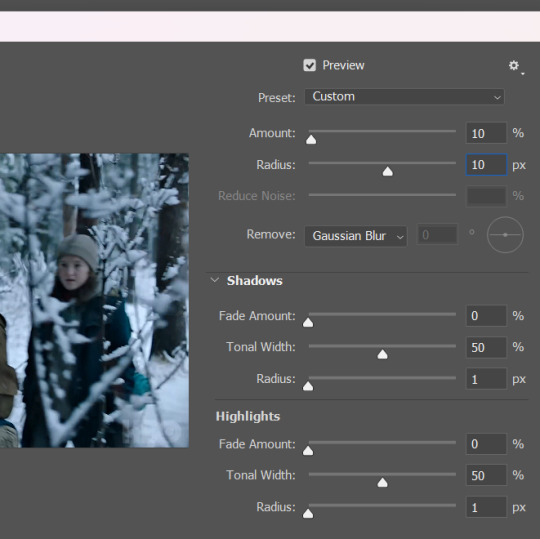
3. Sharpening:
sharpening settings make a ton of difference. here are mine
4. Coloring:
each scene is different and you need to experiment with different methods and see what looks good to YOU personally. for me, i usually start with a blank Brightness/Contrast layer with its blending mood set to Screen. sometimes you need to lower the opacity of the layer if the scene is already bright enough (some scenes don't work with this layer so I go for Levels and Curves next. and those are a lifesaver for brightening up a shot and getting rid of the awful filters some shows have. if you want more details on this, this and this tutorials are amazing)
then I go for a black and white Gradient Map set to Soft Light with opacity from 10-25%
from here on out the world is your oyster. experiment with different layers to see what you like. Selective Color and Color Balance are your best friend to make a scene truly pop. one trick I always always use (as long as it works lol) to fix a scene's coloring and make it as neutral as possible is to add a Curves layer right after the Gradient Map, select the middle ink dropper and click on the yellowest parts of the gif. this works by bringing out the color opposite of what you click on, so you click on yellow, it brings out blue. that's why it's important to click on dark rather than bright areas to bring out darker blues and thus make the scene look more neutral. but this part is always experimental with me. I click somewhere on the gif, it doesn't work, I Ctrl+Z and click another part. and again and again until I find the perfect spot. sometimes I have to decrease this layer's opacity (anywhere between 90 and 10) because it sometimes looks way too bland
5. Exporting:
this can all sound overwhelming at first, trust me I know. so try out a method, if it works, perfect. stick with it. until you encounter a scene where it doesn't work or you get used to it and want to try something new, then look for another method, find which you prefer and stick with it. etc. some scenes have me try out every single thing I know to make them look decent. with time you'll get used to these steps and it will come easy to you
here are my settings

that's all I can think of at the moment, if you need anything else, let me know! oh and go to @usergif they have a TON of resources and tutorials that have helped me so much
8 notes
·
View notes
Text
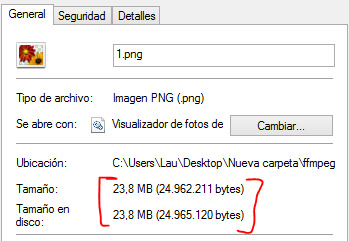
screencapping with ffmpeg
hey friends, long time no write! today i'm gonna explain how to get image sequences (aka screencaps) from any video files using ffmpeg in the command line.
First, if you don't have ffmpeg please go an download from HERE and install it, here's how WINDOWS / MAC and once you're good to go we can start!
i have a windows os so i'm going to explain for that but i don't think it should be more complicated for macs if you know how to work on the command line, under the read more bc i used a lot of images lol
what we need:
a video player to get the proper timestamps we need, i use mpv but any video player will help tbh
make a folder for our screencaps
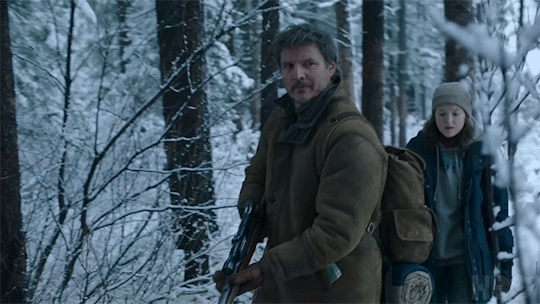
okay! so i'll be taking caps from a 4k video and i find my timestamps, this is my start (i don't have 4k movies on my computer, so you'll see my kpop boy lmao)

and this is the ending
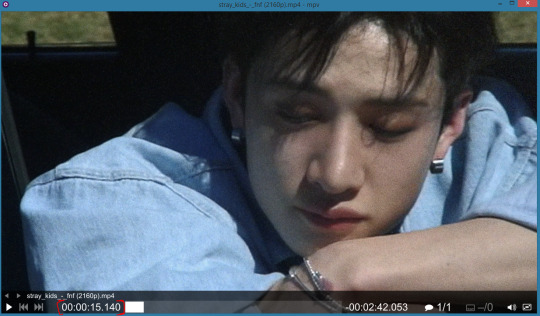
i would recommend to set the timestamps a second earlier and a second after the video ends so there isn't frames missing if you want a complete scene, deleting caps from a folder is easier than doing the whole process again lol
on the folder your video is while having it selected, click on this icon to copy its path

now i go to the folder i made! in the path bar it should be like this on windows

we click on the blank part and write cmd and hit enter

the command line should open right now
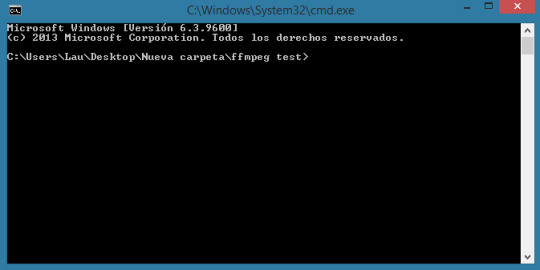
we proceed to write the following command
ffmpeg -ss hh:mm:ss -to hh:mm:ss -i [paste path to the video] -compression_level=0 output_%04d.png
hh:mm:ss is how you imput your timestamp, it's the most accurate way of doing it
output_%04d.png: name the files will have, if you're capping several timestamps from the same video i would change the name output to anything (example part1_%04d.png for scene 1, part2_%04d.png for scene 2 and so on) otherwise ffmpeg will overwrite your caps every time, i know there's probably a workaround but i haven't researched to that point yet, i'll update later!
compression_level=0 : makes the png the highest quality possible, pngs are essentially lossless, but without this command i've found the file size is rather small even if the finished image doesn't have much difference. you could try not putting the command and see if there's a difference for you, the files will just be smaller
Update (240402): my ffmpeg doesn't seem to recognize the command for compression level as it's written here anymore, but fear not! If yours doesn't either it's just a matter of adding a space instead of an equal sign between the command and the 0. It works as it's supposed to!
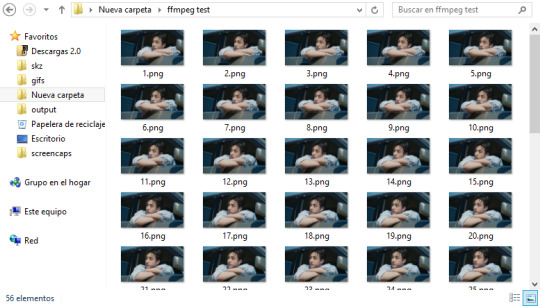
on your command line should look like this

you hit enter and ffmpeg should start processing, once it's done it'll open a new line for you to keep doing things on that folder, but if you don't want to do anything else just close it. your folder should be filled now with your screencaps
to compare, i capped the same scene with mpv to see if there was any frame drop and i was pleasantly surprised that the amount of caps was basically the same (there wasn't frame dropping! just the regular more frames bc you were a little slow on stopping the process on mpv)
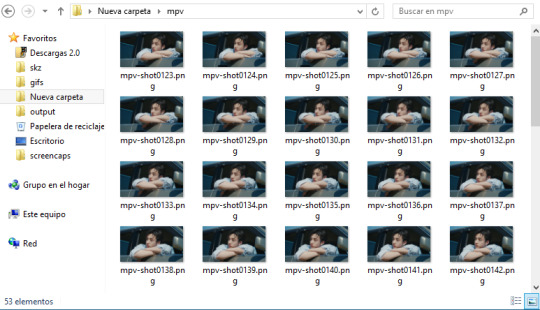
and the size is what mpv usually gives when screencapping too so it was a win for me
if you have any doubts ask me! or if you know more about ffmpeg and want to add on to the command i shared please do!
38 notes
·
View notes
Text
Graphics tutorial requested by anonymous
All made with adobe photoshop 2023 (you can find free downloads of cracked versions on here occasionally, photopea.com is also good I've heard) I'm assuming basic knowledge of photoshop/similar editing platforms and their tools, but you can always message me or comment if you are confused about anything!
Also, I used keyboard shortcuts sometimes to change the size of a brush or toggle the brush options, I'm not going to annotate this because it's a lot but here is a resource for basic photoshop keyboard shortcuts
Firstly, the sizing of your edit matters! Max sizing for best quality on Tumblr is 1280 x 1920. If you want to put to put two images next to each other sizing should be 640 x 960.
Next, always try to find the highest quality picture of whatever you're using. Good resources include taylorpictures.net, 4k Taylor Swift, and if I can't find them here I do a google image search of my photo to see if any other websites have a bigger/hq file.
This video is a couple clips I screen recorded for you to see my process and demonstrate a few different tools I use regularly. I added timestamps for you to follow along as you read the rest of this.
Here's a photo of my workspace I am working with and what I will do first is cut out Taylor from this photo and move her to my correctly sized canvas. There are multiple ways to cut out an image in photoshop, the easiest I've found is the select subject function and using the quick selection tool (see toolbar beneath the photo). Other tools include the magic wand tool, lasso tool, and quick selection tool which I will show later.
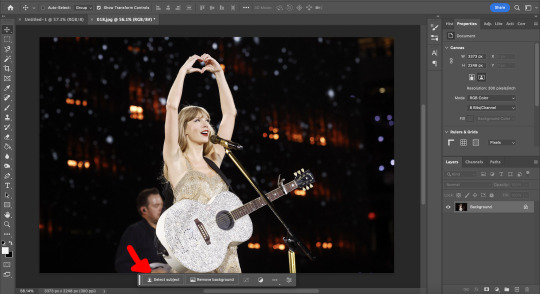
Now you will see that my selection isn't perfect, so I will use the quick selection tool to fix a few areas that I'd like to manually select/correct. This isn't totally necessary at this stage as you can always perfect your cutout in the next few steps, but it does help save some time.
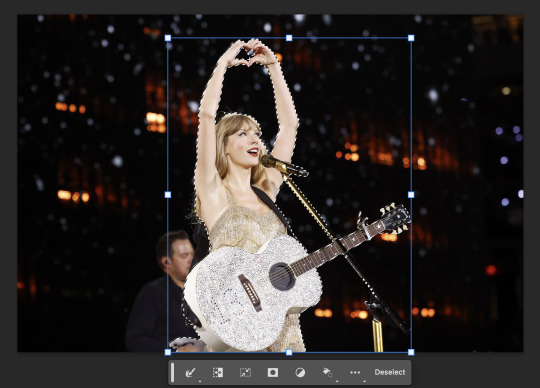
This is where I'll use the quick selection tool to either subtract or add to my selection. There are keyboard shortcuts to toggle between + and - to make this quicker.
See my screen recording of the process from 0:00-1:07
Now that we have our image selected and cut out, I copy and paste it to my canvas I want to work with (size 1280 x 1920) and this is what I've got:
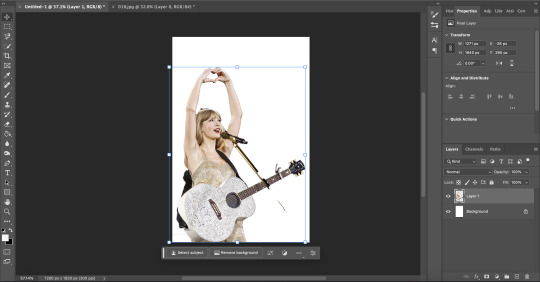
As you can see there's a few spots that need cleaning up in order to make our cutout perfect. You can do this with the eraser tool, magic wand, quick selection, or lasso tool.
See my screen recording of the process from: 1:08-3:50
Now that we're happy with our cutout, we can play around with it in any ways we want! Typically you're gonna do things like change the background color/texture, add elements with the square/circle tool to create what you're looking for, overlay elements and/or textures, and finally recolor it to your preferences.
This part is where you can try new techniques and play around to find what you like. I recorded some of my process of playing with different ideas and elements until I got to something I was happy with! The video explains the tools I was using as well
See my screen recording of the process from: 3:51 - the end
I hope this helps you with creating graphics in the future! The fun thing about photoshop is there are multiple ways to get what you want done. I showed you my way but there's plenty of other techniques and methods out there to try if you're unable to achieve what you want!
Best of luck and feel free to reach out to me if you are struggling/have questions! <3
#Tessa talks#requested#my tutorials#this took forever pls share!!!#photoshop tutorial#graphics tutorial#photoshop
45 notes
·
View notes
Text
youtube
So, here's some simple thoughts I had about Sonic x Shadow Generations. I was trying to push this one out real fast, but ended up with some technical problems and other stuff you can read about below the cut.
This video was a small technical nightmare to put together because I'm experimenting with new stuff. I capture a lot of my own footage when I can, and when I can't, I go out of my way to find the cleanest, highest quality version of what I'm looking for. That in itself can take a lot of time, but then I usually have to download it off of Youtube. For years, I've used a suspicious website called Keepvid (don't go there) to download Youtube videos, but recently I saw someone recommend a piece of software called "Stacher".
Stacher is basically a front end for another piece of software called "yt-dlp", which was the subject of a lawsuit a couple years ago -- basically, Youtube (Google) was claiming it was illegal to download Youtube videos, and was specifically targeting yt-dlp in the hopes of getting rid of it. A judge ruled that downloading Youtube videos is in fact totally reasonable and legal, and yt-dlp was allowed to keep existing. All of this is because yt-dlp is the best way to download Youtube videos, but it's command line software. I'm no stranger to command line (I've used FFMPEG), but I do tend to prefer having an interface to work with, which Stacher provides.
I picked up Stacher because Keepvid was starting to not work so well. Youtube is implementing new video formats and Keepvid was consistently only detecting 720p30 downloads. Stacher on the other hand will grab the absolute maximum possible resolution, which in this case was 4K60. Which is great! Even though I am downsampling to 1080p60, it still means I'm getting very sharp, very clean source footage. Except Vegas doesn't really like whatever 4K60 format Youtube is using, so I have to transcode it using Handbrake, which for even a 10 minute video can take upwards of an hour.
And then there's editing. My poor little 2015 CPU (Intel Core-i5 4690K) really struggles to work with 4K footage, which probably doubled the length I spent in Vegas putting this together. On top of the hours spent transcoding. So you can really start to see how all this adds up and delays what should have been out by, like, the 12th.
And if I couldn't get it out fast... I do wish I'd spent maybe a little longer explaining some of my opinions. I get the gist across but in particular when talking about what I think is cool about this level design, I think I could have explained a bit more.
Sonic games make you feel so railroaded and there are little hints in this footage of breaking free of that. There's a bit in the footage we've seen where Shadow runs around inside of a tube. This is interesting because:
This is a level design feature that makes total sense with Sonic style physics
This is a level design feature they barely ever use
There's an alternate path where, if you're fast enough on the draw, you can take a grind rail on top of the tube.
Not only would most Sonic games never have this tube section at all, if they did, they would not let you skip the tube and run on top of it. And if you go on top of the tube, there's more than just one grind rail up there, to boot!
So I see something like that, and it gives me a different vibe than most 3D Sonic games typically get. And that makes me excited!
As always I think these work best when I take a step back and think a little. Better Late Than Never is my brand.
#sega#sonic the hedgehog#sonic team#sonic x shadow generations#sonic generations#remaster#shadow the hedgehog#video#youtube#reaction#Youtube
8 notes
·
View notes
Note
Sorry if I bother you, but I really love your gif sets! Do you know some tutorials or, app, or anything, to learn how to make good gif? I am learning and I feel very stupid because all my gifs are shit. (if my ask is inappropriate or anything, please ignore me)
you're not bothering and none of this is inappropriate, you're more than welcome in my inbox! as for your questions, let's see what i can do.
1) tutorials — i've been doing this for long enough that i don't really have much to recommend here, the only tutorials i use nowadays are all about specific things and not how to make gifs as a whole. that being said i've linked this one before, i personally do some things differently but it's a very good tutorial, well-received by gifmakers who are just starting and well written, from what i've skimmed through.
another good post to look through is this one, not a gifmaking tutorial per se but it goes into sizes, sharpening, and how to get neat & clear gifs. two of the main points are A) while you can get away with making gifs out of a 720p quality video, 1080p is what is usually recommended. you could use 4k as well, but a 1080p video is usually easier to find, will take less space in your storage, and will give you really good results already. no need for overkill <3 as for B) size matters here on tumblr dot com, mostly width. the op of the post linked in this paragraph has included a nice graphic for the size limits for gifs, you can refer to it as you make your gifs so that whatever you make won't turn out pixelated once you upload it to tumblr.
if you're curious, i've been asked about my sharpening settings here and i spoke before on tumblr sizing here
2) software — you mentioned app, if by app you mean mobile stuff then i'm sorry, i can't help you! i've never made gifs through mobile and i wouldn't even know which direction to point towards for you to find more information. as for computers, if you mean programs then these are what i use to make my gifs: potplayer (for taking screencaps) and photoshop cc 2020 (for making the actual gifs, this is the post i used but here's one with more links)
now i'd like to mention something my grandma always used to say: no one is born learned. you're not stupid just because it's taking you a while to do something, learning is a process and everyone has their own pace. i've been making gifs for a decade now and i know there are things i could do better! i'm also still learning, i make plenty of "shit" gifs before stumbling my way to something i am okay with posting, and sometimes i'm really proud of what i've made and other times i think it's just "good enough". i understand feeling disheartened but please do not feel stupid about any of this!
no use in putting yourself down, now hold my hand and let's add the finishing touches on this long ass reply <3
3) tips — we've mentioned video quality, sharpening, and sizing. what else, what else. personally i would start simple (and i did, way back when, and still do!! most of my gifs are quite simple). so: cropping/resizing + coloring + sharpening. it'll help get the basics down and then you'll have a good foundation for everything else you might want to learn. i mentioned in another ask, almost two years ago now lmao, that i used to download other people's free psds (that is, pre-made settings and layers to color your gifs) and instead of using them i would open them up and pick them apart to see how people were coloring things, which layers they used, in which order, stuff like that.
remember: there is no right or wrong to do this! you could ask ten different people how they make their gifs, and their preferences for any specific part of the process, and you'd get ten different answers. if you find a tutorial and don't vibe with it, throw that aside and look for another. pick and choose, find what works for you and what doesn't! and that means do not be afraid to experiment and try things out.
also, don't like photoshop? no problem! i started with gimp, now personally i wouldn't recommend it over ps but it's a good program, it taught me a lot, and there's really nothing to hate about it. it might have less functions than ps though, and already a decade ago there weren't that many tutorials/resources for it.
don't like photoshop AND don't want to download a program? try photopea, i haven't used it but it works directly from your browser and it should do everything photoshop does!
let me know if there's anything else i can help with <3
18 notes
·
View notes
Note
This is probably so dumb and I'm sorry but how do you make your gifs? I use 4k Downloader to download videos then use clip champ to shorten the videos to 4 second clips then put the through ez gifs video to gif feature but it turns out so weird for me even when I download the video at high quality like I think 1080mps bit tje gifs always turn out weird on ez gif and photopea, I hope this was okay to ask I love your content
hi anon ! no question is dumb i asked myself the same things when i started making gifs.
that is an option, i know many friends that make their gifs on ezgifs, but i will suggest trying photoshop for that you can find amazing free versions on tumblr, you just have to look for them hehe
here you'll find a quick tutorial on how i make my gifs i hope it's helpful !
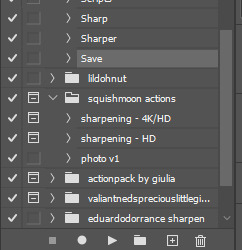
download the video using 4k downloader
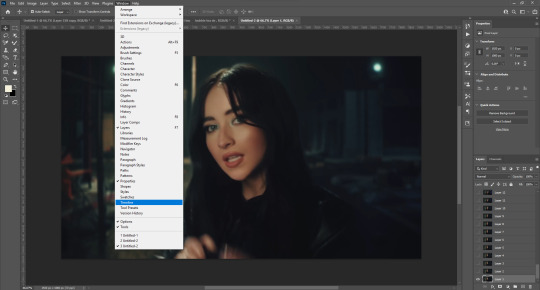
choose your video once you open photoshop. file > import > frames to layers

select the length of the gif (you will be able to trim it later so don't worry about it)
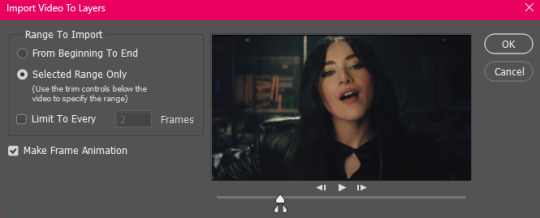
and then once once you have the video imported from frames to layers you'll open the timetable option to be able to trim your gif to the desiered length. i would suggest minimum 40 frames, maximum 120.

great ! now that you have your video trimmed we can start re-sizing it. for that, you'll go to the tool bar > crop tool and this is what you're going to see:
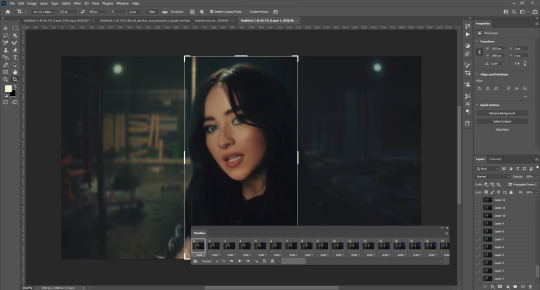

the key to a good gif i changing this commands you'll see here ! a gif icon should be 100x100 and a medium gif around 268x150. (obviously it's up to you !)
now you'll have your gif at the perfect size, it's time to apply some actions to sharpen it. play your action and you'll have your gif ready ! shoutout to all the creators you see listed here !
here you can add the psds and filters you want to make your gif look nice !
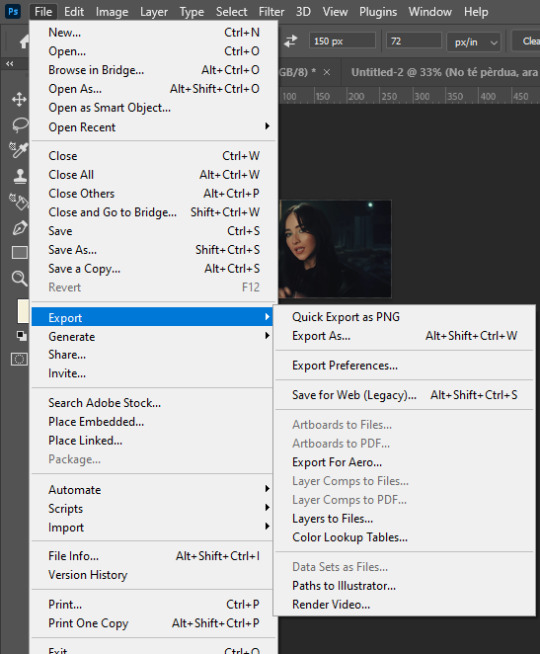
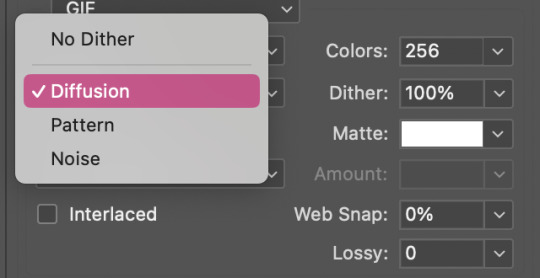
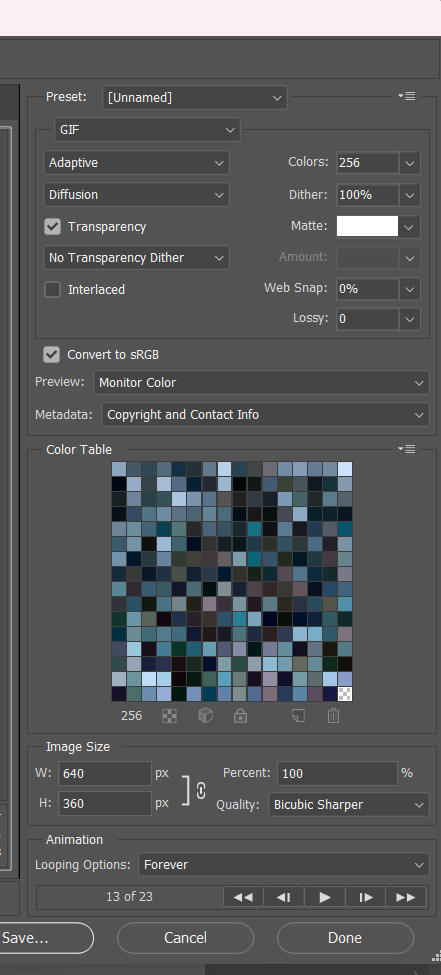
once your gif is sharpened and ready, you will have to save it ! for that, you'll have to go to file > export > save for web (legacy)
this window will open and you will have to set the different settings to get your gif ready. i use these :
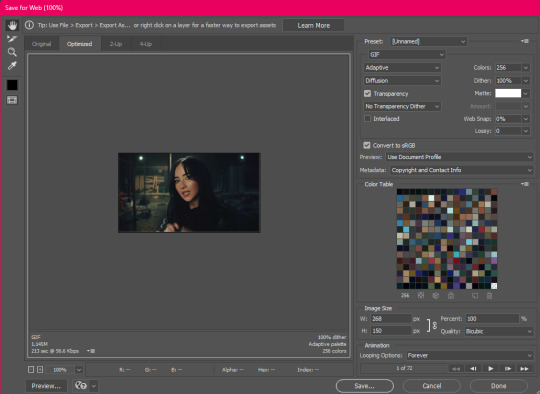
you save it wherever you want and you'll have your gif ready !
29 notes
·
View notes
Note
You make such beautiful gifs, the quality and coloring are simply wonderful.... I'm slowly getting into making gifs myself but I'm really struggling since my results come out looking muddy/low quality whenever I upload them (for example, uploading on twitter) .
And so I was wondering if you were ever up to making a tutorial on what your process is to get the results that you get.
Thank you for sharing your work with us, always a pleasure to see.
Thank you! Happy you like my gifs!
Learning to gif is a journey, and most people's first gifs don't turn out as nice as they want them to, so you're not alone. There's a lot of trial and error involved.
As for tutorials, I follow the same steps as most of the gif tutorials you'll find on tumblr. If you're not using Photoshop to make your gifs, you might want to try it. I'd recommend just finding a tutorial on how to make gifs in Photoshop on tumblr and working from that. Aside from one caveat, which I'll get to later, I don't have much to add about the gif making process that hasn't already been said.
The requirements for Twitter are a bit different than Tumblr as Twitter processes gifs differently than tumblr (and Twitter is worse). I don't make twitter gifs very frequently, so I can't give you the best advice for that. What I can say is that you'll need your gifs to be large enough for Twitter. You'll want to look up the optimal size for gifs on twitter because the last time I posted gifs to Twitter, the optimal size was larger than Tumblr. Once you figure this out, you should be able to make pretty good gifs for Twitter.
In terms of general gif making, for best results you should use HD files. This is going to be key. You want to use either 1080p or 4k, and in my experience, 4k doesn't significantly improve gifs unless you want to zoom in, in which case the extra resolution of a 4k file helps a lot. I use 1080p unless I want to zoom in.
You also want to make sure the file you download isn't overly compressed because overly compressed video is much more difficult to brighten and color. If you're looking to download an episode of a tv show, you may find a few different files. I usually go for the largest 1080p version because that will give me the best quality. The smaller 1080p files are noticeably worse quality than the larger 1080p files. They both say 1080p, but they are not the same - that smaller file size came with sacrifices. Ripping straight off a blu ray will usually give you great results, but the files can be very large.
Now on to the one thing I do differently than what you'll see in a lot of gif tutorials - I don't sharpen in Photoshop. I use Topaz Video AI. This is a resource-intensive program, and I run it on an expensive laptop which allows it to run quickly. It's not going to run well on everyone's computer, so if you're working with 1080p files, it's absolutely not necessary. I use it a lot because I like it, but sharpening in photoshop will be fine if you're gifing an HD file.
If you're working with standard definition content, Topaz Video AI makes a world of difference. If you're asking me about my gifs because you saw my Scrubs gifs, then, unfortunately, Topaz Video AI is the secret to how they're much higher quality than anything you'd make from the SD/DVD files that are available.
I do know that a lot of people have used Topaz Video AI (or a similar program) to upscale many older series, so if you're looking to gif a standard definition series, someone out there may have already done the work for you. For example, I know you can find upscaled Xena episodes pretty easily these days, which was not the case when I first started using topaz to make my gifs.
And if you can't find an HD file, you just have to make the best with what you have. Sometimes that's the only option.
Hope this is helpful!
#reply#i know it's not super specific#but the gif tutorials on tumblr are usually pretty good for the basics#and this is what I have to add that might not be in there
5 notes
·
View notes
Note
hi, would you mind posting a gif tutorial? your gifs are so pretty!
helloooo! thank you so much for saying that 🥹
firstly, when it comes to making gifs, i like to use 4k files. at the very least, i don't want to use anything lower than 1080p. this post helped me in finding where to download things like tv shows, movies etc.
i'm really not very good at explaining how i make gifs, so i hope that it's ok if i can link you to some tutorials that i have personally used and that have helped me learn more about making gifs.
i'll link along the way and show you some of my settings!
when i got back into making gifs a couple of years ago i used this tutorial. it's so thorough and takes you through every step you can think of. it has lots of really good information and it was so helpful to have a reference to help me get myself reacquainted with photoshop and the whole gif making process.
here are some of the things i personally do when making gifs.
SHARPENING: these are my sharpening settings! mess around with each of the bars and drag them to see what suits you. you may want your gifs to be sharper, but this is what works for me!
here's a gif i made, fully coloured, before sharpening:
here's the same gif after the sharpening has been applied:

as for colouring, i like to make colours bright and vibrant. i focus a lot on using the vibrance and exposure tools to create this effect. i like to try and bring out the colours that are already in the video and enhance them without washing out the subject. this takes A LOT of trial and error but it's so much fun to experiment with.
this tutorial is SO helpful when it comes to the basics of colouring. i also found this tutorial that was so helpful when learning to colour gifs and tackle yellow lighting in scenes.
this post also has some really good resources to help you colour gifs without white washing people of colour.
finally, these are the settings i use to save my gifs:

the settings really do change the quality of the way your gifs display on tumblr. mess around with these settings below to find a look that you feel happy with.
when posting to tumblr, i like to save every gif set i make for a set into my drafts before posting for everyone to see. colours look different on every screen so i like to check how things look on mobile too before i post!
sometimes it really helps being able to visually see a whole gif set together. it can help point out to you if your colourings look consistent and then you can tweak anything before posting!
i really hope some of this was helpful to you. sorry for not being able to articulate and explain for myself. the ops of the tutorials i've linked have been so thorough and have explained things far better than i could. i've always got them saved in my drafts just in case i need to reach for them again.
3 notes
·
View notes
Note
Your gifs are always so gorgeous! I love the variety of different things you gif, there’s always something I like ❤️
I was also wondering if you could help me. Whenever I try to gif anything animated, the colors turn ‘sparkly’ or ‘noisy’ I guess you could say, both when I do and don’t touch the coloring. Basically any light color looks like it’s glittering dots, and I don’t really understand what I’m doing wrong, because it doesn’t happen when I gif live-action stuff.
No problem if you can't help. I noticed your animated gifs always look great, and I love them.
Hey anon!
Tysm, that's extremely kind of you to say 🥰💛
I love being a multi-fandom girlie otherwise I get bored if I'm giffing the same one or two shows, it's much more fun having a variety I can keep on rotation and go back to if/when the hyperfixation quietens down.
With live action vs. animated, in my experience live action stuff will never look the same as animated, you won't get a beautiful, sharp, crisp finish like you do with a live action gif as seen here due to how they are filmed. Ultimately, there will always be some level of noise and graininess to animated gifs it's just how you execute the finish that can help cover up some of that.
Plus the more saturated with colour a scene is whether it's animated/live action it will always look better than light scenes eg any background with a white base or certain skin tones so faces, hands etc and the evil outdoor natural lighting. Probably something to do with the pixels idk😅
*All of this is going on the assumption you are using photoshop, are working with 1080p or higher because that's what I use. It doesn't make a huge amount of difference if it's 720p but any lower could be a factor as to why they are looking like yours do. I always say 3 things will affect your gif: quality of your download (always aim for 1080p where possible) sharpening and colouring*
To note, I colour all my gifs from scratch. I don't use a blanket sharpening for everything, I know some people do it's all down to preference. I have around 4 that I tweak depending on the gif/media, it's what I prefer and how I work as I deal with 480p/4k, no gifmaker is the same.
I don't know what your sharpening is like as that will affect the graininess of the gif, so if you say it's not your colouring maybe your sharpening needs some tweaking and you need to change it up.
With my animated gifs, regarding colouring I always make sure to utilise, gradient maps/curves/levels more to balance the lights and shadows, alongside the colour balance, vibrance and saturation tools to add the colour. Here are some examples below which I hope demonstrate what I mean.
GIF 1: I haven't coloured it exactly how I would colour wise as it's just an example so it's basic colouring to get the point across.
I used no gradient maps, levels or RGB channel. Only brightness, selective colour, slight curves and saturation with a basic sharpen. The result is a grainy, noisy, crunchy finish on Pooh's face and the background with a dull looking gif.

GIF 2: I used the same basic colouring as above but added a gradient map, adjusted the RGB channels in the curves tool & levels to balance those lights and shadows, increased the saturation, colour balance, added vibrance and an exposure layer on top to make the gif brighter and pop!
The same basic sharpen but this time with some noise on top around 2% you can increase/decrease it slowly never more than 5 and see what you prefer. The crunchiness and graininess has decreased and you get more of a smoother finish on Pooh's face and the background.

GIF 3: When applicable I will use a stronger, fancier sharpen bear in mind this means you have to tweak your base colouring as you don't want a deep fried, over sharpened gif eeek and the final gif size will increase. Adjust your dimensions etc. I love making huge gifs and hate small ones so I'm forever fighting the gif limit and am used to it.
There's an increase to the grain to Pooh's face and background, the finish is slightly more HQ and the colours again pop. Some might find this too much grain but again preference, depends how I feel on the day tbh. I think I used this in my original set here.

Sometimes, no matter what you do, you can end up with glittery spots it's the way it is with animation as seen below. But by playing with colouring and changing it up completely, it draws your eye to the background and how pretty it looks that it doesn't matter about the spots on Pooh's face.

If you managed to get to the end and understand a single word I said, then congrats lmao. I always ramble when explaining and my process is different from other people's but seems to work for me. It's simply based on vibes when I'm in Photoshop 😂😂😂
Good luck anon, I hope something from this helps you!!!
#soph asks#gif advice#i apologise but trust me it was longer than this i had to trim it down asdgjkl i explain better verbally!#i wanted to add as much explanation because i've read advice where i understand nothing so id rather over explain
1 note
·
View note
Text
Revolutionizing Video Quality: How iFoto's Video Quality Enhancer Boosts Your Content Game
Hey fellow content creators and video enthusiasts! If you've ever found yourself staring at your phone, wishing you could convert those grainy, low-res clips into cinematic masterpieces, then you're in luck. Today, I'm diving into the world of video production, sharing insights on how iFoto's Video Quality Enhancer can take your content to the next level.

Why Video Quality Matters
Before we delve into into the nitty-gritty of iFoto's Video Quality Enhancer, let's talk about why video quality is so crucial for your content. Here are a few key reasons:
Engagement: High-quality videos are more engaging. They captivate viewers and keep them watching.
Brand Perception: If you're a business, the quality of your videos reflects your brand's image.
Message Clarity: Good video quality ensures that your message comes across loud and clear.
What iFoto's Video Quality Enhancer Offers
Now, let's talk about the star of the show: iFoto's Video Quality Enhancer. This AI-powered tool is a game-changer for anyone looking to raise their video production game. Here's what it can do:
Upscale Your Videos: Take those low-resolution clips and upscale them to stunning high-resolution formats like 4K at 30FPS and beyond. It's like magic for your videos!
Maintain Quality: The best part? This enhancer does it without compromising quality. Your videos will look sharp and crisp, every time.
Efficient Workflow: With iFoto, you can streamline your workflow. No more spending hours tweaking and adjusting in post-production. This tool does the heavy lifting for you.
How to Get Started with iFoto's Video Quality Enhancer
Now that you're sold on the benefits, let's talk about how to get started. Here's a quick rundown:
Sign Up: Head over to iFoto's website and sign up for an account. It's quick and easy.
Upload Your Video: Once you're in, upload the video you want to enhance.
Select the Enhancer: Choose the Video Quality Enhancer option from the menu.
Wait for the Magic: iFoto's AI will do its thing, and you'll be amazed at the results.
Download and Share: Once the enhancement is complete, download your new, high-quality video and share it with the world!
Tips for Maximizing Your Video Quality Enhancer Experience
To make the most out of iFoto's Video Quality Enhancer, here are some tips to keep in mind:
Start with the Best Quality: Always upload the highest quality video you have. The enhancer works better with high-quality source material.
Experiment with Settings: Try different settings to see what works best for your content.
Regularly Update: Keep an eye out for updates to the enhancer to take advantage of new features.
The Bottom Line
Finally, video production is all about quality, and iFoto's Video Quality Enhancer is the tool that can help you achieve that. From upscaling your videos to maintaining quality, this AI-powered enhancer is a must-have for any content creator. So, what are you waiting for? Give it a try and watch your content soar!
0 notes
Text
what is handbrake? basically its a software that helps you change the format of videos, such as for certain devices or screens, or in the case that we’re going to utilise, quality and frame rate!
disclaimer: handbrake is super easy to use and very beginner friendly for this procedure and it can make a video go from 30fps to 60fps however it does not replace the quality of true 4k/blue/master-pro res files. in the gif below, this is the level of detail in a master pro-res file.

getting started it’s easiest first to note the timestamps of the video you want to encode, and keep in mind that unless your computer is incredibly powerful, i wouldn’t try to encode an hour worth of footage in one run! my laptop could handle about 30 seconds in one go before she started toasting.
using handbrake: once you’ve downloaded the software, open the software and it will come up with a pop up window asking you to open the video source (that is presumably saved within your folders) and go ahead and do so!
in the range section, use the drop down button to navigate to seconds and enter your timestamp. the duration on the side will show how long of the footage you’re gonna encode is!

then go down to the save as, and give your footage ‘to be snipped’ a name. this isn’t necessary but useful because if you’re planning to say, encode 3 or 4 small parts of footage in one sitting, each encoding instance will overwrite the previous one. so i just call mine 'cut 1’, 'cut 2’ and so on.

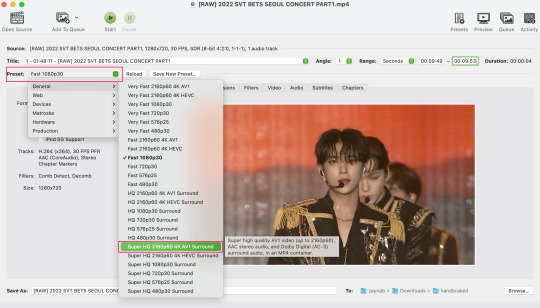
next go to preset, and there you’ll see such a wide variety of options that you can play around with, with differing qualities, frame rates, sound options, and so on. for the sake of this tutorial, i’m using ’superhq 2160p60 4k av1 surround’ and i’ve used the drop down menu to select it! then go ahead and press start! the time taken to complete depends on the duration of footage that you sent to encode! you’ll find your encoded video as an .mp4 file in your designated folder (which you can change via browse at the bottom)

what next? • if you prefer to open footage directly into photoshop (my ps can’t handle it), then go for it! • if you screencap as i do, then just use mpv or whatever screencapping program you prefer to make the screencaps and open in ps in your usual manner. • you can use the timestamps to further process the video through vapoursynth to denoise, but i’ve yet to try that!
the results for this first set of example footage, i used footage from the be the sun concert file, which is almost 2 hours in length and 4gb in file size.


you can see the difference in the smooth frame rate of the footage, as well as the quality of the sharpening!
and to utilise the bane of gifmaking, a gose episode, notorious for dodgy pixelated frames and less hd quality in 1080p on youtube, i ran it through the same settings!


these are the exact same files, downloaded using 4k video downloader and with the same sharpening, but see how on the original file, the sharpening looks a bit more harsh and 'outlined’ while it seems to sit softer on the encoded 4k version!
so i mainly use handbrake for dvd files, or not-so-hd 1080p youtube videos or videos that seem a bit clunkier but i had never tried them on a tv/film file so take a look below! i used a 1gb (so not very good quality) of a show (as compared to its 4gb files).


as i said at the start in the disclaimer, handbrake can’t replicate true file quality, as you’d expect to see in a proper hd bluray/t*rrent file of a show but there’s an interesting difference in the frame rate. personally it’s not something i would utilise much there but its all up to individual preference on how someone prefers to have their gifs <3
this is a very basic run-through of how i used handbrake, as i haven’t really explored all its features and i use this as a quick process when i’m running through seventeen dvd/dl files but i feel like it would work well on general youtube videos (such as interviews, episodes, behind the scenes) and feel free to send an ask/message for any help/clarification! <33
☆ UPSCALING LOW QUALITY FOOTAGE
what i used: • 2021 macbook pro with m1 chip (390/500gb storage used she's hanging in there) • photoshop 2020 • mpv (for screencaps but this isn't needed!) • handbrake (available for linux, mac and windows here) • video source to gif
what is handbrake? basically its a software that helps you change the format of videos, such as for certain devices or screens, or in the case that we're going to utilise, quality and frame rate!
disclaimer: handbrake is super easy to use and very beginner friendly for this procedure and it can make a video go from 30fps to 60fps however it does not replace the quality of true 4k/blue/master-pro res files. in the gif below, this is the level of detail in a master pro-res file.

getting started it's easiest first to note the timestamps of the video you want to encode, and keep in mind that unless your computer is incredibly powerful, i wouldn't try to encode an hour worth of footage in one run! my laptop could handle about 30 seconds in one go before she started toasting.
using handbrake: once you've downloaded the software, open the software and it will come up with a pop up window asking you to open the video source (that is presumably saved within your folders) and go ahead and do so!
in the range section, use the drop down button to navigate to seconds and enter your timestamp. the duration on the side will show how long of the footage you're gonna encode is!

then go down to the save as, and give your footage 'to be snipped' a name. this isn't necessary but useful because if you're planning to say, encode 3 or 4 small parts of footage in one sitting, each encoding instance will overwrite the previous one. so i just call mine 'cut 1', 'cut 2' and so on.

next go to preset, and there you'll see such a wide variety of options that you can play around with, with differing qualities, frame rates, sound options, and so on. for the sake of this tutorial, i'm using 'superhq 2160p60 4k av1 surround' and i've used the drop down menu to select it! then go ahead and press start! the time taken to complete depends on the duration of footage that you sent to encode! you'll find your encoded video as an .mp4 file in your designated folder (which you can change via browse at the bottom)
what next? • if you prefer to open footage directly into photoshop (my ps can't handle it), then go for it! • if you screencap as i do, then just use mpv or whatever screencapping program you prefer to make the screencaps and open in ps in your usual manner. • you can use the timestamps to further process the video through vapoursynth to denoise, but i've yet to try that!
the results for this first set of example footage, i used footage from the be the sun concert file, which is almost 2 hours in length and 4gb in file size.

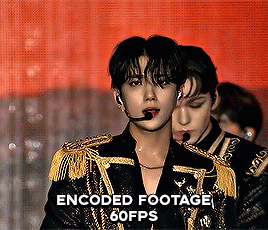

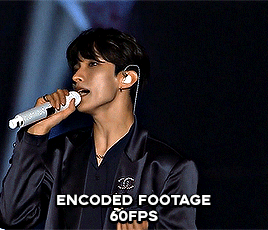
you can see the difference in the smooth frame rate of the footage, as well as the quality of the sharpening!
and to utilise the bane of gifmaking, a gose episode, notorious for dodgy pixelated frames and less hd quality in 1080p on youtube, i ran it through the same settings!

these are the exact same files, downloaded using 4k video downloader and with the same sharpening, but see how on the original file, the sharpening looks a bit more harsh and 'outlined' while it seems to sit softer on the encoded 4k version!
so i mainly use handbrake for dvd files, or not-so-hd 1080p youtube videos or videos that seem a bit clunkier but i had never tried them on a tv/film file so take a look below! i used a 1gb (so not very good quality) of a show (as compared to its 4gb files).
as i said at the start in the disclaimer, handbrake can't replicate true file quality, as you'd expect to see in a proper hd bluray/t*rrent file of a show but there's an interesting difference in the frame rate. personally it's not something i would utilise much there but its all up to individual preference on how someone prefers to have their gifs <3
this is a very basic run-through of how i used handbrake, as i haven't really explored all its features and i use this as a quick process when i'm running through seventeen dvd/dl files but i feel like it would work well on general youtube videos (such as interviews, episodes, behind the scenes) and feel free to send an ask/message for any help/clarification! <33
367 notes
·
View notes
Note
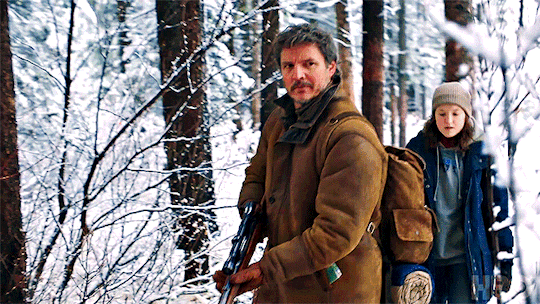
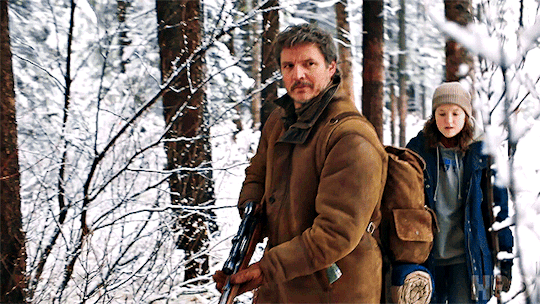
Your gifs are always spot on. I’m thinking about starting a side blog for tlou gifs— but honestly I’m kinda lost on how to get that started. What’s your normal giffing process? (If you don’t mind sharing oc)
thank you! i'm fairly new to gifing as well, and use a lot of really good resources i found online to help me along. the process i follow depends on the scene i'm looking at (it is light, dark, does it have ugly colouring, words, or text, etc) and i adjust it to fit whatever i need.
but here is the normal gifing process i follow!
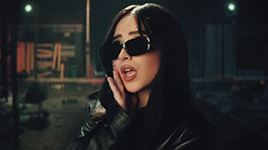
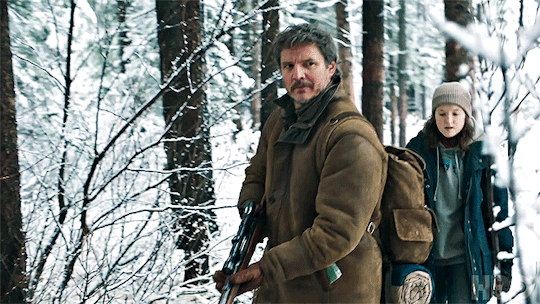
I grabbed the trailer of TLOU to use as an example.
Here is how I go from this to this:

Once you know what scene you want to gif, you need to capture it. I usually download it through torrents (always 1080p, never under as tumblr tends to ruin the quality), buy them online (as a downloadable version), or with 4K Video Downloader (perfect for getting YouTube videos in 1080p), or screen capture to record them.
Since you can't put in a 45+ min video in Photoshop, you need to trim it down. I use Video Proc Converter (the full version also has a video downloader and a screen recorder!) to trim the video down to the clips I want. It also retains its resolution, too.
Then comes editing!
I primarily use these in PS:
Once all my frames have been added, trimmed, timed, cropped, and converted to a Smart Object, the gif looks like this:
It's not bad, but it could be better! So, I always sharpen them next. I sharpen them twice with Smart Sharpen:
It looks like this now:

You can already see the difference!
Next, I brighten the gif. I use Exposure, Brightness/Contrast, and Curves, and Levels (more so for gifs with heavy black). For this one, I used Exposure (+0.99), Brightness/Contrast (1 & 35), and Curves (I used the white eyedropper tool on the snow in the background - the whitest part of the gif), and then used the Line to add more brightness.
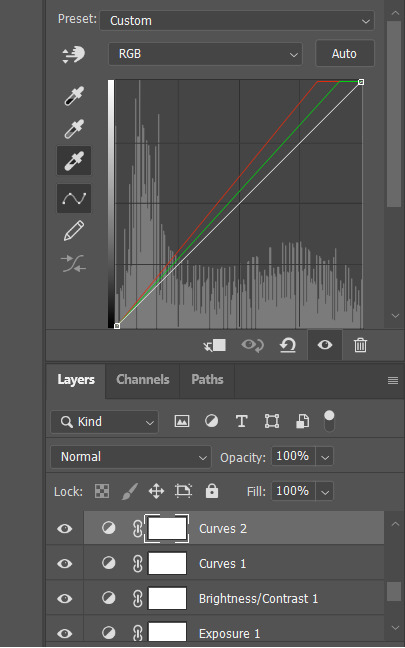

Now, my gif looks like this!
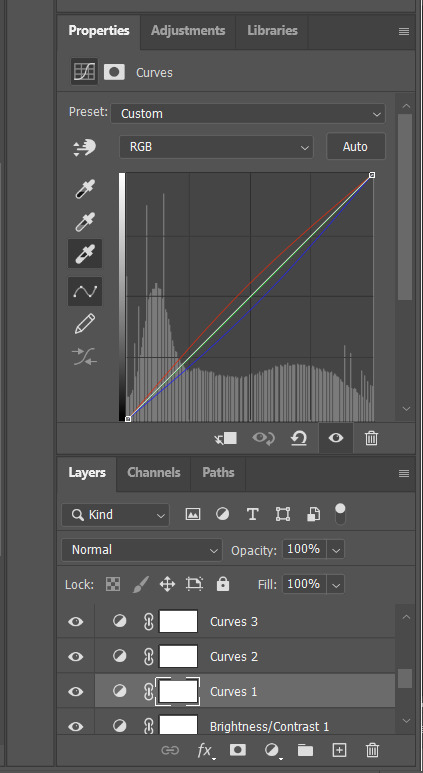
Next, I use Colour Balance I ALWAYS use this. There is no preset. You should play around with the colours to see which ones work for your gif. I rarely use Shadows, sometimes I use Highlights but I always just stick with Midtones.

I suggest playing around with this until you find something you like.
My gif with Colour Balance looks like this:

I then go into Selective Colour. For this one, you can try them out until you find what you like! I wanted to make the reds in the trees pop and make her rucksack a deeper blue, so I added:
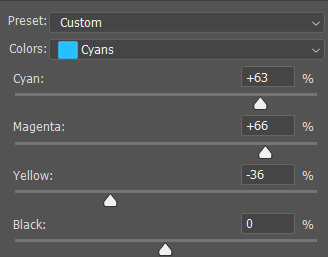
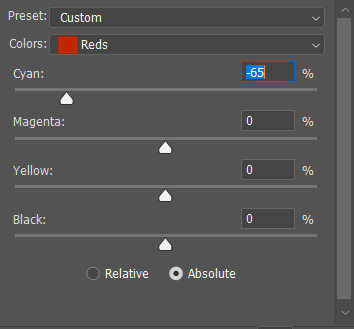
My gif looks like this:

And it's basically finished!!
If you want, you can add Vibrancy to make the colours pop (but is does saturate them so you might need another Colour Balance to even it out):
Since the red was pretty saturated and dark, I added Colour Balance to even the tones out.
Now my gif is finished!!!!
And these are the settings I use to save my gif:
#this isn't the best but it's the general idea of what i do!!!#i really hope this helps!!!!!!#gifmaking#gif tutorial#because of all the ugly gifs used i'm hesitant to tag this as tlou
37 notes
·
View notes
Note
hello! i want to start making gifs, but i don't really know where to start. what are some programs you use and any tips?
hello hello ! ah amazing we can always use more content creators <3 i'll try to point you in the right direction to get started ! under the cut bc it's long:
⏤ my first app recommendation is 4k video downloader which will let you download videos in their highest quality from youtube. i recommend starting with content like music videos as they are usually available in 1080p (the minimum high quality you want - anything less and it can be really tough to get your gifs looking smooth) and up to 4k (pretty much the best quality you'll get), and it's easy to pick out shots you like to start messing around.
⏤ when i was first learning to gif, the only other app i used was photoshop. i started with a free trial to see if i would get the hang of it and now i pay for a monthly adobe subscription, but there are definitely cracked versions out there for download - you just have to find them (check the links at the bottom of this post) 👀 i honestly don't remember what tutorial specifically i followed to get the steps down, but here is one and here is another i found with a quick search that i think are good for a beginner. if those don't work for you, you can google "how to make gifs in photoshop" and you'll be able to find a ton and choose one that suits your learning style (i prefer written step-by-step, but if videos are easier for you, there are a lot of choices out there).
⏤ as far as coloring goes, it'll take time to figure out using adjustment layers and your own style. i really like this tutorial on how selective color works and remember using it when i was first starting. that same blog has a lot of other giffing resources you can look through, too: all ps tutorials
⏤ once i had the hang of just using ps, i learned how to use vapoursynth which is a python script program that will help you resize your gifs and keep them looping smoothly. it also can denoise and sharpen your gifs if you want. the reason i don't recommend starting with it is because i think it looks overwhelming at first, but once you get the hang of it, it's simple to use and makes a big difference especially when it comes to cropping. ultimately it's totally up to you if you want to try and learn it all up front or not. this guide has all the information you'll need to install it depending on operating system, and also has guides for how to use it. it is MUCH harder to set up on a mac than windows, especially new macs, just fyi. if you are planning to gif ts files (for stage performance sets) you will need vapoursynth imo, but otherwise it's not at all a necessity, just a recommendation. i also used this tutorial to help me learn to use it.
general tumblr tips i wish i knew starting out:
⏤ the appropriate sizing for gifs on tumblr is as follows: your width should be 540px for one gif in a row, 268-268px for 2 gifs in a row, and 177-178-177px for a row of 3 (middle has to be 178 or it'll be blurry. i have no idea why. this site is insane). your length can be whatever you want but certain things just look better & if you aren't resizing in VS, then you're at the mercy of your videos dimensions when it comes to cropping them down.
⏤ the mb limit for gifs is 10 but if you're using beta post editor it's actually 9.5, and tumblr will compress the heck out of your gifs that are larger than 5mb, so just keep that in mind, i recommend only make bigger gifs with SUPER high quality videos.
other helpful resources:
⏤ this awesome post compiled by another wonderful cc friend here has links to programs and specific resources for hq kpop files
⏤ a helpful open network tag list to use for getting your gifs seen
i think that about covers it ... sorry this is a LOT of info but i hope it makes it easier to narrow down where to start. if there's anything else i can help you with, just let me know and i'll do my best !
#erimail#i hope this helps :<< pls let me know if there's anything i can explain better !#it can be overwhelming at first but if you really want to learn it's super fun and worthwhile so don't be discouraged#we're here to support you !#chuuchuutrainnn#gif help#.resource tag
26 notes
·
View notes