#these are part one of three and you can find the gifsets these psds belong to by checking out my previous gifs for the last... year or so?
Explore tagged Tumblr posts
Text


Lord of the Rings Aragorn → PSD #35-46 ↳ 1 - 2 - 3 - 4 - 5 - 6 - 7 - 8 - 9 - 10 - 11 - 12
Works for gifs and screencaps.
Adjust to your liking if necessary.
Like if taking/downloading!
Don’t redistribute or claim as your own.
#lotredit#lotr#tolkien#aragorn#psd#lotr resources#resources#itsphotoshop#yeahps#gif psd#psd pack#psds#our psds#the lord of the rings#lord of the rings#fotr#fellowship of the ring#tt#two towers#return of the king#rotk#elise#our resources#these are part one of three and you can find the gifsets these psds belong to by checking out my previous gifs for the last... year or so?#number 5's scene is yet to be posted though#the quality used for the screencaps are 4k btw
83 notes
·
View notes
Text
✨ basic gif tutorial pt. 1 by vvondergifs !!
so i’ve been looking for a way to show people how i make my gifs but couldn’t find any way better than making a tutorial myself so here it is ! as the title refers this will be the first part of a few tutorials, they will be broken up so they are easy bite size so everyone can start making the gifs of their dreams !
in this part i’ll be showing you how i make my gifs from screen caps for a gif set ( i use a different method for gif packs that i’ll be covering in a later tutorial ). keep on reading if you’d like to know how i get to this !!

what you’ll need:
photoshop ( i’ll be using cc but i believe anyone you have would be fine! )
KMPlayer
your video/show/movie of choice downloaded into your computer
1. the first thing you want to do when you have your video downloaded is open up your KMPlayer, once you have it open you need your frame extraction window, you get there pressing ctrl + g ( i believe for mac would be command + g ). this will pop up for you:
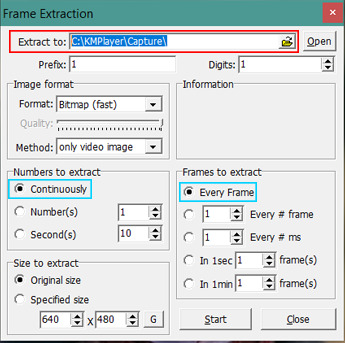
now you will want to replace the destination of your caps where i put a red rectangle, you do that by clicking on the little folder next to the box and choosing the folder on your computer. tip: i suggest making a folder for each gif you will want to make for your gifset so your caps are sorted for you, you do that by changing the destination every gif you cap.
make sure the settings are exactly like in the picture above specially the ones in blue !
2. now it’s time to open your video on the player, i just use ctrl + o but you can also go here:

3. once the video starts to play it’s when the fun part starts ! firstly you have to find the time frame that you would like to gif, just scroll by the timeline or just have a watch make a activity out of it, it’s up to you. but once you find were you’d like to gif go a few frames before and hit play, as you hit play you should also start to screen cap the video by hitting this handy button on the frame extraction window:

and that button will become a stop button that you will click once the scene you want to gif is over:

now you have your screen caps ! yay. if you want to do multiple gifs i’d suggest capping them all now so you can get over with using KMPlayer, just repeat the same process for every gif and you’re golden.
tip: after i do all of that i like to go into the folder i put my caps in and delete the unnecessary ones, like the leftovers from another scene before or after. but you can also do it on photoshop and i’ll show you how, i just think it’s easier to do before hand.
4. now it’s the part we’ve all been waiting for.. photoshop ! open yours and let’s get cracking.
once you have it open what you’ll want to do is go in file > scripts > load files into stack...
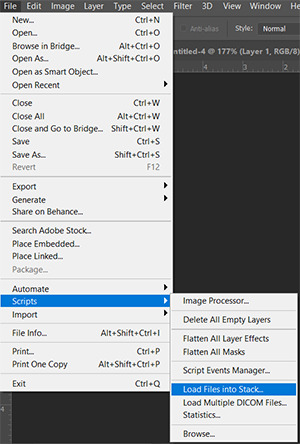
5. a new window will pop up and in there you want to click on browse...
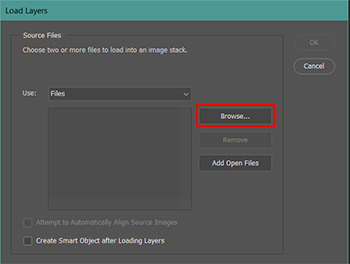
when you click browse your file explorer will pop up and there you’ll need to find where you put your screen caps on. once you’re there select all of them and click ok
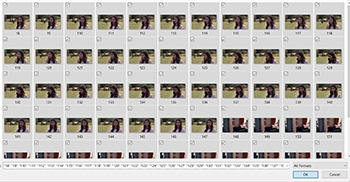
once your photoshop loads your caps the ok in the top right corner of that pop up will turn white and when it does you click it,
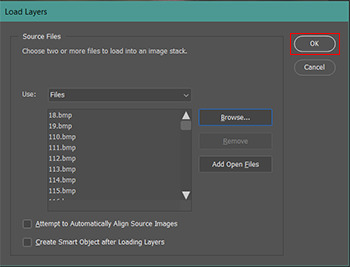
photoshop will now get all your screen cap and put it in a file for you, for that step all you have to do is watch and have patience with it. it normally doesn’t take long but if you are doing a gif with many frames it will take a while.
6. now we going to start to gif, once photoshop finishes with your caps your workspace will be something similar to this
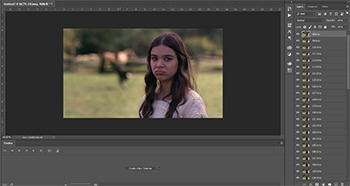
if it doesn’t go into window > timeline, on the top bar.
now on the bottom part of your screen there’s a button that says create video timeline, click it

when you do the bottom part will be turned into this:

and you’ll be able to see in the bottom left corner a button with three squares, click that

now you should have this:

7. now look for the little list icon on the top right of this area and click it:

it will open up a menu, in there you have to find the make frames into layers, select it
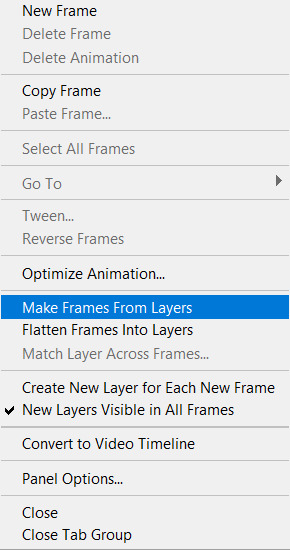
now you have all your layers as frames in your timeline, however they are reverse from what you want, to fix that go in the little list icon once again and select reverse frames

we are almost there !!
8. ok if you left your leftover frames to be deleted in photoshop now it’s when we are going to fix that. go over your timeline and look for the frames that don’t belong in this gif, select them by clicking on the first you don’t want holding shift you click on the last one you don’t want:

and then hit delete or the little trash icon

photoshop will ask you if you’re sure just hit yes.
9. now we are going to crop the gif whichever dimensions you’d like ( here is a good reference for you ) in this case i’ll be making my 268px x 150px. for cropping gifs you’ll want to find the cropping tool that is located in the tools bar on the far left of your screen and it looks like this:

once you click it your top bar will change to cropping settings, which you will change to these settings ( disregard the numbers, put your own dimensions there )

now we have to decide where to crop the gif,

just play around with your grid by dragging and resizing from the corners, until you are satisfied with where you want to crop and hit enter
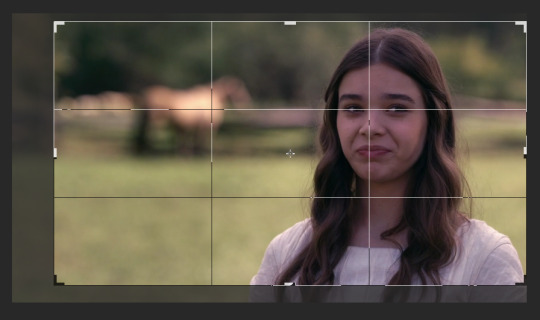
photoshop will crop it and resize it for you.
10. you’re on the finish line, now all we have to do is fix the time stamp and maybe sharpen it. let’s start by selecting all frames in that same place we made the frames and reversed them:
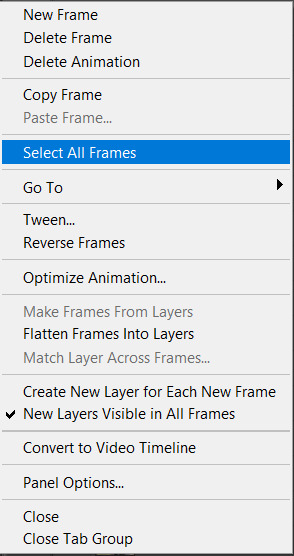
and now on the bottom of your frame preview there’s a “0 sec.” and an arrow

click it and you will get a menu, select other:

once you do it a pop up window will appear for you, there’s were you set the time your frames will go from one to the next. i find it that the delay 0.07 is the perfect one for a gif, so type that in the box of the pop up and hit ok.
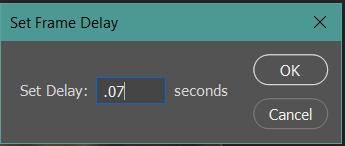
once you hit ok you’re basically done, if you hit play on your timeline you’ll see your gif. but we like to go the extra mile, right ?

( this next part will be totally optional, it makes your gif cleaner but you are free to choose not to do it, just jump ahead on this tutorial to see how to save your gif on step 13 ! )
11. let’s see how to simply sharpen your gif now ! select all your frames once again the same way we did it before and this time make sure you select all your layers too ( click on the first one and shift + click on the last ). now that you have everything selected we are going back to the video time line, on the same place there was three squares now there’s this icon:

click it and now we once again have this:

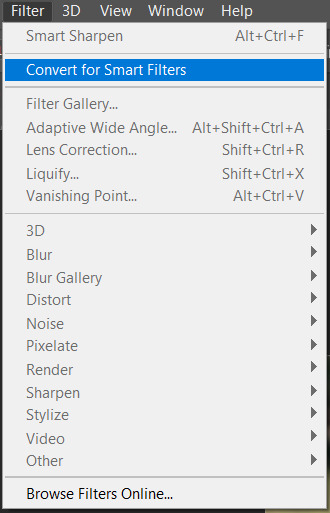
now what we want to do it is go to the top bar and look for filter > convert for smart filters, select it and say ok when photoshop asks you if you’re sure.
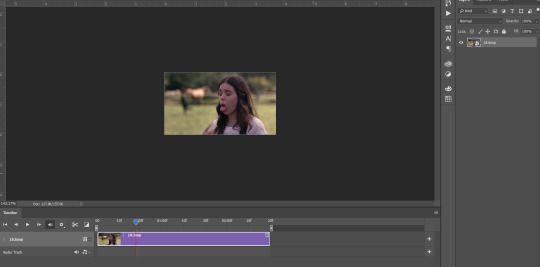
your workspace should be looking like this now
next thing you do is go back to filter > sharpen > smart sharpen
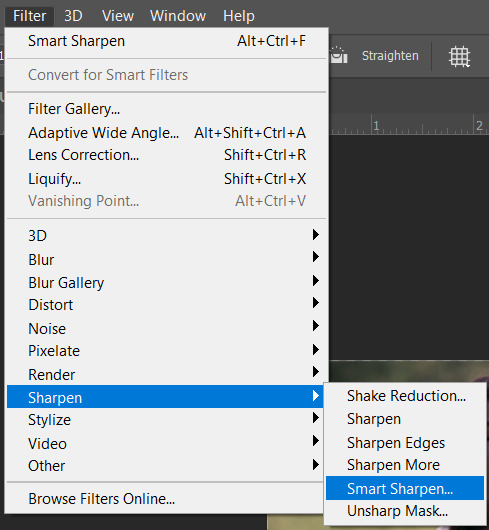
the smart sharpen window will show up to you and here is were you fix your settings, this next picture is how i like to sharpen my gifs and you’re more then welcome to just copy every setting, but if you feel like playing with the settings a little that’s also ok, it’s your gif make it how you like it !
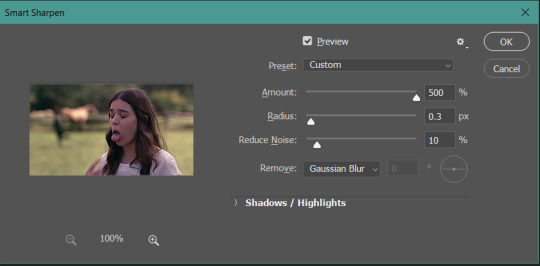
click ok and you have a sharpened gif !
12. now we are done ! if you like to color your gif, this is the step that you would do it ( if you’re familiar with psd and coloring feel free to drop them in now ) but i’ll make a separate tutorial on how i make a base coloring for my gifs soon so i’ll skip this step for now and go directly to saving.
13. to save it is a little different than a picture, you need to go to file > export > save for web
tip: if you’re a windows user you can use the shortcut alt + shift +crtl + s it will make your life so much easier, trust me ! ( i’m not sure what the shortcut is for mac but i’m sure there is one )
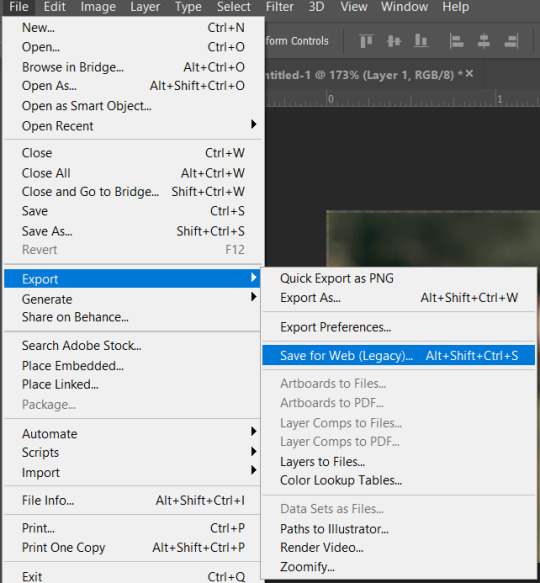
now your final pop up ! you will see the preview of your gif and a bunch of information on the side, the most important one lays on the looping options that if it isn’t set to forever already you have to change to it, if not your gif will only loop once and stop.

now click save and choose the folder destination of your file and TA DA you make yourself a gif !!

if you still have any questions about this process my inbox is always open and i’ll gladly help you understand how to do it !
i know this is a lot of information to take in at once, and i know it seems daunting at first, i’ve been where you are and this is going to be cheesy but practice makes perfect. once you got the hang of this whole process it’s like second nature and you’ll be making gifs in no time. ( also in a next tutorial i’ll teach you how to make an action in your photoshop that will cut this process in half, but you need all the steps to learn ! )
stay tuned for that though, my next tutorials will be how to make a gif from video frames to layer, how to color a gif, how to make an action and/or load them, how i screen cap for packs and how i make gif icons, if you are interested in anything else leave me a ask and i’ll help you out !
#gif tutorial#tutorial#itsphotoshop#rph#rpc#*m#*m:tutorial#it goes against my nature to post an unedited gif but#we gotta#hope this makes sense#im not usually the best at explaining stuff but i tried to be thorough#hope it helps someone
84 notes
·
View notes
Note
Hi
hey! thanks for asking. the instructions in this thing are all made in accordance with photoshop cs5. it’s also photo-heavy. i also don’t use apple, so all the keyboard commands in the tutorial are according to windows 10. you will need to know how to make a gif if you want to use this tutorial. you’ll always need to know how to use some basic tools in photoshop, like the quick selection tool. if you don’t know how to make a gif, here’s a link to a tutorial: click here!
this is the post the ask is referring to. here’s an example of the final product:

also, two things to note before we get started:
1. my theme stretches out all inline images to 100% of the post width and i haven’t been able to figure out how to Stop That from happening yet. so if something appears super blown up under the “keep reading” cut (for instance, the gif in step 3), that’s because of…that. yeah. :| you can circumvent this if you have xkit and you have that extension that allows you to read stuff below a keep reading cut right on your dashboard, so that’s a thing, too.)
2. jsyk, i wrote this in chunks through the past month, and i changed some of my settings in that time span, so some screenshots have a gray background and others have a blue background. that doesn’t mean anything, it’s just that i changed the color of the background in photoshop.
STEP 1. find your “big picture,” the one that’ll be overlaying all of the small gifs. open up your image in photoshop and crop it to around 540px in width (or 500px, depending on what dimensions you’re using), so that the picture doesn’t cover up all the gifs in your final product. you should note that you should make the height of your picture to two times as large as the height of the final gif you plan on making. in this case, the final gif i planned on making was 270px in height, so i made sure the height of my cropped photo was 540px.
then, use the quick selection tool (shown below) to cut out any part of the background you don’t want.
if you want, you could then sharpen/add coloring to that photo any way you like to make it more pretty or something. (i colored all of the big pictures, in this case.) your photo should look like this now (these dimensions are 540x540, fyi):

next, i cropped this picture into two separate 540x270 pictures, because i can’t exactly put a 540x540 picture on top of my final 540x270 gif. here’s what one of them looks like now:

you can blur the edges of the photo if you want, to get rid of the sharp-ish uneven edges (if…you know what i mean lol), but it isn’t really visible in the final product anyway. i didn’t do that in this gif. your call completely.
you’re about done with the big picture (for now), so set it aside.
STEP 2. make a new file (???), its dimensions being the size of the final gif you want. calculate the dimensions of the small gifs you want to make so that they all can fit into your final gif. in this case, following what dimensions i wanted my final gif size to be and the number of gifs i wanted in each final gif, my small gifs are 86x86, leaving a space for around 6px between each of the small gifs. i’d also definitely suggest laying out guidelines for where your small gifs will be:

or, if you wanted to make “bigger” smaller gifs — like if you only wanted four small gifs per final gif — your guidelines may look something like this (assuming small gifs are 268x133):

anyway, whatever dimensions you want to use, just lay out guidelines for them. it will make your life so much easier when you put all your small gifs into the final gif, because they’ll snap right into place. here’s a link to the psd i used for this gifset, by the way, if you want to make a gif exactly according to the dimensions i’ve used here. (it’s unfinished, because i wasn’t continuously saving while i made these gifs — file size got too big and it took too long — but you can figure out the rest after you’ve read this tutorial, i hope :P).
STEP 3. copy your big picture onto the document you laid the gridlines out, so that your doc now looks like this.
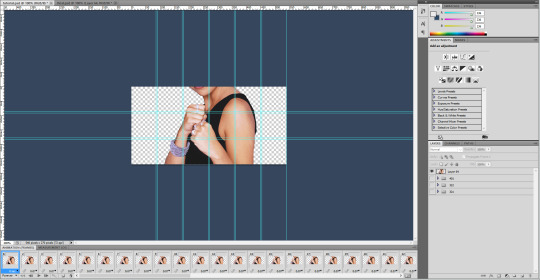
you see how some of the squares are completely filled in by the big picture? note which squares those are and forego making any gifs for those locations, because the process gets really tedious later on and you don’t want to be stuck making gifs and highlighting its layers and moving them to a place that no one will even see in the end product. in this case, i’ve highlighted the squares that i will not be using, and you can see that below.
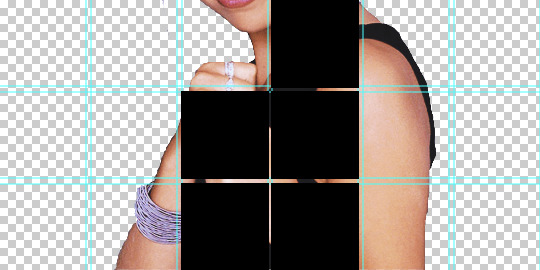
anyway, once you’ve taken note of the places you won’t need a gif, delete the big picture from the file for now, and make sure that your doc is completely empty save for the guidelines grid, so that step 5 won’t get messed up.
STEP 4. make your small gifs, but make sure that they all have the same number of frames! crop each of your gifs to the dimensions you previously calculated in step 2, and color it any way you want. here’s the final product of one of my gifs, after cropping and sharpening and coloring:

STEP 5. okay, so now, you’ve made your small gifs and set the dimensions on your final gif. what you want to do now is open the first small gif you want placed in the final gif in photoshop, like this:
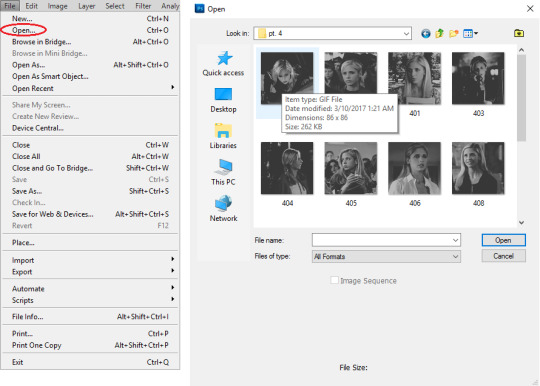
once you double click on it, it should bring up a screen like this:

click on the three horizontal bars thing on the upper right corner of the frame animation, and then click select all frames.

the frames should then all be highlighted. then, click on the same button and select copy frames from the menu.

now go back to the doc file you made in step 2, the one with all the guidelines and stuff. make sure that you’re in frame animation, NOT timeline animation. if you’re in timeline animation, click on the icon that looks like the one below (it should be placed on the bottom right corner of the screen), and it’ll convert to frame animation.

once you’ve done that, click on the three bars button again and this time, click paste frames. when you click it, this following window should pop up:
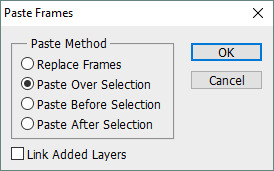
the default for this “paste frames” window is for the circle next to “paste after selection” to be selected. select the circle next to “paste over selection,” like the example above shows. this is important, so make sure you Do That!!! after that, your final gif file should now look like this:

now, these next few steps are theoretically optional (??? honestly i don’t even know if they are lol, it’s more organization than anything but organization is also really important in making these gifs, in case you couldn’t tell :P), and also super annoying to finish, but if you don’t do them, you’ll have a hell of a time moving all the gifs into place later on. go to the layers panel. right-click on a random layer and then click on select similar layers.

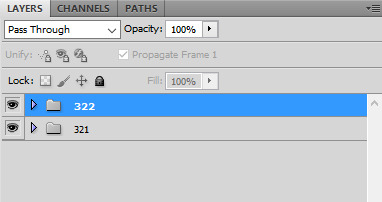
all of the layers should now be highlighted. press ctrl + g to move them all to a group. now, all the layers that belong to that gif, and only that gif, will be all grouped together nicely.
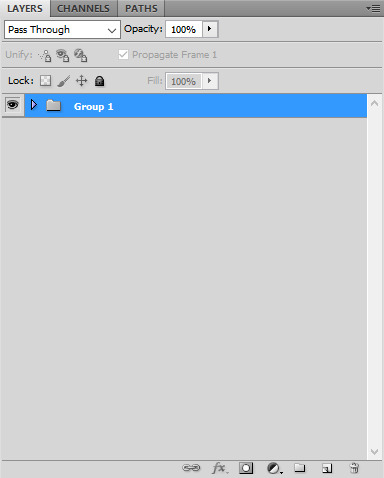
i’d also rename the group to something that identifies the gif for what it is, so in case you need to do something with that particular gif later on in the process, you can easily identify it. in this case, since this gif is buffy from s3e21, i later named the group “321”.
STEP 6. so, now that you’ve put your first gif on, you’ll want to put all the other ones too. open the second gif that you want to use, and copy and paste the frames onto the same document, exactly like you did with the first gif. however, while pasting your second gif’s frames onto the document, when the window prompting you to select your paste method appears, not only do you want to make sure that the circle next to “paste over selection” is, but also check the link layers box at the bottom of the window. (note that checking the link layers only applies when pasting this particular gif.)
after you’ve done all of that, your doc should now look something like this:

yes, the second gif has overlayed the first gif. don’t worry; we can fix that easily. right-click on any one of the layers in the layers panel. then, select select linked layers from the menu that appears:

this should select all the frames in your second gif, and only those frames, because you linked them together while pasting them over the first gif. press ctrl + g again so that you can group these gifs together. after you’ve done that, click on the group you’ve just made so that it’s highlighted.
then, go to the main body of your document, and then click and drag the second gif (which, again, is placed on top of the first gif) to the second placement on your guidelines grid:
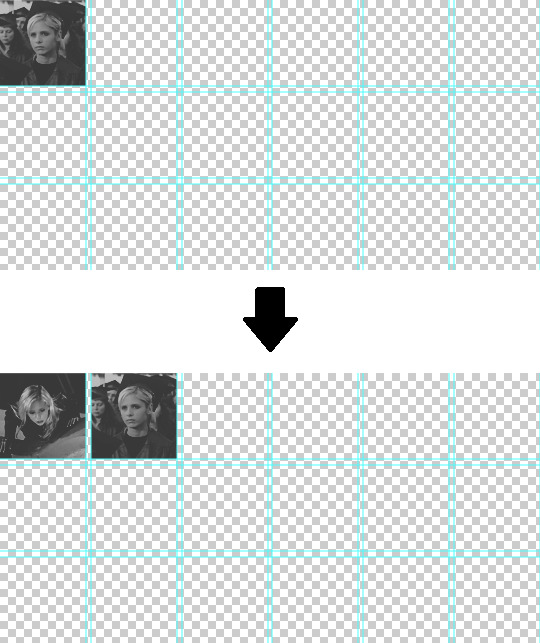
STEP 7. so now, you’ve got two gifs. to add all your gifs from this point on, it gets a little bit different than what you’ve been doing for the first two. (it’s also a lot more tedious, but at least for me, i haven’t been able to find a better way to do it. so.) anyway: open, copy, and paste your third gif like you did for the past two gifs (make sure that this time, though, the link layers box in the window prompting you to select what paste method you want isn’t checked!). your doc should now look like this:

note that the third gif is overlaying the first gif, just like how when you initially pasted the second gif, it was overlaying the first gif as well.
now, what you want to do is manually highlight all the layers of the third gif in the layers panel. you can’t use any of the “select similar layers” or “select linked layers” options that you used to select all the layers that belonged to either the first/second gif anymore, because if you do that, you’ll end up highlighting all similar layers (that is, every single layer in the panel) or all linked layers, and you won’t be able to move your gif properly. you can do this by holding down the ctrl button on your keyboard, and then clicking on each layer in the panel until they’re all highlighted.

once again, press ctrl + g to group them together after they’re all highlighted. after that, move the third gif to the third placement on the grid guidelines, exactly like how you did moving the second gif.

STEP 8. repeat step 7 until you’ve fit in all the gifs you want. remember that you don’t have to fill in the doc completely with gifs, because the big picture you made in step 1 will cover some spaces completely.
your gif file should now look something like this (just…imagine that the bottom line is filled with gifs that are actually from episodes 10 - 15 lmao i just copied the 409 gif onto there to fill the rest of the space; i’m using the same psd i linked somewhere in the second step of this post and it isn’t complete):

STEP 9. finally, copy the big picture you made in step 1 onto your doc, complete with all the compiled gifs. your doc should now look something like this:

it’s basically finished by this point. just make sure that the delay time between frames is what you want it to be (i usually gif buffy with a delay of 0.05 seconds). then, save your gif! make sure it’s under the 3.00 mb limit; if it isn’t, convert the frame animation back to timeline animation and get rid of some frames.

voilà, you’re done!
anyway, i hope this wasn’t too hard to follow.
#not buffy#inbox#spnjensenlove02#sct#sct.tutorials#add. tags#lmao hell i hope i haven't forgotten anything and that this is clear enough??#anyway good luck <3
14 notes
·
View notes
Text


Lord of the Rings → PSD #47-58 ↳ 1 - 2 - 3 - 4 - 5 - 6 - 7 - 8 - 9 - 10 - 11 - 12
Works for gifs and screencaps.
Adjust to your liking if necessary.
Like if taking/downloading!
Don’t redistribute or claim as your own.
#lotredit#lotr#tolkien#psd#lotr resources#resources#itsphotoshop#yeahps#gif psd#psd pack#psds#our psds#the lord of the rings#lord of the rings#fotr#fellowship of the ring#tt#two towers#return of the king#rotk#elise#our resources#these are part one of three and you can find the gifsets these psds belong to by checking out my previous gifs for the last... year or so?#number 03's scene is yet to be posted though#the quality used for the screencaps are 4k btw
65 notes
·
View notes