#the test involved painting with acrylics and like
Explore tagged Tumblr posts
Visit Tumblr Blog
Explore Tumblr blogs with no restrictions, modern design and the best experience.
Last Seen Tumblr Blogs


Fun Fact
Premium Tumblr themes are available from anywhere between $9 to $49.
Text
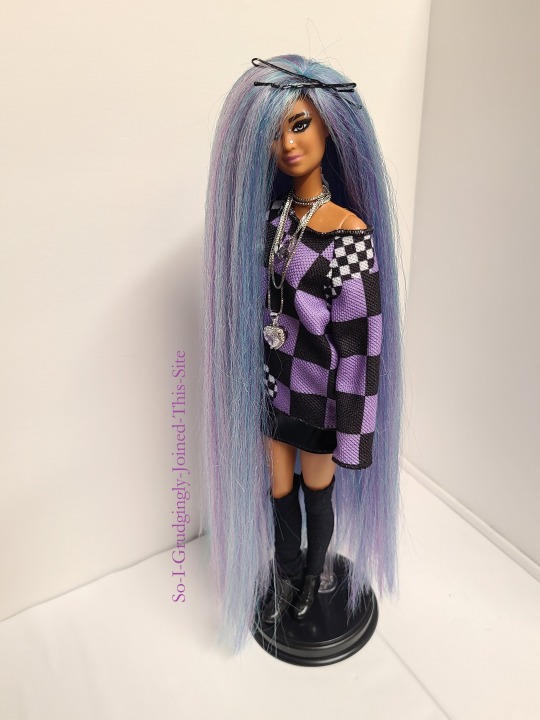
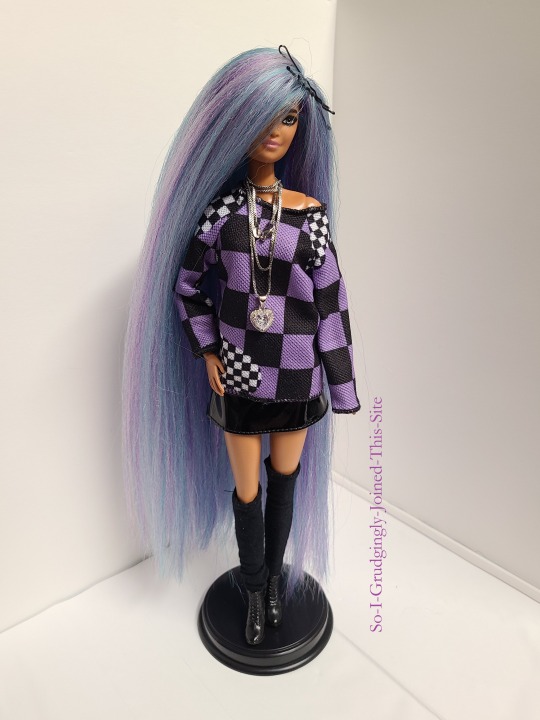
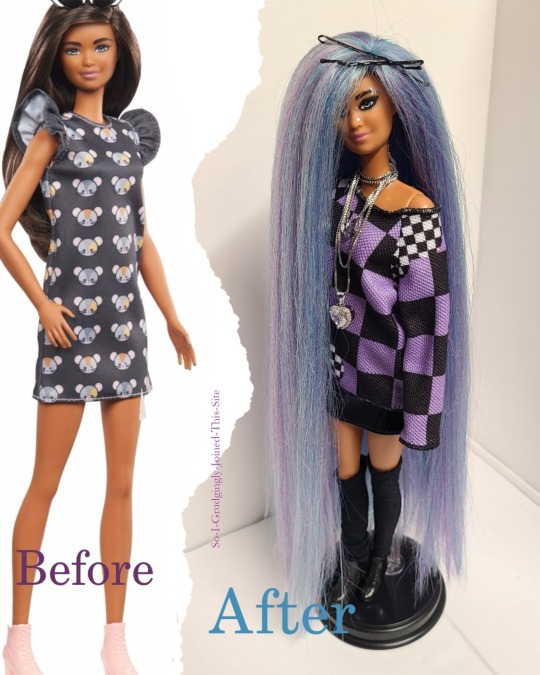
Thought I'd take a break from fandom and post one of my original designs for once! I call this gal "Hayley," after the lead singer of Paramore. She was originally a Barbie Fashionista #140 "Kira" doll (before photo is a stock photo from Amazon).
If you're like me and like knowing the components of a custom and the story behind them, here they are under the cut:
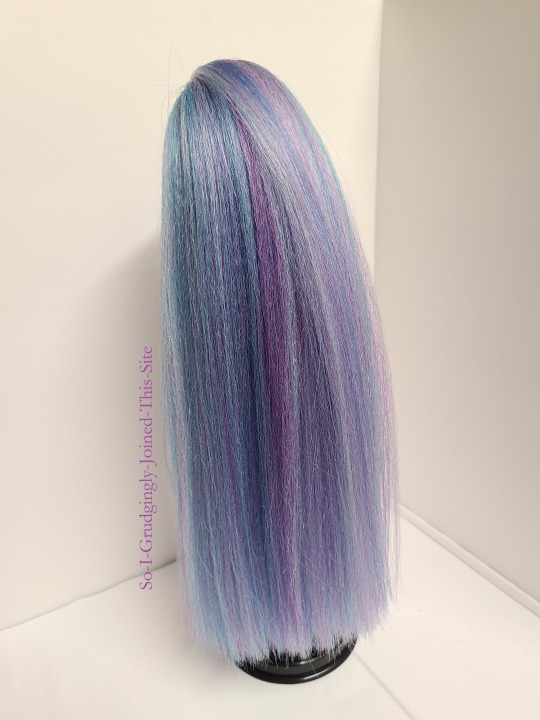
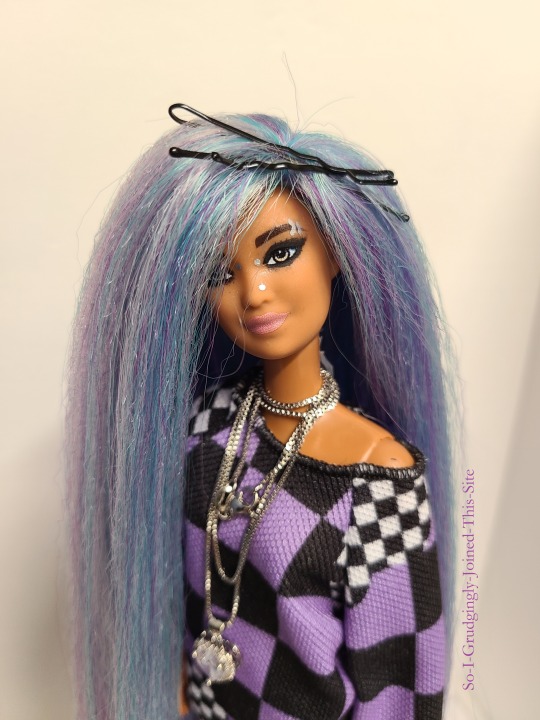
Base doll: Fashionista 140 Kira Hair: rerooted in 12 inch Kanekalon in a blend of pink, purple, light green, and blue Face: partially repainted with acrylic paint for both makeup and piercings Clothes: skirt from Looks Model 10, sweater from Ken Fashionista 191, stockings made from scrap fabric by me Shoes: her original boots, repainted Necklace: an actual random necklace I had
Ever had a design go from least favorite to one of your favorites with a makeover? Fashionista 140 Kira sat in my "stock box" for a long time...the awful proportions, the ugly dress, the glue seepage hair, the pixilated face screening that couldn't even be removed with acetone...I disliked her so much that I ended up using her as a test dummy for different paints and sealants! Likewise, I ended up with some kanekalon hair that had a truly fried texture that I needed to use up.
So, I needed a design that could hide a LOT of issues with the doll and the materials. One that could involve hair that looked bleach-fried, a hair style that could cover holes and bald patches, grungy/messy makeup, and random questionably-fitting fashion. Then, I remembered the mid-2000s, and with it, scene fashion! Or is it emo? Alas, in high school I was not cool/uncool (depending on your POV) to ever be informed of the difference no matter how much I admired the fashion.
Thus, this girl emerged! I'm so happy with how she turned out; she really went from one of my least favorite designs to one of my favorite original designs of my own.
Tagging those that may want to see my OC designs: @serenityspiral @violetoftheendless (who helped with the name!) and @tryan-a-bex
#my art#art#doll art#barbie#custom barbie#custom doll#doll#ooak doll#ooak barbie#barbie fashionista#character design#oc art#original character#original post
60 notes
·
View notes
Note
Hi
If it's not too much to ask, how did you manage to paint the gold on your Malenia cosplay that well?
With the ER boardgame coming out soon, I've been rather dreading the tree sentinel that comes with it as I often struggle with golds
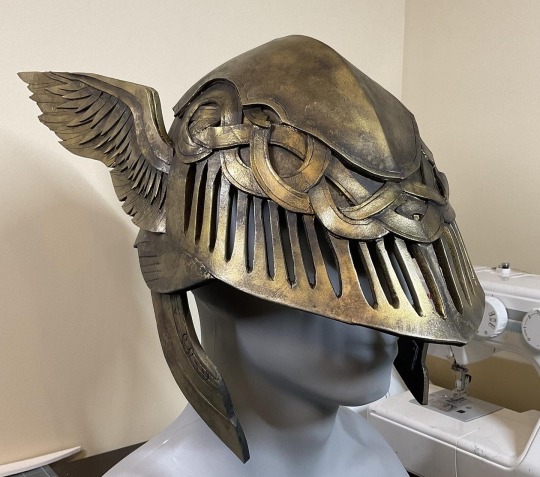
hi!! ty for the ask! I’m not the greatest at teaching but I can try and explain what I did the best I can! And thank you so much!
I’ll use the helmet as an example. All of the armor is painted this way save for the white parts of the legs.
So I started with a Vallejo airbrush base coat gold.
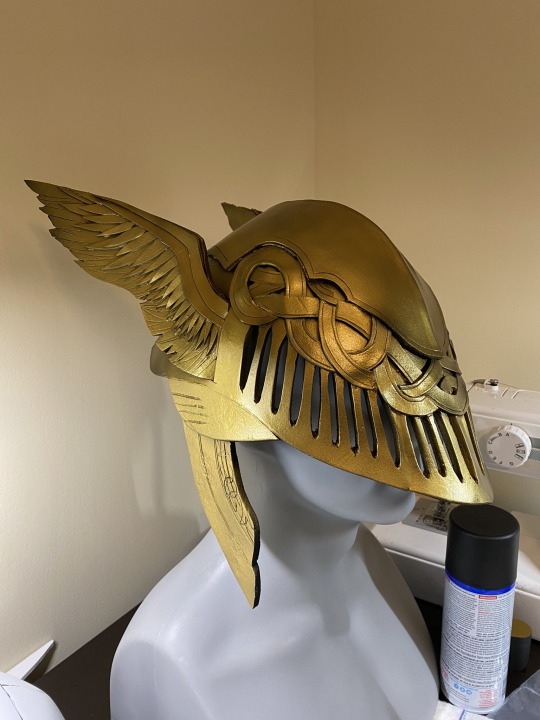
I then went in and did a little dry brushing with black acrylic/black acrylic diluted with a little water to add some basic shadows. I used a combination of soft brushes and a natural sponge to help blend it out.
Next I sprayed the whole helmet at this point with a matte spray varnish to protect the paint so I could go in with water mixable oil washes in black and brown to make a dark brown grimy color. I did a few passes of the oil wash and let it sit for a few seconds before wiping it away with a paper towel. It mutes the shiny pristine gold really well and adds that extra layer of dimension to the piece, while also helping the shadows to look a little less uniform. In different areas I layered the wash more heavily to get a little more variation.
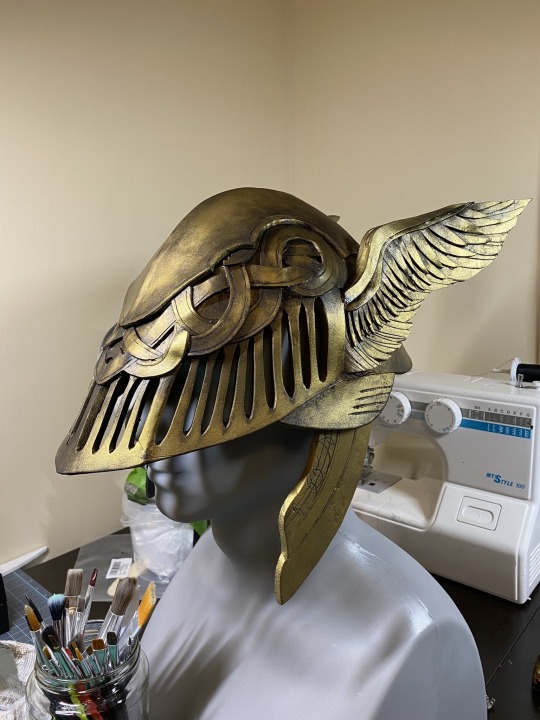
If you’re painting minis I would recommend an army painter or citadel brand wash for this part rather than water mixable oils, I think it’ll be way easier to control on a smaller scale! But here’s what it looked like after a few wash passes:
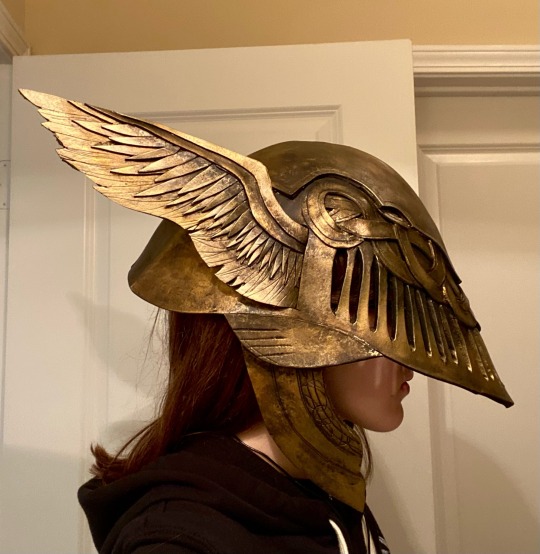
Then, I blended the shadows out further with more gold acrylic (mixed with a little black to make a nice darker gold color) using the same dry brushing/sponge method. To get that flecked gold texture over the dark spots, I just used my sponge with just the tiniest amount of paint on it and pressed it gently onto the surface in a couple areas. Again using a natural sponge will yield a better result. It looks like this after it’s all done:

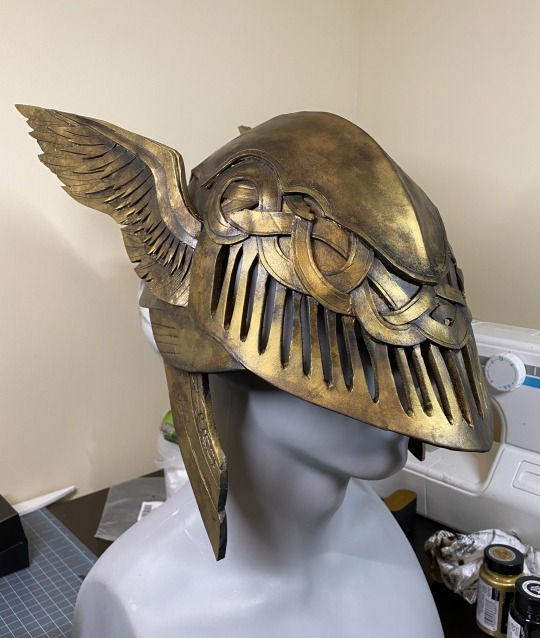
I then added highlights with a lighter/less yellowy gold, but I went REALLY light on them. You really only want to hit the high spots here - for example the crest/point on the top of the helmet, the edges of the wings/wing details, etc. it REALLY helps pull the gold back from all of the shadows and weathering.
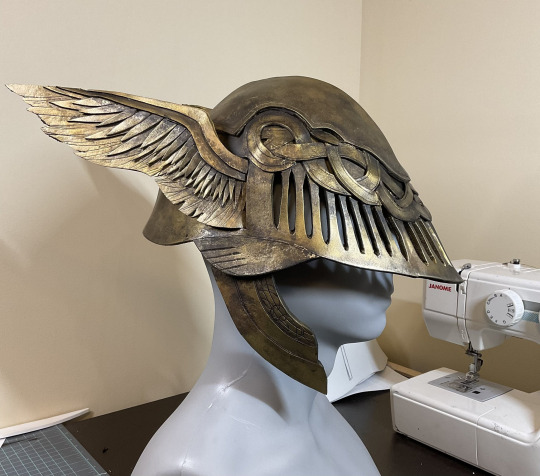
After that I sealed the whole thing in matte spray varnish one more time and the helmet was all finished!

Essentially it just involves carefully planning out how to layer your paints. I def recommend doing some tests if you can.
I know painting armor is a lot different than painting minis but I hope I was able to help at all! Good luck with your project, I’m sure it’ll turn out badass!!!
21 notes
·
View notes
Note
How do you make your stencils? Assuming you do it without fancy equipment just like the sewing
Your assumption is correct. Nothing fancy here. Everything is done the old school way.
It's pretty simple but takes patience and skill with a Xacto knife. My process may be more involved but gives me the best results and stencils I can reuse many times.
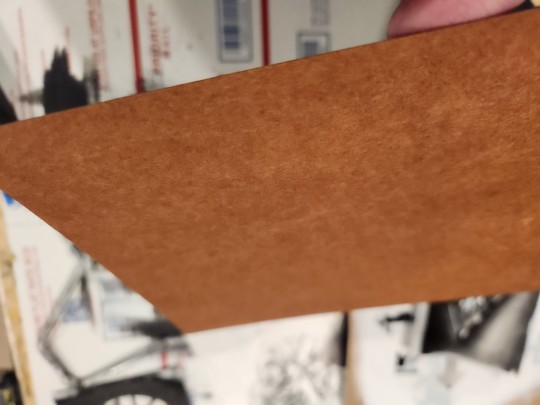
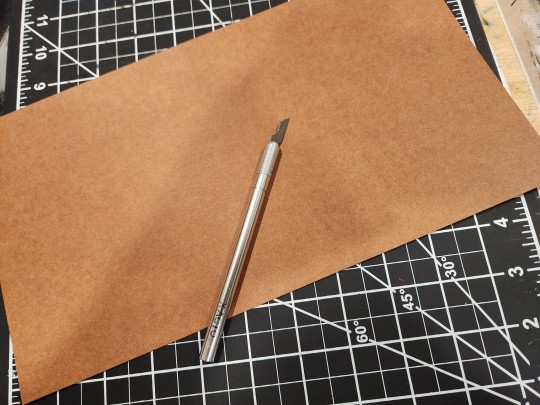
First up, stencil board options. I'm currently using this oil board but you can use 4 mil. mylar, bristol board, watercolor paper, postcard stock, thick envelopes, thin cardboard, poster board or even a soda can box. The material you choose will determine the lifespan of the stencil!

Now select your stencil image. Since I just made this DRI stencil I will use it for example.
I first draw it out on scratch paper or you could print an image. Then cut out the paper stencil. This is basically to test the design, transfer it to a different medium and make adjustments like line thickness and separations.
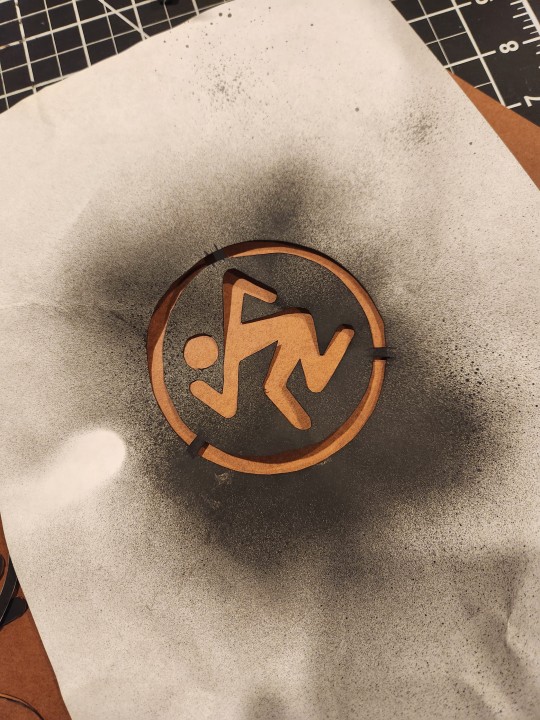
I use spray paint to transfer the paper stencil image to the oil board or thicker material.
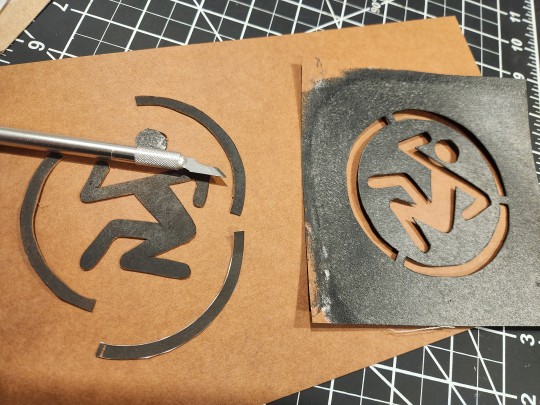
Now you can see what your stencil image will look like and can tweak it before committing to the thicker hard to cut material. You can see here I use this specific smaller blade and the cutting matt underneath also helps.
Cut out your final image and bam.

I'm using a roller brush and acrylic paint but you can use spray paint or that leftover house paint in the shed.
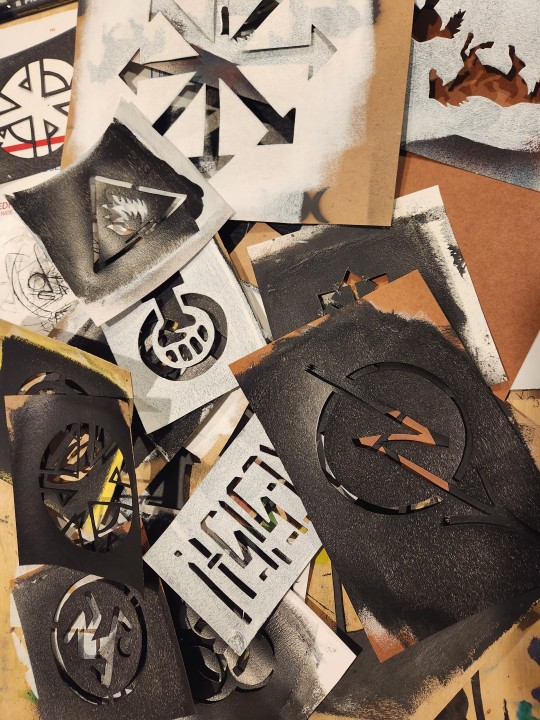
Not every image will come out exactly the same but for me that's the magical part I like because it makes each one unique/special.
*pro-tip: If you really like how your new stencil came out, stencil it onto another piece of your thicker material but don't cut it out. That way when your first stencil dies you can cut out another one just like it but with less steps involved.*
#diy#punk#stencil#how to#fyi#knowledge#the more you know#old school cool#handmade#mine#work in progress#questions#answers#tutorial#pictorial
11 notes
·
View notes
Text
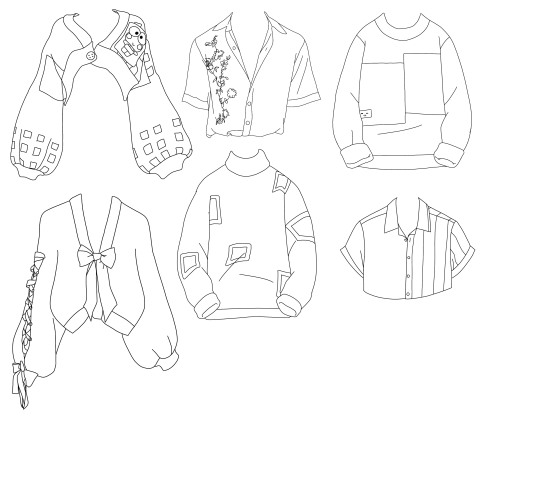
Semester 2, Week 2:
This week was mostly comprised of rounding out my selection of clothes and finalizing my pose and outline for the actual body cutout I'll be using as the base for the doll and project overall.
The clothes I've reduced to just contour drawings consist of sweaters/shirts and skirts for now, but I'm obviously working on a more extensive catalog of clothes that will consist of everything from various kinds of shoes, headwear and accessories, to pants/shorts, to trenchcoats and suits. I'll be altering these contours according to the final pose I selected, as many of the sweaters won't suit the pose I eventually settled on. They were drawn prior to settling on a final pose.

I started by taking a lot of pictures of different poses and comparing them to paper dolls and dress-up games I'd researched during last semester. I won't be including these images because I took them in underwear to ensure I was working with an accurate body shape/outline unobstructed by clothing, and I'd rather not have that on the internet, but I will include the final outline I'll likely be proceeding with to laser cut from the balsa wood:

As you can see, it's largely featureless, and that's because I'll be hand-drawing the necessary details on after it's cut out, and I've decided to make interchangeable hairstyles for viewers to interact with as well as clothing. Hats will likely come with built-in hairstyles for simplicity's sake.
This week will involve getting the cutout made and glued together, as it'll have to be cut in pieces, and finalize my materials testing and get my first few pieces made. I've decided to get some paint markers as well as the acrylic paints I already have, as I think it'd really help with the finer details and linework. I also need to make a final decision on the adhesive I want to use to stick the Tyvek to the magnetic sheets, but I doubt that'll be anything particularly exotic. I think once I adjust to the materials and get used to my dimensions, things should progress a lot more quickly.
0 notes
Text
Model Making and Laser Cutting: Crafting Precision and Creativity
In the world of design, architecture, engineering, and art, model making has always been an integral part of the creative process. Models allow us to visualize concepts, test ideas, and communicate visions effectively. With advancements in technology, laser cutting has emerged as a game-changing tool that elevates the art of model-making to new heights. This blog explores the synergy between model making and laser cutting, highlighting their significance, applications, and tips for harnessing their full potential.
The Essence of Model Making
Model making is the art and science of constructing physical representations of objects, structures, or systems. Whether it’s an architectural scale model, a prototype for a product, or an artistic creation, models serve as tangible manifestations of ideas. They are critical for:
Visualization: Models help translate abstract concepts into physical forms, making them easier to understand and analyze.
Problem-solving: Through models, designers can identify and address potential issues before full-scale production or implementation.
Presentation: A well-crafted model is a powerful tool for conveying ideas to clients, stakeholders, or audiences.
Experimentation: Models provide a platform for testing materials, structures, and aesthetics in a controlled environment.
The Role of Laser Cutting in Model Making
Laser cutting is a precise and versatile manufacturing process that uses a focused laser beam to cut or engrave materials. In model making, this technology has revolutionized the way creators approach their craft by offering:
Precision: Laser cutting ensures exact measurements and sharp edges, crucial for intricate details in models.
Efficiency: Complex patterns and repetitive designs can be executed quickly, saving time compared to manual methods.
Versatility: It works on a wide range of materials, including wood, acrylic, paper, cardboard, and even metals.
Customization: Laser cutters allow for the creation of bespoke parts tailored to specific requirements.
Reproducibility: Digital designs can be replicated accurately, ensuring consistency across multiple models.
Applications of Laser Cutting in Model Making
The integration of laser cutting into model making spans across various fields:
Architecture: Scale models of buildings and landscapes often require intricate details like facades, windows, and staircases. Laser cutting ensures these elements are rendered accurately.
Product Design: Prototyping for consumer products, gadgets, and industrial components benefits from the precision and rapid production capabilities of laser cutters.
Engineering: Mechanical and structural models often involve complex geometries, which laser cutting can handle effortlessly.
Education: Students and educators use laser cutting for projects, enabling hands-on learning and creative exploration.
Art and Craft: From intricate sculptures to personalized designs, laser cutting opens up endless possibilities for artists and makers.
Tips for Effective Model Making with Laser Cutting
Master Digital Design Tools: Proficiency in software like AutoCAD, Adobe Illustrator, or Rhino is essential for creating precise vector files for laser cutting.
Choose the Right Material: Consider factors like strength, flexibility, and aesthetic appeal when selecting materials. Ensure the material is compatible with the laser cutter.
Optimize Your Design: Simplify unnecessary details and ensure all lines are properly closed in your vector file to avoid errors during cutting.
Test and Iterate: Create test cuts to refine settings like laser power, speed, and focus. Iterative testing helps achieve the desired results.
Prioritize Safety: Always follow safety guidelines, including proper ventilation and protective equipment, to ensure a safe working environment.
Embrace Post-Processing: Sanding, painting, and assembling the laser-cut pieces can add depth and polish to your model.
The Future of Model Making and Laser Cutting
The combination of model making and laser cutting continues to evolve, driven by advancements in technology. Innovations like AI-powered design software, 3D laser cutting, and hybrid manufacturing processes are broadening the horizons for creators. Furthermore, as laser cutting becomes more accessible through makerspaces and affordable desktop machines, its potential to democratize model making is immense.
Conclusion
Model making and laser cutting are more than just tools—they are enablers of creativity and innovation. Together, they bridge the gap between imagination and reality, allowing creators to bring their visions to life with precision and efficiency. Whether you’re an architect, engineer, artist, or hobbyist, embracing these technologies can unlock new possibilities and elevate your craft to extraordinary levels. So, gear up, explore, and let your ideas take shape in ways you’ve never imagined.
0 notes
Text
How to Start a Wall Putty Plant - A Complete Setup Guide

Starting a wall putty plant can be a profitable business, especially with the increasing demand for high-quality wall putty in the construction industry. Wall putty is essential for prepping walls prior to painting, in order to achieve a durable and seamless outcome. This blog will guide you in establishing a wall putty manufacturing plant, including selecting suitable equipment, the production process, and entering a profitable market.
Step 1: Conduct Market Research
Prior to investing in a wall bag factory, it is crucial to comprehend the market demand in your region or country. Engaging in thorough market research will enable you to identify the demand for wall bags, your possible rivals, and various product categories. For instance, certain regions may opt for a white cement ulcer, while others may choose an acrylic ulcer. Having knowledge of these preferences will enable you to make well-informed choices.
Step 2: Create a Business Plan
After completing your market research, develop a detailed business plan. Make sure to maintain the same meaning and not add or remove any information.
Ensure that the paraphrased text is within the same context as the original text.
- Investment costs - Location selection - Target market - Marketing strategies - Financial projections
Your business plan will also act as a guide for establishing your wall putty plant, helping you remain efficient and reach your objectives.
Step 3: Location selection
Choosing the right location for your wall putty manufacturing plant is critical. The facility must be located in an area where infrastructure, utilities (electricity, water), and transportation facilities are available for the distribution of finished products Industrial areas are generally the best location due to for their services and proximity to suppliers.
Step 4: Equip your plant with the right tools
To make high-quality high-quality wall putty, you need to invest in the right equipment. In Readymix Construction Machinery Pvt. Ltd., we specialize in worldwide mechanical wall mould plants, including:
- Putty Mixers: These are used to mix the ingredients into a smooth paste. The mixture must be strong enough to handle large volumes to ensure uniform mixing. - Wall Putty Manufacturing Plant: This includes multiple machines like a ribbon blender, storage silos, packing machines, and conveyors. - Quality Control Equipment: Checking the quality of the product is essential. The testing equipment will help maintain the composition and consistency of each batch.
Step 5: Ingredient requirements
Some of the main types of wall bags are:
- White Cement: A base material for putty, providing strength and a smooth finish. - Mineral supplements: These help improve the work and texture of the putty. - Polymers and additives: These increase the adhesion and drying time of the putty, allowing the walls to bond better and dry evenly.
Make sure you have reliable suppliers of these items to ensure regularity.
Step 6: Production
The process of making wall bags involves several steps:
1. Weighing and Mixing: The ingredients are accurately weighed and placed in the putty mixer. Mixing is an important step, as it ensures an even distribution of all ingredients. 2. Blend: Use a ribbon blender or vertical blender to blend the ingredients together into a smooth, smooth paste. 3. Storage and Packing: Once the mixture is ready it is stored in silos before being packed into bags or jars for distribution. In this process, automatic packing machines can ensure efficiency and accuracy.
Step 7: Quality control
Quality control is important to ensure your wallpaper meets industry standards. Regular testing of the final product for accuracy, drying time and adhesion is essential to maintaining a good reputation in the market. A laboratory equipped for physical and chemical testing will help you with this.
Step 8: In Marketing Distribution
To successfully sell your wall bag, you need to invest in marketing strategies. Highlight your product’s features and benefits, such as its smooth, durable, and easy-to-use finish. You can target construction companies, designers, and hardware stores as potential customers.
Online platforms and social media can be used to expand your brand awareness. Attending construction shows and networking with architects and contractors will also help you find potential customers.
Step 9: Calculate costs
The total cost of setting up a wall bag manufacturing plant depends on various factors e.g.
- The size of the plant - Provision of cost of machinery and equipment - Buying raw materials - Labor and material costs
An average medium-sized wall bag factory can cost Rs 20 lakh to Rs 1 crore depending on the volume of production and equipment used It is important to have an adequate budget to cover and manage these costs manage your operating expenses.
Step 10: Legal Requirements
Before you start manufacturing, you need to register your business and obtain the necessary licenses. This may include:
- Business registration (LLP, Pvt. Ltd., etc.) - GST registration - Pollution control board clearance - Factory license
Make sure your product complies with all local regulations to avoid any future legal issues.
Step 11: Hiring skilled workers
Experienced employees are necessary to keep your wall pot business running smoothly. You will need to:
- Manufacturing equipment for the design process - Quality control personnel for testing and inspection - Conducting sales and marketing personnel to promote and distribute the product
Hiring skilled workers will help maintain product quality and ensure product quality.
conclusion
Starting a wall putty manufacturing plant can be a profitable venture if done right. After conducting market research, Readymix Construction Machinery Pvt. Ltd., and by following an established procedure, you can successfully set up your office and meet the growing demand for wall putty in the construction industry.
With proper planning and execution, your wall cylinder business can grow, delivering consistent profitability while meeting the needs of your target market.
Follow these steps and you’ll be well on your way to setting up a successful wall bag manufacturing business.Make sure to stay updated with the latest trends in the construction industry and continuously improve your production processes to stay competitive.
#Wall Putty Manufacturing Plant#Wallputty Plant#Putty Mixer#Wall Putty Production#Putty Making Machinery#Wall Putty Mixer Machine#Wallputty Manufacturing Equipment
0 notes
Text
A Comprehensive Guide to Buying Dining Chairs: What You Need to Know
When it comes to furnishing your dining room, selecting the right chairs can transform your space from ordinary to extraordinary. Whether you're hosting a family dinner, entertaining guests, or simply enjoying a quiet meal at home, the right dining chairs play a crucial role in both comfort and style. If you're looking to buy dining chairs, this guide will walk you through everything you need to consider to make the best choice for your home.
Why the Right Dining Chairs Matter
Choosing the perfect dining chairs involves more than just picking a design that looks good. Here’s why selecting the right chairs is essential:
Comfort: Dining chairs should be comfortable enough to sit on for extended periods. An uncomfortable chair can ruin a meal and make entertaining guests less enjoyable. Opt for chairs with proper cushioning, ergonomic design, and the right height to ensure maximum comfort.
Style: The style of your dining chairs should complement the overall design of your dining room. Whether your décor is modern, traditional, or eclectic, there are dining chairs available that will enhance your space and tie the room together.
Durability: Investing in high-quality dining chairs ensures they will last for years to come. Look for chairs made from durable materials that can withstand daily use and remain in good condition over time.
Functionality: Consider how the chairs will be used. For a formal dining room, you might prefer elegant chairs with detailed craftsmanship. For a casual dining area, you might opt for more relaxed and versatile options.
Size and Fit: The size of your dining chairs should match the dimensions of your dining table and room. Chairs that are too large can overcrowd the space, while ones that are too small may look out of place. Proper sizing ensures that the chairs fit well and provide adequate space for movement.
Factors to Consider When Buying Dining Chairs
When you're ready to buy dining chairs, keep these key factors in mind to make an informed decision:
Material: Dining chairs come in a variety of materials, including wood, metal, upholstered fabric, and leather. Each material offers different benefits:
Wood: Known for its classic look and durability. Wood chairs can be finished in various stains and paints to match your décor.
Metal: Offers a sleek, modern aesthetic and is typically very durable. Metal chairs can be paired with various seat materials for added comfort.
Upholstered Fabric: Provides added comfort and comes in numerous colors and patterns. Upholstery can be easily cleaned, but it may require regular maintenance to keep it looking fresh.
Leather: Elegant and easy to clean, leather chairs add a touch of luxury to any dining room. They can be more expensive but are highly durable and age beautifully.
Design and Style: Dining chairs are available in a range of designs, from traditional to contemporary. Consider the overall style of your dining room and choose chairs that align with your aesthetic. Some popular styles include:
Modern: Clean lines, minimalist design, and often paired with metal or acrylic elements.
Traditional: Detailed woodwork, classic shapes, and often featuring upholstered seats.
Rustic: Often made from reclaimed wood and featuring a more rugged, natural appearance.
Comfort and Ergonomics: Ensure that the chairs offer adequate support and comfort. Look for features like cushioned seats, ergonomic backrests, and armrests if needed. Test the chairs for comfort if possible before making a purchase.
Color and Finish: The color and finish of your dining chairs should coordinate with your dining table and overall room décor. Neutral tones can blend with various styles, while bold colors can make a statement and add personality to your space.
Budget: Dining chairs come in a wide range of prices. Set a budget before you start shopping and try to stick to it while ensuring you don’t compromise on quality. Remember that investing in well-made chairs can save you money in the long run by avoiding frequent replacements.
Where to Buy Dining Chairs
There are numerous places to buy dining chairs, each offering different styles, prices, and options:
Furniture Stores: Specialized furniture stores often have a wide selection of dining chairs, allowing you to see and feel the chairs before purchasing. Stores like IKEA, Pottery Barn, and Crate & Barrel offer various styles and price points.
Online Retailers: Websites such as Amazon, Wayfair, and Overstock provide a vast selection of dining chairs with the convenience of online shopping. Online retailers often have customer reviews and detailed product descriptions to help you make an informed choice.
Home Décor Boutiques: For unique and high-end options, visit home décor boutiques that specialize in designer furniture. These boutiques often offer exclusive styles and custom options.
Warehouse Stores: Retailers like Costco and Sam’s Club offer dining chairs in bulk or as part of package deals. These stores can be a good option if you're looking for affordable solutions or need multiple chairs.
Custom Furniture Makers: If you’re looking for something specific or unique, consider working with a custom furniture maker. They can create bespoke dining chairs tailored to your exact preferences and needs.
Tips for Buying Dining Chairs
Here are some additional tips to keep in mind when purchasing dining chairs:
Test for Comfort: If possible, sit on the chairs before buying to ensure they are comfortable. Pay attention to seat height, cushioning, and overall feel.
Check for Quality: Inspect the construction of the chairs, including joints, seams, and materials. Well-constructed chairs will have solid joints and high-quality finishes.
Consider Maintenance: Think about how much maintenance the chairs will require. Upholstered chairs may need regular cleaning, while wooden and metal chairs might need occasional polishing.
Think About Versatility: If you frequently rearrange your dining space or need chairs that can be used in different settings, consider versatile designs that can adapt to various layouts and occasions.
Conclusion: Finding the Perfect Dining Chairs
When you’re ready to buy dining chairs, taking the time to consider factors like material, design, comfort, and functionality will ensure you make the right choice for your dining room. Whether you prefer the timeless appeal of wood, the modern look of metal, or the luxurious feel of leather, there are dining chairs available to suit every style and need. By following this guide and exploring various options, you’ll find the perfect chairs that enhance your dining experience and complement your home’s décor.
0 notes
Text
Transform Your Space with Innovative Texture Coating Techniques
Texture coating is a powerful tool that can dramatically enhance the look and feel of any interior or exterior space. Whether you’re aiming for a modern aesthetic or a more rustic vibe, the right texture coating can completely transform your environment. This blog will explore innovative techniques for applying texture coatings, the benefits they offer, and tips for achieving the best results.

What is Texture Coating?
Texture coating refers to a decorative finish applied to walls, ceilings, or surfaces that adds depth and dimension. This type of coating can be made from various materials, including acrylics, polymers, and cement-based compounds. The texture can vary widely, from smooth to rough, depending on the technique used and the desired effect.
Benefits of Texture Coating
Aesthetic Appeal: Texture coating can elevate the visual appeal of a space, adding interest and character. It can be used to mimic natural materials like stone or wood, providing a unique finish.
Durability: Many texture coatings are designed to withstand the elements, making them suitable for both interior and exterior applications. They can resist cracking, peeling, and fading, ensuring your walls look great for years to come.
Easy Maintenance: Texture-coated surfaces are often easier to clean than traditional paint. Many coatings are washable and resistant to stains, making them ideal for high-traffic areas.
Concealing Imperfections: If your walls have imperfections or irregularities, texture coating can help conceal them. The added depth of texture can distract from flaws, resulting in a smoother overall appearance.
Innovative Texture Coating Techniques
Spray Texture: This technique involves using a spray gun to apply texture coating evenly across the surface. It allows for quick application and creates a uniform finish. Spray texture is popular for ceilings and large walls.
Knockdown Finish: This method involves applying a thick layer of texture coating and then “knocking it down” with a trowel or knife. This creates a unique, flattened texture that adds depth and visual interest.
Stucco Coating: Traditionally used for exteriors, stucco can also be applied to interior walls. This technique provides a rustic, Mediterranean feel and can be finished in various styles, from smooth to heavily textured.
Stenciling: For a more customized look, consider using stencils with your texture coating. This allows you to create intricate patterns and designs that reflect your personal style.
Trowel Texture: By manipulating the coating with a trowel, you can achieve various finishes, from smooth to highly textured. This technique is often used for accent walls and creates a more artisan feel.
Tips for Achieving the Best Results
Surface Preparation: Ensure the surface is clean, dry, and free from any debris before applying the texture coating. Proper preparation will help the coating adhere better and result in a smoother finish.
Test on a Small Area: Before applying the texture coating to the entire surface, test it on a small area to see how it looks when dry. This will help you adjust your technique if needed.
Use Quality Materials: Investing in high-quality texture coatings will ensure better durability and finish. Look for products specifically designed for your intended application.
Practice Techniques: If you’re new to applying texture coatings, practice your techniques on scrap materials before tackling your walls. This will help you build confidence and achieve the desired look.
Conclusion
Texture coating is an innovative and versatile way to enhance the aesthetics of your space. By experimenting with different techniques and finishes, you can create a unique environment that reflects your style and personality. Whether you choose a smooth, elegant finish or a bold, textured wall, the possibilities are endless. Transform your living space today with the power of texture coating!
0 notes
Text
Lizards in the Shed (telepathic)
Lizards in the Shed (telepathic)
Tuesday morning, 25 June 2024
As a child, years before I met Zsuzsanna, I perceived her existence accurately (including birthdate and specific mixed heritage) from the other side of the world. This continual factor of my life was not "seeing the future" but transpersonal communication with her in real time (which occurred with her as well). This attribute is something that still occurs regularly. When dream content matches something she had been thinking about or engaged in (typically while I am asleep), it happens after a "blue flash" when I am awake. It has been my experience since childhood that people, in general, do not know much of anything about anything in that they seem extraordinarily unaware and "absent." The evidence has come to me continually since childhood with inexplicable coincidental events as if "something" was teaching me something important.
In this dream, I return to the shed in Cubitis, although my dream self maintains a level of current real-world identity. Even so, it builds a narrative that implies Zsuzsanna is in America (where she has never been in real life). The narrative is not quite like a typical Cubitis shed dream, where I otherwise have a focus on my father's tools or sheet music being there, scattered about.
The main focus involves two lizards, a small skeleton of one, and a sizeable green one in suspended animation on the ceiling. (Both signify the state of R.E.M. atonia and being asleep, though the skeletal element corresponds with not having real-world physicality while sleeping.) They are both near the southeast corner. There is much other content in the shed, and I want to keep most of it. Zsuzsanna, at a later point, had cleaned the shed.
Later, the "important" one I wanted to keep the most is now missing, but I find it outside the front of the shed in a garbage bag. The big green lizard is now a tube of acrylic paint. Zsuzsanna had removed it from the shed because of potential toxicity. I read a label that mentions that it may affect DNA. My dreaming mind makes no correction or distinction about the paint tube or the lizard being different in any way. The tube of paint “still is” the lizard. This bizarre attribute of dreaming with no conscious correlation is common in narrative changes, particularly when in a different node of liminality for each part of a narrative.
As it turns out, in real life, Zsuzsanna had held, and was planning to return, a tube of Jo Sanja acrylic paint to her sister Judy. She had also been thinking about a lizard regarding her craft. I had no way of knowing either aspect. In my dream, the word "poison" was actually where "Jo Sanja" appeared on the real-life tube - so there were some of the same letters in the same order (O, S, N). Unlike the many people who are "not all there," since I know reading occurs in my dreams regularly, I also recognize that most dream lore (and typical beliefs about dreams) is false. I mention this because of the myth that a person "cannot read" in the dream state. For me, there are several levels of how text appears in dreams (and different levels of reading viability). There is a state where text changes rapidly, and only certain letters and words are briefly discernable - often a "close plane" filled with text, sometimes two-dimensional, sometimes three. It contrasts with other states where the writing only changes if I focus more on it (but not always).
I will mention an idea I have often seen others claim - for over 50 years - that text changes when you look away and look back again (including as a way to "recognize" that you are dreaming - which makes no sense because I always have at least an intuitive awareness I am not navigating real life - and am also often directly aware of how my mind is creating a dream's content - though if you need to "test" whether or not you are dreaming - I think there is something wrong). It is one of many distractions in false dream lore and, I believe now, a type of societal brainwashing since it is typically the opposite for me.
I do not know the whole nature or ultimate purpose of the mechanism behind telepathy (for lack of a better word) or why so many people are "not all there" - but I do know the effect has been seen by others when I experience it as a "blue flame" (even people like my brother-in-law, who had no interest in the "unexplained" but saw the "blue flame" around my shoulders and head). I also do not accept anything about people who promote the occult or religion. I think without the physiological real-world “anchor” - there would be no dynamics of this kind. The patterns have remained consistent since my earliest memories.
0 notes
Text
Can You Use Spray Paint on Fabric: Revolutionary Techniques

Yes, spray paint can be used on fabric.
Benefits Of Using Spray Paint On Fabric
Spray paint can effectively transform fabric, offering a quick and easy way to customize clothing or home decor. It provides a durable and long-lasting finish, making it a versatile option for craft projects. The wide range of colors and finishes available allows for endless creative possibilities. Versatility In Design Quick Application Process Spray painting on fabric offers numerous benefits that appeal to DIY enthusiasts and artists alike. Versatility In Design Spray painting on fabric allows for creative expression with endless design possibilities. You can achieve unique patterns, gradients, and textures effortlessly. Quick Application Process The spray painting technique on fabric is fast and efficient, enabling you to complete projects in minimal time. It also dries quickly, making it convenient for immediate use.
Choosing The Right Spray Paint For Fabric
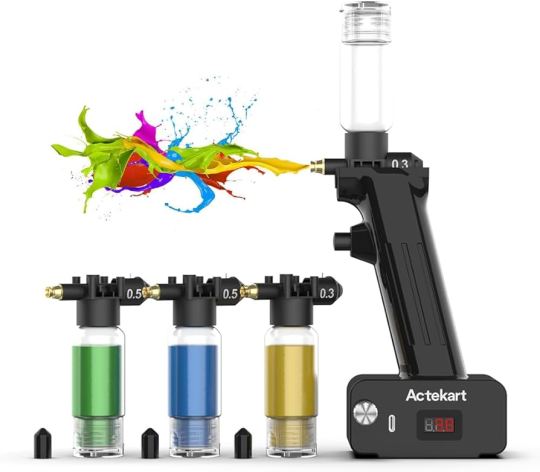
Choosing the right spray paint for fabric is essential to achieve the desired results in your DIY projects. Whether you want to transform an old piece of furniture or revamp your clothes, spray paint can be a handy tool. However, not all spray paints are suitable for fabric, so it's important to understand which types are appropriate and the factors to consider when selecting one. Types Of Spray Paint Suitable For Fabric When it comes to spray painting fabric, there are several types of spray paint that work well and ensure a long-lasting finish. These include: Type Description Acrylic Fabric Spray Paint This type of spray paint is specifically formulated for use on fabric. It adheres well to the surface, dries quickly, and remains flexible, ensuring the paint doesn't crack or peel off. Fabric Dyes Unlike traditional spray paints, fabric dyes penetrate the fabric fibers, resulting in vibrant and long-lasting colors. They are available in a wide range of shades and can be mixed to create custom colors. Fabric Spray Paint for Upholstery For those looking to give their upholstered furniture a fresh look, fabric spray paint for upholstery is the way to go. It is designed to withstand regular use and provide excellent coverage on fabrics like cotton, polyester, and blends. Factors To Consider When Selecting Spray Paint When selecting spray paint for fabric, it's important to consider the following factors: - Color Range: Look for spray paints that offer a wide variety of colors to ensure you find the perfect shade for your project. - Opacity: Consider the opacity of the spray paint. If you want to completely cover the fabric's original color, opt for an opaque spray paint. If you prefer a more translucent effect, choose a semi-transparent option. - Compatibility: Ensure the spray paint you choose is compatible with the type of fabric you're working with. Some spray paints are designed specifically for certain fabrics, such as cotton or polyester, while others are more versatile. - Durability: If you plan to use the spray-painted fabric in high traffic areas or frequently wash it, opt for a spray paint that offers durability and can withstand the demands of everyday use. - Spray Nozzle: Consider the spray nozzle of the can. A nozzle that provides fine, even misting ensures better control and coverage, resulting in a smoother finish. By considering these factors and selecting the right spray paint for your fabric, you can transform your projects into eye-catching masterpieces that stand the test of time. So, gather your supplies, choose the perfect spray paint, and let your creativity shine!
Preparing Fabric For Spray Painting
When preparing fabric for spray painting, it’s essential to take certain steps to ensure the best results. Proper preparation not only helps the paint adhere to the fabric but also ensures the longevity of the painted design. This involves fabric pre-washing and drying as well as surface protection and testing. Fabric Pre-washing And Drying Pre-washing the fabric is crucial to remove any residues, dirt, or sizing that could hinder the adhesion of the paint. Use a mild detergent and follow the care instructions for the fabric. After washing, it’s important to thoroughly dry the fabric before proceeding with the spray painting process. This helps to prevent any shrinkage or distortion of the fabric due to moisture. Surface Protection And Testing Before applying spray paint, protect the surrounding surface from any potential overspray by laying down drop cloths or newspapers. It’s also advisable to test the spray paint on a small, inconspicuous area of the fabric to ensure compatibility and desired results. This step is particularly important for unfamiliar fabrics or specific types of spray paint.
Techniques For Spray Painting On Fabric
Spray painting on fabric can be a fun and creative way to customize clothing, home decor, and other fabric items. There are various techniques to achieve great results when using spray paint on fabric, each with its own unique process and outcome. Whether you want to directly apply the paint, create intricate designs using stencils and layering, or experiment with different methods, understanding these techniques can help you achieve the desired effects on fabric. Direct Application Method The direct application method involves applying spray paint directly onto the fabric surface. This technique allows you to create abstract patterns, blend colors, and achieve a seamless finish on your fabric. When using the direct application method, it's important to hold the spray can at a consistent distance from the fabric and move it in even, smooth motions to prevent blotches or uneven coverage. Stenciling And Layering Stenciling and layering offer a more precise and controlled approach to spray painting on fabric. Using stencils allows you to create intricate designs and patterns, while layering different colors can add depth and dimension to your fabric projects. When stenciling, secure the stencil firmly on the fabric and apply the spray paint in light, even coats to avoid any seepage or smudging. Layering involves using multiple stencils or applying layers of paint to achieve a multi-dimensional effect on the fabric.
Fixing And Caring For Spray Painted Fabric
Once you have successfully spray painted your fabric and created a beautiful design, it is important to take the necessary steps to fix the paint and ensure proper care and maintenance. By following these guidelines, you can make your spray painted fabric last longer and maintain its vibrant appearance. Heat Setting The Paint Heat setting the paint is an essential step to ensure that your spray painted fabric stays on even after multiple washes. It helps to bond the paint molecules to the fabric fibers, preventing them from flaking off. To heat set your fabric, follow these simple steps: - Allow the paint to dry completely. This usually takes around 24 to 48 hours, but check the instructions on the spray paint can for specific drying times. - Place a clean cotton cloth or an ironing board cover over the painted area. - Set your iron to the appropriate temperature for the fabric you have painted. Check the care label on your fabric or refer to the spray paint manufacturer's instructions for recommended heat settings. - Gently iron over the painted area, applying even pressure for 2 to 3 minutes. This will help the paint bond to the fabric. Proper Washing And Maintenance Proper washing and maintenance are crucial for preserving the longevity and appearance of your spray painted fabric. By following these guidelines, you can keep your design looking fresh and vibrant: - Always check the care label on the fabric before washing. Some fabrics may require special care, such as handwashing or dry cleaning. - If the fabric is machine washable, turn it inside out before washing to minimize friction and prevent the paint from rubbing against other garments. - Use a gentle cycle and cold water when washing your spray painted fabric. This will help to protect the paint and prevent fading. - Avoid using harsh detergents or bleach, as they can damage the paint and cause it to peel off. - After washing, air dry your fabric by laying it flat or hanging it up. Avoid using a dryer, as the heat can cause the paint to crack or peel. By following these simple steps, you can ensure that your spray painted fabric stays vibrant and intact for a long time. Whether you've created a unique piece of clothing or a decorative item, proper fixing and caring techniques will help your artwork withstand the test of time. Now you can enjoy your spray painted fabric without worrying about the paint fading or coming off!
Inspiring Ideas And Projects
DIY Clothing Customization Transform your basic wardrobe into unique pieces by spray painting fabric. Be bold with colors and stencils to create one-of-a-kind clothing designs. Home Decor Applications Refresh your living space with spray painting fabric for custom throw pillows or upcycling old curtains with vibrant patterns. https://www.youtube.com/watch?v=eDboS3BH0fA
Safety Tips For Spray Painting On Fabric
Discover essential safety tips for spray painting on fabric. Learn how to effectively use spray paint on fabric without compromising safety. Ventilation and Breathing Protection: Ensure proper airflow in the work area to prevent inhalation of fumes. Wear a mask or respirator for breathing protection. Proper Storage and Disposal of Materials: Store spray paint cans in a cool, dry place away from heat sources. Dispose of empty cans responsibly to protect the environment. When using spray paint on fabric, it is important to follow safety guidelines to protect yourself and the environment. Here are some essential tips to ensure a safe spraying experience: Ventilation: Ensure proper airflow in the work area to prevent inhalation of fumes. Breathing Protection: Wear a mask or respirator for breathing protection. Proper Storage and Disposal of Materials: Storage: Store spray paint cans in a cool, dry place away from heat sources. Disposal: Dispose of empty cans responsibly to protect the environment.
Credit: www.amazon.com
Frequently Asked Questions On Can You Use Spray Paint On Fabric
Can Spray Paint Be Used On Fabric? Yes, spray paint can be used on fabric to revamp old items or for DIY projects. It’s important to use fabric-specific spray paint and follow proper application techniques for the best results. Is There A Special Spray Paint For Fabric? Yes, there are spray paints designed specifically for fabric. These paints are formulated to adhere to fabric fibers and withstand washing and wear. Look for fabric spray paint in craft or fabric stores for best results. How Do You Apply Spray Paint To Fabric? To apply spray paint to fabric, first ensure the fabric is clean and dry. Then, work in a well-ventilated area, lay the fabric flat, and apply thin, even coats of paint. Allow each coat to dry before applying the next for the best results. Can You Wash Fabric Spray Painted Items? Yes, you can wash fabric spray-painted items. It’s best to wait at least 72 hours after painting before washing to allow the paint to fully cure. When washing, use a gentle cycle and cold water to help preserve the paint job.
Conclusion
Spray paint can indeed be used on fabric, offering an innovative way to transform and customize textiles. The key is to choose the appropriate spray paint formulated for fabric, and take necessary precautions such as proper ventilation and protecting the surrounding area. With the right technique and a bit of creativity, spray painting on fabric opens up a world of possibilities for creating unique and personalized garments, accessories, and home decor items. Explore the endless potential of this technique and unleash your artistic side on fabric! Read the full article
0 notes
Text
The Beauty of Wall Art Acrylic Painting: Enhancing Spaces with The Sivaya
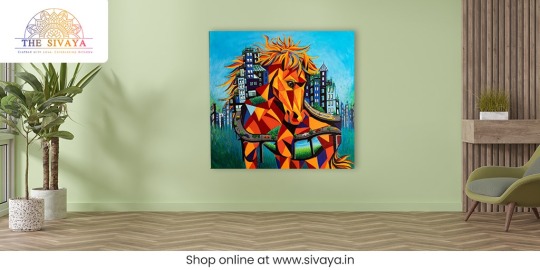
Wall art acrylic painting is a captivating form of artistic expression that has the power to transform any space into a visual masterpiece. As one of the most versatile mediums in the art world, acrylic paint offers artists a wide range of possibilities, from bold and vibrant colors to subtle and nuanced textures. In this article, we delve into the world of acrylic painting, exploring its history, characteristics, techniques, and its significance in contemporary home décor, with a special focus on the offerings by The Sivaya.
Introduction to Wall Art Acrylic Painting
Wall art acrylic painting is a creative endeavor that involves using acrylic paint to produce captivating artwork on canvas or other surfaces. Whether it's abstract, landscape, portrait, or any other style, acrylic painting offers artists the freedom to experiment and innovate, resulting in unique and visually stunning pieces.
History of Acrylic Painting
Acrylic paint may seem like a modern invention, but its origins can be traced back to the mid-20th century. Developed as a water-based alternative to oil paint, acrylics quickly gained popularity among artists for their fast-drying properties and versatility. Over the years, acrylic painting has evolved into a prominent medium in the contemporary art scene, with artists pushing the boundaries of its capabilities.
Characteristics of Acrylic Paint
Acrylic paint is prized for its vibrant colors, quick drying time, and versatility. Unlike oil paint, which can take days or even weeks to dry, acrylics dry within minutes, allowing artists to work quickly and make spontaneous changes to their artwork. Additionally, acrylic paint can be thinned with water or mixed with other mediums to achieve various effects, from transparent washes to thick impasto textures.
Types of Wall Art Acrylic Painting
Acrylic painting encompasses a wide range of styles and techniques, including abstract, landscape, portrait, still life, and more. Each style offers its own unique challenges and opportunities for artistic expression, making acrylic painting a dynamic and diverse medium for artists of all levels.
Choosing the Right Acrylic Paint for Wall Art
When it comes to choosing acrylic paint for wall art, there are several factors to consider, including color intensity, permanence, and lightfastness. It's essential to invest in high-quality acrylic paint that offers excellent coverage and durability, ensuring that your artwork will stand the test of time.
Essential Tools and Materials for Acrylic Painting
In addition to acrylic paint, there are several essential tools and materials that every acrylic artist needs, including brushes, canvas or painting surface, palette, and mediums. The Sivaya offers a wide range of high-quality acrylic paints and accessories, ensuring that artists have everything they need to bring their creative visions to life.
Preparation and Techniques
Before starting a painting, it's essential to prepare the canvas properly by applying a primer or gesso to create a smooth and stable surface. Once the canvas is ready, artists can begin experimenting with various techniques, such as layering, blending, and dry brushing, to achieve the desired effects.
Step-by-Step Guide to Creating Acrylic Wall Art
Creating acrylic wall art is a rewarding process that requires patience, practice, and experimentation. To get started, sketch out your design on the canvas using a pencil, then gradually build up layers of paint, adding depth and dimension to your artwork. Don't be afraid to make mistakes or take risks – experimentation is key to discovering your unique artistic style.
Tips for Beginners
For beginners, acrylic painting can be intimidating, but with practice and perseverance, anyone can master this versatile medium. Start by experimenting with different techniques and subjects, and don't be afraid to ask for feedback from more experienced artists. Remember that art is subjective, and there are no right or wrong answers – the most important thing is to enjoy the process and keep learning and growing as an artist.
Inspiration and Ideas
Finding inspiration for your acrylic paintings can come from anywhere – nature, music, literature, or even everyday life. Take time to explore different sources of inspiration and develop your own unique artistic voice. The Sivaya offers a wealth of inspiration and ideas for acrylic painting, from curated collections to tutorials and tips from experienced artists.
Caring for Acrylic Wall Art
Proper care and maintenance are essential for preserving the beauty and integrity of your acrylic wall art. Avoid exposing your artwork to direct sunlight or extreme temperatures, as this can cause fading or damage over time. Regular dusting and occasional cleaning with a soft, damp cloth can help keep your acrylic paintings looking their best for years to come.
Benefits of Acrylic Wall Art
Acrylic wall art offers numerous benefits for both artists and art lovers alike. Its affordability, versatility, and durability make it an ideal choice for decorating homes, offices, and other spaces. Whether you're looking to add a pop of color to your living room or create a statement piece for your bedroom, acrylic wall art offers endless possibilities for creative expression.
Popular Artists and Styles
From classic impressionism to contemporary abstract expressionism, acrylic painting encompasses a wide range of styles and genres. Some of the most influential artists working in acrylic today include Jackson Pollock, Mark Rothko, and Gerhard Richter, whose bold and innovative work continues to inspire artists around the world.
Acrylic Painting in Home Décor
Acrylic painting has become increasingly popular in home décor, thanks to its ability to add color, texture, and personality to any space. Whether you prefer bold and vibrant abstracts or serene landscapes, acrylic wall art can help create a focal point and tie together the various elements of your interior design scheme.
Conclusion
In conclusion, wall art acrylic painting is a dynamic and versatile medium that offers artists endless opportunities for creative expression. Whether you're a seasoned professional or a beginner just starting, acrylic painting is a rewarding and fulfilling pursuit that can bring beauty and joy to both creators and viewers alike. With its vibrant colors, quick-drying properties, and endless possibilities for experimentation, acrylic painting is sure to remain a beloved medium in the art world for years to come.
Here are some more information about it:-
Buy Acrylic Painting online for displaying intricacies
Elevate Your Home Decor with Wall Art Acrylic Painting
0 notes
Text
More Research/Experimenting
Due to the two fast approaching deadlines for my divergent and creative research project are past, it was well overdue to take the breaks off of creative enquiry to now think of where the end result will be for degree show.
after looking at the test space to get a scope of what can and can not be done, i found myself to be looking at installation with contemporised printmaking to get back in the swing.
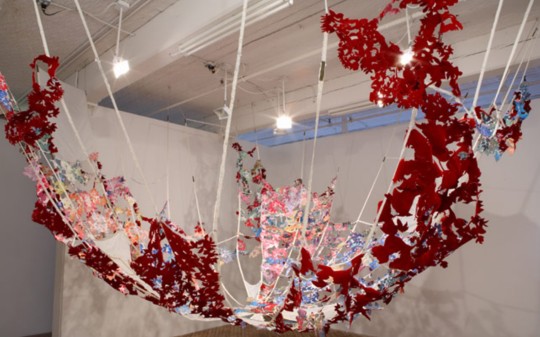
Wylie, E. (2008) Roaring Garden [Installation] Available: Fick, B. and Grabowski, B. (2016). Printmaking. A complete guide to materials & process, pp 196
Eva Wylie’s sculpture proved to be a food for thought when it comes to what form my final may take. The fragmented areas make interesting marks and do play a reminder of my automatic lines but if they weren’t on a solid surface. i do understand that this sculpture is suspended from the ceiling which can not be guaranteed for myself. but it is a good idea to stem from.
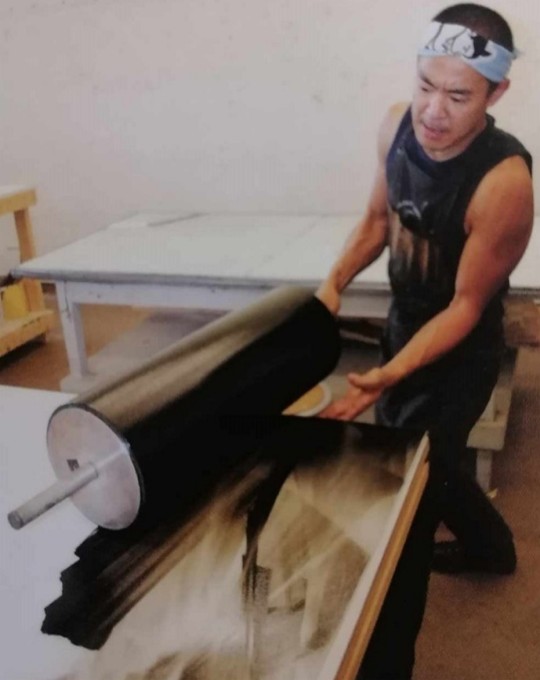
However i was pleasantly perplexed by Yamamoto’s method of using the roller as a drawing implement and had wanted to attempt it myself.
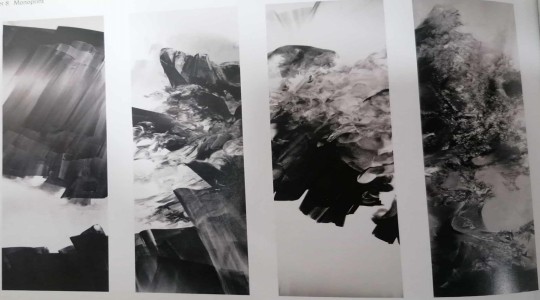
Yamamoto, K. (2007) (Left to Right) Ridatzu, Fusen, Fujyou and Chiri Nagae [Monotypes] Available: Fick, B. and Grabowski, B. (2016). Printmaking. A complete guide to materials & process, pp 196
The results did differ from the artists works as they did not appear to be as free flowing. As it was a rough attempt, I did use a watered-down black acrylic but would look towards trailing this further with different inks and paints as means of having other methods of contemporised printmaking involved.
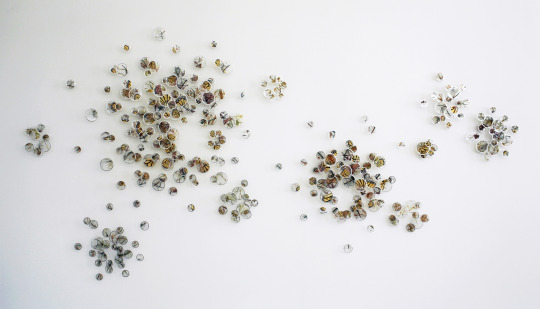
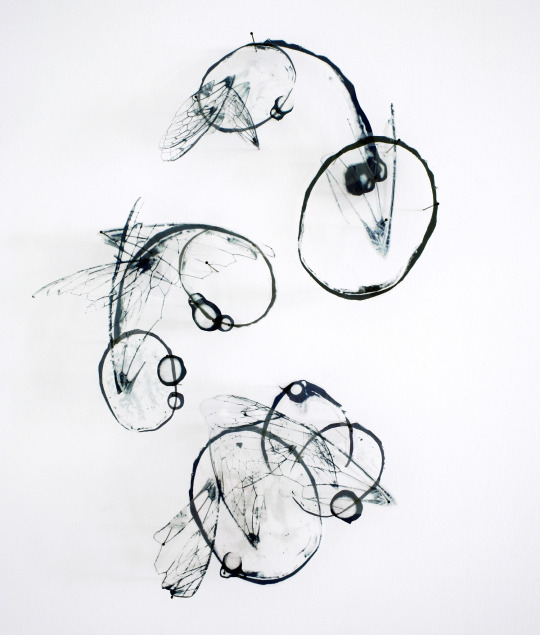
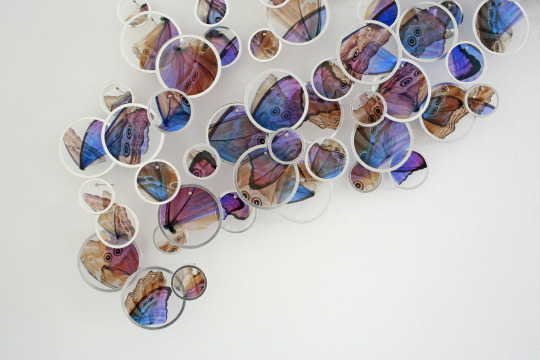
Another artist i had admired for a few years prior to this course was Alan Bur Johnson.
i liked how his fragmented transparent peices acted as a jigsaw, assembling the finished work when collected together.
despite his images coming from insects wings, there is a resonance with my work as there is the small play of abstractions with the drawn line.
its only making me think that there could be a mix of media coming into the final play?
0 notes
Text
PAINTING SERVICE IN AYAPAKKAM-1
https://www.varshagroups.com/painting-service-in-ayapakkam-1/

Painting Service in Ayapakkam Welcome to Varsha Construction Founded in 2002 by Managing director Jai Prakash. We have been in this field for almost 20 years.We are a design-oriented company specialized in CCTV installation and landscaping work contracting for your outdoor spaces. We are also efficient in many other fields like Floor and Wall tiling, Plumbing, Sanitary and Carpentry contracting.
We have a team that is young and dynamic with seasoned experience in the landscaping and garden designing sector. We aim to provide our clients with utmost satisfaction whether be it in the quality of materials used or the timeline for project completion.We also provide an ongoing maintenance service to keep your landscape and pool clean, healthy, tested and adjusted to give you year round peace of mind. Our passion and commitment towards customer service is our core brand value.
We have made it an essential company culture to put the interests of our customers first. Our professional, knowledgeable and highly experienced staff are ready and waiting to answer any of your questions. We can help you find the right materials for the job, and at the right price. Every member of our team is friendly and passionate about what they do, and we aim to make buying your building supplies from us as hassle-free as possible.
We are a very versatile building material supplier as we can provide a range of materials for large scale or small scale building projects. Therefore, whatever your project and whatever it is that needs doing, you can be certain that our team can supply you with all the building materials you need to complete the job in time. Our products are always in superb condition and you will never have to worry about being sold defective materials.
Certainly! Painting is a visual art form that involves applying pigments, colors, and other mediums onto a surface, typically canvas, paper, wood, or a wall, to create a two-dimensional representation or artwork. Paintings can be created using various techniques and styles, and they serve as a means of artistic expression, communication, and storytelling.
Here are some key points about painting:
Materials: Painters use various materials, including paintbrushes, palette knives, and even their fingers to apply paint to a surface. The primary medium is paint, which can be oil-based, watercolor, acrylic, gouache, or other types, each with its unique properties and techniques. Techniques: Different techniques are used in painting, such as blending, layering, impasto (thickly textured paint), glazing (applying transparent layers), and more. These techniques can create different visual effects and textures in the artwork.
Styles: There are numerous painting styles, each characterized by its own approach to composition, color, and form. Some famous painting styles include realism, impressionism, abstract, surrealism, and cubism, among others.
Genres: Paintings can belong to various genres, such as portraiture (depicting people), landscape (depicting scenery), still life (depicting inanimate objects), and abstract (non-representational or non-objective art).
Famous Painters: Throughout history, many renowned painters have left a significant mark on the art world. Some of the most famous painters include Leonardo da Vinci, Vincent van Gogh, Pablo Picasso, Michelangelo, and many others.
Art Movements: Different art movements have shaped the course of painting over time. These movements, such as the Renaissance, Baroque, Romanticism, and Modernism, have introduced new ideas, techniques, and styles to the world of art.
Contemporary Painting: In contemporary art, artists continue to experiment with new materials and techniques, pushing the boundaries of traditional painting. Digital painting has also become increasingly popular with the advent of digital tools and software.
Expression and Meaning: Paintings can convey a wide range of emotions, stories, and messages. Artists often use color, composition, and symbolism to communicate their ideas and feelings to the viewer.
Appreciation and Collecting: Paintings are not only created for artistic expression but are also collected and appreciated by art enthusiasts and collectors. Some paintings have become valuable works of art and are displayed in museums and galleries worldwide.
Painting is a diverse and versatile form of artistic expression that continues to evolve with time, reflecting the ever-changing world and the creative vision of artists. Whether you’re an artist, art enthusiast, or simply someone who appreciates visual beauty, painting offers a rich and fascinating world to explore.
0 notes
Text
Building Dreams in Miniature: A Guide to Architectural Model Creation

**1. ** The Power of Miniature Realism
Architectural models have the unique ability to communicate intricate details of a design that might be lost in two-dimensional drawings or digital renderings. By bringing a project to life in miniature form, designers can showcase the relationship between spaces, the play of light, and the overall spatial experience with an unparalleled level of realism.
2. Tools and Materials
Creating an architectural model requires the right tools and materials. Architectural foam, balsa wood, acrylic sheets, and various modeling supplies are commonly used. Precision tools like X-Acto knives, rulers, and cutting mats are essential for achieving clean and accurate cuts. Adhesives, paints, and detailing tools also play a crucial role in adding the finishing touches.
3. Scale and Proportion
Scale is a fundamental consideration in architectural model making. Choosing the appropriate scale ensures that the model accurately represents the dimensions of the real-world structure. Whether it’s a 1:100 scale for a building or a larger scale for intricate interior detailing, understanding scale and proportion is key to achieving a convincing and accurate model.
4. Techniques for Model Construction
There are various techniques for constructing architectural models, ranging from simple block massing to highly detailed representations. Layering, stacking, and carving are used to build up forms, while laser cutting and 3D printing can add precision and complexity to the models. Combining these techniques allows for a versatile approach that suits different design styles and project requirements.
5. Communicating Design Concepts
Architectural models act as powerful communication tools. They enable designers to convey their concepts to clients, stakeholders, and even the general public in a tangible and relatable way. The ability to physically interact with a model, exploring it from different angles, helps everyone involved gain a deeper understanding of the design’s nuances.
6. Iterative Design and Problem Solving
Architectural models facilitate the iterative design process. Designers can test different ideas and solutions by quickly creating and modifying models. This hands-on approach often leads to unexpected insights and innovative solutions to design challenges. As the model evolves, so does the design itself.
7. Showcasing Design Excellence
Architectural models aren’t just functional tools; they’re also works of art that showcase design excellence. Meticulous detailing, realistic textures, and thoughtful lighting can transform a model into a captivating masterpiece that reflects the designer’s vision and skill.
8. Inspiring Creativity

In conclusion, architectural model making is a dynamic and enriching endeavor that bridges the gap between imagination and reality. From conceptualization to communication, from problem-solving to artistic expression, architectural models hold a special place in the heart of design. By investing time and care into creating these miniature wonders, designers breathe life into their dreams, one tiny detail at a time.
0 notes
Text
LUKES WARNING IS BRUSHED OF with a roll of his eyes and the trilling of his lips . pft — please , truly , how hard could it be ?? one thing thomas had learned about luke during what felt like a six month long ' friendship test ' was that he was a man who favored melodramatics . he reminded tom so much of eliza , it was a miracle he hadn't ever caught the blonde getting involved with the theatre department ( where he'd find a way to get his name to the top of every cast list , and tom and camille would both have to get an earful about it from eliza every . single . time . ) . the card started going around , and something in thomas's stomach coiled tight . a few close calls were enough to have his palms sweating , and when the ace card finally fell from between two participants — seeming almost purposeful on the male's end — thomas's jaw went slack in silent horror . the card being halved only worsened his distress , an iron rod speared down the length of his spine as he watched the smaller piece of laminated cardboard begin its second rotation .
oh shit .

he notably stiffened , leaning back into one of his hands to play it off , though it was something his companion must have taken note of as luke leaned in to whisper , breath hot and stained with booze as it fanned over thomas's suddenly clammy throat . " fuck off , man . " thomas attempted to jest , hitting the back of his hand into the man's chest as if he were a pesky fly . his gaze , however , drifted to the woman beside him , who was now much closer than she had been when she first sat down and looking at him with a wildly feral gleam in her eyes .
the card eventually reached her , and she leaned with both palms on her neighbor's knee as she received the spit-slicked card from their puckered lips . thomas swallowed as he watched . anticipated . her head seemed to be on an effortless , eager swivel as she spun around towards him . leaning in , she sank acrylic talons into his upper thighs and surged her weight forward . the nameless girl had practically hurled herself into his lap , smacking the card against his mouth ( more so his bottom lip ) . thomas screwed his eyes shut and sucked in as hard as he could to pull its halved body from her lips . distracted by the force of her frame atop him , he had entirely failed to notice her efforts to try and purposefully get the card to drop between them .
desperately eager to turn away from her , to twist his body so his shoulder would knock her off of him ; thomas never realized the card had been lost by the time he had fully turned his head . it was too late by the time he had noticed , mouth stamping against luke's with a such a force it was a miracle their noses didn't crunch together . he tasted peppermint and remnants of liquor . felt lips and teeth . tom's eyes snapped open , the man tearing himself back , an expression that could only be labeled as humiliation painting his face as heat crawled up his neck . the laughter swelled instantaneously , thunderous in his ears where blood was rushing , one giggle to his left particularly shrill as the handsy girl cackled and clapped her hands .

" FUCK - " thomas panted , gaze still zeroed in on luke before he ripped it away , looking around frantically . " where'd the - where'd the , " he licked his lips , brows creasing , breaths suddenly erratic . " where'd the fuckin' card go ?? i had the card !! i - i sucked on it , man !! no fuckin' way it fell . " maybe if he distracted himself with the searching for what to him was now public enemy number one , he'd be able to tune out the song of his own misfortune . to ignore the icy blue stare no doubt sewn to him .
a tongue rolled over rum-stained teeth , hiding the tickle of a humored smile . there was just something about thomas — his eagerness to please , his need to wear the skin of whoever he stood closest to , his innate ability to be anyone but himself . luke had clocked it immediately , mere minutes into their first conversation . for thomas , it must have been a god-sent miracle to be seated beside luke sinclair last semester . for luke , it was simply another moment . another face , another name , another game . the only difference this time was how long good ol' tom had managed to hang around.
an eyebrow arched in response . luke snorted , cornflower eyes rolling . " what —— are you guys ' open ' or something ? by all means , if you're searching for a third in our little pool of players , call her up . " each word was drenched in a thick layer of sarcasm which drowned the gravel of his voice . but , before thomas could have a chance to respond , or defend the sanctity of his relationship ( which , honestly , luke could have cared less about ) , the game had begun .
some guy wearing a rancid hue of yellow started them off . from his puckered lips , the ace was passed to lauryn mercer ( wasn't she fucking banned from alpha delta events ? luke would need to speak with reeve later about the integrity of their blacklist ) . she carried it to another fleeting acquaintance . and to another and another . around the circle they went . until it reached the sloppy kiss of jacob jones . the card fluttered away and , in the same second , jacob's wet lips were mashing into his neighbor's . fuck , he needed to be cut off . they were not having a repeat of the renegades party from last year .

after the jeering and laughter died down , the ace of spades was picked up and — as the rules went — split in half . one side was discarded , while the other remained in the game . suddenly , the stakes were raised and difficulty doubled .
" careful , " luke whispered , watching the halved card continue on its path toward them . closing in . " chick next to you tends to get handsy . hope you have strong lungs . "
4 notes
·
View notes
Text
Art school application exam really invokes something in ya, huh
#like yes i still love to do art yes i now hate to do art#its????? Im confused#I realized how much i adore digital art rather than traditional art when making it myself#the test involved painting with acrylics and like#ive never done that before#i absolutely hated it#and the things that are planned to do in art school???? The different exercises????#I do not vibe with that#At least?????? It made me realize how much i appreciate and love digital art????#like yes sir i have been in the midst of a mental breakdown because i dislike my art for the last two weeks but also wow#im a god with digital art and a medieval peasant child who just discovered crayons with traditional art#but anyways#I have two wips of my boy (Emil) that i need finishing and i also need to rework his refsheet#will i do that? Oneday yes but also no i refuse#until then#I shall disappear into my forest and occasionally spew out another post into the void#banshees ramblings
5 notes
·
View notes