#synth diy
Explore tagged Tumblr posts
Text

This photo is weirdly intimate, so i wanted to share
94 notes
·
View notes
Text


Moog 3p modular, Synclavier II, Yamaha CS 80, Minimoog, Korg MS-20 and various other instruments at the Deutsches museum
#retro tech#electronic music#music#synths#vintage tech#synth diy#vintage#modular synth#moog synthesizer#yamaha#korg#korg synthesizer#Synclavier
78 notes
·
View notes
Text


Friday night build
#Serge#Serge Modular#Serge Tcherepnin#Delian Diver#Modular Synth#Modular Synthesis#Delian Diver Modular#Synth DIY#DIY#Synth Case#Signatura Project
42 notes
·
View notes
Text


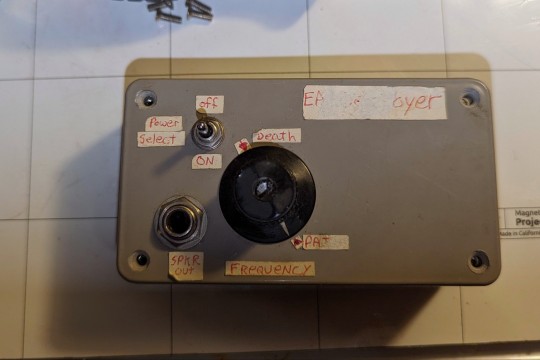
I don't know exactly when or where I got this little guy; it probably was in an assortment of parts and projects several years ago, though I'd guess it's much older. (The chip has a 1987 date on it, though that just means it can't have been made before then.) It's a very obvious homebuild, but I don't know whose. Some of the labels are heavily damaged, but the main one I believe originally read "Ear Destroyer"; the two marks on the "Frequency" scale are "Pain" and "Death". In the interest of information, I did pop a fresh 9V battery in and got it to generate a high pitched squeal whose frequency went up as the knob swung counterclockwise.
The guts are a basic 555 astable multivibrator circuit; the only really notable aspect is that it's made by wire wrapping, where all the connections are via thin insulated wires wrapped around long posts in the back. It was a very common prototyping technique for a long time, but I don't think I have anything else built using it (though I do have a wire wrapping gun somewhere in my collection).
52 notes
·
View notes
Text

if you look closely, you can see the exact point where my wire management plan shit the bed
16 notes
·
View notes
Text
R-8 backlight DIY

I picked this up off the Yahoo Flea Market app. It's seen better days but works fine. I had a Mk II aaaaaaaaaaages ago. I forgot how goddam huge these things are. I was killing time on YouTube and saw someone doing Autechre style stuff with an R-8 and was like OH YEAH! That was right around when I had one and I was doing similar stuff, though I was shit at putting actual tracks together. Oh well. Anyway so yeah tharr she blows! As I mentioned, I had the Mk II version and that one has a backlit screen, which the first version does not have, so I thought hmmmm inverters are probably super small to drive that tiny of an EL sheet, and a step-up power converter probably won't be too big, and I can probably find an el-cheapo made in china deal for peanuts on Jamazon or AliExpress, so let's do this! I got the step up converter from Jamazon. I think I had to buy a set of 8 and it was like ten bucks. I tapped the legs of the 7805 +5V regulator for the power source and ground. Set the pot on the step up thing to output +12V, ran that out to the inverter for the EL sheet, cut the sheet to size, wired it all up, plugged it in, turned it on and hoped for the best. Worked fine first time.

Went with "red" for no real reason. If I get sick of it I'll just buy a blue or blue-green sheet. They're like ten bucks for a sheet. The inverter was about fifteen bucks? I got those from Kyohritsu, a major electronics parts supplier in Osaka. I always use them or Akidzuki. In this case it was Kyohritsu because they make the backlight screen kits themselves, and I've always used them for EL sheets. Here's what the business end looked like when done.

I used double-sided tape to secure the step-up converter there on the right, but because of me forgetting to trim the legs off the inverter components (not done at the factory, tsk tsk) I used a set of clippers but that didn't work 100% so I hot glued the inverter pcb there on the left. LOTS of free space on that PCB in the R-8. I had to cut a small hole in the metal noise shielding sheet that goes between the main PCBs and the keypad/drumpad PCBs to feed the EL sheet power wires through, but yeah no big deal. I also checked the voltage on the battery while I was in there. It's still fine. Something that surprised me was that there is NO whine at all with this inverter. Super easy job. Yay!
5 notes
·
View notes
Text

Pine box with wood nobs. Planning on making something arduino-based.
4 notes
·
View notes
Text
youtube
2 notes
·
View notes
Text


Switch board assembly from last night. Getting the leds bent just right and fitting the covers and actuators together was fiddly but very satisfying. Seeing that line of iconic colors really fills me with a feeling.
0 notes
Text

8 octaves of eurorack level saw wave! And it's got a second voice (only one connected right now). Next step is pulse wave then migrating to the protoboard
26 notes
·
View notes
Text

DIY Banana modular at the Science University of Pécs
10 notes
·
View notes
Text
DUT: AD633 based Multiplier/Balanced Modulator
#device under test#Delian Diver#Modular Synth#Modular Synthesis#Delian Diver Modular#Synth DIY#DIY#AD633#AD633 Modulator#Ring Modulator#Balanced Modulator
8 notes
·
View notes
Text


the nightmare box mixer is finished! and it actually works!
14 notes
·
View notes
Text
Rattle rattle
I bought a mixer off Mercari a few weeks back, finally got around to cleaning up the former Lair of Nefarious Machinery enough to the point where I can start putting things together again. I went to put the mixer on the rack and noticed a rather loud rattling sound coming from inside when I tilted it 90º to either side. What is this? Loose screw? Hmmmm. Let the surgery begin.

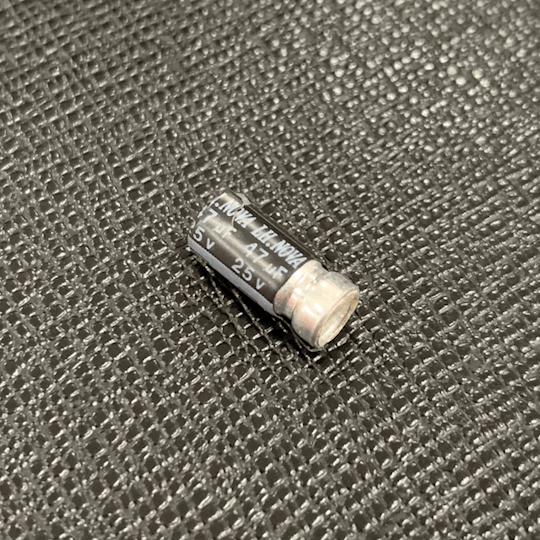
I removed the plastic side panels just to slim the thing down. Once I had the bottom panel off, I shook it again and this fell out.

Say what? A shell from an electrolytic capacitor? Whaaaaaat? Never seen that before! So, did the cap shit itself, or did the shell just fall off, seeing as it looks like an el-cheapo Chinese part. LH Nova? What the fuck company is that? Goddammit. So I ordered a replacement online. Taking the mixer apart fully was a real task, as Mackies are built like tanks even now.

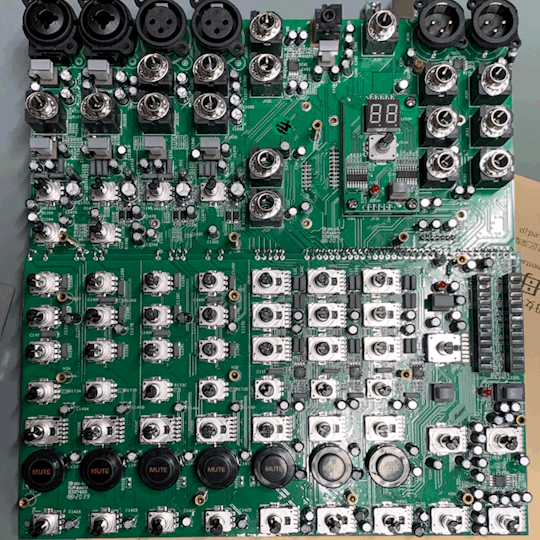
There are about 100 electrolytic caps on the PCBs. It took a minute to find the one that blew its top. But here it is in all its blown up glory. Doesn't look like a catastrophic fire and smoke involved failure though. Hmmmm.

Here's the whole thing before I removed the blown cap. OK maybe 100 was an exaggeration. Still.. Shitloads.

Here's the replacement one, next to a paired cap of equal value. I replaced it with a Nichicon FG series cap, which is audio grade, if that actually means anything at all. It's a tad larger than the factory ones. Anyway, it's all done and back together now. Easy enough.

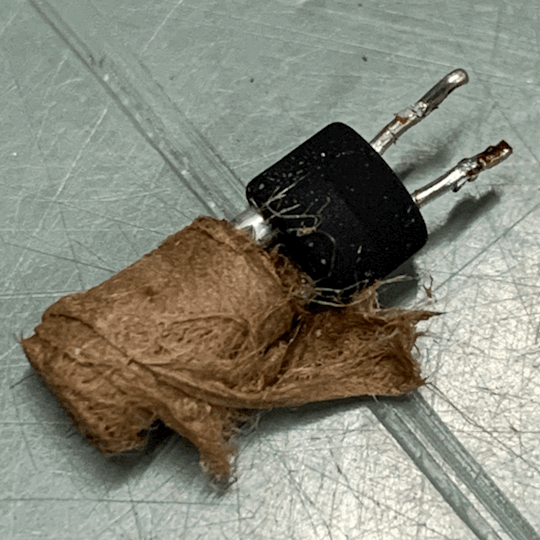
Get a load of this guy. I was gonna carefully unroll it just to see what I could see but decided against it in the end. Bog knows what the hell is lurking inside that mess. Yecccch. It's crazy to think that I am able to do this kind of 'repair' though. I didn't know feck all about this kind of thing even though my old man was an electronics engineer who worked for Honeywell on space shuttle and missile guidance components in the early 70s until they laid off half the workforce right after the oil shock. I learned everything from YouTube videos and reading online resources. The internet can be a blackhole vortex of shitfuckery, no doubt, but here and there you can find valuable resources that even 15, 20 years ago were just simply out of reach. Freaks me out sometimes thinking about the gap between these two extremes. Anyway, that's all for now folks. Hope your part of the rock is doing ok.
2 notes
·
View notes

