#sorry for the 3 gifsets in a row just wanted to get them done and posted
Explore tagged Tumblr posts
Text


#mj really grew on me this season she a lil quirky lol homegirl was just talking and talking through the entire part 3#m*tt should get a job and stay away from her#big brother#bb26#makensy manbeck#*#sorry for the 3 gifsets in a row just wanted to get them done and posted#that's me done with big brother until next season 🫶🏿 watch house of villains y'all
101 notes
·
View notes
Note
Sorry if you’ve answered this question before, but how do you make your gifs?
With an outdated version of photoshop and a lot of patience 😤 my messy process under the cut
let's say i have this movie downloaded in .mp4 i open it in windows movie maker - or any other software that lets you do quick and easy edits and whatnot but me i use wmm even tho it's obsolete i knoooow leave me alone - cut the scene i want to gif out and save it into this tiny little file
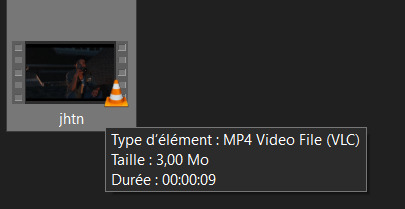
then i open photoshop and go into import > video frames into layers (i may be a little bit off in how things are called on PS in english, but they should be in the same places anyway)
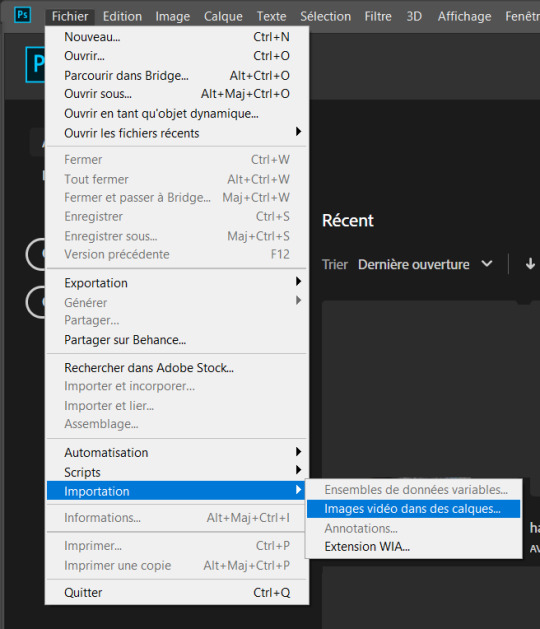
this little popup will open

since my file is exclusively the thing i want to gif i don't need to bother with the little arrow-ish things underneath the video player, they're there if you need to shorten your thing or like cut into it.
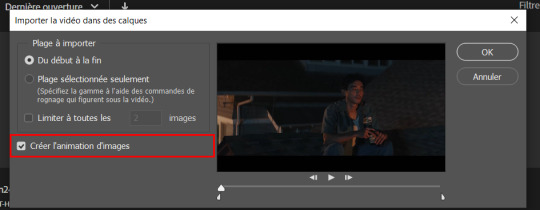
this bit here needs to be checked like this, it'll set up the gif animation or whatever. so yeah then click Ok
bim bam boom photoshop will open like this
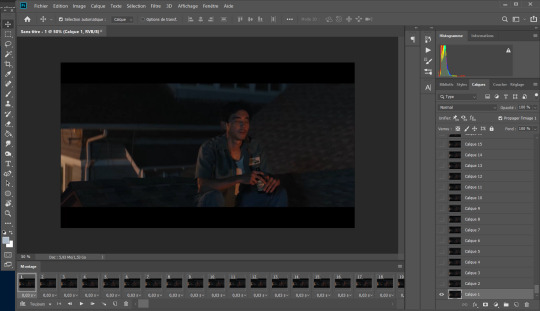
big scary image with many tiny scary images, so first of all what i do is get on the cropping tool

this will show up in the toolbar up top

and in there you set the dimensions of the gif, 1 gif in a gifset that takes up the whole post has to be 540px wide for 2 gif next to each other it's 268px wide and i can't remember 3 by 3 but i never do that so whatever who cares.
once you've set up the dimensions you want, you got this grid thing to move around and set however you want it to be
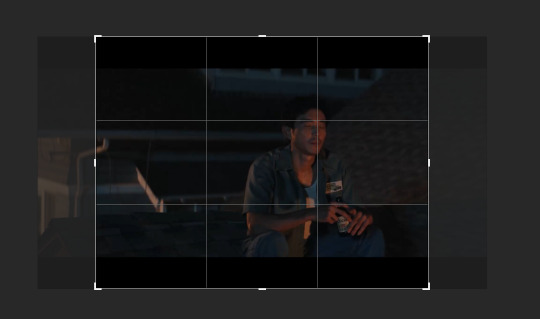
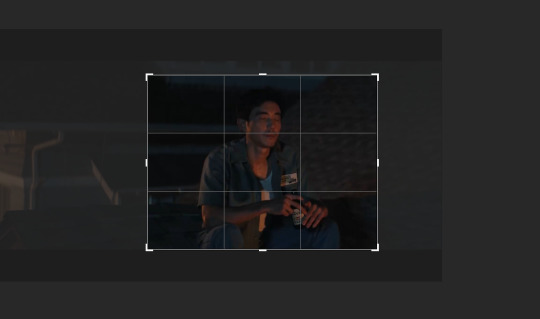
and then you wait as it painstakingly takes its time to do it
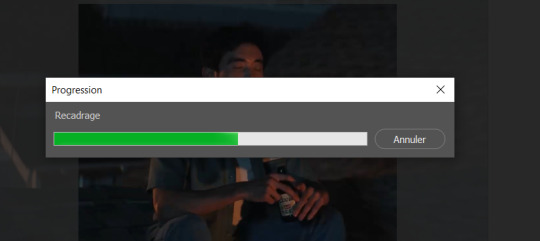
boom! it's done!

so that's your gif raw and unprepared without any filters or whatever, no length, no speed, nothing!
down there you've got the frames of the gif, depending how long is it'll be either a lot or very very short, in this case it's 277 frames, so already you know it's not gonna be just one gif but probably two or three - which i knew btw that's on purpose!!

first thing i do when all the cropping and setting up is done is scroll all the way through the frames to see if there's a bit that won't make it into the gif, and here, there is
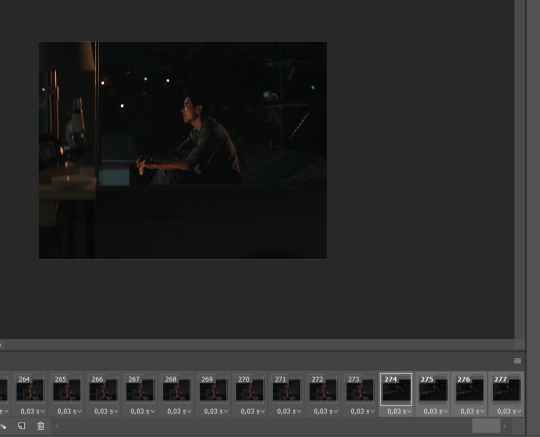
these last four frames show a different bit of the scene because i cut shit very messily and don't check before opening photoshop but you know! trust the process! so make sure to select the unwanted bunch and delete them
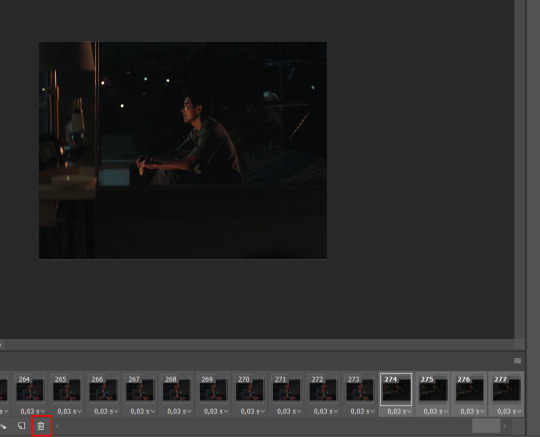
so now hurray the gif is 273 frames and it's only the one scene i want

and now the fun not fun starts!
to the right you got these, the layers
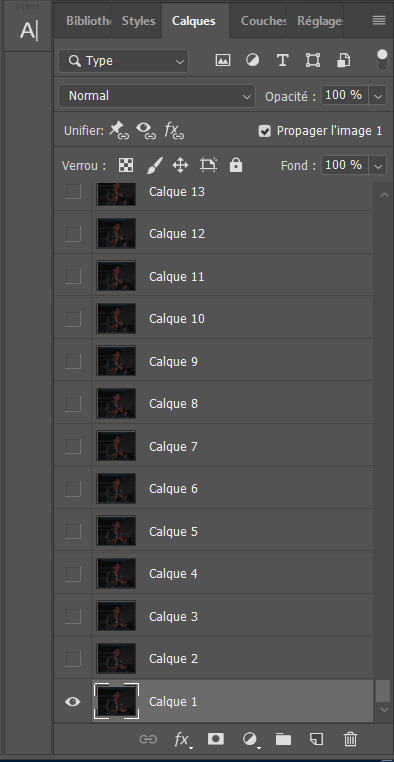
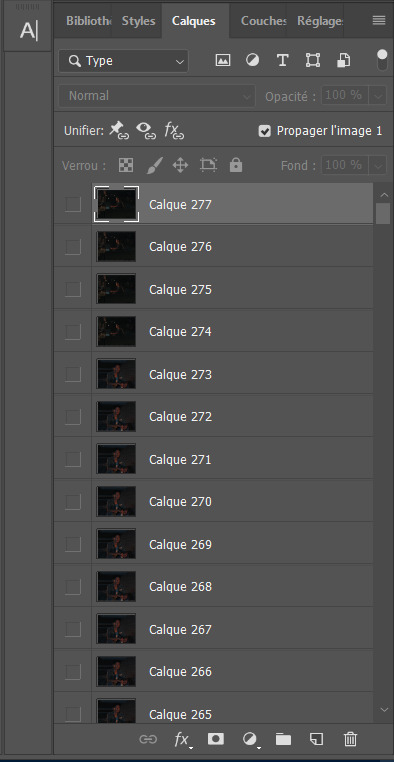
so you gotta scroll all the way up and NOT forget to click on the very last layer before you start playing around with filters and all that

this little guy right here is my bestien he's the only one i use when editing gifs, fuck everybody else on that row. when making gifs i mostly just use a combination of those three things, brightness/contrast, vibrancy and photo filters
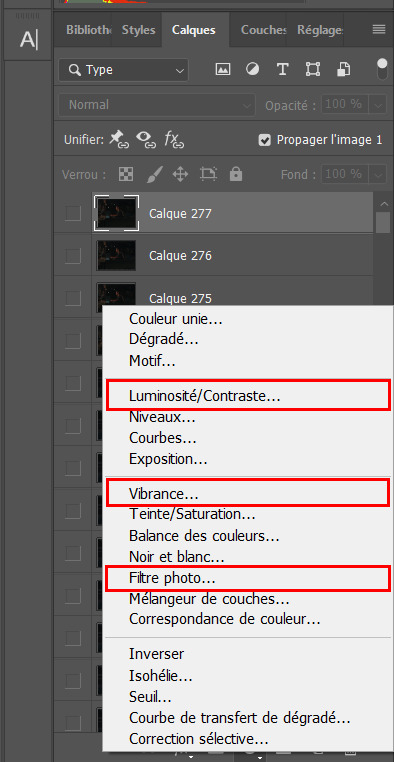
so anyway, let's fool around with those little things and make a gif (i realize now the scene is very dark and it will look very ugly but never mind! we carry on) so there a bunch of random settings added - you gotta make sure they are all the way on top of everything or else they just won't appear on every single frame
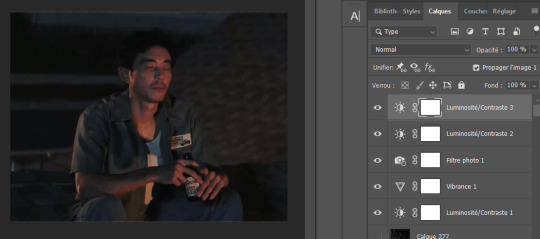
what i do then is probably very stupid and there's probably a better way to do it, but MY PROCESS, so i divide the amount of frames i've got by the number of gifs i want to make in a set, so 273/3 that's 91 (thank you google), so we look back down at the frames

and then scroll aaaaaalllll the way back to frame 91 (if you hold shift and use the wheel it'll be much faster) and while still holding shift pressed down click on frame 92
that will select every frame from the last to that and we delete that shit


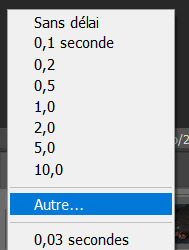
so now we only have 91 frames and that's one gif. so let's save it! but wait, no you forgot to do something! see the 0.03s? that's the gif speed or whatever, idk how it works but 0.03s is too fast, me i usually use 0.05s so what you do next is select every one of those frames you've got left and click the little pointing down arrow, that'll open that

click Other... and then set it as the speed you want
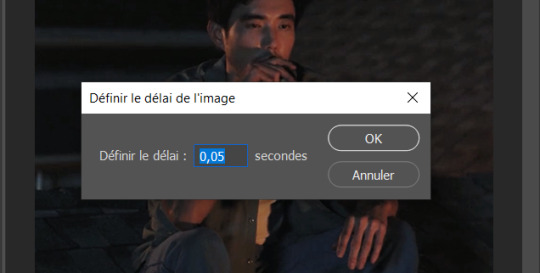
ok so your gif is at the correct speed NOW you can save it so it's file > export > save for web
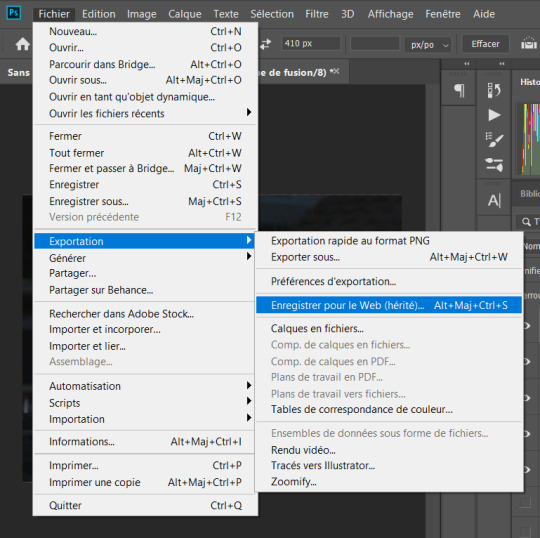
this new popup will appear
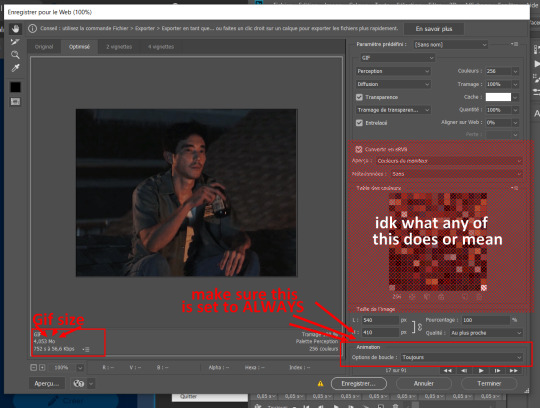
currently as of 2024 gifs can't be bigger than 10Mb/Mo, this one is 4mo

so we're good we're fine. so then you just click save, name the file whatever you want and VOILAAAA, a djeef!

(and then undo the delete and repeat everything for the other two gifs you'd want to make in that set)
7 notes
·
View notes
Text
Starkerfestivals Summer Bingo

Hey Guys! It’s time!!!
General Info
The Starkerfestivals 2023 Summer Bingo will begin Thursday, June 1st, 2023, and run until September 30th 2023. Each participant will receive a personalized card with a 5x5 bingo of prompts.
Here is a link to the sign up.
We accept signups even after the event starting date so feel free to join in!
What Counts As a Fill?
Overall:
There are no minimums or maximums for this event.
Each fill must fulfill the prompt you choose to associate it with. (Meaning, don’t do a fill about them going to the beach if the prompt you attach to it is a prompt such as ‘breakfast in bed’.
One fill per prompt, no doubling up.
As long as the other event is okay with it, we are fine with a fill in our event being used as a fill in another event. (For example, if you have a prompt for ‘date night’ in our bingo and ‘date night’ in another event’s prompt, we are okay with you using our event alongside theirs)
Starker must be the main pairing. Other pairings are absolutely fine to include (Poly, other one-sided relationships, background, etc) as long as Starker is in the main focus)
Specifics:
Visual Media:
Anything new! One piece of art/gif/edit per prompt. (Meaning, for example, one gifset can be made for the prompt “proposal,” but it cannot double as “wedding” and “arranged marriage.”)
Sketches, line art, fully colored for art.
Gifs/gifsets/moodboards are also welcome.
Edits or videos, as long as credit is given to any music you add.
We will also accept reworks of previous art; for example, if you flesh out a previous sketch into a fully colored piece of art, or expand on an old piece. Or you add a drabble/fic to go along with an old gif set. As long as something is new, it can count as a fill.
Fics:
Anything new! One fill per prompt. (Meaning, for example, one work can be made for the prompt “wedding,” but it cannot double as “Proposal” and “arranged marriage”)
One shots
Drabbles
Multi-Chapter fics (For these, one chapter per prompt. For example, chapter one could be a fill for “courtship/wooing” and chapter two could be “proposal”)
We will also accept reworks or sequels of previously posted fics; for example, if you completely redid an old work or added a chapter to an old one shot. As long as the work your publish for the fill is new, it can count as a fill.
Other:
If there was a type of fill we missed, please feel free to do that as well! Anything can count as a fill as long as it fits these requirements.
Reminder of Rules
You can only have one card active at any time. You may ask for another card after you have won your old one. As if a new card, you should receive it within 24 hours.
As a participant, fulfilling prompts can be done at your leisure. We want everyone to have fun so whether you fulfill 1 or do the entire card, it's up to you! There is no obligation to "win" bingo but for those that want to go for it:
To "win", you will need to get five in a row via horizontal, vertical, or diagonal means. You can also win by getting the free space and all four corners. Finally, you can get a blackout by completing every square on the board. Visual Examples:

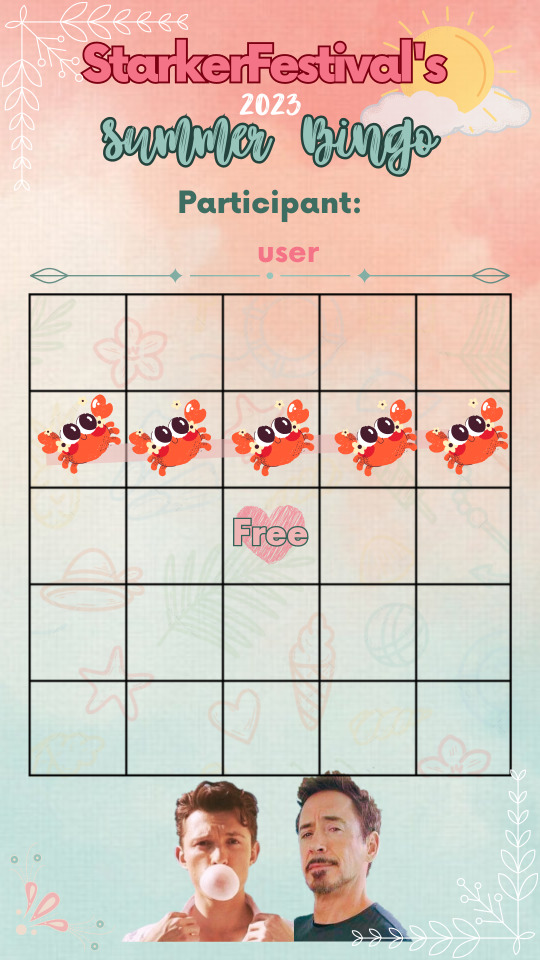
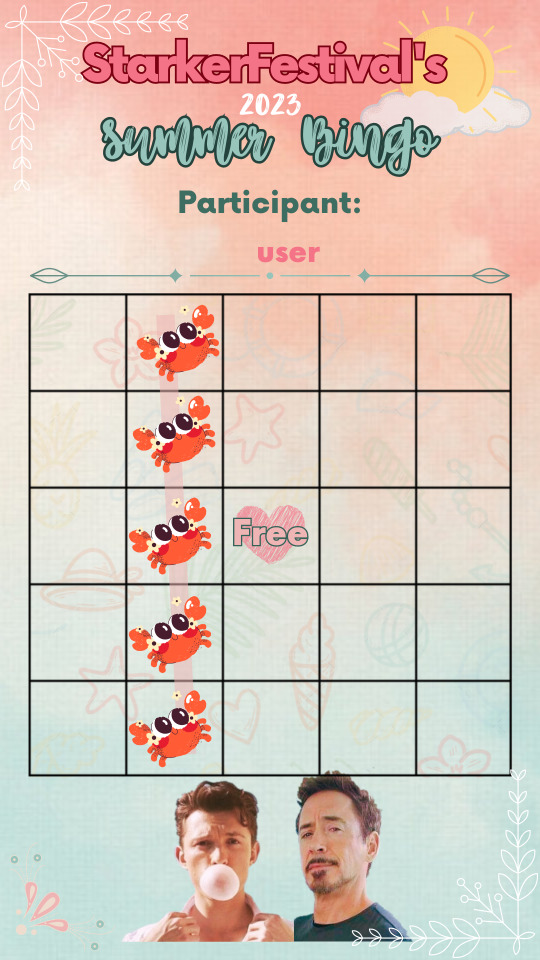
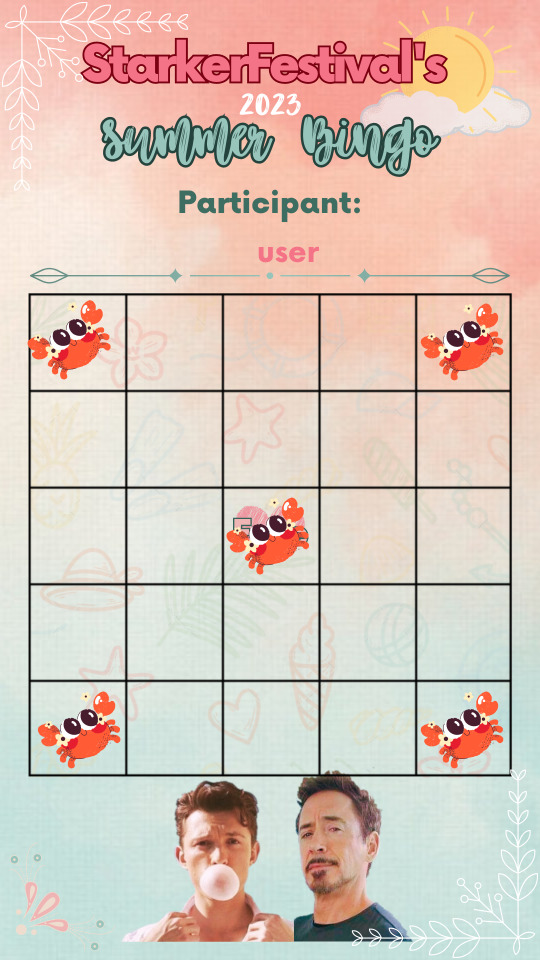
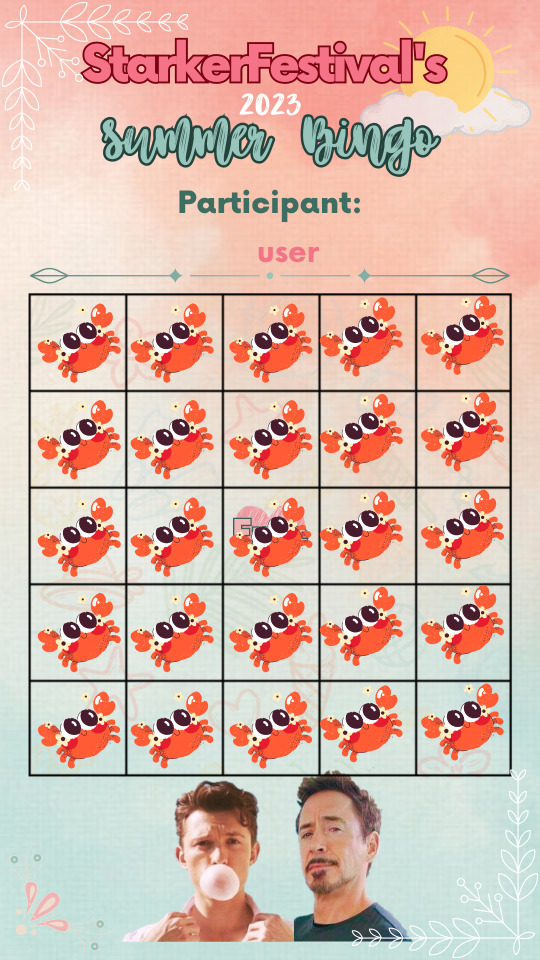
Free space is free prompt choice. You can write or draw anything you like as a fill, just please make sure it follows the rest of our rules as they apply.
You must tag everything appropriately; meaning, make sure to tag every trigger/content warning correctly. If you're unsure whether or not something needs to be tagged, it’s always better to be safe than be sorry.
To have us reblog it, you can tag your work as #SFSummerBingo23 or @ us here. We should get to it within 24 hours; if we haven’t please feel free to dm one of us or send us an ask here. We won’t mind! <3 Collection for AO3 is also SfSummerBingo23
38 notes
·
View notes
Note
There was this tag game for gifmakers, where you would talk about a gifset of yours, from why you made it to how you made it, then proceed to tag others, specifying which gifset you’d like for them to talk about. No one in the Good Girls fandom did it, so I was wondering if you’d be interested in starting the tag chain? If so, I’d love if you talked about your diamond Ruby gif!☺️
sure, it sounds fun!! ty, nonnie <3
so, this is the gif in question (x).
why i made it: i needed to make something quote-related for the good girls meme. i decided i wanted to do this ruby quote bc it's one of my favourites. and i didn't wanna just gif the scene bc a) i'd already done that for top 15 and b) i'd made a "fancier" gifset for the previous quote (x) because i wanted to try out blending and using this really pretty font and i felt like it'd be weird for me to go from that to a simple gifset. at the same time i was brainstorming what i should do, merlin ladies appreciation week was going on and a lot of pretty gifsets were crossing my dash and they really inspired me. specifically, i decided i wanted to make something similar to this one (x)
how i made it: so what i did was i picked a shot from that scene where ruby was relatively still, so that it would be relatively easy to change the colours. i just coloured her as usual, added a black and white gradient map and then used a brush to paint the background red on a layer set to vivid light. then for the diamonds, i found a copyright-free png with a diamond shape i liked and arranged them to the side so they didn't cover up the big shot. i did some math to figure out how big the diamonds had to be to get exactly 2.5 per row. that took me a while because math is not my forte lol. to create the little white borders, i selected the shape of the diamond, created a new layer, right-clicked, selected stroke (obviously, picked a white colour. pretty sure the width was 1px but not completely sure) and moved it 3px to the right and down. for the shots inside the diamonds, i picked the moment of reconciliation between her and stan later in the ep, when he comes back to bed, and then just a bunch of other moments in different eps that i felt had similar vibes to the "i'm that bitch" speech?? i coloured 2 normally but with red backgrounds, 2 in black and white and 2 in a red and black gradient. i'm pretty sure i chose to do that because not all the shots were still enough or had the appropriate colours for me to get red backgrounds, so it was easier to do it like this hahaha. to get the images inside the diamond shapes i used clipping masks bc that's just easier imo. then for the text, i used bonavista and function (which i stole from @mego42 - ty! <3) in white and set the layers to difference to get that effect where you can kind of see the gif behind it. and that's it, sorry if i didn't explain myself very well. if you're a gifmaker and the reason why you asked is bc you wanted something closer to a tutorial or had a specific detail you wanted to know how i made, feel free to send another ask or even a dm asking about whatever it is you wanna know :)
people i'm tagging: @mego42 for the first 20 questions set, @elizabethbolands for the rio ggsuits set, @riosnosestud for her gg.ge21 set, @emilykolburn for her top 3 episodes of each season set, @fondful for her brio blue set and @sdktrs12 for her gg.ge21 set
9 notes
·
View notes
Text
creator tag
rules: It’s time to love yourselves! choose your 5 favourite works you created in the past year (fics, art, edits, etc.) and link them below to reflect on the amazing things you brought into the world in 2019. tag as many writers/artists/etc. as you want (fan or original) so we can spread the love and link each other to awesome works!
thank you to the lovely @judearaya @outphan and @alittledizzy for tagging me!!
1. life is but a dream (fic)
an underrated lil baby of a fic, at least in my biased opinion. i’ve always found most comfort in understanding and using natural imagery, so although those lads never go outside i wanted to write a fic about what might happen on such an occasion. at the time it also didn’t help that i’d asked a friend of mine (whom i’ve liked for years) to go rowing together cus it was late summer and why the fuck not. we were making arrangements, but then she just stopped texting at all for two weeks and nothing came of it. it was rough, so i vented my heartbreak by imagining a universe where at least someone else could get the rowing date they wanted.
2. the king (fic)
again, this was a result of my own personal life - you guessed it: heartbreak! i was driving into town, healing over someone who had recently rejected me, listening to this fic’s song, and then i realised “this is like how i imagine phil felt in 2009 before oct 19.” because pining for someone who is sending mixed signals, pining for someone who seems confused even though in your eye there is no clearer answer? that is some relatable shit. writing this was largely therapeutic and helped me come to terms with my own situation, through exploring fic!phil’s feelings. because this fic was more than just surface pining: it is about all the insecurities, all the anger, all the panicking which comes with it. the key to it was that anyone reading it knows that things do turn out for the better and dan does choose phil, even if neither can see it now. so for myself, it was reassurance that when life hits rock bottom there’s only one way up, that the present does not reflect the future. but at the same time, even if things are destined to improve, it is beyond your knowledge and your feelings now are still valid. you are allowed your anger and your sadness, but do not take it as the end.
3. ‘talk abt dnp love languages and the way they express them pleasee’ (meta)
back in days of old when i got anons, sometimes i did a bunch of interpretation/analysis stuff, and this was probably my favourite to write. i don’t have much to say about it here other than that it’s something i’ve seen people discuss at length and i hopped on the opportunity to give my two cents on it lol
4. ‘you are the drum!’ (gifset)
my first ever gifs, the day i got photoshop completely legally *cough*. are they good quality, rich in technique? fuck no! was i, and am i still, pleased with them? fuck yes! especially because if every phannie were to have a ‘niche’ in what phandom stuff they like to indulge in, phil being a fond guy is definitely mine. :’)
5. first impressions (gifset)
for what is probably one of my favourite gaming vids of theirs ever, my second of two gifsets i’ve done so far - i would have done more but i have legit no idea what i’m doing wrong that makes them so low-definition. each gif was also more saturated than the one before, which i did not intend. oh well, i am not a good gifmaker and i own it! (but send me all your tutorials please, i need ‘em!)
overall?
the reason i only included two fics in this list is because they are my only two so far. i want to do a lot more fic-posting - you will not believe the number of wips i have in my fic GD folder right now. my 2019 has been absolutely chaotic which is why i haven’t posted much, in many ways i’m surprised i’ve got anything done at all lol. but it’s been a good year for me, definitely a brilliant one for the overall phandom. may 2020 be kind to us all. happy new year!
i am so sorry if i miss anyone, it’s just off the top of my head that i am tagging: @karcathy @elisethephangirl @phlanetary @toxicnebulaae-deactivated201912 @imdyingriprip @autumn-in-phandom @calvinahobbes @itsaravetree @throwing-roses-into-the-abyss @owodnp @incognitovampiregoblin
10 notes
·
View notes
Note
would u ever do a gif tutorial?? i love your gifs !! 💓
first of all, thank you 💖💖 and sorry this took a while to answer/make, i have had a lot going on and found it hard to make myself focus on this! but here it is now :D
i did make a tutorial earlier this year, but since i feel like that’s slightly outdated now (because i’ve changed the way i make my gifs quite a lot during this year), here’s a new one :’)
in this tutorial i included how i:
download
cut out the part i want to gif
import to photoshop
how to use actions (because i’ve started using that a lot and will in this tutorial)
crop (action)
put the text on (action)
sharpen (action)
colour (psd)
save
‘delay’ the gif so it’s a (in my opinion) good speed (again with an action)
i use photoshop cc 2018, but i think as long as you can open video clips in it and it has the ‘timeline’ you should be fine no matter what ps you have. (don’t hold me to it, though, that’s just my own speculation.)
i’ve included some things too:
an ‘action pack’ including: crop, sharpening, text and ‘delay’.
3 colouring psds (2 from the last tutorial+the one used for this tutorial)
i’ll be showing how i made this 540x300px type of gif:

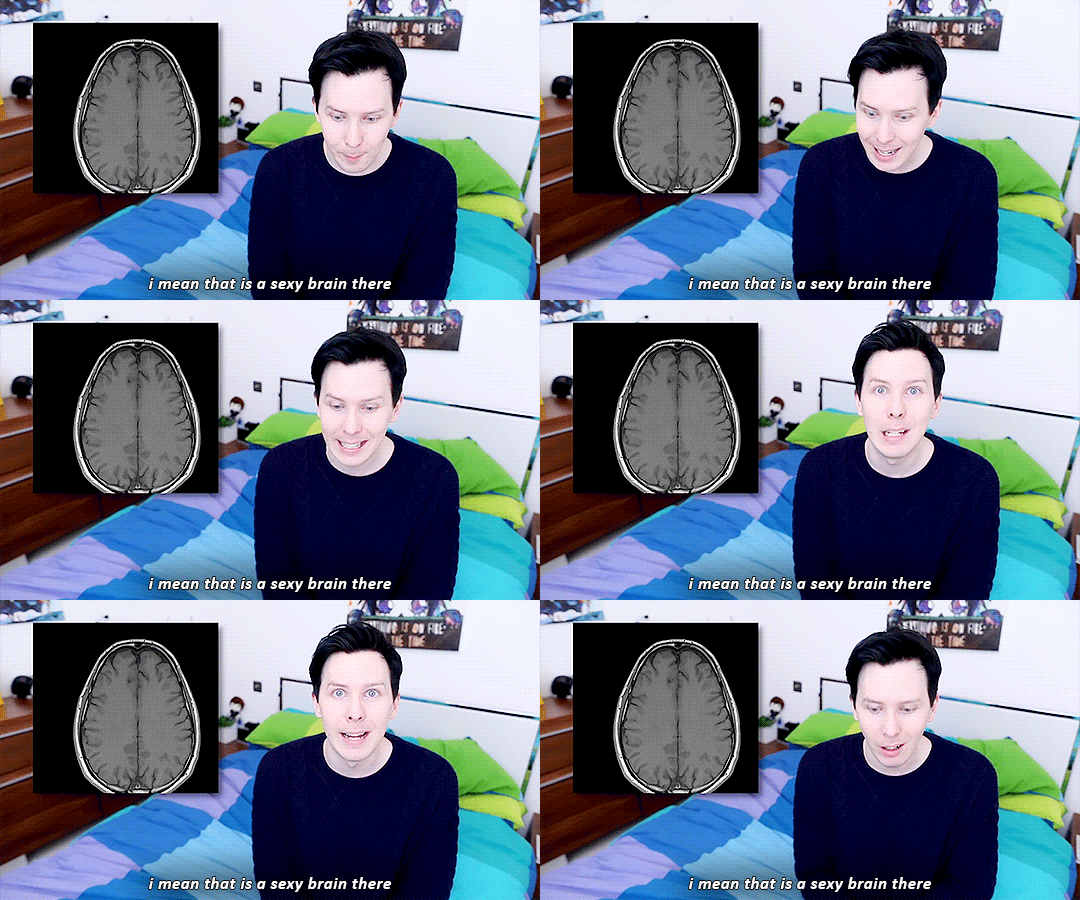
from this gifset.
(tutorial under the cut! warning for a long post, with a lot of text and pictures. sorry if this is very in depth i just can’t stop talking sometimes. some things might be small details, but it’s things i wish i learned sooner myself. anyway lets get into it! also i’m not an expert, just speaking from my own experience.)
downloading the video
the first thing i do is download the video i want from clipconverter.cc. paste the link in the field, press continue, choose mp4 and highest possible quality (preferably high definition (hd) 1080p or 720p) and then press start. it takes a while to process the video, but once that’s done just press download and wait for the video to download, which takes another while.
if you know which part you want, and don’t wanna download a full video, you can just put in what part you wanna download like this at the bottom:

cutting out the part i want to gif
i use quicktime player (download link) to open the video and then i cut out the part i want to gif using the ‘trim‘ tool, found under edit -> trim… i always leave more than i need when trimming, just to be sure i get all of what i want to gif, then trim it a bit more later in ps.

trim by pulling the yellow things until you’re happy, then hit the button to the right.
when you feel like you have the part you want, just click file -> save… and name it and save it where you want.
importing the clip to photoshop
i simply import a clip by pulling it from the folder into ps, like this:
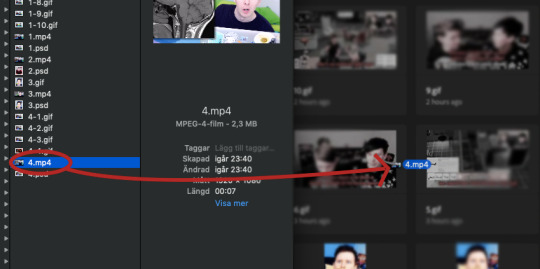
this will open up your clip like this:
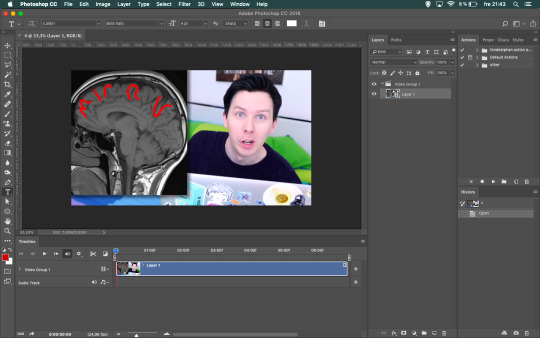
i always work in the video timeline like this, because i find it easier to move stuff around in it - especially text. and because you can listen to the video clip as you do the text part of the gif, so i don’t need to have it open on the side.
how to use actions
using actions may sound hard, but it’s honestly the best discovery i’ve done in ps this year! now i tend to use it more often than not, because it makes gifmaking simpler (in my opinion). basically, the action does the things for you instead of you having to click a lot of buttons
depending on how you’ve set up your ps, the ‘actions’ panel is on the right. if it’s not, open it by clicking window -> actions.
to import an action to photoshop, you click the little lines at the top right corner of the ‘actions’ window. then click load actions…

find the action (.atn) you wanna use and click it to add it to ps.
then you just click the action you wanna use in the actions window on the right, and hit the little play button (see pic below) and let ps do the rest.
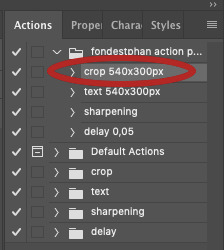
click the action (red circle), then play (blue circle)!
nothing more, nothing less!
crop (action)
following the steps above we’re now gonna crop the video.
my ‘big’/one line gifs are usually 540x300px because i find that to be a good size for those.
click the ‘crop 540x300px’ action and ‘play’. done!
and before we move on, this is usually when i trim the gif from the excess i left when trimming it in quicktime player.

place the marker (red circle) where you want to cut the clip, use the scissor (blue circle) to cut it. click the clip you don’t want anymore and delete it.
text (action)
when i make gifs with text, i find it best to do the text right after the cropping. if the gif doesn’t have text, i just go straight to ‘sharpening’.
first close the video group by clicking the little arrow next to it, then click the video group:
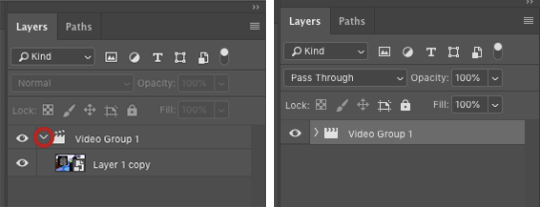
add the ‘text’ to the gif using the action. the text layer won’t go all the way out, or it might be too long depending on the clip’s length, so just pull it so it fits the size of the whole clip:

this something to remember to check once we get to colouring as well.
then what i do is that i play (the button marked in blue below) the clip in ps, listen for what i want to be in that particular gif and then pause where i want to cut it, and simply cut it with the scissor. make sure the text layer is selected before cutting it.

you can either keep the layers like this, or you pull down the top one to the same line in the ‘timeline’. i always want them all in the same row because i find that simpler.
i keep cutting the text where i want the gifs to end. you could say that each section of text is a gif in the gifset, because that’s how i think when i gif like this.

then it’s just to put the text you want for each part of the gif.
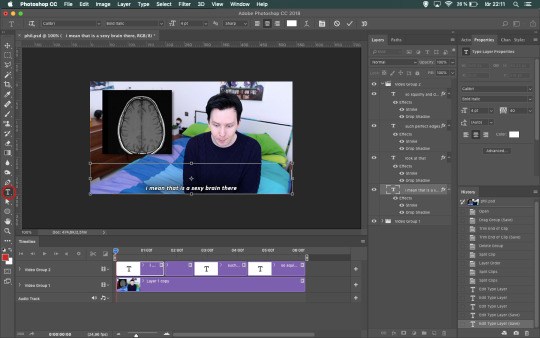
click the section of text you want to write in, click the ‘type tool’ and then the text on the gif to start writing.
i always make my text boxes higher than i need to, because i never know how many lines the text will be. then i just hit enter to jump down as many lines as i need in order for the text to be at the bottom of the gif.
sharpening (action)
when you’re gonna sharpen the clip, you’ll need to open the video group that you previously closed again.
click the ‘video’ layer and apply the ‘sharpening’ action just like with the other actions.
now that we’ve sharpened it, when saved the gif will look something like this:

colouring
i most often colour every gifset by itself nowadays, because i love experimenting with colours and try to find something that works for every gif/gifset. it can be challenging, but i personally enjoy that kind of challenge!
for the tutorial i made earlier this year i included some psds that you can find here. you can find the colouring i made for this tutorial there as well! if you just wanna apply the psd and not colour from scratch, i explained how you do that here!
the layers i use are:
‘levels’ (to lighten/darken)
‘vibrance’ (to make the colours ‘pop’)
at least one ‘selective layer’, but usually a few more (to experiment with colours and change/desaturate colours completely)
sometimes a ‘curves’ layer as well (if the gif is very dark or just need some more light other than what the ‘levels’ layer can do)
sometimes i use ‘hue/saturation’ as well (if i wanna change a specific colour to another or saturate it completely)
all adjustments layers i use can be find at the bottom of the ‘layers’ tab, the button is called ‘create new fill or adjustment layer’:
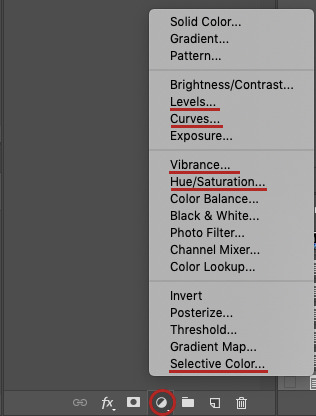
since my colourings differ from gifset to gifset, this is just generally what i do when colouring. it also varies depending on if it’s more colourful gifs (like this or this, or like the phil one i’m gonna show now), or just one more subtle coloured (like this, this or this).
if there’s requests for more colour tutorials i can make more :’)
but now back to this gifset!
i always start with adding a ‘levels’ layer. my settings for this gifset was:
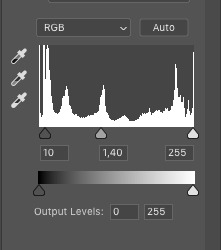
the first value is shadows, second is midtones and third is highlights. i usually keep my shadows value at 10-20, midtones 1,20-1,50 or 1,60-1,70 if i need to, and leave highlights as it is. (i don’t use the output levels at all.)
after ‘levels’:
second layer i add is usually ‘vibrance’. (sometimes i add ‘selective layer’(s) before ‘vibrance’, but i find it easier to do ‘selective layer’(s) last.) my settings for ‘vibrance’ is usually:
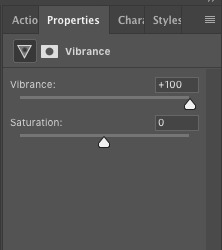
so i basically always turn ‘vibrance’ up to +100, sometimes i’ve used ‘saturation’ too and put it at like +10 or +20 but i find that to be a bit too much most times.
after ‘vibrance’:

‘selective layer’ is for me the most frustrating part, but also the most fun because you can get such cool colours with it - or even just enhance the already existing colours just a bit.
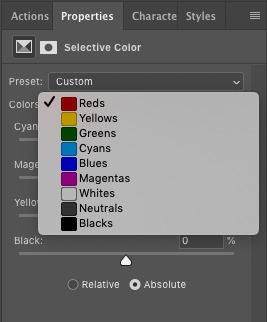
‘selective layer’ have many different options and depending on what my ‘goal’ for the gifset is, i use these differently. something i always try to have in mind, though, is that the colours ‘disappear’ a bit when i upload the gifs to tumblr and it’s okay if it’s a bit too ‘much’ in ps.
my biggest tip is probably to explore it on your own and play around with it a lot. that’s how you learn what works and doesn’t work and also what you personally like or don’t like. if it doesn’t look good, just delete the ‘selective layers’ and start from scratch again.
my first layer is always in the reds and often in the black one as well. for the phil gifset my settings were:
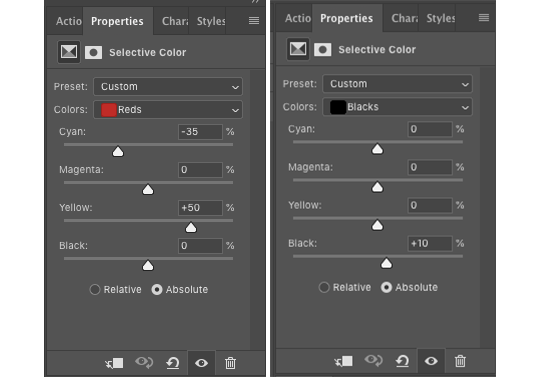
in the reds i enhance his skin colour and in the blacks i make everything black a bit darker. if it’s a colourful gifset i always make the reds a bit ‘stronger’ than i need to, because a lot of the skin colour disappears when i keep adding layers and changing the colours in those.
after this layer the gif looks like this:
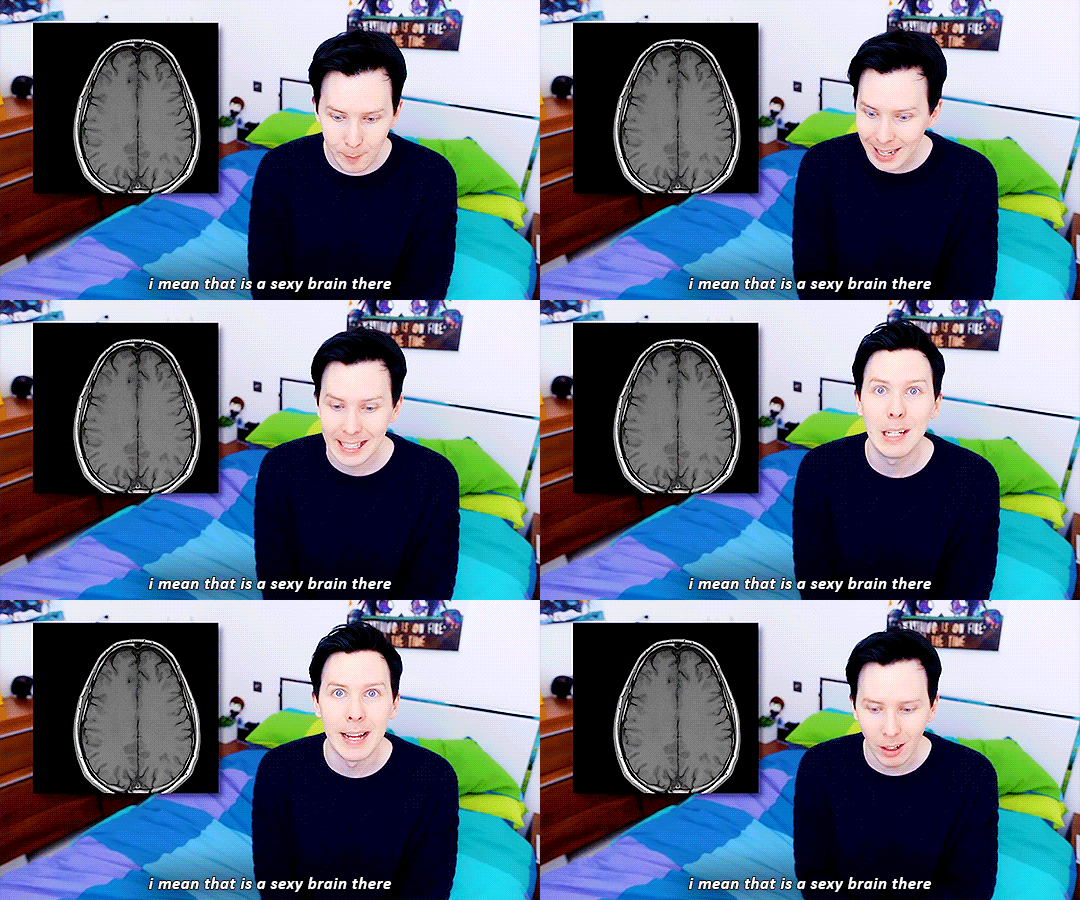
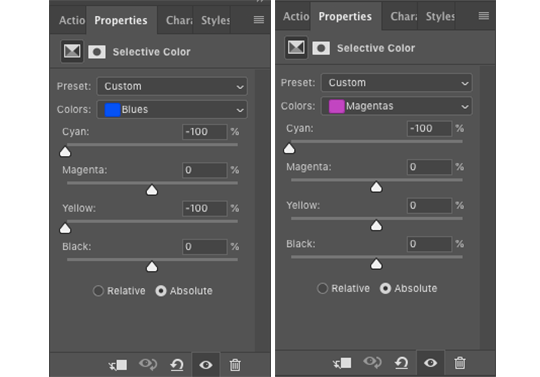
in the second layer i played around with the blues and magentas, to try and change the blue and magenta colours in the gif - in this case phil’s sheets, his sweater and his eyes.
my settings ended up being like this:
and then the gif looks like this:

layer 3 in this gif is just magentas, in which i kind of saturated the magenta and blue colours a bit.
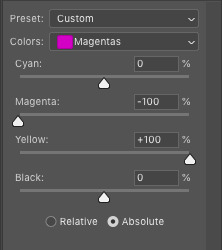
then it looks like this:
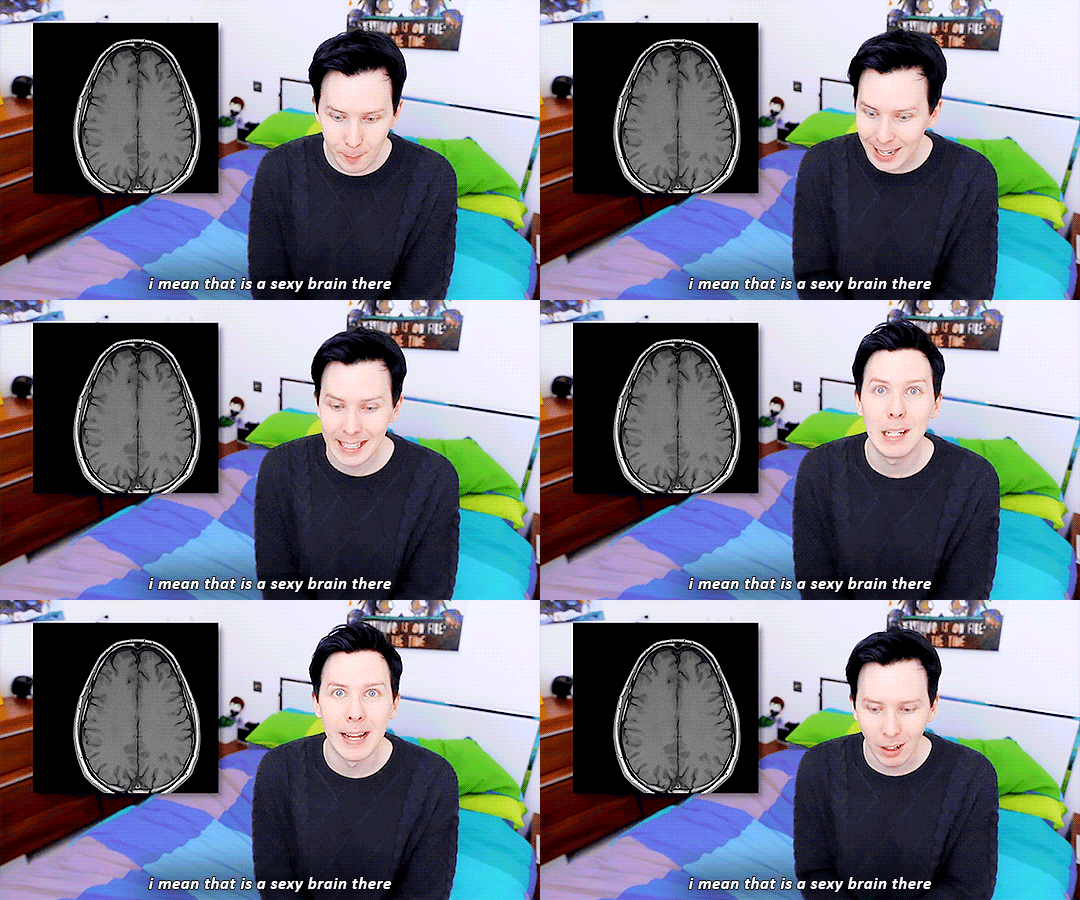
i wasn’t really happy with the green (the pillows) in the gif, so i added another layer in which i changed yellows and greens, and put it beneath the rest of the ‘selective layers’.
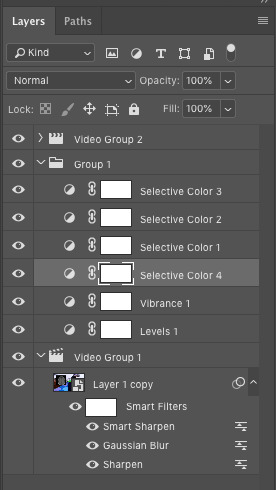
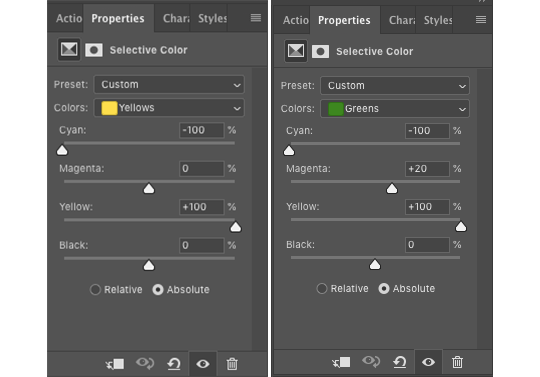
in this layer i played with the yellows and greens, because green always contains yellow and green. putting the cyan to -100 in the yellows layer will make it more reddish and the yellow at +100 will make it more yellow. changing the greens and putting the cyan on -100 made it more reddish too, the magenta at +20 gave it a kind of orange-ish tone and yellow at +100 made it a bit more yellow.
and this is how the gif looks now:
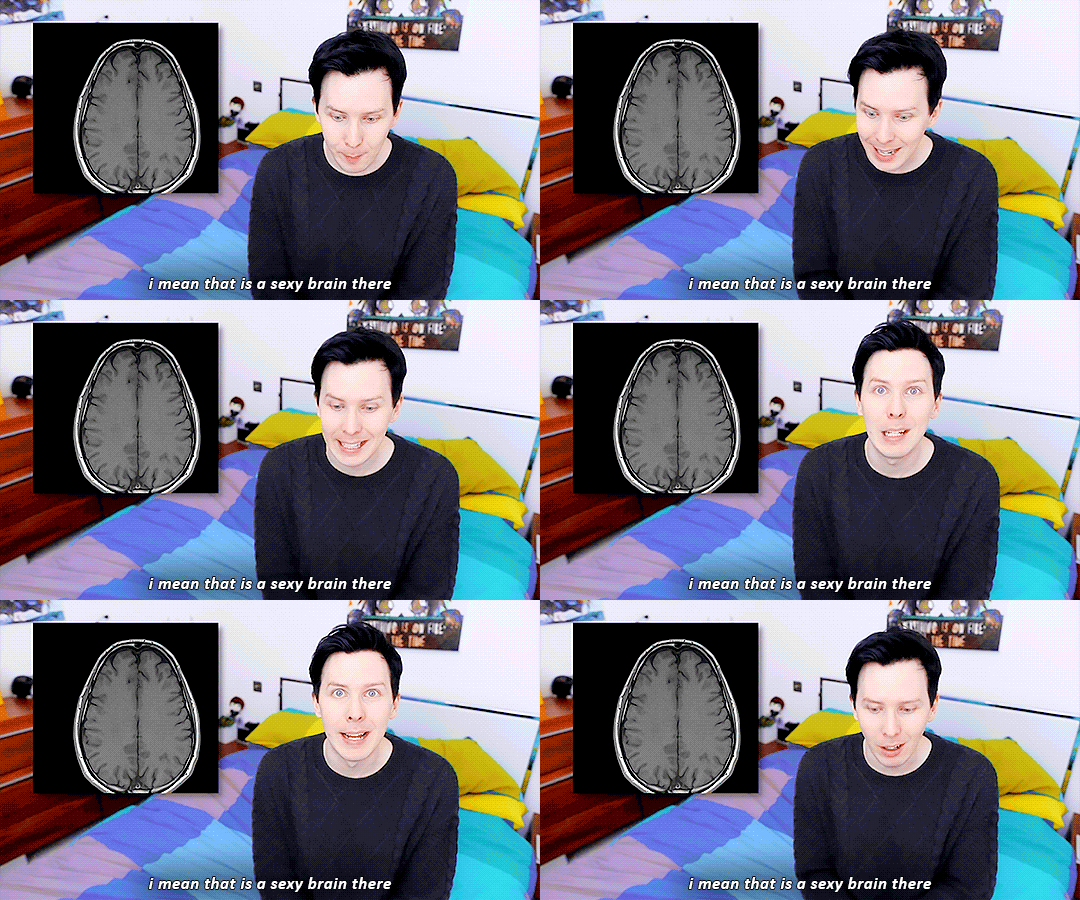
all in all, i find that to get good or interesting colourings you just have to play around with the different layers. and add more ‘selective layers’, to change the colours even more. as i said before - if it doesn’t work or looks weird, simply delete the ‘selective layers’ and start over :’)
saving
one of the final steps in gifmaking is saving. i save my gifs in two steps, and this is the first one.
to save the first gif, just place the markers like this:

so it matches with the ‘text’ layer.
click file -> export -> save for web… for my laptop it takes a little while to process it, but soon this window will pop up:

in the bottom left corner of the window you can see the gif size.

it needs to be under 3mb for it to work in a tumblr post. if it’s over that, you can either exit the window now and shorten the gif a bit more - or you can save it now and remove frames in the ‘delay’ step further down. i personally most often do the latter because i find that easier.
on the right of the gif are all the settings, mine are:
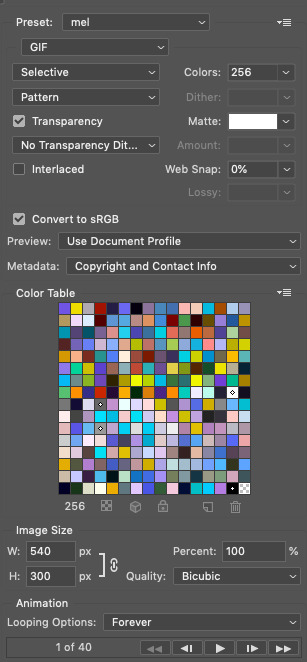
i mostly focus on the top half i find ‘selective’ and ‘pattern’ to be the best settings, but that’s a matter of taste really. you can always play around with it until you find what you think is best for your gifs.
and make sure the looping options at the bottom is set to ‘forever’, so the gif doesn’t suddenly stop.
when you’re done, click save… and save your gif where you want.
move the markers (red circles) to match with the next text layer to and repeat the steps to save the next gif.
‘delay’ (action)
once the gif is saved i always open it again to change the ‘frame delay time’ and sometimes (like for the gif used in this example) i add another ‘vibrance’ layer if i find that the gif lacks some colours. you can of course do this during colouring, but for me this works as well.
find your gif, open it in ps. choose the action called ‘delay 0,05’, then hit play. this will make the gif a bit slower than it is when you first save it in ps.
if you want to add another ‘vibrance’ layer, you can do so now. in the ‘layers’ tab, scroll all the way up and click the first layer and then add another ‘vibrance’ layer and set it to the value you want.
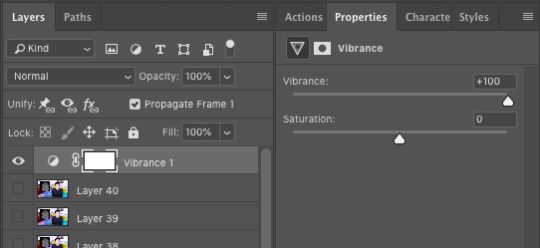
(i usually go for +50 or +100.)
if you know your gif is too big (over 3mb) from saving it earlier, you can now delete frames in order to make it smaller. what i do is delete one or two frames at a time until it’s under 3mb.

to delete frames, click the one frame, hold ‘shift’ and click as many frames back as you wanna delete. click the tarsh bin (blue circle) to delete them.
once you’re done, click file -> export -> save for web… again to save your gif. i usually save over the one i saved before, because i see no use having two gifs that’s almost the same. i only confuse myself so i don’t know which one is which without having to open ps again.
now you’re finally done and can post your gif(s) to tumblr :D
the final result!
before all effects:

after all effects:
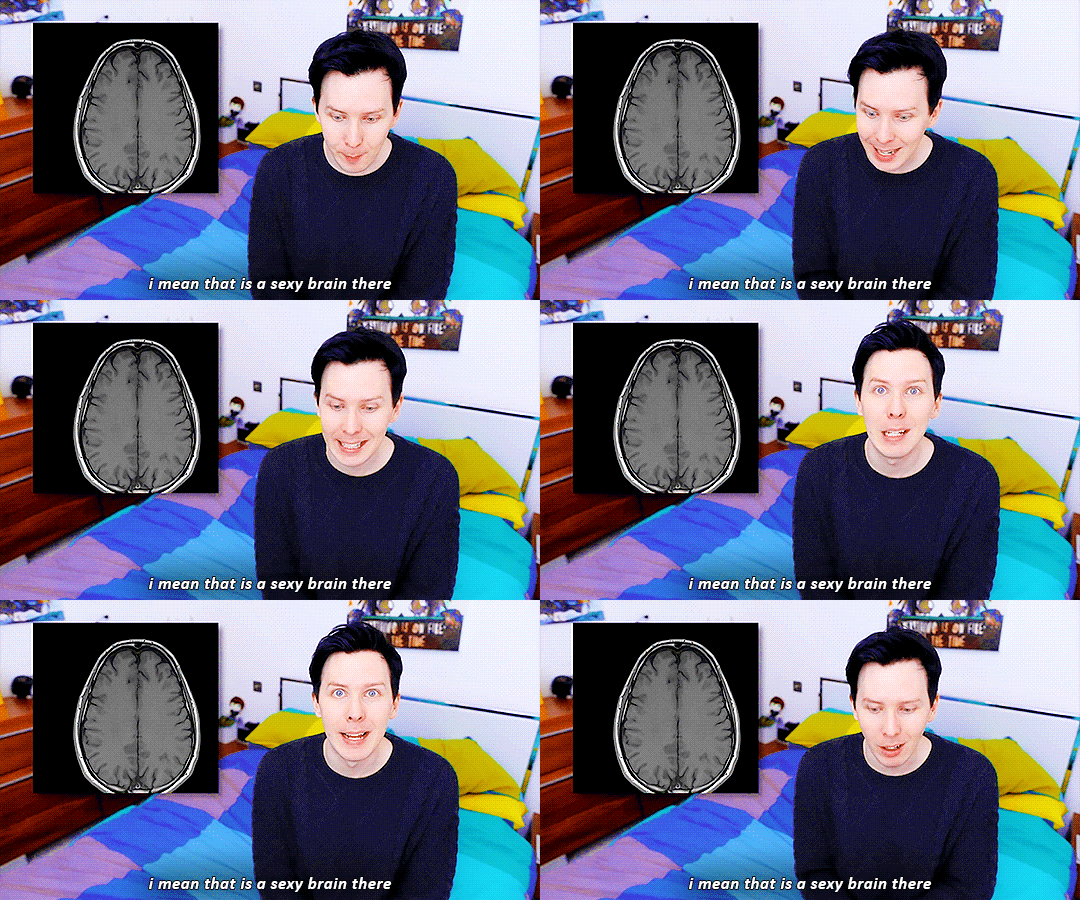
if you found this helpful, please like or reblog! thank you for reading :’) 💖
#anon#asks#gif tutorial#i really hope this makes sense and that i didn't miss anything hhhh iamanxious sjkdhjgdshfkl
126 notes
·
View notes
Text
Big ass gif tutorial
It’s been a while since I made a coloring tutorial, and I thought it would be useful if I made a full tutorial on how I make my gifs. I will go over:
how to screencap
making your gif in ps
sharpening
coloring that gif
putting subtitles on a gif
saving that gif
you will need
a hd copy of the episode/movie you want to gif
potplayer (or kmplayer)
a version of photoshop (I use CC)
a sharpening action
A psd or patience to color your own gif
end result:

Everything will be under the cut. Warning: this will be picture heavy and text heavy. English is my third language so there will probably be some mistakes in here.
If this is the first time using photoshop, your startpage will look pretty blank. I’ll show you what you need to make visible to gif.
Click on “window”. The screencap I made of the settings is pretty big so click here if you need to see it.
Not seen in the picture but useful: actions, properties, character, paragraph
STEP 1: THE FILE
Okay first of all, you’ll need your file. I recommend downloading ��torrent, then going to a torrent site (like rarbg.to) and searching for your episode or movie. ALWAYS choose 1080p and web dl if possible (web dl means logoless) Example: wynonna earp s01e01, then in your search results, look for one that has both 1080p and web dl in the title. 720p is also good.
You can also find twitters that post logoless episodes and movies, this is better if you don’t like using torrents or if you live in a country that gives you fines for torrenting (I’m lucky, Belgium doesn’t care). If you want a list of a bunch of twitters that share logoless episodes and movies, message me off anon so I can link you privately.
STEP 2: CAPPING
When you have your file, download potplayer (or kmplayer). Open the program and open the file you want to cap.
Search for the moment you want to gif. Tip: hover over the playline thing to see what scene is at what time. Normally it looks somthing like this:
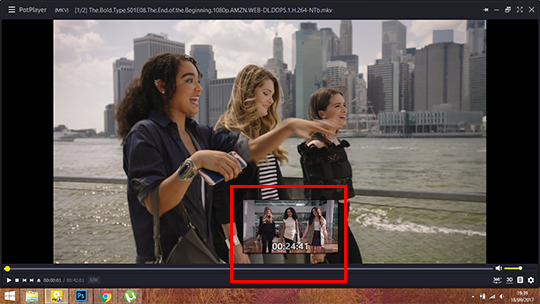
Press ctrl + g when you have the moment you want This window opens:

Change your settings to mine ^^. I made a new folder in my Pictures folder where all my caps go bc it’s easier to go to. It’s up to you where you save all of them, but I suggest you pick one you can easily access. Click start.
Click escape and start your video. Pause again when you have what you wanted (this can be a whole scene or a moment, depends on what kind of gifset your making). Press ctrl+g again and click “stop”, then close.
Now go to the folder where you saved your caps. I always make another new folder inside that one, put all the captures in there (unless I’m doing a scene, then I’ll make 6-8 new folders and distribute all the captures in those folders. Note that with the 3mb limit you’ll be able to use about 60-120 captures per gif, sometimes more. You can always delete layers of your gif in case it goes over 3mb)
Tip: make all your screencaps before opening photoshop. If you’re making a general character/ship gifset, that can take a while, but it’ll save you time if you seperate the two actions.
After you have taken all your caps, open photoshop. You can download it on any photoshop tumblr like yeahps or itsphotoshop. I cannot give you the link to mine because it doesn’t exist anymore, but I got it from kickass (rip).
STEP 3: OPENING AND MAKING THE GIF IN PS
We have our caps and our ps open, but now we have to open those captures in photoshop. Do not use ‘open’, but Files > Scripts > Load multiple DICOM files
I know a lot of people choose ‘Load Files into Stack’ but Load Multiple DICOM files is SO much faster.

This window will open
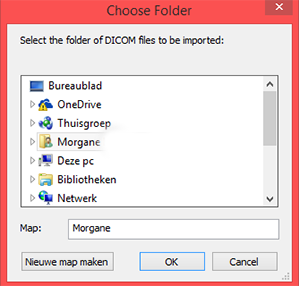
Now you go to the folder where you saved all your caps, choose the file with the screencaps for 1 gif and open it.
It might take a little bit for everything to load, especially if there’s a lot of screencaps, so just wait.
When you have everything, click on “Create video timeline”. It might be called something different if you have another version of PS, but whatever it says here:
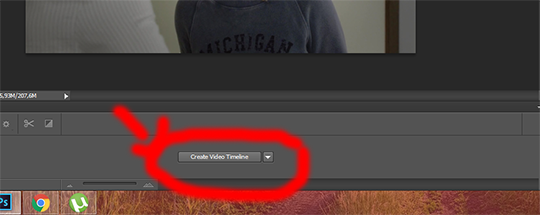
(I know I know, I make pretty arrows lmao)
Then click those 3 boxes on the left side

Next step is ‘make frames from layers’, after that click “flatten frames into layers”

STEP 4: CROPPING
Obviously our gif doesn’t have to be as big as it is in ps right now, so we’ll crop to make it smaller. For this, you need to know the dimensions Tumblr uses:
540px for 1 gif in a row
268px for 2 gifs next to each other
177px - 178px - 177px for 3 gifs in a row (this is something annoying à la tumblr, and because it’s hard to predict which gifs you’ll put in the middle when cropping, I make them all 178px in width and then crop the ones I won’t use in the middle to be 177px after)
You can choose to use the old dimensions which are 500px, 245px and 160px.
These are the widths, you can choose the heights yourself. For this gif I’ll be cropping 268 x 150
This is the cropping tool

click it and you’ll see this on the topbar of your screen. Type in your dimensions

Then crop as you wish. This is my result.
STEP 5: CHANGING YOUR IMAGE SIZE + SHARPENING
The gif is way too big at this moment, so go to image > image size, this window opens:
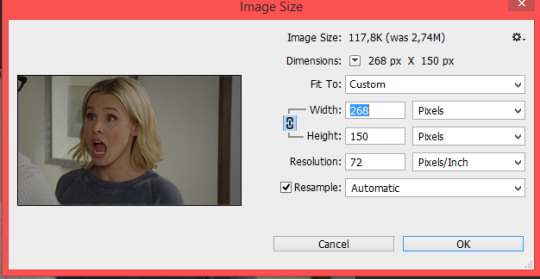
Click “okay” and your gif will be a lot smaller. Use ctrl + “+” to make it bigger
This is what our photoshop looks like right now

These steps look like A LOT of work but as soon as you’re used to the steps, it’ll take you about a minute to do all of this.
Next is sharpening. I use a sharpening action made by ilanawexler but it’s pretty complicated, so I do not recommend it if you’re a beginner. I will however explain it fully here. Note: I had to do something different than the directions the blogger gave, so what I get might not work for others and you might have a different outcome
Select all your frames (from 1 -)

then click “convert to videotimeline” (it’s possible it’s called differently in your ps)
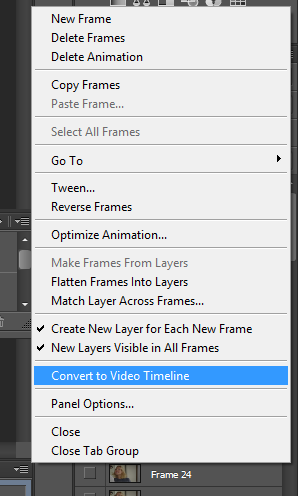
when you did that, add two layers on top of your other layers
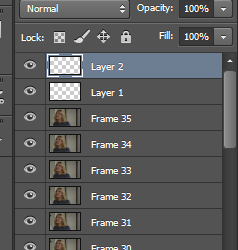
Select all your frames (frame 1 to layer 2), right click and click “convert to smart object”
Then, go to your actions. If you just downloaded your action, you have to add it.
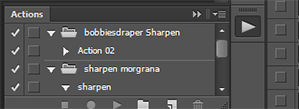
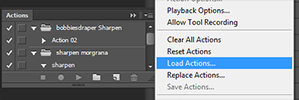
When that’s done, open the bobbiesdraper sharpen and click “action 2″. Thn click the play icon
It’ll a LOT of stuff, but just let it be.
Warning: if you changed anything to the frames in the timeline section, this won’t work. I noticed that if I delete frames or change the delay, ... before sharpening, it won’t work.
If it worked, you now have this
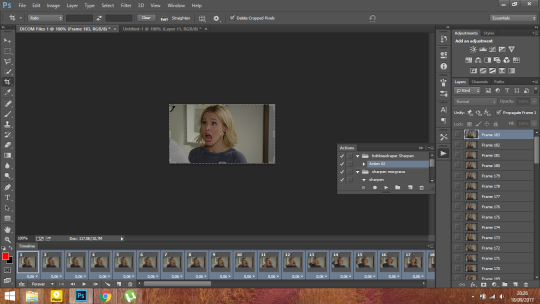
I’m not sure if it’s normal, but I now have twice the frames I had before, but only the SECOND amount is sharpened. So I delete frame 1-35 now in the timeline section.
This is my gif after sharpening (you can use this to practice coloring or to follow along with my coloring tutorial below)

this psd automatically sets the delay for your gif to 0,05, I always change it to 0,06 (sometimes 0,07). Just select all your frames, then click on the 0,05, ‘other’ and choose whatever you like. The max I would go is 0,08 (0,07-0,08 is the speed the episodes go btw when you watch them)
STEP 6: COLORING
Now the fun part!! You can either choose to use a psd (here are my psds) or you can color it yourself.
For this tutorial, I’ll be doing a basic coloring. (that means: steps I always use to start my colorings).
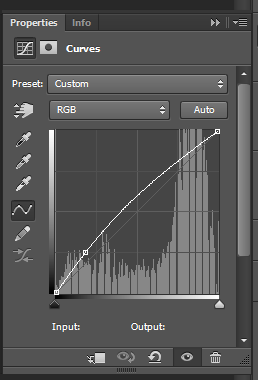
We start with curves. For this gif, these are the settings: (this is a pretty bright gif so for darker scenes you’ll have to use more, but don’t start with too much, build it up)
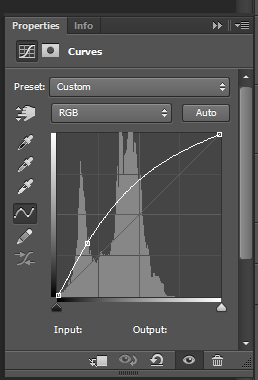
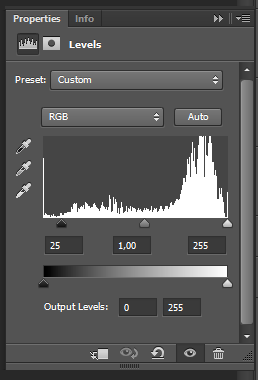
then some levels to give the gif more depth
I usually enter 10 for the black (unless it’s a very dark gif) and I’ll move the arrow of the white to where the little line starts.

Some brightness
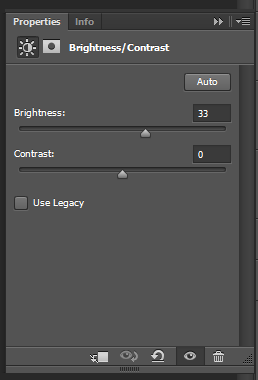
Some black selective color (I always enter 10, unless it’s a dark gif)

Color balance (also usually start with this, unless it’s a blue gif, then I’ll move the arrows to red, magenta and yellow). If the gif is VERY yellow, I’ll add more in cyan and blue.

Then I’ll add a vibrance layer, +100 vibrance.
This is what I have now (with a pretty watermark). These are the layers I will always start with.

You can stop here, but I like to add some more to my gif so I’m continueing
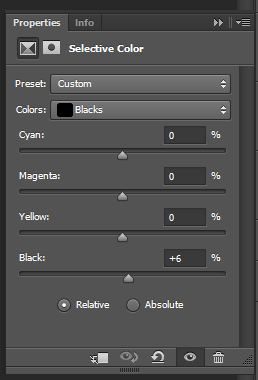
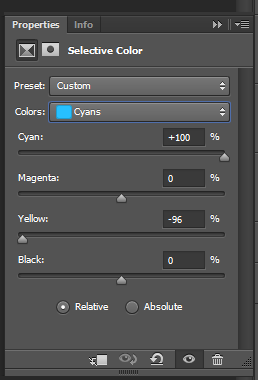
I like adding more blues so I’ll add a selective color layer: (you can also decrease magentas is the “blue” ones to make the blues more cyan)

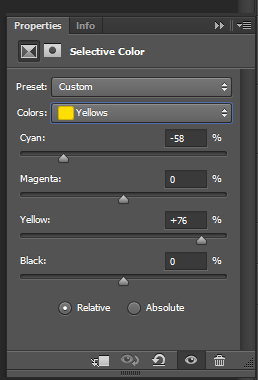
For blondes, I like making their hair stand out more so I’ll add a selective color layer for the yellows:
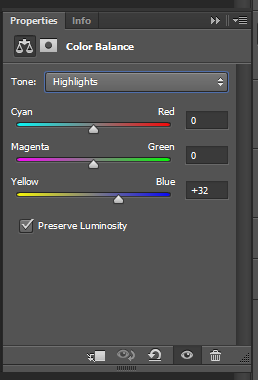
Of course, there’s a lot of yellow in the skintone so chances are the skin will look very yellow now, I add a color balance layer and change the highlights. (In darker gifs you might need to change the midtones instead)
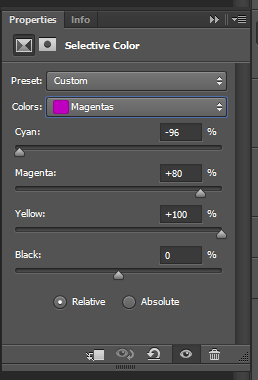
Some magentas to make the lips stand out
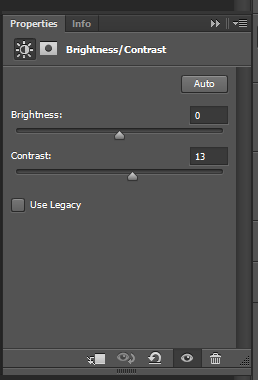
and some contrast
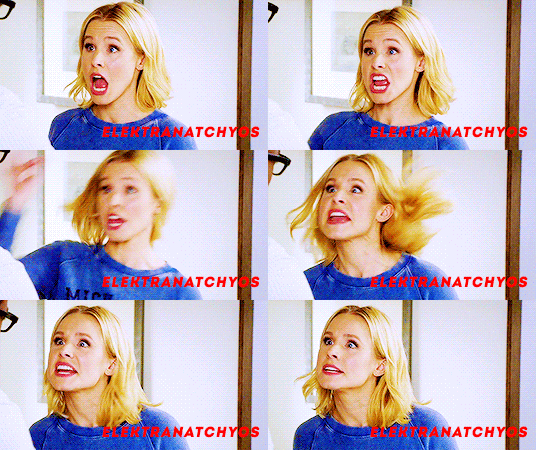
That’s all for coloring. This is what my gif looks like right now:
STEP 7: SUBTITLES
If you want to add text, click this icon

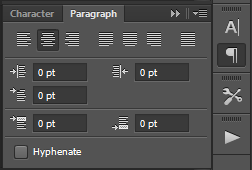
these are the settings for my text


Then we’ll add some other adjustments to make the text more visible:
click on the fx icon

then click ‘stroke’
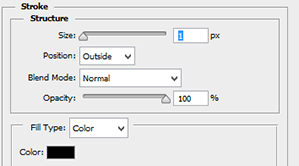
click okay, and click on the FX icon again, then click “drop shadow”

when you added all your adjustments, duplicate the textlayer and delete the first one (if not, your adjustments will only show on 1 layer instead of the whole gif)
If your text isn’t in the middle of your gif. Click your text layer, then click this icon

then in your topbar, adjust with these tools

this is what the text looks like now:
here is the psd for the text
STEP 8: SAVING
Of course, you have to save your gifs. Go to File > Save for web and this window will open

Make sure your settings look like these:
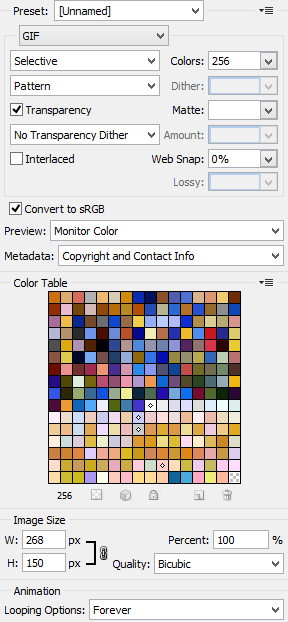
Make sure this number isn’t above 3 mb

That’s all!!! If you have any questions, you can always come ask me. I’m sorry if this wasn’t clear, but I hope it made atleast a bit sense.
916 notes
·
View notes
Photo






- ̗̀ How to Make Gifs with Photoshop and KMPlayer (Very Detailed) by quirkyresources © ̖́-
♡ All my tutorials ♡
Hi! I'm no expert, but I've been making gifs for at least like four or five years, and over that time I've learned a lot, so I want to share that stuff :) Also, someone requested that I teach them how to gif. I hope this helps!
This tutorial will teach you how to create simple but quality gifs, like the ones in the gifset above! Those gifs are all from TV shows, but it should apply to giffing almost anything. I’ll be using KMPlayer and Photoshop.
This is the gif I’ll be showing how to create, as an example:
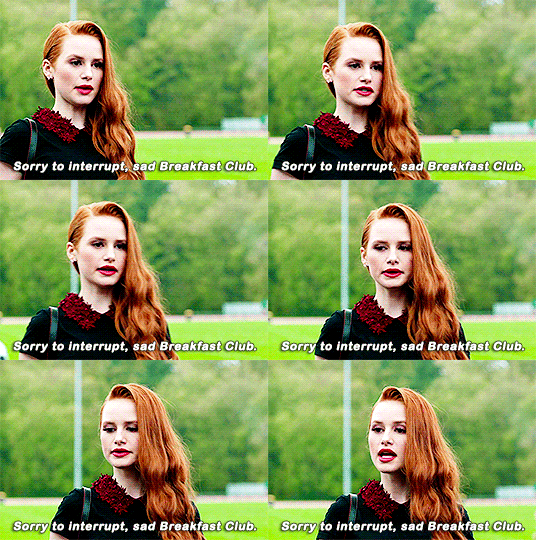
If you have any questions at all, please feel free to message me here :) And I’m somewhat new to writing tutorials, so if you notice that I got something wrong, please let me know. Thanks!
Please like/reblog if this is at all useful to you. Thank you so much if you do!
You need:
KMPlayer (link below)
Photoshop (I'm using CC 2017, but I think any version with the timeline should work)
A video to gif (recommended source below)
A sharpening action (recommendations below)
A PSD / or to know how to color gifs (recommendations & tips below)
I'll go over:
How to buy/download PS, download KMPlayer, and download a video!
Taking screencaps in KMPlayer
Importing the screencaps into Photoshop
Cropping and timing the gif, organizing layers, etc.
Adding a PSD or tips for coloring it yourself
Adding subtitles & learning font settings
Saving for web
Posting to Tumblr
Various tips along the way!
The tutorial is under the cut. Have fun and good luck! ♥
[Note: If a photo looks too small, right click it and choose "open in new tab"]
Step 1: getting Photoshop, KMPlayer, and quality videos
Get Photoshop: I was able to buy my Photoshop, so I don’t have any free downloads to recommend, I’m sorry! But there are plenty of other Photoshop blogs on tumblr that can help with this stuff :) And there are some deals from adobe that might help you afford it if you want to buy it instead. They had a great one for college students that totally helped me. Anyways, if you can get it somewhere/somehow, here are the next steps...
Download KMPlayer: Here's the link (it's free!): kmplayer.com You can use it to watch videos, but in this case we use it to take screencaps of them to use for gifs.
Get your video: If you’re going to download a movie or show, I recommend getting torrents from thepiratebay.org and using μTorrent to download them. (Here's a tutorial for how to download stuff with it.) Be careful with viruses and stuff, though! When you look for a video, try to get one that's as HD as you can find, meaning one that is 720p or 1080p! That tells you what the height of the frames will be, in pixels. They are usually big files, but should be much better quality than others. Also, try to find videos that do NOT have network logos or ads on them!! They can make gifs look pretty bad, and it takes some serious cropping to get rid of them, which then makes it look even less quality.
Step 2: taking your screencaps Open your video in KMPlayer. (Open KMPlayer and press CTRL O.) Get to the exact scene/clip you want to gif. (Tip: it's hard to find the exact place you're looking for, so I recommend using your right/left arrow keys to skip through a little at a time.)
Once you're at the part of the video you want to gif, press CTRL G. This brings up the "frame extraction" window. This is where, as you can probably guess, you extract the frames for your gifs! Here are the settings I use:

I use these exact settings almost every time, except for the image format section. I go between JPEG and PNG. I use JPEG if I'm making a smaller gif (like 268px width or less) and I use a PNG if I'm making a larger gif (like 540px width.) This is because (or at least I've heard) PNGs are the highest quality option, JPEGs are the middle, and bitmaps are the lowest (don't use them!!) The only downside is that the higher the quality, the higher the screencap's file size. So use PNGs sparingly if that matters to you.
You can also change the "prefix" of the screencap filenames.
After figuring out all of these settings, click "start"! Then press play on the video, play until the end of what you're giffing, and press "stop" and pause it.
Then, in the frame extraction window, click the "open" button that’s to the far right of the "extract to" bar. This will open up the folder location of your new screencaps.
Step 2.5: organizing your screencaps What you'll want to do now is organize the screencaps into separate folders for each individual gif. This is something that's good to do whether it's all from one scene or you're doing a compilation of different clips. This is because, when you upload the screencaps into PS, it's best to have them in their own little folders!
(Tip: Personally I use 75 frames or less in each gif. This is because that’s the limit on the sharpening action I use, but I also think it's a good amount to stop at.)
Step 3: importing your screencaps into Photoshop
Next, we're finally going to move the screencaps you took into Photoshop. Yay!
Open file > scripts > load files into stacks. (Tip: Sometimes this function doesn't work on certain Photoshop downloads. If this is the case for you, here's a tutorial on how to get around that!) This brings up this window:

Click "browse" and find the folder with the screencaps you want for your gif. Select all of them and click "open". Then click "ok" and wait for them to load. Each screencap will load as its own layer in the layers panel, which is what you want to start with.
Step 4: changing the screencaps from layers into frames in the timeline
Once they're all loaded as layers, go to window > timeline. This brings up the timeline!
At this point, things should look something like this:

Now we can start using the timeline! In this method we convert the layers into frames that live inside the timeline, which we’ll use to make the gif move.
First click on the button in the middle of the timeline panel that says "create frame animation" right here:

Then click on the little three bars icon on the top right corner of the timeline. Click "make frames from layers" on the thing that pops up .
It depends, but you might need to reverse the frames (if it imports them in backwards). So just click on that three bars icon again and click "reverse frames".
Step 5: cropping the gif
It's really important to know the Tumblr dimensions! If you have a gif that doesn't fit the dimensions most Tumblr users view it at it can get distorted.
So the width dimensions you should use are:
A row of just one: 540px wide
A row of two: 268px wide each
A row of three: 177px & 178px & 177px
A super helpful explanation of good dimensions to use is this one made by karazorel. It's very close to the way I do it.
So to crop it, go to the crop tool (duh, sorry) and enter in the dimensions you want into the area I highlighted here:
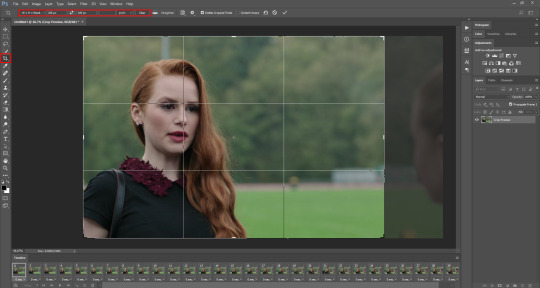
Here's what the gif looks like so far:
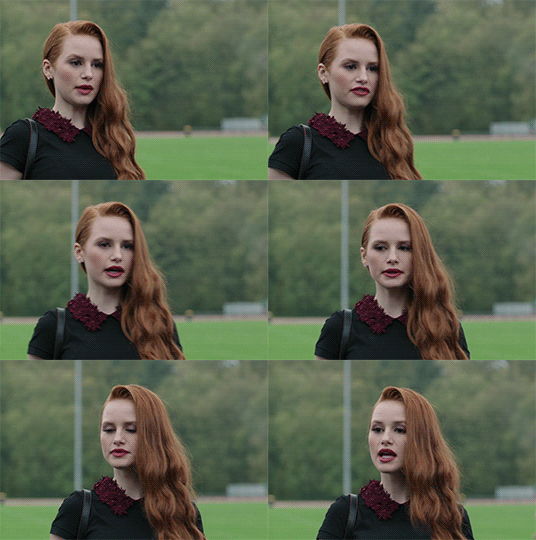
You'll probably notice it moves really fast and stops moving after playing once. That's because we haven't gotten to the step to fix that yet. But that's next!
Step 6: timing, looping, etc.
Timing: Select all of the frames. You can do this by selecting the first frame, holding shift, and clicking on the last frame. Now click the little arrow next to where it says "0 secs." under any of the frame previews right here:

Click on "Other..." and type "0.14" into the text field. That represents the number of seconds, or usually the fraction of a second, that each frame will play for. (It's "0.14" in this case because of the way we entered the settings in KMPlayer in the "Frames to Extract" section. The number depends on what you enter there.) Press enter/okay.
Looping: Next change the looping setting from "once" to "forever". Here's where I'm talking about:

Step 7: sharpening the gif frames
This step can either be done at this point (before coloring it) or later (right after coloring it.) I go back and forth on which is better, and different people say different things. So just play around with it!
I use this sharpening action. It can sharpen up to 75 frames, which is a really good amount in my opinion.
Once you have a sharpening action downloaded, go back to Photoshop and go to window > actions. Click this little menu button, then click "Load Actions...".
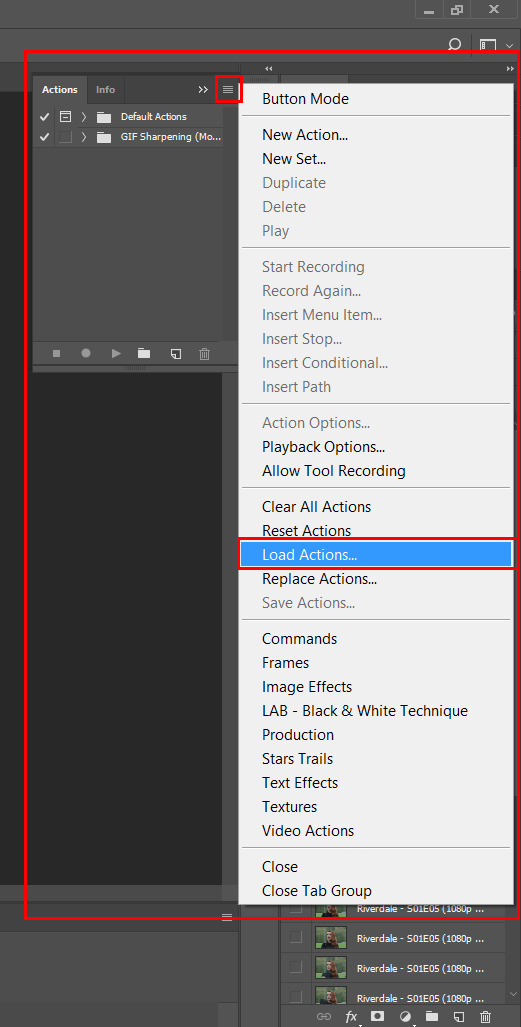
In the window that pops up, choose whatever sharpening action you downloaded and open it. This will load it into your actions panel!
Next, click the menu button on the upper right corner of the timeline panel and click "Flatten Frames Into Layers". Now there will be a new set of layers that are labeled Frame 1, Frame 2, Frame 3, etc. Keep those, and then you can delete the OLD set of layers. (That can significantly lower the file size, and it doesn’t mess anything up if you do it right!)
Now select the very first frame in the timeline, labeled "1", and select the corresponding layer, labeled "Frame 1".
Then open the sharpening action's folder within the actions panel and select the folder labeled with the number of frames you have in your gif. For example, I have 18 frames in my gif, so I selected the folder labeled "18 frames". Or at least that's the way they labeled things in the action I'm using. You may have to explore yours to figure it out.
Then click the play button on the actions panel:

Now that should have sharpened all of your frames/layers! Woohoo! Here's what the gif should look like by now, all cropped, timed, looped, and sharpened:

If this way of sharpening doesn't work for you, here are some other gif sharpening tutorials:
How to use sharpening actions in Photoshop CC by peacelovegifs
Gif sharpening tutorial by manofsteel.co.vu
Sharpening for Photoshop CC by completeresources
Sharpening all gif frames at once by thosetutorials
Sharpening masterpost by itsphotoshop
Gif sharpening action tutorial + download by themazerunnrs
Step 7.5: grouping your layers (a baby step!) A bonus step that I recommend you do is to put all your layers into a group to keep things neat. Just select all of them and press CTRL G.
Step 8: adding a PSD and/or coloring it yourself!!
Here's the fun part! Now you can let out your creativeness with the coloring. It takes a LOT of practice to get good at this, trust me. I've been doing this for YEARS and I still hate my results sometimes. But if that happens to you, too, don't let that stop you from trying again! (God, I sound like a motivational speaker or something, sorry!)
Here’s some background on PSDs for beginners, but you can totally skip this bit...
"PSD" stands for "Photoshop document", meaning a file you make or edit in Photoshop (sorry, kind of self explanatory). On Tumblr, when people talk about PSDs, they're usually referring to a document with layers that add effects (mostly adjustment layers) to a gif/photo/graphic, etc. Also referred to as a "coloring". They usually include things like brightness/contrast, vibrance, curves, selective color, etc. People post these so you can download them and use them for your own work! (Just don't repost and claim as your own. Not cool, man.)
All you have to do is download the file, open it in Photoshop, make sure you have the layers panel open (windows > layers), and drag the PSD file's window on top of your file's window, but keep them separate so you see both at once. Then drag the PSD file's group of layers (but not the background!) over to your file.

(Then you can close the PSD window.) Then on YOUR file, mess around with the adjustment layers and stuff to change it to whatever you want it to look like. I usually edit mine like crazy!
Anyways, here are what your options are.
Finding a PSD (and then I recommend editing it to however you like it)
Here are places to find some great PSDs on Tumblr! (FYI, some are tag pages with sections for PSDs, with different types to choose from. So look around.)
QuirkyResources (Navigation) (Yup, shameless self-promo!)
QuirkyResources (My PSDs)
CompleteResources
ItsPhotoshop
ChaoticResources
YeahPS
DrunkandColoring
AresColoring
That's just a few of my favorite sources, so message me if you want more recs! :)
Coloring it yourself
I'm not going to do a full-on coloring tutorial right now, but here is my tag for those made by other people!
Basically you should learn how to use the most important adjustment layers: curves, brightness/contrast, selective color, color balance, hue/saturation, vibrance, levels, exposure, and gradient maps. At least those are the ones that I use the most and find super useful. Many of the tutorials in that coloring tutorial tag I just linked go over how to use those. So check them out!
In this case, I used my current fave PSD by dracoharry. (I’ve noticed it works on most shows I gif, so it’s super useful! I actually used it for all of the gifs in the gifset I made for this post.)
Here are the layers I kept hidden/showing:

FYI, I changed the layers' settings and whatnot a bunch.
And here’s what my result was:

Step 9: adding text & learning font settings (optional)
This is usually when I add text to the gif, if relevant.
There are various fonts and settings you can use for this, but to make things easier, here's a font PSD by adorkablelena. It’s for subtitles/quotes. I recently started using it. It's really cute! If you're not into it though, here's my tag for other font PSDs you can check out.
When you find a font PSD you like, open it and drag it into your document the same way you would with a regular PSD.
Select the text tool and replace the text with your quote. (Tip: Try not to misquote or misspell things if you can help it! I've done it and it sucks when that happens. Ugh.)
As far as colors go... For the primary quote I make the text white, and the secondary quote I usually make it yellow (#ffde00). And if there is a third I'll use some shade of orange, and anything after that I just use whatever I can make look the best. The stroke color I use varies sometimes, but I usually use black (#000000).
Finally, select the move tool (V) and make sure "smart guides" are turned on. To check this, go to view > show > smart guides, and make sure it's checked. Now when you drag around the text (select its layer first), you can see little purple vertical/horizontal guides pop up when you drag the text to the center of either direction. For the subtitle we're making, we want it to be centered horizontally and close to the bottom of the gif, but not too close. Also, if you have more than one line of text, just press enter somewhere in the text that splits it into similar-sized lines. Here's an example of all of this stuff put together:

Step 10: saving for web
There are a lot of settings to remember and play around with when saving for web, and specifically for Tumblr.
First, go to file > export > save for web (legacy).
Here you'll see a lot of settings to choose from, but they're not as intimidating as they may look!
Here are my usual settings:

Red highlight: There are multiple options in the top drop down list in the area I highlighted that are good to use. I usually use “Adaptive”, but “Perceptual” and “Selective” are good options too. In my experience, the rest make your gif look pretty gross. For the drop down list under that I choose "Pattern". This arranges the pixels in a pattern, and I like the look of that more than the two other viable options, ”Diffusion” and “Noise”.
Orange highlight: This is where you choose the number of color shades that are in the gif. I use the top amount allowed, 256, because this achieves the highest quality possible! If you need to make the gif's file size smaller, you can lower this amount, but I don't recommend it. If it's a B&W gif you can sometimes get away with using less and have it still look just as quality.
Yellow highlight: Looping options: Forever. Very important! Like I showed earlier, you can also set this setting before you get to the "save for web" option. Either way, this makes it so the gif loops forever.
Green highlight: Gif size! As I mentioned earlier, there is a limit for Tumblr. This example is a pretty small gif (592.9K) and the current file size limit on Tumblr is 3MB. Tumblr seems to change this limit a lot though, so you may want to look that up once in awhile to stay up to date.
Turquoise highlight: Always check the box next to “Convert to sRGB”. I just learned that this setting is important. It basically keeps the vibrance intact when you take it from Photoshop to Tumblr. Read a much better explanation here! :)
Then just click "Save...", choose the file location, and press "Save" again.
Step 11: uploading/posting to Tumblr
Now, last but not least, it's time to upload it to Tumblr! I probably don’t need to explain this, but I’m going to anyways. It's super-duper easy. Just go to your dashboard and click on this button:

Then the post creation window pops up, and just go on from there. Upload your images/gifs, drag them around to arrange them however you like, and add a caption if you want.
(Tip: Don't forget to add tags! It's super important to add tags if you want people to actually find your post. Only the first 5 tags show up in the main Tumblr tag-search results (ugh wtf, right?) but sometimes the other ones you add will show up on the general search page. I don't really get how to explain it or how it works tbh, sorry! But I do know that many fandoms have developed their own tagging-language to find people's posts more easily (and avoid spam) which is very useful once you figure it out. For example, if I was posting a gifset of Cheryl Blossom from Riverdale, I'd tag it with things like "riverdaleedit" and "cherylblossomedit" and maybe "madelainepetschedit". So basically the name of the show/character/actor/ship plus "edit", no spaces. Or an abbreviation of any of those, like "spnedit" or "dwinchesteredit". I hope that at least makes a little sense? As far as the amount of tags that will show up on individual blogs, I'm not positive, but I believe you can use up to 30. After that the post won't appear on the tag's page. Grrr.)
Then, of course, just post it! I recommend saving it as a draft and then posting it at a time when a lot of people are likely to be on Tumblr. (There's research done on this timing!)
THE END! :D
I really hope that was at least somewhat helpful. Sorry if it was annoying that I went into sooo much detail, I just thought I should explain everything so it would make sense to most people, especially total beginners. Again, if anyone has any questions at all, you can absolutely ask me here! Or let me know if you think I got anything wrong, I would definitely want to fix it! Thanks for reading, and please like/reblog ♥ I’d really appretiate it!
#photoshop tutorial#completeresources#itsphotoshop#chaoticresources#yeahps#tutorials#gif tutorials#gif making#how to make gifs#gif making tutorial#mine#mine: tutorials#peachresources#riverdale#riverdaleedit#coloring tutorial#sharpening tutorial#photoshop tips#ps tips#photoshop 101#ps 101#500
632 notes
·
View notes
Text
What are you working on meme
Do Dis: List all the things you’re currently working on in as much or little detail as you’d like, then tag some friends to see what they’re working on. This can be writing, art, vids, gifsets, whatever.
Tagged by the magnificent @teacuphuman09
This won’t include all the art stuff, but I’ll try to remember all the fannish ones.. Let’s start with fic though, hahaha haha ha.
Fic WIPs
Tart: Kingsman canon-ish tropefic. Eggsy & Harry get sent on a mission together wherein Eggsy has to pretend to be Harry’s airheaded little boytoy. Currently, this summary is longer than the fic.
Project Monster 4: 00Q AU where monsters are real, Bond is one, and Q has one for a pet. Bond takes Q & his pet flying monkey thing to a matinee, plus possibly some plot happens, but possibly not.
Solarpunk AU: Inception AU. Arthur is a witch apothecarist. Eames is a sorcerer tattoist. There are magic bees and a lot of shopping. It’s already 23K 24.6K 25.1K words long. Send help.
Fitting: Inception AU. Specificity a year later, wherein Eames gives them bespoke suits at Alexander McQueen on Saville Row, and also they go to Architect for dinner. At the “oh god how does bespoke work and wtf will they eat” stage.
Arthur’s Dream: Inception canon AU crossover with Monument Valley. I.. have no explanation for this.
Snarry Haunted House Thing: Snape/Harry EWE where Harry hires Snape to help him get 12 Grimmauld Place to stop resisting his remodeling. Started in 2009, have written 22.5K words, still stuck. Kill me now.
Things That Only Exist in the Dark: non-fandom maybe-horror version of the Project Monster world.
Julian 3: the third Consulting Magic book, which is done and just needs to be edited, a cover drawn, everything laid out, more editing of the physical proof, and finally published on Amazon. *headdesk*
An Element of Charm: unrelated non-fandom novel set in a magical university with a sex magic prof & his two hot apprentices and a bunch of horny elementals. needs an ending and a lot of editing.
Makeshift: If you know what this is, then you know what needs doing. Sigh.
Art WIPs
A&E Gorey Things: A is for Arthur who fell down the stairs. E is for Eames, devoured by bears. At least one sketch is done, but progress is stalled because reasons.
Sherlock spanking comic: commission for a very patient person who is very kind and deserves better. 4/8 panels penciled, all plotted.
Sekrit chibis: Just the photoshops left!
ALL the Doctors!: 12 & 5 are done, 11 is sketched, and a design for 1 needs to be sent to the patron for opinions. Way behind but again, patient patron is patient and kind.
Myriorama: not precisely fannish but a bit monstery, a series of 6 paintings that can be swapped around to make different skyline/landscapes. 3 sketched, progress stalled.
Alex: does fan art of my own books count? inked, needs colors.
I’m sure there’s more but you know, brains wot.
I think nearly everyone that I know has already done this, so please do it if you want to. I literally keep filling and names and going “no they did it or were tagged” so, sorry if you feel left out, my brains are a bit mush today.
#meme#teacuphuman#wips#i should just post the snarry thing for wip amnesty#ahahahahahahhaha#this doesn't even include ideas i haven't started yet#or it would be much much longer
5 notes
·
View notes