#software testing for beginners
Explore tagged Tumblr posts
Visit Tumblr Blog
Explore Tumblr blogs with no restrictions, modern design and the best experience.
Last Seen Tumblr Blogs


Fun Fact
Mobile US users spent an average of 115.8 minutes on Tumblr app monthly.
Text

Why Rahul Shetty Academy is the best Option for Generative AI in Software Testing
Venkatesh (Rahul Shetty) offers specialist training in Generative AI for Software Testing that includes practical experience, real-world applications, and industry-leading approaches. Venkatesh (Rahul Shetty) Academy offers the greatest guidance to help you improve your testing skills right now. For additional information, go to https://rahulshettyacademy.com/.
#ai generator tester#ai software testing#ai automated testing#ai in testing software#playwright automation javascript#playwright javascript tutorial#playwright python tutorial#scrapy playwright tutorial#api testing using postman#online postman api testing#postman automation api testing#postman automated testing#postman performance testing#postman tutorial for api testing#free api for postman testing#api testing postman tutorial#postman tutorial for beginners#postman api performance testing#automate api testing in postman#java automation testing#automation testing selenium with java#automation testing java selenium#java selenium automation testing#python selenium automation#selenium with python automation testing#selenium testing with python#automation with selenium python#selenium automation with python#python and selenium tutorial#cypress automation training
0 notes
Text
The Ultimate Software Testing Tutorial for Beginners: Step-by-Step Guide to Start Testing Today

Software testing is an essential step in ensuring that any application or system works flawlessly before it reaches users. If you’re new to the field, this beginner-friendly guide will help you understand the basics of software testing and how to get started.
What is Software Testing? Software testing involves verifying that a software application performs as expected and is free from bugs or errors. It ensures quality, improves performance, and enhances user satisfaction.
Types of Software Testing
Manual Testing: Testers manually check the functionality of the application. It doesn’t require coding skills but needs attention to detail.
Automation Testing: Test cases are executed using automation tools like Selenium or JUnit, making the process faster and more accurate.
Why is Software Testing Important?
Detect Errors Early: Identify and fix issues before deployment.
Save Costs: Fixing bugs after release can be expensive.
Ensure Quality: Deliver reliable and high-performing software.
Steps to Get Started
Learn basic software testing concepts and terminologies.
Understand different testing methods like functional, regression, and usability testing.
Practice with real-world scenarios to improve your skills.
Getting started with software testing doesn’t require prior experience in programming. With consistent learning and practice, anyone can build a strong foundation in this field.
For a more detailed guide, visit Software Testing Tutorial.
0 notes
Text

This tutorial is perfect for beginners who want to learn software testing. It covers basic concepts, types of testing, and practical examples, helping you understand how to test software effectively. Step-by-step guidance makes learning easy and fun.
0 notes
Text
"Transform Your Marketing Strategy with FunnelCockpit: The Power of One Tool"
FunnelCockpit is an all-in-one marketing software platform designed to help businesses and marketers manage various aspects of their online marketing efforts. It provides tools for creating and managing sales funnels, email marketing campaigns, landing pages, lead generation, and more. The platform aims to streamline the process of marketing automation by integrating multiple tools into one solution.

"For more details, visit the official site Click here"
Some of the key features typically offered by FunnelCockpit include:
Sales Funnel Builder: A drag-and-drop interface for designing and managing sales funnels, which can include landing pages, opt-in forms, checkout pages, etc.
Email Marketing Automation: Tools for creating and automating email sequences, as well as managing email lists and tracking engagement.
Lead Generation: Tools to capture leads through opt-in forms, landing pages, and pop-ups.
Payment Integrations: Integration with payment gateways to process transactions directly through sales funnels or checkout pages.
Analytics and Tracking: Insights and metrics to track funnel performance, conversion rates, and customer engagement.
A/B Testing: To test different versions of funnels or landing pages to determine which performs best.
This platform is especially popular among entrepreneurs, coaches, and businesses that need an all-in-one solution for managing their online marketing campaigns without needing to use multiple separate tools.
If you're looking for more specific details about FunnelCockpit, such as pricing or advanced features, you can usually find these on their official website or product documentation.
FunnelCockpit offers a comprehensive suite of features designed for businesses and entrepreneurs to manage all their marketing needs in one place. Here's a deeper dive into its features, benefits, and how it can be used:
Key Features of FunnelCockpit
Sales Funnel Creation & Management
FunnelCockpit enables users to create highly customizable sales funnels with a drag-and-drop builder. You can build funnel steps like:
Landing pages
Sales pages
Upsell/Downsell pages
Checkout pages
Order forms
This flexibility allows for a seamless user experience and the ability to guide visitors down a sales path that aligns with your business goals.
Email Marketing Automation
FunnelCockpit allows you to create automated email sequences that can be triggered based on user actions. For example:
Send welcome emails when someone opts in to your list.
Follow-up emails to nurture leads.
Transactional emails after a purchase.
It also supports segmentation, so you can send targeted messages based on user behavior or other criteria.
Lead Management & CRM
The platform integrates a built-in CRM (Customer Relationship Management) system to manage and track leads. You can assign tags, segment lists, and view detailed profiles to understand your prospects better.
This feature helps businesses maintain relationships with their leads and customers, track their journeys, and optimize marketing efforts based on data.
A/B Testing
FunnelCockpit supports A/B testing, allowing you to compare two or more variations of your sales funnel, landing page, or email campaign. You can test elements like:
Headlines
CTAs (Call-to-Actions)
Page layouts
Email subject lines
By testing these variations, you can continuously optimize your funnels and campaigns for better conversion rates.
Payment Integration & E-commerce Features
The platform offers integration with popular payment gateways like Stripe, PayPal, and others, allowing you to process payments directly within the funnel.
You can set up one-time or recurring payments, making it suitable for selling both physical and digital products, subscriptions, and services.
You also have the option to offer upsells, downsells, and order bumps to increase average order value (AOV).
Webinars & Course Delivery
FunnelCockpit allows you to host webinars, which can be used for live training, product demonstrations, or marketing events. It includes tools for scheduling, registration, and email reminders.
The software also provides course management features, allowing you to create, host, and sell online courses. This is ideal for businesses in the education or coaching industry.
Affiliate Management System
If you run an affiliate program, FunnelCockpit includes affiliate management tools. You can track affiliate sales, manage commissions, and incentivize affiliates to promote your products.
This helps to expand your reach by tapping into the networks of others.
Analytics & Reporting
FunnelCockpit offers detailed analytics and tracking to monitor the performance of your funnels, sales, email campaigns, and overall business operations.
You can view key metrics like:
Conversion rates
Revenue generated
Email open and click-through rates
Funnel drop-off points
This data is crucial for refining marketing strategies and optimizing your campaigns.
Landing Pages & Website Builder
The platform also offers an easy-to-use landing page builder with customizable templates. You can design high-converting pages with drag-and-drop functionality, without needing to know how to code.
This feature can be used for creating squeeze pages, lead magnets, and other marketing assets.
Custom Domains & Branding
FunnelCockpit allows you to use your own domain names, ensuring your funnels, landing pages, and emails are fully branded.
This helps maintain a consistent brand identity across all customer touchpoints.
Benefits of Using FunnelCockpit
All-in-One Solution
By integrating all of these features (sales funnels, email marketing, CRM, payment processing, etc.) into one platform, FunnelCockpit helps businesses eliminate the need for multiple software tools. This can save both time and money by reducing the complexity of using third-party services and tools.
Increased Efficiency
The drag-and-drop builder, pre-built templates, and automation features streamline the process of creating and running campaigns. This allows businesses to focus on strategy rather than spending too much time on technical details.
Better Conversion Rates
With advanced tracking, A/B testing, and optimization tools, FunnelCockpit helps businesses continuously improve their marketing efforts to convert more leads into customers.
Cost-Effective
FunnelCockpit can be a more affordable option compared to purchasing separate tools for building funnels, email marketing, CRM, and other services. By consolidating everything in one package, businesses can reduce overall expenses while still getting powerful features.
Comprehensive Customer Support
FunnelCockpit offers customer support to assist with any issues or challenges that users may face. This ensures a smooth experience, especially for new users who may not be familiar with online marketing tools.
Use Cases for FunnelCockpit
Online Courses and Coaching
Coaches and course creators can use FunnelCockpit to create automated funnels that drive leads into their courses or programs, with integrated email sequences to nurture prospects.
The webinar and course delivery features are particularly beneficial for instructors looking to engage students through live sessions or digital content.
E-commerce Stores
E-commerce businesses can use FunnelCockpit to optimize their sales process with automated funnels that guide potential customers from landing pages to checkout pages, upselling them along the way.
Service-Based Businesses
Service providers can use FunnelCockpit to set up lead generation funnels, automate email follow-ups, and convert inquiries into paying clients through streamlined processes.
Affiliate Marketers
Affiliate marketers can leverage FunnelCockpit's affiliate program features to track sales, manage commissions, and scale their marketing efforts.
Pricing Structure
FunnelCockpit typically offers tiered pricing plans based on the number of features or the level of usage. These plans are designed to cater to different needs, ranging from solopreneurs and small businesses to larger enterprises. For more details on specific pricing, it's best to check FunnelCockpit's official website for current plans and offers.
Conclusion
FunnelCockpit is an all-in-one marketing platform that provides everything a business needs to run and optimize online marketing campaigns. With its drag-and-drop builder, email marketing automation, CRM, payment integrations, and analytics tools, it’s a powerful solution for entrepreneurs and businesses looking to increase sales, improve conversions, and save time managing multiple software tools.
Whether you're running a course, an e-commerce site, or a service-based business, FunnelCockpit can help automate processes and improve your marketing results, all from a single platform.
#FunnelCockpit#All-in-one marketing software#Sales funnel builder#Marketing automation platform#Marketing automation platfor#Lead generation tools#Email marketing automation#Funnel creation software#Affiliate marketing management#Landing page builder#E-commerce funnel software#CRM for small businesses#A/B testing tools#Online course funnel software#Business growth automation#Sales optimization tools#Digital marketing solutions#Sales funnel software#Marketing funnel tool#klicktipp#Lead conversion tools#Email campaign automation#Automated sales funnels#Marketing funnel builder#CRM automation#Online business automation#Conversion optimization software#Funnel tracking software#Landing page creation#Sales funnel software for beginners
0 notes
Text
PureCode company | Tailored for absolute beginners
This course is tailored for absolute beginners, I love this course because it doesn’t just teach you how to code HTML and CSS. It teaches you how to plan, sketch, design, build, test, and optimize a professional website.
#Tailored for absolute beginners#HTML and CSS#teaches you how to plan#sketch#design#build#test#and optimize a professional website.#purecode company#purecode software reviews#purecode ai company reviews#purecode ai reviews#purecode#purecode reviews
0 notes
Text
Why Do we Need Software Testing
Why Do we Need Software Testing
Software testing is a trying cycle to check whether the created programming item is 1) liberated from bugs for smooth usefulness and 2) meets the genuine necessities of the clients with no properties or elements missing.
Testing in the IT business
According to ANSI/IEEE 1059 norm, software testing is in fact characterized as the assessment of a product item to track down the distinctions between the current necessities and the necessary prerequisites. Through testing holes in the prerequisites, bugs/mistakes, practicality, security and execution are analyzed. In the event that you are searching for the best Software testing On the web Course, go for Capturous Infotech Foundation best preparation establishment.

For what reason do we really want software testing? Programming is the one which runs the world at this point. Assuming that we take any industry, the product is significantly included to do the primary work job. For example, in science and innovation consideration of programming should be visible in space machines, airplane, drones, and so on. In this virtual world, any industry you envision has programming items maintaining their organizations in the background. Presently we might grasp the significance of testing our recently evolved programming items. It not just reduced the expenses in the underlying stages yet additionally serves to productively run the applications to suit the business needs. There are a few other significant advantages of testing a product item which assists organizations with involving programming applications in a useful manner.
Security:
Even a typical individual needs no gamble happening in their cell phone due to the applications they use. Similarly, huge firms could do without to be inclined to dangers and perils a product item might cause. Consequently testing an item might keep away from every one of the vulnerabilities and convey a solid item.
Item quality:
Obviously when we test an item, its quality is kept up with. The nature of the item guarantees a brand's development and notoriety in the IT market.
Savvy:
Testing an item in the underlying stage will reduce the expense and furthermore be useful to convey a quality item in time.
Consumer loyalty:
Client experience is vital in this digitized world. Giving the fulfillment of utilizing a problem free item is the best consequence of testing.
Testing Levels
Testing levels are only a program going through a testing stage to guarantee that it is mistake allowed to move into the following improvement stage.
Unit testing:
Unit testing is finished by the software engineers while coding to check whether a singular unit of the program is sans blunder.
Joining testing:
As the name proposes, coordination testing is done when individual units of the program are incorporated together. All in all, it centers around the construction and plan of the product.
Framework testing:
Here, the whole program is incorporated as programming and tried all in all. This tests every one of the elements of a program including usefulness, execution, security, compactness, and so forth.
Standards of software testing
There are a few standards kept up with while testing programming. At last, an analyzer can't continue to test the item till it gives zero mistake, which is preposterous. In this way a few standards are observed while troubleshooting the projects.
Thorough testing is absurd:
Indeed, no analyzer can rehash the testing system again and again till the program is without blunder. It will be comprehensive for both the analyzer and the program that it will quit bringing up the blunders assuming monotonous experiments are done like clockwork. In this manner in the event that the testing system depends on the gamble evaluation factor, programming can create, then, at that point, it will be simple for the testing experts to focus just on the significant elements of a program.
Imperfection Grouping:
The deformity bunching guideline expresses that the majority of the deformities are found in little modules of the program and just experienced experts can manage such unsafe modules.
Software testing Preparing Capturous Infotech is the top of the line schedule that comprises of the fundamental and fundamental ideas of industry testing strategies to teach expertness in understudies. we are effectively giving programming course classes in Software testing Course in Nagpur . Understudies who are situated in Nagpur, kindly visit the Nagpur page and get yourself signed up for our organization.
Contact Us: 8600028849
#software testing course near me#software testing training#software testing course online#software testing course with placement#software testing boot camp#software testing training and placement#manual testing online course with certificate#certified tester foundation level#software testing course certification#software testing certification for beginners
0 notes
Text

Fully Underwater Lot Tutorial
@creida-sims @kitkat99
UPDATE January 2025
There is now a much, much easier way to do this. This version of SimPE now includes a tool to change terrain geometry. To edit the terrain in SimPE, go to Tools/Neighborhood/Neighborhood Browser and load your neighborhood. In the Resource Tree, select Neighborhood Terrain Geometry (NHTG) and select the only resource in the Resource List. In Plugin View, click Terrain Editor. It's very intuitive, but basically, you can edit the terrain under a lot to make it be underwater. You can also delete the road with the Road Editor.
I'll keep the old tutorial for archival purposes, but unless you can't or don't want to install this version of SimPE, it is pretty much obsolete.


Some warnings and disclaimers
1. This is not a beginner tutorial. I have tried to explain with as much detail as I can, but still, if you just started playing The Sims 2 I recommend trying out other building tutorials first.
2. I have tested it but there's always a possibility that some new problems will come up. Follow at your own risk. Backup your neighborhoods before trying this. Test it first in a new empty neighborhood.
3. These lots are roadless, so they require specific gameplay conditions to avoid breaking immersion (pun intended).
4. They will behave like normal lots in the sense that sims can walk around and do anything as if they were on land. There's one big problem to consider: when sims go fully underwater, their hair and some parts of their clothing might disappear visually.
So this is more useful for structures that sit above the water, shallow water that doesn't reach a sim's head or, with some modifications, small islands surrounded by water. So unless you want bald mermaids, I don't recommend this for sims that live underwater.
5. If you use Voeille's hood water mod, reflections will look glitchy in lot view, because this is technically not a beach lot. The only solution I found is enabling "Lot view ocean reflections" in RPC Launcher. Otherwise you'll have to deal with glitchy reflections.
6. Before following this tutorial, make sure you know the basics of creating, editing, importing and exporting SimCity 4 terrains. Written tutorial by SimEchoes here, video tutorial by loonaplum here.
Software and mods used
The Sims 2 FreeTime expansion pack (required for the modifyNeighborhoodTerrain cheat)
SimCity 4 (required) Hood Replace by Mootilda (required)
Lot Adjuster by Mootilda (required)
Portal revealer by Inge Jones (required)
Voeille's pond and sea water overhaul and RPC Launcher (optional, see disclaimers)
The Sims 2 Apartment Life and Bon Voyage expansion packs (optional, for "walk to lot/work/school" options)
Cheat codes used
moveObjects on/off
modifyNeighborhoodTerrain on/off
1. Creating/editing a terrain in SimCity 4
1.1. You can edit an already existing terrain or create your own from scratch. In both cases, you need to keep two things in mind: If you want the usable area of the lot to be underwater, such as making houses for mermaids or a coral reef, make sure the water is shallow. No more than a few short clicks with the terraforming tools in SimCity 4. This is because The Sims 2 live mode camera won't go underwater, so making the water too deep might make it uncomfortable to build or play the lot.
If you goal is to build a structure mostly above water, like a ship or an oil rig, you can get away with making the water a bit deeper, but not too much. I've noticed that sometimes the lot terrain tools stop working correctly if there a hill that's too steep.
1.2. Once you've created the terrain, you will need to add a small island on the area where your lot will be. I know it seems contradictory, but trust me, it will make sense. Create and name your city. Use the terraforming tools in city mode to make a tiny island of about 6x2 squares.

1.3. On the island, use the road tool to place a straight road that takes up 4 squares. Then, using the street tool (the last option), place two short streets at each end of the road.
Streets will disappear in TS2, only roads translate to roads in ts2, so why do we place them? Well, placing a street at the end of a road will get rid of the rounded end bit in TS2, which can't be used to place lots. This will be important for the placement of the lot and to make sure the edges of the lot are underwater. If this doesn't make sense yet, don't worry, it might make sense later.
1.4. Save the terrain. Don't exit SimCity 4. Copy your new/edited sc4 terrain from your SimCity 4 folder to your SC4Terrains folder in your Sims 2 documents directory. It is usually
"C:\Users\YOURUSERNAME\Documents\EA Games\The Sims 2 Ultimate Collection\SC4Terrains"

1.5. Back in SimCity 4, we're going to make a second version of this terrain. Remove the roads and streets you made before, with the bulldozer tool. With the level terrain tool in Mayor mode, carefully remove the island, so it's on the same level as the bottom of the ocean/lake. Don't change anything else. Save, exit and copy this second terrain to your Sims 2 SC4Terrains folder. Make sure you rename the file to something different from the first one, like adding "no roads" to the filename. You should have two terrains by the end of this step. One with the small island and one without it.
2. Editing the terrain in The Sims 2
2.1. Open The Sims 2 and create a new neighborhood using your new terrain. Something to keep in mind: if you want the terrain to be a subhood of another neighborhood, make it a subhood from the start. You will not be able to move the lot once it's finished, since it will be roadless. I don't recommend decorating the neighborhood for now. Leave it empty until the end of this tutorial.

2.2. Place the smallest empty lot (3x1) on the island.
2.3. In neighborhood view, open the cheat console by pressing Control + Shift + C, and type
modifyNeighborhoodTerrain on
To quote The Sims Wiki:
"This allows you to alter the neighborhood terrain by raising or lowering it. To use this cheat, be in the neighborhood view, then enter the cheat "modifyNeighborhoodTerrain on" (without the quotation marks), and click over the area you would like to change. To select a larger area, click and drag the cursor to highlight the desired area. Press [ or ] to raise or lower the terrain by one click, press \ to level the terrain, and press P to flatten terrain. When you're finished, type “modifyNeighborhoodTerrain off” in the cheat box (again, without the quotations)."
If you use an English keyboard, these instructions will probably be enough for you. If you don't, I recommend first testing the cheat, because the keys for using this cheat are different in other languages. For example, in my spanish keyboard, the question marks are used to raise and lower the terrain and the º/ª key flattens it.
Another aside: When you select an area using this cheat, a green overlay is supposed to show up. Some lighting mods make this green overlay invisible, like the one I use. If that's your case, you kind of have to eyeball it. Remember that one neighborhood grid square in TS2 is equivalent to 10 lot tiles, or the width of a road. I recommend getting a mod that allows you to tilt the neighborhood camera on the Y axis, which will allow you to have a bird eye's view of the terrain.

2.4. Flatten the terrain around the lot so it's at water level. This cheat won't allow you to edit the terrain inside the lot, so you have to edit the terrain around the lot. Make sure there is plenty of flat underwater space around the island. You should end up with something like the picture above. The water will have some holes, but don't worry, those get filled with water the next time you load the neighborhood.
2.5. Enter the lot and place any object on it. Save the lot and exit the game. This is so LotAdjuster recognizes the lot in the next step.
3. Expanding the lot with Lot Adjuster
3.1. Open Lot Adjuster and select your neighborhood and lot.

3.2. Click "Advanced…". Check "Over the road (only enlarge front yard)". Use the arrows to add 20 tiles to the front yard. Click "Finish" and "Restart".

3.3. Select the same lot again. This time, check "Add and remove roads". Uncheck the road checkbox for the front yard. Add 20 Tiles to the back yard, 20 tiles to the left side and 10 tiles to the right side. Check "Place portals manually". You should end up with a 60x60 lot, which is the biggest size. You might want a smaller lot, but unless you know what you are doing, I recommend starting with this size. You can shrink it later. The goal of making the lot this big is making sure the edges of the lot are underwater. Click "Finish" and exit.
4. Moving portals and flattening the lot

4.1. Make sure you have the portal revealer by Inge installed in your Downloads folder before the next step. Open your game and load your neighborhood. The lot should look something like the picture above.

4.2. Load the lot. Delete the object you placed before. Place the portal revealer on the lot near the mailbox/phone booth and trashcan. It looks like a yellow flamingo and you can find it in Build Mode/Doors and Windows/Multi-Story Windows catalogue. You will notice that when you select the object from the catalogue, some yellow cubes appear on the lot, and when you place the object, the cubes disappear. After placing the portal revealer, pick it up and place it again. This will make the yellow boxes visible again.
So what are those yellow boxes? They are portals. They determine where sims and cars arrive and leave the lot. The ones on both ends of the sidewalk are called pedestrian portals, and in the street, one lane has portals for service vehicles (maids, gardeners, etc.) and the opposite is for owned cars and carpools. You can see the portal's names if you pick them up. Make sure not to delete any of them.
Now, since this is going to be a roadless lot, ideally there won't be vehicles in it. This means that the lot would ideally be accessed through walking only. In community lots, this would not be an issue if you have the Bon Voyage expansion pack, which allows sims to walk to lots.
In residential lots, you might run into some problems. Service NPCs always arrive on vehicles, and unless your sim owns a vehicle, the carpool and school bus will always come to pick sims up for work/school. It might break your immersion to have a vehicle show up underwater or on a ship. There are many options to avoid this: having sims work on an owned business instead of a regular job, not having kids on the lot, making the kids homeschooled, avoiding calling service NPCs… it depends on how you want to play the lot. For example, my icebreaker is a residential lot, only adults live there, some sims live in it temporarily and none of them have a regular job.

All of this is relevant because we're going to move the portals. Where you move the portals depends on you. Think about how you're going to use the lot. In my icebreaker, I placed the car portals (which won't be used) underwater, on a corner of the lot. I placed the pedestrian portals on the ship, to pretend that the walkbys are part of the crew or passengers. But for now, just move the portals, mailbox/phone booth and trashcan to a corner of the lot. To be able to pick up the mailbox/phone booth and trashcan, use the cheat moveObjects on. Delete the street and sidewalk tiles using the floor tool (Control + click and hold left mouse button + drag).


4.3. Flatten the island with the level terrain tool. Save the lot. Almost done! Don't mind the hole in the water, this will be fixed. You will notice that in neighborhood view, the island is still there. This is because the neighborhood terrain under the lot hasn't updated. I don't know why this happens, but it does. Normally, moving the lot would fix it, but we can't move this lot using the game's tools. Instead, we are going to fix the terrain with Hood Replace. Don't exit the game yet.
5. Updating the terrain with Hood Replace
5.1. Create a new neighborhood using the new roadless terrain. Make sure it has the same type of terrain (lush, desert, etc.) as the first one. Again, name it "NO ROADS" or something similar. Exit the game.

5.2. Open HoodReplace. On the left column you will select your "NO ROADS" neighborhood. In the right column, select the neighborhood that has the underwater lot. Check these settings: Replace terrain, replace road, and versioned backups. Leave everything else unchecked. Click Copy.

5.3. Open The Sims 2 and load the neighborhood to check if the changes worked. That concludes the tutorial. At this point you can shrink the lot if you don't want it to be so big. Remember to move the portals to their final placement when you're done building the lot. Also keep in mind pedestrians (walkbys) always walk by the mailbox, so keep the mailbox accessible for sims.
If you're going to have multiple underwater lots, I recommend making them first, and decorating the neighborhood after. Doing this in an already existing neighborhood might be more difficult, mainly because, if you made any changes to the terrain using the modifyNeighborhoodTerrain cheat in the past, they might get reset when using Hood Replace.
145 notes
·
View notes
Text

THE SIMS 3 TUTORIAL
HOW TO CREATE DEFAULT REPLACEMENT MOD USING CUSTOM MESH & TEXTURE FOR SIMPLE OBJECT
⚠️ Tumblr has 30 pictures limit, so I cannot include too many pictures. If you want to zoom in the pictures, click the pictures to enlarge, or save the pictures into your PC, zoom the pictures on picture viewer or zoom in the pictures on your mobile phone. ⚠️
----------------------------------------------------
I create this tutorial to make easier to follow because there are older tutorials available before but scattered on internet and usually only say "Export to replace s3asc" without explaining how to export the edited object properly.
My method is using TSR Workshop instead of exporting the object using Sims 3 Object Export/Import plug in because exporting to replace the s3asc using that plug in always giving error notification "ERR: Model has 1 groups; original had 0" and cannot be exported.
For beginners who are very new using s3pe and haven't created default replacement mod before, better start from simple object first.
Simple objects I mean in-game object that has single MODL and single texture with no morphs, no GeoStates, no presets, no CAS colour channels, and easily cloned from OBJD on catalogue. Usually as utensils that Sims holding in their hand, not buy/build objects. For example: Pencil, pan, fork, spoon.
----------------------------------------------------
Tools to prepare:
s3oc
s3pe
Milkshape 3D for bone assignment (Version I use 1.8.5 beta, discontinued by its developer, therefore feel free to download the full version with its license key provided).
Sims 3 Object Export/Import 1.01 by Wesley Howe (Milkshape plug-in. Download msS3ObjPluginsV101.rar )
TSR Workshop (Older version for TS3 only version 2.0.88)
TSR Workshop plug-ins for export.import TSRW Object.
3D Program (Blender/Maya/3dsMax)
Editing images software (Photoshop, make sure you have to install .dds plugin by Nvidia. For free software alternative, you can use GIMP with its .dds plugin)
This tutorial will not teach you how to:
Meshing object ❌
Create alpha texture ❌
Change thumbnails in-game ❌
Install programs and plug-ins ❌
This is how I created Chinese chopsticks replacement mod using custom mesh and texture.
In summary, this tutorial has 10 steps:
Step 1. Clone the Object using s3oc
Step 2. Open S3PE to Copy the Original Resource Code and Export the Files
Step 3. Export the Original Mesh as Base Mesh to .obj format
Step 4. Create Your Custom Mesh
Step 5. Bone Assignment & Create Group
Step 6. Create custom Texture
Step 7. Import the .wso of Edited Mesh on TSR Workshop & Export the package
Step 8. Export MODL file from Package saved from TSR Workshop
Step 9. Finalizing in s3pe & Replacing the Original file with Edited File & Correcting the Code As Same As Default Code
Step 10. Test the CC in your game.
-----------------------------------
✳️ Step 1. Clone the Object using s3oc
Before cloning the object, check the Game Folder for in-game object file location. Settings > Game Folders...
Take a look if the Base Game or Expansion Pack for object file you want to clone is in the right folder. For example, my The Sims 3 game are all bought from Steam, so the location is D:\SteamLibrary\steamapps\common\The Sims 3
If you want to clone object from Expansion Pack, make sure input the folder location. For example, the location for World Adventures EP is D:\SteamLibrary\steamapps\common\The Sims 3\EP1

If you are done, close the pop-up box. You can continue click Cloning then choose Normal Object...
Wait until you get the whole catalogue. Click Search...

For example, I clone object from World Adventures Expansion Pack. You can clone object from Base Game or other Expansion Packs as long it is considered as "utensil" that Sim holding on hand. For example: "Pencil" or "Pan"
Search for text: chopsticks
or if you want to clone object from Base Game, search: utensil
Tick check marks for Resource Name, Object Name, Object Desc then click "Search button"
Search result gives you results with name "chopsticks". Here is the object we are looking for: UtensilChopsticks
We need the OBJD file to clone. OBJD = Object Data.

Click "Clone or Fix" at the right bottom. Then you see the next page to determine if you want to clone with renumber or not. If you want to make default replacement, then do not check the Renumber box. Keep it blank.
Tick check box means the s3oc will generate new resource code for new item. Not tick the check means the s3oc will overwrite the same resource code, it is to replace object you cloned in-game.
I am personally a detailed person, so I usually tick as many as I want: tick "Deep clone" "Missing String Tables" and "Include Thumbnail" to include more details. Then click "Start" to proceed.

It will give you file name [CreatorName]_ObjectName_Number
Then save your package file in "DBPF Package" format in your project folder. Always make folder for any file to make everything organized.
✳️ Step 2. Open S3PE to Copy the Original Resource Code and Export the Files
Open S3pe, locate your package file you cloned from s3oc. Find the MODL of Utensil Chopsticks, Right-Click, "Details..."

On Resource Details, click "Copy TGI" to copy the Resource Code. Type, Group, and Instance will automatically be copied on clipboard. Then open Notepad, Right-Click to "Paste".
Click GRID on bottom of the s3pe (I mark it red on picture), it will give you pop-up box with Data Grid. Click "Resources", it will be highlight blue and there's 3 dots button appeared on the right side. Click the 3 dots button. It will give you TGI Block List Editor.
Inside MODL's TGI Block List Editor only has IMG. You may wondering why, but that's how the game coded. Type, Group, Instance of _IMG inside TGI Block List Editor should be the same as _IMG on the package.
Copy the TGI, Group, Instance to your Notepad.

After you copied code of MODL, do the same for the texture image (_IMG), but only copy the code from Resource Details. You cannot edit TGI Block List Editor for _IMG as the Grid button for _IMG is greyed out.
The main task is the code of your edited mesh and texture should be the same as the code you copied now from original package you cloned with s3oc.
Keep the code on notepad. You will need this code later.
Export the MODL file. Right-Click, "Export to s3asc". The file appears in long string such with name for example: S3_01661233_08000001_B619DB2238C3430B%%+MODL_filebase
Do not rename the file. Save.

Export the texture file. Right-Click "Export > To File..." The file will be saved in .dds format. Do not rename the file. Save.

✳️ Step 3. Export the Original Mesh as Base Mesh to .obj format
Open Milkshape. Import the s3asc file you saved before.
More steps click spoiler tag "Read More / Keep Reading" below
File > Import > Sims 3 Object Import v 1.01 by Wesley Howe

Locate the s3asc file, then the original chopsticks mesh appears.
Click the "Joints" tab. It has 4 codes. Check box "Draw vertices with bone colors" It will show Bone Assignment colors on the original mesh. Yellow on top chopstick and light blue on bottom chopstick. The colours are to make the object has rig and movement following the Sim's interaction.

Take a look at the 4 codes on Joints Tab. You can play around to see which colour of the code will appear, after that copy paste the code to Notepad to make it easier to comprehend.
Click Select from Tools menu, Select Options: Face. On "Right/Left/Top/Bottom 2D View", Left-click make selection of one part of chopsticks. While the part of object being selected (Red), click Joints then Choose "Assign".
0x96239247 --> Yellow 0xFEAE6981 --> Purple 0xCD68F001 --> Light Blue 0xD0DECA8E --> Red
Your edited mesh must have the exact same Bone Assignment colour later. Check again if the code and colour are correct.

You can save object mesh as .obj to other 3D software such as Blender or any other 3D software.
✳️ Step 4. Create Your Custom Mesh
Use the original .obj as base model. While you can create longer mesh or any edited version as you wish.
Make sure the scale and position of the edited mesh is same as base original mesh, because the edited mesh will be used on Sim's hand.

If you are done editing the mesh, export the UVmap.
You can export the uvmap in higher resolution, as long as it is Power of 2. 64x64, 128x128, 256x256, 512x512, 1024x1024, 2048x2048, 4096x4096. I export in 1024x1024 pixels to make the size of texture larger and have more details.
Then export the mesh object in .obj format.
✳️ Step 5. Bone Assignment & Create Group
Open Milkshape. Import the original mesh.
Check the Groups Tab. Original mesh has 1 group, "group 00". Group 00 means it is the main mesh. There is no shadow beneath the object.

Import the edited mesh as .obj file.

My edited mesh has one single name "default" name on the Group Tab. While edited mesh may have a lot of file name scattered on Group Tab. Regroup the file name to simplify your edited mesh into one single name. Select > Regroup.
The main task is replacing the EA's original mesh with your edited mesh.
Before you delete anything, you must do Bone Assignment first to the edited mesh you created.
Your edited mesh does not have Bone Assignment, so it appears white.
Remember the 4 codes you copied earlier in Notepad.

Copy Bone Assignment from original mesh to your edited mesh.
This case, your want to Bone Assign Yellow colour.
Select > Face to select one part of chopsticks of your edited mesh. On Joints Tab, double click the appropriate code 0x96239247 in blue highlight then the code box on the right side of "Rename" will appear 0x96239247. Make sure the code is correct. Then you can click "Assign".

Your edited mesh will appear in Yellow colour. Then do the same for another part of chopsticks.
Select another part of chopsticks of your edited mesh. On Joints Tab, double click the appropriate code 0xCD68F001 in blue highlight then the code box on the right side of "Rename" will appear 0xCD68F001. Click "Assign".

Your edited mesh will appear in Light Blue colour.
Then what's the other code for? With colour purple and red?
Leave them. Let the codes have the same exact codes as appear in original mesh and let the colours only assigned Yellow and Light Blue. The colours are to determine rig for interaction in-game, which only use Yellow as upper part of chopstick and Light Blue as bottom part of chopstick.
You can safely delete the original mesh with name group00 until it remains your only your edited mesh.

Rename your edited mesh to group00. Type group00 on the box then click "Rename" on the left side.

Export to TSRW Object in .wso format. .wso is format with bone assignment on object attached.

Save your .wso in your project folder.
✳️ Step 6. Create custom Texture
Import original texture you exported from s3pe to your editing image software.
Look at the original texture made by EA. 32x64 pixels. It is very low resolution, blurry and stretched, because the texture should be compressed as low as possible by game designer. As player you want it has higher detail to look realistic as possible and your PC of course can handle high resolution content, sure you can make the resolution much higher than EA's.

Import the UVMap you saved from 3D software. For example, UVmap I imported has 1024x1024 resolution. Add your custom texture. Then save it to .dds format in the same name as original texture. Save in separate folder, name it "Edited Texture" to keep it separated from original texture.
✳️ Step 7. Import the .wso of Edited Mesh on TSR Workshop & Export the package
Open your TSR Workshop.
Create New Project > New Import >Next...

Then Browse original mesh by EA in package format in your project folder.
On Open file box, you cannot see .package file because the filter is .wrk (TSR Workshop Project). Choose the .package dropdown.

Then you can see .package file.
Open the .package. After the file is located, then Next. On Project Details I usually skip without giving name of Project Name and Title. Next.
You must have seen green land with white blank sky.
Where's the mesh? It is actually there... just being zoomed in too close. You need to zoom out by scrolling down mouse.
You can see the original chopsticks mesh by EA. You can save the project file in .wrk format. After you save the file, import the .wso of your edited mesh. Mesh tab > High Level detail. Click green arrow folder icon to import. Then your edited mesh will appear replacing the original EA mesh.

As you see, the texture is messed up because the texture is still using original EA's texture. But then you check Textures tab and it has blank dropdown...
I cannot change the texture on this TSR Workshop!
Don't worry, we can replace the texture on s3pe later.
No need to change anything other than importing mesh. Click Edit > Project Contents to save as package.
You will see pop up box with number or files DDS, FTPT, LITE, MODL, OBJD, OBJK, etc. Export > To. package. Give name such as "EditedChopsticks_TSRW"

✳️ Step 8. Export MODL file from Package saved from TSR Workshop
Open S3PE, File > Open package "EditedChopticks_TSRW" that you saved from TSR Workshop.
Export MODL. Right-Click, export. It gives you file name with [StringOfNumber] .model .
Save it on project folder. Keep it organized and separated from original MODL. Name the folder "Edited MODL". Do not rename the file.
✳️ Step 9. Finalizing in s3pe & Replacing the Original file with Edited File & Correcting the Code As Same As Default Code
Open s3pe, File > Open original package that you cloned from s3oc. [CreatorName]_ObjectName_Number
Find the MODL. Right-Click > Replace...
Locate to your edited MODL with filename .model .
Then click Open.
The original MODL of the package should be replaced with your edited mesh.
Do the same for the texture.
Locate to your edited texture with filename .dds
Then click Open.
The original texture of the package should be replaced with your edited texture.
Take a look at MODL's Type, Group, Instance. It has the same code as original MODL in the original package cloned with s3oc (because it has been replaced)
Don't forget to see the code inside TGI Block List Editor.
Repeat step 2 how to check the code. Right-Click on MODL/IMG > Details... and click GRID > Resources > TGI Block List Editor.
The Type, Group, Instance of the _IMG are different compared from IMG from original package clone, which means that is the evidence of edited mesh replaced the original.
Rename the Instance with default/original Instance you copied on notepad from Step 2. Type, Group, Instance should be the same as default/original Type, Group, Instance.

Open notepad with resource code you copied from Step 2. Make sure the Type, Group, and Instance are all the same.
If the codes are the same, then your edited mesh and texture will overwrite the default mesh and texture with the same code in the game. Save, Commit, Save the package.
Check again if the texture is replaced properly. Right-Click on _IMG > ViewDDS.
ALTERNATIVES!
Yes, you can delete unwanted files in your edited package, to keep the package clean. Simply Right-Click>Deleted.
The only files needed in package are: MODL, _IMG, _KEY
They are the only files with your edited mesh/texture including codes to overwrite the default codes.
You can Start new fresh blank s3pe. Right-Click>Import from file...
Locate your edited MODL and _IMG (texture) file.
On Resource Details box, tick mark "Use resource name" > OK.
Make sure all the Type, Group, and Instance of MODL and _IMG including in the TGI Block List Editor are all the same as the code in original package.

Save the package.
✳️ Step 10. Test the CC in your game.
Put the package to your CC folder in your The Sims 3 document folder to see if the CC is working or not.
If the CC is working as your intended, with your custom mesh and texture, then test the animation. Are the chopsticks animation working as the same as original EA's? If the animation are working well too, then congratulations!

Your default replacement are working. Give applause to yourself. 👏
-------------------------------------
QUESTIONS!
Q:
Can I use this tutorial for making default replacement for buy/build object?
A: This tutorial covers basic method of using TSR Workshop and replacing the default codes (Type, Group, Instance), so you will understand the basic principle of doing default replacement mod.
Keep in mind that different object has different case. Buy / build object has MLOD (not just MODL) more than one, texture images more than one, has presets, and CAStable colour channels.
The TGI Block List Editor for buy/build object has a lot of codes, so have to spend a lot of time to do trial-and-error to make the default replacement working properly, because a lot of times the texture doesn't work (still using default EA's texture), or when the object appears right with your edited mesh and texture, after you choose the presets, the object reverts back to your edited mesh with default EA's texture.
Q:
Help! The texture is black! / still using same EA's texture when tested in the game!
A: The texture codes must be not the same. Check the Type, Group, Instance of _IMG. Do the codes are the same like codes in original package? Check the TGI Block List Editor for MODL, is the _IMG inside has the same Type, Group, Instance as in original package.
Q:
Help! The object disappears when tested in the game!
A: You must be replacing OBJD in your package. Do not replace OBJD. Just MODL and texture only.
#tutorial#the sims 3#the sims 3 tutorial#thebleedingwoodland#the sims 3 default replacement mod#modding#s3pe#s30c#TSR Workshop
92 notes
·
View notes
Text
Syzygy Podfic Project Auditions - Second Round!
Are you interested in voice acting, but intimidated by the prospect of a large role? Did you consider auditioning for the Syzygy project before, but didn't because of time constraints? Are you just finding out about this project now and wishing you had discovered it sooner so you could be a part of it?
Well, you're in luck, because the Syzygy Podfic Project is in need of extra voices to fill out our cast! There are dozens of minor roles that are perfect for anyone hoping to dip their toes into voice acting in a large project!
Find the audition information here!
Make sure to only submit the form once you are confident in your recording! Only the first submission will be accepted, so take your time and get the best take you can before submitting!
Tips for recording your audition:
Record in a small space that's insulated - a closet can work very well, as the clothes can minimize the echo and avoid too many outside sounds.
Make sure you are the proper distance from your microphone - this can take some testing and trial and error!
Have your microphone resting on a flat surface, don't attempt to move it while recording.
Don't be afraid to do multiple takes and only pick your favorite ones!
Audacity is a free audio recording software that is very intuitive for a beginner to use, if you're looking for a recording program.
Feel free to send an ask if you have any questions!
@tsseventhub @sanders-sides-events
#syzygy podfic project#sanders sides#thomas sanders#logan sanders#patton sanders#remus sanders#roman sanders#virgil sanders#audition info
60 notes
·
View notes
Note
Please tell us how to get into IT without a degree! I have an interview for a small tech company this week and I’m going in as admin but as things expand I can bootstrap into a better role and I’d really appreciate knowing what skills are likely to be crucial for making that pivot.
Absolutely!! You'd be in a great position to switch to IT, since as an admin, you'd already have some familiarity with the systems and with the workplace in general. Moving between roles is easier in a smaller workplace, too.
So, this is a semi-brief guide to getting an entry-level position, for someone with zero IT experience. That position is almost always going to be help desk. You've probably heard a lot of shit about help desk, but I've always enjoyed it.
So, here we go! How to get into IT for beginners!
The most important thing on your resume will be
✨~🌟Certifications!!🌟~✨
Studying for certs can teach you a lot, especially if you're entirely new to the field. But they're also really important for getting interviews. Lots of jobs will require a cert or degree, and even if you have 5 years of experience doing exactly what the job description is, without one of those the ATS will shunt your resume into a black hole and neither HR or the IT manager will see it.
First, I recommend getting the CompTIA A+. This will teach you the basics of how the parts of a computer work together - hardware, software, how networking works, how operating systems work, troubleshooting skills, etc. If you don't have a specific area of IT you're interested in, this is REQUIRED. Even if you do, I suggest you get this cert just to get your foot in the door.
I recommend the CompTIA certs in general. They'll give you a good baseline and look good on your resume. I only got the A+ and the Network+, so can't speak for the other exams, but they weren't too tough.
If you're more into development or cybersecurity, check out these roadmaps. You'll still benefit from working help desk while pursuing one of those career paths.
The next most important thing is
🔥🔥Customer service & soft skills🔥🔥
Sorry about that.
I was hired for my first ever IT role on the strength of my interview. I definitely wasn't the only candidate with an A+, but I was the only one who knew how to handle customers (aka end-users). Which is, basically, be polite, make the end-user feel listened to, and don't make them feel stupid. It is ASTOUNDING how many IT people can't do that. I've worked with so many IT people who couldn't hide their scorn or impatience when dealing with non-tech-savvy coworkers.
Please note that you don't need to be a social butterfly or even that socially adept. I'm autistic and learned all my social skills by rote (I literally have flowcharts for social interactions), and I was still exceptional by IT standards.
Third thing, which is more for you than for your resume (although it helps):
🎇Do your own projects🎇
This is both the most and least important thing you can do for your IT career. Least important because this will have the smallest impact on your resume. Most important because this will help you learn (and figure out if IT is actually what you want to do).
The certs and interview might get you a job, but when it comes to doing your job well, hands-on experience is absolutely essential. Here are a few ideas for the complete beginner. Resources linked at the bottom.
Start using the command line. This is called Terminal on Mac and Linux. Use it for things as simple as navigating through file directories, opening apps, testing your connection, that kind of thing. The goal is to get used to using the command line, because you will use it professionally.
Build your own PC. This may sound really intimidating, but I swear it's easy! This is going to be cheaper than buying a prebuilt tower or gaming PC, and you'll learn a ton in the bargain.
Repair old PCs. If you don't want to or can't afford to build your own PC, look for cheap computers on Craiglist, secondhand stores, or elsewhere. I know a lot of universities will sell old technology for cheap. Try to buy a few and make a functioning computer out of parts, or just get one so you can feel comfortable working in the guts of a PC.
Learn Powershell or shell scripting. If you're comfortable with the command line already or just want to jump in the deep end, use scripts to automate tasks on your PC. I found this harder to do for myself than for work, because I mostly use my computer for web browsing. However, there are tons of projects out there for you to try!
Play around with a Raspberry Pi. These are mini-computers ranging from $15-$150+ and are great to experiment with. I've made a media server and a Pi hole (network-wide ad blocking) which were both fun and not too tough. If you're into torrenting, try making a seedbox!
Install Linux on your primary computer. I know, I know - I'm one of those people. But seriously, nothing will teach you more quickly than having to compile drivers through the command line so your Bluetooth headphones will work. Warning: this gets really annoying if you just want your computer to work. Dual-booting is advised.
If this sounds intimidating, that's totally normal. It is intimidating! You're going to have to do a ton of troubleshooting and things will almost never work properly on your first few projects. That is part of the fun!
Resources
Resources I've tried and liked are marked with an asterisk*
Professor Messor's Free A+ Training Course*
PC Building Simulator 2 (video game)
How to build a PC (video)
PC Part Picker (website)*
CompTIA A+ courses on Udemy
50 Basic Windows Commands with Examples*
Mac Terminal Commands Cheat Sheet
Powershell in a Month of Lunches (video series)
Getting Started with Linux (tutorial)* Note: this site is my favorite Linux resource, I highly recommend it.
Getting Started with Raspberry Pi
Raspberry Pi Projects for Beginners
/r/ITCareerQuestions*
Ask A Manager (advice blog on workplace etiquette and more)*
Reddit is helpful for tech questions in general. I have some other resources that involve sailing the seas; feel free to DM me or send an ask I can answer privately.
Tips
DO NOT work at an MSP. That stands for Managed Service Provider, and it's basically an IT department which companies contract to provide tech services. I recommend staying away from them. It's way better to work in an IT department where the end users are your coworkers, not your customers.
DO NOT trust remote entry-level IT jobs. At entry level, part of your job is schlepping around hardware and fixing PCs. A fully-remote position will almost definitely be a call center.
DO write a cover letter. YMMV on this, but every employer I've had has mentioned my cover letter as a reason to hire me.
DO ask your employer to pay for your certs. This applies only to people who either plan to move into IT in the same company, or are already in IT but want more certs.
DO NOT work anywhere without at least one woman in the department. My litmus test is two women, actually, but YMMV. If there is no woman in the department in 2024, and the department is more than 5 people, there is a reason why no women work there.
DO have patience with yourself and keep an open mind! Maybe this is just me, but if I can't do something right the first time, or if I don't love it right away, I get very discouraged. Remember that making mistakes is part of the process, and that IT is a huge field which ranges from UX design to hardware repair. There are tons of directions to go once you've got a little experience!
Disclaimer: this is based on my experience in my area of the US. Things may be different elsewhere, esp. outside of the US.
I hope this is helpful! Let me know if you have more questions!
46 notes
·
View notes
Note
The book you binded looks so cool!!! I've been meaning to get into book binding as well, especially for One Piece fics and I love the format you did it in with Zoro's logo. How did you edit it? Would you be willing to share tips on how you did it? Did you watch book binding YouTube videos?
Thanks, anon! I'm glad you enjoyed! And I'm absolutely willing to share what I learned!
For the general book-binding, I used a couple book binding how-to videos.
Turning Fanfiction Into the Hardcover Book it Deserves by Jess Less
This one helped with:
How to use an old book cover/used book for the cover of the fanfic (you can also MAKE covers, and she has another video on this as well, but I love the idea of recycling old unwanted books into something new and loved)
The basics for formatting the pages (her bit about adding a compass design for the chapters is what inspired me to use Zoro's flag logo)
How to print and prep the pages/signatures
How to finish putting the whole thing together and add some interesting design elements
I especially liked this video because it's very beginner-friendly and casual, which helped the whole project feel a little less daunting. You can get special tools for book binding (there are kits online) but as shown, it's also simple enough to do with a thumbtack and some corkboard if you're low on cash.
That said, I found the stitch in this video a bit confusing, so I used the stitch from this video instead:
Folding & Sewing - Rounded and Backed Cased Book // Adventures in Bookbinding by DAS Bookbinding
Stitch prep is specifically around 7min in if you just want to skip to that. But the whole thing is an interesting watch too. This is more professional bookbinding and he has a lot of other interesting videos if you want to do some more complex things. However I found this stitch to be very straightforward and easy to follow and assemble, so I ultimately used this one when I put together Seven Deaths.
As for my personal tips and things I learned while doing this project?
Turns out Google Docs is kind of useless for this. You'll want actual word processing software like Microsoft Word. If you don't have the cash to spend on Microsoft's ridiculous subscription policy, you can use LibreOffice which is free (I did, and it works very well).
Fics are way longer on paper than they are digitally. Seven Deaths is 'only' about a 50K fic (less, in fact). But it still makes a 200+ page book. Pic a smaller fic to start with while you figure out everything you want to do.
Do some research on good book fonts for the body of your text. You can get crazy with other things (chapter headers or title pages) but pic something recommended for your text body so it's legible.
To add character symbols (like Zoro's flag) you'll need a transparent copy of it to save as a png. Once you pull it into the word doc you can resize and arrange as needed.
Also look at other "real" books you have lying around for ideas for things to add to your book! I turned an author's note into a "Forward", added an "about the author/publisher" section at the back, put in a table of contents, etc. There's other things I want to experiment with next time. Go wild! Have fun!
Test print a couple pages before printing the full project, just to be sure it's actually the right page size, your font is legible and spaced well, etc. If you don't have a printer and you don't want to pay a print shop for some expensive test pages, try your local library! Many let you use their computers and printers for an extremely low cost.
If you don't have a printer (or not one that can do quality printing for 200+ pages) you'll need to go to a print shop. DON'T bother with places like Staples or OfficeMax. I tried this, but their machines automatically staple "booklets" out of your signatures, which messes up your paper and costs extra for this "service." Instead, track down a local print shop in your area. It's easier to talk to them directly about what you want and the quality is better anyway.
On that note, this is an expensive hobby! Printing for Seven Deaths was about $87USD. The quality was worth it, but definitely do not start if you don't have your own printer or a little bit of spending money.
You do not need as much glue or thread as you think you need. Go less. Waste not.
A lot of the end stages is just...waiting...for...glue...to...dry.
You will inevitably, invariably, mess things up on your first project. I sure did! I underestimated the sharpness of some tools and put holes places I didn't mean to; some things glued in a bit sloppily; I didn't set up my page organization exactly right my table of contents ended up on the left page when I envisioned it on the right. But you know what? It doesn't matter! Because at the end of the day you have a book that YOU MADE. And it's still fucking awesome! And now you've learned some things for next time. Do it anyway and have fun with it!
Happy crafting, anon. I hope you are able to add some personal favorites to your bookshelf soon :)
16 notes
·
View notes
Text
Hey you! Yes, you! Learn how to use GZDoom!
Also if you see this post, please reblog it if you think it's good, like I don't think Tumblr's algorithm (that kinda exists) will like it.
Hi, I'm Lynn "WJB" Beck, and I'm here to tell you about an exciting new old game engine that is extremely easy to use for not just making original games, but also mods and animations and stuff!
And this engine... is GZDoom.
GZDoom is an enhanced sourceport of the 1993 first-person shooter, demon-punching simulator and stress-test for pretty much any technology that contains a computer. As opposed to more low-key and/or "vanilla" sourceports like Chocolate Doom or Boom, GZDoom allows for a lot more options, including Build Engine-style voxels, several types of dynamic lighting, and even stuff that was originally exclusive to specific Doom Engine games, like Strife's light RPG mechanics, This means that it can be used to make extremely impressive "total conversion" mods, and even fully original games with entirely custom stuff!
This guide covers how to get started, and a basic overview of how certain things work (get ready to learn about lumps!).
Getting Started
Ok so before you can start Doing The Thing, you need to... install some software! Don't worry, it's only like 4 and they're fairly lightweight.
Go to this website here and download the most recent version of GZDoom. You will need this to actually run your game.
Go here and get Slade. You will need this to import custom graphics and audio, as well as to use text-lumps (which are basically necessary, even if you're making a basic custom level set, and I will explain why further down).
This ZDoom Forum topic is where you can get Ultimate Doom Builder. While there are other Doom mapping tools, UDB is what I personally use, and it's extremely beginner-friendly while also being fairly versatile. It even has a built-in script editor, so you can modify a script and then immediately jump into testing to see if what you've done has worked!
Finally, you need a copy of specifically Doom 2. You could use Doom 1, but in my opinion Doom 2 is better because it has a lot more stuff than the first game, and - let's be real - you'll probably be doing a lot of vanilla mapping to get to grips with the editor before you can start making your big ambitious game (which is what I'm doing over on my modding sideblog, check it out). I'll leave this one up to you. EDIT: I forgot that Freedoom exists. That's also good.
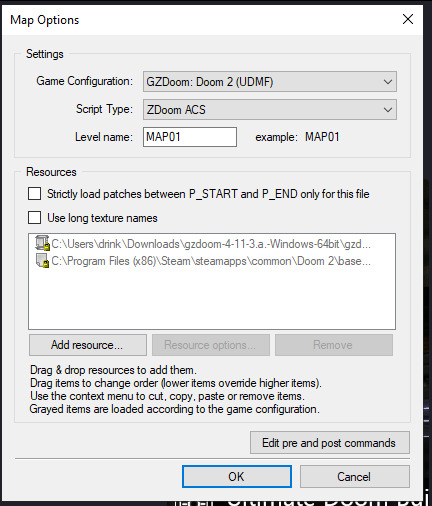
Mounting stuff into Ultimate Doom Builder
Next, you'll need to get UDB set up. This is fairly easy. First open UDB and, as soon as it starts up, go to the top-menu and click "Tools", then go to Game Configuration. Select "GZDoom: Doom 2 (UDMF)" and click "add resource"; using the attached file-explorer, locate the Doom 2 folder on your computer's file system and add DOOM2.WAD to the list of resources, then do the same with gzdoom.pk3 in the GZDoom folder (making sure to switch the "Add Resource" tab from "From WAD" to "From PK3". Click Ok, and you're done!
If you want to put your custom graphics into the game, you simply create a WAD file in Slade, put your graphics in (more on that later) and save it; then when creating a map in UDB, this box will appear:
If you click "Add resource" here, you can then select your custom wad and use any assets, code etc. in your map!
How Slade works
This bit is a bit more complex because it deals with multiple file formats and methods of importing stuff, but I'll start simply by explaining textures, flats, sprites and patches.
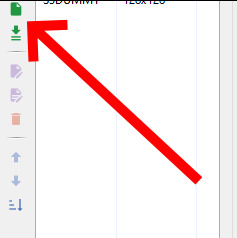
Before I do that though, I need to talk about Markers. To define images as a sprite, patch or flat, you need to put them between a pair of Markers with specific names, which you can create by clicking the "New Entry" button:

"Empty (Marker)" is selected by default, so all you need to do is name it. The naming format is [LETTER]_START to start a section and [LETTER]_END to end one; S_Start/S_End are for sprites, P_Start/P_End are for patches, and F_Start and F_End are for flats. You can, additionally, further subdivide this by making another pair of Markers inside a Start/End pair with a number after the letter, but I'm not sure if this does anything (my only experience with it is that the Doom 2 wad file does this).
Now to explain how these things actually work! First, sprites. A sprite is an image that represents an object or creature in the game, and a cool thing that GZDoom does is let you use generic PNGs instead of Doom's proprietary GFX format. Sprites use the following naming scheme: a four-letter identifier, a single character denoting what frame of the animation the image represents (the Arch-Vile, which has the most sprites out of any monster in Doom 2, has frames that go from A all the way to Z, and then [, \ and ]), and finally a number from 0-8 that indicates the angle the Thing (that's the technical term for a Doom Engine entity, by the way) is at. Using the Imp as an example:

The "0" angle just means that the sprite should look the same regardless of the player's angle; this is used for items, decorations, the death animations of all monsters (including players), and the two sprites used for Doom II's final boss.
A cool thing about sprite angles is that you can actually make a sprite work for multiple angles; by adding an extra frame-letter and angle-number after the first set, you can do things like have a monster whose left and right walking frames are the same but mirrored by formatting the sprite's name as something like NAMEA2A8 (in fact, the Imp uses this technique for all its sprites apart from its death animation).
Next up, flats! Flats are square textures that are designed to go on floors or ceilings (though you can use them anywhere, including as sky textures!) but lack the flexibility of patch-based textures. You literally just. Import your texture and put it between F_Start and F_End. That's it. That's how a flat works.
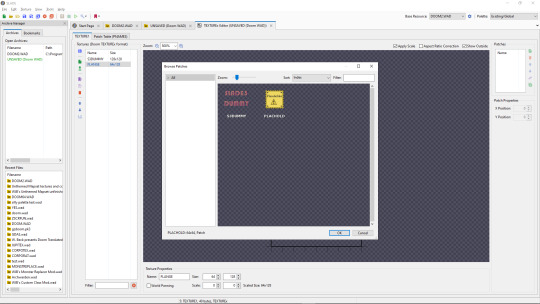
And finally, patches. Patches are complicated, but very easy to use when you know what you're doing. First, put your image between P_Start and P_End, then right click it, put your mouse over the "Graphics" dropdown, and select "Add to Patch Table". You will then be prompted to create a TEXTURES lump; click "Ok" with the default settings. This creates a Texture1 lump, and the "Patch Table" (which is just a list of patches, which I will explain soon), alongside P_Start and P_End if they aren't already present (and a dummy texture). Double-click Texture1 to open it, and then select "New Texture" (you can adjust the scale, too):
Once this is done, go to the top-right corner and click "Add patch":

By default, you only have access to any patches you have assigned, but a cool trick I use in my own mapsets whenever I want to modify an official texture is to copy its Texture1 entry from the Doom 2 WAD, then paste it into my WAD's Texture1 and rename it. This does create copies of the constituent patches in your own wad's P_Start/P_End section, but you can delete those and it will still work fine.
Both patches and Flats are limited to 8-letter names, so be warned.
The actual final thing to talk about is converting PNGs to GFX; this is a simple process, but it can cause issues with colour. Basically, Doom has a very specific palette:

While this can look pretty good, on images it wasn't designed for or that use colours it doesn't feature, it can look pretty bad. For example, if I put this random image I made through the conversion process:
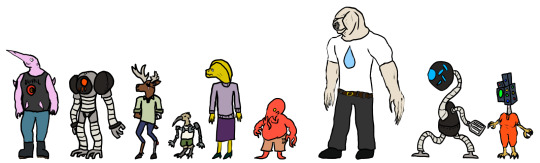
Then it comes out looking like this:
All the more cyan-adjacent hues become more blue, it nuked the antialiasing, and some of the gaps in my colouring are now much more obvious (especially on the fifth character's head and legs).
My point is, only do this if you want your mod to be compatible with more vanilla sourceports, or if you want to reduce the filesize. Otherwise, you're better off just using a strict palette when making the sprites and keeping them as PNGs.
Custom palettes are possible, but like. Literally all you do is click "New Entry", select "palette", name it, click the "Import from" button (purple page with a diagonal arrow on the top-middle of the palette-view window), set the filetype on the file explorer to "PNG", and import your custom palette image (which should be square (non-square images get squished and lose some colours) and 16x16 at the smallest, though the images I normally use are 128x128 because for some reason they're scaled up by a factor of 8, even though they display the same when imported regardless of size). You can even test them out or add them to the in-built palette list, which is nice. If you want it to override the default palette when your WAD is loaded, name the lump "PLAYPAL", which is what Doom's palette is called.
Now we get to talk about text lumps! I don't have much to say. Do the "New Entry" thing, select "Text", and name the file. The ZDoom wiki - which I will be linking to at the end - has information on each type, so check those out.
Map making
This is the final main section of this, and I'll try keeping it fairly brief and simple. Doom maps use four main elements; Vertices, Lines, Sectors, and Things. A Vertex is, well a vertex; it's a point in 2D space that acts as a starting or connecting point on a Line. Lines can be either walls or walkover triggers, depending on how you use them. Sectors can be rooms or shapes on the floor, and have properties such as damaging floors, being "underwater" (the player can swim and sound is muffled), or even having different gravity. Finally, a Thing is any entity that isn't one of those, ranging from monsters to player-starts to decorations, plus some complex technical ones I can't even begin to explain.
Useful resources
I am not good with words, but these places are!
ZDoom wiki - covers both regular ZDoom and GZDoom, plus other sourceports like the multiplayer-focused Skulltag and Zandronum. It has guides about ACS and ZScript, two of GZDoom's most useful tools for scripting maps and Things, respectively, as well as the obsolete "DECORATE" language which ZScript incorporates many elements of.
Dragonfly's Doomworks - mapping tutorial resource. I use their portal tutorial a lot whenever I want to put portals in a map.
Doomwiki - good for looking up monster and weapon stats for if you're making custom Things.
23 notes
·
View notes
Text
Funding FujoCoded: Stretch Goals!
It’s time! With our first goal met (🎉 thank you!), let’s talk about stretch goals. We have quite a few planned, so we're going to go through them one by one and explain what they are and why we chose them!

Before we go down the list, here's something fun:
Sticker Unlock: At 45 backers, we also unlocked one more sticker!
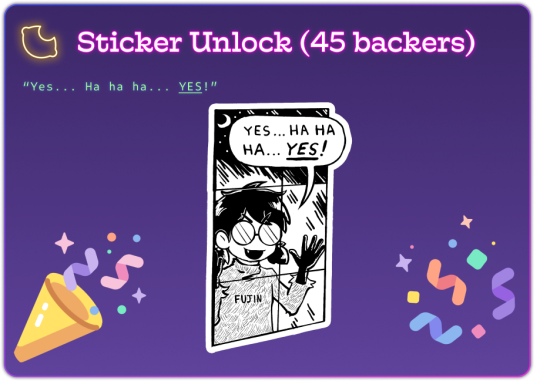
The goal of our campaign is to cover business expenses most of all. The unlocked content is an extra token of gratitude for your support that also helps us meet our own targets!
With that said, let's get to our stretch goals...
$4,000: "That's Why I Ship On Company Time" Ao3 Sticker
At $4,000 we'll unlock one more sticker design that you can add to your collection!
Our first version of this "shipping" sticker features VSCode and a terminal, but there's more than one type of shipping... here's to the other one!

$5,000: "Using NPM with Javascript" Article
Next up, we have our first article. Our plan is to add an Articles section to @fujowebdev where we'll collect simple, free guides to help beginners get past the roadblocks we see them encounter!
This first one will cover the basics of NPM, a core element of modern JavaScript!

"How do I install this JavaScript library? How do I run this open source JavaScript project? How can I get started creating my blog using a tool like @astrodotbuild?" are some of the most common questions we get in our Fandom Coders server.
Let's give *everyone* the answer!
$6,000: Offering Website Art Prints
Next up, we'll turn the excellent art on our website into prints! These will be (probably) 8x10-sized art prints that will look amazing without breaking the bank. Full specs soon!

...and speaking of the site, you have tried moving the windows, right?

$7,000: "Catching Up With Terminal" Article
Next, another common issue for beginner developers: how to start learning how to handle the Terminal.

This will require some research to determine the major roadblocks, which is how our project operates: active learning from those going through it all!
$8,000: "Crucial Confrontations" Article
And last (for now), something very dear to us: an article extracting some wisdom from the book "Crucial Confrontations": https://www.amazon.com/Crucial-Confrontations-Resolving-Promises-Expectations/dp/0071446524
This may seem like an unusual choice, but it highlights how our teaching goals go beyond programming to cover collaboration!

After years of working within our community, we repeatedly found that developing effective communication and confrontation skills helps our collaborators thrive. Unfortunately, the world doesn't teach us how to effectively (but kindly) hold each other accountable.
Some of our most involved collaborators have read this book and found the tools within it transformative. Given this experience, we deeply believe that making some of this wisdom easily accessible (without having to read the full book) will allow all of us to collaborate better!
If we can reach $8,000, this will enable us to test this hypothesis and learn how teaching soft skills beyond programming influences what we're able to achieve! It's a bold idea, but we're excited to see how it turns out in practice.
Help us make it there!
And that's all...for now!
If you want to hop on Twitch right now, you can join us as we put some extra polish on our shiny new FujoCoded website.
And remember, you can back our campaign here to help us achieve these goals and more:
23 notes
·
View notes
Note
Hii me again. I'm not sure if I sent the ask I'm talking about on anon, so maybe that's why you didn't see it? It partially got answered with a recent ask you got anyway so no worries. I was just wondering if you use 3d in your process and if so, how? I've seen other illustrators use it to varying degrees and it seems like a really helpful tool to push your work.
Oh that's so weird! No I periodically go through my asks in chunks and I didn't see anything like that. I've had a few people in the past few months send me asks that looked like the second half of something else with no context, so maybe it's Tumblr fuckery. Sorry!!
I recommend learning Blender so you can help sculpt shapes and render lighting onto them in order to get the weirder/more complex shadows right. You can also apply colors onto the things you sculpt in order to see how the colors act in different lighting. It's pretty much an invaluable tool to me as it keeps me from having to problem-solve too much. I did a lot of digging around in my house to build references to photograph but it was just impractical to achieve the things I want to a lot of the time. I still do that, and you would not believe how many goofy photos I have of my husband in the poses you've seen me paint Astarion in lmao...
I do think that it needs to be used in moderation if you are a more beginner artist- I think that using 3D is DANGEROUSLY close to becoming a massive crutch for a newer artist and improper usage or over reliance on it can lead to stiffness or artificial looking colors. You need to be able to train your eye to create compelling compositions by bashing things together, and train your hand to replicate/add/subtract as needed from your references with an organic feel.
I will say this as a total committer of this crime myself in the past, it's VERY easy to tell when an artist relies too much on, for example, Clip Studio Paint posed models as bases for pieces without a good enough grasp on their fundamentals. And I also used to prickle when I saw more advanced artists warn of this, so I do think maybe it just has to run its course sometimes, because I know that using 3D for reference seems like an easy-button.
I've taken a lot of in-person classes for live figure drawing and painting, as well as just totally done drills, basically, on sketching and painting from life before relying too much on static imagery/3D/etc.
I often fret over every piece I do looking too stiff even still.
You have to do a LOT of the boring hard stuff the old fashioned way. And I regularly go back to it over and over when needed.
For example, I recently did a stupid amount of rose petal/flower studies deconstructing and painting ugly little paintings/doodles over and over because I know that I've been horribly weak at painting flowers for years (actively avoiding them). And I've been doing a lot of floral stuff lately due to that.
Whenever I start a new piece in new territory, I know it's going to mean several 3AM nighters where I have two other tabs open on Photoshop where I test out different textures or do a couple of studies. I'm working on a piece of my OC right now that has a lot of gore/medical instruments and I've been working on testing out different methods for shiny metal painting and some anatomical studies. I'll come to a snag in a painting and go "here we go" and work through it one piece at a time.
My Halsin piece, "Secret Spot" in the hot spring, was a massive undertaking with a lot of these moments. The Karlach x Dammon piece took 3 times longer than it should have due to me just having to go back and fix things knowing I could do better after doing some studies.
Ultimately I personally find art tutorials to be quite useless overall once you get to a certain point, unless they are teaching the use of a tool/software because you HAVE to figure out what works for you. And even then I use Blender like a monkey with a keyboard, I suspect, because I've just bruteforced through it, so I could probably use a tuneup from a good teacher on that haha. I hope this helps some, and sorry if I overstepped if I sound preachy.
24 notes
·
View notes
Text
Preliminary Considerations - Which Vocal Synthesizer Software is Right for You - Paid Synthesizers
Hello everyone, Shimmer/Ripple/whatever you want to call me here. Sorry for not posting for a while, I've had a lot of stuff going on in my life (I turned 20 last week!), and have been busy with using vocal synthesizers than to make a blog post about them. I hope this article was worth the wait.
Last time, I comapred various free vocal synthesizers, and this time, I will be showing off the most popular paid ones. Quick disclaimer; I do not own all of these softwares, and will not buy the ones I have just to test them out as they are not cheap. I got feedback and advice from my friends who do own these synthesizers, along with Reddit posts and other forums. The piano roll images for the softwares I do not own are from various websites and vsynth users who I will be crediting in the captions. VOCALOID4

(Song: Devil's Manner by Konnichiwa Tanita-san; UST by Moru, Tuning by me)
When people think of the VOCALOID user interface, this edition of the software is probably what first comes to mind. It is very popular for a good reason; it’s got a simple UI and release of some of the best VOCALOID voicebanks; including Hatsune Miku V4x, Megurine Luka V4x, Kagamine Rin and Kagamine Len V4x, Fukase, Otomachi Una Sweet and Spicy, Megpoid Gumi V4, and Yuzuki Yukari V4. V4 also introduced the “GROWL” and “CROSS-SYNTHESIS” parameters! Despite being the sister software to UTAU, it is a lot easier to install voicebanks and plugins into VOCALOID4, and you do not need to worry about phonemizers or resamplers.
Pros:
Can use every V2, V3, and V4 VOCALOID voicebank
Growl and Cross-Synthesis (also known as XSY; allows you to combine any two V4 voicebanks of the same character; such as Fukase’s Normal Japanese voicebank with his Soft Japanese voicebank or Gumi’s V4 Sweet voicebank with her V4 Adult voicebank) parameters
Can use job plugins to simplify the overall tuning process like in UTAU, Open Utau, and SynthesizerV Studio Pro
Pitch Rendering function allows users to see the pitch of notes
Really beginner-friendly (this vocal synthesizer was the one that taught me how to tune)!
Cons:
Is no longer available for purchase on the official YAMAHA website; you can only obtain it through Mercari (that was how I was able to get it), eBay, or through piracy
No piano roll tuning; users are restricted to the parameter box
Can not use V1 or V5 and higher voicebanks
The breathiness parameter gives a metallic effect instead of the desired whisper-like outcome
youtube
VOCALOID5
(Song: ID Smile by Toa; UST by K3RA; Cover by Shara Delvia)
The next edition of VOCALOID that was meant to change the playing field for vocal synth users. With an entirely new UI and never-seen-before features, VOCALOID5 was designed to simplify and enhance the overall vocal production and tuning process.
Pros:
Dark mode at last!
Unlike the previous editions where you had to purchase a voicebank to use VOCALOID, VOCALOID5 comes with four free voicebanks
Preset phrases that beginners can play with to learn how different vocal properties can result in different sounds
Preset “attack” and “release” pitch bend effects
Easy pitchbend and vibrato adjustment using the “style” and “emotion” tools
Automatic breaths
Can be used as a VST plugin in almost any DAW or as a standalone editor
Over a hundred style and voice colour presets (Rich, Husky, Hard; Melodic, Diced Up, Bent; Lead Vocal, Chopped, Pitched)
Tons of audio and mixing effects
Fixed breathiness parameter
Cons
Appears to be no longer up for purchase through normal means, YAMAHA has pulled it from the VOCALOID website to promote their newest engine, VOCALOID6
Does not support V2 or V1 VOCALOIDS
Does not support job plug-ins
Does not have the Cross-Synthesis parameter
Not worth the price
No piano roll tuning
youtube
VOCALOID6

(Song: Unknown Mother Goose by wowaka; VSQx and Tuning by me)
This is the most recent edition of VOCALOID that is up for purchase from the official website. With this installation of the VOCALOID software, the highly anticipated AI VOCALOID voicebanks have come into existence so that we can enjoy GUMI AI, ZOLA PROJECT AI, and Otomachi Una AI at last! It also comes with many other fresh features that were not present in VOCALOID5.
Pros:
Multilingual(Japanese, English, and Chinese) AI voicebanks!
A total of ten VOCALOID AI voicebanks
VOCALO CHANGER: works similarly to plugging an RVC model on top of an audio file, but legal
The doubling feature allows instant harmony creation
Fixed breathiness parameter
It can be used as a VST plug-in in most DAWs. or as a standalone editor
Included with the CUBASE AI DAW
Can be purchased at a cheaper price by upgrading from previous VOCALOID editions
Every feature that was present in VOCALOID5 is included in VOCALOID6!
Cons:
The AI voicebanks are of poorer quality compared to SynthesizerV; they are not easy to tune in the slightest, and you can only edit three parameters (pitch, pitch bend sensitivity, dynamics) unlike the normal VOCALOID voicebanks; not including the style presets
For the desired results in VOCALO CHANGER, the audio recordings must be clean without any flaws, otherwise the audio will sound distorted
Does not support V2 or V1 VOCALOIDs
Does not support job plug-ins
youtube
Piapro Studio V4x

(Song: Enjou Alice by Maiki-P; UST by KIRI; Tuning by Me)
Following its departure from YAMAHA, Crypton Future Media created a new vocal synthesizer to promote its new V4x Cryptonloid voicebanks. With its VSTi compatibility and E.V.E.C. feature, this software gave a new feel to tuning VOCALOIDs all while maintaining the features from the vocal synthesizers that were developed by YAMAHA.
Pros:
Bundles with Cryptonloids include Piapro Studio V4x and Studio One 6 for free; an incredible DAW
VOCALOID4 with a different, cleaner UI
Compatible with V2 (some of them), V3, and V4 voicebanks
Enhanced Cross-Synthesis parameter; now you can cross-synthesize two completely different VOCALOIDs (such as Hatsune Miku V4x Original with Megurine Luka V4x Hard)
E.V.E.C. with a press of a button; in VOCALOID4 you have to edit phonemes manually
Improved breathiness parameter
Ability to change the wallpaper of the piano roll and icons of voicebanks!
Can be used as a VSTi plug-in in most DAWs
Cons:
Does not support job plugins
Not all VOCALOID2 voicebanks are supported; such as Utatane Piko
Does not support NT voicebanks
Playback is not always on time with piano roll; you have to scroll as the vocals play unlike other softwares (this could be a glitch for me however)
No piano roll tuning
Can not run it through Studio One 6 (despite being included with the bundles), it can only function in Studio 5
youtube
Piapro Studio NT
(Song: vivid by Utsu-P x Yuyoyuppe; UST by pifuyuu; Cover by AfiqTV)
Yes, Piapro Studio NT (an acronym for “new type”) is completely different from Piapro Studio V4x. This successor to the latter vocal synthesizer is entirely separate from YAMAHA, and was created for Crypton’s NT voicebanks. It no longer requires the use of a DAW, and was carefully designed with resynthesis technology for efficient vocal creation through the research that was conducted by the National Institute of Advanced Industrial Science and Technology (AIST).
Note: As of August 2024; Crypton has shifted their intention to release the other NT singers to getting back with YAMAHA to develop Miku V6 AI. We will be getting a Piapro Super Pack in a week (it is currently available for preorder). The package contains remastered versions of Miku V4x Original, Rin V4x Power, Len V4x Power, and Luka V4x Natural; along with V4 versions of KAITO and MEIKO. The former V3 voicebanks will come with growl features, and although there will be no appends, you can cross-synthesize any of the new Cryptonloids to produce unique sounds. In addition, Miku NT will be receiving a massive new update in the future.
Pros:
Piano roll tuning at last!
New accent feature and E.V.E.C
Comes with Vocal Drive Plugin for growl and scream effects
Cons:
Not compatible with VOCALOID voicebanks; Miku NT is the only usable voicebank to date
Harder to tune in
Missing parameters such as pitchbend sensitivity
Plugins are not compatible
youtube
SynthesizerV Pro
(Song: Underworld by niki (reverse); SVP and Tuning by PixPrucer)
This is the complete version of SynthesizerV Basic. It has suppressed VOCALOID in every way possible; from having insanely good AI voicebanks, to a multitude of features, this is probably the best paid vocal synthesizer available for purchase as of now. Honestly, I could only find a few downsides to this software because it’s that good, and one of them is more of a personal preference than a major issue. YAMAHA seriously needs to take notes from Dreamtonics.
Pros:
The synthesizer and voicebanks are much cheaper than any of the VOCALOID engines
Comes with Mai; an amazing female vocalist
Piano roll tuning
Auto-pitch tuning makes the pitchbending process much easier
Paid voicebanks come with THREE activation codes so they can be used on multiple devices
Allows scripts (basically plug-ins but for SynthesizerV)!
Cross-Lingual Synthesis; allows Japanese voicebanks to sing in English, English voicebanks to sing in Japanese, etc
Really complex phoneme customization
Vocal modes for full A.I. voicebanks
The audio to midi tool we’ve always wanted for VOCALOID; it turns wav. files into an amazing SVP (I know V3 has the Vocalshifter plugin… but it’s kind of trash in my opinion as it only works with Japanese lyrics and goes crazy with trying to copy the vocalist’s tone rather than just the pitchbends)
Frequent updates!
Cons:
As the voicebanks are ultra realistic, it’s not the best for those who enjoy more robotic voices, as seen in UTAU and VOCALOID
Crashes every now and then
Still no glottal effects
youtube
ACE Studio

(Image Source: https://support.acestudio.ai/article/62-3-2-the-main-ace-studio-screen)
ACE Studio is a newer AI vocal synthesizer. Like DeepVocal, it features characters that originated from other softwares such as Namine Ritsu, Luo Tianyi, Kurobousuku, Yuezheng Longya, and many others. It also has a heavy emphasis on Chinese vocals. Most importantly, Ace Studio had a mobile version called Pocket Singer!
Pros:
Piano roll tuning
Can cross-synthesize voicebanks to your liking to make your own vocal synth (Pocket Singer has a simple yet cute OC maker)
Simpler pitch editing
Cons:
Subscription based model on both platforms
Some of the voicebanks sound too similar to each other
Pitch editing on a phone is not fun
The phone number sign-in thing is a pain… why don’t these guys have my regional phone code as an option?!
One of the developers was exposed as a pedophile and proshipper; and some of the voicebanks used A.I. artwork; I personally don’t feel comfortable using a software made by people like this… ew
youtube
I’m just going to say it; SynthesizerV Pro is probably your best pick here, in terms of both price and versatility. You get so much out of this editor at a good cost, and it’s super easy to use! However, if you prefer robotic voices and can get your hands on it, then go with VOCALOID4 as it's pretty beginner friendly. If V4 is not an option, then you may have to deal with V6.
Now, even though the latter software is not as easy to use as the former, a new lightweight singing editor designed for V6 and V5 called TuneLab has been recently released! It allows for piano roll tuning, along with better cross-synthesis usage. I will cover this software in a later post as I am still trying to learn the ropes of it.
Finally, as I have stated in my other post, take my statements with a grain of salt. Pick whatever synthesizer you want based on your interest; whether it is a fun feature or a specific singer you like.
Hope this helps! In my upcoming post, I will recommend some VOCALOID voicebanks that are easy to use for beginners.
#Youtube#vocaloidproducer#vocal synth#vocaloid#music production#vocal synthesizers#synthv#synthesizer v#ace studio#piapro#crypton#hatsune miku#kagamine len#fukase vocaloid#vocaloid miku#miku#i know this is long im sorry for wasting your time#long post#vsynth#guide#fukase#len#yamaha
9 notes
·
View notes
Photo
XP PEN REVIEW
I’ve been testing out the Artist 10 2nd Gen tablet sent to me by XP-PEN!
Note, I have previously only used screenless tablets so that will be my point of comparison. I’ll mainly just share my thoughts, likes, dislikes, aspects that stuck out to me.
What I liked
Tablet set-up is pretty simple. Just plug it in, download+install the latest driver(for Artist 10 2nd Gen) on the XP-Pen website, then turn on the tablet. (btw I use Windows, not sure what the experience is like for mac users)
Clear resolution
I liked how smooth and natural it felt to draw with the pen. There wasn’t any point where I felt that it lagged (while in display mode)
The shortcut keys and especially the artist glove (prevents your skin rubbing against the screen)
Customizable screen settings: I liked being able to watch a video full screen on my laptop while drawing on the tablet. And it was easy to set up! Usually with my screenless tablet I just squeeze the browser and sai into one screen.
Warning: Take care of any unsaved canvases before starting driver installation.
When downloading the driver you will see an .exe file to install. When you click that file and give permission to make changes, it automatically closes any graphics program you have open. After that, a window appears with a warning that reminds you to close them, even though it already closed the programs for you. I found this strange since other softwares that give this type of warning always let me pause to close the programs myself. Luckily sai 2 has a recovery function!
Pen Tablet/Display Mode
The tablet also comes with a “pen tablet” mode that turns off the display and lets you use it like a screenless tablet. I think it works okay, however, something that bugged me is occasionally the cursor would lag before registering that I was moving the pen.
(Note: if you previously used smaller screenless tablets(like me), this mode may feel jarring to use at first due to the different dimensions.)
Size & Portability
It’s among the smaller options for a display tablet, but part of that is for portability. Normally you need to plug an HDMI and USB adapter into your computer to use this tablet, but you can also connect it to a smartphone and take it anywhere. However, I cannot judge that feature as it requires a USB-C cable sold separately.
Regardless, I appreciate how easy it is to hold and handle, it reminds me of doodling in a notebook. It’s also a bit more convenient for me since it doesn’t take up too much space on my (very crowded) desk.
If you’re a beginner or a screenless tablet user looking to get a display tablet:
This does not come with a stand. I would suggest getting one for convenience and to help maintain proper posture while drawing and prevent back and neck issues. With a display tablet, there’s a tendency to hunch over while drawing.
The actual screen you draw on is approximately 9 x 5 inches. This can make make drawing feel cramped. (While it is a bigger drawing space than my Intuos draw, I had grown accustomed to staring at a larger computer screen while drawing.) Eventually the space felt less restrictive as I got used to drawing on it
The parallax (distance between pen nib and cursor) is very minimal, but it becomes more noticeable with the small screen size if you’re trying to sketch out a full image or body without zooming in
Overall thoughts
Pretty good. I had fun drawing on this. I’d recommend it as a simple, portable, and affordable option for a display tablet (right now it’s on sale until 02-20-23)
125 notes
·
View notes