#shining nikki headers
Explore tagged Tumblr posts
Visit Tumblr Blog
Explore Tumblr blogs with no restrictions, modern design and the best experience.
Last Seen Tumblr Blogs


Fun Fact
Post activity is at the highest at 4:00 pm EDT; notes peak at 10:00 pm EDT.
Text


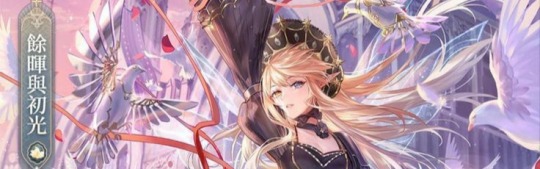
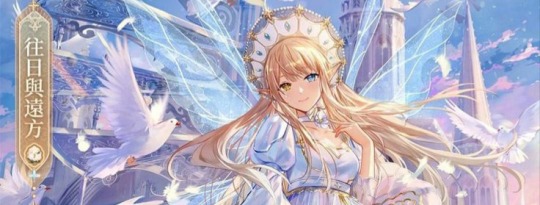
requested by 🌨️☄️anon: Qin Yi x Mercury x Vulture headers with themes of ice
#. i've defeated the witch's henchman too . fulfilled request .#shining nikki edit#shining nikki kin#shining nikki headers#headers#qin yi#qin yi kin#qin yi headers#mercury#mercury kin#mercury headers#vulture#vulture kin#vulture headers#🌨️☄️anon
13 notes
·
View notes
Text

Tutorial - Extracting the assets from Shining Nikki for conversion for Sims games (or anything, really)
Finally! In advance I'm sorry for any errors since english isn't my first language (and even writing in my actual language is difficult for me so)
And first, a shoutout to The VG Resource forums, where I found initially info about this topic 😊 I'm just compilating all the knowledge I found there + the stuff I figured out in a single text, because boy I really wanted to find a guide like that when I first thought about converting SN stuff lol (and because there's a lot of creators more seasoned than me that could do a really good job with these assets 👀)
What this tutorial will teach you:
How to find and extract meshes and textures (when there's any) for later use, and some tips about how stuff are mapped etc on Shining Nikki.
What this tutorial will not teach you:
How to fully convert these assets for something usable for any sims game (because honestly neither I know how to do that stuff properly lol). It is assumed that you already know how to do that. If you don't know but has interest in learning about CC making (specially for TS3), I'd suggest you take a look at the TS3 Tutorial Hub, the MTS tutorials and This Post by Plumdrops if you're interested in hair conversion. Also take a look on my TS3 tutorials tag, that's where I reblog tutorials that I think might be useful :)
What you'll need:
An Android emulator (I recomend Nox)
A HEX editor (I recomend HxD)
Python and This Script for mass editing
AssetStudio
A 3D Modeling Software for later use. I use Blender 2.93 for major editing, and (begrudingly) Milkshape for hair (mostly because of the extra data tool).
Download everything you don't have and install it before starting this tutorial.
Now, before we continue, a little advice:
I wrote this tutorial assuming that people who would benefit from it will not put the finished work derivative from these assets behind a paywall or in any sort of monetization. These assets belong to Paper Games. So please don't be an ass and put your Shining Nikki conversions/edits/whatever behind a paywall.
The tutorial starts after the cut (and it's a long one).
Step 1:
Launch Nox, then open Play Store and log in with a Google account (if you don't have one, create it). Now download Shining Nikki from there.
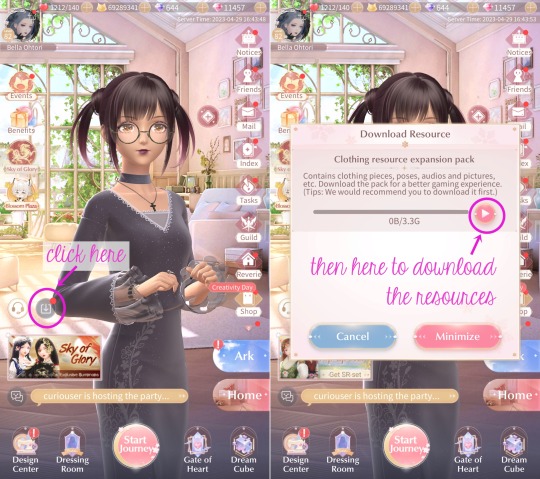
After downloading the game, launch it. It will download a part of the game files. After that, log in on the game, or create a new account in any server (the server is only important if you want to actually play the game. For extracting it doesn't really matter since the game already has the assets for the upcoming events and chapters. It also doesn't matter if you actually own an item in game, you can extract the meshes and textures even if you don't have it in game). If you're creating a new account, the game will lead you through the presentation of it etc (unfortunately there's no way to skip it).
After that, click on that little arrow button on the main screen. There, you can download the actual clothing assets. Wait for the download to finish (at the date I'm writing this tutorial, it is around 13GB). When finished, close the game (not the emulator).
Step 2:
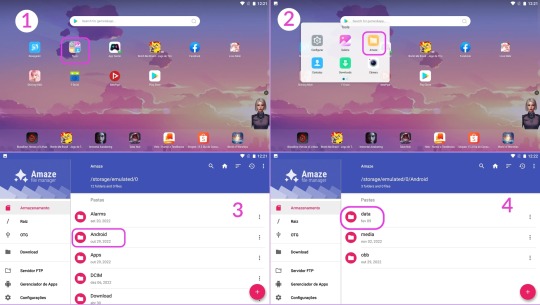
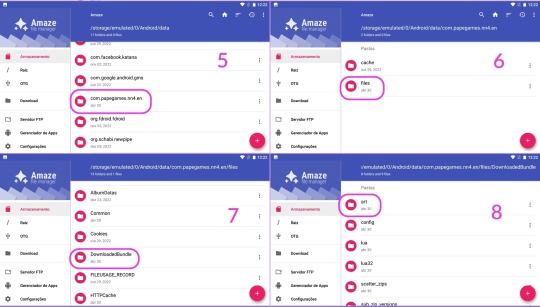
Now we're going to copy the assets to our computer. Click on Tools, then on Amaze File Manager. Navigate to Android > data > com.papergames.nn4.en > files > DownloadedBundle > art > character. This is the folder where (I believe) most of the assets are stored.
Now, where the stuff is located respectively:
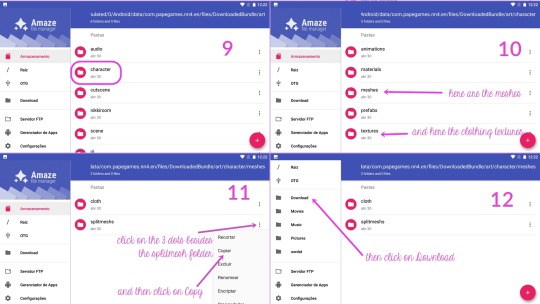
Meshes are on the meshes > splitmeshs folder
Textures are on the textures > cloth folder
Tip: Want to really data dump everything? Just select the folders you want and copy to your PC! 😉
Click on the three dots on the side of the wished folder, then in copy. Then click on the three lines on the left upper corner to open the menu, and then click on Download. Now just pull the header of the app to show the Paste option and click on it. It might take a while to copy completely (the cloth folder might take longer since it's bigger, so be patient).
If you're confused, just follow the guide below:

The copied folder will be located at C:\Users\{your username}\Nox_share\Download
Step 3:
Now that we got the files, we need to make them readable by AssetStudio.
For this, we need to open the desired .asset file on a hex editor, and then delete the first 8 bytes of the file, and then save.
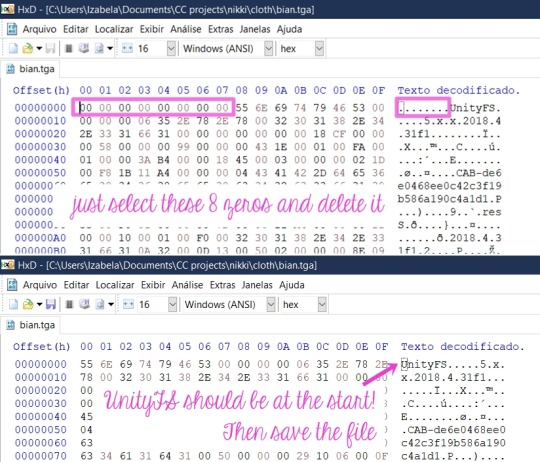
You can see it is a pain to do that manually to a lot of files right? This is why I asked my boyfriend to create a script to mass edit them. (I only manually edit when I'm grabbing the textures I want, because afaik the script won't work with .tga and the .png files, more about that forward this tutorial)
How to use the script:
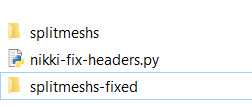
Make sure Python is already installed, grab the nikki-fix-headers.py file and place it on the folder where you copied the folder from the game (mine is still the Nox_Share Download folder).
It should look like this, the meshs folder and the script.

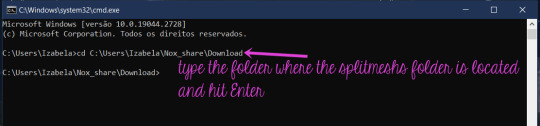
Let's open the Command Prompt. Hit Windows + R to open the Run dialog box, then type in cmd and hit Enter.

Now follow the instructions pictured below:

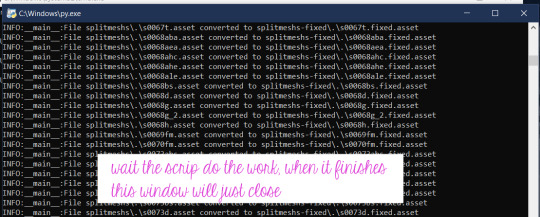
The folder with the edited files will be at the same location:
Now, we finally can open it all on AssetStudio and see whats inside 👀
Step 4:
Open AssetStudio. Now click on File > Load Folder and select the folder where your edited meshes are (mine is "splitmeshs-fixed"). Wait the program load everything. Click on Filter Type > Mesh, and the on the Asset List tab, click twice on the Name to sort everything by the right order, and now we can see the meshes!
To extract any asset, just select and right-click the desired groups, click in Export selected assets and select a folder where you wish to save it.
Stuff you need to know about the meshes:
Step 4-A: Everything is separated by groups.
Of course you'll have to export everything to have a complete piece. Only a few pieces has a single group. When exporting, you have to select every group with the same name (read below), and the result will be .obj files of each group that you have to put together in a 3D application.

Step 4-B: The names are weird.
They're a code that indicates the set, the piece, the group.
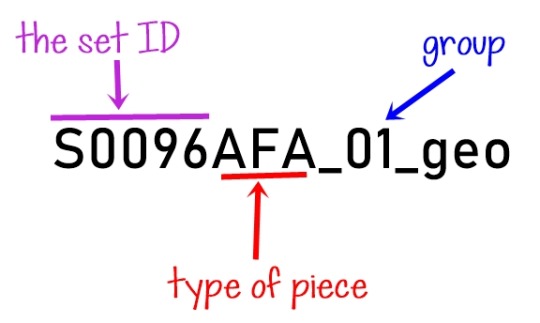
Items that doesn't belong to a set won't have the "S...something", instead they'll have another letter with numbers, but the part/piece type and group logic is the same.
As for the parts, here are the ones I figured out so far:
D = Dress
H = Hair
AEA = Earrings
ANE = Necklace
BS = Shoes
ABA = Handheld accessory
AHE and AHC = Headpieces/hats/hairpins
AFA = Face accessory (as glasses, eyepatches, masks)
(maybe I'll update here in the future with the ones I remember)
Step 4-C: The "missing pearls" issue.
Often you'll find a group that seems empty, and it has a weird name like this:

I figured out that it's referent to pearls that a piece might contain (as in a pearl necklace, or a little pearl in a earring, pearls decorating a dress, etc). The group seems empty, but when you import it to Blender, you can see that it actually has some vertices, and they're located where the aforementioned pearls would be. I think that Unity (SN engine) uses this to generate/place the pearls from a master mesh, but I honestly have no idea of how the game does that. So you'll probably have to model a sphere to place where the pearls were located, I don't know 🤷♀️ (And if you know how to turn the vertices into spheres (???) please let me know!)
Step 5:
Now that you already extracted a mesh, we're gonna extract the textures (when any). Copy the textures > cloth folder to your PC like you did with the splitmeshs folder.
Open it, and in the search box, type the name of the desired item like this. If the item has textures, it will show in the results.

Grab all the files and open them in HxD (I usually just open HxD and drag the files I want to edit there), and edit them like I teached above. Then you can open them (or load the cloth folder) on AssetStudio, and export them like you did with the meshes.
Stuff you need to know about the textures, UV map, etc:
Step 5-A: The UV mapping is a hot mess (at least for us used to how things works in sims games).
See this half edited hoodie and the UV map for a idea:
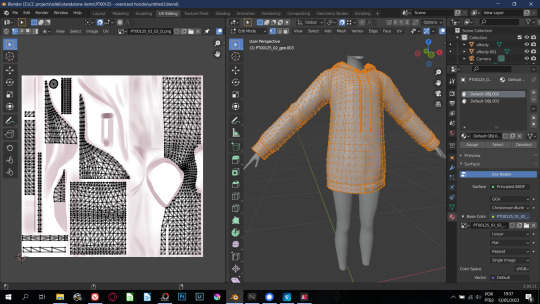
So for any Sims game, you'll have to remap everything 🙃 Also, stencil-like textures all have their own separated file.
As for hair, they all use the same texture and mapping! BUT sometimes they are arranged like this...

Here's the example of a very messed one (it even has some WTF poly). Most of them aren't that messy, but be prepared to find stuff like this.
Shining Nikki just repeat the texture so it end up covering everything, for Sims you'll need to remap, and the easiest way is by selecting "blocks" of hair strands, ticking the magnet button to make your seletion snap to what is already placed (if you have familiarity with blender, you know what I'm saying). Oh, some clothes are also mapped with the same logic.
Regarding the hair texture, I couldn't locate where they are, but here is a pack with all of them ripped and ready to use. You can also grab the textures from any SN hair I already converted :)
The only items with a fine UV map are the accessories, at least for TS3 that the accessory has a UV map independent from the body.
"But I typed the ID for the set and piece and couldn't find anything!"
A good thing to do is to search with only the set ID and edit all the files with it, because some items (especially accessories) share the same texture file. But if even then you can't find anything, it means that there's no texture for this particular item/group because Shining Nikki use material shaders* to render different materials like metal, crystal, some fancy fabrics, etc. So you'll have to bake or paint a texture for it.
*I believe that those shaders are located on the other cloth folder in the game files. This one is way bigger than the other one and once I copied it to see what it was, AssetStudio took ages to load everything, almost used all my 16GB of RAM, and then there was only code that the illiterate me didn't know what it was 🤷♀️

So that was it! I hope I explained everything, although it is a little confusing.
If you have any questions, you can comment on this post or send me a PM!
#sims 3 tutorial#converting stuff for sims#honestly idk what else to tag#reblog so your fave cc creator sees this!#sims 3 how to#sims 3 cas tutorial#sims 3 clothing tutorial#sims 3 hair tutorial
26 notes
·
View notes
Text

competition entry for ‘wonderland adventure’ | top 35%
sanrio collab finally giving me the cute pastel background i’ve always wanted, it looks especially nice with this filter
#shining nikki#shining nikki styling competition#in the original one with the header the tiny cinamoroll got blocked T_T
2 notes
·
View notes
Text


shining nikki hestia layouts
fav & reblog if use
#anime layouts#game layouts#anime messy headers#anime messy packs#love nikki#shining nikki#hestia#shining nikki hestia#shining nikki icons#nikki 3d#softcore layout#softcore#webcore layout#webcore#messy icons#messy layouts#messy packs#anime packs#anime icons#anime headers#anime messy layouts#anime#game#3d#twitter pack#twitter layouts#twitter icons#twitter messy icons#twitter messy layouts#soft layouts
79 notes
·
View notes
Text
Change my blog header because I post a lot of Shining Nikki stuff here so I wanted my blog to reflect that, but I'm kind of attached to the ace Futaba header so I might change it back sooner or later. It stays for now though
1 note
·
View note
Text
1956 Chevy 210 Post with 54,000 original miles packs more punch than you realize
“I found the car posted on Craigslist.” So says Pat Nevin. “It was located up in Northern California at a Honda dealer car sales showroom. It looked exactly like what I was looking for so I made arrangements to drive up and have a peek. Naturally, I had a trailer hooked to my truck in case we could make a deal. Well, we made a deal. When I was reviewing the paperwork for the title transfer I noticed it was currently owned by Steve Moal.
“I’m not so sure of the exact history of where the car came from but I do know some of those who owned the car before me. John Stimic had the car first for a few years and installed the LS1 and 4L65-E transmission. Then a man by the name of Jackie Howerton (of Sprint Car fame and builder also known for the heavy hand in the ‘Indy Speedster’ that won the AMBR in 2011) persuaded John to sell him the car. Jackie too owned the car for a short few years until he sold it to another guy who just had to have it … Steve Moal. Fortunately for me he was onto other car interests and this one could be mine for just the right price.
“Having recently transplanted myself from the Sacramento area to Southern California in 2016, I happened to have a chance meeting in the city of Orange when I noticed the name Shine Speedshop next to another company I was paying a visit. I walked in and was met by Nikki Shine who then introduced me to her husband, Jimmy. A quick eyeball over the 1956 with Jimmy and we were both bouncing ideas like it was a racquetball court. I was adamant about maintaining the integrity of the car but also exercise some ideas I’d been thinking about for years. I affectionately call this car ‘Grandma.’ Jimmy seemed to know from the word ‘go’ what I had in mind and was eager to share my vision … this was my plan.
“I’m very much a fan of big power and performance, which makes my aspirations for this car no different than any of my other hot rods, but I did want to preserve the ‘real patina’ of the original paintjob (well it does appear to have been repaired but mostly original and is the charm of the vehicle). I really liked the sleeper aspect of the car but I’m a hot rodder, so what do you know we opted to maintain the ‘poverty’ hubcaps and modify the rear suspension to handle the power I planned to run through it. I talked to Mike at Chris Alston’s Chassisworks and decided a four-bar coilover shock was the right combo. The Shine crew got busy with measurements for the rearend to run both the ‘steelies’ but also some original Halibrand gasser-style mag wheels. Cars are like a pretty girl who just needs to change her shoes from time to time. So the crew designed the rearend to accept both and the shallow dish steelies that attach via a billet bolt on spacer on overkill for power. We took action and placed the actual rims and tires in the wheelwell and decided for proper clearance to move the rearend back 1 inch. The fuel tank was also moved rearward. Mini-tubs were carefully cut into place and then painted the factory color without disturbing the tire jack original directions. Battery relocated from the engine bay to under the rear package tray was then concealed behind a composite board header panel.
“The car was sent to Superior Automotive Engineering for some improved breathing, big cam, Chevrolet Performance Lingenfelter CNC ported heads, roller rockers, and also a 3,600-rpm stall converter. Tad Bansuelo ran up on the chassis dyno for the final tune. Upon return, the SSS crew, under the guidance of Rich Waitas and MagnaFlow, built the 3-inch stainless steel X’d exhaust system that exits under the corners of the rear bumper. All good but for added fun I wanted to keep the idea of the ‘Grandma’ at heart so I asked if we could put a ‘puffer pipe’ pencil tip exhaust hanging out the back for that six-cylinder appearance. The cherry on the top was to attach it and actually make it function, hence the puffer pipe, but also a block-off plate when I decide the gag has worn off (it hasn’t as yet). Pacific Coast Powder Coating did the titanium ceramic on the headers and the black on the exhaust system.
“The engine makes plenty of power and I like the LS1 but aesthetically they are lack luster. We chose to utilize some vintage Chevrolet script valve covers and reposition the coil packs underneath with the leads exiting and dropping right to each cylinder. Now we’re getting close but still not a homerun yet. The engine bay was quite literally “littered” with the controllers and needed wiring but it too was ugly. I had come across a 1966 Oldsmobile air cleaner for sale and thought it might be the ticket, as we needed an appropriate place for our electrical to be mounted. The SSS guys liked the idea so the air cleaner was mounted to the manifold and was perfect for all the controllers and easy access with only the wing nut to get inside. I thought the ‘Duntov Experimental LS DIV’ wrap on the cover was fun, so we did it. John ‘Harpoon’ Haprov did the lettering on the valve covers along with some other painted areas that needed to be addressed … thanks John! The 90mm throttle body is still loud and proud with the fresh air snorkel through the core support but was blacked-out so not to distract the eye … but still not hidden.
“There are 54,000 original miles on it to date.
“The interior is stock and original down to the driver side–only sunvisor, black and white seat cover, rubber floormats, no rear seat, and factory radio delete plate. Behind the plate is the control panel for the N.O.S. and the hit switch hanging on a telephone cord. There’s an early Sun tach mounted on the column with an MSD adapter to trigger.
“The next stop since only recently hitting the streets is a trip to ‘Camelot’ . . . not that one of shining armor folklore but the amusement park of the ’80s whereas kids we’d go to pick fights (street race) with our machines, who remembers that? Probably get super busted for it now and have my lunch money taken away … oh well, what does this red button do?” SRM
The post 1956 Chevy 210 Post with 54,000 original miles packs more punch than you realize appeared first on Hot Rod Network.
from Hot Rod Network https://www.hotrod.com/articles/1956-chevy-210-post-54000-original-miles-packs-punch-realize/ via IFTTT
0 notes
Text
Nikki; with Costa Rican national futbol team player Kendall Watson
Ricky; with Costa Rican national futbol team player Kendall Watson
COSTA RICA FUTBOL AND FORTITUDE
A week to remember… and one we wish we could forget
This week has been a difficult one; in line with the recent natural disasters that maimed areas of the United States, Puerto Rico, Dominica, and Martinique, Costa Rica–together with its Central American neighbours–weathered one of the region’s most violent attacks. Tropical Storm Nate brought high winds, floods, and mudslides; it took roads, homes, livelihoods, and lives.
This week has also been a united one as Ticos from all over the country accepted the destruction through acts of courage, support, and goodwill. Our eyes and ears have been glued to Teletica (the local news station) and La Nacion (the local newspaper) in order to absorb stories of kindness aimed to lift everyone’s spirits and serve as a reminder of national pride.
Schools closed, businesses stopped operating, and time seemed to standstill.
But, “pura vida” persevered.
By Saturday, focus shifted momentarily from the national emergency to the upcoming World Cup qualifying futbol match between Costa Rica and Honduras that was scheduled for the evening. Arguably the most future-defining game of the year (as either a game win or a game tie would enter the team into the competition), there was a lot riding on its outcome. Given the unpredictable and unprecedented changes that stunned the country days before, Ticos from Guanacaste to the Osa to Limon craved normalcy. Fortunately, in Costa Rica, nothing screams convention and habit like watching and cheering for la sele (the national team selection), so the game couldn’t have come at a more impactful time.
In Costa Rica, futbol isn’t a sport–its a spirit. When an intruding outside force as uncontrollable as a tropical storm swings for the knock out, futbol is the inner force that lifts Ticos up and wills them to keep fighting.
Fast forward to the moment when Kendall Waston scored a goal with less than two minutes to go at the end of the game to tie Honduras; with one swift header, he secured a spot for himself, his teammates, and the entire nation in Russia’s World Cup set for 2018.
And, in that moment, the country erupted with elation. Fans in the stadium cheered. People in the streets screamed. Viewers watching at home cried (Ricky and I included). We all sighed with relief. Once again, there was joy, understanding, and belief in Costa Rica.
To everyone who lost something or someone irreplaceable due to the events of this week, a futbol game will offer little comfort; however, love and solidarity heal hearts. Our hope for you is that today’s unity threaded between your family, friends, neighbours, community, and country will make for a stronger and more tolerable tomorrow.
To la sele and your loved ones (especially goal-scoring Kendall Waston–a kind and humble guy who we have met on two separate occasions), felicidades! The qualification is well-deserved, and no doubt, appreciated by everyone you seek to represent when you don your jersey. During one of the darkest weeks in this country’s history, we thank you for shining a light.
Pura vida! 🙂
https://costaricatravelblog.com/?p=179570&preview=true
Costa Rica’s World Cup Qualifying Game Shines A Light On One Of The Country’s Darkest And Most Destructive Weeks COSTA RICA FUTBOL AND FORTITUDE
#costa rica#costa rica weather#costa rican culture#culture#futbol#nate#pura vida#soccer#sport#sports#tropical storm#tropical storm nate#weather#world cupc
0 notes
Note
May I request a ship pairing header of Qin Yi, Mercury and Vulture from Shining Nikki? With themes of ice? If that's too many characters, then, just Qin Yi and Vulture
As typical, this is for a friend, ❤️🤍, - 🌨️☄️
Good to see you again, snowroid! ^^ The headers are posted!!
0 notes
Text


requested by @/ozeca: Vulture x Qin Yi headers
#. i've defeated the witch's henchman too . fulfilled request .#shining nikki edit#shining nikki kin#shining nikki headers#headers#vulture#vulture kin#vulture headers#qin yi#qin yi kin#qin yi headers#fashion polycruel
31 notes
·
View notes
Text


event prize ~ requested by @/ozeca: Qin Yi headers with themes relating to Banica Conchita and red
• Do not tag as kin/me/ID unless you’re the requester! •
#. twin rabbits . event .#shining nikki edit#shining nikki kin#shining nikki headers#qin yi#qin yi irl#qin yi headers
9 notes
·
View notes