#sims 3 hair tutorial
Explore tagged Tumblr posts
Visit Tumblr Blog
Explore Tumblr blogs with no restrictions, modern design and the best experience.
Last Seen Tumblr Blogs


Fun Fact
Tumblr Inc. is using 66 technologies for its website.
Text

this was requested by @chrissybrown1127, who was struggling to retexture skysims 050, which, like many skysims hairs, does not actually have a gray recolour for elders. so, here is a tutorial for how to make your hair retexture have elders go gray!
it was particularly intended for chrissy, who does struggle with tutorials and prefers visual learning. the hair that i retextured for this can be found here. and for people who struggle to retexture my volatile bases, the process is exactly the same for them as it is for this 🎊
TUTORIAL: GOOGLE DOCS | PDF 👱🏻♀️
if there are any tutorials that you need and feel i can provide, lmk! i'm still learning myself, so there's probably a lot of easier ways to do the things i do than my ways 🥰
79 notes
·
View notes
Text
Sims 2 Databases Database
(Alright it's an index, I just had to)
Made it for myself, I might as well share. If there's something I've missed please let me know. This list is being updated, Tumblr is being a pain and updates won't show up on re-blogs. Visit the original post to view the most current version. Mirror: Dreamwidth.
CC:
By Type:
Sims 2 - Object Default Database [Discontinued - DW].
Sims 2 - Object Default Database [Active - Spreadsheet].
Sims 2 - [CAS] Default Database.
Sims 2 - Hair Database.
Sims 2 - CC: Afro Hairstyles.
Sims 2 - Shoes Database.
Sims 2 - EA Store Items 2016.
Sims 2 - The Maxis Match Repository Project [CAS] [Pinterest Ver.]
Sims 2 - Repository Finds [CAS&Objects] [sorted into categories].
Sims 2 - Functional Finds [Sorted by function].
Resource list: Clutter and decorative items [massive index at GoS].
Sims 2 - Wall Hanging Decor Recolors Database [New!].
Sims 2 - Lot Database [Maxis ones emptied out].
Sims 2 - Lot Makeover Database [of Maxis Lots] [Note the Uploading Tutorial].
SkyBox/Horizons/Skylines Database.
Maxis Career Conversions TS1+3+4 to TS2 [Sorted by Game&EP - Under Downloads].
Fractured Moonlight's Stone Super Set Database [Creator Unknown, let me know if you know].
By Theme:
List of Maxis Lost & Found Objects Converted into Usable Items.
Stories to Sims 2 Conversion Database. [DW Backup]
TS1 to TS2 Conversion/Recreation Database.
TS1 to TS2 Catalog Conversions [Active, Includes OG Object Descriptions].
TS3 to TS2 Conversion Database [DW Backup].
TS3 to TS2 Traits Project Mod Tracking Sheet [Blog Ver.]
TS4 to TS2 CAS Conversion Archive [EA].
TS4 to TS2 CC Clothing Conversion Database [Custom - ts4 only?].
TS4 to TS2 Build/Buy Conversion Database [EA].
TS4 to TS2 CC Build & Buy Database [Custom].
The Sims spin-off games to the PC TS2 [&3+4].
TSM-to-TS2 Conversion Database [DW Backup].
Sims 2 Historical Finds [CAS&Objects] [Sorted by Era/Period].
Historical Sims 2 Wiki [New!].
Grunge Masterlist Project 2025.
List of Asian Sims 2 Sites With Working Downloads [As of 2017?].
CC Archives:
Sim Archive Project, at The Internet Archive [Introduction Post].
Sims Cave.
Sims Graveyard.
Simblr.cc - Dead-Site Repository.
Liquid Sims - Community Archives.
The Booty, at PSMBD.
Sims 2 Packrat, on Tumblr [Watch out for the recent SFS Hacking problem].
Ekrubynaffit (a.k.a bestbuild4sims) has re-uploaded a lot of archives of defunct creators. Albums with DL on her pinterest. Mainly build and buy mode, thanks a lot!
Resources:
CEP-Extras List, Huge Lunatic at Sims 2 Artists.
The Sims 2 Tutorials Database [Active] (Really needs a backup outside of Tumblr).
Several Lists of Maxis Resources for Modding,Pick'n'Mix Mods, own website, under Notes.
Sims 2 GUID Database Revival (Yes I'm shamelessly promoting it).
Sims 2 Trait GUID Database, by FireFlower.
Sims 2 Painting Sizes Database.
List of all Color Actions, With DL, ZeroDark/Graphic at GoS.
List of all WSO Actions, by Blue Heaven Sims, under Resources.
List of Hacks & Mods That Use Tokens, Bulbizarre at MTS.
Giant List of Simlish Fonts - Collect ‘Em All!, by franzillasims.
Masterlists of Recolouring Templates; MTS [+Cloning] | Hafiseazle | ZreoDark [not a list but a tag].
Index of Effects Names & Definitions [+ Guide], by AmmarAskar at GitHub.
Update notes are under the cut:
Update: Custom Clothing Conversion db [4t2], by @brandinotbroke/ Hair db, by @krabbysims/ Sims 4t2 CAS Conversion Archive [EA], by @mdpthatsme/ CEP-Extras List, by @hugelunatic/ Lists of Maxis Resources for Modding, by @picknmixsims/ Sims 2 Tutorials db [Active], by @sims2tutorials/ Sim Archive Project at The Internet Archive, by various - see @simnostalgia. Update 1: added EA ts2 store items at GoS/ Painting sizes db/ Tutorials db, by @sims2tutorials. Update 2: GUID db Revival. Update 3: believe it or not, there's more - Shoes db/ Sims 2. Functional Finds [sorted by function], by @sims2functionalfinds. Update 4: Resource list: Clutter and decorative items, at @gardenofshadowssims. Update 5: added archives section. Update 6: added @ekrubynaffit's Pinterest Archive. Update 7: Fixed TSM link, added Stories db/ Afro Hairstyles db, by @letomills/ SkyBox/Horizons/Skylines Database, by @simmergetic/ Grunge Masterlist Project 2025, by @pixeldolly/ and DW backup links (Everything that's exclusively on Tumblr/LJ should be backed somewhere else). Update 8: List of Asian Sims 2 Sites With Working Downloads [as of 2017?] by @0201-sims. Update 9: added Sims 2 Repository Finds [sorted into categories], by @sims2repositoryfinds. Update 10: added Sims 2 Object db [Discontinued], because the more the better. Update 11 Yet another (!): The Maxis Match Repository Project [CAS], by @whattheskell [how did i forget?]/ TS3 to TS2 Traits Project Mod Tracking Sheet, by Rowena Sims & @noodlebelli. Update 11: Maxis Career Conversions TS1+3+4 to TS2 [Sorted by Game&EP - Under Downloads], by @sims2idea-lientebollemeis2i. Update 12: HS I found another one: List of all Color Actions - Names, Creators, and Download Links. Maintained for over a decade by @zerographic at GoS :P Update 13: separated by type & theme. added Sims 2 Historical Finds [CAS&Objects] [Sorted by Era/Period], by @ts2history. Update 14: added to resources Trait GUID db, by @fireflowersims. Update 15: I shit you not, there's more - Sims 2 Lot Makeover db [Maxis Lots], by @ts2lotmakeoverdb/ List of Hacks & Mods That Use Tokens, Bulbizarre at MTS/ TS1 Catalog Conversions [Active], by @kitteninthewindow/ WSO Action Masterlist, by Blue Heaven Sims under Resources. Update 16: List of Maxis Lost & Found Objects Converted into Usable Items, @kirlicues. Update 17: Sims 2 Lot db [Maxis ones emptied out], by @mikexx2 @mrsktrout @ts2lots. Update 18: Historical Sims 2 Wiki [New!], by @theacmecatalogblog. Update 19: under archives; Simblr.cc - Dead-Site Repository by @simblrcc-site. Jackpot! Update 20: added Giant List of Simlish Fonts - Collect ‘Em All!, by @franzillasims. Update 21 [can't believe there's more]: Masterlists of Recolouring Templates; MTS [+Cloning] | @hafiseazale | @zerographic [not a list but a tag]. Update 22(!): Index of Effects Names & Definitions [+ Guide], by AmmarAskar at GitHub. Update 23: added Sims 2 - Wall Hanging Decor Recolors Database [New!], by @sims-for-semi
#ts2#sims 2#the sims 2#resources#ts2 resources#ts2 database#ts2cc#ts2 cc#ts2 download#sims 2 cc#the sims 2 cc#sims 2 download#the sims 2 download#the sims 2 resources#tagging is a bitch#sims 2 database#the sims 2 database#sims 4t2#sims 3t2#sims 1t2#1t2#3t2#4t2#ts2 defaults#sims 2 default replacement#GUID Database#The Sims 2 GUID Database#ts2 archive#ts2 archives#sims 2 archives
2K notes
·
View notes
Text


krøller & bølger hair pack
more info and download under the cut.
A hair pack with 4 new curly and wavy meshes bc I'm obsessed with getting better at these styles... still didn't manage to achieve exactly what I want but I think I've gotten closer, and they are nice looking regardless. So here you have them!
info:
࿔ base game compatible ࿔ 4 hairs, new meshes ࿔ hat compatible ࿔ HQ compatible ࿔ masc frame, enabled for fem frame, disallowed for random* ࿔ teen-elder ࿔ all LOD’s ࿔ 40 swatches - 24 EA'ish + 16 custom ࿔ high poly :/ una: 21,6k mio: 21,9k esben: 22,5k helmi: 30,9k🥵 (I'll probably make a tutorial in a few weeks on how to lower poly count on hairs yourself in blender. read this post for more info) ࿔ tou: edit/recolor them if you like, just credit me if you share and no paywall.
previews:


DOWNLOAD (SFS)
I hope you enjoy •ᴗ•<3
*I modeled the hairs on the masc frame, so they might not always work perfectly on fem frame sims but I enabled them anyway so you'd have the option. 😆
#ps krøller and bølger just means curls and waves in Danish but i aspire to be cool mysterious and edgy you know#pps they're all named after oc's of mine 🥹#sims 4#ts4#thesims4#my sims#mycc#sims 4 cc#ts4 cc#ts4 hair#showusyoursims
689 notes
·
View notes
Text
About Me/Mobile Navigation
I probably should’ve done one of these a long time ago BUT I’m a procrastinator 😅 finally making one so it’ll be easier to find my cc and other things. I’m Lala, been on tumblr since 2013 but I’ve been playing Sims way longer ❤️ I play Sims 3 only, thinking about getting into Sims 2 again, but maybe on a different blog.
Commissions: I do take commissions and they’re open. Whether from Sims 4 or other games. Hairs mostly, but I’m comfortable with clothes and accessories as well 💕 feel free to message me directly about prices etc. Examples of my previous commissions from TS4 and other games (can't share these by the way so plz don't ask, you cannot buy these either lol)


Requests: I do take requests for the most part if it’s a hair that I like myself or if it’s not and I have free time I’ll do it anyway. My messages and anonymous asks are open 🩷
I am WCIF Friendly so feel free to ask me about anything!
MY STUFF
Downloads
Tutorials
WCIF
MY SIMS
Mya Knox
Sierra Martin
Deandre (no last name) 😂
246 notes
·
View notes
Text
Edit this screenie with me!


This is an unused screenie of Penny Pizzazz and Marcus Flex. Feel free to save the screenshot (Dropbox link below) and follow along with the instructions, or play around with it and do your own thing! I’m going to keep the instructions as simple as possible; hopefully they make sense.
Note: My process is kinda involved, but it’s a relaxing hobby for me. You do not need to do all of these steps! If the process doesn’t bring you joy, don’t bother!
I’m using procreate, but I’m also a photoshop user. You can use any software that has layers and blend modes :)
Instructions and downloads under the cut!
Dropbox link to the screenshot, and overlays!
1. Let’s start with shadows. The first step is to create a new layer. Put the blend mode to “multiply” (this darkens anything you draw on the layer). Then select a soft brush. We’ll start with Penny’s face. Use the eyedropper tool to choose a shadowy color of her skin (hold your finger on the color you want).

2. Decide where the light will be coming from (we’ll be placing it behind them on the top left). Deepen the shadows already made by the game, and add some shadows opposite to where the light will be. Choose a darker color to match each area you’re drawing on (Penny’s hair, her shirt, Marcus’ skin, his sweater).
When you’re finished drawing the shadows, go into your layer and lower the opacity. Less is more!

3. Choose the eraser (set it to soft brush). With a light hand, soften any shaded areas that are too harsh. Basically you want to blend the shadow with the skin using the eraser. You can also use Gaussian blur!

4. Let’s add some background lighting. This will also be our guide as we add bolder highlights in the next steps. Make a new layer and set the blend mode to “add.” Take your soft brush and a yellowy-orange color, and draw some glowy light coming from the top left.
Lower the opacity and take the eraser and erase much of the light on the right side of Marcus, and erase a bit of the light on their skin/ hair/ etc (like we did with the shadows). You can use Gaussian blur here too!
Note about lighting and highlights: experiment with the color of light, because some will look better depending on the environment and the sims skin tones. Because Penny and Marcus have dark skin, a bolder or darker yellow/orange will look much better than a pale yellow.

5. Let’s start adding more highlights! Make another new layer and change the blend mode to “add.” Choose a yellow-orange and paint some highlights on Penny’s hair, her left shoulder, her chest, cheekbone, and the left side of Marcus’ face. I made the image on the left a different color so you can see where I put the highlights.
Lower the opacity, and use the eraser or Gaussian blur to blend.

6. More highlights! Make a new layer and set the blend mode to “overlay.” Overlay lightens while adding color. I use “light pen” for any outlined highlights (the outer left of Penny’s hair, Penny’s shoulder, the left side of Marcus’ face), and I use a soft brush for the rest. Lower with the opacity, and use the eraser to blend.
This is a great time to play around with other highlight colors! I’m sticking with yellows, so I chose a peach color. Note: the red is to show what I drew.

7. We’re going to import a light leak overlay, and set the layer to “screen.” Then take your eraser, and erase any areas where you don’t want there to be too much light (red areas).

Finally, I’ll merge the layers together and bump up the highlights by going to adjustments > curves. Then I’ll add noise, and a vintage dust overlay. Sometimes I do more than this, sometimes less. I also like to draw hair strands and stuff, but that’s a whole second tutorial.
266 notes
·
View notes
Text
how I edit my sims ts3/ts4 screenshots (day-time edition)
A helpful? guide for editing screenshots during the day (this is not so easy for me as i prefer taking screens at night but my sims can't always be in the dark so let us all struggle together ok? ok.) this tut is done in procreate on the iPad.

Before taking screenshots:
Help yourself as much as you can in-game, utilise in-game lighting as shadows/lighting is created for you
Understand good/bad composition and add variety by using different angles to make scenes look interesting
I take LOTS of photos just to end up with 1 or 2 good ones

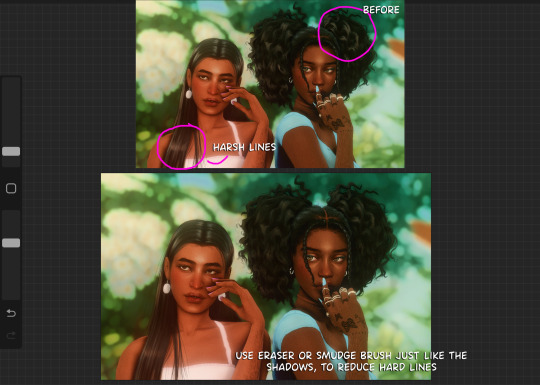
step 1: i would use liquify to smooth out any sharp edges or paint over them

step 2: create new layer, blending mode "multiply" use the colour picker on the area you want to add shadows to, use the selection tool to draw the shadow. you can either colour fill or just shade into the area with the brush. If you colour fill you can then erase lines that are too harsh or use the smudge tool to soften them.


step 3: do this same step but for the clothing. remember shadows are not usually completly black so i use shades of blue to shade her clothes and then shades of green for the tree.


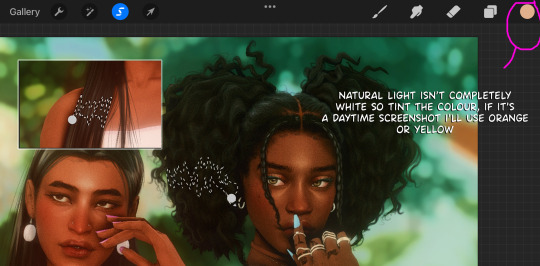
step 4: create new layer, blending mode: overlay. outline the left side of the sim this is to make the light source more prominant. as natural light is not usually just white, i picked a slight orange tint.

step 5: add more lighting to enhance the effect. *create new layer* blending mode: add, and do the same thing as step 4 but with this layer i'll add more lighting to the parts that will be affected most by the light

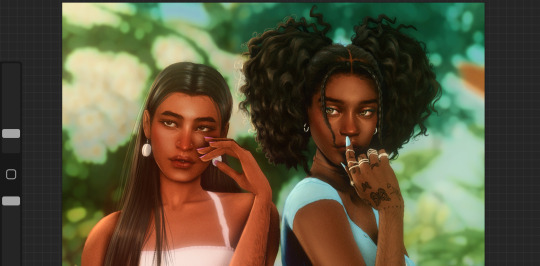
step 6: i edit the hair. you can look here for my in depth hair tutorial
step 7: add lighting effects *create new layer* blending mode: add. i used the default procreate brushes 'flare' and 'glimmer' [found in luminace] to immitate light rays

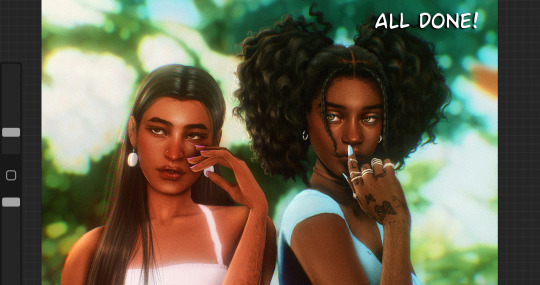
step 8: merge all layers, *duplicate layer* add bloom effect and change opacity and erase parts where bloom is too strong.

step 9: merge again, then go into photshop and colour grade using 'camera raw filter' then 'smart sharpen', use 'topaz labs' effect then done!

if you have any questions feel free to direct them to my inbox & u can check out other tutorials here
204 notes
·
View notes
Text

Fully Underwater Lot Tutorial
@creida-sims @kitkat99
UPDATE January 2025
There is now a much, much easier way to do this. This version of SimPE now includes a tool to change terrain geometry. To edit the terrain in SimPE, go to Tools/Neighborhood/Neighborhood Browser and load your neighborhood. In the Resource Tree, select Neighborhood Terrain Geometry (NHTG) and select the only resource in the Resource List. In Plugin View, click Terrain Editor. It's very intuitive, but basically, you can edit the terrain under a lot to make it be underwater. You can also delete the road with the Road Editor.
I'll keep the old tutorial for archival purposes, but unless you can't or don't want to install this version of SimPE, it is pretty much obsolete.


Some warnings and disclaimers
1. This is not a beginner tutorial. I have tried to explain with as much detail as I can, but still, if you just started playing The Sims 2 I recommend trying out other building tutorials first.
2. I have tested it but there's always a possibility that some new problems will come up. Follow at your own risk. Backup your neighborhoods before trying this. Test it first in a new empty neighborhood.
3. These lots are roadless, so they require specific gameplay conditions to avoid breaking immersion (pun intended).
4. They will behave like normal lots in the sense that sims can walk around and do anything as if they were on land. There's one big problem to consider: when sims go fully underwater, their hair and some parts of their clothing might disappear visually.
So this is more useful for structures that sit above the water, shallow water that doesn't reach a sim's head or, with some modifications, small islands surrounded by water. So unless you want bald mermaids, I don't recommend this for sims that live underwater.
5. If you use Voeille's hood water mod, reflections will look glitchy in lot view, because this is technically not a beach lot. The only solution I found is enabling "Lot view ocean reflections" in RPC Launcher. Otherwise you'll have to deal with glitchy reflections.
6. Before following this tutorial, make sure you know the basics of creating, editing, importing and exporting SimCity 4 terrains. Written tutorial by SimEchoes here, video tutorial by loonaplum here.
Software and mods used
The Sims 2 FreeTime expansion pack (required for the modifyNeighborhoodTerrain cheat)
SimCity 4 (required) Hood Replace by Mootilda (required)
Lot Adjuster by Mootilda (required)
Portal revealer by Inge Jones (required)
Voeille's pond and sea water overhaul and RPC Launcher (optional, see disclaimers)
The Sims 2 Apartment Life and Bon Voyage expansion packs (optional, for "walk to lot/work/school" options)
Cheat codes used
moveObjects on/off
modifyNeighborhoodTerrain on/off
1. Creating/editing a terrain in SimCity 4
1.1. You can edit an already existing terrain or create your own from scratch. In both cases, you need to keep two things in mind: If you want the usable area of the lot to be underwater, such as making houses for mermaids or a coral reef, make sure the water is shallow. No more than a few short clicks with the terraforming tools in SimCity 4. This is because The Sims 2 live mode camera won't go underwater, so making the water too deep might make it uncomfortable to build or play the lot.
If you goal is to build a structure mostly above water, like a ship or an oil rig, you can get away with making the water a bit deeper, but not too much. I've noticed that sometimes the lot terrain tools stop working correctly if there a hill that's too steep.
1.2. Once you've created the terrain, you will need to add a small island on the area where your lot will be. I know it seems contradictory, but trust me, it will make sense. Create and name your city. Use the terraforming tools in city mode to make a tiny island of about 6x2 squares.

1.3. On the island, use the road tool to place a straight road that takes up 4 squares. Then, using the street tool (the last option), place two short streets at each end of the road.
Streets will disappear in TS2, only roads translate to roads in ts2, so why do we place them? Well, placing a street at the end of a road will get rid of the rounded end bit in TS2, which can't be used to place lots. This will be important for the placement of the lot and to make sure the edges of the lot are underwater. If this doesn't make sense yet, don't worry, it might make sense later.
1.4. Save the terrain. Don't exit SimCity 4. Copy your new/edited sc4 terrain from your SimCity 4 folder to your SC4Terrains folder in your Sims 2 documents directory. It is usually
"C:\Users\YOURUSERNAME\Documents\EA Games\The Sims 2 Ultimate Collection\SC4Terrains"

1.5. Back in SimCity 4, we're going to make a second version of this terrain. Remove the roads and streets you made before, with the bulldozer tool. With the level terrain tool in Mayor mode, carefully remove the island, so it's on the same level as the bottom of the ocean/lake. Don't change anything else. Save, exit and copy this second terrain to your Sims 2 SC4Terrains folder. Make sure you rename the file to something different from the first one, like adding "no roads" to the filename. You should have two terrains by the end of this step. One with the small island and one without it.
2. Editing the terrain in The Sims 2
2.1. Open The Sims 2 and create a new neighborhood using your new terrain. Something to keep in mind: if you want the terrain to be a subhood of another neighborhood, make it a subhood from the start. You will not be able to move the lot once it's finished, since it will be roadless. I don't recommend decorating the neighborhood for now. Leave it empty until the end of this tutorial.

2.2. Place the smallest empty lot (3x1) on the island.
2.3. In neighborhood view, open the cheat console by pressing Control + Shift + C, and type
modifyNeighborhoodTerrain on
To quote The Sims Wiki:
"This allows you to alter the neighborhood terrain by raising or lowering it. To use this cheat, be in the neighborhood view, then enter the cheat "modifyNeighborhoodTerrain on" (without the quotation marks), and click over the area you would like to change. To select a larger area, click and drag the cursor to highlight the desired area. Press [ or ] to raise or lower the terrain by one click, press \ to level the terrain, and press P to flatten terrain. When you're finished, type “modifyNeighborhoodTerrain off” in the cheat box (again, without the quotations)."
If you use an English keyboard, these instructions will probably be enough for you. If you don't, I recommend first testing the cheat, because the keys for using this cheat are different in other languages. For example, in my spanish keyboard, the question marks are used to raise and lower the terrain and the º/ª key flattens it.
Another aside: When you select an area using this cheat, a green overlay is supposed to show up. Some lighting mods make this green overlay invisible, like the one I use. If that's your case, you kind of have to eyeball it. Remember that one neighborhood grid square in TS2 is equivalent to 10 lot tiles, or the width of a road. I recommend getting a mod that allows you to tilt the neighborhood camera on the Y axis, which will allow you to have a bird eye's view of the terrain.

2.4. Flatten the terrain around the lot so it's at water level. This cheat won't allow you to edit the terrain inside the lot, so you have to edit the terrain around the lot. Make sure there is plenty of flat underwater space around the island. You should end up with something like the picture above. The water will have some holes, but don't worry, those get filled with water the next time you load the neighborhood.
2.5. Enter the lot and place any object on it. Save the lot and exit the game. This is so LotAdjuster recognizes the lot in the next step.
3. Expanding the lot with Lot Adjuster
3.1. Open Lot Adjuster and select your neighborhood and lot.

3.2. Click "Advanced…". Check "Over the road (only enlarge front yard)". Use the arrows to add 20 tiles to the front yard. Click "Finish" and "Restart".

3.3. Select the same lot again. This time, check "Add and remove roads". Uncheck the road checkbox for the front yard. Add 20 Tiles to the back yard, 20 tiles to the left side and 10 tiles to the right side. Check "Place portals manually". You should end up with a 60x60 lot, which is the biggest size. You might want a smaller lot, but unless you know what you are doing, I recommend starting with this size. You can shrink it later. The goal of making the lot this big is making sure the edges of the lot are underwater. Click "Finish" and exit.
4. Moving portals and flattening the lot

4.1. Make sure you have the portal revealer by Inge installed in your Downloads folder before the next step. Open your game and load your neighborhood. The lot should look something like the picture above.

4.2. Load the lot. Delete the object you placed before. Place the portal revealer on the lot near the mailbox/phone booth and trashcan. It looks like a yellow flamingo and you can find it in Build Mode/Doors and Windows/Multi-Story Windows catalogue. You will notice that when you select the object from the catalogue, some yellow cubes appear on the lot, and when you place the object, the cubes disappear. After placing the portal revealer, pick it up and place it again. This will make the yellow boxes visible again.
So what are those yellow boxes? They are portals. They determine where sims and cars arrive and leave the lot. The ones on both ends of the sidewalk are called pedestrian portals, and in the street, one lane has portals for service vehicles (maids, gardeners, etc.) and the opposite is for owned cars and carpools. You can see the portal's names if you pick them up. Make sure not to delete any of them.
Now, since this is going to be a roadless lot, ideally there won't be vehicles in it. This means that the lot would ideally be accessed through walking only. In community lots, this would not be an issue if you have the Bon Voyage expansion pack, which allows sims to walk to lots.
In residential lots, you might run into some problems. Service NPCs always arrive on vehicles, and unless your sim owns a vehicle, the carpool and school bus will always come to pick sims up for work/school. It might break your immersion to have a vehicle show up underwater or on a ship. There are many options to avoid this: having sims work on an owned business instead of a regular job, not having kids on the lot, making the kids homeschooled, avoiding calling service NPCs… it depends on how you want to play the lot. For example, my icebreaker is a residential lot, only adults live there, some sims live in it temporarily and none of them have a regular job.

All of this is relevant because we're going to move the portals. Where you move the portals depends on you. Think about how you're going to use the lot. In my icebreaker, I placed the car portals (which won't be used) underwater, on a corner of the lot. I placed the pedestrian portals on the ship, to pretend that the walkbys are part of the crew or passengers. But for now, just move the portals, mailbox/phone booth and trashcan to a corner of the lot. To be able to pick up the mailbox/phone booth and trashcan, use the cheat moveObjects on. Delete the street and sidewalk tiles using the floor tool (Control + click and hold left mouse button + drag).


4.3. Flatten the island with the level terrain tool. Save the lot. Almost done! Don't mind the hole in the water, this will be fixed. You will notice that in neighborhood view, the island is still there. This is because the neighborhood terrain under the lot hasn't updated. I don't know why this happens, but it does. Normally, moving the lot would fix it, but we can't move this lot using the game's tools. Instead, we are going to fix the terrain with Hood Replace. Don't exit the game yet.
5. Updating the terrain with Hood Replace
5.1. Create a new neighborhood using the new roadless terrain. Make sure it has the same type of terrain (lush, desert, etc.) as the first one. Again, name it "NO ROADS" or something similar. Exit the game.

5.2. Open HoodReplace. On the left column you will select your "NO ROADS" neighborhood. In the right column, select the neighborhood that has the underwater lot. Check these settings: Replace terrain, replace road, and versioned backups. Leave everything else unchecked. Click Copy.

5.3. Open The Sims 2 and load the neighborhood to check if the changes worked. That concludes the tutorial. At this point you can shrink the lot if you don't want it to be so big. Remember to move the portals to their final placement when you're done building the lot. Also keep in mind pedestrians (walkbys) always walk by the mailbox, so keep the mailbox accessible for sims.
If you're going to have multiple underwater lots, I recommend making them first, and decorating the neighborhood after. Doing this in an already existing neighborhood might be more difficult, mainly because, if you made any changes to the terrain using the modifyNeighborhoodTerrain cheat in the past, they might get reset when using Hood Replace.
154 notes
·
View notes
Note
Hi there! I hope you're well! Your beautiful CC has always inspired me and recently I finally made the decision to start making hair cc from scratch. I've created custom hairs using EA meshes. However, you're literally one of the most skilled and talented artists/creators out there and I'd love your advice! Do you have any resources/videos/tuts/blender add-ons, that helped you create from scratch? Ik you put in the work and learned your craft, but any resources you have would help! Tysm <3
youtube
This video by @jellypawss (yes, you're guilty for raising me) was the FIRST video i ever saw on making hair cc for sims. I know this might not be what you're looking for since you want hairs for scratch, but it's the BASICS. And you NEED the BASICS, ok? Don't jump over them!
youtube
Now, this gem by my beloved friend @enriques4 was the one that kickstarted me into meshes from scratch. I slowed it down and started working and mimicking Enrique, until I could do it alone!
There might be other videos out there that are more specific for your needs but, since you asked for my tutorials, here they are!
92 notes
·
View notes
Text
Self-use Sims 3 CC Tutorials List
Here is a list of tutorials from which I learn to convert/create sims 3 cc in a few months (and as a poor English speaker). I think it might help someone who also wants to try making things for sims 3 but doesn't know where to start, though it's been 15 years from the game release and even Inzoi is coming hahah.
The list covers objects, clothes, hairs and eyes. I know there're lots of tutorials not listed here, that's because I haven't tried them in my projects by hand. But The list will be updated with new things I learn. Most tutorials are in English. Thanks to all these creators for sharing their precious knowledge!
Sorry for the miserable format, cuz I wrote them in Patreon and paste here. You can also read it there, free of course.
Where I find tutorials
sims 3 tutorial hub
ts3 creators cave and its discord
Mod the sims tutorial wiki and the forum
pis3update tutorials tag
General
CC basic concepts by nightosphere (for clothes, most knowledge is shared with objects)
Tools
TSRW guide by apple (for objects, most knowledge is shared with clothes)
Blender
shortcut by Blender Guru
beginner tutorial for version 2.5, 2.8, 3.0, 4.0
3.5入门教程 (youtube / bilibili)
设置切换语言快捷键 change language shortcut settings
图片取色器网站
Mesh ToolKit with Seam Fixer for all ages
Topaz gigapixel AI guide / higher quality texture
Texture
Nicer bake / bake in blender 2.78
Bake in blender 2.93
Make normal map
small size blank texture
Reasons for black blocks on baked image
Adjust texture color without losing quality
Object
clone obejcts with S3OC
4t3
Functional Objects
Functional bed
TSRW setting
Combining Textures for Objects with Multiple Textures
Add normal map to objects
Introduction to slot categories
Add slots in TSRW
Edit in-door shadow or occluders in TSRW / Talks about 3 kinds of in-game shadow by Pocci
Clothes
4t3 by nightosphere
Reduce polycount / fix seams, holes, shadows or normals
Bone reference rule
Avoid milkshape workflow / adjust bone assignment and morphs in blender
Manually fix bone in blender
Convert between ages/body meshes
TSRW check list
Fix long clothes clip with body
Fix holes on morphs (easier in blender)
Extrude collars
Create texture in PS
Avoid TSRW workflow / CTU tutorial
Hairs
Avoid milkshape and TSRW workflow / delete backfaces / handmade morphs / DABOOBS guide
Keys pointing to in-game blank textures to save file size (for DABOOBS not TSRW)
Reduce polycount
4t3
Fix weird seam lines on hairs from s4s
Fix pigtail issue
Eyes
Convert contacts to default eyes
245 notes
·
View notes
Text
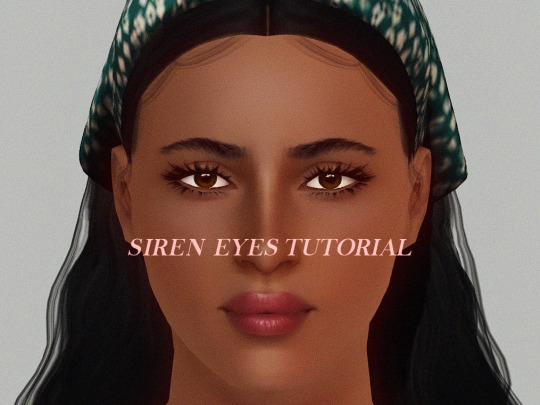
Siren Eyes Tutorial - TS3
Trying something new on the blog!
I wanted to share a mini tutorial + slider recommendations about how to create a sultry "siren eye" shape in CAS. This is my go-to method for shaping my sims' eyes. It's really quick and simple.
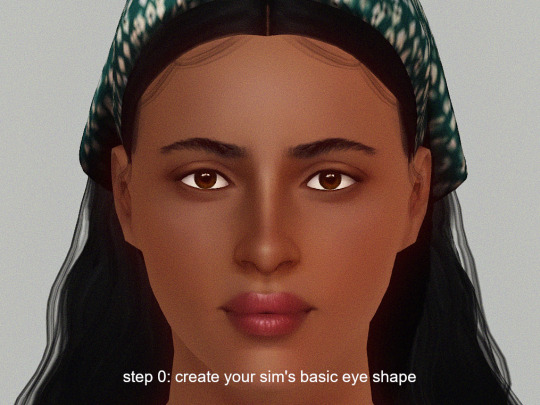
Step 0: Create the basic shape of the eye like the rotation, eye depth, eye corner height, scale, etc.
Step 1: Use the Eye Stretch slider to elongate the eyes a bit. I like to use around 50 to 100.
download it here
with NRAAS Master Controller, you can shift + click on sliders to edit the number values.
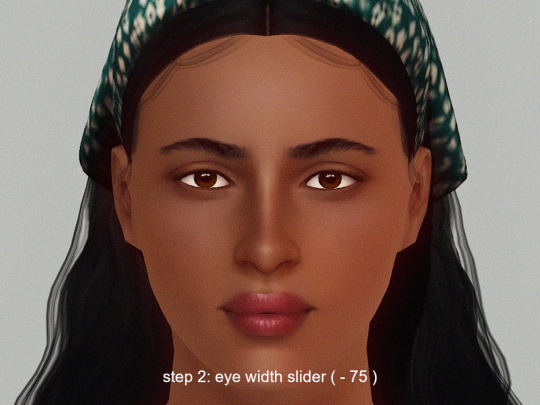
Step 2: Use the Eye Width slider to make the eyes narrower. I like to use both sliders below, at around -25 to -50 for each.
download them here: eye width / eyelids width
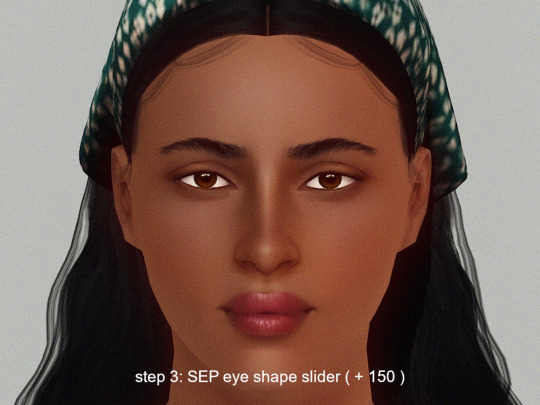
Step 3: Use the SEP Eye Shape slider to shape the eyes. I like to use around 100 to 200.
download it here
in CAS, it's located in the head section, not the eyes section
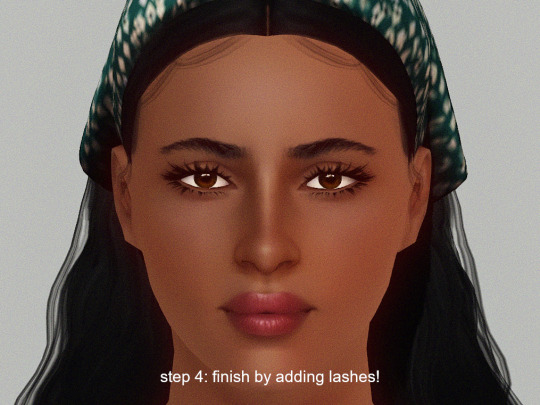
Step 4: Add eyelashes and makeup to complete the look.
That's it! I hope you enjoyed reading my mini tut. I feel like CAS tutorials for TS3 are rare so I wanted to try writing a short one. 🤍
Step by step pics and CC list:
Eyebrows: not sure which set but it's by @sourlemonsimblr
Contacts: Anva Anette by brntwaffles
Lashes: S-Club and w0esies
Lipstick: Angels Kiss lipstick by Pralinesims
Skin: Gardenia by me
Hair: Simpliciaty Ruby, by ifcasims
CAS Lighting Mod: Pure V1 by Criisolate

428 notes
·
View notes
Text
4t2 S-Club 081022 Rose Hair

DOWNLOAD (SFS)
DOWNLOAD (BOX)
DOWNLOAD (GOOGLE DRIVE)
Edit: I have also added a google drive link as an alternative.
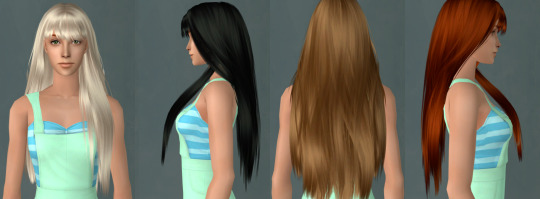
PF-EF, 9k poly.
Pooklet's textures, elder grey is linked to each black.
Compressed and tooltipped.
Credits:
S-Club for the original mesh here.
Pooklet for the textures and huge thanks to IaKoa for the GIMP curves here.
And @platinumaspiration, @redsimmer-blog, @peppermint-ginger, @rented-space for and everyone else for their various tutorials. Also, @simborg for the bone assignment references.
I have binned the following together:
Flash Powder (black) - Depth Charge (brown) - Volatile (blonde) -Explosive (red)
Dynamite (black) - Safety Fuse (brown) - Primer (blonde) - Molotov (red)
There are some clipping issues, and it may not be perfect; but I decided to share anyways to cripple my perfectionism. Maybe I am not a professional, but perfection takes time and experience; which I need.
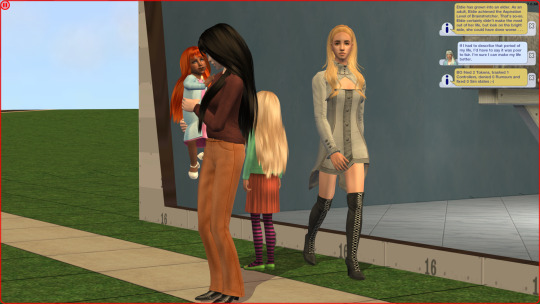
Well, I had almost lost hope for posting more stuff until I got the notifications chime in. Honestly, thank you to each person even seeing this posts somewhere. It may sound weird, but I feel like I have finally have a purpose on this blue little dot called Earth.
And...My other conversions that are yet to be shared; some previews.
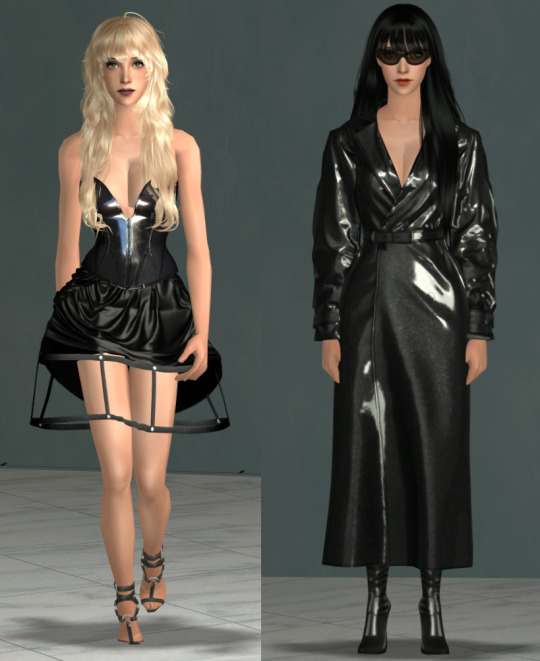
The blonde hair, the black dress and its shoes for the first sim.
The glossy Jill's coat and Madlen's boots for the second sim.
And the-one-that-got away-not shared: 3t2 Magician Outfit.
Well, now excuse me as I will go watch and then cry for Invincible season 3.
83 notes
·
View notes
Text
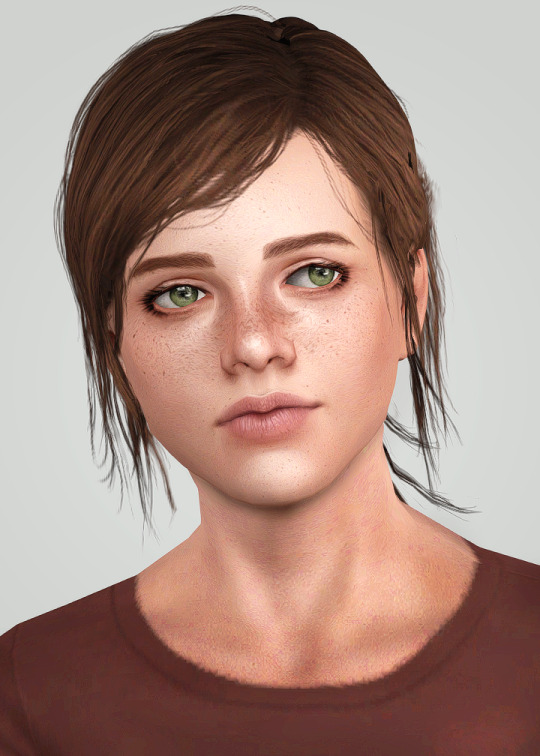
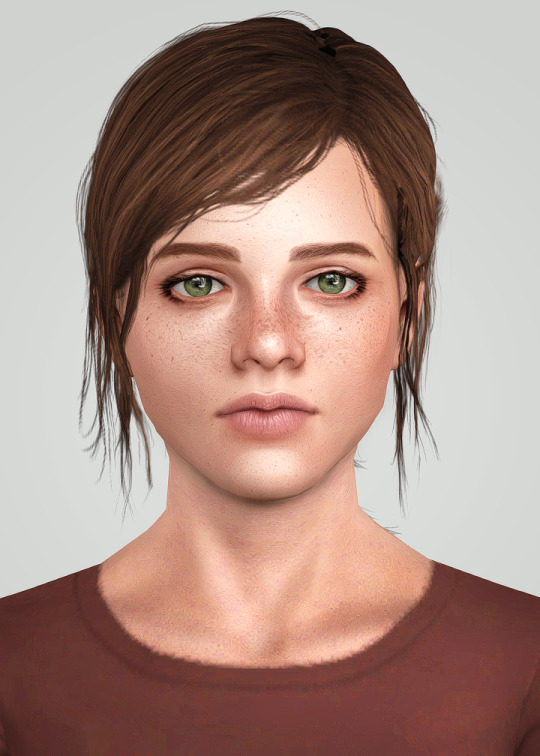
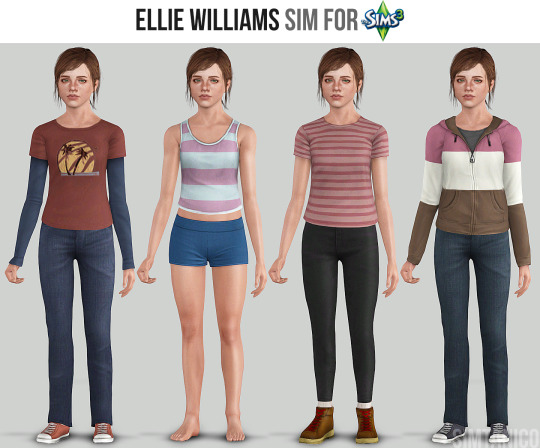
Ellie Williams (inspired by The Last of Us) for The Sims 3
Teen | Brave, Loner, Artistic, Animal Lover
Behold: my pride and joy. You could say that this character is the reason I started creating CC in earnest. Now it's been almost 10 years since I first saved a version of her in CAS and here she finally is! A whole depressing heart-wrenching sequel to her story and a live action adaptation has come out since then!
So maybe this is the opportunity to give her the fun-filled tragedy-less life she deserves?????? Perhaps???????
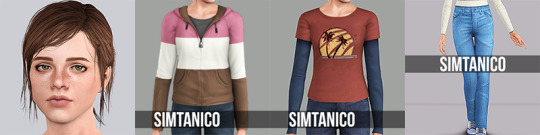
If you're up for it, Ellie comes with brand new CC including her hair, Fall Hoodie, Summer Top and an edit of the Diesel High Kee jeans I recently released and a soft-launched slider that is soooooooo niche that I don't think merits its own post. You can find it at my sliders page and in the download. :)
And her being a sim of mine, she has a LOT of CC requirements and uses a ton of sliders. You've been warned!!!
The rest of the details below!
The List (and credits):
Skin: @kurasoberina Primer Skin HD+ (Default) with @chinsims Extra Tones [She will probably do well with another skin, as most of her features are slider and makeup reliant.]
Eyebrows: @simmillercc Low Full Tweezed brows from the EA Female Eyebrow Overhaul (Non-Default) collection (MTS archive.org link, current Patreon link does not have the non-default version of the eyebrows, afaik)
Face Details: Gosik Subtle Freckles v2 // v3 // v5 | @pralinesims Delicate Freckles for the Nose // Delicate Freckles for the Cheek
Makeup:
NOTE: ALL MAKEUP THAT WASN'T ORIGINALLY ENABLED FOR TEENS WAS MADE SO. This tutorial covers how to do that with s3pe.
Eyeshadow: 1. Base Game Eyeshadow (w/ lavsm's default replacement alpha fixes) 2. mochi029 inner eyelid make06 [reuploaded by @hyperkaos] 3. @sk-sims Natural Eyebag 4. Ephemera E121228eyeshadow [hosted by me here]
Eyeliner: 1. @sclub-privee Eyelash 3NA 2. Eyelid 2 by me [included in download] 3. Base Game Top Eyeliner
Blush: 1. @gramssims Contour 2 and Contour 5 [Link inactive. Click here for official archive link.] 2. mochi029 plainMakeSet A 3. Tifa Shading Line Blush // Nose Mask V2 [creator inactive, shared by @simdreams] 4. ModernLover Nosemask 5. @agnelid Bloodland Blush N1 Part 3
Lips: 11 IN3S Dry Lips [re-hosted by @villesims] | 2. Lip Definition III by me [included in download]
The Riding Pants in her athletic outfit (with the striped shirt) are by @sweetdevil-sims!
*** she does require a slider that I have not been able to find reuploaded anywhere, Ottershell's Chin Tallness. Link here. ***
For any other defaults and mods installed please visit my newly-updated resources page linked on my page!
Last thing: Feel free to change her up as you need. Simplify her slider usage, use her as a base, whatever. Just, please, do not claim you made her all on your own OR make money from reposting her or subsequent sims. I've spent years making her and worked very hard to compile all this. If you've made it this far, thank you!!!!!!!!!!
Download .sim and included CC (and leave a 💖): https://simfileshare.net/download/4512068/
Please tag me in any photos you might take!
She will also eventually be hosted on simblr.cc!
#s3cc#the sims 3#ts3cc#dl: sims#the last of us#this is actually making me super nervous sdfhafhewfsd#i'll scurry back from whence i came#mysims: Ellie
387 notes
·
View notes
Text
I've seen alot of people "wishing" they could make cc for the game but just wont because they dont know where to start or how to gainthe skill or that they are not knowledgeable enough
Listen.... Do you think i know everything there is to know about cc making??
NO
I started out by watching exactly 1/4th of the blender doughnut video and closed it out when i got bored after i learned blender Controls and everything before he gets to the sculpting part
Then from then on i just followed whatever tutorial duck duck go spat out for me that day
I STILL follow those tutorials till this day 3 years later for everything all the shadow bump specular maps all the hair frankmeshing all the clothes frank meshing recolors whight Transfer its all bookmarked tutorials pages that i have open once i sit down to make cc and close each gradually once im done with that step
Are my meshes perfect? NO FAR FROM IT they have issues sometimes i get lazy and skip steps (usually comes back to bite me in the ASS) but people still like them download them and use them so that should tell you something
It should tell you that you shouldn't stop yourself from learning blender Controls and fucking up those sims 4 meshes
You can do it
Trust me i know you can because i did it too
#this is inspired by me having to look at my earliest cc yesterday while i was moving stuff to patreon#i remember how clueless i was#i remember how hard everything was the first time#i remember even making an eyeliner was a massive task#now im thinking about going back and watching rhe rest of that blender video to learn more than frankmeshing#lol
58 notes
·
View notes
Text
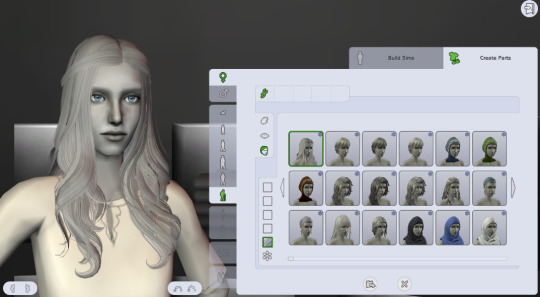
TUTORIAL: Creating default replacements for hair colour presets
Since @sandra-vu asked <3
Here is a hair presets default replacement I did, and now I'll try to explain how you can do it yourselves. Unfortunately I don't know how to make eye presets replace default ones because apparently it must be done completely differently
Disclaimer: my way is probably not the fastest, smartest or the most convenient, but that's the only way I figured out
Preparations:
Have S3PE
Move your userpresets.package from documents/electronic arts/sims 3 somewhere outside game folders to not loose your presets. You can leave the copy there, but then you'll need to delete in cas every preset except 1 you need.
Get yourself a copy of fullbuild0.package somewhere not in game files (original located in main game folder where it's installed and then sims 3/gamedata/shared/packages
STEP 1: Create or choose new hair colour preset
If you think that you'll not be able to recreate desired preset without userpresets file you can keep a copy of userpresets, and delete every other preset while you're in cas (or write down rgb numbers and then create new preset by them). I just created new preset how I liked it
The important thing - you should have only ONE preset when you are leaving the game.
STEP 2: Leave the game properly after saving the preset
You don't have to save the game, you can just exit. But killing it with task manager to save time will not help.
STEP 3: Open your new userpresets.package
in the documents/electronic arts/sims 3. HINF is a hair preset
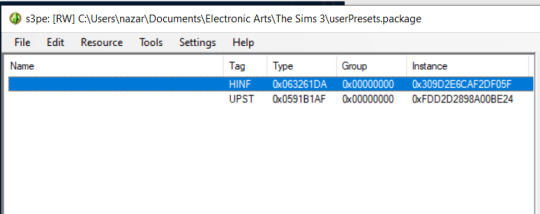
That's why I said about only 1 preset being here. I couldn't find a way to preview HINF files or differenciate them, so if you end up with several HINF's - you will not know which is which
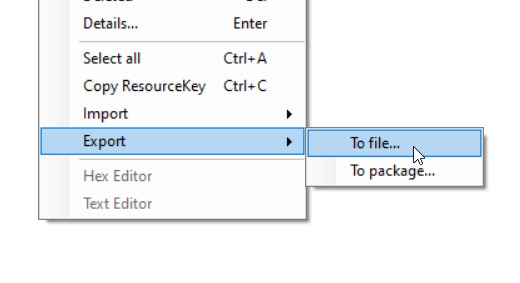
STEP 4: export the HINF file
Don't change the file name
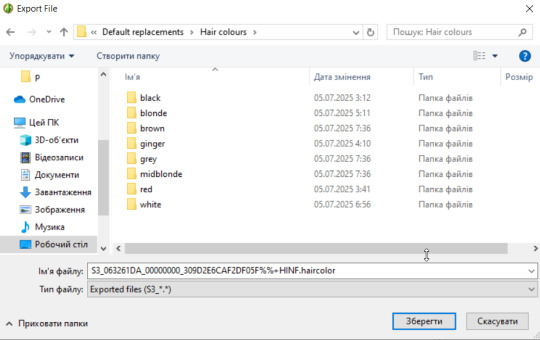
Now is the right time to organize your folders to know what color is your preset or for what colour you are getting a replacement. Hair colours have official names, I just named them how I saw them. Apparently what looks like a shade of blonde EA considers light brown. EA haircolours are:
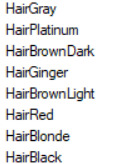
STEP 5: Repeat
Delete userpresets file that is currently in documents folder, load the game, make a new preset, export to labeled folder, untill you have all your presets that you want to turn to default replacements. Yes, this is tedious
STEP 6: Create new package in S3PE and open fullbuild0.package
Now, in fullbuild0 you need to locate the original HINF files, which all are named by their colour (on the left row)
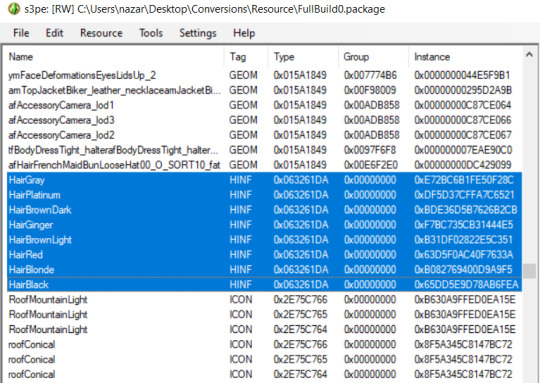
Let's move from the top. The first one is gray (let's think that you want to replace it, otherwise - skip to the next you need)
I imported my preset that was chilling in "gray" folder to my new clean package. Don't import anything else yet.
Select the original EA gray by double clicking and copy its instance

Double-click your replacement preset in new package and replace its instance with one you coppied. Hit OK. That's how most CAS replacements are made - replacing the instance number. Save your package
Now you have a default replacement for gray hair (or whatever you were replacing). If you want more hairs to be replaced - import to your package the next preset you've made and replace its instance with the instance of original EA preset, and that's it. If you got lost which one you already replaced and what's a new imported one - check instances. The one that is different from HINF's in fullbuild0 is the ine you didn't change instance for. When you finish just save the package and now you have your default replacement for hair colour presets
Happy modding<3
44 notes
·
View notes
Text
Tutorial: How I edit my pics (Photoshop)

A not so helpful guide by me~
(orig. post)
For the beginning: I use my own Reshade and use only Photoshop to edit. (for videos I use Premiere Pro/After Effects)
Ingame: I use SRWE with the profile 3840x2400 to get it already in a better qualitity. For this pic I also used ReLight.
In Photoshop:
I start with using Topaz Clean with these Settings:
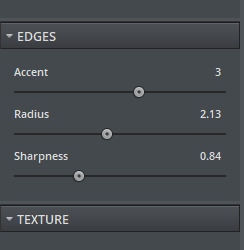
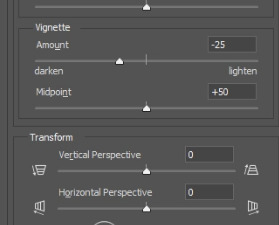
Next I make a Vignette ("Filter"-> "Lens Correction") with these Settings:
After that, I start making a bloom you can use this tutorial for that: https://www.youtube.com/watch?v=aMxnXfN7ZDg
Before and After
Now I put a filmic grain on it . For that I go on "Edit" and click on "Fill"

you want it to look like that
The pic will turn gray but thats normal!:)
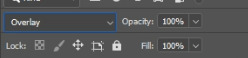
Now I convert it into a smart object by right clicking on the layer.

Next I change the layer to "Overlay"
I continue with going to "Filter" and click on "Noise" -> "Add Noise"
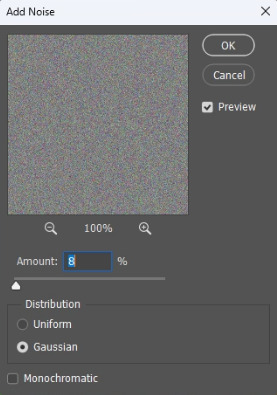
The window will look like that. I like to put the Amount to 8 but that's all preference:)
That's it for the filmic grain. (I made it into an Action so it's faster)
My next step is to put a Curve to make the pic a bit more moody.
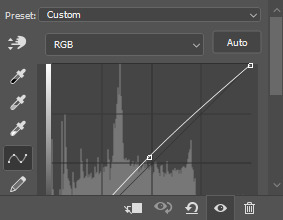
I don't put too much though lol, it also changes depening on the pic.
After that, I put a Color Lookup to change the color a bit.
For that I click on the little half moon bottom right.
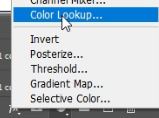
I like to use on of the first 2 Kodak LUTs (Kodak 5205 or Kodak 5218)

I put the Fill of that layer around 40% to make it less strong.
Next I draw hair! (still a noob at it...) I use this Brush "Kyle's Real Oil Round Flex Wet" that comes with Photoshop:
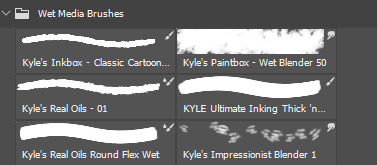

Before and After
For the next step I use 2 Hue/Saturation Layers also on the little halfmoon bottom right.
With that I draw Shadows and Highlights!

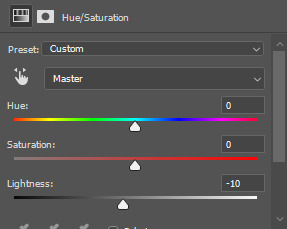
For Highlights For Shadows
After that, I click Ctrl+I to invert the Layers and start drawing on the mask layer.

Before and After
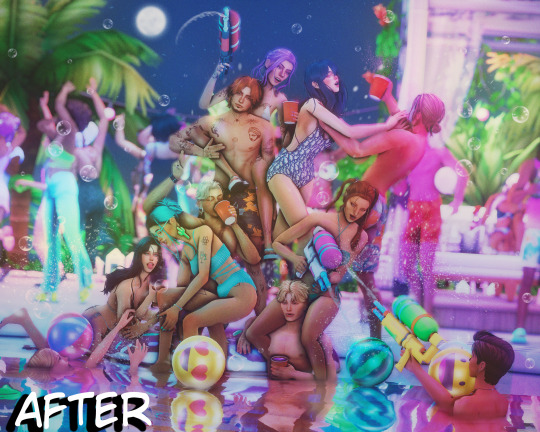
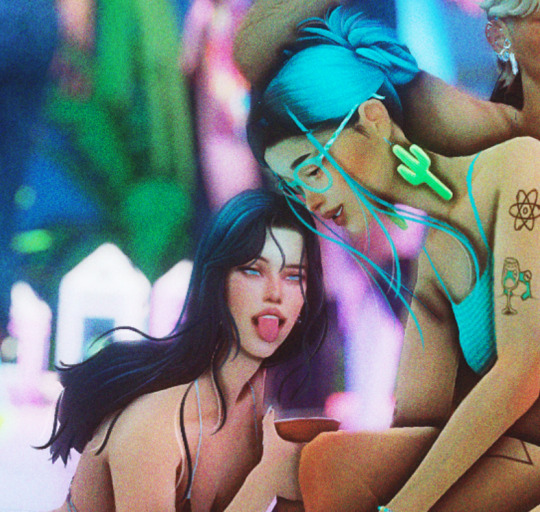
The pic is in an area with lots of colored lights, it would naturally reflect on the Sims, so I put some pinkish and blueish colors on highlights like this:

Now to the effects to make it look more fun!
3 of the Sims are using water guns and they splash with it ofc! So I added some water splashes with a brush and put a slight motion blur on it.

and since it's a lot of people, water splashes everywhere. Because of that, in some areas I added some water splashing effects (Photoshop Brush) that are making it look like there is movement.
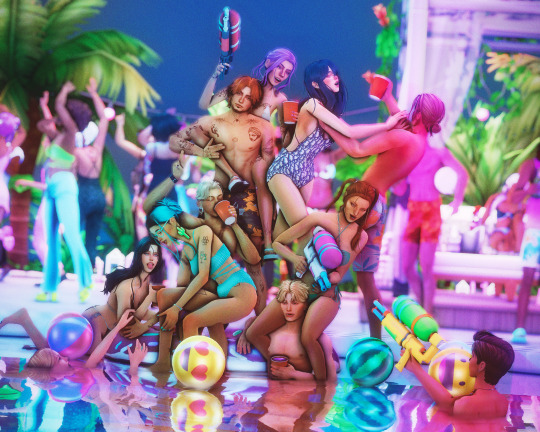
looks way more alive now right?
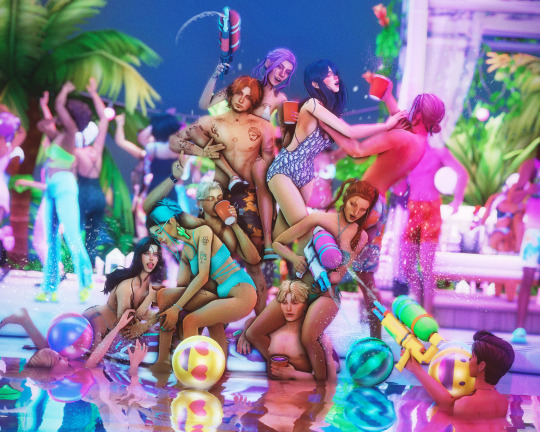
It still felt a bit "empty" though, so I decided to put a picture of a moon in the sky and added some bubbles (Photoshop Brush) around.
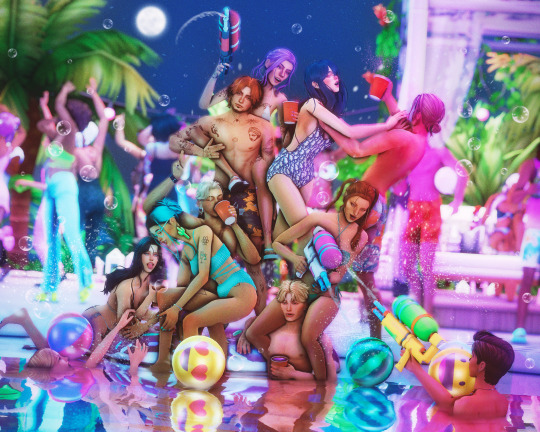
fun fun
Now I put a light leak overlay I found on the internet over the pic.
I put the Fill of that Layer on really low though, so it has a “soft“ effect.
At the end, I made a chromatic aberration (color distortion)
For that I make a Layer copy of the pic and double click the new copy layer and a menu should open.
Under channels uncheck G and B. After that close the window and just resize the Layer a bit.
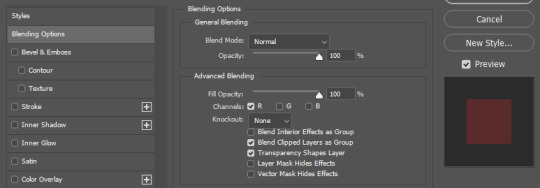
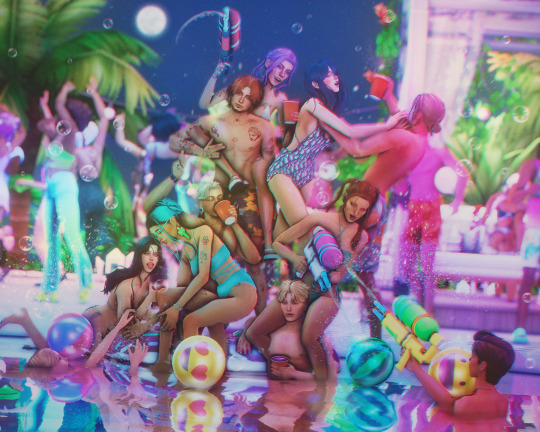
And that's it! Hope it was helpful somehow:)
158 notes
·
View notes
Text
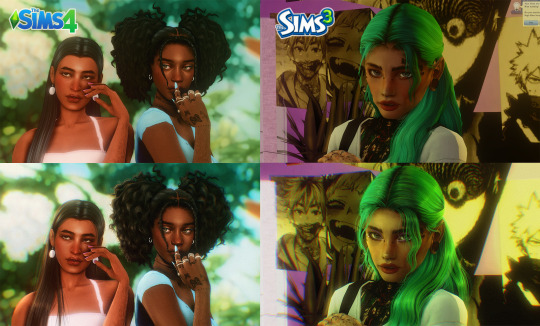
how i draw hair :) applies for TS3 & TS4
a few people have asked for this so i thought i'd just show my process, i'm still learning myself but sharing is caring. This is all done in the Procreate app on the ipad.
i used to use these brushes when i had my old ts3 acc: photoshop brushes these are super good if you might be be able to draw the individual strands, now i just use 3 brushes from samdoesart patreon:
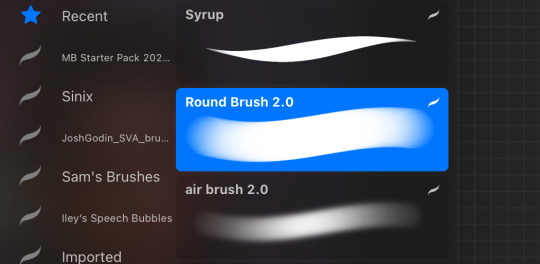
round brush: has some hard edges air brush: better for curly hair as it's soft syrup brush : i use this more for straight/wavy hair
procreate does have FREE brushes so alternatives for the brushes i use are found in: calligraphy - 'script', airbrushing - 'hard blend' & 'soft brush'.
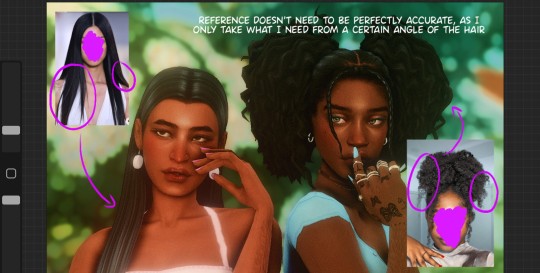
step1: i'll gather reference on pinterest for curly/wavy hair as straight hair is more simple to draw, this help me to understand how the hair falls and where to put highlight/shadows
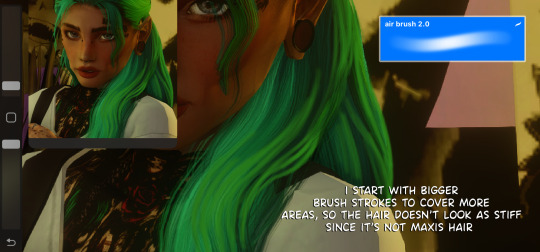
step2: *create new layer* pick the brush and colour pick the hair, i like a lot of loose strands and messy looking hair, start drawing your strands lightly and build up. The only thing that differs with sims 3 is that when drawing the strands i use a bigger brush size to start with then go in with smaller strands later.

step3: *create new layer* blending mode: multiply opacity: 50-60% i'll add shadows to the parts of the hair that 'bend' to add more depth. (remember shadows are never usually completely black, so if the sim has blue hair make the shadow a dark blue)
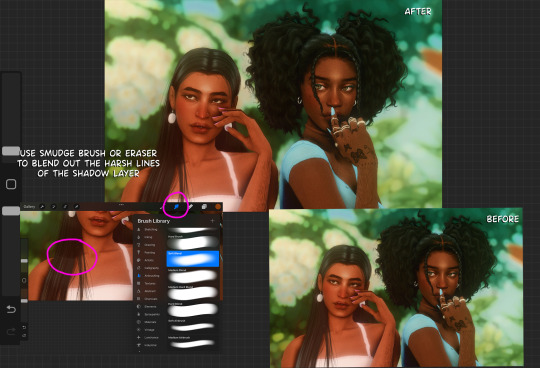
step4: *create new layer* blending mode: add. opacity 20-30%. i'll add highlight by using the selection tool and similar to how anime hair looks with the hair higlight ill add zig zag lines going around the hair, then go in with my brush lightly making the centre more intense. Once done ill get the eraser and make sure the edges aren't too harsh
step5: *create new layer* blending mode: normal (place under shadows layer. i'll add colour highlights, (for black hair i'll use a littie bit of brown as no ones hair is really completely black)
step 6: *create new layer* blending mode: add. this one is for lighting purposes. for the rest of the screenshot then i'll add extra shine to hair & add shadows to the body
step 7: once i'm done. *create new layer* blending mode: overlay and i'll go over the parts that are in the light. merge all layers together and add some grain so the hair drawing blends in with the rest of the screenshot.
if you have any questions feel free to direct them to my inbox & u can check out other tutorials here
214 notes
·
View notes