#semi realistic tutorial
Explore tagged Tumblr posts
Text
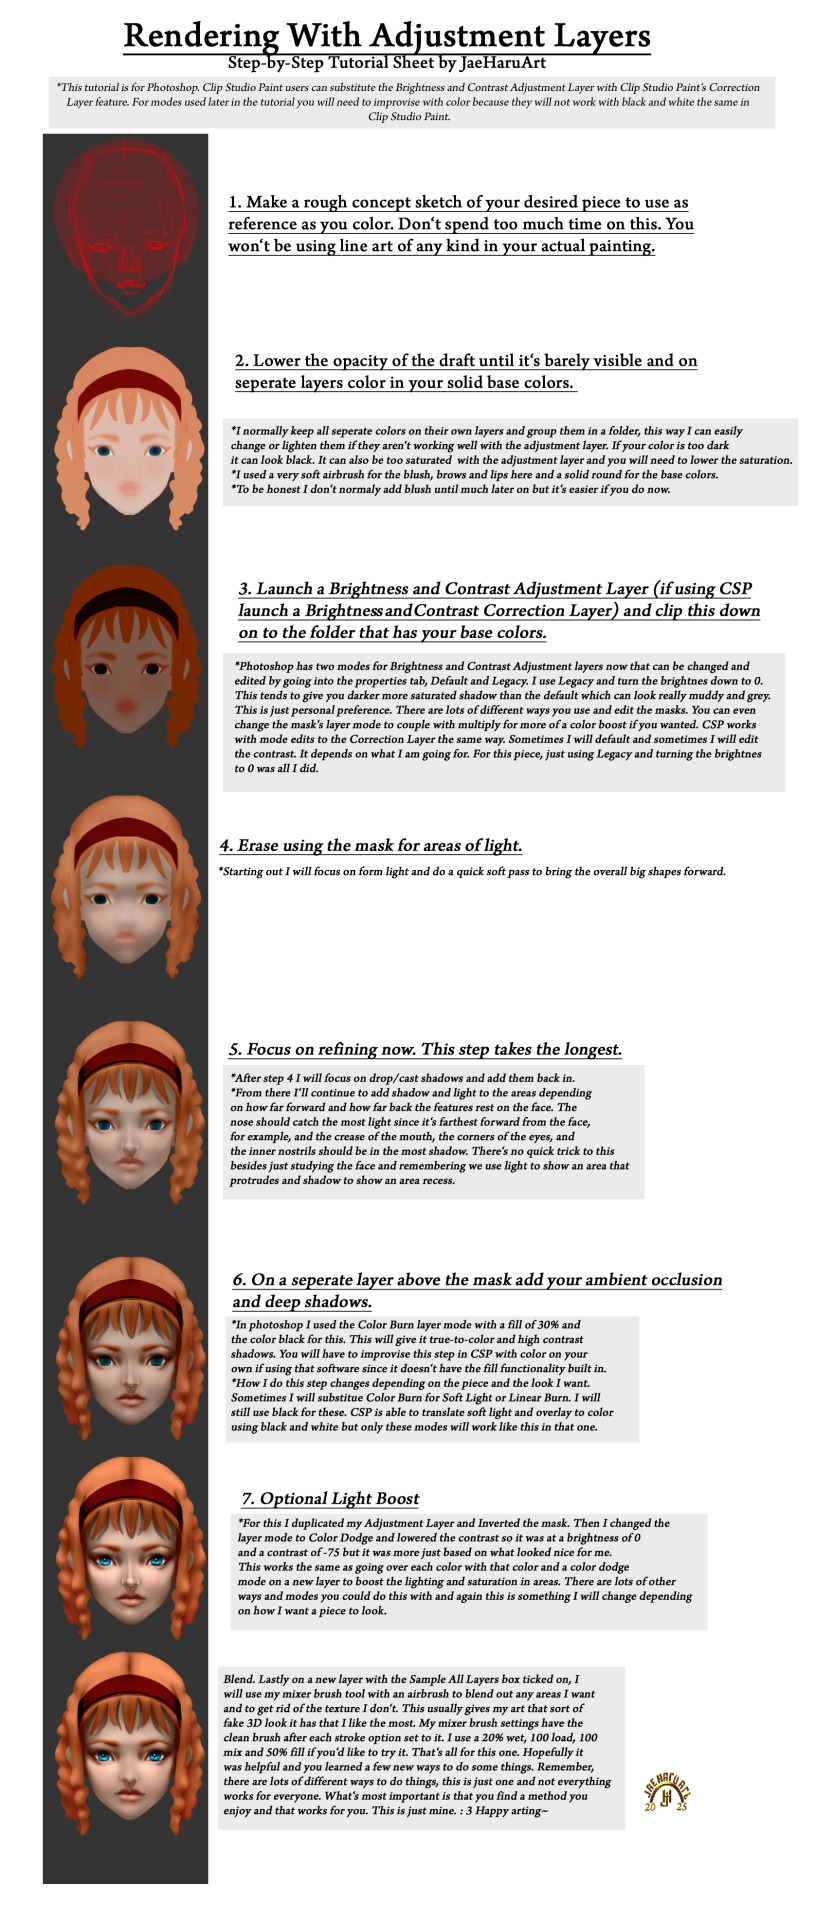
Something my past self wish I had. This might be a bit hard to see here so it's posted on my other socials as well feel free to hop over to DA or Arstation or whatever and grab it if you want to.
Patreon
LikTree
Prints
#art tutorial#digital art tutorial#digitalart tutorial#rendering tutorial#semi realism tutorial#semi realistic tutorial#semirealism tutorial#semirealistic tutorial#jaeharuart#tutorial
13 notes
·
View notes
Text
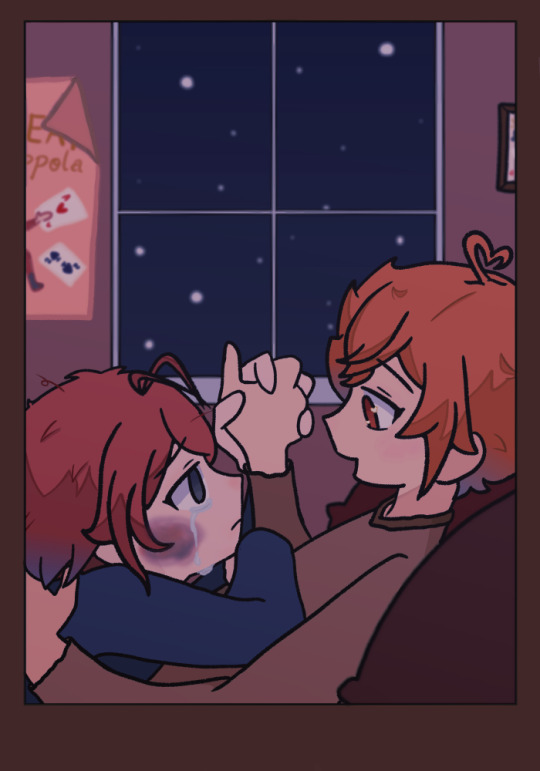
cause everything means nothing if i can't have you
the first coffeeshop au art i've made... technically not The first but the first i've finished and actually posted so. yippee!!
#my art#twisted wonderland#riddle rosehearts#ace trappola#ridoace#angst#tw semi-realistic bruise#aka my best attempts at drawing one with a tutorial#also this may just be a me thing bc i drew it but. the difference bt the little hearts in ace's eyes and the no light in riddle's GETS ME#actually can u even tell that those are hearts. idk#and yes that is a makeshift poster for ace's family magic shows in the back. yes it says the great ace trappola#but in his defense he made that when he was seven#offtopic but i keep finding too many good refs on pinterest. PLEASE I HAVE PROJECTS DUE AND I THINK I'M GNA FAIL A CLASS
40 notes
·
View notes
Note
Heya! Person who went/goes over gender swap?? Female version?? Of Ratiorine, or just the way you draw women in general here. I'm an artist (not really but I do draw and paint from time to time) I just wanted to ask, (sorry if this is really silly or inappropriate) How do you draw breasts semi realistically?? Or just draw them the way you do. I honestly don't know how to draw human anatomy at all, I just kinda wing it but breasts, male chest alongside legs and hands are a STRUGGLE for me. (Been slowly getting better) YET BREASTS ARE ALWAYS JUST NOT LOOKING RIGHT AND IT MAKES ME WANT TO SOB They're always very anime looking in a very very bad way (because I grew up watching mostly anime and using old anime drawing tutorial books) No need to respond/answer if you don't want to! Just wanted to ask!
breasts are affected a lot by the angle of the shoulders and the pull of gravity, which are both pretty daunting factors for learning artists
i'd recommend anatomy studying but that's not what you asked for(tell me if anyone's interested), so i'll take the opportunity to draw more fem!ratio
behold, a booba tutorial with veritas ratio. only open if youre interested in boobs
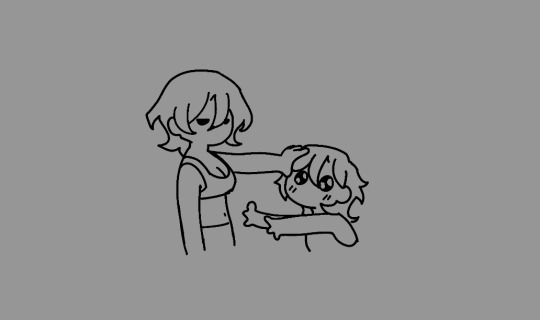
breasts don't really have a fixed form, so they're tricky to make them look natural. as i mentioned, i consider the gravity and angle of the shoulders, as well as clothing when drawing them

i'll go over an easy method to paint them. for demonstration, i unbuttoned ratio's shirt. for educational purposes.

i like to use shaded tones as base color and add light afterwards

with some lassoing and glow layer (overlay/add/anything that works) it already looks fairly alright, but i'm gonna do some blurring to make it look better
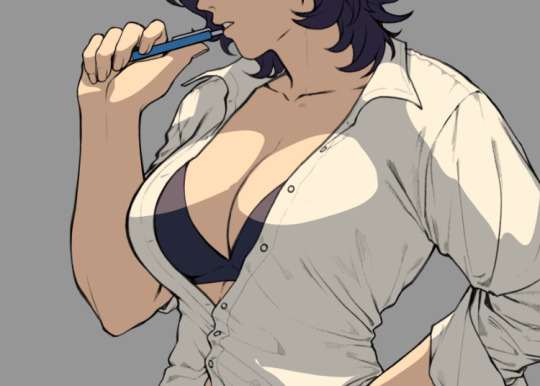
i blurred and erased around the edges to make the light blend in more naturally to the lineart and the shirt

i added a little bit of redness around the edges of the light to make it look more like flesh as well as reflected lights (the blue circles), they'll give clearer indications on where the breast starts and ends
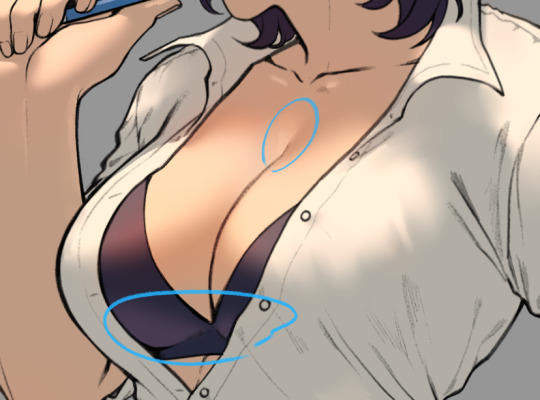
i usually end the details here when i don't feel like going for high quality render
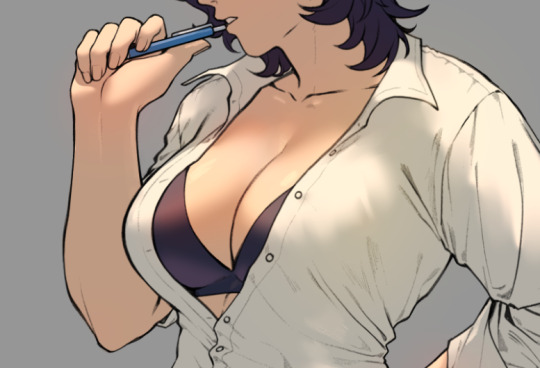
and there it is, a pair of shiny boobs
im not sure how to lay out the higher quality render process, i haven't really figured it out enough to explain it to someone else yet
anyways i like how this one turned out, so i'll try fancying it up tomorrow, i'll post it when im done
1K notes
·
View notes
Note
Hello, darling. I saw the gorgeous portrait you were working on yesterday, and I noticed a little anatomy quirk that used to be a huge blindspot for me in my own work. The foreshortened eye is perfect, but the one that is closest to the viewer is drawn a little flat, as if it were being seen from the front. Typically, when seen from a 3/4 angle, the portion of the sclera closest to the tearduct is vertically longer and appears to 'bulge' because of the mass of the eyeball. I'm really sorry if this is unwanted advice, but it was something I really struggled with for ages, and I've found it makes a big difference. I also wanted to tell you that the portrait is lovely. I love the rendering and the subtle splashes of warmth in the skin!
hi nonnie! I don’t mind the critique dw! I had to edit the fuck out the eyes so many times and the in the end I still wasn’t satisfied w it 😭
I can see exactly what ur talking about, im rlly bad at capturing uhhh what’s it called depth and perspective especially when it comes to eyes? I know that they’re not just flat on the face n I know that they’re spherical, but i can’t capture that bulge well if that makes sense, if u have any tips on that I’d love to hear it ^_^
#sorry if this is nonsense I’m very sleepy#asks#nonnie#also thank you! it was a warm up from a few days ago and honestly it’s probably the cleanest rendering ive ever done in my life#besides the eyes it’s one of my fav things I’ve drawn this year#I like to think it’s a rlly good uhhhhh in between of my more comic-y graphic style and a more semi realistic style#the model had rlly big beautiful eyes and I hate that I couldn’t capture them well#ironically this was meant to be an ear hair and nose study#which I think came out pretty well n the lips omg I still love how they look#but yeah I’m trying to tilt an eye in my head but I’m not too good at visualizing things#I’ll probably look at a tutorial soon#ooooh next study session planned
0 notes
Note
Do you have any advice with drawing boobs in general because I struggle with getting them to look right. I know how to draw fat rolls well but boob proportions confuse me. Can I see your process on drawing boobs (both bare and under a shirt, especially under a shirt that puzzles me) maybe to see where I can improve? If you're not comfortable with doing tutorials that's fine. I just want to draw bodies more like you do, our art styles are both semi-realistic so I think it would be helpful.
i can't find shirt examples
but!!! when I draw more exposed breasts I make them pointy at the tip where the nipples would be along with spacing them out because breasts carry weight to them like say, a water balloon!!! feel free to reference or trace my art!!! have a good one


166 notes
·
View notes
Text
Yet Another Major Revamp: Semi-Realism Edition + make-your-own toolkit!🥳
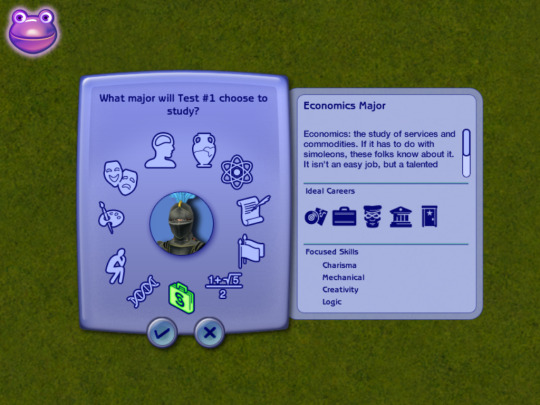
🐸 DOWNLOAD: SFS / MIRROR
This is an edit of Phaenoh' Realistic Major to Career Linking BUT with the following BENEFITS:
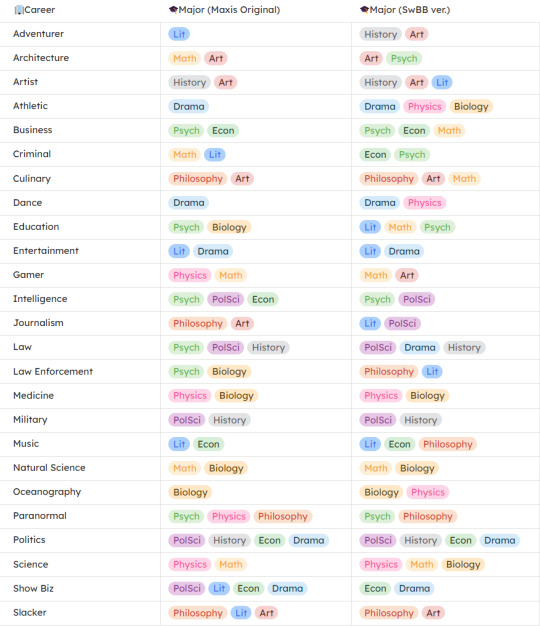
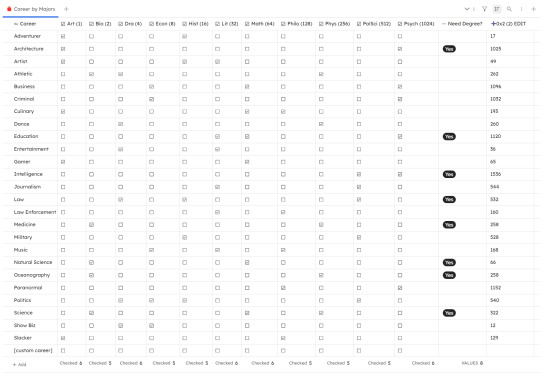
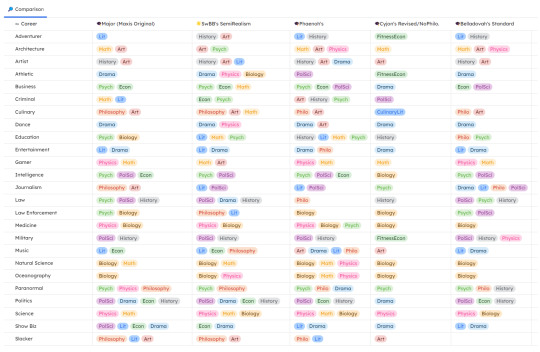
🌟 NOT REALISTIC... BUT MAXIS-REALISM: this edit made the ideal careers for each major somewhat logical and coherent (consult the table below for the changes) yet respects the internal logic of the game because Maxis' humor is underrated, slacker and criminal are treated as serious career pathways in this game so why not 🤩
🌟 ALL MAJORS BALANCED ⚖️: frustrated with the lack of benefits that some majors offer compared to others? want an easier time being a job-hopper?? what do you mean my skills aren't transferable in this market??? WELL:
All majors are now supporting at least 5 or more careers
Art [6]: Adventurer, Architecture, Artist, Culinary, Gamer, Slacker
Bio [5]: Athletic, Medicine, Natural Sci, Ocean, Science
Drama [6]: Athletic, Dance, Entertainment, Law, Politics, ShowBiz
Econ [5]: Business, Criminal, Music, Politics, Show Biz
History [5]: Adventurer, Artist, Law, Military, Politics
Lit [6]: Artist, Edu, Entertainment, Journalism, Law Enf, Music
Math [6]: Business, Culinary, Edu, Gamer, Natural Sci, Science
Philo [5]: Culinary, Law Enf, Music, Paranormal, Slacker
Physics [5]: Athletic, Dance, Medicine, Ocean, Science
PolSci [5]: Intelligence, Journalism, Law, Military, Politics
Psych [6]: Architecture, Business, Criminal, Edu, Intelligence, Paranormal
All careers are now supported by 2 or more majors, only the Politics career is supported by 4 (cause Maxis' choice was so good I didn't want to touch it!)
8 careers that require degree (only available for graduate): Architecture, Education, Intelligence, Law, Medicine, Nat Sci, Oceanography, Science.
🌟 OTHER INFOS:
🎓 You'll need UNI EP 🎓
Credits: Phaenoh (for the base mod I edited and the tutorial!), SimPE
Conflicts:
mods that lock/unlock degree requirement like Lamare's getUniCareerWithoutEducation
any mods do the same thing (Belladovah's, Phaenoh's & Cyjon's) which you might want to consider shopping around first before picking mine so look below 🛍️🛒👀
also conflicts with lauratje86's but their mod works with default replacement majors so it can't be covered here, check it out though!
note: Cyjon altered some majors' names and skill requirements (he also hates Philosophy methinks), Phaenoh offers a different version that changes which career requires degree (just like mine but ADDED Business), Belladovah offers Education version in which every major benefits the Education career.
📁 MOD RESOURCE: Linking Maxis Majors & Degrees to Maxis Career Toolkit 🥳
🎯 Difficulty: EASY (no modding experience needed)
It's easier to customize own or track which majors your career is linked to with a bunch pre-made templates right???
Download my edited mod as a base & start making edits 📝 Have these templates to easily cross-reference 0x2(2) values you need to change in SimPE following PHAENOH'S TUTORIAL.
The templates will look like the 2 tables you see above, they are available in:
odt (highly recommended, easy to use word doc file with Phaenoh's tutorial included)
md (markdown file)
csv (for both of the tables you see above)
Comparison Table - use to compare your edits to MAXIS original Career By Major Table - work out which major supports your career and calculate 0x2(2) values
4. zip (for SiYuan users to import, highly rec because I used that program to make the tables, it's Notion but ✨uglier and offline✨)
🐸 DOWNLOAD (browse what you need): SFS / MIRROR
380 notes
·
View notes
Text


That moment when you download new cc and yassify all your favorite model sims. 😏

Before and After (And yes I'm tired of my usual cartoony style and went back to semi-realistic sims)

Honestly, I've improved so much with the way I make sims, makes me happy.
Ok now I will evaporate see y'all in two months with the face preset tutorial :)
#ts3#sims 3#the sims 3#ts3 cas#sims 3 cas#ts3 simblr#ts3 simmer#sims#mysims#ts3 screenshots#thesims3#sims 3 screenshots
126 notes
·
View notes
Note
Your art is super cool and inspiring to me be an art person. Can you show how to draw a cat please? If that is okay?
Thank you oh so much <3 it’s honestly shocking! It’s kind of nice to know im repeating the lineage of giving people cat brainworms. It’s more than okay!!!
I don’t know if this is entirely what you mean, but!!! I’m gonna be honest, a lot of it is making basic shapes and silhouettes. Usually I do more semi realistic cats. And a lot of it is your sense of shape language!!!!! But, I’ll take you through the steps. (Keep in mind that a lot of this is better said than done, as this is from years of being a self taught artist.) this may end up being a thread? There’s also plenty of artists who do cat tutorials WAY better than me. None of this is really defined!
1) CIRCLES AND SQUARES.

Twilight ended up with a circle shape, but as you’ll notice she actually ended up with a more triangle shape! Circles and squares are a best friend.
2) Basic shaping

Anytime you draw, you probably already have a pose in mind. I usually like to shape it out and mold it kind of like clay!!! But the real refinery comes later. Again, keep it basic. You iron out the details later and if you get stressed too fast due to detailing it’ll put you off from the drawing in general.
3) Minor detailing

Since Twilight was sitting, this is just kind of outlining a placement and shape for the limbs and chest I liked. This also includes tail placement!
4) Rough Flats!!!

This is the moment where you of course do the flat base color! As you can see this is usually pretty rough. Again, clay! You’re doing a basic cookie cut shape and smoothing it into the shapes you want come later. As you’ll notice I leave the tail for later since it’s usually BEHIND them and it’s less headache.
5) Put the sketch layer on top and lower the opacity !

This is where more detailing comes in. Like placement of the eyes and patterns. As you’ll notice I’ve ironed out the shaping!!!
6) Mapping

This is pelt mapping!!! Of course, it’s mapping out the patterns and shapes of a cats fur to a place im content with. Again, this kind of plays into your understanding of shapes.
7) Color!!!!

I’ll end it here, but this is for playing around on a clipping layer once you figure out a placement and color you like!!!! Airbrushing, stippling, the pattern and detail is up to play with!!!
8) And you have yourself a pretty decent cat!
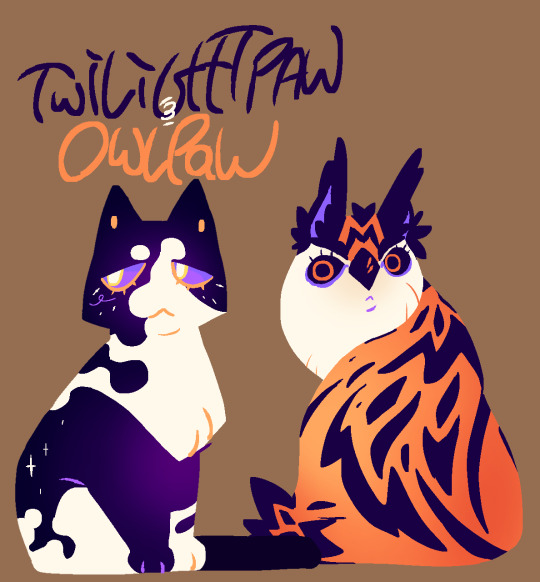
Remember, shapes and exaggeration of features are your best friend!
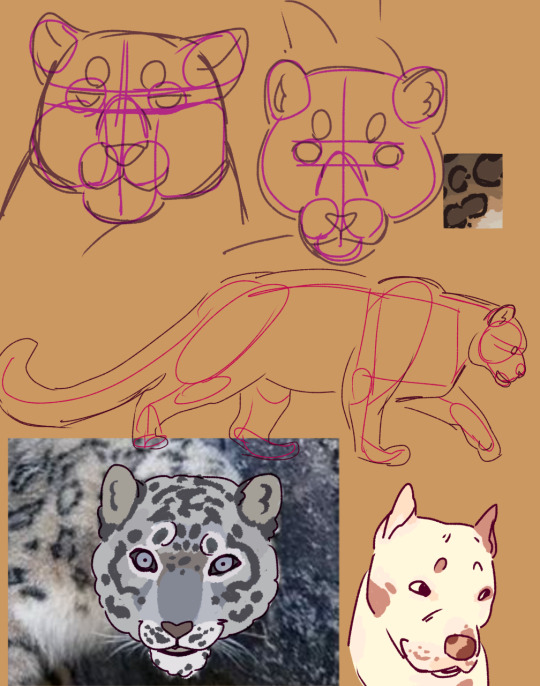
a repeat but a more standard show of anatomy: my snow leopard study! But as you can see even in the character design I give them poof and exaggeration to make expression. Even in the final product I think I will mess around with the shapes to give off whatever vibe I want! Even as you can see for the full body I referenced I blocked out the character instead of really following the shapes.
#clangen#oc#oc art#wc#wc art#wc clangen#wc designs#wc oc#clangen oc#endlinggen#nonmoon#answered asks#THIS … IS A BAD GUIDE#I FEEL#but this is generally how I figure out my foundation!!!!!!#please ignore the kitten that was a sweetkit concept#a lot of it is. for me. ironing out the SHAPE of the cat first before figuring out anatomy#im a very toony and shapes guy. big on shapes and exaggeration#im no teacher unfortunately :(#AND EXCUSE THE QUALITY I got these off the playback of ibs speedpaint video#anatomy is very important don’t get me wrong especially for a beginner but I’ve found blocking out the characters shapes first in your head#to be more helpful#because I usually end up sticking close to my anatomy structure!!
35 notes
·
View notes
Note
Any tips on getting better at realism? I've been drawing very cartoony works forever but I really want to branch out and draw more realistically and hone that style but Everytime I try it never feels human 😔
Suuuure. Sorry it’s fairly long, answer under the split thing.
I’d say mainly just practice drawing from reference first. Before I started doing any sort of more abstractive or non referential realism, I spent time practicing with maybe 20 or 30 paintings from reference.
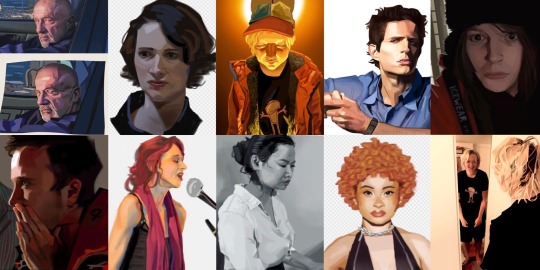
Here are just some that I made during that time. I think they really really helped me to learn the principles of painting appealing realism, different kinds of people, color, skin, lighting, and anatomy.
In terms of actually drawing realism (whether from reference or not) I think the most important tip I can give, as well as the most overlooked ironally, is stylisation. Most realism that I see doesn’t connect at all with me which I think is maybe what you’re talking about when you say your portraiture doesn’t “feel human”.
Learning to draw realism in my eyes is largely about learning how to shortcut every single thing you can. So instead of drawing everything exactly how it is using an image, learn how to stylise realism in your own way. I find that if you don’t find a way to simplify the process, it can end up being A : Busy and B : hard for you to create more realistic images from imagination or from real life instead of photographs.
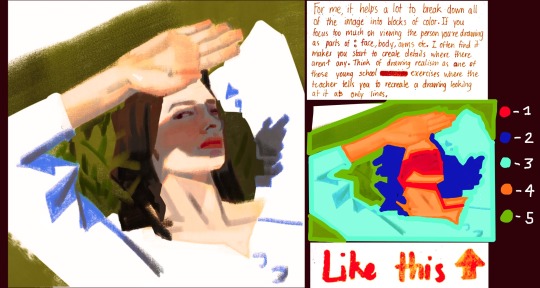
Here is a 40 minute drawing I just drew from a random photo I pulled off Pinterest + small explanation on what helps me to break down an image. I simplify realistic portraiture by adopting somewhat of an angular style, but the best realism / semi realism artists I know of draw realism using their own stylisation methods.
I also personally find that it helps to start by blocking in instead of sketching with lines, but I understand that this is a personal preference and might not work for you.
I also say this for everything but there is no “cheating” in art and anyone who tells you there is fundamentally doesn’t know anything about drawing, especially in the learning process. Cheat if you want. Use grids to plot where things will be, colorpick, trace, liquify, transform, whatever. Although I do also recommend that you only use this as a way to learn and don’t rely on it as a crutch, it helps a lot to be able to draw independently of all of these factors. But I learned to draw partially *by* being a kid who traced and colorpicked and fucked around. Who cares
This applies to everything too but just practice a lot. I’m too embarrassed to show but when I first starting drawing semi realistic art without reference it fucking sucked. Like *really* fucking sucked because I am extremely extremely faceblind and I mean that. It takes me 3 seasons of a show to recognise an actor’s face. But because I’ve drawn hundreds of faces now I know what I’m doing kind of. I also never post any realism art immediately because oftentimes if I don’t look at it for a day or two, I’ll come back to it and notice that something doesn’t look quite right. I would say that definitely helps.
ALSO very important but look at it from far away or a little version. I always look at my drawing in the digital navigator on FA and it helps me to notice when something looks dumb.
Anyways hope this helped at all… lalala. I don’t know man. Don’t take my words as bible I’m just some guy and I am also not a professional and realism is definitely not my strong suit. Tutorials are bullshit and if you think any of this advice sucks for you then don’t take it and forge your own path. Bless
#ask#I’ve got quite a few asks asking for tips. I’ll try to answer them all in time but#seriously I am just an amateur at words and at pictures.#I like making pictures though… let’s all make pictures guys.#But my methods are just my methods. I try to use as few brush strokes as I can#and I’m sure other wonderful artists probably draw realism completely differently than me. I don’t know#Long as heck !#No one judge on the 40 minute portraiture in image#It was my first time using CSP today and I just wanted to try it out. So it was very quick and I don’t know the program well at all.#Lalala…
75 notes
·
View notes
Note
Just out of curiosity, you make the mockups for your faux sticker set by yourself from scratch? or maybe mofidy existing ones?? I Think they look very good and add so much to the comms and you even theme them to suit the characters instead of using the same one over and over, like wow that takes some effort!! Your art is amazin! Do you reccomend some tutorials/tips and tricks/sites for mockups like these?
Hi! Thank you so much, I am so glad you like these! To do these I most often use stock images and public domain images alongside textures and scans of objects (notes, paper, scribbles, book spreads etc.) I made myself and mofidy them into digital collages. I also sometimes use preexisting mock-ups for graphic designers and just edit the hell out of them to make them suit my patchy aesthetic, but I prefer to just use the previous method of putting images together, because it gives me more of a field to work with. It does take a bit of effort, yes, that's why I don't make them for every commission post but I like to create them anyway as much as I can, to visualize a digital product in a semi-realistic way :-)
If I want to create a specific effect, I often just search up some photoshop tutorials or just experiment with filters untill i find something exciting or nice graphically. There are a lot of places that offer free textures to use, for example sites with materials for 3d modelling that offer these things - which I love to use in my work. But they are super easy to create on your own as well traditionally. I often take pictures of scraps, dirt and the like to later put into these types of images. You can also find that many museums and art institutions offer public domain images (of artwork, documents and the like) from their collections!
All in all, the process of making these comes from my need to explore how all the effects, filters etc. from digital programs can be used to achieve interesting visuals. I am by no means any authority on the topic though, I mostly just explore and if I like something - explore it more.
Sorry for the long anwser, but i think this is something other people would also enjoy to know!
Thank you again!
71 notes
·
View notes
Text

Finally found a good tutorial that wasn't just airbrushed semi realistic women so I had to try it out immediately! Nothing wrong with that but I just realised it's not the drawing style I lean towards cause I struggle too much with it and end up having no fun - and art is supposed to be fun! You guys who do it are more patient than me haha! But here is a style study on Silco and I really like the outcome!
33 notes
·
View notes
Photo

Tutorial sheet. One of my personal methods I use to color over greyscale. Just thought I'd share. Patreon: https://www.patreon.com/JaeHaruArt?fan_landing=true Link Tree: https://linktr.ee/jaeharuart
#art tutorial#drawing tutorial#painting tutorial#rendering tutorial#semi realism#semi realistic#jaeharuart#how to color#how to color greyscale#tutorial#digital art#how to draw digitally
48 notes
·
View notes
Text
How I draw: Silver Metallic Buttons for Sims 2 Textures
As we all know, Sims 2 doesn't really appreciate large file sizes/dimensions for it's textures, so sometimes you have work very closely with the individual pixels. Here is how I draw buttons. Video is sped up so don't feel like you need to draw as fast as me!
Side note: this tutorial is created on the basis that you already know how to use the basic functions of Sims BodyShop to extract the texture file. There's plenty of tutorials out there explaining that so please don't ask me to clarify on that part. Anyway, on to the buttons...↓↓↓
What you need:
A PC
Digital Drawing app (like Photoshop, Krita etc)
A Graphics Tablet with pen - you could try this with a mouse but I wouldn't recommend!
And obviously Sims 2/Sims 2 BodyShop
First off, create a new layer - we don't want this button permanently stuck to our base texture. Then I get a standard hard edge brush (I use Krita as my drawing software, so just use whatever hard brush is available in your preferred software/app). Because I'm making relatively small buttons, I make my brush 7.09px in size. Select a mid to light grey colour as the base. Make a single circle.
Then decrease the brush size to be nice and small. As a comparison to my 7.09px circle, I decrease to 0.01px for this next step. Choose a slightly darker grey colour and lightly sketch in a 'semi-circular line' about 3/4 of the way around just in from the edge of the circle. By lightly sketching - and not pressing down hard, you'll get varying tones on each pixel to represent different reflections on the 'metal'.
Next choose a darker grey again, and lightly sketch around the similar area as the last colour, but don't be too fussy on hitting the same pixels - we want varying tonal values for our shadows.
Then choose white and lightly sketch the 'catch light' part of the button. This doesn't need to be right in the centre, in fact it's better if it's off to the side, or towards the top more. We're not always facing directly towards a light source so this creates a more realistic lighting effect. You'll see me select the same mid to light base grey I used just to lightly dust over the edges of the white area to soften it a tiny bit (only do this if your white edge is a little to crisp).
After that I go back and forth between a few different tones of grey to lightly sketch over the parts we haven't really drawn on yet. This just helps create some gradual shading that enhances the 'roundness' of our very flat, very 2D button texture.
Once you're happy with the shadowing (remember it looks somewhat janky this close up, but you can always zoom out to see if the button looks more smooth when further away), you can then make another layer, and drag it below your newly made button layer in the layer menu. Select a soft edge brush and increase the size to slightly wider than your buttons overall size (I chose 9.14px compared to my 7.09px button)
Choose black from the colour wheel/palette and lightly build up the shadow underneath the button, gradually increasing size and opacity until desired tone. If the colour of the 'garment' in this texture is light then keep the shadow to a minimum, if it's dark then the shadow needs to be deep enough to show up.
Zoom out and inspect how this button looks further out. If you're satisfied, then merge the button and shadow layers together, copy/paste it as many times as needed for the garment you're texturing and Voila! You made buttons for a Sims 2 Texture!!
Feel free to ask any questions below - I'm definitely no professional, especially in creating tutorials so I'm more than happy to clarify if something didn't make sense.

#sims tutorial#digital drawing#retexture#drawing tutorial#ts2#the sims 2#digital art tips#lraerosesims#lraerosesims-tutorials
91 notes
·
View notes
Note
Wait but how do you draw faces???? ): Do you have more suggestions for that sort of thing?
oh faces! i'm going to assume you're drawing in a semi(?) realistic/ anime-ish style? that's kinda the style i'm familiar with, if you're going for a super 2D graphical style then a lot of my advice won't really apply! i'll put it under the cut
1) I think the most important thing for faces is to always keep in mind the 3D form and planes of the face. Looking at a lot of simplified art (like anime) is a little detrimental for this because it's easy to think the features of the face are just kinda pasted on
Here's a tool from William Nguyen that lets you play around with any angle and light source you desire for heads! It really emphasizes the 3D form and especially the planes of the face. It's helped me out a ton!
Sinix has a video on drawing faces from any angle from imagination (no reference), again focusing on the 3D nature of faces. For individual features of the face (eyes, nose, mouth, etc) he has a playlist of anatomy tutorials!
- I advise against turning to memory and iconography for features of the face (like 👁️ and 👄) Icons like these are useful when the 2D shape is more important for communicating information quickly like in standardized hazard signs. But for more realistic drawing, you want to rely on the 3D form so these simplistic drawings can be jarring in certain styles when in the context of a full human face. This Proko video mentions that you should treat the features of the face like the eye as just another abstract form and not think of it specifically as an "eye" (Proko's channel is also a good general art resource)
2) basic proportions
This is about where specific features of the face are located. I never really studied this on its own, but I think drawing a lot just got me familiar with it. I'm hesitant to link a specific resource here because I didn't really use any myself;; while this isn't as exhaustive as I'd like, I like how Marc Brunet explains it! (Although I'm not a big fan of how he delineates male/female faces and facial features so black and white...? like don't feel obligated to stick to that specific face shape for female characters TTOTT i think it can get pretty redundant compared to the diversity of the male faces he draws)
- Facial proportions change with age! So you should be mindful of it depending on how old the character that you're drawing is
3) expressions
Drawing faces means you're gonna have to draw expressions, even if that expression is a neutral face. I'm admittedly not the best at this, but try pushing the expressions to their extremes to make them more interesting (of course depends on context). 2D disney expressions/concept art accomplish this perfectly and are a good reference to study from (I personally enjoy Shiyoon Kim's concept art!)
- Note how when you cry, the entire face (+body) moves to create that expression. It's not just a tear falling down the cheek, it's the eyebrows furrowing, the muscles around the eyes scrunching in(?), mucus running down the nose, mouth and lips tightening, eyes and nose becoming red, shoulders hunching up, etc.
- as a small aside I want to emphasize the importance of eyebrows because I avoided drawing them/ moving them around more when I started learning to draw, don't do that!! they're crucial for drawing expressions!
4) diversity
Try depicting facial diversity to make a character unique and more interesting!
- semirealism helped me turn away from the hyperstylization of certain anime styles where a lot of these unique features are smoothed away. Things like wrinkles around the brows/eyes/mouth, eye/nose/mouth shape and size, facial bone structure, facial hair, etc really help to individualize a character/ capture their likeness
- also people of different races have different facial features that you should be mindful of. I don't feel knowledgeable enough to give specific advice on this, but if you're unfamiliar with something please use references!!
This can be challenging especially in stylized drawing, since you tend to have to pick and choose what you choose to depict. For example, I find that trying to draw out all the wrinkles of a character, while it may be accurate, it just doesn't fit my style. I therefore have to balance the amount of details to include to achieve a character's likeness. However, stylization also allows you to emphasize those unique features which makes a character more memorable to me!
as another example this is a personal trick i use but i've found drawing the bottom lip helps make a more masculine face, and drawing the top lip as well for a more feminine face...??? idk why this works for me (and it may not work for you!) but yeah try playing around with what details you include/exclude and see what you end up liking!
okie I think that's all I have for faces..? hopefully i'm not missing anything... again I prefer to let actual teachers give specific advice on how to draw, I feel more comfortable talking about general ideas and referring you to better sources that you can learn from first-hand!
also I think in my efforts to explain the key aspects of drawing faces I've kind of made it seem like I follow strict delineated steps... no I truly just wing it every time I draw TTOTT I just think these points are important to keep in mind so that when you amass more knowledge about them you can internalize it to become a habit!
enough yapping from me thank you for your ask! i hope this can be of help to you 🫡💞
#my asks#art resources#edit just realized this may have been more about how i draw faces like step by step and not so generalized TTOTT#i'm sorry if i didn't really answer your question correctly TTOTT;;;
81 notes
·
View notes
Text
I'm currently working on the Odin Project to learn how to code and wow just...it's so cool a community of people came together to give free resources so others could learn something like this without having to go to school or spend money at all.
Art doesn't work the same way as coding, it's not all about rules, but I think once I'm able to semi-retire out of professional art I'd like to take time to build something akin to this with other art professionals. I've talked about doing a discord but that would simply be too much on me right now, but I do think in the future it's possible to do that and much more. Go over fundamentals of art, tutorials and more complex and specific processes. I feel like this exists but often scattered and often behind paywalls.
I've made a lot of wishes and dreams for my future, and have had to re-evaluate what I want to do with my life a lot the past few years. This is a dream that I feel like really encompasses my need for community and to help others, while also being realistic with my physical abilities. It's a long way off, but I'm excited for its prospects.
43 notes
·
View notes
Note
Hi! I was wondering how you draw people’s faces & bodies (specifically babe but thats just cuz I like him :3), I kinda struggle with the proportions of stuff relative to each other, and your art always looks so good! Both like, the style, but also getting them to look consistent. (Also it is in fact me who asked about copying your art again, hi :D) Love your stuff man 🫶
hi anon!!! my art is pretty stylized, and im not the best at explaining but ill briefly explain my process to u!!
this is a p long one so
okay! so!
here are the babes i quickly scribbled up

usually the very first thing i establish is the face shape! i usually do a very vague oval that extends from a circle (generally the eyes are around/ slightly above where the circle crosses the overall oval shape.) depending on who u wanna draw, the oval can be long or roughly square,,, treat it like a playdoh in which u can mold it
* generally i keep the eyes where the ears are, and realistically the tip of the ears is where the eyebrows end but i always break this rule LOLOLOL
THEN i try to figure out the key features of the face: the eyebrows, the nose shape, the eye shape and if there are any other visible feature like deep smile lines or moles
* i draw the mouth around where the bend of the jaw is, and eyebrows are around the same length of the eye (sometimes slightly longer and it ends bending w/ the eye shape). make space for the gap between the nose and the mouth, and the chin
try not to line out every detail cuz it'll look. off??? treat ur lines like shapes and shadows. the eyes are semi circles and the lines of the nose are shadows and stuff like that,, its really about simplifying what u see
style is also what u wanna emphasize. i emphasize their eyes and ears (?) to be bigger and to stick out more. i also shrink necks to emphasize their heads. i also make hair messier and in a sense,, bigger,, than they usually would be.
its all about playing with proportion until whatever looks right to u 🤑
i added a speedpaint below,,
ON TO THE BODY PART!
firstly when it comes to proportion i really recommend practicing figure sketching 🧘🧘 it was super helpful for me when i was still figuring out how to draw anatomy and stuff
i was also gifted this book called bridgman's life drawing WHICH IS SOOO helpful and interesting! not saying u have to buy it, cuz there's plenty free resources to help u like youtube tutorials
i took pics some of the pages
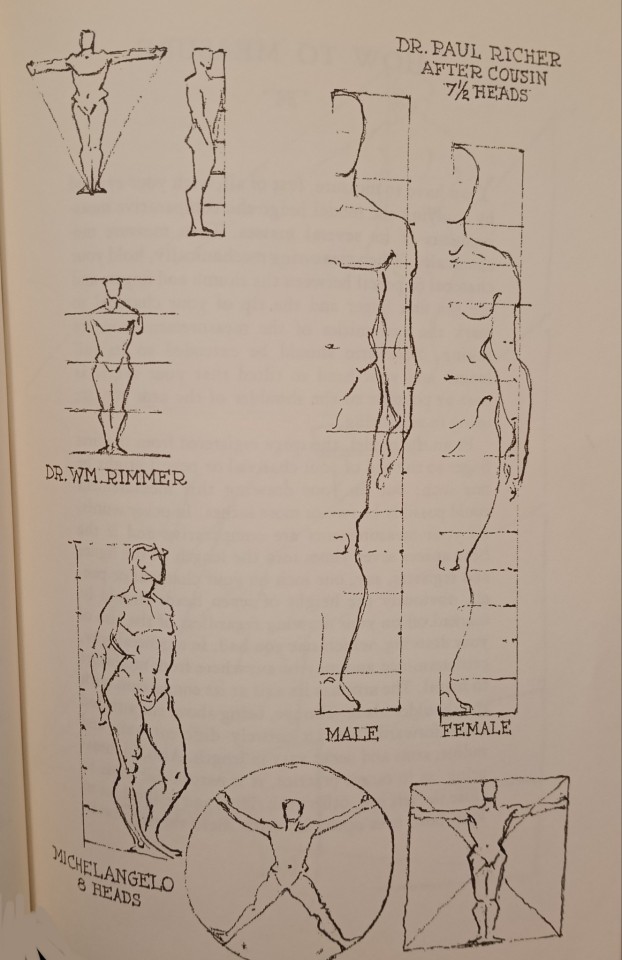
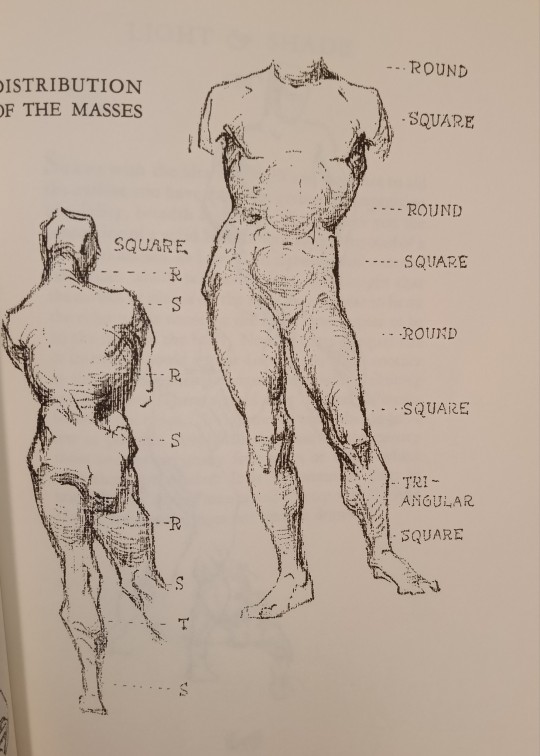
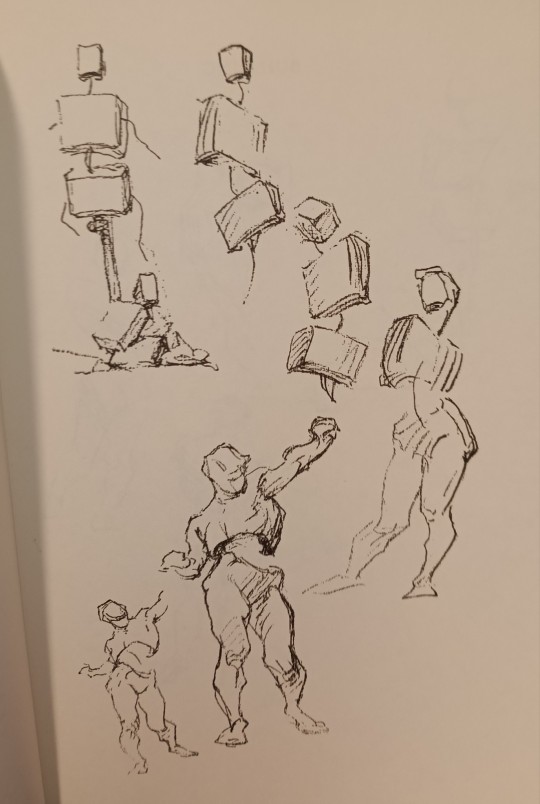
again its all about breaking the body down into bendable shapes and depending on ur style how long these shapes are
and then getting familiar with how it bends and where each part ends in comparison to the rest of the body.
i always start from the head, then the upper torso to get a grasp of how i want to draw a figure's body!
i tend to draw really long limbs, but to keep it looking anatomically accurate enough that it doesnt rlly look "off" i generally keep to these rules
>split the arm into two equal parts at the elbow
>split the legs at the knee, where the thigh + knee is equal with the foreleg (??? the yellow part in the image below) (but i break this rule alot LOLOLOL so. as long as it looks okay)
>the torso length generally varies but imagine it as 3 shapes strung on a string. the middle shape is the smallest and acts as the "knee" of the torso,,
once u get a sense of how the body works shape-wise, u can go silly with the poses (first with reference, then when ur confident enough try without, just to build confidence)

i connect the shapes that dont bend and where many lines connect with a strong line
its important to not treat every line or shape u lay down as the final line. ITS SO EASY TO FORGET THIS!!! u can always erase or redraw or repaint until u get the character right
and then draw everything over and over and over again
thats how u build consistency HAHA
OF COURSE every body is different so mold the shapes to whatever ud like.
++ the key to the confidence in ur figures and posing (dynamic or not) is all about control
and u can really only get that thru experience and practicing and experimenting 🤑🤑
im not a pro (yet) so this is all just from someone who draws too much for my own good.
hope this wasn't too confusing!!!! thank u for the ask anon!
15 notes
·
View notes