#redingote
Explore tagged Tumblr posts
Text
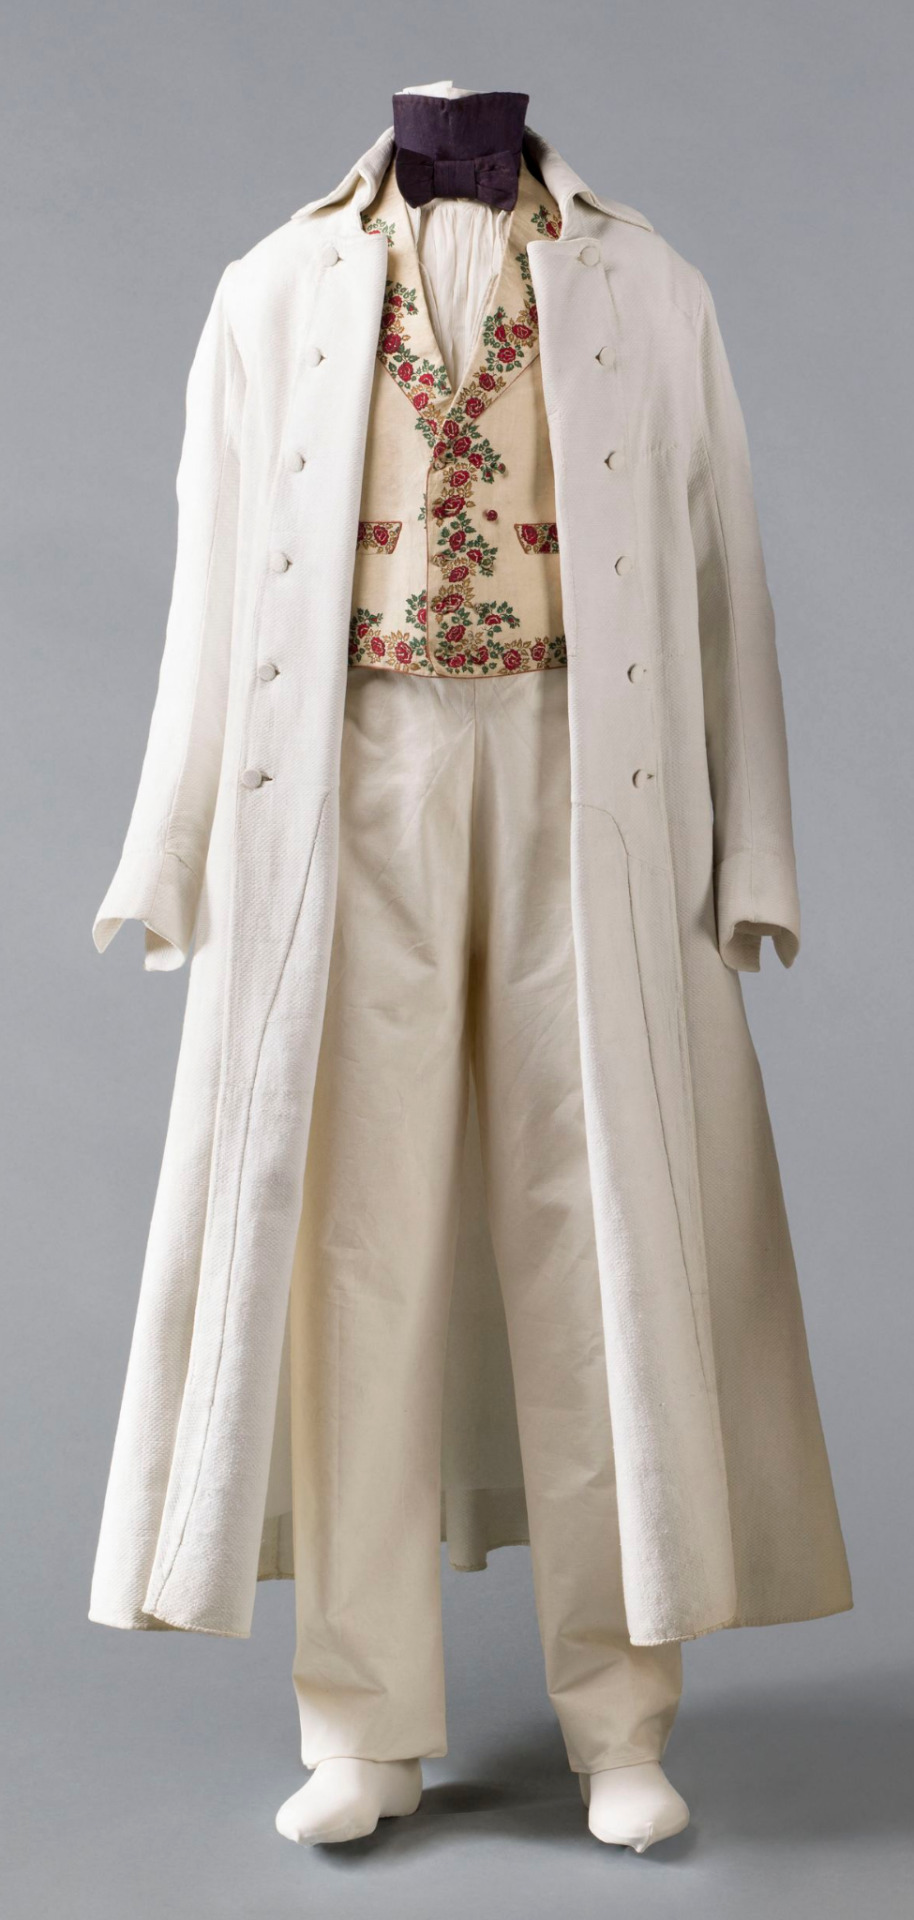
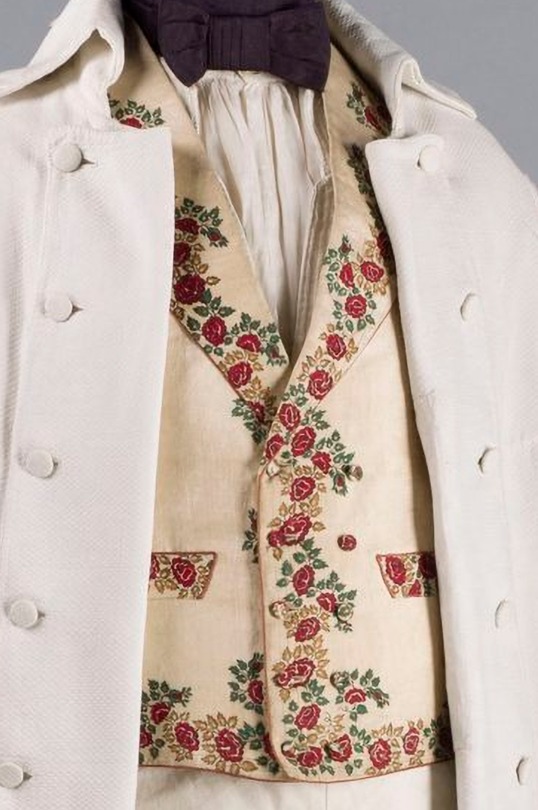
Redingote c. 1815-1825 in piqué de coton (Paris Musées).
Description and machine translation:
Redingote longue et croisée en piqué de coton blanc, col droit rabattu, 2 poches à revers boutonnés derrière et une poche intérieure gauche, fermé par 12 boutons, 2 petits boutons aux manches.
Long, double-breasted frock coat in white cotton piqué, straight turn-down collar, 2 buttoned cuffed pockets behind and one left inside pocket, closed with 12 buttons, 2 small buttons on the sleeves.
The Dictionary of Fashion History by Valerie Cumming describes piqué as a textile from the 19th century and later, "Usually a cotton fabric, woven with a raised rib, often in a diamond pattern, also in straight horizontal or vertical ribs."
#1810s#1820s#fashion history#dress history#regency#bourbon restoration#historical men's fashion#redingote#embroidery#francophones with an interest in fashion history feel free to offer corrections#why nothing about the waistcoat?#textiles#extant
1K notes
·
View notes
Photo


This gray/blue redingote was first seen in the 2017 third season of 𝑷𝒐𝒍𝒅𝒂𝒓𝒌, where it was worn by Gabriella Wilde as Caroline Enys. The piece reappeared again (with a missing button) in 2021, when it was worn by María Hervás as Amelia Castro in 𝑳𝒂 𝑪𝒐𝒏𝒄𝒊𝒏𝒆𝒓𝒂 𝒅𝒆 𝑪𝒂𝒔𝒕𝒂𝒎𝒂𝒓 (𝑻𝒉𝒆 𝑪��𝒐𝒌 𝒐𝒇 𝑪𝒂𝒔𝒕𝒂𝒎𝒂𝒓). Learn more at Bit.ly/StuGeo163
#GabriellaWilde#TheCookOfCastamar#LaCocineraDeCastamar#MaríaHervás#Redingote#CostumeDesign#Costumes#RecycledMovieCostumes
166 notes
·
View notes
Text


Redingote, 1815-20
From Kerry Taylor Auctions
193 notes
·
View notes
Text

La Mode nationale, no. 52, 26 décembre 1896, Paris. No. 19. — Redingote pour voyage ou courses.
No. 19. — Redingote pour voyage ou courses en drap corkscrew livrée. Bibliothèque nationale de France
Dos princesse très ajusté. Baguettes sur les coutures. Baguettes garnissant le devant. Poches sur les côtés. Col évasé formant créneaux. Col et revers doublés de velours.
Chapeau amazone en soie brillante, garni de velours et de plumes.
—
No. 19. — Redingote for travel or races in corkscrew cloth livrée.
Very fitted princess back. Baguettes on the seams. Baguettes garnishing the front. Pockets on the sides. Flared collar forming crenellations. Collar and lapels lined with velvet.
Amazon hat in shiny silk, trimmed with velvet and feathers.
—
Matériaux: 6 mètres de drap, 11 mètres de petite soie fantaisie pour doublure, 1m,50 de velours.
#La Mode nationale#19th century#1890s#1896#on this day#December 26#periodical#fashion#fashion plate#description#bibliothèque nationale de france#dress#coat#redingote#collar#gigot
156 notes
·
View notes
Text
Making the ✨Lioncourt Gown✨ (Part 4/4)
It's been such a fun project working on the Lioncourt Gown (aka Interview with the Vampire's Lestat de Lioncourt's theater costume -
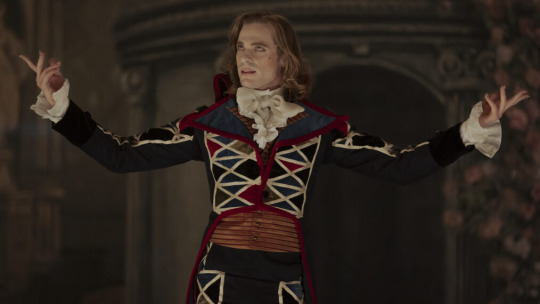
made into a 1790s women's redingote) and I can finally say that I have finished it. It's done, and I love it. It didn't turn out exactly how I'd planned, but that's how it is with me and sewing. I admire anyone who can just stick to their original plan haha but that person is not me. Usually, when sewing I don't think too far ahead, I just do it until I hit a point where something just isn't working out and have to find a way around it. I'm also self-taught, so my workarounds may not be standard procedures when you actually know what you're doing. But I'm still really, really happy with it, and I did a little photo shoot as soon as it was done.
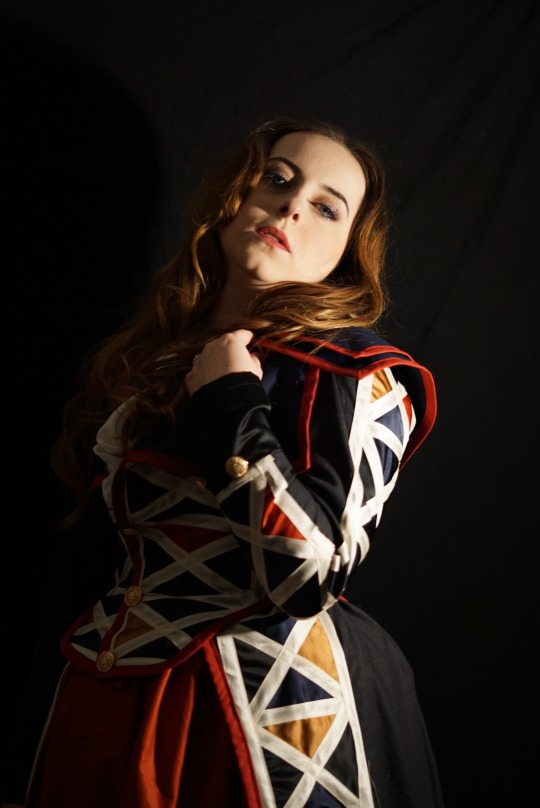
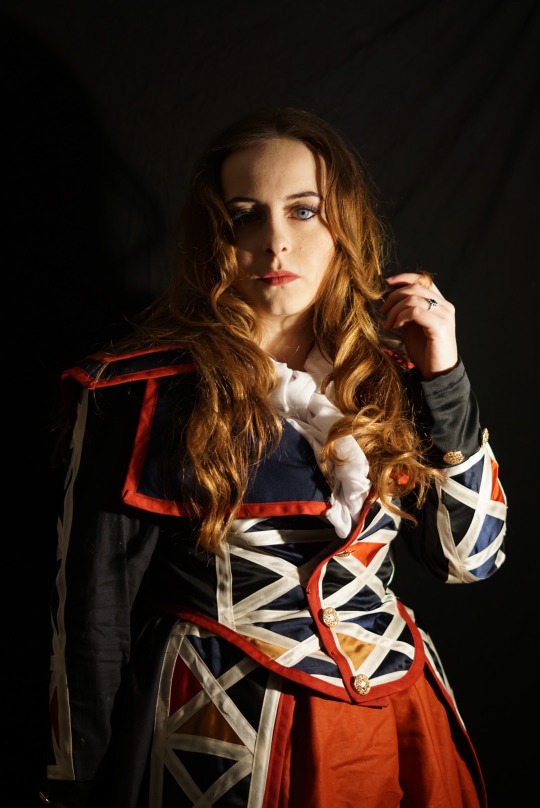
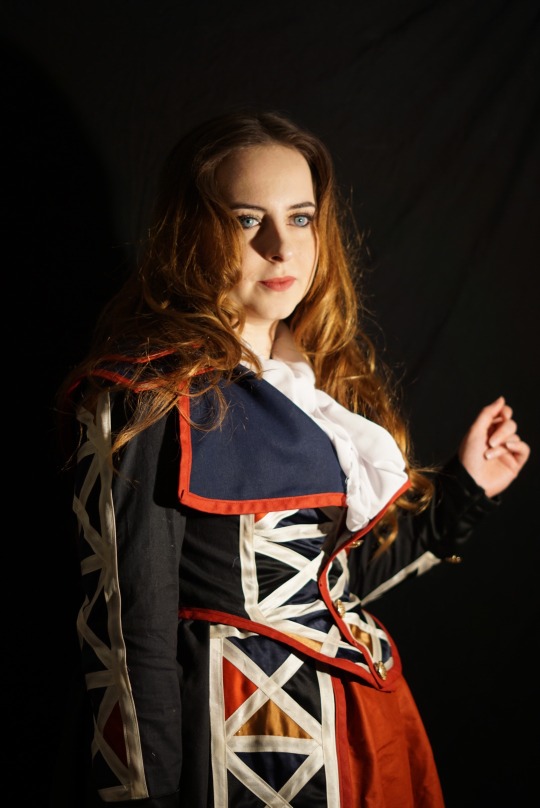
But anyways, here's the final part of this project.
In my last post, we left off with the still detached but finished collar/yoke and the finished bodice. I attached the yoke to the bodice, and then went on to make the final piece - the outer skirt.
For that, I essentially did the same thing I did with the bodice and the sleeves. I attached the colored satin triangles and stitched them down with the tape. Here is a picture just before I attached the tape:
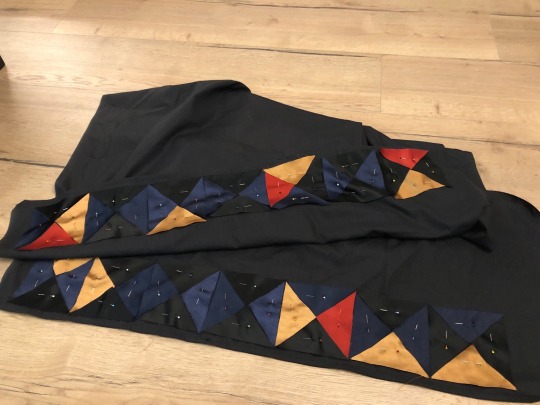
This process is very time consuming and I had severely underestimated it. I did end up finishing it in a day, but it was the only thing I did that day. You have to stitch super close to the edge or the satin is going to fray and stick out and it's not a pretty look. It did end up happening in a few places, so I had to take the stitches out and redo them. But when that was done, I added red tape to the raw edges of the fabric and finished the skirt.
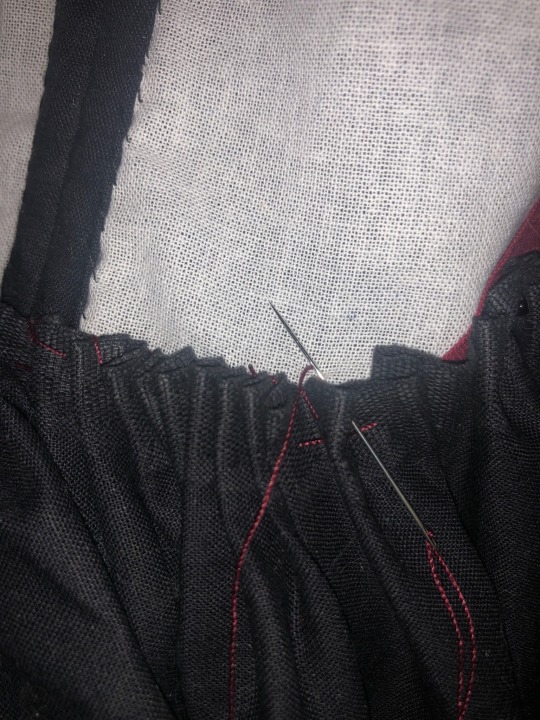
Then finally, it was time to attach the skirt to the bodice. For that, I gathered it with a quick basting stitch to bring it to the needed width and then had to hand stitch it in place, making sure I was attaching it only to the lining layer so the stitches wouldn't be visible from the right side.
Once that was done, it was time for the first complete try on! For one, I was really excited to see it as a basically completed project, but more importantly, I needed to know where to put the buttons. So I put on all my layers for this (shift, stays, bumroll, two petticoats, the skirt, and the bodice with the outer skirt), and realized... it was a bit smaller than anticipated. It fit, but I'd planned to make it double-breasted and the front panels didn't overlap quite enough to make two button rows possible while keeping them centered. So I ended up deciding in that moment I was only going to do one row of buttons. The original only has one row, so it was fine either way. But while on the topic of buttons, another thing: I'd mentioned in a previous post that I wasn't sure whether to add buttonholes or to fake the closure with hooks and eyes, and I decided to do neither. I was way too scared of the satin fraying if I did button holes and the whole hook and eye system is pretty annoying to do, and since I'm only really gonna wear it once or twice a year I decided to just use some red pins to pin myself into the dress for the day. This protects the satin from fraying and is less work for me. It doesn't look super professional though and while historically accurate for some dresses in the 18th century (some even used to sew themselves, or have someone sew them into their dresses), it was not used on redingotes (as far as I'm aware) for practicality reasons. Redingotes are essentially riding coats and were used primarily outdoors, so buttons was the most common way to close up these types of garments. Still, I did not want to risk ruining the fabric, so I decided to do it this way.
So once I'd figured out where to place the buttons, I sewed them into place. On a side note, I do love the way they look. They're so pretty.
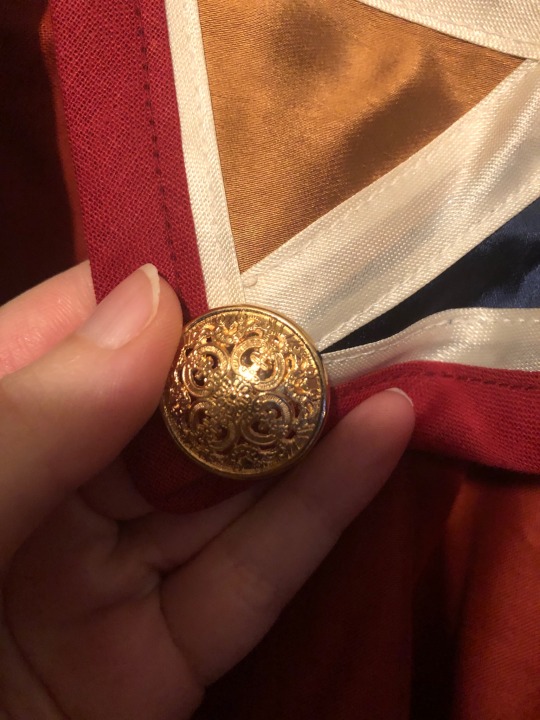
I added four in the front, two on each sleeve and four in the back.
So this is it. It's done.
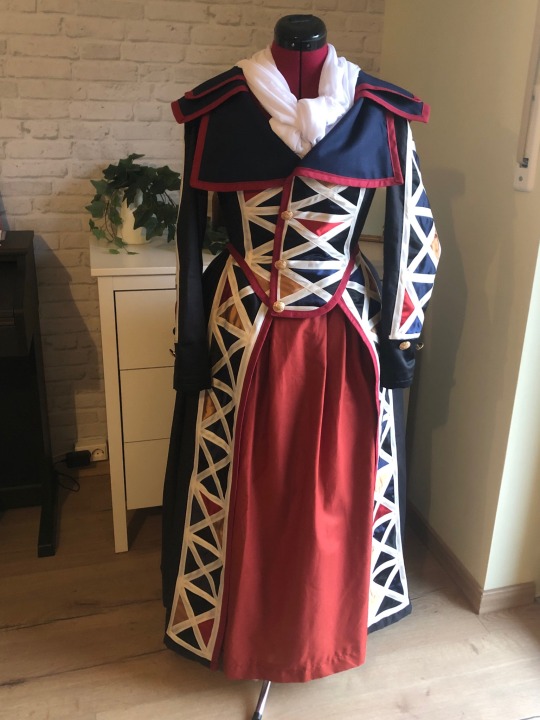
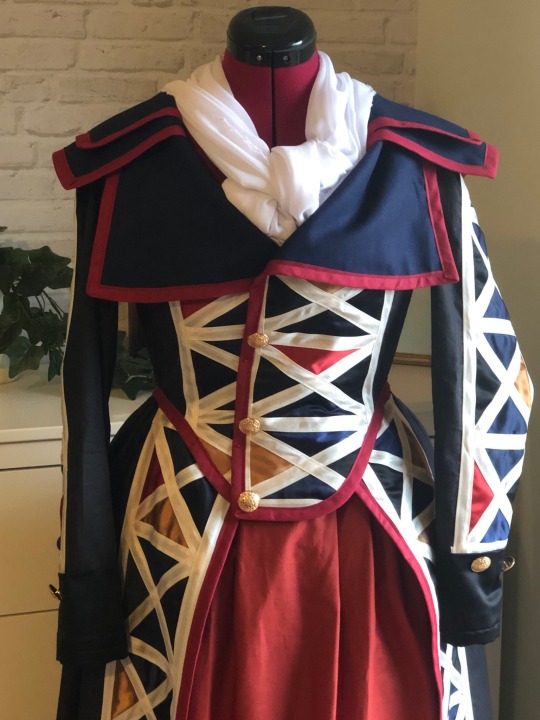
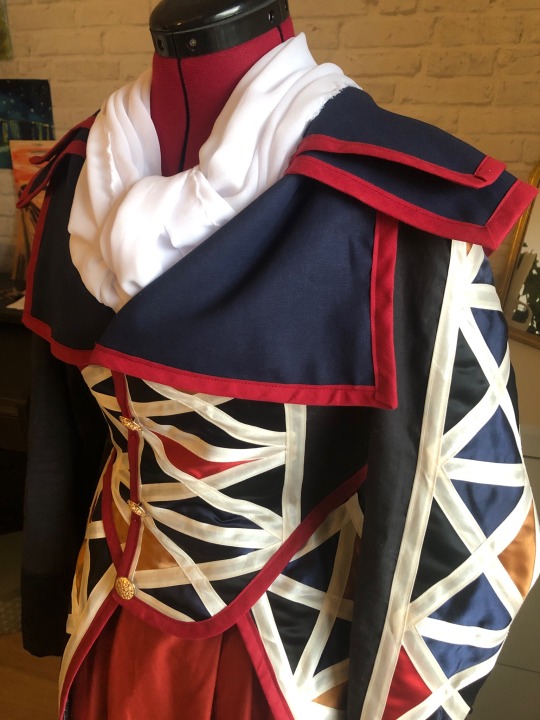
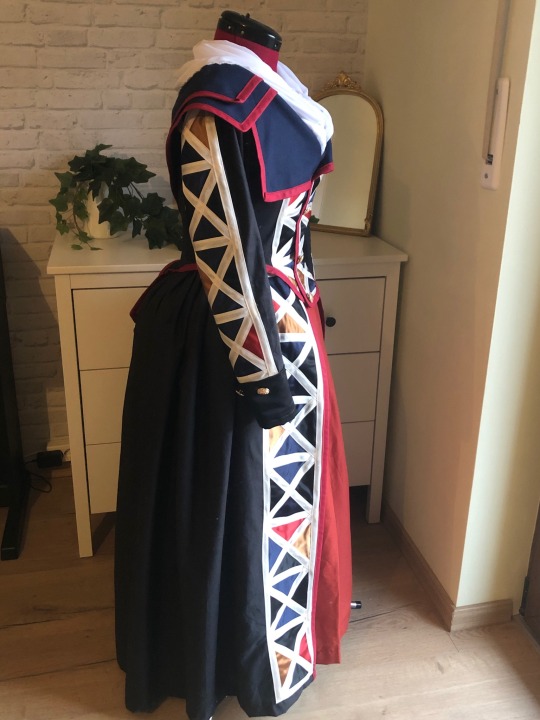
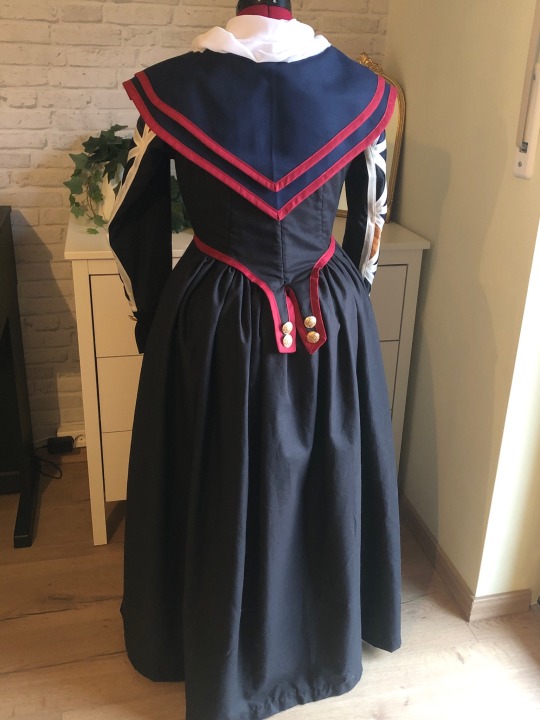
This was, mostly due to the color details, the most time time-consuming and frankly expensive project I've ever worked on (well, maybe except for my very first dress as I still didn't know what I was doing back then - that one took me literal months hah). But it was so worth it. It's been in my bedroom for a few days now and I smile every time I see it. I still can't believe it's in my possession.
Part 1 | Part 2 | Part 3 |
#fashion history#historical fashion#iwtv#interview with the vampire#lestat de lioncourt#amc iwtv#sewing#redingote#georgian fashion#18th century#18th century fashion#18th century dress#1790s#1790s fashion#georgian#fashion
143 notes
·
View notes
Text


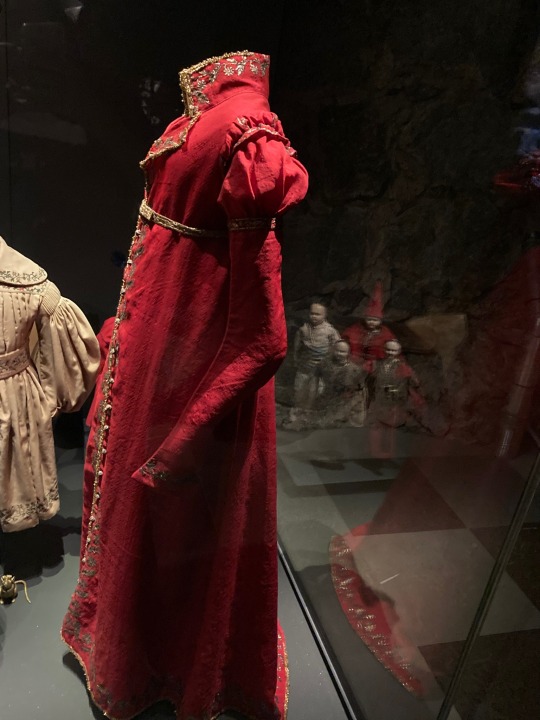
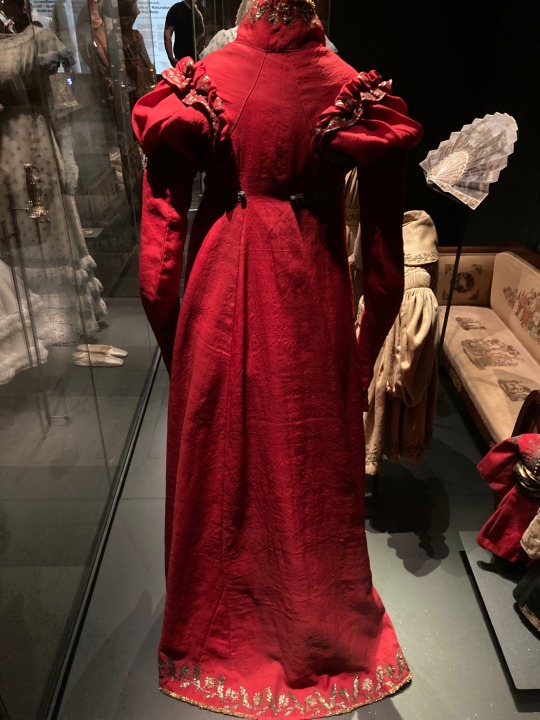


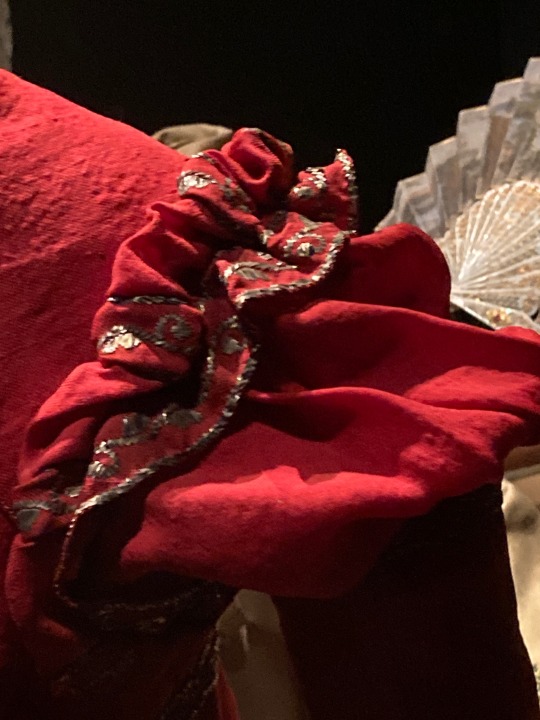
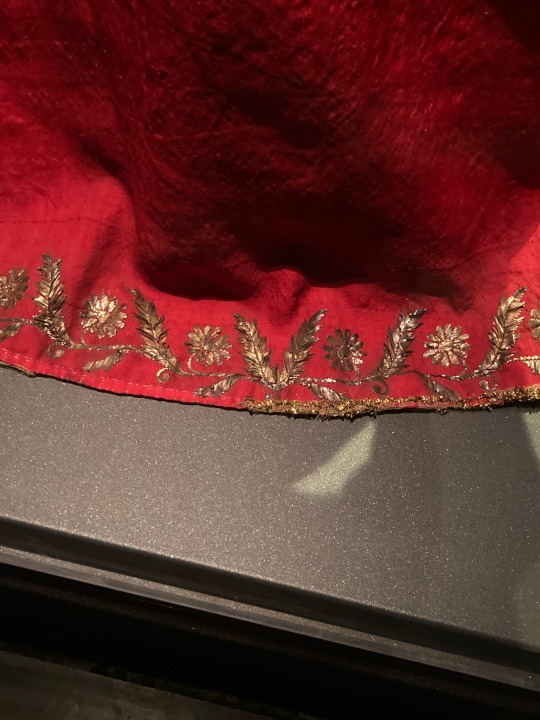
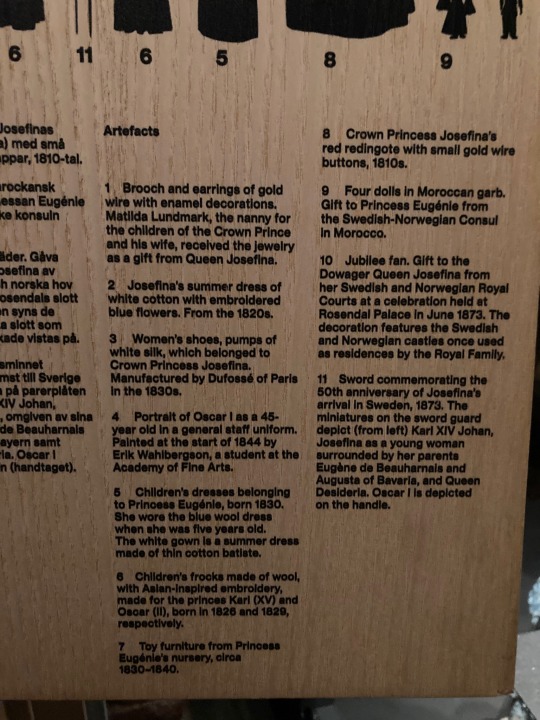
Crown Princess Josefina's Red Redingote With Small Gold Wire Buttons
Circa 1810s
The Royal Armoury
Stockholm, Sweden
#redingote#extant garments#1810s fashion#empire fashion#gold embroidery#gold buttons#crown princess josefina#royal armoury#stockholm#sweden
563 notes
·
View notes
Text

Coat Dress (Redingote), 1810-1815
17 notes
·
View notes
Text
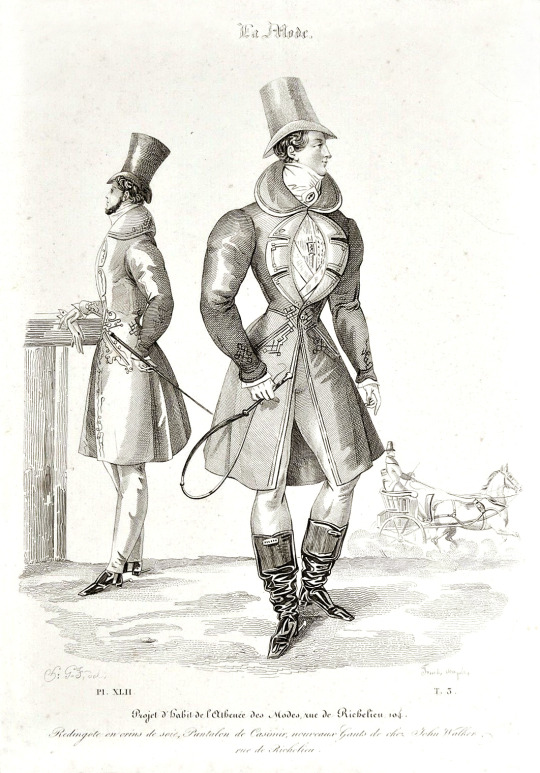
Fashion plate of a redingote (frock coat) design featuring big bold lapels and a slutty waistcoat window, La Mode, c. 1820s
#the 19th century gentleman's answer to the anime girl cleavage cutout#also great for casual Eye of Sauronbounding#19th century#1800s#1820s#1820s fashion#19th century fashion#men's fashion#menswear#redingote#frock coat#19th century art#19th century illustration#fashion#fashion plate#La Mode
389 notes
·
View notes
Text


Au Louvre-Lens, une nouvelle expo : "S'habiller en Artiste. L'Artiste et le Vêtement" :
Henri Fantin-Latour - "Un atelier aux Batignolles" (on voit autour d'Edouard Manet, de nombreux artistes impressionnistes dont Auguste Renoir, Claude Monet ou encore Frédéric Bazille...)
Louis Joseph César Ducornet (artiste né sans bras ni fémurs) - "Autoportrait"
Théodore Chassériau - "Portrait de l'artiste, en redingote"
Yves Saint-Laurent - smoking 1995
Francisco de Goya - "Autoportrait"
voir 1
redingote - Argenton-sur-Creuse, 1875-1900
#louvre-lens#s'habiller en artiste#l'artiste et le vêtement#fantin-latour#henri fantin-latour#impressionnisme#louis ducornet#louis joseph césar ducornet#théodore chassériau#redingote#smoking#ysl#yves saint-laurent#goya#francisco de goya#monet#manet#renoir#bazille#auguste renoir#frédéric bazille#claude monet#édouard manet#vêtement#mode#fashion
6 notes
·
View notes
Text

Fashion Plate, 1786, French.
From Cabinet des modes.
Portraying a woman in a purple redingote and white cotton fichu.
BNF Gallica.
#redingote#purple#cabinet des modes#1780s fashion plate#fashion plate#1780s#1786#bnf gallica#fichu#hat#fashion magazine#reign: louis xvi
63 notes
·
View notes
Text

So-called free thinkers when La Mode is pushing redingotes in 1830.
#Eighteen-Thirties Thursday#1830s#fashion plate#after drawing by#paul gavarni#men's fashion#romantic era#historical men's fashion#fashion history#frock coat#redingote
139 notes
·
View notes
Text

Womens' Red Round Gown with Fichu, March 1792.
#fashion plates#historical fashion#clothing#women's fashion#dress#18th century#century: 1700s#era: georgian#red#round gown#redingote#fichu#month: march#year: 1792#decade: 1790s#colour illustration#op's favourites
2 notes
·
View notes
Text


Pelisse or redingote, 1810-15
From Kerry Taylor Auctions
110 notes
·
View notes
Text

Journal des Dames et des Modes, Costumes Parisiens, 10 octobre 1835, (3310): Chapeau de pou-de-soie de M.me Hocquet 106 Rue Richelieu; Redingote de reps garnie de chicorée. - Bonnet de tulle; Redingote de mousseline garnie de noeuds de ruban de M.me Oudot-Manoury. Collection of the Rijksmuseum, Netherlands
Two women shake hands. Left: hat of 'pou-de-soie' by Hocquet. Redingote of 'reps' garnished with 'chicorée'. Right: cap of tulle. Redingote of mousseline decorated with ribbon bows by Mme Oudot-Manoury. The print is part of the fashion magazine Journal des Dames et des Modes, Paris, 1797-1839.
#Journal des Dames et des Modes#19th century'#1830s#1835#on this day#October 10#periodical#fashion#fashion plate#color#description#rijksmuseum#dress#gigot#redingote#fichu#bonnet
84 notes
·
View notes
Text
Making the ✨Lioncourt Gown✨ (Part 1/4)
Shoot, it's been like two years since I last posted, apologies! I’ve been incredibly busy with uni and life in general, taking care of my mental health, it’s just been a very stressful time lately. I haven't really worked on anything worthy of posting in the meantime, only minor things and one dress I rushed and it didn't turn out well anyway. But, since Halloween is coming up and I don’t feel like wearing the same thing for the third time in a row, I thought it was the perfect excuse to try and make something new and the other day at 2am I fell down a rabbit hole and came up with an idea I’m completely obsessed with.
So recently, (in case you couldn't tell by the title haha) I’ve been really into Interview with the Vampire (the TV show), and there’s this one costume that’s so iconic it immediately caught my attention: This Lestat outfit.
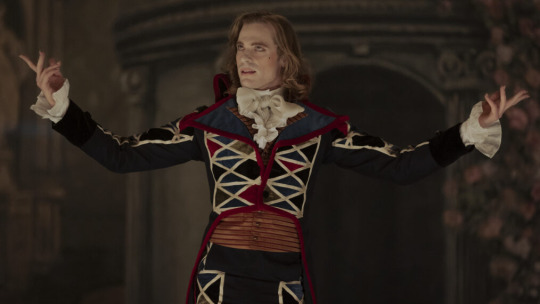
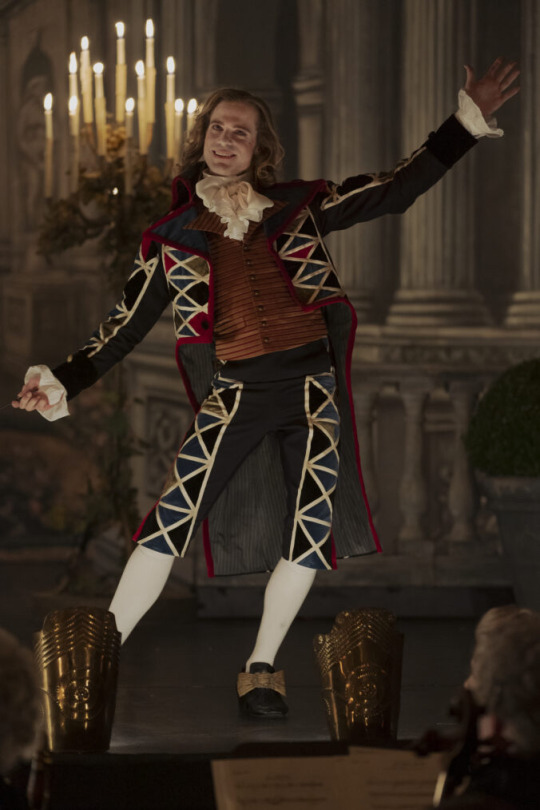
I feel like since this blog isn't fandom related I need to explain myself to those of you who are just semi-familiar with IWTV. Maybe you know Lestat as essentially the villain of the story and are wondering why on earth I'd want to make an outfit inspired by him. The answer is quite simple and not actually deep at all: I just thought it'd be a fun project. I'm very well aware of his personality and would not want to be in the same room as him in real life haha. But he's such an interesting character to watch on screen (they all are, in my opinion). Anyways-
This outfit is from a scene that takes place in the 1790s and now, I’m unfortunately not too versed in men’s fashion so I can’t quite comment on its historical accuracy (and also it’s worn in the context of a theater performance so it’s bound to be more flashy than what people would have worn on the streets), but the way the lapel is shaped just screams redingote to me, and since I've always wanted to make a redingote I'm going to make a redingote version of the costume!
For reference, here's what a c. 1790 redingote looks like:
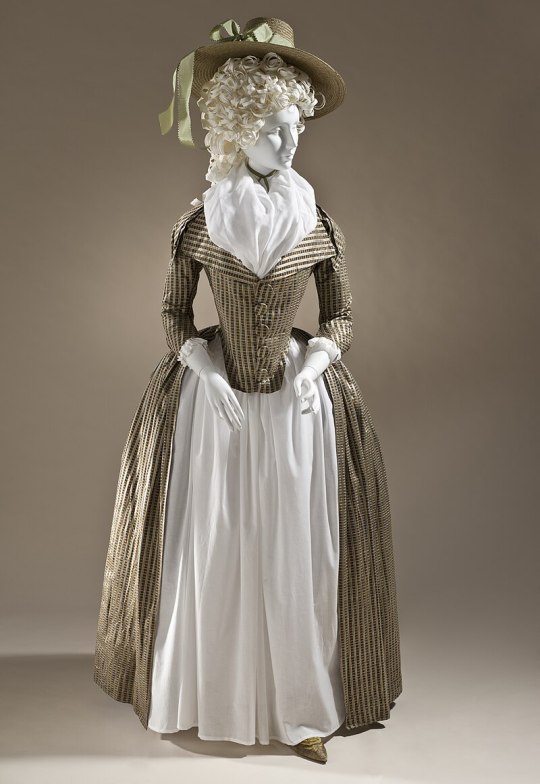
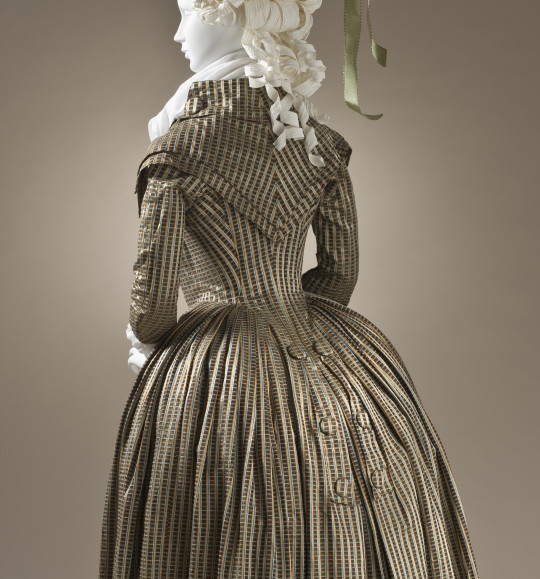
This one has a normal button closure but redingotes were also often double-breasted (which is what I'm going for), taking inspiration from men's fashion. These were often worn to ride in - hence the name, redingote - riding coat.
Maybe this is the point where I should mention that I'm not going for perfect historical accuracy for this project. It really is just a fun project to try to approximate something as seen on a show to an actual historical piece of clothing.
Here’s a super quick sketch I drew to check if the colors looked good together, and I have to say, I’m sold 1000%.
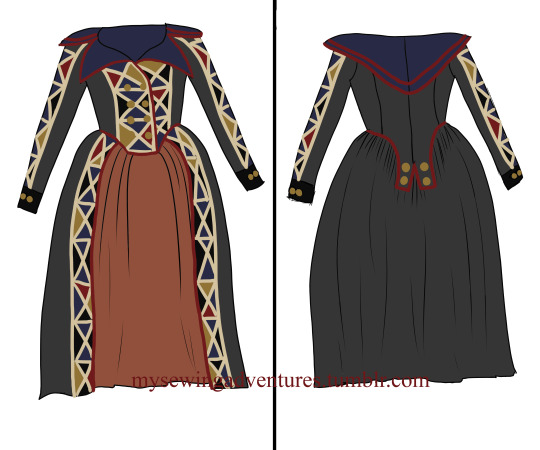
I am so excited to wear this when it’s done, but also a bit anxious because for starters, I’ve never made a redingote before, and the dresses that I have made all have issues with the sleeves because apparently, I can’t sew sleeves correctly. So this time, I really want to make sure it all fits properly before I sew it and take my time with it to make sure it ends up being something that I love as much as I love the idea of it.
This time, I tried something a little different with my mockup - usually, I’ll draft a pattern on paper, then cut out my mockup and sew it, but this time I decided to make the mockup by draping the fabric directly on the mannequin that I dressed in my stays and a bumroll, making sure I had the correct measurments, and it was a complete gamechanger. It fit right away with minimal adjustments, and I was also immediately able to check how the fabric falls, if it needed to be on the bias or not, etc. I ended up doing everything on straight grain which is technically not 100% correct as the front piece needs to be on a slight bias but it seems to work for this piece so let’s hope the fabric doesn’t wrinkle! I’ll also be adding boning so I’m hoping that’ll additionally keep it all straight and even in the front.
Once the mockup was completed, I went on the search for the right fabrics and got these (the skirt fabric, the buttons and the tape I ordered online and they've yet to arrive!):
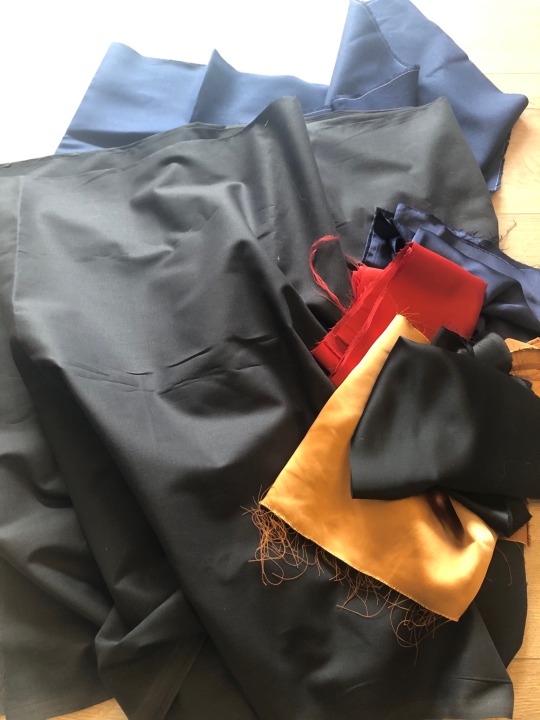
The black base fabric and the blue one are cotton, as will be the skirt. The details are satin! I spent a long time at the fabric store trying to think of the best way to do this and it does look like the details on Lestat's outfit are maybe velvet, but I was afraid it would look a little too costume-y and cheap, so I ended up going with satin in the end.
I pinned the fabric mock-up onto the lining fabric (just a white Ikea bedsheet), added 1,5cm seam allowances where needed cut out the lining first, then placed the lining onto the black base fabric and cut that out as well.
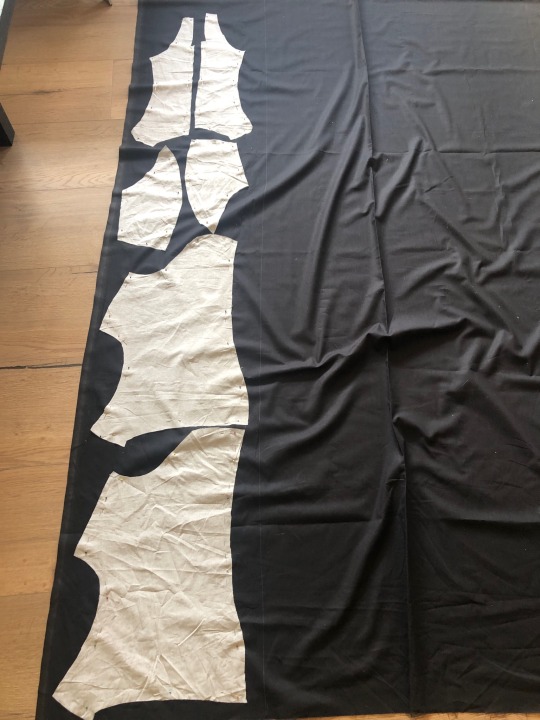
I needed to lay the pieces down this way because I bought 2,5 meters, and I'll need 2m for the outer skirt alone so there's not a lot of space left, as I'll also have to cut out the sleeves from that fabric. I then sewed everything together.
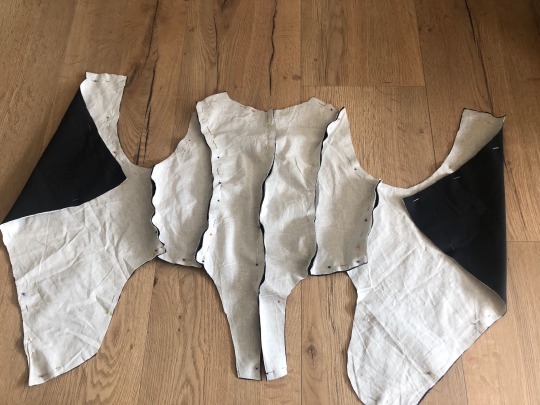
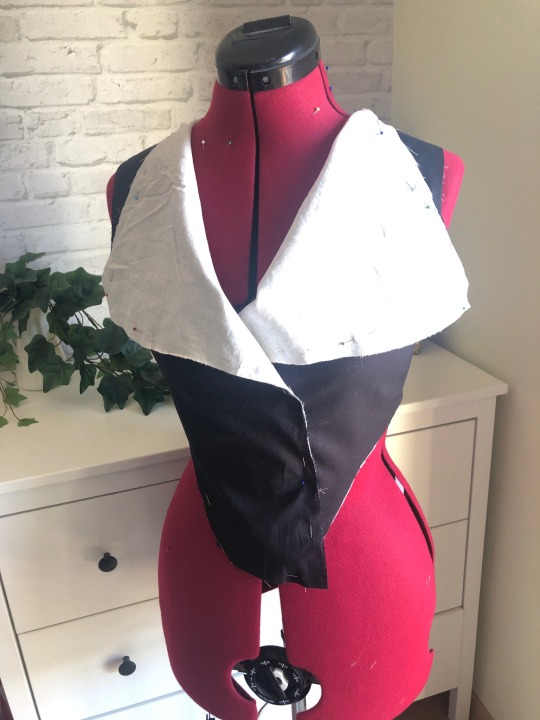
And then I noticed I'd made a mistake - the lining for the front panel was supposed to be blue. Welp, now it's white, and I also realized I didn't have enough blue fabric to do the collar AND the lining, so I went for a fake lining for which I cut out two blue triangles to be slightly bigger than the lapel
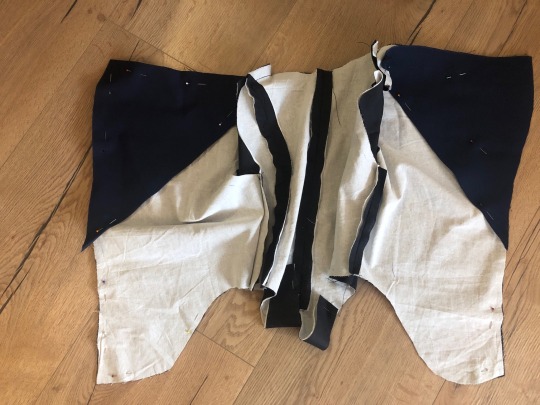
and stitched them to the lining layer so the seams wouldn't be visible on the black outer layer. This was the result:
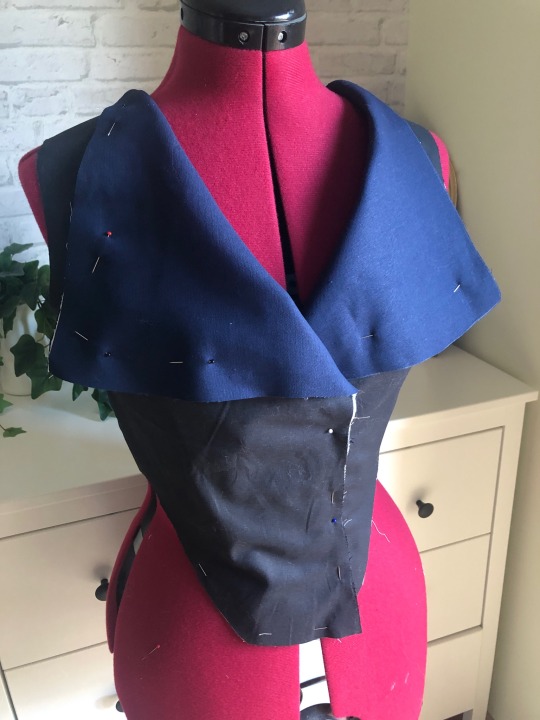
Pretty happy with it! Next up, even though I don't have the beige tape yet, I decided to cut out the color panels in the front and already pin them down. After some trial and error, I decided to go for 15x4,5cm triangles and calculated the size needed for the shorter ones (9x7,5cm), cut them out of the satin (which, let me tell you, was so finicky it ended up being the most difficult part of it all) laid them down and fastened with pins.
This is what I have so far:
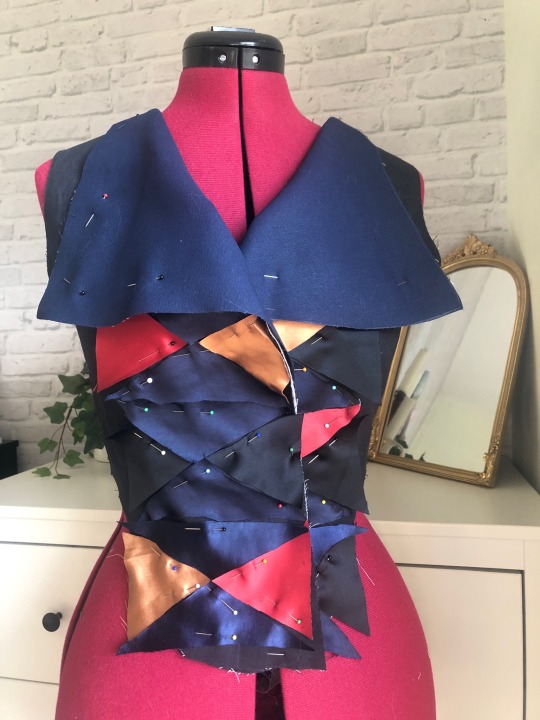
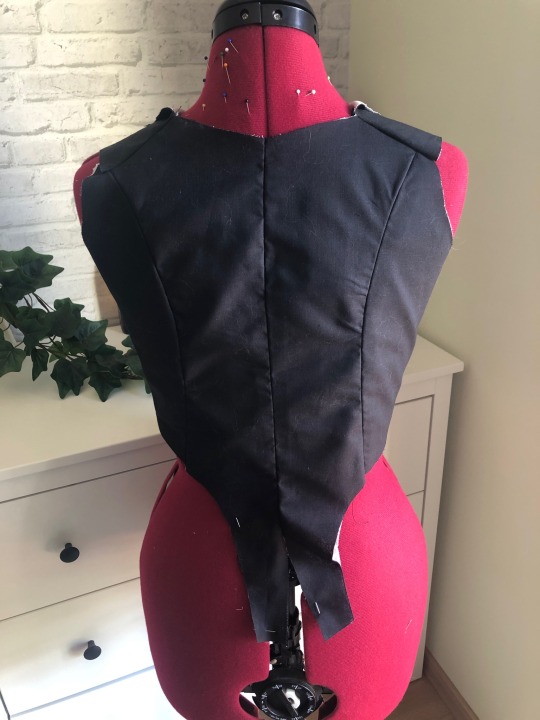
Looking at it in the picture, I'm worried that the color panels take up too much space in the front. It looks like that in the original picture, but in my sketch I made everything a little narrower. But I was also scared of pulling on it too much because the panels are just pinned to the fabric. Some parts are sticking out over the black base layer which maybe also makes it look wider than it really is, I'll cut it to shape once I have the tape and have a better visual understanding of what it's going to look like.
Next up will be the collar/yoke and the dreaded sleeves and possibly the boning. I should do the boning before I attach the beige tape. I am realizing as I’m writing this that I should’ve done the boning before pinning down the colored panels as they’re supposed to cover it. Oh well. It’s fine. Either way, I think it already looks super cool and I can't wait to see the finished product!
Part 2 | Part 3 | Part 4|
#fashion history#historical fashion#iwtv#interview with the vampire#lestat de lioncourt#amc iwtv#sewing#redingote#georgian fashion#18th century#18th century fashion#18th century dress#1790s#1790s fashion#georgian#fashion
60 notes
·
View notes
Text


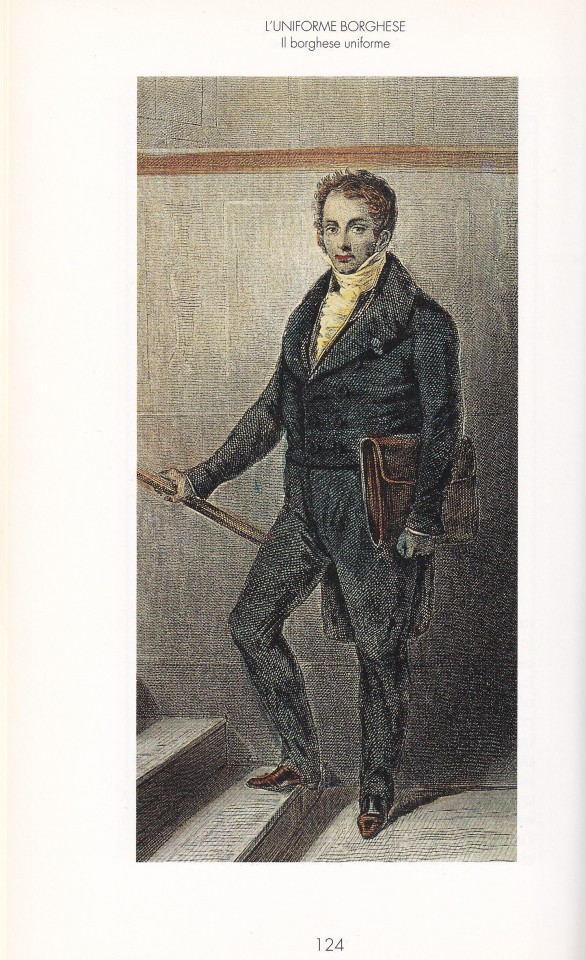


L'uniforme borghese
DeAgostini, Novara 1991, 183 pagine, 14x21,5cm, ISBN 9788840292298
collana Idee di moda, collana a cura di Grazietta Butazzi e Alessandra Mottola Molfino
euro 18,00
email if you want to buy [email protected]
…Tutti quei signori si rassomigliavano, le basette abbondanti sfuggivano dai grandi colletti duri, ch’erano sostenuti dalle cravatte bianche con l’orlo di trina ben spiegato. Tutti i panciotti erano di velluto col risvolto a scialle; tutti gli orologi portavano in capo a un lungo nastro qualche sigillo ovale di corniola; e ognuno teneva appoggiate le mani sulle cosce, abbassando con cura la forca dei calzoni, ch’erano di panno lustro e brillavano più del cuoio delle grasse scarpe…(G. Flaubert, La Signora Bovary, 1857).
La moda come sintesi di una mentalità, come rappresentazione di un comportamento è questo il filo conduttore dei dodici volumi della collana Idee della Moda che si propone un’approfondita analisi del fenomeno moda attraverso i mutamenti psicologici, sociologici, estetici. Saggi redatti da storici della moda e del costume individuano di volta in volta i motivi, i temi, i soggetti, i percorsi essenziali che segnano e permettono di leggere l’evoluzione dei ruoli, femminile e maschile, attraverso quelle trasformazioni. Un corredo iconografico selezionato e un pertinente commento didascalico guidano a una ricostruzione per immagini dei temi proposti.
25/06/24
#Uniforme borghese#moda maschile#anglomania#livree#marsine#frac#redingote#giacca#fashion books#fashionbooksmilano
1 note
·
View note