#rectus abdominis exercises
Explore tagged Tumblr posts
Visit Tumblr Blog
Explore Tumblr blogs with no restrictions, modern design and the best experience.
Last Seen Tumblr Blogs


Fun Fact
Kazakhstan’s Minister of Communications and Informatics has blocked the Tumblr site because it contained 60 sites of terrorism, extremism, and pornography in 2015.
Text
Mastering the Reverse Crunch for Effective Core Training
If you haven’t done the reverse crunch but want to work towards six-pack abs, perhaps that is the missing ingredient. Learn all you need to know about the reverse crunch below.
The reverse crunch is an effective exercise that targets your abs, but most people fail to do it. Don’t be like most people.
How To Do the Reverse Crunch
As with most ab exercises, you only need to lie on the floor or floor mat to perform the reverse crunch.
Lie on the floor mat facing up with your knees bent at a 90-degree angle. Your feet should be flat on the floor, and your arms should be straight near the side of your body.
This is the initial position.
Brace your core and lift your feet off the ground by curling your hips and moving your knees toward your chest.
Slightly continue lifting your legs until your lower back is off the mat, but your mid-back is still in contact with the floor.
Keep your head straight and aligned with your spine at all times. Arms and hands should be parallel and next to your body.
Slowly lower your feet back to their initial position.
That is one rep.
You can make the exercise more challenging by always keeping your feet off the ground. This will keep your abs under tension for the entire exercise duration. Keeping your legs straight while descending adds another difficulty to this exercise; aim to lift your legs instead of bringing your knees toward your chest.
Muscles Targeted
This exercise targets only your abs.
The rectus abdominis is also known as the six-pack muscle. The reverse crunch will target what is commonly referred to as the upper and lower abs.
Mistakes to Avoid
Using momentum is a common mistake people tend to make with this exercise. As is familiar with other ab exercises, you need to avoid using the momentum of your body to help you lift your legs. If you cannot perform the exercise, do regular crunches, an easier reverse crunch variation.
A sign that your abs are not strong enough is if you are arching your back. This is common when you are lowering your legs to the initial position, and it can leave you open to injuries.
If you choose to do the advanced version of the reverse crunch without touching your feet on the floor and with straight-up legs, check out the video below by Jeff Cavaliere to see more mistakes you should avoid and how to fix them.
Benefits
The most significant benefit of this exercise is that it targets your rectus abdominis, your six-pack abs muscles, as the primary function of this muscle is to flex your trunk and spine. However, only exercise will not give you six-pack abs, as what you are eating is more important than any workout.
How to Shed Fat and Completely Transform Your Body
Compared to other ab exercises, such as the regular crunch, the reverse version takes the strain off your neck. Some people use their hands to elevate their torso when doing regular crunches, which puts a lot of pressure on the neck. By lifting your legs toward your body, you are more likely to use your abs than any other muscle to do the movement.
The same can be said about your back muscles. Bending your spine during traditional crunches can be detrimental, according to this study, and the reverse crunch can be adjusted to flex your spine less than the traditional crunch.
For its easy setup, this exercise can be performed nearly anywhere.
Cons of the Reverse Crunch
Now that you know the benefits, you should also consider the negative side of this exercise.
Unfortunately, this is not the most complete ab exercise you could perform. The reverse crunch will barely target your obliques, the side of your abs, which is the muscle responsible for twisting your torso.
Read More: Science-Backed Oblique Exercises to Build the Most Solid Trunk
How many reps and sets?
Reverse crunches should be added to your regular training routine. As you discovered, it is not the answer to having six-pack abs, but it will help you get closer to your goals.
As part of your core training, you should aim to do three sets of 12–20 repetitions of the reverse crunch.
If it is too hard, lower it to 2 sets and have a more extended rest period between the sets. If it is too easy, add a resistance band to make the exercise even more difficult.
0 notes
Text
Kettlebell Snatch Muscles Worked
The kettlebell snatch is a dynamic, full-body exercise that targets multiple muscle groups while also improving power, coordination, and cardiovascular fitness. It’s a more advanced kettlebell movement that requires proper technique to maximize benefits and minimize the risk of injury. Here’s a breakdown of the primary and secondary muscles worked during the kettlebell snatch:
Primary Muscles Worked
Posterior Chain (Backside of the Body)
Glutes: Drive the explosive hip extension during the upward swing.
Hamstrings: Assist in hip extension and control the downward phase.
Erector Spinae (Lower Back): Stabilize the spine during the movement.
Shoulders (Deltoids)
Anterior Deltoid (Front Shoulder): Lifts the kettlebell overhead.
Lateral Deltoid (Side Shoulder): Assists in stabilizing the arm during the snatch.
Traps (Upper Back)
Upper Trapezius: Helps elevate and stabilize the shoulder as the kettlebell moves overhead.
Core (Abdominals and Obliques)
Rectus Abdominis (Front Abs): Stabilizes the torso during the explosive movement.
Obliques (Side Abs): Engaged to maintain balance and control rotation.
Secondary Muscles Worked
Quadriceps (Front Thighs)
Assist in the initial leg drive during the upward swing.
Lats (Latissimus Dorsi)
Help control the downward phase of the snatch and stabilize the shoulder.
Triceps
Extend the elbow to lock out the arm overhead.
Forearms and Grip Muscles
Work to maintain a secure grip on the kettlebell throughout the movement.
Calves
Assist in the explosive upward drive during the snatch.
Hip Flexors
Help control the downward phase and stabilize the hips.
How the Kettlebell Snatch Works These Muscles
The kettlebell snatch is a compound movement that involves multiple phases, each engaging different muscle groups:
Hinge Phase (Downward Swing):
Muscles Worked: Hamstrings, glutes, lower back, and core.
Action: You hinge at the hips, allowing the kettlebell to swing between your legs.
Explosive Drive Phase (Upward Swing):
Muscles Worked: Glutes, hamstrings, quads, calves, and core.
Action: You explosively extend your hips and knees to propel the kettlebell upward.
Pull and Punch Phase (Overhead Lockout):
Muscles Worked: Shoulders, traps, triceps, and core.
Action: You pull the kettlebell close to your body and punch it overhead, locking out your arm.
Descent Phase (Controlled Lowering):
Muscles Worked: Lats, core, and grip muscles.
Action: You guide the kettlebell back down with control, preparing for the next rep.
Benefits of the Kettlebell Snatch
Full-Body Workout: Engages multiple muscle groups in one movement.
Improves Power and Explosiveness: Develops fast-twitch muscle fibers.
Enhances Grip Strength: Requires a strong grip to control the kettlebell.
Boosts Cardiovascular Fitness: High-intensity nature elevates heart rate.
Functional Strength: Mimics real-world movements like lifting and pulling.
Tips for Proper Form
Start Light: Use a lighter kettlebell to master the technique before increasing weight.
Engage Your Core: Keep your core tight to protect your lower back.
Use Your Hips: Generate power from your hips, not your arms.
Keep the Kettlebell Close: Avoid letting the kettlebell drift away from your body.
Lock Out Overhead: Fully extend your arm at the top of the movement.
Practice the Swing First: Master the kettlebell swing before attempting the snatch.
Conclusion
The kettlebell snatch is a highly effective exercise that works the entire body, with a focus on the posterior chain, shoulders, and core. It’s a great way to build strength, power, and endurance while improving coordination and cardiovascular fitness. Always prioritize proper form to maximize benefits and reduce the risk of injury!
#kettlebell#kettlebell workouts#kettlebell workout#beginner kettlebell workout#kettlebell chest workout#video#exercise#youtube#new york#workout
9 notes
·
View notes
Text
5 Lower Ab Exercises You’ll Fall in Love With

#1 Mountain Climbers
You’ll really work up a sweat with this one! Mountain climbers are one of our favorite low-impact exercises that targets your entire core and increases your heart rate.
This exercise targets more than just your core, you’ll feel this in your shoulders, back, and hips. To make sure your lower abs are getting enough love, focus on pulling your belly button into your spine and give a big exhale every time you draw your knee into your chest.
#2 Double Crunch
Think crunches, but on steroids. Double crunches are far more effective, so you can do less and get better results.
Crunches neglect your lower abs. But this exercise combines the standard and the reverse crunch into one, targeting almost every inch of your core, so your lower abs are going to get all the love they deserve.
For even more ab sculpting, add resistance to this exercise by holding a weight in your hands.
#3 Lying Leg Lifts
Our favorite lazy-day exercise. Don’t be fooled, it’s only lazy because you get to lay on your back. This exercise is going to have those lower abs working. As long as you make sure to keep your lower back on the mat the entire time (this means you only lower your legs as far as you can while adhering to this), your lower abs won’t have a choice but to engage.
To optimize this exercise, focus on pulling your belly button into your spine and exhaling every time your legs come back up to the ceiling.
#4 Burpees
Oh, burpees. The exercise everyone loves to hate. This killer, explosive exercise burns major calories and targets nearly every muscle in your body to help you shed unwanted lower belly fat. Though it doesn’t directly target your lower abs, engaging your transverse abdominis (your deepest core muscles in your lower abs) is vital to performing this exercise safely. If they’re not strong, your back will eventually feel it.
Having a hard time turning on your transverse? Start by lying on your back, feet planted. Place your hands on the insides of your hip bones near your pelvis. Pretend like you’re putting on a really tight pair of low-rise skinny jeans (remember those?). You should feel your transverse abdominis flex when you do this. Try to flex them 15 to 20 times in a row and keep it up daily until they learn to turn on automatically
#5 Flutter Kicks
Flutter kicks are specifically designed to target your lower rectus abdominis, another fancy name for your lower abs. Just like your lying leg raises, the trick to doing this exercise correctly is making sure your low back stays connected to the ground the entire time. If you’re having trouble with this, try placing your hands under your hips.
Feeling this more in your legs than your abs? Pull your belly button in to make sure you’re engaging your core.
#ambitious women#beautiful women#beauty#glow society#the glow society#fit beauty#health#self love#self improvement#self care#fit and sexy#fitness routine#fitness gym#fitness motivation#fitness and exercise#fit model#fit tips#fitspo#fit woman#fitness#fit girls
8 notes
·
View notes
Text
AB CRUNCHES
WHAT ARE CRUNCHES?
Ab crunches, which are sometimes mistaken for sit-ups, require the practitioner to raise their shoulders and upper back off the ground, which strengthens the rectus abdominis. With ab crunches, the lower back remains fixed to the floor, in contrast to sit-ups where the entire torso is elevated. This implies that it works fewer muscles than a sit-up, but it's still a useful exercise and can be beneficial for novices who find it difficult to stabilize their lower back during a sit-up.
Because they isolate the abs, ab crunches are a popular exercise for anyone looking to get a six pack. You can utilize the ab crunch machine or advance to dumbbell or cable crunches if you want to make this exercise more difficult. To work on your obliques, you can also do side crunches.
DO CRUNCHES GIVE YOU ABS?
Everyone possesses abdominal muscles, or abs, but whether or not these muscles are visible depends primarily on the amount of fat that covers them. Crunches can help define and strengthen the abs to provide the appearance of a six pack, but for many people, losing weight must also come first in order to show off the abs.
HOW MANY CALORIES DO AB CRUNCHES BURN?
Because there is little activity involved, performing ab crunches won't burn many calories. Resistance training, such as ab crunches, is best viewed as a way to build muscle rather than burn fat!
WHY DO MY ABS CRAMP WHEN DOING CRUNCHES?
When doing crunches, you should feel some stress in your abs; however, if you are in discomfort or feeling cramps, this could indicate that you are injured, overtrained, or just not strong enough. If you feel a cramp coming on, stop what you're doing and give your body time to heal.
WHAT DO SIDE CRUNCHES WORK?
One version of an ab crunch is the side crunch, which is crushing the torso to the side. Side crunches also target the rectus abdominis and the obliques.
DO SIDE CRUNCHES WIDEN THE WAIST?
It is theoretically possible for side crunches to increase waist circumference by strengthening the oblique muscles, which are the side waist core muscles. But that's not something to worry about because it would require a lot of training and an excess of calories to increase muscle mass to a noteworthy degree.
DO SIDE CRUNCHES GIVE YOU CURVES?
Side crunches are not likely to give you curves, but they also aren't likely to make your waist wider. Although side crunches can aid in defining the core, training the upper and lower bodies to develop a wider back with the intention of emphasizing curves is a superior way to get the popularly wanted "hourglass" appearance.
#Fitness#Health#gym#Workout#Exercise#FitnessGoals#GymLife#FitLife#Cardio#StrengthTraining#Yoga#Pilates#Running#FitFam#HealthyLiving#FitnessJourney#FitnessMotivation#Fitspo#Fitspiration#HealthyLifestyle#Sweat#TrainHard#NoPainNoGain#FitnessAddict#FitGirl#FitGuys#nutrition
2 notes
·
View notes
Text
Abs Aren't Just for Show: The Hidden Power of Your Core

When most people think about abdominal muscles, they envision the coveted six-pack that graces magazine covers and social media feeds. The pursuit of visible abs has driven countless individuals to invest in everything from specialised equipment to setting up elaborate home gym in Sri Lanka setups, all in the name of achieving that sculpted midsection. However, reducing your core to merely an aesthetic feature is like judging a book by its cover – you're missing the profound story that lies beneath.
Your abdominal muscles represent far more than a symbol of fitness dedication. They form the foundation of nearly every movement you make, from the simple act of getting out of bed to the complex mechanics of athletic performance. Understanding the true function and importance of your core muscles can revolutionise not just your workout approach, but your entire relationship with physical health and daily living.
The Architecture of Strength
The core is not simply the visible rectus abdominis that creates the six-pack appearance. It is a complex system of muscles working in harmony, including the transverse abdominis, internal and external obliques, diaphragm, pelvic floor muscles, and the multifidus muscles along your spine. This intricate network forms what exercise physiologists call the "powerhouse" of the body – and for good reason.
Think of your core as the central hub of a wheel, with your arms and legs as the spokes. Without a strong, stable hub, the entire structure becomes compromised. Every movement pattern, whether you're lifting groceries, playing with children, or engaging in competitive sports, relies on this central stability system to function efficiently and safely.
The transverse abdominis, often called the body's natural weight belt, wraps around your torso like a corset. When activated properly, it creates intra-abdominal pressure that stabilises your spine and protects your lower back. This deep muscle does not contribute to the visible six-pack, yet it is arguably the most important component of core strength. Its activation precedes nearly every movement you make, firing milliseconds before your arms or legs begin to move.
Beyond the Mirror: Functional Benefits
The functional benefits of a strong core extend far beyond what meets the eye. Proper core strength dramatically improves posture, reducing the forward head position and rounded shoulders that plague our increasingly sedentary society. When your deep abdominal muscles are strong and engaged, they naturally pull your ribcage into proper alignment, creating length through your spine and opening your chest.
This improved posture does not just make you look more confident – it fundamentally changes how your body moves and feels. Many people who struggle with chronic lower back pain find significant relief when they develop proper core strength. The muscles work together to decompress the spine, reducing pressure on intervertebral discs and alleviating the tension that builds up from hours of sitting or poor movement patterns.
Athletic performance sees dramatic improvements with enhanced core strength. Whether you're swinging a tennis racket, throwing a punch, or simply walking upstairs, power generation begins in your core and transfers outward to your extremities. A weak core creates energy leaks, forcing other muscles to compensate and reducing overall efficiency. Professional athletes across all sports prioritise core training not for aesthetics, but because it directly translates to improved performance and injury prevention.
The Breathing Connection
One of the most overlooked aspects of core function is its intimate relationship with breathing. The diaphragm, your primary breathing muscle, is actually part of your core system. Proper breathing patterns engage the deep abdominal muscles naturally, creating the stability your spine needs while promoting relaxation and stress reduction.
Many people breathe shallowly into their chest, never fully engaging their diaphragm or core muscles. This pattern not only limits oxygen uptake but also prevents the natural activation of your body's stability system. Learning to breathe deeply into your belly while maintaining gentle tension in your deep abdominal muscles can transform both your core strength and your overall sense of well-being.
The connection between breathing and core stability explains why practices like yoga and Pilates are so effective for developing functional strength. These disciplines emphasise the coordination of breath and movement, teaching your nervous system to maintain core engagement throughout various positions and transitions.
Training Smart, Not Just Hard
Effective core training requires a shift in mindset from isolation exercises to integrated movement patterns. While traditional crunches and sit-ups might create some muscle definition, they do not teach your core to function as it is designed to in real life. Your abdominal muscles rarely work in isolation – they are constantly coordinating with other muscle groups to create stability and generate power.
Compound movements that challenge your core stability while performing other tasks more closely mimic daily activities and sports demands. Exercises like planks, dead bugs, bird dogs, and loaded carries train your core to maintain stability while your arms and legs move independently. This type of training develops what exercise scientists call "anti-movement" – the ability to resist unwanted motion in your spine while forces try to push you out of alignment.
For those building their fitness foundation at home, incorporating versatile equipment can enhance core training significantly. A quality cross trainer in Sri Lanka can provide excellent cardiovascular exercise while engaging core muscles for stability, especially when you focus on maintaining proper posture throughout your workout. Similarly, a weight lifting bench in Sri Lanka opens up numerous possibilities for challenging your core stability during various exercises, from single-arm rows to Bulgarian split squats.
The Daily Impact
The benefits of proper core strength extend into every aspect of daily living. Simple tasks like carrying groceries, lifting children, or reaching for items on high shelves become easier and safer when your core provides the necessary stability. Your risk of injury during these routine activities decreases significantly when your body moves from a stable, well-supported centre.
Sleep quality often improves with better core strength, as proper muscle balance reduces tension and allows for more comfortable positioning throughout the night. The improved posture that comes with core strength can also alleviate headaches and neck tension that result from poor alignment during the day.
Even your confidence and presence can be positively affected by core strength. When you move from a stable, strong centre, your gait becomes more purposeful and your posture more commanding. This is not about vanity – it is about the natural confidence that comes from feeling strong and capable in your own body.
Building Your Foundation
Developing true core strength is a gradual process that requires consistency and patience. Start with basic stability exercises that teach you to find and maintain your neutral spine position. Focus on quality over quantity, ensuring that you can maintain proper form throughout each exercise before progressing to more challenging variations.
The beauty of core training is its accessibility. While equipment can enhance your workouts, many of the most effective core exercises require nothing more than your body weight and a small floor space. Whether you're using basic equipment like adjustable weights – and dumbbell price in Sri Lanka makes this an affordable option for most fitness enthusiasts – or working with just your body weight, the key is consistent, mindful practice.
Remember that core strength is not built through endless repetitions of a single exercise, but through varied, progressive challenges that teach your muscles to work together efficiently. Your abs are not just for show – they are the foundation upon which all movement is built. Treat them with the respect and attention they deserve, and they will reward you with a lifetime of better movement, reduced pain, and enhanced performance in everything you do.
The journey to true core strength is about much more than achieving a certain look. It is about building a foundation that supports you in every movement, every day, for years to come. Your future self will thank you for the investment you make in this crucial aspect of your health and fitness today.
0 notes
Text
Best Exercises for Building Abs
Building well-defined abs is one of the most common fitness goals for individuals aiming to improve their physique, strength, and overall fitness. The key to achieving strong, visible abs isn’t just about doing hundreds of crunches or following a trendy workout program. It involves a combination of targeted exercises, proper nutrition, and consistency. Some of the Best Exercises for Building Abs are given below
In this blog post, we will break down the best exercises for building abs, offer tips on how to structure your ab workout routine, and discuss the importance of diet in your quest for a six-pack. Whether you’re a beginner or an experienced fitness enthusiast, you’ll learn how to take your abs workout to the next level.
Why Abs Exercise is Important Before diving into the specific exercises, it’s essential to understand why abs exercises are so crucial for overall fitness. While toned abs are often seen as a symbol of fitness, they serve a more critical role in functional strength. Your abdominal muscles, which include the rectus abdominis (the six-pack muscle), transverse abdominis, and obliques, work together with your back muscles to stabilize your torso and support your spine.

A strong core helps improve posture, balance, and athletic performance, reducing the risk of injury during activities that require physical exertion. Whether you’re running, lifting weights, or doing yoga, your core plays a role in virtually every movement.
The Key Elements of an Effective Abs Exercise Routine Before we list the best exercises, let’s cover the key elements that should be part of your abs exercise routine:
Variety of Movements: Your abs aren’t just one muscle. Different exercises target different parts of your core, so it’s essential to incorporate a variety of movements that work the upper abs, lower abs, and obliques.
Progressive Overload: Just like any other muscle group, your abs need to be challenged. As you get stronger, increase the resistance or complexity of your exercises to continue making progress.
Consistency: Building abs is a gradual process that requires consistency. Incorporating abs exercises into your routine 3-4 times per week is ideal.
Nutrition: You can do all the abs exercises in the world, but if your diet isn’t aligned with your fitness goals, your abs won’t become visible. A healthy, balanced diet that supports fat loss is crucial for revealing those muscles.
Top Abs Exercises for Building a Strong Core Here are some of the most effective abs exercises to build core strength and muscle definition. These exercises can be done at home or at the gym with minimal equipment.
Plank The plank is one of the best exercises for building core strength. It works the entire core, including the rectus abdominis, transverse abdominis, and obliques.
How to do it:
Start in a push-up position, but rest on your forearms instead of your hands. Maintain a straight body from head to heels. Hold the position, engaging your core muscles, for as long as you can (start with 30 seconds and gradually increase). Why it’s effective: Planks engage multiple core muscles and also improve stability and endurance.
Crunches Crunches are a classic abs exercise that specifically targets the rectus abdominis.
How to do it:
With your feet flat on the ground and your knees bent, lie flat on your back. Keep your elbows apart and place your hands behind your head. Lift your upper body toward your knees, curling your shoulder blades off the floor. Slowly lower back down. Why it’s effective: Crunches directly work the upper part of the rectus abdominis, helping to build muscle definition.
Bicycle Crunches Bicycle crunches are an advanced variation of the traditional crunch, targeting both the rectus abdominis and obliques.
How to do it:
Lie flat on your back and lift your legs, keeping your knees bent at a 90-degree angle. Raise your upper body and place your hands behind your head. Bring your right elbow toward your left knee as you straighten your right leg. Alternate sides in a pedaling motion. Why it’s effective: This exercise is excellent for working the entire abdominal region while also improving coordination.
Leg Raises Leg raises focus on the lower part of the abs, which can be more challenging to target.
How to do it:
With your hands supporting your hips, lie on your back. Keep your legs straight and lift them until they form a 90-degree angle with your body. Slowly lower your legs back down without touching the floor. Why it’s effective: Leg raises help target the lower abs, an area that’s often difficult to work. They also strengthen the hip flexors.
Russian Twists Russian twists are excellent for working the obliques, helping to build definition along the sides of the waist.
How to do it: With your feet slightly off the floor and your knees bent, take a seat on the floor. Lean back slightly while keeping your back straight. Hold a weight or medicine ball, and twist your torso to the right, then to the left. Why it’s effective: Russian twists engage the obliques and lower abs, helping to create a toned, V-shaped torso.
Mountain Climbers Mountain climbers are a dynamic exercise that combines cardio and abs work, making them great for burning fat while building core strength.
How to do it:
Start with your arms straight up in a high plank stance. Quickly bring one knee toward your chest, then switch legs, alternating as if you’re running in place. Why it’s effective: Mountain climbers get your heart rate up while engaging your entire core, making them great for both fat loss and core strength.
Hanging Leg Raises For an advanced lower abs workout, hanging leg raises are an excellent choice.
How to do it:
With your hands shoulder-width apart, hang on a pull-up bar. Keep your legs straight and lift them toward the ceiling, bringing them as high as you can. Slowly lower your legs back down. Why it’s effective: This exercise provides a more intense lower abs workout and also works your grip and upper body.
Creating Your Abs Exercise Routine Now that you know some of the best exercises for abs, it’s time to put them into a structured workout. Here’s a sample abs routine that you can incorporate into your fitness regimen.
Sample Abs Workout Routine (3-4 times per week):
Plank: 3 sets of 30-60 seconds Bicycle Crunches: 3 sets of 15 reps per side Leg Raises: 3 sets of 12 reps Russian Twists: 3 sets of 20 reps (10 each side) Mountain Climbers: 3 sets of 30 seconds Hanging Leg Raises (if advanced): 3 sets of 8-10 reps Nutrition: The Key to Visible Abs No abs workout is complete without addressing the importance of nutrition. You might have strong abs, but if they’re hidden under a layer of fat, they won’t be visible. To reveal your abs, you need to focus on losing body fat through a combination of diet and exercise.
Here are some basic tips for a diet that supports fat loss and muscle definition:
Calorie Deficit: You must consume less calories than you expend in order to lose fat. However, ensure that you’re not drastically cutting calories, as this can lead to muscle loss. High Protein Intake: Protein helps build and repair muscle tissue, and it also keeps you feeling full longer. Include lean sources of protein like chicken, fish, tofu, and eggs in your diet. Healthy Fats: Include sources of healthy fats, such as avocados, nuts, seeds, and olive oil, in your meals. These help with overall health and provide energy. Hydration: Drink plenty of water throughout the day to stay hydrated and support your metabolism. Conclusion Building strong, defined abs requires a combination of the right exercises, consistency, and proper nutrition. By incorporating the exercises mentioned in this guide and paying attention to your diet, you’ll be on the right path to achieving your abs goals. Remember, abs are made in the gym, but revealed in the kitchen. Stay consistent, stay motivated, and in time, you’ll see the results of your hard work.
1 note
·
View note
Text
Repairing Abdominal Muscles After Pregnancy or Weight Loss

Significant life changes like pregnancy or major weight loss often leave lasting effects on the body, especially in the abdominal region. One of the most common concerns individuals face post-pregnancy or after shedding a considerable amount of weight is a weakened or separated abdominal wall. This condition not only affects appearance but also core strength, posture, and comfort. Fortunately, Tummy Tuck Surgery in Karnal offers a reliable solution for repairing abdominal muscles and restoring confidence.
Understanding Abdominal Muscle Separation (Diastasis Recti)
During pregnancy or significant weight gain, the growing belly stretches the rectus abdominis muscles (the “six-pack” muscles), causing them to separate. This condition, known as diastasis recti, is very common in postpartum women but can also affect men or women who have experienced rapid or massive weight changes.
After childbirth or weight loss, even though the external fat may reduce, the underlying muscles may remain stretched or weakened. This leads to:
A protruding belly
Poor posture
Lower back pain
Weak core strength
Difficulty with exercise or daily movements
Exercise and a healthy diet may help strengthen the abdominal area, but in many cases, the muscle gap does not close naturally. This is where tummy tuck surgery becomes a powerful and transformative option.
What Is a Tummy Tuck?
A tummy tuck, medically known as abdominoplasty, is a cosmetic surgical procedure that involves the removal of excess skin and fat from the abdomen and tightening of the underlying abdominal muscles. The result is a flatter, firmer, and more toned midsection.
The surgery is especially beneficial for:
Post-pregnancy abdominal repair
Excess skin removal after major weight loss
Repairing muscle separation (diastasis recti)
Improving posture and back support
Tummy Tuck Surgery in Karnal: A Trusted Solution
For residents of Karnal seeking effective body contouring and muscle repair, Tummy Tuck Surgery in Karnal under the expert care of Dr. Girish Sharma offers both safety and outstanding results.
Dr. Sharma is a board-certified plastic, reconstructive, and aesthetic surgeon with over a decade of hands-on experience. He has performed more than 500 successful procedures, consistently delivering results that align with patient expectations. Known for his precision and empathetic approach, Dr. Sharma provides a complete patient-first experience, ensuring both aesthetic improvement and medical safety.
His qualifications include an M.Ch in Plastic and Reconstructive Surgery from Jawaharlal Nehru Medical College (AMU), Aligarh, as well as MS and MBBS degrees from prestigious government institutions. Dr. Sharma has also received specialized training in microsurgery, facial reconstruction, and aesthetic surgery from top-tier centers, equipping him with the skills required for advanced abdominal repairs.
How the Procedure Works
Tummy tuck surgery typically involves the following steps:
Anesthesia is administered for comfort during the procedure.
A horizontal incision is made above the pubic area, strategically placed to be hidden within natural skin folds or under clothing.
The abdominal muscles are sutured back together, repairing diastasis recti and strengthening the core.
Excess fat and skin are removed.
The remaining skin is pulled taut and repositioned for a smoother appearance.
The incision is closed carefully to minimize scarring.
In some cases, liposuction may be combined with the procedure to enhance results further.
Recovery and Results
The recovery period after a tummy tuck varies, but most patients can return to light activities within 1–2 weeks. Full recovery, including resumption of exercise, typically takes 4–6 weeks. Wearing a compression garment during recovery helps reduce swelling and supports healing.
The results of the surgery are long-lasting, especially when maintained through a stable weight and healthy lifestyle. Patients experience:
A flatter and tighter abdominal profile
Improved posture and reduced back discomfort
Increased confidence in clothing and daily activities
Is Tummy Tuck Surgery Right for You?
You may be a good candidate for a tummy tuck if you:
Are physically healthy and at a stable weight
Have loose or sagging abdominal skin
Experience muscle separation or weakness
Are finished with childbearing (for women)
Have realistic expectations for the outcome
A consultation with Dr. Girish Sharma will help assess your specific needs and determine if tummy tuck surgery is the best course of action.
Conclusion
Whether due to pregnancy or major weight loss, loose abdominal muscles and sagging skin can affect not only your appearance but your daily quality of life. Tummy Tuck Surgery in Karnal, performed by a trusted and experienced surgeon like Dr. Girish Sharma, can restore both form and function, helping you feel strong, confident, and comfortable in your body once again.
If you are ready to take the next step toward reclaiming your body, now is the perfect time to explore the benefits of tummy tuck surgery with a personalized consultation.
0 notes
Text
Plank Exercises

That’s where plank variations come in.
Whether you’re a beginner or a seasoned athlete, these dynamic alternatives will challenge your muscles in new ways, improve balance and posture, and boost your overall core strength.
💪 Why Planks Work
The plank is an isometric core exercise, meaning it strengthens your muscles by holding a static position. Unlike crunches, planks target your entire core, including:
Rectus abdominis (your six-pack muscles)
Transverse abdominis (deep core stabilizers)
Obliques (side abs)
Glutes, shoulders, and back
🔄 7 Plank Variations to Transform Your Core
SidePlank
Muscles Worked: Obliques, shoulders, hips
How to Do It: Lie on your side, elbow under shoulder, legs stacked. Lift hips and hold.
🧠 Tip: Raise the top leg for an added challenge.
Plank to Push-Up
Muscles Worked: Chest, shoulders, triceps, core
🔄 Repeat for 30 seconds to 1 minute.
Plank with Shoulder Taps
Muscles Worked: Core, arms, chest
How to Do It: In a high plank, tap each shoulder with the opposite hand, minimizing hip movement.
🎯 Focus on core control to prevent rocking.
ReversePlank
Muscles Worked: Posterior chain—glutes, hamstrings, back
How to Do It: Sit with legs extended, hands behind hips. ✅ Great for balancing out forward-dominant exercises.
Plank with Leg Lifts
Muscles Worked: Glutes, hamstrings, core
🔥 Add ankle weights for more resistance.
Forearm Plank with Arm Reach
Muscles Worked: Core, shoulders, upper back
🚦 Try 10–12 reps per arm.
Copenhagen Plank (Advanced)
Muscles Worked: Inner thighs (adductors), obliques, core
How to Do It: Sideplank with your top leg elevated on a bench or chair.
⚠️ A true test of core strength and stability.
🕒 Sample 5-Minute Plank Challenge
Forearm Plank – 30 sec
Side Plank (Right) – 30 sec
Side Plank (Left) – 30 sec
Plank with Shoulder Taps – 30 sec
Plank to Push-Up – 30 sec
Rest – 30 sec
Repeat Once
✅ Pro Tips for Better Planks
Keep hips in line: Avoid sagging or piking your hips.
Breathe: Don’t hold your breath—inhale and exhale steadily.
Start small: Work your way up from 20–30 seconds per variation.
🌟 Final Thoughts
Plank variations are more than just upgrades to a classic move—they’re the key to a stronger, more functional body. Whether you’re aiming for visible abs or improved athletic performance, these tweaks can help you get there faster and smarter.
So next time you drop into a plank, don’t just hold it. Mix it up, level up, and feel the burn where it counts.
#PlankChallenge #PlankWorkout #CoreWorkout #PlankTime #PlankLife #BuzzCreatorsDigitalMedia #FYP
0 notes
Text
Abs Workout Tips: How to Build a Stronger Core
A strong core is about more than just visible abs—it’s the foundation for good posture, balance, and overall body strength. Whether you’re aiming for a six-pack or just want better fitness, working your abs the right way is key. Here are the best tips to help you maximize your abs workouts and achieve real results.

1. Focus on the Entire Core, Not Just the "Six-Pack"
Your core includes more than just the rectus abdominis (the front “six-pack” muscle). It also involves the obliques (sides), transverse abdominis (deep core), and lower back.
✅ Tip:
Incorporate a variety of exercises like planks, Russian twists, and leg raises to target all areas of your core.
2. Quality Over Quantity
Doing hundreds of crunches daily won’t necessarily lead to results—and it can even lead to injury. The key is controlled, intentional movement with proper form.
✅ Tip:
Focus on slow, controlled reps that engage the muscle deeply. Ten perfect reps are better than 50 rushed ones.
3. Don’t Skip Compound Movements
Big lifts like deadlifts, squats, and overhead presses engage your core more than you might think. These compound movements help build core stability and real-world strength.
✅ Tip:
Add full-body workouts into your weekly routine—they challenge your abs while building overall muscle.
4. Include Cardio and Diet
You can have strong abs underneath a layer of fat, but visible abs require a lower body fat percentage. A combination of cardio, strength training, and healthy eating is key.
✅ Tip:
Incorporate HIIT (High-Intensity Interval Training) or steady-state cardio 3–5 times a week, and focus on a clean, balanced diet.
5. Don’t Train Abs Every Day
Like any muscle group, your abs need time to recover. Overtraining can lead to fatigue, poor results, or even strain.
✅ Tip:
Train abs 3–4 times per week, allowing at least one rest day between sessions.
6. Breathe Properly During Exercises
Many people hold their breath while doing core work, which can reduce oxygen flow and increase tension. Learning to breathe properly helps improve performance and control.
✅ Tip:
Exhale during the exertion phase of the exercise (e.g., when crunching up), and inhale as you return.
7. Use Resistance for Progression
As with any muscle group, abs respond well to progressive overload. Add resistance to bodyweight movements for better strength and muscle definition.
✅ Tip:
Try weighted crunches, cable woodchoppers, or use a resistance band to increase intensity.
8. Stay Consistent and Patient
Visible abs take time, especially if you’re starting from a higher body fat percentage. Consistency with your workouts, diet, and lifestyle choices is what gets results.
✅ Tip:
Track progress with photos or how your clothes fit rather than just scale weight or visual abs.
Conclusion
Building a strong and defined core is about smart training, not endless crunches. Combine variety, form, recovery, and proper nutrition for the best results. And remember—your core is at the center of everything you do, so investing in it pays off in every aspect of your fitness.
0 notes
Text
7 Effective Exercises to Lose Belly Fat at Home Without Equipment

Losing belly fat can be a challenging journey, especially if you're restricted to staying at home. But the good news is that you don’t need expensive gym memberships or complex equipment to shed unwanted fat around your midsection. With the right combination of exercises and consistency, you can achieve great results right in your living room. If you're looking for a lose belly fat exercise at home that actually works, this blog outlines seven simple and effective moves to target stubborn abdominal fat.
1. Crunches
Crunches are one of the most popular ab-focused exercises. They effectively target your upper abdominal muscles and help strengthen your core. To do crunches, lie flat on your back with your knees bent and feet flat on the floor. Place your hands behind your head, inhale deeply, and exhale as you lift your upper body off the ground. Start with 3 sets of 15 reps.
Pairing crunches with a well-structured lose belly fat home workout routine ensures a consistent fat-burning process.
2. Leg Raises
Leg raises target your lower abdomen and are excellent for strengthening the core. Lie on your back with your legs straight and hands under your hips. Slowly lift your legs towards the ceiling and bring them back down without touching the floor. This controlled movement really works the lower abs and helps tone the belly region.
3. Mountain Climbers
This dynamic, cardio-infused move not only strengthens your core but also increases your heart rate, burning calories fast. Get into a plank position, keep your hands aligned under your shoulders, and quickly alternate bringing your knees to your chest. Aim for 3 rounds of 30 seconds with 15-second breaks in between.
This full-body movement is an essential part of any lose belly fat exercise routine, especially for targeting stubborn fat areas.
4. Plank Hold
Planking is a static core exercise that engages multiple muscle groups, including the abdominal, back, and shoulder muscles. Start in a forearm plank position and maintain a straight line from your head to your heels. Try holding the position for 30 to 60 seconds. As you progress, aim to increase your hold time or switch to side planks for variation.
5. Russian Twists
Russian twists are great for targeting the obliques—the side muscles of your abdomen. Sit on the floor, lean back slightly, lift your feet off the ground, and twist your torso from side to side. Perform this move slowly to maintain form and feel the burn in your midsection.
To enhance the benefits of this movement, include it regularly in your lose belly fat home workout regimen.
6. Bicycle Crunches
This variation of traditional crunches adds leg movement to intensify the core workout. While lying on your back, mimic the motion of pedaling a bicycle in the air while simultaneously twisting your torso to touch opposite elbows to knees. It’s excellent for working the rectus abdominis and obliques in one go.
7. Yoga for Belly Fat Loss
Yoga isn’t just for relaxation—it can also be an effective tool for burning belly fat. Poses like Boat Pose (Navasana), Cobra Pose (Bhujangasana), and Bow Pose (Dhanurasana) engage the core and promote fat loss. Practicing these poses regularly improves flexibility, tones the abdominal muscles, and reduces stress, which is a known factor in weight gain.
Incorporating lose belly fat yoga into your daily routine can offer both mental and physical health benefits, making your fat-loss journey more sustainable.
Final Thoughts
Consistency is the key when it comes to losing belly fat at home. These seven exercises are simple yet powerful when performed regularly with proper form. Combine them into a daily or alternate-day routine and pair with a healthy diet for the best results. Most importantly, listen to your body and progress at your own pace.
With dedication and the right lose belly fat exercise at home strategy, achieving a flat and toned stomach is absolutely within reach.
0 notes
Text
To do planks, you use your own body weight as a resistance. Try weighted planks to make the exercise more challenging. But start with a light weight to avoid injuries.Planks are among the top core strengthening exercises. They not only engage muscles of the core, but also of shoulders, glutes, back and arms. They can help improve stability, strength and overall posture of the body. All you need to do is take support of your toes and forearms to hold a straight horizontal position on the floor. Don’t forget to engage your core tightly while performing this exercise. But have you ever tried this exercise with a weighted vest or weight plates? Weighted planks also have benefits including weight loss and a stronger core. We tell you how to perform this exercise with weights on your back.What is the difference between weighted planks and planks?The main difference between regular planks and weighted planks is the added weight that creates the differentiation of resistance. “Weighted planks add more resistance and tension against the muscles by putting extra kilos on the back,” says fitness expert Aman Puri. This requires more effort from muscles and so, helps in activating the muscles of the arm, core and shoulder more effectively. Also, this variation of planks strengthens the upper body part and core muscles. On the other hand, normal planks do not provide extra resistance. You have only your own body weight as a resistance. “They only help strengthen the core and abdomen with fewer effects on the upper body,” shares the expert.Planks can be performed with weights. Image courtesy: Adobe StockMuscles worked during weighted planksThe weighted planks exercise involves multiple muscle groups: The oblique muscles or side muscles which are present in the abdomen. The transverse abdominis, a deep core muscle that provides stability to the core. The rectus abdominis, the top layer of abdominal muscles. The erector spinae, present longitudinally at the back along with the spine. Two shoulder muscles: the triceps and deltoids. The quadriceps and glutes, present at the front part of the thighs and the back of the hips, respectively.What are the benefits of weighted planks?Yes, the weighted planks exercise is beneficial and effective when done in the correct way. Here are some benefits of performing weighted planks: Strengthens core muscles: Weighted planks improve core muscle strength by adding resistance against muscles through extra weights, which leads to core muscles putting in more effort and strengthens them. A study, published in the Journal Of Exercise Rehabilitation, shows plank exercises, including the ones using weights, can help in activating core muscles. Boosts stability: This technique demands more involvement of core muscles to maintain the position of planks. “This improves the ability to be stable while performing, improving overall control and balance,” says Puri. Helps manage weight: The weighted planks exercise helps burn calories, as it involves several muscles and uses energy by breaking down deposited fat. A study, published in Medicina, showed that participants who did plank exercises for four weeks saw a decrease in body fat mass and fat percentage. If you decide to use a weighted vest during this exercise, it can further help to reduce body weight. A study, published in the Journal Of Strength And Conditioning Research, showed that people wearing a weighted vest burned significantly more calories than those who did not wear it. Improves endurance: Weighted planks help improve muscle endurance by adding extra weight. During this exercise, core muscles work against their capacity by holding the tension, improving muscle endurance.If you are performing this exercise for the first time then start with 0.5 to 1 kg and then gradually increase the weight as per your capacity. This way, you can perform weighted planks in a safe manner.How to do weighted planks?Here’s how to perform this exercise for a strong core:1. Hold a straight horizontal position by touching both hands and toes on the ground.
2. Widen your hand to shoulder-width and toes to the waist-width gently. 3. Take your trainer’s help to place a weight carefully on the lifted upper back portion. You can use weight plates to add extra weight to the upper back. If you are doing this exercise all by yourself, you can place a weighted vest on your back. 4. Maintain the position for a while and engage your core tightly for an effective outcome and also to reduce the risk of injuries. “If you are a beginner, hold the weight for 10 to 15 seconds and then gradually adjust the holding time. Those who regularly do this exercise can hold a plank for 30 to 60 seconds,” says the expert.You may also likeYou can use a weighted vest for performing this exercise. Image courtesy: Adobe StockWho should not do weighted planks?Certain groups of people should avoid performing this exercise even though there are benefits: Pregnant women: It is extremely difficult to maintain a plank position during the gestation period. “Weighted planks may put excess stress on core muscles, leading to discomfort and may cause miscarriages,” says Puri Older people: As we grow older, the body’s ability to maintain proper coordination and balance, especially in the plank position with weight, diminishes. Also, at this stage, the knee joints and spine may not be supportive enough to hold the extra pounds on the back. Individuals with body pain and injuries: As weighted planks require whole-body coordination, people with lower back, shoulder, neck and spine injury or pain should avoid performing this exercise because it may worsen the condition.Weighted planks can be added to your core strengthening routine, but start with a light weight. Even though you can do the exercise without the help of an expert, it is better to perform it under the supervision of a professional trainer to avoid injuries.Related FAQsIs 1-minute plank a day enough to lose weight?Including planks in the exercise regimen would be an effective approach in a weight-loss journey, but only 1 minute of plank a day will not as effectively help you burn calories. To lose weight, there are factors that need to be taken into account, like combining strength and resistance exercises with a calorie-deficit diet.Can you get a 6 pack from just planking?There is no doubt planking is the way to strengthen the abdominal muscle and the core, but planks solely will not provide 6 packs. For that, you need to include other abs exercises, eat a balanced diet and follow a healthy lifestyle.Are planks better than sit-ups?Both the exercises help in strengthening the core. But planks are better than sit-ups because planks not only work on the core and strengthen abdominal muscles, but also help in the functionality of the spine, shoulder, lower and upper back, glutes and knee.What is an alternative to weighted planks?To strengthen abdominal muscles, you can include other abs exercises like crunches, mountain climbing, sit-ups, straight leg toe touches and hanging leg rises as alternatives to weighted planks.Disclaimer: At Health Shots, we are committed to providing accurate, reliable, and authentic information to support your health and well-being. However, the content on this website is intended solely for informational purposes and should not be considered a substitute for professional medical advice, diagnosis, or treatment. Always consult a qualified healthcare provider for personalised advice regarding your specific medical condition or concerns. Read More Read More
0 notes
Text
PLANKS
WHAT IS A PLANK?
A common isometric exercise that targets all of the core muscles as well as the back, shoulders, hips, and legs is the plank. The plank teaches the core to resist movement by holding the body stationary for a while, in contrast to most traditional core workouts that train the core through movement. Known as an anti-core workout, it increases stability and strength, which can help with movements like the bench press and squats.
For people whose backs hurt from doing sit-ups and crunches, planks are a decent substitute for ab workouts like those because they don't require any spinal flexion. To make these workouts easier, planks can also assist develop core strength and master proper engagement. Although they are a difficult exercise, planks are excellent additions to any fitness regimen. There are a few modifications that can alter the difficulty of planks and highlight certain muscles more:
Elbow plank (also called forearm plank): The performer of the forearm plank must be on their forearms and elbows. This lessens the upper body's involvement and increases the emphasis on the core.
Full plank (also called straight arm plank): Push-ups are used to achieve straight arm planks. By strengthening the shoulders, this lessens the strain on the core.
Kneeling plank: Kneeling planks are a good regression exercise for anyone who find it difficult to hold their form during a full plank.
Weighted plank: For individuals who have gotten the hang of the plank and want to challenge themselves without devoting additional time to the position, weighted planks are a suitable option.
WHAT IS A FULL PLANK?
The full plank, also known as a straight arm plank, is the traditional method in which the plank is executed while performing a push-up. It's an isometric workout that tests the muscles' ability to stabilize the body over time.
WHAT ARE THE BENEFITS OF A FULL PLANK?
The entire plank works to stabilize the body by strengthening the shoulders, hips, and back in addition to the core. Strengthening your core can help with posture, back problems, injury prevention, sports performance, and other lifts.
IS THE FULL PLANK BETTER THAN ELBOW PLANK?
Compared to the elbow or forearm plank, the full plank is tougher to perform because there is less floor contact, which means the body has to work more to maintain stability. The elbow plank actually emphasizes the core more than the full plank since it requires more shoulder engagement. These are both worthwhile activities!
WHAT IS THE HARDEST PLANK POSITION?
The hardest plank position is the straight arm plank. Because there are fewer points of contact with the floor, maintaining stability requires more effort from the body. Maintaining proper form also requires activating the triceps and shoulders, and it is more difficult to keep the hips from lowering when in this position.
ARE WEIGHTED PLANKS OKAY?
Weighted planks are an excellent advancement from the elbow or full plank, but before attempting this variation, be sure you can maintain proper form and have mastered the others. The weighted plank might injure you if done improperly or before you're ready. Before advancing to weighted planks, begin with 1-2 kg and gradually increase it.
DO WEIGHTED PLANKS BUILD ABS?
Doing planks with weights can help develop abs. The rectus abdominis, the muscle responsible for noticeable abs, is one of the core muscles that is tested during this exercise. Weighted planks help build muscular mass by gradually overloading the rectus abdominis.
WHAT IS THE BEST WAY TO DO WEIGHTED PLANKS?
Performing weighted planks safely requires a companion who can place the weight plate on your back and take it off after you're done. Kneel on the floor with the weight plate in front of you if you don't have a partner to assist you. Before assuming the plank position, carefully place the weight plate behind your head and slant forward gradually to balance it on your upper back.
WHAT ARE THE BENEFITS OF A KNEELING PLANK?
For individuals who are new to planks, the kneeling plank is an excellent variation because it helps you develop strength and technique. In order to maintain the tension in the core, this variant eases some of the pressure off the lower back.
IS A PLANK ON THE KNEES AS EFFECTIVE?
Core exercises like planks on the knees are a good technique to strengthen your core. You might discover that in order to adequately challenge the core, you need to go on to full planks as your strength and stability increase.
#Fitness#Health#gym#Workout#Exercise#FitnessGoals#GymLife#FitLife#Cardio#StrengthTraining#Yoga#Pilates#Running#FitFam#HealthyLiving#FitnessJourney#FitnessMotivation#Fitspo#Fitspiration#HealthyLifestyle#Sweat#TrainHard#NoPainNoGain#FitnessAddict#FitGirl#FitGuys#nutrition
2 notes
·
View notes
Text

Is obesity the cause of hunchback? How to lose weight by improving basal metabolism with correct posture
Transform into a thin constitution by improving your hunchback! The unexpected relationship between obesity elimination and posture correction
Is it a diet effect just by stretching your back? How to break the vicious circle of obesity and poor posture
With weight gain, I'm worried about hunchback and warped waist. In fact, there is a deep relationship between obesity and the deterioration of posture, and it is known that maintaining the correct posture improves the basal metabolism and changes to a constitution that is easy to lose weight. Here's how to get healthy weight management and beautiful posture at the same time.
Table of contents
1. The mechanism of posture deterioration caused by obesity
・Effects on pelvic forward tilt and lumbar spine due to weight gain
・Physical burden on posture caused by abdominal fat
1. The mechanism of the vicious circle that accelerates obesity by hunchback
・Mechanism of metabolic decline due to poor posture
・The relationship between deterioration of exercise efficiency and loss of muscle mass
1. The effect of improving basal metabolism brought about by correct posture
・Physiological changes that can be obtained by stretching your back
・Promote fat burning by improving blood flow and increasing oxygen consumption
1. Posture improvement techniques that can be practiced in daily life
・Basics of sitting and correct use of muscles
・Improved digestive function by normalizing the position of internal organs
1. An effective diet strategy that incorporates posture correction
・The importance of posture that maximizes exercise effects
・The role of posture in long-term weight management
1. The mechanism of posture deterioration caused by obesity
・Effects on pelvic forward tilt and lumbar spine due to weight gain
Weight gain due to obesity causes major changes in the balance of the human body's center of gravity. The fat tissue accumulated in the abdomen creates a force that pulls the pelvis forward under the influence of gravity, which is the main cause of pelvic forward tilt.
When pelvic forward tilt occurs, the anterior curve of the lumbar spine becomes excessively strong, forming a so-called curved lumbar condition. In this state, excessive strain will continue to be put on the muscles of the lower back, especially the lumbosal quadrugular muscles and the erector muscles of the spine. As a price, the upper body begins to take a forward-leaning position, and the back of the thoracic spine is strengthened to complete the hunchback posture.
From an anatomical point of view, the normal spine draws an S-shaped curve, and this curve plays a role in efficiently distributing weight. However, when this balance is broken due to obesity, the pressure on the intervertebral disc is unevenly distributed, which increases the risk of diseases such as herniated discs and spinal stenosis in the long run.
・Physical burden on posture caused by abdominal fat
The accumulation of visceral and subcutaneous fats goes beyond mere appearance problems and has a serious impact on the posture control system. The fat tissue accumulated in the abdomen increases intra-abdominal pressure and limits the movement of the diaphragm. As a result, the breathing pattern becomes shallower, and thoracic breathing becomes dominant, increasing muscle tension around the shoulder blades.
The decrease in the function of the deep trunk muscle groups such as the rectus abdominis muscle and the transverse abdominal muscle is also an important factor in posture deterioration. These muscle groups act like corsets to stabilize the spine, but an increase in abdominal fat reduces muscle contraction efficiency and impairs the stability of the trunk.
As a result, the body adopts a compensatory muscle activity pattern to ensure stability, forcing excessive tension in the neck and shoulder muscles. If this condition continues, adhesion of the fascia and shortening of muscle fibers will occur, and it will progress to structural posture abnormalities.
2. The mechanism of the vicious circle that accelerates obesity by hunchback
・Mechanism of metabolic decline due to poor posture
Poor postures, such as hunchback and warped waist, create a vicious circle that promotes obesity through a decrease in basal metabolic rates. In normal posture, the anti-gravity muscle group works efficiently and always consumes a certain amount of energy. However, in poor posture, muscle activity patterns change, and muscle activity with poor energy efficiency prevails.
According to physiological studies, it has been reported that the hunchback posture limits the mobility of the rib cage and reduces lung capacity by about 15-20%. This reduces oxygen intake and suppresses oxidative metabolism at the cellular level. When the ATP production efficiency in mitochondria decreases, the β-oxidation of fatty acids is also inhibited, and the ability to burn fat is significantly reduced.
You can't miss the impact on the endocrine system. Chronic stress caused by poor posture increases the secretion of cortisol and increases insulin resistance. Cortisol promotes the synthesis of fats, and in evols the effect of promoting fat accumulation in the abdomen. This change in hormonal balance is a factor that further accelerates the progression of obesity.
・The relationship between deterioration of exercise efficiency and loss of muscle mass
Poor posture also has a serious impact on performance during exercise. The hunchback position limits the range of motion of the shoulder blades, and the exercise efficiency of the upper limbs is significantly reduced. This reduces the effectiveness of aerobic exercise and strength training, and consumes fewer calories even with the same amount of exercise.
Changes in muscle activity patterns are also an important issue. In normal posture, the main muscle group functions as the main muscle, but in poor posture, the compensatory movement of the small muscle group increases. Large muscle groups have thick muscle fibers and have the characteristic of consuming a large amount of energy, but the compensatory action of small muscle groups significantly reduces the energy consumption.
In the long run, the decrease in muscle mass, the progression of so-called sarcopenia, is also a concern. When blood flow to the muscles is inhibited by poor posture, muscle protein synthesis decreases and muscle atrophy progresses. The decrease in muscle mass is directly related to the decrease in the basal metabolic rate, so it changes to a constitution that is increasingly difficult to lose weight.
3. The effect of improving basal metabolism brought about by correct posture
・Physiological changes that can be obtained by stretching your back
Maintaining a correct posture with a straight back muscle dramatically improves the physiological function of the human body. When the spine draws a normal S-shaped curve, the intervertebral foramen is properly opened and the transmission of the autonomic nervous system is smoothed. By balancing the sympathetic and parasympathetic nerves, the secretion of hormones involved in metabolic regulation is normalized and the basal metabolic rate is improved.
Studies using electromyograms have confirmed that the activity of the deep muscle group increases by 15-25% when maintaining the correct posture. Inner muscles such as the transverse abdominal muscles, polycleft muscles, and the diaphragm continue to contract continuously to maintain posture, and additional energy consumption of about 50-80kcal per day can be expected from this muscle activity alone.
From a neurophysiological point of view, correct posture improves sensory input from the vestibular system and activates the posture control function of the cerebellus. The cerebelle is not only involved in motor learning and motor coordination, but also in metabolic regulation, and the improvement of its function increases the metabolic efficiency of the whole body. In addition, the activity of the retid body activation system of the brain stem is also promoted, and the basic metabolism is improved along with the improvement of the awakening level.
・Promote fat burning by improving blood flow and increasing oxygen consumption
The effect of improving blood flow with correct posture plays a crucial role in promoting fat burning. In the hunchback posture, the rib cage is compressed and the venous reflux to the heart is inhibited, but studies on the circulatory system have shown that the heart rate output is increased by 10-15% by stretching the spine.
Improved blood flow increases the oxygen supply to muscle tissue and activates aerobic metabolism in mitochondria. A large amount of oxygen is required for β-oxidation of fatty acids, but when the oxygen supply is stabilized by improving blood flow, the fat burning efficiency is greatly improved. In actual measurements, it has been reported that correct posture increases oxygen consumption at rest by 8-12%.
You can't miss the improvement of the circulation of the lymphatic system. In the correct posture, the movement of the diaphragm is active, which promotes lymphatic pump function. Improved lymphatic circulation promotes the discharge of waste products and improves metabolic efficiency at the cellular level. In addition, immune function in the lymph nodes is also activated, contributing to metabolic improvement through the suppression of chronic inflammation.
4. Posture improvement techniques that can be practiced in daily life
・Basics of sitting and correct use of muscles
An effective way to sit starts with erecting the pelvis. By firmly applying the sciatic nodule to the seat surface of the chair and keeping the pelvis in the middle position, a natural curve of the spine is formed. At this time, the stability of the trunk can be ensured by lightly contracting the transverse abdominal muscles. It is important to maintain the contraction of the transverse abdominal muscles with the image of a light concave of the stomach and not stopping breathing.
Adjusting the position of the shoulder blades is also essential. By gently pulling the shoulder blade back and lowering it downwards, the rib cage is opened and the breathing function is improved. By balancing the lower fibers of the trapezius muscle and the anterior serration muscle, the stability of the shoulder blades is improved and the exercise efficiency of the upper limbs is also increased. By maintaining this posture, you can expect an additional energy consumption of about 15-20 kcal per hour.
The position of the head and neck is also an important factor. By gently pulling the head back and gently pulling the jaw, the anterior curve of the cervical spine is normalized. This posture relieves the overtension of the cocialital muscle group and improves blood flow to the brain. Improved cerebral blood flow is effective in normalizing the secretion of appetite-regulating hormones and suppressing overeating.
・Improved digestive function by normalizing the position of internal organs
When the internal organs return to their normal position due to correct posture, the digestive function is dramatically improved. The hunchback posture compresses the stomach, inhibiting gastric acid secretion and peristalsis, but stretching the back normalizes the volume of the stomach and improves digestion efficiency. This improves the absorption of nutrients and increases the efficiency of the use of proenzymes and vitamins necessary for metabolism.
Normalizing the position of the intestinal tract is also an important effect. In poor posture, the intestinal tract is compressed and the balance of the intestinal flora is easily disrupted, but when the correct posture improves the blood flow of the intestinal tract, the activity of the good bacteria is activated. Improvements in the intestinal flora promote the production of short-chain fatty acids, which contribute to improved metabolism throughout the body.
The position and function of the liver are also affected by posture. When the movement of the diaphragm is active due to correct posture, a massage effect on the liver is created and the liver blood flow is improved. The liver plays a central role in the metabolism of carbohydrates, lipids, and proteins, and the improvement of its function greatly improves the metabolic efficiency of the whole body.
5. An effective diet strategy that incorporates posture correction
・The importance of posture that maximizes exercise effects
Correct posture during exercise maximizes energy consumption and dramatically increases the diet effect. Aerobic exercise improves ventilation efficiency with correct posture and increases maximum oxygen intake by 10-15%. This will allow you to burn more fat even with the same exercise intensity.
Posture is also extremely important in strength training. By training with the correct alignment, you can efficiently stimulate the desired muscle group and maximize the effect of muscle hypertrophy. The increase in muscle mass is directly related to the improvement of the basal metabolic rate, so you can expect a long-term diet effect. In addition, training with correct posture minimizes the risk of injury and contributes to the establishment of continuous exercise habits.
In the recovery process after exercise, correct posture plays an important role. When blood flow and lymph circulation are improved by proper posture, the removal of metabolic products such as lactic acid is promoted, and fatigue recovery after exercise is accelerated. This makes it possible to increase the frequency of exercise and leads to an increase in total calorie consumption.
・The role of posture in long-term weight management
Posture improvement is not a temporary weight loss, but a true value in long-term weight management. By habitualizing correct posture, the calorie consumption in daily life movements can be continuously increased, significantly reducing the risk of rebound. This is known as an improvement in non-motor heat production, and an additional consumption of 100-200 kcal per day can be expected.
Long-term stabilization of hormonal balance is also an important effect. When the autonomic nervous system is normalized by correct posture, the secretion of appetite-regulating hormones such as leptin and grelin is appropriated. This makes it possible to control your appetite naturally, and the suppressive effect of overeating and snacks is maintained.
Even on the psychological side, correct posture improves confidence and vitality and contributes to maintaining an active lifestyle. The correlation between posture and psychological state has also been proven by neuroscience, and correct posture activates the activity of the frontal frontal, and promotes the improvement of willpower and the establishment of habits.
Lastly
The relationship between obesity and posture is a serious health issue that goes beyond just a matter of appearance. The deterioration of posture caused by weight gain leads to a further decrease in metabolism and creates a vicious circle of obesity. However, this vicious circle can be broken with the right knowledge and the right approach.
Attitude awareness reform in daily life is an effective diet method that anyone can start right now without the need for special equipment or high costs. The simple action of stretching the spine has multifaceted effects such as improving basal metabolism, improving blood flow, and normalizing visceral function, and achieving healthy weight management.
With continuous posture improvement, your body will naturally change to a constitution that is easy to lose weight. Get a beautiful posture and ideal weight at the same time to achieve a healthier and more energetic life.
0 notes
Text
Sculpt Stronger Core Muscles with These Stretch Band Exercises for Abs
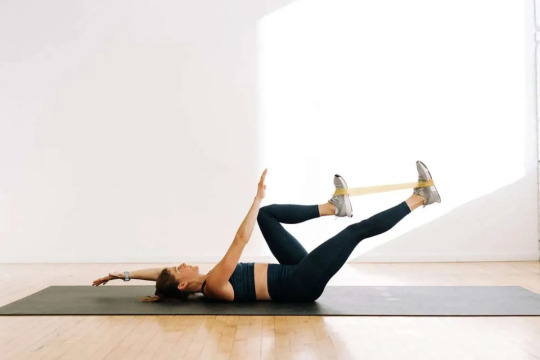
Variety and resistance are the keys to core exercise when it comes to shaping definition and strength. One of the best—and most underused—tools to incorporate challenge and variety into your abdominal workout is the stretch band. Light, portable, and inexpensive, stretch bands (also referred to as resistance bands) can assist you in exercising your core muscles in fresh ways, leading to quicker results and less chance of injury. If you’re ready to take your fitness to the next level, it’s time to discover these energetic stretch band exercises for abs.
Why Use Stretch Bands for Ab Workouts?
Before jumping into specific movements, it’s important to understand why stretch bands are so effective for abdominal training. Unlike traditional bodyweight or machine-based ab exercises, bands provide variable resistance, meaning the tension increases as the band stretches. This forces your muscles to work harder through the full range of motion, especially during the eccentric (lengthening) phase of an exercise.
Additionally, stretch bands improve muscular endurance and coordination. They activate stabilizing muscles in your core that may not be engaged during standard crunches or sit-ups. The result? Stronger abs, improved posture, and a more balanced, functional body.
Best Stretch Band Exercises for Abs
Whether you’re a beginner or an advanced fitness enthusiast, these exercises target the entire core—including the rectus abdominis, obliques, and transverse abdominis—with maximum efficiency.
1. Standing Band Woodchoppers
This dynamic movement targets the obliques and mimics the motion of swinging an axe.
How to Do It:
Anchor the band at shoulder height.
Stand with feet shoulder-width apart, side-on to the anchor.
Hold the free end of the band with both hands.
Pull the band diagonally across your body, from high to low, twisting your torso.
Return slowly and repeat before switching sides.
Pro Tip: Keep your hips steady and focus on the rotation coming from your waist, not your arms.
2. Seated Band Russian Twists
Great for hitting the obliques and challenging your balance.
How to Do It:
Sit on the floor, loop the band around your feet, and hold the handles or ends with both hands.
Lean back slightly to engage your core.
Twist your torso to one side, pulling the band across your body.
Return to center and twist to the opposite side.
Modification: For extra intensity, lift your feet off the ground.
3. Banded Plank Pulls
Add dynamic resistance to the classic plank with this variation.
How to Do It:
Start in a forearm plank with the stretch band looped around a sturdy object to your side.
Hold the free end with your outside hand.
While maintaining plank form, extend your arm outward against the resistance, then return.
This move lights up your transverse abdominis, the deep core muscles that help stabilize your spine.
4. Resistance Band Bicycle Crunches
Take your bicycle crunches up a notch with added resistance.
How to Do It:
Lie on your back and loop the band around both feet.
Bring one knee toward your chest while extending the opposite leg.
As you twist your torso, the band resists the motion, increasing the challenge.
Do 12–15 reps per side for a killer burn.
Also Read: Is a Stationary Bike Workout Really Effective? Here’s Some Science behind it
5. Kneeling Band Crunch
A powerful move that targets the upper and lower abs simultaneously.
How to Do It:
Anchor the band above head height.
Kneel on a mat and hold the ends of the band behind your head.
Crunch down, bringing your elbows toward your knees.
Slowly return to the starting position.
This is one of the most effective stretch band exercises for abs to simulate a cable crunch without gym equipment.
6. Banded Dead Bug
This move trains core stability while resisting tension from the band.
How to Do It:
Lie on your back and anchor the band behind your head.
Hold the band in both hands with arms extended.
Lift your knees to 90 degrees.
Extend one leg out while keeping tension in the band and your arms steady.
Alternate legs.
This exercise strengthens deep abdominal muscles and improves coordination.
7. Side Plank with Band Row
Add resistance to the traditional side plank for a functional twist.
How to Do It:
Anchor the band in front of you.
Get into a side plank on your elbow.
With your top hand, grab the band and row it toward your torso.
Perform 8–10 reps on each side.
This combination move targets your obliques, lats, and shoulders all at once.
Also Read: Stretch Band Back Exercises To Strengthen and Support Your Spine
Benefits of Incorporating Stretch Band Exercises for Abs
Beyond variety, there are several compelling reasons to add stretch bands into your ab routine:
Enhanced Muscle Engagement: Bands require you to stabilize throughout each movement, targeting muscles that static exercises may miss.
Injury Prevention: Low-impact yet effective, these exercises reduce strain on the lower back.
Progressive Overload: As you get stronger, you can easily switch to a band with more resistance to continue building strength.
Portable Workouts: You can do these workouts anywhere—no need for a gym or expensive machines.
Stretch bands also allow for functional training, helping your core perform better in everyday activities and sports.
Stretch Band Ab Workout Routine
Here’s a quick 15–20 minute circuit using the above stretch band exercises for abs:
Standing Band Woodchoppers – 12 reps per side
Seated Band Russian Twists – 15 reps per side
Banded Dead Bug – 10 reps per leg
Plank Pulls – 10 reps per arm
Kneeling Band Crunch – 15 reps
Side Plank with Band Row – 8 reps per side
Bicycle Crunches with Band – 12 reps per side
Repeat the circuit 2–3 times, resting 30–60 seconds between sets.
Also Read: Think Leg Stretch Band Exercise Is Too Easy? Think Again!
Tips for Success
To get the most out of your stretch band ab training, keep these tips in mind:
Maintain control: Don’t let the band pull you too quickly; controlled movement builds more strength.
Engage the core: Focus on keeping your core tight during each repetition.
Breathe properly: Exhale on the contraction and inhale on the release.
Don’t rush: Form is more important than speed, especially with resistance.
Also, be consistent. As part of an overall fitness program, try to do stretch band exercises for your abs two to three times a week.
Final Thoughts
Whether you want to build a stronger core, correct your posture, or etch out visible abs, stretch band exercises for abs are a powerful and flexible solution. They are suitable for all levels of fitness, enable progressively overloading, and can be practised almost anywhere. With their patented resistance system, every rep counts, giving you a progressively stronger, more defined core over time.
So grab your stretch band, roll out a mat, and start activating your abs like never before. Your core—and your overall fitness—will thank you.
0 notes
Text
Planks: The Ultimate Core Exercise for Strength and Stability
If you're looking to build a stronger core, improve posture, and increase overall stability, the plank exercise should be at the top of your list. The plank is a simple yet highly effective bodyweight exercise that targets various muscle groups in your body, making it a full-body workout. Whether you're new to fitness or a seasoned athlete, planks can provide numerous benefits. In this blog post, we'll dive into the active muscles involved, how to perform them correctly, and why you should incorporate planks into your workout routine.
Why Should You Do Planks?
Planks are incredibly versatile and can be modified to suit anyone’s fitness level. Here’s why they should be an essential part of your routine:
Core Strength: Planks target the core like no other exercise. This means strengthening your abdominals, obliques, and lower back muscles.
Stability & Balance: A stronger core leads to better stability and balance, which is crucial for other physical activities, including running, weightlifting, or sports.
Posture Improvement: Strong core muscles help improve your posture by supporting the spine.
Fat Burning: Planks engage several large muscle groups, which helps burn more calories compared to isolated exercises.
Active Muscles in Planks
The beauty of the plank is that it works multiple muscle groups at once. Here's a breakdown of the primary muscles engaged during this exercise:
Rectus Abdominis (Abs): The primary target during the plank. This is the muscle responsible for the “six-pack.” By engaging your core to maintain the position, you strengthen this key abdominal muscle. Dosage: For beginners, hold the plank position for 15-30 seconds. Gradually increase the time as your strength improves.
Transverse Abdominis: This is the deepest layer of the abdominal muscles. When you hold the plank position, the transverse abdominis contracts to stabilize the pelvis and spine. Dosage: Include 3-5 sets of planks, aiming for a steady 30-45 seconds per set, with short breaks in between.
Obliques: These muscles run along the sides of your abdomen and are responsible for rotational movements. In planks, they help with stabilizing and preventing twisting of your torso. Dosage: Side planks can be used to target the obliques more effectively. Hold for 20-30 seconds on each side.
Glutes: While planks mainly target your core, your glutes (buttocks) also get a great workout. The glute muscles activate to help you maintain proper posture and alignment throughout the movement. Dosage: For best results, squeeze your glutes throughout each set of planks to maximize engagement.
Shoulders and Upper Back: The shoulders, traps, and upper back muscles stabilize the body during the plank. Keeping your arms, shoulders, and neck aligned with your spine is essential for performing the exercise correctly. Dosage: Ensure you're engaging these muscles during the entire plank hold for better posture and effectiveness.
Quadriceps: Your quadriceps (front thigh muscles) also engage to support your body while maintaining the plank position. A steady plank helps tone these muscles, giving you more power for activities like running or cycling. Dosage: Regular practice, with focus on tight leg muscles, will help tone and strengthen your quads. Start with 3 sets of 30 seconds, then gradually build up.
How to Perform a Plank Correctly
To reap the full benefits of the plank exercise, proper form is crucial. Here’s how to do it right:
Start in a push-up position with your hands directly under your shoulders and your body in a straight line from head to heels.
Engage your core by pulling your belly button toward your spine. Avoid letting your hips sag or pike up.
Squeeze your glutes and thighs while keeping your body stiff and strong.
Keep your neck and head in a neutral position by gazing slightly ahead of you on the floor.
Conclusion: Why Planks Should Be Part of Your Workout Routine
Incorporating planks into your fitness routine can help you build a solid foundation for strength, stability, and overall fitness. They are simple to perform, require no equipment, and can be modified to suit all levels of fitness. By targeting the core, glutes, shoulders, and even your legs, planks offer a full-body workout that’s ideal for anyone looking to improve their posture, balance, and muscle endurance.
Tip: Consistency is key! Start slow, focus on form, and progressively increase your time in the plank position. You’ll be amazed at how quickly you notice improvements in your strength and stability.
Ready to improve your core strength? Start incorporating planks into your daily routine today, and feel the difference it makes!
"For expert advice and guidance, visit our website's 'Ask the Experts' section."
0 notes
Text

Maintaining an upright posture is more challenging than it seems, often due to weak deep muscles. Unlike the surface-level muscles that control movement, it is the deeper postural muscles that keep the body properly aligned. These muscles—known as core muscles—include those around the spine, abdomen, and pelvis, providing essential stability. Specifically, they encompass the obliques, rectus abdominis, transverse abdominis, and pelvic floor muscles.
The term “deep muscles” may be unfamiliar, but “core muscles” is widely recognized. Although their names vary, their purpose remains the same—supporting the spine and posture. When these muscles weaken, maintaining an upright stance becomes difficult. This is a clear signal that core strength has been neglected for too long. To restore stability, incorporating exercises like squats, planks, and yoga is a great way to begin.
0 notes