#rca cable connections
Explore tagged Tumblr posts
Text
complaining about modern tvs and nostalgia posting~~
buys new tv cause old one was blasting volume to very loud randomly for no reason whatsoever~~
hindsight biting me in the butt cause now I want to play SA and SA2 on the dreamcast to try to get better at the controls, and to check out more of the graphical differences and differences in the chao system~~
it was mainly to see the differences in graphics and the chao system, cause I love the little guys so bad~~~
now I can't even play it to try to get better at the controls cause the new tv doesn't have RCA connections to hook the dreamcast up... or any retro console for that matter.
I need to get an HDMI to RCA cable splitter or something to connect them to the tv now.....
I have to buy yet another thing~~~
every tv should still have legacy connectors I swear......
and the ports should be easily accessible too....
I'm assuming its a struggle for anyone who has their tv in a corner to plug things into the back of it..... even moreso for me cause I'm legally blind......
do I regret buying the new tv? no not really but also yes cause I didn't take the "not having legacy ports anymore" into account cause I wasn't thinkng about it at the time of purchase... and I was looking for the best "cheap" one I could find cause idk why.....
and iirc the "grades" that are on the chao stats were a non dreamcast thing? so I think if I did ever get to the chao garden in those games and start raising chao there, I'd need to cross check numbers of stats upon level up to tell what "grade" the stat has....
man I want the "new" gamecube chao breeding system as well as the older chao garden layouts and the dreamcast graphics. I hope getting used to the dreamcast system isn't too much of a pain if and when I get around to it again~~~
and I wonder if they display correctly in the dreamcast~~ cause there were a number of chao I bred as a teenager while playing the gamecube version that were invisible.... wonder what colours they actually were~~ I'd assume they were supposed to be coloured transparent chao but just ended up being invisible...
I miss messing around in the chao gardens in sadx and sa2b~~~
that comparison video I found and shared sparked all of the nostalgia and I can't act on it to play any games I'm nostalgic for T_T;;
#personal#thoughts#thinking#tv#tvs#modern tv#modern tvs#rca cable connections#rca cables#hdmi#hdmi cables#hdmi ports#modern tvs should have legacy connections#and they should be easier to get to#now I got to find a converter or something to use legacy devices that still use that connection#hindsight#I should've waited and bought a tv with rca connections by default#nostalgia#nostalgic#sonic adventure#sonic adventure 2#sonic adventure dx#sonic adventure 2 battle#chao#chao garden#chao raising systems#dreamcast#gamecube#wonder just how different the dc and gc chao raising systems actually are#will forever love those little guys~~~
0 notes
Note
Top 5 animals
Top 5 people
Top 5 connection cables
Top 5 green things
No particular order
Top 5 animals
Cats
Raccoons
Bats
Otters
Those flying snakes
Top 5 green things
Sprigatto
Pistachios
Text prompts
The devils bush
Uranium
Top 5 connectors
USB 3.0 type B
Serial
Composite RCA
Molex
Ethernet
Top 5 people
Definitely have
51 notes
·
View notes
Text
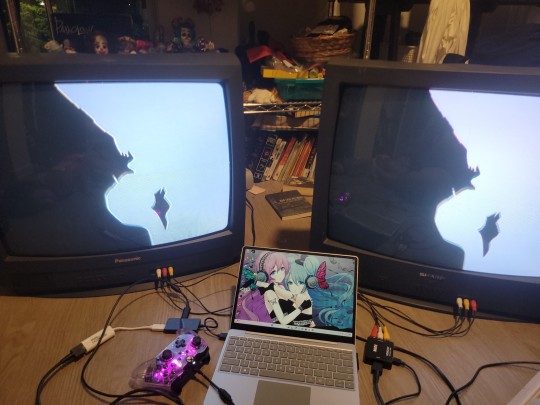
some of you have asked me about my crt setup!!
some basic materials you'll need.
CRT TV (duh)
computer or laptop (duh)
HDMI2AV (NOT AV2HDMI)
RCA cords (the red, white and yellow ones)
HDMI to USB converter if your laptop doesn't have HDMI like mine does.
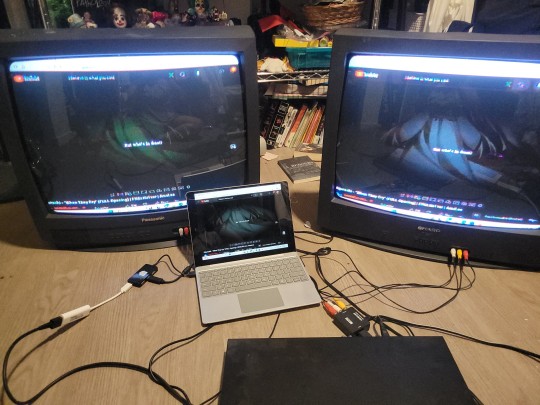
here is the setup, this is a multi monitor setup but you can just do this with one CRT.
step one: plug in your crt. cord in the back. that will power your crt!
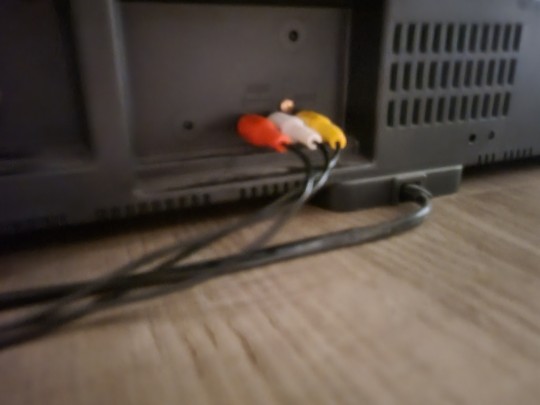
step two: plug in the RCA cables like this.
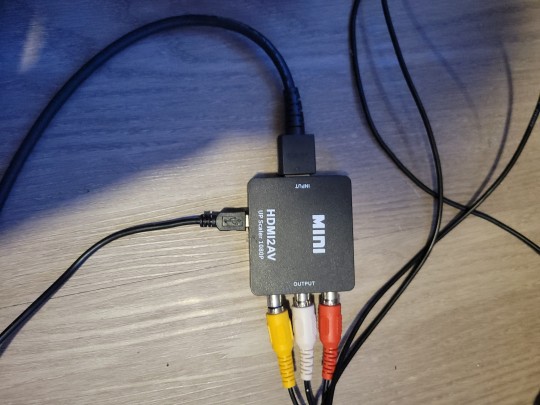
step three: plug your RCA cords into the HDMI2AV adapter like so. you'll plug in an HDMI cord on the other side. MAKE SURE IT'S SET TO THE CORRECT SETTING. THERE'S NTSC AND PAL
if you don't know what yours is, check this map that explains where each one was sold.
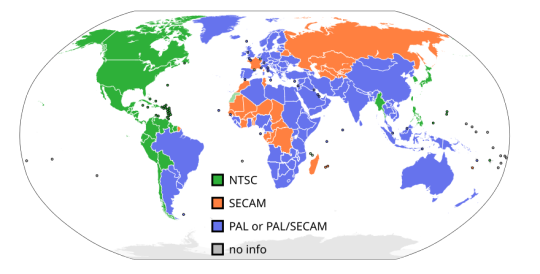
PAL is just a different color encoding system, a bunch of technical stuff you can learn on your own.
step four: plug your HDMI into the USB adapter if you need it. YOU MIGHT NOT. DEPENDS ON YOUR DEVICE.
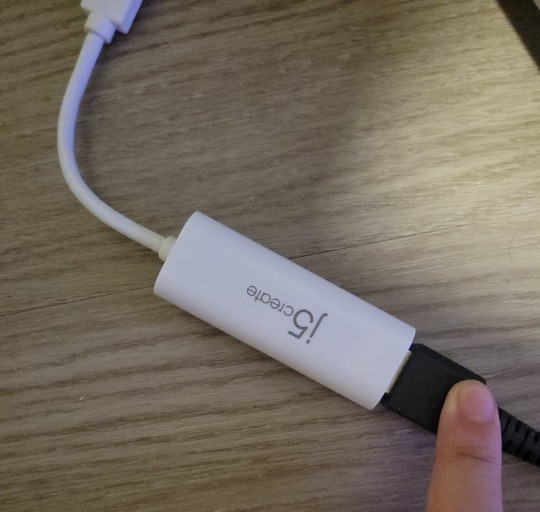
i use a windows surface pro and it requires i use this adapter. sucks ass but whatever.
OPTIONAL: if you have ONLY ONE usb port in your computer, consider getting a USB splitter so you can plug multiple things in. i have one.
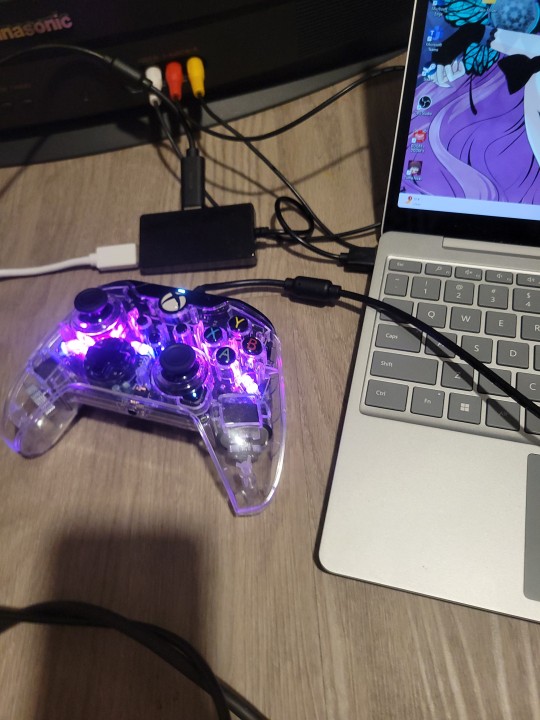
and voila. a set-up!
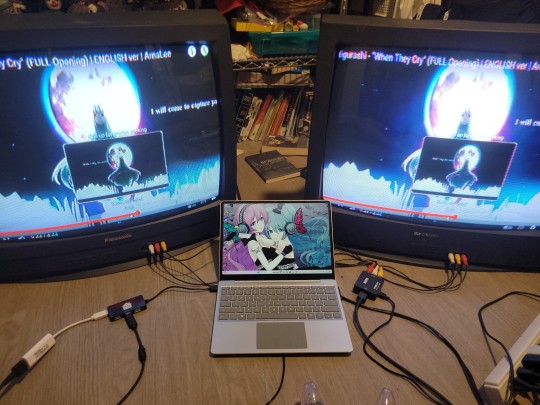
you can treat these like different displays.
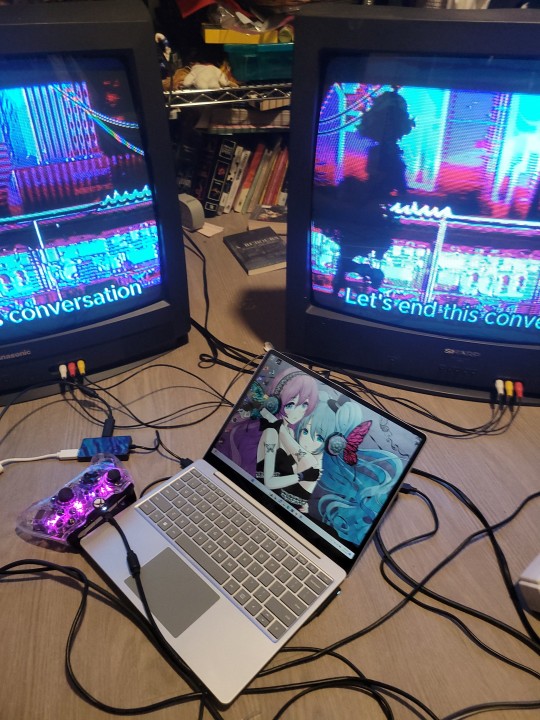
mines connected by the 3 cords in the front, but if you have more money and can get another adapter and etc etc, you can make these all different.
a few FAQ since i assume quite a few of you have never used crts or vhs players:
whats the ringing sound?: its a ringing sound caused by the transformer in the back, its the 15kHz tone. as you get older, you stop hearing it because you lose high frequency hearing. i cant hear it in one ear because of a radio accident and i bursted my eardrum.
can i stop the ringing?: buy a crt pc. theyre smaller and dont ring as much/at all depending on which one you have.
how do i use my vhs player: you plug the cords into the back of the vhs player and then into the crt.
where do i buy a crt: theyre not in production anymore so you will have to buy it secondhand on markets.
where did you get all your cords: most stores with an electronics section will have it but consider secondhand computer parts store.
what do you do with it: literally watch YouTube, vhs tapes, make vhs tapes (whole different thing) or play video games.
can it run bad apple?: yes
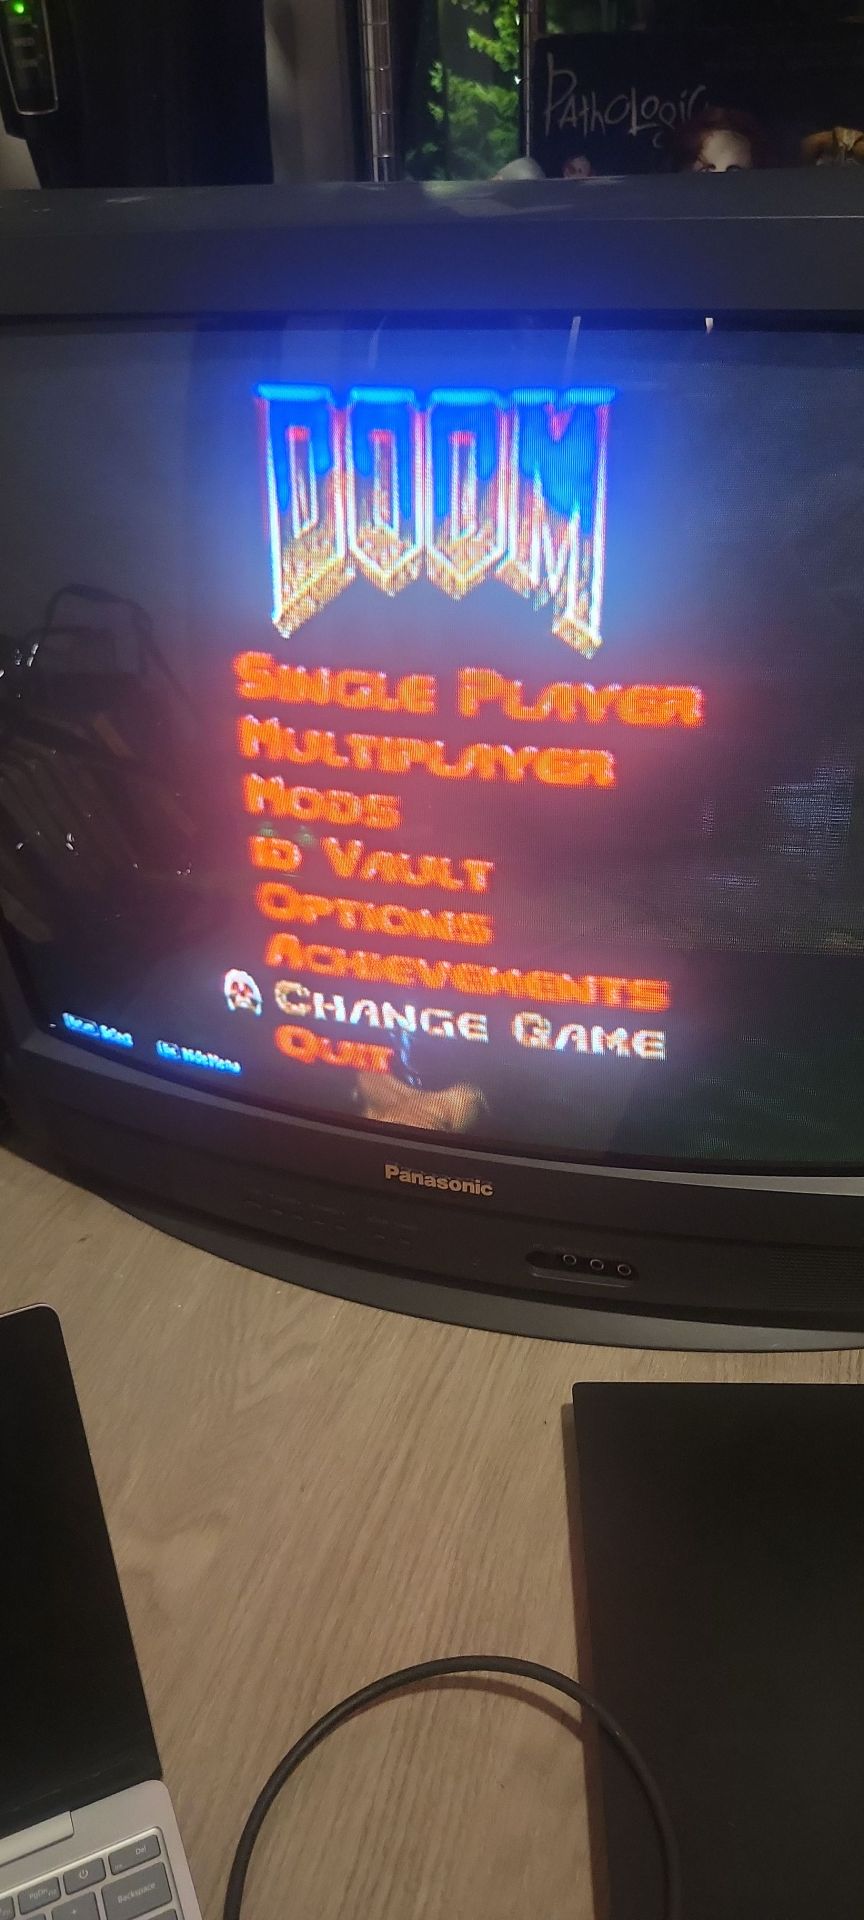
can it run doom?: yes
anyways yeah. end tutorial. 🥳
23 notes
·
View notes
Text
In addition to yesterday being PTO from work, I took today and tomorrow off too. As fall approaches I usually like to set aside a few weekdays to wash windows and purge the house of unneeded items.
This morning I blasted through my home office, going through every drawer and cabinet. I found an old Garmin watch that I haven't used in years. It may still work, but it's large and clunky. The heart rate monitor is a separate strap that goes around the chest. It never felt comfortable to me.
These things wouldn't fetch a dime on eBay. I ran many miles and races with that watch. There are many nice memories around its worn-smooth, sweat-etched edges.
But I'll never use it again. My latest Garmin, like Hugh Hefner's youngest wife, is thinner, lighter, and does more things than the old one.
There's no point in keeping that old watch only to have my kids throw it away when I'm gone. I may as well benefit now having a desk drawer that isn't overflowing with junk/memories.
I also threw out of miles of cables and cords. Those RCA cables that connected my dual tape deck, turntable, and CD player to the cool Sony receiver I bought when I got married? Well, since I don't have any of those components anymore is there really any reason to keep the cables? Uh, no. Does anyone need a charging cord from a 1998 Palm Pilot? I have one, at least until the garbage truck arrives today.
It relaxes me, being able to see the bottom of drawers or having cabinets that close without a solid nudge from my shoulder.
Those clean windows make rooms a lot brighter as well.
54 notes
·
View notes
Text
Hey, do you want to learn how to play VHS tapes in the year 202X?
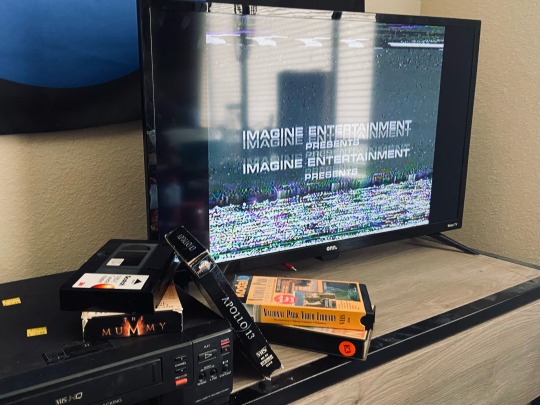
I know this is my art blog, but it has come to my attention that some of you are too young to have experienced the joys of the Video Home System in its prime. Come hither so I can teach you and we can embrace the beauty of physical media together. If you have a thrift store and a TV, this process should work for you.
Step 1: Get a VCR ($4-$15)
DO NOT BUY EXPENSIVE VCR/COMBO SETS FROM THE INTERNET!
The ones you find on sites like eBay and Etsy are insanely overpriced and might not even work. Instead, find a Goodwill, Savers, or independent thrift store near you and go to the electronics section. There’s a good chance they’ll have at least one VCR. If they don’t, try a different shop. You can also check local online marketplaces, yard sales, etc.
Good things to look for:
4 (or more) Heads — Heads are the things that actually read the tape. The more heads you have, the better your picture is going to be.
Auto Tracking — Poor tracking can create a rolling picture, which is a pain to fix. An auto tracking VCR does that work for you.
Pre-2000 — After 2000, electronics started being mass produced with plastic casings and cheap parts. VCRs made after this time are a whole lot easier to break. Ideally, you want something from the late 80s to mid 90s.
Well-known brands — Sony, Toshiba, etc. Japanese manufacturers tend to have the best quality. Early Emersons are nice too.
Generally good condition — If there’s a bullet hole in the case, it’s probably best to pass on. A bit of dust isn’t an issue, but major damage isn’t a good sign. If you can, plug the machine into a power outlet in the store and see if it even turns on.
Head cleaning indicator — Not something you *need*, but I find it nice to have. You’ll want to use a head cleaning tape when the indicator starts flashing.
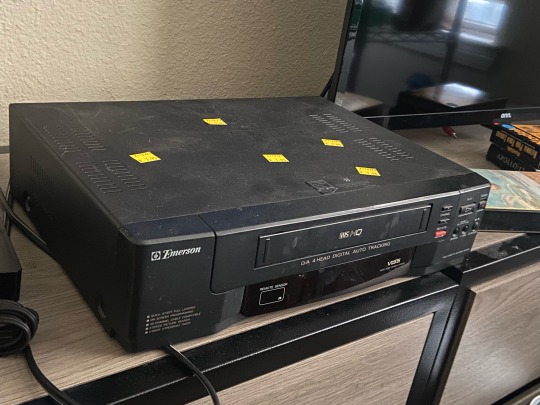
This is the one I’ll be using for the sake of this guide. This is an old Emerson that I picked up from Goodwill for $7.95. (Notice the five price tags they slapped on top.)
Step 2: Get Some Tapes (¢10-$1)
This is the fun part. Almost every thrift store will have some VHS tapes, usually near the books/DVDs/records. I’ve seen them as expensive as a dollar, but some stores will just give them away for free. I suggest buying a few movies you like, plus one or two shitty tapes to test out your VCR with.

You may also find 20 different copies of Titanic in every store. This is a normal occurance.
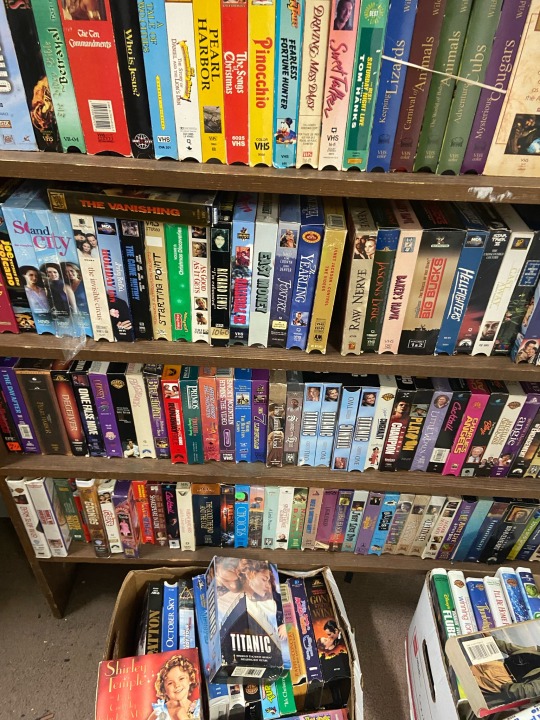
Remember to check the condition of any tape you plan on putting in your machine. If the spool looks moldy, you *can* try to clean it, but you’ll need another VCR to do so. If the tape looks wrinkled or otherwise damaged, you can still probably play it, but it will look and sound a lot rougher than you should expect. If the casing is damaged, I wouldn’t risk trying to put it in your VCR at all.
Remember: VHS tapes stopped being produced commercially in 2006. Most tapes you find aren’t going to be in the best shape, because they’re all a few decades old. (Sometimes, though, you will come across a tape with an excellent picture, good sound quality, and subtitles! The Mummy tape that I own is near perfect.)
Step 3: Connecting the VCR to Your TV
For this step, you’re going to want a coaxial cable and a set of RCA cables (the red, yellow, and white ones). If your TV doesn’t have an RCA input, you’ll also need an RCA-to-HDMI converter. If your TV also doesn’t have an HDMI input for whatever reason, you’re shit out of luck.
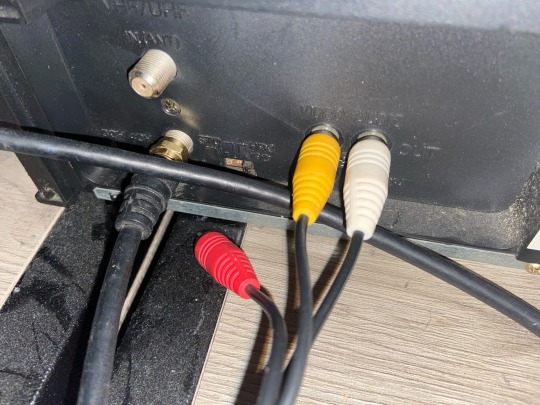
You’ll plug these cables into the “out” or “out to tv” connection on your VCR, then plug the other end into the back of your TV.
Note: Not all VCRs have right audio (the red one)! That’s fine. Just leave it hanging free. The left audio (white) is your mono audio, so you’ll just have that instead.
Lastly, put the channel switch on the back of your VCR on 3 or 4. I keep mine on 3. This is the number for the channel you’ll go to on your TV to actually see what the VCR is playing.
Step 4: Setting up the TV
I use a little Roku TV, which is surprisingly steady to set up for VCR input:
Settings ➡️ TV Inputs ➡️ Live TV
From here, you’ll either be prompted to scan for channels OR you’ll have to select “scan for antenna channels”. It will ask you if you want to have channels 3 and 4, to which you’ll say “yeah, I do want channels 3 and 4” and click the button that lets you have channels 3 and 4. If you don’t have an antenna, you can skip the other prompts.
I haven’t done this on any other type of TV, but the process should be pretty similar: get yourself to channels 3 and 4 through whatever means necessary.
Once you’re there, it should look like this. Sad, blank, and lonely. But not for long.
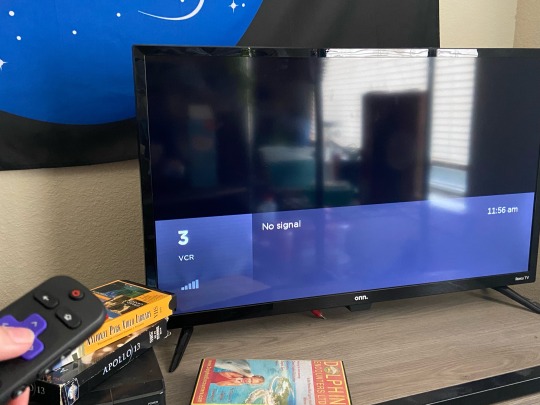
Step 5: Playing Your Tapes
This is where things can go really really well or really really wrong. If everything is hooked up, you can grab your shitty tape and insert it into the VCR.
(Make sure there isn’t anything else in there first, though. Some people don’t remove their precious Titanic copies before donating these things.)
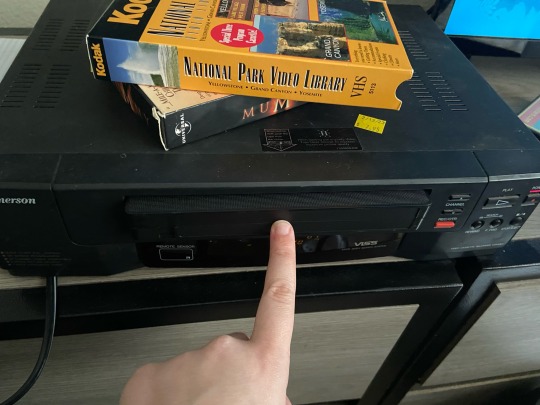
You’ll want a tape that’s fairly clean, with no casing damage, and already rewound (black tape in the left window). To insert the tape into a front-loading VCR, slowly and firmly slide it into the slot. Once it’s most of the way in, the machine should “grab” it and pull it all the way inside. You’ll hear the machine make some noises.
(If those noises are really crunchy, that’s probably not a good thing. Troubleshoot with your favorite search engine or head over to r/VHS to see if anyone can help you.)
Once your machine is only making some clunky whirring sounds, it should be safe to press the play button. Enjoy watching your favorite films in the least pleasant format possible. Don’t forget to rewind em when you’re done.
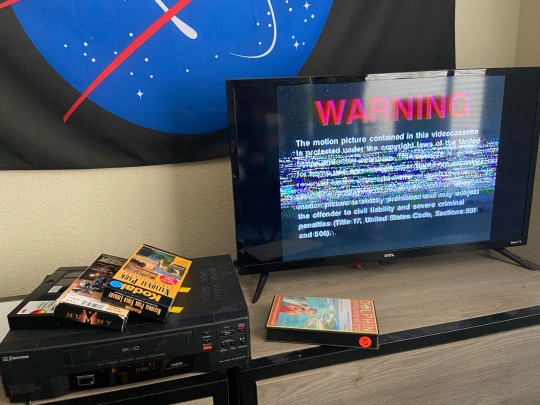
If you have issues, the freaks over at r/VHS tend to be really helpful, but you can also find decade-old YouTube videos that might answer your questions too.
183 notes
·
View notes
Text
Dynaco Repair Post No. 6: The Glow Renewed
Tuesday evening, 12-26-23
I was completely caught off guard by the box by the front door when I got back from Bunny Duty/Safeway/Post Office errands today. Things are supposed to be delivered starting tomorrow, three different packages, but nothing was scheduled to come today.
Busted out in a big grin as soon as I saw it was from my bud in SC: The EL34s got here two days early! So...I was completely (and delightedly) doing something much different this evening than I had planned!
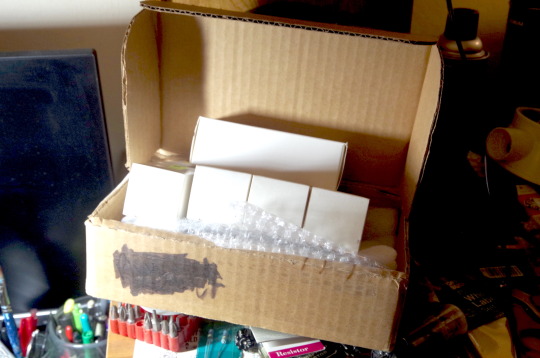
In the box were five tubes, all of them "good spares" I had personally pulled out of working ST70s I had. I'd de-tubed them before I sold them on eBay. They went to afore-mentioned friend who was going to use them in HIS Dynaco, but hadn't yet. He sent 'em back to me, four of the square-bottled Mullards (three of 'em original Dynaco-branded actual Mullards), and one "Winged C" (the Russian iteration), and a JJ as a spare. These had been in one of the systems I'd set up for ANOTHER of our buddies (my bestie who died in 2021). Old, but good, solid tubes with lots of life left in 'em.
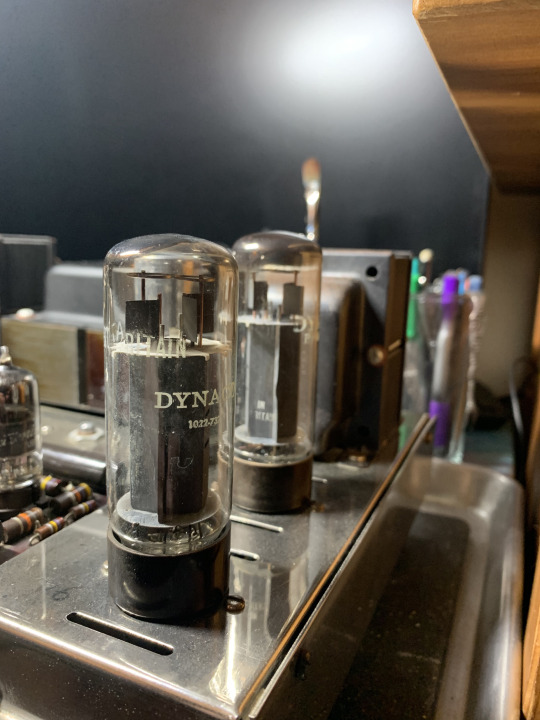
The 5AR4 I have is the original one. The silvering at the top is almost non-existent. It's a US-made Mullard clone:
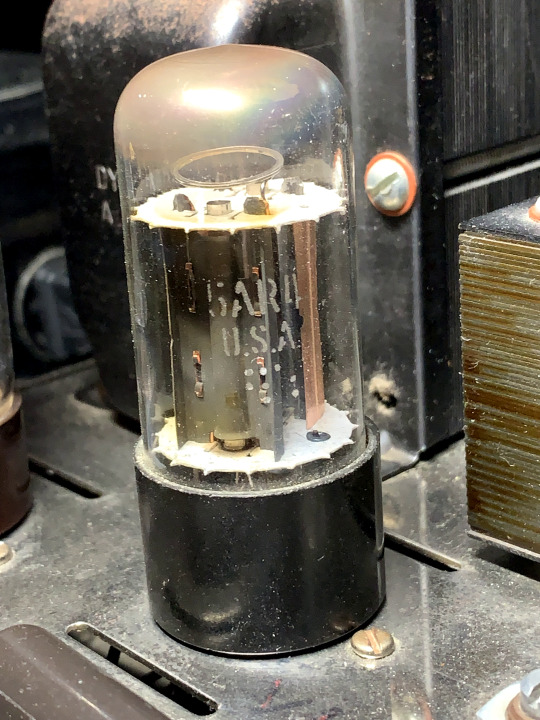
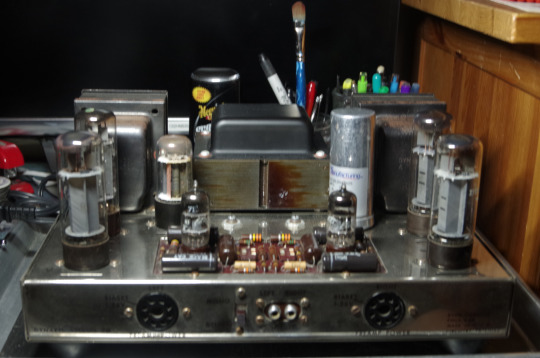
Gorgeous, ain't it?
SO...I got the ST70 ready for relaunch. Put it on the bench and hooked it up to my trusty old Micronta variac, set to "Zero Volts", got the fuse in, and switched it on.

Started out slowly turning it up to 10V, and waiting 15 minutes, and then turned it up another 10V to 20V, and waiting 15 more minutes, lather, rinse, repeat, until I got it up to about 117V.
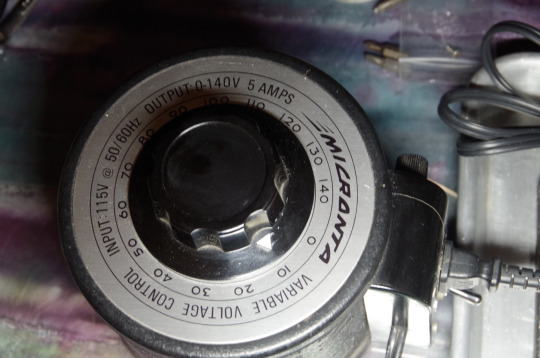
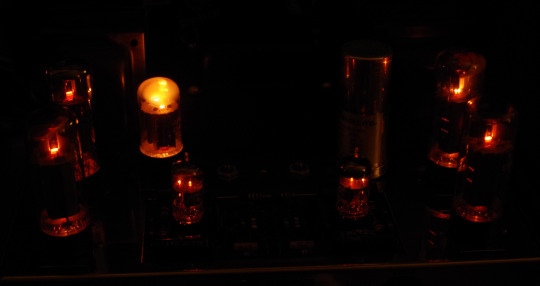
At about 40V I began to see the barest glow in all but one tube (that Winged C). At 50V, it began to glow as well. So far so good. After about an hour, I'd nursed it up to 70V, every tube glowing strong. I let it sit at 70V for about a half hour, and then just slowly turned the knob on the variac up to 117.
Every tube came up like a champ. The ST70 Glows once again!
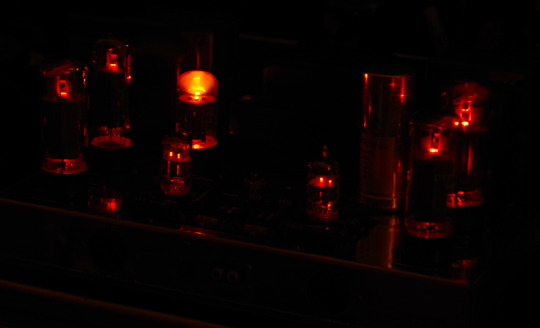
I let it sit and burn for about an hour, and checked the bias voltages. I had set the two adjustment pots to their center point. The left channel needed the slightest of increase (probably due to the Winged C) to get it up to the correct voltage, but the right channel was dead-set-centered on 1.56V. Boom. Rock solid. Done.
Now that the repairs are done, and I know everything is working, I will start tomorrow on re-connecting and re-arranging all the components in the system. I'm kinda spent at the moment...it's been quite a day! I'll post more tomorrow, but for tonight I call it a victory. All of the thanks go to my buddies @misfitwashere (who got me the parts) and our old compadre "Harbourmaster" on the East Coast, who sent the tubes.
More tomorrow, and to all a bitchin' Good Night.
Wednesday Night, 12-27-23
Well, it took awhile, but I finally got things re-wired and in position. Got the turntable and the FM3 hooked up and both work splendidly. I found a super-shielded RCA cable for the turntable specifically, and it sounds better...there's almost no need for the turntable ground wire now!
First, tho', I have to show off my speakers. These started their lives as Pioneer boxes, Model CS-44, to be exact. I got them at the thrift store for $25.

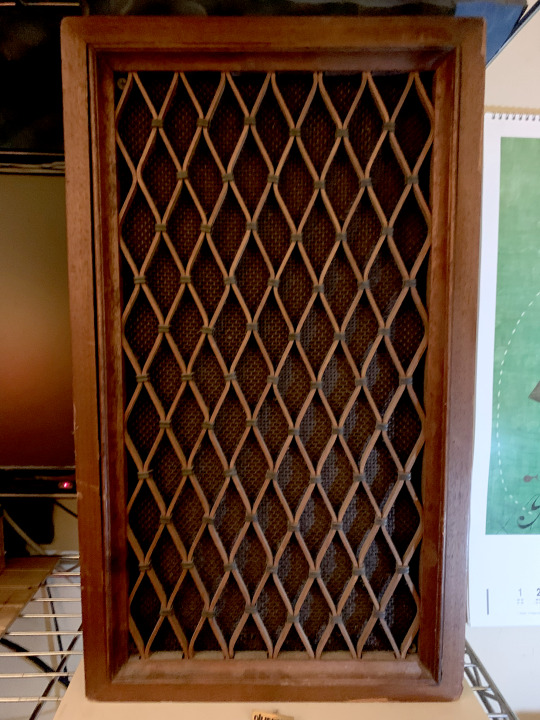
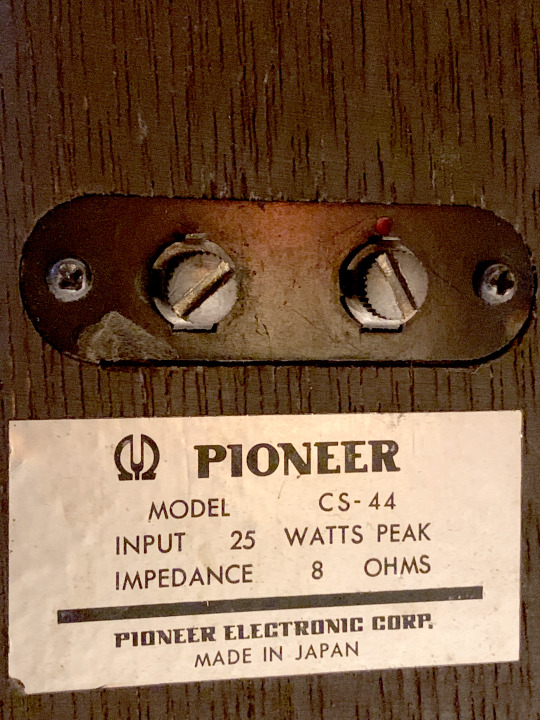
BUT: the 8-inch woofers and tweeters in them were garbage, so I replaced them with new components: A pair of 8" butyl-rubber surround, poly-cone woofers (they will never need reconing), and a pair of genuine Danish SEAS Tweeters, salvaged from a working pair of Dynaco A-25s.
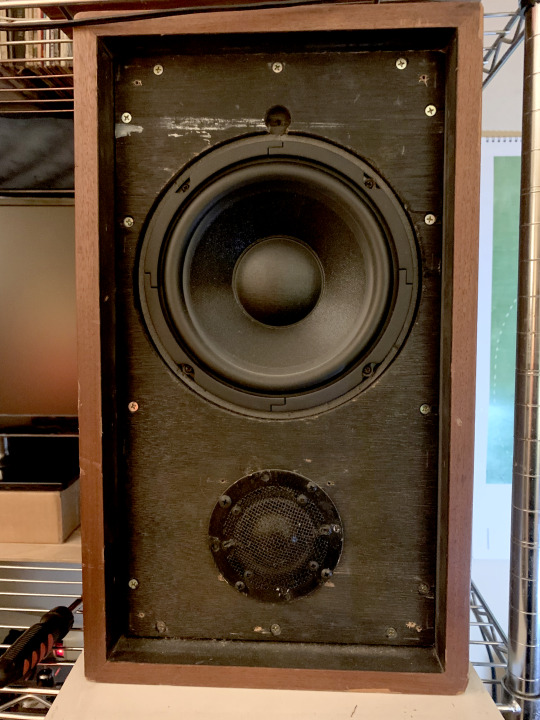
The result? The 8-Inch Dynaco Speaker That Never Was! The A-10s had 6-inch woofers, and all the others had 10-inch woofers.
And the sonic result? A pair of mid-sized bookshelf speakers with rock-solid bass and the clearest, most well-defined mids and highs you could ever want to hear! And they don't look bad, either!
Here is everything finally in place:


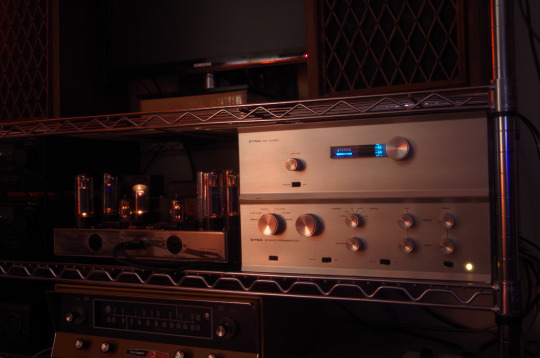


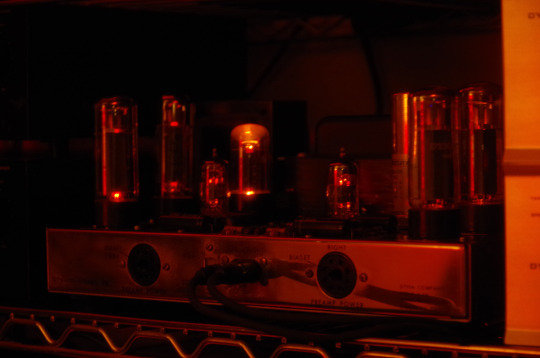
And that about wraps it up! I've finally got my music back. I'll finally be able to continue my vinyl transcribing, and won't have to worry about my equipment for another good long while.
Many thanks again to my bros @misfitwashere and Harbourmaster. I couldn't have gotten it accomplished without y'all's help.
21 notes
·
View notes
Text


Ako - circuitbent Sega Megadrive / genesis photographed on a monitor some time ago - 06/03/2024
How it works:Pins of the Megadrive's video chip were first tested by shorting between them with piece of wire to establish which pins would give interesting visual effects and were ‘stable’ (i.e. less likely to cause the console to freeze or reset). These pins were then connected to RCA sockets inset in the top case of the console to create a patch bay so that these bend points could be connected in any desired order using RCA cables. Video: https://www.youtube.com/watch?v=e6RIY8cwM0M
Source: Glitch artists collective - Facebook
7 notes
·
View notes
Text
Twin Famicom (NES model by Sharp)
The Twin Famicom is a video game console system that was produced by Sharp Corporation in 1986 (Juli 1) and was only released in Japan. It is a licensed Nintendo product that combines the Famicom (NES) and the Famicom Disk System into a single piece of hardware.
The essential parts of the Twin Famicom include a 60-pin socket for Famicom cartridges and a socket for Disk System disk cards. The player could switch between the two media types with a switch – cassette "カセット" or disk "ディスク" The Twin Famicom is fully compatible with the NES and can handle accessories made for the NES (e.g. Beam Gun). But there is also an extra port on the Twin Famicom. This allows a 'regular' Famicom to use the Twin Famicom's disk drive.

The original Famicom only has one color combination, and the Twin Famicom was initially sold in two colors: red with black highlights (AN-500R), and black with red highlights (AN-500B). A second version of the system was released in 1987 with a slightly different case design, turbo controllers, and two different color schemes; black with green highlights (AN-505-BK) and red with beige highlights (AN-505-RD).
Like the Famicom, the Twin Famicom uses NTSC but with an AV output rather than an RF modulator[2][3] with an RCA connector for composite video and mono audio, allowing for greater audiovisual quality on TVs and monitors with such inputs. An external RF modulator is bundled with the unit for connection through a TV's antenna/cable input. The two gamepads are hardwired into the console, so they cannot be disconnected. Source: Wiki NES models Check these out too if you are interested in retro computing


22 notes
·
View notes
Text
This is the new (kind of) CRT TV I got today! I saved up ages for it so I'm really excited that I've finally got one. I also got a RCA to HDMI adapter so I can connect it to my PC and Xbox One, but the seller forgot to send the RCA cables so I need to buy some new ones. I've been watching all my DVDs on it all night though and I really love it!


2 notes
·
View notes
Text
Word Salad #3
Whee desktop keyboard instead of iPad this time! Gosh this feels much more comfortable to type on aa.
So today we went to check out a local gaming shop to browse around. I was primarily looking for a DualShock2 controller and a VMU for the Dreamcast, but sadly there wasn't any. Though I still love looking around for anything new that drops by...and mildly cry inside at how expensive everything has been getting.

We also had a spare TV just hanging out in storage, but it didn't have its legs as it was wallmounted previously. I stumbled on this kit that essentially adds new legs to a TV while at work. plus it still has traditional RCA (Component) ports as well as 3 HDMI ports so plenty of room to hook up everything.


Currently the old 360, PS2, and Wii are connected with Component cables, and the new 360 and PS4 are hooked via HDMI, and the N64 has a Rad2X HDMI adapter (which that is a whole story behind that aa). The main goal with this setup is I wanna have a nice cozy retro gaming area, along with being able to watch DVDs and BluRay movies. I definitely wanna get a nice speaker system setup someday too, but hey, baby steps.
Tho even while this whole setup looks neat, there is a bit of a flaw. This particular TV seems to have trouble with interlaced video and the PS1 mode on the PS2 unless I fiddle around with the connections and the settings, which is extra hard because we have no clue where the remote for this TV is (planning on getting a universal remote aa). Even then, another solution I'm looking into a RetroTINK 2x-Pro which should not only upscale everything but also adds scanlines for that retro look. However it's currently $140 USD so I'll have to tackle that much later.
Last part of this I wanna add, last night I found Paw being...Paw and quickly made a doodle. Note for myself, learn how to fur.

And that'll wrap things up for now. Tomorrow I have work for the next 4 days which practically takes up my entire day. Still unsure how I wanna handle those days but I guess I'll know for sure tomorrow aa
so...yeah
fishcakes
meow
#bryastart#bryart#journal#cat#cat drawing#video games#retro video games#xbox 360#ps2#playstation#wii#gamecube#dreamcast#nintendo power#pokemon#zelda#luigis mansion#ratchet and clank#banjo-kazooie#word salad
3 notes
·
View notes
Text
Alright guys. With the talk of streaming services being the way that they are and like… who even has cable anymore? You may be thinking to yourself, well, damn, there are some things (sports, the news, live TV, whatever the case may be) that I’d like to watch but I’m not paying for cable or anything, and I don’t want to wait to pirate it. (Or maybe you’re not comfortable pirating which, cmon now, but fair enough.)
I have a solution!
First thing you’ll need: a good old fashioned antenna. This will be particularly helpful if you live in a city, relatively close to the towers doing the broadcasting, but you can get antennas with some pretty incredible range. Here’s a fairly decent one from Amazon for about $30. Usually hardware stores also have them, and chances are pretty good you have an electronic supply store in your town that also carries some!
Second thing you’ll need is an app called RCA Signal Finder. Just type that into your app store of choice, and you should get a free app from RCA you can download. This will allow you to choose which channels you’d like to watch, and it will tell you where the towers broadcasting those channels are so you can turn your antenna towards the tower for a stronger signal!
Other than the $30 investment for the antenna, the channels are completely free, and in this day and age typically in HD. You will mostly get local news channels, but that means you can watch whatever shows happen to be airing on NBC or CBS or whatever stations you can get. It’s genuinely a lot like cable, just minus the fancy extras (like DVR or being able to pause the show or whatever), and with a little bit of quality loss considering antennas can be a little touchy.
I used this technique to watch SNL last night, actually!
Anyway, here are some tips for you to give you the best chance at success with this:
The higher you can set up the antenna, the better. If you have a bookshelf you can set it on top of, that would work, or you can usually use a command strip or something similar to hang it on the wall. That said, if you hang it on the wall, you’ll have less ability to adjust which way the antenna is pointing if you’d like to use the RCA Signal Finder app to find towers.
As an extension of that, if you own your home or have a cool landlord (which is an oxymoron I know but hang with me here) and can set up a bigger antenna outside, maybe on your roof, that’s even better! But not strictly necessary.
Yes, that’s (most likely) a coax cable. Your TV (even your brand spanking new smart tv) should have a little screw looking thing in the back with a convenient little label next to it that says “antenna” or “ant/cable in” or something similar. The little wire sticking out of the middle of the cable will go in the hole in the center of the screw looking thing, and you’ll screw the cable on. Voila! Your antenna is now connected. Unless you have one that requires external power, this should be the only thing you need to plug in at all.
Getting to channels should be easy. If you have a Samsung smart TV like I do, you should be able to go into the settings menu, then broadcasting, then auto-program, and tell it to program from air. It should automatically detect the channels you’re receiving from your antenna and save them to your TV. If you don’t have a Samsung smart TV, I can’t imagine the steps would be too much different. You should be able to Google “how to set up antenna on [brand] tv” and it’ll walk you right through it.
Don’t be afraid to adjust and get creative with the antenna if you’re not getting a channel you want. Those old TV bits of people building wild contraptions with coat hangers and duct tape to get a decent signal to watch a show aren’t THAT much of an exaggeration. Now though our antennas are typically a little less unwieldy.
Go forth and watch TV for free!!!
17 notes
·
View notes
Text
This RCA Male Plug AV connector comes with screw terminal which ensures a firm and secure connection for audio and video signal cables. This RCA male connector is commonly used for CCTV installation and it only needs a screw driver to make secure connection for a variety of applications such as CCTV, microphone or camera installation.
2 notes
·
View notes
Text
we should make a new country and the flag should be red white and yellow to honour rca connection cables
2 notes
·
View notes
Text
Blind Review - Vizio 1080p 40” smartCast Smart Display (smartTV)
- by Bryan Gruver
Display
I am blind. My friend says it looks great. Vizio is known for good black levels. That is how black black actually is when it is displayed.
I called this a display and not really a TV because it is mainly a display. Technically, it does have a TV tuner built-in, but this TV really shines as a smart display. You can airplay to it from your Apple device or cast to it from your android device. Among its real inputs, it has several virtual inputs and buttons on the remote specifically for streaming services, including a free one. As far as inputs go, it has down facing Analog (Red White and Yellow RCA) inputs and side facing HDMI inputs, two. And an optical out below theHDMI ports. This makes the unit perfect for wall mounting. The coax input is also down facing. We use this input for an actual over the air digital antenna. I wish it had more HDMI ports. At least three. But this is fine for what we have. A cable box, and DVD player.
Audio
Out of the box the unit had no base. I left it like this because I intended to hook it up to a sound bar and bass usually just muddles The audio of cheap speakers. The mid range and high end is very good. At times you think it’s a real person in the other room. A virtual surround sound effect is enabled. It’s pretty good. Although I intend to replace the speakers with the sound bar, they are actually very decent quality.
As a Computer
Welcome to the future, everything is a computer. This TV is actually running googles Android. But for this purpose, it works well. You may have to occasionally fully reboot the TV. There is a way to do this in the menu. Otherwise, the TV will quick start. This means it’s in a low power mode. There is also an app for the TV that will allow you to fully control the TV, change settings, change inputs and a completely virtual remote. This is great for a blind person. Apple devices are very handicapped accessible,. this feature makes it very useful for me. You can also enable talk back on the accessibility menu in settings. I have not done this, but from what I know, it will speak the items on the screen.
Thoughts
I got this TV used from Amazon for $134. You would never know that it was used. This is a great deal. It is heavily subsidized. I am very happy with the quality overall, and Vizio as a company. I would recommend their products..
I am going to try something new. If you enjoyed this review and would like to tip me, please feel free to send cash to my cash tag. Lol. $brygruver
I am also going to include a link to my Facebook page where if you purchase through my link, I will receive a small commission, thank you.
- groovyBry $brygruver 👍📺💵

3 notes
·
View notes
Text
How to Activate Your Cox Cable Box in 4 Easy Steps
Activating your Cox Cable is easy and quick. With a few simple steps, you can enjoy all the features of your Cox cable services. In this article, we will discuss how to activate your Cox Cable and what to expect before and after activation. We will also discuss some use cases of the Cox Cable activation process so you can get the most out of your service.
Step One: Locate the Cable Box
The first step in activating your Cox cable box is to locate the box. Depending on the type of cable service you have, you may need to locate the Digital Cable Adapter (DCA) or the Set-Top Box (STB). The DCA and STB look similar and are usually about the size of a small DVD player.
To locate the cable box, check around your television for any cables that might be connected to the TV. If you have an HDTV, you may find a single coaxial cable going from the wall to the back of the television. If this is the case, then the cable box should be located near the TV and plugged into this cable.
If you don't see a cable connected to the TV, then check around your home for any other devices that may be connected to your cable service. The cable box could be located near a DVD player, gaming console, or VCR. If you can't find the cable box, try calling your local Cox office and they can help you locate it.
Once you've located the cable box, move on to Step Two: Connect the Power Cord.
2) Step Two: Connect the Power Cord
Once you have located your Cox cable box, the next step is to connect the power cord. This cord should be included with the cable box when it arrives. You will need to plug the power cord into an electrical outlet or surge protector. Make sure that the outlet is not controlled by a wall switch, as the power may be interrupted if it is. Once the power cord is plugged in, you should see a light on the front of the cable box indicating it is receiving power.
Now that your cable box is connected to power, you can move on to connecting the coaxial cable. This is the cable that runs from the wall to your cable box. If you are replacing an existing box, then the existing coaxial cable should already be connected to your wall and ready to plug into the back of the new box. If you are setting up a new box, you will need to run a coaxial cable from the wall to the back of the new box. Make sure that the cable is properly connected at both ends and then proceed to Step Three.
3) Step Three: Connect the Coaxial Cable
The coaxial cable needs to be connected after you've found the cable box and connected the electricity. The primary cable connecting your cable box to the wall socket will be the coaxial cable. The "Cable In" port on the rear of your Cox Cable Box is where you should first place one end of the coaxial wire. The second coaxial cable end should then be inserted into the wall outlet. Use the proper connection type for your Cox Cable Box (F-type or RCA, for example).
Take the other end of the coaxial wire and place it inside the splitter if you're using one. Your wall outlet should be directly linked to the splitter. The other end of the splitter should then be connected to your television or modem using a different coaxial wire.
Once your cable box is connected to your wall outlet, turn on your television or modem and make sure that they are properly connected. If everything is connected correctly, you should now be ready to activate your Cox Cable Box.
Read also : Cox Bill Pay
4) Step Four: Activate the Cable Box
The last step to get your Cox cable box up and running is to activate it. This process is simple, but will vary depending on the type of box you have.
For an HD Box:
If you have an HD box, then all you need to do is connect it to a power source and turn it on. Once the box is powered on, you’ll need to press the “Cox” button on the remote and follow the onscreen instructions to complete the activation.
For an SD Box:
If you have an SD box, then all you need to do is plug the power cord into the wall outlet and switch the power on. You’ll then need to press the “Power” button on the remote, followed by the “Menu” button. After that, you’ll be taken to the setup screen, where you’ll select “Activate Cable Box.” Follow the onscreen instructions to complete the activation.
Now that you’ve activated your Cox cable box, you can start watching all your favorite shows and movies in no time!
Cox Customer Support
If you have any problem with the Cox connection or other services of Cox We offer the best customer service, You can contact the customer support team either by phone or email and are guaranteed a response within 24 hours. Furthermore, the customer support team is available 24/7 for any urgent matters that require immediate attention. Our goal is to ensure that customers get the help they need in a timely and professional manner. We offers a range of Cox Support services including technical support, billing assistance, and account management.
How long does it take for Cox to activate?
Cox usually activates your cable box within an hour of connecting the necessary cables. However, if you are experiencing any delays in activation, it is best to call Cox customer service for assistance. Generally, you can expect the activation process to take anywhere from a few minutes to a few hours. It all depends on how many steps have been completed and the equipment that is being used.
Once you have connected the necessary cables, you will need to call Cox customer service to activate your cable box. The customer service representative will guide you through the activation process and help you get your cable box up and running as quickly as possible.
In some cases, Cox may need to send out a technician to ensure that the cable box is properly installed and activated. If this is required, it may take up to 24 hours before the box is fully activated and ready to use.
No matter what the activation process requires, you should always be sure to check with Cox customer service or technical support if you are having any difficulties activating your cable box. They are available to provide assistance and get you up and running with your Cox Cable TV services in no time.
2 notes
·
View notes
Text
i have this windows 7 pc that wont play sound and needs and rca cable and a monitor to use and it's space is so ass it has like 1gb left and i cant find whats taking up space but it connects to the internet well and i used to use it as a typewriter and it sucks so much ass
1 note
·
View note