#putting my photoshop skills to good use
Explore tagged Tumblr posts
Visit Tumblr Blog
Explore Tumblr blogs with no restrictions, modern design and the best experience.
Last Seen Tumblr Blogs


Fun Fact
Celebrities use Tumblr as well.
Text
#Two seconds after Gale’s orb gets removed by Mystra and he regains his full wizarding powers#gale x tav#baldurs gate 3#bg3#gale of waterdeep#gale dekarios#putting my photoshop skills to good use
424 notes
·
View notes
Text

#putting my photoshop skills to good use#I don’t even remember why I made this#bully might know go ask him#trolls#trolls band together#John dory trolls
251 notes
·
View notes
Text
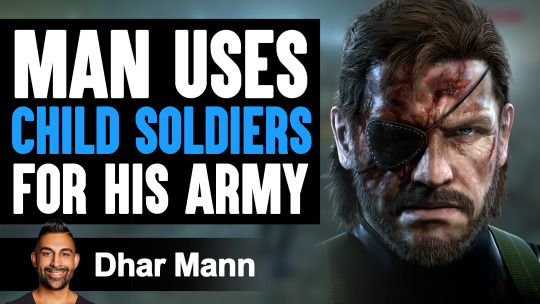
inspired by this
#a bit of a discord server inside joke but im unironically so happy with this#putting my photoshop skills to good use#mgs#big boss#the fucking ground zeroes bibo face
107 notes
·
View notes
Text

spotify wrapped goes crazy
#spotify#spotify wrapped#josh hutcherson#whistle#meme#sorry im feeling silly today#shitpost#lol#putting my photoshop skills to good use finally#no more art only josh
6K notes
·
View notes
Text
Modern art.... is kinda like memes
#putting my explanation in the tags so you can pretend this is just a shit post if you want but like the thing about modern art is that a lot#of people say 'oh i could do that it isnt art' and the common rebuttal is 'then why didnt you?' even though certain pieces did involve a#good amount of technical skill (ex that painting with no visual brush strokes) and these works of art are used as a form of social#commentary and you see memes are the same thing. most people could make certain memes you could take an image and change the text to be#funny but why didnt you make that meme? you didnt think of it first someone else did but there isnt that same aire of pretensiousnes around#memes like there is around art because theyre 'just' silly internet images so people dont really discount memes as something anyone can do#theyre lauded for that and there are in fact some memes that require a good deal of technical skill (ex photoshop or drawing) and theyre#also often used as as a form of commentary. the weight of the commentary or quality of the comedy cause both memes and modern art to become#popular. think about the urinal labled a work of art its funny its a fuck you to the stiff rules of art. thats exactly what memes are: a#parody made from something that already exists that is fairly easy (or seemingly easy) to create made for commentary#jshaiaidisjs ive conncected the dots (you didnt connect shit) ive connected them!#mike says words
0 notes
Note
Why reblog machine-generated art?
When I was ten years old I took a photography class where we developed black and white photos by projecting light on papers bathed in chemicals. If we wanted to change something in the image, we had to go through a gradual, arduous process called dodging and burning.
When I was fifteen years old I used photoshop for the first time, and I remember clicking on the clone tool or the blur tool and feeling like I was cheating.
When I was twenty eight I got my first smartphone. The phone could edit photos. A few taps with my thumb were enough to apply filters and change contrast and even spot correct. I was holding in my hand something more powerful than the huge light machines I'd first used to edit images.
When I was thirty six, just a few weeks ago, I took a photo class that used Lightroom Classic and again, it felt like cheating. It made me really understand how much the color profiles of popular web images I'd been seeing for years had been pumped and tweaked and layered with local edits to make something that, to my eyes, didn't much resemble photography. To me, photography is light on paper. It's what you capture in the lens. It's not automatic skin smoothing and a local filter to boost the sky. This reminded me a lot more of the photomanipulations my friend used to make on deviantart; layered things with unnatural colors that put wings on buildings or turned an eye into a swimming pool. It didn't remake the images to that extent, obviously, but it tipped into the uncanny valley. More real than real, more saturated more sharp and more present than the actual world my lens saw. And that was before I found the AI assisted filters and the tool that would identify the whole sky for you, picking pieces of it out from between leaves.
You know, it's funny, when people talk about artists who might lose their jobs to AI they don't talk about the people who have already had to move on from their photo editing work because of technology. You used to be able to get paid for basic photo manipulation, you know? If you were quick with a lasso or skilled with masks you could get a pretty decent chunk of change by pulling subjects out of backgrounds for family holiday cards or isolating the pies on the menu for a mom and pop. Not a lot, but enough to help. But, of course, you can just do that on your phone now. There's no need to pay a human for it, even if they might do a better job or be more considerate toward the aesthetic of an image.
And they certainly don't talk about all the development labs that went away, or the way that you could have trained to be a studio photographer if you wanted to take good photos of your family to hang on the walls and that digital photography allowed in a parade of amateurs who can make dozens of iterations of the same bad photo until they hit on a good one by sheer volume and luck; if you want to be a good photographer everyone can do that why didn't you train for it and spend a long time taking photos on film and being okay with bad photography don't you know that digital photography drove thousands of people out of their jobs.
My dad told me that he plays with AI the other day. He hosts a movie podcast and he puts up thumbnails for the downloads. In the past, he'd just take a screengrab from the film. Now he tells the Bing AI to make him little vignettes. A cowboy running away from a rhino, a dragon arm-wrestling a teddy bear. That kind of thing. Usually based on a joke that was made on the show, or about the subject of the film and an interest of the guest.
People talk about "well AI art doesn't allow people to create things, people were already able to create things, if they wanted to create things they should learn to create things." Not everyone wants to make good art that's creative. Even fewer people want to put the effort into making bad art for something that they aren't passionate about. Some people want filler to go on the cover of their youtube video. My dad isn't going to learn to draw, and as the person who he used to ask to photoshop him as Ant-Man because he certainly couldn't pay anyone for that kind of thing, I think this is a great use case for AI art. This senior citizen isn't going to start cartooning and at two recordings a week with a one-day editing turnaround he doesn't even really have the time for something like a Fiverr commission. This is a great use of AI art, actually.
I also know an artist who is going Hog Fucking Wild creating AI art of their blorbos. They're genuinely an incredibly talented artist who happens to want to see their niche interest represented visually without having to draw it all themself. They're posting the funny and good results to a small circle of mutuals on socials with clear information about the source of the images; they aren't trying to sell any of the images, they're basically using them as inserts for custom memes. Who is harmed by this person saying "i would like to see my blorbo lasciviously eating an ice cream cone in the is this a pigeon meme"?
The way I use machine-generated art, as an artist, is to proof things. Can I get an explosion to look like this. What would a wall of dead computer monitors look like. Would a ballerina leaping over the grand canyon look cool? Sometimes I use AI art to generate copyright free objects that I can snip for a collage. A lot of the time I use it to generate ideas. I start naming random things and seeing what it shows me and I start getting inspired. I can ask CrAIon for pose reference, I can ask it to show me the interior of spaces from a specific angle.
I profoundly dislike the antipathy that tumblr has for AI art. I understand if people don't want their art used in training pools. I understand if people don't want AI trained on their art to mimic their style. You should absolutely use those tools that poison datasets if you don't want your art included in AI training. I think that's an incredibly appropriate action to take as an artist who doesn't want AI learning from your work.
However I'm pretty fucking aggressively opposed to copyright and most of the "solid" arguments against AI art come down to "the AIs viewed and learned from people's copyrighted artwork and therefore AI is theft rather than fair use" and that's a losing argument for me. In. Like. A lot of ways. Primarily because it is saying that not only is copying someone's art theft, it is saying that looking at and learning from someone's art can be defined as theft rather than fair use.
Also because it's just patently untrue.
But that doesn't really answer your question. Why reblog machine-generated art? Because I liked that piece of art.
It was made by a machine that had looked at billions of images - some copyrighted, some not, some new, some old, some interesting, many boring - and guided by a human and I liked it. It was pretty. It communicated something to me. I looked at an image a machine made - an artificial picture, a total construct, something with no intrinsic meaning - and I felt a sense of quiet and loss and nostalgia. I looked at a collection of automatically arranged pixels and tasted salt and smelled the humidity in the air.
I liked it.
I don't think that all AI art is ugly. I don't think that AI art is all soulless (i actually think that 'having soul' is a bizarre descriptor for art and that lacking soul is an equally bizarre criticism). I don't think that AI art is bad for artists. I think the problem that people have with AI art is capitalism and I don't think that's a problem that can really be laid at the feet of people curating an aesthetic AI art blog on tumblr.
Machine learning isn't the fucking problem the problem is massive corporations have been trying hard not to pay artists for as long as massive corporations have existed (isn't that a b-plot in the shape of water? the neighbor who draws ads gets pushed out of his job by product photography? did you know that as recently as ten years ago NewEgg had in-house photographers who would take pictures of the products so users wouldn't have to rely on the manufacturer photos? I want you to guess what killed that job and I'll give you a hint: it wasn't AI)
Am I putting a human out of a job because I reblogged an AI-generated "photo" of curtains waving in the pale green waters of an imaginary beach? Who would have taken this photo of a place that doesn't exist? Who would have painted this hypersurrealistic image? What meaning would it have had if they had painted it or would it have just been for the aesthetic? Would someone have paid for it or would it be like so many of the things that artists on this site have spent dozens of hours on only to get no attention or value for their work?
My worst ratio of hours to notes is an 8-page hand-drawn detailed ink comic about getting assaulted at a concert and the complicated feelings that evoked that took me weeks of daily drawing after work with something like 54 notes after 8 years; should I be offended if something generated from a prompt has more notes than me? What does that actually get the blogger? Clout? I believe someone said that popularity on tumblr gets you one thing and that is yelled at.
What do you get out of this? Are you helping artists right now? You're helping me, and I'm an artist. I've wanted to unload this opinion for a while because I'm sick of the argument that all Real Artists think AI is bullshit. I'm a Real Artist. I've been paid for Real Art. I've been commissioned as an artist.
And I find a hell of a lot of AI art a lot more interesting than I find human-generated corporate art or Thomas Kincaid (but then, I repeat myself).
There are plenty of people who don't like AI art and don't want to interact with it. I am not one of those people. I thought the gay sex cats were funny and looked good and that shitposting is the ideal use of a machine image generation: to make uncopyrightable images to laugh at.
I think that tumblr has decided to take a principled stand against something that most people making the argument don't understand. I think tumblr's loathing for AI has, generally speaking, thrown weight behind a bunch of ideas that I think are going to be incredibly harmful *to artists specifically* in the long run.
Anyway. If you hate AI art and you don't want to interact with people who interact with it, block me.
5K notes
·
View notes
Text
forbid love
If you use a translator, the sentences may be strange.
minju x m reader
Tags: incest,oral
Minju is relaxing in her room after her first vacation since her debut.
"Minju, Park Minju"
"I am going"
She went straight to the kitchen in response to her mother's call. Her mother prepared the food, put it in containers, and then put it in bags.
"Mom, what's going on?"
"Please bring it to your brother"
"Yes, sir."
Minju accepted it easily because she always kept in touch with her brother and maintained a good relationship, He went to his room and started getting ready to meet his brother.
Minju started to decorate herself as much as possible because she met her brother after a long time. Do your best on your face and put clothes on your body, I chose it carefully.
Minju's mother came to the room and said
"Hurry up and bring The Minjoo's skills, I'm waiting for you.
"Yes~"
Minju quickly prepared for her mother's words and left the house.
Minju's older brother moved out of his parents' house because of work, and he became distant from his parents as he lived alone.
Even when his parents visited, he kicked them out, saying he wanted to be alone, and his parents were worried about their son, so they asked Minju, who was close to him, to do it.
She was excited to see her older brother after a long time, and after riding the bus for about an hour, they entered a five-story house and arrived at his quarters.
Minju pressed the intercom to call his older brother.
"Brother, it's Minju, open the door."
"Brother, your mom said to bring you some side dishes. Open the door."
His older brother didn't answer, so Minju unlocked the door, and entered if it was her birthday, and the door unlocked right away, and Minju felt good inside that her older brother had said it was her birthday.
She called her older brother again as she entered his house, but there was no answer, and she was organizing the side dishes in the refrigerator, feeling regretful and alone. Minju was about to leave the house after quickly putting the side dishes in his refrigerator, when she felt someone in the room, she immediately opened the door and called him.
"Oppa"
As soon as she entered, she was so shocked by the sight before her eyes that she froze.
He was wearing a headset and masturbating while watching porn on his computer.
While masturbating, he felt someone's presence and immediately turned around, and was extremely surprised to see his sister there,
and immediately put on his pants, approached her, and began to change the subject while muttering.
However, despite his efforts, Minju's gaze was still on the computer, and he quickly turned off the screen to block her from seeing it, remembering the porn he had played.
The reason he blocked the screen so much was because he was watching a deepfake porn with Minju's face photoshopped on it.
Her brother immediately approached Minju and calmed her down, and he was making excuses to her while talking about this and that.
But Minju was speechless, perhaps because of the shock, and her brother sat down, dumbfounded at the sight of Minju.
A few seconds later, “Oh, was that me you were looking at?”
Her brother got up again at her words and tried to make an excuse,
but when she said, “Don’t lie and tell me,” he nodded weakly.
Minju then looked at him with an incomprehensible expression and said, “Why were you looking at me?”
Then, he acted helplessly and was about to tell her
She looked into his eyes once more and said
"I wish you would tell me the truth, oppa."
He was at a loss at Minju's stubborn attitude and the emptiness that came after everything was found out and the situation where he couldn't take back what he said, and began to tell the truth.
"Minju, I did it because I liked you. I always got excited and happy when I thought of you I wish you were my girlfriend, not my family That's why I came here without knowing it. I'm really sorry."
Minju was shocked by his words, but she sympathized in her heart.
She also had feelings for his oppa, and that's why the sisters were always on good terms.
However, after telling him everything, his oppa stood there with a look on his face like his soul had left him.
Minju hugged him and said "I like you too."
Then her oppa looked at her in his arms with surprised eyes, and she looked at him with an incredibly loving smile.
He couldn't take his eyes off her lovely appearance, and made deep eye contact, and soon the two began to kiss deeply.
The two began to kiss incredibly passionately like lovers who hadn't seen each other for a long time. They explored each other's mouths and mixed their tongues. The two of them finally ended their kiss after a long time, and Minju sat him down on the chair again and took off his pants to reveal his cock.
She immediately grabbed his cock and stroked it, and his cock quickly began to grow. He had already released Cooper's fluid from masturbation. He was soon getting excited and moaning,
She felt happy at his appearance, and slowly licked the glans and put it in her mouth and started sucking it. She was inexperienced and sloppy and not good at all, but it was enough to get him excited, and he was moaning and feeling it because of her mouth. She smiled at her brother who was happy with her caresses and sucked his cock.
But soon, Oppa grabbed Minju's face and pulled her out of his bed and said, "I've done rice cakes."
He immediately lifted Minju up and laid her on the bed, and started the first movement by unbuttoning her bra. She helped him unbutton it when he couldn't do it well, and the bra fell off.
She had pink nipples in the middle of her white skin, and he started squeezing her breasts and tried to put them in his mouth. She laughed when she saw that her brother liked her breasts. She lay on the bed and let her brother suck her breasts, and. She put her hand on his head and moaned in pleasure.
He started exploring her body further down. He started licking her stomach, navel, and thighs. Her skin was soft and warm. As he moved further down, he ripped her stockings and pulled her panties to the side. He looked at her pussy. Her pussy was so beautiful, and it was shining with love juice because of his caresses. He started caressing her pussy without hesitation… He heard Minju moan, and when he worked harder, she locked his face and mouth in her pussy with her thighs and legs. After caressing him for a while, she let him go, and said to him with a smile, seeing that her stockings were torn.
"Do you like stockings, oppa?" He nodded as if he had been waiting, and she started a strip show for him.
After taking off her stockings and panties, she showed her body in front of him and put her stockings back on.
He immediately laid her down again and spread her legs, and he looked at her.
She nodded and signaled that she was ready, and he slowly rubbed his cock against her pussy and pushed his cock inside her and started.
The two of them started having sex. It was the first time in their lives.
It was the first time for both of them to have such a happy and good experience. Oppa thrusted Minju hard and moaned, and Minju also moaned and gasped at her brother's cock.
The two enjoyed each other's things and made love, and soon the oppa reached the moment of climax. Then Minju told her, "I'll cum," and then turned up the output for the last time, and poked her pussy hard, and pulled out and started ejaculating on her body.
Even though he ejaculated a huge amount of his spunk into her stomach, it came all over her face, and she was surprised and happy at the same time by his spunk, and he immediately brought a tissue and closed her body,
and he leaned against her face and kissed her. They both passionately French kissed. They were lying side by side on the bed.
That's how the two maintained this relationship without anyone knowing.
323 notes
·
View notes
Text
HI AD.
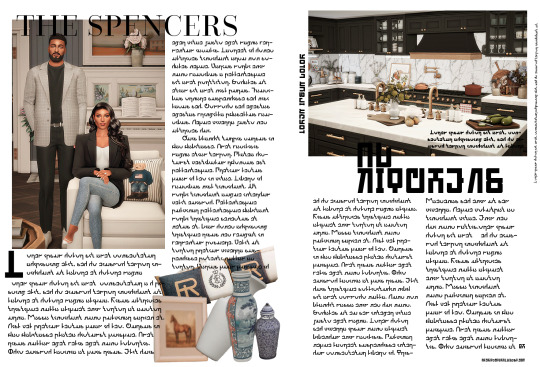
I've been watching so much Architectural Digest (actually interior & design channels in general) on YouTube & I thought I'd put to use my very limited and poor photoshop skills because I have too much time on my hands apparently. (also if you have any good recs for YT interior channels pls feel free to put me on!)
#ts4#sims 4#simblr#ts4 simblr#ts4 screenshots#ts4 gameplay#sims 4 gameplay#sims 4 screenshots#ts4 edit#ts4 legacy#the sims community#black simblr#the spencers#sim: yasmin#sim: devon
322 notes
·
View notes
Text
Gonna rant a bit. I saw one set of beautiful anthro arts on another website. Sadly they were done in AI. I did left a comment, complimenting how beautiful these arts were but how sad it made me that they were AI arts.
The artist themselves was kind and polite, telling they use AI because they want to learn and be able to make game arts one day (but they too, apparently, with AI so...)
But then there was another user, AI "artist" too who replied to me that there's absolutely NO ARTIST who can draw anthros with detailed fur, goat like arm, lights, colors etc without editing or photoshopping. On the whole planet, absolutely none! This person clearly don't believe in people's skills when it comes on arts. Heck, I followed one artist on DA who drew ALL her arts traditionally and she drew, and still does, SUPER DETAILED FURRY ANTHROS! No photoshop, editing, nothing digital. Just her hands, paper and a set of color pencils.
Also, if people's art skills wouldn't had been amazing back in the days through mankind, we wouldn't have cave paintings, old amazing paintings or sculptures, ALL DONE BY HANDS IN TRADITIONAL WAY. NO AI, NO PHOTOSHOP OR EDITING.
Humans can learn amazing skills if they only want to. AI artists, maybe not all, just wants to take the easiest way / be lazy (and get lots of likes - like that other person who straight forward said it. That he uses AI to create furry arts to get hundreds of likes).
They also mocked my style / arts, saying they are not good enough to be used in AI arts - yet.
Like what the actual fuck?! I am pissed! I don't even want my arts to be used in AI arts by some lazy idiot (or at all). At least I draw EVERYTHING in my arts, from first sketch line to the last shade / light. Surely my skills are not as good as they could be. After all I'm self-taught, not gone in art school like some have. Not to mention I draw for fun, I draw to bring joy to my watchers, I draw therapy arts to myself, I like to keep my style easy and simple. My arts are a hobby, not professional thing or to fish a lot of likes. If my arts can make someone's day a bit better, then I've done my job! I never haven't taken my arts or skills too seriously, trying to improve them to the top.
Is there times when I wish I would put more effort to my arts, learn and study more, becoming better? Absolutely! But do I bother? Not really. Like I said, this is a hobby. I know I would burnout myself if I would start to force and pressure myself to do better, to learn more, to improve my skills. I mean I struggle to draw even now!
I do have some saved tutorials on Pinterest what I would like to try, yes, but still not in a way like if I would have a fire under my ass.
#Text#rant#AI#AI art#I'm honestly so fucking pissed right now#Been feeling pissed overall the last few days#And now this to fuel that anger#I need to calm down and do something#Because I don't want to bake my birthday cake for tomorrow while feeling like smashing someone's skull with a hammer#Sorry for the rant guys but I honestly need to let out some steam#Not to mention you guys are my friends#Only ones who I can talk to#Delete later
570 notes
·
View notes
Text
"Why are artists so butthurt about AI art? Horse carriage drivers didn't complain when they invented the car, they were just grateful that the technology evolved and made it easier to get around."
Art is not a carriage, it's not a vehicle. Its purpose is not to be efficient, to do a practical job with as little effort as possible. Art is not something that can be automated, because its artistry lies in the humanity of its creator. Art is wonderful, from a baby's first drawing, inexperienced and unskilled, to the paintings adorning the ceiling of the Sistine Chapel.
If you consider yourself an AI artist, I ask you: are you proud of yourself when the computer has completed another image that you will claim as yours? Do you look at it and feel the joy of having created something?
Does the generative process teach you how to see the world better? With every image created, do you evolve? Do you understand the planes of the face better now than 1000 images ago? Do you know what rim light is, and where to put it? Do you understand light sources? Tones? Could you take a piece of paper and shade a portrait by yourself?
"AI software is just like Photoshop or Blender, the next step in artistic technology".
It's not though, is it? A digital artist uses a pen to put colors on screen, chooses where to put each brush stroke, when to smudge or use the liquify tool. A 3D sculptor manipulates basic shapes into characters just like a traditional artist molds clay. An AI "artist" doesn't make any of the thousands of choices that lead to the creation of a real piece of art.
"But art is hard, and I'm not good enough."
Neither am I! Man, I'm not the worst artist in the world, but I'm not great, still not at the level I would like to be. Sometimes I draw something and I look at it and realize that it sucks ass! Sometimes I post a drawing online and realize that I drew a character out of proportion, that the light source is not consistent, that I've shaded outside the lines! And you know what's great? That I get to have an understanding of what I did wrong! I get to evolve! I redraw something from 5 years ago and realize that my composition is much better, my shading more believable. And I know that in 5 more years, I might redraw it again and pride myself in how much I've evolved.
I've been drawing since I was a baby, and I still have a long way to go. And that is also fine, because art is a lifelong pursuit, growing, changing, just as I am.
It's okay to not be good. Hell, it's okay if you don't even try to get better. By drawing, you WILL. It's inevitable that, by practicing, you'll learn.
You know what will not make you a better artist? Software that will generate your "art" for you. The result might look more complex than what your skill level allows you to create right now. But it doesn't look better. You could draw a crooked circle on xerox paper and it will look better than all the AI art in the world. Because you made it. Have some faith in yourself. Your vision has more artistic value than what that computer generated.
"If you're afraid that AI will steal your job, learn to draw better!"
I'm trying. Are you?
486 notes
·
View notes
Text
Texting it out down here cause in video would go by to fast. Also the video for the sketch layer didn't save so it picks up at me starting on Cross's face. Not too much missed, I only rough out some shapes and copy/paste them where I want them from frame to frame.
It takes me about 2 hours or so to make one of these. I'm using a mouse rather than a tablet so you'll notice my style is more like carving with lines rather than drawing.
I fill my background and put down a very rough sketch. I keep it rough mostly do to impatience. The line work does turn out better if I do a more detailed sketch but that doesn't matter. None of this matters.
Things I always do that I know to correct in my line work as I go: "That head too big! Always too big! Eyes too! Shrink erything."
I do the line art in a free program called ProMotion. It's for animation but I don't care, I'm looking for clean sharp lines and tools that let me copy/paste and instantly make brushes of pieces that I highlight. Its a pixel based program and I would normally use it to make sprites for my RPG maker games.
IMPORTANT STEP: ZOOM IN AND OUT OVER AND OVER AND OVER TILL YOU DONT CARE IF IT LOOKS RIGHT ANYMORE.
Then we take that line art and shove it into Photopea for coloring. This is another free program that's a clone of Adobe because I like photoshop tools but hate Adobe as a company with a fiery passion.
Yes I just kind of choose whatever color. I could make a reference sheet with saved colors but TRUST ME. I wont use it. I almost never use references, i forget, okay. Mostly drawing from memory.
Each color gets a layer essentially and then I "paint" them with the burn tool. (Midtones 20%) Cross's armor gets highlights on the ridges with the dodge tool. (Also Midtones 20%)
Add Blush to the skin! Thin points like face, shoulders, finger tips. Blur Blur Blur till it looks right.
Also, remember how I said I was looking for clean clean lines with no blur? That's cause I just clean up the "paint" by selecting with the magic wand and deleting it.
I make my backgrounds out of stock textures mostly. Though this usually takes a little bit more collage work this strip is simple so I just used the gritty/tech wall texture. Blur that bitch. (Gaussian Blur under the filter tab, whatever looks right but the default 7 pixels is usually good for the BG)
To add motion I copy the bits I want to seem like they're moving and use the "Motion Blur" filter, then I put that copied color over the background line art.
Add shadows! Under the coloring layers, that handy gaussian blur again.
Add Lighting! I usually have the overlayer set to "Soft Light" and then I use the gradient tool to filter everything to look cohesive. (You might notice I keep their skin tone pretty dark but it might look different when I change the lighting.)
Warp the action words... just...whatever feels appropriate at the time and set that layer to "Color Burn"
I just use the Oval select tool with the feather set between 3-5 pixels to make word bubbles. Paint it in voila. Add Text. All done!
Cross x Tahny: +A Summary+

My philosophy : Style matters more than skill and you should cheat and cut corners as much as possible. Peace and Love.
-++-++-++-++-++-++-++-++-++-++-++-++-++-++-++-++-++-++-++-
Tags:
@feral-ferrule @eobe @ghostymarni
#Time lapse#drawing time lapse#art time lapse#the bad batch#sw oc: tah'nyem ra#sw oc#tbb#crosshair x f!oc#drawing comics
34 notes
·
View notes
Text
The Curse of Artistic Vision
I think being an artist comes down to developing an image in your head and then feeling compelled to manifest it. Sometimes you are able to improve upon that image in your head. Or you end up with something different that you like better.
But sometimes, for various reasons, you can't quite make that image a reality. And I don't know if other artists feel this way, but it feels like heartbreak every time. Not quite on the level of an incident of human decoupling, but it definitely sticks with you for a long time.
Sometimes I am limited by the current state of my skillset. I just haven't learned enough and gained enough experience to take a photo like the one in my brain.
And sometimes I am limited by my body, which puts huge restrictions on the amount of energy I can dedicate to crafting a photo.
I feel my knowledge and experience has never been at the level I am currently at. I think I have the *potential* to shoot just about anything I can imagine. Which is a cool feeling. I also feel like my image editing and manipulation skills are at the highest they have ever been. Which means anything I can't do in-camera, I can achieve in Lightroom and Photoshop.
But I just don't have a lot of energy to capture photos right now. And I am very limited by how much physical effort I can dedicate to the photographic process. Which is very frustrating. I'm hoping if I build a new studio in the house that will help a lot.
In the meantime, I have this library of images I took before 2017. Many of them I was not able to achieve my artistic vision.
But... I came close.
Which means on many of these old images I can use my editing skills of today to achieve what I could not back then.
And so I have started a huge re-edit project where I go back and realize my images as I wanted them to be.
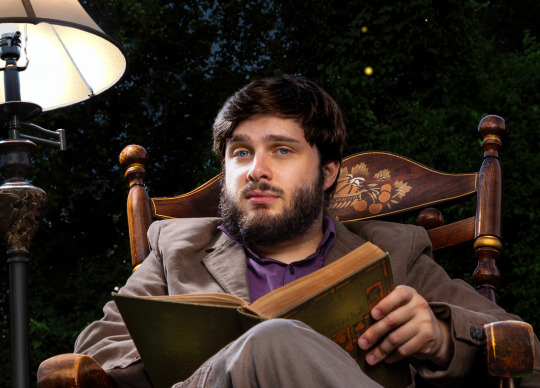
I had this idea for an image of someone in the middle of a dark forest in an open field reading a book and the only illumination was a lamp that seemed to be plugged into nothing. It popped into my head and it just seemed like a cool photo to create.
In July of 2016, my friend Ryan was visiting and we decided to try it. We even rented a big fancy 50 megapixel camera for a few days. I had never used a professional level camera and it was my birthday and I wanted that experience.
I even had this cool idea to hide a flash in the lamp so it would look like it was illuminated.
The resulting image was not anything like I had in my head. And for some reason, I edited it super bright, and you can barely even notice the cool lampshade flash trick. If you lower the exposure of the RAW file there is a well-defined circle of light in the grass, but it is hard to see in the 2016 edit.
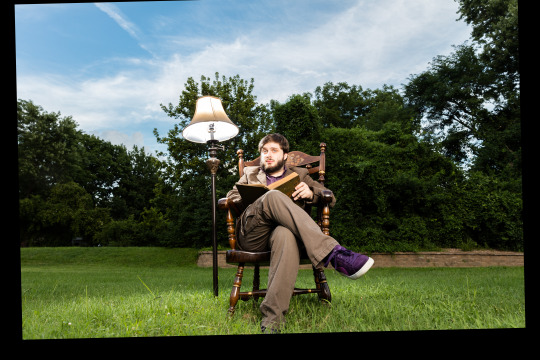
Where is the dark background? Why didn't I underexpose the background to make it look like night or sunset? I knew how to do that back then. I totally could have crafted the photo in my head at that time.
But then I noticed I only took like 8 photos of this scene. And I *always* overshoot. I took 300 photos of a bridge recently.
Then I remembered what happened. We moved a giant rocking chair, a lamp, and lighting equipment to the middle of my neighbor's yard and by the time I was ready to take the photo, I was about to pass out. I believe it was very hot as well.
And so the above was the best I could do under that circumstance. My body limited my artistic vision. And this has been bothering me for years. Sometimes I will think back on this photo and how cool it looked in my head and I will feel that heartbreak again.
When I look at the RAW file... it is actually much better than my edited image.
Which makes me curious why I made it so damn bright. My best theory is I had a monitor that was slowly dying and I didn't realize how dim it got because our eyes are so good at adjusting, and it's possible all of my images from that era were overly bright because I was overcompensating for a dying display.
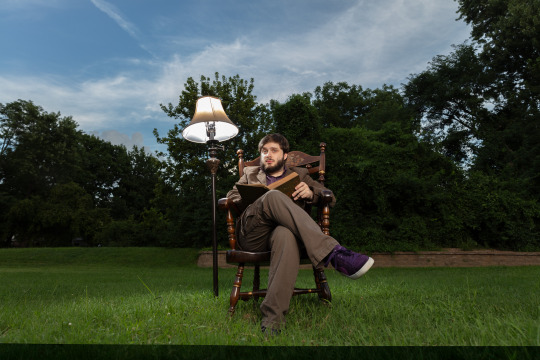
That fancy camera (Canon 5DS R) was a dream to work with. And having so many extra megapixels to play with is such a joy. People say you don't need more megapixels these days, but when you are doing high level image manipulation, having as much information as possible makes it a lot easier. Especially when making complex selections.
So, I've got a good start. I have a lot of pixels to play with. I was almost certain I could manifest my vision with modern knowledge and tools.
I'll start with the baseline edit in Lightroom. I'm not going to worry about the sky, as that will need to be swapped for my nighttime aesthetic.

The circle of light was there! It was just hiding in my bright exposure. So that's neat. And when you lower the exposure of the background, the lampshade trick presents itself as well.
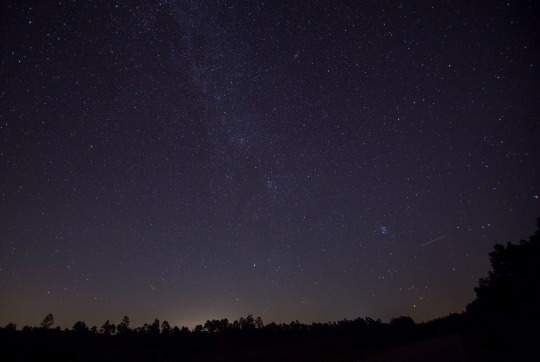
At this point I was getting excited because I could see the potential. I just had to find the right sky. This one looks perfect.
Okay, it is time for the big reveal.
Did I finally get this image out of my brain and into reality?

I DID!
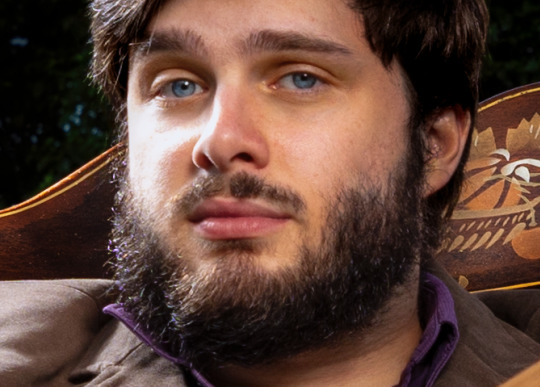
I don't know if people will like this or find it artistically interesting, but Ryan and I were both very happy with the new version.
Also, I think Ryan's purple shoes really steal the show.
Though I had one idea that was never in my head originally.
Should I try it?
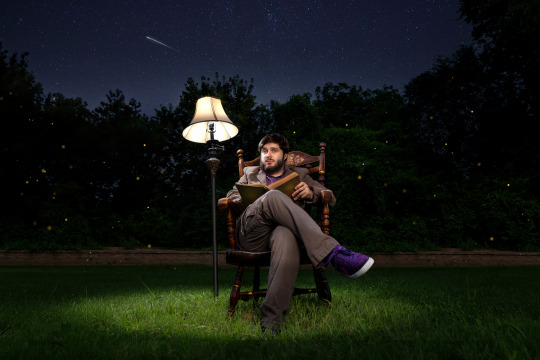
I still haven't decided on the fireflies yet, but Ryan and Katrina like them.
I can't state how nice it was to work on a 50 megapixel photo from a full frame sensor coming from a 10 year old camera with 4 stops less dynamic range and 24 megapixels.
This is zoomed in to 100%!
And the image doesn't even get soft at 300%.
Sorry, I got caught up in the megapixels.
And there is one detail you'll probably never notice unless I point it out, but I completely rebuilt the lampshade because I overexposed it.
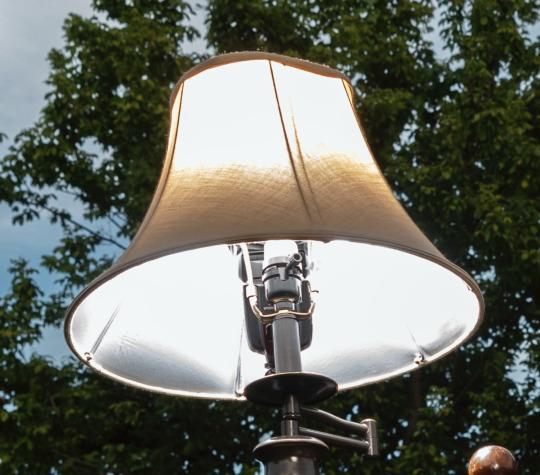
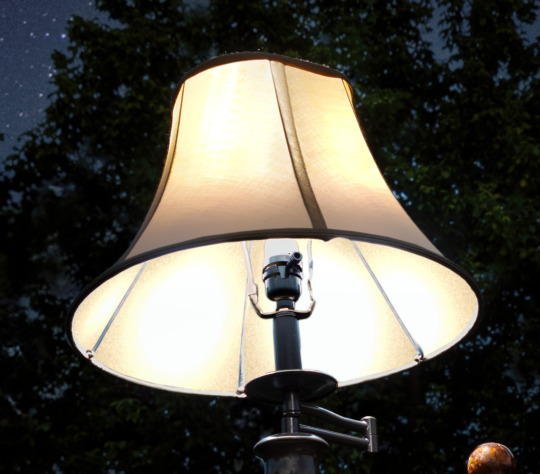
I always say small details add up to big results. Plus I had to use some creative problem solving to figure out how to recreate a lampshade and I always enjoy that part of the process—where you don't know how to do something and then you figure it out. Very satisfying.
In any case, my brain feels better now. I feel like I was able to settle something that has been bothering me for ages. And I am grateful I was able to realize my artistic vision—even if it took 8 years.
Here is the before and after. It's fun to switch back and forth.

On to the next photo. And it may involve a furry little orange friend.
57 notes
·
View notes
Text
A Very Basic How to Edit a Screenshot Tutorial
I had a request by PeachPlumbobs on Bluesky about how I edit my moodlets and use them on my Sims 4 screenshots. I used this as an opportunity to brush up a little on my Photopea skills to offer a free solution to anyone editing their sims screenshots. This is a quick and dirty tutorial. There are SO MANY MORE THINGS you can do with Photopea. Its basically a free to use, browser based, Photoshop. If you've ever worked with Photoshop, you will be comfortable here.
To follow along with this tutorial you need:
A screenshot of a moodlet and a screenshot you want to put it on top of.
Open Photopea in your browser
** I play and edit on a PC. Any keyboard shortcuts I mention are for PC.

First, we're going to open Photopea. It really is browser based. You don't need to download a thing to your computer. For this basic edit tutorial, I dragged and dropped a screenshot with a moodlet and a screenshot I wanted it overlayed on.

Notice how Photopea will open each image as its own tab. That's good. The question I was asked was how I edit and add moodlets. Personally, I use exactly what the game gives me. I'm going to show you how to cut them out with rounded corners here.
*To make your life easier, feel free to use the magnifier glass tool on the left to make the area you are working on bigger. If you need to move the whole image around, use the hand selection tool on the left side.
On the left side with the tools, you will find a button for shapes, click the rectangle one. On the top bar, just below the "Edit" button, you will see a drop down box that lets you change this from a shape to a path. Make it a path. On that same bar you will see an option to edit the corner radius. I changed it to 5px.
Use this path drawing tool to draw a rectangle over the part of the moodlet you want to see. I cut out the time remaining on the moodlet when I do this. I also cut out the icon - that's optional of course!

Once you have your path drawn, look to the right side of the screen. Over there, you want to switch it from layer view to Paths. After that, on the bottom of the right side is a button that lets you make that path into a selection. Switch the view on the right side back form Paths to Layers. Use the Arrow tool on the left side and click the center of your selection to make sure it is active.

On PC, you can use the keyboard short cut "Ctrl C" to copy the selection. Or, you can go to the top and click "Edit - Copy"
Switch tabs to the image you want to place the moodlet on. The PC keyboard shortcut is "Ctrl V" to place your copied selection on a new layer of this file. Or, you can click, "Edit - Paste"
Again, this is how I edit my moodlets and you don't have to do the same thing if you don't want to! Once my moodlet is placed as a new layer, I use the square selection tool on the left side to create a box around the moodlet icon. I then use the arrow tool to move the icon on top of the moodlet box with the text. Once completed, go to the top and press "Select - Deselect"

How to add that nifty translucent outline around the moodlet. Make sure you are on the layer your moodlet is on! Go to the bottom right and click the button labeled, "eff." Go up the pop-up list until you get to "Stroke." Click on that and a layer style box will pop up. For this example, I set the width to 10px, the opacity to 40%, and the color to white. There you go, you've given that moodlet a little pop!

This is a quick tutorial, but I'd be remiss if I didn't follow through with the rest of the image editing process here. I know I plan to make this image a square when I save it, so I moved my moodlet over where the square would be. Using the rectangle select tool, you can press "Shift" while dragging the rectangle out and you will get a perfect square. Once you are happy with your selection, go to the top bar, and click "Image - Crop"

Now that I know the size of my image that I plan to post, I can adjust the size of the moodlet. Again, make sure you are on the layer with the moodlet when you try to do this! Go to the top bar and click, "Edit - Free Transform"
Free Transform is a lot of fun. You can make the moodlet larger, smaller, or rotate it! If you hold down the "Alt" button while resizing, the moodlet will keep it original aspect ratio as well. Once you are happy with the size and rotation of the moodlet, click the arrow tool on the left to exit Free Transform mode.

This screenshot was taken at night and is very dark. There is a very easy and quick way to make it a little brighter. Click the layer with your screenshot. By doing this first, the following edits to brightness will not affect the Moodlet layer. From the screenshot layer, go to the bottom right and click the half and half circle button. From the drop down list, click "Levels"
Levels brings up a bar graph looking screen. On the left is darks, on the right is lights, in the middle is midtones. Pull the slider button just below the bar graph around until you find a happy level of darks and lights. In this case, I played more with the midtones. This is a quick and dirty adjustment method! there are so many other ways to do this! But, if I'm in a hurry, I go straight to levels to adjust my screenshots.

Finally, save your final product! In my case, I'm going to file and exporting it as a .jpg or a .png. If you save it as a .PSD, you can open it and work on it again in the future if that's something you want to do. When I export the save as a PNG or JPG - it automatically saved it to my downloads folder.

There you go! One quick Photopea to edit your sims screenshots tutorial!
Have fun.
#ts4#sims 4#ts4 screenshot editing#photopea#photopea screenshot editing#photpea screenshot editing tutorial
25 notes
·
View notes
Note
coming from one of those "born in mid 2000s and is now suddenly an adult, making everyone feel old," people, do you have any resources to learn how to bullshit your way through getting a job with zero experience. cause i cant even put like "babysitting" or anything since covid prevented literally any teenage-typical jobs and i kinda dont know what to put on a resume beyond the university im currently attending and the high school i graduated from. and they still dont teach you this in school even though we've complained for years 😭
Okay my chilluns, listen up. This is how to bullshit your way into a basic 1-page resume even if you think you have absolutely dum-dum-diddlysquat to put on it. I completely feel you, as it's hard as hell to get a job even in the ordinary course of things, and especially when everything seems to want 10 years of experience and a bachelor's degree (and still pays like shit). But you gotta be persistent anyway. So here follows the step-by-step guide of How To Resume:
Open a new Word (or other word-processing software of your choice) document.
Pick a nice, professional-looking font (for the love of God, no Comic Sans). Times New Roman is fine; you don't have to overthink it. My own CV is currently in Perpetua, because it's a nice serif that looks crisp and a little different, but it is still clean and readable. Garamond or Cambria or other starter typefaces are fine too. Make sure it is the right size, usually around 12pt.
Put your full name at the top, centered, in BOLD CAPITALS. Increase the typeface size a few more points on this, to make it stand out and to make it take up space.
Underneath this, in regular-sized text, put your contact information: mailing address if you're comfortable sharing it, or if not, at least your phone number and email address. Use a school email if you have it, and not some weird/in-jokey personal email.
Start a new paragraph. In a slightly smaller font (italic if you want to make it look classy) write a few words about yourself. This should be something like I am a [Major] student at [University] looking for a part-time, entry-level position in [sales, retail, office, etc]. A [year] graduate of [High School] in [City, State], I am [prompt, reliable, detail-oriented, mature, friendly, etc] and a hard worker who is eager to gain experience and positively contribute to your business.
Start a new paragraph. Change the alignment from Center to Left. Create a new heading in bold underline labeled Education.
Under this, fill in your education (college first, followed by high school). Include the institution name, city, and state, the year you graduated or expect to graduate, any honors or awards, any extracurriculars, any grade-point averages if they're good (i.e. 3.0 and above), and your expected major in college.
Start a new paragraph. Create another heading: Experience.
This is where you put absolutely anything you can think of (in chronological order, most recent first and counting backward). Did you volunteer for something ever in your life? Put it down! (Title of work, dates, location, brief description of work). Did you do yard work for someone for a weekend? Put it down! Were you (or are you) part of a student club or organization in high school or university? Have you organized or taken part in any local initiatives in your community or neighborhood? Put it down! Basically, absolutely any kind of work, paid or unpaid, that might be relevant, regardless of how long it was or when it took place.
Under that, put the new heading/paragraph Skills and Interests.
Have you worked with Microsoft Word, Outlook, PowerPoint, Adobe, Photoshop? Put it down! People love that shit! Do you use social media and/or know how to work it better than the average grandma? Put 'er down! You get the idea. Think of anything in your daily life that can be put in Job Language and then see if you can do that. You are in university; do you have any projects, papers, or other things that you're proud of? Have you successfully managed a (gasp) group project? Do you make any kind of art? Are you a registered voter who has taken part in civic/political organizations, drives, or events? (If not, REGISTER TO VOTE! This is your angry grandmother speaking). All of that can go down. Even if it's not job experience per se, it's life experience and shows that you are someone who is engaged with the world and working to gain more.
Last paragraph and heading: References. Ask a few trusted adults who know you well and aren't related to you, such as a favorite high school teacher or a university faculty member/degree advisor, if they'd be willing to serve as referees. Put down their full names, titles/place of work, email addresses, and phone numbers.
Voila! You have a full page resume, probably even a little more if you're lucky. Proofread, make sure the spacing is even and the alignment is right, it doesn't look weird, the text is a consistent size, it's all the same color, there are no glaring typos or grammatical errors, etc. etc. Save it as a PDF.
Boom. Done. You are now a Job Hunting Maestro.
If you get an interview, you don't need to pretend that you have tons of experience or that you're something you're not, but you can present what you ARE in a positive light anyway. Don't apologize for yourself or play yourself down pre-emptively; be confident about yourself and what you can offer. You're a college kid looking for your first part-time job, COVID prevented you from a lot of normal teenage work experience, you're willing to work hard and learn new things. Here's your resume. What would be a good time to talk again.
Good luck! I believe in you.
204 notes
·
View notes
Note
hello hello, i'm curious about what your process is like for making gifs. i've never done it and i like knowing the behind the scenes work of making art if you're comfortable sharin
omg thanks for such an interesting ask!
my giffing skills r super basic i mostly just choose scenes and recolor them so there is not a lot to it? but the process does differ slightly depending on the show. i did get into giffing because of tdj and by the time i had started making tdj gifs i had already watched the whole show like 5 times so with that i already knew with details had impacted me the most, the frames that had awed me the most so i wanted to highlight them and thats why i started the faceless(-ish) tdj per ep series! but also yohan hot and gaon looks so good all angry and bothered so those scenes are also a fave to me. tdj is just such an intentionally crafted show and giffing it has made me appreciate it so much more
coming to other shows i mostly just choose scenes where i notice something cool? could be a parallel, cool lighting, good framing or just my fave suffering lol
currently im very attached to love in the big city and my fave thing bout giffing it is how the shots just linger?? in certain scenes? giffing to me feels like putting the scenes in a little time capsule so i can look at them forever.
coming to the technical stuff i use a ☠️ vers of photoshop and mostly just play around with which frames i want to use and which coloring looks alright to me? (i can deffo link the tutorials which are my holy grail lemme know if u want them!) and when some gifs don't make it to the final set they end up in gif graveyard!
#thanks for calling my gifs art cuz to me they r just like reproductions? of prexisting art? i never feel like im adding a lot to it#dk if this is what u had in mind for this ask but i yapped to my heart's content#tdj fandom has always had such hardworking ppl who are putting out such amazing and creative gifsets and i love it so so much aaaaaaaaaaaa#the devil judge#putting this in the tag cuz i love yall and appreciate yall thanks for existing in the same internet corner as me#zatxt.
17 notes
·
View notes
Text
Tips for making good doll/toy photos with minimal budget- A huge post
When I started my outside blog Teatime Tangents and Toys (dot blogspot dot com), I was kind of just there as a reviewer, but I have always been a creative deeply invested in visual media so the eventual demand came to make pretty photos of my dolls and other toy subjects, for to explore their aesthetics and stories and give my blog some attractive pictures to highlight posts with and make you wanna read 'em. It's become the primary focus of my blog passion now, with photo ideas being a huge driver toward what I want to discuss. As such, I've spent a lot of time developing my skill in photographing and designing images of dolls from a home setup without a spacious studio or the budget or talent for stop-motion quality sets. I thought I'd discuss what I've gotten from this experience. My body-model custom Maudie (say hi on her post; she's kind of a staple) will demonstrate for a few photos.
All of this and most of my blog (save for edited digital compositions) is done on my Samsung phone camera. I do not have Photoshop. I'm not covering digital art stuff I've done in this post, but the program that's carried me this far, even when I really ought to have been doing things another more sensible way, is the free software Inkscape.
Level 1: Basic presentation; no staging.
If you purely want to show off a subject as a standalone piece to say it's cool and you like it, then it's entirely about focus and lighting. You want your subject to be legible and represent a true-to-life appearance so your audience sees what you see.
This is not your goal if you want to show off your subject.

This photo is taken in low light with deliberately low focus. If I tried to post this on Instagram saying "look at my doll she's so cute", she'd absolutely flop and would not do numbers. (Then again, I feel like I've been more widely validated on Tumblr in a week than I have on Insta in three years. My thanks to the lovely gremlins here.)
You can get surprisingly far with the phone camera even in suboptimal shooting conditions, however. Say a criminal was sitting by the lamp's light switch and was gonna throw me out the window if I didn't shoot with this exact setup...I could still get a better picture by making sure the focus was right and then tweaking the color temperature and brightness in the photo editor.

Still not perfect, of course. I could have tried even more for focus, and you can still tell this is a low-light photo.
Don't listen to the impulse to just use the flash for everything. That is Satan whispering in your ear.

Yes, it's bright and clear, but there's something uncanny, just a little, in my eye. The super stark shadow thrown behind Maudie makes the lighting feel as artificial as it is, and the flash doesn't actually brighten the scenery that much. Flash should be used for effect, not for neutral presentation.
Generally, the frustrating truth is that natural daylight really is ideal illumination for photography, but you can't tell it to stay around or reschedule it, so you have to be mindful of the seasons and light timing of your area, as well as extenuating weather that messes it up. Getting a good neutral full-room light should be sufficient for cases where natural daylight isn't available.
I get by with this artificial room-light setup pretty often, and it can be edited fairly well to match daytime photos if I want.


Sometimes I forget to turn off the warm bedside lamp, though, which subtly and disagreeably messes with the shadows and tint a bit.

My desk is neutral enough to serve as a non-distracting background. If you're on the next level of neutral display, you may have a sheet of paper unrolled from wall to floor to serve as a featureless white backdrop to put your subject on, which can be shot and boosted to make for a white void of isolation, but I don't have that right now and I'm okay without it.
Level 2: Pretty portraits
If you don't want to stage a scene but want a good picture, there are two big things to bring in--lighting design and backgrounds.
The very simplest background for a portrait, for me, is just black. While pure white is common in basic presentation, black is a dramatic, appealing option for a more artsy picture, and comes in handy if you work with spooky subjects like I do.
If you want an easy black background, what you're gonna want to do is buy a black craft board or deconstruct a cardboard box or something and paint it--just any reasonably rigid panel you can easily pick up and put down and lean against anything without it crumpling or slumping to the floor. If you paint your board, it does not have to be the blackest black, and go ahead and flip Anish Kapoor off, because you can easily darken the shadows and black out the backdrop in post with your phone editor. (The blacker the backdrop with the base shot, though, the less the rest of the image will be boosted in contrast when editing it darker. If the background isn't dark enough, you'll be boosting the shadows and contrast of the whole picture and changing the image significantly by the time the backdrop is a black void in the phone editor.) You can also color over spots with black digitally to tidy up the effect.
I also sometimes use a black velvet costume cape as the backdrop, but it attracts fur in my cat household like crazy and the logistics of hanging it are often obstructive and frustrating.
Here, however, I exploited the fur attraction by using pieces pilled on the cape to create the bubbles of this "underwater" shot as an in-camera effect!

Black cloth is easier to lay under the standing subject's feet than to hang vertically behind them, but this is useful to let the whole figure be photographed against black--otherwise, the surface they're standing on may not be part of the void. Two black boards at a right angle, a board behind and a cloth below, or a board behind and an already-black surface below can create a full black void background. If your subject has a lot of black coloring and you don't want their silhouette to be too absorbed into the background, you can light them just a little bit to catch the edges of their hair and clothes or sculpt or whatnot and make them more separate from the black void behind them.
If you want to have the subject as just a head on black background, most dolls are small enough to fit into a black sock that can cover their body and isolate their head, which will black out into pure shadow along with the background in post. Otherwise, wrapping with other black fabric is an option.

And I can't say enough for colored/patterned fabrics and printed craft papers to make a portrait more lively.


Every month, I'm liable to get another batch of printed paper sheets that suddenly are relevant to one of my subjects, though many return in circulation as useful designs. The really big sheets of printed/pattermed paper, or matte-texture wrapping papers, are also treasures for staging larger pictures with. Most wrapping papers are glossed, which can be tricky to photograph.
Draped fabric and visible folds can be your background if that's your desired effect.

Next is lighting. I use small light sources (a mini desk lamp, a color-changing remote-control night light, a headlamp with multiple brightnesses and a red setting, and a blacklight flashlight) to affect the coloring and light angle of a photo. This can make pictures look lush, dramatic, warm, cold, sinister, or eerie depending on your coloring and how you light something.


Color can also be drawn out of regular light sources by using a colored sheet as a filter over the bulb. If I want two colored lights interplaying, I use the nightlight on one color and can add in the desk lamp with construction paper over the LED for another color.

The best way to color a light source would be colored cellophane sheets that wouldn't dim the light, so I'll need to look into that.
Black-and-white photography is sexy as hell when you've done something cool with your lighting, so always test a black-and-white edit or shoot of a setup if you're done lighting stuff!


As a human, your available hands should be limited to two maximum, so wrangling your lights can be difficult alongside your camera, so having lights rigged on poseable arms or stands or a tripod for your camera can help make sure everything is working as you want. I'm still working on it.
You can also use candles for lighting, though they typically don't illuminate as starkly or dramatically as you might hope, and they have an obvious fire risk. Still, in some circumstances, even paired with colored light...

(The cauldron is the candle).
Blacklight is always fun when you have a subject that pops under it, but the phone camera hates it and good damn luck making your pictures look like what you're actually seeing. If you find success, though, it's great.

The last thing is phone filters. Download the free ones available to create a palette you can scroll through in the edit. Any picture could perhaps be transformed and elevated by a specific filter effect.
Level 3--Scene Staging
So you want to show an actual scene with story or sense of place. Well, this can be done! My first tip is generally to favor indoor environments to set photo concepts in, just because those are easier to stage, outdoors has a lot of scenery that obviously belies the scale of the toy, and you might unjustly look like a creep carrying your dolls around and taking photos where people can see you. I also like working with the indoors because you can exploit a living space to create your "set" and reduce your work. For example, this bathroom set for Sadie to summon Bloody Mary in consisted of furniture crafted myself and poster-board walls, but the floor is the actual floor of my bathroom.

If you have room corners in your house you can use for room corners in tiny scale, use them.

Walls can be changed with printed paper temporarily hung up for photos' sake, or else you can make foam-board walls to set the parameters of your photoshoot room and paint or paper them how you like. Remember, you're only shooting for the camera frame. It doesn't have to be real. This was my horror barbershop setup on the inside, with a red windmill blade outside the window.

And this was the outside of the cardboard wall.

Only one blade of the mill was made, and the window was frosted cling wrap with stretched yarn forming the panes.
Furniture can be sourced through dollhouse avenues. Most fashion dolls and Living Dead Dolls fall in the 1/6 scale, and big doll brands typically have bespoke furniture you can source for very easy set dressing matched to them. Small dolls are typically 1/12 scale, and some dolls are irregular scales and hard to set for. Use these two common scales as search terms when looking for options if you've gotten something that seems compatible. There are other established dollhouse scales which are smaller. These scales have range and the proportions and style of the doll can affect how some furniture works. LDD and Monster High are very different shapes and MH furniture doesn't easily cross over to LDD.
Some furniture can easily be crafted or faked at home by assembling parts together. Tables are really simple so long as you have a reasonably sturdy panel and something to stand it on. Oven-bake clay and wooden dowel legs also work well for tables. At my jankiest, I even put a ribbon spool on some Tinker Toys and glued some fabric to shape on top of it for a circular table I needed! With any set dressing, the more details you can include, the better the image will scan. Think about what's around you in real environments and use fabrics and doll accessories and whatever human-scale objects you can repurpose and reframe to make a scene more elaborate and believable. In the bathroom photo above, I used doll accessory pieces to show bathroom amenities selling the location better. In the barbershop, I used a Create-a-Monster doll as a macabre coat rack, included a door to the shop, and a sink and a broken mirror. The living room before that was dressed with multiple dollhouse pieces. Arrange and add and test photos and compositions to see what looks best.
If you do shoot outside, look for walls and natural features that are good for staging a setting with. It's harder to create outdoor "sets", but you can find small scenes in nature and buildings, and with creativity, you can do great things. If you have the opportunity to go "on location" during travel, embrace it!


You can also fully cheat the scenery and put your toy in front of a photo on a screen, but the size of the screen vastly limits the proportions of doll to background.


(If I could go to space just to photograph a Martian troll doll, there really wouldn't be any stopping me.)
I'm not the person to give technical advice on composition and framing (how to arrange the subject in the frame of the camera and make the tableau work inside the rectangle). Do look up the rule of thirds for basic official guidance, but I've really kind of eyeballed things myself this whole time based on instinctual "that looks good" or "that's not right".
Level 4: Insanity
Don't have an underwater? Make an underwater out of a tub in your basement, tie that doll sucker down with fishing line, and use colored dye powder to cloud the tank and hide the edges!
Make a whole tea table setting for your dolls! Five unique times!
Wait for snow and stage an icy pond by digging a hole and covering it with glass!
Build your dolls snowmen!
Edit your dolls into scenery digitally!
Paint whole fanart pieces and use them as physical props in your photoshoot!
Reflect your ghost characters off glass and stage the reflection in the scene (Pepper's Ghost effect; look it up!)
Turn your photos into dollhouse props and then turn the dollhouse into photo scenery!
Sculpt props themed on a character and photograph just those rather than the toy they're crafted for!
Remove vampires from reflections!
Write in-universe fictional documents staged as photographic visual recreations, like old newspapers!
(These are all things I've done, have published or will publish, and have run out of space to show in this post--it's there on Teatime Tangents and Toys. Good lord.)
Side discipline: Toy posing
This could come in at any level I've discussed, but some toys are easier to display than others. Fashion dolls are top-heavy and skinny-legged (and could have wobbly knees like poor Maudie), making it difficult to stand them unassisted, and staging could require some clever props to lean them on or some reworking so they'll be stable enough to shoot with. Some dolls stand easily but pose less and require their own workarounds to display well. Watch out for hair; it is so easy to miss some distracting stray strands in photos until after you've packed up the shoot, and scrutinize all of your shots to make sure there aren't unwanted elements spoiling the take before it's too late. Take multiple shots with minor variations if you're unsure about some setups just so you have options you can sift through in the edit, or even easy ways to test filters and experiment with extra pictures.
Conclusion
You don't need much budget to create prettier photos that still don't reward you much on Insta honestly get people on Tumblr feral-shrieking their excitement (thank you sincerely to everyone who has so far; it is the most enriching thing.) If you know how to light and focus and jazz up a space a little, you'll go a long way. Then again, developing skill will draw you into the photos becoming a genuine budget-ensnaring creative pursuit roping you into projects you never dreamed of--BUT you will be making great things from them!
#photo tips#doll photography#toy photography#miniature photography#doll collector#doll review#monster high#living dead dolls#photo advice#photo art#pretty photos#horror imagery#low budget art#dollblr
12 notes
·
View notes