#power query tutorial
Explore tagged Tumblr posts
Visit Tumblr Blog
Explore Tumblr blogs with no restrictions, modern design and the best experience.
Last Seen Tumblr Blogs


Fun Fact
28.6 is the average number of monthly visits per US mobile user.
Text
[PowerQuery] Múltiples reemplazos estilo switch o case
Hace tiempo no escribíamos un tip en M. Recientemente, me comentaron que querían hacer varios reemplazos de texto por nro para generar una columna de ID y mejorar la relación para que sea más liviana. Un buen ejercicio para alivianar el modelo.
Recorde que había escrito un post al inicio del blog con múltiples reemplazos, pero quise probar una técnica que aprendí hace unos años y hoy voy a compartir aqui.
Este artículo mostrará lo más parecido que tenemos en power query para generar algo estilo case o switch.
Para poder generar un case en Power Query vamos a realizar algo similar a un archivo de formato json. Veamos el caso simplificado.
Contamos con una tabla de hechos que traía el estado de una operación en texto y tenemos una dimension de estados. Sin embargo para reducir el tamaño de la relación y buena práctica, sería mejor que la relación este dada por un entero y no texto.

Vamos a asumir que la operación no puede desarrollarse en base de datos, porque recordemos que "mientras más temprano o atrás podamos resolver data modeling mejor será". Este escenario esta a modo de ejemplo.
Conociendo los estados y sus ID podríamos crear una función que reemplace el texto por el número esperado bajo una condición.
El primer paso será generar una variable que tenga las opciones de reemplazo

El primer valor será el que queremos encontrar y el segundo el que reemplazaremos. Podríamos definir que es una lista de listas, puesto que los {} en Power Query representan listas.
Para pode ejecutar el reemplazo sobre un texto seguiremos con la siguiente indicación:

De ese modo selecciona una lista devolviendo el primer resultado {0} quiere el segundo item {1}. Para filtrar ese item haremos un contains de texto de "rawText" validando contra cada fila (haciendo un each validamos fila por fila) donde _ representa una lista de las recorridas y {0} el primer item de la fila al cual lo compara.
Para mejor desarrollo esto podemos englobarlo en una función que recibe el texto por parametro y llamaremos "ChageStatus"

Para ejecutarlo en nuestra tabla de operación podemos llamarlo de dos maneras. Por un lado con "Agregar columna personalizada". La nueva columna simplemente haría ChangeStatus([Estado]).
Si queremos reemplazar la columna existente con sus múltiples reemplazos, entonces agregaremos un paso personalizado con el botón fx.
Nos nutriremos de TransformColumns y generaremos un código de este estilo:
= Table.TransformColumns( #"Paso anterior", { { "Estado", each ChangeStatus(_) } } )
El método permite ejecutar varias funciones recorriendo fila a fila sobre una columna. De nuevo una lista de listas. En nuestro caso es una sola operación de lista en la listas. Para ello, definimos la columna Estado como la involucrada al reemplazo y llamamos la función con each. Each nos permite ir fila a fila capturando el record de la columna con "_". Por esta razón, lo colocamos como parámetro.
De esa forma reemplazaremos nuestros textos por números de texto. Solo restará cambiar el tipo de la columna a entero para reducir el tamaño de la relación cuando esta generado el modelo.
Espero que este pequeño tip les haya servido y despligue nuevas ideas sobre Power Query y su manejo de listas.
#power bi#powerbi#power bi argentina#power bi cordoba#power bi jujuy#power query#power query tips#power query training#power query tutorial#ladataweb#power query switch#power query case
0 notes
Text
i'm gonna say something incredibly fucked up. i miss excel my best friend microsoft excel
17 notes
·
View notes
Text
Learn Power BI Tutorial Beginner to Pro 2023 Edition [Full Course]
Introduction to Power BI Course
Welcome to the Power BI Course! In this comprehensive training program, we will embark on an exciting journey to explore the powerful world of Microsoft Power BI, a leading business intelligence and data visualization tool. This course is designed to equip you with the essential skills and knowledge required to harness the full potential of Power BI and make data-driven decisions with confidence.
1. The Power of Data Visualization: In today's data-driven world, organizations generate massive amounts of data. However, raw data alone is not enough to drive informed decision-making. The ability to transform data into meaningful insights is crucial, and this is where Power BI shines. By providing an intuitive and user-friendly interface, Power BI enables you to create captivating visualizations, interactive dashboards, and insightful reports, empowering you to extract valuable information from your data effortlessly.
2. Understanding Power BI: Before diving into the technical aspects, we will start by understanding the fundamental concepts of Power BI. You will learn about the components that make up the Power BI ecosystem, including Power BI Desktop, Power BI Service, and Power BI Mobile, and how they work together to deliver a seamless user experience. Additionally, we will explore the key features and functionalities that set Power BI apart as a leading BI tool.
3. Data Preparation and Transformation: One of the initial steps in any data analysis process is data preparation. In this course, we will guide you through the process of connecting Power BI to various data sources, including Excel, databases, and online services. You will learn how to transform and cleanse raw data into a structured and usable format, ensuring that your analyses are accurate and reliable.
4. Building Interactive Reports: With a solid foundation in data preparation, we will move on to designing interactive reports. Power BI offers a wide range of visualization options, from basic charts and graphs to custom visualizations created by the vibrant Power BI community. You will discover how to present data in a compelling and informative manner, using different types of visualizations to effectively communicate insights to stakeholders.
5. Creating Dynamic Dashboards: Dashboards are a crucial element of data analysis, as they provide a consolidated view of essential metrics and KPIs. In this section, we will show you how to combine multiple visualizations into interactive and dynamic dashboards. You will also learn how to set up filters, slicers, and other interactive elements to allow users to explore the data on their terms.
6. Sharing and Collaborating: Data analysis becomes more impactful when shared with others. Power BI enables you to publish and share your reports and dashboards securely, both within your organization and externally. We will walk you through the process of sharing your work and collaborating with colleagues to foster data-driven decision-making across the organization.
7. Power BI for Data Modeling and Analysis: To take your skills to the next level, we will delve into the realm of data modeling and analysis. You will learn about data relationships, calculated columns, and measures, which are essential for creating robust and accurate data models. These models will empower you to perform in-depth analyses, conduct what-if scenarios, and gain deeper insights into your data.
8. Advanced Power BI Features: As we approach the conclusion of the course, we will introduce you to some of the advanced features and functionalities that Power BI offers. This includes data security, DAX expressions, custom visuals, and incorporating AI and machine learning capabilities to enrich your reports.
Conclusion: By the end of this Power BI course, you will have gained a comprehensive understanding of the tool's capabilities and the skills to transform raw data into powerful insights. Whether you are a business professional, data analyst, or IT expert, the knowledge acquired in this course will empower you to make data-driven decisions and contribute significantly to your organization's success. So, let's get started on this exciting journey of unleashing the power of data with Power BI!
Learn Power BI Tutorial Beginner to Pro 2023 Edition [Full Course]
#power bi#power bi tutorial#power bi desktop#power bi dashboard#microsoft power bi#learn power bi#power bi training#power bi for beginners#power bi tutorial for beginners#what is power bi#power bi reports#power bi course#power bi demo#how to use power bi#power bi full course#power query#introduction to power bi#power bi project#dax power bi#power bi desktop tutorial#curso de power bi#power bi beginner#power bi pro#power bi dax#power bi data
1 note
·
View note
Text
#Power BI
Power BI Tutorials
Data Analysis
Check how to transform data in power bi using merge queries for data analysis
youtube
#Youtube#Power bi#Data analysis#Merge query#Join queries#Data transform#Tutorials#Technology#information technology
1 note
·
View note
Note
Hi I've been a big fan of your blog since it was arwensundomiels and your tutorials are always so helpful!!
I have recently started to make gifs of KPOP music videos and fancams but for the life of me I cannot even achieve smooth and crisp gifs like the other KPOP gif makers on here.. I've been making gifs for other fandoms and never struggled like this to get a decent result until KPOP gifs! I read tons of tutorials from Tumblr but nothing made it better.
Even with TS files and screencaping it's still potato quality I don't know if I'm doing something wrong but I'm desperate for a solution if you have one!
Thank you and have a nice day!!
hii <3 i hope i'm understanding your query correctly so please let me know if ur after something else!
for me i think i subconsciously change my gif style every few days or so based on different gifmakers i see on here; and the result will vary based on whether u want more matte, smooth gifs (which i'm glad to see a resurgence of!) or more sharper, more contrasted vibrant gifs (also super pretty!)
in terms of ts. files, they aren't always super great to use, especially nowadays so wherever possible i would definitely use uhd files instead (but of course they're not easy to find, and most uploaders only focus on female idols so they're more in abundance if thats what u want to gif!). there's no need to use vapoursynth then, and the quality is SUPER nice!
also you can use the topaz upscaler to improve quality but it can be tough to use unless you have a powerful computer, my laptop can't handle it heaps so i don't use it as much 💀
if you want some sharpening actions and more detailed tips feel free to message me!
2 notes
·
View notes
Text
Mastering Web Development: A Comprehensive Guide for Beginners
In the vast landscape of technology, web development stands as a crucial cornerstone. It encompasses the art and science of building websites, ranging from simple static pages to complex web applications. Whether you're aiming to pursue a career in software development or seeking to enhance your digital presence, understanding web development is essential.
In this comprehensive guide, we'll take you through the fundamental concepts and practical skills needed to master web development from scratch. Let's dive in!
1. Understanding HTML (Hypertext Markup Language)
HTML serves as the backbone of every web page, providing the structure and content. It uses tags to define different elements such as headings, paragraphs, images, and links. By mastering HTML, you'll be able to create well-structured and semantically meaningful web documents.
2. Exploring CSS (Cascading Style Sheets)
CSS is the language used to style HTML elements, enhancing their appearance and layout. With CSS, you can customize colors, fonts, spacing, and more, giving your website a polished and professional look. Understanding CSS selectors and properties is essential for effective styling.
3. Introduction to JavaScript
JavaScript is a versatile programming language that adds interactivity and dynamic behavior to web pages. From simple animations to complex web applications, JavaScript powers a wide range of functionalities. Learning JavaScript fundamentals such as variables, functions, and events is crucial for web development.
4. Building Responsive Websites
In today's mobile-centric world, it's essential to create websites that adapt seamlessly to various screen sizes and devices. Responsive web design achieves this by using fluid grids, flexible images, and media queries. Mastering responsive design principles ensures that your websites look great on desktops, tablets, and smartphones.
5. Introduction to Version Control with Git
Git is a powerful tool for tracking changes in your codebase and collaborating with other developers. By learning Git basics such as branching, merging, and committing, you can streamline your development workflow and effectively manage project versions.
6. Introduction to Front-End Frameworks
Front-end frameworks like Bootstrap, Foundation, and Materialise provide pre-designed components and stylesheets to expedite web development. By leveraging these frameworks, you can create responsive and visually appealing websites with less effort and code.
7. Introduction to Back-End Development
While front-end development focuses on the user interface, back-end development deals with server-side logic and database management. Learning back-end languages such as Node.js, Python, or PHP enables you to build dynamic web applications and handle user interactions efficiently.
8. Deploying Your Website
Once you've developed your website, it's time to make it accessible to the world. Deploying a website involves selecting a web hosting provider, uploading your files, and configuring domain settings. Understanding the deployment process ensures that your website goes live smoothly.
9. Conclusion and Next Steps
Congratulations on completing this comprehensive guide to mastering web development! By now, you've gained a solid understanding of HTML, CSS, JavaScript, version control, frameworks, and deployment. As you continue your journey in web development, remember to stay curious, practice regularly, and explore advanced topics to further refine your skills.
Resources for Further Learning:
Online tutorials and documentation
Interactive coding platforms
Community forums and discussion groups
Next Steps:
Explore advanced topics such as web performance optimization, server-side rendering, and progressive web apps.
Build real-world projects to apply your skills and showcase your portfolio.
Stay updated with the latest trends and technologies in web development through blogs, podcasts, and conferences.
With dedication and perseverance, you'll continue to evolve as a proficient web developer, creating innovative solutions and contributing to the ever-changing digital landscape . Happy coding!
4 notes
·
View notes
Text
#excel #microsoft #microsoftexcel #office #word #o #powerpoint #business #cursodeexcel #data #msexcel #curso #cursoexcel #powerbi #exceltips #motivation #datascience #microsoftoffice #n #aprenderexcel #planilhas #dicasexcel #windows #cursos #exceltraining #excelbasico #dataanalytics
2 notes
·
View notes
Text

Power up your CSS skills with Landscape #19! - Chrome 126 DevTools & Safari 18 beta - Detect JS with CSS & container queries magic ✨ - Master forms, BEM & popover positioning - Unleash creative uses of CSS mask-image Tutorials & videos included! → https://freefrontend.com/css-landscape-2024-07-09/
1 note
·
View note
Text

Mastering Creo Assignment: A Comprehensive Guide to Top Resources for Success
Creo, formerly known as Pro/ENGINEER, is a powerful parametric 3D computer-aided design (CAD) tool widely used in the field of mechanical engineering. As students delve into the complexities of Creo assignments, they often find themselves in need of reliable resources to enhance their understanding and complete their tasks successfully. In this comprehensive guide, we explore various online platforms that offer valuable Creo assignment help. At the forefront of these resources is Mechanical Engineering Assignment Help, a website dedicated to providing expert assistance in navigating the intricacies of Creo assignments.
Mechanical Engineering Assignment Help - A Beacon for Creo Assistance
Mechanical Engineering Assignment Help stands out as a premier platform for students seeking online Creo assignment help. With a team of experienced professionals and subject matter experts, the website offers a range of services to cater to the diverse needs of Creo learners. From basic concepts to advanced topics, this resource ensures comprehensive coverage, helping students grasp the essentials of Creo design and modeling.
The platform provides tailored solutions to specific assignment queries, ensuring that students receive personalized assistance. Additionally, the website offers timely delivery, which is crucial for students working within tight deadlines. The user-friendly interface enhances the overall experience, making it easy for students to navigate and access the necessary resources for their Creo assignments.
PTC Creo Learning Exchange
The PTC Creo Learning Exchange is an official resource provided by PTC, the company behind Creo. This platform offers a range of tutorials, webinars, and learning materials to help students and professionals enhance their Creo skills. The Learning Exchange covers a variety of topics, including parametric modeling, assembly design, and advanced surfacing.
One of the notable features of the PTC Creo Learning Exchange is its emphasis on hands-on learning. The platform provides downloadable exercise files and practice assignments, allowing users to apply their knowledge in a practical setting. This resource is especially beneficial for students looking to reinforce their understanding of Creo through interactive exercises.
Creo Parametric Tutorial by Tutorial Books
Tutorial Books is a valuable online resource that offers a series of tutorials dedicated to Creo Parametric. These tutorials cover a wide range of topics, from basic sketching to advanced assembly design. The step-by-step approach of Tutorial Books allows students to follow along at their own pace, making it suitable for learners of all levels.
The tutorials often include visuals and detailed explanations, making complex concepts more accessible. Additionally, Tutorial Books frequently updates its content to align with the latest versions of Creo Parametric, ensuring that students have access to relevant and up-to-date information for their assignments.
GrabCAD Workbench
While GrabCAD is widely known as a platform for sharing CAD models, it also offers a collaborative work environment known as GrabCAD Workbench. This tool enables students to work on Creo assignments collaboratively, fostering teamwork and knowledge sharing.
GrabCAD Workbench allows users to upload their Creo files, invite team members, and work together in real-time. This resource is particularly beneficial for group projects or assignments that require collective input. Furthermore, students can access a version history, making it easy to track changes and revert to previous iterations if needed.
YouTube Tutorials and Channels
YouTube is a treasure trove of educational content, and Creo is no exception. Numerous channels provide comprehensive video tutorials covering various aspects of Creo Parametric. Channels such as 'Creo Parametric Tutorials' and 'Creo Modeling' offer a wealth of video resources that cater to different skill levels.
Video tutorials can be especially helpful for visual learners, as they provide a dynamic and engaging way to understand complex concepts. From basic commands to advanced features, YouTube tutorials offer a diverse range of content that can supplement traditional learning methods.
Conclusion
Navigating Creo assignments can be a challenging task, but with the right resources, students can enhance their understanding and successfully complete their projects. The highlighted resources, including, PTC Creo Learning Exchange, Tutorial Books, GrabCAD Workbench, and YouTube tutorials, offer a diverse range of materials and support to cater to the varied needs of Creo learners. Whether seeking expert guidance or interactive exercises, these resources collectively contribute to a well-rounded approach to mastering Creo Parametric. By leveraging these tools, students can confidently tackle their assignments and develop valuable skills for their future careers in mechanical engineering.
#Creo assignment help#Online Creo assignment help#Mechanical Engineering Assignment Help#Mechanical Engineering#Assignment Help#Education#university#students#educational website#study tips#educational service
6 notes
·
View notes
Text
[PowerQuery] Transformar columnas con condición personalizada
No hay nada más molesto para hacer informes o análisis que datos sumamente sucios. Con esto me refiero a malos ingresos de datos, normalmente proveniente de encuestas u hojas de cálculo.
Power Query es una buena herramienta de ETL pero es importante usarla bien para no reventar de pasos insostenibles en nuestro script. Para eso ya escribimos un post que nos ayude a reducir pasos. Lo que veremos en este artículo esta enfocado en simular lo que podemos hacer dentro de “Agregar Columna Personalizada” pero transformando la columna que necestamos limpiar sin crear otra columna con el código personalizado deseado.
En el proceso iremos agregando codiciones varias para ver el poder que tenemos.
Antes de iniciar me gustaría aclarar que este artículo mostrará técnicas avanzadas de power query para usarse como ETL en respuesta a procesamiento de datos. Eso no quita que haya mejores prácticas. Nada superará a hacer el procesamiento en un único origen de verdad como warehouse o lakehouse que sería la mejor de las prácticas.
¿Cuántes veces tuvieron que crear una columna personalizada en power query porque no existía un modo en la interfaz para reemplazar valores con un sencillo if?
Me quedó media larga la pregunta pero ciertamente ocurre que a veces necesitamos limpiar un conjunto de datos con una columna numérica mal escriba y caemos en hacer muchisimas operaciones de “Reemplazar Valores”. Lo cierto es que reemplazar valores solo cambia una cadena de texto por otra. Eso esta bien para cosas pequeñas como errores de tipeo tradicionales. Sin embargo, con una condición más complicado, digamos, si queremos que salga un determinado texto tras encontrar una determinada cadena sin reemplazarla, entonces se complicaría. Ejemplo, cada vez que encontremos el texto “hombr” debería salír “Varón”. Si aparece homb, hombre, hombrrrre, hombre pues, hombrecito, hombreton o algo similar, lo reconocería como hombre y le pondríamos “Varón”.
Vamos a ver tres ejemplos de reemplazo y limpiezas.
Supongamos que enviamos una encuesta de sueldos a un grupo de personas que trabajan remoto. Tenemos una tabla con salarios y una descripción que no todos llenan sobre el pago en dólares.
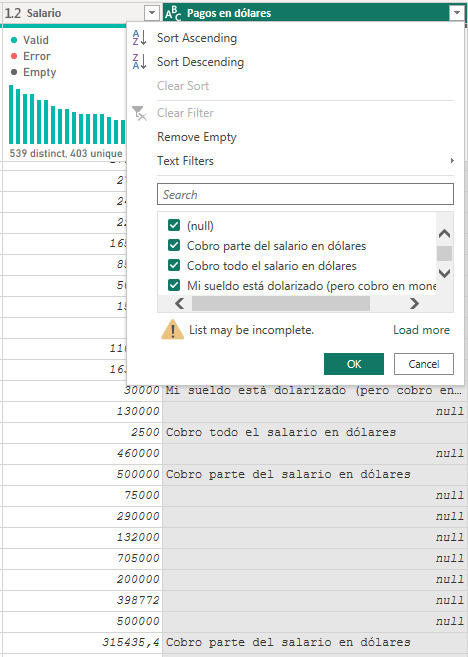
Lo primero que podríamos pensar es agregar otra columna más limpia, pero podríamos limpiar esta. ¿Qué tal si reemplazamos “USD” cuando encuentra la palabra “dólares” y “ARS” cuando no lo hace?
Veamos el proceso. Cuando queremos reemplazar bajo condición en una columna necesitamos usar la función ReplaceValues de tabla. Veamos la teoría:
Table.ReplaceValue(table as table, oldValue as any, newValue as any, replacer as function, columnsToSearch as list) as table
Esta función nos deja reemplazar una cadena oldValue (en este caso el mismo valor de la columna porque queremos reemplazar cada aparición sin importar su valor) con un newValue (resultado de una condición que armemos) en una clásica condición de reemplazo Replacer y la columna columnsToSearch en la cual buscará el oldValue para cambiar por el newValue. Basados en la tabla anterior nos quedaría algo así:
= Table.ReplaceValue( #"Paso Anterior", each [#"Pagos en dólares"] , each if Text.Contains([#"Pagos en dólares"], "dólares") then "ARS" else "USD", Replacer.ReplaceValue,{"Pagos en dólares"} )
De este modo en cada aparición del valor propio de la columna hace un reemplazo de lo que tenga por la condición elegida. Dejandonos con un pobre pero inicial resultado:
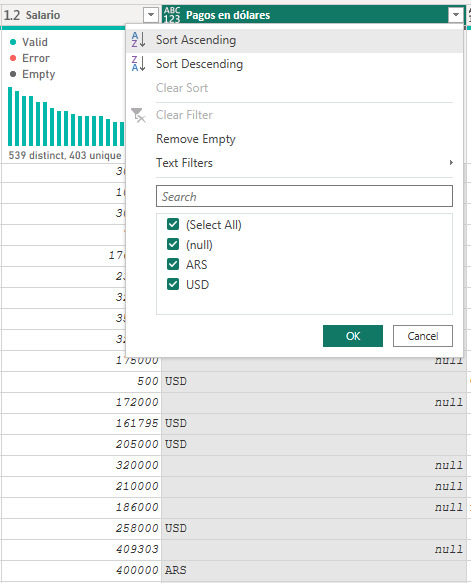
La lógica se cumplió y aprendimos a hacer un reemplazo en la columna. Sin embargo, la limpieza fue medio pobre y no hemos contemplado los escenarios correctamente. Recordemos que tenemos muchos null y también hay casos que tienen “Parte del salario en dolares”, lo cual no quedaría contemplado con ARS y USD.
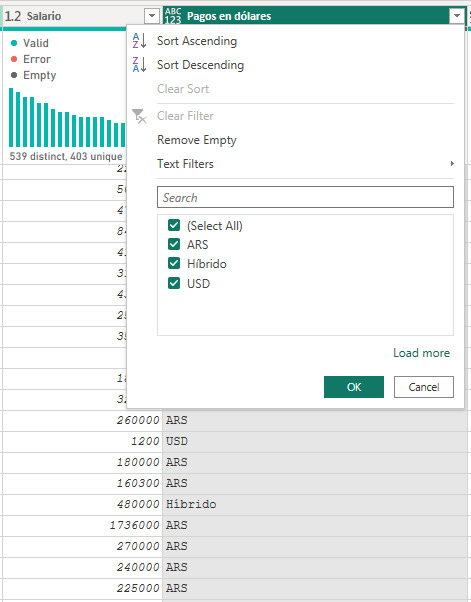
Para mejorar nuestro limpieza sobre la columna vamos a realizar una condición entre las dos columnas. Por vivir en este páis tengo claro que no existe un Salario menos a 15000 ARS en la industria remota de tiempo completo (FullTime) y sería también dificil que una persona tenga un salario de 15000 USD mensuales.. Entonces voy a usar ese conocimiento para limpiar con una condición numérica la primera elección y luego preguntar por la palabra “parte” cuando recibie en ambas monedas el salario.
Veamos el caso
= Table.ReplaceValue( #"Renamed Columns", each [#"Pagos en dólares"], each if [Salario]< 15000 then "USD" else if Text.Contains([#"Pagos en dólares"], "parte") and [#"Pagos en dólares"] <> null then "Híbrido" else "ARS", Replacer.ReplaceValue, {"Pagos en dólares"} )
Hacemos la primera condición coladores si el número es menor a 15000 entonces USD. Para la segunda condición en el if vamos a ir por "parte” y sumamos que no sea nulo porque sino Text.Contains ignora preguntar a los nulos y esas filas quedarían nulas aunque existiera el else.
De este modo el reemplazo quedaría más completo dejando nuestra columna con todas las opciones posibles:
Condición IN SQL en Power Query
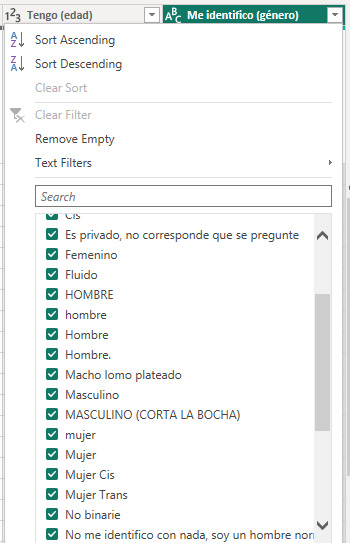
Los casos anteriores suelen ser un clásico, pero que ocurre cuando tenemos algo más complejo. Cuando necesitamos una serie de reemplazos masivos del estilo “IN” de SQL. Por ejemplo, veamos la siguiente imagen y digamos que necesitamos reemplazar todos las apariciones de cadenas de texto que conlleven a Hombre, Varón, Macho y Masculino. Algo tipo hombr, var, mach, masc. Si encontramos algo con eso, entonces reemplacemos por “Varón”.
La condición semejante a IN en SQL se construye con List.Contains. Veamos la teoría:
List.Contains(list as list, value as any, optional equationCriteria as any) as logical
La función necesita una lista de valores bajo los cuales comparar y el valor a recibir. Dicho de otro modo si algun string de la lista coincide con value entonces true.
Para poder realizar esta compleja tarea necesitamos dos operaciones. Por un lado construir la lista de valores a reemplazar en cada valor de nuestra columna puesto que los comparadores masivos hacen comparación de valores exactos. Dicho de otro modo el reemplazo ejecutado se vería tipo:
List.Contains({”hombre”, “Hombre”, “Hombre.”, “Macho lomo plateado”, “Masculino”, “[entre otros....]”} , [#”Me identifico (Género)”])
Necesitamos construir esa lista de manera tal que por cada coincidencia podamos reemplazarlo por “Varón”.
En nuestro editor de consulta vamos a crear una variable. Una variable no es más que un paso más que no está relacionado con el “Paso anterior” y vive en nuestro script para usarlo. La generación de la lista sería filtrar la tabla por valores únicos cuando el texto contenga lo deseado y convertirlo a lista. Veamos:
Lista_de_varones = Table.ToList( Table.SelectRows( Table.Distinct(#"Paso Origen"[[#"Me identifico (género)"]]), each (Text.Contains(Text.Lower([#"Me identifico (género)"]), "hombr") or Text.Contains(Text.Lower([#"Me identifico (género)"]), "var") or Text.Contains(Text.Lower([#"Me identifico (género)"]), "mach") or Text.Contains(Text.Lower([#"Me identifico (género)"]), "masc") ) and (not Text.Contains(Text.Lower([#"Me identifico (género)"]), "trans") ) ) )
Fijense que si bien hace referencia a un paso anterior, no lo vamos a usar en el siguiente. A la tabla de una única columna género distintiva le filtramos las filas cuando contenga lo antes acordado “hombr”, “var”, “mach”, “masc” y le agregue que no contenga “trans” puesto que sería otro género. Así obtenemos una lista con todos los resultados para nuestro IN de SQL. Son más de 50 resultados, pero solo mostraré algunos porque esto se descontroló

Con esa variable en lista que llamaremos al paso reemplazador que veníamos construyendo para aplicarlo sobre nuestra columna:
= Table.ReplaceValue( #"Paso Origen", each [#"Me identifico (género)"], each if List.Contains( Lista_de_varones, [#"Me identifico (género)"] ) then "Varón" else [#"Me identifico (género)"], Replacer.ReplaceText, {"Me identifico (género)"} )
Fijense como se acortó la lista. Pasamos de casi 150 valores distintos de género a tener casi 80.

De este modo podríamos repetirlo con apariciones para Mujer, No Binario, Mujer Trans, Varón Trans y dejar al resto en Otro.
Antes de concluir me gustaría hacer incapie en que este es un proceso muy pesado. Recorrer el conjunto para obtener la lista que luego usamos de reemplazo puede tardar mucho si la lista demora en generarse. El reemplazo es rápido pero la lista no. Por ello recomiendo fuertemente hardcodear la lista si el origen de datos es una encuesta cerrada como este caso. Hacemos la ejecución para conocer los valores y ya conociendolos los registramos en otro origen:

Pueden copiar a notepadd++ y generar un macro que ponga comiilas y comas en menos de un minuto.
Ahora si llegamos al final del post y hemos aprendido a reemplazar valores de una columna según condiciones personalizadas en cualquier otra columna de la misma fila inclusive con múltiples reemplazos de porciones de cadenas de texto. Ojalá les sirva para limpiar esos datos sucios que nos llegan.
#power bi#powerbi#power bi tips#power bi tutorial#power bi training#power query#powerquery#power query tips#power query tutorial#power query training#ladataweb#power bi cordoba#power bi jujuy#power bi argentina
0 notes
Text
4 Easy Steps to be a Plus Size Lolita Beauty in 2023
Intro
Because the same query (I'm a plus-sized girl, where can I get Lolita clothes?) has just risen to the top of searches, Many adolescent girls are prone to low self-esteem or becoming easily dissatisfied with their supposedly minor flaws, but Lolita fashion is like the light that shines into life, the spiritual power and inner world that is strengthened by love, the magic that can help people become more self-assured and determined. We have made the decision to compile a brief tutorial and demonstrate how to buy and purchase plus size Lolita dresses. Just remember to follow these suggestions before making a decision!
Step1: Get Your Measurements
First and foremost, it's crucial to be aware of your measurements when shopping for big size Lolita in general, but especially for plus size Lolita. When it comes to "normal" clothing, being aware of your size "XL" or "18" may be helpful, but those designations are largely meaningless in Lolita. Additionally, there are differences between Chinese and American sizes.
The most crucial measurements for Lolita outfits are the bust and waist. The widest area of your chest should be measured (while wearing a bra) to determine your bust size, and the smallest part of your torso, located directly between the ribs and the belly button, is your waist. Knowing the distance from your waist to your knees is also helpful if you're tall so you can choose a Lolita dress that fits properly. Learn these distances in both centimeters and inches!
Step2: Discover Your Ideal Fit
Speaking of Lolita fashion, there are JSK, SK, OP, etc. How should we choose our fit? Here are some tips:
JSK
JSK can refer to a vest dress, a sleeveless dress, or a skirt with shoulder straps. JSK is the best option over salopette because the latter will make wearers appear heavyter. Large size Girls from Lolita should pick a plus size JSK dress with adjustable buttons. These buttons can be altered to fit your individual bust and waist, and it will also be more comfortable.
We advise trying a mid-length or long Lolita JSK if you are self-conscious about your thighs or have uneven leg lines. Long hemlines conceal the flesh on the legs while also making the legs appear longer than they actually are.
If you have a large bust, you should pick a JSK with a natural waist rather than one with a high or empire waist. When a dress has a high waist and is poorly fitted, it can occasionally make you look pregnant. In the real world, a high waist style will draw attention to your bust, which is unflattering to plus size Lolita girls. If you have a large bust, there are additional things you should take into account.
Avoid using bulky lace, ruffles around the bust, floral designs, and other intricate decorative elements on the upper portion of the dress as these will accentuate the breast. Just keep in mind to pick a Lolita outfit that will highlight your waistline!
SK/Skirt
One of the most popular Lolita versions is the SK, which has the advantages of being both functional and versatile to wear. The majority of Lolita skirts lack a waistline, making them great for hiding both meat and skinny people. However you wear it, everything looks beautiful!
A top shirt typically goes with a skirt. A SK may be created with or without shoulder straps. Normal-waisted skirts will make people look more slender than high-waisted ones. Another tip is to select skirts that end below the knee, so that if you're not happy with the length of your legs, they will only reveal a small portion of them.
OP
An OP specifically alludes to a dress with sleeves. Long sleeves or short sleeves may be OP. You are free to choose a skirt with any waistline. You can select a belt in the same shade as your plus size OP dress to go with it! To a certain extent, the waistband can highlight the slim waist and accentuate the waistline, giving the legs the appearance of being long and lean. The waistband gives the impression that the person is taller overall, making them appear thinner.
Puff sleeve OPs should also be avoided if your shoulder is wider than typical. However, this does not always imply that donning an OP with puffy sleeves will give you the appearance of a "rugby player." Puffed sleeves with a great shoulder line can totally cover the upper arm line, head-to-shoulder ratio, and actual shoulder width. A great shoulder line is a little deeper in than a standard Lolita dress, which most of the puffed sleeves OP would have on our website.
Step3: The Secret Weapons To Match Plus Size Lolita
Petticoat
One of the basics when you are wearing Lolita and want to have that perfect Lolita silhouette is a petticoat. It gives that nice poof that makes this fashion so recognizable. But it will also make you look heavier then you are. So to wear a petti or not?
When buying petticoats, you should also look for ones that provide plus sizes, or provide customized sizes. Wearing a plus size Lolita dress is inseparable from the skirt, but when choosing the skirt, you should also choose according to the size of the skirt. If a girl with a heavy body chooses it, she can wear a lo skirt with a larger skirt After putting on a relatively large pannier, using the "top wide and bottom narrow" wearing principle, the fluffy skirt can visually have the effect of thinning legs.
It is recommended to buy cotton lined skirt support, after all, plus size girls are prone to sweating, cotton lining will be very breathable and comfortable to wear. For example, the Aurora & Ariel makes all their petticoats with pure cotton lining, and also provide size customization.

Also, you can match Lolita coordinates with high heels. It can not only increase the height, but also lengthen the lines of the legs, making the proportion of the body more coordinated. If you feel that a solid color petticoat is too monotonous, you can also try a floral skirt support, such as the following flower petticoats.


Shirring
Shirring is your very best friend! In terms of plus size Lolita, shirring is arguably the best invention. The shirring section can expand and tighten as necessary since the fabric is collected using a unique method that makes use of elasticized threads. When a plus-sized beauty want to buy and use brand-name clothing without changing it, full shirring is the ideal choice.
Nearly all Lolita fashion brands have introduced shirred clothing at some point, albeit more recently for some. Recently released totally shirred pieces have been known to come from Metamorphose and Baby the stars shine bright. However, this does not guarantee that a dress with a full back shirring will expand to fit you. You should still consult the full size chart before making a purchase because it will typically provide you with a selection of sizes to choose from.
Beret
You can select accessories with eye-catching patterns and expansive spaces to fit a Lolita coordinates. Beautiful and high-end accessories can give the entire ensemble a more cohesive and layered appearance. Larger decorations, like a beret, will also draw attention and make you appear smaller in the face.
There are variation of hat styles. If the Lolita dress is beautiful and elegant, such as Cla Lolita dresses, you can choose a straw beret with a narrow brim and some delicate flowers laced along the top for decoration. Allow the characteristics of the clothing to stand out more, just as a large straw hat can be worn with an idyllic low skirt.


Tights
Buy some tights in a plain color. To make your legs look thinner, go for dark hues. Check out here for an incredible selection of colored plus-sized tights if you're considering wearing Lolita coordinates. Many companies sell socks that coordinate with their printed clothing. Despite the fact that some may advise you to avoid wearing socks since they will make your legs appear shorter I'd choose over-the-knee socks. When you are plus sized, those most likely won't cover your knee, but they look so much better than knee socks. You will only expose a tiny bit of leg if your skirt is the proper length.
Dark socks typically slim the legs more than light socks. Your Lolita ensembles will look more colorful with lace mesh pantyhose. You should pick dark, pattern-filled socks. Your leg line will get thinner. You can also choose darker socks with a small lace accent if you think black socks are too plain and monotonous.


Cardigan
A gorgeous cardigan is a girl's wardrobe need during the fall and winter. Lolita looks tiny and delicate when wearing a cardigan in addition to being elegant. Additionally, it is very body inclusive and is friendlier to ladies with larger arms. For a classier appearance, pair your skirt with a cardigan of the same hue. Another option is to simply invest a black and white cardigan—it's a chic combination! You can pair a black cardigan with Cla or Gothic Lolita coordinates and a white cardigan with a Sweet Lolita dress. You just wear a cardigan if you can't or haven't made the investment in a blouse. With a solid piece, you can even go over the top sweet since you may accessorize with bows or brooches. All depends on you!


Hime Sleeve Blouse
Many cute newcomers to the pit may have a hazy understanding of what hime sleeve shirt is. In fact, this sleeve type's design shares layers and a "fluffy" appearance with the little skirt.
As "Ji" is the Japanese word for princess, Lolita's inner sleeve is decorated with lace and numerous little details, giving it a stunning and elegant appearance. It is quite retro and not just has the taste of a dress. As a result, it is simple for us to locate the character "Ji Xiu" in some sweet and traditional Lolita.
The upper part's straight cuffs can help us visualize thin lines, while the lower part's sleeves can visually conceal the fleshy flesh. When you pair it with a JSK Lolita skirt, you won't have to worry about how it will look or effect your body. worth it
The upper arm, which is above the elbow and has a straight sleeve shape, is typically made up of two sections; suddenly, from the middle, a large cuff extends out, which can be useful for covering the skin on our arms.


Step 4: Brands Just For Plus Size Lolita
Here are some recommended indie Lolita brands that sell plus-size Lolita clothing. You can find these brands on 42 Lolita.
NanShengGe
NanShengGe is an indie Lolita brand that offers a lot of plus size Lolita clothing. Numerous dresses from this line are in the Cla Lolita collection style, which is known for its timeless elegance. It is good at conveying a sense of luxury with unique design. No matter if it has a handle design or not, the overall color matching is really exquisite, there won't be any color collisions, and the colors have a high saturation level.


Sakurada Fawn
Sakurada Fawn is a plus size Lolita brand that offers Sweet Lolita outfits. The main goal of Sakurada Fawn is to achieve a doll-like, adorable, and sweet shape while pursuing the "sweet girlish heart," which is typically used to express girls' innocent and romantic feelings as well as their inner dreamy consciousness.


The Conclusion
Having a large figure might be really discouraging. Avoid getting caught up in the "but I want it to fit since I love it sooooo much" stage. Buy brands for plus-sized beauty items like dresses, headbands, necklaces, and other accessories to complement your style to boost your spirits. No matter what people say, just remember that you are beautiful if you feel that way.
Lolita fashion should not be a tool to divide people, but a clothing that makes people happy. Whether you are heavy or thin, tall or short, or what skin color you are, you have the right to enjoy happiness. Wearing Lolita is just to make yourself happy, not to please others.
Lolita is accessible to anyone. Anyone can wear Lolita fashion, if there is one thing you learn from this post. No matter your age, race, height, or size, Lolita fashion can help you become the most attractive version of yourself. 42Lolita sincerely hope this information was helpful and wish you the best of luck on your Lolita journey!
8 notes
·
View notes
Text

The Leading Ecommerce Site Daraz Has An Extraordinary Marketing Strategies...
Digital marketing is a crucial aspect of success for any e-commerce business, and Daraz, a leading e-commerce platform in South Asia, is no exception. To effectively reach its target audience and drive sales, Daraz employs a comprehensive digital marketing strategy that encompasses various channels and tactics. Here's a breakdown of Daraz's digital marketing approach:
1.Search Engine Optimization (SEO): Daraz prioritizes optimizing its website and product listings to rank high in search engine results pages (SERPs). This involves keyword research, content optimization, technical SEO, and backlink building. By improving its website's visibility in search results, Daraz attracts organic traffic from potential customers actively searching for products they offer.
2.Social Media Marketing (SMM): Daraz maintains a strong presence on various social media platforms, including Facebook, Instagram, and Twitter. Through engaging content, targeted ads, and influencer partnerships, Daraz builds brand awareness, interacts with customers, and drives traffic to its website. Social media serves as a powerful tool for generating leads, promoting new products, and fostering customer loyalty.
3.Pay-Per-Click (PPC) Advertising: Daraz utilizes PPC campaigns on search engines like Google and social media platforms to reach a wider audience and boost website traffic. PPC allows Daraz to display targeted ads to users based on their search queries and interests, increasing the likelihood of converting them into customers.
4.Content Marketing: Daraz creates and shares informative and engaging content, such as blog posts, product reviews, and video tutorials, to attract and educate potential customers. This content builds brand authority, establishes Daraz as a thought leader in the e-commerce industry, and encourages organic traffic to its website.
5.Email Marketing: Daraz nurtures relationships with existing customers through personalized email campaigns. These emails may include product recommendations, promotional offers, and abandoned cart reminders, encouraging customers to revisit the website and make purchases.
6.Affiliate Marketing: Daraz partners with bloggers, social media influencers, and other website owners to promote its products. These affiliates earn a commission for each sale generated through their unique referral links, incentivizing them to promote Daraz to their audience.
7.Mobile App Marketing: Daraz heavily promotes its mobile app, offering exclusive discounts and features to encourage users to download and use the app. The app provides a seamless shopping experience, facilitating impulse purchases and increasing customer engagement.
8.Performance Tracking and Analysis: Daraz continuously monitors and analyzes the performance of its digital marketing campaigns, using data-driven insights to optimize its strategies and maximize ROI. This data-driven approach ensures that Daraz allocates its resources effectively and focuses on the most impactful marketing channels.
In conclusion, Daraz's comprehensive digital marketing strategy, encompassing SEO, SMM, PPC, content marketing, email marketing, affiliate marketing, mobile app marketing, and performance tracking, enables the e-commerce giant to reach its target audience, drive traffic, increase sales, and build a loyal customer base.
3 notes
·
View notes
Text
A New Star on the Horizon: Welcome to "The MOA Embassy"
Hi MOA! 💙💚
Welcome to, The MOA Embassy, where we embrace the diversity and vibrancy that Tomorrow X Together fans have across the globe. This Embassy is our start line - a space where every MOA's enthusiasm for TXT becomes a powerful tide that supports and propels all 5 of the members to new heights.
At The MOA Embassy, we're not just fans; we're ambassadors. We're the active voices that appreciate, respect, and support TXT, the music they make, the stories they tell and the dreams they dare to dream.
Together, we'll navigate the streaming seas, conquer the voting battlegrounds, and make sure that our support for TXT translates into tangible results.
Here's what you can expect from The MOA Embassy:
Regular updates on TXT's music releases, tours, and more. Stay in the loop and never miss a beat.
Informative guides and strategies for streaming TXT's music across various platforms. Every stream counts!
Voting updates for music shows, awards, and polls where TXT is nominated. Let's ensure our voices are heard loud and clear!
Step-by-step tutorials and advice on how and where to purchase TXT albums and merchandise, both physically and digitally. Every purchase contributes to chart performances and supports TXT!
Safe and respectful space for every MOA, where every ambassador can share their love for TXT freely and without judgment.
Step into The MOA Embassy, and let's embark on this exciting journey together. No matter how far apart we might be, remember, when united under the starry banner of TXT, we can achieve anything!
Stay tuned for updates and engaging activities. Don't hesitate to drop your queries or suggestions in the ask box - I'm always ready to lend an ear!
Until then, keep streaming, keep voting, and most importantly, keep loving TXT.
With love, The MOA Embassy 💙💚

#txt#tubatu#tomorrow x together#moments of alwaysness#moa#fanbase#soobin#yeonjun#beomgyu#hueningkai#taehyun
6 notes
·
View notes
Text
Unleash Your Web Testing Potential with Selenium Training: Master the Art of Automation!
Education: How do I learn Selenium on my own?
Are you a web developer or a software testing enthusiast looking to upgrade your skills in web testing? Look no further than Selenium! Selenium is a powerful open-source tool that allows you to automate your web testing and maximize your efficiency. In this article, we will guide you through the process of learning Selenium on your own, so you can unleash your web testing potential and become a master of automation.

So, how can you get started? Here are some key points to consider on your self-learning journey:
1. Understand the Basics of Selenium
Before diving into Selenium, it's crucial to familiarize yourself with its fundamentals. Start by understanding what Selenium is and how it works. Selenium is a suite of tools used for automating web browsers, and it supports various programming languages such as Java, Python, C#, Ruby, and more. Knowing the core concepts and the underlying architecture of Selenium will provide you with a solid foundation for your learning journey.
2. Choose a Programming Language
Once you have a grasp of the basics, it's time to choose a programming language to work with Selenium. Java is a popular choice due to its simplicity and robustness, but you can also opt for Python, C#, or any other language that you are comfortable with. Selecting a programming language that aligns with your goals and prior experience can smoothen your learning curve and enhance your understanding of Selenium capabilities.
3. Set Up Your Development Environment
To start practicing Selenium, you need to set up your development environment. Install the necessary software, such as the chosen web browser (e.g., Chrome or Firefox), Integrated Development Environment (IDE) like Eclipse or Visual Studio Code, and the Selenium WebDriver library for your preferred programming language. Ensure that you have all the dependencies and configurations in place to prevent any obstacles during your learning process.
4. Explore Online Resources and Documentation
Learning Selenium on your own doesn't mean you have to reinvent the wheel. Utilize the vast array of online resources available to enhance your learning experience. Visit the official Selenium website, read through the documentation, and explore the comprehensive guides and tutorials provided. Online forums and communities like Stack Overflow can also be valuable sources to seek answers to your queries and learn from the experiences of other Selenium enthusiasts.
5. Hands-on Practice and Project-based Learning
Theory alone won't make you a Selenium expert. It's crucial to reinforce your knowledge through hands-on practice. Start by writing simple test scripts to automate basic web interactions, such as clicking buttons, filling forms, and navigating between pages. As you gain more confidence, challenge yourself with more complex scenarios and real-life web testing projects. Building a portfolio of projects will not only solidify your skills but also showcase your expertise to potential employers.
6. Join Selenium Communities and Network
Learning doesn't have to be a solitary journey. Engaging with fellow Selenium enthusiasts and professionals can greatly accelerate your learning process. Join Selenium communities and forums, participate in discussions, and network with like-minded individuals. Collaborating with others will expose you to diverse perspectives, practical insights, and valuable tips and tricks that can take your Selenium expertise to new heights.
7. Stay Updated with the Latest Trends
The field of web testing is constantly evolving, and staying updated with the latest trends and advancements is essential. Follow authoritative blogs, subscribe to relevant newsletters, and join webinars and conferences to keep yourself abreast of the latest happenings in the Selenium ecosystem. Knowing the current best practices and emerging technologies will enable you to adapt to changing industry demands and further refine your automation skills.

With these key steps and a determined mindset, you can embark on your Selenium learning journey with confidence. Mastering the art of automation through Selenium training at ACTE institute will not only enhance your web testing skills but also unlock a plethora of opportunities in the world of software development and testing. So don't wait any longer, unleash your web testing potential with Selenium, and pave your way to a successful and fulfilling career in automation!
3 notes
·
View notes
Text
"Small Businesses Are Using AI to Dominate Digital Marketing—Are You Missing Out?"
As a small business owner or marketer, I know that time and budget constraints are always a challenge. That’s where AI tools come in—they can help automate tasks, improve content creation, and boost engagement without requiring a huge marketing team. Here’s how I’d use AI to enhance my digital marketing efforts:
1️⃣ AI-Powered Content Creation & Optimization
Writing high-quality content regularly can be tough, but AI tools make it easier:
✅ Jasper – Helps generate blog posts, ad copy, and social media content quickly.
✅ SurferSEO – Optimizes content by analyzing top-ranking pages.
✅ Grammarly – Ensures content is clear, professional, and mistake-free.
🔹 How I’d use it: I’d create AI-assisted blog drafts and then add my personal expertise to keep content engaging and authentic.
2️⃣ AI-Driven Social Media Marketing
Managing multiple platforms manually is exhausting, so I’d use AI for:
✅ Canva Magic Write – AI-generated captions and designs.
✅ Lately – Converts long-form content into social media posts.
✅ Buffer or Hootsuite – Automates post scheduling and engagement tracking.
🔹 How I’d use it: I’d schedule posts in bulk and use AI-generated analytics to see what’s working and adjust my strategy.
3️⃣ AI Chatbots & Customer Support
Instead of manually answering every query, AI chatbots can handle common customer questions 24/7.
✅ ChatGPT API – Custom AI chatbots for websites.
✅ Drift – AI-powered live chat for lead generation.
✅ ManyChat – Automates replies on Facebook and Instagram.
🔹 How I’d use it: I’d set up a chatbot on my website and social media to answer FAQs, recommend products, and collect leads.
4️⃣ AI-Powered Email Marketing
AI makes email marketing more personalized and effective by analyzing customer behavior. ✅ Mailchimp – AI-driven subject line suggestions & automated sequences.
✅ HubSpot – AI-powered lead nurturing and segmentation.
✅ Seventh Sense – AI-optimized email delivery for better open rates.
🔹 How I’d use it: I’d let AI personalize emails based on customer actions (e.g., sending a special discount if they abandoned their cart).
5️⃣ AI for SEO & Website Optimization
AI can improve rankings and website performance with data-driven insights.
✅ Clearscope – AI-based keyword and content recommendations.
✅ Frase – Automates content research and optimization.
✅ RankIQ – AI-driven keyword analysis for small business blogs.
🔹 How I’d use it: I’d optimize my website for SEO and user experience without needing deep technical expertise.
6️⃣ AI for Ads & PPC Campaigns
Running paid ads can be overwhelming, but AI tools improve targeting and ad performance. ✅ Google Ads AI – Smart bidding and automated audience segmentation.
✅ Adzooma – AI-powered ad performance optimization.
✅ Pattern89 – AI-driven insights to improve ad creatives.
🔹 How I’d use it: I’d let AI analyze ad data to automatically adjust my budget and optimize for conversions.
Final Thoughts
AI is not a replacement for human creativity, but it’s a powerful tool to save time, cut costs, and improve efficiency. As a small business, I’d focus on using AI for automation and data-driven decisions while still adding a human touch to my brand.
I often check out CoderzColumn (which covers Digital Marketing blogs and tutorials) to stay updated on how AI is evolving in digital marketing. The future is AI-driven, and small businesses that adapt early will have a major advantage.
0 notes
Text
Avoiding Common Mistakes in Digital Customer Support
Providing excellent digital customer service is essential for maintaining customer satisfaction and loyalty. However, many businesses unknowingly make mistakes that can damage their reputation and drive customers away. Understanding these common pitfalls and how to avoid them can help companies deliver a seamless customer experience. Here are the most common mistakes in digital customer support and how to prevent them.
Slow Response Time Customers expect quick resolutions to their issues. A delayed response can lead to frustration and dissatisfaction. To improve response time: - Implement AI-powered chatbots for instant support. - Use automated ticketing systems to prioritize urgent queries. - Monitor response times and set benchmarks for efficiency.
Lack of Personalization Customers appreciate personalized interactions, and failing to provide them can make your service feel robotic. To enhance personalization: - Address customers by their names and reference past interactions. - Use customer data to offer relevant solutions and recommendations. - Train support agents to tailor responses to individual needs.
Ignoring Social Media Complaints Social media is a key customer support channel, yet many businesses overlook complaints posted online. To manage social media effectively: - Regularly monitor brand mentions and customer messages. - Respond quickly and professionally to complaints. - Engage with customers positively to turn negative experiences into opportunities.
Offering Inconsistent Support Across Channels Inconsistent information and service quality across different channels can confuse customers. To ensure consistency: - Integrate customer support channels for a unified experience. - Train agents to provide accurate and uniform responses. - Use a centralized CRM system to track customer interactions.
Over-Reliance on Automation While automation improves efficiency, relying too much on chatbots and automated responses can frustrate customers who need human support. To balance automation and human interaction: - Use AI chatbots for simple queries and escalate complex issues to human agents. - Offer a clear option for customers to connect with a live representative. - Continuously refine automated responses to improve accuracy.
Not Providing Self-Service Options Many customers prefer finding solutions independently rather than contacting support. Without self-service resources, businesses may experience higher support ticket volumes. To empower customers: - Create a detailed knowledge base with FAQs and troubleshooting guides. - Develop video tutorials and step-by-step articles. - Use AI-driven self-service tools for common inquiries.
Failing to Collect and Act on Customer Feedback Ignoring customer feedback prevents businesses from improving their digital customer service. To make feedback valuable: - Send post-interaction surveys to gather insights. - Analyze feedback to identify recurring issues and improvement areas. - Actively implement changes based on customer suggestions.
Poor Data Security Measures Customers trust companies that protect their personal data. Neglecting security protocols can lead to data breaches and loss of credibility. To ensure data security: - Use encrypted communication channels. - Regularly update security measures and comply with data protection laws. - Train support agents on data privacy best practices.
Conclusion Avoiding these common mistakes in digital customer service can help businesses build trust, improve customer satisfaction, and enhance overall efficiency. By prioritizing fast response times, personalization, and data security while leveraging automation strategically, companies can provide top-notch digital support.
About Simplify360
Simplify360 is an AI-driven digital customer service platform designed to streamline support operations across multiple channels. With advanced automation, social media integration, and real-time analytics, Simplify360 helps businesses enhance customer experiences and deliver seamless support. Elevate your customer service with Simplify360 today!
To know more about Simplify360,
Visit website: https://www.simplify360.com/ Address: 91springboard, 7th floor, Trifecta Adatto, 21, ITPL Main Rd, Garudachar Palya, Mahadevapura, Bengaluru, Karnataka 560048 Email: [email protected]
0 notes