#photoshop-presets-free-download
Explore tagged Tumblr posts
Text

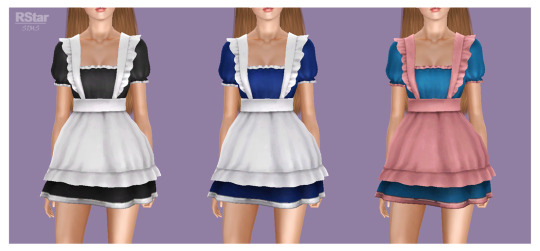

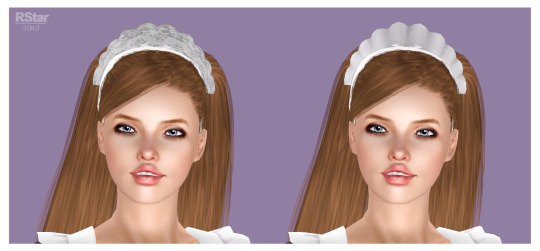
4t3 Lovestruck Costumes - French Maid & French Butler + TS3 Maid Bonnet Dehairyfied (as accessory)
General details:
Meshes by EA/Maxis;
Age: (young) adults;
Base Game compatible;
All LODs & Morphs;
Disabled for random;
1k & 2k textures;
Normal maps included;
Custom thumbnails for both Launcher and CAS;
sims3pack & package files;
Compressed;
The Sims 4, Sims 4 Studio, Milkshape, Photoshop, TSRW.
► Costume French Maid - AF
Poly: 6,3k
Outfits section;
Fully recolorable;
3 presets, 2 recolorable channels;
Categories: Everyday, Formal;
Valid for maternity
Not valid for random.
► Costume French Butler- AM
Poly: 5,1k;
Outfits section;
Fully recolorable;
3 presets, 4 recolorable channels;
Categories: Everyday, Formal;
Not valid for random.
► Maid Bonnet - accessory for AF (& AM)
Poly: 0,3k;
Accessories/Earrings section;
Fully recolorable;
2 presets, 2 recolorable channels.
Categories: All main categories, plus outerwear & maternity;
Not valid for random.
compatible with AWT's Hat Sliders.
!! There are 2 files for the maid bonnet in the download. One is only for FEMALES, the other is for both FEMALES and MALES. USE ONLY ONE!!
———————————————
CREATOR NOTES:
For the male outfit, the original mesh had shoes attached to it. I had to remove them since I don't like that kind of setting, but now the pants are a little long so they might clip with other shoes. I didn't want to raise the pants as the outfit might have ended up looking a bit odd so use a similar color for shoes or let me know if you want me to modify their length.
I didn't modify the maid bonnet mesh at all, but since accessories tend to become blurry when there's too many of them, I created an additional and cleaner texture. So the first preset is the original one made by EA (the lace one), and the second one is made by me in order to avoid blurriness.
———————————————
Download ALL: Patreon (FREE)
Download Outfits: SFS / Mediafire
Download Accessory: SFS / Mediafire
Hope you enjoy them!
Thank you & Happy Simming!
———————————————
You can also support me on Ko-fi.
———————————————
Thank you to my supporters on Patreon & Ko-fi!
———————————————
TOU 🔊 Do not re-upload my creations. Do not claim as your own. Do not put them anywhere up for download and don’t add adfly to my links.
#ts3#4t3#4t3conversions#4t3 conversion#ts3 download#ts3cc#sims 3 custom content#ts3 cc#ts3 clothing#ts3 female clothing#sims 3 clothing#ts3 male clothing#sims 3 accessories#ts3 accessory
454 notes
·
View notes
Text
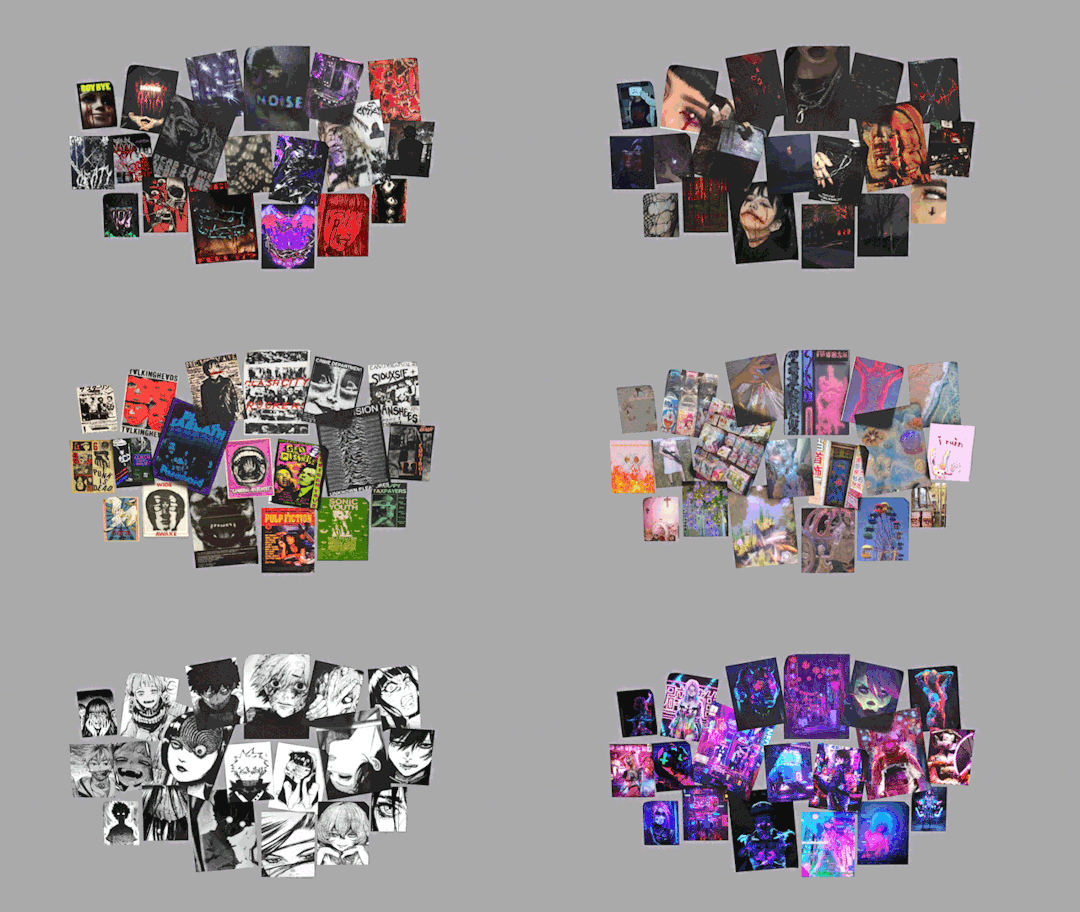
4t3 Conversion of Grouped posters by @cosmiccs4 + Recoloring PSD with tutorial
8 non-recolorable presets
1024 textures
Included PSD for retexturing (tutorial how to use under the cut)
113 poly, all LODs
Shiftable
Price - 5§
BGC
Compressed package
TOU, Ko-Fi

DOWNLOAD | ALT | SIMBLR.CC
Tutorial: How to use my PSD for retexturing
You need:
Photoshop with .dds plugin
My retexture PSD and package file of posters
19 pictures to your liking, preferably vertical
TSRW
Sims3Pack Multi Installer and Compressionizer
Step 1: Open my PSD file, open your images:
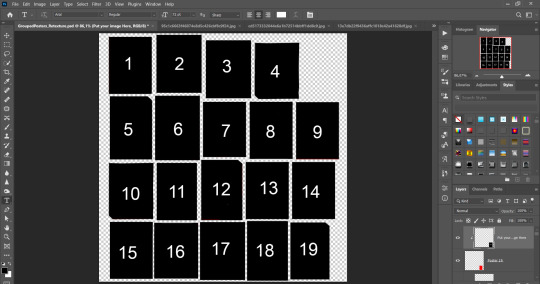
Step 2: Select (Ctrl+A) copy and paste to posters file (Ctrl+C, Ctrl+V) first of your images :
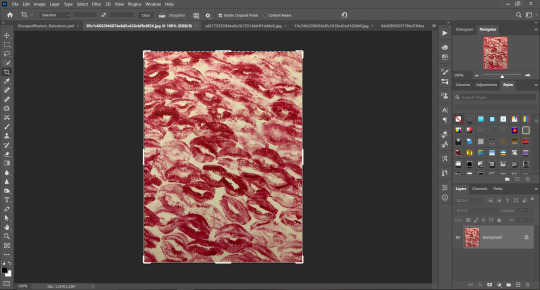
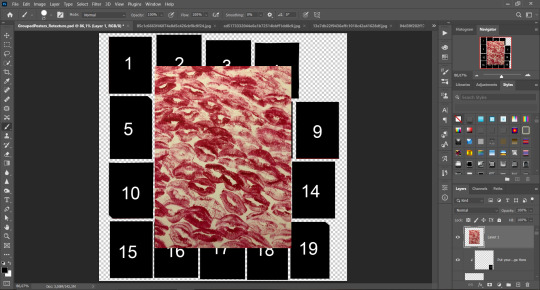
Step 3: Choose where you want to put it, for reference you can use one of the presets:
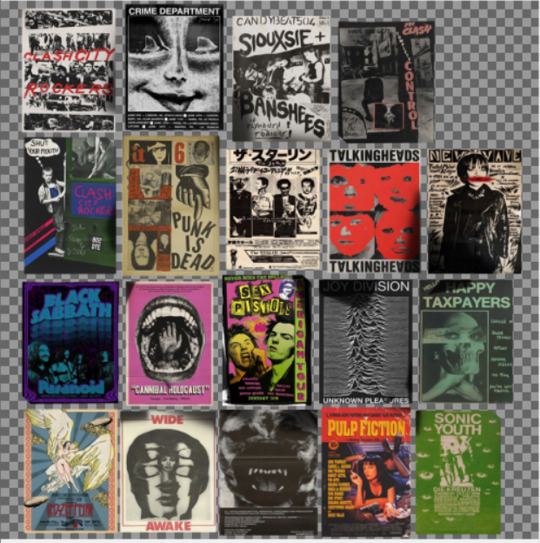
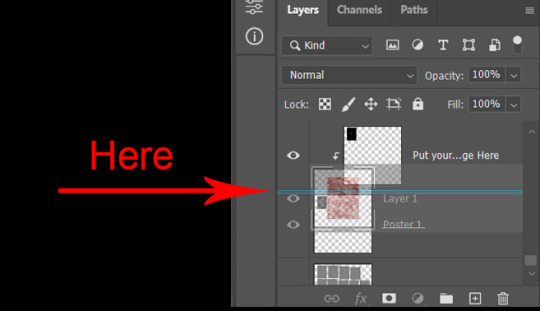
Step 4: After you decided with placement of your image. Move its layer in the Layers tab between "Poster x" and "Put your image here" layers, it will create a clipping mask, which allows the picture to be fit within the poster without cropping. Hide or delete "Put your image here" layer.
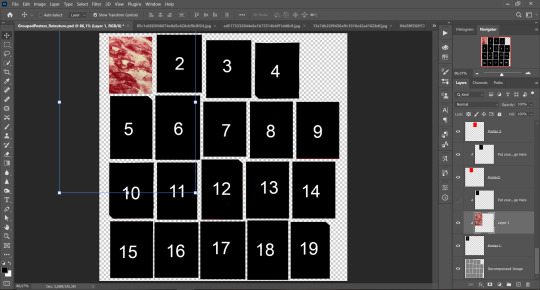
Step 5: Use Transform, Free Transform and Move tools to resize the image by your liking:
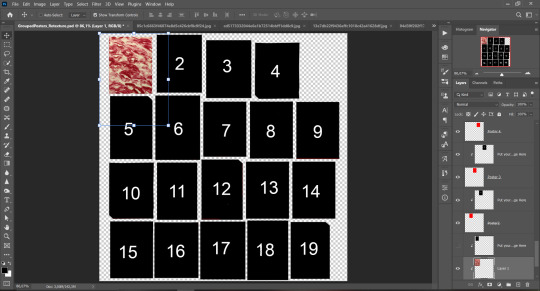
Step 6: Repeat the Step 2-5 with other 18 images:
*vibes are totally random, all images from Pinterest*
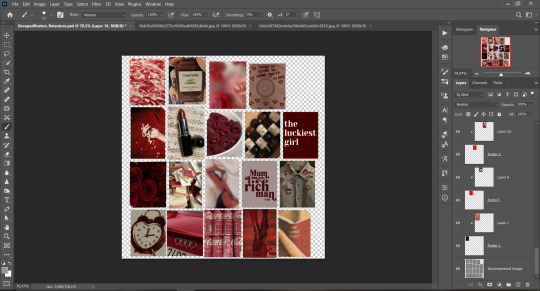
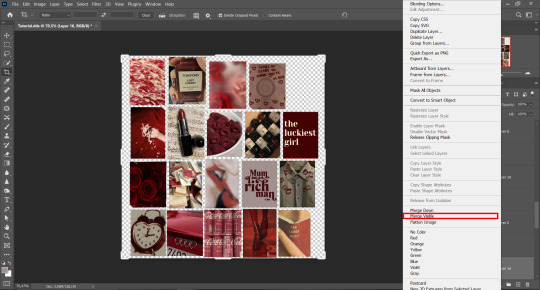
Step 7: After you've done, delete all the "Put your image here" layers, if you didn't it before. Right-click on the Layers tab and press Merge Visible (Shift + Ctrl + E). Now press Save As (Control + Shift + S) and save your image as .DDS with this parameters (2nd picture):
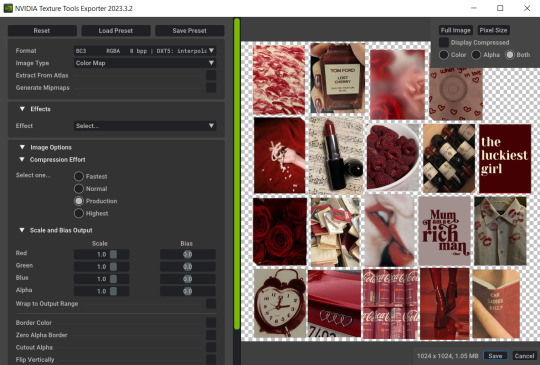
Step 8: Go to TSRW. Press Create New Project > New Import, and select package with my posters. Give for your recolor unique Title and Project name, otherwise it will override original posters:
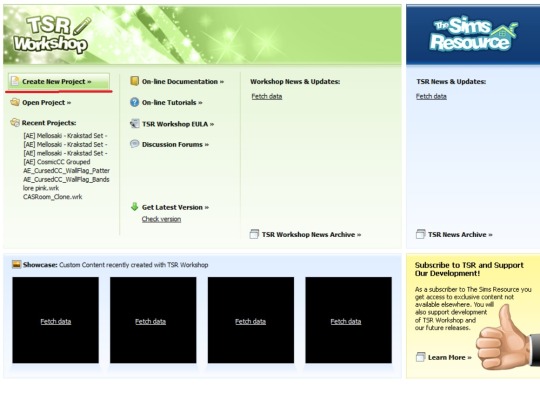
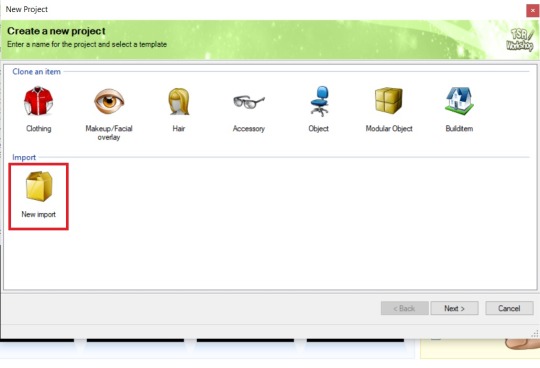
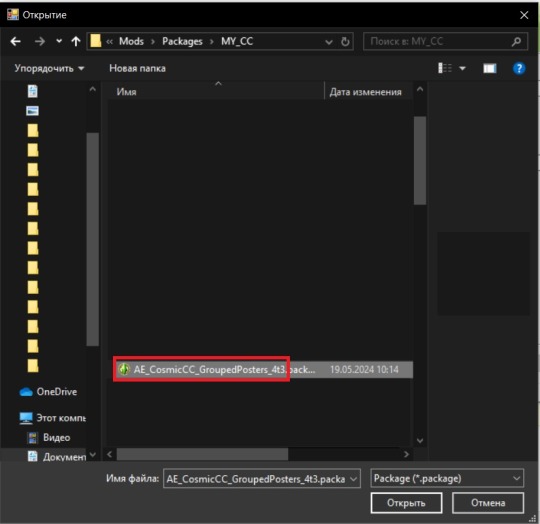
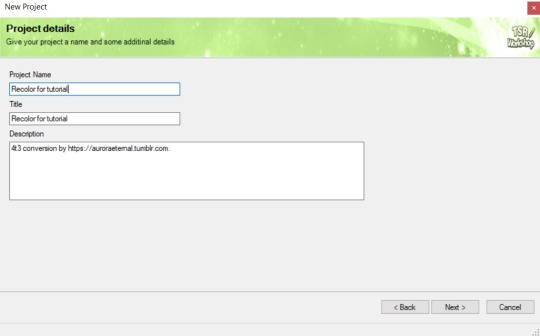
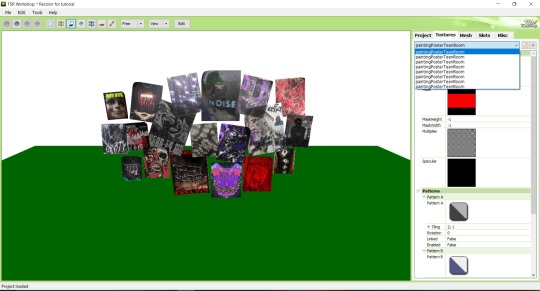
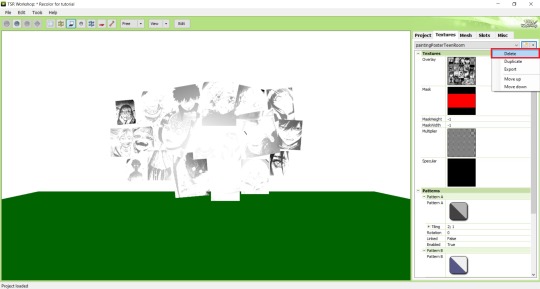
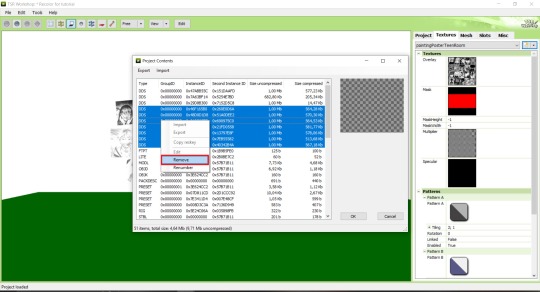
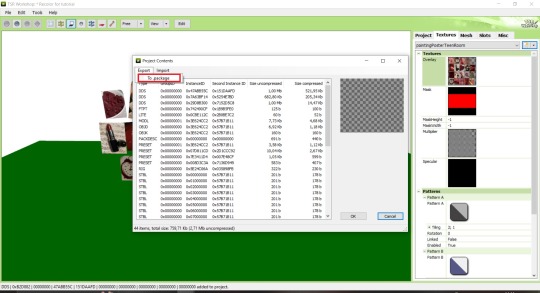
Step 9: In Textures tab go through all the presets except the first one and delete them. Then go to Edit > Project Contents and remove all the textures of removed presets. Its pretty common when someone make retexture of TS3 mesh and leave that unused textures in file, which leads to increasing its size:
Step 10: Press Edit button next to the Overlay tab. Then press Import button and select your retexture. Press Done and when this pop-up appears, press Yes:
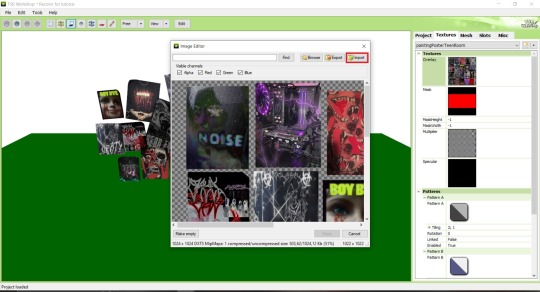
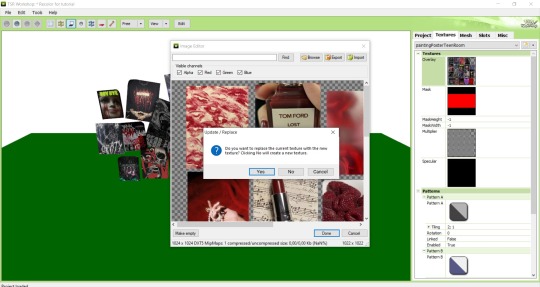
Step 11: If you want to add more presets press Duplicate and reapeat Step 10, but instead, when pop-up about replacing the texture appears, press No.
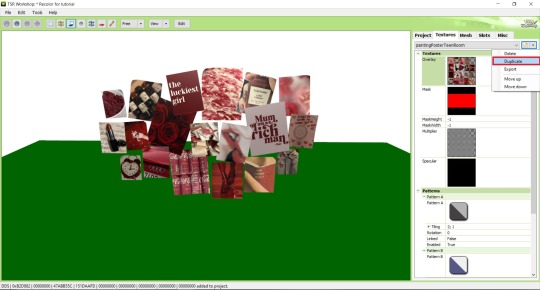
Step 12: After you've done, press File > Export > To Sims3pack or Edit > Project Contents > Export > To .package. If you choose the first method, convert your Sims3pack to Package and in both cases run it through Compressionizer. Test your recolor In-game, make thumbnails (if you want to share it) and have fun!
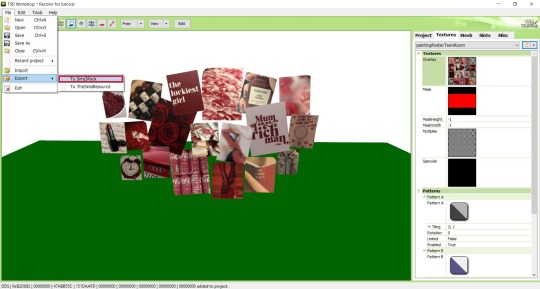
For those who read this tutorial to the end, click HERE to download this recolor.

@pis3update @xto3conversionsfinds @wanderingsimsfinds @kpccfinds @simfluencer-network @sssvitlanz @simblrcc-site
855 notes
·
View notes
Text
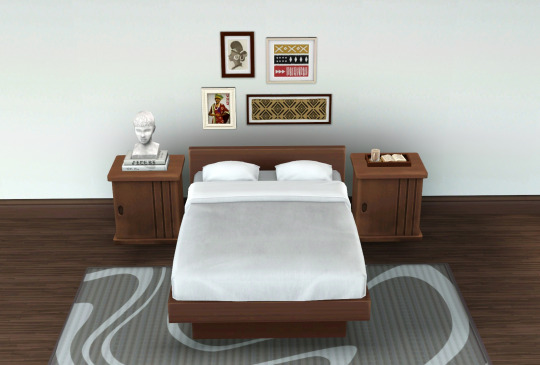
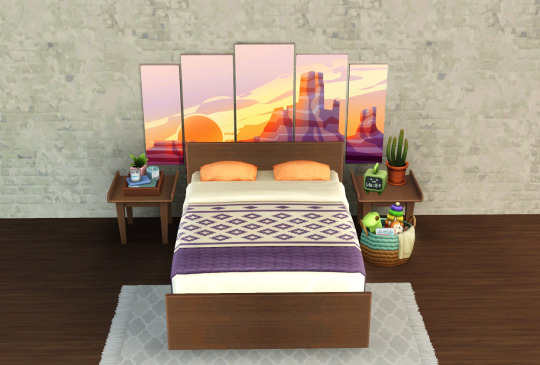
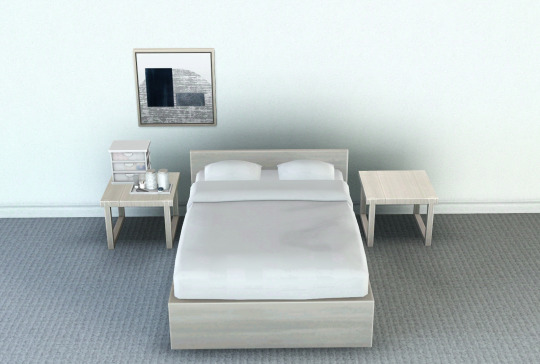
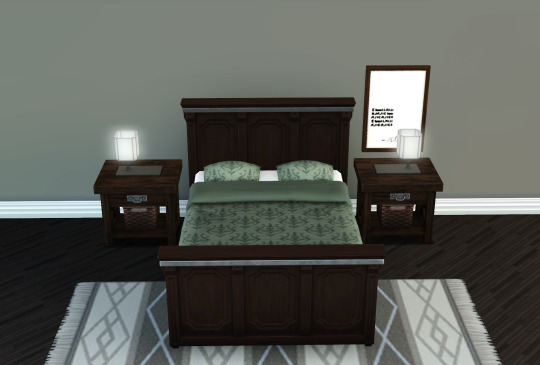
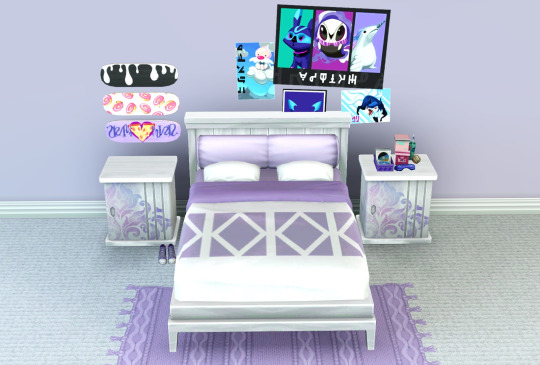
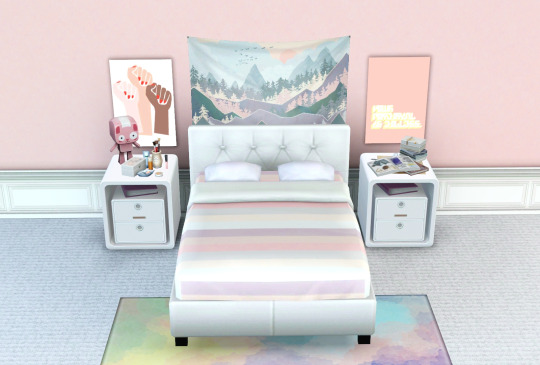
Mattresses & Frames Conversions [Pt. 3]
Here's my third set of converted mattresses and bed frames! The conversions are from the following packs: The Sims 4 (#4), The Sims 4: Snowy Escape (#1), The Sims 4: Cats & Dogs (#5), and The Sims 4: City Living (#6).
I also converted the mattress and bed frame from the SIMKEA Furnishings Stuff Pack (#3) and the bed frame from the Tiny Living Plus - CC Addon (#2) by @illogicalsims.
The bed frame and mattress from The Sims 4: Cats & Dogs are longer than the others to leave room up top for the pillows, but I've also included "standard" versions that can work with other mattress/frame combinations. And I edited the bed frames from The Sims 4: Snowy Escape and The Sims 4: City Living to convert them from singles to doubles.
The mattress in Preview #1 can be found here, the mattress in Preview #2 can be found here, and the mattress in Preview #6 can be found here.
Links to Mattresses & Frames Part 1 and Mattresses & Frames Part 2.
Comfort -> Beds
Monster Free Bed Frame [edit by twinsimming]: one channel | §500 |
Not So Murphy Bed Frame [by illogicalsims]: two channels | §600 |
Sömlös Double Bed Frame [by illogicalsims]: one channel | §3000 |
Sömlös Double Mattress [by illogicalsims]: four channels | §850 |
The Barnish Bed Frame: three channels | §400 |
The Barnish Mattress: four channels | §220 |
Modern Colonial Bed Frame: two channels | §1500 |
Modern Colonial Bed Frame Standard [edit by twinsimming]: two channels | §1500 |
Modern Colonial Mattress: four channels | §700 |
Modern Colonial Mattress Standard [edit by twinsimming]: four channels | §700 |
Modern Colonial Bed Pillow: two channels | §50 |
Space Blanket Bed Frame [edit by twinsimming]: two channels | §500 |
| All TS4 presets included and base game compatible |
Credit: meshes by EA, meshes by illogicalsims, The Sims 4, Sims4Studio, TSRW, Blender, Milkshape, Photoshop, and Gimp.
Download (SFS, package) | Mirror (MEGA, package)
If you like my work, please consider tipping me on Ko-fi.
Experiencing issues with my conversions? Inbox me. Enjoy! 💙
904 notes
·
View notes
Text


Gshade preset "Pumpkin spice"
This preset will help to create an autumnal atmosphere in your game with a pumpkin latte flavor ☕️
All screenshots were taken with this preset and without any additional editing (except for additional sharpening in Photoshop).
If you use this preset, don't forget to tag me ❤️
Download: Patreon (free)
198 notes
·
View notes
Text
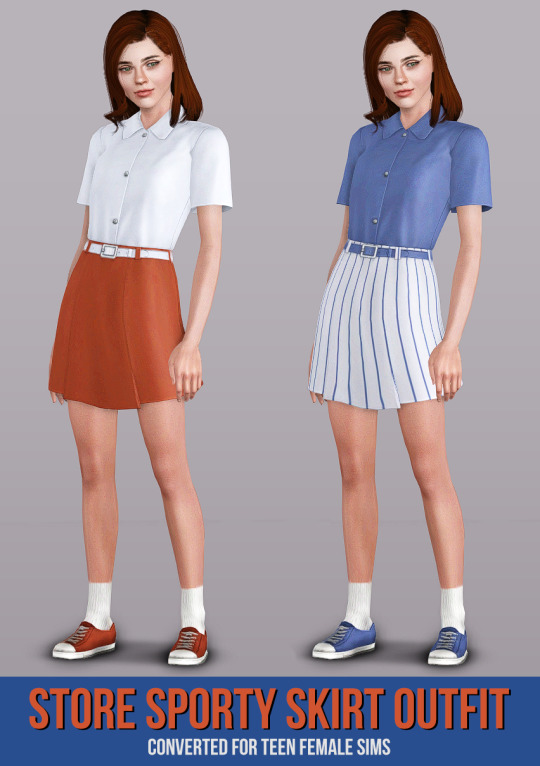
Sporty Skirt Outfit from The Sims 3 Boardwalk Attire CAS Set for Teen Female sims Original Found here: https://store.thesims3.com/setsProductDetails.html?productId=OFB-SIM3:71059
What it says on the tin. I changed the preset colors to those that are a little less fluorescent. Socks and shoes are from the base game.
Details:
For teen females
completely base game compatible
modified the multiplier and normal textures.. lots of color artifacts on the originals
2 presets, shown above. Second preset has the original store stencil of the number 5 on the back.
Enabled for Everyday and Athletic | Custom Thumbnail
Compressorized | 1.4 MB
TOU Feel free to edit the textures or whatever as you like.
Credit: mesh by EA, TSRW, Milkshape, Photoshop
Download (and ❤) at Sim File Share: https://simfileshare.net/download/4327865/
Mirror
773 notes
·
View notes
Text


HONEY Gshade Preset
I've been using three different presets and I figured it was finally time to combine them together and add my own touch to the game!
Disclaimers:
I played around with the qUINT_dof settings, but I didn't include them in this version.
I also love to use Photoshop and Relight to give my screenshots a bit of a pop, but all the photos included in this post aren't edited beyond cropping!
This was designed for DirectX 9. My sims game constantly crashes with DirectX 11, so until there's more support, I won't update this preset to DirectX 11.
download (patreon, completely free)
If you want to learn how to play with Gshade, I recomend this video by Oshinsims to get started!
Feel free to message me if you have any questions and enjoy! 💗
126 notes
·
View notes
Text
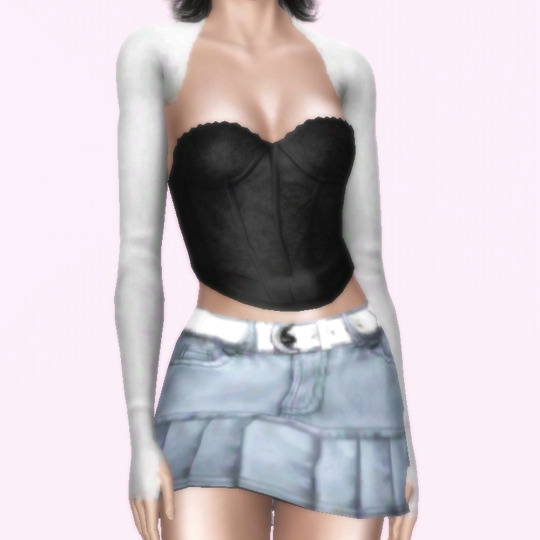
Caio Dainty Bolero Acc Top (For The Sims 3)
huge thanks to @auroraeternal and @thornowl for their texture conversion tutorial, which is how I converted this. gone are the days of mismatched straps and endless hours in photoshop hell !!
for tf-af
recolorable; 1 preset, 1 recolorable channel
find in accessories > gloves
categories: everyday, formalwear, career, outerwear, maternity, athletic
♡ DOWNLOAD ♡
PATREON (FREE)
alt: Mediafire
♡ CREDITS & TAGS ♡
this was made by caio, not me. See original here
@katsujiiccfinds @xto3conversionsfinds @pis3update @matchsim
♡ Support Me (Ko-fi) | All Downloads | TOU ♡
#nightodl#the sims 3#ts3#ts3 cc#the sims 3 cc#4t3 conversion#sims 3 cc#s3cc#ts3 clothing#4t3 clothing#ts3 accessory#ts3cc#simblr#sims 3
493 notes
·
View notes
Text
well well well... happy birthday to me 🥳
to celebrate, here's a lil LUT pack that you can use as a ✨base✨ for your colourings, whether you're a gifmaker, gfx artist or video editor!
thank you to all my moots for always being there for me and for blessing my dash with all your amazing works!! 💖 thank you for keeping this hellsite running; i hope this gift could be a small help to you if you're ever in a pinch 🥰
(also, moots! could i trouble you to help me fill in this form please? 💖 the form is open to all moots even if we haven't interacted 🥺)
to everyone else who supports me, my biggest heartfelt thanks to you all!! 😁😁 i wouldn't be where i am without you, so thank you so so much!!! 💕
🚨 [DOWNLOAD]
this LUT pack is open to everyone, so feel free to download and use as a lil stepping stone for your content! 😁 it'll be long, so everything will be under the cut!

Here’s how to use LUTs in your colouring:
✨ FOR ONE-TIME USE:
Make your gif as usual until the colouring process
In Photoshop, go to Adjustments > Colour Lookup
Make sure ‘3DLUT File’ is selected
In the dropdown menu beside ‘3DLUT File’, click ‘Load 3D LUT…’
Navigate to where you saved the downloaded LUTs
Click on the selected LUT to load it. It will be automatically applied to all your frames
Done! Now you can export the gif, or continue refining the colouring
✨ FOR PERMANENT USE:
Find your Photoshop folder (under Applications for Mac; under Documents for Windows)
Go to Presets > 3DLUTs
Drag in the .3DL / .CUBE LUTs that you downloaded into this folder
Close the Finder / File Explorer
Open Photoshop
Make your gif as usual until the colouring process
In Photoshop, go to Adjustments > Colour Lookup
Make sure ‘3DLUT File’ is selected
In the dropdown menu beside ‘3DLUT File’, click ‘Load 3D LUT…’
Navigate to where you saved the downloaded LUTs
Click on the selected LUT to load it. It will be automatically applied to all your frames
Done! Now you can export the gif, or continue refining the colouring

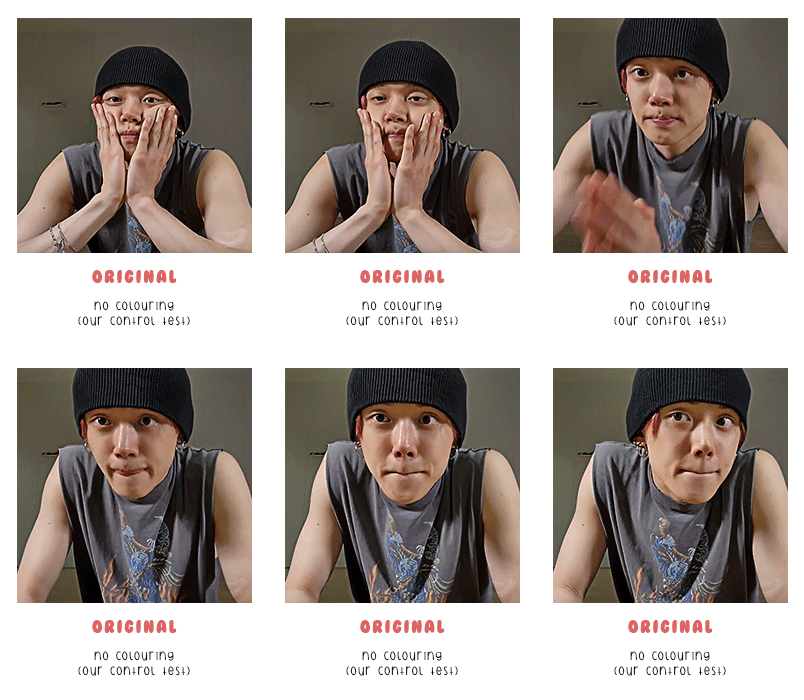
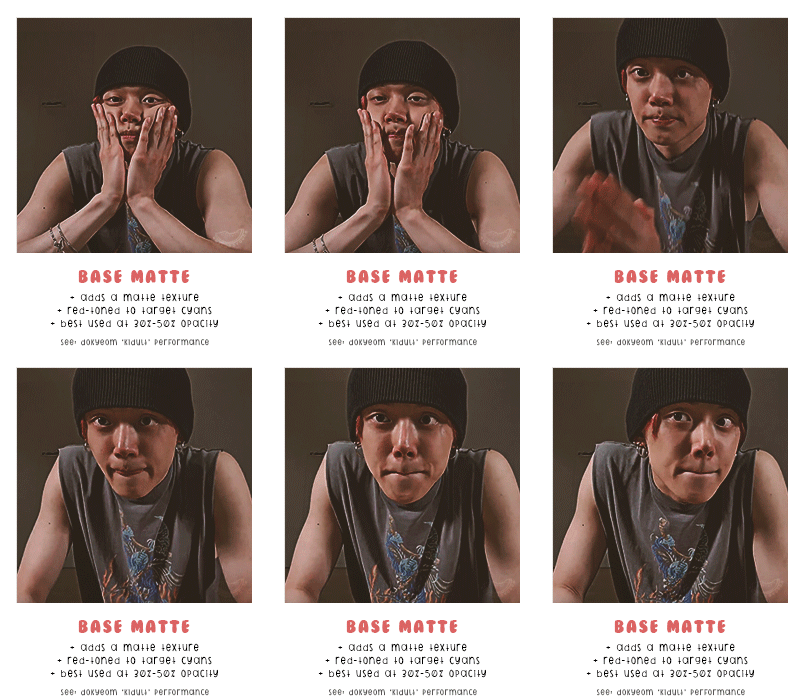
✨ LEFT GIF: ORIGINAL
- no colouring (used as a control test)
✨ RIGHT GIF: BASE MATTE
- adds a matte texture
- red-toned to target cyans
- best used at 30% - 50% opacity
- used in this set: dokyeom "kidult" perfomance


✨ LEFT GIF: BASE 1
- good for overly bright videos
- more blue-toned
- used in this set: seonghwa visual cam
✨ RIGHT GIF: BASE 2
- good for overly bright videos
- best used at 50% opacity
- used in this set: jennie "solo" perfomance


✨ LEFT GIF: BASE 3
- red-toned to target cyans
- best for green/yellow-toned videos
- used in this set: hoshi 'code:graphy' photoshoot behind
✨ RIGHT GIF: BASE 4
- good for overly bright videos
- best for green/yellow-toned videos
- used in this set: mingi "guerilla" 8K cam


✨ LEFT GIF: BASE 5
- aims to balance skin tone
- best for yellow-toned videos
- used in this set: yeonjun essence of dance
✨ RIGHT GIF: BASE 6
- red-toned to target cyans
- increases contrast
- used in this set: jeonghan caratland 2024

✨ LEFT GIF: BASE 7
- best for blue-toned videos
- increases contrast
- used in this set: wonwoo odg video
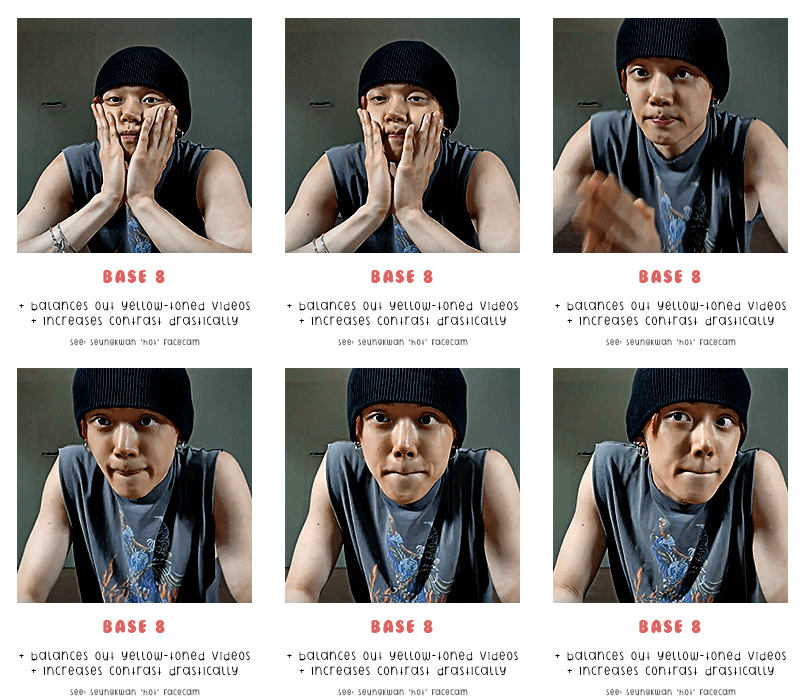
✨ RIGHT GIF: BASE 8
- balances out yellow-toned videos
- increases contrast drastically
- used in this set: seungkwan "hot" facecam


✨ LEFT GIF: MUBANK 1
- ideal for music bank interviews
- aims to balance skin tone
- used in this set: yeosang mubank interview
✨ RIGHT GIF: MUBANK 2
- ideal for music bank interviews
- more red-toned
- increases contrast
- used in this set: jeonghan mubank interview


✨ LEFT GIF: SPOTIFY
- ideal for spotify on! videos
- aims to balance skin tone
- slight matte texture
- used in this set: wooyoung spotify cat aegyo
✨ RIGHT GIF: WIRED
- ideal for (most) wired interviews
- aims to balance skin tone
- increases contrast slightly
- used in this set: jennie wired autocomplete interview

🚨 [DOWNLOAD]
to reiterate again, this is a ✨base✨ for colourings, not to replace your actual colouring! one base does NOT fit all 😇 experiment and see what works best for you!
and that's the end! if you scrolled all the way here, thank you for taking the time to do that 😄💖 i appreciate you so much!!
#igm.talk#igm.ref#useranusia#usertheos#useryeonbins#fordaniseyes#userchoi#useryenas#heysol#userzaynab#hanaablr#useroro#lucieblr#tuserflora#usersemily#chwedoutbox#vacantlook#forparker#tuserrowan#melontrack#forbelleseyes#useregoisthye#userkngld#userresa#anniehae#lunanuggets#moots please help to fill in the form at the top of the post 💖💖#it's 12am kst so it's my bday in korea teehee#im also going to bed now so sorry if i dont see anyones messages :(
79 notes
·
View notes
Text

THE SIMS 3 TUTORIAL
HOW TO CREATE DEFAULT REPLACEMENT MOD USING CUSTOM MESH & TEXTURE FOR SIMPLE OBJECT
⚠️ Tumblr has 30 pictures limit, so I cannot include too many pictures. If you want to zoom in the pictures, click the pictures to enlarge, or save the pictures into your PC, zoom the pictures on picture viewer or zoom in the pictures on your mobile phone. ⚠️
----------------------------------------------------
I create this tutorial to make easier to follow because there are older tutorials available before but scattered on internet and usually only say "Export to replace s3asc" without explaining how to export the edited object properly.
My method is using TSR Workshop instead of exporting the object using Sims 3 Object Export/Import plug in because exporting to replace the s3asc using that plug in always giving error notification "ERR: Model has 1 groups; original had 0" and cannot be exported.
For beginners who are very new using s3pe and haven't created default replacement mod before, better start from simple object first.
Simple objects I mean in-game object that has single MODL and single texture with no morphs, no GeoStates, no presets, no CAS colour channels, and easily cloned from OBJD on catalogue. Usually as utensils that Sims holding in their hand, not buy/build objects. For example: Pencil, pan, fork, spoon.
----------------------------------------------------
Tools to prepare:
s3oc
s3pe
Milkshape 3D for bone assignment (Version I use 1.8.5 beta, discontinued by its developer, therefore feel free to download the full version with its license key provided).
Sims 3 Object Export/Import 1.01 by Wesley Howe (Milkshape plug-in. Download msS3ObjPluginsV101.rar )
TSR Workshop (Older version for TS3 only version 2.0.88)
TSR Workshop plug-ins for export.import TSRW Object.
3D Program (Blender/Maya/3dsMax)
Editing images software (Photoshop, make sure you have to install .dds plugin by Nvidia. For free software alternative, you can use GIMP with its .dds plugin)
This tutorial will not teach you how to:
Meshing object ❌
Create alpha texture ❌
Change thumbnails in-game ❌
Install programs and plug-ins ❌
This is how I created Chinese chopsticks replacement mod using custom mesh and texture.
In summary, this tutorial has 10 steps:
Step 1. Clone the Object using s3oc
Step 2. Open S3PE to Copy the Original Resource Code and Export the Files
Step 3. Export the Original Mesh as Base Mesh to .obj format
Step 4. Create Your Custom Mesh
Step 5. Bone Assignment & Create Group
Step 6. Create custom Texture
Step 7. Import the .wso of Edited Mesh on TSR Workshop & Export the package
Step 8. Export MODL file from Package saved from TSR Workshop
Step 9. Finalizing in s3pe & Replacing the Original file with Edited File & Correcting the Code As Same As Default Code
Step 10. Test the CC in your game.
-----------------------------------
✳️ Step 1. Clone the Object using s3oc
Before cloning the object, check the Game Folder for in-game object file location. Settings > Game Folders...
Take a look if the Base Game or Expansion Pack for object file you want to clone is in the right folder. For example, my The Sims 3 game are all bought from Steam, so the location is D:\SteamLibrary\steamapps\common\The Sims 3
If you want to clone object from Expansion Pack, make sure input the folder location. For example, the location for World Adventures EP is D:\SteamLibrary\steamapps\common\The Sims 3\EP1

If you are done, close the pop-up box. You can continue click Cloning then choose Normal Object...
Wait until you get the whole catalogue. Click Search...

For example, I clone object from World Adventures Expansion Pack. You can clone object from Base Game or other Expansion Packs as long it is considered as "utensil" that Sim holding on hand. For example: "Pencil" or "Pan"
Search for text: chopsticks
or if you want to clone object from Base Game, search: utensil
Tick check marks for Resource Name, Object Name, Object Desc then click "Search button"
Search result gives you results with name "chopsticks". Here is the object we are looking for: UtensilChopsticks
We need the OBJD file to clone. OBJD = Object Data.

Click "Clone or Fix" at the right bottom. Then you see the next page to determine if you want to clone with renumber or not. If you want to make default replacement, then do not check the Renumber box. Keep it blank.
Tick check box means the s3oc will generate new resource code for new item. Not tick the check means the s3oc will overwrite the same resource code, it is to replace object you cloned in-game.
I am personally a detailed person, so I usually tick as many as I want: tick "Deep clone" "Missing String Tables" and "Include Thumbnail" to include more details. Then click "Start" to proceed.

It will give you file name [CreatorName]_ObjectName_Number
Then save your package file in "DBPF Package" format in your project folder. Always make folder for any file to make everything organized.
✳️ Step 2. Open S3PE to Copy the Original Resource Code and Export the Files
Open S3pe, locate your package file you cloned from s3oc. Find the MODL of Utensil Chopsticks, Right-Click, "Details..."

On Resource Details, click "Copy TGI" to copy the Resource Code. Type, Group, and Instance will automatically be copied on clipboard. Then open Notepad, Right-Click to "Paste".
Click GRID on bottom of the s3pe (I mark it red on picture), it will give you pop-up box with Data Grid. Click "Resources", it will be highlight blue and there's 3 dots button appeared on the right side. Click the 3 dots button. It will give you TGI Block List Editor.
Inside MODL's TGI Block List Editor only has IMG. You may wondering why, but that's how the game coded. Type, Group, Instance of _IMG inside TGI Block List Editor should be the same as _IMG on the package.
Copy the TGI, Group, Instance to your Notepad.

After you copied code of MODL, do the same for the texture image (_IMG), but only copy the code from Resource Details. You cannot edit TGI Block List Editor for _IMG as the Grid button for _IMG is greyed out.
The main task is the code of your edited mesh and texture should be the same as the code you copied now from original package you cloned with s3oc.
Keep the code on notepad. You will need this code later.
Export the MODL file. Right-Click, "Export to s3asc". The file appears in long string such with name for example: S3_01661233_08000001_B619DB2238C3430B%%+MODL_filebase
Do not rename the file. Save.

Export the texture file. Right-Click "Export > To File..." The file will be saved in .dds format. Do not rename the file. Save.

✳️ Step 3. Export the Original Mesh as Base Mesh to .obj format
Open Milkshape. Import the s3asc file you saved before.
More steps click spoiler tag "Read More / Keep Reading" below
File > Import > Sims 3 Object Import v 1.01 by Wesley Howe

Locate the s3asc file, then the original chopsticks mesh appears.
Click the "Joints" tab. It has 4 codes. Check box "Draw vertices with bone colors" It will show Bone Assignment colors on the original mesh. Yellow on top chopstick and light blue on bottom chopstick. The colours are to make the object has rig and movement following the Sim's interaction.

Take a look at the 4 codes on Joints Tab. You can play around to see which colour of the code will appear, after that copy paste the code to Notepad to make it easier to comprehend.
Click Select from Tools menu, Select Options: Face. On "Right/Left/Top/Bottom 2D View", Left-click make selection of one part of chopsticks. While the part of object being selected (Red), click Joints then Choose "Assign".
0x96239247 --> Yellow 0xFEAE6981 --> Purple 0xCD68F001 --> Light Blue 0xD0DECA8E --> Red
Your edited mesh must have the exact same Bone Assignment colour later. Check again if the code and colour are correct.

You can save object mesh as .obj to other 3D software such as Blender or any other 3D software.
✳️ Step 4. Create Your Custom Mesh
Use the original .obj as base model. While you can create longer mesh or any edited version as you wish.
Make sure the scale and position of the edited mesh is same as base original mesh, because the edited mesh will be used on Sim's hand.

If you are done editing the mesh, export the UVmap.
You can export the uvmap in higher resolution, as long as it is Power of 2. 64x64, 128x128, 256x256, 512x512, 1024x1024, 2048x2048, 4096x4096. I export in 1024x1024 pixels to make the size of texture larger and have more details.
Then export the mesh object in .obj format.
✳️ Step 5. Bone Assignment & Create Group
Open Milkshape. Import the original mesh.
Check the Groups Tab. Original mesh has 1 group, "group 00". Group 00 means it is the main mesh. There is no shadow beneath the object.

Import the edited mesh as .obj file.

My edited mesh has one single name "default" name on the Group Tab. While edited mesh may have a lot of file name scattered on Group Tab. Regroup the file name to simplify your edited mesh into one single name. Select > Regroup.
The main task is replacing the EA's original mesh with your edited mesh.
Before you delete anything, you must do Bone Assignment first to the edited mesh you created.
Your edited mesh does not have Bone Assignment, so it appears white.
Remember the 4 codes you copied earlier in Notepad.

Copy Bone Assignment from original mesh to your edited mesh.
This case, your want to Bone Assign Yellow colour.
Select > Face to select one part of chopsticks of your edited mesh. On Joints Tab, double click the appropriate code 0x96239247 in blue highlight then the code box on the right side of "Rename" will appear 0x96239247. Make sure the code is correct. Then you can click "Assign".

Your edited mesh will appear in Yellow colour. Then do the same for another part of chopsticks.
Select another part of chopsticks of your edited mesh. On Joints Tab, double click the appropriate code 0xCD68F001 in blue highlight then the code box on the right side of "Rename" will appear 0xCD68F001. Click "Assign".

Your edited mesh will appear in Light Blue colour.
Then what's the other code for? With colour purple and red?
Leave them. Let the codes have the same exact codes as appear in original mesh and let the colours only assigned Yellow and Light Blue. The colours are to determine rig for interaction in-game, which only use Yellow as upper part of chopstick and Light Blue as bottom part of chopstick.
You can safely delete the original mesh with name group00 until it remains your only your edited mesh.

Rename your edited mesh to group00. Type group00 on the box then click "Rename" on the left side.

Export to TSRW Object in .wso format. .wso is format with bone assignment on object attached.

Save your .wso in your project folder.
✳️ Step 6. Create custom Texture
Import original texture you exported from s3pe to your editing image software.
Look at the original texture made by EA. 32x64 pixels. It is very low resolution, blurry and stretched, because the texture should be compressed as low as possible by game designer. As player you want it has higher detail to look realistic as possible and your PC of course can handle high resolution content, sure you can make the resolution much higher than EA's.

Import the UVMap you saved from 3D software. For example, UVmap I imported has 1024x1024 resolution. Add your custom texture. Then save it to .dds format in the same name as original texture. Save in separate folder, name it "Edited Texture" to keep it separated from original texture.
✳️ Step 7. Import the .wso of Edited Mesh on TSR Workshop & Export the package
Open your TSR Workshop.
Create New Project > New Import >Next...

Then Browse original mesh by EA in package format in your project folder.
On Open file box, you cannot see .package file because the filter is .wrk (TSR Workshop Project). Choose the .package dropdown.

Then you can see .package file.
Open the .package. After the file is located, then Next. On Project Details I usually skip without giving name of Project Name and Title. Next.
You must have seen green land with white blank sky.
Where's the mesh? It is actually there... just being zoomed in too close. You need to zoom out by scrolling down mouse.
You can see the original chopsticks mesh by EA. You can save the project file in .wrk format. After you save the file, import the .wso of your edited mesh. Mesh tab > High Level detail. Click green arrow folder icon to import. Then your edited mesh will appear replacing the original EA mesh.

As you see, the texture is messed up because the texture is still using original EA's texture. But then you check Textures tab and it has blank dropdown...
I cannot change the texture on this TSR Workshop!
Don't worry, we can replace the texture on s3pe later.
No need to change anything other than importing mesh. Click Edit > Project Contents to save as package.
You will see pop up box with number or files DDS, FTPT, LITE, MODL, OBJD, OBJK, etc. Export > To. package. Give name such as "EditedChopsticks_TSRW"

✳️ Step 8. Export MODL file from Package saved from TSR Workshop
Open S3PE, File > Open package "EditedChopticks_TSRW" that you saved from TSR Workshop.
Export MODL. Right-Click, export. It gives you file name with [StringOfNumber] .model .
Save it on project folder. Keep it organized and separated from original MODL. Name the folder "Edited MODL". Do not rename the file.
✳️ Step 9. Finalizing in s3pe & Replacing the Original file with Edited File & Correcting the Code As Same As Default Code
Open s3pe, File > Open original package that you cloned from s3oc. [CreatorName]_ObjectName_Number
Find the MODL. Right-Click > Replace...
Locate to your edited MODL with filename .model .
Then click Open.
The original MODL of the package should be replaced with your edited mesh.
Do the same for the texture.
Locate to your edited texture with filename .dds
Then click Open.
The original texture of the package should be replaced with your edited texture.
Take a look at MODL's Type, Group, Instance. It has the same code as original MODL in the original package cloned with s3oc (because it has been replaced)
Don't forget to see the code inside TGI Block List Editor.
Repeat step 2 how to check the code. Right-Click on MODL/IMG > Details... and click GRID > Resources > TGI Block List Editor.
The Type, Group, Instance of the _IMG are different compared from IMG from original package clone, which means that is the evidence of edited mesh replaced the original.
Rename the Instance with default/original Instance you copied on notepad from Step 2. Type, Group, Instance should be the same as default/original Type, Group, Instance.

Open notepad with resource code you copied from Step 2. Make sure the Type, Group, and Instance are all the same.
If the codes are the same, then your edited mesh and texture will overwrite the default mesh and texture with the same code in the game. Save, Commit, Save the package.
Check again if the texture is replaced properly. Right-Click on _IMG > ViewDDS.
ALTERNATIVES!
Yes, you can delete unwanted files in your edited package, to keep the package clean. Simply Right-Click>Deleted.
The only files needed in package are: MODL, _IMG, _KEY
They are the only files with your edited mesh/texture including codes to overwrite the default codes.
You can Start new fresh blank s3pe. Right-Click>Import from file...
Locate your edited MODL and _IMG (texture) file.
On Resource Details box, tick mark "Use resource name" > OK.
Make sure all the Type, Group, and Instance of MODL and _IMG including in the TGI Block List Editor are all the same as the code in original package.

Save the package.
✳️ Step 10. Test the CC in your game.
Put the package to your CC folder in your The Sims 3 document folder to see if the CC is working or not.
If the CC is working as your intended, with your custom mesh and texture, then test the animation. Are the chopsticks animation working as the same as original EA's? If the animation are working well too, then congratulations!
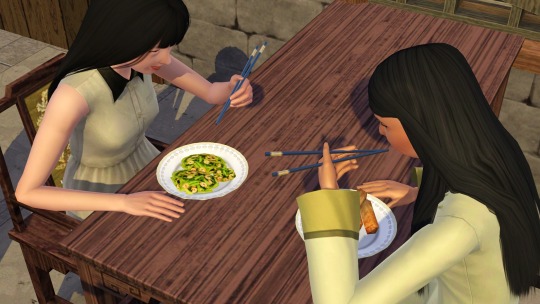
Your default replacement are working. Give applause to yourself. 👏
-------------------------------------
QUESTIONS!
Q:
Can I use this tutorial for making default replacement for buy/build object?
A: This tutorial covers basic method of using TSR Workshop and replacing the default codes (Type, Group, Instance), so you will understand the basic principle of doing default replacement mod.
Keep in mind that different object has different case. Buy / build object has MLOD (not just MODL) more than one, texture images more than one, has presets, and CAStable colour channels.
The TGI Block List Editor for buy/build object has a lot of codes, so have to spend a lot of time to do trial-and-error to make the default replacement working properly, because a lot of times the texture doesn't work (still using default EA's texture), or when the object appears right with your edited mesh and texture, after you choose the presets, the object reverts back to your edited mesh with default EA's texture.
Q:
Help! The texture is black! / still using same EA's texture when tested in the game!
A: The texture codes must be not the same. Check the Type, Group, Instance of _IMG. Do the codes are the same like codes in original package? Check the TGI Block List Editor for MODL, is the _IMG inside has the same Type, Group, Instance as in original package.
Q:
Help! The object disappears when tested in the game!
A: You must be replacing OBJD in your package. Do not replace OBJD. Just MODL and texture only.
#tutorial#the sims 3#the sims 3 tutorial#thebleedingwoodland#the sims 3 default replacement mod#modding#s3pe#s30c#TSR Workshop
98 notes
·
View notes
Text
[morallee] Cherri Bomb Star Shaped Cyclops Glass...es? (Hazbin Hotel x The Sims 4 Series)

specifically made to be used with the cyclops eye preset by @ssspringroll !! i haven't tested them on two-eyed-sims lol but they should work anyway, even tho they'll look very funny
also it should say lods on the preview but im blind and mistyped it as loss lol
- new mesh - glasses category - 20 swatches with different frame and glass colours - custom thumbnail - all tags, all LODs, all maps - disabled for random
apps used ;; photoshop, substance painter, blender, sims 4 studio do not re-upload, but feel free to make recolors if there’s any issues i beg you message me and i’ll fix them asap tag me if you use my CC, I’ll be glad to see your creations!
DOWNLOAD Patreon (free) | SFS
#the sims#the sims 4#ts4#the sims 4 cc#the sims 4 custom content#the sims cc#ts4 cas#ts4 cc#ts4 custom content#ts4cc#hazbin hotel#hazbin#the sims 4 hazbin hotel#sims4cc#s4 cc#ts4 cc download#the sims 4 hazbin hotel cc#hazbin hotel cherri bomb#hazbin cherri bomb#s4 custom content
40 notes
·
View notes
Text
Krita tutorial the way I know it.
Basics: What is where.
Gimmicks.
Specific advice on specific tools.
Basics: What is where.

Upon opening the program this is what you're met with. First of all, must comment: The layout is HEAVILY editable so you can just drag menus anywhere you want, even leave them floating amidst the sheet you're drawing on.
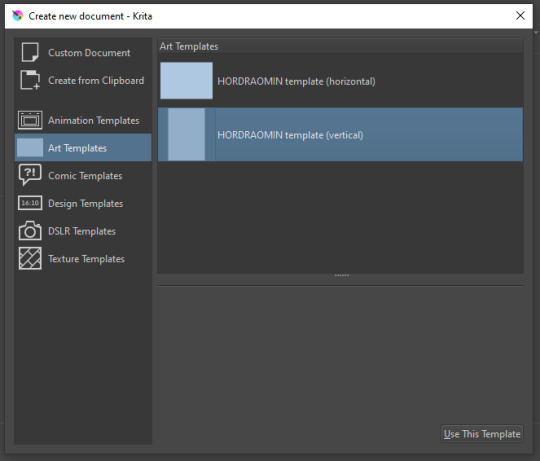
You can create custom art templates, I have two o'mine here as both have my signature background color.
As well, you can edit the custom document settings, as in what size you want it, what resolution, even the initial content of the image. As well you can create from clipboard: Just copy some image from your browser and Krita will recognize it (useful for making meme edits lol).
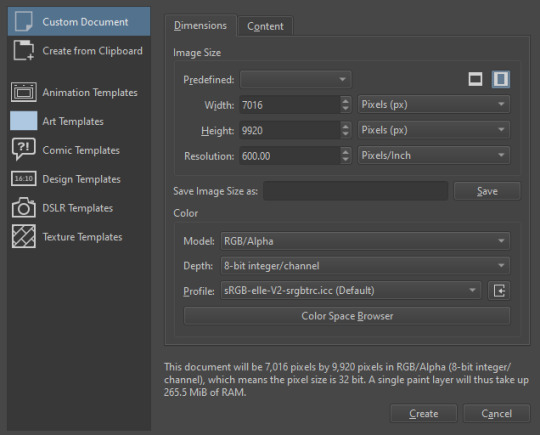

Now, once you have your file, I will show you what is where.
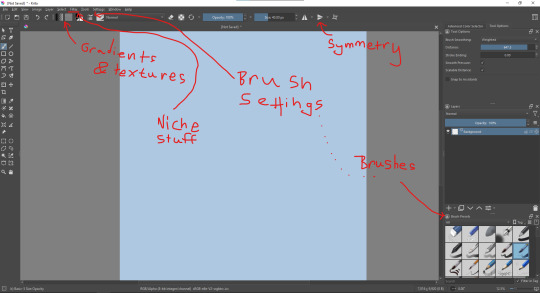
Brushes:
Brushes are easy to edit and there are tons of free bundles to download online. I myself only got one bundle, Jackpack (bit hard to find now due to original source being lost, it is still available but bit tricky to come by).
There. Are. Tons.

Some of these are my custom brushes for calligraphy in neography, you might even guess which ones. You can edit existing brushes, make new ones from the ones you've edited without changing the original, and all sorts of stuff (more below in the third chapter).
There are numerous packages of brushes once you enter Krita, but only one/two are available when you first open it. To unlock them all, click here:
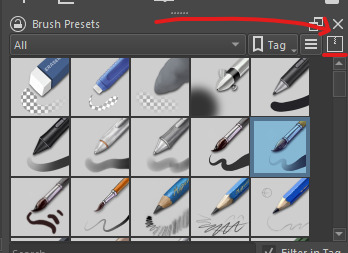
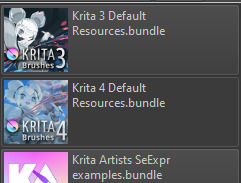
And make sure all bundles are dark gray in color (example of both dark and light below).
Now Tools Options: those will pop up depending on what tool you're using.
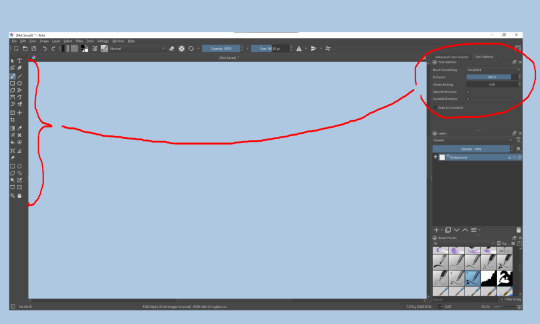
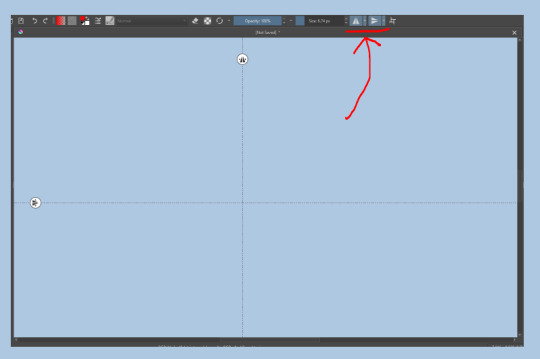
Symmetry: Fun stuff. You can drag the lines depending on how you need them and then center them back to the center of the screen if needed.
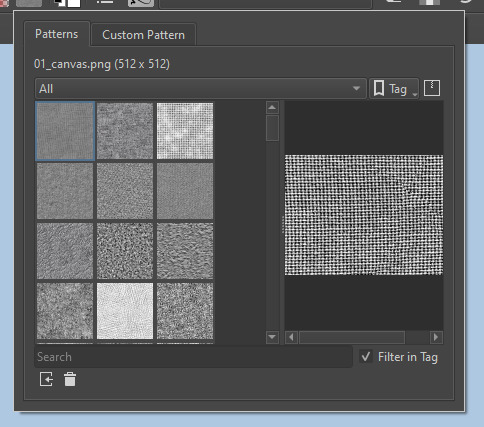
Gradients and Textures also have their tools options, you can play with those to get the feeling what they can do (more in third chapter).

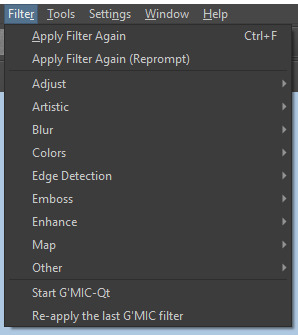
The Filters tab is useful too. Blurring, motion blurring, color mapping, artistic filters and all that: Quite fun.
Gimmicks.
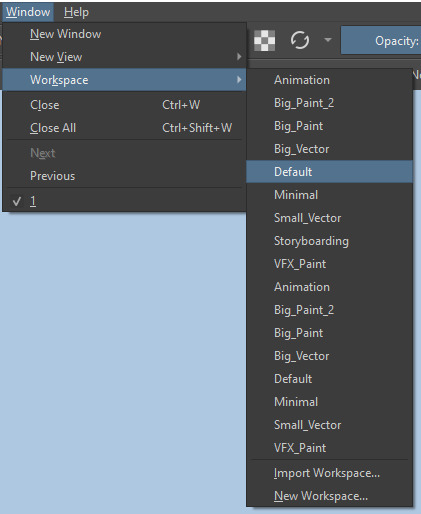
Krita allows you to customize your workspace freely. Floating menus, tabs, anything you want. It has quite many drivers at that-
To access the workspace templates, go to Window and choose Workspace.
Krita allows for copy-pasting any image onto the sheet. Though, for me it sometimes crashes if I accidentally copy-paste text into it without choosing the Text tool first.
The software allows for both raster and vector work. It is basically Photoshop sharpened to be used by artists primarily.
There are some interesting mechanics regarding the Eraser (default bind E).

You can use it with any brush, allowing for textured erasure/quick work. Good for sketching.
You can use it on gradients (given there's a transparent point on the gradient preset).
There's a Multibrush tool:

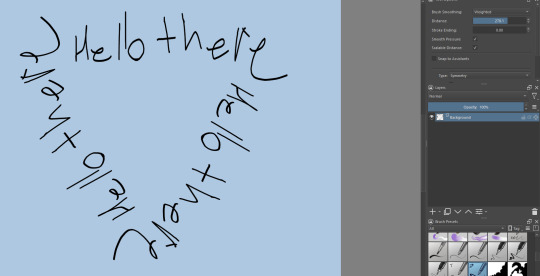
People say Krita is good for animation but my brain can't wrap around it yet honestly @~@.
The keybinds:
B - Brush tool.
E - Erase tool option.
M - Mirror (useful for checking accuracy from a new angle).
Ctrl - Color pick (when used with brush or other color-using tools).
Shift+L.Mouse+drag - Changes the size of the brush by dragging left and right.
Ctrl+E - Merge layer with the one below.
Ctrl+G - Group selected layers.
Ctrl+A - Select whole sheet.
Ctrl+Shift+A - Deselect everything.
F - Bucket tool.
G - Gradient tool.
Ctrl+S - Save document.
Ctrl+Shift+S - Save As document.
Ctrl+N - New document.
Ctrl+O - Open document (will be seen in a new tab on top of the sheet).
Ctrl+C - Copy selected layer or selection.
Ctrl+X - Cut selected layer or selection.
Ctrl+V - Paste copied/cut layer or selection.
Q - Multibrush tool.
R.Mouse - Interesting thing: Opens up a quick selector for brushes and colors you've already used in the piece.
1 - Zoom 100%.
2 - Zoom to fit the piece vertically.
3 - Zoom to fit the piece horizontally.
4, 5, 6 - Turn 15 degrees (4 and 6) or undo the turning whatsoever (5).
Ctrl+I - Negative filter applied to layer.
Ctrl+U - Color editing on the layer.
Ctrl+Y - Soft proofing mode (for color mistakes and stuff like that, mostly annoying for me tbh).
Ctrl+T - Transform selection/layer.
Ctrl+R - Square select tool.
Ctrl+J - Lasso select tool.
Honestly you can just hover your mouse over tools and see their shortcut binds, as well. Or edit them in Settings.
Specific advice on specific tools.
Brush:
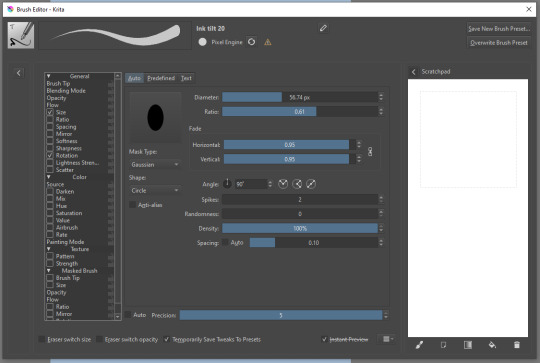
Brush editor is a great tool for making custom brushes, and it even has a sratchpad to test them out. Lots of settings, but no need to be afraid; Most of them you might never use on purpose.
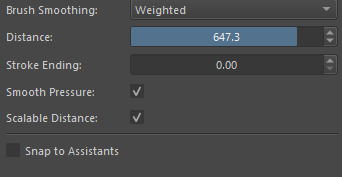
Use Brush Smoothing for great and pretty lines in lining pieces or making calligraphy.
Gradient:
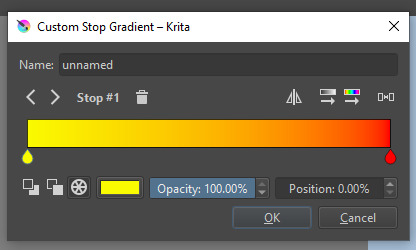
The four icons to the right top are:
Mirror gradient.
Arrange by lightness value.
Arrange by color value.
Space the stops evenly.
Click the gradient to add a new stop. The three things to the left are:
Make the stop use Primary Color.
Make the stop use Secondary Color.
Make the stop use a fixed color.
307 notes
·
View notes
Text
Frequently asked questions
Hi! I'm Ellie, I'm 25 yo Russian girl, she/her. You can find answers to the questions most frequently appearing in my inbox below, but if you still need help, have smth to ask or just want to write me smth, feel free to send me a message. ✎ RESHADE
☆ I use my own personal preset running on reshade version 3.0.8. It is based on Sumahama preset created by Wilderbees / Ichosim years ago. Even if I wanted to I can’t share the download link because the author’s blog has been deleted. ☆ I’m always using this preset, if it looks different it’s because i edited some settings but it’s still the same one. ☆ I'm not going to post my preset for download. I don't mind, it's just that uniqueness is a pretty important criterion for blogging. And I wouldn't want to lose it by sharing the settings I've been tweaking for years. ✎ GRAPHIC MODS I USE ☆ I use only one graphic mod to make my game more beautiful and atmospheric. This is the twinkle toes lighting mod by @softerhaze. You can find it here (updated for Lovestruck). ✎ EDITING SCREENSHOTS I don’t edit very extensively. Most of my editing is just reshade with some topaz clean. For some specific screenshots I like to play with lighting and coloring in Photoshop. ✎ WILL YOU UPLOAD (...) ? ☆ I am sharing all my builds that I have managed to finish. If I don't publish a lot, there is always a reason for it. ☆ For example, at one time my game crashed and everything that was in my gallery disappeared. I will never be able to share with you some of the old buildings that I posted in screenshots, because they simply do not exist, and I have no desire to rebuild them. This applies, in particular, to THAT VERY STREET about which you often write to me. ☆ Also it happens that I am not satisfied with the final result or I just do not have the strength and inspiration to finish a lot. In this case, even if I promised to publish something, I will hardly do it. I am not a robot and I have crises and different moments in my life. So just follow the updates and you will not miss the published content. ✎ TS4 GALLERY ☆ I don't post anything in the gallery. You can download all my builds only via links in the form of Tray files. ✎ TRAY FILES INSTALATION ☆ It's very simple. Close your game and download the archive from the link. Unpack it and move everything inside to your TRAY folder. As a rule, the path to it is: C:\ > Electronic Arts > The Sims 4 > Tray. Then launch the game and go to your library. The build should be there. If it's not there, you did something wrong. Feel free to ask me anything not listed here!
40 notes
·
View notes
Text
cc links <3
skin details + presets + sliders: Maxis Match CC World - S4CC Finds, FREE downloads for The Sims 4 (tumblr.com) sims, spice and everything nice — True Almond Nails by Joliebean I can’t live... (tumblr.com) Flushed Blush Conversion | Patreon Basic 10 Eye Bags Set For both gender, child to... | TAMO (tumblr.com) yaaahh!!!! (tumblr.com) FLORAL - a skin detail cc pack by peachyfaerie ✿ | Patreon lip fullness slider & msblue skintone set v3 overlay ! | Patreon Twistedcat : Comet Eyes (tumblr.com) 3D eyelashes ☆*:。Skin details | Patreon its haha funny : Skindetail Dump just some skindetails from... (tumblr.com) Ceeproductions : Snatched Edges - Part III Hey guys, I took the... (tumblr.com) Maxis Match CC World - S4CC Finds, FREE downloads for The Sims 4 (tumblr.com) Cellulite overlay | Patreon Twistedcat : Stalker Makeup set (tumblr.com) Because every time I look at photoshop I want to... - 𝕊 𝕀 𝕄 𝔸 ℕ 𝔻 𝕐 (tumblr.com) obscurus-sims.tumblr.com/post/189333461988/eyes-presets-4-11-teen-females-only the basics set ♥ | Patreon miiko : Chin slider (tumblr.com) obscurus-sims.tumblr.com/post/178609869638/dl-6-sliders-for-nose-early-access-at-patreon elle (@marsosims) (tumblr.com) Mouth Scale Slider - By Teanmoon Teen- Elder ... | ♥Teanmoon♥ (tumblr.com) velvet scout; (tumblr.com) Chih (@cheng-chih) (tumblr.com) DFJ — Lustrous Lipgloss Teen - Elder Male & Female... (tumblr.com)
clothes:
outfit one/two (before + during) - MUVASIMMER - astya96cc: moonchildlovesthenight: 🧟♀️ ... (tumblr.com) christopher067 : G L I M M E R / r i n g s Hello! Today I have... (tumblr.com) Dusk Diva Collection | Patreon EYELINER Ultimate Collection | Patreon ADA: 2019 Simblreen | Public Release This CC set... : AHarris00Britney (tumblr.com) digital explorer (tumblr.com) Gothi is Rock Collection - Piercings Set | Patreon SIMBLREEN 2019 TREATS | Patreon (1) tunayegit on Tumblr: better than mosc. boots [EnriqueS4] Valentine Set Hi guyss!! i hope you’re... — ENRIQUE (tumblr.com) aretha (tumblr.com) AxA 2020 | Public ReleaseAxA 2020 is a custom... : AHarris00Britney (tumblr.com)
outfit three - MADLEN : Hania Backpack Hania backpack is now available for... (tumblr.com) ☠️ the onyx - a small set of gothic makeup ☠️ | Patreon Rip Off Hair | Patreon Accessory Tops | WildlyMiniatureSandwich The Sims Resource - Gorgon Jeans / Christopher067 oakiyo : Evergreen Collection: Initially inspired by the... (tumblr.com) DallasGirl - EA Mosh Boots - New Mesh Hi Everyone! 😄👋 Since... (tumblr.com) simstrouble : DEIMOS by simstrouble Base Game Compatible 24... (tumblr.com) [B0T0XBRAT] Pixies | Patreon The Sims Resource - Odd Goth Socks
#maxis match cc#sims 4#sims 4 cc#sims 4 screenshots#the sims community#ts4#ts4 simblr#mods#apocalypse#post apocalyptic#zombie apocalypse
36 notes
·
View notes
Text

The Sims 4: Moonlight Chic - Blazer Crop and Ankle Pants converted to The Sims 3
Idk what i did with this preview................. thank you all for your patience! I was trying my best to get some really nice custom morphs so that the lapels wouldn't distort but I couldn't get it to work well enough without messing other important things up.
Here: a slightly oversized blazer and cropped tee! With some cropped pants!
Details:
For YA to Adult males
2048px textures for the multiplier, normals | 1024px textures for pants
recolorable, 2 channels on top: Jacket, Tee || recolorable, 1 channel for pants
8 presets for blazer | 1 preset for pants
Enabled for Everyday, Formalwear, Career, and Outerwear | Custom Thumbnails
Compressorized: 1.4 MB for top | 0.7 MB for bottoms
Polycount: 4519 (top) || 1014 (bottoms)
TOU [Emphasis on NO REUPLOADING] Feel free to edit the textures or whatever as you like.
Credit: mesh by EA, TSRW, Milkshape, Photoshop, MeshToolkit
Notes/Known Issues:
May be some clipping or gaps with certain bottoms or poses!
the textures on the jacket are ugly as hell! blame compression and my failure to get the UV map to fit a smaller texture size 😢
There is sliiiight clipping on the jacket with the pants using the fat slider at its highest. (it's in the butt area)
Download (and ❤) at Sim File Share Blazer with Cropped Tee: https://simfileshare.net/download/4065975/ Ankle Pants: https://simfileshare.net/download/4065976/
Mirror: Top // Bottom
459 notes
·
View notes
Photo
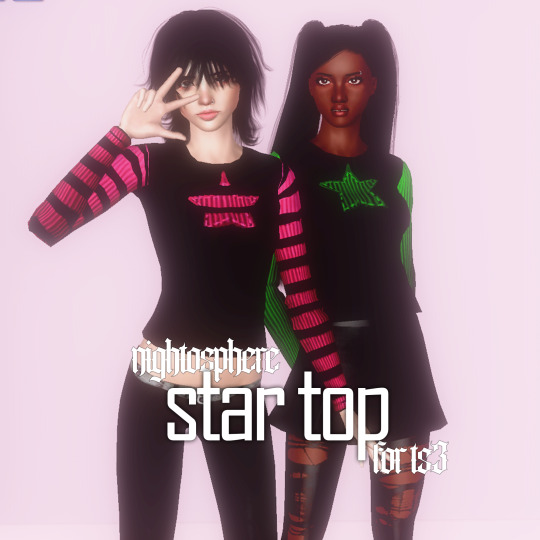
nightosphere star top (For The Sims 3)
i finally started screwing around with making my own stuff! this is just a simple crop of a parenthood pj top with my own brand new texture. used this as the inspo. lmk if there’s any issues!
STAR TOP
available for yf-af and tf
everyday athletic sleepwear career categories
valid for maternity + preg morphs (adult only)
2 presets - both fully recolorable with 2 channels
may clip with some bottoms
♡ CREDITS & TAGS ♡
EA for the mesh and textures, me for my sick photoshop skillz (jk)
@katsujiiccfinds @pis3update @sssvitlanz @emilyccfinds
♡ DOWNLOAD ♡
Adult Female: Patreon (Free) / Mediafire Teen Female: Patreon (Free) / Mediafire
♡ LINKS ♡
♡ Support Me (Ko-fi) | All Downloads | TOU ♡
#nightodl#s3#the sims 3#ts3#s3 cc#the sims 3 cc#ts3 cc#ts3 clothing#the sims 3 clothing#s3 clothing#sims 3 clothing#sims 3 tops#sims 3 alt cc#sims 3 goth cc#sims 3 y2k cc
538 notes
·
View notes
Text
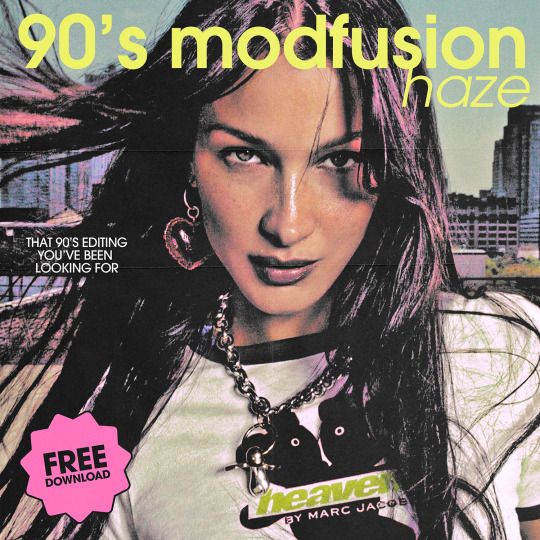
90's Modfusion Haze
FREE Photoshop Action - Available on Gumroad
A simple 5 adjustment layers editing preset condensed into a photoshop action you can download and play with (it's fully editable).

#photoshop#artists on tumblr#digitalarchive#gumroad#free assets#photoshop assets#copyscan#vintage#filipagomas
10 notes
·
View notes