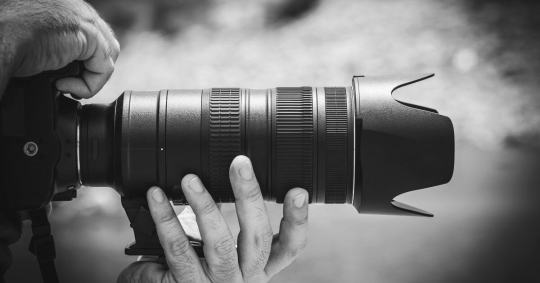
#photography tutorials and tips
Explore tagged Tumblr posts
Visit Tumblr Blog
Explore Tumblr blogs with no restrictions, modern design and the best experience.
Last Seen Tumblr Blogs


Fun Fact
Tumblr Inc. has $15.1M in annual revenue.
Text
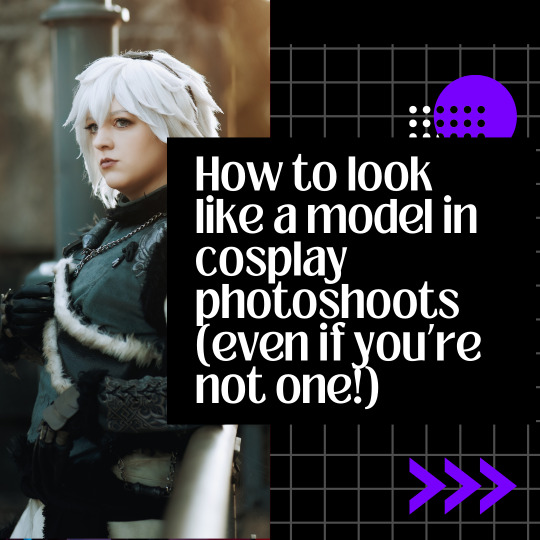
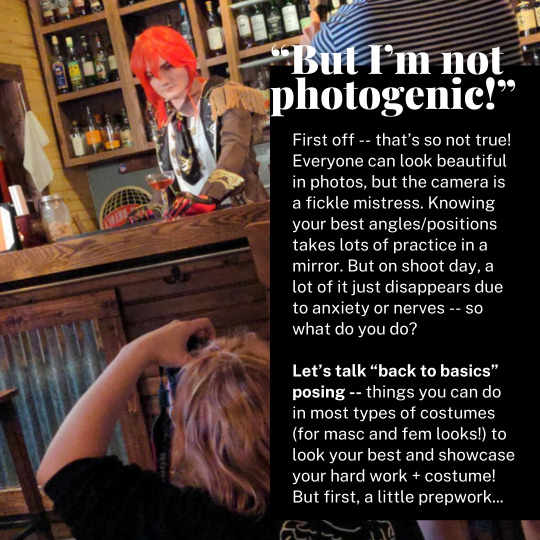
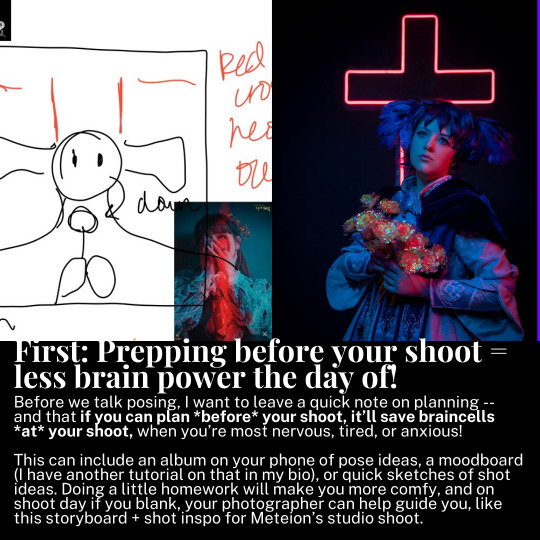
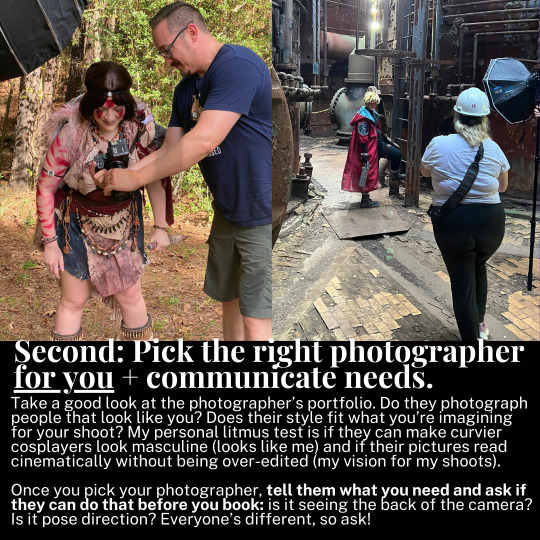


A cosplay tutorial on how to pose for photoshoots, no matter what you look like and what you're wearing -- with example shots to help guide you along.
309 notes
·
View notes
Text
Finding Cosplay Photoshoot Locations: Part 1
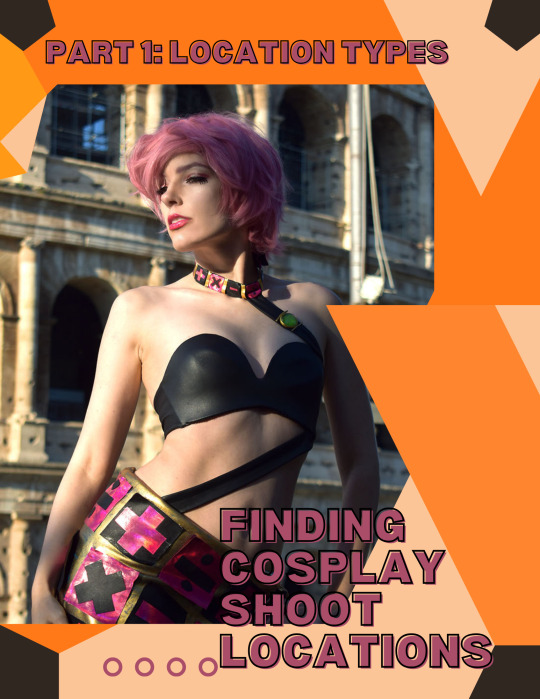


📸Want to do cosplay photoshoots but don't know how to find that perfect place to shoot? This tutorial covers how to brainstorm a location for your shoot, logistical and cost concerns with shoot locations, and how to actually find your dream location.
📸This tutorial can be applied to shoots of all types, including but not limited to self shoots, shoots with friends, and shoots with hired photographers. Self shooting or shooting with friends only requires a camera (a phone works!) and possibly a tripod.
Part 1: Location Types
Coming up with the general type of location you want requires some brainstorming about what you want from the shoot. Think about your specific goals and types of photos you want and how certain types of locations would work for your goal. Remember you can always do multiple shoots for the same costume with different concepts!
For example, if you want big, sweeping shots, you will need a location that allows for wider framing and still looks good, while if you are primarily after shots with closer framing, you can go with a location with only a small usable portion. If you are looking to primarily showcase the costume itself or your posing, a flatter and simpler background works better than a busy background, but if you want cinematic shots or shots where you are existing in the environment as the character, somewhere that can show off the location itself as well as how you exist in it would work better.
Types of Locations
There are three main types of locations for cosplay shoots in relation to the cosplay itself. Of course, you can combine these types and there is a lot of overlap, but thinking of these three location types will help you conceptualize your shoot.
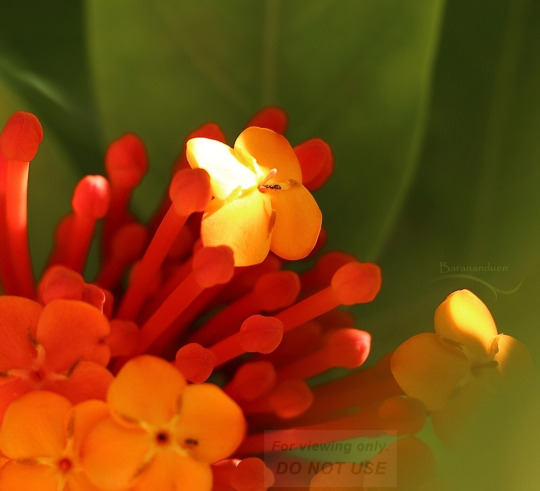
The first type is locations that are similar to something in the series, or an exact location from the series. My cover image is an example of this, where I took photos at the location of the climactic battle of the manga. Most fictional locations don't exist in real life so exactly, however, so think of locations that look similar to where this character might be found. The example on this slide shows a cosplay at a nature preserve with grassy fields and oak trees, which is similar to the locations the character traverses several times throughout the game she is from. This category can also include locations with similar vibes, such as a studio made up to look like a fancy European castle for a character from a series about European royalty, or a shoji screen backdrop for a character who lives in a Japanese-style house.
The second location type is locations with symbolic meaning. These locations showcase something about the themes or character arcs present in the series, and this can be accomplished with anything from specific props and setpieces to the entire background. One shoot I'd love to do with this concept is of Lady Blackpearl staring into a mirror -- this would symbolize her dual personality nature -- or of Lady Oscar wrapped in thorns, with the rose thorns symbolizing her glorious but fragile life. I chose to represent this location type with Ultimecia, a sorceress who wants to compress time so she is the only one who can live in the combined past/present/future, set among ruins. The ruins aren't accurate to the game, but show her crumbling reign marked by the passage of time.
The third location type is locations chosen for pure aesthetics. Obviously all locations are chosen for aesthetics, but these are locations with no deeper meaning and may not represent anything from the series at all. These can range from a simple colored wall backdrop to a sweeping landscape that simply looks good with the colors of the costume. Some examples are the Yasuho Hirose ocean shoot on the slide, where it doesn't represent a particular scene or location in the series but simply looks good with the cut and colors of the costume and the sailor theming, or my Princess White Rose milk bath photoshoot, where again the character never takes a milk bath, but a bathtub full of milk and roses shows off the detail of her floral hat and showcases the opulent nature of a rose-themed princess.
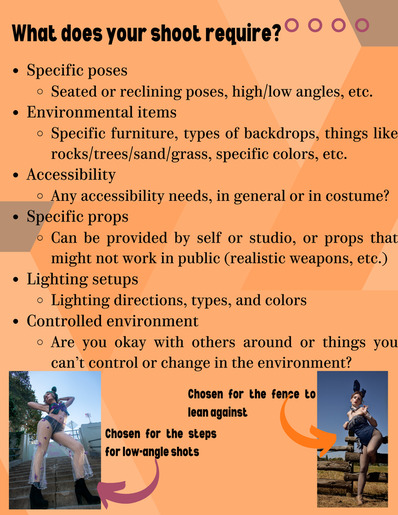
Requirements of your Shoot
Once you have a general concept, think of what is required to fit that concept. This can be as general as specific backgrounds or types of backgrounds to as specific as particular items at the location or particular lighting setups. Some shoots might need specific props, such as furniture to sit or lounge on, and props that won't work in a public location, such as realistic weapons that may cause panic or worse. Also keep in mind any accessibility needs, whether it is an accessible location in general to accommodate a disability or a need that is caused by the costume itself. Check not just the specific area you want to shoot, but how to get there from the parking lot or transit stop. Finally, keep in mind that unsecured outdoor locations, such as a park or beach, are locations where you can't change things about the location and you may encounter other people. Discussion of how to be respectful of such locations is in part 5.
Stay tuned for the rest of the parts~!
Links to other parts: 1 Location Types, 2 Discovering Locations, 3 Indoor vs Outdoor Locations, 4 Location Permissions, 5 Location Logistics
134 notes
·
View notes
Text
How to take good pictures of your figurines
Some friends have been sharing their painted fig and were disappointed at the quality of the photo. If you too have wanted to show your super cool figs, only to end up with something unflattering that doesn't do justice to your work, I made this short guide for you!

I will explain the first 3 basic lights to improve the picture of this poor Nanachi and show their colors and volume as best as possible.
note: all the pictures are taken with my smartphone and have not been retouched digitally. This guide is for a scrappy, low budget, low effort studio photos that still improves massively the quality of pictures.
(putting a read more for the very tall pictures)
"What is a good lighting?" is a question best spoken in hushed tones around passionate photographers, lest you unleash The Infodump or, if there's more than one, The Debate. It is a vast and complex subject, where the change in softness or temperature of a single light can change the whole mood and intention of a portrait.
Here we're gonna keep it simple: a good light is going to be one that shows the volumes of your figurine.
To achieve that I made a small studio with a 3 point light system using 2 bedtime reading lights I got from amazon, an old torchlight, and my phone. I did that on my kitchen table, I would recommend to Not have this reflective surface as a support, but I did it in like 20min and forgot to put a sheet of paper under Nanachi.

Those reading light are nice to read in the dark, but they're also Awesome to take pictures of figs!! They are wide, which create a soft light, and you can chose between 3 temperatures (cold, warm, and daylight), and 4 levels of intensity. and they come with their own support and movable arm, they're just perfect for this. Though if you don't have that, I will explain what each does so you can reproduce the effect with what you have.
The volume of an object is best shown (in a flat picture) by the reflections of light. The first light we're going to use (labeled 1 in the setup) here is the Key Light. It is going to be the main illumination of the subject, the one that creates the shadows and shows the volume of the fig:

The Key Light works best when reproducing the sun. That means: a rather soft and warm light, put higher than the model and, very importantly, at an angle with the camera.
Avoid at all cost to have your light and camera in the same alignment! it will hide all the shadows and make the model look flat! that's also why you shouldn't use the flash from your camera, it's super strong, super cold, very sharp, and directly aligned with the camera. It's makes whole people look like cardboard cutout.
with a key light put to the side, you can already have cool pictures. Now to make it better, you can add a Fill Light. The Fill light is here to fill in the shadows. It's a much weaker light, preferably of another color, that comes opposite to the Key Light, often coming from lower than too. It's the one labeled 2 in the setup.

Here is the fill light only. It's a warm, soft light. So soft that my smartphone had a hard time taking the picture and started to auto-correct the color. Here's what it look like with the Key and Fill lights together:

Looking nice! I put the fill light at 2 of intensity, but you can make it even softer by putting the light further away. As you can see, it doesn't overpower the Key Light, we can still see the shadows and understand the volumes, but we can see better what's going on in the shadows.
In outside photography, by daylight, the fill light is mostly provided by the blue sky, that's why we tend to paint shadows in cooler colors than highlights.
Let's finish with the third light, the Rim Light. This one is completely optional, but if you can have it it makes a very neat effect. The Rim light is positioned behind the subject, at a slight angle, just out of the camera field. It's strong, sharp, usually white but you can go crazy on the colors with this one, and it serves to outline the silhouette of the subject:

The Rim Light alone can make such a dramatic effect! It's great to detach people from the background, so it's often used in movies.
Here's what it look like with Key and Rim:

and here's with only the fill and rim:

As you can see, if you only have 2 sources of light, using on as the Rim can give a striking effect. Opting for no key light, only the fill and rim, is a bold choice that will show less of you handiwork on the figurine, but can make a very very cool ambiance. Especially with the fill coming from below, it create a menacing look that would fit some cool monsters.
Finally, when you combine the three, you get this:

If you have the option, don't hesitate to change the colors of your lights too! I made a test with a warm key and a cold fill (same rim):

It's less classic and will show your painting less, but it makes a cool dual tone light.
So yeah, That's how I do! The reading lights were 15 bucks on amazon, and are very serviceable for studio photo of figurines! I hope this post can help you show how cool your work is without losing in quality at the photo step. Don't hesitate to mix things up and experiment, you can make some very very cool pictures with a very very low budget!
Thank you to my loyal assistant Nanachi for this small photoshoot.
If it helps and you have a the means to, please consider supporting me on liberapay: https://liberapay.com/Tootkin/ , it would mean the world to me!
#photography#rambling goblin#3 point lighting#tutorial#kinda?#tips and tricks#mini#miniature#warhammer 40k#warhammer fantasy#miniature painting#hero forge
11 notes
·
View notes
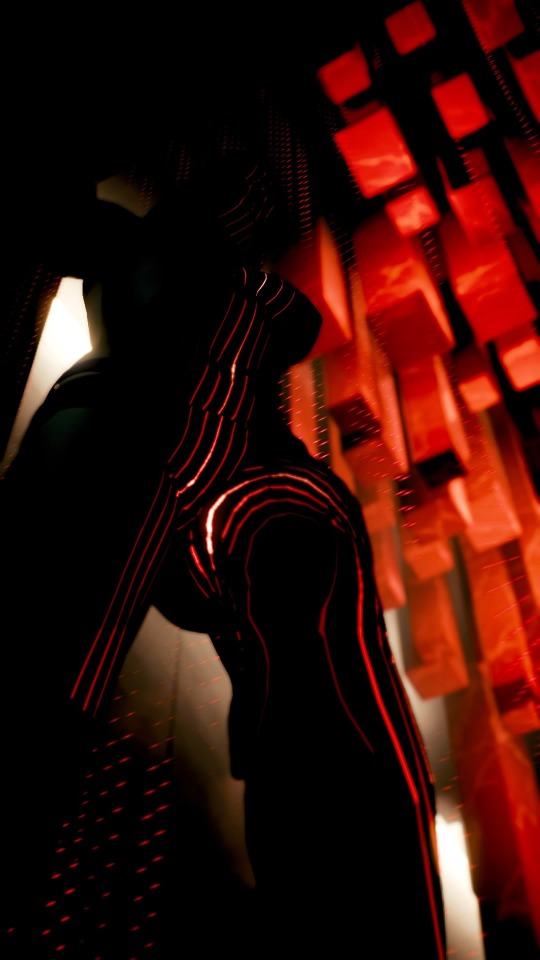
Text
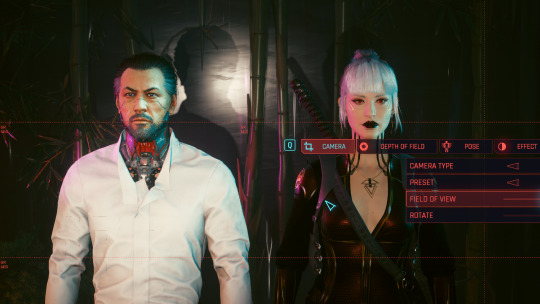
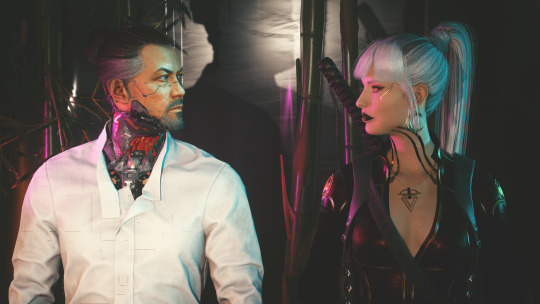
^ the process
v the result
#when i say i'm in there sideways & half-blind I MEAN IT#oc: venus#cyberpunk 2077#photomode#virtual photography#console shots#ps4#video game art#my v#oc#nomad v#tips tricks & tutorials
30 notes
·
View notes
Text
Art Advice: Composition pt. 1 - Leading Lines and Focal Points
Composition is a vast topic that would take a long time to talk about in full, so I'm breaking it down into parts of more manageable size. This article is for people who draw/paint and for photographers.
In this issue, we will talk about guiding the viewers' eyes using: I. Leading lines II. Focal points
Every artpiece (drawing/painting or photograph) has visual pathways that guide the viewer's eye from one point to another in the piece, whether you intended to include them or not. It's important to be aware of them and learn how to use them to your advantage.
I. LEADING LINES
One way to guide the viewer's attention through a piece is by using explicit and implicit lines. An imbalance in these can cause your drawing to appear lopsided. (Imbalance, however, can also be used to your advantage; we'll talk about that later in this article.)
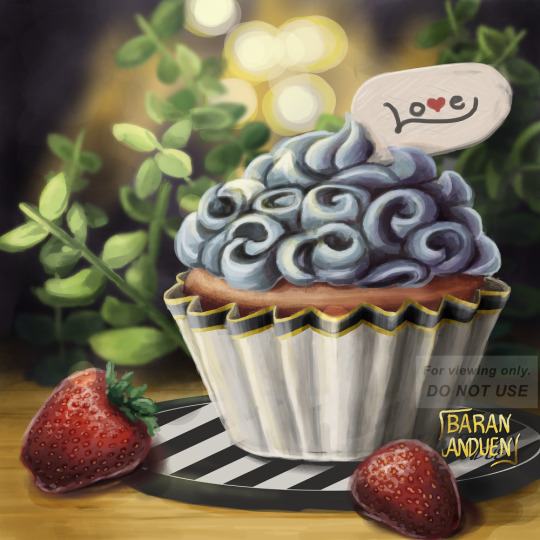
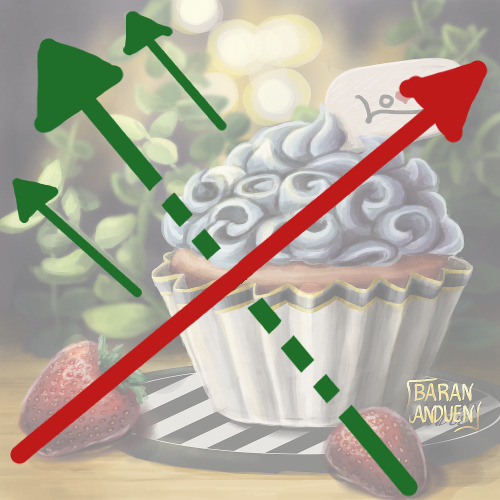
"Cupcake Love" [link]
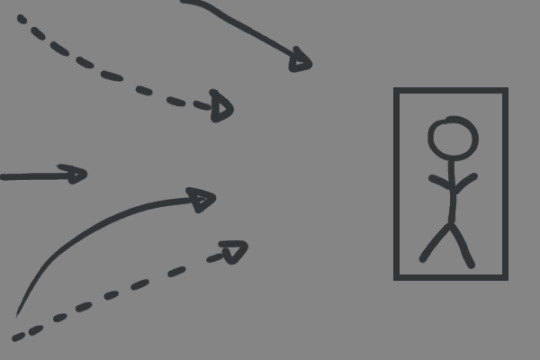
Explicit lines are easier to identify: they're actual lines in your drawing. Here, we have three explicit sets of lines:
The sprigs of greenery: the two main ones are shown by the solid green lines on the diagram on the right. Here, they have a top left ↔ bottom right motion;
The black and white lines on the coaster, running in the opposite direction; and
The creases on the cupcake paper, fanning out from bottom to top.
Implicit lines are harder to spot, but your subconscious does catch them, so it's important to train yourself to see them. Here, there is an implicit line, marked on the diagram by the red arrow, that goes from the strawberry on the bottom left (notice its alignment) to the "Love" sign on top of the cupcake (notice that the "L" also forms an arrow that points back to the strawberry).
There is also another implicit line (shown by the dotted green arrow) going from the strawberry on the bottom right and connecting with the explicit lines formed by the sprigs on the top left.
🌱Tip! For people drawing: While training yourself to see implicit lines, a good way to spot them more easily is to flip your canvas. When working traditionally, you can use a mirror or take a photo of your work (make sure you paper is straight/not bent, and that your camera or mirror is perpendicular to your paper). You may not notice where the implicit lines are, at first, but you're more likely to spot a skew/slant this way.
The "red" and "green" lines here are perpendicular to each other, giving the painting a balanced appearance, despite the cupcake being off-center. You may have noticed that, if we were to remove the "Love" sign, we would still have more bottom left ↔ top right lines, from the sprigs behind the sign. So there is not just one bottom left ↔ top right line; there are more, and this also contributed to the sense of balance.
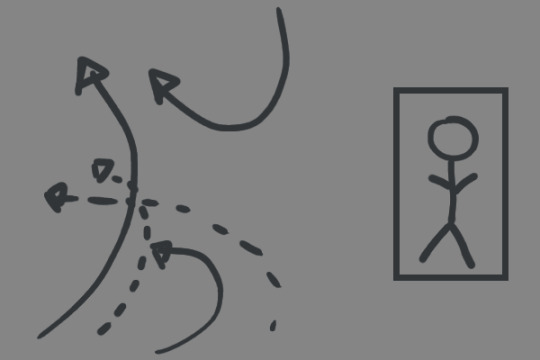
II. FOCAL POINTS
Another way to guide the viewer's eye across the canvas, or make them pay attention to a specific area, is to use focal points smartly.
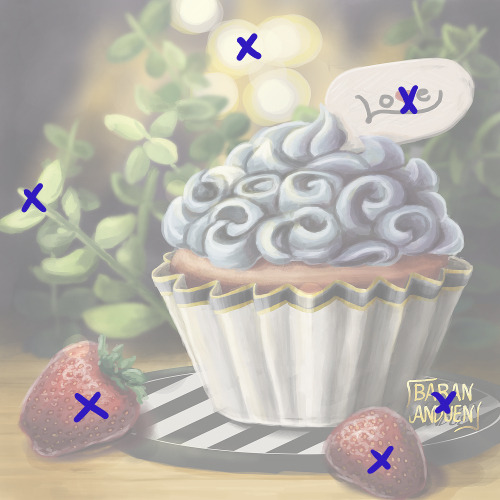
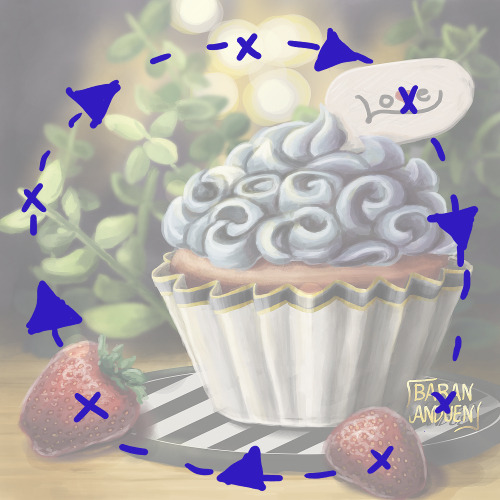
Here, I've marked with Xs the secondary focal points of the painting (the main focal point being the cupcake). These are the points on which a viewer's eye will rest (after spotting the main subject first).
Like with leading lines, you want to use these to guide the viewer's eye around your piece in the way YOU want. This visual pathway can vary from piece to piece. You can try to arrange them in such a way that you keep the viewer's eye within your drawing, as opposed to leading it off the canvas. In this painting, they form a circle, but they can have any number of shapes.
IMBALANCE CAN WORK FOR YOU...
So far, we've talked about maintaining a balanced composition and keeping the viewer's eye from wandering off the canvas, but there are situations where you may want to do the opposite, to achieve a certain effect. For example:
To create a sense of bigness of smallness, or of open spaces
To cause an uneasy feeling in the viewer
To guide the viewer's eye in a specific direction
Let's look at some examples:

from my photography account: @barananduen-photo
These two compositions have very strong bottom left → top right leading lines (explicit), and nothing bringing the viewer's eye back. The focal point(s) are also all clustered toward one end of this line (in these cases, they're in the bottom left). This is done intentionally to create a feeling of open-ness.
You could also use a group of leading lines all pointing toward one focal point off to one side, to create a feeling of both isolation and focus/stress on said figure ("all eyes on..." type of concept). On the other hand, keeping the focal figure on one side, but, instead of lines pointing toward it, using curves leading away from it, can create a feeling of exclusion or loneliness for the figure.
So, you can use imbalance in composition in different ways to convey different messages.
...OR AGAINST YOU
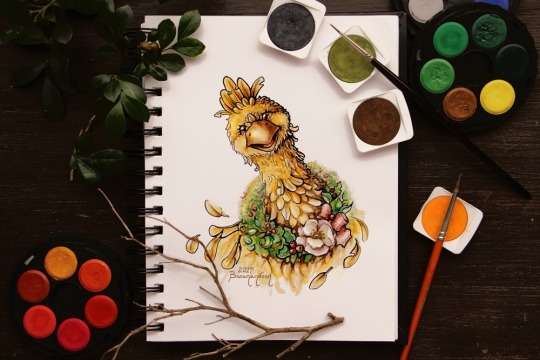
"Christmas Chocobo" [link]
This (the painting by itself), on the other hand, has pretty bad composition. I have one leading, explicit line: bottom right ↔ top left. If you take away all the stuff I placed on and around the sketchbook, that composition is not really doing anything for me. The subject is centered, and there's nothing in the spaces around it, so it's not creating a pleasant sense of open-ness. It just looks skewed. There's a weak implicit "swoop" in the feathers on the bottom right, but it's not enough. The figure balances off a little bit because it's very bottom-heavy, so the body of the bird is like a horizontal mass.
The photo as a whole is more balanced out, because there is an implicit line going from bottom left ↔ top right, from the orange/reds paint wheel, through the bird, and to the paints on the top right (and this line is top-heavy). There are also various items forming a circle around the painting. Also, the darker leaves on the top left blend more into the background, keeping the bottom right ↔ top left explicit line of the painting from extending farther (therefore not diminishing the effect of the bottom left ↔ top right implicit line mentioned before).
🌱So the important takeaway is: Learn to identify leading lines and focal points, and arrange them to suit your purpose, whether it be creating balance or breaking it, and experiment to see when breaking it is good and when it is not.
CLOSING
Composition is a very important skill for both drawing/painting and photography, but the way each of these two types of artists goes about it is usually the opposite: While, when drawing, you start with a blank canvas and fill it up, when making (I prefer this term, used in German, over the English "taking") a photograph, you usually (unless you're doing still life, etc) start with a whole scene that you have to figure out how to fit into the frame.
For this reason, I'd like to encourage both types of artists to try each other's medium as an art exercise in training your sense of composition, because changing your approach often leads to you discovering new things you can use.
For people who draw: Take your phone (or camera if you have one) and try to frame things "artistically," taking into consideration the things we've discussed in this article.
For photographers: Try making little stick-figure doodles (for drawing/painting, this is called "thumbnailing") of what you'd like a scene to look like. This is something you can use in the planning stage before a photo session, sort of like a "wishlist."
And, like I said, there are more topics in composition, but this is a good chunk to digest in one sitting, so we'll leave the other topics, including other ways to guide the viewer's eye, for future Art Advice Articles.
I hope you found this helpful, and see you next time! 💗
MORE ART ADVICE ARTICLES
You can find the index to all Art Advice Articles [here] including:
How to Deal with Art Block
How to Have a Positive Outlook
Advancing in Art: The 3 Ps
The Misconception Behind "Study Realism"
How to Develop Your Own Style (coming soon!)
How to Photograph Traditional Artwork (coming soon!)
etc.
#composition#art advice#art tips#art help#art resources#artists on tumblr#photographers on tumblr#art#photography#how to#art tutorial#photography tips
32 notes
·
View notes
Text

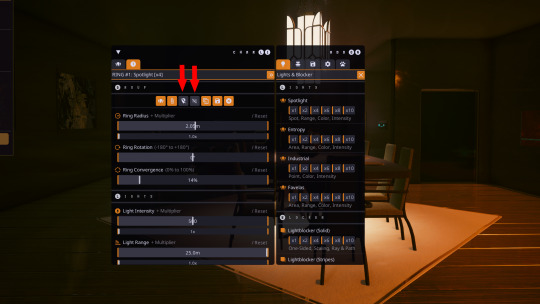
Welcome to my Little CharLI and VP spotlight tutorial I will be going over a few things I have learned since starting Virtual Photography in the hopes I can help out people unfamiliar with CharLI and want to learn how to light there model, make characters look at each other and how to use AMM to help get that perfect shot.
I'm not an expert but I have improved alot since I starting using these simple tips I will share with you.

Here is what CharLi looks like when you open it, it may seem a little overwhelming at first but once you get used to what does what, its prety simple to use
I'm going to be sharing how I use spotlights in this tutorial so don't worry about the other lights for now.
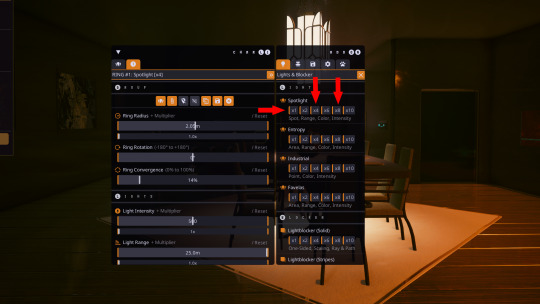
first of all I usually only use a single, or a set of 4 or 8 spotlights in my shots, you can use more of course.

this is what the spotlights look like, they are in two parts, the main spotlight mesh, this is the physical spotlight that emits the light, and the pink triangle (Pin) this gives you an indication of there height for reference, this is useful when you are getting your lights in position as you can physically see them to get them in the right spot.

Here you have your radius, this is how close the spotlights are to your model,
your rotation this does as it says and rotates your lights around your model,
your intensity is how bright your lights are. each as two sliders, the top is subtle the bottom will be more extreme.
For example with radius if I use the top slider it moves the lights further away but only a little, if I use the bottom slider it will move them even further away. be careful as you can push them so far away light no longer hits your model or they disappear through walls. so its a little trail and error.

Here you have colour, position and angle
colour - is self explanatory, you can use the red, green and blue sliders to change the colour of your lights, it can be a bit of trail and error to get the colour you want
Position - you can adjust your lights position in the X, Y and Z axis i.e to the left, right or up or down.
Angles - tilt you lights to the left, right or up or down
Ok now we know the basics of what does what.
There is more stuff you can adjust but I'm still learning so we will only be covering what I use and know which is the basics
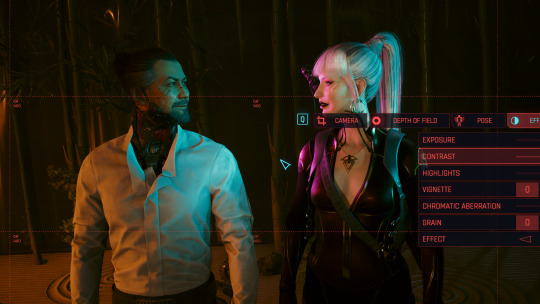
When you first spawn in spot lights, they will likely be to close to your model and the light will be a little too bright, so once you spawn them in we can make a few quick adjustment to there radius and light intensity to make that lighting a little less harsh.

See how much better this looks already? a good tip I follow is to lower your exposure in Photomode down, then bring up lights with CharLi so you have a better control of the light on your model.
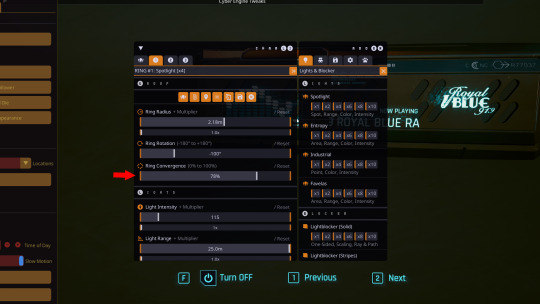
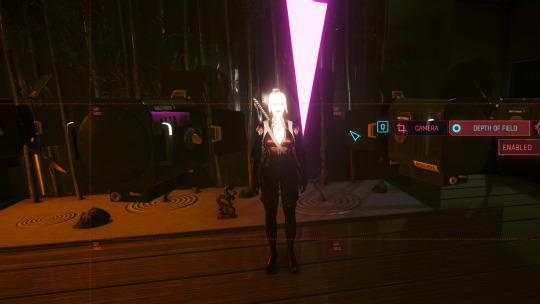
multiple spotlights spawn in a ring around your model, if you want to use different colour lights ect, I usually converge my lights so they are closer together then rotate them to one side of the model.

Once I have my coloured lights in position I duplicate them, this duplicates all settings from light intensity, radius, colour ect, then I use the rotate function to bring the duplicate lights to the other side of the model and adjust my colours.

here I have made the left lights pink and the right lights a pale blue. looks kind of cool right?
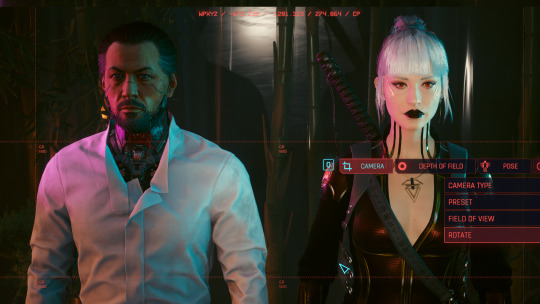
I noticed when having lights on either side, the middle of her face was not lit so I added a single spotlight in front to give her face some light. I also zoomed in using the FOV slider in Photomode. you can zoom with the scroll wheel but this can result in some distortion like making her head look bigger than her body at some angles. using the FOV slider gives you much better quality and far less distortion.
Once you are happy with your lights positions you may find the lights are in the way when trying to get your shot as at some angles the lights will be in the shot blocking your model. to solve this you can hide the mesh and pin we talked about earlier with these icons here. this will hide the lights while still lighting your model. giving you more freedom to get that perfect angle.
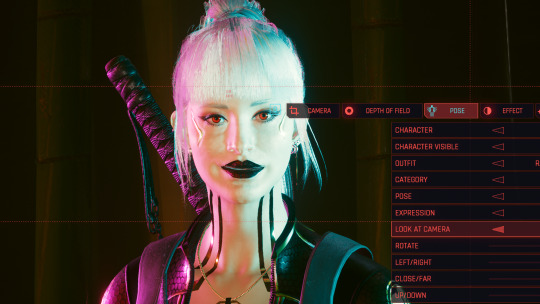
you know when you click look at camera in Photomode the body twists with the head, spoiling some poses and causing clipping ect. well with AMM you can make it so only the eyes look or only the head does.

using AMM if you head to tools, then either target your replacer or V then toggle if you want just the head to tilt to look at camera or just the eyes.


Here I have toggled just eyes so now Raven will track me with just her eyes rather than rotating her torso and head as well. if you want to swap to just the head, open AMM select just the head. then close AMM you will need to then toggle the look at camera of and on for it to change.
Another thing to bare in mind is when and if you decide to change the rotation or position of your model in Photomode. your lights will follow V so sometimes this can change your lighting. you may need to adjust rotation ect to get them back where you want them so bare that in mind if you adjust your models position after you have your lights in place.

simply use the tabs at the top to select each light and make any adjustments you need to get your lights back where you want them. un toggle hide mesh or pin if you hid them to make it easier to see where they are when making adjustments then you can re hide them when your done.

Lets say you have a replacer spawned and you want your characters to look at eachother. this can be done using the look at camera feature with a little help from AMM
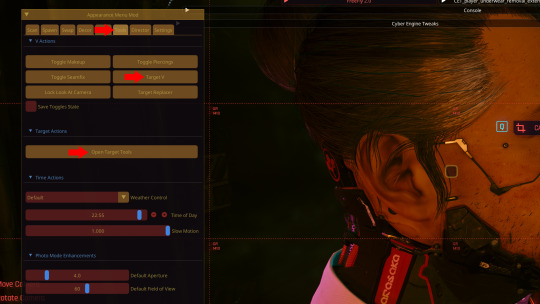
open AMM and go to tools, now depending on who you want to look at who will decide who to target. in this example I will show both. first I will target Raven (V) and select head only for look at camera. then close AMM. I will rotate the camera to the other side of my replacers head then select V and look at camera. then open AMM and target V. then open Target tools and you should have an option to freeze target.

once you freeze the target close AMM and you will see her head will stay in position and is now looking at Goro

Bare in mind once you freeze a target this way you can not unfreeze despite that being a button, If u change pose while frozen it can get pretty cursed pretty quick. its a pain in the ass. some poses you can swap to without it getting to cursed but again its trail and error. if you need to change pose ect you will have to exit Photomode and re-enter it to unfreeze it can be prety time consuming. if there is away around this I'm unaware of it currently feel free to share if you know.
Here I repeated the look at camera trick with Goro so now my models are looking at each other yay
another thing to bare in mind with CharLi is the lights focus on V so you will notice here Goro is not as well lit as Raven. Spawning more lights and adjusting there position with X, Y and Z will come in handy here. it can take some experimenting though.
Here I have added additional lights and positioned them on Goro so he now has light to.

Here we have taken a photo after doing all our adjustments to lights, there position and making our models look at each other. sometimes there will be an error where it will go darker then you want when you hit space to take your shot. I think its called auto exposure error or something basicaly its the game being poopy its annoying but sometimes unavoidable so you may need to keep adjusting your lights and taking shots until the game behaves.
One final thing I like to do when tweaking my shots in photoshop. I usually adjust exposure. offset and contrast to make the pic really pop
Here I have adjusted the offset up a little and tweaked the contrast up a little. it really softens blacks and the light and makes the pic look better in my opinion.
And there you have it. all the tips and tricks I have learned while doing Virtual Photography. I hope this helps peeps out that want to get into VP.
If you have any questions regarding anything I have said my Asks are always open. I'm happy to talk you through stuff if you need some help. I'm also willing to do screen share discord calls to help you follow along or show you in real time how to do stuff if your interested in something like that drop me a DM.

🚫 Do Not Re-Upload/Edit My Shots/Art Without My Permission🚫
�� [Pillowfort][Instagram][Tumblr][AO3][Nexus][Ko-Fi]
#cyberpunk 2077#cyberpunk 2077 photomode#virtual photography#photomode#CharLi#lighting#vp tutorial#vp resource#AMM#amm tutorial#look at camera#vp tips#tips#tricks#tutorials#dreads tips#cp77 photomode 1 o 1#in game photomode#how to use amm with vp
19 notes
·
View notes
Text
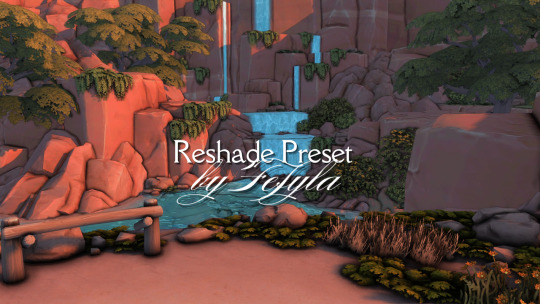
🎨 Why My Presets Are Worth the Investment 🎨
Hey everyone! 💛 I’m thrilled to see how much you love my Presets—and I’d love to share why I’ve chosen to offer them as paid creations while keeping them accessible and fair for you all.
✨ What You’re Getting:
Unique Presets, crafted to stand out from generic filters, with meticulous attention to detail.
Constant Updates, ensuring full compatibility with ReShade and GShade as they evolve.
No Subscriptions Needed: Pay once on my Patreon (for individual presets or a full bundle) and keep them forever—no hidden fees!
🔒 Why Paid? Each preset represents hours of work, testing, and fine-tuning—they’re not just “filters” but a tailored experience for your game. Sadly, renaming a file is all it takes to steal creative work… so this helps protect my effort while letting me keep improving them for you.
💡 Ready to Elevate Your Game? No forced memberships! Find all my presets in my Patreon shop, with the freedom to pick only what you love. It’s a way to support my work without waste—and for me to keep delivering quality content for you.
Huge thanks to everyone who supports and values creativity! 🚀
#The Sims 4#TS4 CC#Sims 4 Mods#ReShade TS4#GShade#PC Gaming#Life Simulation Games#Digital Art#Game Aesthetics#Visual Effects#Color Grading#Virtual Photography#Creative Coding#Tutorial#How To Sims#ReShade Guide#Tech Tutorial#Modding Tutorial#Step by Step#Aesthetic Gaming#Cozy Games#Vintage Games#Dreamy Graphics#Cyberpunk Aesthetic#Fantasy Vibes#Before & After#Satisfying Edit#You Should Know#Pro Tip#Creative Process
3 notes
·
View notes
Text
youtube
I JUST MADE NEW VIDEO PLEAS GO CHECK IT <3
#cool#photography#cosplayer#anime#art moots#cosplaying#looking for moots#cartoon#handmade#cosplay#youtube#youtube video#new video#tutorial#art tips#art tutorials#art reference#art resources#Youtube
3 notes
·
View notes
Text
My first post!
Please continue reading this post if you're self conscious in any way.
--
I'd like to start off this message to all photographers (I'll get to the rest of yah soon) that I took the photo above on accident while in a moving car and I'm not able to take photos like these intentionally, this is an example of what I'm about to talk about.
What I'm saying is.
((*Snap snap* (blue balls on the colors lol.) you're almost to the end of the post. Take some pretty colors along with funny fonts and FOCUS. you are a TUMBLE WEED... OR A TUMBLR!! FOR TUMBLR AND YOUR MENTAL HEALTH. CHAAARRGG-))
It's very common to see things online that are made by people who have been practicing for years, are skilled at Photoshop, or who are just lucky like I was with the photo ((Yes, I know. I'm amazing, feel free to comment about how cool I am 💅))... Or made by people who are pretty and good with angles, Photoshop, or makeup. But the algorithm pushes those lucky and talented people TOWARDS you. This goes for ANYTHING, even if it isn't beauty influencers or photographers. Also, sometimes seeing cool things online at such a rapid rate can lessen your view on your own creations ((Whatever they may be.))
This concludes my very healthy reminder that you and whatever you do is amazing, no matter if you're just starting out of have practiced for a long time. Now please either take a cookie or a donut. 🍩 🍪
#photography#mental health#i shit myself#art tutorial#depressing shit#mental heath awareness#insecure#beauty tips#artists on tumblr#how to lose weight#sad thoughts#sad quotes#the algorithm#lgbtqia#art
8 notes
·
View notes
Text
What Is Photography? Photography Definition, Meaning (2023)
Photography is nothing but the art of capturing light with a camera to create an ‘image’. It’s a powerful medium to showcase your memories and express your creativity, and tell your stories to the world in an art form!
The term “photography” comes from the Greek words “photos” (light) and “graphos” (to draw or write). Joseph Nicéphore Niépce is the first man who took a first photograph back in 1826. Photography has made our lives have been shaped by it ever since. We have used it to document our memories, share our experiences, and tell stories.
Generally, photography has plenty of genres like Travel, Wildlife, Fashion, Documentary photography, etc… All of them serve their own purposes!
No matter what your interests & genre are, there is a type of photography for you. So what are you waiting for…? Just be curious and start taking pictures now!
Different Types of Photography?
Portrait Photography
Headshot Photography
Fashion Photography
Editorial Photography
Food Photography
Architectural Photography
Landscape Photography
Event Photography
Street Photography
Sports Photography
Product Photography
Wildlife Photography
Read More...
#photography#what is photography#photography tips#learn photography#photography for beginners#digital photography#photography tutorial#photography (visual art form)#what is photography?#art photography#photography essay#what is photography for you?#is photography art?#photography course#beginner photography#landscape photography#photography kya hai#iso photography#star photography#film photography#what is street photography#why do photography
12 notes
·
View notes
Text
cant really way I did a good job but this is my first attempt at trying to make to photos look natural together.
youtube
I used this 10 step guide to help and it had some very helpful tips, although I did find it hard to relate to their mostly white object to my bright colour full one.
#adobe#adobe photoshop#graphic designer#photography#portfolio#poster design#digitalart#graphic art#photoshop#sketch#desert#Youtube#youtube tutorial#youtube tips
5 notes
·
View notes
Text
Finding Cosplay Photoshoot Locations Part 5: Logistics and Behavior
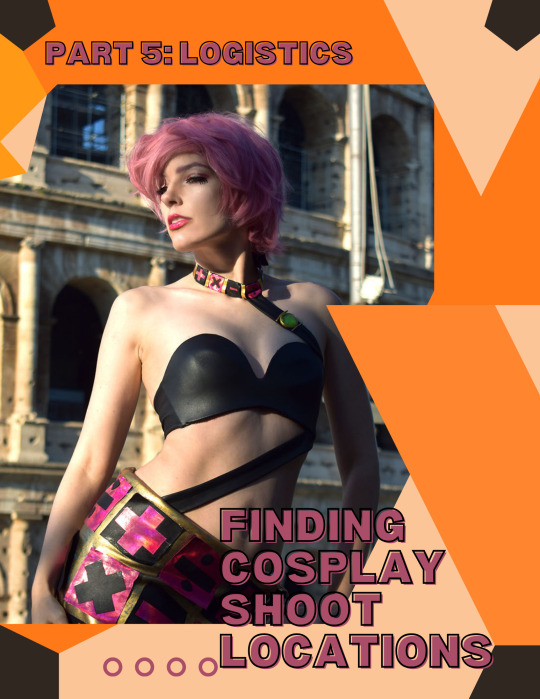


📸Discovering Cosplay Photoshoot Locations Part 5: Logistics and Behavior 📸
Final part of my tutorial on finding cosplay photoshoot locations! This portion covers how to plan for your shoot, what to bring, and how to treat the location and anyone at it with respect.
I hope you enjoyed the tutorial! I have a few more in the works, but let me know in the comments what other tutorials you'd like to see.
Cosplay is often uncomfortable and cumbersome, and needs extra care when going to a location. You also want to make sure you look the best in your photos. This means that you need to take some extra planning into consideration when planning a photoshoot.
What to Bring
I always bring a small kit with me with necessary or potentially necessary items so I can keep myself and my costume in proper shape. This kit always includes a small makeup touchup kit, which usually has the items most likely to need touching up at the location: eyelashes and lash glue (I put on the lashes once I'm at the shoot), lip products, face glue for my wig, and any cosplay-specific items like nail glue or face paint. This kit also includes wig touchup items such as a comb and bobby pins. I also recommend a small repair kit with items such as safety pins, tape, and a quick-setting glue so you can do any quick repairs on your costume.
Bring a cover-up item or change of clothes. If you are planning on anything that might be messy, especially dirty, or wet, you may need a full change of clothes (and a place to put these on), but even if not, bring a coverup item such as a skirt or robe in case your costume is on the skimpy side, or something to convert your costume into normal-ish clothes if you need to stop anywhere on the way there or back.
In addition to items for cosmetic repairs, you also will need a few safety items, especially when shooting outdoors and not in a studio space. If your costume has difficult shoes, bring a change of shoes if you need to cross difficult terrain or if the ground is especially dirty or dusty and would ruin the look of your cosplay shoes to walk through. Snacks and water are also always a good item to bring, as well as any medication or items you may need for medical conditions. If the costume is not suitable for your location's weather, you will need to bring items to mitigate the weather: a coat or jacket, handwarmers, hot or cold beverages, hand or battery operated fans, and stick-on cooling patches often sold for headaches, depending on the situation.
Planning Ahead
I always check the weather leading up to a shoot, and sometimes, you want very specific weather. In these cases, such as wanting a photoshoot in the snow or on a sunny beach when you live somewhere those conditions happen but aren't especially common, keeping a cosplay on hand to take advantage of the weather when it does happen can help you get that dream shoot.
When planning for travel to your shoot location, be sure to plan for all aspects of travel: what mode of transportation, how you will get from your main transportation to the shoot itself, and how the photographer will get there if they are not coming with you. I highly recommend driving or carpooling if at all possible, since you don't want the hassle of taking public transit in cosplay, and a car can hold more and larger items like props and wings. I also recommend putting the finishing touches on your cosplay at the location -- wigs, false eyelashes, accessories, etc. -- so you don't have to worry about these items getting damaged or being uncomfortable in transit. Also get to know the parking for your shoot ahead of time. I like SpotAngels.com for parking information, since it tells you where parking is, how long the time limits are, when no parking times such as street sweeping are, and how much the parking costs. Know the cost of parking and how far it is from the shoot location itself -- I'd personally rather pay a little more for closer parking while in cosplay, but that's up to your own comfort and ability.
Also get to know the location ahead of time. Look at user-submitted photos and street views on Google Maps and similar sites, and if possible, visit the location ahead of time. There may be hazards like uneven ground, rocks, stairs, or water that you would not otherwise be aware of. Since some costumes would be difficult at best and dangerous at worst to wear in some locations, such as very high heels when scrambling over rocks or a trailing gown with deep water or thorny underbrush, be sure to bring that change of clothes and shoes for such situations and only wear the final look at the actual place the photos are being taken.
Behavior Towards the Location
Finally, when shooting on location, treat the location itself and anyone at it with the utmost respect. With private locations, such as a rented studio, be sure to treat the property well, and with public locations, be sure to treat both the property and anyone at it well, as you won't have a private, cordoned-off area. Treat your location better than you would treat your own property. This is both for the sake of other people so you do not disturb them or force people to clean up after you, but also for your own sake so you don't get in trouble and also can continue shooting in that location. Studios and other rented locations will give you their rules on their website or when you book, and most public locations will have their rules and regulations on their website or alongside any permits you purchase. If you are in doubt about something, always email to get permission first. This will not only ensure that you actually have permission to do what it is you want, but will also put you in the good graces of whoever is in charge of the location and they will be more likely to welcome you and other cosplayers back.
Always follow the "carry in, carry out" principle. With very few exceptions for properly disposed of small trash items (think snack wrappers, not entire props), everything you bring with you into a location needs to come back out of the location with you. This is most important for outdoor locations, as anything left behind can become an ecological issue, but also in private indoor locations, especially if you are using messy substances like fake blood or confetti. Be sure to clean up any props you use and any trash you generate. If renting a location, be sure to leave extra time to strike the set at the end. This involves cleaning up and removing anything you brought in yourself as well as moving anything that belongs to the location back to its proper place. Many studios have lighting equipment, furniture, and other items you can use, but require you to leave the location how you found it and these items where they belong.
Don't make any permanent or potentially permanent changes to your location. This includes digging in outdoor locations, littering, staking items into the ground, or affixing items to walls or other environmental items such as rocks or furniture, even if you use temporary methods such as tape, as these can still damage the location. Also be careful of trespassing into areas that are closed to the public, especially in outdoor locations where these areas are typically closed due to either danger or ecological sensitivity, and stick to public pathways and roads as much as possible. Don't trample plants or pick flowers or otherwise damage the environment. Grassy fields and such are usually okay unless specifically blocked off or closed, but areas like flower fields or otherwise cultivated gardens are generally not. Also be sure to not use dangerous substances or props, especially in outdoor locations. You don't want to release dangerous chemicals in the environment or cause panic over a possible fire with smoke machines, or, worst case, actually start a fire.
Behavior Towards Others
Perhaps one of the most important things to keep in mind is to treat anyone you encounter with respect. Staying humble and being an unobtrusive as possible will go a long way. Don't take up a lot of space for a long time, especially in popular areas. This goes for blocking pathways, camping in popular features so others can't enjoy them, blocking doorways, and otherwise diminishing other people's enjoyment and also creating an accessibility hazard. Move aside if you see people coming or if you are shooting in a particular spot for an extended time, and then return to it.
Do your best to not get strangers in your photos. While most wouldn't want that anyway because it would ruin the shot, be sure you aren't shooting in a way that could accidentally get people in your photos more easily by angling yourself differently or using different lenses and depth of field, but also make sure it doesn't look like you are photographing strangers. Generally it's obvious what you are doing, especially with a photographer and not self shooting, but it's something to be aware of.
You might get questions when shooting in a public place, so do your best to answer them kindly. I often don't want to explain the whole ordeal to people, and people generally understand when you say phrases like "art project" and "fashion shoot," but if you get people asking more in-depth questions than that, answer truthfully and kindly. You don't want people who had never heard of cosplay to have their first exposure to the hobby be negative, and most people are simply curious and interested in what cool thing you are doing. Use the opportunity to share that interest! In all my time shooting in public places, I have never gotten a rude comment, but if you do, deescalate the situation as much as possible and walk away if you need to. If you are more comfortable with a friend with you to help deflect, bring one.
Finally, keep yourself safe in interacting with others. Don't brandish weapon-like props in ways that can look like an attack, and I would advise leaving anything that looks realistic for private locations where you won't be putting yourself at risk if anyone mistakes the prop for being real. Even if a prop looks like a fantasy weapon, be careful not to brandish it in a potentially threatening manner. Also, if someone in a position of authority asks you to leave for any reason, cut the shoot short and do so immediately.
Thank you for reading, and happy shooting! :]
Links to other parts: 1 Location Types, 2 Discovering Locations, 3 Indoor vs Outdoor Locations, 4 Location Permissions, 5 Location Logistics
28 notes
·
View notes
Text
Into the Wild – A Wildlife Photography Adventure at Bandipur National Park
In the heart of the jungle, patience meets magic — and with a camera in hand, every heartbeat could be the moment you’ve been waiting for! If you’ve ever dreamt of capturing the raw, unfiltered moments of nature — locking eyes with a tiger or photographing the tender bond between a mother and her young in their natural habitat — then wildlife photography is your calling. On my recent trip to…
#basics of photography#DSLR settings for wildlife#learn photography#nature photography blog#Photography#photography tutorials#photography website#wildlife photography tips
0 notes
Text
^ the process
v the shot
#i'm pretty sure my latest series of scan shots all used these same levels#just adjusting things like camera angles + poses + effects + frames etc#protip if you change the background it also changes the lighting & doesn't keep the scanlines :(#tips tricks & tutorials#oc: venus#cyberpunk 2077#photomode#virtual photography#console shots#ps4#video game art#my v#oc#nomad v
6 notes
·
View notes
Text
#photography business#photography tips#photography entrepreneur#digital photography#photography marketing#photography tutorials#creative photography#photo editing#camera gear#photography blog
0 notes
Text
🖌️ James Charles Painted Oversized Sponge Review 🖌️
youtube
#james charles#painted#overstim kink#cnc overstim#cl!t overstim#overstimulated#makeup essentials#makeup review#makeup routine#makeup trends#makeup transformation#makeup tips#makeup tutorial#makeup tumblr#makeup tools#makeup talk#makeup of tumblr#makeup of the day#makeup products#makeup photography#makeup artist#makeup and cosmetics#makeup addict#makeup application#Youtube
1 note
·
View note