#vp tips
Explore tagged Tumblr posts
Visit Tumblr Blog
Explore Tumblr blogs with no restrictions, modern design and the best experience.
Last Seen Tumblr Blogs


Fun Fact
Mobile US users spent an average of 115.8 minutes on Tumblr app monthly.
Text

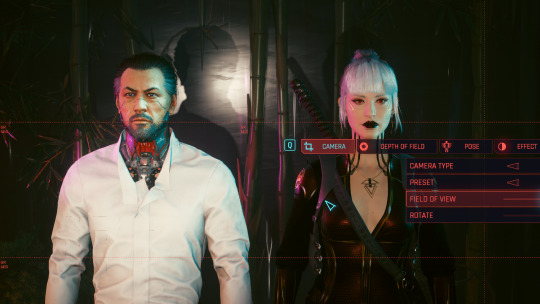
Welcome to my Little CharLI and VP spotlight tutorial I will be going over a few things I have learned since starting Virtual Photography in the hopes I can help out people unfamiliar with CharLI and want to learn how to light there model, make characters look at each other and how to use AMM to help get that perfect shot.
I'm not an expert but I have improved alot since I starting using these simple tips I will share with you.

Here is what CharLi looks like when you open it, it may seem a little overwhelming at first but once you get used to what does what, its prety simple to use
I'm going to be sharing how I use spotlights in this tutorial so don't worry about the other lights for now.
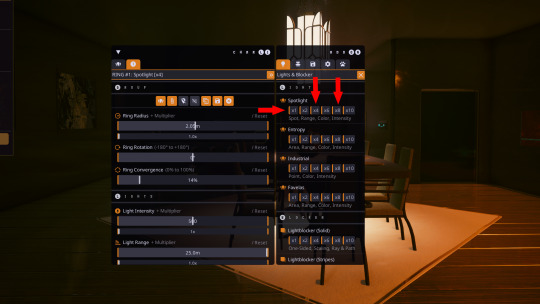
first of all I usually only use a single, or a set of 4 or 8 spotlights in my shots, you can use more of course.

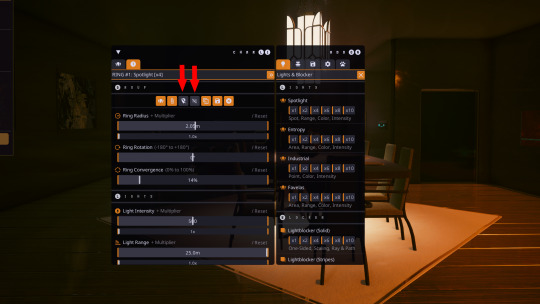
this is what the spotlights look like, they are in two parts, the main spotlight mesh, this is the physical spotlight that emits the light, and the pink triangle (Pin) this gives you an indication of there height for reference, this is useful when you are getting your lights in position as you can physically see them to get them in the right spot.

Here you have your radius, this is how close the spotlights are to your model,
your rotation this does as it says and rotates your lights around your model,
your intensity is how bright your lights are. each as two sliders, the top is subtle the bottom will be more extreme.
For example with radius if I use the top slider it moves the lights further away but only a little, if I use the bottom slider it will move them even further away. be careful as you can push them so far away light no longer hits your model or they disappear through walls. so its a little trail and error.

Here you have colour, position and angle
colour - is self explanatory, you can use the red, green and blue sliders to change the colour of your lights, it can be a bit of trail and error to get the colour you want
Position - you can adjust your lights position in the X, Y and Z axis i.e to the left, right or up or down.
Angles - tilt you lights to the left, right or up or down
Ok now we know the basics of what does what.
There is more stuff you can adjust but I'm still learning so we will only be covering what I use and know which is the basics
When you first spawn in spot lights, they will likely be to close to your model and the light will be a little too bright, so once you spawn them in we can make a few quick adjustment to there radius and light intensity to make that lighting a little less harsh.

See how much better this looks already? a good tip I follow is to lower your exposure in Photomode down, then bring up lights with CharLi so you have a better control of the light on your model.
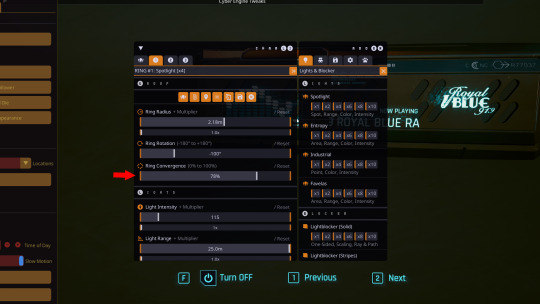
multiple spotlights spawn in a ring around your model, if you want to use different colour lights ect, I usually converge my lights so they are closer together then rotate them to one side of the model.

Once I have my coloured lights in position I duplicate them, this duplicates all settings from light intensity, radius, colour ect, then I use the rotate function to bring the duplicate lights to the other side of the model and adjust my colours.

here I have made the left lights pink and the right lights a pale blue. looks kind of cool right?
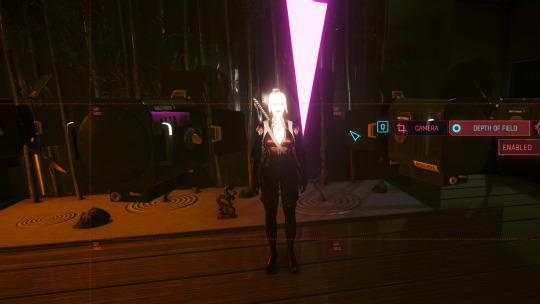
I noticed when having lights on either side, the middle of her face was not lit so I added a single spotlight in front to give her face some light. I also zoomed in using the FOV slider in Photomode. you can zoom with the scroll wheel but this can result in some distortion like making her head look bigger than her body at some angles. using the FOV slider gives you much better quality and far less distortion.
Once you are happy with your lights positions you may find the lights are in the way when trying to get your shot as at some angles the lights will be in the shot blocking your model. to solve this you can hide the mesh and pin we talked about earlier with these icons here. this will hide the lights while still lighting your model. giving you more freedom to get that perfect angle.
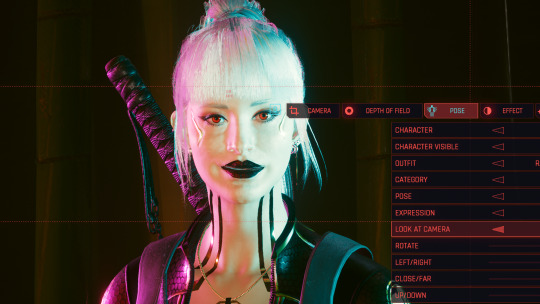
you know when you click look at camera in Photomode the body twists with the head, spoiling some poses and causing clipping ect. well with AMM you can make it so only the eyes look or only the head does.

using AMM if you head to tools, then either target your replacer or V then toggle if you want just the head to tilt to look at camera or just the eyes.


Here I have toggled just eyes so now Raven will track me with just her eyes rather than rotating her torso and head as well. if you want to swap to just the head, open AMM select just the head. then close AMM you will need to then toggle the look at camera of and on for it to change.
Another thing to bare in mind is when and if you decide to change the rotation or position of your model in Photomode. your lights will follow V so sometimes this can change your lighting. you may need to adjust rotation ect to get them back where you want them so bare that in mind if you adjust your models position after you have your lights in place.

simply use the tabs at the top to select each light and make any adjustments you need to get your lights back where you want them. un toggle hide mesh or pin if you hid them to make it easier to see where they are when making adjustments then you can re hide them when your done.

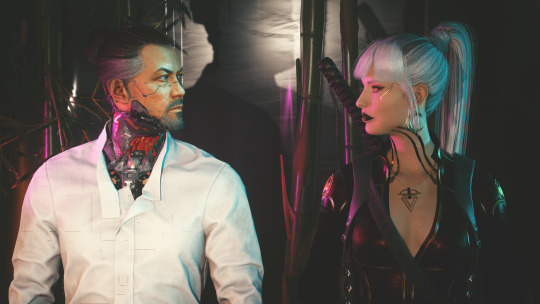
Lets say you have a replacer spawned and you want your characters to look at eachother. this can be done using the look at camera feature with a little help from AMM
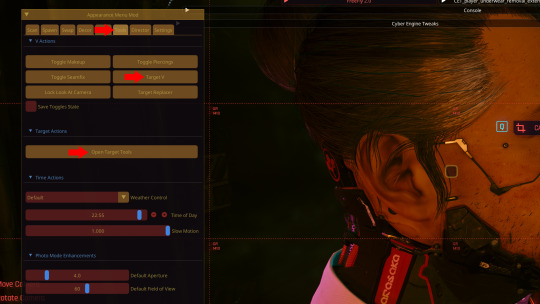
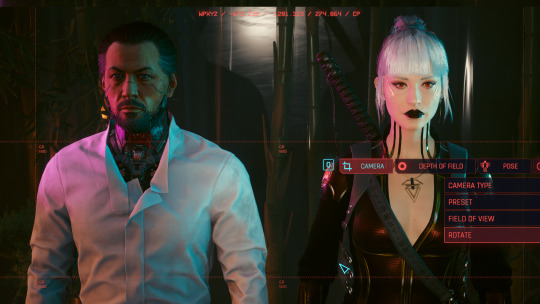
open AMM and go to tools, now depending on who you want to look at who will decide who to target. in this example I will show both. first I will target Raven (V) and select head only for look at camera. then close AMM. I will rotate the camera to the other side of my replacers head then select V and look at camera. then open AMM and target V. then open Target tools and you should have an option to freeze target.

once you freeze the target close AMM and you will see her head will stay in position and is now looking at Goro

Bare in mind once you freeze a target this way you can not unfreeze despite that being a button, If u change pose while frozen it can get pretty cursed pretty quick. its a pain in the ass. some poses you can swap to without it getting to cursed but again its trail and error. if you need to change pose ect you will have to exit Photomode and re-enter it to unfreeze it can be prety time consuming. if there is away around this I'm unaware of it currently feel free to share if you know.
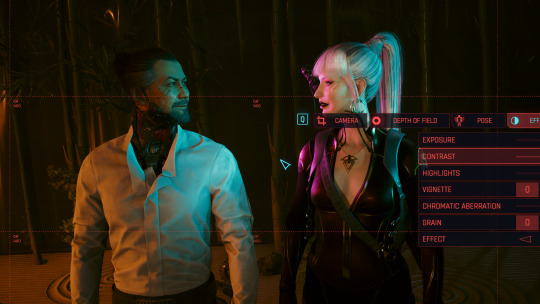
Here I repeated the look at camera trick with Goro so now my models are looking at each other yay
another thing to bare in mind with CharLi is the lights focus on V so you will notice here Goro is not as well lit as Raven. Spawning more lights and adjusting there position with X, Y and Z will come in handy here. it can take some experimenting though.
Here I have added additional lights and positioned them on Goro so he now has light to.

Here we have taken a photo after doing all our adjustments to lights, there position and making our models look at each other. sometimes there will be an error where it will go darker then you want when you hit space to take your shot. I think its called auto exposure error or something basicaly its the game being poopy its annoying but sometimes unavoidable so you may need to keep adjusting your lights and taking shots until the game behaves.
One final thing I like to do when tweaking my shots in photoshop. I usually adjust exposure. offset and contrast to make the pic really pop
Here I have adjusted the offset up a little and tweaked the contrast up a little. it really softens blacks and the light and makes the pic look better in my opinion.
And there you have it. all the tips and tricks I have learned while doing Virtual Photography. I hope this helps peeps out that want to get into VP.
If you have any questions regarding anything I have said my Asks are always open. I'm happy to talk you through stuff if you need some help. I'm also willing to do screen share discord calls to help you follow along or show you in real time how to do stuff if your interested in something like that drop me a DM.

🚫 Do Not Re-Upload/Edit My Shots/Art Without My Permission🚫
[Pillowfort][Instagram][Tumblr][AO3][Nexus][Ko-Fi]
#cyberpunk 2077#cyberpunk 2077 photomode#virtual photography#photomode#CharLi#lighting#vp tutorial#vp resource#AMM#amm tutorial#look at camera#vp tips#tips#tricks#tutorials#dreads tips#cp77 photomode 1 o 1#in game photomode#how to use amm with vp
19 notes
·
View notes
Text
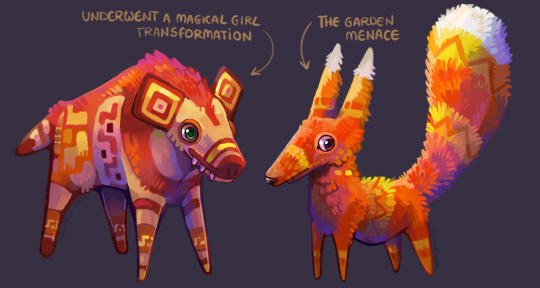
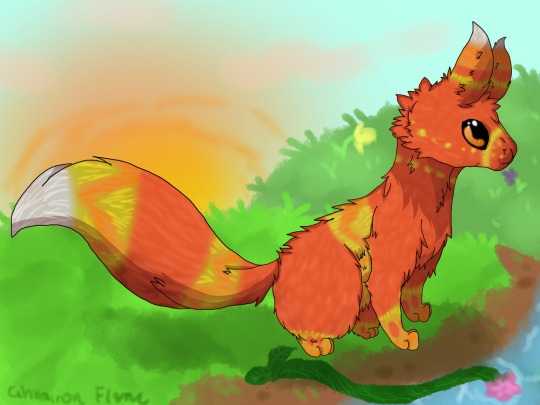
Hello I am back with more Viva Piñata doodles! Turns out if you think enough about fluffy piñatas you can force your way through art block (at least for a while)
The typical Viva Piñata experience, I love you Pretztail but why are you like this I drew so many Pretztail as a "do over" of my first Viva Piñata drawing from 2018
that's when it all started
#For anyone not in the know a Pieena can be made from a Pretztail that has been gifted a bone#after that you can get it at the desert#also additional piñata lore#a Pretztail CAN AND WILL haunt your garden if you have a bunnycomb in it#they won't stop coming#they won't stop attacking them#the only way to end it is getting the master romancer achievement for pretztail and then banning them from appearing#despite this I still love those little dudes#even if they are rascals#me talking about Viva piñata designs : this is the topest tier of creature design#me actually drawing the designs : oh god what does that pattern look like from this side#this is for all the people how still somehow reblog my previous piñata drawings and comment about how they miss the games#I do too#so here I am with doodles#viva piñata#viva pinata#vp#viva pinata tip#pretztail#bunnycomb#pieena#art#cinnamon's doodles
736 notes
·
View notes
Text

64 notes
·
View notes
Text
Just reblogging this for an awareness boost - snapping poses is a thing and makes it SO MUCH EASIER like you wouldn't believe
I'm way too lazy and not nearly horny enough to deal with synced poses though
#cyberpunk 2077#cyberpunk mods#vp tips#i am never consistent with tagging these and i hate it#tutorial#maybe that's the word I use for these kinds of posts
18 notes
·
View notes
Text

Not to be too cringe on main or anything but what if. Pinatasona….
#polly draws#viva pinata#viva pinata tip#dragonache#blue dragonache#dragon#anthro#I Guess#pinata#vp#vp:tip
37 notes
·
View notes
Text
Back in my day, I was the Paulie artist ever (lying)

#but i did draw him a lot#like a lot a lot a lot#hes my favorite guy ever i really need to draw him more#i say like hes not the only character i draw from vp#fanart#digital art#viva pinata#viva piñata#vp#viva pinata fanart#vp fanart#tv show#viva pinata tv show#viva pinata show#viva piñata trouble in paradise#viva pinata trouble in paradise#paulie pretztail#pretztail#viva pinata tip#vp tip#viva piñata fanart#viva piñata show#viva pinata game
11 notes
·
View notes
Text
Blood splatter(ed) tutorial by @halsin
Okay, so @halsin was gracious enough to send me this lil tutorial in my DMs and I thought it might be useful for others, too so I asked her 8f it was OK to screenshot and put here.
So splatter away friends!
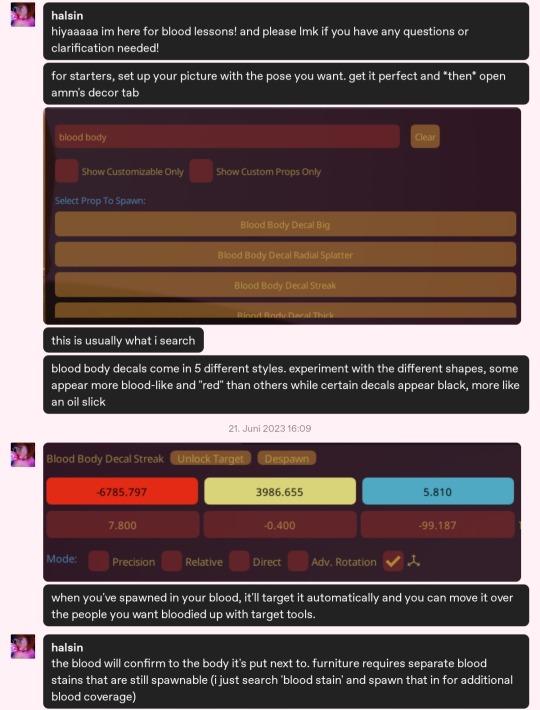
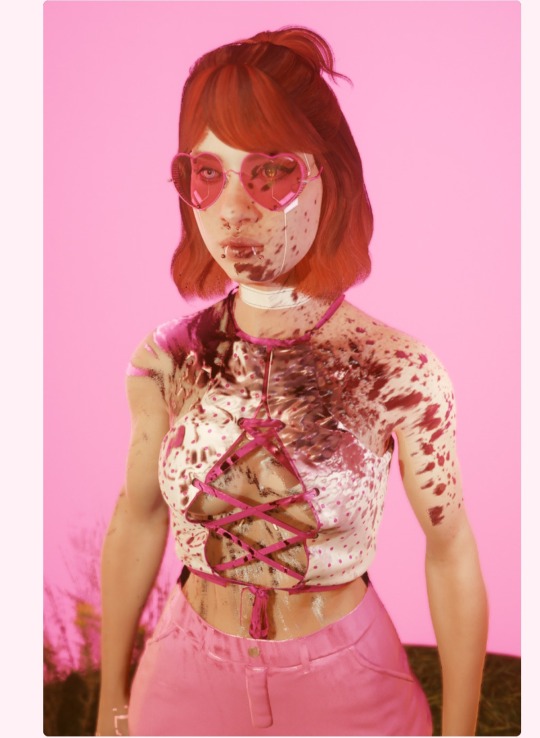
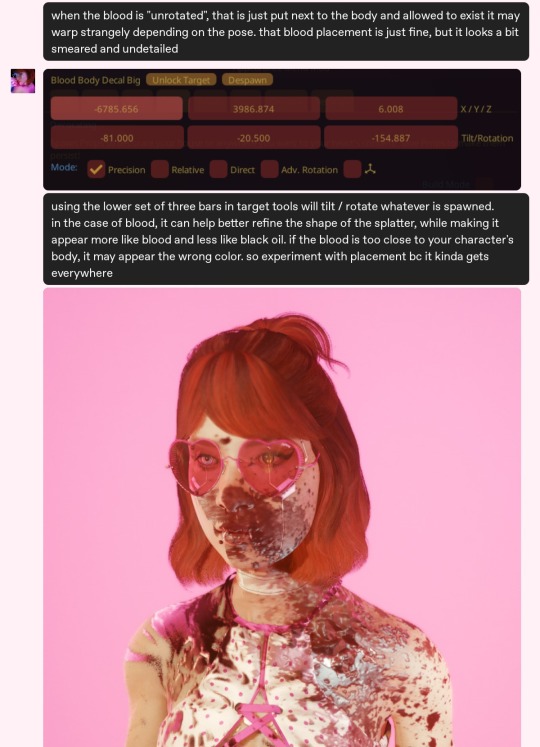
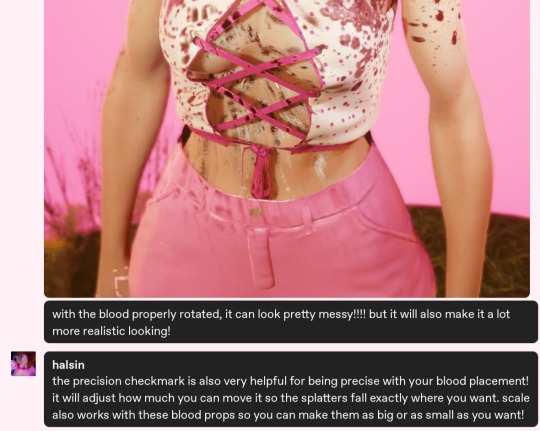
Thank you, babe, for being so kind 🧡
#cyberpunk 2077#virtual photography tutorial#cyberpunk photomode#amm tips#photomode tips#amm tutorial#vp tutorial#tutorial#tw: blood#halsin
34 notes
·
View notes
Text
fuk it send me a viva pinata 2 draw
6 notes
·
View notes
Text
Where Can You Host Your Joomla Blog Site, and What Is the Best Option?
I introduce 7 alternative hosting options with pros and cons for Joomla bloggers. As a writer, I enjoy content development in different forms and have been blogging for a long time. I benefit from it a lot to gain visibility of my YouTube videos, podcasts, gaming articles, Medium stories, and Substack newsletters. Unfortunately, I had to close my big YouTube channel for health reasons years…
#blog hosting#blogging#Blogging tips for beginners#business#Cloud Hosting#Dedicated Server Hosting#Factors to Consider When Choosing a Host#Free Hosting#hosting#hosting alternatives of Joomla#Joomla#Joomla Compatibility:#Joomla Customer Support#Joomla Scalability#joomla Security#Managed Joomla Hosting#Medium#Self-Hosting#shared hosting#stories#technology#the best hosting option is the one that aligns with your growth goals and technical expertise.#Uptime and Performance for Joomla#VPS Hosting (Virtual Private Server)#writers#writing
2 notes
·
View notes
Text
Viva pinata discord
If I made a discord for the viva pinata tip xenia pc port, would anyone be interested in that? For trading wildcards and such!
5 notes
·
View notes
Text
fight for the love of your life like the DNC (Dem leadership) fights to be the loser all the time.
#USA politics#it's not like they bring a knife to a gun fight#<- obvious metaphor not at all a literal one#it's like they bring a cute cuddly bunny to a gun fight#pls for the love of god DNC leadership give a fucking shit -> force Biden out -> make a smart pick for new President and VP -> fight#read the fucking room Dems#and only for an old white guy would all these people tip toe and respect his wishes#if Kamala pulled this shit and was polling this bad they would force her to step aside in about 2 minutes
1 note
·
View note
Text

Everything new I've been posting lately is fully in game! No editing at all except rotating it 😁 Sometimes shots don't turn out how I'm expecting because I'm trying to set them up sideways (& potentially half-blind like with the scan shots) but eh my style's always been a bit ~experimental~ lmao 🖤
In this case, she was rotated 90° in photomode, black/white effect filter, & the skyline background (+ various adjustments on highlights, contrast, vignette, etc) then I just rotated the shot back again!

Can't stop loving Night City!
#i know you also like to experiment with console photomode & i always love the results#there's just something about those creative work-arounds producing these crazy unexpected results ya know?#can't do mods but i can get clever with a ps4! 💖 lmao#i really spent like 3-4 years wishing i could do portrait-mode vp before i finally realized i could just rotate the whole damn thing?! 🤯#crazy lmao#oc: venus#tips tricks & tutorials
37 notes
·
View notes
Link
Choosing the right provider can make all the difference to your business. Use these tips to get the service you need.
0 notes
Text
Mind Over Matter

[Masterlist] [AO3]
18+ Only | 4k | Homelander x fem!Reader | Supe!Reader with telepathic and mind-altering powers. Less established relationship and more fuck buddies. Lewd mental images. Office sex (kind of?). Exhibitionism (also kind of?) Overstimulation. Creampie.
Summary: As the only telepathic, mind-altering member of the Seven you take Homelander for a vivid ride in his mind during an important meeting. Homelander can't handle being reduced to less than his perfect manicured self and he decides to teach you a lesson.
Written for this request💚(thank you for the inspo!)

Boring. Boring. Mind-numbingly fucking boring.
Ashley’s testing out her new ‘VP of Hero Management’ wings that Homelander graciously gifted her and what does she do with them? She parades around the meeting room, putting up a front of a resilient and driven businesswoman while on the inside her heartbeat is in the hundred-tens and her muscles are strung so tight he could shatter them with a flick of a finger.
Now she’s wasting their time with this? So much for filling in Madelyn’s boots with someone capable.
He rolls his eyes.
She’s pitching ideas for the last missing member of the Seven, one they’ve been lacking since Translucent’s funeral. His eyes quickly flit to you sitting to his right side, taking up Deep’s mantle ever since his timely departure. At least you’ve proven yourself to be a worthy member with some quality skillset.
But these fucking options? What is this? When did good old classic superheroes turn into strange curiosities fit for a circus freak show. First an animal whisperer and now another invisible freak?
Looking around the rest of the room, he grits his teeth. The rest of the team doesn’t even fucking care. Why does it always have to be him, maintaining the standard everyone should adhere to?
“Nope. Not happening.” He dismisses the presented slide with disdain.
“S-sir, we could really do with the boost in our 18-32 demographic. Invisi-lass has already hit 20 million followers on Instagram. Our forecast shows an uptick of 5%.” Each stutter of her voice is even more grating on his ears than the obnoxious click of her stilettos.
“Right, a bunch of fucking pre-teen girls wishing they could disappear like her. Fantastic. They’re not gonna come out in support of us, Ashley.” He’s had enough of everyone else thinking they know what’s best for the team, what’s best for him. “Instead it will hurt the biggest demographic—my demographic—because everyone can clearly see that we only care about optics. A female majority in the Seven? Give me a fucking br—”
Moan. That was a fucking moan. Homelander whips his head around to look at the rest of the room to see anyone else reacting. Nobody is paying fucking attention. His mind is playing tricks on him.
He looks at you again. Even you’re making him look bad, sitting at your spot at the Seven’s table all uninterested just like the rest of them.
“Sir?” Ashley’s voice rings the clearest.
“I said no. We don’t need Translucent 2.0. Find something better—” He chokes on the last letter, eyes widening a fraction when he hears the distinctive sound of fingers running up and down a wet pussy.
It’s the loudest thing in his head. Jesus Christ, if that doesn’t make his cock throb.
“Find someone better.” He repeats with a scathing enough look that Ashley—nor anyone else—dares question his restlessness.
The squelch of a soaked cunt is still loud in his ears, the brazen repetition of the lewd noise tinges the tips of his ears pink. He swallows, shaking his head clear of the sound instead trying to focus on the rest of the presentation.
The intermittent nature of the sound is enough to disturb his attention. He throws you a cautionary glare. Not that it does much besides egg you on. The teasing tilt to your lips makes him want to get up and teach you a lesson.
The sound of soft groans in his head makes Homelander squeeze the armrest, just about stopping himself from ripping it clean off.
Ashley clicks a button on her remote and the screen changes. Moan. Homelander’s barely paying attention to the new recruit candidate. They are as unremarkable as the others.
“Homelander.” You sneaky devil. You’ll pay for that one for sure. Timing that sinful pleasure-infused sound of his name at the same time as Ashley asks for his opinion.
He barely grits out an irritated no. His tongue flits out to wet his lips as his mind fills with the images of a sopping wet set of lips eagerly waiting for his rapt attention.
It takes him everything to stop the wanton moan from escaping his lips when he turns to look at you but instead the image of you naked from the waist down, sitting on top of the table right in front of him steals his mind away from reality.
He has to shake his head clear before he gets lost in the vivid image you’ve planted in his head. Oh now you’ll definitely get what’s coming to you.
It’s impossible to escape the literally mind-fucking you’ve trapped him in now. Thank fuck for the hard cup in his suit. Without it he’d be flashing a hefty erection to the rest of the team.
If he wasn’t horny out of his mind he’d be impressed with how far you’ve come with your skillset since you’ve become a part of the team. What started as implanted ideas and fleeting moments you’ve turned into vivid and believable scenes, an outright reshaping of his view of reality. The way you could easily manipulate what someone saw—or believed they saw—was pretty fucking hot if he had to say so himself.
His voice quivers when he denies yet another proposal but nobody dares pull him up on it.
The image of your legs spread right in front of him is inescapable. He sees bare thighs sticking to the table top. Along with a mouth-watering pool of slick right where you sit as your fingers go to town, pushing into your cunt with a need he can’t believe he can’t exploit.
He’s stopped staring at the screens Ashley presented on as she moved onto stats and ratings. While it just comes across as uninterested to anyone else, he wants to look at that exact spot you’ve planted yourself onto in his mind. It makes it more vivid. His mouth is fucking dry. How can you present the oasis and not let him have a sip.
He’s shifting in his seat, each movement aiding in feeling a sliver of friction against his cock. He feels how obscenely he’s leaking. Embarrassing, what you do to him. What he lets you do to him.
The images and visions you send into his mind are nearing crescendo. Each of Ashley’s words is punctuated by a lewd sound. Moan. Filthy noise of your plunging fingers. Groan. His fucking name.
No.
No.
He can’t have you enjoy yourself with your shitty little smirk while he’s fighting for his fucking life.
“Enough.” It comes out weak, but to the unknowing it just sounds exasperated. When nobody moves or says anything he repeats himself.
“That’s enough Ashley.” He’s too frustrated to put on the cheerful aura. Too worked up to perform. “Just-just come back when you’ve got something useful. Don’t waste my time with more of these good-for-nothings.”
Ashley’s polite, business curated smile drops and she tightens her lips into a fine line, turning the screens off with an affirmative, “yes, sir.”
He stands up from his seat after he pushes his chair back. He shakes the image from his head.
“Everyone. Out!” He repeats, motioning with both hands towards the exit with a sweeping gesture.
The rest of the team clearly doesn’t care. They barely paid any attention to begin with. All dealing with their insignificant issues in their insignificant little lives. Even after he brought them all to glory they’re still not grateful.
He feels his own heartbeat rise with frustration, the sick feeling taking over.
His vision turns red when the doors take their sweet time opening fully. He’s ready to laser them off the hinges. Upon opening Ashley gets out first, thank fuck, rushing to keep out of the way as fast as possible.
“And where the fuck do you think you’re going?” Homelander stands behind you, both gloved hands land on your shoulders hard, squeezing with a moderate strength. For all your mind-fucking powers you’re still fairly fragile.
The room empties out, doors shutting behind them.
“Well,” he lets you turn around just in time to see that bratty smirk, “you did say ‘everyone out’. I’m just following orders, sir.” Youuu make him want to strangle and kiss you at the same time.
“Really? This is what you’re going with? Brave. Your sassy attitude isn’t gonna soften the blow sweetheart.” He cups your face pulling you closer to his face. Your hands automatically rest on his biceps, whether for support or as a feeble attempt to push him away he doesn’t really care.
“If you think it’s fun to fuck around—well—then I’m sure you won’t mind if I fuck you riiiight here.” He pushes you back against the table with each step forward, effortlessly hoisting you up with a little throw, making you land on the hard surface.
“See, honey,” he pinches your chin with his thumb and forefinger and he tilts your head a little to the left. “That camera in the upper corner? Yep that one.” He points at it with his finger just to be sure.
“Now that camera is gonna record eeevery little moan and whimper along with your embarrassing little faces.” He chuckles with his lips closed, already terribly amused at your wide-eyed expression. You make it too easy.
“I was going to keep it to myself, wipe the recording, that sorta thing.” He pulls off his gloves, noticing your eyes follow each movement of his hands as if to brace yourself for what’s to happen.
As you should.
“But then I thought that I might be better off just accidentally sending it to everyone at Vought. So everyone can see what a nasty little slut you are.” His one hand cups your crotch through your uniform. He barely needs his super hearing to catch the squish of wet flesh when his finger presses in the middle.
“Be real, did you really think I would let this slide?”
“I was just doing you a favour!” You squirm under his hand, trying to worm your way further away from him. “You were clearly bored out of your mind.”
Homelander pulls you close, sucking on his teeth with a disapproving shake of his head.
His bare fingers pinch the smooth stretchy fabric of your costume right at your crotch. With his second hand joining the cause he rips the material apart like tissue paper, grabbing the new frayed edges and ripping a hole big enough for the tear to span the top of your pubic bone to the middle of your ass crack.
“Homelander! What the fuck!?” Oh finally, you’re realising the severity of your actions. He grins, ripping the next layer, your colour matching panties, down the middle—making them effectively crotchless.
God it’s so satisfying to see you try to force your legs closed. As well as wedging your hand down the middle. It’s all pointless anyway.
“Come on, don’t cover up. You were so happy to show off all your best assets earlier, gorgeous. Where’s that energy now?” He teases you. He’s being an asshole and he knows it. It’s all so worth it, especially when your eyes flicker to the camera.
“Eyes down here darling.” He pushes your head back down, not giving you a second to spare before he’s capturing your lips with his. And for all your embarrassment in the moment you still give as good as you get. Really, he thinks this always ends up being some of your hottest sex.
The kiss is messy, pulling and tugging at each other's lips, tongues wet and hot against each other in between the greedy nips and bites at the other ones lips. There’s no time and space for gentle and loving in this moment. He has to stop himself from not shattering your jaw with his hand as he kisses you like a starving man. Each wet kiss and moan makes his cock throb, balls heavy and aching, bordering on painful.
Homelander can’t really wait much longer. He's not gonna get blue-balled by your stupid powers. His cock has been begging for some sweet relief quite some time now.
Reluctantly he pulls away, hands going to his pants. He leaves his belt on, pulling the zipper down from underneath it, pushing all layers down in one fell swoop.
And wow, already he’s really raring to go. His cock bounces up when it’s released from its fabric prison, grazing your hot flesh on the way up. His mind gets shot with a fuzzy feeling he’s not used to.
He rests both arms on the table, leaning in close to you with a groan. “Stop that.” He rests his forehead against yours with a hiss. “None of your tricks.”
“It’s not a trick. It’s not made up. It’s-it’s what I feel. I’m sharing it with you.”
Eyes widening as he pulls back a bit, staring you up and down with a confused look. So what, you can now broadcast your pleasure? Straight to his pleasure receptors? What in the—
“You can do that?” It’s unbelievable really.
Nevertheless, Homelander hooks his arms under your thighs pulling you closer to the edge and forcing you down on your back, no matter how much you try to stay up propped by your arms.
“It’s new to me too…” You say a little out of breath as your back hits the table top.
Immediately he grips the base of his cock, flicking the head up and down your slit. The pay off is immediate. His mind buzzes with pleasure he’s never felt before. Is that what it feels like when he teases your clit?
He can’t wait to eat you out with this new party trick.
Greedy for more of that sparkling pleasure he rubs his cock against your clit with more urgency than you’ve ever seen him do before. Look, he’s always been a good lover to you, making sure you finish each time. But this? This feeling? This more than reassures that you’ll get your fill and more.
The possibilities this opens up are endless. Already curious to find out what else the rest of your body feels like he reaches out to unzip the top part of your uniform, pulling down the fabric of your bra so he can suck on your nipple as he bends over your body.
God, look at him. He feels like a teenage boy touching a woman’s body for the first time.
His eyes widen immediately as his tongue circles your nipple—both, for good measure. You’re so sensitive. His nipples are nowhere near this level of tingling when you give them some love.
That’s it. He can’t wait. He needs to know what it feel like to have his cock stretch you out. Fill you over and over again.
He nearly comes at the thought of getting to feel that sensation first-hand. His hand trembles when he pulls back to stand somewhat straight as he positions his cock to kiss your entrance. The wet squelch of the two meeting makes you flush. He can feel how hot you’re getting.
“Fuuuck me—you’re even wetter than you were in your little fantasy. Lucky me.” His eyes flutter shut as he pushes into the intense wet heat inch by glorious inch.
And this already feels orgasmic. The hot squeeze of your soft walls is unlike anything in the world. Or… so he thought until a second ago. Somehow it feels even better from your side. This new trick of yours will definitely become his favourite.
It’s really no surprise you jump on his dick anytime the situation allows these days because holy shit is this how it really feels?
You broadcast all that you’re feeling into his brain, tapping straight into the pleasure centre and lighting it up like a Christmas tree on Times Square. The thick glide and fill is unlike anything he’s ever experienced before. It actually makes him a little dizzy. Having the dual sensation of your wet pussy clinging to him all while enjoying your side of getting filled is guaranteed to make him bust in no time.
“F-ffuck you're perfect… Jesus a-hah…that's so fucking tight and wet.” He’s really losing his mind now. For a second it feels like he’s the one getting embarrassed on camera with how thoroughly this is reducing him to a bunch of moans and mumbles. But at least he’ll have a fun memory to look back on.
So he makes the best of it.
This is where all his bravado and cocky words just stop. There’s nothing else on his mind now except the feeling of two hot bodies getting off together.
His hips thrust into you with jagged snaps, unwilling to stay out of your warmth any longer than necessary. His one arm is wrapped around your thigh, pulling you even closer to him as he continuously pumps his hips into you.
The room is a mix of grunts and moans, squeaky sounds of the table legs being pushed forward with each thrust. The huge V-shaped table stands no chance against the hurried and desperate drive of Homelander’s hips.
He takes his free hand to your clit. Immediately hit by what feels like a bolt of lightning inside his brain.
He whines needily, forcing his hand to focus on rubbing your clit in a solid rhythm.
It doesn’t help that you sing for him prettily, little sweet moans as he’s setting your sensitive clit on fire.
He can't resist anymore. The feeling of your clit getting stimulated with his fingers, all while getting your insides massaged with each pass of his cock is enough to make his mind melt. If you weren't his favourite before you definitely are now.
What catches him off guard is your climbing climax. That feeling is familiar yet foreign and interesting enough to add to his own pleasure. And with that there's nothing he can do to hold back. His balls ache too much.
With a whimpered cry he feels the pull of his orgasm taking over. His hips stutter into a pathetic tempo as his cock pulses with his orgasm, unloading one spurt of come into you after another.
“God–fuck s’rry…sorry. I couldn’t—ah, couldn't hold back.” He’s gasping for air, the most he’s ever been winded after sex.
But there's no way he's going to let you go until he feels your orgasm through your powers. He needs it.
“Don't stop, please.” You whimper, the pleading sending a pulse of heat down his gut.
He tries to match the same pace from earlier as much as he's capable. He's still hard inside you. The shivers up his spine from your climbing orgasm are keeping him on the razor's edge of too much stimulation.
The steady rubbing of your clit makes him grit his teeth, the pleasure of it makes him want to drool and roll his eyes back.
“N’t g’nna” He mumbles through his teeth, watching with wide eyes as you suck on your own fingers, using the wetness to rub and pinch your nipples of your bouncing tits.
He watches as your moans get higher, pushed out in between gasps for air as you arch against the tabletop, your body pulsating and straining against his.
And then he feels it. For a little while he thought you wouldn't be able to have enough control of your powers to transmit the feeling to him, exhausted after a vigorous fucking to give him what he's here for.
But you do. A burst of hot pleasure melts in between each crevice of his mind, suffocating him with how obscenely strong it feels. The way it reaches into each fingertip and limb makes him nearly fall over on top of you and go limp.
He sucks in the saliva when he feels it gathering on his tongue, his eyes blown black and his body feeling like it's dealing with the aftershocks of electrocution. It's only then he realises he can feel his cock throb and pulse, the tell-tale sign of having just come. Again.
He sucks in a big gulp of air and he pulls out. His cock has reached its oversensitivity limit and now every pulse of your pussy sends a shiver of pain-laced pleasure up his spine.
“What the fuck was that?” He asks, exhausted and falling back into his chair, for once with a heaving chest and gasps for air. It takes a lot to get him winded. Somehow you managed that. Your only response is a weak laugh.
He'd be embarrassed with how ruined you made him feel if his entire nervous system wasn't buzzing with the signals that amount to three orgasms in the span of five minutes.
He pushes his softening cock back into his underwear. Not wanting it to smear the leftover dribbles of come into the fabric of his suit.
Looking at you like this makes him especially glad to have made you the centrepiece in the camera angle. You've propped yourself up on your elbows, catching your own breath. But Homelander can't quite look away from the mess he's made of you.
Your pussy is swollen with the effort, blood rushing underneath the surface. Nice and stretched for his size now, perfect for round two—well, three really—as the small gaping entrance leaks his come in dribbles, collecting on the table. Just like your slick was in the fantasy visual you fed him earlier.
You should be happy he's a generous enough man to make your dreams come true.
Clearing his throat he goes “you're gonna have to clean that up.” His signature sharp grin makes itself known, beyond pleased with the effect he's got on you. Even though you’re the one who started this, abused him with your telepathic powers in ways nobody else would ever dare. You can bet on him being the one to finish it.
“Huh? With what!” You bite back when you gain some functions back. Sitting up on the table properly. You rush to zip your uniform back up again, not wanting to have anyone else see you as exposed as you are.
“Your tongue for all I care. Can't have you leaving a mess like that.” He stands up, stretching himself tall, puffing his chest out as if his own cock didn't leave a mess in his underpants.
“How the fuck am I meant to walk anywhere like this? Could you not have just pulled my pants down? Fucking asshole.” You mutter as you hop off the table, ripping the rest of your tattered underwear off so you can wipe as much of the milky white stain and shove the sopping wet fabric into your pocket.
Oh, kitty has claws. Cute.
You stand up straight in front of him, or as straight as you can seeing as you're clutching your pussy so you can’t leak any of his essence down your legs. Or the ground.
Good girl, keeping it all in there like you should.
“Oh please, you loved it.” The sheepish little ‘maybe’ that escapes your lips is all he needs to kiss you silly. His signature wet and loud kiss that makes your mind hazy each and every time.
He pulls back after one last, surprisingly soft, kiss.
Homelander knows the toll your mind powers have on you, you're tired, overworked and overly sensitive. It’s your only weakness as far as he’s concerned—apart from him of course. And contrary to your belief he does have a particularly soft spot for you.
He unclasps his cape, wrapping it up around your middle as a cover-up. He picks you up into his arms, bridal style, carrying you effortlessly as he makes his way around the 99th floor, towards his penthouse.
“Hope you've got a clear schedule because I want you to show me what else you've learned to do without telling me.”
And while originally he threatened you with leaking the footage, he doesn't particularly want you to fill the daydreaming heads of every Joe in the company. He's sure you would. Though the footage will certainly come in handy for a good old Friday movie night in.
For now though? Your job will be to warm the other side of his bed while you get your rest. After that? You're really gonna have to reconsider your stance on a public relationship because there's no way he's not gonna make you his.
Taglist (you can add(or remove) yourself to be tagged when I publish a new fic):
@infinetlyforgotten | @rafecamsgirlll | @nervoussystemss | @hom3landr
@mrsdesade | @nommingonfood | @littlegaaby | @jokesonyoupup
@natliecole
#ahhhhhhh this was so fun to write!!!#feel like I sprinted all while writing this lmao#also my first supe!reader entry! I always said that I'm not fond of them but I think I just haven't come across powers I liked.#this one really tickled my fancy tho#homelander x reader#homelander x you#homelander#homelander fanfiction#my writing#the boys fanfiction#homelander smut#fic request#supe!reader
186 notes
·
View notes
Text
be mine this christmas: l.hamilton.

pairing: lewis hamilton x back oc!xenia richards
trope: grumpy billionaire x personal assistant au
ru’s 💌 : Please keep in mind that the Lewis in this story is not the IRL Lewis or the Lewis I typically write about. He’s a bit more of an asshole, he’s a bit more controlling. You’ll love him the same. This story is fast paced because it takes place in just about one night.
chapter: ONE
chapter warning: n/a
chapter w.c: 3.44K

𝐎𝐍𝐄:𝐗𝐄𝐍𝐈𝐀
Lewis Hamilton was an arsehole.
No, arsehole was not strong enough of a word to describe the depths of her hatred. She utterly loathed the man and there were not enough words in the a thesaurus that could describe the thoughts that plagued her mind. The thought of him on fire and she still wouldn’t throw water on him to save him. In fact, Xenia would throw the continuous stack of files that sat on her desk into the fire to stock the flames.
There was so much more that she could say but there was not enough space within her mind to keep thinking about that man.
Ugh, that man.
Xenia rolled her eyes at the phrase. Lewis Hamilton was the definition of being ‘the man’. To the modern man, he was the quintessential ‘alpha’ as they called them these days. A term that equally irked her.
An egotistical twat is what she felt was better suited for the type of man that Lewis Hamilton actually was. The type of man that made an obscene amount of money just by breathing and made it known that he had no qualms flaunting it. ’Who the fuck has a designer customised pen?!’
He was the type of man who walked with his head held high, shoulders square - demanding the attention through the sea of desks to the elevator that was constructed for his private use. The peasants were to use the smaller elevator further down the corridor.
Lewis Hamilton was considered a god to the board as his legacy in motorsport alone brought the investors, begging to give the company their money. Every man wanted to be him, willing to accept being his doormat if he allowed it. Every woman wanted to be in his bed if he spared them a glance. Equally pathetic.
Xenia wanted him to disappear. Then she would know peace.
She never understood how people could see the sun that seemed to be shining out of his arsehole. He had no redeeming qualities that she could think of and she’d been his personal assistant for three years.
He was a dominating whirlwind of force that blew everything that stood in his way and he would never look back to witness the havoc that he wreaked.
Xenia was not blind - she knew that he was an attractive man. It was in her face every day, confronted by it and that drove her hatred even deeper. He had her occupying the building that held her captive for sixty hours a week.
Yes, SIXTY!
In heels on top of it! Something about looking professional at all times that was written within the office’s code of conduct. Why she could not answer the emails at home (she was already doing that anyway) as she ran around the city of London doing errands off the clock was beyond her.
There were a lot of things that Hamilton did that would qualify enough as a form of harassment for a lawsuit.
But she was still here. Why?
Well, for one, her salary was amazing and helped her afford her obsession with fashion. It also helped that the VP of Sales, Rebecca Bailey was a sweetheart who loved asking her fashion tips. Xenia had cultivated a special relationship over the years with the older woman. They got along so well most likely due to the fact that she was one of the very few women in the building who did not want to cut off Xenia’s head because of her proximity to the boss.
Another reason why Xenia loved Rebecca was because of her encouragement for her to delve deeper into her fashion interest. Which was something Xenia was craving to do. She had gone so far as to create a website that she had intended to be her homage to fashion. Granted the only thing on the homepage was a white screen with the words ‘under construction’ flashing on the page. But it was a starting point.
“What are you so focused on?” The resident gossip, Lola Braun, stood at the edge of Xenia’s desk as she eyed the article that she had been working on. Xenia quickly shut her laptop screen down before Lola could read any further. She scrunched up her recently sculpted nose up when Xenia quietly pulled her screen close.
“It’s none of your business what I’m focused on actually.” Xenia replied . If she had to be honest with herself, she was not the biggest fan of Lola, matter of fact, she hated Lola at about the same level that she hated Lewis. Lola was the personal assistant of Rebecca which angered her even more due to how close they were forced to work with each other.
Lola loved herself in a way that was deplorable. Her high arched and pulled back eyebrows , hazel green eyes and a body every model aspired to have. With hair and flawless toffee-toned skin, magazines would say that you can get from rosemary water and witch hazel. However, because of this perceived perfection, Lola had made it her mission to force everyone around her to be miserable. She despised any food that contained more than 300 calories around her. God forbid, Xenia ate a lemon and poppyseed muffin with her caramel latte.
Everyone (mostly the women) wanted to look like Lola and they all seemed to hate the way Xenia looked. She was 5’9”, body full of curves, kinky coils that defied gravity with skin tone deep and rich as the juices of blackberries. Xenia loved the way that she looked. Lola could shove a chocolate chip cookie down her throat if she didn’t.
Xenia also hated the fact that she was a blubber mouth. You only ever told her anything when you wanted the entire office building to know. Xenia learned that little tidbit the hard way when she confided in her that she thought that the boss was a dick during her first month of employment. It was a very awkward staff general meeting when Lewis reprimanded ‘staff’ for inappropriate comments about higher administration.
Yes, Xenia hated Lola a great deal.
Lola cleared her throat, as if to remind her of her presence. Like Xenia could forget that she was standing there, not when her pungent fragrance was itching her nose.
“What do you want, Lola?”Xenia asked. She then dropped a stack of files onto her desk.
“Well, from the looks of it, it seems that you don’t have much work to do so here are the sales quarter files that Mr Hamilton asked for. Should keep you occupied until late. I can bet that you don’t even have an outfit for the Christmas party tonight.”
Xenia finally glared up at her. Meeting the woman’s snarky expression through her lashes.
“You’re right.” Xenia offered her a fake smile. “How about I start on these whilst you go and get those nails filled in. They look overdue.” Lola gasped as she pulled her emerald green manicured nails towards her chest before she moved to inspect them. Before Xenia could bask in the afterglow of Lola's stunned silence, a large and tasted hand dropped a note onto the stack of files in front of Xenia.
“Okay, this sparring round is over ladies.” Her eyes rolled before they landed on Miles. Miles Chamley-Watson was the Chief Marketing Officer of Hamilton Enterprises and also Lewis’s best friend. Only four years younger than the boss, Miles still knew him the longest and was there at the inception of the company - playing a massive role in its growth with his sharp eye on marketing the brand to a more generation.
Miles was also someone Xenia considered a friend and an ally. Their first meeting happened when he had walked in as she was getting a verbal lashing from the boss man. All she had done was pour oat milk into his coffee instead of almond. As the tears brimmed in her eyes, Miles was able to de-escalate the situation and since then, he had been a shoulder to lean on when the brunt force that was Lewis Hamilton was too much for her to bear.
“I just wanted to make sure that she got the files that were being asked for, Mr Chamley. We all know she seems to let her little fashion hobby get in the way of her actual job here.” Lola smirked as she tucked her bleached strands behind her ear with a smirk.
Xenia chewed the inside of her cheek to simmer the twitch of her palm to reach over and slap her. There were a lot of things to be said about Xenia and the disdain of her current job occupation but to try and imply that she was any less but good at her job was deeply insulting. Lola, pruny and loudly made it known that it should have been her in the position that Xenia was in. And if she could switch their places, she would. But Mr Hamilton had made it clear that he only wanted Xenia, even though they seemed to have each other.
Miles sighed as he awkwardly scratched the back of his neck. “I’m sure that Miss Richards is more than capable of her job and has everything under control. Thank you, Lola.”
Lola huffed as she brushed her bleached strands from her shoulder and scattered away from Xenia’s desk. A sigh of relief left her lungs.
“Thank you, Miles.”
“Don’t thank me yet. What was that I heard about you not having a dress for tonight?”
A noise that sounded like a disgruntled groan left her mouth. She knew what he was going to say as she conjured up her excuse.
“I’m not going.”
“Come on Nia! You always say that!” Miles exclaimed with a hint of annoyance. His animated expression almost caused a smile to break out on her face.
”Listen. I’m always here as it is and I don’t want to stay here any longer than I need to. The party is in this building where I already feel suffocated and I won’t even be comfortable enough to drink. My enemies are everywhere and a drunken Xenia would be like food for fodder to the people.” Her last statement caused Miles to chuckle.
“I would much rather spend my night at home, take a nice and long bath then watch both versions of Black Christmas.” Her preferred plans sounded boring but they were honest. Xenia would rather enjoy her solitude than be surrounded by people who did not like her.
The annual Christmas party was the one thing that Xenia never had to set up; however, it was still her who ordered the decorations, figured out the catering and then the entertainment. Xenia was the unofficial party planner - another title under her hat that she was not getting paid for.
She was exhausted beyond belief.
Besides, she had too much to figure out before they broke for Christmas - Xenia wouldn’t be missed at the party.
“You can’t not go Nia.”
“Miles -.”
“Of course, she’s going. Why wouldn’t my assistant and the planner of the party be there?”
The deep voice of Satan bellowed through the air and almost forced Xenia to flee for her life. She had not seen him all day and now as she turned in her chair, she came face to face with her boss.
Lewis Hamilton. A brooding, muscled machine covered in a tailored suit and a million dollar Richard Mille watch on his wrist. Her eyes trailed down the thickness of his tattooed neck, broad shoulders and back up to his sharp jawline covered by his beard. Then her eyes settled on his soft and full lips that were tinted a soft pink. She hated to admit it but she loved his hair. He kept it in either braids or twisted plaits tied in a low bun. This time, two braided strands hung on either side of his face with the rest tied back which seemed to bring a softness to him that he did not deserve.
He was too handsome and ugly souls like him should not be handsome.
“I’m pretty tired sir. With everything that you’re having me do, I’m pretty worn out. I think I’ll sit this one out. Maybe next year?” Xenia let the sarcasm drip into her words and revelled in the way that he rolled his eyes.
“Not this time, Miss Richards.” Lewis spoke as he placed his hands into his pockets. The side of his face twitched in a way that showed that her tone had bothered him. He looked at Miles for a brief moment before turning his attention back to Xenia.
“Have you completed the list Mr Chamley gave you?”
Xenia frowned in confusion and slight annoyance. “You mean the list that he just gave me two seconds ago?”
“Watch that tone with me Richards. Get it done and then figure out your outfit situation for tonight.” His eyes dropped down the length of her frame, the heat of his stare forced her back straighter. “I’m sure because of your little hobby, you’ll be able to figure out something in such short notice.’
Without another word, he indicated for Miles to follow him before he turned and disappeared back into his office. That was it, a demand that he expected to be followed. No please. No thank you.
Dickhead.
Miles offered her an apologetic smile before he followed behind Lewis towards the office. Then she looked down at the list that had been placed in front of her.
Lunch from Bubala: Tuna Nicoise on toasted focaccia with the soup of the day.
Coffee order from Blank Street.
Dry cleaning from Nova’s (Need the shirt for tonight.)
She stared at the list, seemingly remembering the words from her interview. How she was supposed to his right hand and right hand only. Now she was doing that and somehow also finding the time to pick up his fucking laundry. Xenia looked around her surroundings before her moving eyes settled on the falling snow through the floor-to-ceiling windows.
The slow and steadiness at which the snowflakes seemed to fall was a drastic contrast to the fast pace that her mind was running. Maybe if she was lucky, Santa’s reindeer’s would run her over with his dry cleaning getting trampled on.

Xenia was surrounded by the settling blankets of picture perfect snow as she walked down the Main Street in her FENDI vintage boots. Christmas lights decorated the buildings with wreaths hanging on each lamp post. Everything around her was perfect and yet, Xenia still felt like the Grinch but who’s Christmas was being stolen from her.
Everything about the festive holiday that should give her all the joy was not giving her the warm and fuzzy feeling that it used to. This had been the feeling that had been sentiment since the first year at Hamilton Enterprises. Lewis seemed to have sucked the life out of her. However, Xenia had to take a deep breath and remind herself that she won't be a personal assistant forever.
Her fashion content was rising in popularity and it was only a matter of time before the vitality would turn into constant income then she would be able to leave. For good.
She sighed to herself once more as she hauled the dry cleaning over her shoulder as she entered into Bubala. The low lights, exposed brick and the flush of the Christmas colours added to the things that she adored about the shop. The queue to the counter was atrocious but it didn’t bother Xenia at all. It only prolonged her time away from the office. The smell of freshly baked goods, warm soup and the sounds of cheery, festive music was far more appealing to her than the four corners of her small cubicle.
As she waited in line, she scrolled through her emails, grinning at a report from Rebecca. She had already sorted through the first predicted quarter of the merchandise branch. She was a stickler for deadlines, often completing the work before the imposed time. How Rebecca was able to find the time to do it all? Xenia would never know.
“That smile will always outshine the brightest star.” A soft voice cut through the chatter of the restaurant and nestled within her ears. Her shoulder relaxed as she peered at the owner of the voice.
Nathan Fieldman.
Modality manager of the radiology department at the Great Ormond Street Children’s Hospital. A Marvel enthusiast and the owner of the cutest golden daschund she’d ever seen.
Also, her ex-boyfriend.
Xenia offered him a platonic embrace, his Sauvage cologne causing her eye to water. She almost wanted to sneeze in repulsion. As they pulled apart, upon instinct, he reached out to touch her standing Afro. Yes, he was one of those men. But that wasn’t the reason that they had broken up. (even though in the long-run, it should have been a reason.)
No, they broke up because the leader of the Legion army of hell demanded so much of her time that it cut into the spending time that she had with Nathan. Their schedules did not align any more and she felt sorry for always leaving him hanging and cancelling plans last minute.
The guilt was heavy within her as she often left him to fend for himself. When she had suggested however, to quit her job and focus on being a fashion content creator, he thought that it wasn’t wise nor a sustainable career. That had been the last wedge in the relationship. So by the time that Xenia had asked for the break up, Nathan did not put up any type of fight. He was complacent in almost everything including the bedroom.
Now that she thought about it, there were a lot of things outside of her job that had resulted in the termination of their relationship.
“So what has you smiling like that Nini?” The cringey nickname made her want to vomit. Xenia did not miss that at all.
“Nothing in particular. I was just reading a report.” She kept her answer vague. Nathan’s eyes narrowed, pulling the rich brown skin at the corners of his eyes together.
“You still haven’t found your footing huh?”
“Not quite.” She answered with a smile that did not touch her eyes. She tried to ignore the rising insecurity within her at the tone of condescension in his words. He didn’t need to know that her lack of growth in the field of her passion was a soft spot for her and constantly had her worried that she would fail. The last person that she needed to confine in was her ex-boyfriend.
Clearing her throat as she shuffled forward in the queue. “So how is everything with you?”
Nathan’s eyes beamed, the skin of his cheeks spreading his five o’clock fuzz as he delved into the details of his past year in about the twenty minutes as they waited. She learned about all of the unique patients that he had come across and the department drama amongst his plans to expand into teaching university students. Along his retelling, he had mentioned that he had started dating again.
“So how’s everything with you? How are things for you these days?” Nathan finally asked Xenia as the both of them paid the cashier for their individual orders.
She shrugged her shoulders. What was there to say? Nothing had changed in the last year she had spoken to him. She was still stuck in the same job that she hated, doing things for a man she’d rather watch eat shit for pay as she struggled to produce any consistent content for her website.
“Nothing much. Just learning from the best around me, really.”
“That’s good to hear. Did you finally give up on the fashion stuff then?”
It took all of her strength to not tell him that it took an entire weekend in the Cotswolds to find the vintage Tory Burch blazer that she was wearing but the ping of her phone stopped her. As Xenia was about to offer an apology, Nathan placed a kiss on her cheek and picked his order from the counter.
“Duty calls, I know. It was nice seeing you, Nini. Take care.” A deep breath exhaled through her nose as she nodded. Xenia then grabbed her own bag from the counter as she looked down at her phone.
Arsehole: Coffee from MonMouth instead. Get one for yourself - I can’t have you sleeping before your duties are done. And sushi from Atelier for Mile.
Where were those fucking reindeers? She thought.

reading list: @queenshikongo3 @dhlfastestlap @saintslewis @serpenttines-library @saturnville @hopefulromantic1 @lettersofgold @cocobutterqwueen @melodichaeuxx-lacritquexx @sapphireheaven @olyvoyl @lewisroscoelove @lh44adore @hellomadamebutterfly @scorpiobleue @laneywrld @qveenmelanink @tremendousstarlighttragedy @bekindbecoolbeyou @greedyjudge2 @itsapurrfectstorm @createdbylivingclocks @omgsuperstarg @peyiswriting @miyuhpapayuh @blowmymbackout @purplelewlew @henneseyhoe @perfecttrashface @alianovnaromanovanatalia @leilaxaliel @hotfudgeslug @iamryanl @pickingupmymercedes @eleetalks @ambs-06 @annisassintchaska @boujiestpoet @nayaesworld @nat-lh-44 @mochachocolatteyaya @melaninpov @kindan3rdy951 @elyseesarchive @sl33p-deprived-princess @soiguessimtheshit @acidlv @trinitoldyouso @gwenda-fav @f1-football-fiend
#mauvecherie writes#be mine this christmas:short story#lewis hamilton x xenia richards#lewis hamilton au#lewis hamilton short story#lewis hamilton x black oc#lewis hamilton x black reader#lewis hamilton x black!reader#lewis hamilton fanfiction#lewis hamilton fanfics#lewis hamilton fic#lewis hamilton#lh#sir lewis hamilton
207 notes
·
View notes
Text
TIME SAVING POSING TIP
I need to boost the shit out of this video bc I did not know about this, and apparently, even much more experienced VPers also did not know.
You can SNAP synced poses easily like this and save a FCKTON OF TIME.
youtube
This is a lifesaver. Also, those romance poses by wolvmods are everything.
THANK YOU @wolv2077 for these poses and this tutorial on SNAPPING
#cyberpunk 2077#tutorial#vp tutorial#virtual photography tutorial#photomode tips#amm tips#boost#Youtube
49 notes
·
View notes