#ortho linear keyboard
Explore tagged Tumblr posts
Visit Tumblr Blog
Explore Tumblr blogs with no restrictions, modern design and the best experience.
Last Seen Tumblr Blogs


Fun Fact
Tumblr was created by web developers David Karp and Marco Arment.
Text
Alumni Stories: Meet Lydia Macleod
Kelsey, #AlumniStories, features Lydia Macleod, a Marywood alumna who overcame challenges to become a mental health clinician & accessibility advocate ✨ Lydia's inspiring story shows how resilience and passion can lead to a fulfilling career. #MarywoodArt
“Do what you can, with what you’ve got, where you are.”Squire Bill Widener, as quoted in the autobiography of Theodore Roosevelt This is a special Alumni Stories blog post that I am honored to write. Meet Lydia Macleod, a mental health clinician, and an accessibility technology advocate and researcher. Lydia earned an Art Therapy degree from Marywood in 2016, minoring in psychology. Lydia was a…
#accessibility#accessibility technology advocate#advocacy#Americans with Disabilities Act#Art#Art Therapy#authenticity#ceramics#disability#Education#ergonomic keyboard#inspiration#instructional design#jewelry-making#Lydia Macleod#Marywood Art#Marywood Art Department#Marywood University#Marywood University Art Department#marywoodart#mental health clinician#mental health counseling#ortho linear keyboard#Painting#Printmaking#Problem-solving#Sculpture#vertical mouse#Where Creativity Works#ZSA Moonlander keyboard
0 notes
Text
Last Monday of the Week 2025-02-10
I do make the rules and I also enforce them
Listening: Two songs have been stuck in my head all week, #1 is I Got My Tooth Removed from 10,000 gecs by 100 gecs.
youtube
If I'm honest I've primarily had this sequence stuck in my head
My head's like a ton of bricks, but this dumb bitch still learns new tricks I fuck with fire, burn my dick, play violin on sinking ships I woke up and was down, horrendous, think I need to see the dentist
#2 and I think the theme here is "attractive use of rhythm and rhyme" because it's Vampire State off Your Majesty by Michael Guy Bowman
youtube
I know this one has featured already. As mentioned, I make and enforce the rules. I like a lot of the stupid puns in here! It's a very smug song, very self-satisfied. Also making me so badly want to get a bass guitar.
Watching: Busy week! First up Macbeth, the 2024 West End performance film release.
youtube
It has been a hot second since I have seen Macbeth although I pregamed this with the Ian McKellen and Judi Dench one from the 70's which I kind of half-listened to while making dinner.
youtube
Macbeth is not as dense with like Good Lines as Hamlet but it is tied for like, how fun it is to watch. Relies very heavily on your Lady Macbeth driving everything forward.
There's a lot of gender in here! Everyone is constantly saying whether they're a man or a woman and they're totally not lying they promise.
Also, at Bad Movie Night: Flash Gordon, which. Is not like Macbeth.
Flash Gordon has some really killer outfits! My only knowledge of Flash Gordon is secondhand through parody and I was not prepared for how all out the sets and costumes went, thank you movies.
Multiple lost technologies on display here. We don't make t-shirts that tight anymore, and we also lost this kind of big semi-earnest comedy sci-fi technology. The closest thing to this is I guess Jupiter Ascending, which is Very Tropey in a similar way but that's like, ten years old now?
Reading: Going back and forth between Pale Fire and other things, mostly the little Nabokov collection I picked up. Little to say, Pale Fire continues to be fun but in the same way as before.
Making: Printing around the house, more design stuff around the TV. Starting to work on a lapboard-ish thing. Currently I use the steam desktop mode which is very good, like, genuinely quite handy, which combined with being able to send links from my phone to the handheld is pretty much complete, but it would be nice to be able to a) type and b) play 3D games without having to learn how to use a controller. I am not a picky gamer when it comes to my keyboard and mouse, I've beaten Star Wars Republic Commando on a trackpad more than once, but I do want a mouse.
This involves figuring out what I want to do with Galena. I've run into problems! Galena suffers from "not the same kind of layout as the keyboard I type on all day at work", a problem that has two possible solutions, 1) build a Galena copy for work, or 2) build a work copy for home. I kind of like my work layout (Logitech K860) more than the strict ortho of Galena so it's possible I'm going to tear her down and rebuild her. If I do do this what I might do is figure out how to get time on the makerspace CNC mill so that I can build a swoopy complicated case out of wood, I do like having a wooden keyboard, but it'll probably at least start out as a printed project. It's also possible that much of Galena will become the lapboard and I'll build something new for the desktop.
Additionally: remembered I have that whole LED project. Got save slots working on the API and backend side of things.
Playing: Cyberpunk, I am presently in Phantom Liberty which is a very sharp change of pace, much more focussed, it feels almost like a linear campaign in many ways. Enjoying it but hoo boy that division feels artificial. It doesn't help that I basically waited until everything else was wrapped up to go there, although I am enjoying having some latitude to deploy my top level skill tree in the wild.
Tools and Equipment: I got a really really long wool coat the other day and I cannot overstate how good it is for cold weather because it covers your legs. Combined with my ridiculous chaps this is perhaps the most comfortable I've been outside all winter.
6 notes
·
View notes
Text
obsessing over ergonomic keyboards lately


i just want a low profile wireless split ortho (or staggered linear) programmable keyboard that looks nice. tenting doesn't look good imo , but i would probably benefit from it. can't stand dactyl manuform tho, im sure it's better but it looks tacky and takes up way too much space. and would take forever to get right. also, some people go below 36 keys, all the way down to 16 even, and i don't wanna do that, im no stenographer.
#split keyboards#ergonomics#ergonomic keyboards#keyboards#mechanical keyboard#ortholinear keyboard#low profile keyboard#wireless keyboard
1 note
·
View note
Text
Listen, I have a proper Ortho-linear split keyboard. This is weak
Reblog, click the picture, and prepare for battle.

715K notes
·
View notes
Photo
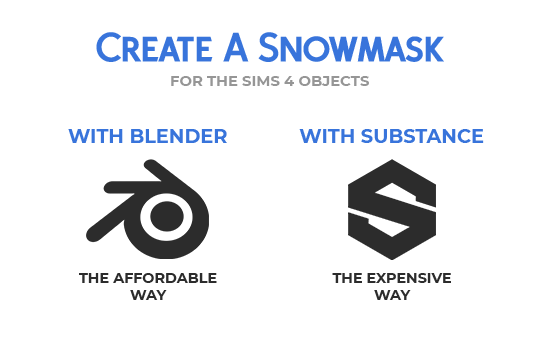
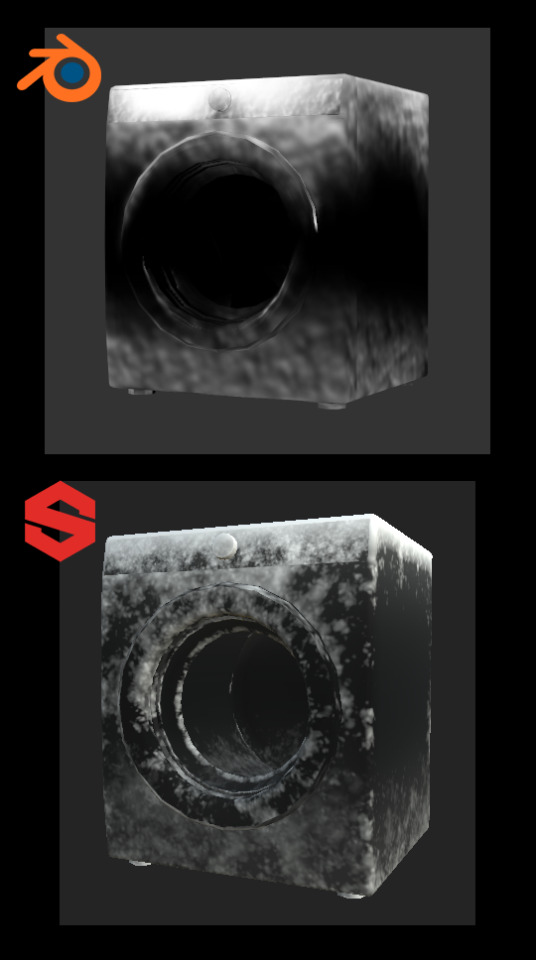
Click on Continue Reading to learn how to create Snow Masks for The Sims 4 objects.
After The Sims 4 Seasons came out, some object were provided with a Snow Mask. It’s a black and white mask with pretty high contrast, used for objects that, in real life, would have more complex snow accumulation than what the automatic accumulation can achieve. Some objects have a void snow mask, which is pretty annoying. If there is a snow mask for an object, i always use it, and these are my methods.
This tutorial teaches you some methods to make this map easily and quickly.
Hopefully, the GIFs work 🤣

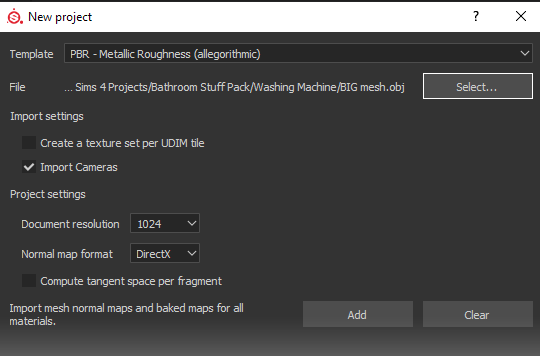
Requirements: - Your mesh has to have a UV Map; - You must decide a texture size and stick to it, you can always size down but never up; - You must switch to the Cycles rendering engine.
Procedure:
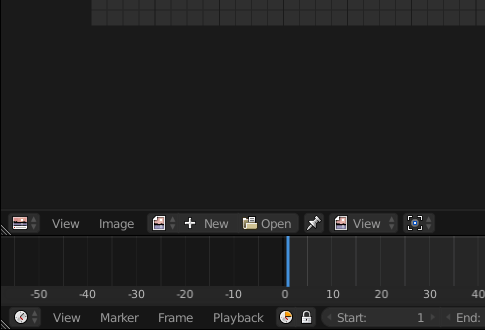
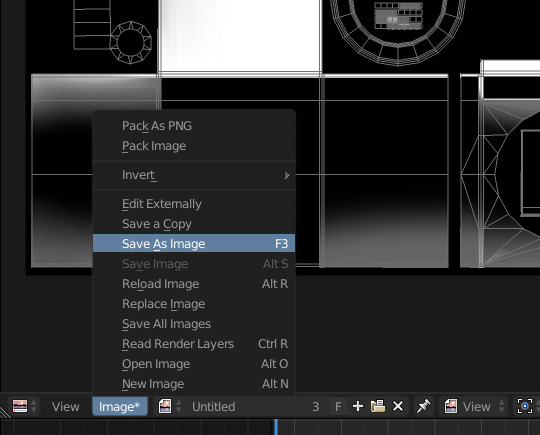
Open your Blender file with the object we’re going to design the snow mask for. Once you’ve opened the file, open yourself a UV editor tab and create a new texture with the size of your diffuse texture. The texture we’re going to create is going to be black:
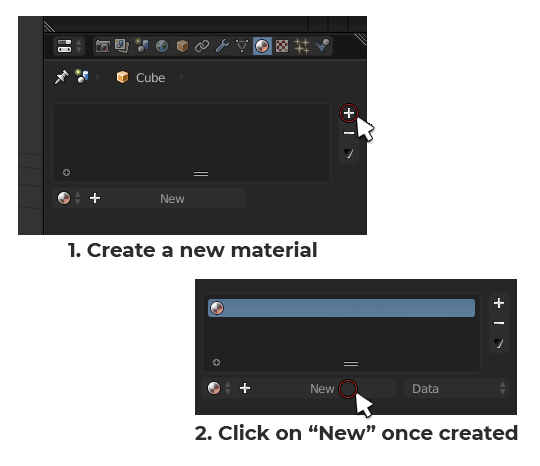
Once you have your texture, we can start painting. Let’s create a new material for your mesh. Click on your mesh and reach the materials panel:
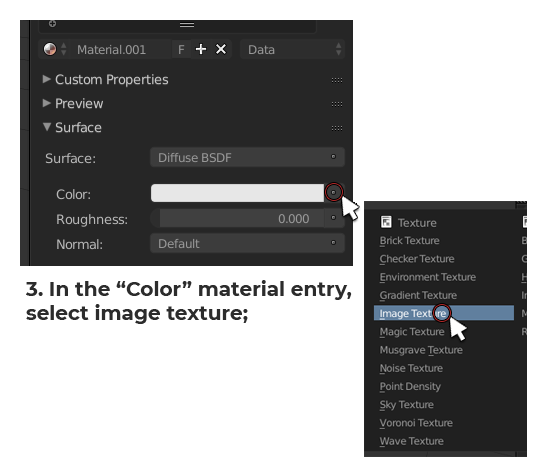
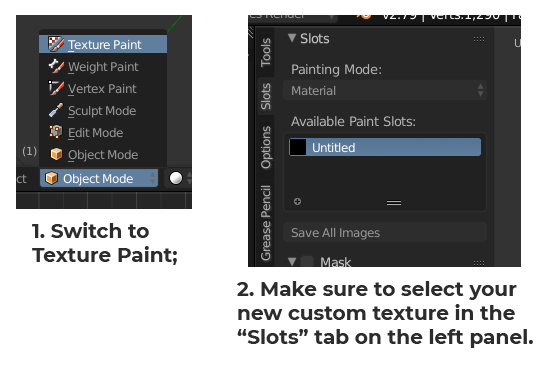
Now that the texture is inserted into the material, we can paint on it. Let’s switch to Texture Painting. Select your mesh and press [DEL] on your keyboard Numpad to center the view on it. Once you’re done doing that, this is how to enter Texturing painting mode:
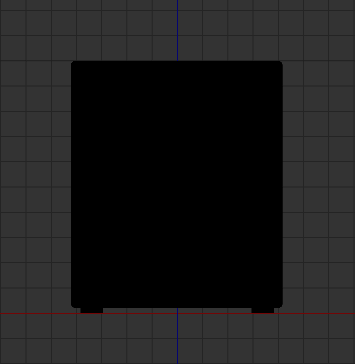
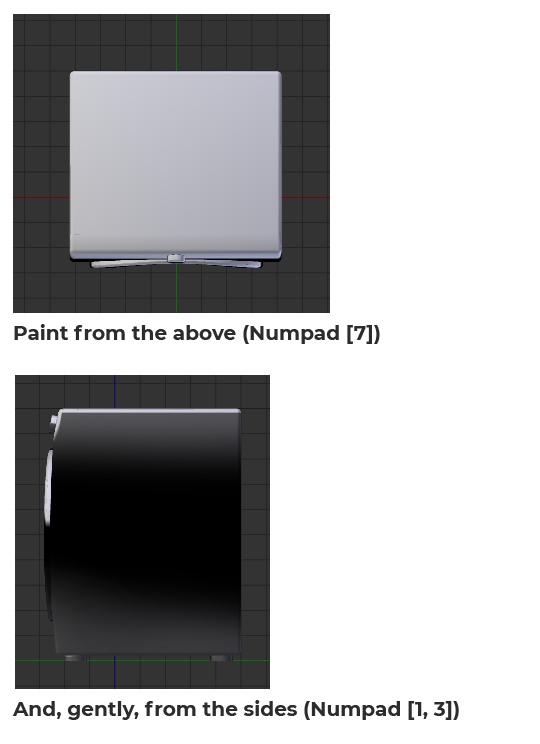
We’re ready to paint. To create a snow mask, you want to cover the base of the mesh a bit to simulate the frosting of the surface caused by the freezing snow on the ground but also the top surface to simulate the snow that has fallen onto the object from the sky. The best way to do so is, first of all, by going into Orthographic view. Having no perspective in the scene will help you minimize the bleeding of your painting. To switch to Ortho, press [5] on your keyboard Numpad.
Let’s paint the front first. Press [1] on your keyboard Numpad to switch to front view. Let’s adjust our brush before painting. Adjust your brush size and strength according to what are you’re trying to cover.
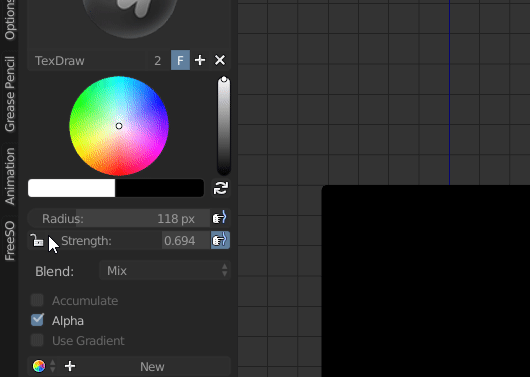
For the bottom portion of the object you want to have a big brush and a lower strenght (around 50% the original default strenght) in order to use just the feathered out end of it for a softer stroke.
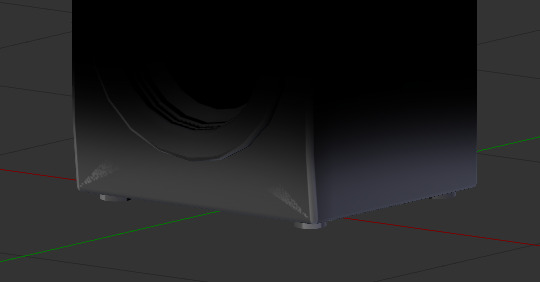
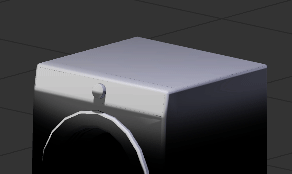
Repeat this for all sides! Don’t worry too much about being too even with the height of your strokes, we’re gonna blend them together after we’re done painting them.
Once you’re done, it should look something like this:
Let’s even out these harsh edges and, occasionally, painting artifacts. Grab the “Smear” brush in the brushes toolbox:
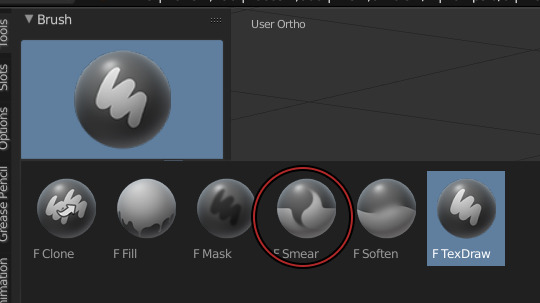
Smear the edges until completely smooth. Do this for all sides.
Once you’re done with the ground snow, paint the sky snow. To do that, grab your Texdraw brush back and follow these steps:
And then, smear it all!
Once you’re done doing that, save the texture and open it in Photoshop. I’m assuming you know how to export a texture from Blender as a PNG and then opening it in Photoshop.
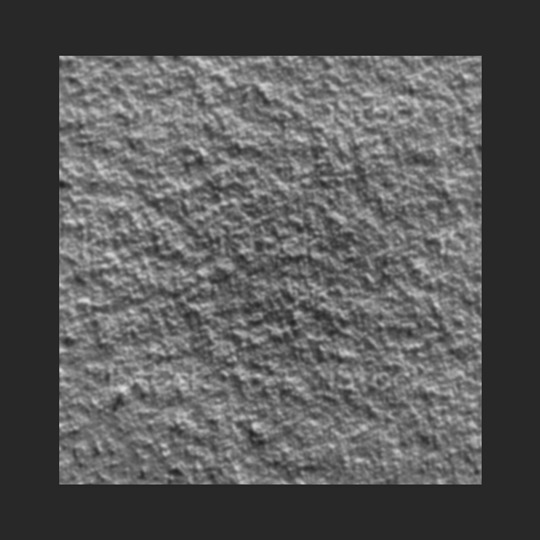
Once you have your texture open in Photoshop, i want you to google a Snow texture, fairly big (big enough to fit the size of your texture).
Insert it in your PS document as a new layer and put it over the snow texture you painted earlier. Now turn that snow texture black and white (even if it seems to be already, there’s probably some colored pixels due to compression here and there).
Now open the Levels sliders and achieve this look by sliding the middle slider on the right or left (depending on your picture):
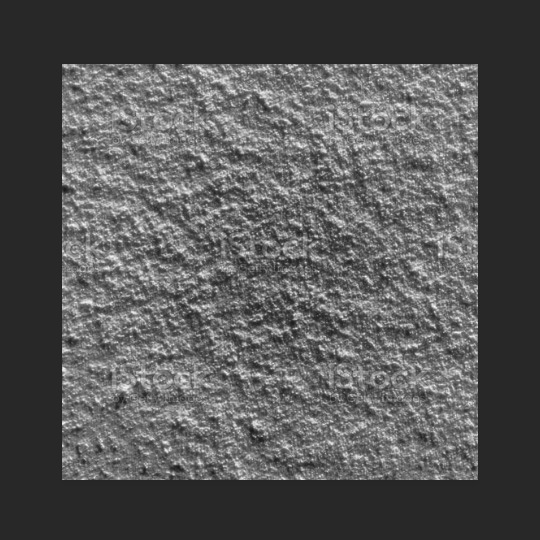
Now, use gaussian blur to feather it out a bit and make it less harsh and Alpha like, we’re going for a maxis match look. If you want an alpha look, skip this step. This is how it looks after blurring it:
Now, go to the blend mode of this layer and set it to Overlay. I’m assuming you know what this means.
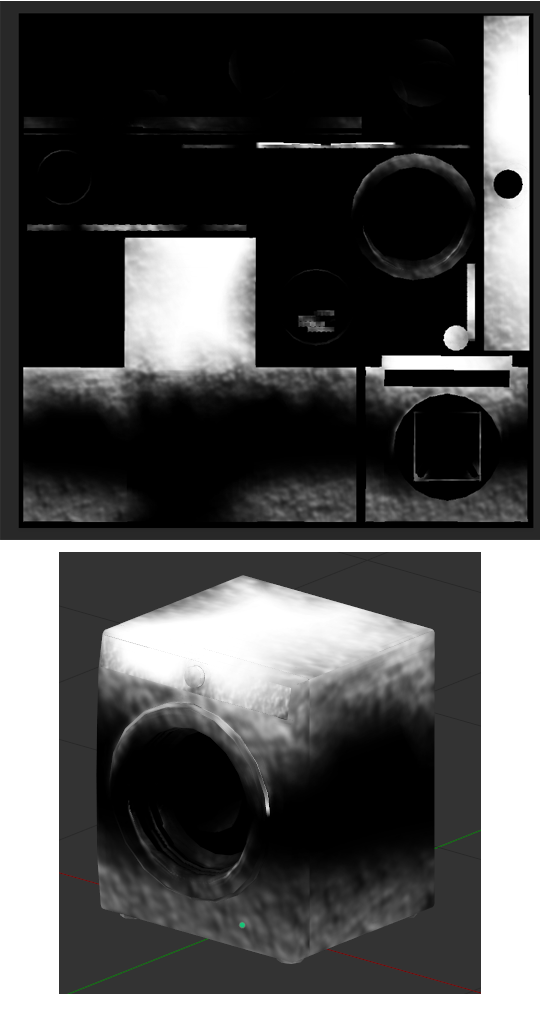
If it needs further smearing, go ahead and do that to remove visible seams. If it needs opacity adjusting, you can do that as well. Add a pitch black layer over everything in photoshop and adjust it’s opacity to make the snow more or less visible.

Substance Painter is a product under paid license by Adobe. My university provided me with a license, however, you can use the trial version to experiment with it.
Import your mesh into substance painter, without any additional texture (don’t click on ADD):
Add two fill layers and uncheck every single material property except for “Color” and “Roughness”. The top material will be white, the bottom one will be black. Turn the roughness of both material to 100%:
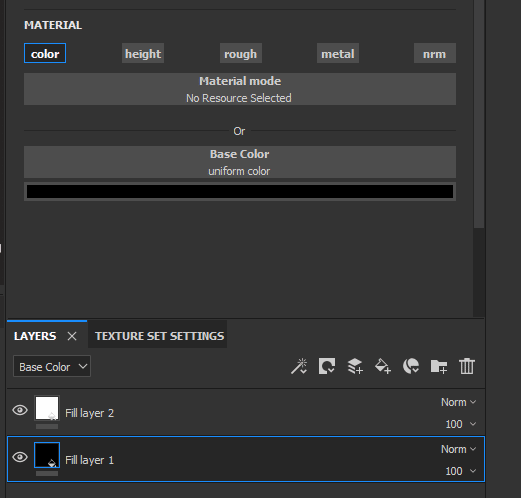
You can rename your fill layers if it makes it easier for you to keep track of what you’re doing. I suggest renaming the white one “Snow” and the black one “Background”.
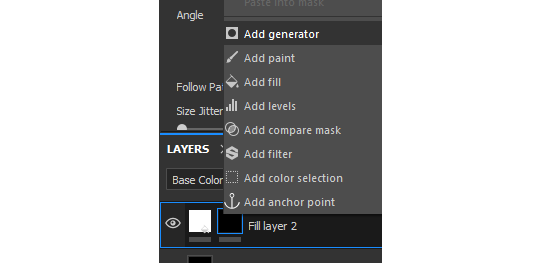
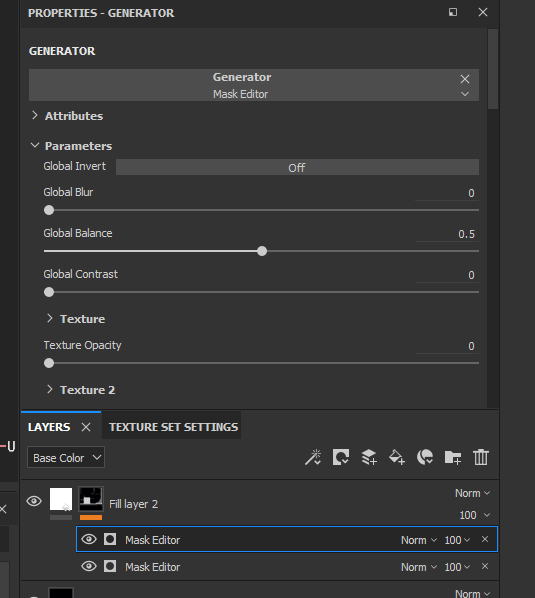
Now, let’s add a few a masks to make it look like what we’re trying to achieve. Right click on the snow material and select “Add Black Mask”. Now, right click on the mask and select “Add Generator”:
Generators are dynamic masks that can be fully controlled by the user to achieve multiple types of dirt.
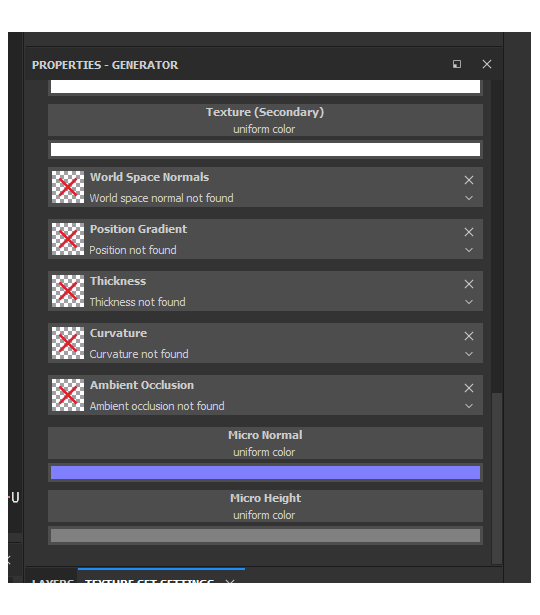
For our snow, we’ll begin with the ground generator, for the frosted surface starting from the bottom. Click on the generator entry that was created and assign it a “Mask Editor”:

If you scroll all the way down inside the Mask Editor options, you will notice our mesh has absolutely NO baked texture:
To operate, the Mask Editor needs these textures, so we’re gonna bake them. In order to do so, switch over to the “Textures” tab:

This is what your Baker window should look like:
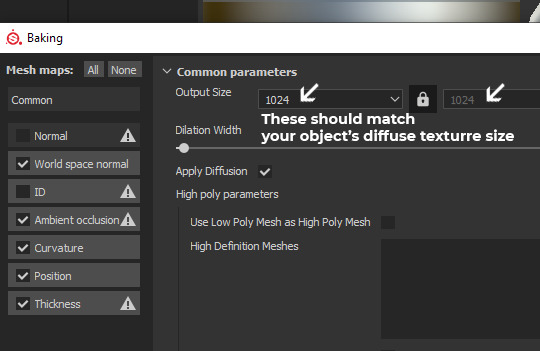
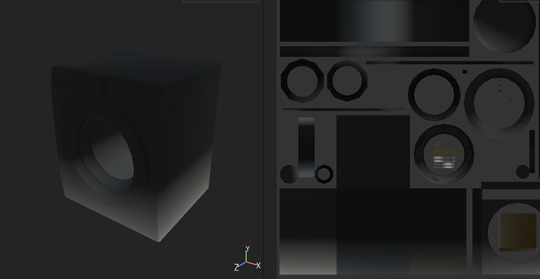
You can now click on [Bake DefaultMaterial Mesh Maps]!
Once the bake is finished, your Snow fill layer should look a little different, cause the Mask Editor received the recently baked textures. Now we can edito the Mask Editor properties. We are starting by creating the bottom frost layer, so let’s get to it.
By default, in the Mask Editor settings, the Curvature value is turned on all the way. Slide the slider to 0. Instead, activate the Position Gradient value. By default, the position gradient goes from top to bottom. To invert this flow, the handy Invert button is there for us. Switch Invert from off to on. Since we inverted the mask property, the Brightness slider will still do its job, but the other way around. Increasing the brightness will decrease the opacity of the snow mask. Now, play around with the Balance and Contrast sliders until you achieve a similar look:
Balance: 0.09; Contrast: 0.22; Brightness: 0.57;
We now have the perfect base to work on some details, a nice linear bottom to top gradient. Now, scroll down to the texture area of your Mask Editor. You’ll notice there’s two empty slots, called just “Texture”:
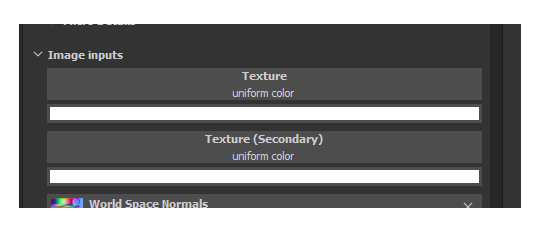
You can fill these in with “Grunge maps” (detail textures in black and white) to add variation to anything in the Mask Editor. Let’s fine one that suits our project the most.
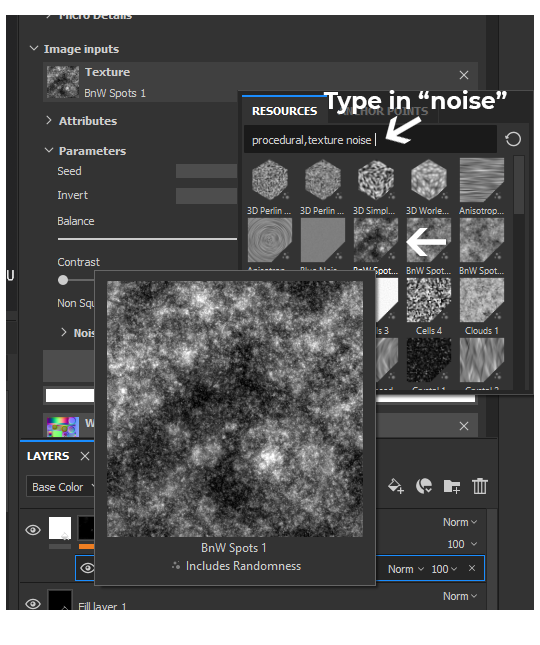
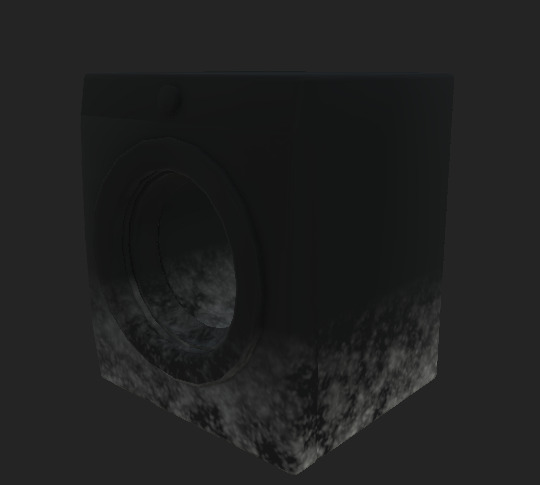
This randomizable texture called “BnW Spots 1″ seems to be a good starting point, it looks like it could be interpreted as a frosty snow, let’s click on it and add it to our “Texture” slot.
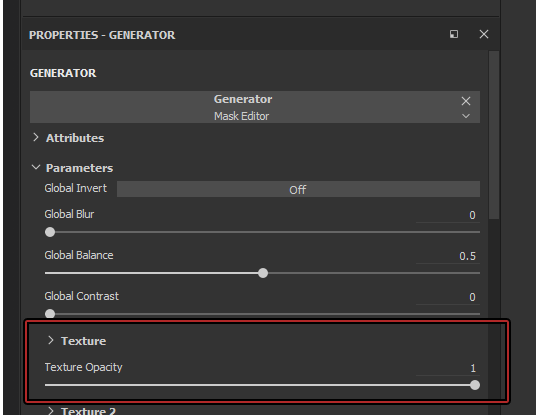
To make our “Position Gradient” influenced by the newly added texture, you’ll need to turn up the “Texture Opacity” slider in the Mask Editor global settings at the top:
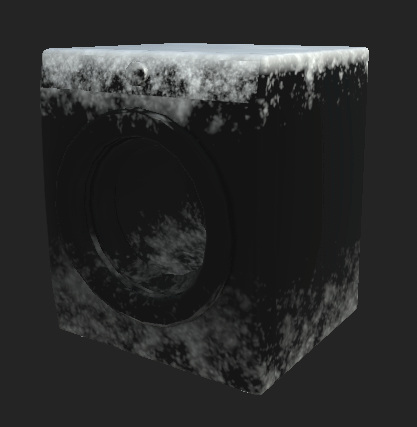
The result is now undeniably better:
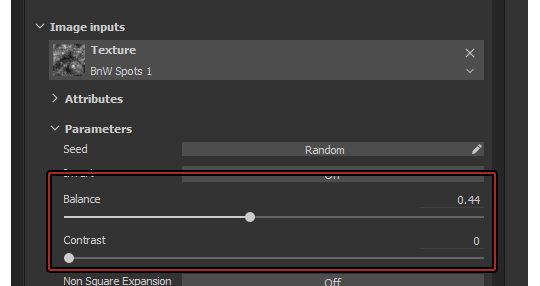
Looking good so far! Now, you can play around with the Texture’s Balance and Contrast in the Texture Slot and see changes happen live:
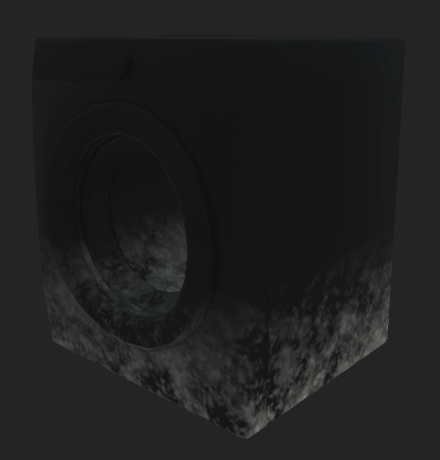
Decide what looks good to your eyes, this is 100% subjective! It’s looking really good, but you can still see a clear ending point of the gradient!

To fix this issue, you’re gonna have to play around with the Balance and Contrast of the entire Mask Editor, which are located at the top of the Mask Editor options:

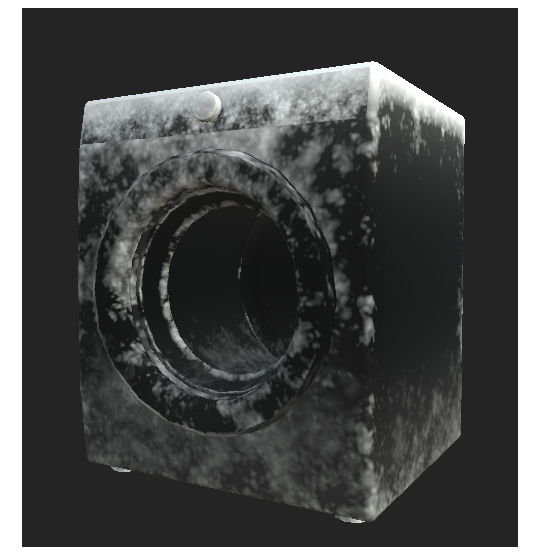
Repeat the same process for the top portion of the snow (the fallen down from the sky type), just without turning on Invert obviously. You can right-click on the mask and add another Generator. Just make sure to set your second Generator to Add onto previous layers!
You can also turn on some “Curvature” (the one we previously disabled) on the top snow Generator to make it even frostier:
In my final product, i added another two generators, with no texture, to add some more gradienty frostiness to the whole texture.
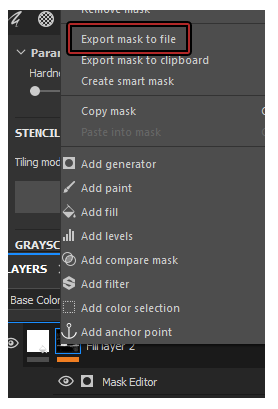
Once you’re done, export your mask and save it as a file. Put “.png” at the end of the file name!
And you’re done!
#the sims 4#sims 4#ts4#s4#the sims 4 tutorial#sims 4 tutorial#ts4 tutorial#s4 tutorial#the sims 4 snow#the sims 4 snow mask#sims 4 snow#sims 4 snow mask#ts4 snow#ts4 snow mask#s4 snow#s4 snow mask#the sims 4 seasons#sims 4 seasons#ts4 seasons#s4 seasons#tutorial
71 notes
·
View notes