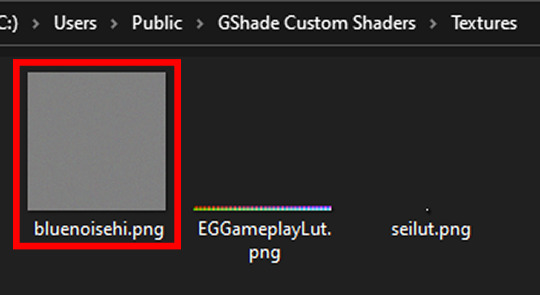
#open folder: png
Explore tagged Tumblr posts
Visit Tumblr Blog
Explore Tumblr blogs with no restrictions, modern design and the best experience.
Last Seen Tumblr Blogs


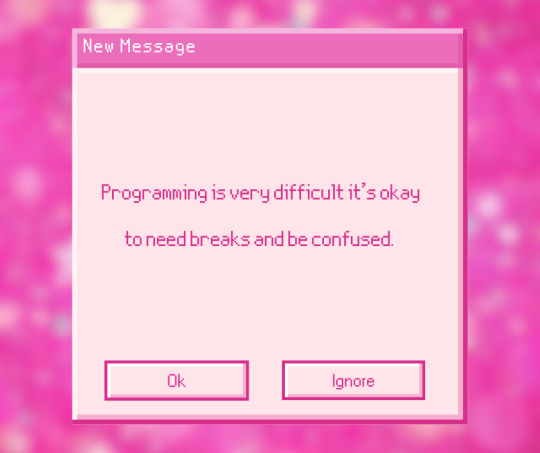
Fun Fact
12.7% of mobile users access Tumblr.
Text
#gentle reminder#bunny makes blinkies#codeblr#coding#open folder: png#progblr#studyblr#css#programming#code blog#programming blog#programming blr#comp sci#computer science#2000s tech#pink#pink tech#pink aesthetic#old web#old tech#techcore#webcore
2K notes
·
View notes
Text
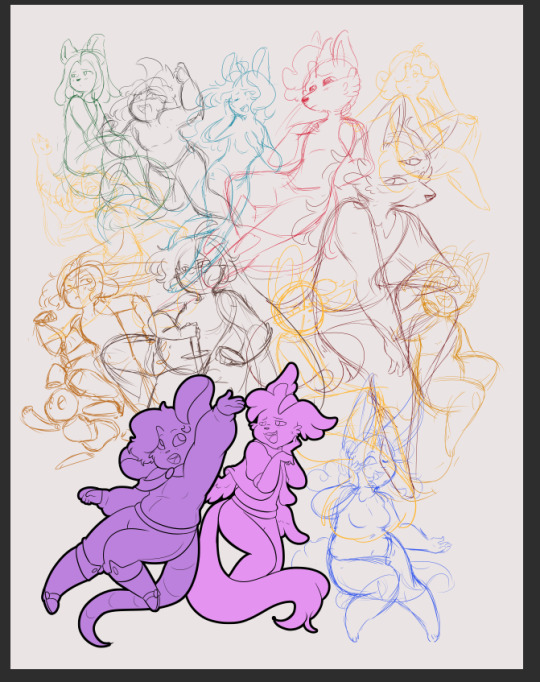

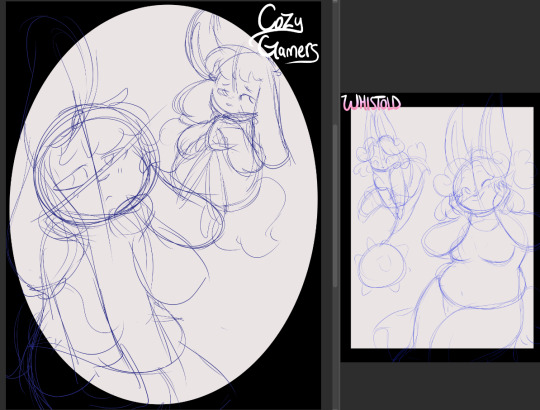
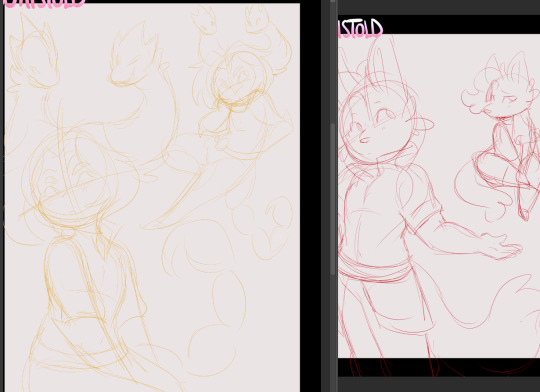
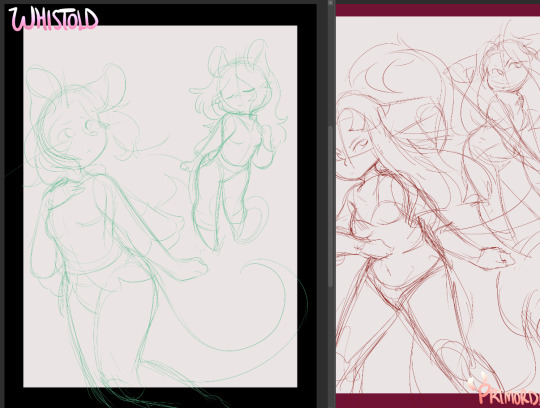
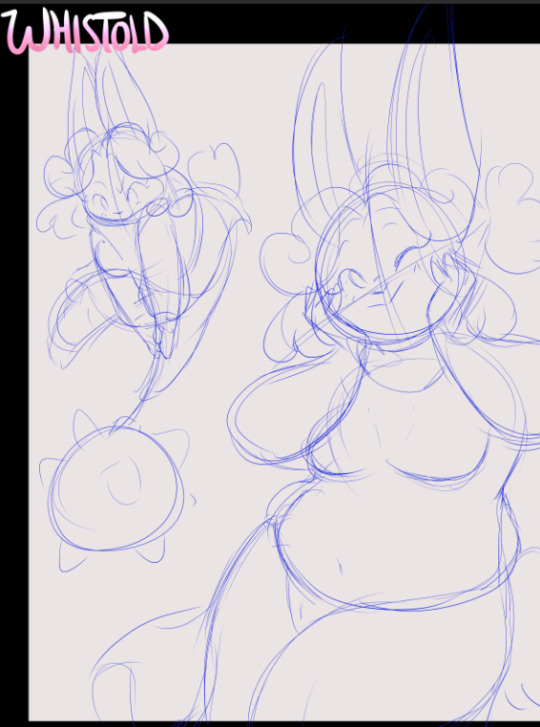
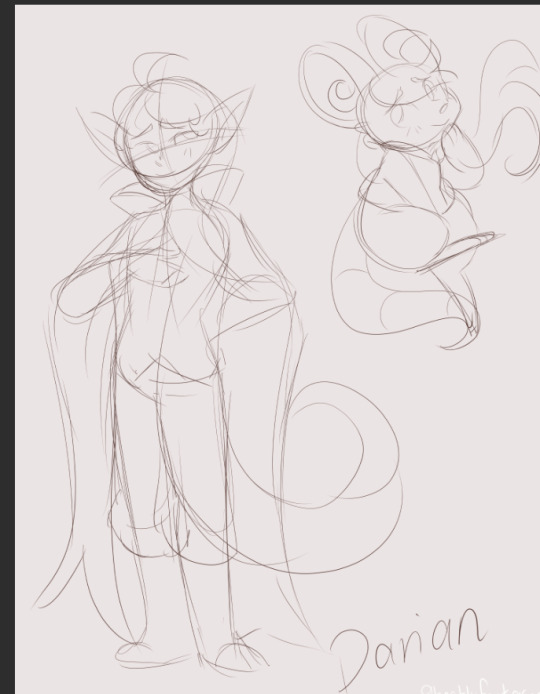
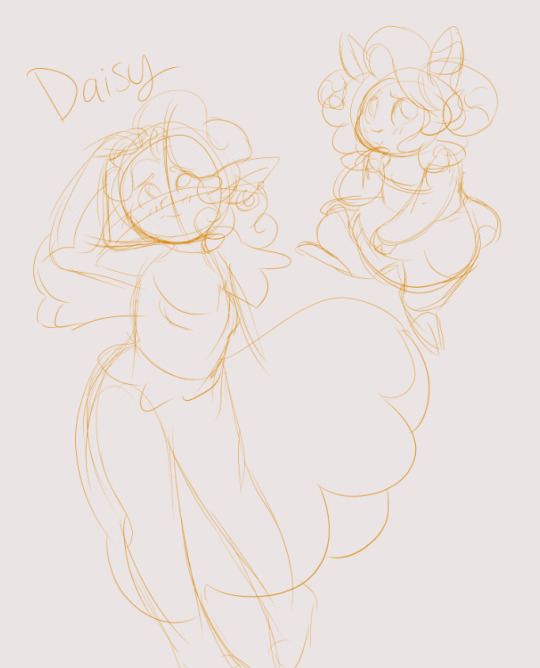
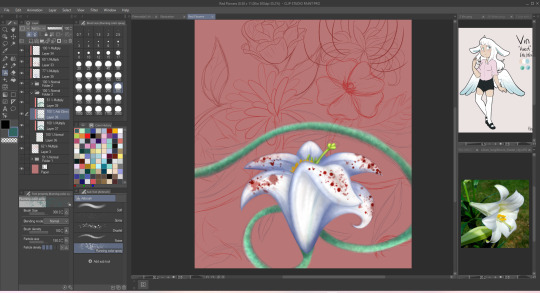
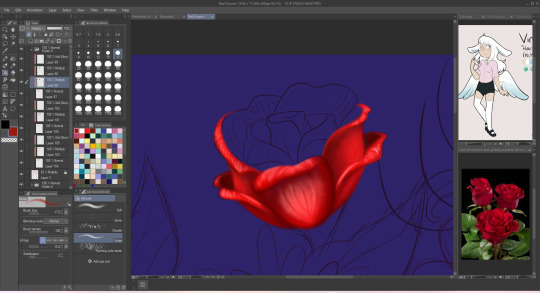
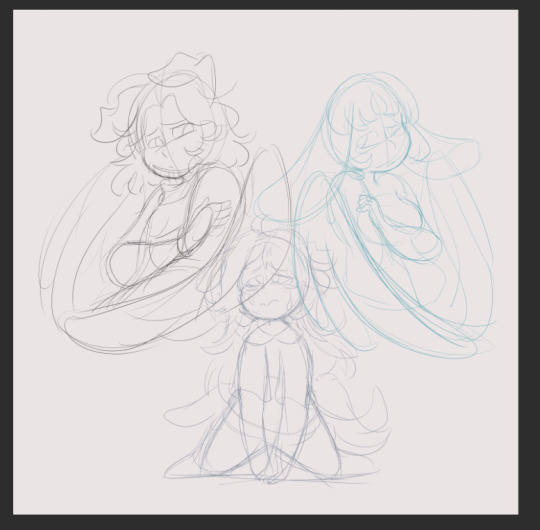
Way to many projects dump
some old sketches I'll never finish, some I plan to, some I need to but lost motivation to (*cough cough*Whistoldmap*coughs*)
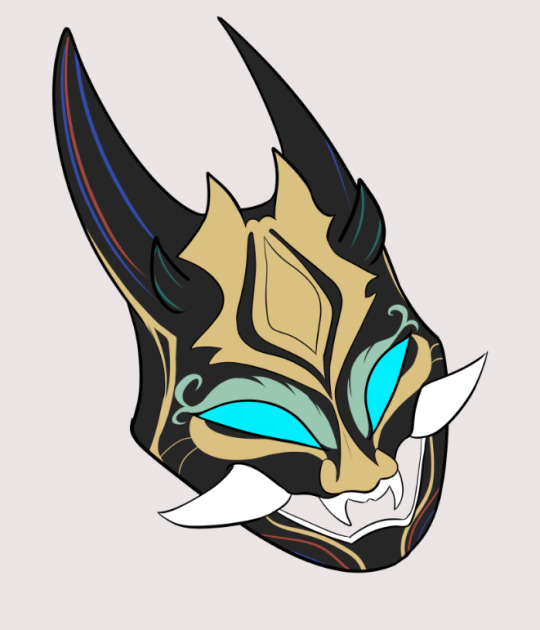
And the flat color of Xiao's mask from a drawing that is definitely already dont and posted
#wips#this is a lot of stuff#i just. went through and started opening canvases that never got exported as png#basically 'it was never finished so it never left the csp file stage#some of these i really love and need to finish#others im like.. nah#*looks at several screenshots of the same big drawing*#can i even bring myself to finish you#months old lots of detail flower drawing with an ugly luis#i didnt even open my genshin impact folder and im sure there are more there#primordial life#whistold#cozy gamers#some of these were artfight prep i didnt finish in time lmao
3 notes
·
View notes
Text
THE NEXT PERSON WHO SAYS IT DOESN'T WORK GETS PUBLICLY EXECUTED VIA HAMMERCAR (check reblogs for further info)
"what's it like to use nightshade/glaze?"
so based on my own experience I thought I'd make this more transparent since I know a lot of people hesitate to take action on some things if they do not know Exactly what happens. it's me i'm people. So;
Nightshade takes about 30 minutes on its fastest setting. The end result tends to look like mild jpeg artifacting, very slightly creased paper, or just brush texturing. Looking at it normally, it is undetectable. Glaze is very visually similar, given the strategy, except that Glaze's longest time setting is 5 minutes.
You put in a file, select how much you want it affected and for how long you want it to render. For Nightshade, you also attach a tag to it, that way AI finds what it's looking for with an associated word. You select a folder for the final result to save to, then hit run.
It takes a lot of GPU/CPU. The fans on my laptop sound a bit like I'm running Minecraft, and it refuses to run if you have too many programs open. I could run Youtube and Nightshade at the same time, but Youtube did Not like it. Best to just take a break while you let it do its thing. Run Nightshade before you go out or something.
It does NOT like transparent png backgrounds. Makes me wonder how AI does with 'em. Anyways, running a backgroundless drawing through Glaze and Nightshade respectively makes it turn out like this:
creasing effect is more noticeable, and it adds strange blocky black and white backgrounds to it. If you want good results for your time, be that less than 1 minute or 180 minutes, consider getting rid of the transparency.
I would post a before and after picture of a Nightshaded piece but of course, I would like to post exclusively poison on this site.
As one last note, it took me a lot of effort to find where you're actually supposed to download these tools, so Glaze is here and Nightshade is here. Overall I highly recommend using them if you can. Don't let AI run you off of your sites: run the AI out yourself.
8K notes
·
View notes
Text

Did you know you can modify your game files to start with custom lots in the lot bin? Did you know you can add your favorite lots to the program files and you'll never have to import them ever again? I sure didn't. Here's how.

Part 1: Freshen Up That Lot!
Locate the lot you want to freshen up. If it's in your Documents > LotCatalog, it'll be named something like cx_00000001.package. [Hint: you can use CleanInstaller to browse your LotCatalog with pictures!]
Clean it up using LotCleaner and LotCompressor (and Magic Wand, if you want). Here's a tutorial. Do NOT skip this step, or you risk contaminating future save files with old sim references.
Make it a spiffy new picture. Personally I like to lump my similar lots together with a similar title/street name. And I color-code using CatherineTCJD's color-coding format. If you want to match me, you can download my template psd here.
Open your lot in Simpe and replace that old preview. Click 'jpg/png image'. Right click the property > Replace. Change file format to 'all files' to see your image. Click either 'yes' or 'no' on the 'resource changed' popup (it doesn't matter--one updates the image preview immediately, the other doesn't). Click save.


Part 2: Relocation Time! *MAIN LOT BIN*
You cleaned up your lot, right? No sim references left? Don't skip this step or you risk messing up future hoods. Clean up that lot!
Select your lot file and rename it to the cx_00000000.package format. You can use any numbers but it must be in that format and have 8 digits. The number denotes the order so get creative with your categories. (ex: lots cx_00000100-150: modern houses / cx_00000200-250: beachy, etc.). You can use any bulk renamer to rename files in order without having to manually number each one.
Pick an Expansion for your files. Mansion and Garden comes first in the lot bin, Base Game last. The expansion you select will denote the location of your lots within the catalog. The file location is the same in every expansion, so you can even spread your lots around for max organization.
Move your cx_#.package lot file to Program Files > The Sims 2 > [expansion of your choice (ex. Nightlife)] > TSData > Res > UserData > LotCatalog. You will already see some files here. These are the maxis lots that fill the lot bin every new game. You can delete them if you really want to, or just change the extension to something else to make them go away. (Catherine has a backup if you need them back.)
Done! Now your custom lots will prefill the lot bin every time you generate a new The Sims 2 save file in your documents!
This will not pre-fill existing games. If you want to put your new clean lots into your current file, rename your main The Sims 2 save file (in your Documents folder) something else. Launch Sims 2 so it regenerates a clean copy. Create a new Hood, let the game load, and check out the LotCatalog. It will be now filled with your brand-new lots. Copy them over to your main file's LotCatalog. [Check your main LotCatalog in game to make sure you won't be deleting/overwriting anything you want to keep (make a backup just in case!) Check it again with CleanInstaller. Do not delete/overwrite occupied homes! And delete your old and crusty lots in game if you want to be extra safe.]

Part 3: Relocation Time... 2! *SPECIALTY LOT BIN*
You cleaned up your lot, right? No sim references left? Don't skip this step or you risk messing up future hoods. Clean up that lot.
We will now populate the second tab in the lot catalog, the Specialty lot bin that holds Hotels and Apartments. You can put whatever you want in here; it doesn't have to be hotels or apts. You can move lots from the main catalog to this one, if you want. These lots do not appear in the LotCatalog of your main save file, in case you try to look for them there later. They only exist in the program files.
Rename your files. Unlike the previous lots, you can name these lots anything you want, as long as it ends in _Permanent.package. stinky_Permanent.package is perfectly fine. Name it something descriptive.
Pick an Expansion for your files. You can put them in any Expansion folder, but personally I keep my apts in Apartment Life to stay organized.
Move your files. Take your stinky_Permanent.package and move it to Program Files > The Sims 2 > [expansion of your choice (ex. Nightlife)] > TSData > Res > LotTemplates. You'll see some other files here already. These are blank lots and hotels/apts (if you're in Apt Life or Bon Voyage). Don't touch the blank lots, but you can remove the hotels/apartments if you don't want them. (You can move them to the main lot bin by renaming the files to the cx_# format and moving to the location in part 2). You can open them in SimPe to check what they are, but Catherine has a visual list here.
Done! These lots will appear in the Specialty lot bin every time you boot up the game, even in your current saved game.
Have fun and enjoy organizing!
[PS: did you know you can not only delete or relocate existing bin lots, but replace them with better, and cooler lots by simply overwriting the existing cx_0000000 files in your UserData > LotCatalog folders? Catherine has a visual guide which file is which, if you want to reinvent them all. The lot bin is your oyster!]
credits: CatherineTCJD for the Lot Refresh project that made me learn this. Bluerubberbear for the majority of the lots in my thumbnails and the lot in the psd file. Plumbtales for the other lots in the thumbnails and for the beautiful lot makeovers that I replaced maxis's community lots with.
#sims 2#the sims 2#ts2#sims 2 tutorial#ts2 tutorial#lot tutorial#tutorial#mine#this literally blew my mind when i learned you could do this. i hate how messy the lot catalog is!!!!!!!!#and how you cant tell apart community lots from residential. smh.
367 notes
·
View notes
Text

i told my friend i would find him some beginner’s giffing tutorials, but all the one’s i could find were either years out of date, used a method that made me go “huh”, or incorporated ready-made actions. all perfectly fine, but if i’m sending someone a tutorial i’d rather it be one for a method i understand enough to help with.
so, here is a beginner’s guide to giffing, as told by cleo, a neurotic, detailed, and organization happy individual. there will be many pictures.
this tutorial will strictly cover the gif making portion of the process, from getting your screencaps to importing in photoshop, resizing/cropping, and sharpening. i was going to briefly go over colouring, but tumblr only allows 30 images and i ran out of space, so i'll have to do a separate colouring tutorial (which also means i can go into more detail, yay).
downloading the videos, whether direct downloads or t*rrents, is also another tutorial. but make sure you’re using at least 1080p, and the bigger the file the better. a single episode of a ~45 minute show should ideally be 2gb at minimum. a full length movie should ideally be at least 5gb. imo 2160p/4k files are not really necessary; the quality increase is negligible, and it takes a lot longer to screencap them. if you do use 2160p/4k files, try and make sure it is not HDR, as those videos are often washed out and require a different screencapping program to fix.
Programs
I am using a cracked version photoshop 2022, but whichever version you use should be pretty much the same
Actions. not a program but a function inside photoshop, where you essentially record a series of steps, and then you can simple play that action when needed and those steps will repeat, which saves considerable time when giffing. I will note which parts of the tutorial are best saved as actions, and explain how to create actions at the end.
For screencapping i use kmplayer it’s free and very simple to use
not at all a necessary program, but i use freecommander instead of the regular windows file explorer as i find the dual panels very helpful when moving the frames around
Screencapping
there are many programs you can use to get the screencaps from a video, a lot are basically the same, some are better suited for particular video file types. kmplayer is a very simple program to use, but afaik the capture function only works on mkv. files (the only other file type i’ve tried is mp4, which plays but does not capture)
once you open your video file in kmplayer, we’re going to open the advanced capture window, found under capture→advanced capture, or alt+v
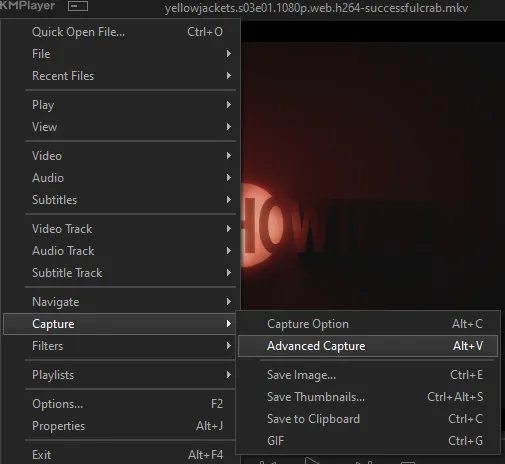
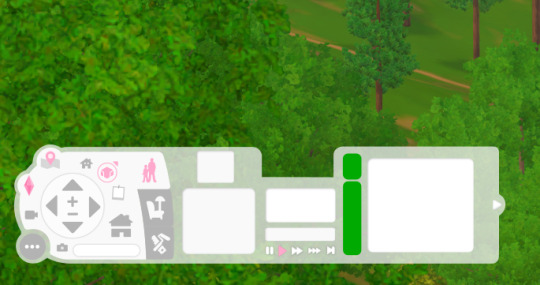
the window should look like this
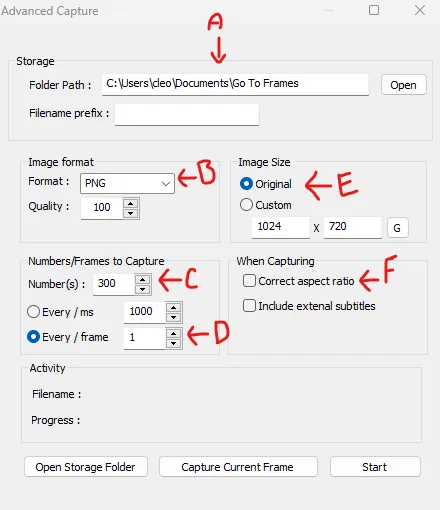
A-this is where all your screencaps will save to. i recommend making a specific folder for all your screencaps
B-make sure this is set to png for best quality
C-this is the number of screencaps you want to take, guesstimate how many you will need, keeping in mind that most videos are approx. 25 frames per second, and you should always cap a bit more than you think just in case
D-make sure “every/frame” is selected and set to 1
E-make sure “original” is selected, resizing will be done in photoshop
F-make sure “correct aspect ratio” is unselected
go to the part of the video you want to gif, and pause it just slightly before that part starts, then select ‘start’. the screencaps will start to save to the file, no need to play the video, and will automatically stop once it has capped the number of frames you have chosen
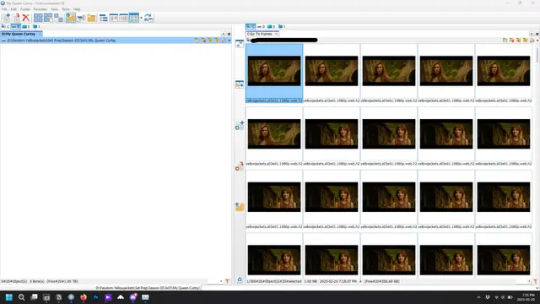
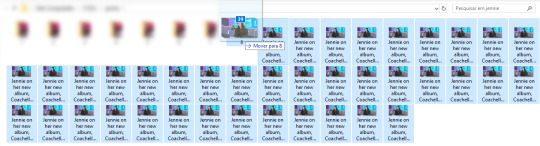
and here is how they look inside freecommander. i have already made a folder for this gifset, which is on the left. now you’re going to make a folder for each individual gif. i’ve decided this one will have four gifs, so create four folders (i just label them gif 01, gif 02, etc) and then move the frames for each gif into their respective folder
while you can always delete frames once the gif is made if it’s too big, i prefer to make sure i have the correct number of frames before i start. the gif limit on tumblr is 10mb, so it’s good to look at the scene/shots you’re giffing and decide approx. what dimensions your gif will be. full size gifs have a width of 540px and your choice of height. if you go for a square gif (540x540) you can usually fit 40-50 frames. if you’re planning for a smaller height (such as 540x400) you can usually fit more around 50-60 frames.
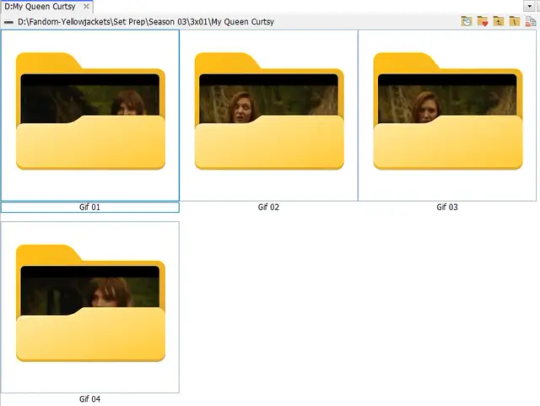
and here are the caps inside the folders. another reason i like freecommander is it’s ability to “multi-rename” files. the default file explorer can do so as well, but you have to do each folder individually and you can’t customize the new names as much. either way, i prefer to rename the files to each gif just to scratch my organization itch.
Introduction to Photoshop
NOTE: i have changed many of my keyboard shortcuts in photoshop to ones i prefer, so any you see listed in the menus of these screenshots are likely not the original shortcuts. you can see and change them yourself under edit→keyboard shortcuts

quick run-down of the photoshop interface. i have adjusted placement of some things from the default so this isn’t exactly how your photoshop will look when you open it, but everything is labelled, either on top or by hovering over the element. once you’re more familiar and have your process down i would recommend adjusting the workspace to suit your process.
A-your main tools and colour selector. almost all the tools have either several tools in one, or have alternate options which can be accessed by right-clicking the tool. you can also hover over each tool to get a pop-up with a quick explanation of the tool
B-additional “windows” such as history, properties, actions etc. can be opened from the window menu at the top and moved around with click-and-drag. history and properties should already be there by default, but probably on the right hand side instead. each window opens and closes with a click
C-the timeline window where the gif is made. the white square is a single frame of a gif, and on the row below is the play controls. this will not be there by default and will need to be opened from the window menu
D-adjustment layers for colouring
E-layers box. this is where the screencaps will show, along with adjustment layers, text layers, etc.
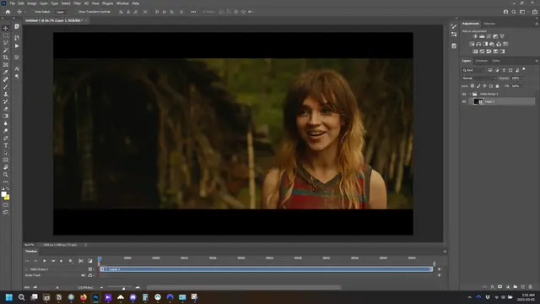
Opening Screencaps in Photoshop
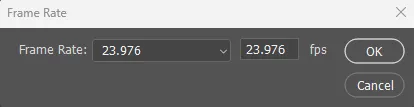
go to file → open navigate to the folder for your first gif, select the first screencap, and check the image sequencing, and click open

a window will open labelled frame rate. set it to 23.976 and select ok
the screencaps will open in the timeline view, seen as the blue panel line at the bottom, and the screencaps are combined into video layer in the layer panel on the right.
Creating Frames
technically, you could go right into your cropping/resizing and sharpening from here, however if you do that directly then you have to keep the screencaps in the folders you have, otherwise if you save and re-open the gif it won’t move.
this next part should be made into an action.
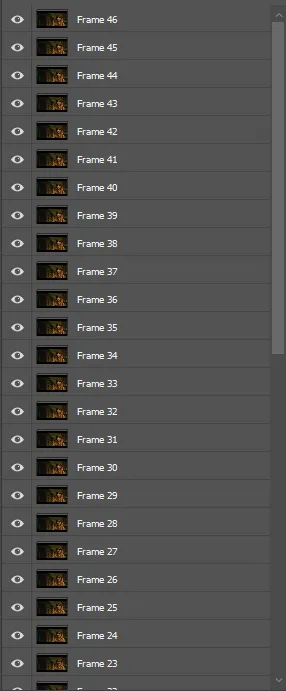
at the top right of the timeline window, click four vertical lines to open the menu and select convert frames → flatten frames into clips. depending on how long the gif is, this can take a minute.

the layers panel should now look like this, each frame of the gif is now its own layer.
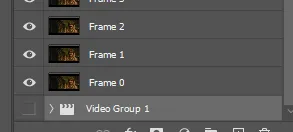
the very bottom layer will be the video group. this can be deleted as we’ve made the frames from it
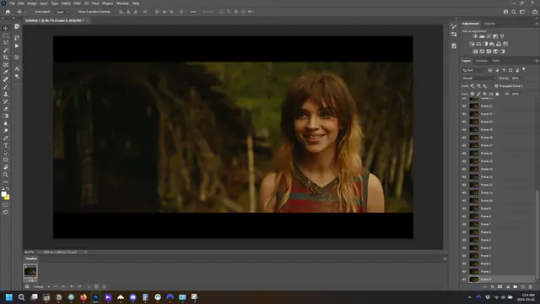
in same timeline menu as before, right under “flatten frames into clips”, select “convert to frame animation” and the screen should now look like this. this will be the end of this action.
Cropping and Resizing
with widescreen footage, sometimes it’s just shorter than 1080p, but most of the time it will have the black bars on the top and bottom, and frustratingly, they’re not always the same size. it’s good to save the most common sizes as actions.
to find the size of the actual screen you turn on the rulers under view→rulers and check the height. then open your canvas size dialogue box under image→canvas size and change the height, making sure pixels are selected in the dropdown. yellowjackets is what i call “xtra wide” which is 800px. “normal” widescreen is 960px.
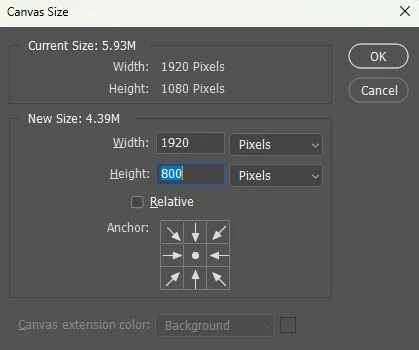
next we’re going to resize the caps. i also make actions for this, one for each potential gif size. open the image size dialogue box under image→image size and change the height of the image to your desired height plus 4 pixels. these extra pixels are to prevent a line at the top and/or bottom of your completed gif. now re-open the canvas size box, change the width to 540px, and the height to the desired, removing those 4 extra pixels. i have set this one to 540x540. this is where you would end the resizing action.
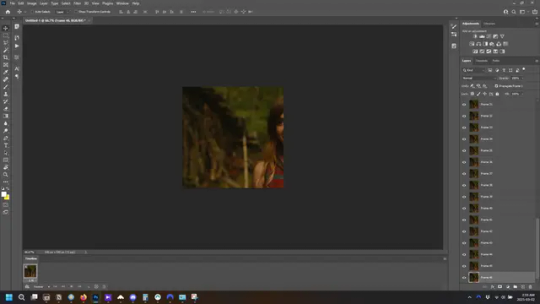
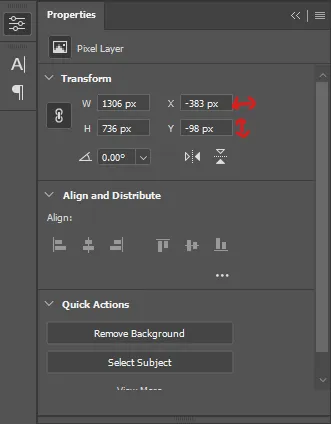
and as you can see she is off-screen. select the top layer, hold down shift and select the bottom layer to select them all, and with the move tool (the very top one) activated, click and drag to move it left to right as needed to centre the figure/s. as you move it a box will appear telling you how far you are moving it in any direction. make sure you are only moving it left or right, not up or down. to be certain of that, open the properties tab.
the y axis is your up/down, x is left/right. for this gif the y needs to stay at -98. you can also manually change the x axis number instead of dragging the image. also helpful for making sure multiple gifs of the same shot are all positioned the same.
the layer are currently ordered with the 1st at the top and the last at the bottom. with all layers still selected, go to layers→arrange→reverse. the last layer will be on top now. if there is movement in your gif, check if you need to alter the position again to make sure the movement properly centred. but once you are satisfied with the position, the layers should be in “reverse” position, of last layer on top. this is to ensure that the gif plays forwards.
Converting Gif
this should also be made into an action, going through sharpening process
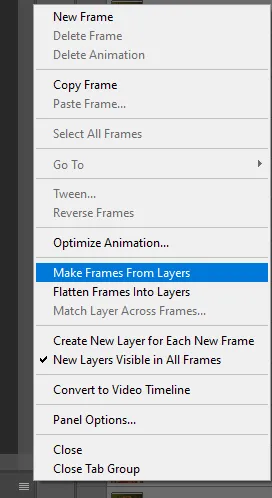
in the timeline menu, select “make frames from layers”
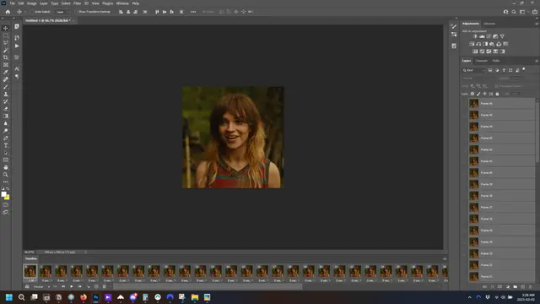
the frames are now populated in animation window. in timeline, click select all frames. go to any of the frames on the bottom and click the little arrow beneath it, select other, and enter 0.07 seconds. this is not a necessary step, as we will have to adjust the frame rate at the end, most likely to 0.05, but if we don’t change the frame rate here, then when we play the gif while working on it to check how it looks, it will play very fast.
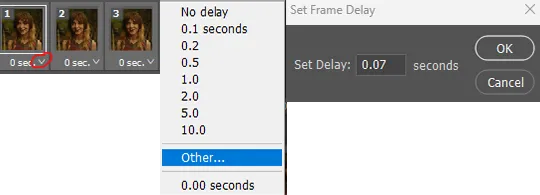
in the same menu at the right of the timeline box, select “convert to video timeline”
then, making sure all layers in the panel on the right are selected, go to filter→convert for smart filters. this turns all the layers into a single smart object.
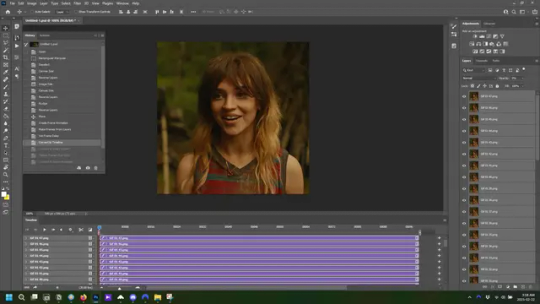
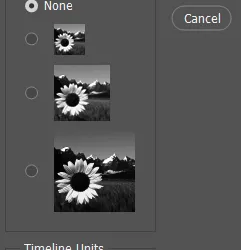
but if you look where i’ve circled, it says the gif is 99 frames long*, when in fact there are only 47. if you are making regular “scene” gifs, basic colouring and maybe a caption, this is fine and does not need to be fixed, it will play at the same speed. if you want to change it to display (approx.**) the correct number of frames, go to the timeline menu on the right, select “set timeline frame rate” and change it from 30 to 15
*if it does not list a frame number by 4 digits but instead says 5f, 10f, 15f, etc. go to the timeline menu on the right, select panel options, and change timeline units to “frame number”
**the reason why this is only approximate is because the actual frame rate is not a a whole number, so when changing the frame rate it isn’t a 1:1, and 47 frames becomes 50 frames. the extra frames are removed at the very end, but if you are not doing any edits that require working frame by frame, there’s no need to change the frame rate here at all
Sharpening
this is, as it sounds, making the gif look sharper. to start go to filter→sharpen→smart sharpen and this window opens. play around with the dials to see what each ones does. the below settings are good for most high quality footage.
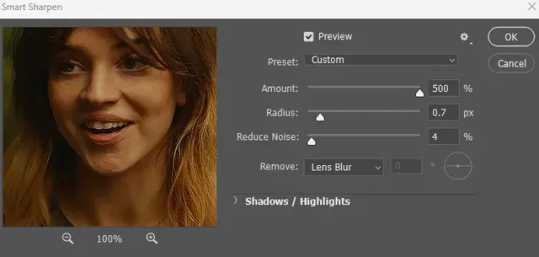
Amount-basically, how sharp do you want it
Radius-hard to explain, but this essentially sets how deep the lines of the sharpness are
Reduce Noise-smooths the pixels
once you click okay your single layer should look like this.
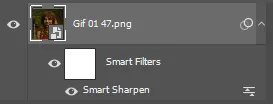
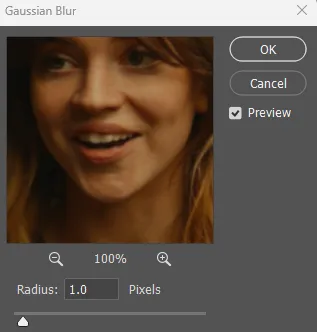
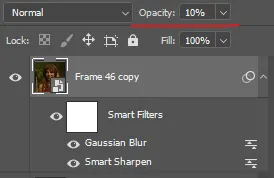
you’re going to then right click the layer and select duplicate layer. with the top layer selected, go to filters→blur→gaussian blur and set the radius to 1.0 pixels.
then change the opacity of the top layer to 10%. this is to essentially soften the sharpening a bit, as if it’s too sharp it can make the colouring wonky. this opacity level can also be changed depending on need.
finally, select both layers, right click, and click “group from layers”. your gif is now fully made and sharpened.
Colouring
yeah. ran out of image space. but this is where you would do your colouring and add a caption or any other text.
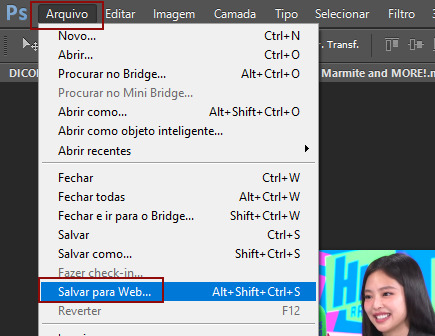
Converting & Exporting
when all your colouring is done, you’re ready to start saving your gif. you can do it directly from your current file, but that means essentially losing your colouring, as all those layers will be merged together. i am someone who likes to save my psd’s (photoshop files), at least until i’ve posted the gifs, in case i need to fix something in the colouring. if you’d like to keep yours as well, open the history tab and select the first icon at the bottom “create new document from current state”. this will open a copy of the file in a new tab. save the original file and you can close it, continuing all work on the copy file.

select your all your layers, convert them into a smart object from filter->convert for smart filters, then follow the same steps from Creating Frames above. once you're back in frame animation, select Create Frames From Layers, and once again set the frame animation speed.
most people set the speed to 0.05. i personally set it to 0.05 or 0.06 depending on the length of the gif. check how it looks at 0.05, if it seems too fast, try 0.06.
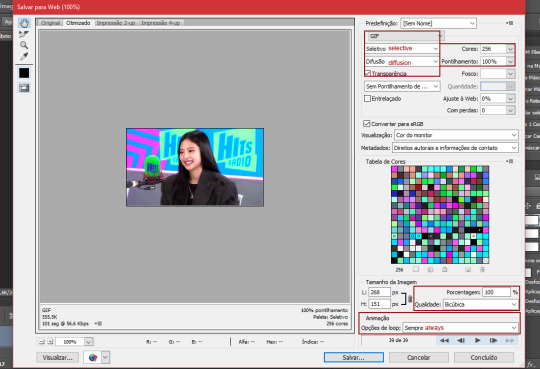
now to save. go to file->export->save for web (legacy). the number is the lower left corner is your gif size, it needs to be under 10mb or else you'll have to delete some frames.

the right panel is your save options. the preset dropdown has some built-in settings, but you won't use them because (at least on my version) the presets only go up to 128 colours, instead of the full 256. the 3 i've highlighted in green are the only one's you'll adjust as needed. the settings below i use for i'd say 90% of my gifs. i'll sometimes change the adaptive dropdown to one of the other options, ocaissionaly the diffusion, and rarely the no transparency dither, but play around with them and see how they change the look of the gif.

when you're satisfied with the look of your gif, click save at the bottom right of the window.
voilà! you now have a gif.
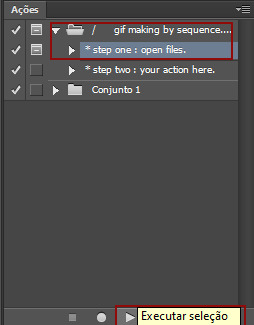
Actions
this is your actions panel. the triangle on the left side is the button to open it. remember, if it's not already there, go to windows->actions to open it.
the buttons on the bottom, left to right, are stop recording, record action, play action, new folder, new action, and delete.

as you can see, i have different folders for my resizing, sharpening, captions, saving, and my 1 step (temporary) actions. to run an action is very simple; click the action, and click play.
to create an action, click the new action button, a box will pop up, give the action a name, and click record. the record button at the bottom of the action window will turn red. now perform all the steps you want it to record, and click stop recording. keep in mind it will record every single thing you do, including in other open files, so if the action you plan to record will have a lot of steps, it might help to write them down first.
to modify an action, select the step in the action above where you'd like the new step to be, hit record, perform the step, stop recording. select the step you'd like to delete, and click the delete button.
steps within the actions can be clicked and dragged, both within that action and moved to other actions. actions can also be moved between folders.
278 notes
·
View notes
Text


synopsis :- You can only see colors after meeting your soulmate. You saw it. He did, too. He just walked away like an emotionally repressed cryptid.
warnings :- this is more crack than fluff, reader almost breaks in the boys locker room, canned coffee, parking lot confessions
a/n:- okay fine i inserted myself as the best friend SUE ME
@uzmacchiato for dividers
png by me dont steal pls
You were not asking for a soulmate.
You were asking for iced coffee and peace and a day where it didn't feel like the world was personally out to get you.
Your umbrella broke in the rain, you stepped in some gum, and your coworker tried to mansplain email folders to you again. You were already at 'burn the world down' levels of tired.
You came into the convenience store, hoping that maybe some cheap canned coffee would help. And then you touched hands with some guy that was reaching for the same thing and—
— the world exploded.
Color.
So much of it.
Your eyes blew wide. His did, too. You locked gazes.
The world blazed into reality.
Bright red fire hydrants, silver glossy soda cans, electric pink gum on the bottom of your shoe. And the stormy teal in his eyes that felt like a punch to the throat.
You opened your mouth to say something soulmate-worthy like "hi" or "Are you actually my fine shyt?" or perhaps the might, "Woah, shawty, can I get that number?"
He blinked.
And then, he walked away.
The cashier tapped the counter. "Ma'am. He left. Are you gonna pay, or do you need five more business days?"
You stared, stunned, at the exit.
Then, at your coffee.
Then, your hands.
"What the fuck just happened...?" you asked no one.
"Girl, I felt that," the cashier whispered. "Why'd your soulmate ghost you like a Netflix show that never got a season two?"
You left the store wet, confused, betrayed, and in full color. It was worse than heartbreak. It was rejection in high-definition lighting.
You spiraled. Just a little.
You even told your friends about him.
"He just left?!"
"He looked you in the eyes and then fled the scene?!"
"Was he hot?"
"Okay, but like, worth chasing down hot?"
"Maybe he's colorblind?"
"Maybe he's emotionally blind.."
You spend the next week checking every street, every Instagram story tagged 'Shibuya' like an obsessed Victorian widow. Nothing.
He just vanished.
You moved on. Or well, tried to.
The world stayed in color. Unfortunately, teal was everywhere. On street signs, on product packaging, on the Clavin Klein underwear ad featuring this super hot model named Leon Kennedy. Ugh, he wouldn't leave you alone (in memory).
You nicknamed him in your head. The Cryptid Bastard. My Ex-Husband. Pinkie Pie, too, ironically.
You tried Googling him (nothing).
You tried asking the cashier for CCTV footage (denied).
You even started writing passive-aggressive soulmate poetry like :
roses are red,
violets are blue,
I saw color,
and so did you,
so why'd you run,
you stupid shrew.
It didn't help.
Rin's POV
Okay. So.
He accidentally met his soulmate.
Saw color.
Felt a weird amount of chest pain.
And left.
Like a normal person.
It's fine. It's fine.
You probably didn't even notice. Maybe you thought it was a weird lighting trick. Maybe you don't know what he looks like. Maybe you've forgotten all about him.
He tried to focus on football.
Football is good. Football is safe. Football doesn't judge you when you meet your literal other half and then run like she's a debt collector.
He tried to bury it all in a mental soulmate box titled 'DO NOT TOUCH EVER'.
It doesn't even pretend to work. He opens the box everyday.
Because now everything is in color.
And it's the worst.
Green grass? Annoying.
Sunsets? Emotional terrorism.
The concerning brown of the canned coffee he keeps buying? It gives him heartburn now.
He doesn't even know your name.
All he knows is that he saw you once, made solid eye contact, and chose violence via disappearance. Now he's living in 4K Ultra HD regret like a clown in high-definition.
If fate ever brings you back, he's going to say something normal this time. Something not insane.
Like "Hi" or "Sorry I ghosted you, I have the emotional depth of a teaspoon" or "Please don't press charges".
God, he's doomed.
Also, has Isagi's hair always been that horrid blue?
Your POV
Months later, your best friend, Mia, forced you to come to a Blue Lock match with her. Something about needing to bag a guy named Isagi or something.
You weren't particularly fond of football. Too many rules. Too many men running around like angry toddlers with a ball fixation. Personally, you'd share the ball, but maybe that's just your opinion.
Then, he walked onto the field.
Number 10.
Black hair.
Stormy-teal eyes.
Rin Itoshi.
Your brain short-circuited.
It must've been obvious because Mia asks you if you're okay.
You stood up. You point at him. "THAT'S HIM! That's Ex-Husband! That's Pinkie Pie! That's–OH MY GOD, MY SOULMATE IS AN ATHLETE?!"
Rin didn't look at the crowd once. Of course, he didn't.
He played like his life depended on it. Sharp, controlled, aggressive. He scored two goals, and he didn't even celebrate. He looked as emotionally open as a bank vault.
You were left staring. Woah, that's your man?
After the match, you were unwell.
"I have to confront him."
"Girl, he's in the locker room."
"I'm breaking in."
"PLEASE, don't get arrested over a man who literally ghosted your existence," Mia begged.
You ignored her. While you didn't break into the locker room, per say, you waited by the players parking lot like a perfectly normal, not-at-all deranged person.
He came out looking well....HOT. Alone. Hood up. Earbuds in.
You stepped in front of him.
He blinked. "You..."
You gawked. "THAT'S ALL YOU HAVE TO SAY?!"
"I figured you would be mad."
"Mad? You triggered a soulmate moment and then VANISHED. I went full K-drama for three months!"
He didn't move. Just stared. "You still remember that."
"Oh, I remember it, Rin. I remember your stupidly symmetrical face, what's your secret? Gua Shua? AND, I remember the canned coffee too! AND, the color coming into my life on full blast before you ran away as if I was the plague!"
He scratched the back of his neck. "...I panicked."
"You... you PANICKED?!"
He nodded. "Didn't expect it. Didn't know what to say. Didn't want to ruin it by being...me. But I suppose I did anyways..."
You blinked.
"Oh my God, you're an emotionally repressed idiot."
"...Yes."
"I can't believe I fell for a hot wall of internalized issues."
"I play football for a living," he said flatly. "We all are."
You huffed at him. "You owe me coffee. A good one. And three months of therapy."
"...Okay."
You paused. "That's it? Okay?"
He shrugged. "I saw color. So did you. I wanted to run. But you're here now. You tracked me down. You yelled. You're terrifying. You...win."
You narrowed your eyes. "Is this you asking me out?"
"I'm asking you not to leave. Or yell anymore. I'll buy us coffee. We can talk."
A pause.
"Can we not walk in the rain, though?" he asked. "I associate you with weather-based trauma now."
You blinked. And then, you laugh.
Hard and loud. Not lady-like. The kind that took you both bt surpirse.
"...Fine. But you're paying."
"I already said that."
"And if you ghost me again, I will commit crimes."
He smirked. "Noted."
Ah Shit! Here We Go Again — Masterlist
#in print#ah shit! here we go again – series#blue lock#bllk#blue lock x reader#bllk x reader#blue lock fluff#blue lock rin#bllk rin#rin itoshi#rin x reader#rin#itoshi rin x you#rin itoshi x reader#rin itoshi x you#itoshi rin x reader#itoshi rin#rin x y/n#rin fluff
155 notes
·
View notes
Text
WIP 2025-07-07: Cloud UI Recolour Tool
I've had some help from an INCREDIBLE person who managed to work out how to generate a TS3 .package file using Python. I didn't even know if I was going to be able to work out how to do that on my own since s3pi uses C# and I have absolutely zero skills in that whatsoever.
This amazing person wants to stay anonymous so I'll be respecting that, but I am soooo incredibly thankful for their help - thank you thank you thank you!!!!
What has been done so far and what I have planned:
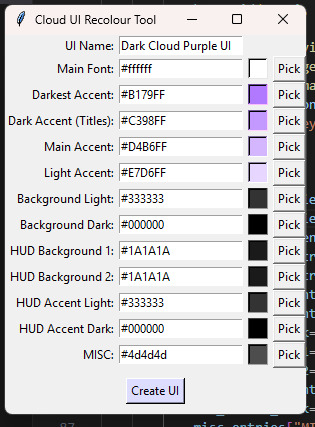
The UI for the tool is still in a very basic state and needs a lot of improvements. Currently it lists a bunch of different elements that can be recoloured and you can type in a HEX colour code or click on the "Pick" button to open a colour picker window.
It's looking very messy atm because I'm still working out which things can/should be recoloured, especially for dark mode and colourful mode.
I'd like the final version to have 3 presets - light, colourful and dark, and the selected preset will control what colour codes are selected by default, and also which colour boxes get displayed. E.g. dark mode would only need the four purple boxes shown below - and I'd add an "advanced mode" so that any of the other colours could be editable if you want to tweak them too.
If possible I also plan to add an opacity control as well, so if you don't like the transparency (which shows up more in dark mode more than colourful/white) then you can tweak it to your liking.
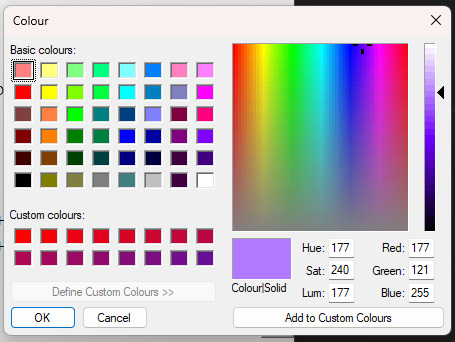
When you click on the "Pick" button this window pops up:
Once you've selected all the colours and clicked "Create UI", the tool goes through all the UI files and replaces the original colours with the colours you've chosen. Then it imports all of those files into a package file and saves it.
Lastly it shows a little popup window to confirm it's complete.
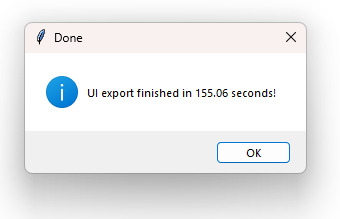
This one took about 2.5 minutes, most of which is spent exporting the ~1000 svg files into png image files.
And the magical part - it created this package file which can be thrown straight into the Mods folder!!

⭐🌟⭐
Another addition I'd like to make to the tool is a UI previewer, so when you're playing around with colours you can see a preview image of what it should look like in-game before you actually click the Create UI button. I've started creating this - so far I just have the main HUD section and I will be adding in a dialog box example as well.
Still plenty to do but it's all so exciting 😍
81 notes
·
View notes
Text
𝐠𝐢𝐟 𝐦𝐚𝐤𝐢𝐧𝐠 𝐭𝐮𝐭𝐨𝐫𝐢𝐚𝐥 by nami ♡
i know that there is a loooot of gif making tutorials on this website but i want to share my way of doing my packs! for this tutorial you'll need basic photoshop cs6 knowledge and a lot of patience lol. this tutorial is very simple and fast, but my inbox and messages are open to any questions. if this post helped you, please please reblog!!

what you will need:
y2meta: youtube download site.
mkvdrama: for dramas.
obs studio: if you need to screenrecord.
potplayer: video player.
gif making action by me: it will help you save a lot of time.
ㅤㅤㅤ���ㅤㅤ
ㅤㅤㅤㅤㅤㅤ𝗦𝗧𝗘𝗣 𝟭.𝟬: configuration stuff (the boring step)
after downloading potplayer, you will open your video of choice and hold ctrl+g, it will open something like this.
make sure the format is jpeg (you can choose png too, but it will take more time to capture the frames)
for the frames, you can choose how many frames you want to capture. i let it capture until i manually stop, so it's 99.999. but you can put 60, 80, etc.
for the image size, let it be the original size.
ㅤㅤㅤㅤㅤㅤ
ㅤㅤㅤㅤㅤㅤ𝗦𝗧𝗘𝗣 𝟭.𝟭: the capture folder.
for this next step, you click the configure folder option:
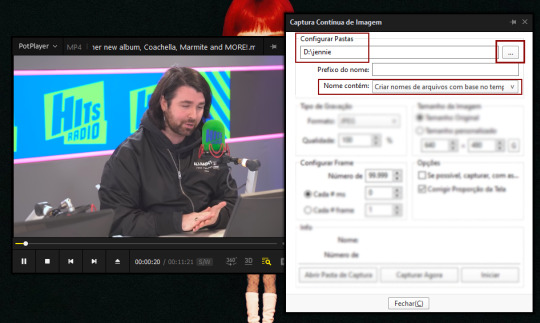
create a new folder and select it. the images you capture will apear on that folder.

ㅤㅤㅤㅤㅤㅤ
ㅤㅤㅤㅤㅤㅤ𝗦𝗧𝗘𝗣 𝟭.𝟮: photoshop !
after dowloading my gif making action, open your photoshop and open the action. it will look like this:
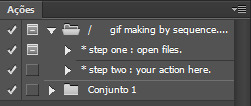
you can download any free sharpening action and put it on the step two option!
ㅤㅤㅤㅤㅤㅤ
ㅤㅤㅤㅤㅤㅤ𝗦𝗧𝗘𝗣 𝟮.𝟬: capturing the frames!
after doing all of that, let's get to work! first, open your video of choice. mine is an interview of jennie, as you can see. after that, select the part of the video you want to capture and hold ctrl+g. once you're ready to capture the frames, click start.

i clicked start, let the video play and clicked stop when i wanted to stop. usually i do this basing on whos on the screen: for this example, i click start when jennie is talking and stopping once the interviewer appear.
after that, open you capture folder, it will look like this:
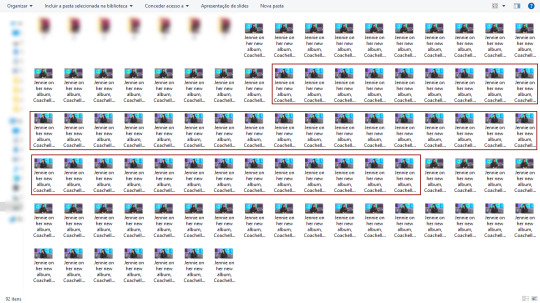
as you can see, it starts with the interviewer and ends with the interviewer so i don't miss any frames! jennie's frames are inside the red rectangle!
now you just delete the interviewer frames, select all of jennie's frames and move to another folder inside our capture folder, like this:
ㅤㅤㅤㅤㅤㅤ
ㅤㅤㅤㅤㅤㅤ𝗦𝗧𝗘𝗣 𝟯.𝟬: photoshop timeeeee.
open your photoshop and click the step one of my action,
this will pop on your screen:
now you will open your capture folder, mine looks like this:

now you click OK and let photoshop do his work. once it's done, this is what you're going to work with:

now, for the fun part! adjust your gif to your liking and press play to check if everything's ok. make sure you click that chain thingy up there so your image doesn't get weird angles.
this is how my gif is looking like until now:

pretty, right? NO! lets sharpen and edit!!!!!!!
ㅤㅤㅤㅤㅤㅤ
ㅤㅤㅤㅤㅤㅤ𝗦𝗧𝗘𝗣 𝟰.𝟬: THE OTHER FUN PART!!! COLORING!!!
first, choose your gif action of liking and apply it to the gif. i'll be using mine! this is what it looks like with sharpening only:

it's getting better... BUT LET'S COLOR IT!
usually i do curves > vibrancy > color balance if needed. it looks like this:

i normally like more natural and vibrant colors to my gifs, so this is perfect for me! all done :]
ㅤㅤㅤㅤㅤㅤ
ㅤㅤㅤㅤㅤㅤ𝗦𝗧𝗘𝗣 𝟱.𝟬: saving for web.
after that sharpening and editing, follow these steps:
set your configs like mine (if you want to, this is up to you!) and set the loop to always. after that, just save to your gif folder and its done!
this is how my gif looks:

ㅤㅤㅤㅤㅤㅤthat's it! a tutorial that nobody asked but i wanted to make! feel free to ask me any questions you have!
ㅤㅤㅤㅤㅤㅤmeus brs, as fotos estão todas em português e o google tradutor pode ajudar vocês, mas se mesmo assim vocês tiverem alguma dúvida, me chamem!
love y'all. ♡
#rp help#rp h#rph#rp br#gif making tutorial#gif tutorial#mine by taylor swift#ive been wanting to do this for so long lol
72 notes
·
View notes
Text
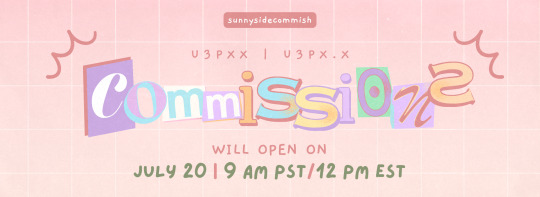
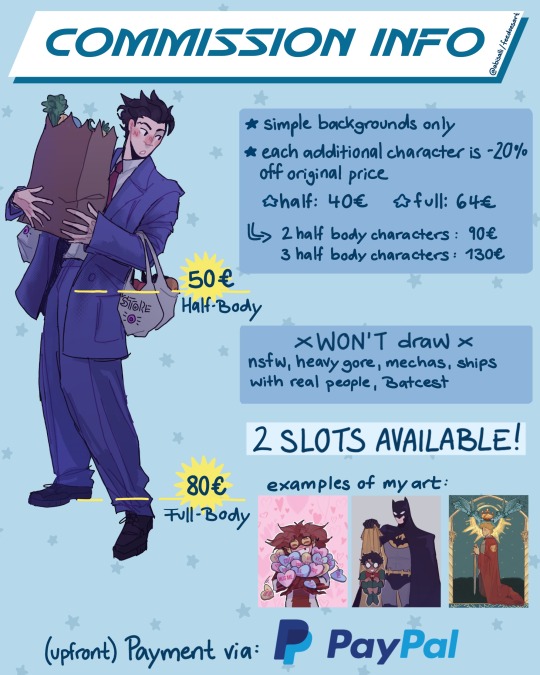
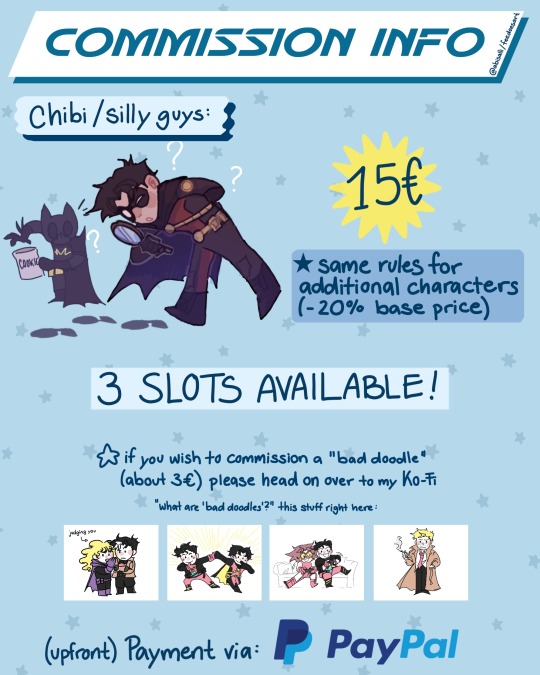
COMMISSION CARRD | TOS | SAMPLES OF MY ART
hi there :^D announcing that i'll be opening commissions on JULY 20! i'll be opening 4 SLOTS in total but i will have a waitlist! focusing on 4 things at a time just makes things easier for my brain (also, trying out a new method of collecting responses, just testing it out if this method is easier for me lol)
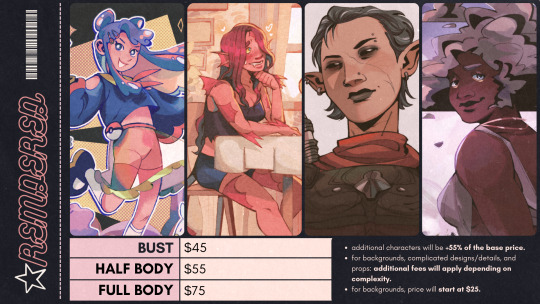
on july 20, i'll be releasing a google form to collect responses, commissions are first come first serve, so if you want to be one of the first ones, i ask that you prepare a:
description of what you want me to draw (formatted in bullet points, not paragraph form)
character reference/reference pictures (you can send more as we go through the commission. send in either a png/jpeg file, a drive folder containing the reference photos, or even a google document containing the references)
if you have any more questions, feel free to look over my commissions carrd or send me an ask! reblogs are very appreciated, and thank you so much always for the support 🫶💥
249 notes
·
View notes
Text

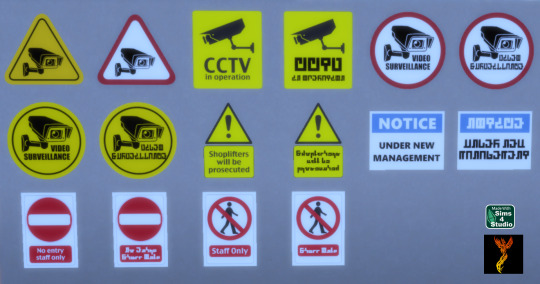
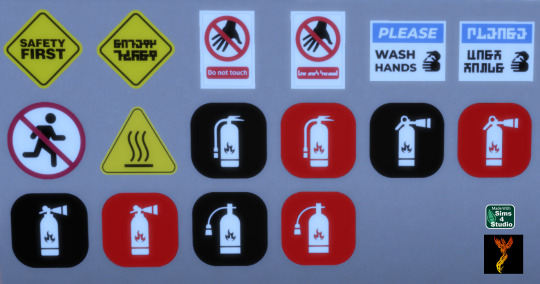
Retail and Safety Wall Decals - UPDATED 15 May 2025
I created two sets of wall decals for you to use. Each sign is available in English and Simlish, as appropriate. There are 30 swatches for the Retail Wall Decals and 16 swatches for the Safety Wall Decals. With decals, they can be placed on a variety of surfaces including windows, doors, etc.
To adjust the size of the decals: Enable the bb.moveobjects on cheat and then you can adjust the size of the item by depressing the Shift key and either [ (for smaller) or ] (for bigger) (on PC).
If you have not checked it out yet, I also have a set of Shop Sign Wall Lights. The SFS link goes to the folder with my shop sign cc, so you can access the shop lights from the same link here as in the wall lights post.
Enjoy!
DOWNLOAD for FREE: SFS
OR at Patreon*
*You must be over 18 to access my Patreon page.
Creations by SexyIrish7
These cc objects were produced as a selective clone using Sims 4 Studio.
Polygon Count: 4
All CC have:
*Ability to search catalog using search terms: sexyirish7 and si7
*Customized thumbnail
*******
CREDITS:
Software credits:
Sims 4 Studio v. 3.2.4.2 (Star): https://sims4studio.com
GIMP v. 2.10.34: https://www.gimp.org/
Inkscape v. 1.2: https://inkscape.org/
Thank you to the creators and moderators producing tutorials and answering questions!
*******
Retail Wall Decals Image Credits:
Swatches 1-2 Image by All-Free-Download.com https://all-free-download.com/free-vector/download/colorful_vector_tags_146737.html
Swatches 3-6: Image by studio4rt on Freepik https://www.freepik.com/free-vector/closed-open-white-signboards-hanged-suction-cup_22656027.htm
Swatches 7-14: Image by upklyak on Freepik https://www.freepik.com/free-vector/wooden-board-sign-with-open-closed-business-status_406436627.htm
Swatches 15-16 & 19-22: Image by freedesignfile https://all-free-download.com/free-vector/download/vector_video_surveillance_design_elements_532894.html
Swatches 17-18, 23-24, & 27-30: Image by Myshopsigns https://all-free-download.com/free-vector/download/18_warning_signs_47669.html
Swatches 25-26: Image by Printable Designs https://free-printable-signs.com/Re
Safety Wall Decals Image Credits:
Swatches 1-2: Image by Sumran Ali via Vecteezy https://www.vecteezy.com/png/16770597-safety-first-yellow-sign-on-transparent-background
Swatches 3-4: Image by Myshopsigns https://all-free-download.com/free-vector/download/18_warning_signs_47669.html
Swatches 5-6: Image by Printable Designs https://free-printable-signs.com/
Swatch 7: Image by juicy_fish on Freepik https://www.freepik.com/free-vector/no-running-prohibited-signs_132098936.htm
Swatch 8: Image by Joko Sutriso via Vecteezy https://www.vecteezy.com/vector-art/27841150-hot-surface-warning-sign-icon-vector
Swatches 9-16: Image by Bai Ha via Vecteezy https://www.vecteezy.com/vector-art/36140779-fire-extinguisher-icon-in-flat-a-fire-extinguisher-icon-design-stock-vector
*******
TOU:
Do not re-upload and claim as your own
Do not re-upload and hide behind a paywall
*******
Changelog:
15.05.2025 Updated swatches for compatibility with slotted signs.
For Retail Wall Decals: Edited appearance of swatches 1 and 2.
#retail signs#shop signs#wall decor#business#wall decals#decals#safety#caution#the sims 4 cc#ts4cc#sims 4 cc#sexyirish7#updated cc#featured
131 notes
·
View notes
Text


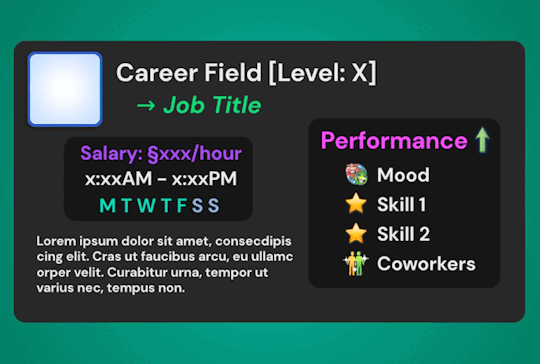

I was so so so excited about the release of Blackout UI by @simstate recently! I've been wanting a dark-mode modern UI in my game for the longest time and they finally came thru with their mod tysm angel <3<3
With this exciting new release, I needed to rework a few of my Gameplay PSDs to fit in better with this mod - and I've made them available for download here if anyone else would like to switch!
What's In The Folder:
💫 Wish Template: → 3 frame colour options: Black, Green & Grey
🥶 Moodlet Template: → 4 frame / mood effect colour options: Neutral, Positive, Negative & Plain Grey
💼 Career Template: → 3 frame colour options: Black, Blue, Green & Grey → Career icons from BG to All EPs included → Extra mood icons for the 'Performance' section included
Extra: Transparent background alternative included for all templates!
Terms of Use: Please don’t claim as your own or reupload without my permission, I’d love to see you use them in your game if you do choose to tag me - but that’s totally optional I'm just nosey haha :P Feel free to alter and customize the templates literally however you want, but pls link back to my blog if you’re gonna reupload a downloadable variation :)
Download Here (Simfileshare, .psd files)
The font used in all templates is DM Sans, it can be found in all variations here - I only used ‘bold’ & 'bold italic’
Instructions:
These are supposed to be opened in a photo editing software like Adobe Photoshop, I personally recommend Photopea / Gimp as free alternatives - you can probs use any other editing software as long as it can handle .psd files - lmk if you have any problems in other programs, I have only tested these in Photopea!
I also intended for these to be used alongside game icon collections, here are some suggestions for those: TS2 Icons / TS3 Icons + Extras / TS4 Icons
Just edit the text, hide & unhide the layers / folders and place the icons to get your desired outcome, then save as a .png and plop the final image over your gameplay screenshots :)
For any PSDs I create in the future I hope to create both light-mode & dark-mode versions so you can take your pick - I’m also open to requests so if you have anything you’d like to see as a psd lmk 😊💞
Finally, thanks again to SimState for their wonderful mod - the UI is absolutely gorgeous and I will be exclusively using it from now on! Pls go show them some love if you haven't already 🫶
#Blackout UI#download#simblr#psd template#sims template#sims psd#my resources#sims resources#resources
131 notes
·
View notes
Text

Hello one and all! It sure has been a while, but I am finally opening up my commissions again! <3 I'm fairly busy this summer, which is why I only have limited slots, but maybe I'll open up more slots coming August. It's first come, first serve ;) [0 /2] 📭 || CH[2 /3] 📭 || MP [0 /2]
If you're interested or have any questions, shoot me a message! 📨
Some more info under the cut ⤵️
★ the final artwork will be sent via a dropbox-folder as a JPEG and PNG (-> feel free to ask for other file-types as well) ★ References for OCs must be provided! If you don’t have a reference, you must be willing to discuss the OC in detail! ★ if you're having trouble putting your commission wish into words use this google form! It also has some questions regarding OCs if you're wondering what I typically need.
That's all! Feel free to check out my Ko-Fi as well (for bad doodle comms) or even my Carrd (for any updates)
#commissions open#art commissions#my art#I've just started writing my bachelor's thesis so maybe be a little patient as well haha :')#ikik it's bad timing but I really wanted to open them again!#I've been getting some messages and I felt so bad that I haven't opened them in so long orz I think last time was in 22!#(sorry for the p high prices I am currently doing an unpaid internship </3)
48 notes
·
View notes
Text


IDs in alt.
These are overlays for our folders to allow for greater customizability. You can put these over any of our new folders and thus have folders that better match your AAC.
To do so, you need to download the folder symbol you want and open it in an image editing software that has layers and transparency. Open the symbol in the editor, and then download the colour of folder overlay that you want. Make sure you choose either the thick or thin version, depending on which one fits the symbol you have. Open the folder overlay in the editing software and place the layer for it above the layer for the basic symbol.
From there, save it as a PNG, and it should be done. Because the canvas size for these overlays is the same as the canvas size for our folders, you should not need to move anything around to make it match.
Here are some examples of overlays used with some of our folders.
If you are having trouble combining the overlays and folders on your own, send us an ask with the ones you want combined and we will do it for you.
#Emojis#Custom emojis#AAC emojis#AAC folders#petrichoremojis#folders#folder overlays#overlays#folder overlay#overlay#long post#Cisra's tag#We have been meaning to do these for some time. We hope that people like them.
99 notes
·
View notes
Text
INSTALLING// GShade + ReLight for The Sims 4
I've been getting a lotta asks about how I got the up to date GShade working with ReLight ( ALPHA ), so here's a mostly quick tutorial, that will hopefully get it working properly for you too!
Firstly, download and install GShade, unless you've already got it installed, then just be sure it's up to date.
Click, or right click pics below and open in a new window to see them in more detail.
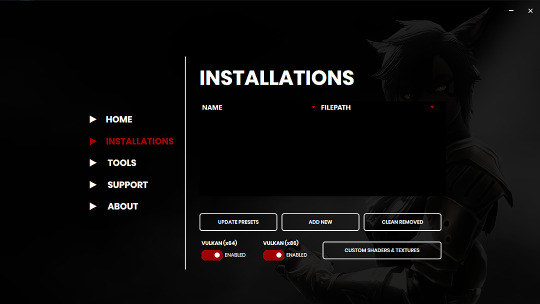
Now I don't currently have it installed into any of my games, bc I mainly use Reshade 2, so if you need to know how to do that, you're in luck! I'll walk you through it.
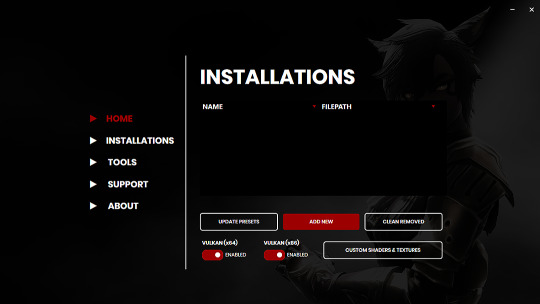
Click Add New.
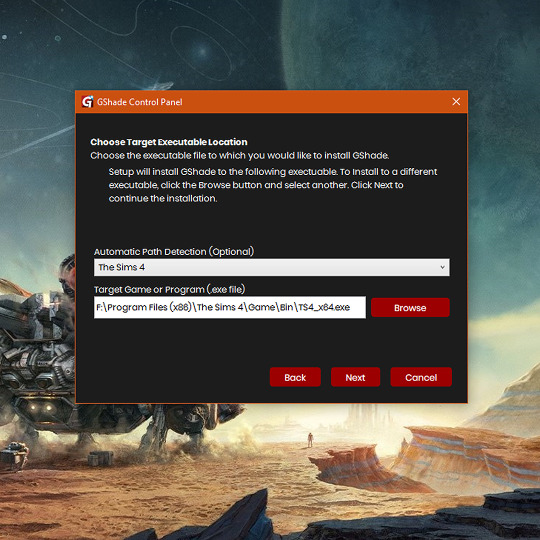
Then locate your TS4_x64.exe, except if you're fully updated, in which you'll need to locate your TS4_DX9_x64.exe, but only if you plan to opt out of using DX11, then click Next.
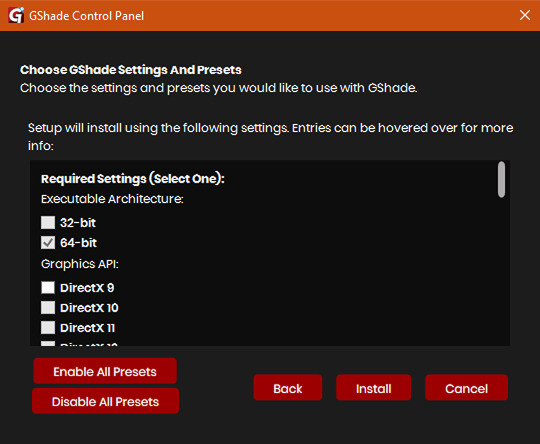
This will open another window with a bunch of ticked boxes, and tbh I didn't mess with any of these. Many them are greyed out anyway, and it all works fine for me.
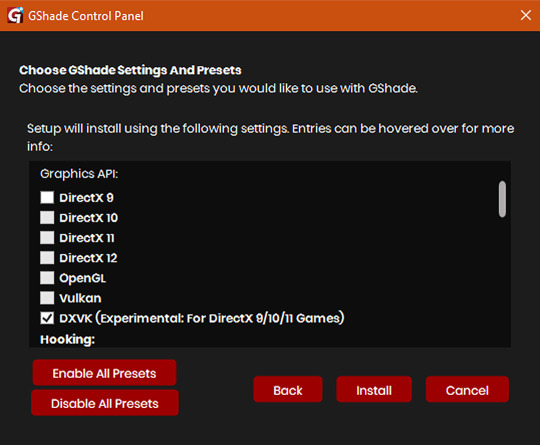
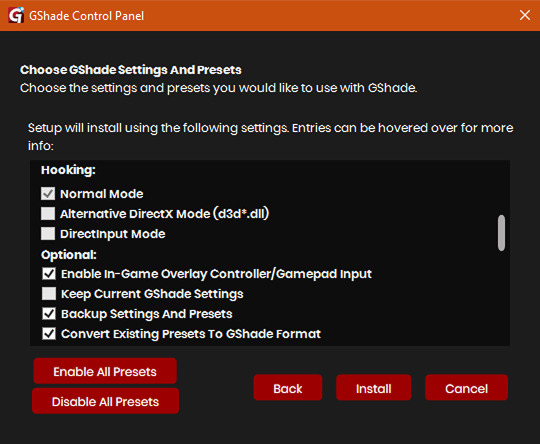
So if yours look like this, then you should be fine too.
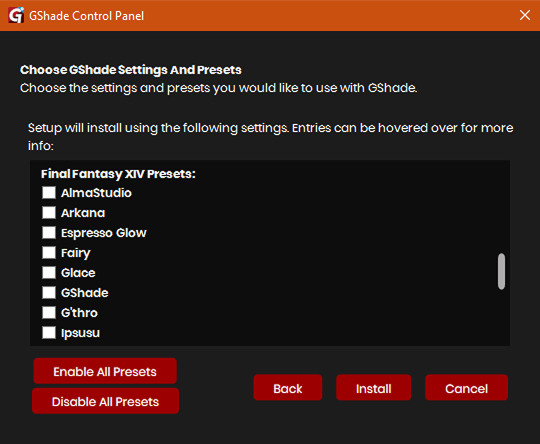
Lastly, at the bottom you can preload some presets if you like, but it's purely up to you. They aren't required.
When done, click Install.
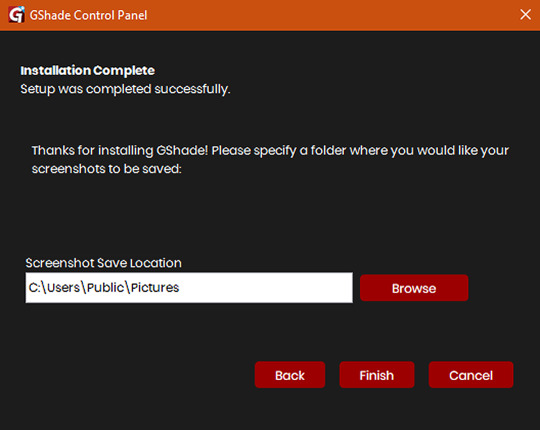
There will be another window that asks you where you'd like to save your pictures. Once again, this is purely up to you, click Browse to locate your preferred folder, or if you use programs like Nvidia for screenshots, just ignore it, and click Finish. Then when it asks if you're okay with the chosen location, click Yes.
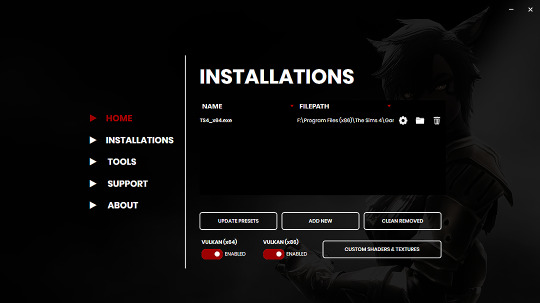
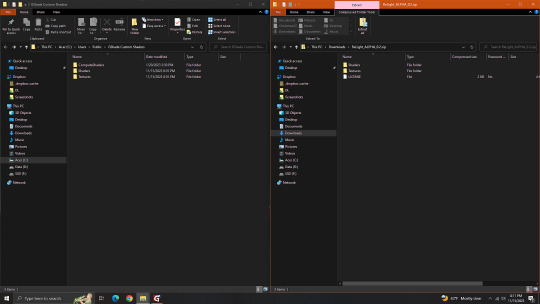
Once you've finished, TS4_x64.exe should show up in the Installations tab of your GShade installer, which means you're part way there! Now, click on the Custom Shaders & Textures button at the bottom, this will open the folder where you need to install ReLight.
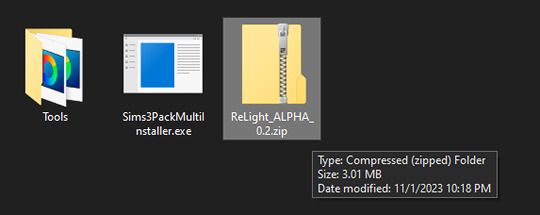
Locate your ReLight_ALPHA_0.2 download. Mine was in my Downloads folder. Double click it, or unzip it, and you'll find a couple folders inside it.
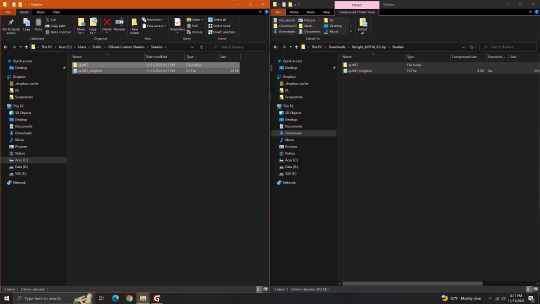
Click or right click pics below and open in a new tab for more detail.
Here's a side by side comparison of the GShade Custom Shaders folder we just opened, and the ReLight_ALPHA_0.2 folder we unzipped and opened, so you can see how there are two identically named folders. The goal is to put whatever is in the Shaders folder of the ReLight folder, into the Shaders folder of the Custom Shaders folder, and then repeat this process again for both Textures folders, until they end up looking like this...
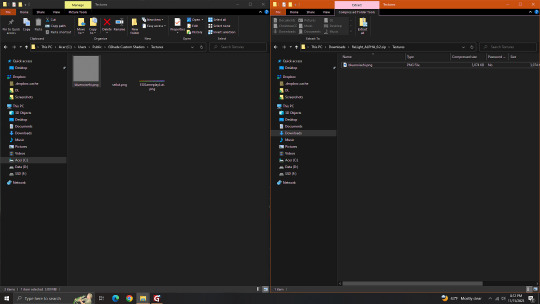
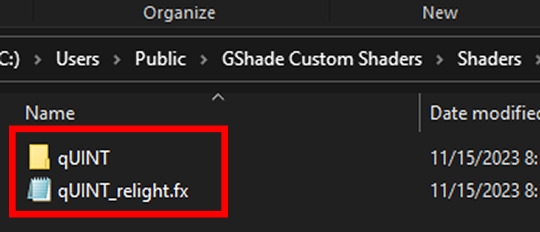
In conclusion, your GShade Custom Shaders > SHADERS folder should have these two files in it...
While your GShade Custom Shaders > TEXTURES folder should have this .png in it...
Good? Now let's turn on The Sims 4.
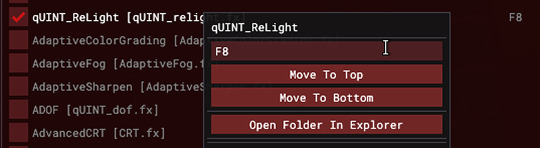
When you've opened you game, load your save ( idkw, but the GShade UI won't open in the menu screen ), then hit Shift + Backspace on your keyboard to open up the GShade UI. You can choose to go through the tutorial, or skip it. Either way just keep clicking continue or OK until you get to the Home panel. Now, I've got a preset already, if you've got one too, good, activate it, if you don't there should be like a default one you can use until you create one or get one. Main goal at this moment is to find ReLight in the list of shaders, and activate it so we know it works. Tick the Performance Mode box at the bottom, and scroll down 'til you find this...

This list should be alphabetized so just scroll down to the Q's, then tick the box beside it. Then click Active to Top, and scroll back to it. One thing I would suggest is binding it to a key ( right click while hovering over it ), this will make it easier to find if you lose it again, since clicking Active to Top also recalls any shaders that are bound, even if their box isn't ticked ( isn't active ).

I've bound mine to F8, but it's up to you what you wanna use, I only suggest it be F6 or above, since The Sims 4 already uses F1-F5 I believe.
Oh, and whenever you're done messing around with it, be sure to untick Performance Mode, so your computer won't beat your ass.
582 notes
·
View notes
Text
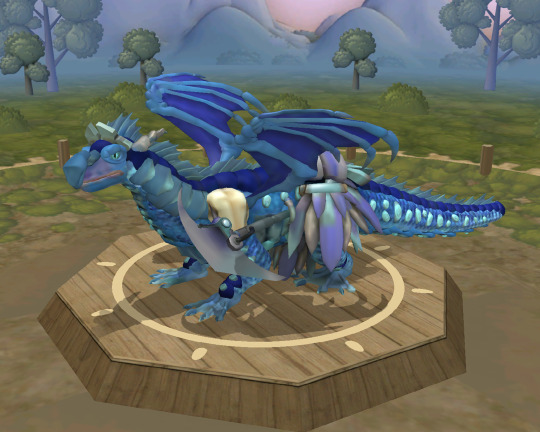
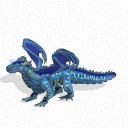
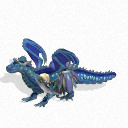
Tsunami in Spore | DOWNLOADABLE
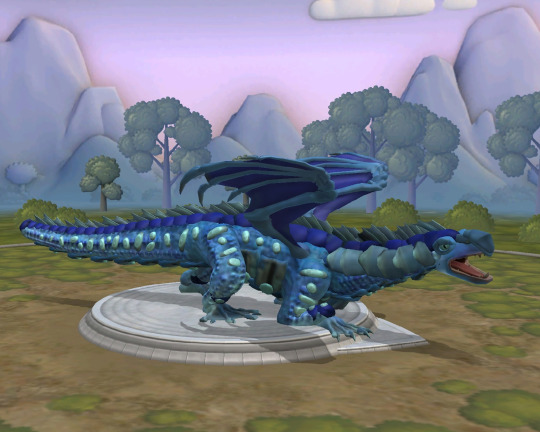
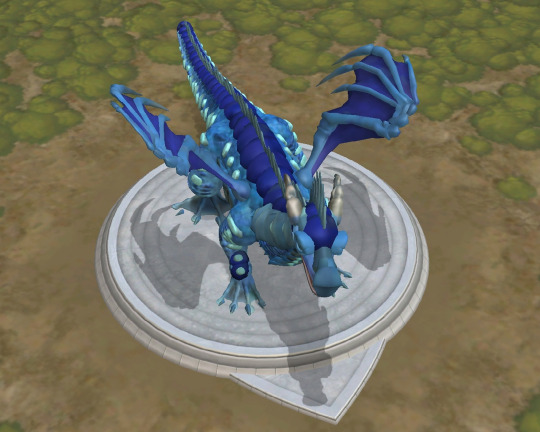
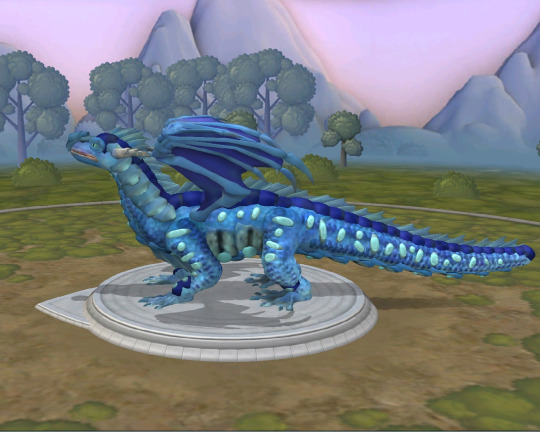
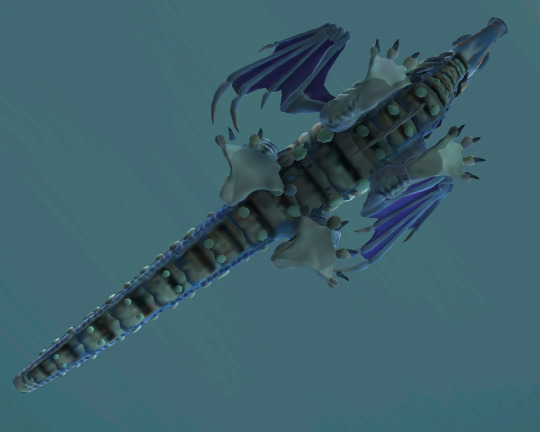
And so, I decided to make another tribe in Spore - Seawing! This time I painted the dragon like Tsunami. You can also add her to your game, see the instructions below. Which tribe will be next?
You can also visit the post below, where I made a Rainwing, which you can also install.
Tribe version
How to add a creature to your game:
Install the "Dark Injection" modification (version 9.r public Beta 2.3.2) (+ Spore should contain "Galactic Adventures", "Creepy and Cute")
Download a PNG below and place it in the folder "My Creations" > "Creatures" (usually found in Documents) If after placing in folder the creature does not appear, then open Spore in window mode, open the creature editor, and just drag the PNG there.
#wings of fire#wings of fire art#dragon#wof#wof art#dragon art#spore#spore creature#tsunami wof#tsunami wings of fire#seawing
168 notes
·
View notes
Text
Edgaring time!
Tutorial on how to make your own responsive Edgar :D I will try to explain it in really basic terms, like you’ve never touched a puter (which if you’re making this… I’m sure you’ve touched plenty of computers amirite??? EL APLAUSO SEÑOOOREEES).
If you have some experience I tried to highlight the most important things so you won’t have to read everything, this is literally building a website but easier.
I will only show how to make him move like this:
Disclaimer: I’m a yapper.
Choosing an engine First of all you’ll need something that will allow you to display a responsive background, I used LivelyWallpaper since it’s free and open-source (we love open-source).
Choosing an IDE Next is having any IDE to make some silly code! (Unless you can rawdog code… Which would be honestly impressive and you need to slide in my DMs and we will make out) I use Visual Studio!!!
So now that we have those two things we just need to set up the structure we will use.
Project structure
We will now create our project, which I will call “Edgar”, we will include some things inside as follows:
Edgar
img (folder that will contain images) - thumbnail.png (I literally just have a png of his face :]) - [some svgs…]
face.js (script that will make him interactive)
index.html (script that structures his face!)
LivelyInfo,json (script that LivelyWallpaper uses to display your new wallpaper)
style.css (script we will use to paint him!)
All of those scripts are just literally like a “.txt” file but instead of “.txt” we use “.js”, “.html”, etc… You know? We just write stuff and tell the puter it’s in “.{language}”, nothing fancy.
index.html
Basically the way you build his silly little face! Here’s the code:
<!doctype html> <html> <head> <meta charset="utf-8"> <title>Face!</title> <link rel = "stylesheet" type = "text/css" href = "style.css"> </head> <body> <div class="area"> <div class="face"> <div class="eyes"> <div class="eyeR"></div> <div class="eyeL"></div> </div> <div class="mouth"></div> </div> </div> <script src="face.js"></script> </body> </html>
Ok so now some of you will be thinking “Why would you use eyeR and eyeL? Just use eye!“ and you’d be right but I’m a dummy who couldn’t handle making two different instances of the same object and altering it… It’s scary but if you can do it, please please please teach me ;0;!!!
Area comes in handy to the caress function we will implement in the next module (script)! It encapsulates face.
Face just contains the elements inside, trust me it made sense but i can’t remember why…
Eyes contains each different eye, probably here because I wanted to reuse code and it did not work out and when I kept going I was too scared to restructure it.
EyeR/EyeL are the eyes! We will paint them in the “.css”.
Mouth, like the eyeR/eyeL, will be used in the “.css”.
face.js
Here I will only show how to make it so he feels you mouse on top of him! Too ashamed of how I coded the kisses… Believe me, it’s not pretty at all and so sooo repetitive…
// ######################### // ## CONSTANTS ## // ######################### const area = document.querySelector('.area'); const face = document.querySelector('.face'); const mouth = document.querySelector('.mouth'); const eyeL = document.querySelector('.eyeL'); const eyeR = document.querySelector('.eyeR'); // ######################### // ## CARESS HIM ## // ######################### // When the mouse enters the area the face will follow the mouse area.addEventListener('mousemove', (event) => { const rect = area.getBoundingClientRect(); const x = event.clientX - rect.left; const y = event.clientY - rect.top; face.style.left = `${x}px`; face.style.top = `${y}px`; }); // When the mouse leaves the area the face will return to the original position area.addEventListener('mouseout', () => { face.style.left = '50%'; face.style.top = '50%'; });
God bless my past self for explaining it so well, but tbf it’s really simple,,
style.css
body { padding: 0; margin: 0; background: #c9c368; overflow: hidden; } .area { width: 55vh; height: 55vh; position: absolute; top: 50%; left: 50%; transform: translate(-50%,-50%); background: transparent; display: flex; } .face { width: 55vh; height: 55vh; position: absolute; top: 50%; left: 50%; transform: translate(-50%,-50%); background: transparent; display: flex; justify-content: center; align-items: center; transition: 0.5s ease-out; } .mouth { width: 75vh; height: 70vh; position: absolute; bottom: 5vh; background: transparent; border-radius: 100%; border: 1vh solid #000; border-color: transparent transparent black transparent; pointer-events: none; animation: mouth-sad 3s 420s forwards step-end; } .face:hover .mouth { animation: mouth-happy 0.5s forwards; } .eyes { position: relative; bottom: 27%; display: flex; } .eyes .eyeR { position: relative; width: 13vh; height: 13vh; display: block; background: black; margin-right: 11vh; border-radius: 50%; transition: 1s ease } .face:hover .eyeR { transform: translateY(10vh); border-radius: 20px 100% 20px 100%; } .eyes .eyeL { position: relative; width: 13vh; height: 13vh; display: block; background: black; margin-left: 11vh; border-radius: 50%; transition: 1s ease; } .face:hover .eyeL { transform: translateY(10vh); border-radius: 100% 20px 100% 20px; } @keyframes mouth-happy { 0% { background-color: transparent; height: 70vh; width: 75vh; } 100% { border-radius: 0 0 25% 25%; transform: translateY(-10vh); } } @keyframes mouth-sad { 12.5%{ height: 35vh; width: 67vh; } 25% { height: 10vh; width: 60vh; } 37.5% { width: 53vh; border-radius: 0%; border-bottom-color: black; } 50% { width: 60vh; height: 10vh; transform: translateY(11vh); border-radius: 100%; border-color: black transparent transparent transparent; } 62.5% { width: 64vh; height: 20vh; transform: translateY(21vh); } 75% { width: 69vh; height: 40vh; transform: translateY(41vh); } 87.5% { width: 75vh; height: 70vh; transform: translateY(71vh); } 100% { width: 77vh; height: 90vh; border-color: black transparent transparent transparent; transform: translateY(91vh); } }
I didn’t show it but this also makes it so if you don’t pay attention to him he will get sad (mouth-sad, tried to make it as accurate to the movie as possible, that’s why it’s choppy!)
The .hover is what makes him go like a creature when you hover over him, if you want to change it just… Change it! If you’d rather him always have the same expression, delete it!
Anyway, lots of easy stuff, lots of code that I didn’t reuse and I probably should’ve (the eyes!!! Can someone please tell me a way I can just… Mirror the other or something…? There must be a way!!!) So now this is when we do a thinking exercise in which you think about me as like someone who is kind of dumb and take some pity on me.
LivelyInfo.json
{ "AppVersion": "1.0.0.0", "Title": "Edgar", "Thumbnail": "img/thumbnail.png", "Preview": "thumbnail.png", "Desc": "It's me!.", "Author": "Champagne?", "License": "", "Type": 1, "FileName": "index.html" }
Easy stuff!!!
Conclusion
This could've been a project on git but i'm not ready and we're already finished. I'm curious about how this will be seen on mobile and PC,,, i'm not one to post here.
Sorry if I rambled too much or if i didn't explain something good enough! If you have any doubts please don't hesitate to ask.
And if you add any functionality to my code or see improvements please please please tell me, or make your own post!
98 notes
·
View notes