#mytest
Explore tagged Tumblr posts
Text
33/100 Days of Code
THE THING WORKS I AM DRAFTING THIS SO THAT I CAN GOOF AROUND WITH IT AT WORK AND DO THE FLEXBOX THING.. evil flexbox...
html
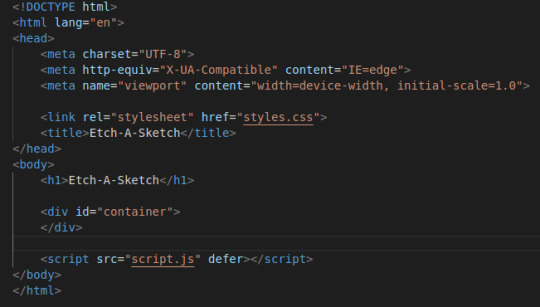
<!DOCTYPE html>
<html lang="en">
<head>
<meta charset="UTF-8">
<meta http-equiv="X-UA-Compatible" content="IE=edge">
<meta name="viewport" content="width=device-width, initial-scale=1.0">
<link rel="stylesheet" href="styles.css">
<title>Etch-A-Sketch</title>
</head>
<body>
<h1>Etch-A-Sketch</h1>
<div id="container">
</div>
<script src="script.js" defer></script>
</body>
</html>
css
body {
font-family: sans-serif;
}
#container {
display:flex;
flex-wrap: wrap;
margin: auto;
height:auto;
background-color:lightblue;
max-width: 90vw;
}
div {
/* flex: 1; */
border: 1px solid gray;
}
.empty {
background-color:pink;
}
.activated {
background-color:red;
}
/* .pixel {
height: 8px;
width: 8px;
border: 1px solid black;
} */
script
const container = document.getElementById("container");
let gridNumber = 16;
container.style.width = (gridNumber * 10) + "px";
// draw as many pixel boxes as gridNumber
for (i = 0; i < gridNumber * gridNumber; i++) {
let pixel = document.createElement("div");
pixel.style.cssText = "height: 8px; width: 8px; border: 1px solid black;";
pixel.setAttribute('class', 'empty');
pixel.addEventListener("mouseover", myTest)
container.append(pixel);
// console.log(i);
}
//pixels.addEventListener("mouseover", myTest);
function myTest() {
// console.log("Moused Over");
this.removeAttribute('empty');
this.setAttribute('class', 'activated');
}
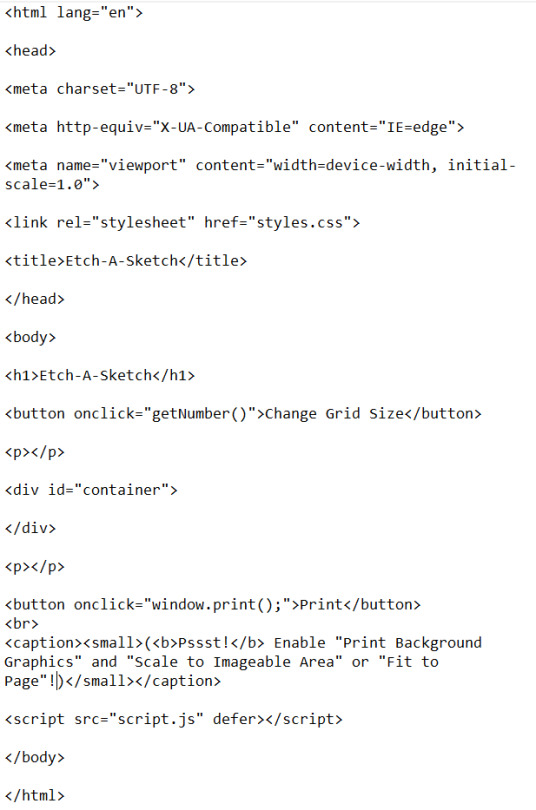
!! :) Print Button!
const container = document.getElementById("container");
let gridNumber = 16;
let containerWidth = container.offsetWidth;
// draw as many pixel boxes as gridNumber
for (i = 0; i < gridNumber * gridNumber; i++) {
let pixel = document.createElement("div");
pixel.style.cssText = "border: 1px solid black;"; pixel.style.width = ((containerWidth / gridNumber) - 2) + "px"; pixel.style.height = ((containerWidth / gridNumber) - 2) + "px";
pixel.setAttribute('class', 'empty');
pixel.addEventListener("mouseover", pixelHover)
container.append(pixel);
// console.log(i); }
console.log(containerWidth);
//pixels.addEventListener("mouseover", pixelHover);
function pixelHover() {
// console.log("Moused Over");
this.removeAttribute('empty');
this.setAttribute('class', 'activated');
}
function getNumber() { if (gridNumber) { gridNumber = prompt("Please provide a number", "4");} else { gridNumber = prompt("Please provide a number", "4"); }if (isNaN(gridNumber)) { alert("Must input numbers"); return false; } if (gridNumber > 100) { alert("Please use a number between 1 and 100"); return false; } console.log(`New Number is ${gridNumber}`); container.textContent = "";
for (i = 0; i < gridNumber * gridNumber; i++) {
let pixel = document.createElement("div");
pixel.style.cssText = "border: 1px solid black;"; pixel.style.width = ((containerWidth / gridNumber) - 2) + "px"; pixel.style.height = ((containerWidth / gridNumber) - 2) + "px";
pixel.setAttribute('class', 'empty');
pixel.addEventListener("mouseover", pixelHover)
container.append(pixel);
// console.log(i); }
}
7 notes
·
View notes
Text
Exploring the Exciting Features of Spring Boot 3.1

Spring Boot is a popular Java framework that is used to build robust and scalable applications. With each new release, Spring Boot introduces new features and enhancements to improve the developer experience and make it easier to build production-ready applications. The latest release, Spring Boot 3.1, is no exception to this trend.
In this blog post, we will dive into the exciting new features offered in Spring Boot 3.1, as documented in the official Spring Boot 3.1 Release Notes. These new features and enhancements are designed to help developers build better applications with Spring Boot. By taking advantage of these new features, developers can build applications that are more robust, scalable, and efficient.
So, if you’re a developer looking to build applications with Spring Boot, keep reading to learn more about the exciting new features offered in Spring Boot 3.1!
Feature List:
1. Dependency Management for Apache HttpClient 4:
Spring Boot 3.0 includes dependency management for both HttpClient 4 and 5.
Spring Boot 3.1 removes dependency management for HttpClient 4 to encourage users to move to HttpClient 5.2. Servlet and Filter Registrations:
The ServletRegistrationBean and FilterRegistrationBean classes will now throw an IllegalStateException if registration fails instead of logging a warning.
To retain the old behaviour, you can call setIgnoreRegistrationFailure(true) on your registration bean.3. Git Commit ID Maven Plugin Version Property:
The property used to override the version of io.github.git-commit-id:git-commit-id-maven-plugin has been updated.
Replace git-commit-id-plugin.version with git-commit-id-maven-plugin.version in your pom.xml.4. Dependency Management for Testcontainers:
Spring Boot’s dependency management now includes Testcontainers.
You can override the version managed by Spring Boot Development using the testcontainers.version property.5. Hibernate 6.2:
Spring Boot 3.1 upgrades to Hibernate 6.2.
Refer to the Hibernate 6.2 migration guide to understand how it may affect your application.6. Jackson 2.15:
TestContainers
The Testcontainers library is a tool that helps manage services running inside Docker containers. It works with testing frameworks such as JUnit and Spock, allowing you to write a test class that starts up a container before any of the tests run. Testcontainers are particularly useful for writing integration tests that interact with a real backend service such as MySQL, MongoDB, Cassandra, and others.
Integration tests with Testcontainers take it to the next level, meaning we will run the tests against the actual versions of databases and other dependencies our application needs to work with executing the actual code paths without relying on mocked objects to cut the corners of functionality.
<dependency> <groupId>org.springframework.boot</groupId> <artifactId>spring-boot-testcontainers</artifactId> <scope>test</scope> </dependency> <dependency> <groupId>org.testcontainers</groupId> <artifactId>junit-jupiter</artifactId> <scope>test</scope> </dependency>
Add this dependency and add @Testcontainers in SpringTestApplicationTests class and run the test case
@SpringBootTest @Testcontainers class SpringTestApplicationTests { @Container GenericContainer<?> container = new GenericContainer<>("postgres:9"); @Test void myTest(){ System.out.println(container.getContainerId()+ " "+container.getContainerName()); assert (1 == 1); } }
This will start the docker container for Postgres with version 9

We can define connection details to containers using “@ServiceConnection” and “@DynamicPropertySource”.
a. ConnectionService
@SpringBootTest @Testcontainers class SpringTestApplicationTests { @Container @ServiceConnection static MongoDBContainer container = new MongoDBContainer("mongo:4.4"); }
Thanks to @ServiceConnection, the above configuration allows Mongo-related beans in the application to communicate with Mongo running inside the Testcontainers-managed Docker container. This is done by automatically defining a MongoConnectionDetails bean which is then used by the Mongo auto-configuration, overriding any connection-related configuration properties.
b. Dynamic Properties
A slightly more verbose but also more flexible alternative to service connections is @DynamicPropertySource. A static @DynamicPropertySource method allows adding dynamic property values to the Spring Environment.
@SpringBootTest @Testcontainers class SpringTestApplicationTests { @Container @ServiceConnection static MongoDBContainer container = new MongoDBContainer("mongo:4.4"); @DynamicPropertySource static void registerMongoProperties(DynamicPropertyRegistry registry) { String uri = container.getConnectionString() + "/test"; registry.add("spring.data.mongodb.uri", () -> uri); } }
c. Using Testcontainers at Development Time
Test the application at development time, first we start the Mongo database our app won’t be able to connect to it. If we use Docker, we first need to execute the docker run command that runs MongoDB and exposes it on the local port.
Fortunately, with Spring Boot 3.1 we can simplify that process. We don’t have to Mongo before starting the app. What we need to do – is to enable development mode with Testcontainers.
<dependency> <groupId>org.springframework.boot</groupId> <artifactId>spring-boot-testcontainers</artifactId> <scope>test</scope> </dependency>
Then we need to prepare the @TestConfiguration class with the definition of containers we want to start together with the app. For me, it is just a single MongoDB container as shown below:
public class MongoDBContainerDevMode { @Bean @ServiceConnection MongoDBContainer mongoDBContainer() { return new MongoDBContainer("mongo:5.0"); } }
2. Docker Compose
If you’re using Docker to containerize your application, you may have heard of Docker Compose, a tool for defining and running multi-container Docker applications. Docker Compose is a popular choice for developers as it enables them to define a set of containers and their dependencies in a single file, making it easy to manage and deploy the application.
Fortunately, Spring Boot 3.1 provides a new module called spring-boot-docker-compose that provides seamless integration with Docker Compose. This integration makes it even easier to deploy your Java Spring Boot application with Docker Compose. Maven dependency for this is given below:
The spring-boot-docker-compose module automatically looks for a Docker Compose configuration file in the current working directory during startup. By default, the module supports four file types: compose.yaml, compose.yml, docker-compose.yaml, and docker-compose.yml. However, if you have a non-standard file type, don’t worry – you can easily set the spring.docker.compose.file property to specify which configuration file you want to use.
When your application starts up, the services you’ve declared in your Docker Compose configuration file will be automatically started up using the docker compose up command. This means that you don’t have to worry about manually starting and stopping each service. Additionally, connection details beans for those services will be added to the application context so that the services can be used without any further configuration.
When the application stops, the services will then be shut down using the docker compose down command.
This module also supports custom images too. You can use any custom image as long as it behaves in the same way as the standard image. Specifically, any environment variables that the standard image supports must also be used in your custom image.
Overall, the spring-boot-docker-compose module is a powerful and user-friendly tool that simplifies the process of deploying your Spring Boot application with Docker Compose. With this module, you can focus on writing code and building your application, while the module takes care of the deployment process for you.
Conclusion
Overall, Spring Boot 3.1 brings several valuable features and improvements, making it easier for developers to build production-ready applications. Consider exploring these new features and enhancements to take advantage of the latest capabilities offered by Spring Boot.
Originally published by: Exploring the Exciting Features of Spring Boot 3.1
#Features of Spring Boot#Application with Spring boot#Spring Boot Development Company#Spring boot Application development#Spring Boot Framework#New Features of Spring Boot
0 notes
Text
Expectations
We constantly expect.
We expect things from others, neglecting what they freely give, and getting upset at what they don't.
We expect our childhood to be trauma free, but it has been as it has been.
We expect life to serve us fish today and refuse the nice veggies we have.
We expect whoever we love to love us back.
it's all ego crap. Once we stop expecting, the space opens and we can see the abundance of life.
5 notes
·
View notes
Photo

*WERBUNG* Heute kam der Einkaustrolley KOOL an. bin gespannt wie er sich schlägt und ob er wirklich die 30kg aushält. #mytestgimikool #mytest #kool #trolley #einkaufstrolley #hackenporsche #vileda #gimi #gimitrolley #gimikool https://www.instagram.com/p/CQ_0mG9Lx2J/?utm_medium=tumblr
1 note
·
View note
Text


(Werbung wegen Marken-, Namens- und Ortsnennung)
Seit kurzem darf ich dank @mytest.de zwei #mascaras von @essence-instagram testen. #getbiglashes und #lashprincess sind die zwei die mir zugeschickt wurden. Zufällig genau zu dem Zeitpunkt als meine Mascara leer wurde. Ich mag beide sehr sehr gern aber das Rennen hat die Lash Princess Mascara gemacht. Sie gibt mir den false Lash Effekt den ich mir vorstelle. 😇💓
2 notes
·
View notes
Photo

Werbung 💳💳💳 Großer Dank an @mytest.de und @amex_de für diesen sehr interessanten Produkttest! 💳💳💳 Seit einiger Zeit bin ich bereits überzeugter Nutzer der Amex Payback Kreditkarte. Nun konnte ich die Gold-Card auch testen. 💳💳💳 Die Amex ist in DE immer weiter verbreitet und auch in Läden, welche keine Amex annehmen, kann man über Umwege (bspw PayPal) trotzdem damit zahlen und Membership Punkte sammeln! 💳💳💳 Die Gold-Card hat ggü der Payback-Karte ein paar Vorzüge (Hotline, Membership-Punkte, Versicherungsleistungen), im Vergleich zur Payback-Karte erscheint sie mir jedoch etwas unnötig. Zum einen sind Payback-Punkte weiter verbreitet als die Membership-Punkte der Gold Card, zum anderen ist die Payback Karte kostenlos, während die Gold Kreditkarte 12€ monatlich kostet. 💳💳💳 Während ich die Amex also durchaus empfehlen kann, muss die Wahl zwischen Payback und Gold (oder Platinum, das gibt's wohl auch) gut überlegt sein :) . . . #mytestamexgoldcard #amex #mytest #produkttest #payback #paypal #kreditkarte #produkttester #sparen #punktesammeln #couponing #coupon #couponeering #productphotography #produktfotografie #americanexpress #card #gold #goldcard #membership #werbung #werbungwegenmarkennennung #money #moneymindset #financialfreedom #finance #produktdesign #creditcard #creditcards #waldmichelbach (hier: Wald-Michelbach) https://www.instagram.com/mihau_travel_exp/p/CZKz5GshKV3/?utm_medium=tumblr
#mytestamexgoldcard#amex#mytest#produkttest#payback#paypal#kreditkarte#produkttester#sparen#punktesammeln#couponing#coupon#couponeering#productphotography#produktfotografie#americanexpress#card#gold#goldcard#membership#werbung#werbungwegenmarkennennung#money#moneymindset#financialfreedom#finance#produktdesign#creditcard#creditcards#waldmichelbach
0 notes
Text
Frio
Manhã
Frio
Fechado
Silêncio
Propaganda na tv
Manhã
Espera para o futebol
No supermercado paga
Pelo futebol
Na manhã seguinte
Espera pra dormir
4 notes
·
View notes
Photo
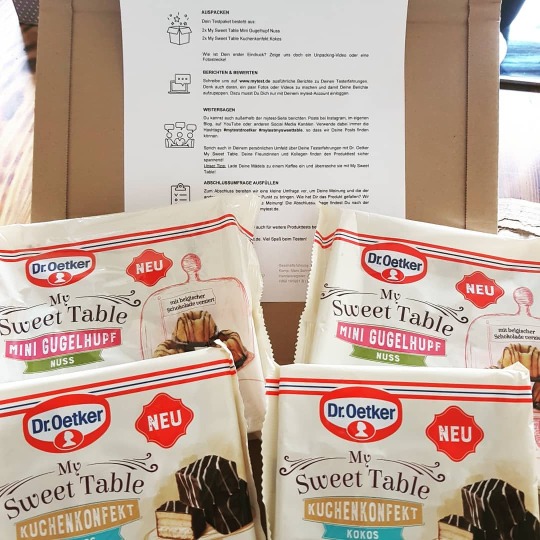
WERBUNG Danke an @mytest.de und @dr.oetker_deutschland My Sweet Table Mini Gugelhupf und Kuchenkonfekt #mytest#mytestmysweettable#mytestdroetker#produktesterin#produktest#test#testerinmitleidenschaft#food#foodporn#droetker#lecker https://www.instagram.com/p/BzoG5waoqtT/?utm_medium=tumblr
#mytest#mytestmysweettable#mytestdroetker#produktesterin#produktest#test#testerinmitleidenschaft#food#foodporn#droetker#lecker
0 notes
Text
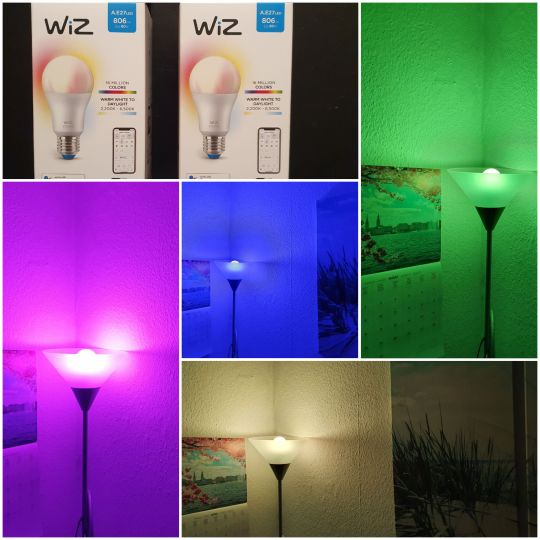
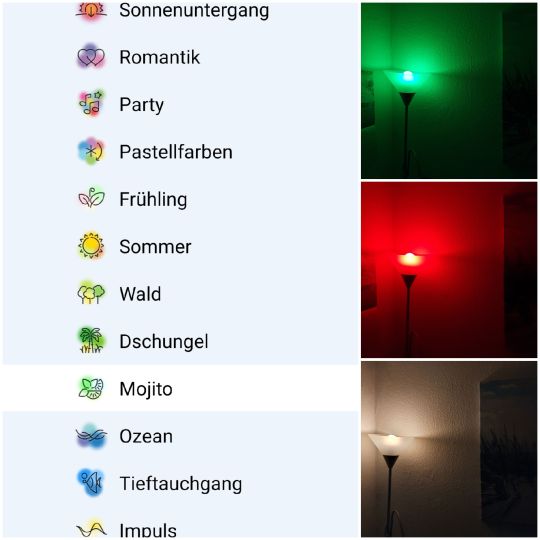
[Werbung für WiZ Color Lampen]
Im Rahmen einer Kooperation von WiZ und mytest, darf ich aktuell zwei smarte Colorlampen von WiZ testen.
(-Produkt-) Die smarten Colorlampen von WiZ (60W/E27 Fassung) werden ganz normal in eine Lampe eingeschraubt und können kinderleicht mit der kostenlosen WiZ App aus dem Playstore eingerichtet und bedient werden. Einfach den Raum / bzw. Standort der Lampen in der App markieren; die Lampe kurz an & ausschalten & schon funktioniert alles! Im Gegensatz zu einigen anderen erhältlichen smarten Lampen, bennötigt mein kein weiteres Equipment.
(-Eindruck-) Ich bin beeindruckt von der smarten Colorlampe, welche neben diversen Weißlicht Varianten wie bspw. Tageslicht, Warmes Licht etc. auch die gesamte Palette an bunten Farben und voreingestellten Lichtszenarien bspw. Entspannung, Fernsehen, Kaminfeuer etc. darstellt. Bei allen Lichtszenarien kann auch die jeweilige Farbintensität sowie die Helligkeit reguliert werden! Besonders überzeugt hat mich die Regulierung der Farbintensität, da ich nun problemlos von einem hellen Tageslicht (fokussiertes Arbeiten) in ein gemütliches, warmes Gelblicht (relaxen) umschalten kann. Durch einen individuellen Zeitplan, welcher in der WiZ App kinderleicht einstellbar ist, können zudem Lichtrythmen eingestellt werden und man wird morgens zu einer frei wählbaren Zeit durch ein immer heller werdendes Wake-Up Licht geweckt. Das ist schon sehr praktisch! Natürlich ist auch einiges Spielerei, welche keine dauerhafte Anwendung finden wird, wenn man sich erstmal an dem Farbspektakel satt gesehen hat. Zudem ist es etwas gewöhnungsbedürftig, dass der Lichtschalter eingeschaltet bleiben muss (auch wenn die Lampe nicht leuchtet), damit die Lampe überhaupt von der App erkannt werden kann. Das ist zwar logisch aber trotzdem erstmal eine gewisse Verhaltensumstellung. Durch den Google Assistant etc. kann die Lampe zudem mit diversen Sprachbefehlen gesteuert werden, was durchaus eine praktische Sache ist. Im Praxistest hat sich leider herausgestellt, dass das perfekte smarte Lichtvergnügen nur dann problemlos per Sprachsteuerung möglich ist, wenn man sein Smartphone nicht erst jedesmal entsperren muss. Das mindert das Vergnügen und hat weniger mit den Colorlampen an sich als vielmehr mit den Berechtigungen der dazugehörigen App zu tun.
(-Fazit-) Zusammengefasst lässt sich festhalten, dass uns die smarten Colorlampe von WiZ mehr als überzeugt haben! Ich habe nicht erwartet, dass es so einfach möglich ist normale Lampen zu einem smarten Lichtvergnügen zu aufzuwerten. Aus diesem Grund möchte ich die smarten Colorlampen von WiZ auch nicht mehr missen & kann eine uneingeschränkte Kaufempfehlung aussprechen!
0 notes
Photo
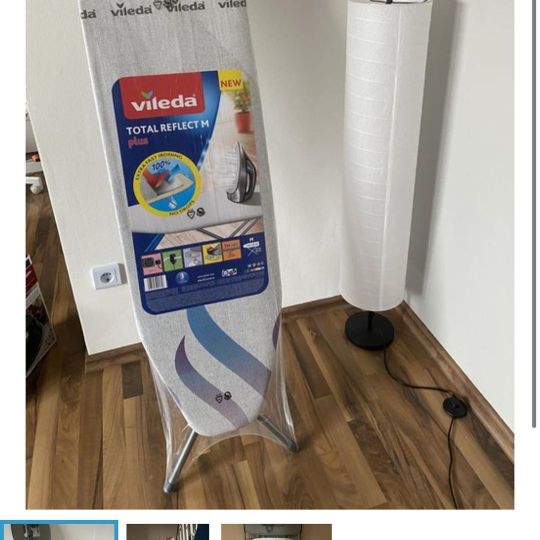
~Werbung~ kostenlos zur Verfügung gestellt Anfang des Jahres erreichte mich wieder ein Paket von @mytest.de Ein ziemlich großes Sogar, es war das neue Bügelbrett von @vileda_home Dank dem höhenverstellbaren Tisch und der Metallschicht, geht das Bügeln ziemlich einfach und schnell und dazu ohne Rückenschmerzen. Ich finde es lohnt sich es zu kaufen. #mytest #bügeln #bügeltisch #vileda #produkttest #testen #produkttesterin https://www.instagram.com/p/CNvFU9XFTLP/?igshid=119gfcx94ccmj
0 notes
Text
34/100 Days of Code
HEY LOOK the number is.. the same dimensions! i did the thing! rigid container width, flexible pixel width :)
next: custom dimensions like it says
html

styles
body { display:flex; flex-direction:column; font-family: sans-serif; text-align: center; }
container {
display:flex; flex-wrap: wrap; width: 50vw; max-width: 400px; margin: auto; background-color:lightblue; }
div { }
.empty { background-color:pink; }
.activated { background-color:red; }
script
const container = document.getElementById("container");
let gridNumber = 16;
let containerWidth = container.offsetWidth;
// draw as many pixel boxes as gridNumber
for (i = 0; i < gridNumber * gridNumber; i++) {
let pixel = document.createElement("div");
pixel.style.cssText = "border: 1px solid black;"; pixel.style.width = ((containerWidth / gridNumber) - 2) + "px"; pixel.style.height = ((containerWidth / gridNumber) - 2) + "px";
pixel.setAttribute('class', 'empty');
pixel.addEventListener("mouseover", myTest)
container.append(pixel);
// console.log(i); }
console.log(containerWidth);
//pixels.addEventListener("mouseover", myTest);
function myTest() {
// console.log("Moused Over");
this.removeAttribute('empty');
this.setAttribute('class', 'activated');
}
now with button prompt loop :)
const container = document.getElementById("container");
let gridNumber = 4;
let containerWidth = container.offsetWidth;
// draw as many pixel boxes as gridNumber
for (i = 0; i < gridNumber * gridNumber; i++) {
let pixel = document.createElement("div");
pixel.style.cssText = "border: 1px solid black;"; pixel.style.width = ((containerWidth / gridNumber) - 2) + "px"; pixel.style.height = ((containerWidth / gridNumber) - 2) + "px";
pixel.setAttribute('class', 'empty');
pixel.addEventListener("mouseover", pixelHover)
container.append(pixel);
// console.log(i); }
console.log(containerWidth);
//pixels.addEventListener("mouseover", pixelHover);
function pixelHover() {
// console.log("Moused Over");
this.removeAttribute('empty');
this.setAttribute('class', 'activated');
}
function getNumber() { if (gridNumber) { gridNumber = prompt("Please provide a number", "16");}if (isNaN(gridNumber)) { alert("Must input numbers"); return false; } if (gridNumber > 100) { alert("Please use a number between 1 and 100"); return false; } console.log(`New Number is ${gridNumber}`); container.textContent = "";
for (i = 0; i < gridNumber * gridNumber; i++) {
let pixel = document.createElement("div");
pixel.style.cssText = "border: 1px solid black;"; pixel.style.width = ((containerWidth / gridNumber) - 2) + "px"; pixel.style.height = ((containerWidth / gridNumber) - 2) + "px";
pixel.setAttribute('class', 'empty');
pixel.addEventListener("mouseover", pixelHover)
container.append(pixel);
// console.log(i); }
}
also went nuts & made a calc start too

body {
}
calculator {
display: flex; flex-direction: column; align-items: space-around; max-width: 300px; background-color: lavender;
}
result {
flex: 1;
/* width:280px; */ background-color: Silver; }
buttons {
display:flex; flex-wrap: wrap;
}
.btn { flex: 1; width: 97px; background-color:LavenderBlush; }
button { border-color:Lavender; }
.btn:hover { background-color: MediumPurple; }
and this is the script lol
console.log("hello");
0 notes
Text

24.8.20
The village of Emley with the transmitter visible in the background.
0 notes
Photo

Werbung Ich habe ja ein Testpaket von #mytest.de gewonnen mit #melitta #kaffee Und zwar den #kaffeedesjahres2021 Und schaut euch mal die Filtertüten an. #kaffeecoach nennt sich das. Und zwar seht ihr dort wie viel Kaffeepulver ihr benötigt für die entsprechende Anzahl Tassen um das bestmögliche Ergebnis zu erhalten. Was soll ich sagen? Es funktioniert! Zum Kaffee selbst muss ich berichten, er hat einen super guten Geruch, dezent und unaufdringlich und der Geschmack ist absolut fantastisch! Der Kaffee den ich derzeit daheim habe, ist da leider das Gegenteil. Was sagt uns das? Dieser #kaffeedesjahres2021 verdient seine Auszeichnung zurecht. Ich werde natürlich ein paar Leute mittesten lassen! #aroma #duft #kaffeeliebe #auftanken #auszeitfürdieseele #ausgleich #balsamfürdieseele #kaffeepause #gesundundlecker #foodblogger #blogger_de https://www.instagram.com/p/CLkI8PKnWZK/?igshid=1h1un4f2o1r4r
#mytest#melitta#kaffee#kaffeedesjahres2021#kaffeecoach#aroma#duft#kaffeeliebe#auftanken#auszeitfürdieseele#ausgleich#balsamfürdieseele#kaffeepause#gesundundlecker#foodblogger#blogger_de
0 notes
Photo
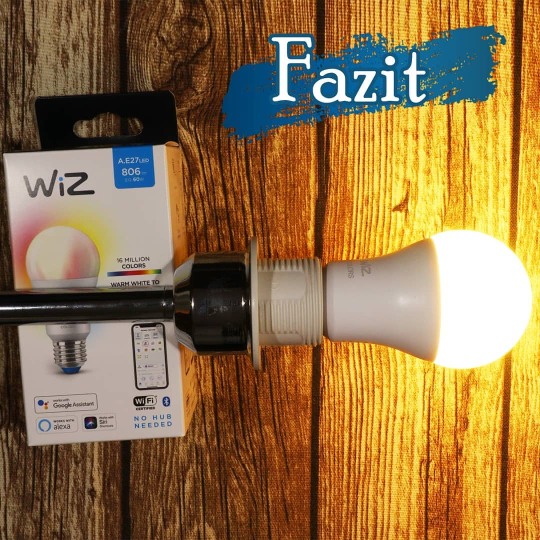
*WERBUNG* #Fazit: Nach 4 Wochen in Verwendung bin ich immer noch begeistert von den #WiZ #Lampen. Sie macht ein wunderschönes Licht und lässt sich einfach mittels der App bedienen. Die #Lichteffekte sind sehr angenehm und bei mir ist die Verbindung mit dem #WLAN super. Kaum habe ich in der App die Lampen ein- oder ausgeschaltet oder den Modus gewechselt ist das auch schon umgesetzt. Die Zeitsteuerung funktioniert auch immer noch super, so dass ich bis jetzt jeden Werktag pünktlich geweckt wurde. Auch die vielen Möglichkeiten sie mit verschiedenen #Sprachassistenten wie #Alexa oder #Siri zu verbinden finde ich super. Ich kann die Lampen nur weiterempfehlen, da sie eine tolle Alternative zu den großen teuren Marken ist.#mytestWiZColor #SmartMitWiZ #connectedlight #produkttester #produkttest #mytest #LEDGlühbirne #LEDLampe https://www.instagram.com/p/CNDNgpZrxp5/?igshid=1ebq7b1r59ekm
#fazit#wiz#lampen#lichteffekte#wlan#sprachassistenten#alexa#siri#mytestwizcolor#smartmitwiz#connectedlight#produkttester#produkttest#mytest#ledglühbirne#ledlampe
0 notes
Photo

Turn the light on...In which mood are you? #mytestwizcolor #smartmitwiz #mytest #produkttest #produkttester #produkttesterin #wiz #wizcolorlampe #wizcolor #lichtperapp #neuelampe https://www.instagram.com/p/CNSi7AMgp6h/?igshid=u8ecu75jtpur
#mytestwizcolor#smartmitwiz#mytest#produkttest#produkttester#produkttesterin#wiz#wizcolorlampe#wizcolor#lichtperapp#neuelampe
0 notes
Photo
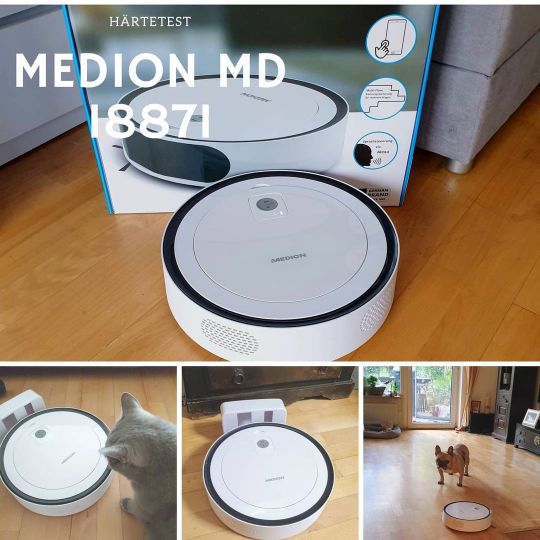
Werbung Vor einer Weile ist der MEDION MD 18871 Saugroboter bei uns eingezogen und er meistert seinen schweren Job richtig gut. Was hier im Haus aber eine echte Herausforderung ist: Drei Kinder, mehrere Etagen, Hund und zwei hyperaktive Kater plus tonnenweise Katzenstreu und Krümel jeder Art versuchen ihm das Leben schwer zu machen, aber das bringt meinen kleinen Helfer nicht aus dem Konzept. Er überzeugt in allen Punkten. Den ganzen Bericht findet Ihr auf meinem Blog, der Link dazu ist in der Bio. #werbung #medion #saugroboter #mytest #mytestmedionmd18871 #tech #home #homeappliances #blogger #instablogger #Hamburg #animals #catsanddogs #family #lifestyle #robot #tierhaare #haushaltshilfe https://www.instagram.com/p/CIFXIeyFDQJ/?igshid=jgr5pixvu0sr
#werbung#medion#saugroboter#mytest#mytestmedionmd18871#tech#home#homeappliances#blogger#instablogger#hamburg#animals#catsanddogs#family#lifestyle#robot#tierhaare#haushaltshilfe
0 notes