#milkshape 3d
Explore tagged Tumblr posts
Text

made a little viewsonic g90fb!
#milkshape is so jank but i love it#made the textures in ibis paint#PLEASE give me funny things to put on that screen#works of motan#milkshape 3d#3d modeling#crt
5 notes
·
View notes
Text
Milkshape in Parallels/Windows 11
Edit: I fixed this - see this post for instructions
This is such a niche one but maybe a follower can help 🙏
Do any of you have Milkshape running on Parallels or via any other method on an M1 (64 bit ARM) Mac?
Do you remember if you installed any other required bits and pieces to get it to work?
I'm using a Windows 11 VM. Everything else one could possibly need (TS3, S3PE, TSRW, Blender, etc) works fine on the VM except for Milkshape! It just does nothing. Doesn't launch. Tried 1.8.5 betas 1&2 as well as 1.8.4.
The Milkshape 3d and developer's website are both long gone and I can't find a list of requirements to run it anywhere to check against.
So I'm starting up this clunky Windows computer all the time purely to convert an obj to wso and whack the wso on a USB stick to take back to my Mac (the Windows computer doesn't even connect to wifi loool). It feels really silly and so I would love to know if anyone else experienced this or fixed it 🙏
2 notes
·
View notes
Text
I- I think I have successfully done a feet swap. I'm speechless…. A new world has opened to me щ(゜ロ゜щ)
#sims 2#I have done 3d things in the past#but usually just basic shapes or buildings#also can I just say thay milkshape is interesting to work with...#I gave up already because I couldn't figure why some of the mesh parts looked sharp#Just needed to smooth those haha
9 notes
·
View notes
Text
My mum is wearing colourful leggings with cozy colorful socks. Urge to start yet another clothing project ; ;
#leggings would imply a seamless waistline implies having to fiddle in milkshape though#but 3d socks!!#would be a good separate bottom for pjs and underwear
16 notes
·
View notes
Text
Retexturing some Maxis models

Made my dog Robin as a skin, although, I'd like to edit the actual model itself. Learned a bit about how to pose in milkshape, but I can't seem to export whatever edits I do as an actual .skn that is functional. I can write the .cmx files just fine.
If I only knew, I'd make the tail on the "xskin-B022dog_poodlemuffin-PELVIS-DOGBODY.skn" have a cropped looking tail. Why? Because Robin doesn't have a full tail, and making a game model to look like him would be a lot more fun for me.
#sims1cc#sims#my sims#the sims#simblr#ts1cc#thesims1#my cc#sims mods#milkshape#3d modelling#texturing#poodle
0 notes
Text
i love u milkshape...........
#just discovered a small offshoot of forgotten memories messing around with milkshape#and those programs where you make funney skeletal creatures and watch them to get to the other side of the room the fastest#sort of like a rudimentary ai training thing#man it has not been updated since 2013?#a fucking decade.. i thought the site was taken offline#its still there!#3d modeling#3d modeling software#abandonware#I DONT KNOW IF THE DLS WORK BUT ITS ALL THERE#i hope to see people using milkshape in the future even if its super outdated and probably runs like shit nwn#idk i just think its neat
0 notes
Text

🦐Download🦐(Googledrive Free)
On the fifth day of Jeffmas, my true love gave to me, a troubled expression, but I also got this fantastically shiny boudoir collection by @simmingnate!
My fifth prawn, is the multi-skilled creator of the icon Beverlee, the one and only Simmingnate! He decided to make this rather slippery and shiny boudoir collection to share upon this Shrimpmas day!
An invitation to join a league so devout To destroying the tradition of Shromp came about
One knew the occasion must not be brushed off But one struggles with meshing; would one’s gift be enough?
Milkshape and Blender never were friends of mine All past 3D creations, akin to war-crimes
But now ’tis the season for giving, and such, And to give back to Anne, who has given so much
And so one decided “to hell with this doubt! I’ll try some recolours, it’s the thought that’s what counts!”
So recolour, one did, with some pearly prawn pals, A boudoir collection for the guys and the gals
There was meshing attempted, a shirt slightly cropped, But Blender near killed me, and so there I stopped
An Ice-Creamy confidante helped add some shine As N-Job won’t work on this MacBook of mine
And so, there you have it, all shrimpy and prawny, Your Sims can sleep soundly, or woohoo ’til dawny
And so they exclaimed, as they dressed up to retire, “Merry Jeffmas! Now yield to your crustacean desire”
And so Nate created this set, so demure and mindful! Don't combine it with silk sheets, or you may cop a hindful!
Swatches: 6 Polys: Shirt - 4026
Come back tomorrow for a winter treat, from a creative prawn who is sure to brighten up the chilliest of homes.
495 notes
·
View notes
Text
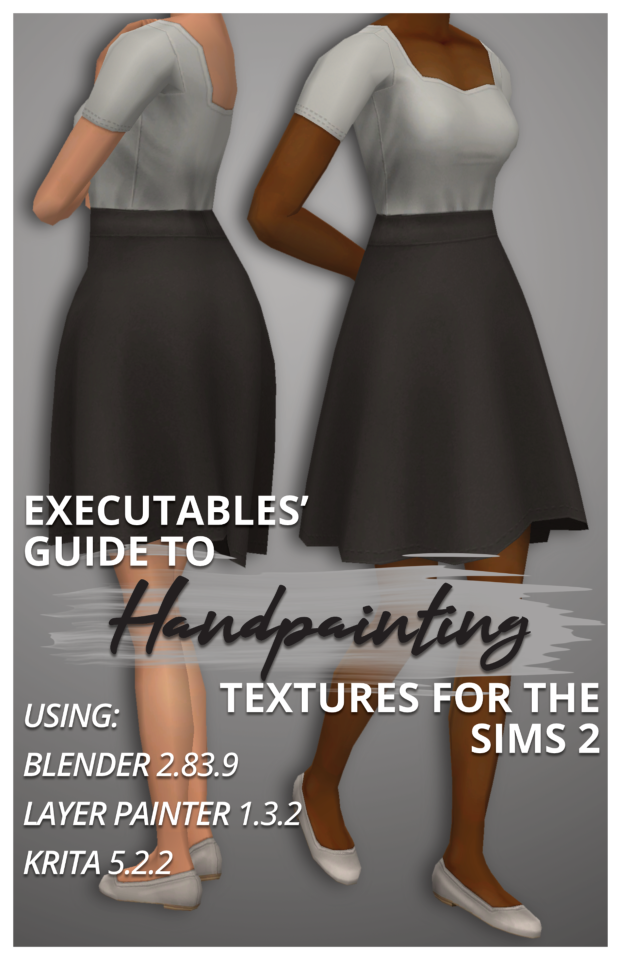
Executables' Guide to Handpainting Textures for The Sims 2 | Download PDF (67 pages)
Have you ever wondered how to paint clothing textures from scratch?
I've been using paid software like Milkshape, Photoshop, and 3D Coat Textura to texture Sims 2 models for years, but I've managed to translate my process to completely free open-source software!
I've broken down the entire process from start to finish for complete beginners (who may never have made a clothing recolour package before), but more experienced CC creators can skip around as needed using the PDF bookmarks.
You don't need a graphics tablet– but you may want one once you've played around with this! :)
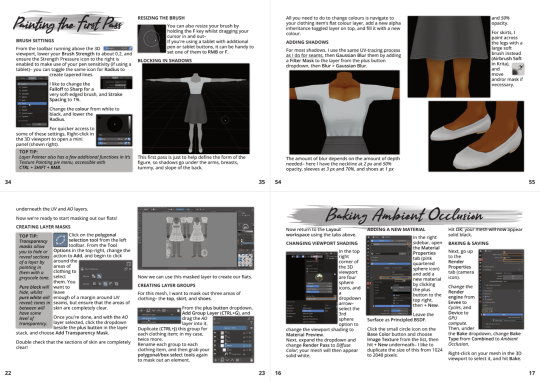
The clothing shown on the cover is also downloadable through the document.
Hope this inspires you to make something! :D
#The Sims 2#TS2 Download#Tutorial#PDF#If you'd prefer video format tutorials let me know! Everything is already captured :)
278 notes
·
View notes
Text
Tutorial: How to adjust joint position (in TS2 object skeleton)
This tut is NOT meant for beginners because I don't explain how to use SimPe or Milkshape. But actual process is very basic: you change joint coordinates and do GMDC model rebuild. The tricky part is to get coordinates right.
If you don't know much about joint assignments, start with this tutorial: "Retaining object animations in your new package" by Bluetexasbonnie @ MTS2, which explains how to add joint assignments to custom stuff cloned from functional objects (to make parts of the mesh move when Sims interact with it).
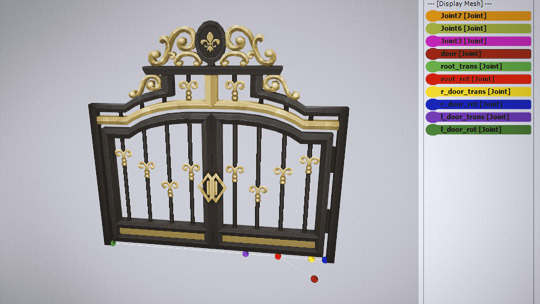
The pic above: SimPe GMDC skeleton preview. You can click on each joint name to see which part is assigned to it. Gate is here.
This will work for simple object skeletons without IK Bones.
There are no plugins that would allow us to properly import TS2 CRES skeleton data with IK bones - like sims, pets and more - to any 3D program
If object has IK Bones - you'll find out when importing CRES to Milkshape. If it displays a notification "joints with rotation values found...", IK Bones are present and there's a high risk that skeleton: A. will not be imported. B. if it's imported, it will get mangled. C. will be mangled after using model rebuild option.
I've experimented with car skeletons (those have IK Bones), managed to edit car door joints but it required removing wheel bone assignments - because wheel movement becomes wonky after doing model rebuild
/FYI: steps 1 - 5 are optional, you can edit CRES joint coordinates right away if you know the right values - which is usually not the case/.
Export GMDC with your custom mesh
Export CRES (if you wish to preview entire skeleton and/or joint names)
Import GMDC to Milkshape
Import CRES (if you need it. Plugin is called: Sims2 AniMesh CRES Skeleton Import. Click 'yes' to 'replace all bones?'). You should be able to see entire skeleton imported. Note that Milkshape won't let you export a GMDC after you imported CRES skeleton unless you change joint comments (point 7.)
Measure how much you need to move the joint. You can create a box as ruler substitute, then check the distance with extended manual edit plugin. If you're not sure where to place your joint, you can move it and test if object animations look alright (import CRES again to reset joint position).

tip: when working on GMDC in Milkshape you can rename the model parts in model list (door right, door left etc). Only names inside the model comments actually get exported.
6. Go back to SimPe, open CRES resource. Remember TS2 is using flipped coordinates: X = -X, -X = X, Y = Z, Z = Y. Edit joint Translation data, commit, save.
Optional: you can export CRES skeleton again and import to Milkshape to test if joint has moved to the right position.
7. Go to GMDC, Model tab - hit rebuild, commit, save.
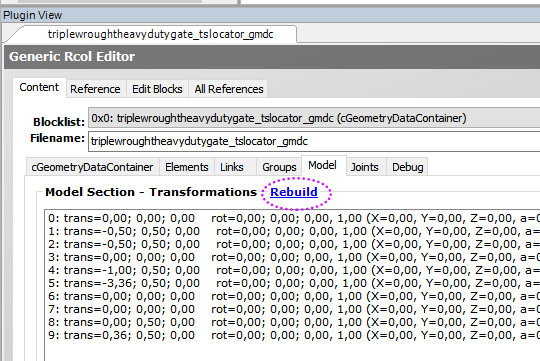
if you have the edited object placed on a lot, it's gonna look weird when you load the game. You need to re-buy it from catalogue to see results.
If for some reason you'd like to export entire GMDC with your imported CRES skeleton, Milkshape won't let you do that. You'll get "ERR: No quaternion values stored" error. You need to go to Joints tab and edit each Joint comment to ImpQuatDat: (that's imp, with capital i )
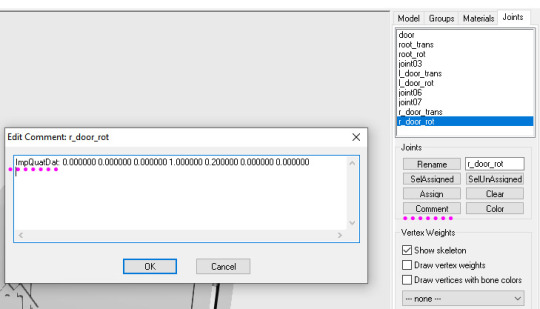
Notes:
if you go to GMDC Joints tab, there's also a rebuild option to update single joint - but I've tried it on car door joints and it didn't work.
If you edit joint coordinates in CRES, for example- move the car door forward, and preview skeleton in GMDC viewer, your model is gonna look fine. But in the game every vertex assigned to that joint will also be moved forward. That's why you need to use model rebuild option. In theory, if you'd like to skip rebuild, you could import GMDC to milkshape and move the door backwards to compensate for joint adjustments? I haven't tried that (yet).
72 notes
·
View notes
Text

THE SIMS 3 TUTORIAL
HOW TO CREATE DEFAULT REPLACEMENT MOD USING CUSTOM MESH & TEXTURE FOR SIMPLE OBJECT
⚠️ Tumblr has 30 pictures limit, so I cannot include too many pictures. If you want to zoom in the pictures, click the pictures to enlarge, or save the pictures into your PC, zoom the pictures on picture viewer or zoom in the pictures on your mobile phone. ⚠️
----------------------------------------------------
I create this tutorial to make easier to follow because there are older tutorials available before but scattered on internet and usually only say "Export to replace s3asc" without explaining how to export the edited object properly.
My method is using TSR Workshop instead of exporting the object using Sims 3 Object Export/Import plug in because exporting to replace the s3asc using that plug in always giving error notification "ERR: Model has 1 groups; original had 0" and cannot be exported.
For beginners who are very new using s3pe and haven't created default replacement mod before, better start from simple object first.
Simple objects I mean in-game object that has single MODL and single texture with no morphs, no GeoStates, no presets, no CAS colour channels, and easily cloned from OBJD on catalogue. Usually as utensils that Sims holding in their hand, not buy/build objects. For example: Pencil, pan, fork, spoon.
----------------------------------------------------
Tools to prepare:
s3oc
s3pe
Milkshape 3D for bone assignment (Version I use 1.8.5 beta, discontinued by its developer, therefore feel free to download the full version with its license key provided).
Sims 3 Object Export/Import 1.01 by Wesley Howe (Milkshape plug-in. Download msS3ObjPluginsV101.rar )
TSR Workshop (Older version for TS3 only version 2.0.88)
TSR Workshop plug-ins for export.import TSRW Object.
3D Program (Blender/Maya/3dsMax)
Editing images software (Photoshop, make sure you have to install .dds plugin by Nvidia. For free software alternative, you can use GIMP with its .dds plugin)
This tutorial will not teach you how to:
Meshing object ❌
Create alpha texture ❌
Change thumbnails in-game ❌
Install programs and plug-ins ❌
This is how I created Chinese chopsticks replacement mod using custom mesh and texture.
In summary, this tutorial has 10 steps:
Step 1. Clone the Object using s3oc
Step 2. Open S3PE to Copy the Original Resource Code and Export the Files
Step 3. Export the Original Mesh as Base Mesh to .obj format
Step 4. Create Your Custom Mesh
Step 5. Bone Assignment & Create Group
Step 6. Create custom Texture
Step 7. Import the .wso of Edited Mesh on TSR Workshop & Export the package
Step 8. Export MODL file from Package saved from TSR Workshop
Step 9. Finalizing in s3pe & Replacing the Original file with Edited File & Correcting the Code As Same As Default Code
Step 10. Test the CC in your game.
-----------------------------------
✳️ Step 1. Clone the Object using s3oc
Before cloning the object, check the Game Folder for in-game object file location. Settings > Game Folders...
Take a look if the Base Game or Expansion Pack for object file you want to clone is in the right folder. For example, my The Sims 3 game are all bought from Steam, so the location is D:\SteamLibrary\steamapps\common\The Sims 3
If you want to clone object from Expansion Pack, make sure input the folder location. For example, the location for World Adventures EP is D:\SteamLibrary\steamapps\common\The Sims 3\EP1

If you are done, close the pop-up box. You can continue click Cloning then choose Normal Object...
Wait until you get the whole catalogue. Click Search...

For example, I clone object from World Adventures Expansion Pack. You can clone object from Base Game or other Expansion Packs as long it is considered as "utensil" that Sim holding on hand. For example: "Pencil" or "Pan"
Search for text: chopsticks
or if you want to clone object from Base Game, search: utensil
Tick check marks for Resource Name, Object Name, Object Desc then click "Search button"
Search result gives you results with name "chopsticks". Here is the object we are looking for: UtensilChopsticks
We need the OBJD file to clone. OBJD = Object Data.

Click "Clone or Fix" at the right bottom. Then you see the next page to determine if you want to clone with renumber or not. If you want to make default replacement, then do not check the Renumber box. Keep it blank.
Tick check box means the s3oc will generate new resource code for new item. Not tick the check means the s3oc will overwrite the same resource code, it is to replace object you cloned in-game.
I am personally a detailed person, so I usually tick as many as I want: tick "Deep clone" "Missing String Tables" and "Include Thumbnail" to include more details. Then click "Start" to proceed.

It will give you file name [CreatorName]_ObjectName_Number
Then save your package file in "DBPF Package" format in your project folder. Always make folder for any file to make everything organized.
✳️ Step 2. Open S3PE to Copy the Original Resource Code and Export the Files
Open S3pe, locate your package file you cloned from s3oc. Find the MODL of Utensil Chopsticks, Right-Click, "Details..."

On Resource Details, click "Copy TGI" to copy the Resource Code. Type, Group, and Instance will automatically be copied on clipboard. Then open Notepad, Right-Click to "Paste".
Click GRID on bottom of the s3pe (I mark it red on picture), it will give you pop-up box with Data Grid. Click "Resources", it will be highlight blue and there's 3 dots button appeared on the right side. Click the 3 dots button. It will give you TGI Block List Editor.
Inside MODL's TGI Block List Editor only has IMG. You may wondering why, but that's how the game coded. Type, Group, Instance of _IMG inside TGI Block List Editor should be the same as _IMG on the package.
Copy the TGI, Group, Instance to your Notepad.

After you copied code of MODL, do the same for the texture image (_IMG), but only copy the code from Resource Details. You cannot edit TGI Block List Editor for _IMG as the Grid button for _IMG is greyed out.
The main task is the code of your edited mesh and texture should be the same as the code you copied now from original package you cloned with s3oc.
Keep the code on notepad. You will need this code later.
Export the MODL file. Right-Click, "Export to s3asc". The file appears in long string such with name for example: S3_01661233_08000001_B619DB2238C3430B%%+MODL_filebase
Do not rename the file. Save.

Export the texture file. Right-Click "Export > To File..." The file will be saved in .dds format. Do not rename the file. Save.

✳️ Step 3. Export the Original Mesh as Base Mesh to .obj format
Open Milkshape. Import the s3asc file you saved before.
More steps click spoiler tag "Read More / Keep Reading" below
File > Import > Sims 3 Object Import v 1.01 by Wesley Howe

Locate the s3asc file, then the original chopsticks mesh appears.
Click the "Joints" tab. It has 4 codes. Check box "Draw vertices with bone colors" It will show Bone Assignment colors on the original mesh. Yellow on top chopstick and light blue on bottom chopstick. The colours are to make the object has rig and movement following the Sim's interaction.

Take a look at the 4 codes on Joints Tab. You can play around to see which colour of the code will appear, after that copy paste the code to Notepad to make it easier to comprehend.
Click Select from Tools menu, Select Options: Face. On "Right/Left/Top/Bottom 2D View", Left-click make selection of one part of chopsticks. While the part of object being selected (Red), click Joints then Choose "Assign".
0x96239247 --> Yellow 0xFEAE6981 --> Purple 0xCD68F001 --> Light Blue 0xD0DECA8E --> Red
Your edited mesh must have the exact same Bone Assignment colour later. Check again if the code and colour are correct.

You can save object mesh as .obj to other 3D software such as Blender or any other 3D software.
✳️ Step 4. Create Your Custom Mesh
Use the original .obj as base model. While you can create longer mesh or any edited version as you wish.
Make sure the scale and position of the edited mesh is same as base original mesh, because the edited mesh will be used on Sim's hand.

If you are done editing the mesh, export the UVmap.
You can export the uvmap in higher resolution, as long as it is Power of 2. 64x64, 128x128, 256x256, 512x512, 1024x1024, 2048x2048, 4096x4096. I export in 1024x1024 pixels to make the size of texture larger and have more details.
Then export the mesh object in .obj format.
✳️ Step 5. Bone Assignment & Create Group
Open Milkshape. Import the original mesh.
Check the Groups Tab. Original mesh has 1 group, "group 00". Group 00 means it is the main mesh. There is no shadow beneath the object.

Import the edited mesh as .obj file.

My edited mesh has one single name "default" name on the Group Tab. While edited mesh may have a lot of file name scattered on Group Tab. Regroup the file name to simplify your edited mesh into one single name. Select > Regroup.
The main task is replacing the EA's original mesh with your edited mesh.
Before you delete anything, you must do Bone Assignment first to the edited mesh you created.
Your edited mesh does not have Bone Assignment, so it appears white.
Remember the 4 codes you copied earlier in Notepad.

Copy Bone Assignment from original mesh to your edited mesh.
This case, your want to Bone Assign Yellow colour.
Select > Face to select one part of chopsticks of your edited mesh. On Joints Tab, double click the appropriate code 0x96239247 in blue highlight then the code box on the right side of "Rename" will appear 0x96239247. Make sure the code is correct. Then you can click "Assign".

Your edited mesh will appear in Yellow colour. Then do the same for another part of chopsticks.
Select another part of chopsticks of your edited mesh. On Joints Tab, double click the appropriate code 0xCD68F001 in blue highlight then the code box on the right side of "Rename" will appear 0xCD68F001. Click "Assign".

Your edited mesh will appear in Light Blue colour.
Then what's the other code for? With colour purple and red?
Leave them. Let the codes have the same exact codes as appear in original mesh and let the colours only assigned Yellow and Light Blue. The colours are to determine rig for interaction in-game, which only use Yellow as upper part of chopstick and Light Blue as bottom part of chopstick.
You can safely delete the original mesh with name group00 until it remains your only your edited mesh.

Rename your edited mesh to group00. Type group00 on the box then click "Rename" on the left side.

Export to TSRW Object in .wso format. .wso is format with bone assignment on object attached.

Save your .wso in your project folder.
✳️ Step 6. Create custom Texture
Import original texture you exported from s3pe to your editing image software.
Look at the original texture made by EA. 32x64 pixels. It is very low resolution, blurry and stretched, because the texture should be compressed as low as possible by game designer. As player you want it has higher detail to look realistic as possible and your PC of course can handle high resolution content, sure you can make the resolution much higher than EA's.

Import the UVMap you saved from 3D software. For example, UVmap I imported has 1024x1024 resolution. Add your custom texture. Then save it to .dds format in the same name as original texture. Save in separate folder, name it "Edited Texture" to keep it separated from original texture.
✳️ Step 7. Import the .wso of Edited Mesh on TSR Workshop & Export the package
Open your TSR Workshop.
Create New Project > New Import >Next...

Then Browse original mesh by EA in package format in your project folder.
On Open file box, you cannot see .package file because the filter is .wrk (TSR Workshop Project). Choose the .package dropdown.

Then you can see .package file.
Open the .package. After the file is located, then Next. On Project Details I usually skip without giving name of Project Name and Title. Next.
You must have seen green land with white blank sky.
Where's the mesh? It is actually there... just being zoomed in too close. You need to zoom out by scrolling down mouse.
You can see the original chopsticks mesh by EA. You can save the project file in .wrk format. After you save the file, import the .wso of your edited mesh. Mesh tab > High Level detail. Click green arrow folder icon to import. Then your edited mesh will appear replacing the original EA mesh.

As you see, the texture is messed up because the texture is still using original EA's texture. But then you check Textures tab and it has blank dropdown...
I cannot change the texture on this TSR Workshop!
Don't worry, we can replace the texture on s3pe later.
No need to change anything other than importing mesh. Click Edit > Project Contents to save as package.
You will see pop up box with number or files DDS, FTPT, LITE, MODL, OBJD, OBJK, etc. Export > To. package. Give name such as "EditedChopsticks_TSRW"

✳️ Step 8. Export MODL file from Package saved from TSR Workshop
Open S3PE, File > Open package "EditedChopticks_TSRW" that you saved from TSR Workshop.
Export MODL. Right-Click, export. It gives you file name with [StringOfNumber] .model .
Save it on project folder. Keep it organized and separated from original MODL. Name the folder "Edited MODL". Do not rename the file.
✳️ Step 9. Finalizing in s3pe & Replacing the Original file with Edited File & Correcting the Code As Same As Default Code
Open s3pe, File > Open original package that you cloned from s3oc. [CreatorName]_ObjectName_Number
Find the MODL. Right-Click > Replace...
Locate to your edited MODL with filename .model .
Then click Open.
The original MODL of the package should be replaced with your edited mesh.
Do the same for the texture.
Locate to your edited texture with filename .dds
Then click Open.
The original texture of the package should be replaced with your edited texture.
Take a look at MODL's Type, Group, Instance. It has the same code as original MODL in the original package cloned with s3oc (because it has been replaced)
Don't forget to see the code inside TGI Block List Editor.
Repeat step 2 how to check the code. Right-Click on MODL/IMG > Details... and click GRID > Resources > TGI Block List Editor.
The Type, Group, Instance of the _IMG are different compared from IMG from original package clone, which means that is the evidence of edited mesh replaced the original.
Rename the Instance with default/original Instance you copied on notepad from Step 2. Type, Group, Instance should be the same as default/original Type, Group, Instance.

Open notepad with resource code you copied from Step 2. Make sure the Type, Group, and Instance are all the same.
If the codes are the same, then your edited mesh and texture will overwrite the default mesh and texture with the same code in the game. Save, Commit, Save the package.
Check again if the texture is replaced properly. Right-Click on _IMG > ViewDDS.
ALTERNATIVES!
Yes, you can delete unwanted files in your edited package, to keep the package clean. Simply Right-Click>Deleted.
The only files needed in package are: MODL, _IMG, _KEY
They are the only files with your edited mesh/texture including codes to overwrite the default codes.
You can Start new fresh blank s3pe. Right-Click>Import from file...
Locate your edited MODL and _IMG (texture) file.
On Resource Details box, tick mark "Use resource name" > OK.
Make sure all the Type, Group, and Instance of MODL and _IMG including in the TGI Block List Editor are all the same as the code in original package.

Save the package.
✳️ Step 10. Test the CC in your game.
Put the package to your CC folder in your The Sims 3 document folder to see if the CC is working or not.
If the CC is working as your intended, with your custom mesh and texture, then test the animation. Are the chopsticks animation working as the same as original EA's? If the animation are working well too, then congratulations!
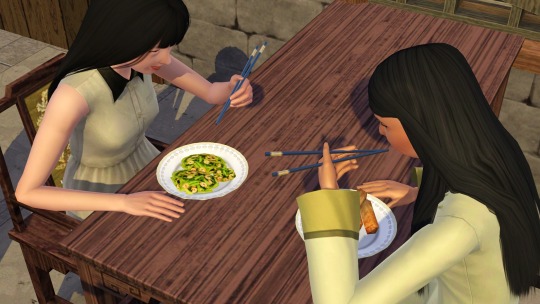
Your default replacement are working. Give applause to yourself. 👏
-------------------------------------
QUESTIONS!
Q:
Can I use this tutorial for making default replacement for buy/build object?
A: This tutorial covers basic method of using TSR Workshop and replacing the default codes (Type, Group, Instance), so you will understand the basic principle of doing default replacement mod.
Keep in mind that different object has different case. Buy / build object has MLOD (not just MODL) more than one, texture images more than one, has presets, and CAStable colour channels.
The TGI Block List Editor for buy/build object has a lot of codes, so have to spend a lot of time to do trial-and-error to make the default replacement working properly, because a lot of times the texture doesn't work (still using default EA's texture), or when the object appears right with your edited mesh and texture, after you choose the presets, the object reverts back to your edited mesh with default EA's texture.
Q:
Help! The texture is black! / still using same EA's texture when tested in the game!
A: The texture codes must be not the same. Check the Type, Group, Instance of _IMG. Do the codes are the same like codes in original package? Check the TGI Block List Editor for MODL, is the _IMG inside has the same Type, Group, Instance as in original package.
Q:
Help! The object disappears when tested in the game!
A: You must be replacing OBJD in your package. Do not replace OBJD. Just MODL and texture only.
#tutorial#the sims 3#the sims 3 tutorial#thebleedingwoodland#the sims 3 default replacement mod#modding#s3pe#s30c#TSR Workshop
89 notes
·
View notes
Photo

The Sims 4: Discover University - Cardigan converted to The Sims 3 for men
*changes post preview style once again* the textures are a little iffy as usual but idk i like it! it’s got some custom morphs so the 3d buttons don’t get too disgusting
Details:
For YA to Adult males
1024px textures
recolorable | 3 channels for preset: Cardigan, Tee, and Buttons
6 presets, shown above
Enabled for Everyday and Outerwear | Custom Thumbnail
Compressorized | 0.9 MB
4104 poly at the highest LOD
TOU [Emphasis on NO REUPLOADING] Feel free to edit the textures or whatever as you like.
Credit: mesh by EA, TSRW, Milkshape, Photoshop
Notes/Known Issues:
As with all my s4 conversions, the textures are a little gross. I tried my best but I guess you can only do so much
May be some clipping or gaps with certain bottoms or poses!
Download (and ❤) at Sim File Share: https://simfileshare.net/download/3849522/
Mirror
829 notes
·
View notes
Text
Katerubovsky and jacky93sims Furniture


This set is made functional thanks to @jacky93sims This wonderful and kind person created working files for the game for me, then I did the recolor shades. Thank you @jacky93sims for your help. I made the 3D models personally in Milkshape.
💖download from link💖
82 notes
·
View notes
Text
Tutorial - extracting stuff from Disco Elysium (+ viewing the models in blender)
Due to... recent events, I decided to finally get myself to write a tutorial about this, because all I found was some half-assed reddit comments when I was trying to figure out how to do it sometime last year.
I'll show you how to extract... pretty much everything (including voice lines) from the game.
This is a beginner tutorial, so you don't have to know shit about any of these programs, I'll try to explain everything.
I promise it's pretty easy! I extracted stuff from various games, and this is one of the easiest I ever did, so yeah.
You'll need:
Disco Elysium on PC
AssetStudio
Blender
+1 Interfacing
+2 Endurance (mostly to survive my bad jokes)
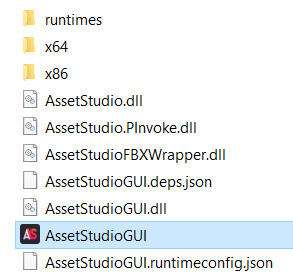
First of all, open AssetStudio. You don't have to install it or anything, just unzip the file you downloaded and open the program inside (AssetStudioGUI).
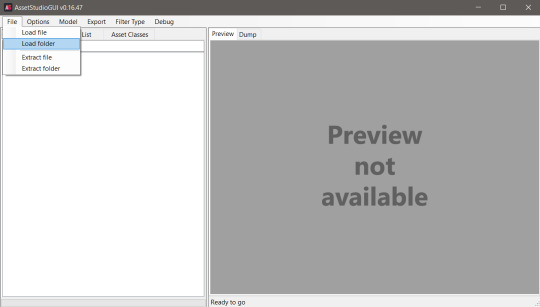
This is how the bad boy looks like, we'll be able to see the asset list on the left and the preview on the right.
Click on File../Load Folder.
Select the folder where the game is installed. For me it's Steam\steamapps\common\Disco Elysium\disco_Data. You can load individual files too, but it's easier to just list everything and then filter them imo.
Wait... for a while. It's a lot of assets. Make a tea or something (hydration is important).

After everything loaded up, click on the Asset List tab. You can see all the stuff! Well, it's rather confusing. Let's see what is what!
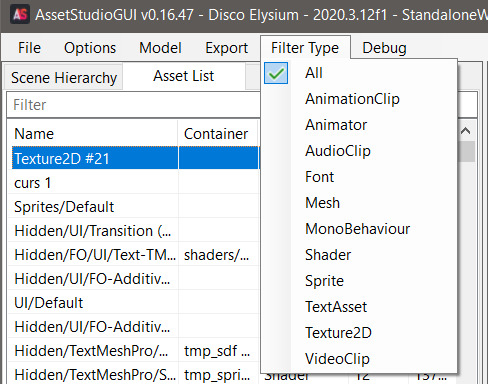
If you click on Filter Type, you can see the types of the assets. These are:
AnimationClip: I think these are supposed to be the animations, you can export them if you select an animator asset alongside and right click Export Animator + selected Animation Clips (couldn't get the animation to play but that's probably on me).
Animator: These are the rigged models, you can export them to .fbx format, but I couldn't figure out what to do with them in Blender because they were kinda distorted (funnily enough, when I imported it to the shitty Milkshape program it showed up just fine... and people wonder why I prefer shitty Milkshape XD) Anyway, I hope someone can figure this out that actually knows something about Blender lol.
Audio Clip: Sounds, voice lines, background music. (.wav format)
Font: Well, fonts. Can be exported and installed to your device like any fonts.
Mesh: 3D models of the characters, objects, scenes. (.obj format)
MonoBehaviour: No fucking clue.
Shader: Shaders for the game. Not interesting in our case.
Sprite: Images that the game uses: portraits, object thumbnails, user interface elements.
Texture 2D: The textures that belong to the 3D models. (.png format)
TextAsset: ??
VideoClip: The stuff that plays when you open the game.

You can preview any assets (well, the ones that you can preview), if you click on them. You can view them in the right panel.

You can extract by left click on the asset in the list -> Export selected assets. You can select multiple assets and export them at the same time.

The program will ask you to select a folder where you want to export the stuff. It'll export them into separate folders, by assets.
Well, yeah, now you know what is what, and how to extract them, but there are still a lot of assets. Good news, you can filter them with the little search bar too, if you type in some gibberish! Some stuff are a little tricky to find.

Voice lines are grouped by task / place, so if you know where the particular thing takes place, you can try to filter for those. The assets are named with the speaker's name - either a character or a skill. I think the numbers mean some kind of order, but I couldn't really figure it out. If you click on one of them, you can preview, and listen to it in the right panel! Super easy! (if you want your own daba-doop-doop-dead it's Kim Kitsuragi-YARD HANGED MAN-556. Just saying)
For objects and characters, you can find them by name, although some characters are named differently. Like, Harry is referred as Tequila in the game files.
Basically if you want to have a character or an object extracted, you’ll need to extract a mesh and a texture that belongs to it. You can quite literally play dress-up game with Harry, because all of his clothes are separate files (and named with kinda the clothing item name). The Kineema has multiple parts (exterior - interior - door - whatever else).
Anyway, let's move on to the Blender part before I forget how to do it (I learned it this morning lol). (Disclaimer: I don't know jack shit about Blender, I use it for extracting stuff and creating the simplest shapes in existence. I use the godforsaken program Milkshape on a daily basis.)
Open Blender.
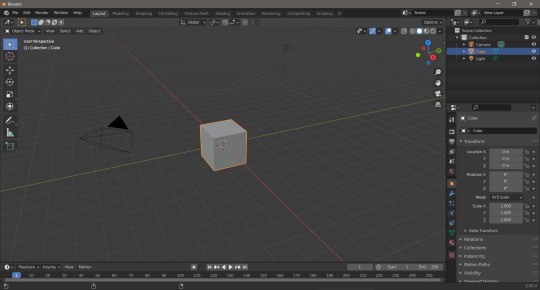
Hit delete to get rid of this beautiful default cube.
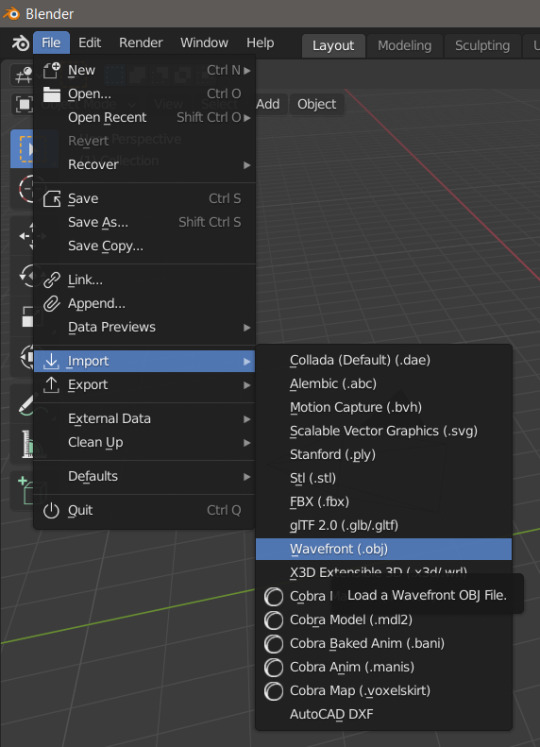
File.../Import.../Wavefront (.obj)

Select the thing you want to import (I'll import the gremlin child).

There he is! And he doesn't fucking care!
Btw, you can zoom with the middle mouse button scroll or middle mouse button + Ctrl, rotate with middle mouse button, move the view with middle mouse button + Shift. So you can see his itty-witty mischievous face from very close!

Now, that's great, but he doesn't have textures still. First of all, change the Viewport Shading to Material Preview.

Select him (just click on him, you'll see an orange outline). And go to the Material Properties tab on the side.
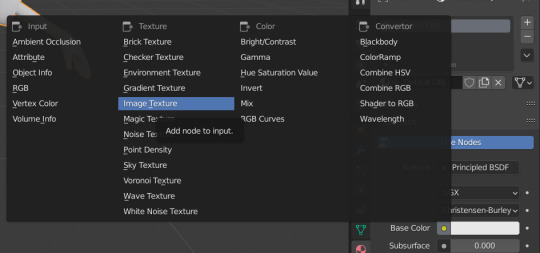
Click on the little dot next to Base Color, and select Image Texture.
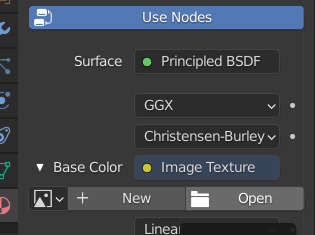

Click on the Open button that appeared out of nowhere, and search for the Cuno texture.
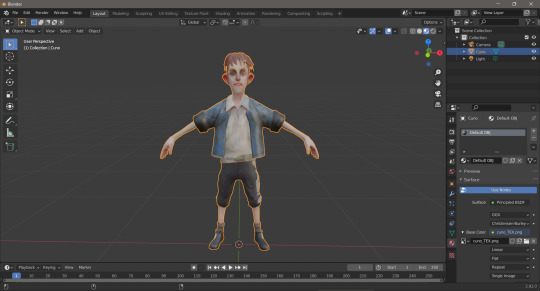
Tada! He looks beautiful now! (and he still doesn’t fucking care)
You can do the same with any 3D models, objects from the game, really.
Well, that's it lol. I hope it made sense! And I really hope someone runs away with extracting the animators + animations, because I'm pretty sure it's doable, I just have no clue how.
515 notes
·
View notes
Text
Before VS After: Shoe Swap and Retexture!!
I used to love the shape of these pants when playing Sims growing up but hated the tall boots so bad...but now I get to enjoy them! Shoe swap in Milkshape 3D, and new pants texture by me.
Platform boot mesh and texture credit goes to @madlensims (original TS4) and @monilisasims for TS2 conversion
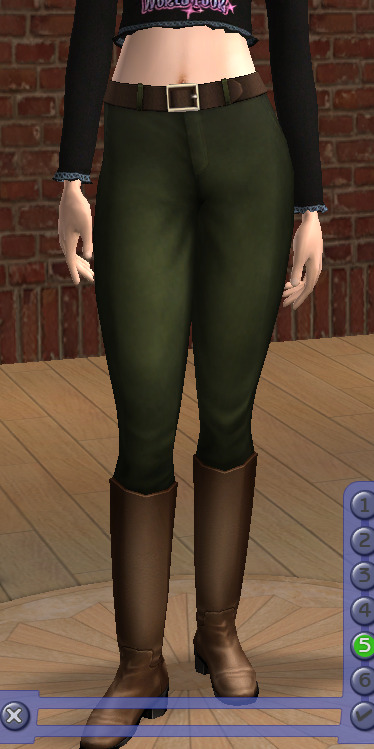
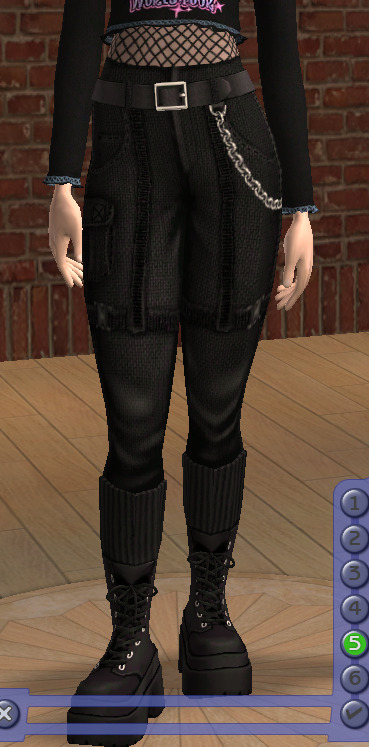
#the sims 2#ts2cc#alt fashion#goth aesthetic#the sims cc#ts2#sims 2 custom content#sims cc#sims shoes
69 notes
·
View notes
Text
*Pay Attention - Part 2 - Tutorial*
I was about to go back to my business and quietly leave y'all with a word of wisdom but the very next package I opened raised my hackles. So here we go, hold on to your seat.
Disclaimer for younger/sweeter - followers - this has language in it because I'm pissed... I apologize in advance.
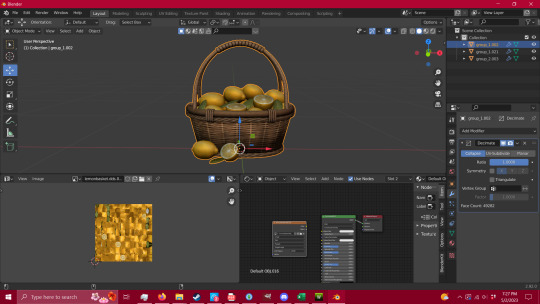
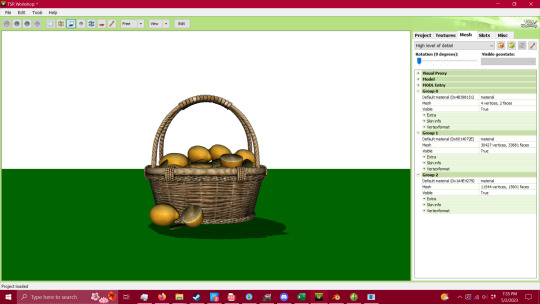
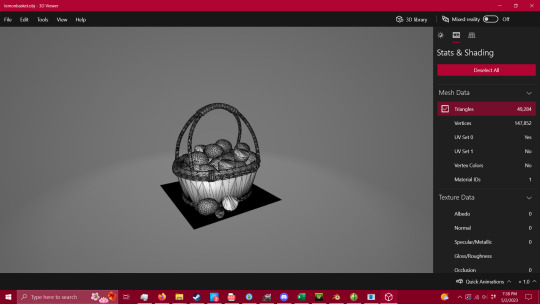
49,282 Polycounts. That's 50K for a fucking basket!!!
It's pretty, it's beautiful, and I downloaded it because it's everything you could want out of a basket of lemons... whoever created it did an outstanding job... for a movie production.
NOT PC GAMES.
So let's fix it - and let's hold our creators and converters to a higher standard or send them along to a different platform where they can create without our bitching.
First off, there's 3 or 4 ways you can check polycounts.
1 - TSRW under Mesh tab
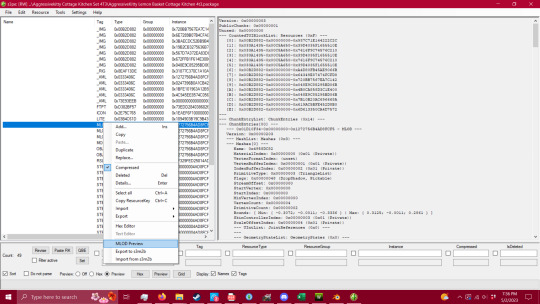
2 - S3PE (Pretty sure you have to have an addon to do this - I'll try to find it when I'm done and add the link) Under MLOD, right click and go down to Preview. It'll open up a window and you can view the model and the polycount.

3 - 3D Viewer on your computer
4 - Blender or Milkshape

Now that we have the ability to check our polycount - we're gonna fix this mesh. I'm not going to show you how to package it, there are other tutorials for that part, but this is VITAL to having a healthy game, and honestly, being a creator or converter for this game. I do understand that you have to have the knowledge before you can fix a problem, so here it is - literally handed to you in a basket. I also understand that there are creators/converters who don't post polycounts because they're afraid people won't download it - that is inexcusable. If that's the case then you will eventually be boycotted by the players who know better.
Alright, so step one - you're going to want to get into blender after exporting your mesh. You're going open the modifier properties and add a decimate modifier (the wrench circled in red, and the add modifier drop down menu).
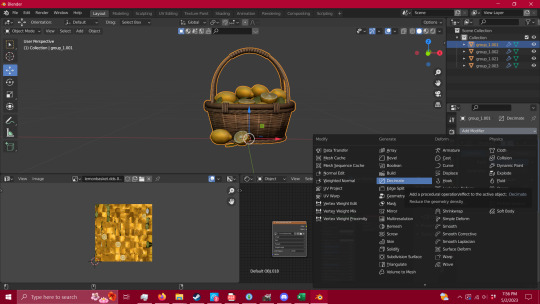
Keep it in Collapse, not un-subdivide. It's gentler on the mesh itself and you'll get a lot farther with it. You're also going to want your UV map to match what you're doing with your mesh, in case you need it for selection (I'll explain that in a minute) and have faces tagged so the selection is easier.
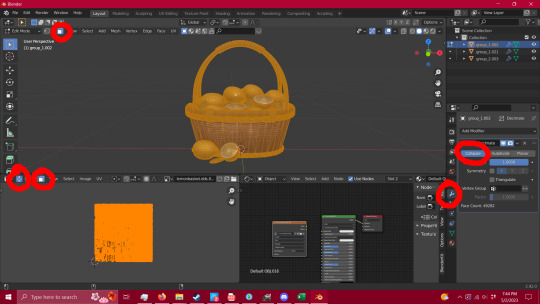
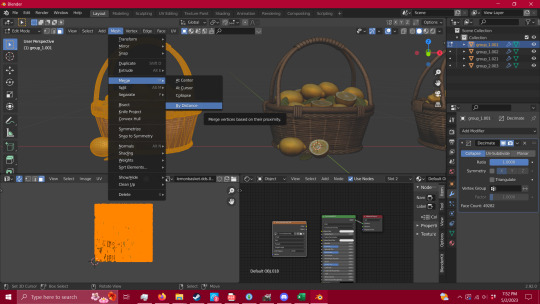
Now that you have that set up, you're gonna want to remove unnecessary vertices. See the shadows on the bottom of the basket? Here's how to fix that - hit tab, press A to select everything, and then go to MESH/MERGE/BY DISTANCE. This removed 16,900 loose vertices that didn't need to be there.
Go back to your modifiers and add an edge split modifier and hit apply.
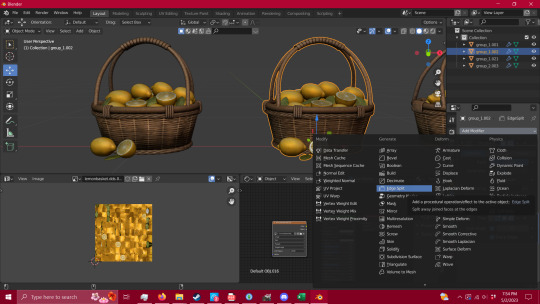
Boom - no shadows.
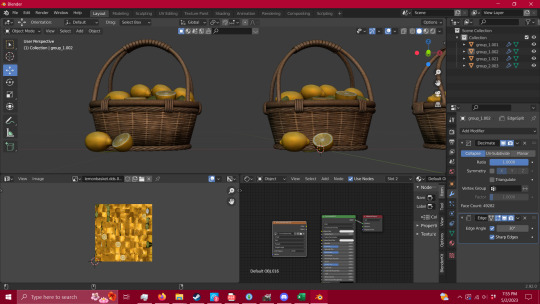
Now that that is all done you're going to go in to edit mode (tab) and press L while hovering over what you're wanting to select. This is going to select all of the islands in your UV, and it's the fastest way (that I've found) to quickly select pieces of your mesh.
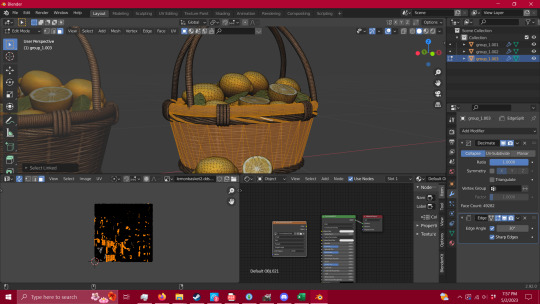
When you have your whole group selected (you can also figure out at this point what pieces need alternate textures or groups for TSRW later in your packaging process) you're going to hit P-Selection. That's gonna split whatever you have selected into a separate group.

Now, you can do that to however many pieces you see fit, but for this I'm just gonna stick with two - the lemons and the basket itself. You're going to click the blue Ratio box - and type in .5 and hit enter. That will collapse your polycount in half - (you can move that ratio box lower if you wish, but this way is the gentlest way possible and I've gotten better results. So play with it and see for yourself if you wish to. ) - Now repeat the process until your mesh starts to lose quality, I tend to stop there unless I can push it a bit further without making it look bad.
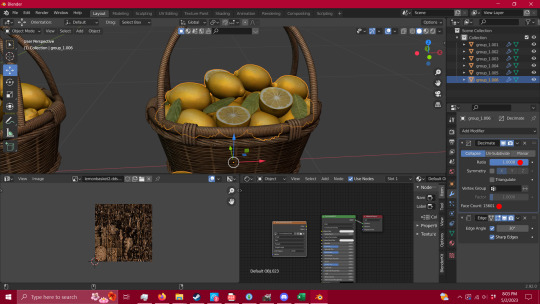
Now repeat that process with all groups.
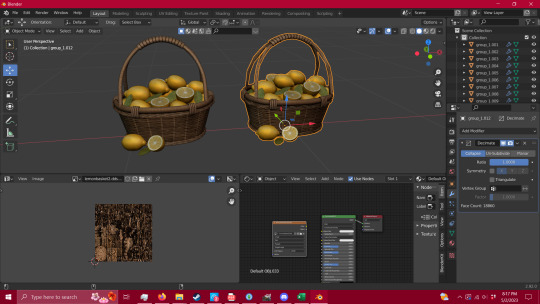
Given that this particular mesh was such high polycount and an intricate mesh, I could only manage to get it from 49,282 faces (polys) down to 18,860. This is absolutely not okay for TS3 - and I'm using as a lesson rather than using something that I can get down to an okay level - because this is what you're going to run into when getting meshes that start in the tens of thousands of polys. THIS IS NOT MEANT FOR TS3, it's beautiful, yes, but you are putting people's equipment at risk by advertising a mesh for a 13 year old game without disclaiming that it's dangerous for it.
This tutorial will absolutely work for most objects, and I've used this process for a couple of years now with success, but you have to be able to decide what you're willing to put into TS3. We have all of these tutorials for reducing lag in this old as dirt game, but NONE of that matters if you're carrying objects like this - no matter how pretty they are.
If you need it that bad, figure out how to make a version of it that CAN look as good as this with a little less detail (think the spirals in the wicker that is actually meshed rather than just textured), or ask a creator to make something for you.
If you have any questions, please feel free to ask. If I have the time, I try to help whoever comes into my inbox. If I can't help, there is a hoard of creators out there that probably can.
So have fun, CHECK YOUR CONTENT, and keep your computer safe.
And creators/converters - do better.
Edit to add - to the creators/converters who do put out their polycounts, or a disclaimer of high poly/photo use only - thank you. I do understand the need for high poly objects for photo-op purposes, and I'm not here to attack anyone's preferred gaming style. I just want people to be safe while they play, as there are those who don't know what they're putting into their games. Let's help ensure that everyone has a chance to play whether they're experienced creators or regular game-players.
Edit to add 2 -
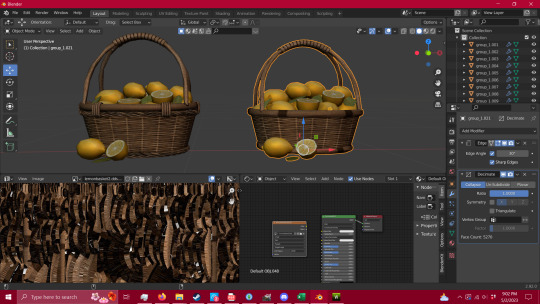
To add a bit of context - I was able to get the reduced mesh even further by removing some of the intricate details of the mesh, to create a simpler version. This is now down to 5,270 - and it could be lowered even further by removing the top of the handle - which is 1700 by itself because it's spiraled. So when you're dealing with a high mesh object such as this, pay attention to what's really adding weight, and if you can replace/remove it without taking too much away. The shadows can be fixed in gimp as well.
350 notes
·
View notes
Text
youtube
i created a tutorial on how to age and gender convert hairs in the sims 2. you will need simpe and milkshape 3d for this tutorial. this is my first real youtube video so please be nice ^^;
37 notes
·
View notes