#might get some rit and dye it black
Explore tagged Tumblr posts
Text
dipped into my savings to get taco bell and thrift, disappointed in myself but it’s progress
#only got two things at the thrift#finally got a nice silk robe so i’ll stop walking around naked#got a cute dress but it’s not really my color#might get some rit and dye it black#or maybe red
1 note
·
View note
Text
Hey if this infuriates you and you would actually like to try to plan for your blacks to match, try this-
(info dump ahead)
Get a color wheel from an art/craft store and hold it up to your black clothes in (very important) natural light. Those super bright desk lamps for crafts work too.
You should be able to see those subtle differences with the color wheel held against the fabric and easily be able to sort your clothes how you want. Bring the color wheel when you go clothes shopping too.
You will start to see that some blacks are a little more green, some a little more brown and some are blue toned. The color wheel gives your eyes a little help because you will more easily see the undertone of the black popping out when the "pure" form of that undertone color is held against the fabric.
The sad tragedy is that black fabric dye isn't ever really truly black. It's the hardest dye color to get right. It took people in my textile class multiple passes and careful lengthy babysitting to dye something black. I also often used black dye to dye something dark purple when I was fucking around with Rit as a teenager, because that's just how hard it is. (Disclaimer: Rit isn't the best dye, and a lot of people hate it. It's just what I had when I was 16 and broke. Use jacquard if you can. Dharma trading Co is a good supplier for everything you need if you wanna dye stuff in general.)
This is because black dye is usually made up made up of some combo of dark super saturated greens, purples, reds, and blues, sometimes oranges. You can see what I mean if you use a sharpie (tbh any black marker) on paper, splash it with alcohol and let it run.
Because of the various ways textile companies make black fabric and the different dye formulas and fixatives they might use, some blacks are cool blacks and some are warm. Over time, as you wash your clothes, the dye fades and goes just a little green or a little brown or even blueish grey. I knew fashion majors in college who were nitpicky about fabric brand consistency because of this. "It matches now but it won't when I wash it ten times!" I heard someone say once. The fabric can also take the dye differently too, making different undertones pop, which is also a factor.
In closing, you really don't have to match your blacks, because it's hard AF, but I like having a color wheel when I'm thrifting faded clothing especially because it gives me a better idea of what actually matches and this comic made me wanna share.
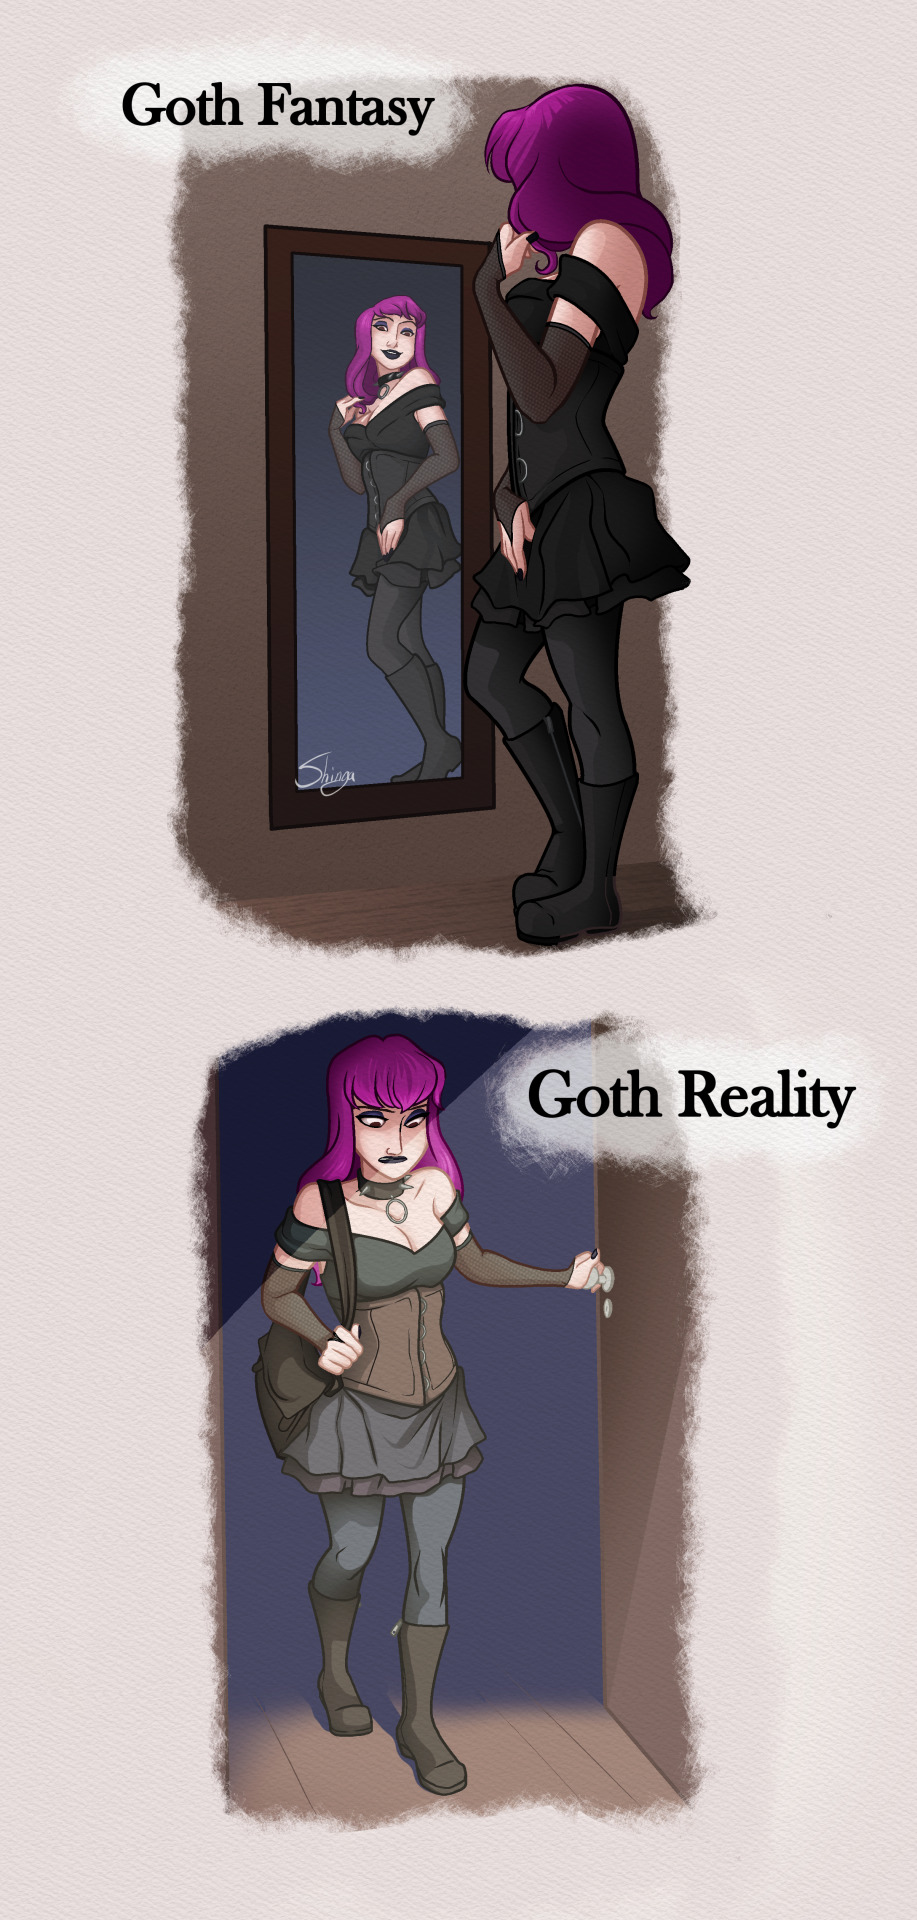
i hate when my black doesn't match my black
#orn rambles#my textile prof had a whole lecture she titled so you wanna dye it black? are you sure?#fabric dye#textiles#color theory
15K notes
·
View notes
Note
I accidentally prewashed white lace with a red towel and now it is light pink. I didn't use a dryer but I've done one round of bleach and oxiclean and it's still there. Should I just give up on it being white again?
Short answer: I'd check out Rit or iDye's color removers.
Right tool for the right task.
Oxiclean removes organic stains, like coffee and sweat and grease, by exposing them to a lot of oxygen, which helps break the bonds that hold those stains onto your fabric (and also causes fading). It doesn't work too well on pigment stains, because those don't care too much about oxygen. It's why it's hit-and-miss on lipstick stains, because lipstick can't decide if it's a pigment stain or a grease stain. Oxiclean can work really well on a dye transfer onto an already dirty garment. The dye often settled into the dirt on the garment, and when you unbond that dirt, the dye goes with ti.
Bleach removes stains by removing pigment. It can get into the natural hairs and remove their pigment, which is how you can bleach naturally-dark wool fibers to be white. If you add oxygen to the party, it can make the bleach reaction a lot faster, which sometimes makes things move too quickly for textile land. As someone who has had pink hair for over ten years, I'm very experienced with mixing bleach with an oxidizing agent and applying it onto natural fiber to strip the pigment out, and I can confirm that it does this by damaging the fiber. But, with chlorine bleach, pigment is pigment. If that's pigment naturally in the cotton, or pigment that transferred over from a towel, pigment that was carefully applied into a beautiful print or even the "pigment" that makes sweat stains yellow, bleach don't give a fuck. Bleach will go into those fibers, it will take whatever is making it that color, and whatever damage happens to it on the way is something that bleach is okay with.
Dye remover removes some kinds of dyes, sometimes. Generally, it does this by reversing the process that was done with the dye originally. Fiber reactive dyes start by mixing a pigment with a very alkaline substance, and then bonding that into the fibers. Dye remover goes, oh hey, what if I take this thing that is ever MORE alkaline, and use that to un-bond the pigment! How's that sound? It can still damage the fiber just through exposure to the high PH, but it's less likely to do the same kind of damage as extended bleach treatments, because it's not going into the fiber the same way. When it's the kind of dye that dye remover works on, it's a lot more effective than bleach. This is why reverse tie dye often uses dye remover instead of bleach.
And hey, if you've tried the other two, why not throw that third one in and see what happens? If it was a really expensive lace, definitely go the extra step to save it.
Very important, though: GOOD JOB ON PREWASHING THE LACE! GOOD WORK. DEFINITELY DO THAT. DO NOT SKIP THAT STEP! EVERYONE READING THIS, DO NOT SKIP THAT STEP.
Some other thoughts: What color of fabric are you going to apply that lace to? How even was the color transfer? Much like how white fabric that's actually a light blue will still read as bright white, very light pink lace that's on a pink background, or on a contrasting color like mint, will still read as white. If you're going to be applying it onto white or black fabric, it might still read as pink, but if it's going onto a color where it won't be obvious that it's a little bit tinted, just go with that.
You can also commit to it full-on and get yourself some dye and say hey, it's already shown that it wants to take on color, so if it wants to take on color, you can show it what it means to take on color. Make it REGRET wanting to take on color. DEMAND TO SEE LACE'S MANAGER. MAKE THE LACE TAKE THE PIGMENT BACK. Dye the whole thing whatever color you feel like! Redesign the whole thing. Punch it in the face. Show it who decides who is what color.
76 notes
·
View notes
Note
Hello! Another question for you. Do you have any experience with dying doll clothes? Or do you know anyone who does? I would like to dye a Truly Me Meet jacket (the blue one) black and I know I’d probably need to use RIT dye but that’s all I know about it. Any advice?
I have done it several times, and I've always had success. RIT dye works very well so definitely stick with that. Basically you'll follow all the instructions on the bottle of dye. But the instructions are written for full-sized human clothes, and so in some projects you might not need as much dye as they advise. To make a blue jacket black, though, I don't think it would hurt to use a large amount. Especially when you're trying to cover the blue color completely. Start out with maybe 1/4 the bottle and see where that gets you. Increase it if you still need more color coverage.
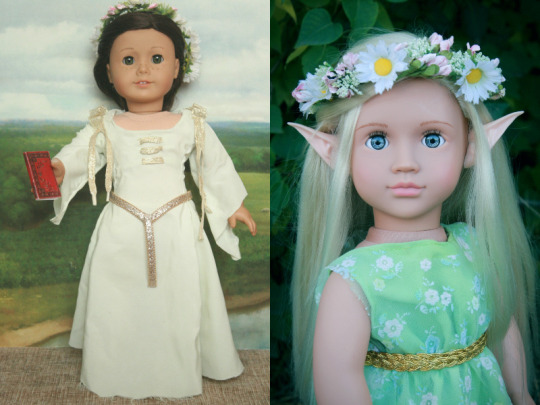
Here's an example of some of the fabric I've dyed. The dress on the left was made with only a couple splashes of green dye per yard of fabric, to give it a subtle minty color. The dress on the right was made with more dye, giving it a deeper green color.
10 notes
·
View notes
Text
Chat cosplay Cont.!!
Day 4:
It's 9am and I have decided to dye the lace before class. I took a silly 5 minute video of me having a blast dying the fabric lmao
Oh before I get into it, I put the chat ears up to my head to see what It would look like and it sounds like a sea shell. It muffled a lot of sound so I need to drill holes in them somewhere TvT
Please excuse my messy hair, it did not want to be brushed.
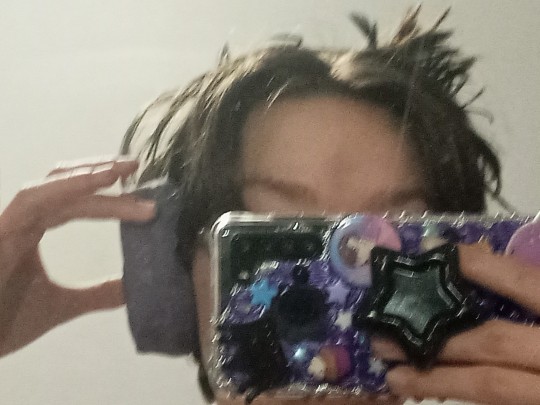
Anyway, back to the lace! The lace I got was very cute ^^ I used this rit fabric dye stuff because that's all Walmart has.
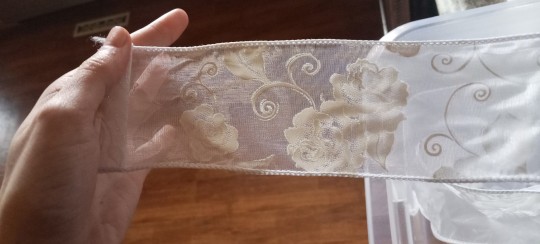
Forbidden tomato juice
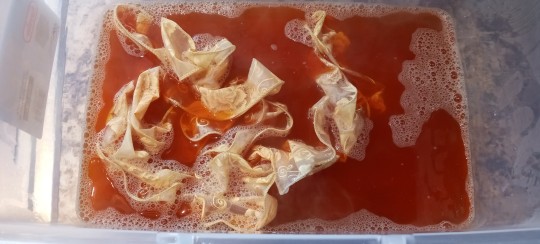
Afterwards, I did what the instructions said, wash it out and put it in the dryer.
This is the closest I could get the camera to capture the true color I see. It dyed a lot faster than what the time said because it was nylon, thank God because I didnt have patience lol.
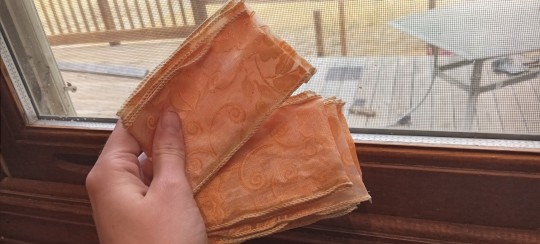
After this I went to class ^^
it lightened up a bunch when i came home.
I had about an hour or two between class and work so I had the choice of dying the robe since I got it, doing the mask, or figuring out how to drill holes in the ears and attach them.
I didn't get the package for my robe and mask yet as I thought I would have had it before 2pm and I did not. Drilling holes in the ears it is then.
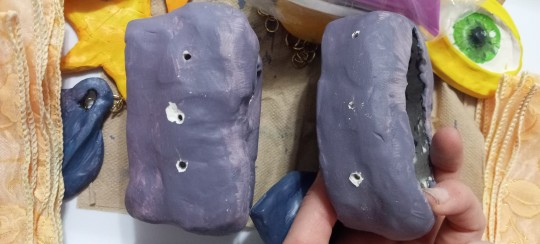
Putting in holes actually helped a lot more than I thought. It was still muffled but it more so echoed in my ears so it wasn't as bad. I put three for where the i want the front of the ears to be, because I want to be able to hear whoever I am speaking to, and one in the back so sound doesn't get as trapped and I can hear better behind too.
I'm probably just speaking nonsense but this makes sense to me. It might not actually do anything putting holes in these but it helps me.
After a long time at work, I HAVE RECIEVED THE GOODS.
Really helped that I work at a coffee shop so I garbbed like five shots of espresso when it hit 9pm and I closed. We staying up tonight to work on this thing.
Day 5:
I really worked on some of this day 4 but it reached midnight went to bed but I was too tired to document it haha.
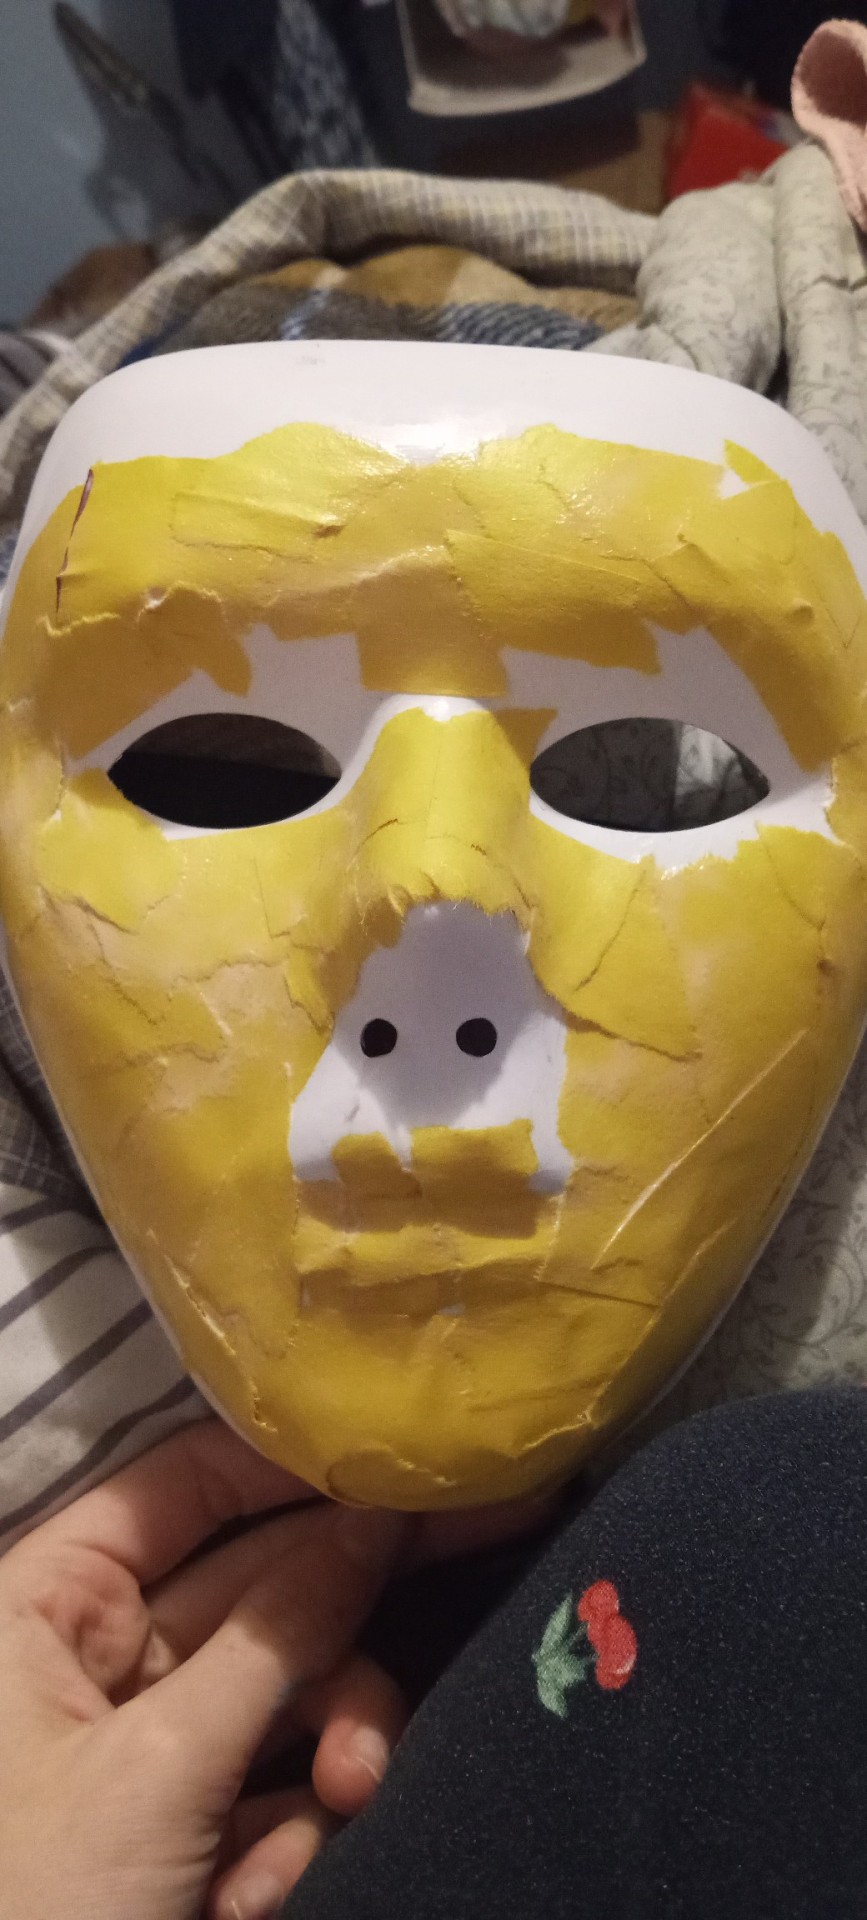
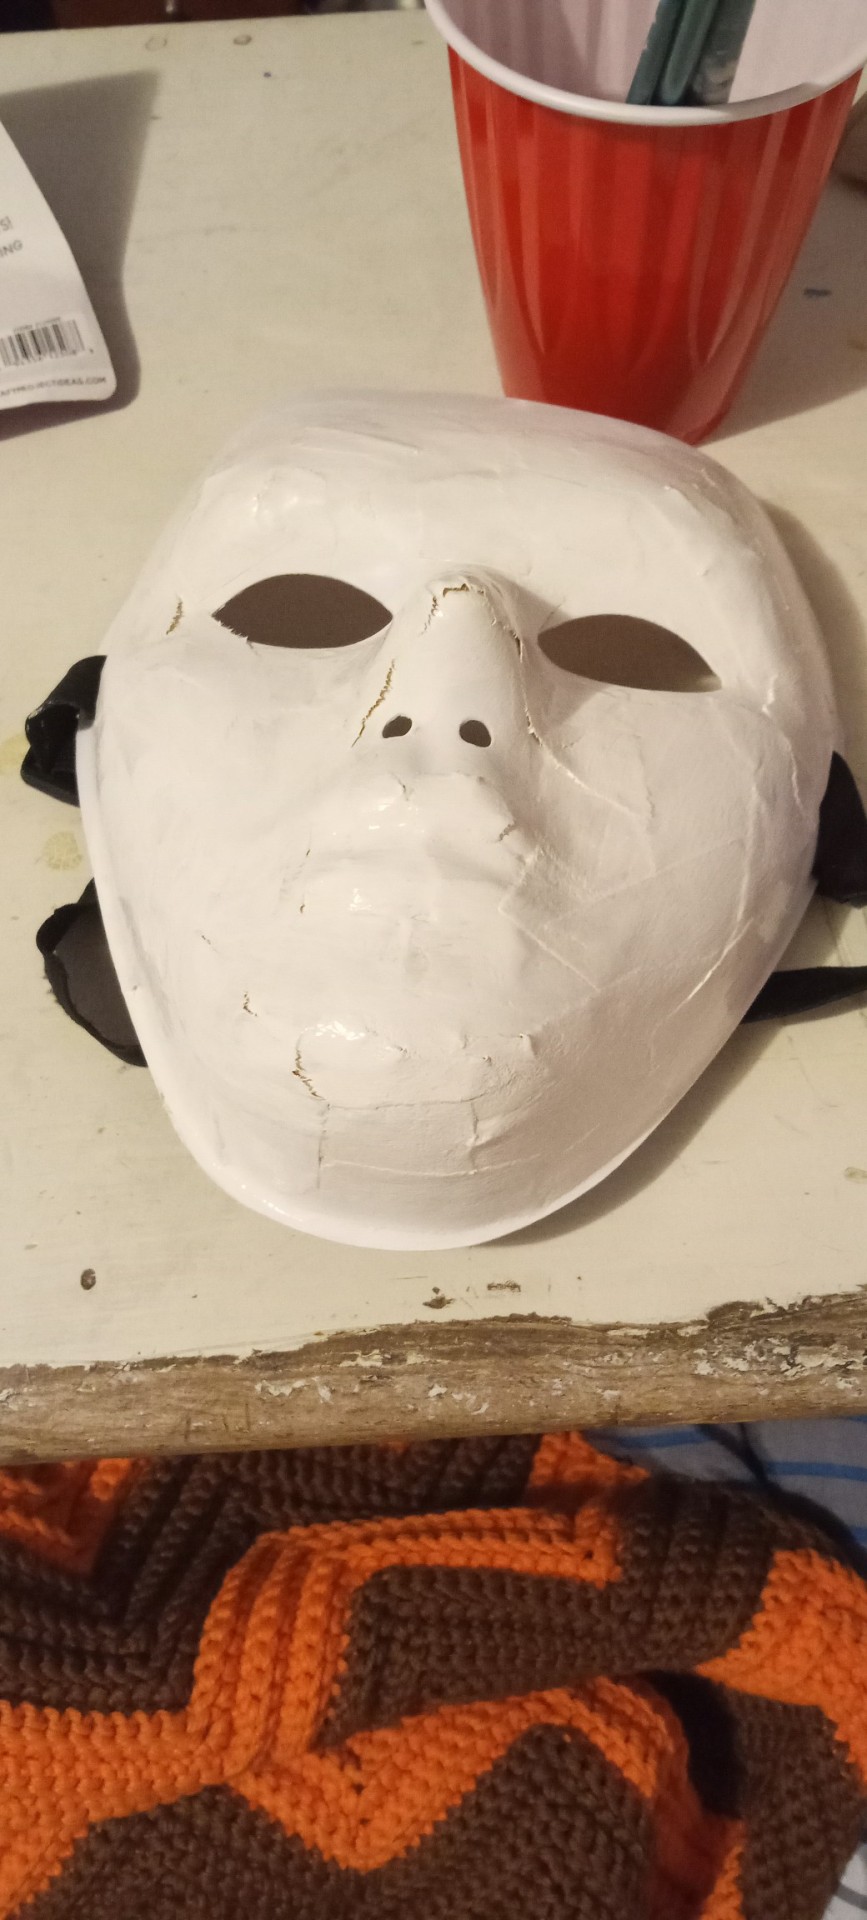
All I really did last night was cover the face like this with paper and I pretty much paper mached it. I wanted to give it a stitch looking design because chat is after all just a bunch of people. I painted it white and then went to bed.
This morning I dyed the robe and painted the mask :)))
My silly little workspace yet again was the tub and hot water. I wanted to use a pot to do the robe right but I figured whatever the robe looks like it'll be fine.
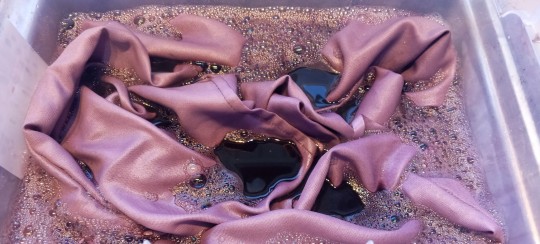
The robe looked fine dying, I added more black to it to darken it but since this wasn't nylon and it's polyester, the dye didn't stick as much. There was an acrylic paint spill in it of black paint and now there's parts that are just pure black :<< but it's mostly all on the inside so I hope it doesn't show too much 🙏🙏
While I waited for the robe to wash in the washer I finished painting the mask.
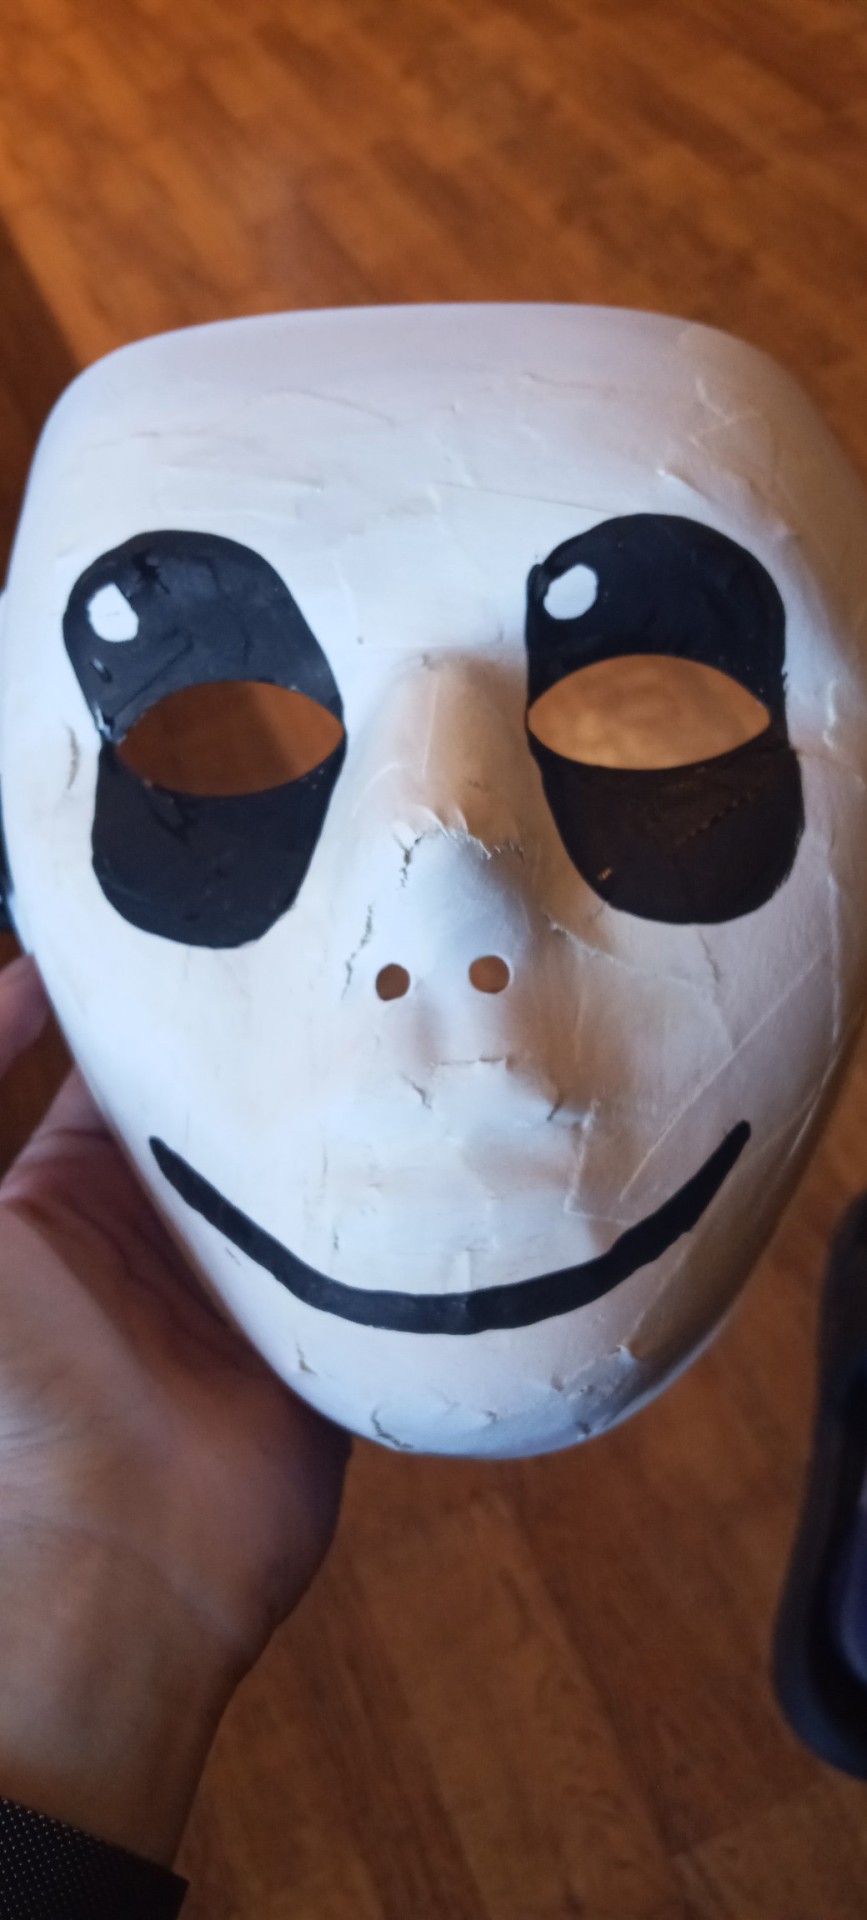
So far the whole thing is looking good >:))
Tumblr has a max limit of ten images so I will have to archive some images.
What I want to do next with the mask is put like a see through black fabric there to hide my eyes and make the illusion of twitch eyes look better as well.
I need to bust out my sewing machine as well to make the sleeves of the robe skinnier. I don't have enough lace TvT
17 notes
·
View notes
Text
I'm adjusting to the fact that my arm is going to take at least few months more to heal and don't know how much my sister may need me for upcoming specialist visits, she wanted full independence but then didn't stick up for herself at all, twice. I've been in full big sister - guard dog mode, hackles up, since.
I made a big list of projects to part with but remembered in the night: "Dolls are patient" as said by @dollsahoy so i might remove a Janay or two. =p There are quite a few things that are either beyond my current ability to work safely, current skillsets or would require whole new supplies. I'd rather stay in my lanes for now. I have plenty of supplies and ways of improvising.
Current List: won’t ask more than they cost even if they’ve had extensive work. Can put on hold until USPS is safe to use. Photos at the bottom of the page here http://suppi.net/bratz/wip.php
-Pinkie Cooper fakies
-Pullip Etoile undomiel (head, lip dmg)
-Pullip Rche (head, needs reblushing)
-Pullip MIO (blank complete: mech and body)
-Steffie Barbie head (blonde dgkk face rubs)
-Furby Baby (would like to regift to Myondolls)
-Pixies Jade w stock
-4 rerooted vintage straight leg skippers who need repaints
-Space Angel Yasmin stock only (damaged silver paint to shoes)
-Shibajuku (bait)
-Yeluoli knockoff 1/4th body
-Bratz and Bratz clothes bundle
Hard heads
-bald Janay green (forehead scratch)
-bald Janay black (cheek hole)
-bald Kia Hart head, no lips, no eyes
-bald Amaya Raine v1 head, new eyes, needs eyeliner repair
-Monster High Gooliope mising a few plugs in front. full stock modded shoes
-Disney Descendants: Bald Lonnie (body+stock),Bald Jane (body+stock),Bald Uma,Mal (yarn hair)
-Bratzillaz Jade bald with body and stock
-Bratzillaz Meygan 'Skully' bald with body
-Bratz Party Yasmin bald articulated body
Possibly:
-bald Live action Disney Jasmine (no lips, body)
-bald Janay orange
-Janay Blue (full reroot)
-------------------
It occurs to me that if people are able to dye rainbow high maybe it's possible to dye some of the star darlings, pretty sure they use some of the same fibres and it's definitely nylon. It's just that most of the base colours are already dark. The two i can't complete right now are leona who comes with yellow hair who needs to be dark red and libby who has milky pink and fairly dark fuschia to be turned orange. Of course i'd have to get two more as mine are pre-scalped but i do have their hair to test. Will use some of my usual semi permanent red hair dye before investing in importing rit dyemore plus and more doll heads.
5 notes
·
View notes
Photo
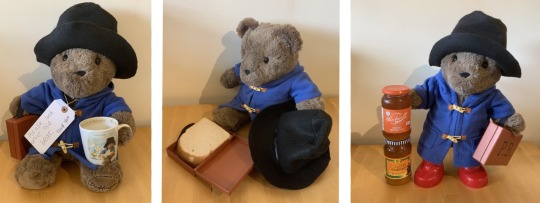
How To Make A Build-A-Bear Dye Without Killing It:
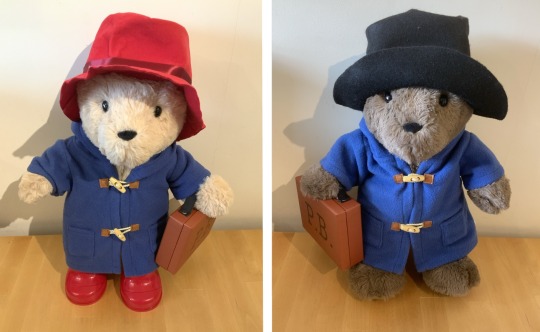
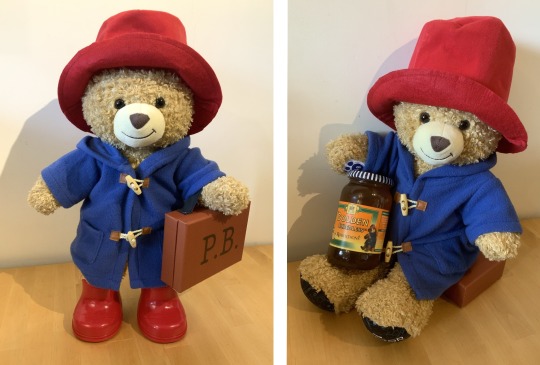
Me: If this is Paddington, why is he white?
Build-A-Bear: Oh my god Rowan, you can’t just ask why Paddington’s white!
Paddington is currently one of Build-A-Bear’s cutest and plushiest options. However he’s also significantly lighter-furred than either the recent movie, the classic television show, or even the original illustrations made him. My sponsor being a fan of the Paddington TV show, I was asked to experiment to see if I could correct this by dying him, in a long-lasting, no rub-off way, whilst maintaining the gorgeous fluffy texture of the fur.
And shockingly...yes. Yes, you actually can.
(Instructions and more adorable pictures under the cut)
Now as far as I can tell, if you can do it with this plushy baby, you should be able to do this with any Build-A-Bear. Probably any bear full-stop, but I’m not responsible if you re-dye that toy tiger you’ve had since you were a baby and it crozzles into a little plastic ball. Be smart, be responsible, be sure you can buy another one of whatever you’re dying in case you screw up. Remember even if it all works, you might still not get the colour you want. Dying’s a lottery.
Disclaimers over, you will need,
A Bear.
Rit DyeMore Synthetic in the colour of your choice. (Cocoa Brown if you’re doing this Paddington).
A big metal pot than can go on the stove. Bigger than the one you’re thinking of right now.
A cooking thermometer is highly encouraged - look you’re buying the dye, you might as well spring for this too, you’ll find uses for it.
Nice smelling washing-up liquid.
Rubber gloves if you’re not an idiot.
A big wooden spoon that can reach the bottom of your pot.
Basic sewing supplies (don’t panic, nothing arduous)
Ideally an extra person in case of emergencies (these include: when it turns out you can’t stir a pot continuously for over thirty minutes, when you splash yourself with scalding-hot dye and need someone to stir while you hold your hand under cold water, when you apparently don’t have the coordination to stir, check temperature, and keep track of time all at once, etc.)
And before you begin, offer a prayer and thanks to @tokozdragon whose own experimentations allowed me to stand on the shoulders of a giant. Theirs was one of the most helpful bits of information I came across in my research, and is how you’re gonna hopefully keep that fluff nice and gorgeous.
So. Build-A-Bears are seemingly synthetic top to bottom. Certainly this one is. I couldn’t find any tags saying anything other than 100% polyester, man-made fibres. Now this is a bad thing when it comes to dying, because the dyes can’t penetrate and hold in the same way. You wash it, everything’ll immediately rinse out. But Rit Synthetic Dye, does work. The only catch is, you’re gonna have to get it to just below boiling point. And if you’ve ever left a cuddly toy against a radiator before, you might know that these things do not like heat.
But there is a trick to this. You’re gonna diverge from your dye instructions just a little bit, but it’s going to work so long as you’re really on the ball.
First of all, check to see that your bear will fit in your pot - physically put it in there - and check if it could move freely and be covered with water. No? Then you’re gonna do what I did, and frankly what I suggest: You’re going to unstuff your bear. Get a clean box, find a seam (the BAB tag is perfect for this if it’s still got it on) pull until you see threads, have courage, and snip. You can put them back together, I promise. I left the head and arms stuffed for Paddington because it would fit, and they’d be more difficult to restuff. You might want to as well. Keep your heart (and tracking barcode) safe, as well as all that stuffing. Now you may have someone who looks like this:
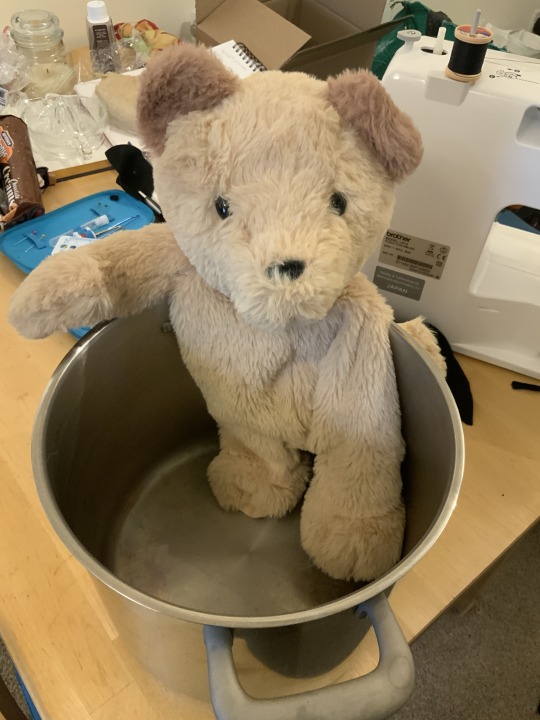
Next, it’s bath time. No, don’t skip this step. Get a little of your nice washing-up liquid, just a small drizzle, and some warm water. Nothing hot, not close to hot - baby bath temperature. Give your bear a gentle wash, to remove any coatings or oils or dirt, and rinse them out well under more warm water. Make sure to squeeze it through any remaining stuffed bits too. You don’t need to go overboard though, a bit of soap left over is gonna be fine.
While you’re doing that, you’re going to heat up your dye to just below teddy bath temperature.
This is where we start to deviate from instructions.
You’re gonna put that dye in right away, while it’s still cool. I needed about 5 litres of water for my pot, and used about a quarter of a bottle of dye (somewhere between 6-8 tablespoons). You can see how Cocoa Brown turned out here. Obviously if you want a weaker colour, use a few spoons less. If you don’t get it perfect straight away, don’t worry about it, you can add more later if you have to, but again remember your ideal colour is not guaranteed.
Then add a small trickle of washing-up liquid to the dye. Less than a teaspoon, but it’s going to help the dye catch.
When your dye is just about bear-temperature, still really low, you are going to immerse your bear, while the temperature’s still going up. That’s right, we’re doing it now. What we’re trying to do is not shock the fur by giving it a sudden temperature change - plunging it into 90°C dye like you’d usually do. Instead we’re gonna boil it like a frog in a pot.
You are gonna stir this baby continuously, and treat it like a video game level you can’t afford to fail. Bits that float, squeeze em and squish em back down. Nothing stays still. You stop stirring? You’ve failed. And never, ever, ever, let it touch the bottom of the pot for even a second without you moving it away. Treat this early temperature where you can still put your hand in it as your test, and get a rhythm up. Using your gloved hands (or not, but it’s gonna make your nailbeds look weird for days), squeeze the dye thoroughly through your still-stuffed areas, make sure everything’s evenly covered, because once this dye goes past 50°C you’re going to be using your spoon only.
Then just keep stirring. If your arms get tired, this is why you have your emergency standby buddy. Check the temperature occasionally. When it gets up to about 80°C this is when the dye will actually start activating. Keep the heat going, but check your time. If you can’t easily see a clock and don’t have a buddy, you definitely can’t afford to stop stirring now, so start counting one-Mississippi, two-Mississippi, up to about 240-Mississippi. For everyone else, go to about 4-5 minutes, maybe having your buddy check the temperature as you go. If you hit a boil - you’re seeing bubbling - turn the heat off. What we’re aiming to do is give it about 4 minutes in the 85-max 95°C range, so you choose when to shut your heat off - you know your cooker better than I do.
After your heat is off keep stirring as it drops its temperature, remembering it’s just as delicate a procedure as when you were heating it up, it still can’t touch that hot metal for too long. When it gets down to about 60°C, if you or your emergency buddy can easily (and I mean easily, with no difficulties at all) lift that pot to put it in a cold water bath in your sink, you could do that, but if your wrist suddenly gives out or something that is a hell of a lot of hot water that will mess you up. If in doubt, you gotta just keep stirring for as long as it takes for the pot to cool back down to bath temperature. Don’t try and lift the bear out and put it in the sink early, just do it properly.
Once you’re down to relatively cool again, lift the bear and squeeze the dye out. Then transfer them to your sink. Run water at about the same temperature, and rinse them thoroughly.
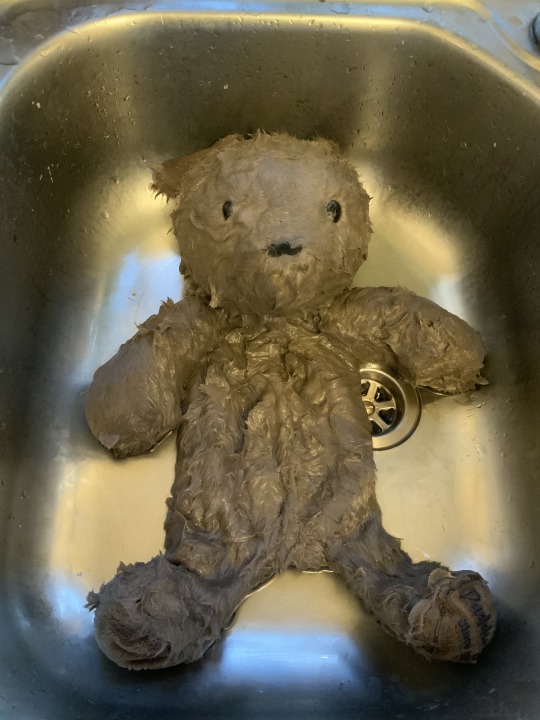
When the worst of the dye stops coming out, then it’s time for bath time yet again. More of that nice smelling washing-up liquid, soap them up good, and watch that sink get all colourful again.
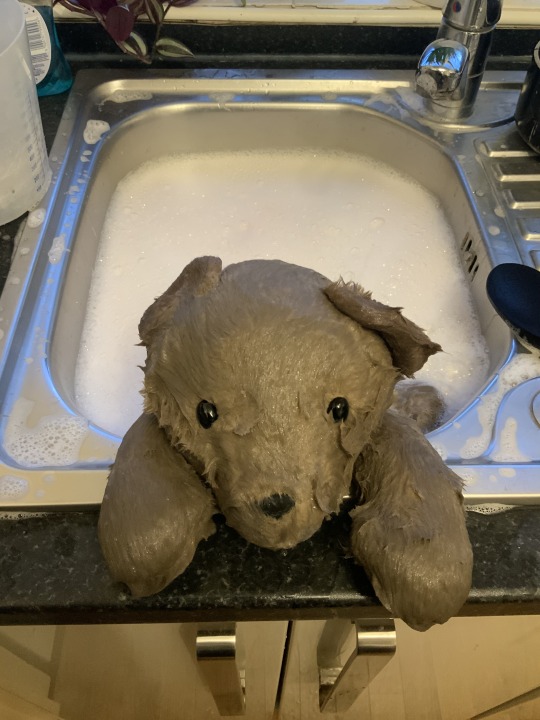
Then keep rinsing them, replacing the water until it stays clear and free from soap.
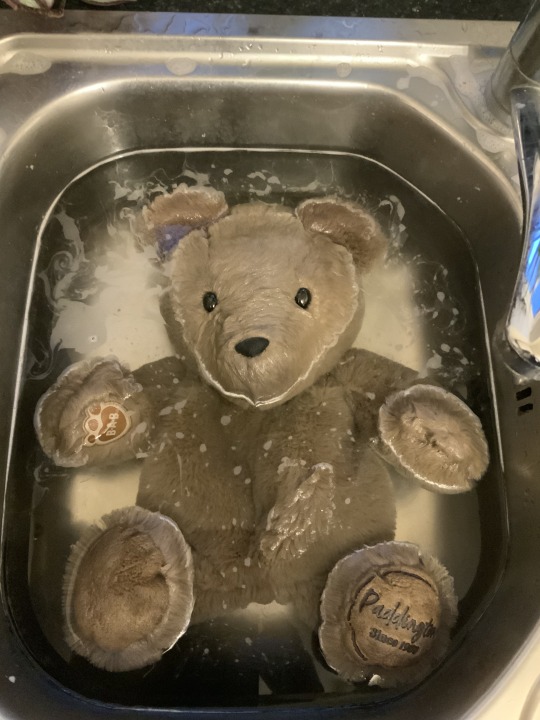
And then all you need to do is wait for them to dry!k
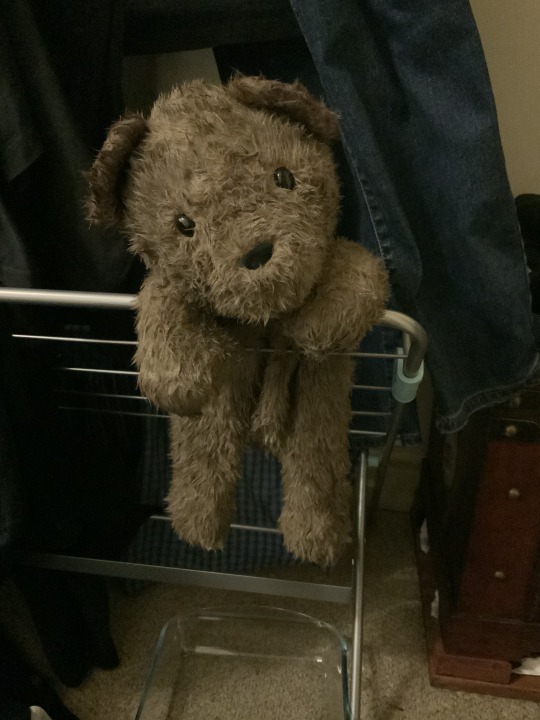
(If you don’t have a hairdryer that works on a cool setting, then just squeeze them with paper towels to get the worst of the water out, and fluff em up a little bit every now and again, moving that fur, and making sure it ends up roughly in the direction it should be so it doesn’t dry too oddly.
Then the next day when they’re dry, brush them up a bit, and give them a re-stuff, making sure to give that heart-wish a little booster when you put it back in. (And put that odd little barcode you probably found in there right next to it - that’s one of the ways a lost bear can find its way back to you. You never know). Then to stitch up the hole, use a ladder stitch. Google it to find instructions that work for you, but that’s the clever invisible stitch you’ll need. And if you can’t do that last bit for any reason, I’ve never found a Build-A-Bear shop that won’t help fix up a bear (and they’d probably be interested in your dye test. You could probably even get a scent put in if you’re good at sweet talking).
And voila, one spiffy bear.
Who in this case, had all his stuffing given a rub down with sweet orange essential oil, the perfect scent for any bear who carries an emergency marmalade sandwich.
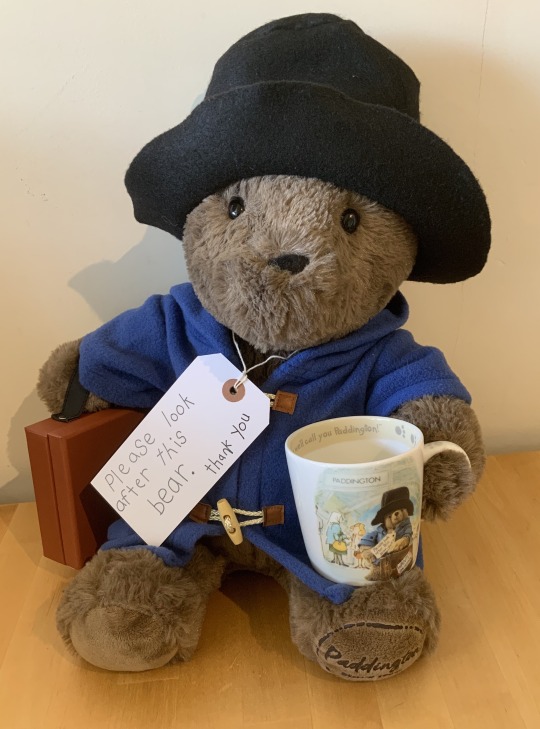
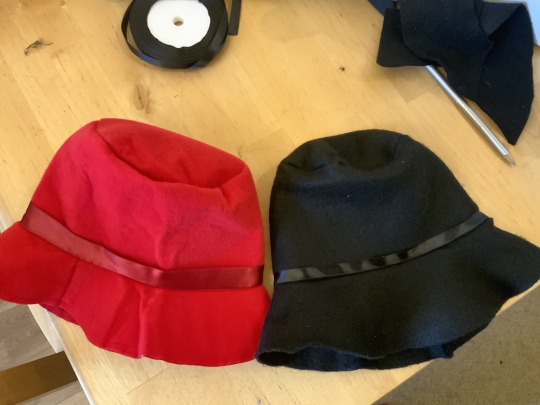
Of course if you’re going the full Classic Television Paddington, then a bit of work with some black felt and ribbon is still required. The red hat should be enough for you to mirror a pattern. I suggest 2mm or 3mm thick felt (and you’ll need a metre/whatever rather than A4 if you want to do the...sticky-up-bit of the hat all in one go like the red hat). And 1.5-2cm ribbon (but I had 1cm so that’s what I used). The brim is about the size of a dinner plate, and you could cut the circle for the top out of the middle of that if you’re trying to conserve materials.
Bonus cuteness: I think Orlando the Thirteenth Doctor Bear makes a very good movie Paddington.
#toy making#toy modding#paddington#build-a-bear#feat#orlando the#build a bear#Arts and Crafts#mine#tutorial#props to the furry community#y’all are more helpful#than any teddy bear website#of pinterest moms
52 notes
·
View notes
Text
I'm gonna ramble a little, pay no mind, or actually give me ideas and feedback but anyway I just need to write down my ideas somewhere
So for the bjd doll hair, there are. So many materials !!! I didn't know wig could be made of such different things
For the Kaeya cosplay, since it's long, dark blue (not a common color it seems) and straight (unlike Kaeya himself lol) I'm thinking nylon/fake saran. I'd have to make the wefts myself but that way I can adjust length layers to fit the Canon haircut better. It's cheaper than real Saran, and looks as good on pictures. For the light blue strand either I yarn brush a single weft or use a dyed white strand (depend on Louis' hair)
Emilie will probably be my next doll, and oh my god her hair is going to be the most annoying. Why did I make a girl with longish curly two-toned hair ? So either curled synthetic fibers (nylon too? Is it easy to curl/wave ???) or curly cheap mohair. It will depend on the brown shades disponible I guess, and then I'll have to see if I can use Regular Rit dye or some acrylic ink/alcohol mixture to dye the end of the wefts
Christopher will be the easiest : pure black, mid-lengt, straight in a proportionally inverted way to his sexuality. Either I buy more Nylon fibers or I do brushed yarn. The nylon would be better I think, his hair is pretty flat
Louis. Now Louis I now what I want but I'm unsure how to achieve it. See his actual haircut is rather short and fluffy, so I'm guessing brushed yarn would be good. BUT ! I want to use that boy as a Barbie model and dress him up in all kind of clothes and so I'd also like a wig with his "younger" haircut. Which was very long but still kinda fluffy hair. So now if I make both wigs I think it might be best to use the same fiber so no obvious and weird color/texture change between pictures. Does the straight Nylon fibers can curl and "fluffy up" well? Because if I do brushed yarn it's going to be so annoying and hard to get a nice, even length. I think I might end up putting a little more money for actual mohair lambskin for him. 15cm length on a 33cm doll should make nice long hair, right ?
I think I have some leftover yarn wefts from back when I became interested in bjd for the first time (before I made hard hair for my 1st attempt) so I guess I can use this for a random wig to get used to the feels/practice cutting. I definitely don't have the patience to make several whole wigs out of brushed yarn tho. And synthetic fibers are pretty cheap, especially if I buy all my colors at once to regroup the delivery costs
Guess I should try making some hard and soft wig caps at first.
#my crafts#Bjd#Wig#Hair#Rambling#The only synthetic stuff I've ever handled were Barbie hair and a cheap ass wig#These nylon/milk silk fibers are cheap as fuck but they look rather nice on picture but what about irl?#And can you Poof them for like bedhair ???#Every doll I've seen seems to have perfectly straight Japanese oiled hair with these. All the fluff is always genuine mohair or fake fur#Tbh thinking about it the price difference between a pack of acrylic yarn in the right color and nylon is. Not too different.#Then again I'm not in a hard financial situation and I could afford to spend like 20 bucks on real mohair for Louis
1 note
·
View note
Text
^^^THIS. I… won’t disclose when exactly my teen years were, but, yeah, THIS. My friends and I were (and some still are) goths and punks and metalheads, or some deeply cool hybrid or offshoot thereof, and literally none of us could afford much of anything in our formative years. We thrifted and scoured yard sales and dyed clothes with Rit and sewed and modified and spray painted and patched and put the spikes on ourselves. We borrowed clothes from each other a lot. We did sewing/dyeing/crafting sessions and skill-shares together. We, uh, *obtained* eyeliner pencils and nail polish from drug stores.
Hot Topic? I mean, rarely, when I could afford it (almost never) and they had something I wanted or a clearance sale on. Some kids with money had to be buying full price for that store to be as successful as it was and is, but idk. If there was a thing someone in my circle wanted that we couldn’t make or put together ourselves, or wasn’t really something typically found on a clearance rack, like a fishnet top or vinyl stuff or leather bondage gear or whatever, we could usually get a local fetish or specialty shop to let us buy from them — and it was nearly always wayyyyy better quality, and there was less chance of harassment than we might get at the mall. It could be pricey, sure, but almost no one I knew had more than a few pieces like that. Everyday wear was, as mentioned by @3liza, black jeans, black shirt, boots (though tbf some of us wore skirts). The most expensive clothing many of us had were our boots and jackets/coats. We wore everything to death, and repaired or repurposed where we could.
I reckon I owe a lot of my resourcefulness to my wayward youth, but I do spring for better fabric dye these days
one thing i find interesting is teens online today like to argue (90s influenced) "goth" was for poor people... goth is one of the most middle to upper class subcultures i can think of honestly. still had rebellous elements but like those long gowns were not cheap. and people argue tripp pants were for poor people like have you been under a rock? you're just saying things that sound good to you i guess? like ok grunge and punk i understand arguing it was originally diy and cheap...
#goth fashion history#diy fashion runs in our veins#all my love to the poor goths and punks and metalheads <333#thinking back it was probably toughest for those who had an extremely elegant aesthetic but no money to support it#but yeah we all made do with clearance sales and diy skills
6K notes
·
View notes
Photo
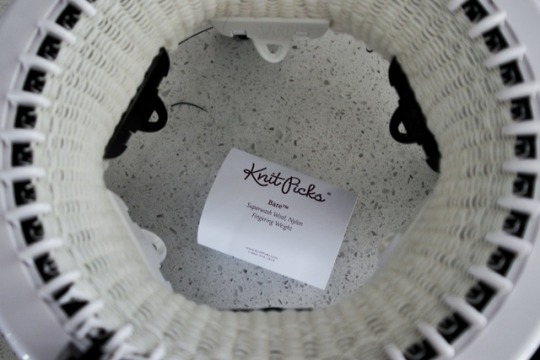
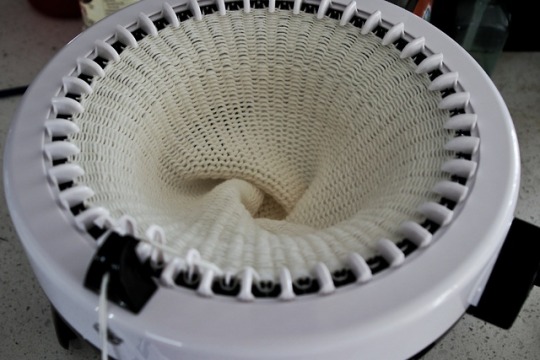
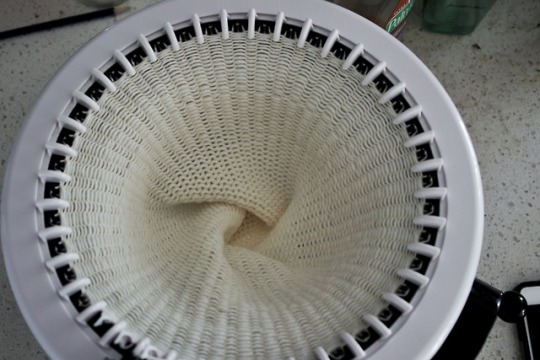
I’ve finally come full circle.
Let me tell you a little story of baby knitter Kneil.
When I was in middle school my mom bought this little toy knitting machine for my sister thinking it would be a nice hobby for her daughter to get into. We lived in Minnesota at the time so scarves would always come in handy. My sister enjoyed it for a few hours, and I asked her to make me a Harry Potter scarf and she said yes. Well, the thing about this little machine was that it ALWAYS dropped stitches. So my sister couldn’t really make a single project unless it was yarn mush. I kept trying to make suggestions, to the point that she shoved it into my hands and said, “if you want it so badly, then you do it”
I ended up working on it over, and over, because the machine wouldn’t pick up stitches after a few rows. I worked well into the night for days, to the point where my family started making fun of me for being so persistent. I felt crestfallen and then I came up with the bright idea that if I’ve spent all this time working on a machine. I might as well just learn how to do the real thing.
And that’s how I learned how to knit.
Now, we are back.
A big box craft store was taking competitor coupons and I happened to have a 60% of coupon. I saw this baby and I thought it would be the perfect thing to make bare blanks on. So I bought it. Today, I’m machining up (I feel like I have to make the verb different because I’m not technically knitting) a full blank of two skeins of fingering Merino wool so I can dye a long gradient. I’ve been obsessed with @chemknits` YouTube. And I’m going give it a try with some black rit dye.
Wish me luck!!!
Here’s to hoping and its looking good so far!
12 notes
·
View notes
Note
hey Mac where'd you find the vest you stuck stuff on? I have a shirt I've been meaning to delogo and add to a vest but I haven't had good luck finding a sturdy vest for that. thoughts? thanks!
thrift store babey!!!!! and not a fancy one thats still expensive either,,, pretty much every warehouse thrift store will have a section for jean jackets or sometimes just jackets but there will probably be some jean jackets in there,,, i actually have two vests cuz i found so many at the thrift store that i couldnt narrow it down to one which im really glad about actually cuz one of em is good for wearing over my hoodie and the other one is a bit snugger so its good for just wearing over tshirts and stuff like that,,,, but anyway ur gonna wanna get a jean jacket that you like the fit of, cut the sleeves off along the seam, and if its not already black you can dye it with fabric dye,, personally i use rit brand,, it might seem like a lot of steps but jean vests, especially black ones, are a lot rarer than jean jackets and usually more expensive anyway
6 notes
·
View notes
Text
Hey! So I know some of you were asking for some advice on a Chrom cosplay so at last I am here to help. Sorry it's a bit late, but let's get started!
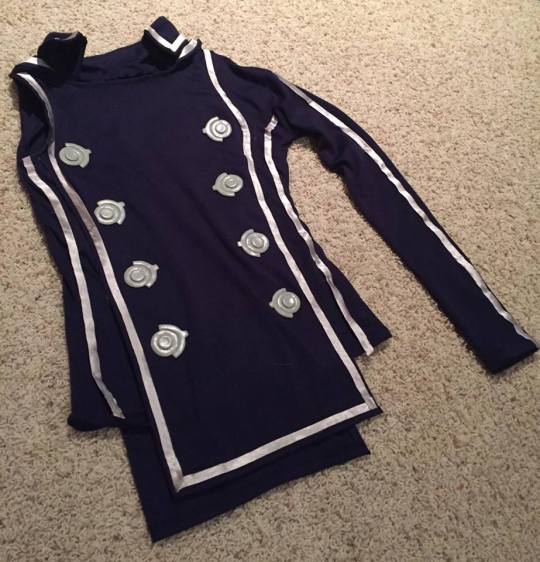
Here's the front of the shirt! The shirt and pants are made up of some dark blue spandex-ish type fabric, and I got about 4.5 yards of it. The shirt is actually two layers, the under layer being the part with the sleeve and folded collar. I used just a basic long sleeve shirt pattern for that but instead of sewing on both sleeves, I only did the one and just hemmed off the one missing the sleeve. The collar was simple too, I just used YouTube for collar tutorials since I never made one like this but it's very basic and is easier to make than you might think. Now, the top layer is a sort of poncho that I made out of the same fabric that I lined with bias tape as seen above and connected the buttons and other collar to.
Chrom is weird and has two collars, one being the folded one (that I sewed on the bottom shirt) and the other being a sort of Sailor Moon or Anime School Girl collar which I connected to the top layer, the poncho. The flatter, school girl collar was simple to make as well and just used more tutorials on YouTube, you can make these however you want or in what way you want, but that's how I did it! So the funky-shaped poncho went over the shirt and that's the base of the shirt!
The bias tape is actually made by me, I bought the fabric I wanted for it which was some silvery-gold satin and used a bias tape maker to get the even strips of fabric that are free of frays on the outside. Then I literally just hot glued them onto the shirt lol.
The buttons are made of craft foam and worbla and I just hot glued those on as well. Sometimes the simplest/laziest methods work the best!
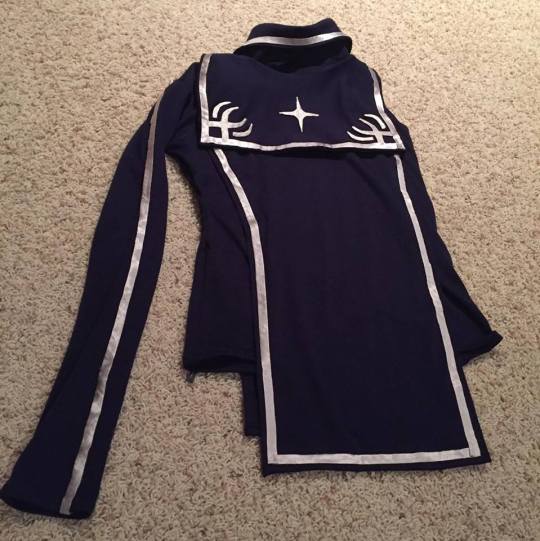
This is the back of the shirt where you can see that school girl collar much better. To get the designs, I used some thinner cardboard/cardstock and cut out the shapes, then I took the same fabric as the bias tape I made and covered the cardboard pieces with it. (The cardboard could be like the backs of notebooks or cereal box cardboard, that's what I used) I tucked the edges of the fabric around the back of the cardboard and glued it down so the fabric didn't fray, then I just hot glued the pieces on, nothing fancy at all!
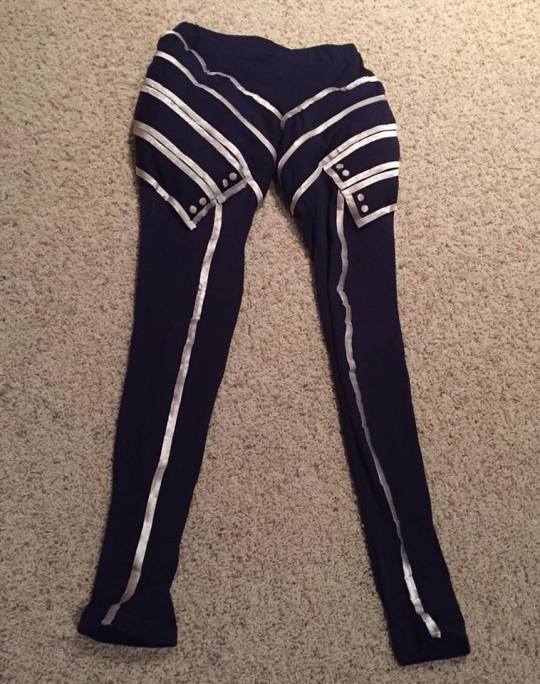
Here are the pants, I already talked a bit about them in a previous post but here they are again! The base of it is just leggings I sewed, then the part on the thighs are strips of that blue fabric that I put bias tape on and glued together and wrapped around my legs. So they're like an extra layer that I just hot glued on top of the leggings. I also stuffed them with a bit of stuffing to give them that pantaloons shape that Chrom has. (So yes, these are pillow pants basically) The little buttons are buttons that I covered in that same fabric and glued on as well.
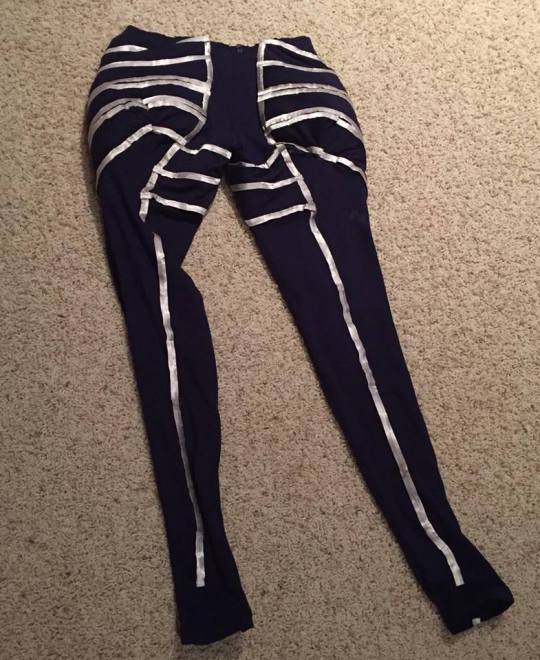
Here's the back of the pants where you can see how the fabric is wrapped around from the butt and all the way around the front and to the inseams. It was very awkward to make, but they're comfy!
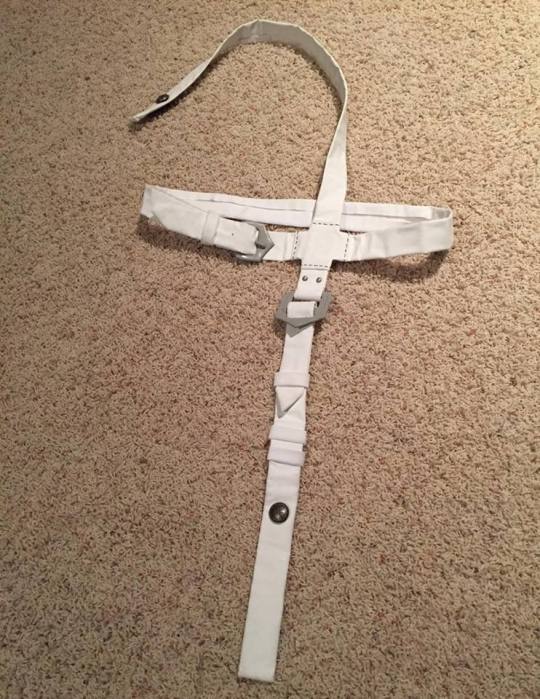
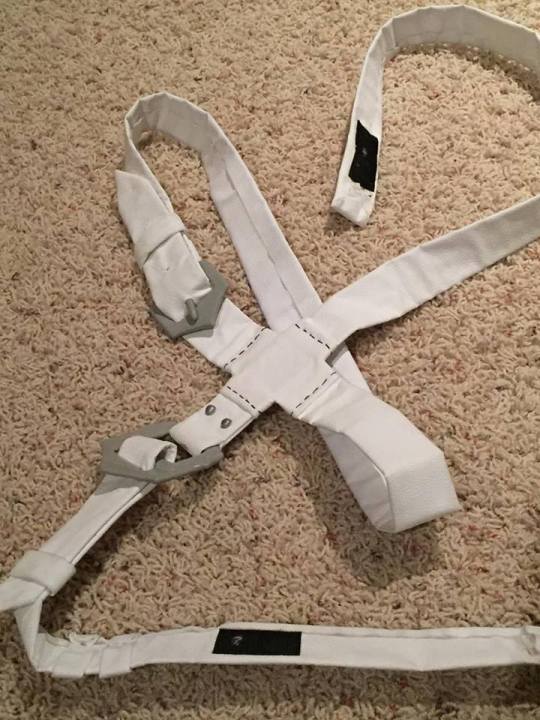
These are the belts that go around the chest area! I got about 2-2.5 yards of this I think... The base is just some white vinyl I picked up and folded over (and glued) so it had nicer edges. The buckles are made of craft foam and worbla and the buttons are googly eyes that I painted. There's also a decorative button that I sewed onto it as well.
It looks like a jumbled mess now, but if you take a look at a reference of Chrom, this all makes much more sense where everything should be placed! You can also see Velcro on there where I attach it to the bottom part of the belt that goes around the waist, which you'll see in a second.
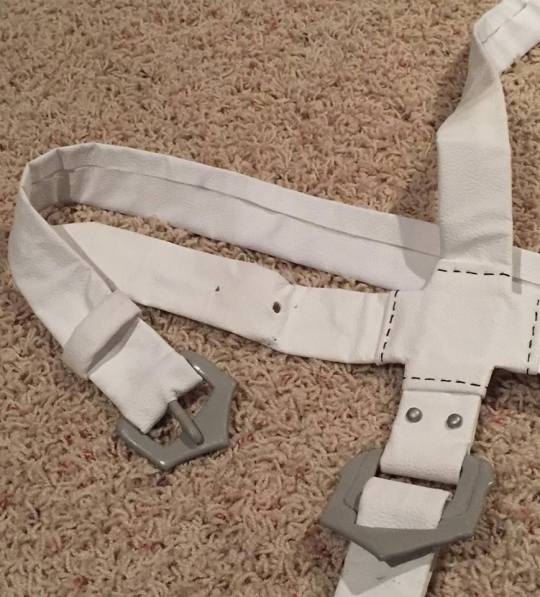
Only one of the buckles I made actually functions like a buckle in case I need to use it getting on the costume or taking it off, but usually I don't need to unbuckle it at all.
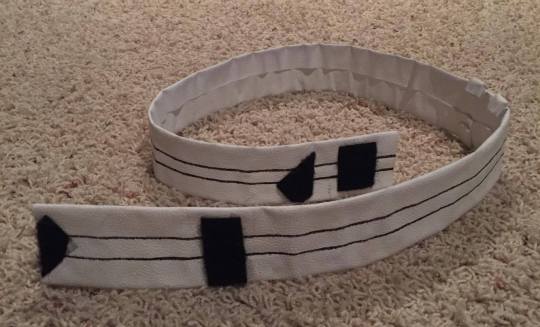
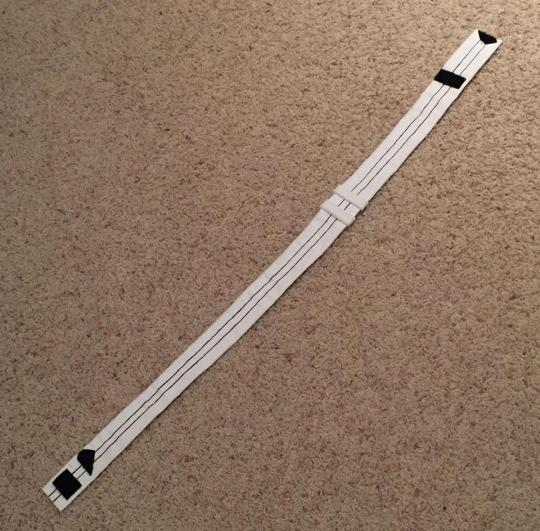
Here is the other belt I mentioned earlier that hangs lower on Chrom's waist and sort of loops around his thighs. You can also see the Velcro here where I keep it attached to the chest belts. Nothing fancy here either, just a strip of fabric with lines on it. The lines are black fabric paint that I very carefully painted on because for some reason, I didn't want to sew on the black lines since it was leather-y fabric. It took a lot of patience lol.
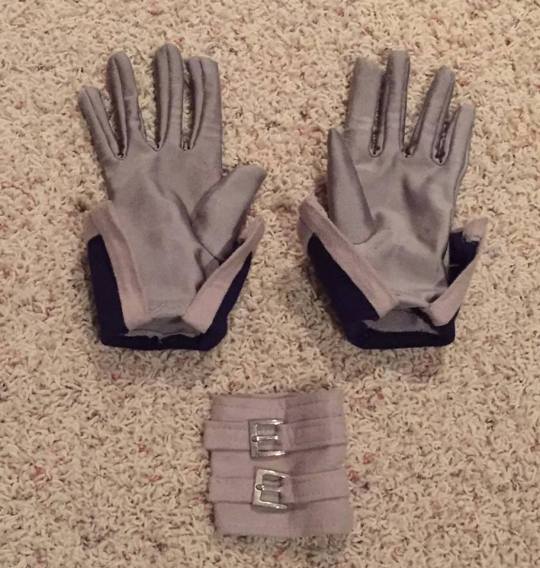
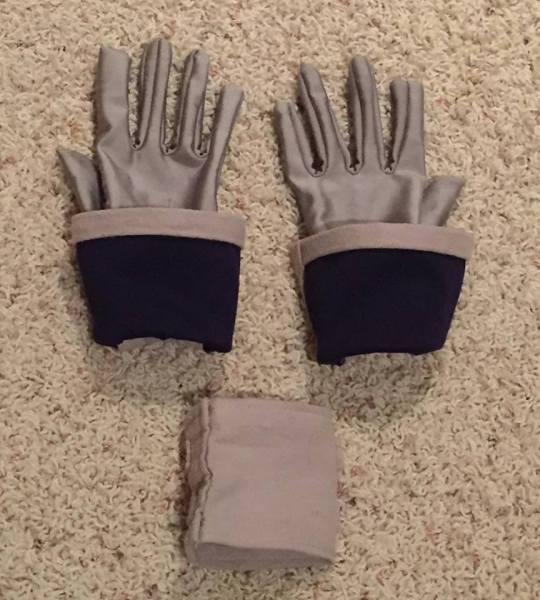
Moving along, these are the gloves and the little wrist band thing that goes on his sleeve arm! I literally bought some gray gloves off amazon, cut them down to size, then made little cuffs and sewed them on (that are lined with the same gray fabric as the wrist band). Then the wrist band is just a strip of fabric I hemmed and sewed in a loop that I just slide onto my wrist. It also has some tiny buckles on it that I believe I bought from Etsy, I just got a little package of like 12 of them since I used them more later on.
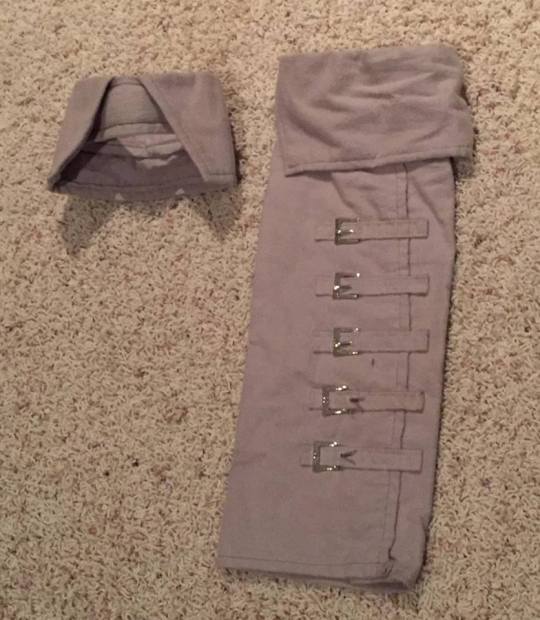
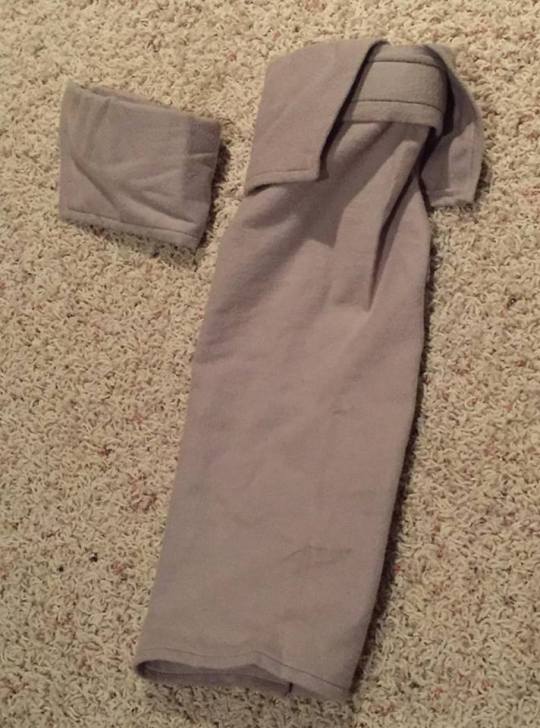
Here are the leg things! Leg sleeves? Leg bands? Leg warmers? I have no idea. Either way, you can see that the little buckles come into action again here and I just stuck them through little hemmed strips of fabric, then (you guessed it) hot glued the strips down to the base of the leg thing. The longer leg thing is just sewed in a tube and hemmed, once again nothing fancy there, then the top is a band that I sewed in a tube shape as well and sewed black lines on for details. As you can see, I also added on the cuffs just like the gloves made of that same gray fabric (that I got about 2 yards of). So I made two identical bands with cuffs, but one has that weird leg sleeve thing, otherwise they're exactly the same and just slide onto the legs just below the knees!
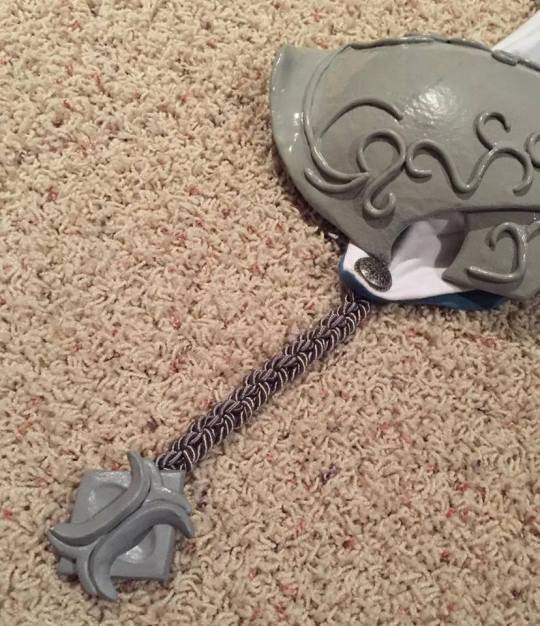
Now getting to the cape, you can see the little brooch he has that I made out of clay and then painted with acrylics and sealed with mod podge. The brooch is hot glued to some weird rope stuff I found at a craft store, however, I braided the rope so it was thicker, sturdier, and got a similar effect to Chrom's. The other end f the rope is hot glued to the inside of the cape on the edge there, where there is also another decorative button I just sewed on.
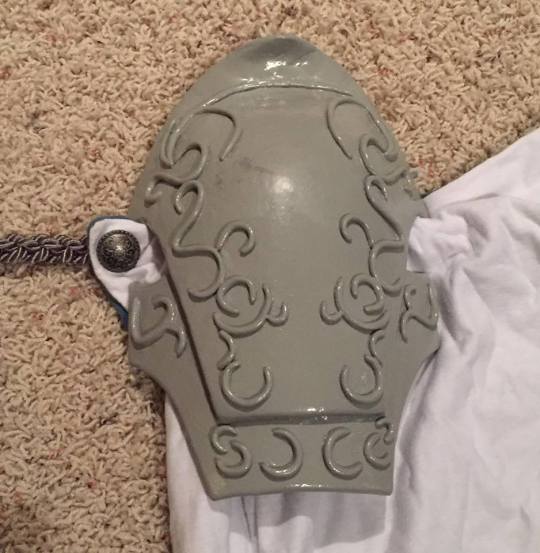
Here's the pauldron/shoulder armor! I could have done better on this but whatever. It's made out of craft foam and worbla and I just shaped it to the way I wanted and added on the details. The details are little strips of worbla that I heated up and rolled into noodles, then I just attached them and shaped them to the surface of the pauldron. No glue there since worbla sticks to itself! If it looks uneven, you can always heat it back up and move the pieces around!
I also just glued the pauldron to the cape because I was lazy and when I was looking at references, I didn't notice any straps or anything that Chrom has so that's what I did!
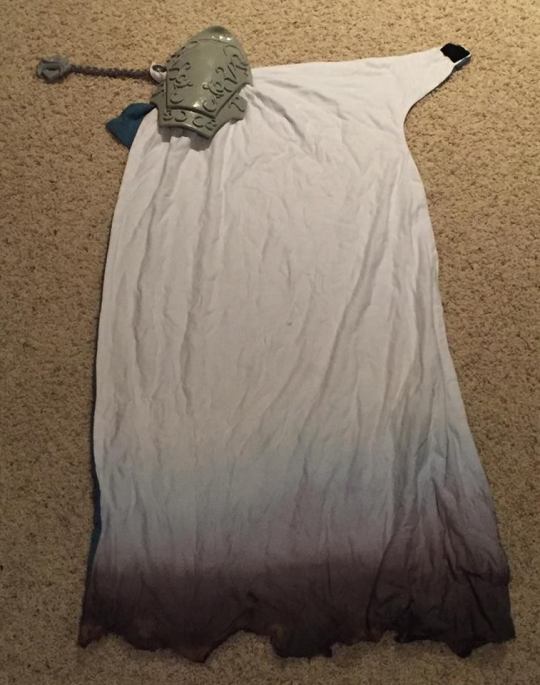
And this is the cape! You can see the black patch in the top right corner there, that's just more Velcro that connects to the back of the brooch, which of course also has Velcro on it. You'll see that in another picture as well. The cape is made up of some nice cotton fabric and it's two layers of the same stuff that are just sewed together. I made sure it was cotton because that's the easiest to dye since the bottom gray-ish part is gray Rit Dye that I dipped it in to gat the worn/burnt/dirty effect. The edges are all trimmed in random directions to give it the cool effect.
After that. I decided to take it up a notch! I actually rubbed that bottom part of the cape in some dirt and grass as well to get some real dirt effects. (which you can't see as well in the picture, but it's the thought that counts) Then I had some help with a blow torch and singed the edges of the cape to get an even more battle-worn and burnt look to it! This was the most fun part of making the cosplay tbh.
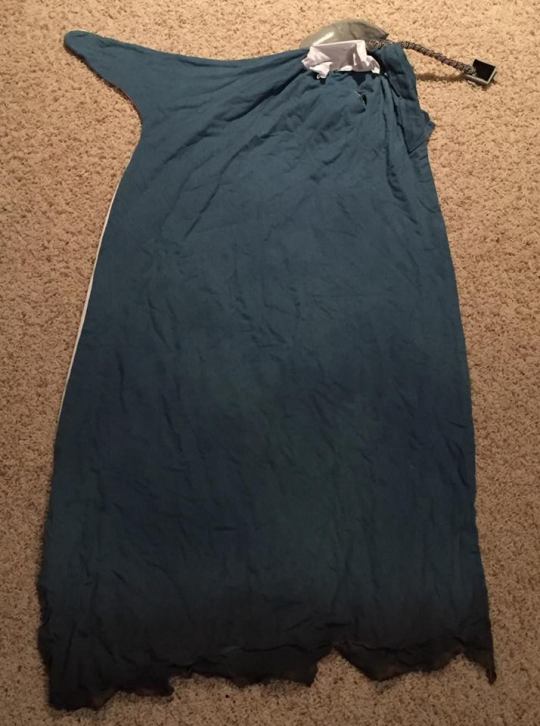
Here's the backside/inside of the cape! It's made of that same cotton fabric, but I dyed it blue! (Fun fact I had this fabric and it was dyed blue already before I even thought about making this costume because I was going to use it for something else but never did lol) You can also see the sloppiness of the cape bunched up where the pauldron is because that's where I glued it, but it looks fine from the outside which is where it counts! And you can also see the patch of Velcro on the back of the brooch that I mentioned before so I can keep the cape on and take it off with ease.
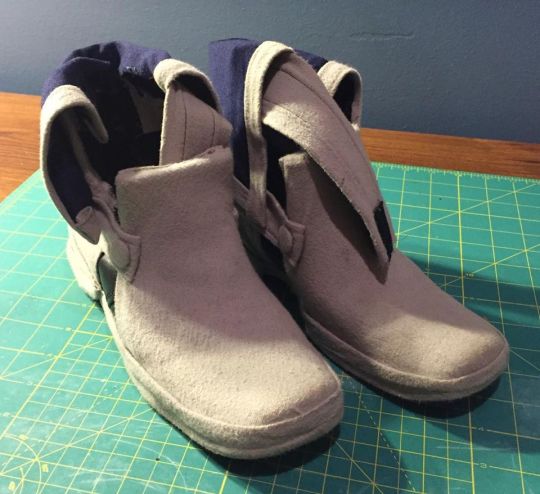
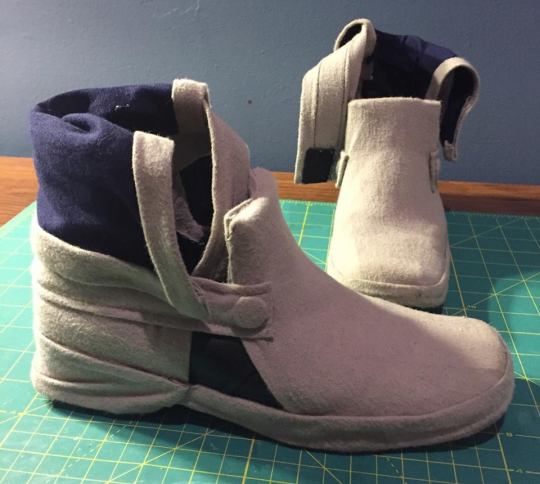
Next is the shoes! These were fun to make too! I just used a cheap pair of boots I bought from Saver's for the base and decorated them with the same dark blue and gray fabric from before. I added on some cuffs just like the leg bands and gloves, and of course I covered the front and back with some gray fabric which took a long time to get that smooth effect. With the leather-y boots, I used super glue to glue down the fabric and I only used the super glue along the edges so it didn't bleed through in random spots in the middle.
As you can see, they also have a band that I attached to the cuff part and I used Velcro so I can put them on and take them off easily. The Velcro especially helps keep them on my feet since I had to manipulate the original boots and cut them down to get them to the shape I wanted!
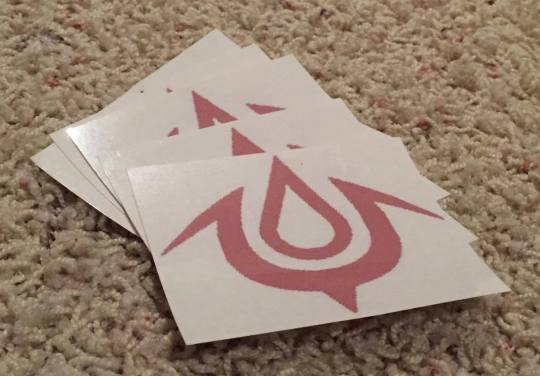
Almost done! These are the fake tattoos I made that I use for his Brand of the Exalt on his shoulder. I'm going to be honest, I went into Microsoft Paint (before I got a tablet and Paint Tool Sai) and took a picture of the brand and just colored it to that light red-ish color that I wanted. Like I said, sometimes the simplest methods work the best! Afterwards, I put the picture onto a Word document and got it to the size I wanted. Before I printed it on the special tattoo paper, I monkeyed around with the shade of red I wanted and the size and printed it on normal paper first to double check everything. Once It was settled, I fit as may little pictures as I could onto the Word document and printed it with the tattoo paper. There are instructions with the package, I just looked up "temporary tattoo paper" on amazon and it was the first one I'm pretty sure. This was an easy part of the cosplay too!
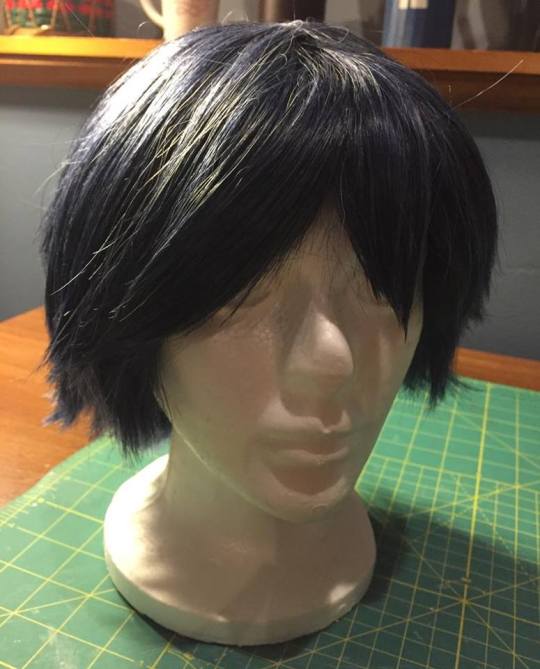
Last but not least, the wig! This is a Magnum wig from Arda wigs in the color dark blue, from what I can remember. It was very easy to style and I know I can always trust Arda to have some amazing cosplay wigs!
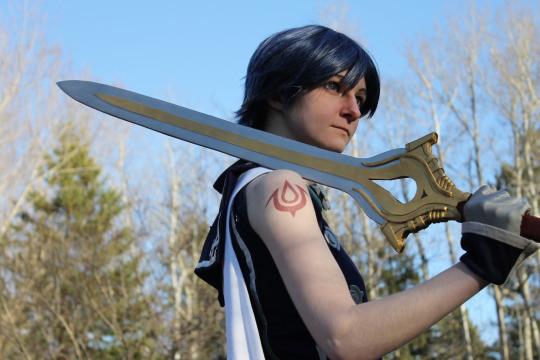
Besides the Falchion, that's basically it! The Falchion is made of poster board with foam and worbla details, but since there are 100 million ways to make swords, I won't go into depth unless you guys are interested.
Just let me know if you have any further questions and I'll try my best to answer them! Thank you so much for all of your support and great questions, I'm always happy to help!
#chrom#fire emblem#fire emblem cosplay#fire emblem awakening#fire emblem chrom#cosplay#cosplay help#cosplay tips#cosplay tutorial#This was such a fun cosplay to make and wear tbh#typing all this out made me want to wear this to another convention lol#long post
852 notes
·
View notes
Note
Hello!! I need some help.. (i may have asked you once. well if I did, then just ignore this!) But if I haven't, I need some fabric-choosing help! A friend of mine and I are going to be cosplay the Yuri!!! On Ice "Day/Night" AU(created by artist Beanpots here on tumblr). The outfits are very flowing and gorgeous and, as an amateur and medium-skilled sewers, we need a bit of help choosing fabrics! What fabrics would you recommend that look nice but aren't too hard to dye and work with? Thank you!!
Hello there!
http://beanpots.tumblr.com/post/155507414818/day-and-night-x-x-full-body-references-for
http://beanpots.tumblr.com/post/157148935643/day-and-night-when-in-distress-draw-a-dude-in-a
Those outfits, correct?
For the sheer sleeve parts, there really isn’t much of a way around using chiffon. It’s sheer, it flows and drapes rather than holding structure, it’s chiffon. Most chiffon is polyester, which is less easily dyeable than a natural fiber. You have to use a specific dye type (disperse dyes), of which there are only a few brands (iDye Poly and Rit Dyemore) and simmer it with high heat. Silk chiffon exists, and isn’t terribly expensive from sources like Dharma Trading Co., and is easier to dye with acid dyes (though it also has to be simmered or otherwise heated to set the dyes), though it is significantly harder to sew. Be sure to use microtex needles, or else you will constantly snag the fabric. Chiffon can be difficult to hem without a serger. I’d recommend a rolled hem, which can be done on a regular machine with a rolled hem foot. Luckily, the sheer parts are common enough colors that you may be able to find them without having to dye.
For the rest of it, you have a few options. You can continue with the chiffon, but dyeing may be an issue.
Yuuri’s outfit would look good with a deep, dark, black velvet. This would keep the night theme, since velvet traps light and gives a very rich look. Other options would be pretty much any kind of eveningwear fabric that isn’t terribly stiff – a dull satin or a charmeuse would be a good choice, I think.
Victor’s outfit seems to have a bit more structure to it. Since there’s a lot of gradient dyeing, I’d recommend a 100% natural fiber fabric. A cotton sateen might be good, or various weights of linen, or a silk twill or broadcloth. If you wanted to go with the heavily pleated version in one of those links, there appears to be some brocade as the patterned gold parts, and the pleated parts I’d go with either a linen or a silk habotai, both of which can be dyed. I would dye a natural fiber with fiber-reactive dyes for this, though something like Rit dye can work. Use acid dyes if you are using an animal-based fiber.
Cotton sateen is easy to work with, by the way.
Unfortunately, all of these materials are difficult to sew. They tend to be slippery, and you will need smaller needles for most of them since they are delicate. It’s a good chance to learn, however! Make sure that you pin carefully, or use clips, as these fabrics tend to slip and slide all over your machine and can get out of place easily.
If you use velvet, care must be taken not the crush the pile, and you need to make sure that the pieces are cut with the pile all going the same direction. Here are some tips on sewing velvet.
You can also ask the artist directly what kinds of textures they envision, and use similar materials, though there’s no guarantee that they know anything about materials choice.
Good luck! I hope that helps. :]
—Fabrickind / Q&A Staff
30 notes
·
View notes
Text
When She Gets Startled, How To Manage Your Pet Dog! Excellent Training Tip
You might want to examine for some excellent quality plants at your local garden center, when you are all set to start planting your garden. They will know which plants grow best in your area and will be able to offer you good advice and address any concerns you may have. Due to the fact that they have not been subjected to delivering tension, plants that are grown on site at the garden center are vigorous and generally healthy.
First you require to do is check around the entire location for leaks. When you are cleaning up take a peek at the pipelines and see if you see any water coming out. Smell and try to see if there is an awful odor coming from anywhere. The leak can be around the toilet or listed below the sink so look all over.
youtube
Today your infant's brain is transparent and is growing at a rapid 100 cells per minute. His/her face is being more specified with a tiny mouth hole. directory, nostrils and ear indentations are noticeable. The eyes are wide open however without any irises (the colored part). The arms now look like ping pong paddles, and last but not least the umbilical cable (the connection in between you and your baby) is now noticeable.
One of the most typical reasons for scalp itching is ringworm. One thing you should understand is that it does not necessarily appear like a worm which is why it can be discovered seemingly spread all over one's body. Ringworm causes the clinically understood "tinea capitis" which are the apparent spots of loss of hair.
youtube
Make the witch-king's streaming robes out of old thrift shop clothes. Rip the joints out the hems of old mancha negra en los labios night-gowns, t-shirts, dresses and skirts. Cut slits in the ends of the clothing and fray them. Include a number of layers of clothes till your witch king costume has the right appearance. If necessary, you can color them utilizing Black spots on tongue, brown or gray Rit dye. Add a prop sword to make your witch-king Halloween outfit complete.
Modern innovation caused the natural wood horses. Modern innovation made wood easier to work with and less time consuming. However, tools are now available to rub down elaborate shapes, making it a lot much easier. For that reason, lovely refined surfaces are quickly developed.
Train hard. Swellings and bumps will heal with time. Not all of the lessons are discovered in the dojo. Be alert to your environments and do not hesitate to inform someone to withdraw or get lost. Listen to your impulses and act upon them. Because it didn't feel right, it is best to never ever know if your abilities would have been put to use in that dark alley you chose not to walk down.
0 notes