#metal stitching technique
Explore tagged Tumblr posts
Visit Tumblr Blog
Explore Tumblr blogs with no restrictions, modern design and the best experience.
Last Seen Tumblr Blogs


Fun Fact
The total number of visits Tumblr.com received during January 2021 is 327 million.
Text
For more information on metal locking a crack engine block, cracked engine block repair, repair of damaged engine block, metal stitching technique, cracked and damaged engine block contact us at [email protected] or [email protected] or call us at 9582647131 or 9810012383.
#damage engine block repair#cracked engine block repair#metal locking a crack engine block#cracked and damaged engine block#metal stitching technique#METAL LOCK PROCESS#metal stitching#metal lock#repair of engine blocks
0 notes
Text
I'm making mall jorts I am healing
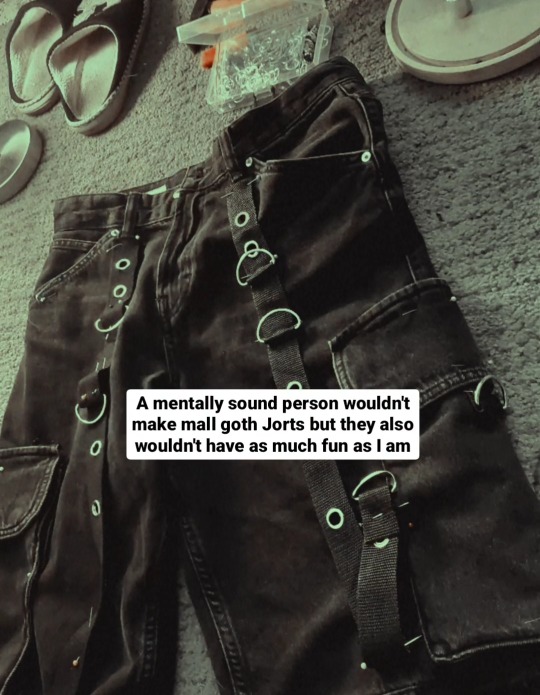
The pockets and the straps are gonna be a massive pain to sew in the right place but this is a battle I'm willing to pick
#im gonna be the most 2005 person at the next metal night watch it#jorts are superior#my gender is jesse pinkman if he slayed btw#misc#mine#i still need to do the back#the bleach cybers#and add white string stitches#and fray the edges#this is the most complicated thing ive made after the complicated white dress i made from scratch in 2020 and even that#was in competition with the plushies#but this has 3 types of technique in one instead of just sewing and cutting
0 notes
Note
F***ing FINALLY!!! I've been looking for stuff with a Reader saving Dogday since he's been introduced and I've only got like, three so far-
And I want this Reader to be resourceful, using anything to patch Dogday up(including scraps of Miss Delight's dress)

I hear your calls <3
...............
"You're wasting precious time, angel. Poppy needs you. I'm only gonna slow you down. Just leave me here, and tell her I'm-"
"You'll get to tell her that yourself, Dogday. Because I'm not going anywhere. I'm gonna help you whether you like it or not."
With a huff, you used the grabpack to wheel in a cart filled with an assortment of items you picked up around the Playcare area: doll parts, plush felt, metal bars, and even Dogday's other missing leg, which you have miraculously found in the playhouse.
You did your best to stitch them back onto his body, although the real challenge was fixing them up first--considering how badly they got mangled by the smaller Smiling Critters. Through sheer luck, you were still able to recognize them as his legs.
And conveniently, you've retained some of your craftsmanship skills from your days working with Playtime Co.
You were given some praise for being able to speedily patch up broken and torn-up toys, but you've never touched upon any of the "Bigger Bodies" despite seeing similar injuries on them. They simply never gave you that clearance, and dealing with blood and organs (and possible death) was something way above your paygrade.
But with Dogday, you were able to apply similar techniques you used in doll repair. You made patches out of Miss Delight's polka-dot dress to cover up any tears, and you created small mechanisms to put inside his legs that would (hopefully) enable him to walk again.
It was like you were performing a surgical operation..
Except, well..that's exactly what was going on.
Despite your unwavering determination--and the fact that you succeeded in reattaching one leg to him so far--he insisted that you were only putting yourself at risk trying to help him.
Hell, you nearly got torn apart by those little Smiling Critters who chased you both down, being scared off by the flares you shot at them. He didn't think you'd have enough..but by the grace of god, you did. And you escaped and found a safe place where Kissy Missy and Poppy were also hiding out.
Not only did you finally get a breather, but also a chance to help one of the few toys left here who somehow didn't lose their humanity.
Even so, Dogday still feared for your safety.
"You know..this will only enrage Catnap, right?" He rasped, choking out a wet cough. "He'll know that I'm missing. And he'll know you have something to do with it.."
"Wait.." Pausing in your work, you glanced up at him with furrowed eyebrows. "Why would he care about where you are? Or better yet..why would he keep you alive at all?"
"...because I was his favorite."
"Huh..?"
"Before the Prototype became his sole focus, we did everything together." He explained somberly. "We helped the others fall asleep, stayed out of trouble. Catnap and I..we were like day and night. Two peas in a pod. He brands me a heretic now, but...somehow, I don't believe he likes doing so. Maybe..he hasn't forgotten our friendship, after all."
'Well, stringing someone up by belts and ripping off half their body doesn't sound like something a good friend would do..' You thought to yourself, although you understood where he was coming from.
Yet it didn't change the fact you still wanted to kill that stupid purple cat. Especially after he gave you that hellish nightmare of Huggy crawling out of a television.
"I know you wanna believe there's still good in him, but..he's long gone." You shook your head. "Those critters..they tried crawling inside your body, and he was just gonna allow it all because you didn't wanna follow the Prototype's will."
"........"
Silence was your only reply, but you decided to shift your focus back on repairing the other leg. Dogday allowed you to work, no longer protesting as he instead looked at the stitches on his arms, feeling grateful yet unworthy at the same time.
Him and the others...they were all monsters. He never killed a single human in his existence (or at least none that he could recall), but he felt like he was just as terrible as those who did.
Eventually, you finished, and his ears perked up at your sigh of relief as you set down your tools and pushed the cart away. "There we go. Try to stand up, but take it slow. Okay?"
He nodded, feeling quite nervous as he looked at his legs, before he slowly pushed himself off the ground. For a few moments, he was able to stand, but he wobbled a little and had to hold onto the nearest wall so he didn't lose balance.
'When was the last time I had my legs? It's been so long...'
Then he felt your grabpack's hands gently steady him, and soon enough he could stand on his own without their support.
You smiled and retracted them. "How do you feel?"
"Much better...thank you, angel." Dogday looked down at you, the corners of his wide smile turning further upwards. "You truly are something divine. You've come to heal us, mend all of our broken pieces, even when we do not deserve such kindness. How could I ever repay you?"
Right as you were about to respond, you heard sounds of plush feet moving and turned around, seeing Kissy and Poppy entering the room.
You didn't really he'd nearly be as tall as Huggy's spouse.
"You fixed him! What can't you do?" The redhaired doll gasped in awe, hopping onto Kissy's hand before she was carefully transferred over to Dogday's paws, stepping into them.
He held her gently, smiling. "Poppy."
"It's so good to see you, my friend." She smiled, although it was quick to disappear. "I thought all of you were gone."
"It's just me now, and...I'm....I-I'm...." He began to sniffle, his voice breaking as the weight of everything that's happened came crashing down. "I'm so sorry...I tried so hard, but...I-I failed! I couldn't protect them!"
Thin streams of tears seeped from the corners of his eyes, darkening the fur along his cheeks. "Kickin'...B-Bobby..they all died because of me! I was supposed to be their leader, but all I did was lead them to their demise! I-I should have joined them in-"
"There, there..it's going to be alright." Poppy softly hushed him, patting his arm in comfort. "You did your best to protect them given the circumstances. I promise we'll have our chance to avenge them. But you must live, for their sake..and for [y/n]'s sake, too. They went through a lot to fix you up."
"I know but..I-I'm so scared. I don't wanna face him alone-"
"You won't be alone, because I'm gonna take care of him."
With another sniffle, Dogday looked down at you, feeling you gently petting his ear as another comforting gesture. Your eyes held nothing but sympathy and heartache for this poor creature. "I'm sorry, but we have to put him down. It's the only way we can move forward."
"Are you sure?" He mumbled. "He's gotten more powerful, and hungry-"
"So were Huggy and Mommy, but I saw how [y/n] dealt with them..and they're more than capable." Poppy remarked. "But now that Catnap's onto them, they'll need all the protection they can get."
"Then..I'll do my best to help." He finally declared, smiling at you.
You blinked, surprised that he was willing to stand up against the one who tortured him. But you simply nodded and smiled back, watching as he returned Poppy to Kissy, before he turned back to you and crouched down.
He enveloped you in a warm hug, the vanilla scent still seeping from his suit and helping you feel more at ease.
"Thank you, Dogday." You chuckled, hugging him back.
"No..thank you, my guardian angel. I will follow you to the ends of the earth."
#clanask#poppy playtime x reader#poppy playtime dogday#dogday x reader#poppy playtime poppy#kissy missy#platonic#poppy playtime spoilers#hurt/comfort
4K notes
·
View notes
Note
Do you need a sewing machine to start making shirts and vests? Is hand sewing an option worth considering, or should I invest in a machine, in your opinion?
That's really a matter of personal preference!
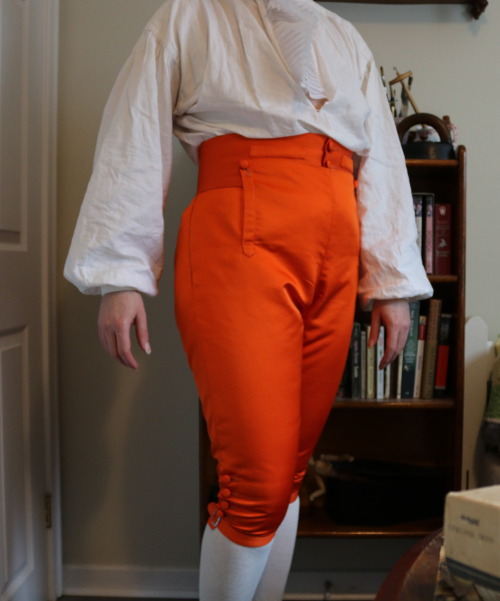
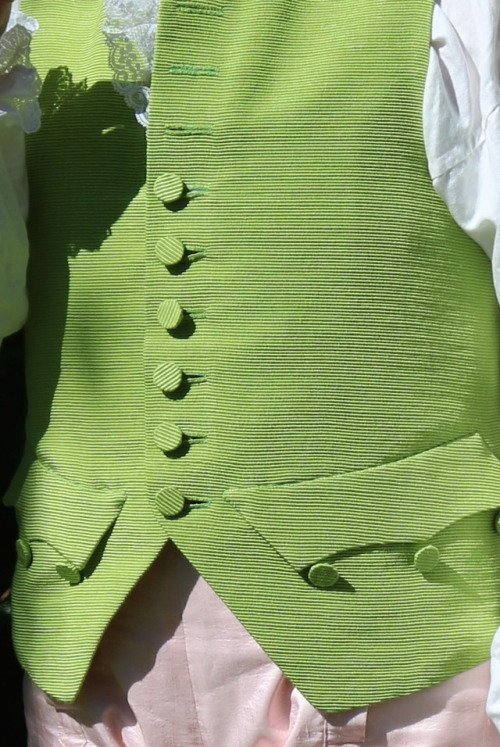
Do you need a machine? Absolutely not! Every garment ever made before the 1840's was sewn by hand, and a lot of them after that too. I've sewn many garments completely by hand, including the early 18th century tiddy-out-violinist shirt, these bright orange breeches, and this green waistcoat.

Is it nice to have a machine? I think so, but again, individual opinions vary!
One of the costumers I follow sews everything 100% by hand because she finds it meditative and isn't interested in using a machine at all. Some people hate hand sewing and prefer to do everything by machine, with maybe a bit of hand finishing if they absolutely can't avoid it.
I do about a 50/50 split overall, maybe skewing a bit more towards hand sewing. I like to do pants, shirts, and nightgowns mostly by machine with some hand finishing, but for jackets and waistcoats I usually do considerably more hand sewing than machine, because I like 18th century tailoring techniques and think they give a nicer looking result. I do most of my buttonholes by hand, or I do them by machine first and then cover them in hand stitching.
Most people who sew do at least some of it by machine, but again, I don't know which way you prefer to work, so I'd suggest trying out both to see how you feel abut them.
For hand sewing, I suspect a lot of people hate it because they're using shitty needles and/or shitty thread, and perhaps haven't found good resources for hand sewing techniques.
Here's a post of hand sewing advice that I found quite helpful a decade ago. Use good needles because the eyes of the cheap ones have jagged edges and will ruin your thread! Use nice thread because the wrong kind will be twisty and tangly and will fray more!
Thimbles are good and useful, and typically they go on the middle finger of your dominant hand, and you use them to push the needle. I prefer metal thimbles and dislike using leather ones, but some people prefer the leather ones, or rubber ones.
The metal ones come in sizes, and I don't know how to find out your size aside from trying them on in person, but I know I'm a size 11.
One very important thing is that if you're hand sewing a garment, look for hand sewing specific instructions on how to do the construction techniques you're going for. A lot of the time when someone nowadays is trying to figure out how to hand sew a thing they'll just try and copy the machine sewn version, and a lot of the time that's inefficient and more difficult and the result looks worse, because machines and hands work very differently!
This is something I'm going to briefly discuss in the outro to the very long shirt video I'm working on, because it's so very common, and I've done it too! On several of my earlier hand sewn shirts I didn't know to turn the edge in on the front slit and do a little narrow hem, so I instead sewed on a facing for the front slit and cut and turned it, just like I'd seen on machine sewn shirts. This made it about 3x more time consuming, and the result was much bulkier and looked worse.
I've got so many more things to say about sewing but it's almost bedtime and I don't want to make this post too long.
For machine sewing, again there's a lot of personal choice. Some people like newer machines, some people like vintage or antique ones. I'm one of the ones who prefers solid metal vintage machines. I grew up using an old cast iron Singer, and the newer domestic machines just feel so plasticy and insubstantial to me. I'm used to ones that just do straight stitch and can also go backwards, but some people are perfectly happy with ones that can't even backstitch.
I do think that for a beginner the vintage machines are a better deal, because if you're patient and look around for a while you can snag one for really cheap at a thrift store, yard sale, facebook marketplace, etc. Also they're mostly metal and therefore harder to break.
I recently got a Pfaff (from I think the 1960's?) at an estate sale for 25 bucks. The zig zag mechanism is stuck and needs fixing, but I cleaned & oiled it up and it works just fine for regular straight stitching.
There are SO MANY online resources for how to clean, oil, and fix vintage sewing machines, especially the more popular brands, and a lot of the time cleaning & oiling is all they need. Read the manual and get an oil bottle with a nice long pointy thing so you can reach all the parts, and get some compressed air to whoosh out the fuzz. If it's old and hasn't been used in years, turn the hand wheel and observe every single place where metal rubs against metal, and Make It Greasy There.
(If you don't have the manual, you can often find those online too. I even found the service manual for my new-old Pfaff! I have the original users manual, but this one's for the people doing repairs.)
Oh this post is getting much too long! If you don't know yet if you like machine sewing, try seeing if you can use one without owning it, perhaps at a sewing class or in a makerspace. I know some libraries can loan out machines. A sewing class would probably be a good idea actually, if there are any available where you live!
Much like how you'll have a bad time hand sewing if you've got shitty supplies and no proper instructions on good techniques, you'll have a bad time machine sewing if it's not oiled well and if the tension is uneven.
There are so so very many things to learn about sewing and I hope I'm not making it sound too overwhelming, because I promise it's not if you take it one step at a time!
Also, when someone who's been sewing for a long time says "You may think you can ignore (piece of sewing advice), but actually that's bad and you will regret it", they're usually right. Oh, how I regret not learning to use a thimble years earlier than I did...
Sorry this post is so long, I hope it's helpful!
Basically, there's no one best way to sew anything, and you should try different stuff and see what works best for you, because everyone has different preferences.
541 notes
·
View notes
Text
« MOIRA › fate; destiny
Gojo x Reader | Warnings: Pure Angst | Discord 18+ | One Shot List

Synopsis— You are reminded of the horrors of Jujutsu, witnessing the last moments of Satoru Gojo and Yuta Okkotsu.
Wake up.
Wake up.
Your mind repeats the phrase, over and over.
“Wake up…”
It had just been you left in the room.
No other signs of life. No other signs of life.
On the metal he lay, motionless and coated in red. It’s all red.
There was no way he could be dead.
“Wake up!” It’s a selfish act, pleading a dead man to wake up.
Oh how you only wanted to see those eyes just one more time. Just one more time.
His face is still, holding an expression you’d never seen him make.
Satoru Gojo was at peace.
Though severed in more places than one, cut in half and bleeding out; he was at peace. A peace he couldn’t find living, even if he searched far and wide. It was an unreachable peace for a man who was as burdened as he was. He was free.
Tangled in your soul, he stays, making it difficult to breathe.
The short time you had alone with him had not been enough, you wished for more— but Shoko had been insistent on preparing his corpse.
Satoru was good at many things, one thing being that he always kept you out of the loop of his plans. “You’re what?” The words fall from your lips in a shocked tone, devoid of anger but filled with horror.
You couldn’t be angry at Shoko for something out of her control. She wanted the same as you; you could see it on her face and in the amount of finished cigarettes on the floor.
“If we hit rock bottom— meaning we have no other choice, if Yuta can’t do it,” Shoko begins to explain as she rids Gojo’s face of the dried blood, “we are to swap Yuta’s consciousness into his body.”
“He was okay with this?” You ask, motioning towards Gojo. Shoko nods, but only once. Her tired eyes jump from his corpse to meet your eyes. “He was sure he’d win, but then expressed that he did not care what happened to his body… if he were to die.”
In silence, though standing back far enough to give Shoko room, you watch her prepare his body. The squeaking wheels of a cart could be heard as she brings over a tray of medical tools.
She cleans off the dried blood after removing the scraps of his torn shirt. In silence, Shoko stitches the man’s body back together. Almost like a puzzle.
She cleans the remaining blood, and then pauses; she’s looking up at you, brown eyes peaking up. Though her face is masked, she’s showing her concern.
“The next part may be hard to watch,” she says steadily, holding up what looks to be a type of scalpel.
One part you had completely missed was how the consciousness would be swapped.
“Wait,” you’re saying, “what are you about to do?”
It’s silent for a beat, and you don’t miss the way her fingers slightly tremble. “The curse that was inside Geto’s body- Yuta will be copying that technique to use Gojo’s technique.”
It was clear as day now, and your eyes widen.
“You’re using-“ you are cut off with a loud popping sound. Ui-Ui appears out of thin air, holding— to the best of his abilities, Yuta Okkotsu.
Once again, all you see is red. It’s spilling onto the floor, a lot faster than Gojo’s had been. Yet, as you watch in pure horror, you see the way Yuta is still alive. He’s still moving, but slowly. Yuta’s energy flickers as it clings to life.
Shoko had dropped everything in her hands to push another metal table over, helping Ui-Ui place his severed body onto it. Piece by piece, careful not to hurt him more than he already was.
Just like Gojo, Yuta matches his sensei’s fatal wounds.
Seconds after Yuta’s arrival, the double-doors to the morgue/medical area are busted open. A kid, who you faintly recall as Amai, and Nitta flood in. Both of them rush to Yuta’s side, doing what they can to help him.
With a few minutes passing, you feel the tension in the air rise. It thickens uncomfortably, making you more anxious than you already were. “It’s no use,” you hear Nitta express. “All my RCT is doing is pausing it— it’s not getting better or worse.”
“Rika is how I’m still conscious, b-but that’s at its limit too…” you hear Yuta’s strained voice choke out. It’s absolutely gut-wrenching, hearing a kid— Satoru’s student, you grew to know so well suffer in such a way. “Ieiri, we’re doing it,” he says, “we have to do it. There’s no other choice.”
For a second, it’s deathly silent. All that could be heard is the strained breathing of Yuta Okkotsu.
“I have finished the stitching on Gojo’s corpse. As soon as you have moved in, push your reverse cursed technique to its maximum and get the body ready,” Shoko is turning slightly to lock eyes with Amai. “Amai, you will help me support him.”
“You have the option to stay and watch or save yourself the grief.”
You are already grieving, what more could make it worse? You stay silent, practically unable to speak.
Her words make you glance up at her, tearing your eyes away from Yuta as you watch Amai move towards his extended right hand.
“Come with me,” you feel Nitta take hold of your hand, pulling you towards the exit.
As if you’re on auto-pilot, your legs take you with her. Your head stays turned as you leave, watching as Shoko begins cutting into Gojo’s head.
The sight is gruesome, making you sick, but the double-doors shut before you can watch any further.
Unable to move any further, you’re falling to your knees, releasing a pained sound as you feel the grief finally take hold of the wheel. It’s painful.
“No…” you gasp out, shutting your eyes tightly together. The last thing you wanted to do was cry, but the tears find their way out, falling down your cheeks in heavy streams. “This isn’t real,” you say, clenching your teeth. “Satoru couldn’t have just died like that.”
Nitta is silent.
When you no longer feel Yuta’s cursed energy, you know.
After peeling yourself off the ground, you’d found a seat in a row chairs just outside the morgue. You assumed they were for grieving people such as yourself. People who needed to say goodbye one final time.
It’s quiet. A quiet that leaves you bare and lonely, alone with your thoughts. All you can think about is how you’ll never see him again.
As you sit in the depths of your mind, wading through heavy thoughts and feelings, a sharp feeling strikes you. It hits you hard, making you jolt.
It was him. It was his energy.
“Satoru…” you’re saying to yourself, in disbelief, picking yourself up from the seat. Nitta notices you immediately, quickly reaching for you, but you slip away.
Your anguish had blinded you. All you wanted was him and currently all you could feel around you was him.
In a haze, you’re opening the doors to the medical area, wincing from the bright lights. Your body reaches for him, grasping at the air. It’s like a magnetic pull, unable to resist the force, you’re scanning the room for him.
Your heart thumps, sending a wave of tingles through you as you finally spot him.
Lost due to the overwhelming events, you weren’t sure what to expect. It had completely slipped your mind as to what Shoko genuinely meant when she’d explained��� though you understood, nothing could prepare you for what you found.
Shoko is eyeing you worriedly.
The man turns, locking eyes with you.
Oh how you only wanted to see those eyes just one more time. Just one more time. Yet, when that wish is granted, when you lock eyes with this man— it’s not the same. At all.
They are distant, lacking the vibrancy of life Satoru Gojo once held when he looked at you. Blue, striking and bright, they’re now cold. Cold like the body that lay on that table moments ago.
The peace was gone, as was Satoru Gojo.
Dead man walking, he moves awkwardly, like a reanimated corpse trying to learn how to walk again.
Disheveled hair, you can see the fresh stitching across his forehead; Geto’s face pops into your mind.
Next to Gojo’s body, Shoko moves away, going to the other side of the room. The air around her has completely shifted, and you understand immediately.
In the background, you can hear Shoko clean the tools she’s used for surgery.
“Yuta,” you say, directing it towards Gojo’s body. When his mouth opens to speak, you feel as if your heart is ripped from your chest.
Gojo was not free. Though death has lifted the burden of his status off his soul, he is unable to rest. He is not free— a weapon, taken advantage of and used selfishly by your fellow sorcerers for their gain. For Japan’s gain. Call it selfish, but you understood why the plan had been kept from you now.
Hell would freeze over before you agreed to such a thing, even if Gojo was okay with it.
To have a body; to just exist, is to suffer— it was what you learned from him in the handful of years you had known Satoru Gojo.
He was not a man to speak up, especially about himself; you could see it in his eyes rather than being told in words. The second his blindfold was removed in the comfort of your home, his entire story would be told, expressed only to you in private.
He was a man, a human, just like any other sorcerer... just as Geto was.
To be used in the same way as his late best-friend, but this time for good; it was more than tragic... disturbing and unforgivable.
“Hello,” he says your name after, following the greeting.
It is his voice. It is his voice.
Under a white sheet, Yuta’s body— now corpse, lays still. His brain, and complete consciousness, residing in the corpse of your late lover.
“I’m sorry,” is all he says before disappearing from the room. His voice is pained, as if he had been in your shoes himself. As if he had been the one to witness his lover's body being used as a tool.
Silence follows his departure, filling the cold room.
You hadn't known warmth since he turned cold.
#satoru gojo#jjk gojo#gojo x reader#angst#jjk spoilers#satosugu#yuta okkotsu#satoru gojo x reader#gojo x you#sukuna#Ryomen sukuna#suguru geto#jjk#ao3 fanfic#fanfic#drabble#smut#jjk angst#angst no comfort#writers on tumblr#jujutsu gojo#gojo satoru#gojo smut#satoru x you#anime#manga#jjk manga#jjk 261#jujutsu kaisen#foggyfrogs
368 notes
·
View notes
Text
Amigurumi/Crochet Toy 101 + Resources
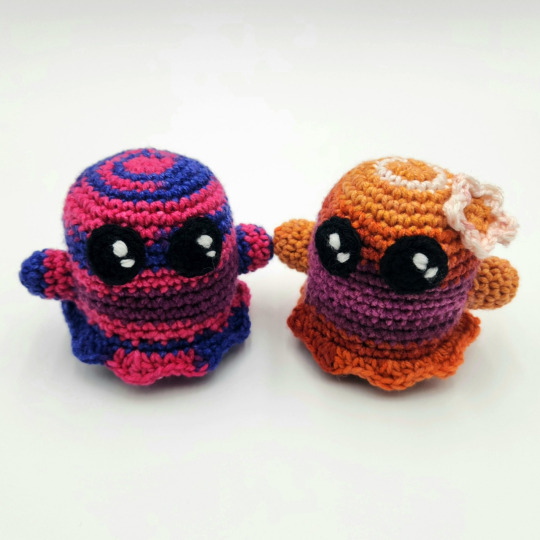
Noticed a couple folks in my tags mentioning that they wanted to learn or wished they knew how to crochet amigurumi. So here's a quick and dirty little how-to guide with resources I threw together? Hope it helps!
Tools + Materials
Crochet is one of those hobbies that is actually relatively cheap to get into. Here is a basic list of what you'll need to get started. You can find most of these at any craft store or even Walmart.
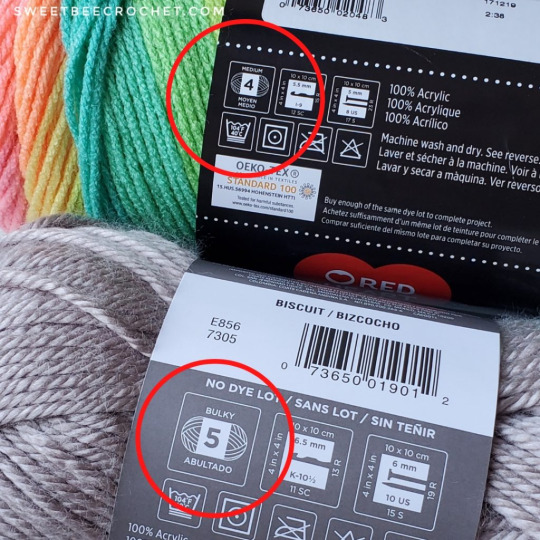
(1) Yarn (Required)
Yarns come in a variety of weights (sizes) and fibers. I recommend a soft, worsted weight acrylic yarn (indicated by a number "4" and "medium" on the yarn label) for your first few projects.
Image
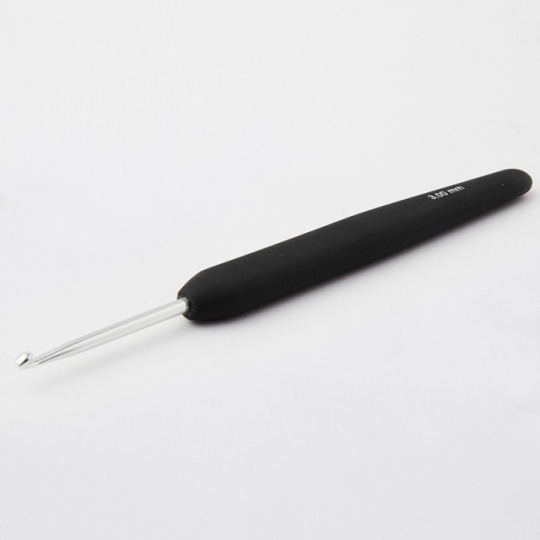
(2) Crochet Hook (Required)
These come in a lot of sizes and styles, and what size you'll use will depend on your yarn weight and how tight you want your stitches to be. I'd recommend buying just one hook to start with rather than a larger set. Metal hooks with ergonomic rubber handles are easiest for beginners (and on your wrists longterm, lol). A 5.0 MM/Size H or a 4.50 MM/Size G works best for making amigurumi with worsted weight yarn.
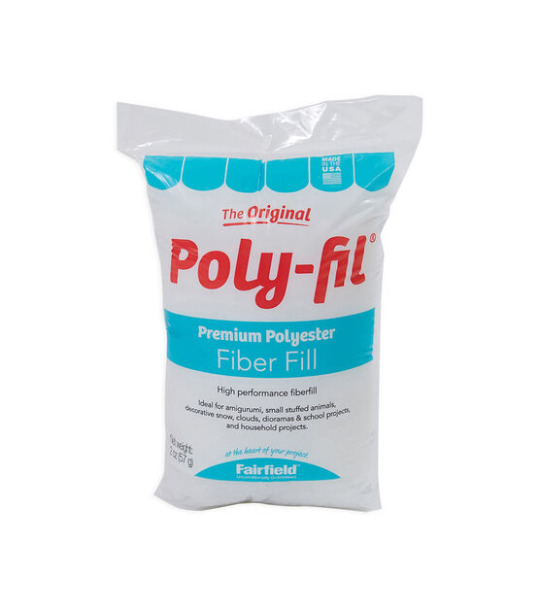
(3) Polyfil/Stuffing (Required)
For stuffing your project.
(4) Yarn Needle (Required)
Most crochet projects require sewing to one degree or another. Yarn needles are distinguished from regular sewing needles by their larger size, larger eye, and blunter tip. Yarn needles may be straight, or they may be angled at the tip (i.e. a darning yarn needle).

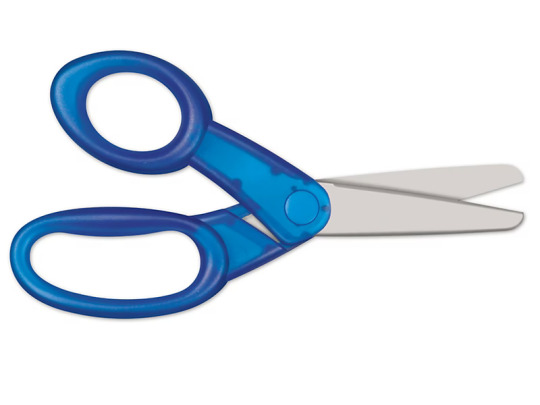
(5) Scissors (Required)
Any sharp, medium-sized pair of scissors will do for cutting your yarn.
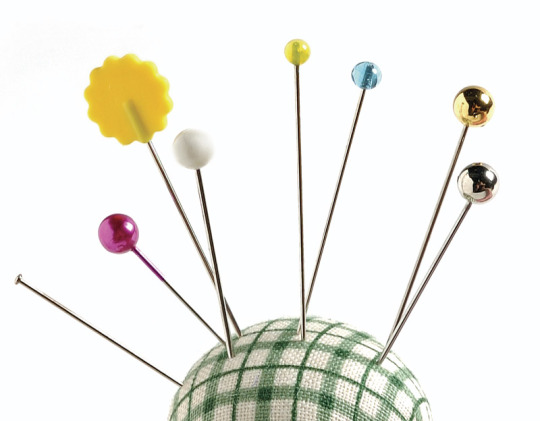
(6) Sewing Pins (Recommended)
For holding parts in place as you sew them on.
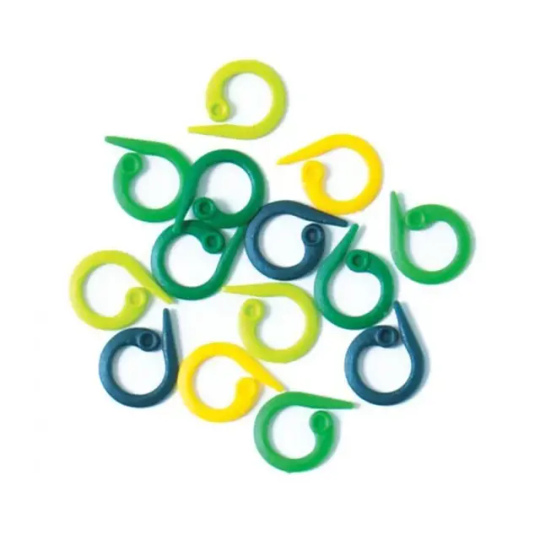
(7) Stitch Marker (Recommended)
Many amigurumi projects are worked in rows of continuous rounds, and stitch markers can be used to mark the beginning or end of these rounds. They can also be used to mark areas of interest in your project or to secure your project to keep it from becoming accidentally unraveled. I strongly reccomend getting split ring ones. Scrap pieces of yarn also work in a pinch as stitch markers.

(8) Counter (Recommended)
For keeping track of your rows as you work a pattern.
(9) Safety Eyes (Recommended)
Most amigurumi will require eyes of some sort. Safety eyes (you can find these in various sizes in the doll section of any craft store) will give your project a polished look, but you can also use buttons, felt, or even embroider the eye details on your amigurumi.

(10) Stuffing Stick (Recommended)
For getting your stuffing into hard-to-reach spots. A chopstick or wooden skewer works very well for this.
Basic Crochet Stitches + Amigurumi Techniques
Most crochet patterns are built from a few basic stitches. Before attempting any larger project, I recommend getting comfortable with these stitches by making a few small, flat pot holders out of each basic stitch. A lot of crochet is pure muscle memory and practice, and this is a great way to start.
There are also a few techniques specific to making amirugumi that will be helpful for you to know. You can find any number of free videos/tutorials online. Below are links to a few videos that I found helpful when I was learning to crochet.

Image
How to Make a Slip Knot
Single Crochet (+ Starting Chain and How to Count Stitches)
Half Double Crochet
Double Crochet
Triple Crochet
How to Keep Starting Chain from Twisting
Magic Ring
Ultimate Finish
Invisible Finish
Invisible Decrease
Beginner Amigurumi Patterns
These were the first three patterns I learned in the process of teaching myself how to make amigurumi. I recommend working them in the order they are listed. The first two links have step-by-step instructional videos and will help ease you into learning to read amigurumi patterns. All of these patterns are free, and there are many more free patterns out there as well. Have fun!
Amigurumi Ball
Amigurumi Whale
Amigurumi Stegosaurus
3K notes
·
View notes
Text
since I just finished my big sansa embroidery project, I wanted to talk about the process of creating it and my inspiration
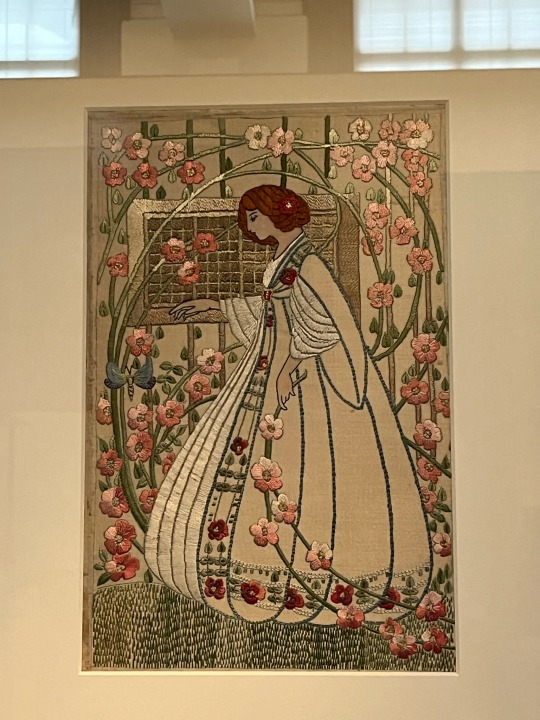
I was inspired by this piece that I stumbled across totally by accident. I was actually researching ptolemaic era egyptian weaving but found this 20th century embroidery and immediately thought of sansa. I created a sketch of sansa and lady in october of 2022 and then traced it on white cotton using a tracing pencil against my window.
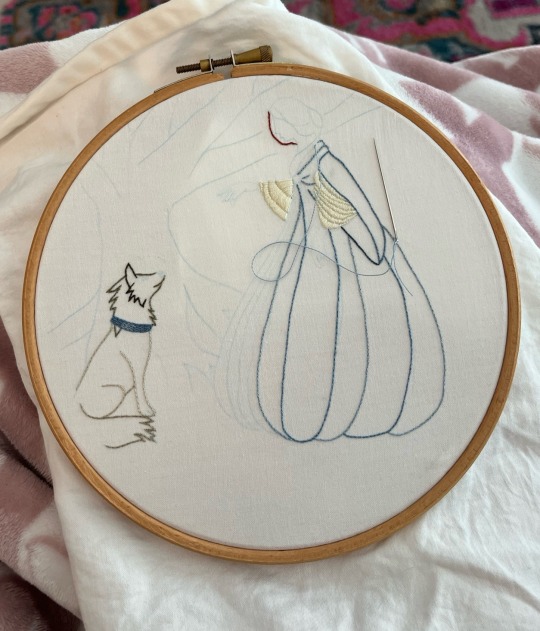
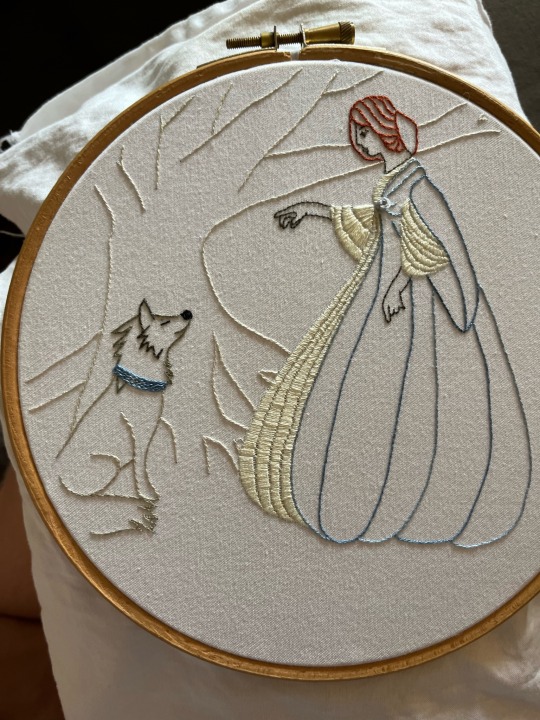
I then began outlining my stitches with a chain stitch using a single strand of embroidery thread. I found that this was really nice for outlining while still blending my colors. For the cream colored thread on sansa’s dress I didn’t outline, which achieved a less blended and more distinct layered effect.
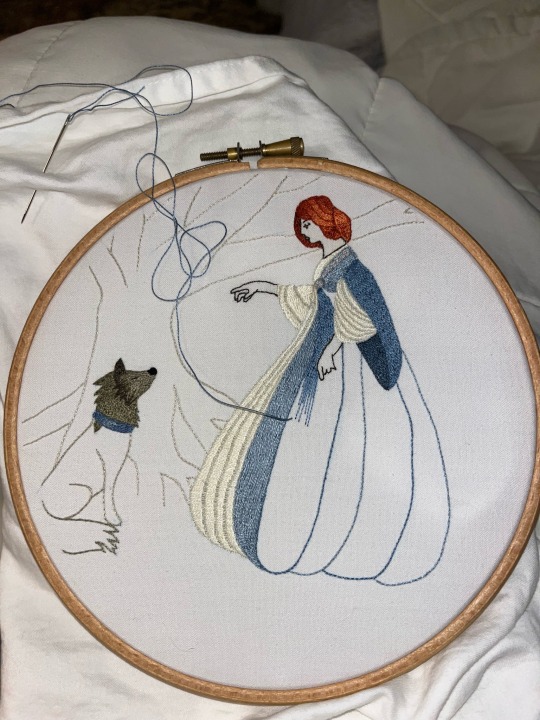
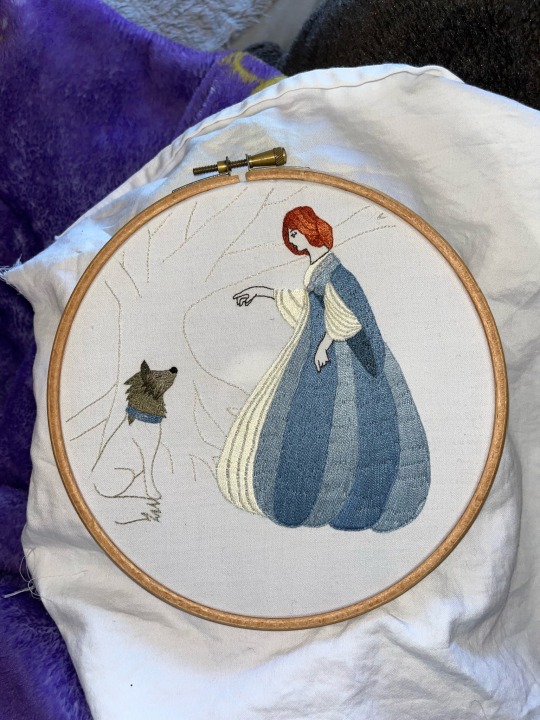
For the majority of the work, I used a technique called needle painting, where the artist uses a series of long and short stitches involving various shades of single strand embroidery thread. This technique was used for the entirety of sansa and lady’s figures.
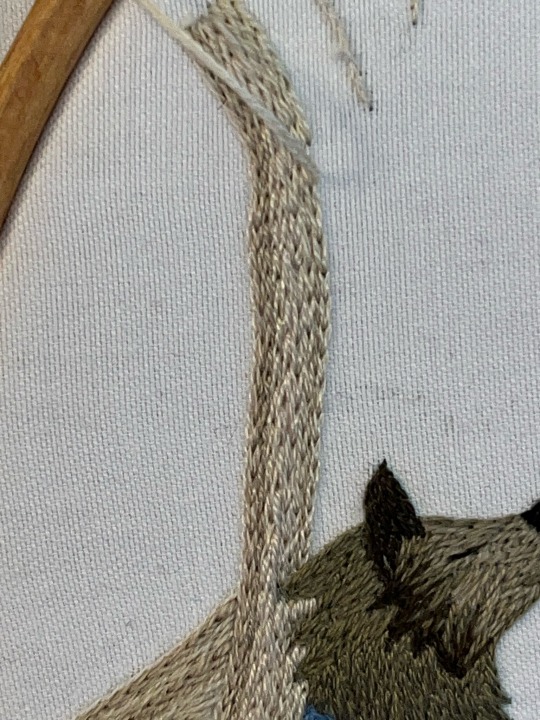
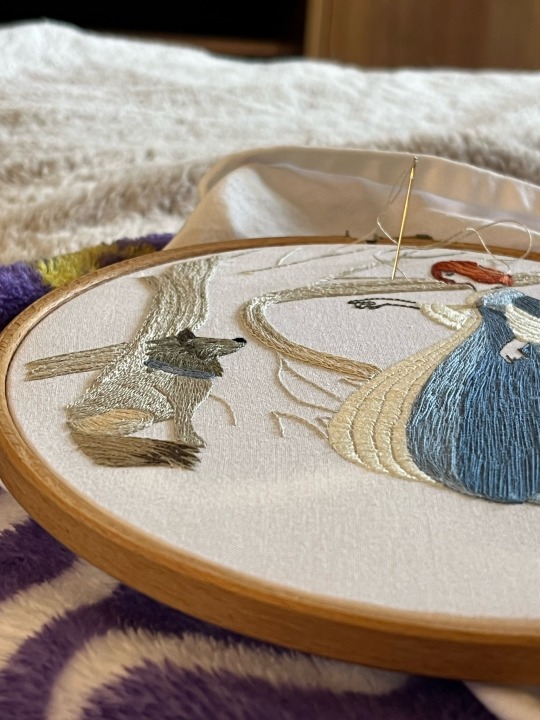
The weirwood tree was a tricky piece for me to work on. Initially I used a technique of horizontal satin stitches to fill in the tree, but ultimately restarted and chose to do vertical chain stitches to imitate real tree bark. I used three shades of tan and cream, using a single strand of the darkest shade, two strands of the medium shade, and three strands of the darkest shade. This created an effect also similar to real tree bark, which I tried to capture in the second picture.
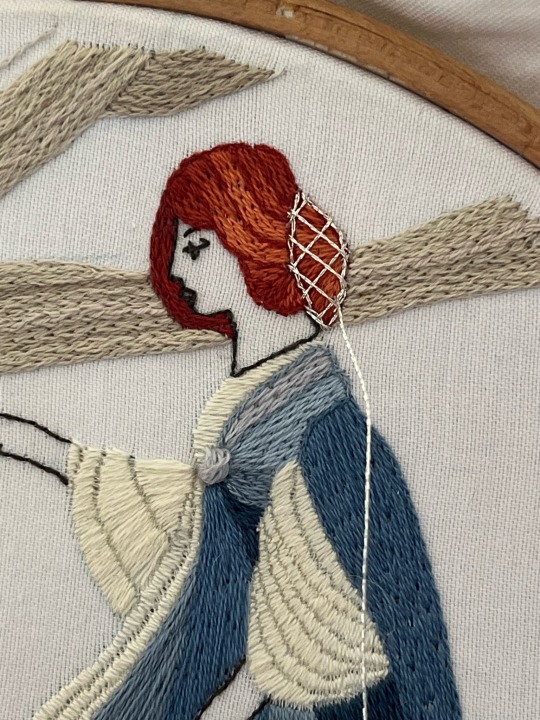
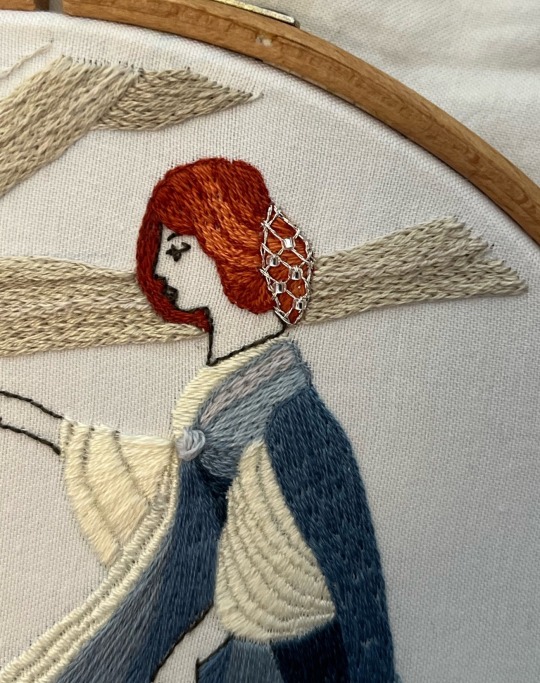
The final touch was adding sansa’s hairnet. I used a metallic silver thread and clear beads, basing it on the amethyst hairnet used to murder joffrey. While the amethysts in the book are black, I used clear beads to match her home of winterfell, where her jewels would match the snowflakes in the godswood.
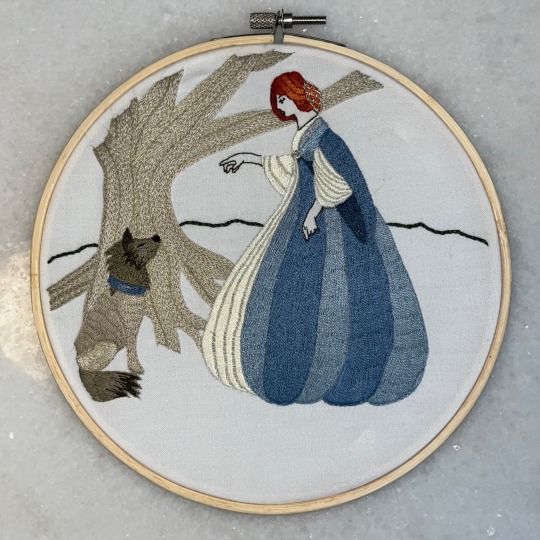
and that's sansa and lady! It may have taken over a year and a half on and off, but I'm super proud and excited about everything new that I learned and improved with embroidery throughout the process. If you have any questions or comments, my asks and messages are always open, I absolutely love talking about embroidery!!
#sansa stark#pro sansa stark#asoiaf#a song of ice and fire#game of thrones#got#lady the direwolf#agot#a game of thrones#valyrianscrolls#long post#embroidery#hand embroidery#art#fanart#sansa fanart#my art#crafts
260 notes
·
View notes
Note
On your recent post for Vivisections
Do you have any more advice or maybe a quick scene lay out on how you'd accurately describe and show it? I've not seen many people explain this before I'd love to know more!
Permission to infodump?? awesome :D
Because it's on topic here, there are a few blogs I think need a mention because they have AMAZING medical/torture writing advice (@scripttorture and @justkidneying )
You didn't ask whether the character lives or dies, I don't know which you want so here's info on both scenarios:
Dying:
First off, without anesthesia, the pain alone would likely lead to a thing called Neurogenic Shock, which will in turn cause a BP drop and organ failure among other things. Your character will likely be breathing quickly, appear pale, have a rapid pulse, and be confused if they are still conscious. And yelling in pain of course.
For death due to blood loss: it's hard *not* to hit a major blood vessel if you're flaying someone open neck to groin, and that will also lead to quick death without immediate treatment. Cautery (using electricity to burn an area, stopping bleeding) will work on smaller bleeding but major blood vessels not so much. Symptoms are similar to shock: clammy/pale skin, thready/weak/rapid pulse, loss of consciousness.
Other: you can also risk damaging organs (someone being vivisected probably isn't going to be staying very still, even restrained, and one slip of a scalpel and oops, that's the aorta...) A punctured lung could lead to pneumo/hemothorax (air/blood in the chest cavity (pleural space), where it shouldn't be) causing respiratory distress—and then shock, and without treatment—death. If the heart is damaged, death would be near instant. Other organs like the liver, kidneys, bowels, spleen etc are pretty big bleeders, so see my Blood Loss section.
Sepsis: If they don't die immediately, sepsis is a big risk, as even in sterile environments you can't completely prevent it. Sepsis is when an infection reaches the bloodstream and is very serious. I imagine whoever is vivisecting the character probably wouldn't care too much about using sterile technique, so you can bet on an infection happening. This can set in within hours or days. Symptoms include high fever, pain, confusion/delirium, sweaty/clammy skin, low blood pressure.
Now, if you want them to live?
Surviving:
If the vivisectionist wants their patient/victim to survive, they'd need a lot of materials. Like any major surgery you'd need blood products, fluids, antibiotics, ligatures, and a way to keep the pain (somewhat) under control. Alcohol has been used in the past for similar procedures, but you could also just opt for a dose of opioids.
Antibiotics are necessary, opening someone up like that is a MAJOR risk (see "Sepsis").
I imagine they'd also somewhat monitor the character's vitals. They'd also probably have a few assistants to help with similar smaller tasks like that—stopping bleeding or handing tools, etc.
Closing the wound: Stitching someone up from such an event would be a lot of work, as you have to close many skin layers (muscle, fat, and the surface skin) and bandage it.
If you don't want to stitch them up immediately, a wound vac (negative pressure wound therapy) would be a good option. Doctors use these in cases of things like compartment syndrome. It is used when you cannot close someone back up right away.
Bandages and proper wound care are also important, you'd need to change the bandages every few hours for the first few days as deep wounds tend to produce a lot of fluids (called "exudate.") Sometimes doctors place drains to help drain away this fluid faster.
All in all, Healing from this would take months, not to mention the psychological trauma from all of this.
The scene:
Writing these scenes is honestly so variable so here's a few thoughts of mine:
You could describe the environment: (cliche, but cold metal table? Harsh lighting? Straps? A table with sharp scary-looking objects on it? How about the scent of disinfectant (or its absence).
The initial sensation would be the biggest to focus on: does the vivisectionist take their time? (pressure before pain?) shock as nerves fire as they are severed (lightning sensation shooting upwards), and the body’s instinctive flinch or freeze. Initially screaming, swearing? Sweating, rapid breathing, muscle spasms, or even vomiting as the body tries to cope?
Smells: Metallic tang of a large amount of blood (I personally HATE this smell, it's like having a penny in your mouth, or if you've ever used a metal scrubber to clean a pan, it smells kind of like that.), burning flesh (if they use cauterization) etc
If the character is partially sedated for it, keep in mind they will still react to pain, albeit sluggishly.
I hope this helps!
#whump#whump writing#whump scenario#whumpblr#whump community#medical whump#whump torture#medically accurate torture#tw torture#whumping#whumpee#physical whump#whump ideas#whump prompt#sick whump#whumplr
82 notes
·
View notes
Text


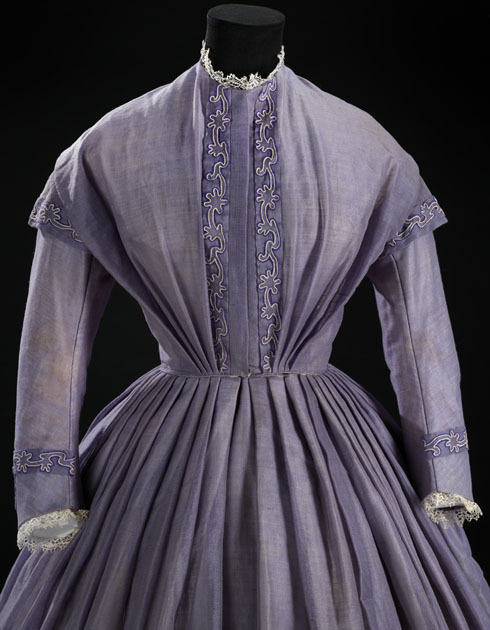
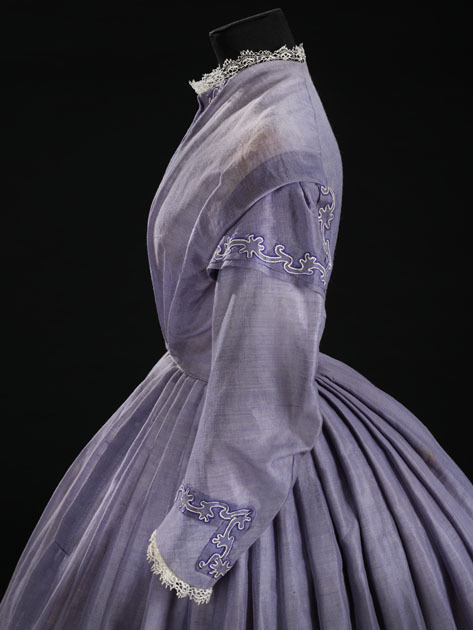
Dress. Scotland, Glasgow (place of manufacture), circa 1863. Wool, cotton.
Glasgow Museum Collections
Woman’s dress in light purple wool embroidered with in purple and white thread in tambour-work in an abstract pattern. High round neckline trimmed with lace, bodice loosely pleated from shoulders to wide v-shape at straight waistline with two narrow vertical pieces of gauze with tambour-work centre front with fastening behind of nine metal hooks and thread eyes attached to lining. Full-length sleeves with short pointed frill at shoulder edged with tambour-work, applied narrow piece of gauze around lower arm to suggest folded back cuff, hem edged with white lace. Skirt, full-length, pleated into waistband with tambour-work border around lower half, opening at front fastened by two metal hooks and thread eyes with small watch pocket in waistband. Bodice and sleeves lined with glazed cotton, skirt lined with cotton.
This beautiful dress is made from light purple wool. The silhouette follows the fashions of the early 1860s with a softly draped bodice and wide, full-length skirt that would have been held out by a steel-framed cage-crinoline.
The dress is decorated with an abstract pattern in purple and white thread tambour-work. The stitch resembles chain-stitch but is worked with the cloth stretch over a hoop, known as tambour, using a small hook rather than a needle. The technique originated in India and reached Britain the 1760s. By the early 19th century the west of Scotland was a leading centre for manufacturing tamboured muslins, with up to 20,000 women and girls in total working in the British industry.
493 notes
·
View notes
Text
20 or so years in the future, doof and perry talk in a pool, at 3am, about the past. for about 5k words. that's it
[ on ao3 here ]
~
Even in dead of night, sounds rattle up the tower’s old iron skeleton to the top. The noise of the residents below, their talking and thumping and TV, warps through metal pipes and chutes into a muffled mechanical soundscape. The aging building’s life functions, thrumming from underfoot, as the fan wheels gently in the air above their bed.
Perry wakes in the room to Heinz’s absence.
Alone like this, he’s left with the many necessities of Heinz’s sleeping arrangement. The carefully selected quilt with the chunky stitching, the snuggly texture. Systematic obliteration of the wrong lights, the wrong sounds. All the particularities that Perry loves. And there are remnants: the old teddy retired to a decorative chair in the corner. The grind guard she doesn’t wear so much now, some little weight has lifted.
Perry squints at the Big Ben miniature on the bedside table to confirm the late hour, and gets up.
He finds her out on the balcony, crosslegged at the side of the pool. The moon’s out of view, but it lights the clouds up like seedpod puffs, and they mirror on the water, underlit by turquoise pool lights. The air is hot.
Perry goes over and places a hand on her bare knee, makes an asking sound.
“Just the usual, Perry,” Heinz says in reply. “I had a stupid dream.” She slides a foot out into the water, where it glows, white in blue. Perry sits at her side. “You were out of character.”
“You’re always uncharacteristically mean in my dreams,” she continues, half smiling. “And you talk. You talk way too often, I think that’s the worst part. In like whatever stupid voice my subconscious thinks you should have. Which changes. I think you sounded French one time, which makes no sense.”
The light is enough for Perry to sign by. What’d I say?
“Oh you know,” she says, her tone compressing. “You regretted this.”
Perry sits with that, with her, pressed against her leg. It’s not an accusation, Perry knows well enough by now, not one made in earnest. They both have to live with Heinz’s self-ravaging mind. He rubs her hand with his.
Hard to know what to regret. He’s put a lot of work in, building this life for himself. Like his boys used to build those miraculous one-day contraptions in the summertime, or Heinz would make reality-cracking machines fueled on coffee and malice, so Perry had built something of his own, more common and slow, but something he was happy with. This partnership with Heinz, this thick-knit network of people he’s living for.
It’s a struggle to even remember the days when he’d been workshopping its contruction. Hard to blueprint a machine, harder to blueprint a life lived in flux, tripwired with secrets and obligations. He used to sweat through nightmares, trying to see the shape of his future, seeing only how easily it could be lost.
Her sitting next to him on smooth cement, 3 AM, poolwater ringing her calf, the bright night sky. He can’t express to Heinz how he never imagined having this much.
So he gets up, with a parting squeeze of her hand, and backdives into the pool, a lazy arc piercing silent and smooth. Might as well give her something to watch. He skims along the bottom, where the LEDs cast sixfold yellow shadows, overlapping like insect wings as he goes.
A few minutes of trawling the circumference, twisting, shooting through the duck-shaped floaty ring, rocketing off the sides with strong pushes of his feet. He weaves and skips between water and air in sinoid leaps. He’s learned to oscillate his body like a seal for these jumps — it’s proved useful sampling the broader animal kingdom for swimming techniques. They keep him limber, in this low-gravity environment his body was made for.
He pops up to check on Heinz, who’s looking. “No no no, keep it up, Perry the Platypus,” she grins at him. “You’re like my Windows screensaver right now. It’s soothing. I dunno if it’s putting me to sleep though, if that’s what you were going for.”
Perry floats over to where she’s sitting. She’s stirring both legs through the water. They’re pencil-skinny and they spirograph ripples that lap into Perry’s neck.
“Y’know what I thought when I found out this place had a pool?” she asks him.
“Well — I thought I’d be doing so much water aerobics. I definitely didn’t think I’d have someone semiaquatic in my life. But that didn’t pan out, the aerobics. So later I thought I’d put in some electric eels or piranhas, for you when you’d visit. Keep it zesty. But I always thought of it right when the aquarium was closed. And you know, after that first spark of excitement has passed, an idea like that just ends up being on your list. So it never happened. You got lucky.”
Perry rests with an arm around her calf, underwater. She’s wearing one of her long hotweather nightshirts, millennial neon geometries advertising a dance camp that Vanessa once attended. It has glow in the dark squigglies. So many little things to keep Vanessa around, her never-worn hand-me-ups.
Perry darkens the shirt fabric in his wet fist, and tugs it toward him. Heinz laughs. “You are not getting me in there,” she says, pushing a foot at him. “I came out here to brood, not swim.”
Perry doesn’t accept it. He pulls her in successfully, and she drops off the edge into the pool without much fuss, splashing him. “This is of my own volition,” she says. “You don’t get to boss me around in the middle of the night. You don’t own me.”
Yes he does. Perry swims a ring around her waist, framing her. The light’s playing off her grey hair, staining it teal. In this view you could mistake them for a matching set. He likes that.
“That is literally still on a list somewhere,” Heinz adds, “the piranhas. In one of my old notebooks.”
They’re piled in storage now, the plans and the blueprints, though she keeps a few sitting around from the later years. A while back they cobbled together a scrapbook of the better schemes, Heinz’s more impressive drawings, fonder memories. Perry got the B.O.A.T. schematic professionally framed, one birthday. Heinz had rolled her eyes at it and hung it in the foyer.
“I feel weird looking at those,” Heinz says. “It’s like oh yeah, that idea was living in my head for years. Thought for sure that one was gonna put one over on Roger, as soon as I got around to it.”
Years, multiple? Really?
“Oh yeah,” says Heinz, as Perry blinks up in question. “You know how I procrastinate, Perry the Platypus. But it was mainly the big plans that I kept putting off, over and over. The ones that required a real surge of hatred, to kick my scheming into gear. Ambitious stuff, you know,” she says, tilting her head. “Mind control, intimidation — stuff that works. Not like the stuff I’d do with you, most days.”
She lilts an arm out, snaring Perry’s hand. He lets her pull him through the water in a curve.
“The bad ideas were more fun — I think I was just trying to give you a laugh, at a certain point. Not that you ever did. The chicken replaceinator, the beam that made people’s ties comically long. I did not think turning everyone’s shoes into heelys would actually win me dominion of the tristate area, Perry, if I’m being honest.
“All those big diabolical plans, they kept me up at night. But I put them off, ‘cause it was more fun getting sugar high with you and bouncing off the walls. Making up an entire song and dance number for the satisfaction of watching you try not to tap your foot to it. Every year it was: oh, just a few more months with Perry. Next year I’ll get serious, for sure.
“And, you know. I can’t regret any of it,” Heinz says. “Because it worked. I got you to dance with me, spend time with me. I didn’t think that was my goal at first — but you know, in retrospect, what else could possibly stack up?
“. . . But I didn’t get to know that, that my time was well spent, until later. Because you can’t really know if you’ll regret something when it’s happening. Like all those bad relationships, all those times I went into debt. You have to wait until you can look back on it all in a decade or two and go: oh yeah, that was a wash.”
Heinz pulls Perry out in a slow-motion twirl, bopping at the water’s surface. She gives him a considering look as their hands detach.
“That’s why I think about you. Because you haven’t been around as long. It takes time to figure out regret. And you don’t have the luxury,” she says with a tight smile, “of regretting a decade. You didn’t fuck up the 90s. You didn’t even have the opportunity.”
Perry can tell she’s got some spleen to vent. Potentially a whole rainbow of humors. He sets up on a paddleboard shaped like a ducky foot — perches zen-legged in its center, balancing what little weight he has. He comes up past her chin now.
“Do you know how many times I’ve invented time travel, Perry the Platypus?” Heinz asks.
“Well, once. When I was in my twenties. For a generous definition of ‘invent’ — we all learned the Onassian principles in college physics. It’s not too hard to plug in the missing variables — sort of an open secret, in the evil science world, how to manipulate time. We’d all dabble, here and there. You overstep and there’s consequences, of course. By the time you met me I was using it for trifles and whimsies. Hyperspecific stuff, that’s less of a risk.”
She fidgets shapes through the water with her hands.
“You remember me, like — summoning the Roman army. That sort of thing.”
Perry remembers it going wrong, yeah, and him sending Heinz back 800 years, in a perfunctory brush-off of that day’s scheme. He remembers finding Heinz back at DEI the next morning, in a sour mood, with a tirade prepared on the difficulties of refining metal ores in 13th century Mongolia. Heinz had lived there a month. Her age was now out of whack with the present date, and she had said something incomprehensible about it, like:
You’ve made me a Leo, Perry the Platypus. A Leo. That’s . . . well I’ve always felt like I should be one, deep down, so thank you. But it explains why horoscope advice has never worked out for me, which in hindsight is just plain embarrassing.
Perry doesn’t recall there being a scheme that day. Even with the freedom to bubble out extra time, Heinz hadn’t bothered prepping more than a long complaining story for Perry — adequate payback for the thwart, he supposed.
“But the first time I got it working,” Heinz continues. “I did some stuff I never even told you about.” She glances up at Perry. “I didn’t even make a plan, I just went back first thing. To Gimmelshtump. Wasn’t even dressed for the weather. And I saw myself there, walking around the outskirts of town. Carrying old breadloaves and rags, and whatever else — I had to be a packrat, back then.
“And I wasn’t even that far removed, at the time, from that kid. But he had a whole system worked out to survive. If you plunked me down in his haferlschuhs now I’d just collapse where he stood, in a matter of hours. Or I’d go crawling back to the ocelots — which wouldn’t end well, I don’t think they’d recognize me.”
Perry’s rather agog. What a length of time to hold this information inside. He realizes he’s perched unstably forward, off the foam board.
What did you do?
Heinz makes a dismissive noise. “What could I do? Nothing. Could I have stayed? Been a parent to that kid? I guess. At least until causality cried foul and wiped me out. But who wants to be a parent at 23?
“And it seems selfish, right, wanting to keep what I made myself into, at his expense. He had to suffer so I could sit warm and cozy in the 80s, failing out of American college because I was too smart for it, schtupping my way through town, selling bratwurst. But I am selfish, Perry the Platypus.” Heinz sets a hard look on him. “All I did was confirm to myself that it was real, all those awful things that happened to that kid. I wasn’t making it up. And I never went back.”
Perry stares at her — he’s sitting pensive on the board, cross-legged, and pushes himself an inch closer with his tail ruddered in the water.
I would’ve stayed, Perry responds, for that kid.
Heinz gives him a quizzical smile. “Would you? That’s easy to say. Would you live out the rest of your days helping him put his rumpkinhosen on the right way? Explaining puberty, that it’s not really the devil growing out of his body, like Mother says? Stealing him acne cream?”
Heinz’s face angles in a mean way.
“Are you gonna convince that kid his parents will never love him? Because that’s all that was keeping me there, apart from Roger. The dumb, burning hope that they might, eventually.”
Ok, so it’s a terrible idea. Perry nods anyway, to be contrary, cheek squished upon his fist.
You’d run away with any cute animal you met, he signs. And I’d kick their asses.
This repairs the mood somewhat, makes Heinz giggle in surprise.
“Oh would you?” she says behind long fingers, eyes sparkling. “Because I’d kind of like to see that. Grizzled platypus with a mysterious score to settle shows up, terrorizes my childhood home. Makes my parents beg for mercy.”
Perry nods. I’d treat you like a princess. Heinz can’t see that he’s blushing. She laughs, louder than before.
“Oh that’s cute, Perry. The Vanessa treatment! Wow. I would’ve turned out different, that’s for sure.” She’s trailing her fingertips across the pool tiles. “But going back in time, taking care of each other . . . let’s not, okay Perry the Platypus? Let’s not and say we would.”
But you did, Perry signs, because once he’s chimed into conversation with Heinz it’s hard to stop himself. Even when he realizes, too late, that he shouldn’t have said anything.
He drops his shaking hands to his lap. Heinz cocks her head with the same pretty smile, now thinner. “You’re gonna bring that up? When we learned how they got you? That . . . that was a mistake,” she says. “We were just getting to be friends, back then. It was exciting. I didn’t have my head on straight. ... And that would’ve been a different situation, in continuity terms, that was . . . ”
She opens and closes her mouth. Perry sees her stare fall to the water, thumb still tracing the putty grooves between the tiles.
“. . . I never really explained to you the technical nitty-gritty, the physics of it. There’s time-space transplantation, moving a body in its current state back or forward through time — that’s what I did going to Drusselstein. But there’s other ways to slide around.
“See, Roger was getting into golf — just excruciating, trying to spend any time with him, it was always ‘Pencil in a timeslot with Melanie and we’ll hit the back nine,’ or whatever.
“I found a way to fast-forward him, that I never got to use. Premature inator-destruction. It happens to the best of us. Usually to me, whenever you got too eager.”
Perry’s propped on his fist, contemplative. I wouldn’t know anything about that.
“See I think you would,” Heinz says, narrowing her eyes. “I’m pretty sure you were my caddie. In fact I’ve gleaned that most, if not all, of the platypuses I encountered in my evil heyday were you. That little guy had your eyes, and he looked unusually hot in golf shorts.”
Perry blinks, mouth trained in a line.
“C’mon, Perry the Platypus,” she wheedles. “It’s not nice leaving a girl in limbo, for so many years. This’ll keep weighing on me.”
Okay fine, Perry signs, shrugging. I was the hot caddie.
“I knew it!” She grabs the foam board and shoves it hard, sending Perry backwards with a splash. “You are such a jerk gaslighting me all the time! Steven.”
Perry shakes water off his bill and punches forward into her, though the effect is more of a cuddle. She tangles him in her arms.
“So that means you know,” she says, scrunching fingers into his chest, “why I wanted to speed through that. And if you can isolate a body, move it forward and back, you can isolate a mind, or a consciousness.
“That was the technique I used, for when . . . you know, when I did the.” She falters. “Really, really bad idea.”
Except you didn’t, Perry signs up at her.
“Yeah, but like. I think about it. How I almost did. How I could’ve screwed everything up. For both of us.”
Perry remembers it more through her recollection than anything. The day she’d cracked into the OWCA admin portal and Perry had let her. The day she found the timestamped geolocation from which Perry had been acquired. He remembers Heinz’s outrage, mourning Perry’s fate at OWCA’s hands, and the wave of giddy revelation that had quickly taken over at the chance to go back, intercede, take Perry for herself instead.
From where Perry had stood Heinz hadn’t vanished, hadn’t even blipped. He just knew that one instant he was rocketing a punch toward someone diabolically driven and the next, post-inator, was socking his fists into the braced forearms of a downed Heinz, cowed under Perry on the lab floor. And Heinz’s eyes had been so haunted, looking up at him from behind those arms, that Perry knew something had passed.
It was years before she’d tell him the full story. How she’d run out of the house as her 41-year-old self, to track Perry down. The bluegreen and red at the riverside. How Perry’s mother had died on the shore, bleeding out of bite wounds, accepting Heinz’s touch as she cooled under frantic hands. The last look she’d given Heinz. The wariness of the OWCA-trained animal control agents who’d found Heinz sitting there, keeping vigil. How Perry had nestled in the palm of her hand, impossibly little, and ate up what milk of his mother Heinz brought to his bill, fingertip to mouth.
He can’t remember any of it, of course, how could he. But he would always carry close to heart the knowledge that Heinz had inserted herself, in this small and careful way. Had been the first human touch he’d felt.
But it made Heinz cry, retelling it. So Perry never brings it up.
He holds the back of her hand, as she winds a thumb through his fur.
“It would’ve been so easy to change what you were to me, and ruin the weird thing we had with each other — even back then, when it didn’t seem like as much. I didn’t know at the time, y’know, that you’d want to stick around this long.”
Perry gives her a sad smile.
“Time travel’s the worst, it’s like an automatic culpability machine,” Heinz says. “It’s a terrible idea to go backward: everything becomes your choice. Any pain in the past is now stamped with your approval, you don’t have the right to complain anymore. Choosing to leave you with Monogram, choosing to abandon myself in Gimmelshtump. It’s so easy to change everything, with a few key edits.
“And greed always makes me want both. I wanna give that lonely little kid a charmed life, and I want to keep the one I have. I want to get to raise you into my perfect little companion,” she says, cuffing the back of his neck. “And I want to get to fuck you, too.”
Her fingers threaten to pince a collar round his throat and he stares up as her words shock his gut, her sick rapacity bearing down on him, heavy. But her face is unplayful: tired and vaguely nauseated, a disgust turned back in on herself.
So Perry swallows down arousal and steadies his composure, in turn. Heinz just closes her eyes, with a sigh, and pushes Perry’s body away from her into the water.
“I dont know how it worked for him,” she says. And Perry doesn’t know who she means, which averted version of herself, so he waits.
“How he could stand to have that power every day, to make any possible reality. And to risk not having one that really matters.”
Oh. Of course.
“I never did got the full story out of him. Professor Me. I wished I knew more — but there’s something so off-putting, seeing yourself from the outside like that. It’s like listening to a voice recording.
“I don’t think he had any extra-special skills, didn’t know anything I don’t — except whatever it was that convinced him pinstripes and a pink cravat were the go-to look for branding himself a big time travel genius. That I’ll never understand, why I’d wanna look like I’m selling snake oil from the future to the past. In fact I get the sneaking suspicion that’s exactly what he was doing. I can’t imagine wearing that costume full time.
“But maybe he didn’t, you know? Maybe he got home at the end of each day and he put his stupid top hat on a peg and he . . . I dunno, worked on jigsaw puzzles with you. Like we do,” she says. “Maybe he was more like me than I knew.”
They never saw him again, after that year. A decade plus of Heinz waiting, stressing, disavowing, dreading. And then at a certain point it dawned on both of them that their trajectory had quietly split from his. And relief overwhelmed curiosity at whatever might have been.
But when she first found out, Heinz had been excited, in a cute nervy way. It was every delusional dream coming true at once and smacking her in the face — right at a vulnerable moment, when another close-call spacetime catastrophe had left her shellshocked and aimless, in need of reinvention.
It’s crazy, right? Heinz would ask anyone who happened to be in earshot. And they’d agree, that it sounded crazy.
It’s like I predicted it! I — I wrote a TV show about it, me being a time traveler. They ripped it off and made me a girl — and then they made Perry the Platypus a human and cancelled it after one season — but I did! I was this hero from the future, and I knew karate. Do you think he knows karate? I bet he knows karate, too, he’s just being low-key about it, because that’s what cool karate experts do, when they know karate.
But then there was the month, the lowest of her life, as Heinz described it, when they weren’t talking. And in the depressive wreckage of their falling out Heinz was left to ponder how, in that glimpse of the future, bright with glory and wealth and eternity, Perry had not been in frame.
He was off to the side, probably. Surely. Though Heinz’s then-drinking buddy hadn’t offered any reassurances. If the future included Perry the Platypus, he was no famous partner of the great Professor Time.
And that’s rookie mistake number one, Heinz had said to Perry later. Traveling through time without a trusty companion. You just don’t do it. I . . . I learned that from cartoons.
Back in the present Heinz is chewing her lip. “It’s just that I had all this baggage, around time travel, that I didn’t even realize — I hadn’t sorted through any of it yet. I just knew I couldn’t go back. And I figured if I couldn’t give myself a perfect past, I’d just have to give myself a perfect future. I never actually wanted to learn about it though, never wanted to skip ahead and spoil myself, in case I got bad news.
“But getting good news was like . . . weirdly so much worse. Like — all that glory I wanted, people shouting my name. He already got it. And with a stupider name. So I didn’t know what to want.
“Except for the uncertainties,” she says, quieter. “The stuff I didn’t know he had, that I knew I had to keep.”
She reaches out a hand. Perry takes it in his paws.
“That’s a lot, I guess, just to say —” Heinz says. “I’m really happy where I am.”
Perry spent years of his life not holding Heinz, not touching. He’d never admit that fear was a reason. It was just a matter of propriety, truly, of acting right under OWCA’s watchful eye, under the spycams they’ve long since eradicated from around Heinz’s loft.
Now he pulls himself into her and she sinks down in the water, so he can wind his short arms around her neck. And Perry feels all those years of idiotic professionalism like a permanent injury in his chest.
But he gets to hold her now, dig his clawed fingers in the clinging wet folds of her shirt and push his bill to the back of her neck, inhale her body heat. Which lessens the sting.
She clutches him back.
“You wouldn’t like the stuff I think about,” she whispers, “the stuff that woke me up tonight, that weighs on me. Stuff I know I shouldn’t say to you.”
Perry pulls back, to give her a sidelong look. It’s strange to hear. There’s no rotten part inside of Heinz that Perry hasn’t learned to love by now.
She elaborates. “I hate how long it took me to get here with you, to figure out my priorities. It took until you existed.
“But you’ve been stuck with me from the beginning. I’m your permanent assignment. In every life you get, you have to make the best of me,” she says. “And that’s when I’m not an irredeemable monster who makes you my slave.”
Perry takes a firm grip of her shoulder and rears back a bit, so he can turn his bewildered face on her.
She waves a defensive palm in front of him. “I know, I know, Perry. Let me get this out.
“I just think,” she says.
“If you wanted a do-over, I could give you one. At the end of all of this, when we’re finally puttering out — I mean we’re getting old, Perry. I could rewind you. You could go back to where you started, live a whole different life. Ditch OWCA. Go out and meet any number of people, around the world, do whatever you wanna do with yourself. Make a life on your own terms. Get to know who you could be without me.”
Heinz was right about Perry not liking this. He’s not sure exactly where his shock turns into anger, but the net effect is hurt, at what she’s saying.
He gives her his wildest are you kidding me look.
“You know I didn’t actually think you’d say yes,” Heinz says. “It was more a question of how hard you’d hit me in the face for saying any of this.
“But I think you deserve the option, if it turned out you did regret a decade of your life, or two. Because that’s all you got. All you got out of life was me and the dumb choices I made.”
She’s hunched into the curved pool wall, tugging at her elbows under the surface. She won’t quite meet Perry’s eyes.
“I could build you a machine and you could use it to go back without me knowing — so it wouldn’t hurt my feelings, it’s not like I’d remember,” she says, and there’s a wretched emptiness as she voices this thought, like it’s rehearsed.
“You could hold onto all of this, or I could wipe it, give you a clean slate. I just wish you could have, like. . . one choice in your life that’s not built around me.”
Perry stares at her. It seems she’s at the end of her speech. Her pool-lit image is ghostly, flickering like a hologram. Her eyes face down.
He racks a hand up his face with a sigh, the sound gurgling in his bill — not to dismiss her pouring out her stupid heart. But what else can he do, faced with such an unpersuasive offer?
She looks at him then, so he signs one thing. You’re too old to hate yourself this much.
“Oh Perry,” she rebukes, as he swims around her to the poolside. “That’s really not the point. You get that it’s unfair, right? Your life versus mine. I got to have all this time, and you — got me, and that’s,” she falters, as Perry hoists himself out of the water.
“I — I don’t think you’re unhappy, that’s not what I’m saying,” she quickly adds. She grabs Perry’s wrist, to make him look at her.
“I don’t know how to deal with you — living less,” she says, staring into him with benthic eyes. “And me being the most you ever got.”
Perry grabs the outside of her hand with his other paw, and tugs. Heinz acquiesces, allows herself to be lifted, and clambers the rest of the way out of the pool.
She’s like a bedraggled cat, long silver hair strands dripping on the pavement. Perry retrieves a fresh towel from the wicker caddy, pads back over and swathes it around her narrow shoulders.
“I should just accept that it’s romantic,” she mumbles, while Perry rubs the towel into her hair. “Like a destiny thing. But it’s a lot of pressure, the universe setting you up with me.
“Are you happy with that, Perry,” she asks. “I bet you are. I bet you feel all cheesy and warm about it.”
Heinz and Perry have been rewatching the same old telenovelas for years. Perry just rolls his eyes, to say you know I do.
Heinz nods. “That’s a problem, Perry the Platypus. So my offer stands. If you ever want to fix it.”
Perry presses his face to her cheek, in lieu of the slap she deserves. When he drags his soft bill across her face she tips it into a kiss, automatically, the deep-grooved pattern of their motions betraying whatever self-injuring case she was trying to make, about the awful tragedy of Perry loving her.
It’s not a choice, he signs, pulling back from the kiss. Taking you out of my life. It wouldn’t be my life anymore. So no.
Perry holds a paw to his chest. The fur’s mostly grey there — a way he really matches Heinz now, no trick of the light required.
If you weren’t in here . . . I don’t know who I’d be. Just a very good pet and a very good soldier. That doesn’t interest me, he signs, and he’s thinking, with less tact: fuck that guy.
Heinz is quiet, staring. She’s slumped so soft in the summer haze, a vulnerable thing in front of him. A whole city behind her. One she gave up ruling, because she liked Perry more.
I’m built around you. No fixing it, at this point. Sorry.
Perry shrugs, and draws his hands into snatching claws: I’m selfish, too.
#fic#this fic is partly me chewing on / rejecting post-pnf canon and the rest is my otp marriage sickness#i still prefer posting things on tumblr first even tho i inevitably realize theres no reason not to put them on ao3. ao3 makes me nervous
38 notes
·
View notes
Text
Bookbinding Year in Review 2024
Another year, another reflection on all of the books I've bound this year! I didn't have as prolific a year as last year, but I still bound quite a bit.
Starting off with some overall stats:
Total books bound: 30 Total books gifted: 26 Total words bound: 1,116,840 Average words per book: 37,228
I bound quite a few blank books/journals this year, and I ended the year with a few very large binds, so there are some outliers skewing this average 😂 Additionally, despite binding about half as many books as last year, my total words bound is approximately the same (likely because so many of last year's books were short pamphlet binds).
This year, instead of doing pamphlet binds for Binderary (a bookbinding marathon event hosted by the Renegade discord server in February), I did 15 Malevolent-themed journals in conjunction with @shadow0haven and sold them at Invictuscon in March, with profits going to charity. Though I probably won't be doing it again (it took a lot out of me), it was a lot of fun!

[ID: Three journals laid side-by-side. The leftmost journal is yellow with a black spine and has artwork of Blob John on it. The middle journal has a black spine and painted-style artwork of John (depicted as a large monster with a large white pallid mask) and Arthur (depicted holding a lighter with his eyes covered) on it. The rightmost journal is black with a gold spine and a gold metallic painted Yellow Sign in the middle. All three journals have gold ribbons and black elastic closures. /End ID]
About half of my bound books this year were for Binderary. I also bound books for Fandom Trumps Hate, Renegade bookbinding exchanges, Big Bang events, and Fanfiction Writers Appreciation Day. One of my most experimental book designs from this year was from the Rusty Quill Big Bang, where I went all-out on a hockey-themed book.

[ID: A hand-bound book open and standing up with the spine facing the viewer. The highlight of the picture is the spine, which has a hockey lace threaded over it so that the spine looks like the front of a hockey skate. The spine beneath the lace is open so you can see the paper and stitching. /End ID]
I've been experimenting a lot with different book styles and binding techniques this year, trying to stretch myself, try new things, and use the skills I've acquired to think and work outside the box. I did that with the above book (combining coptic and sewn board binding styles). I also learned some new techniques, such as creating covers using cutting machines, doing different styles of endbands, trimming edges (easily the most frustrating part of the binding process 😒), and painting edges. One of my favorite aspects of this hobby is, as the Renegade server calls it, FAAFOing, or "fucking around and finding out," so even when something doesn't work out 100% perfectly or the way I envisioned it, it's just a learning experience for the future ✨
This year's fandom that I bound the most for (excluding "no fandom") was back to my roots with the Magnus Archives. I got to bind one of my own fanfictions as part of a Fandom Trumps Hate gift, which was a pleasure to do. It was my first exploration into the world of creating stenciled covers using my Silhouette, and I'm delighted at the cover designs available to me now.

[ID: A hand-bound book photographed from the front. The book has dark green bookcloth, a decorative red and gold ribbon along the left side, and a gold painted cherry blossom design. The title and author name are also in gold and read, “Ten Thousand Flowers in Spring” and “bluejayblueskies.” /End ID]
My favorite bind from this year is currently a secret (it's an exchange gift!), but my second-favorite is a Rusty Quill Gaming bind I did of knifemartin's fic Due North earlier this year. I tried marbling for the first time for it, which was a tricky yet rewarding process, and I'm thrilled with the aesthetics of this book. An honorable mention is Aftershocks, another RQG fic by knifemartin that allowed me to indulge in my love of wingfic.


[ID: Two images of two different hand-bound books. The leftmost image shows the front cover of a book bound in black cloth with the fic name "Due North" and author name "knifemartin" painted on with silver paint in a fancy sans serif font. There is also a rectangular cutout showing off blue and green marbled paper beneath. The rightmost image shows the front cover of a book bound in shiny gold cloth with the fic name “Aftershocks” and author name “knifemartin” painted on vertically on the righthand side with silver paint in a blocky sans serif font. On the lefthand side, there is a 3D white angel wing that has been constructed from individually cut-out paper feathers. /End ID]
I have some fun plans for the upcoming year, as well as a resolution to bind more for myself in 2025. I really enjoy doing events and gifts and exchanges, but it does have me putting a lot of projects I want to do off to the side, so I'm going to make more of an effort to focus on those in the upcoming year. Time to finally make a dent in my to-bind list! 💪
41 notes
·
View notes
Text
Onsite Crack Repair by Metal Locking and Metal Surgery Process
It has been shown that mechanical failures or exposure to extreme heat can cause cracks to form in cast iron components. Sometimes it is challenging to arrange for a new part because of a longer delivery period or an exorbitant price. We fix damaged cast metal or aluminium components by using a metal stitching and locking procedure. It offers permanent crack solutions without producing the heat required for welding. Please email us at [email protected] for further inquiries about metal stitching, the metal surgery process, engine block repair, and cast iron engine block crack repair.
#Onsite Crack Repair#metal surgery process#metal stitching process#repair by metal stitching process#Crack repair techniques#casting repair#on site metal surgery#metal stitching#engine block repair
0 notes
Text
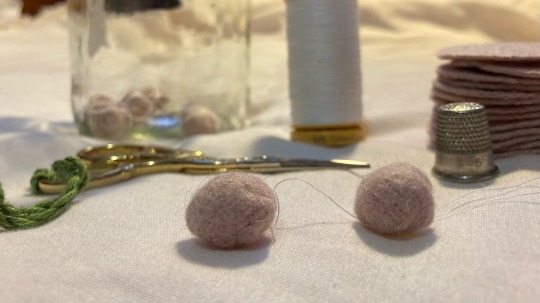
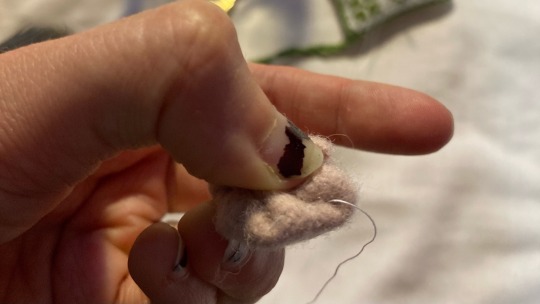
How To Make Medieval Fabric Buttons
You will need:
• fabric (I’m using a medium weight wool)
• a sewing needle
• cotton or silk thread (it MUST be strong)
• a thimble
• dressmakers pins
Using this style of button as a fastening technique was very prevalent in 14th century Europe, on both men’s and women’s clothing. It was used for anything from sleeves and openings on the front of garments, to the iconic liripipe hoods (which is what these are gonna be for!).
They were usually made out of leftover fabric from the same material that was used for the garment they were intended for. As well as using every scrap of material possible, they also save you from having to buy metal buttons, which… aren’t cheap (both now and then).
The trade off is of course having to make them, which can be a painful process (literally - try not to get stabbed by the hedgehog ball at step 4!!). I thoroughly recommend a thimble to push the needle through as you form the ball - this is hard enough without having to pull it through.
Making buttons in my experience is 10% knowledge, 60% spite, and 30% hatred. It is a contest of wills between you (who wants a button) and the fabric (who doesn’t want to be a button). I wish you luck soldier.

To start with, cut a circle out of your fabric. How big will depend on what fabric you use - if it’s linen, you’d cut a larger circle than you would for wool. Mine is about 30mm.
Using a long long thread, bind on and then sew running stitches around the outside, about 5mm from the edge (may vary with fabric).
Pull this thread tight like a pouch, and turn the raw edges inwards in one direction. Try and tuck them inside the “bag” section. It will likely be more of a squashed oval at this point than a sphere.

Now, get your dressmakers pins and go absolutely ham. Continue to squish it “inward” (towards where the opening was) as you pin. The button should now resemble a very unfriendly little creature now (good luck with not getting stabbed, it can be a bit of a prick).
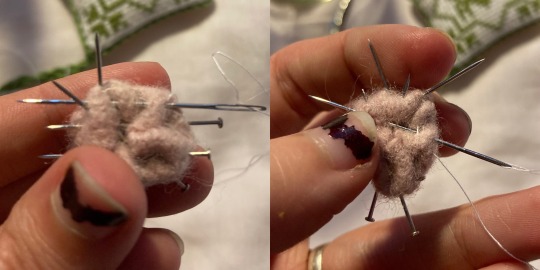
Next, basically use your needle to try and get it to stay in that shape. I usually do a bunch of stitches around the edge of the “back” end, and then spend some time criss-crossing the back. Try and put your needle in close to where it came out, so that you don’t get long pieces of visible thread.
Once you are confident that it will hold A Shape ™ (but also isn’t so stabbed that you can’t refine it further!), remove the pins. Your button will most likely resemble a little tiny messy wool brain at this point, but that’s ok!
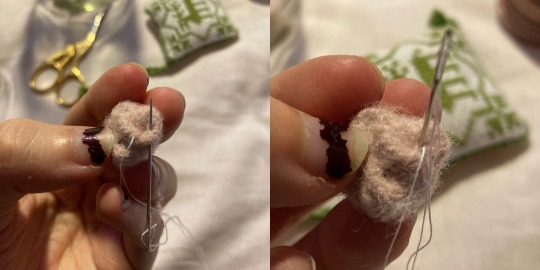
The next step is to use your needle and thread to continue tucking the ball inwards to the centre of where the opening was. Above illustrates how I’ll flip the open part of a fold inward, by coming up through the fold and then levering it downwards so it gets tucked away. You can also just use the thread to pull errant folds inwards. Use the hand holding the button to squash it into form, and then sew it into place.
Once the button is actually a ball shape, crisscross the back of it a bit so that everything is firmly held in place. It should now (all things going well!!) actually be a sphere.

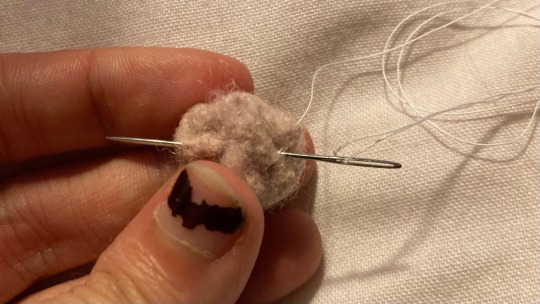
Once you’re happy with the shape and firmness, take your thread to stem out of the centre back. Bind off, and then slide the needle off the thread, leaving the long end. This can then be used to sew the button onto the garment.
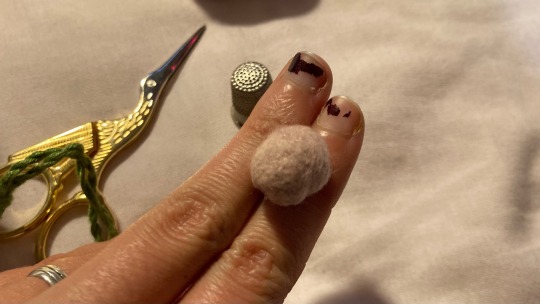
The back will still be somewhat messy, but the front should be smooth, and the whole shape roughly spherical. When the button is sewn on using the remainder of the thread, you won’t be able to see the back!
I wrap the remainder of the thread around the finished button so it won’t get tangled, and then pop it in a jar with the rest while it waits to be sewn onto the garment.
Good luck with your crafting! Feel free to ask any questions in the notes, or straight into my inbox :)
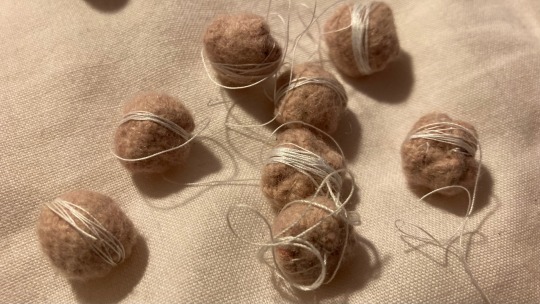
#sewing#tutorial#medieval#medieval reenactment#medieval clothing#medieval costume#historical fashion#historical costuming#medievalcore#14th century#buttons#crafting#diy#i’ll be on my merry way now#I have…… sO many of these to do#truly pain torture and misery hours over here
585 notes
·
View notes
Text
I was reading a book on darning. Apparently the way I darn socks isn't an "official" technique 😂 although it shares some aspects with English darning. Whatever. I hated most of the techniques in the book 🤣 but it still indirectly inspired me to try combining sashiko with square darning.

This pair of pants tore a small hole in the knee ages ago. I've had them in my mending pile while I waited for inspiration to strike. Basically I ran random stitching vertical and horizontal, not trying for regular length of stitches or distance between lines, except in the very center where I picked up extra lines and then wove them from the opposite direction in a square darn.
Supplies: Olympus 100% cotton sashiko thread in navy (103), and a small metal mixing bowl for a darning "mushroom"
Work in progress, below. While the vertical lines were easy to keep straight by following the lines in the denim, horizontal proved impossible without drawing guidelines (in brown). (Not widely approved of, I'm sure, but kids super-washable Crayola fine tip markers are great for this imo. 👍 So far they've always washed out for me.)
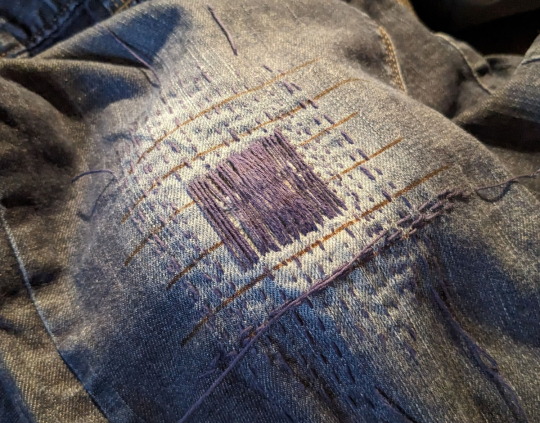
The hole, from the reverse, because I always forget to take "before" photos:
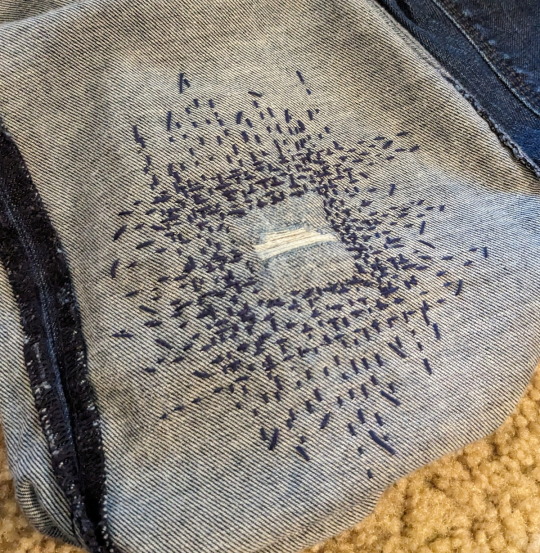
My only regret is that I didn't put an additional piece of denim behind the hole as reinforcement. That may or may not backfire on me. However, so far I'm very please with the outcome. I washed them, everything held up, and the patch is comfortable when wearing.
#mending#sashiko#sashiko inspired#darning#reduce reuse repair#fiber crafts#and after I finished this project I ordered about 5 more colors of thread#I have at least three more pairs of pants with holes and I feel inspired#visible mending
155 notes
·
View notes
Text
pressed petals. ݁₊ ⊹ . ݁˖ . ݁
boothill sews an apron for his partner using the flowers he always gives him.
characters⟡ boothill, (mentioned) argenti
relationships⟡ argenti/boothill
word count⟡ 462
cw⟡ references to canonical child death

Boothill's metallic fingers shook as he attempted to prevent the sewing needle from slipping into the cracks in the casings of his finger joints. He wasn't built with the ability to undertake delicate tasks anymore but for his sweetheart, the dainty yet strong Argenti, he would do his absolute best.
So far, he hadn't torn or ripped the cream fabric while stitching it into an apron but he attributed that to his meticulous focus, rather than any latent ability left from his past life. His sewing skills, once far beyond everyone else in his family, had degraded from disuse and clumsy metal fingers. His finger slipped, the needle briefly jamming into his joint's casing and threatening to snap.
"Aeons damnit darnit." He cursed, inspecting the thin needle. Luckily it was still intact and Boothill was able to continue his work.
When the last stitch was looped into the hand-dyed fabric and Boothill snipped the leftover thread, he lifted the garment up, admiring the finished product.
The last time that him and Argenti had the pleasure of sharing each others company, the subject of cooking had come up. Boothill had plainly told Argenti that he could still taste but since he didn't need it anymore, didn't see the point of eating. Argenti had gasped and insisted on cooking for Boothill.
He had to admit, Argenti was a wonderful cook. Boothill had suggested getting Argenti a frilly apron to cook for him in, as a joke, but Argenti had blushed so prettily that Boothill immediately made up his mind about getting him one.
Unfortunately, none of the aprons he had seen in stores were good enough and Argenti had messaged him about their paths crossing again sometimes soon, so Boothill picked the needle and thread back up from where he had left it behind years ago to make him one.
Looking at the apron, he felt a sense of pride unclock from the recesses of his heart and spread across his chest. It was nothing like the little dresses he had sewed his daughter, when she was alive, but after several decades of not sewing it was passable.
He had taken the petals of the roses that Argenti gave him each time and pressed them into the soft cream fabric in the shape of open roses, dying the fabric into patterns. The bottom of the apron was scalloped, a technique that was much harder than he remembered. All in all, it was a very pretty apron.
Boothill folded up the apron after he had taken a long look at it, tucking the garment into a bag to keep it safe while he traveled, a sharp grin spreading across his face. He couldn't wait to see how flustered the gift would make his pretty knight.
#starrytulips#honkai star rail#argenthill#guns n roses#hsr argenti#hsr boothill#this just came to me#idek who what's going on in the drabble tbh#anyway this is in celebration of argenti coming out#i still don't have in 73 pulls in#this was a request!#dividers by cafekitsune
28 notes
·
View notes
Text
Athena Pallas/Minerva Deep dive
To the wisest of the wise, to the goddess that tells us the wisdom, may we all cheer for her, like how men and women and all equal in war would cheer after victory.
Herbs • Olive tree, Tiger lilies, geranium, oak, cypress, Hellebore (Christmas and Lenten rose), and citrus tree, walnuts, pears
Animals• owl, snake, rooster, griffins, horses (she taught men how to tame horses), female lambs, doves (as a symbol of victory), rams, eagles, tigers, leopards, and other cats (could not find why but many were in agreement.)
Zodiac • She was mostly celebrated in June/July so I would say, Gemini, Cancer, and Leo.
Colors • gold, orange, yellow, emerald green, and royal blue
Crystal• bronze, metal, gold, silver, Azurite, Iolite, ruby, star sapphire, turquoise, lapis lazuli, ivory, Amazonite, Iolite, Bloodstone, Clear Quarterrtz, onyx.
Symbols• owls, olive trees, snakes, the Gorgoneion, golden shield, and helmet, serpents
Jewelry you can wear in their honor• you can veil in their honor
Diety of • knowledge, knowledge in war, crafting, inspiration, strategy
Patron of• Military, justice, skills, close combat, good counsel, prudent restrain and practical insight, weaving, and spinning, crocheting, the defense of towns, heroic endeavor, and protection agriculture, she is known in the arts as well with Hephaestus, protectress of the phratries and houses, authority of the law, the order in the courts and the assembly of the people, mathematics, strength, asexuality, librarians, peace, judges, protests, metalwork, birds (called the goddess of the birds), teachers
Offerings• She was sacrificed bulls, rams cows, all female except a lamb, it must be a male lamb, Locrian maidens or children are said to have been sacrificed to her every year as an atonement for the crime committed by the Locrian Ajax upon Cassandra (do not do, just here for historic offerings.), Olives, Bread, Grains, Olive oil, Cakes, Olive tree branches, Owl figurines or imagery, Silver jewelry, Honey, Milk, Books, Strategy games, Quality chess boards, Snake figurines or imagery, Fountain pens, Handmade objects, Clay items ( ex- plates, bowls, vases), Yellow and/or white candles, Yoghurt, Daggers, Swords (including small decorative versions), Devotional poems, Studying, Learning something new, Using what you learn as a way of growing and developing as a person, Standing up for yourself, Improving yourself, Owl pellets, Owl decoys for gardens,Work out clothes/gear, Fidget toys for when you’re working, Brain imagery, Spider imagery, Crafts you have made, Certificates/degrees/awards for achievements, Favorite books/books on mythos or Greece, Knitting/crocheting/crafting materials, Needles, Your glasses, Coffee/tea, Nice pens/pencils, Journals/notebooks, Voting stickers/cards, Spears/swords/daggers/helmets, Protest signs, pears, walnuts, Garlic bread, Start a small side business.
Devotional• Read a book, become a librarian as a summer job, or simply check out or return a book, join a book club, host a book club, learn Battle strategies, learn Wars and how they were won, learn What led to wars being lost, read The Art of War by Sun Tzu, learn about Politics, Democracy in Ancient Greece, learn about Armor and weapons, Catch and release spiders in your home, do Pottery, learn about Cross stitching and knitting, Tutor someone/get tutoring for areas you need help in, Watch TED talks/listen to educational podcasts, Plan out your day/keep a planner, Thinking before taking action, controlling our anger, Learn new vocab words, Make your notes pretty, Learn study techniques, Take appropriate study breaks, Do projects for Her, Challenge yourself, Learn grounding techniques, Do your homework, Give up things that are unhealthy for your brain (ex- smoking cannabis, drinking.), work out, Learn basic first aid, take CPR classes, Take care of your body, Go to protests/advocate
Ephithets• will post later, postponed due to motivational issues, will come soon.
Equivalents (alike but not the same)• neith (Egyptian), thrud (Norse), Minerva (roman), Athena (Greek)
Alter• I would not put her alter near Heaphestus, be tried to violate her in a myth, I would not put her alter near Aphrodite because they are known to not get along in myths, but things could have changed. She does work well with heroes, so if you worship Hercules or Perseus I would put her alter near them, I would not put her near Arachne and keep her alter away from spider areas, etc. Keep her altar clean and orderly. She does not like the giant Pallas, he tried to ruin her chastity.
Signs they are reaching out• Encounters with owls, olive trees, or feelings of wisdom and inspiration, seeing owls in the day, going to the library more often, staying after school.
Vows/omans• to stay a virgin forever, and to change her name
Number• 6 or 7 and 5 (I couldn't find a website that could agree.)
Morals• Morally lawful
Personality• Strong, endearing, respected, smart, confident, practical, clever, a master of disguises, and a great warrior. Brings Harvard teachers to shame.
Home• Mount Olympus
Mortal or immortal • Immortal
Fact• Some say she invented the flute, she invented the plow, and the rake, borrows tools from Zeus to do war saves people when fate counts on it, she repels Ares, some say Athena’s full name is Pallas Athena, but they say she added the name Pallas to hers after she accidentally mortally injured her friend Pallas during a practice session in her youth. Athena was seen naked bathing, she felt bad for the man, she covered his eyes and made him blind, making him an oracle.
Curses• blindness, more spiders, spilling tea, dyslexia getting harder, losing ur glasses, no one knowing who you're dressed as during Halloween, getting into fights, unjust detentions, no one showing up to class, getting fired as a teacher or librarian (unjustly), dropping books and learning stuff all of the sudden, forgetting materials that you learned on your test, your quizzes and tests get lost.
Blessings• remembering test materials, witty replies in arguments, detentions all of the sudden going away, getting into your dream college, getting into a book club, finding ur books, getting a librarian or teacher or tutor job.
Roots• Greek, near the river Triton born after or in the Titanomachy era.
Friends• Pallas (her friend growing up)
Parentage• Some say Poseidon then she went to Zeus after a dispute and became his daughter, and some say metis and Zeus, some say Hepeastus.
Siblings• Artemis, Aphrodite, the Muses, the Graces, Ares, Apollo, Dionysus, Hebe, Hermes, Heracles, Helen of Troy, Hephaestus, Minos, Perseus, and Porus.
Children• She does not have any romantic lovers, but she has adopted children, who are, Erikhthonios/Erichthonius.
Pet• one white and three dark horse and an owl, (she shares a chariot with Artemis)
Appearance in astral or gen• a stately woman armed with a shield and spear, and wearing a long robe, crested helm, and the famed aigis with the the Gorgon Medusa on a shield
Festivals • The cleansing Festival/Plynteria and Kallynteria Festival, the threshing festival/Skira Festival, the festival of Minerva/Minor Quinquatrus, The panatheanaea/Athena Festival, The Vintage festivalOschophoria Festival, the artisans Festival/Chalkeia Festival.
Day • she does not have any day of the week, the 23 of each month, and the first day.
Sacred places• The Parthenon on the Acropolis of Athens is dedicated to her, and Athens.
Status• Wisdom goddess, One of the major theoi and goddesses in Greek mythology
What angers her • If you stop worshiping her, I would clean up and part respectfully and know she understands, she does not like the sudden removal of an alter and the trashing of one.
The music she likes• classical and lo-fi study music.
Planet• Pallas Athene (minor planet) and the Asteroids 93 Minerva and 2 Pallas
Her Tarot cards• queen of swords, queen of wands, justice card, balance card
Remind me of• the saying “hitting the books” and someone actually throwing books, twilight from My Little Pony, Dead Trees (books)
Scents/Inscene • Patchouli, dragon’s blood, musk, indigo, orange blossom, cinnamon, and cedarwood
My opinion • She's cool.
Prayers•
Prayer To Athena by Liz “Morning Dove” La Posta
Oh, wise Athena with your spear and shield, protect me and my family from injustice and harm. Council me with your wisdom so that I may make the best decisions. Grant me success in my endeavors, but keep me humble so that I might not become condescending to others. I thank you for the many times you have guided me on my Path. Share with me your mysteries and I will do my best to follow. Athena my Goddess, I pray this in your sacred name, and I vow to always be your faithful dedicant.
Prayer to Athena for Wisdom
Clear-eyed Athena, unrivaled in wisdom, daughter of Zeus and Metis whose craft and wit excelled among the mighty Titans: Athena, I pray to you. Wise in all things you are, goddess; your cunning and guile are well known. In time of war you have no equal in tactics or in strategy; many armies have you guided to victory. In time of peace your blessings fall on those whose work is of the mind–friend of the philosopher, the scientist, the student. Advisor of kings, patron of clever heroes and bold-hearted adventurers, defender of the thinker, mistress of reason and understanding, goddess to whom a strong arm and a sharp sword are nothing without the sense to wield them well and the insight to know when words are worth more than weapons. Athena, grant me a sound mind and steady temper, bless me with good judgment, show me the long view.
Links/websites/sources •seleniangnosis https://www.theoi.com/Cult/AthenaTitles.htmlhttps://www.britannica.com/topic/Athena-Greek-mythology https://en.m.wikipedia.org/wiki/Athenahttps://www.perseus.tufts.edu/Herakles/athena.html https://www.theoi.com/Olympios/Athena.html
https://www.worldhistory.org/athena/#google_vignettehttps://greekgodsandgoddesses.net/goddesses/athena/https://olympioi.com/greek-gods/athenahttps://ilfiorello.com/athena-the-importance-of-the-name/https://www.theoi.com/Cult/AthenaTitles.htmlhttp://www.goddess-athena.org/Encyclopedia/Rituals/Festivals/index.htm ATHENA'S BIRTH ON THE NIGHT OF THE DARK MOON - JSTOR 881 Athene - Wikipedia Athena | Olympian Goddess of Wisdom | Born from Zeus SkullGoddess Gift https://www.crystalvaults.com/goddess-athena/#:~:text=Crystals%20such%20as%20Azurite%2C%20Iolite,Athena%20can%20bring%20to%20you.Athena: Greek Goddess Of Wisdom And Craftsmanshiphttps://www.museandmoonstone.com/blogs/blog/crystals-goddess-athenaThoughtCohttps://www.thoughtco.com › what...What Are the Symbols of the Greek Goddess Athena?numeralgame.64g.ruhttp://www.numeralgame.64g.ru › ...Numerology and ancient Greek myths. Pythagorean numerological number 5. Goddess Gifthttps://goddessgift.com › goddessesAthena: Greek Goddess Of Wisdom And Craftsmanship Number Seven Facts, Symbolism & Meaning - Study.com Holy And Unholy Numbers - Street Directory Athena: Greek Goddess Of Wisdom And Craftsmanshipseleniangnosis travelingthief Titanomachy Definition, Myth & Impact - Study.com Athena Siblings - 1379 Words | Internet Public Library - IPL.org Athena Justice, Mythology Tarot Enamel Pin - LitJoy Crate Inner Goddess Tarothttps://innergoddesstarot.com › go...Goddesses in Tarot: Athenahttps://www.hellenion.org/athena/prayer-to-athena/https://www.tumblr.com/tarotbee

I use resources, I do not own the info, and most deep dives have UPG (that I use in my work.) And I only take some information from sources. I am 14, this is my hobby, I am learning but I spent many hours and days on this, and I am always open to criticism. I have been doing worship for 5 years. Please know you can use the info, I do not sue, but I will take action if this work is used without permission and not put as a resource if used in any work. without permisson and not put as a resource if used in any work, for the public.
#the gods#hellenic devotion#hellenic polytheism#hellenic worship#doing the research for you#greek gods#greek mythology#ancient greek#greek pantheon#athena#athens#greek goddess#greek tumblr#greek myth#greek posts#greek quotes#roman mythology#ancient greece#roman goddess#ancient rome
57 notes
·
View notes