#maybe the salt content of the soy sauce is too high so it can only have limited direct contact?
Explore tagged Tumblr posts
Text

can any mycologists help explain what's going on in this soy sauce bottle? i've done some lab work with fungi but i've never seen a mould tree before.
#mycology#microbiology#like usually they grow out as a disc or as balls#but just the physics here is confusing#maybe the salt content of the soy sauce is too high so it can only have limited direct contact?#or because air access to the bottle is limited#it's trying to get closer to the top
3K notes
·
View notes
Text
How Does It Feel to Journey With Golden Teachers Mushrooms?
#mycology#microbiology#like usually they grow out as a disc or as balls#but just the physics here is confusing#maybe the salt content of the soy sauce is too high so it can only have limited direct contact?#or because air access to the bottle is limited#it's trying to get closer to the top
1 note
·
View note
Text
Don’t Underestimate Salad for a Quick, Amazing Meal
It’s summer time, reaching ninety degrees out, and no wants to cook. But some people will have chips for dinner because they are afraid of salad. Maybe they’re afraid they’ll go hungry. Maybe they’re still suspicious of vegetables. Maybe they’re afraid someone will think they’re, gasp, vegan. The horror!
Seriously, did we mention it’s hot out? We’re hot, we’re hungry, and we don’t want to spend afternoon at the lunch table when the beach is calling. We’re throwing together a salad because it’s good, it’s fast, it’s cold, and it’s now. Here’s a few reason why hungry people are missing out if they’re dismissing this humble but powerful meal.
An Easier Sandwich with Less Carbs
A sandwich is often held up as the epitome of a quick, handy, and complete meal. Honestly though, look at a sandwich: it’s just a salad with too much bread. Plus, you’re going to dirty a cutting board, a spreading knife, and a cutting board all before you even put your meal on the plate, probably more if you’re using proper cross-contamination prevention with meats and cheeses. Instead, just throw your ingredients in a big bowl, toss with a fork, and eat. What you say, you like bread? Us too--tear a piece up and throw it in after tossing, fork a piece before each bite. All the parts of a sandwich, with less dishes and a more reasonable serving of carbohydrates. Never forget to wash your hands properly when handling food--it’s harder to overlook when your ingredients are going straight from hand to plate.
No One Said You Can’t Have Carbs
If you’re used to a higher volume of calories, you might be concerned that a salad will soon leave you hangry again. If your experience with veggies is a side salad of iceberg lettuce, that’s understandable. But this is YOUR salad--go ahead and put something filling on it. One upside is you’re not limited to bread, the whole world of crunchy snacks is available. If you were going to eat them instead of a proper meal, you can instantly improve your meal by using them as a salad component. Many common corn or wheat based snacks are much healthier than you might expect, the main concern being less-friendly oils and a possible excess of salt--but check those ingredients, there is a world of difference between Fritos and Doritos, and some snacks are a garbage heap of fillers, sugar, and preservatives.
No One Said You Can’t Have Meat
Meat goes great on salad. Even better, a healthy portion of meat goes great on a salad--meat proportions in America are usually excessive for health or comfort. Keeping the meat modest helps keep you on your feet and on to your favorite activities, instead of sleeping your meal off on the couch.
Your favorite cold cuts will help you keep it easier-than-a-sandwich, or if you are a grill master, you’re in a great position to prepare and slice your favorite cut of beef or pork to properly refrigerate and add to salads over two to three days. The addition of chicken to a caesar is an obvious option, but don’t limit yourself. If you were planning to eat some wings, throw them on some lettuce. Seasoned wings will have all the flavor a few leaves in each bite need and picking up a wing in a bit of lettuce helps keep the seasoning in the bite and off your fingers.
I recall a sandwich customer offended that I would offer him “rabbit food” to go with his beef sandwich; it’s hard to understand how some imagine themselves to be “carnivores” as a diet, including myself as a young man in that category. You don’t want to know how real carnivores such as wolves or tigers get their balanced diet, but suffice to say, meat on the bone is not what they eat first. Trust me, you want your roughage in the form of fresh greens, not the way carnivores get it.
Salads Can Be Crunchy
We’re not just talking about lettuce here either, though greens do provide a nicely crisp bite. Those salty snacks we mentioned earlier bring crunch too. But that’s not all, there are a lot os suitable ingredient when you’re looking to add new textures to your salad. Some people like various cold beans. Corn kernels serve this role too, even outside of a traditional corn salad, though canned corn is not so appealing as freshly cooked. Just adding a cob is also nice, particularly with a unified butter-based dressing
If You’re Bold Enough for Hot Peppers, You'll Love Spicy Greens
If you’ve expressed a love for hot sauce, you should be eating watercress--it’s about the most nutritious thing you can eat, and it’s nicely spicy. This ingredient has somewhat disappeared into the tradition of the cress tea sandwich--don’t be fooled, this is a powerful staple food if you enjoy piquant foods Some paler varieties are less intense; the spiciest stuff announces this right up front if you give it a smell. Arugula-Rocket and mustard greens are also known
Dressings Are Indulgent Wonderland
It’s true some greens can have a bitter initial bite--luckily for us, we can sooth those flavors with dressing. If you’ve ever looked over a shelf of marinates in wonder, you’ve got a whole new world ahead of you. There’s probably a favorite you’ve discovered already, even if you were just trying to get through a salad that was forced on you. But don’t stop there! Where meat condiments tend to lean very heavily on tomato and soy, salad dressing is ahead of curve when it comes to foodie-innovation. Fruits are not as nutritious so much as they are relatively benign; a dressing can bring a little bit of fruit to the meal without replacing a lot of the nutritious content. Increasing variety has blown up the grip oil-vinegar-cream traditionally has had on selection with tahini, poppy seed, flavorful boutique vinegars, or other obvious ingredients back to the bottle. Just look at the ingredients. Sugar is becoming ever more ubiquitous and it can mute strong flavors, for better or worse. The key to a salad is balance--modest indulgence goes a long way to enhance a healthy meal.
Superfoods are Salad Foods
The Center for Disease Control has done an analysis of actual nutritional content per weight to focus attention on “powerhouse” foods, which it scores and publishes as a ranked list. High nutrition content is a crucial thing to consider, as contemporary agriculture has generally reduced nutrient density, making many traditionally nutritious foods less so.
Watercress sets the upper limit at 100 and every food scoring above 60 is a leafy green vegetable. Grapefruit defines the bottom of the CDC’s list with a score of 10. Kale and broccoli might surprise you by falling below 50, but all of the foods included are extremely healthy. Salad staples like spinach, romaine, scallion, cauliflower, carrot, tomato, lemon, strawberry, radish, orange, lime, turnip, and blackberry are all included. With the modest addition of carbohydrates and proteins it is extremely easy to make an extremely healthy salad.
Have the list handy in case your grandmother tells you these ingredients are all just empty calories and water. There are some very outdated notions of what is nutritious floating around.
Leaf Lettuce is Surprisingly Nutritious
One strike against salads is that healthy greens are associated with bitter flavor. Surprise, you throw basic lettuce in to dose your food with nutrients. Red leaf lettuce will be healthier, being more mature, but won’t last as long as green leaf. Romaine and even iceberg lettuce both also make the CDC’s list. So there is no problem finding nutritious greens even if you are looking to keep the flavor mild.
Some Tips for Greater Salad Success
Lettuces don’t keep particularly well--buy lettuce with the intent to eat it within the next three days, tops. If it’s much of a commute to the store you’ll probably want grocery day to start the salad part of your week, then switch to more durable foods in the days leading up to the next shopping. If you do enjoy bitter greens, these tend to keep a little longer. Red leaf lettuce is just riper leaf lettuce, so if you get a mix, eat the red leaf first.
Micro-greens are extremely easy to grow. If you have a window with at least 6 hours of sun it’s easy to place a window planter (inside or outside) and seed it to produce your favorite fresh greens in less than a month. Look online and you’ll find a wide variety of approaches to this, complete with tutorials.
Herbs are greens. Fresh basil, parsley, dill, oregano, cilantro--whatever your tastebuds prefer. Be prepared for more flavor than you’re use to compared to dried spices, especially if your herbs are garden fresh. Note however of the herbs I mentioned, only parsley makes the CDC’s list, but generally the flavor of herbs is so strong you’ll won’t need to replace much volume to get the effect.
With this in mind, there’s never a reason to miss out on a real meal, even when the heat makings cooking a non-option. Next time you reach for the crackers, swivel to the crisper and turn that snack into a nutritious meal.
1 note
·
View note
Text
C’s infinitely modifiable recipe for vaguely niceish dinner-including-vegetables 20 minutes after walking in the front door
Like many of us, my executive function is dead by the end of the day, especially if I’m tired, especially if I’m hungry, and figuring out How To Food when I need it most is hard as fuck, especially if my kitchen’s kind of messy and I stall out on needing supplies or space.
Also like many of us, I have a really hard time figuring out How To Vegetable, because I’m very afraid of buying fresh things that might go bad before I have the spoons to use them. And IDK about you, but I get really tired of eating the same thing all the time, so the only way to actually make myself get excited about cooking and eating is to have the option for variety.
Luckily for me, I’ve nailed ‘many, many pasta dishes I would not be ashamed to serve my mother’ down to a familiar, easy formula that I can follow with whatever I have on hand in the freezer and cabinets. Even better, knowing this formula helps me go grocery shopping, because I can buy specific canned, frozen, jarred, and refrigerate-able things knowing several different ways I can use them.
Maybe it will help you too! Maybe not! But it has made my life SO MUCH BETTER, so, as a gift from me to you, A Recipe (of sorts).
To start: Drop your shit by the door. Get out one frying pan, one pasta pot, and a wooden spoon or plastic spatula or whatever you have to cook with. It does not matter that the counter is a mess; all you need are two clear stove burners. There are almost no prep steps to fuck with your executive function and block you from starting this process as soon as you get home.
Step 1: Veggies Get some olive oil heating up in your pan on medium/low. While it’s warming up, go to your freezer and grab any frozen veggie you own: broccoli, peas, sliced bell peppers, zucchini, spinach, mixed medley, whatever. When the oil’s hot enough that a couple of drops of water sprinkled into it sizzle a bit but don’t spit, pour the veggies straight into the pan. (About 1/4 to 1/2 of a bag is usually plenty for me to make dinner + tomorrow’s lunch). If the oil is Way Too Hot, turn the burner down, wait briefly, and toss the veggies in anyway. They’re frozen, they’ll survive.
Step 2: Carbs If you’re doing regular pasta (or those great frozen raviolis they sell at the grocery store, for extra flavor/protein), stick a pot of heavily salted water on the hottest burner cranked up to high, slap a lid on it, and wait for it to boil. If you’re doing couscous or some other fun grain that cooks in 10 minutes or less, get that going however you usually make it. If you’ve got a bunch of leftover rice in the fridge from the other day’s takeout, wait until the veggies are mostly thawed and then toss it right into the frying pan. Break it up with the wooden spoon and add a little extra oil to make sure none of it’s too dry. (Sadly, this recipe is not��scaled for potatoes.)
(Optional: Seasoning #1 If you happen to have minced garlic in your fridge, throw that shit in the frying pan when the veggies are mostly thawed. If all you’ve got is dried, that’s cool, wait for later. Make sure you add the liquid soon after, b/c garlic burns fast. This is also a good time to add ginger, if you have it on hand and the ingredients you’re planning to use work with it.)
Step 3: Liquid Grab a can of [black beans/tomatoes/coconut milk/crushed pineapple/literally whatever, use the condensed soup if you want, this recipe is ANYTHING GOES] from the cabinet, drain about half the liquid out of the can and throw the rest straight into the pan. OR snag a jar of [pre-made pesto/harissa/salsa/whatevs] from the fridge, and spoon in a big glop. (Use judgment here. Save half a can of things like coconut milk instead of draining it down the sink. If it all looks super dry you can add some a splash of broth, or juice, or milk, or wine, or whatever, but you shouldn’t need much--you’ll have pasta water for that in a minute, and your frozen veg probably produced a ton of liquid to begin with.)
Step 4: Cooking Get that pasta in the water as soon as it’s boiling. If you’re doing grains, check on them and do whatever you’re supposed to do to make the grains cook right. Turn up the heat on the stuff in the pan so it bubbles a little around the edges. The wetter all the stuff in your pan is, the hotter you want the burner. You’ve got a fair bit of leeway here; so long as you’ve still got liquid in there, and you vaguely keep an eye to make sure it doesn’t burn, this can keep going without damaging anything until your carbs are done. (Sugary liquids like orange juice or the syrup from canned fruit are more likely to burn, so keep a closer eye on those and cook them a little cooler.) This is a good point to wash out a bowl to eat out of if you don’t have a clean one. Shove just enough dirty dishes aside to make sure you’ve got enough space in the sink to drain the pasta.
(Optional: Meat/meat substitute We’re cooking fast tonight, so we’re going for precooked meat options. I’ve used canned tuna, frozen Ikea meatballs, leftover grocery store rotisserie chicken, frozen shrimp, fancypants gourmet chicken sausages (which freeze very well), jarred pulled pork I made in my crock pot three weekends earlier... Like everything else in this recipe, you can go as low-budget or as pretentiously gourmet as you like. Microwave frozen things on 50% for a minute or two in the bowl you’re planning to eat your dinner in, then throw them right into the frying pan.)
Step 5: Season (for real this time) Taste the stuff in your frying pan and decide what it needs. You can throw in dried spices or fresh or dried herbs, or splash in soy sauce or vinegar or sriracha, or anything else you use to season food. Season heavily, because your carbs are going to stretch all the flavors out, except for salt--you can add that once everything’s in the same pan.
Step 6: Combine When your starch is mostly-almost-done, drain most but not all of the liquid, and dump the pasta or quinoa or rice or whatever-you’ve-got right into the skillet. (Leaving in a little bit of pasta liquid will help thicken everything and stick it together.) Mix it all up with your trusty wooden spoon or plastic spatula or whatever you’re using and let it all hang out for a minute while you get your bowl. Here’s where you taste and add more salt if it really needs.
(Optional: Cheese If it’s been that kind of day and the stuff in your pan + the contents of your fridge offer up a tasty combination, turn the heat off and just dump a shitton of shredded cheese right into the pan. Mix everything fast so it all melts together from the heat of the pasta and it all gets melty and a little stringy and delicious.)
And that’s it! One Frozen Veggie + One Carby Base + One Wet Canned/Jarred Thing + a few minutes of cooking + some spices + optional meats and/or cheeses = dinner, fifteen to twenty minutes after walking in the front door, plus probably lunch for tomorrow along with it.
This is also very often my base recipe even when I’m working with fresh veggies or raw meat. Chopping fresh veggies adds an extra 5-10 minutes at the front end, depending on how many different kinds of vegetables I’m using. (Make sure any raw veggies go into the pan before any frozens, because they’ll take longer to cook.) If I’m working with raw meat or fish, or I’ve marinated tofu and I want it to get brown and tasty, I’ll generally season my protein and sautee it in the pan before I do anything else, then set it to the side in the bowl I plan to eat dinner in and cook everything else just the same as normal.
Obviously this takes a little bit of flavor-matching when it gets to the seasoning stage, but the whole ‘match a frozen thing to a canned/wet thing’ part is surprisingly forgiving, particularly if you stick to individual veggies instead of trying to play with one of those mixed vegetable medleys.
I generally season a few different ways based on my ‘wet’ ingredient:
Canned tomatoes --> tons of garlic, any vaguely Italian herbs like basil/oregano/fennel, mozzarella or Parmesan cheese
Black or red beans --> lots of chili powder, some garlic, sometimes other spices with a bite like paprika or ginger to round out the flavor for fun, usually cheddar or “southwestern cheese blend”
Canned fruit, orange juice or canned baby corn --> heavy ginger, some garlic, soy sauce, sometimes Chinese Five Spice if I have it around, no cheese
Coconut milk --> just ginger and garlic, OR something vaguely garam masala-like (cinnamon, cumin, cardamom, coriander, cloves, chili, plus also non-c spices like nutmeg and whatever else seems like it might be an okay idea), no cheese
Just broth --> any of the above, OR mustard and paprika, usually with cheddar (particularly if I can add frozen or fresh diced apples to a frozen veg like broccoli)
Pesto, harissa, salsa, and other jarred ingredients usually have tons of seasoning in them already, so I season lightly to enhance whatever they’ve already got going on
(Worth noting that I grew up on Italian cooking, so I think garlic belongs in everything and I’m very much not an expert on many flavor profiles--these are things that taste good to me, and a place that might work for you to start from if you don’t have a lot of ideas what you might like.)
Good luck! Happy cooking!
#food#recipes#I have no idea if this formula will be helpful to ANYBODY ANYWHERE#but it's helped me figure out how to eat vegetables and also meals that aren't completely out of a boxx#less sodium than kraft mac and cheese at least#so what the hell#maybe somebody else's life will be made slightly easier#by a general outline that can be adapted with lots of variations#and doesn't require an oven
334 notes
·
View notes
Note
What was the bomb Ramen recipe?
Aight BOOM I finally got a chance to answer your question so here it is! Thank you for being so patient anon:
To start, I use this video as a reference regarding cooking methods and ingredients/measurements
youtube
Here’s the printed instructions for the above video
I don’t follow it fully because I don’t have all the stuff/don’t feel like doin allat, but here’s what I do use:
*1 Tbsp. sesame seeds
*2 cloves garlic (minced or grated)
*½" ginger (grated)
*Scallion (white part, diced)
*2 tsp. sesame oil
*2 tsp. chili bean paste
*2 tsp. soy sauce
*1 cup rice milk [substituted for soy]
*½ tsp Kosher salt
*Dash of white pepper
I also use the following as a personal preference:
Star Anise seeds (about 3 per serving)
Brewed Noodle Dipping Broth (optional)
Fresh Corn cut off the cob (about 1 cup per serving)
Fresh Spinach (1-2 cups per serving)
Mushrooms (sliced; about ½ cup per serving)
Red Onion (some diced, some sliced [for texture difference])
Eggs (1 per serving)
[For the pictures below, since I’m familiar with this recipe the ingredients shown aren’t exact measurements, so don’t get worried if yours don’t match up. I didn’t use all the ingredients below, but also I was cooking for 3 people {for example I only used about half the ginger on the cutting board, but all the spinach, etc etc.}
If its your first time cooking ramen/this recipe, I’d suggest going with the listed measurements for all the *starred* items until you get more comfortable with your personal taste/preference.]
Heres a few pictures of the ingredients I used, just in case you’re a visual person like myself or you also need an idea for what some of the items look like:
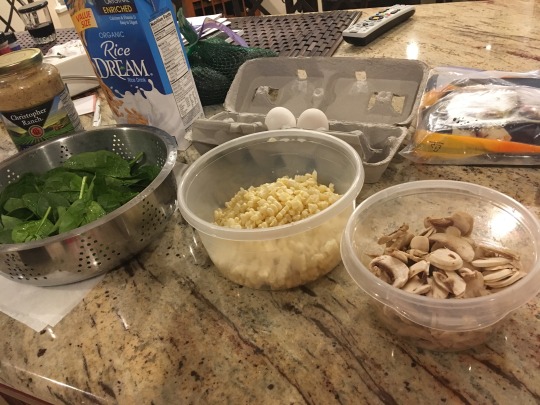
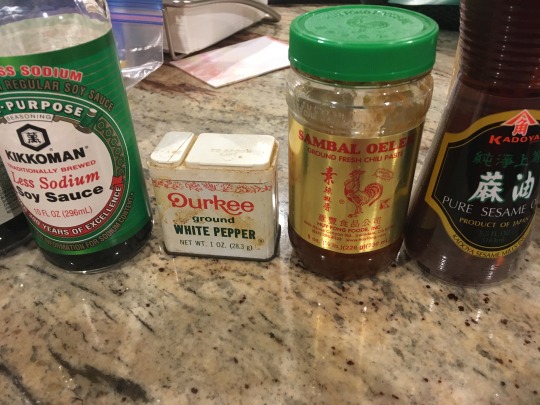
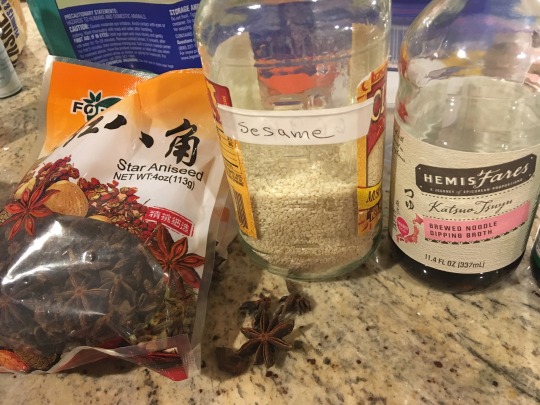
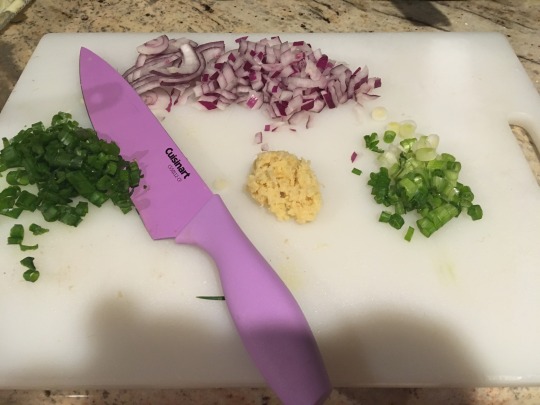
(That hunk of yellow in the middle is grated ginger)
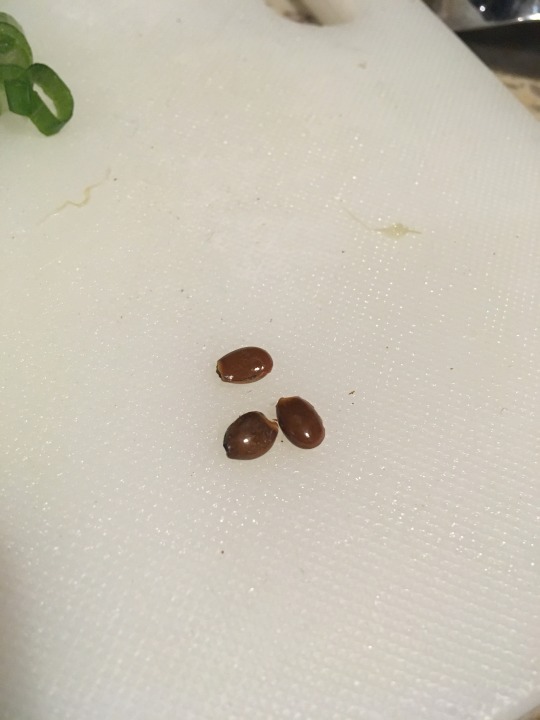
(These are Star Anise seeds)
ALRIGHT! So you’ve got all your ingredients laid out and ready to go.
Starting with your sesame seeds, pour those into a small saucepan and toast them until they’re a nice golden brown. Make sure you start off with low heat because this can get away from you real fast, so stir them regularly every few seconds to keep them from burning.
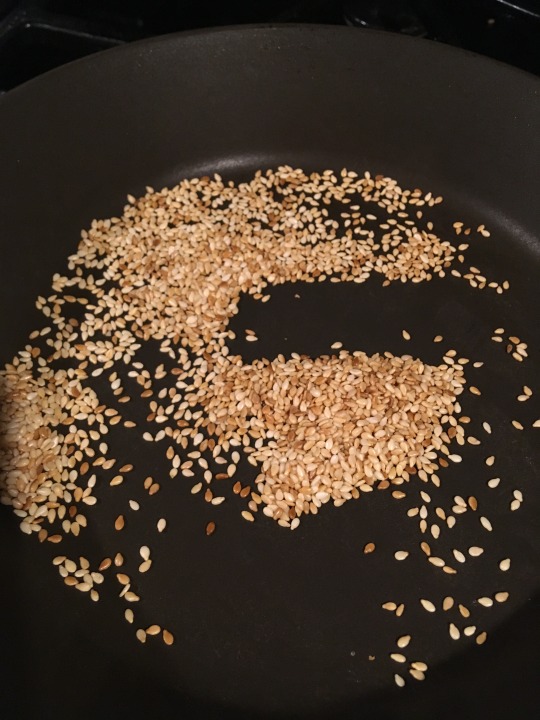
As you can see above these kinda got away from me [😅] but I was comfortable with the toasted : semi- toasted ratio so I stopped several seconds after this point. Toasting the seeds helps to bring out the oils and flavor, and you can also throw the anise seeds in there at the end for a few seconds to get those a little toasted too if you like.
Now you’re gonna grind up the seeds. Don’t have a mortar and pestle? Cool! Me either! What you might have tho is an ice cream scoop and a mug, so throw that shit in there and get to grinding! (You can also use a ziploc bag and a rolling pin, but remember to let the seeds cool before you dump them in the bag or it’ll melt [yup. been there done that 😅] ).
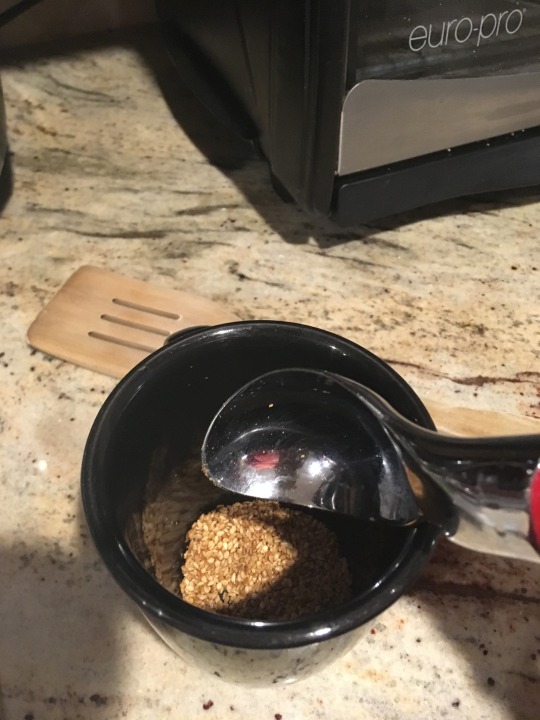
(Unground sesame seeds)
Once you’ve got those ground up to your desired texture (mostly powdery is good, don’t feel it needs to be perfect you just wanna smash open a good amount of the seeds) start heating up your medium sized pot on low.
This would be the 1:18 mark in the video above, and you’re gonna follow the instructions as so up until 2:18.
Start with your sesame seed oil and let that heat up (only takes a few seconds). Then, dump in your garlic, ginger, and white parts of the scallions ( I call them green onions but whatever lmao) and let that cook for a lil until that shit starts smellin good (or until the white parts of the onion get a little translucent). You can play with your fire a little bit but sesame oil burns fast so try to keep it on the low side to keep your food and pot from burning.
Now, if you’re like me and adding red onion and mushroom too, you can add that in now to get those cookin. The mushrooms might soak up a bit of your oil so feel free to add a little more sesame oil and cook until your veggies are evenly coated. Don’t worry about the mushrooms not being thoroughly cooked yet cuz they’ll soak up the flavors of the broth and get cooked with the next few steps. Don’t forget to add in your sesame and anise seed powder now.
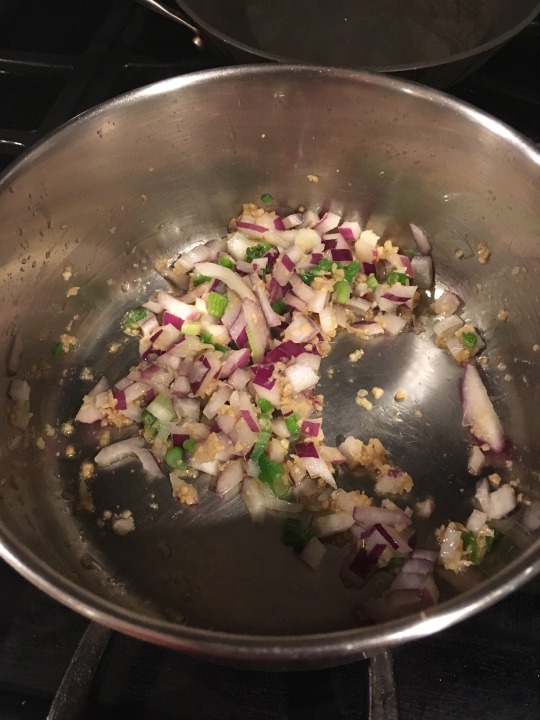
(Forgot to add the mushrooms here lol)
Feel free to turn your heat up to low medium at this point to get your pot headed in a nice simmering direction. Now, you’re gonna add your chili paste, soy sauce, and dipping broth (a quick splash is good enough) and stir that in nicely as well. I suggest tasting all these ingredients before adding them so you have an idea of the spice and sodium content you’re working with, as well as the flavors. I like my food spicy and not too salty, so I use extra chili paste and low sodium soy sauce.
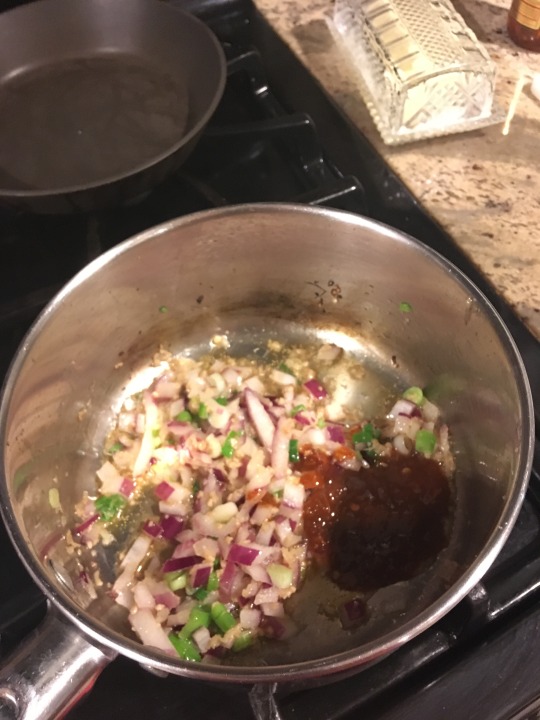
(Does not include soy sauce or dipping broth yet. Still no mushrooms XD)
The dipping broth I use has a little bit of a sweet flavor in it, so I keep that in mind to prevent from adding too much (if you’re using fresh corn the sweetness will also be heightened, tempting you to add more salt). All of the above ingredients have a good salt content tho, so be mindful of that if you need to watch your salt intake. Also! Taste as you go. That way if you need to add a little of anything you can add it in before you get to the finish line.
[You also may want to take a moment to start another pot of boiling water for your ramen noodles at this point.]
You can turn up your heat now to medium, because we’re about to add in the milk. The recipe above calls for soy milk, personally I use rice milk, but if you wanna use another non dairy milk, thats also great! (I’ve only used soy and rice milk tho so I can’t dictate what the taste may be like with another type of milk)
If you’re not fucking with non dairy milk (understandable lmao) see the substitutions I provided down below.
Add in your milk, stirring to blend all the flavors. You can pour half, stir a little, and pour the other half, or pour it all at once and stir, or pour little by little while stirring. The point is, it doesn’t matter how you do it, long as your pour the shit in there and stir it together 😂. Once you get that all mixed in nicely, you can turn your pot up to full medium or even a low high, to get it bubbling.
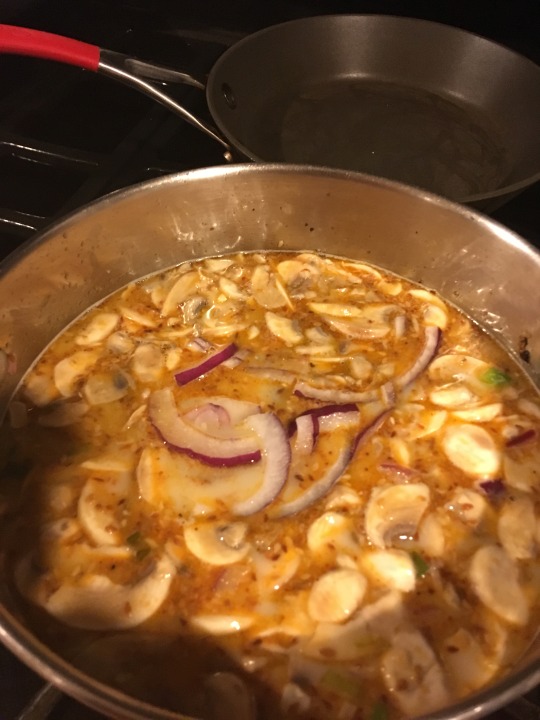
(A non bubbling but very delicious pot of broth)
The raw looking onion up there is just the leftover onion slices I added in for texture. At this point, I like to add a little salt and white pepper into my broth and give it a little taste test to see where its at. Sometimes I use a pinch of sea salt, sometimes just regular salt, it depends on what I feel like reaching for. They’re both the same to me, but again if you need to be mindful of your salt intake for personal or health reasons, you can go ahead n skip this step. I also add a few handfuls of fresh spinach to get that cooking down. ***Also don’t forget to add your corn in too!***
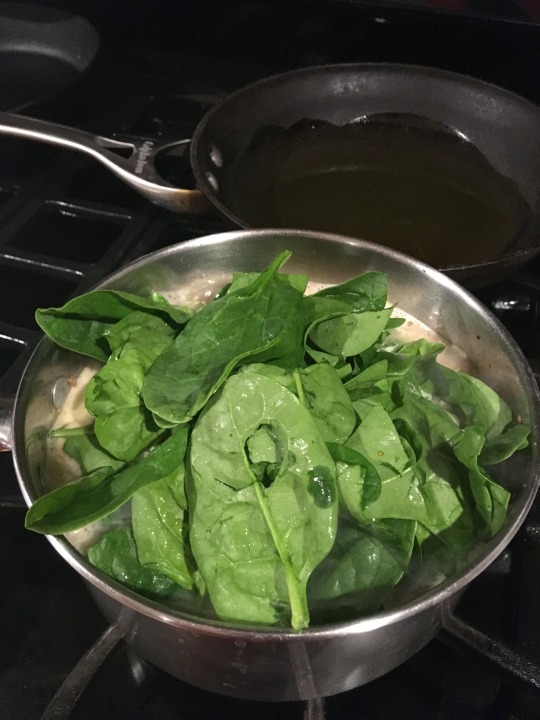
Check on your pot of boiling water, and if its ready, go ahead and add your noodles in. Feel free to use whatever ramen noodles you want, be it Top Ramen, Neoguri, Maruchan, its all up to you. I used Shin Ramyun noodles, in case you’re curious. Cook the noodles as directed.
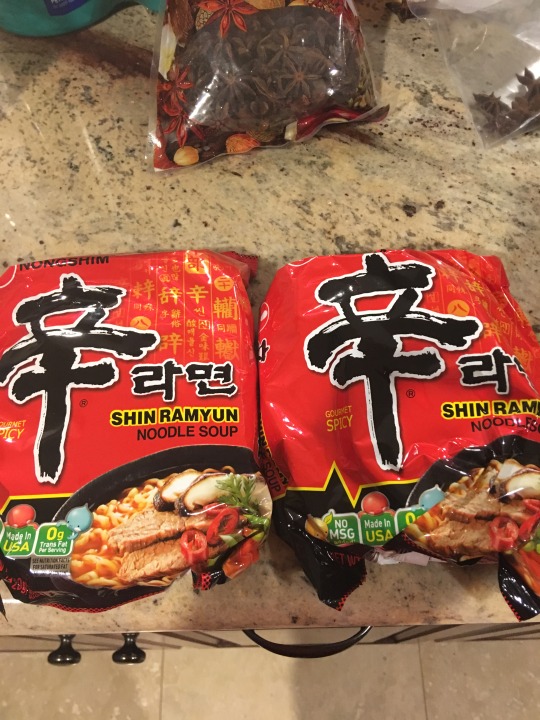
I don’t really use the flavor packets, because 1) ummm we just made some bomb ass homemade ramen broth SON!!! get that shit outta here 😤😤 but also 2) the salt content is out of this world, and as you keep hearing me say, you wanna keep an eye on that.
BUTTTT if you’re tasting your broth and you feel like maybe it could use a lil sum sum, sometimes I’ll add in a couple sprinkles of the flavor packet to give it a little extra spice and umph (the noodle packs up there are Gourmet Spicy), but I really don’t add much, maybe two amounts of whats shown in the spoon depending how many people I’m cooking for. (Maybe a little more if my grannys not looking lol)
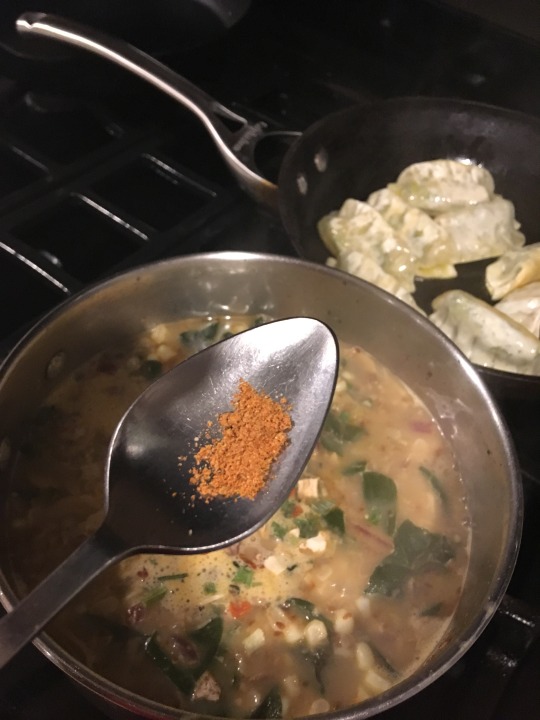
I do however use the vegetable packet, so dump that in the broth too.
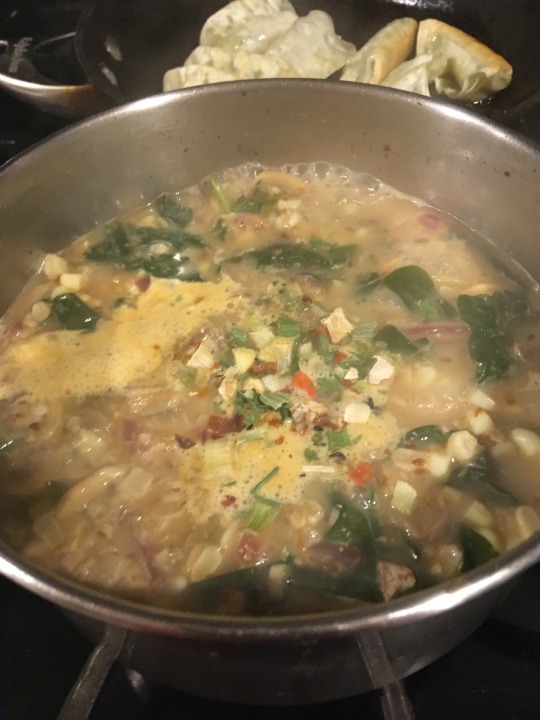
I’ll also crack an egg or two into the pot and let that get cooking. I don’t like the boiled runny yolk versions you’ll normally find in ramen, but I like eggs, so I like this much better. Its basically scrambled egg, just wet lol.
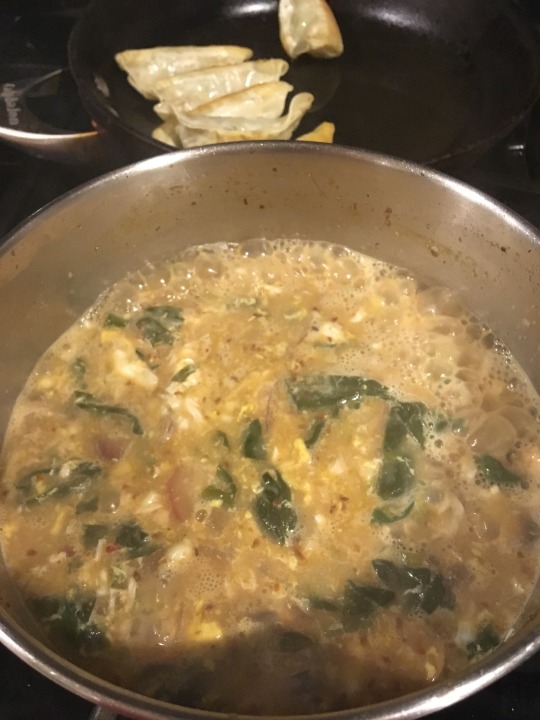
(The egg is the little flecks of yellow and white in the pot)
Try to prevent immediately stirring the egg once you crack it in the pot, otherwise you’ll get little baby disintegrated bits, which is okay, but if you want to taste good amounts of egg with the rest of your ingredients, try the following:
Let it sit for maybe half a minute after cracking (start by doing one egg at a time) then taking some wooden chopsticks, or a fork, and just mix back and forth through your broth. If you’re doing this while the pot is still boiling or on medium heat, it won’t take long for your egg to cook, so don’t get worried about the possibility of uncooked egg in the pot. Give it about 2 minutes, maybe a little more for comfort, and you’re good to go! Put your pot on low and let it simmer.
Go ahead and check on your noodles now, they should be done now or close to it. Once they are, drain the water out of the pot and set aside. Sometimes I forget this part, but you want to drain the water to keep the noodles from getting to the translucent/overcooked stage, unless thats your personal preference.
Now if you’re anything like me, you’re probably up there lookin at the last three photos like “woooow Homie, you out here providing ramen recipes but you aint providing the recipe for them potstickers you got goin in the back,”

First of all, mind ya bidness

Nosy ass….
Second of all, these from Trader Joes bruh!
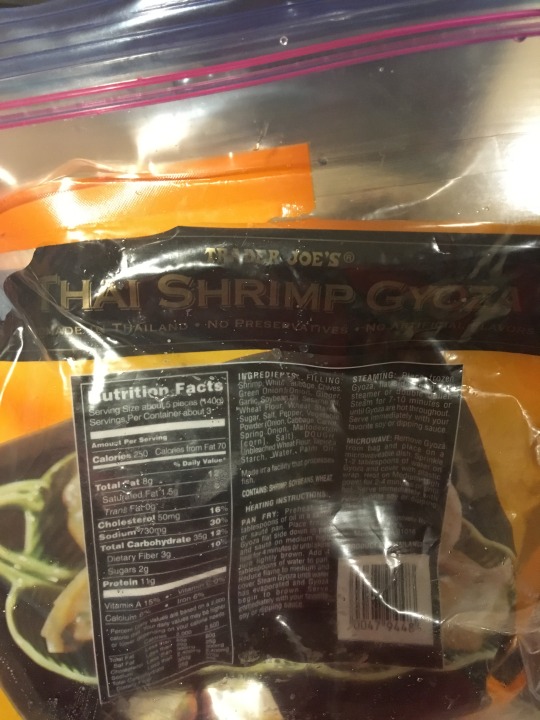
They’re the Thai Shrimp Gyoza ones and they’re in the frozen section. As you can see, I panfried them, using olive oil and sesame oil (like 1 tablespoon each) and these shits are bomb af. See? Don’t I be comin thru for yall?

But anyway, back to the ramen recipe.
NIGGA you done!! All you gotta do is plate your noodles in a bowl, ladle your broth in there, sprinkle your green onions on top, maybe add little sriracha and BOOM
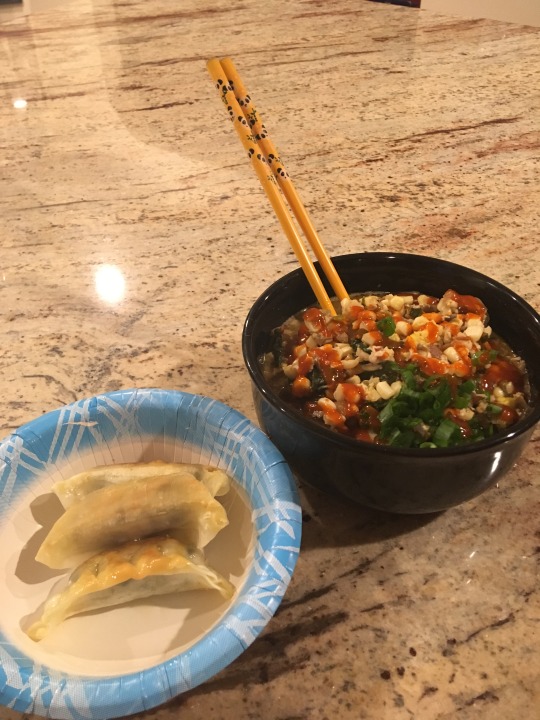
Congratulations! You just made some bomb ass ramen homie!!!! (peep the panda chopsticks :D)
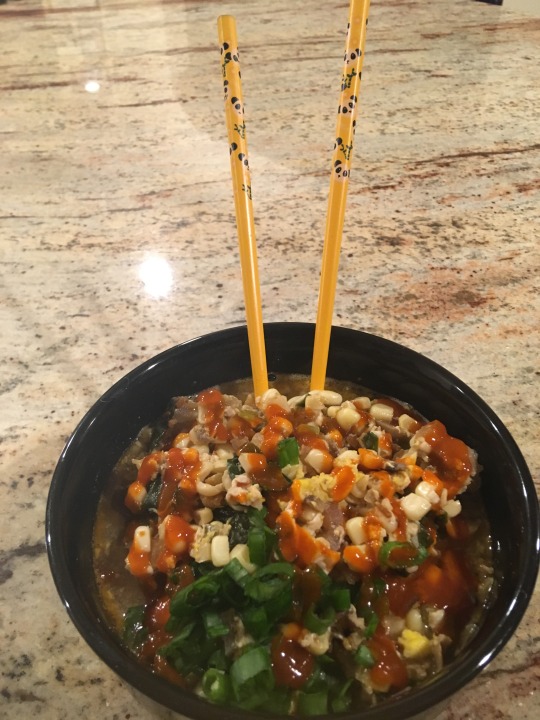
Now go put on your favorite show, kick back, and get to grubbin!
Warning: You will absolutely knock tf out after devouring this shit, so clear a space and prepare for that lmao. Trust me, I do it every time 😂😂

////Substitutions////
For the Garlic, Ginger, and Onion, feel free to use the powder versions instead if you don’t have fresh on hand.
There is also sesame seed powder and, apparently, anise seed powder (don’t ask me where to find those two because ionknow)
Kosher Salt- as far as i’m concerned salt is salt, like I said I use regular or sea salt if you don’t have kosher
Rice or Soy Milk- If you wanna use dairy milk, I’d say start with half a cup of dairy and then half a cup of vegetable or chicken broth (low sodium versions are a thing). This will help make it creamy without compromising too much of the flavor you’ve built up. Again, taste as you go to tweak as needed.
Soy Sauce can of course be substituted for the low sodium kind.
Fresh Ingredients: For Corn, Spinach, Mushrooms and even Onions, Frozen or Canned works just as well and its a significantly cheaper option (idk bout canned onions tho). If you’re going the canned route, make sure to just rinse it out first before adding to get rid of any extra salt content and preservatives that might be floating around in there.
***Black pepper can be subbed for white, theres no difference
I know the struggles college students, those on budgets, and peeps who live in food deserts may have when it comes to getting some of these ingredients, so don’t feel you gotta have it all to make it taste good. Just work with what you got, get a little crafty and experiment a little, and maybe try some new things and see how you like it! (Like, seriously, rice milk is great I love it 😂 )
Lastly, this recipe is vegetarian and vegan friendly! (Sans egg for the vegans of course) so its super enjoyable for yall as well!
I’m not vegan nor vegetarian, and I have added meat sometimes in the past, but I like this version the best because it just taste the best to me.
If you try the recipe, feel free to shoot me an ask and tell me how it went! Now go get cookin! :D

#nons#recipes#cooking#uhhh i'll link this in part two of Movie Night (and one) so that yall can find it#i'll also tag the folks who wanted to recipe but rn its 2:30 in the morning and im tired#so ill hit yall back tomorrow lmao#enjoy homies!#i wanted to add some color but tumblr mobiles being a bitch
233 notes
·
View notes
Text
Cravings: Hungry for More by: Chrissy Teigen
5 stars out of 5

After the extraordinary success of Cravings, Chrissy Teigen comes back with more of her signature wit and take-no-prisoners flavor bombs. Cravings: Hungry for More takes us further into Chrissy’s kitchen…and life. It’s a life of pancakes that remind you of blueberry pie, eating onion dip with your glam squad, banana bread that breaks the internet, and a little something called Pad Thai Carbonara. After two years of parenthood, falling in love with different flavors, and relearning the healing power of comfort food, this book is like Chrissy’s new edible diary: recipes for quick-as-a-snap meals; recipes for lighter, brighter, healthier-ish living; and recipes that, well, are gonna put you to bed, holding your belly. And it will have you hungry for more.
Release Date: September 18, 2018
Before I get started..I'd like to just inform you that this cookbook is outstanding. My expectations have been reached and then some. And I had very high expectations, btw. Chrissy Teigen remains the cooking goddess she is and this cookbook will become a kitchen staple for me, just like her first cookbook. I know I'll be using the recipes over and over. I cannot wait to keep the cooking going. So far..and this is since the release (which was last Tuesday)..I have made four recipes from this book. And all four were delicious. My sister made two others and they were also delicious. I'd say we're on a roll. And now what follows can probably be described as a rant of my love for Chrissy Teigen's cookbooks. I'll let you know which recipes I've made and how this book compares to the last one. Let's go!
Okay, so I've already written a raving review of her first cookbook, Cravings. It became my all-time favorite cookbook. I've never made so many recipes out of a single cookbook. I'm telling you..her tastebuds are in sync with mine or something. Or maybe I should stop thinking the world revolves around me and realize the book is called Cravings, so no shit is it going to be delicious to most people. I suppose I'll update that review eventually with the recipes I've made, but it'll get ridiculous because I've really worked my way through it.
I spent the entire time since the release of the first waiting for the release of her second. I'm one of those people who followed her blog before the cookbooks happened. After the blog stopped, I remember loving watching the process of Chrissy making her first cookbook. This time around..she didn't seem to document it nearly as much, which I found disappointing. I still need something to fulfill the void of waiting for Chrissy's blog posts because it took over 2 and a half years for this second cookbook to come out.
Now...it is a great cookbook. This time around..it is once again cravings, although because she is now a mom there are a few differences. She opted for "lighter food" this time around, which let's be real..there is still tons of cheese and bacon and all types of good stuff throughout. But compared to the first book, there are less of those foods that seem like straight indulgences. Still...very similar in ways too. Meaning..if you enjoyed the first book, you will definitely once again enjoy this one.
The other difference here is, once again because she is a mom, time has become an even more precious thing. So there are things that she takes shortcuts on, while also admitting it along the way. For her jerk lamb chops, she says to buy jerk seasoning ready from the store but notes that if this were her first cookbook, she would have given the recipe to make it yourself from scratch. This is true because there's a recipe in her first book involving cajun seasoning and sure enough, she gives you the recipe to make that from scratch. I'm torn on how to feel about this because yes, I am a major lover of saving time. I love getting the option of how to do things a little quicker when it doesn't make a difference in the finished product. However, I do like to get told how to do something, so I can make the decision myself if it was worth it. She could have included a brief put salt, pepper, this, this, and this and you'd have the seasoning. But it's fine. Not the biggest deal. And again, it's something I'm torn on.
This book has a couple sections that weren't in the first book, such as a dessert section. Chrissy isn't much of a sweet person, so it's not cakes, cookies & brownies. This one has a banana bread, soft pretzels, two-faced cobbler, mango sorbet, homemade magic shell, mousse, and skillet peanut butter chocolate chip blondies (UH...YES PLEASE).
Also, there is an entire sandwich section, which includes a couple grilled cheeses I need..the jalapeño-parmesan crusted grilled cheese and sweet & spice peach & brie grilled cheese. Oh and the philly french dip she makes with more of a cheese sauce au jus. There is just so much. I probably shouldn't just list every recipe in the book. Although, if you get a chance..it wouldn't hurt to check out the table of contents.
Plus...this time there is a potatoes & their friends section. POTATOES!! Yeah..my stomach is pleased. It has plenty of potato dishes among other veggie dishes. I made the Tators, Shrooms, & Peas with parmesan cream from this section. And it was SO GOOD!!! My husband and I were both in heaven. It was more filling than we expected, so next time it'll be a main and we'll add diced ham to it. The parmesan cream was so good that we'll definitely use it with other dishes. I'm thinking it'll be good with pasta.
This time around I didn't find the Thai Mom section quite so intimidating. It probably helped that I got blue apron for six weeks this summer when Chrissy had a partnership. A few of the dishes were from the thai section of the first book and they were absolutely delectable. I get why I was freaked out by ingredients like fish sauce, oyster sauce, hoisin, sweet chili sauce, sambal oelek ..really just things I wasn't used to cooking with. Nor did I see how these ingredients would all mix together to become something heavenly. Garlic is also pretty common in the thai section. I love garlic, though. Anyway, this time around I found myself excited to make these authentic Thai dishes. Last night, we had the Thai soy-garlic fried ribs and OH BABY. Yes, they were ridiculously easy, but oh so tasty. I never knew ribs could be cooked so quickly and there was this nice crisp to them that ribs don't usually have, but I lived for it. Definitely making these again. I cannot believe Chrissy considered not including this one in the book because of how easy it is. It's a keeper. And not something you'd think to do yourself.
I also went into the breakfast section and made the Everything Bagel Breakfast Bake. So good!! It was kind of like a breakfast casserole, but there were chunks of bagel in it that didn't taste fully like bagel by the time they cooked and soaked in the egg mixture. They were much softer. And there were cream cheese bombs throughout. This was a good one for sure! I made mine with mushrooms instead of tomatoes because I'm not a tomato person. And I'll do it this same way again in the future when I want a breakfast casserole with everything bagel type flavoring. Yum!
I finally understand why people call Chrissy a soup master! I have been DYING to try her pot pie soup from the first book. Honestly, I only haven't made it yet because for the longest time I could not find heavy cream in the store. Finally this summer, I FOUND IT!! It's only at one grocery store in my area. So I will make that one in the next month. For now, I needed to make something from her new book. I opted for the French Onion Soup. I'll be honest..I'd never had french onion soup before. I really love onions, though. This one was a major winner. And I feel talented for being able to say I can make it. Not too difficult. Hardest part was getting through cutting all those onions without crying my eyes out. But this beautiful soup turned out sooo tasty. It was oh so cheesy and there were croissant croutons in it that became doughy and just OOOH! You know what I mean? Yeah..this is a major winner.
I guess it's good I've only made the four recipes so far because this review would go on and on. Luckily for you, I didn't have all the time in the world so I'll be making more this weekend.
There is also a salad section, snack section, and supper section which actually has mains & sides tacked on to several of the dishes giving us more side recipes than what is included in potatoes & their friends.
I will say that her introduction to the book and the intros to all the recipes have a great layer of humor. Her stories are fun and will make you laugh out loud. She also talks about how she went through postpartum between books (and babies) and how that affected her/this book. She reminds us she is only human, and a relatable one at that.
There are photos of almost every recipe, but a couple might be missing and that bothers me. I like to see what the outcome of what I'm making should look like at the end. Not to mention, you want to see how tasty a dish looks to decide if you want to make it. I'll still make everything in this book regardless.
So there you have it...delicious recipes from Chrissy Teigen. Food that will make you look like a pro in the kitchen when you have a dinner party. Highly recommended to anyone looking for a cookbook with food they actually want to eat.
goodreads
order on book depository
#chrissy teigen#cravings#cravings hungry for more#cravings: hungry for more#cookbook#food#cookbooks#review#reviews#booklr#bookblr#book#books#book blogs#book blog#booklrs#bookblrs#teigen#john legend#bookstagram#instabook#booklovers#booklover#bookworm#bibliophile#shelfie#library#book haul#book mail#book pile
6 notes
·
View notes
Text
Breakfast with Yang
Originally posted on Otome Amino

It is very very very cold in the United States right now. We knew it would be for this weekend, and so we planned accordingly when it came to staying inside and having comfort foods available. My husband went and bought some firewood before the long week ahead of us.

Some of the stuff that I think of when it comes to comfort foods is chicken and ginger congee. For those who don’t know, congee is a very versatile Asian rice porridge where different cultures and nationalities have their own spin on it. Some cultures will add a certain protein that another may omit, or some will have sweet vs. savory. At any rate, it’s widely and often consumed due to the ability to make it varied. You simply need a rice and liquid base.
Also, last week, I was able to shop at a Vietnamese market, which are fairly far away when it comes to convenience (or lack thereof). So my kitchen is full of Asian ingredients.
And then, this week, my work schedule changed to where I no longer work Friday nights! This means more time for otome!
…And for blogging. :D
So, what does all of this have to do with otome? With all three of these factors coming together, why not make a meal fit for an otome character?

Namely, Yang from Piofiore: Fated Memories.
For those that have not played Piofiore, it is rich with descriptions of meals and food that the characters eat. One of those things is when the MC is staying with the Chinese mafia, about to partake in breakfast. Congee is a very common staple breakfast food with different ways that you can dress it so that you don’t get bored with it.
Here is your congee starter pack!
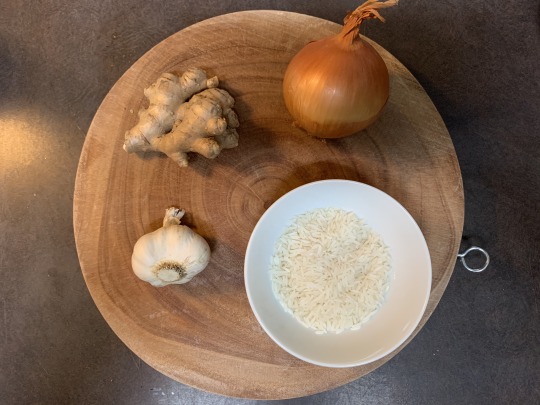
rice, ginger, onion, garlic
Obviously, we’re making a savory congee. Otherwise, if you’d like to make one that is sweet, omit the garlic and onion and maybe the ginger. Depends on the flavor profile you’re going for, but you could use it still if you’re going for something like a chai congee or even a pumpkin spice one. I haven’t tried those variations yet, but I just might have to with some coconut cream or something. BESIDES THE POINT….
For this recipe, I used a pressure cooker, but you can definitely make it on the stovetop! I’ve never made it that way before, and it takes longer, but it’s absolutely doable! Additionally, you can make congee with a rice maker alone. I won’t include those directions here because they aren’t tried and true, but they’re incredibly easy to find online.
I will also say, while you can substitute onion powder and garlic powder for the fresh onion and garlic, I do not recommend substituting ginger powder for the fresh ginger. You really cannot beat the flavor that it imparts on the whole thing. It is an absolute must when making the congee.
Here are some add-ins that I will be using for our breakfast with Yang!
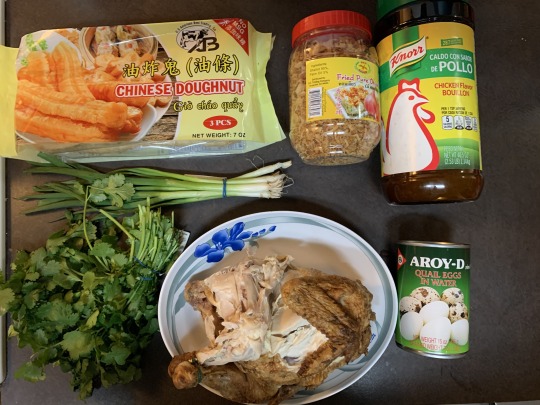
As I mentioned before, this is a highly customizable meal. While I’m typically a “fresh ingredients” person, I really do think that the chicken bouillon is necessary in this recipe. It imparts an umami flavor that you didn’t know that you needed. It’s an easy ingredient to keep on hand, much more convenient than cans or cartons of more costly chicken broth or stock. However, if you’d prefer, you can definitely swap out the water and bouillon for chicken broth or stock.
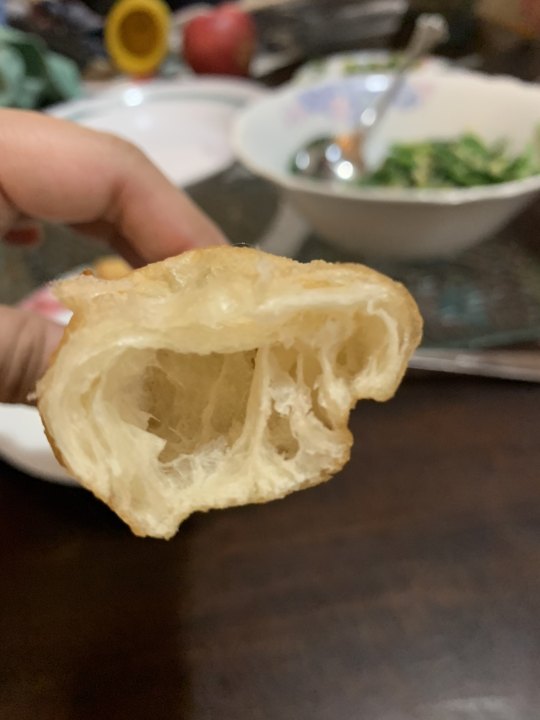
Chinese doughnuts are also popular with congee or even by themselves! They are also mentioned at some point in Piofiore by their Chinese name, youtiao. You can try making them at home yourself, as there are many recipes online, but I was able to find them in the frozen foods aisle at the Asian market. It’s not one of the more common things that you can find in the frozen foods section; this past weekend was my first time ever seeing them frozen. You can also get them at Chinese and Vietnamese bakeries. When I was growing up, we used to cut them into 1-inch pieces and added them to the congee. But we also ate them on their own as well!
Also, if you will note in the screenshot of the meal earlier, the MC mentions “Chinese parsley.” Chinese parsley is also known as coriander or cilantro, so you would use that. Don’t go trying to hunt down Chinese parsley, because cilantro and coriander are the exact same thing. “A rose by any other name…” and all that.
The fried onions/shallots can be found in any Asian market and even some specialty stores, but if you can’t find it, you could definitely fry up some shallots or garlic to add as a mix-in. If I had to have only one mix-in, the shallots would be it.
My daughter loves quail eggs, so we added it to the soup. However, you could just as easily crack an egg in and mix it in or crack it on top for an easy effect. Eggs make a great addition to congee.
I also like to use rotisserie chicken to make this an even easier and quicker meal to make than to use raw chicken. I suggest saving the jelly-like goo to add to the soup as it imparts flavor as well as a silky mouthfeel to the soup. In case you did not know, that substance is gelatin. If you wanted to, you could also include the chicken carcass to extract more gelatin and chicken flavor, but I like to save them for other recipes.
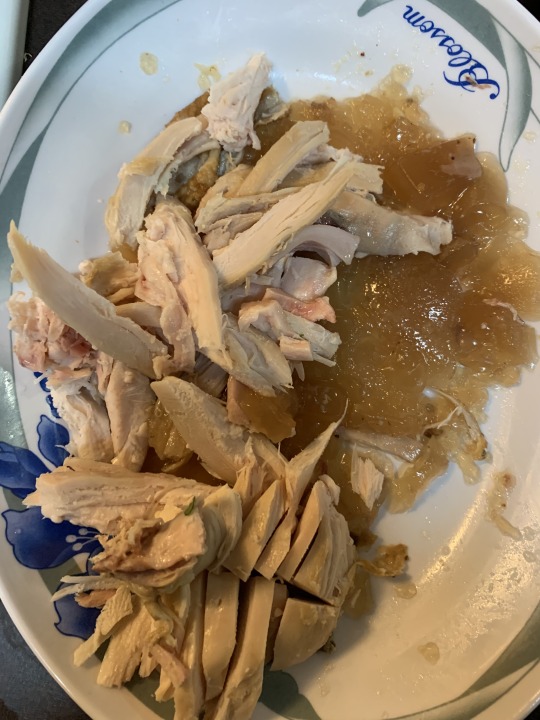
I know it looks kind of gross, but it’s essential to the recipe!
However, if you are making this vegetarian, you can omit any of the chicken, bouillon, and anything else meat-related. To give it umami flavor, you can instead use soy sauce as a seasoning when everything is cooked, and you're ready to eat. However, with all of the chicken seasoning, you won't need to add soy sauce because it will be so flavorful in the end.
The next thing I made for the breakfast is Scrambled Eggs with Garlic Chives. This is not an original recipe. I got it from The Woks of Life website. The recipe is hyperlinked, but following are pictures of the direction steps. This is one of my absolute favorite recipes. It's super easy to whip up, and it goes well with congee or simple rice with a little soy sauce.
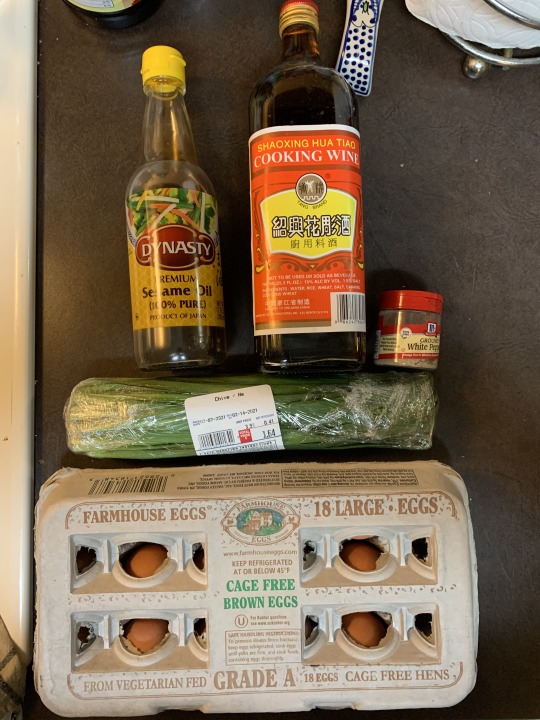
Garlic chives look very much like green onions, but they're much more mild in flavor and sauté very nicely. If you're going to use green onions instead, that's fine, but I would largely reduce the amount you use. It's an okay substitution, but if you're able to get the garlic chives, definitely get those.
Here's what they look like without the packaging:
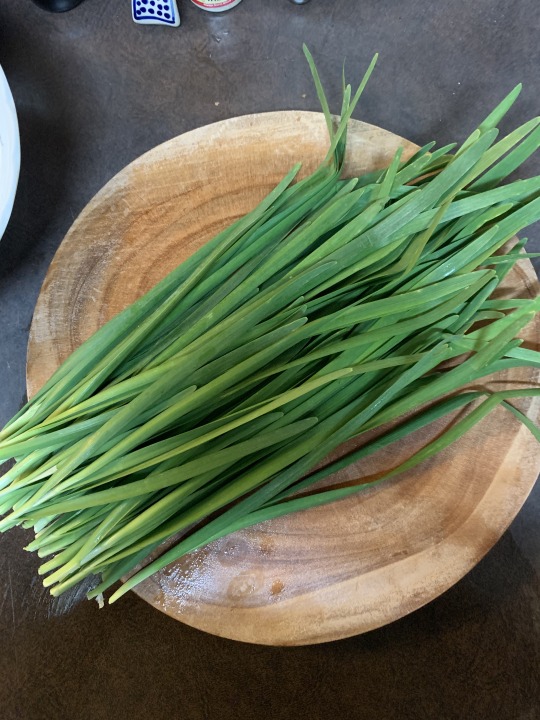
Kind of looks like grass, right? Sometimes, they'll have small blossom buds at the top that are totally edible too.
This is what it looks like to have the eggs and seasonings mixed with the small bubbles, as called for in the recipe:
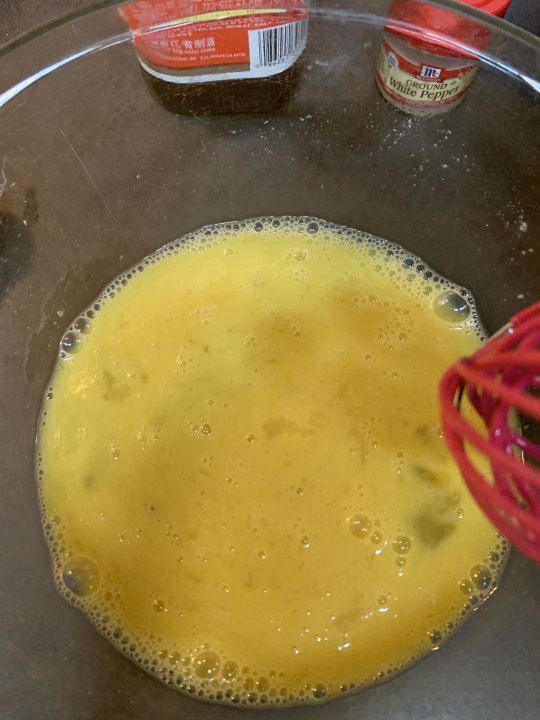
The water that you include in the mix helps with this. It probably took me about 30-45 seconds of rigorous mixing to get those bubbles.
This is the halfway point of sautéing the egg and garlic chive mixture:
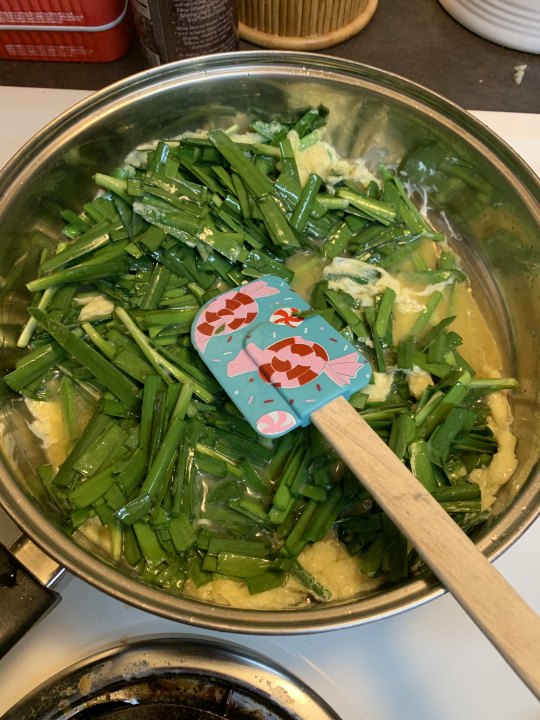
So you may notice here that the chives look shiny, and that's because the egg whites are clinging to them. Additionally, it looks like the chives aren't cooking. They will.
This is what your eggs should look like by the end of it:
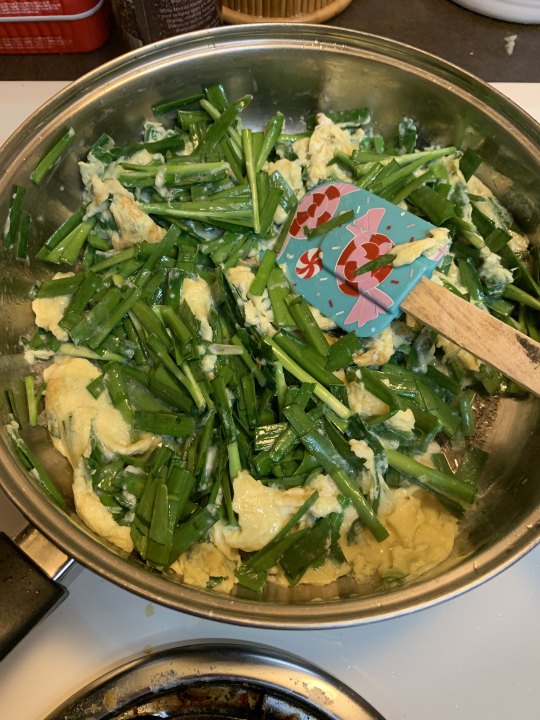
From here, it will take maybe only one more minute to cook the chives.
I rounded out the meal with pork baos, which are steamed buns filled with a sweet Chinese barbecue pork and these big ass apples that are often sold during holidays, particularly Lunar New Year, which was February 12th this year.
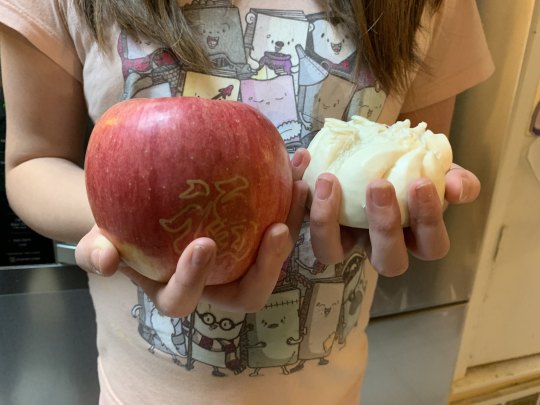
And now, for the congee recipe!
CHICKEN AND GINGER PRESSURE COOKER CONGEE
Ingredients: 1 cup jasmine rice, rinsed and drained (at least 3 times) 8 cups of water or chicken broth 1 1-inch piece of ginger, peeled 1 medium to large yellow onion, washed 4-5 cloves of garlic, minced 4 tbsp chicken bouillon (optional) fish sauce (optional, to taste) sugar (to taste) freshly ground black pepper (to taste)
Suggested add-ins cooked chicken cilantro, chopped green onions, chopped fried shallots soy sauce (if not using chicken bouillon) youtiao quail eggs poached eggs
Directions
1.) Put first five ingredients (and chicken bouillon, if using) in your pressure cooker. Make sure to seal the vent. Set the cooker to HIGH and on 30 minutes. In the meantime, prepare your add-ins.
2.) Once the pressure cooker timer goes off, allow for the pressure cooker to natural release. That means to leave it alone until the pressure is completely released. If you do not have the time to do a full natural release, set your timer to ten minutes, then open the vent to release the remaining steam.
3.) Remove and discard the onion and ginger. Stir the contents of the pressure cooker. If the soup looks too thick for you, add water until it is at a consistency you'd prefer. I usually add an extra 2 - 4 cups of water because I like my congee a little thinner. There is no right or wrong consistency. Go with your preference.
4.) Once the congee is to your preferred consistency, taste to see if you like the flavor. If it is not salty enough, add more bouillon or salt. Soy sauce is used as a finishing seasoning, not a flavoring while cooking. Add chicken and quail eggs, and let the soup heat on low to medium-low to bring the proteins to temperature, as well to heat up the soup if you added water.
5.) Make sure that your proteins are warmed and the congee is hot before serving. Add remaining suggested add-ins to your liking.
Be sure to round out your meal with some nice hot jasmine tea or sweetened soy milk!
Be sure to let me know if you tried the recipe!
After note: I realized that I have become everything that I hate about food blogging by this blog. So sorry for the long exposition lolol
#Piofiore#piofiore fated memories#yang#piofiore yang#Lao shu piofiore#recipe#otome#otome recipe#otome food
0 notes
Text
Commander Charon (Frugal Ferryman)




Charon’s one of those characters you either really love or really loathe. I personally love him and was way too excited when I found his journal in the Silph Co. building in HGSS! Honestly, he may be my favorite in the entire franchise...
He’s also the only Team Galactic Commander who (for the most part) is relatively consistent with his personality. His anime version had that delightful laugh and mildly sarcastic attitude I enjoyed in the game. His Special/Adventures and DPA counterparts just cranked that snark up to 11 and went over the top with it. He was a melodramatic ham, yes, but a recognizable melodramatic ham.


He makes me smile. He makes me laugh. He makes me feel a little less weird about my steadily increasing Rotom collection. And, naturally, I have to have him play a major role in my Platinum prequel fan-fiction Pokemon Dawn & Dusk!
Going into this, I knew there were two things I wanted to do when creating Charon’s blend (Frugal Ferryman):
It needed to smell like old people (but in a good way)
It needed to use at least one of the most ridiculously expensive oils in my collection (because Charon thinks he’s worth it).
And yet somehow, the main oil in this synergy ended up being neither of those things. It ended up being my December Oil of the Month from Plant Therapy: something so obscure and rare that I can only order it from them over the phone!
It’s Cubeb Essential Oil: a mildly peppery scent that promotes pain relief, respiratory health, and digestive health. By itself, it kind of smells like soy sauce. I was stumped on how I could use it, but then I did some research to see what it paired with…
…bingo!
To get that “old person” smell, I added CO2 Supercritical Bulgarian Lavender (which made the blend smell just like these half-fossilized bath cubes my grandmother’s hoarded in her bathroom since the late 1980s) and Ylang Ylang III.
To give you some idea, Ylang Ylang is known as “king of the flowers” and has the obnoxiously high price tag to match. It’s great for hair care, is lauded as a powerful aphrodisiac, but typically only succeeds in making me sleepy due to its strong sedative properties.
Earlier, I made note that one of these bath bombs knocked me out in the tub and I woke up a couple of hours later. It was this one. This bomb means business and isn’t for the faint (or weak) of heart.
Together, the blend starts out with an “old lady’s powder room” type of floral…but then the peppery notes of the Cubeb come back to give it a more masculine bite. I really like the way this one smells…but the way it looks is even more dramatic. There’s so much purple in this one that you can’t even see your body in the water!
Now it’s time to talk about the pros and cons of these oils from a safety perspective…
Aromatherapy isn’t just about pretty smells and scented bath water. Essential oils are in such a high concentration that even absorbing them through your skin can leave you with the therapeutic (and potentially toxic) benefits.
If you are allergic to a plant, you are 100% without question going to be super allergic to the essential oil.
There’s also such a thing as contraindications: where some oils may affect you in weird ways if you have a certain medical condition or take certain medications.
The information below is for your safety if you want to attempt to make this blend at home (as a bath bomb, a body spray, or even scented bath salts). And do be sure to wear gloves. Some of these oils have recommended dilution rates as small as 0.4%. You don’t want that to slide on bare skin!
Cubeb
The Javanese Cubeb plant (Piper cubeba) is known by many names, but is cultivated mostly for its fruit and essential oil. The smell is very aromatic (kind of peppery, really pungent, slightly bitter, and it lingers). The aromatherapists say it smells like a cross between Allspice and Black Pepper (both of which you can get as essential oils), but I’m calling bullshit.
It smells like soy sauce. It pairs well with clove, rosemary, and most wood oils.
I’d never heard of this oil until I got it as Plant Therapy’s December Oil of the Month, nor did I have any idea how to use it. A quick Google search told me this is one of the oldest essential oils used by mankind, dating as far back as the 4th Century BC!
Cubeb was used by ancient Greek pharmakons, along with medieval alchemists. Even some modern witchcraft rituals use this fantastic plant--and I’d never freaking heard of it.
Pros
:
It’s an aphrodisiac! There’s nothing quite like a superconcentrated dried pepper to put you in the mood, I guess. People used to use this thing to treat infertility, impotence, ED, gonorrhea, and other STDs. And apparently, the two things I mixed with the Cubeb for Charon’s blend also have this aphrodisiac property. Ladies~
Feeling bloated? Cubeb’s here to help! Sometimes you really have to fart and it won’t come out. So you bloat, feeling all that painful air trap inside you with no way out. Cubeb Essential Oil has a carminative (gas-relieving) property to help you break wind discretely and safely. However, if chronic flatulence becomes a regular thing for you, contact your healthcare provider.
Feeling a little blocked up? Can’t breathe well? Cubeb’s fantastic for breaking up phlegm, calming down asthma, relieving congestion, and helping you ward off that nasty cough once and for all! For even faster results, pair it with Cajeput Essential Oil, Eucalyptus Globulus Essential Oil, or Camphor Essential Oil.
Flush out toxins! Cubeb has diuretic properties. It stimulates your kidneys to excrete more liquid, which in turn flushes out any toxins in your body. This can include stuff like uric acid, salt, cholesterol, and fat.
Tired joints? Maybe Cubeb can be of assistance! Some Ayurvedic medicine practitioners use Cubeb Essential Oil to alleviate aches and pains from joint and bone problems.
Cons
:
By itself, it smells like freaking soy sauce. I cannot reiterate that enough. If you diffuse this at work (true story), people are going to assume you have something delicious at your cubicle and won’t stop hounding you for it. That’s really frustrating when you’re trying to run a QA test!
Due to its high sequiterpene content, this is not a cat-safe oil.
Cubeb Essential Oil (when overused) runs the risk of increasing the sensitivity of your stomach and intestines. Don’t use this oil if you’re taking antacids, have acid reflux disease, or take medications to decrease stomach acid.
Some people have reported irritated skin after prolonged use of Cubeb.
Avoid using this oil if you are pregnant, plan to become pregnant, or are nursing.
This is not a child-safe oil. Avoid this essential oil (and bath bomb) for any children under the age of 12.
Never apply this oil neat (undiluted) on your skin or ingest.
Due to Cubeb’s strong diuretic properties, avoid usage if you are suffering from kidney disease.
Lavender
Pros: Lavender is one of your best friends when it comes to restlessness, insomnia, anxiety, and depression. It’s also great for loss of appetite, nausea, vomiting, gas, and a fussy stomach. It’s also remarkable for pain relief in cases where you’re troubled by migraines, toothaches, sprains, nerve pain, and joint pain.
Some folks even apply Lavender Essential Oil to the skin for hair loss and pain. It’s also safe to apply this one neat (on your skin) for most people.
Cons:
Lavender has also been shown to slow down the central nervous system when used on the regular. If you plan to go under for surgery or anything else with anesthesia, please avoid using Lavender Essential Oil two weeks ahead of the scheduled procedure.
Lavender should not be used by prepubescent and pubescent boys, as it can warp certain hormonal reactions and greatly increase risk for gynecomastia (male breast growth).
If you are taking a sedative, adding Lavender Essential Oil to the mix may create too much drowsiness. Exercise caution!
Ylang Ylang III
Pros:
Fight insomnia! Ylang Ylang is a natural sleep aid and very effective. However, its sedative properties are so strong that you might want to avoid using Ylang Ylang in the morning or if you intend to drive or operate heavy machinery. Pull this oil out right before bed or at least once you’re in for the night. It’s worked for me!
Repel head lice! Ylang Ylang can be used in a combination spray to repel and even kill head lice. Developing evidence suggests that a homeopathic blend of coconut oil, anise oil, and ylang ylang oil had a 92% effectiveness rate on killing those unwanted creepy crawlies in children’s hair.
Lower high blood pressure!
Increase your sex drive! Ylang Ylang is a natural aphrodisiac and has been used for millennia for that exact purpose. There’s a reason this flower is also known as the King of the Flowers.
Cons:
Ylang Ylang Essential Oil is considered to be universally safe for general use. However, it is not safe to diffuse around a cat.
When I said this thing is a sedative, I freaking meant it. I am a relatively healthy 28-year-old woman and this bath bomb knocked me out in 20 minutes. I stayed asleep for a solid 2 hours. If you plan to use Charon’s bath bomb, make sure you have absolutely no other plans for the rest of the day and leave the bathroom door unlocked. There’s a good chance you’ll pass out in the tub.
#Commander Charon#Charon#Commander Pluto#Pluto#Team Galactic#Galactic Bombs#Skye makes bath bombs#Professor Palmarosa#professorpalmarosa
13 notes
·
View notes
Text
Ham Fried Rice Recipe
Ham Fried Rice Recipe
I recently updated this post from April 2014 with a new video!
I love making fried rice at home. Growing up, my mom and my sister would make fried rice for us. I wanted to come up with a version that rivals take out and I did! It’s an easy fried rice recipe that uses leftover ham and I know you’ll love it! Check out the video!
Last Friday, I started getting a series of texts from Curtis while he was at work. I want ham for Easter dinner. I responded with no, we should have turkey breast like we do every year. Because before Italy last year, I hadn’t eaten pork in over 15 years.
I resisted getting a ham because I hadn’t had ham in a long time and because there’s only the two of us. A little bit later, I looked at the calendar and saw that Sunday was going to be April 20th and then counted the years. April 20, 1999 is the day Curtis and I started dating…it’s been 15 years!! That’s when I texted back, okay go ahead and pick up that ham.
He responded by saying, why are you agreeing to ham? And why are you being so nice? Haha I wasn’t going to tell him because then he would think he would have to get me a gift but I told him why.
Later that night, he came home with a nine pound ham for the two of us. He insisted that’s the smallest one they had. Oh boy. On Sunday, we cut it up before we even baked the portion we would eat for dinner and froze it. We are going to have ham for a very longggg time.
This ham or pork fried rice we had was the second of three meals we have had with the leftovers from Sunday’s dinner…we haven’t even touched what we froze yet. I have to give credit to Curtis, this was fried rice using the leftover ham was Curtis’ idea. I say he made me do it!
I have been trying to perfect my own fried rice recipe for a while now and I have to say this is the best fried rice I have ever made…you’ll have to keep reading to see what the secret ingredient is!
I didn’t make the rice the day before like you should so in the morning, I made the rice in my rice cooker. As soon as it was finished, I poured the rice onto a baking dish and spread it out. I flipped over and mixed the rice a couple of times, let it cool and let it sit out for a while– maybe 30 minutes. Then covered it and stuck it in the fridge until I was ready to make fried rice!
You have to make the eggs first for fried rice. I always feel like I’m making an omelet. (I love using OXO’s omelet turner when I’m making eggs.)
Cut it up.
Then, make the rice. After adding the rice, mix in the soy sauce and the sesame oil really good. Cook for 5 to 8 minutes on medium high.
Add the ham, peas and corn. You can add carrots, broccoli, whatever you want.
There’s the secret ingredient…butter. 2 Tablespoons of butter heaven. There’s a Japanese hibachi grill place I used to go to a lot when I worked across the street from them and I would watch them put butter in the fried rice…near the end. I had to try it and it makes this fried rice so good. Curtis would argue it’s the ham that makes it so good.
Now, add the eggs and sliced green onions.
And you’re done. Seriously…amazing. The ham still has the sugary cinnamony glaze which adds a nice sweetness sometimes. The soy sauce is a must have for fried rice and the butter…yes please. Makes great leftovers too!
As long as you have the rice made ahead of time, it doesn’t take that long to put this dish together!
PS Curtis absolutely loved this fried rice recipe…we will be making this again and again! Hope you enjoy it with your family if you try it!
Recipe
Yield: Serves 4 to 6
Prep Time: 10 minutes
Cook Time: 25 minutes
Total Time: 35 minutes (not including wait time for the rice)
Day old rice, rice that’s cooked the day before and refrigerated overnight makes the best fried rice. If it’s freshly made, you may get mushy results. There are ways around it if you want to make fried rice the same day you make the rice. Omit ham or sub with crispy fried tofu to make this dish vegetarian or feel free to sub with shrimp or chicken!
Secret Ingredient Ham Fried Rice Recipe
Ingredients:
3 cups uncooked Jasmine rice, cooked (preferably the day before)
3 Tablespoons grape seed oil
3 eggs, beaten
2 teaspoons sesame oil
3 Tablespoons soy sauce
1 cup diced cooked ham
3/4 cup frozen corn
1/3 cup frozen peas
2 Tablespoons unsalted butter
2 green onions, sliced thin
Directions:
Cook rice. If you didn’t make it the day before. As soon as it’s done, lay it out on a 9×13 baking dish or a baking sheet. Allow to cool. Mix and spread out several times. Place in the refrigerator for at least 30 to 60 minutes.
Add 1 tablespoon of grape seed oil into a wok or a large skillet, heat on medium for at least 3 minutes. Swirl the oil to cover the pan. Pour in beaten eggs and allow to cook for 2 to 3 minutes and flip and cook for another minute. Remove from skillet and allow to cool. Cut into strips and then into smaller pieces, set aside.
Add 2 Tablespoons of grape seed oil to the wok and add the rice and cook for 2 minutes. Add soy sauce and sesame oil and mix the rice thoroughly. Season with salt and pepper. Increase heat to medium high and cook for 5 to 8 minutes, until rice is completely heated through, be sure to mix occasionally so the rice does not burn.
Add ham, corn and peas and cook for another 3 to 4 minutes, mixing occasionally. Lower heat and add butter, allow to melt, and mix thoroughly. Add eggs and green onions and stir gently. Season with salt & pepper. Serve immediately.
Disclosure: There’s an affiliate link in this post.
Stay Connected
Sign up today to receive exclusive content and news from The Little Kitchen:

Source: https://www.thelittlekitchen.net/ham-fried-rice-recipe/
0 notes
Photo

The Thedosian Pantry
From Seheron to the Korcari Wilds, the adventurous traveler will find a few of the same foodstuffs everywhere people prepare food. Regional variations abound, of course. One might find tea in Par Vollen, but few in Redcliffe would have even heard of the stuff. Tisanes - herbal infusions - they would know, but actual tea leaves? A rare, ultra luxe import, at best. At the other extreme, everyone knows what salt is.
This list applies equally whether the cook habitually prepares food for one or for fifteen, or whether the householder is as rich as a magister or as poor as a city elf.
I’ll start posting regular recipes again soon, I promise, but maybe this is better than nothing?
Staples (dry, non-perishable foods):
Grain (rice, barley, oats, spelt, millet, quinoa, etc): cooked whole, it fills the belly and provides necessary energy
Dried Legumes (beans, lentils, peas): cheap, wholesome source of protein (canned beans are especially convenient)
Salt
Vinegar: (wine and cider are most useful) brightens the taste of most foods, also aids in food preservation
Oil: regular olive oil is indispensable in most kitchens, but households that often fry foods at high temperature might also want one with a higher smoking point (you can use regular olive oil in baking and no one will ever know)
Pasta: one might argue that whole grains fill this role, but there are times when an hour is too long to wait for dinner, and its cost is hardly prohibitive
Preserved Vegetables: canned tomatoes, corn, beans, can be combined for a quick meal, or for emergency provisions
Canned broth
Canned soups (emergency meals)
Canned fish/poultry (chunk light tuna has the lowest mercury levels of the various tunas, but pink salmon is safer)
Peanut Butter: comfort food or emergency rations? You decide.
Flour: If you have nothing to eat but flour, an egg or two, and a pinch of salt, boiled dumplings are better than going hungry
Leaveners: baking powder, baking soda, yeast
Sugar
Honey
Soy Sauce
Onions: all savory foods are better with onions
Garlic: ditto
Important note: store your onions, garlic, and potatoes separately. The onions will cause the potatoes and garlic to sprout and eventually rot. It isn't economy if you have to keep throwing food away because it's gone bad.
Cold Storage:
Cabbage: Can be served cooked or raw, seasoned in any number of ways, and lasts for weeks when kept cool, even if pieces are cut off. The edges will discolor after a few days, but pare off the discolored part and the rest will be fine. Only discard when it starts to feel soft.
Carrots: delicious, nutritious, inexpensive, and last for weeks
Lemon Juice: Versatile for cooking, but a splash of it makes tap water more palatable
Eggs: an ingredient in many recipes, but a quick meal in their own right
Worcestershire Sauce
Prepared Mustard
Mayonnaise
Milk
Butter
Spices and Herbs: Seasonings are expensive, but they last for a long, long time and add vital variety to the most boring diet. I consider the following essential. Others might disagree. My list excludes dill and tarragon because I dislike the taste, but many people would consider both essential.
Basil
Bay Leaves
Cardamom, Green Whole and Ground)
Cayenne
Celery Seed
Chili Pepper, Crushed (Crushed Red Pepper)
Chili Pepper, Ground (ancho, chipotle)
Cinnamon, Stick and Ground
Cloves, Whole and Ground
Coriander
Cumin
Fennel
Ginger, Ground
Mace, Ground
Marjoram
Mint
Mustard, Seed and Ground
Nutmeg, Whole
Oregano
Paprika, Sweet, Hot, and Smoked
Peppercorns, Black, Whole
Rosemary
Sage, Ground
Thyme
Turmeric
Frozen
Vegetables (especially broccoli, spinach, kale, peas)
Store dry chili of any type in the freezer to avoid paprika bugs
Protein: fish, poultry, meat, tofu (buy it in bulk, divide into portions, and freeze)
Leftovers, portioned into meal-sized units (resealable bags rule)
Bread, when purchased on sale (best toasted before use, though)
Wrap "protein" foods first in kitchen foil to exclude air from the surface to prevent freezer burn, then bundle like items together in large resealable bags. Label all food going into the freezer with the contents and the date. Some food is best if you cook it straight from the freezer (frozen pizza, anyone?), but for solid foods that need defrosting, thaw food rapidly and safely in cold water. For larger items such as a whole chicken, put the item in a large bowl, cover with cold water, and thaw in the refrigerator. It will still thaw faster than it would in the refrigerator without the water, and much more safely than it would at room temperature.
A well-stocked pantry can get you through just about anything from surprise guests to an unexpected month without income. Just be sure to rotate your stock so you aren't using the carrots you just bought while last month's gets moldy in the crisper drawer.
41 notes
·
View notes
Text
New Post has been published on Health bolt
New Post has been published on http://www.healthbolt.net/cooking/healthy-cooking-classes-in-orange-county-ca/
Healthy Cooking Classes In Orange County Ca

Contents
Furry family members
Great – cast iron skillets
Financial healthy soul
Local farmers market
Easily incorporate vegetables
Cooking Classes in Orange County with Course Overviews. Research cooking classes in Orange County, California, which currently has four colleges offering programs.
Ever since an overwhelming majority of California voters approved Proposition 215, which legalized the collective use of medical marijuana by patients with a doctor’s note, Orange County has been … …
Every class ends with a dinner party! If you’d like to learn to cook healthy food for your family, fun menus for 20 of your closest friends, or knife skills to impress a samurai, Hipcooks shows you how to be as cool in the kitchen as you are everywhere else.
In August of 2017, I moved from the hustle and bustle of Los Angeles and Orange County, CA to the Ozarks primarily to cut down … my autism service dog, and just cooking a chicken by myself. It was p…
A California surgeon … “Residing in Orange County, when not caring for his patients or volunteering locally and abroad, Grant enjoys cooking, surfing, tennis, fishing, hiking and mountain biking. He …
Healthy Batch Cooking Ideas Healthy Cooking Substitutions Maybe you know to plan and prep healthy meals for the coming week to … Reconsider that tuna salad if it looks heavy with ma… Healthy Home Cooking For Pomeranians Home Cooked Food For Pomeranians Healthy Home Cooking for the Pomeranian can only be found on PetPom, the #1 Pomeranian Information site. Please note that we are not the authors of this book; it is offered as a 3rd party. homemade dog food recipes Our Boutique Contact Us Homemade Dog Food and Treat Recipes… These are recipes I use and my dogs love them! Feel free to try them out, I bet your furry family members will love them too. Not all these recipes I came up with, … Healthy Way To Cook Tilapia Fish Fun Healthy Meals To Cook Remember–healthy cooking doesn’t have to be a chore … Joe Wicks’ Lean in 15 Spiced Prawns and Potatoes Dinner Between the g… See More Photos: Healthy Dinners in 40 Minutes or Less Soy-Maple Salmon A simple marinade of soy sauce and maple syrup transforms salmon fillets into a delicious dinner, rounded out with a side of … Cooking With Non stick pan healthy How To Cook Bean Sprouts Healthy Stir in salt and bean sprouts. Cook and stir over medium heat for 3-5 minutes, or until as done as you like. serve immediately. Cooking With cast iron skillet healthy The benefits of cooking these 15 healthy skillet dinner Recipes with cast iron skillet: The price is great – cast iron skillets have a really good price if you compare with the similar quality aluminum or stainless steel cookware.Although it’s considering a … Using Cast Iron Safely. As mentioned above, using enameled cast iron is a safe option if you prefer the ease of use and heavy feel of cast iron pans. The enameled layer protects the food from contact with the iron portion of the pan and hence, offers an option that is both practical and safe. Mustard Oil For Cooking Healthy The Best Cooking Oils for Your Health. Read In. … (Shop for healthy oils that are actually good for you) … It is recommended that you don’t use mustard oil as the sole cooking medium. It has a high smoking point so it’s very good for deep frying. canola oil. The oil allows the most flexibility—you can drop some in your mouth before bed or create different recipes and infusions with … Healthy Cooking On A Budget Cookbook We can also score a free cookbook with select 6-month plans! “I’ve become an ambassador for the WW Family because it is the p… Is Cooking With Vegetable Oil Healthy Is Microwave Cooking Safe And Healthy Method 3: microwave: place pumpkin pieces in a glass bowl; cover with microwave-safe plastic wrap. cook on HIGH until tender, about 15 minutes. move the pieces around twice during cooking. Cool, then scrape out the tender flesh with a spoon; discard rind. healthy Way To Cook Spaghetti squash spaghetti squash is Healthy Cooking Substitutions Maybe you know to plan and prep healthy meals for the coming week to … Reconsider that tuna salad if it looks heavy with ma… Healthy Home Cooking For Pomeranians Home Cooked Food For Pomeranians Healthy Home Cooking for the Pomeranian can only be found on PetPom, the #1 Pomeranian Information site. Please note that we are not the authors of this book; it is offered as a 3rd party. homemade dog food Recipes Our Boutique Contact Us Homemade Dog Food and Treat Recipes… These are recipes I use and my dogs love them! Feel free to try them out, I bet your furry family members will love them too. Not all these recipes I came up with, … Healthy Way To Cook Tilapia Fish Fun Healthy Meals To Cook Remember–healthy cooking doesn’t have to be a chore … Joe Wicks’ Lean in 15 Spiced Prawns and Potatoes Dinner Between the g… See More Photos: Healthy Dinners in 40 Minutes or Less Soy-Maple Salmon A simple marinade of soy sauce and maple syrup transforms salmon fillets into a delicious dinner, rounded out with a side of … Cooking With Non stick pan healthy How To Cook Bean Sprouts Healthy Stir in salt and bean sprouts. Cook and stir over medium heat for 3-5 minutes, or until as done as you like. serve immediately. Cooking With cast iron skillet healthy The benefits of cooking these 15 healthy skillet dinner Recipes with cast iron skillet: The price is great – cast iron skillets have a really good price if you compare with the similar quality aluminum or stainless steel cookware.Although it’s considering a … Using Cast Iron Safely. As mentioned above, using enameled cast iron is a safe option if you prefer the ease of use and heavy feel of cast iron pans. The enameled layer protects the food from contact with the iron portion of the pan and hence, offers an option that is both practical and safe. Mustard Oil For Cooking Healthy The Best Cooking Oils for Your Health. Read In. … (Shop for healthy oils that are actually good for you) … It is recommended that you don’t use mustard oil as the sole cooking medium. It has a high smoking point so it’s very good for deep frying. canola oil. The oil allows the most flexibility—you can drop some in your mouth before bed or create different recipes and infusions with … Healthy Cooking On A Budget Cookbook We can also score a free cookbook with select 6-month plans! “I’ve become an ambassador for the WW Family because it is the p… Is Cooking With Vegetable Oil Healthy Is Microwave Cooking Safe And Healthy Method 3: microwave: place pumpkin pieces in a glass bowl; cover with microwave-safe plastic wrap. cook on HIGH until tender, about 15 minutes. move the pieces around twice during cooking. Cool, then scrape out the tender flesh with a spoon; discard rind. healthy Way To Cook Spaghetti squash spaghetti squash is quickly becoming one
If you are interested in taking cooking classes or earning a certificate or degree, there are many choices in the Orange County, CA, area. You can earn a certificate in culinary arts or food service, or pursue an associate’s degree in culinary arts or catering from one of the local colleges.
the for about financial healthy soul food cooking Will save you Two-hour classes. however As such, she knew that home cooking doesn’t automatically translate to a commercial kitchen. Before launching Real. Learn Laugh & Eat At Sur La Table®. Explore Our Selection of Classes!
The LA times says the first new locations “are set to open in Los Angeles, Orange County, San Diego and Seattle … events and free-to-the-public cooking classes. Evolution Fast Food in San Diego, Cal…
Why Is Baking A Healthy Cooking Method But if you’re already looking for the next best edible thing, don’t worry, we’ve taken a look at some of the hottest healthy … Healthy Cooking Videos Online Healthy Way To Cook tilapia fish fun healthy meals To Cook Remember–healthy cooking doesn’t have to be a chore … Joe Wicks’ Lean in 15 Spiced Prawns and Potatoes Dinner Between the g… See More photos: healthy dinners in 40 Minutes or Less Soy-Maple Salmon A simple marinade of soy sauce and maple syrup transforms salmon fillets into a delicious dinner, rounded out with a side of … Cooking With Non Stick Pan Healthy How To Cook Bean Sprouts Healthy Stir in salt and bean sprouts. Cook and stir over medium heat for 3-5 minutes, or until as done as you like. serve immediately. Cooking With Cast Iron Skillet Healthy The benefits of cooking these 15 healthy skillet dinner recipes with cast iron skillet: The price is great – cast iron skillets have a really good price if you compare with the similar quality aluminum or stainless steel cookware.Although it’s considering a … Using Cast Iron Safely. As mentioned above, using enameled cast iron is a safe option if you prefer the ease of use and heavy feel of cast iron pans. The enameled layer protects the food from contact with the iron portion of the pan and hence, offers an option that is both practical and safe. Mustard Oil For Cooking Healthy The Best Cooking Oils for Your Health. Read In. … (Shop for healthy oils that are actually good for you) … It is recommended that you don’t use mustard oil as the sole cooking medium. It has a high smoking point so it’s very good for deep frying. canola oil. The oil allows the most flexibility—you can drop some in your mouth before bed or create different recipes and infusions with … Healthy Cooking On A Budget Cookbook We can also score a free cookbook with select 6-month plans! “I’ve become an ambassador for the WW Family because it is the p… Is Cooking With Vegetable Oil Healthy Is Microwave Cooking Safe And Healthy Method 3: microwave: place pumpkin pieces in a glass bowl; cover with microwave-safe plastic wrap. Cook on HIGH until tender, about 15 minutes. move the pieces around twice during cooking. Cool, then scrape out the tender flesh with a spoon; discard rind. healthy Way To Cook Spaghetti squash spaghetti squash is quickly becoming one of the hottest healthy alternatives to pasta, but we bet you don’t know how easy it is to make! While there’s always the … Once it’s steamed to perfection, d… 10 Healthy, Easy Ways to Cook Squash of All Sorts … I first tried spaghetti squash about a year ago and really do enjoy that. Our local farmers market just opened up last week and I know that they will be carrying a few different types of squash soon and was going to look for some ideas to try out one

"Revitalize Your Health" is a series of four cooking classes during which Niessen will demonstrate how you can easily incorporate vegetables and dairy/meat alternatives into your everyday lifestyle. Niessen’s focus is on disease prevention through healthy eating.
SAN DIEGO, CA … healthy food shelf-labeling, cooking classes, and store tours to increase healthy eating knowledge and self-efficacy among CalFresh participants," according to UCSD. The program has …
Clementine-Kitchen offers healthy cooking classes for kids, teens, and adults in Orange County, California. Our emphasis is on an educational and hands-on kitchen experience. We inspire families to live happier, healthier lives by cooking healthy meals at home.
0 notes
Text
Can Dogs Eat Jasmine Rice?
https://www.centralparkpaws.net/wp-content/uploads/2020/01/516QUzNUYL.jpg
Back in the day, I loved making stir-fried rice with fresh veggies.
I used jasmine rice since it’s a light, easy rice to cook.
One time, I scooped the stir-fry into my bowl, went to the fridge for some soy sauce, and came back to find Maggie eating my dinner on the kitchen floor.
I quickly ran through my mental list of foods that are safe for dogs.
The veggies all passed the test, but I wasn’t sure about jasmine rice. What if there was something different that made it bad for dogs?
Since then, I’ve done my research and discovered everything you can read below.
Maggie ended up being just fine, but now I know to keep a closer eye on my rice dishes.
Is Jasmine Rice Safe for Dogs?
Yes, jasmine rice is totally safe for dogs to eat!
Although it might worry you to give your dog something different than traditional white rice, jasmine rice is a type of white rice.
They have very similar nutritional profiles and both are super easy to digest[1].
Why is Jasmine Rice Healthy?
There are a few reasons jasmine rice is healthy for dogs.
The first is that it contains a small amount of protein and contains vitamins like thiamin and niacin (B1 and B3)[2].
It also contains fiber, so it’ll help your dog slowly recover from diarrhea if you serve it with chicken[3].
How to Handle Jasmine Rice
If you decide to give your dog jasmine rice, here are some common ways people handle it.
Raw
The first time you interact with jasmine rice will be when you get a bag from the store.
This is the raw form of the rice.
It will be hard and inedible, so don’t pour it into your dog’s kibble thinking they can crunch it alongside their food.
Cooked
There are multiple ways to cook jasmine rice, which you’ll discover with a quick internet search.
It’s a standard form of rice, so you can boil, fry, bake and dehydrate it.
If you want to give some to your dog, stick with boiling it.
Benefits of Jasmine Rice
You may wonder if jasmine rice is worth your dog’s time.
I know I’ve heard people say that rice has no nutritional value.
Actually, there are a few health benefits to jasmine rice that your dog will enjoy[4]:
It contains insoluble fiber, which helps flush the digestive tract.
It has some amino acids, which may be lacking in your dog’s kibble.
It provides B vitamins your dog may not otherwise get in their diet.
Talk with your dog’s vet if you’re not sure whether your dog needs these benefits or if it could interact with any of their health conditions.
Possible Dangers of Jasmine Rice
As with any food, there are a few dangers for dogs who eat jasmine rice regularly.
It’s a High Glycemic Index Food
Dogs can sometimes suffer from diabetes mellitus[5] or “sugar diabetes.”
It’s a disorder that affects their metabolism, so they shouldn’t eat foods that spike their blood sugar or cause weight gain.
The International Journal of Food Sciences and Nutrition recently released a study that classified jasmine rice as a high glycemic index food[6].
It should be given sparingly, if at all, to dogs with blood sugar issues.
It’s High in Carbs
When you look at the nutritional content of your dog’s kibble, you’ll notice that it contains carbs.
Dog owners often hear that dogs can’t tolerate carbs, but they can if they come from most plants (such as celery) or grains[7].
Starchy carbs are what cause issues for dogs.
There’s 39 grams of carbs in one cup of cooked jasmine rice[8], which all comes from the starch in the rice. It may upset your dog’s stomach if they eat this kind of carb too often.
It May Cause An Allergic Reaction
Dog food allergies are much less common than you’d think, but sometimes dogs are allergic to rice.
If you feed your dog jasmine rice and they start itching or losing their hair[9], they could have a rice allergy.
How to Serve Jasmine Rice to Your Dog
Be sure to cook the chicken, too!
If you want to give your dog jasmine rice, boil it in water according to the directions on the packing.
Don’t add any spices or seasonings, including salt.
Wait until the rice is extra soft to serve it and only give it in small portions (⅛ to ¼ of a cup at a time).
When you want to only give your dog soft foods to help their digestion, you can give them up to ⅔ cups of rice in a meal[10], combined with white meat chicken (or maybe salmon!).
Dog Food Recipes with Jasmine Rice
For those looking to give their dog food in more creative ways, try out these recipes and see if your dog enjoys them.
Chicken and Rice with Veggies
Save the seasonings for non-canine eaters
Treat your dog to fresh food when you combine jasmine rice with chicken and veggies[11].
Be careful that no garlic or onions are included in your chosen vegetable blend.
You can also alter this recipe for sensitive stomachs by leaving out the veggies.
Pumpkin Rice Congee
Whether you’re ready to embrace the season of fall or want to spoil your dog with something new, try making pumpkin rice congee[12].
It’s super soft and easily digestible.
Plus, the pumpkin will soothe the digestive tract and firm up any loose stool.
It’s less messy than other methods for feeding your dog eggs
Egg and Veggie Rice
When you make yourself fried rice and want your dog to enjoy it with you, make them egg and veggie rice for dinner.
They’ll adore the mix of chicken, eggs, rice, and broccoli, and you’ll love that it keeps in the fridge for up to five days.
Conclusion
Jasmine rice is a great food for dogs to eat and can be mixed into different ingredients to create a balanced diet.
Feed it to your dog for fun or to help them calm an upset stomach.
As long as you watch for any allergic reactions or further diarrhea, they’ll love trying something new.
Resources
https://www.healthline.com/nutrition/jasmine-rice-vs-white-rice#bottom-line
https://fdc.nal.usda.gov/fdc-app.html#/food-details/447540/nutrients
https://www.petmd.com/dog/emergency/common-emergencies/e_dg_diarrhea
https://fdc.nal.usda.gov/fdc-app.html#/food-details/535965/nutrients
https://www.akc.org/expert-advice/health/diabetes-in-dogs/
https://www.tandfonline.com/doi/abs/10.3109/09637486.2013.869797?journalCode=iijf20&
https://www.petmd.com/dog/nutrition/evr_dg_carbohydrates_key_to_balanced_dog_food#
https://fdc.nal.usda.gov/fdc-app.html#/food-details/480213/nutrients
https://pets.webmd.com/dogs/guide/caring-for-a-dog-that-has-food-allergies#1
https://www.ardmoreah.com/pet-care/diarrhea-protocol-for-dogs/
https://www.allrecipes.com/recipe/139453/lucky-and-rippys-favorite-dog-food/
https://animalwellnessmagazine.com/8-stomach-soothers/
The post Can Dogs Eat Jasmine Rice? appeared first on Central Park Paws.
from https://www.centralparkpaws.net/faqs/can-dogs-eat-jasmine-rice/
0 notes
Text
How to Cook Tofu: Easy & Delicious Tofu Recipes
Once you learn how to cook tofu you’ll have a whole new appreciation for this ancient food! There are so many ways to make it, but here are 3 easy and delicious tofu recipes to get started with.
Tofu. Growing up I didn’t like the stuff. It’s one of my dad’s favorite foods, so I could always depend on being served something with tofu when I was at his house. I’d let the sauce soak into my rice and avoid all of the marinated blocks of tofu and most of the veggies. I was such a picky kid. So ungrateful! Here I was being served perfectly prepared tofu made with love, and I couldn’t get past the fact that it had a funny texture and an equally funny name.
Now as an adult, I can appreciate tofu fully. I still haven’t managed to incorporate it into my diet as much as my dad does, but I’m more fond of it than ever before. Over the years I’ve learned and experienced how truly versatile and nourishing this humble soy bean curd can be. I’ve had it incorporated into the most luxurious vegan desserts, transformed into the crispiest “tenders,” and fermented to umami heaven. I’ve relied on it as a hearty filling breakfast, and the perfect savory late night snack. I’m finally starting to see why my dad is such a fan.
What is tofu? First created in China over 2,000 years ago, tofu is a bean curd made from soy beans. Soy beans are turned into a milk, then curdled to make all varieties of tofu: silken, soft, firm, or extra-firm. Since its creation all those years ago, tofu has become an important part of many Asian cuisines, and has quite recently become popular around the world. In the United States tofu is almost only eaten for vegetarians and vegans, and thought of as a meat replacement.
However, in Asia tofu isn’t part of a separate culinary category. It became a traditional staple food throughout the region, for all parts of the population, vegetarian or not. Though it is true that Zen Buddhist monks enjoy(ed) tofu as a replacement for meat.
Nutrition
Tofu’s high protein content does make it a perfect dietary alternative to meat. Unlike most beans, soy beans contain all of the different amino acids that the human body must get from food, making tofu a “complete protein.” Tofu is also a fantastic source of calcium, iron, manganese, magnesium, copper, selenium, omega-3 fatty acids, zinc, and vitamin B. Soy beans, and thus tofu, also contain an impressive variety of phytonutrients that help protect our bodies from diseases like cancer (source). Consumption of soy has been linked to a lower risk of breast cancer and prostate cancer (source).
Soy products like tofu have also been shown to lower cholesterol and heart disease risk. Since heart disease is the #1 killer in the United States, followed by cancer, think of how important those benefits truly are. Imagine the improvement in American health if people replaced meat and dairy products with nutrient-dense, plant-based alternatives like soy. We’d have a very different society, maybe even one in which the fight for basic healthcare isn’t the number one priority and stressor for millions, and in which the medical industry isn’t able to make billions of dollars a year selling us expensive pharmaceuticals and procedures for preventable lifestyle diseases.
So much controversy! You may have heard the never-ending controversy over whether or not soy is a health food or a harmful food. It irks me that this conversation is happening at all given the thousands of years of evidence showing that soy is a healthy part of a balanced plant-based diet. In China and Japan, two countries known for their regular consumption of soy products, rates of cancer and heart-disease have traditionally been very low.
It’s true that traditionally most cultures in China and Japan (and throughout the world) have eaten a plant-based diet (not to be confused with completely vegan), so it’s a given that heart disease and cancer would be a rare occurrence. However, so much of what people currently fear about soy products in the United States is that soy will give them cancer. Where is the scientific evidence of this? In fact, as I discussed above, scientific evidence shows that soy consumption is linked to a lower risk of some cancers.
GMO
Another fear people have is that all soy is GMO, or genetically modified. While most soy is genetically modified in the United States, the majority of that soy is used to make processed soy products like soybean oil and soy protein isolates, which are used to make junk food, and for animal feed. Most minimally processed soy products like tofu are non-GMO and often organic. Don’t believe me? Take a look at the labels the next time you’re at the grocery store. Since the impacts of GMO plants are not fully understood yet, I advise avoiding them as much as possible. The best way to do that is to avoid highly processed foods and junk foods (including at fast food restaurants, where they often use soybean oil for frying, among other things).
Estrogen
What about estrogen? The other huge American preoccupation with soy is the fact that it contains phytoestrogens. Some Americans fear that consumption of phytoestrogens will interact adversely with our human estrogen and result in reproductive issues and even cancer. First, it’s important to know that many plants contain this form of estrogen: flaxseed, oats, other beans, lentils, wheat, and more. Common sense tells us that these are all healthy foods, yet soy stands out as the one bad guy.
Studies show that soy products do not cause “man boobs” or reproductive cancers. There may be some concern for women who have had estrogen-sensitive breast cancer, but otherwise moderate amounts of soy are shown to have protective benefits. If you are afraid of the effects of estrogen from outside the body one thing you should make sure to do is to avoid all animal products. Too much mammalian estrogen may lead to reproductive problems and cancer. Obviously you are an animal, not a plant, so it makes sense that adding too much of the type of estrogen you’ve already got can be harmful.
Keep in mind that while the United States is the world’s largest producer of soybeans, Americans on average eat less soy in a year than the Japanese eat in one day. The rate of death from heart disease in the US is about double the rate in Japan. And the US’s rate of cancer is about 50% higher than Japan’s. Meanwhile, in the United States, those who eat a vegan diet have the lowest rates of heart disease and cancer, as well as other common lifestyle disease like type 2 diabetes and obesity, compared to vegetarians and meat-eaters (source). Of course, diet is only one among the many factors that affect these rates, but explain to me how these statistics support the idea that tofu is somehow connected to adverse health outcomes?
We’ve gotten that out of the way, so now we can talk food! Tofu is cheap, readily available, and highly nutritious. Thankfully it’s also very easy to make. Below are 3 simple recipes you should try if you’re new to tofu.
Easy Tofu Scramble | How to Cook Tofu
Make sure you press your tofu for the best results. To press tofu, simply drain and remove it from the package, wrap it in a couple layers of paper towel or a kitchen towel, put it in a container or plate, and place a heavy object on top (I always use a full tea kettle). Allow it to sit and press for about 1 hour. If you forgot to press it, a quick 20 minute press will do.
Author: Jenné
Serves: 2-4
Ingredients
1 tablespoon grapeseed oil (or other cooking oil)
½ yellow onion, diced
2 cloves garlic, minced
½ red bell pepper, diced
1 block firm tofu, pressed and mashed
1-2 vegan sausages (I used Field Roast brand), diced
2 tablespoons nutritional yeast
½ teaspoon turmeric
1 teaspoon salt, plus more to taste
1 teaspoon black pepper
cayenne pepper to taste, optional
Instructions
Warm oil in a large skillet or frying pan.
Sauté the onions, garlic, and red pepper on medium heat until onions are translucent.
At the tofu and vegan sausage followed by ½ teaspoon salt and stir well. Cook for about 10 minutes, stirring halfway.
Add the nutritional yeast and turmeric, the remaining salt and black pepper (and cayenne if you want), and stir again.
Cook another 5 minutes.
Serve!
3.5.3251
Crispy Tofu Tacos | How to Cook Tofu
Be sure to press your tofu at least one hour for this recipe for maximum crispiness. Notes on pressing tofu scramble recipe above. Feel free to use other spices for this crispy tofu. It's also great with Ethiopian berbere and Indian curry.
Ingredients
2 tablespoon grapeseed oil (or other cooking oil)
1 block extra firm tofu, pressed and cubed
1 teaspoon ground cumin
1 teaspoon chili powder
½ teaspoon salt
8 corn tortillas
4 leaves romaine lettuce, chopped
½ cup salsa
1 avocado, sliced or mashed
¼ cup red onion, thinly sliced (or try pickled red onions)
Instructions
Place the cubed tofu in a mixing bowl. Sprinkle on the cumin powder, chili powder, and salt, then toss the bowl to thoroughly coat the tofu.
Warm the oil in a skillet or frying pan on medium-high heat.
Add the tofu, then use a spoon to spread the cubes evenly onto the skillet.
Cook for about 5 minutes on medium heat, then flip the tofu.
Continue doing this every 5 minutes, until all sides of the tofu are golden brown and begin to crisp up, about 30 minutes total.
Warm your tortillas over a gas flame or microwave, keeping them warm between the folds of a kitchen towel.
Once ready, fill the tortillas with the crispy tofu, romaine lettuce, salsa, avocado, and red onion.
3.5.3251
How to Cook Tofu: Easy & Delicious Tofu Recipes
Total time
1 hour 15 mins
No need to press the tofu for this recipe. It's best with firm tofu, not extra firm, though either works. If you have extra tofu cheese leftover use it as a spread, dip, or in pasta. Note: Be sure to factor in the time it takes for the dough to rise when looking at the cook time. You can premade pizza dough at the store if you'd rather not make your own.
Author: Jenné
Serves: 4-6
Ingredients
Pizza Dough
½ teaspoon sugar
½ envelope active dry yeast
¾ cups water, 110 degrees F
2 cups white whole wheat flour, bread flour, or all purpose flour + more for kneading
1 teaspoons kosher salt
4 teaspoons olive oil
cornmeal, just a little for sprinkling on baking sheet
Tofu Cheese
1 block of firm organic tofu
½ cup nutritional yeast
1 tsp apple cider vinegar
1½ tsp sea salt
Instructions
Pizza dough
Combine the water, yeast, and sugar in a glass bowl, and stir well.
Mix the flour and salt together in a mixing bowl.
Make a well in the center of the bowl and pour in the yeast water.
Stir well with a wooden spoon, and then knead the dough with your hands.
Transfer the dough onto a floured workspace, and knead lightly to form the dough into a ball.
Place the dough ball into another mixing bowl coated in a light layer of olive oil.
Cover the mixing bowl with plastic wrap, or an equivalent to seal, and set aside for one hour to let the dough rise.
Tofu Cheese & Assembly
While the dough is rising make your tofu cheese: place the tofu in a food processor, along with the nutritional yeast, apple cider vinegar, and salt. Blend until creamy, then set aside until you’re ready to use it for the pizza.
Once the dough has doubled or nearly tripled in size, remove it from the mixing bowl, and knead it into a ball again.
Cut the ball in half or quarter, and form them into smaller balls.
Place each ball onto a plate, and cover with a slightly damp and clean kitchen towel. Allow to set for 10 minutes.
Preheat oven to 500°.
Sprinkle some cornmeal onto a large baking sheet, press your pizza dough directly onto it (to prevent sticking), and flatten the dough into a thin pizza crust shape.
Top with your pizza topping: sauce, of course, always goes first, then tofu cheese, then basil.
Bake for 10-12 minutes. Serve immediately, and enjoy!
3.5.3251
Check out these other amazing tofu recipes on my blog: Broccoli & Crispy Tofu, Sweet Potato & Tofu Curry. And don’t sleep on tempeh––fermented tofu cake––it’s delicious: BBQ Tempeh Sandwich, Maple Mustard Tempeh Salad, Smokey Tempeh & Kale Salad, and Classic Tempeh Tacos .
Source: http://sweetpotatosoul.com/2018/08/how-to-cook-tofu.html
0 notes
Text
Ham Fried Rice Recipe
Ham Fried Rice Recipe
I recently updated this post from April 2014 with a new video!
I love making fried rice at home. Growing up, my mom and my sister would make fried rice for us. I wanted to come up with a version that rivals take out and I did! It’s an easy fried rice recipe that uses leftover ham and I know you’ll love it! Check out the video!
Last Friday, I started getting a series of texts from Curtis while he was at work. I want ham for Easter dinner. I responded with no, we should have turkey breast like we do every year. Because before Italy last year, I hadn’t eaten pork in over 15 years.
I resisted getting a ham because I hadn’t had ham in a long time and because there’s only the two of us. A little bit later, I looked at the calendar and saw that Sunday was going to be April 20th and then counted the years. April 20, 1999 is the day Curtis and I started dating…it’s been 15 years!! That’s when I texted back, okay go ahead and pick up that ham.
He responded by saying, why are you agreeing to ham? And why are you being so nice? Haha I wasn’t going to tell him because then he would think he would have to get me a gift but I told him why.
Later that night, he came home with a nine pound ham for the two of us. He insisted that’s the smallest one they had. Oh boy. On Sunday, we cut it up before we even baked the portion we would eat for dinner and froze it. We are going to have ham for a very longggg time.
This ham or pork fried rice we had was the second of three meals we have had with the leftovers from Sunday’s dinner…we haven’t even touched what we froze yet. I have to give credit to Curtis, this was fried rice using the leftover ham was Curtis’ idea. I say he made me do it!
I have been trying to perfect my own fried rice recipe for a while now and I have to say this is the best fried rice I have ever made…you’ll have to keep reading to see what the secret ingredient is!
I didn’t make the rice the day before like you should so in the morning, I made the rice in my rice cooker. As soon as it was finished, I poured the rice onto a baking dish and spread it out. I flipped over and mixed the rice a couple of times, let it cool and let it sit out for a while– maybe 30 minutes. Then covered it and stuck it in the fridge until I was ready to make fried rice!
You have to make the eggs first for fried rice. I always feel like I’m making an omelet. (I love using OXO’s omelet turner when I’m making eggs.)
Cut it up.
Then, make the rice. After adding the rice, mix in the soy sauce and the sesame oil really good. Cook for 5 to 8 minutes on medium high.
Add the ham, peas and corn. You can add carrots, broccoli, whatever you want.
There’s the secret ingredient…butter. 2 Tablespoons of butter heaven. There’s a Japanese hibachi grill place I used to go to a lot when I worked across the street from them and I would watch them put butter in the fried rice…near the end. I had to try it and it makes this fried rice so good. Curtis would argue it’s the ham that makes it so good.
Now, add the eggs and sliced green onions.
And you’re done. Seriously…amazing. The ham still has the sugary cinnamony glaze which adds a nice sweetness sometimes. The soy sauce is a must have for fried rice and the butter…yes please. Makes great leftovers too!
As long as you have the rice made ahead of time, it doesn’t take that long to put this dish together!
PS Curtis absolutely loved this fried rice recipe…we will be making this again and again! Hope you enjoy it with your family if you try it!
Recipe
Yield: Serves 4 to 6
Prep Time: 10 minutes
Cook Time: 25 minutes
Total Time: 35 minutes (not including wait time for the rice)
Day old rice, rice that’s cooked the day before and refrigerated overnight makes the best fried rice. If it’s freshly made, you may get mushy results. There are ways around it if you want to make fried rice the same day you make the rice. Omit ham or sub with crispy fried tofu to make this dish vegetarian or feel free to sub with shrimp or chicken!
Secret Ingredient Ham Fried Rice Recipe
Ingredients:
3 cups uncooked Jasmine rice, cooked (preferably the day before)
3 Tablespoons grape seed oil
3 eggs, beaten
2 teaspoons sesame oil
3 Tablespoons soy sauce
1 cup diced cooked ham
3/4 cup frozen corn
1/3 cup frozen peas
2 Tablespoons unsalted butter
2 green onions, sliced thin
Directions:
Cook rice. If you didn’t make it the day before. As soon as it’s done, lay it out on a 9×13 baking dish or a baking sheet. Allow to cool. Mix and spread out several times. Place in the refrigerator for at least 30 to 60 minutes.
Add 1 tablespoon of grape seed oil into a wok or a large skillet, heat on medium for at least 3 minutes. Swirl the oil to cover the pan. Pour in beaten eggs and allow to cook for 2 to 3 minutes and flip and cook for another minute. Remove from skillet and allow to cool. Cut into strips and then into smaller pieces, set aside.
Add 2 Tablespoons of grape seed oil to the wok and add the rice and cook for 2 minutes. Add soy sauce and sesame oil and mix the rice thoroughly. Season with salt and pepper. Increase heat to medium high and cook for 5 to 8 minutes, until rice is completely heated through, be sure to mix occasionally so the rice does not burn.
Add ham, corn and peas and cook for another 3 to 4 minutes, mixing occasionally. Lower heat and add butter, allow to melt, and mix thoroughly. Add eggs and green onions and stir gently. Season with salt & pepper. Serve immediately.
Disclosure: There’s an affiliate link in this post.
Stay Connected
Sign up today to receive exclusive content and news from The Little Kitchen:
Source: https://www.thelittlekitchen.net/ham-fried-rice-recipe/
0 notes
Text
Venison Marinades
Photo by Holly A. Heyser
“What marinade do you use?” is perhaps the most common question I get when people ask me about cooking venison.
Truth is, I don’t always use a marinade – a really good piece of backstrap needs little more than fire, salt and maybe some black pepper. But there is most definitely a place for marinades in venison cookery. You just need to know when to break out your favorite marinade, and when it’s better just to make it a sauce you serve at the end.
Why marinate?
Marinades are acid-based (or occasionally enzyme-based) liquids or loose pastes that are used to infuse meat (or veggies) with flavor, while at the same time tenderizing them. At least that’s the theory.
Bathing venison or any other meat in an acidic sauce (or with certain fruit juices like those from papaya or pineapple) will indeed break down some of the muscle tissues on the outer surface of the meat. The acid or fruit enzymes denature the proteins, making them actually a bit mushy, but we register this as tenderness when we eat it. What’s more, you should know that marinades cannot penetrate meats the same way salt-based brines do. According to most food scientists, a marinade cannot penetrate much deeper than 1/8 inch into a piece of meat, even after several days.
The bottom line is that acidic marinades don’t tenderize meat, and those with raw ginger, pineapple or papaya juices just make the meat mushy. I can hear you saying, “But when I marinate venison roasts, they are absolutely more tender than when I don’t!” And you are right, but it’s not the marinade that is making your roast more tender.
According to the great French food scientist Hervé This, long marinades do have an effect: “The meat is more tender,” This told the Washington Post. “But it is not the marinade that makes it tender: It is time. If you use an acidic marinade, it will protect the surface from spoilage while the rest of the meat matures. And you know when meat matures, it becomes tender.” This is the secret behind the long marinades in German sauerbraten, which can marinate for a week in the fridge.
And marinades do impart flavor onto the meat’s surface. Even a few minutes’ worth of marinating time will give you some added flavor in the finished dish because the flavorful liquid soaks into any crevices and cuts in a piece of meat.
Most importantly, marinating meat in an acidic sauce for at least 40 minutes has been shown by the American Cancer Society to reduce by up to 99 percent the amount of cancer-causing heterocyclic amines created when meat is cooked by a direct, open flame, i.e., grilling. This means a marinade not only improves flavor, but can also make that char-grilled piece of venison healthier.
Which cuts?
Because marinades can only penetrate a few millimeters into a piece of meat (at best), you’ll want to use cuts of venison that aren’t too thick. This means backstrap medallions from large deer, elk or moose, all leg steaks, flank steak, cubes for kebabs and so on.
Or, go the sauerbraten route and marinate a large roast for a week or more. Just remember the acid in the marinade (don’t do this with the enzyme-based marinades!), usually red wine, is just protecting the meat from spoilage, not actually tenderizing it. It’s the wet-aging of the meat for a week that does the trick.
One thing a marinade will not do? Tenderize silverskin and connective tissue. You absolutely need to trim all this off before marinating because not only will it not tenderize, the silverskin will actually block the penetration of a marinade.
How to do it?
You will want to marinate your venison in a sealable plastic bag, or in a covered, non-reactive container such as glass or plastic. Or you can vacuum seal it. Do this in the fridge to slow the growth of any bacteria.
A tip: If you like stir fries and fajitas, marinate the venison slices before you stir-fry them. You’ll get more flavor that way.
When you are ready to cook, take the meat out of the marinade and pat the meat dry with paper towels. Wet meat won’t brown.
If you want to use your marinade as a sauce, you can do one of two things: Boil your marinade for 5 minutes before using it, or, if this will destroy your marinade (like chimichurri, which relies on raw, fresh herbs) make more than you need for the marinade and use the extra as the sauce. Do not just reuse the marinade you soaked the venison in raw: There is a chance, albeit small, that you might get food poisoning.
Sample Marinades
Here are a few worth using. I’ll start with some that need no recipe.
Italian dressing. Yep. The classic. Any sort of oil and vinegar dressing works fine as a marinade.
Buttermilk. It’s acidic all by itself, and thick enough to use as the base to a batter or crust, the way you do with buttermilk fried rabbit.
Citrus. Like orange juice or lemon or lime juice. Pretty harsh stuff, but it works if you don’t marinate too long. A few hours should do it.
Soda. A Southern classic. Marinating in RC Cola or Dr Pepper or whatever is a thing. And it’s not terrible. Watch the sugar content, though, as it can burn on the surface of your venison if you are grilling over high heat.
Worcestershire Sauce. More of a Northern classic, I like this one a lot. It’s a sauce and a marinade all in one. Worcestershire is also a hallmark of western Kentucky BBQ.
Soy Sauce. More of a brine than a marinade, the salt level in soy sauce can be pretty severe, and it will darken your meat dramatically. Use only for an hour or so, or dilute it.
Here are a few marinades from around the world. All can be scaled up, and all are for about 1 to 2 pounds of meat.
Real Teriyaki
You can use store-bought teriyaki sauces, but I find them too sweet and too thick for a marinade. And if you make it yourself you can adjust the flavor to your liking. Just watch the sugar content, and don’t take it too much higher than what I have here, as too much will scorch. Mix together all the following ingredients before marinating.
1/2 cup sake
1/2 cup mirin, a Japanese sweet wine
6 tablespoons soy sauce
1 heaping tablespoon sugar
French Red
2 cups red wine
2 to 6 bay leaves
A dozen or so black peppercorns, cracked
A healthy pinch of salt
2 teaspoons dried thyme
1 teaspoon mustard seeds
Bring all this to a boil, then cool to room temperature before marinating.
Das Marinade, a German Marinade
2 cups lager beer (dark or light)
1/2 cup malt vinegar
1 teaspoon mustard seed
1 teaspoon caraway seed
1 teaspoon salt
1/4 teaspoon celery seed
2 tablespoons minced parsley
Bring all this to a boil, then cool to room temperature before marinating.
Greek style
This is a good summer marinade.
1/2 cup lemon juice
Grated zest of 2 lemons
1/4 cup olive oil
1 teaspoon salt
1 teaspoon black pepper
1 heaping tablespoon dried oregano
Mix it all together and coat your venison with it.
Yucatecan
5 garlic cloves, minced
1 tablespoon ground black pepper
1 teaspoon ground coriander
1 teaspoon salt
1/2 teaspoon ground cumin
1 teaspoon dried Mexican oregano
1/4 cup vegetable oil
1/2 cup lime juice
1/2 cup water
Buzz all this into a puree in a blender. Or you can mash it together in a mortar and pestle.
Korean Bulgogi
This might be my favorite marinade of them all. I grew up with this one; my mom marinated flank steak in a version of this sauce. It’s sweet, savory and sour all at the same time.
4 green onions, chopped
2 tablespoons grated ginger
4 garlic cloves, mashed and chopped
2 tablespoons toasted sesame seeds
2 tablespoons sesame oil
3 tablespoons sugar
2 hot chiles, minced
1 tablespoon molasses or Asian plum sauce
1/4 cup mirin, rice wine or lemon juice
1/3 cup soy sauce
Buzz them all together roughly in a food processor. You don’t want this smooth.
Source: https://honest-food.net/venison-marinades/
0 notes
Text
Batter Up: Finding a Tempura Spot to Call My Own
New Post has been published on https://cucinacarmela.com/batter-up-finding-a-tempura-spot-to-call-my-own/
Batter Up: Finding a Tempura Spot to Call My Own
amzn_assoc_placement = "adunit0"; amzn_assoc_tracking_id = "carmela-20"; amzn_assoc_ad_mode = "search"; amzn_assoc_ad_type = "smart"; amzn_assoc_marketplace = "amazon"; amzn_assoc_region = "US"; amzn_assoc_title = "Shop Related Products"; amzn_assoc_default_search_phrase = "cooking"; amzn_assoc_default_category = "Kitchen"; amzn_assoc_linkid = "51fe4d035c7af8dc5928e6f5e5b79c4e"; amzn_assoc_default_browse_node = "284507"; amzn_assoc_rows = "4"; amzn_assoc_design = "text_links";
[Illustrations: Jessie Kanelos Weiner]
It took me until I was in my 30s to understand that restaurants are like pets. They have a shorter lifespan than humans, and it’s our responsibility to take good care of them, enjoy their company, mourn their passing, and move on.
And usually, I’m capable of following my own advice. But Tenta was different: We never got to say good-bye.
One summer night in Tokyo, I went out for a walk and passed this sliver of a restaurant, barely wider than the sliding door at its entrance. Actually, it wasn’t clear that the place was a restaurant, since the only seating was at a bar, and the patrons—a mix of female and male, young and old—were smoking, drinking beers and whiskey highballs, and eating…something I couldn’t quite make out in the dim space. I squinted at the menu, the print fuzzy from being repeatedly photocopied: TEMPURA.
It was 2012, and my wife and daughter and I were living in a 260-square-foot apartment in the Nakano neighborhood while I was writing a book about Japanese food. “I think I found a tempura place,” I told Laurie and Iris. We went for dinner the next day. It’s unusual to take an eight-year-old to a bar in Japan, but it’s not illegal, and Japan is very tolerant of children. I didn’t speak much Japanese then, and there was no English menu, so I read what I could and guessed at the rest. We ordered à la carte: shrimp, eggplant, onion, green pepper, sea eel. At some point the cook/bartender, a chubby guy in his 30s with a kind smile and a black bandana, held up a hand. Enough. You can order more later!
Tempura batter has to be used quickly after it’s made, or the coating becomes tough instead of light and tender. So periodically, the cook would pour more low-protein flour into a mixing bowl, add egg and water, and mix gently with chopsticks. Then he’d pull the ingredient we’d ordered out of the fridge, dunk it in batter, and toss it into the deep fryer. At any given time, the fryer held half a dozen hunks of breaded vegetables and seafood, each destined for a different customer and in a different stage of cooking, yet the cook managed to simultaneously chat with customers and serve drinks without letting anything overcook or mixing up the green pepper order with the jumbo shrimp.
He gave us each a ceramic plate lined with paper and topped with a metal rack to keep the underside of the tempura crispy during the 10 seconds or so before we devoured it. We dipped each piece alternately in gray sea salt and tentsuyu—light and sweet from soy sauce and mirin, with an umami flavor from dashi and a cleansing bitterness from the mound of grated daikon that rose from the middle of the dish like an iceberg.
The best item we ordered was the eel. It didn’t come from the fridge. The cook pulled it live and wriggling from a tank next to the front door, slaughtered and filleted it in seconds, and served it two minutes later. Best of all, he tied the eel’s slender backbone into an overhand knot; tossed it, un-battered, into the fryer; and presented it to Iris, who to this day goes around telling children and adults alike that they really need to try crispy eel backbone.
Over time, Tenta became our symbol of everything great about Japanese food culture. Going to Tokyo without spending an evening or two at Tenta, bantering with the chef and ordering just one more shrimp, was unthinkable.
In the summer of 2016, I looked at Tabelog, the Japanese equivalent of Yelp, and found that Tenta had moved a couple blocks north. The new space wasn’t great—it had less foot traffic, was larger and less cozy, and the bar was tucked awkwardly into one corner. But the food was as good as ever. We ordered a vegetable-tempura assortment that included fried shiso leaves, battered on one side, as thin and delicate as a sheet of phyllo dough. They were so delicious that we asked for an extra plate of leaves alone.
Last year, I wanted to include Tenta in an article I was writing about Tokyo travel. When I called to confirm its hours and location, however, there was no answer. I texted a friend living in the neighborhood, who walked past the restaurant and reported what I already suspected: Tenta was no more. I thanked her in polite Japanese, relieved that the impersonal Facebook window couldn’t betray how crushed I was.
Theoretically, finding another restaurant I liked as much as Tenta should have been relatively simple. Sure, it was one of the most spectacular eating experiences of my life, but the bar for food is set so high in Japan that finding amazing food in an unassuming neighborhood restaurant is a common experience. The restaurant’s entry on Tabelog confirmed that it was nothing special, with an average rating of barely over three stars out of five (which is pretty good, actually—Japanese reviewers are tough!).
I grumbled about this a bit. How could people not recognize the greatness of this perfect little restaurant? But really, this was a good thing. Maybe Tenta was like a baby, or a house cat—we love our own and celebrate its quirks, but to a disinterested third party, it’s barely different from hundreds of millions of others. Maybe there was another hole-in-the-wall tempura bar in my neighborhood where we could become regulars—if you can use the word to describe a family that comes in once or twice a year.
Back in Seattle, Laurie and I often get pizza and beer at the Hopvine, a bar three blocks from our apartment. I like the Hopvine so much, I requested it for my birthday dinner last year, despite these facts:
It’s not the best pizza in town, or even the best pizza in the neighborhood.
Nor is it especially cheap.
It takes at least 20 minutes for them to make your pizza.
But I keep going back to the Hopvine because it’s cozy, friendly, and nearby, and the food is pretty good. This, I realized, is all I ask of a tempura bar. For that matter, it’s all I ask of my friends: Be around when I need you, and don’t be objectionable in any important way.
So I set out on an on-again, off-again quest to find the new Tenta. How hard could it be? There are over a thousand tempura restaurants in Tokyo, including at least a dozen within a mile of our apartment. And I knew exactly what I wanted: really good food (obviously), ordered à la carte and served by a friendly chef at a comfortable, well-worn bar. In other words, I was like a newly single person looking for someone a lot like my ex. Great plan, right?
Candidate #1: Tensuke
My friend Michael had sent me a photo of a batter-crusted egg oozing golden yolk onto a bowl of rice—a flash-fried egg tempura, he explained, calling it “the single best, yet simplest, dish we had during our trip.” It came from a tempura restaurant called Tensuke, in the Koenji neighborhood. I decided to check it out on my next trip to Tokyo, with my friend Molly, in October.
After our initial attempt was thwarted by a long line of diners, I made sure to arrive at Tensuke 20 minutes before it opened. A few minutes after noon, the door slid open and everyone took seats at the counter (all of Tensuke’s 12 seats are at the counter). The restaurant is so slim that my butt was practically against the wall.
Everyone ordered the Egg Lunch (JPY 1,300) that Michael had described in such glowing terms. As at Tenta, the wall above the kitchen at Tensuke is lined with vertical slats of wood hanging from hooks, each advertising a particular piece of tempura available that day. I was looking forward to supplementing the lunch set with some à la carte extras.
The chef at Tensuke is a real ham. To make their signature dish, he cracks an egg into a copper cauldron of bubbling sesame oil, tosses the shell over his shoulder into the trash, points directly at a customer, and flashes a cocky half-smile, as if to say, “This one’s for you, chief.” As the egg cooks, he sprinkles it with crispy bits skimmed from previous batches of tempura, somehow convincing them to adhere to the egg.
I had no idea it was possible to cook an egg in a deep fryer until I saw it done. I’m sure the chef ruined 10 dozen eggs before he got it right. But once he did, jackpot: Each bite delivered tender whites, runny yolk, and crispy crags of batter, all moistened with a sauce balanced right on the line between salty and sweet.
Molly and I got only a few bites into the egg and rice before the counterman started delivering the rest of the lunch-set items to a paper-lined plate set on the ledge behind the egg bowl. Whiting. Shrimp. Eggplant. The most tender and sweet piece of green pepper. Compared with Tenta, the tempura at Tensuke has a lightness and an almost smoky perfume of sesame oil. The lunch set marched on and on. I hid a piece of squid underneath some rice. We did not order any extras.
In December, I was back in Tokyo with my family and took them to Tensuke for lunch. The egg came first, and Iris dug in. “This is one of the best things I’ve ever eaten,” she said. As more tempura pieces arrived, we passed them around, like kids furtively trading the contents of their sack lunches.
Tensuke is a fantastic restaurant. But it’s not going to be our new regular tempura spot. It’s just too good. A place that draws customers from all over town and always has a line out the door isn’t a neighborhood hangout, even if it looks like one on the inside.
Candidate #2: Tenya
If you’re from the United States, Tenya is a difficult restaurant to understand. It’s a national chain with about 200 locations throughout Japan. As is true of fast food places everywhere, it has zero atmosphere, and it’s easy to get out for under $6.
Unlike with fast food chains in most places, however, the food quality at Tenya is superb. Last time I was there, I had the tendon (sauced tempura on rice) with shrimp, maitake mushroom, sweet potato, squash, lotus root, and green bean. It cost $5.50, came with miso soup, and made a hearty dinner. Their recent fall seasonal specials included a duck tempura bowl and one made with fresh oysters and red rockfish. They also serve draft beer.
This isn’t so outlandish by Japanese standards: Many fast food places in Japan have bizarrely good food (hello, CoCo Ichibanya). But the dishware at Tenya is also superb. Seriously, look at this photo. I’ve had worse food and worse presentation than Tenya at a supposedly high-end tempura place.
Tenya is probably capitalism’s greatest achievement. But it’s not going to be our neighborhood hangout, because it’s just not designed for hanging out. The lighting is institutional, the seats are uncomfortable, no one is going to hail you as a regular, and it’s hard to imagine striking up a conversation with other diners. (Imagine approaching another table at Wendy’s.) How does Tenya serve such great food for $6? Partly by making sure you don’t sit around wasting their real estate.
Candidate #3: Kiyoshi
I began wandering the neighborhood, peering into the windows of tempura places to see if their ambience sparked any Tenta nostalgia. That’s how I came across Kiyoshi, a little mom-and-pop tempura place on Waseda Street, about halfway between our apartment and the neighborhood temple, Arai Yakushi. It has a weathered wooden bar at the front and a small tatami-floored dining room, which is where we sat one Wednesday night in December. We ordered seafood- and vegetable-tempura assortments and the pickle plate. It’s never a bad idea to order pickles (oshinko) at any restaurant in Japan, but these were particularly good—especially the tart apples pickled in rice bran.
The tempura was excellent. It featured almost everything we would have ordered at Tenta, including a crispy kakiage patty of seafood and onions. Our server, the mom of the mom-and-pop team, was delightful. The menu listed only tempura sets, but Mom assured us we could also order à la carte, and I requested a couple extra pieces of the tender, creamy kabocha squash. Everything was delicious, and with each bite, I dwelled on how this place was different from Tenta. The chef was older, and skinnier. They didn’t have menu items listed on vertical wooden slats on the wall. No eel bones.
Kiyoshi is a terrific neighborhood tempura bar, and I know that each time we go back, it will feel a little more like mine. It is everything I’m looking for in a new Tenta—but it’s simply not Tenta. Just because all cats are cats doesn’t mean I’d be satisfied if someone swapped my cat out for a similar model.
The Tempura of the Mind
A couple days after visiting Kiyoshi, we went out for Christmas dinner to Penguin Village, an okonomiyaki restaurant run by the Oda brothers, two ruggedly handsome Japanese professional-wrestling fans. Their restaurant is open most nights from 5 p.m. to 5 a.m., and the facade features an absurdist pirate-penguin mural.
Okonomiyaki are Japanese pancakes. They’re drinking food, and at most Tokyo okonomiyaki places, you cook them yourself. The waiter brings you a bowl of sticky batter full of cabbage, mountain yam, pickled ginger, and whatever custom ingredients you ordered, and you stir it up and cook it on a griddle built into your table. I cooked my lumpy first okonomiyaki at Penguin Village, in 2012.
As at Kiyoshi, you take your shoes off and sit on the floor. We ordered Iris’s favorite, the Niku Niku Niku (“meat meat meat,” although it actually includes four meats, if you count pork belly and ground pork as two meats), and waited the agonizingly long 15 minutes it takes to cook an okonomiyaki.
While our food cooked, we chatted with the brothers, who mentioned that we’d come in on the restaurant’s 11th birthday. After dinner, they brought us free ice cream in heart-shaped dishes—whether for the restaurant’s anniversary or because they hadn’t seen us for over a year, I’m not sure.
Okonomiyaki is not my favorite food. Penguin Village is surely not the best okonomiyaki restaurant in Tokyo. But the stomach wants what it wants. With my most analytical hat on, I went looking for a new tempura place—emphasis on the tempura—when what I really wanted was a new place.
So I guess a restaurant that doesn’t serve tempura is my new favorite tempura place. In any case, it’s never allowed to close.
amzn_assoc_placement = "adunit0"; amzn_assoc_search_bar = "true"; amzn_assoc_search_bar_position = "bottom"; amzn_assoc_tracking_id = "carmela-20"; amzn_assoc_ad_mode = "search"; amzn_assoc_ad_type = "smart"; amzn_assoc_marketplace = "amazon"; amzn_assoc_region = "US"; amzn_assoc_title = "Shop Related Products"; amzn_assoc_default_search_phrase = "cookware"; amzn_assoc_default_category = "All"; amzn_assoc_linkid = "b45319dac495d29e17b5eff312392025"; Source link
0 notes