#mark (awl)
Explore tagged Tumblr posts
Visit Tumblr Blog
Explore Tumblr blogs with no restrictions, modern design and the best experience.
Last Seen Tumblr Blogs


Fun Fact
In 2020, 44% of users from Denmark used Tumblr daily.
Text
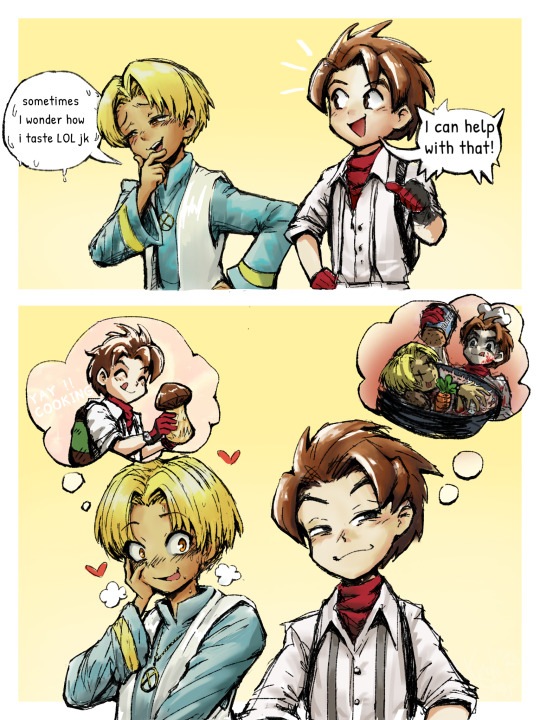
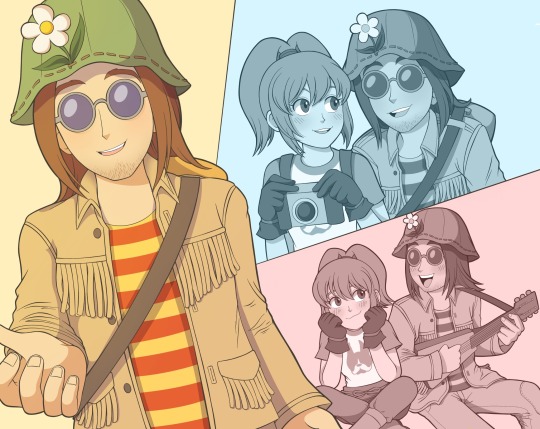
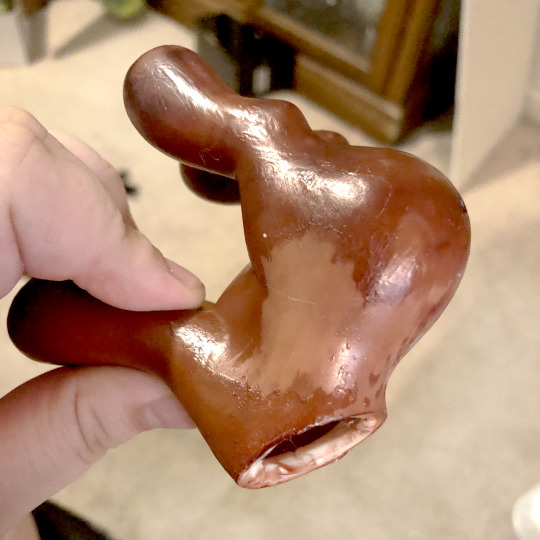
did not expect to find forbidden inaccessible gay autocannibalism variant of rock’s after-marriage line hidden away in the dialogue files for a wonderful life special edition for the ps2 but here we are
context:
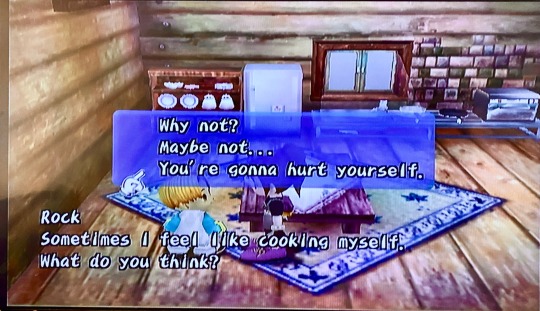
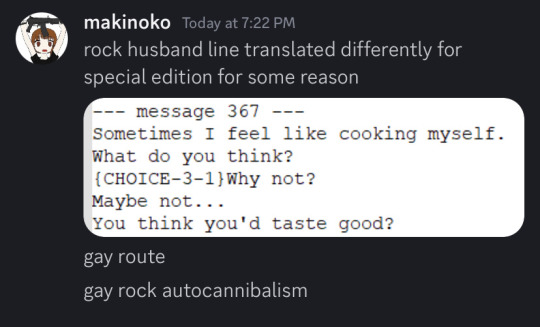
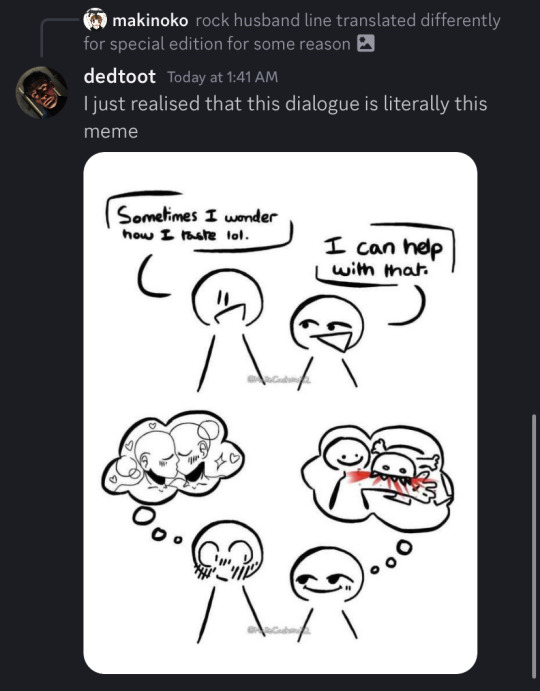
#bokumono#my art#tumblr user dedtoot has the biggest brain once again#harvest moon#rock tumbling (sos)#story of seasons#harvest moon a wonderful life#hm awl#harvest moon a wonderful life special edition#hm anwl#harvest moon another wonderful life#rock (awl)#awl mark#sos awl#story of seasons a wonderful life#for some reason all the bachelors’ separate ‘husband’ dialogue files are in special edition for ps2#AND some lines are different from how they appear in anwl#my best guess is it’s an earlier draft of the anwl script?? since it also has stuff like asking rock if he’s trying to pick you up#instead of asking if he’s hitting on you#which is a phrase in natsume dummied out ds event that later was readded with ‘hitting on’ instead#but who cares. gay cannibalism. happy pride i guess#bokujou monogatari#cw blood#suggestive#i guess#mark x rock#rock awl#awl rock#rock x mark is a totally different dynamic than rock x pony. mark is a bit silly himself#doing this on my fucking phone was hell and not worth it and took 21 hours when tablet would have not. Evil
171 notes
·
View notes
Text

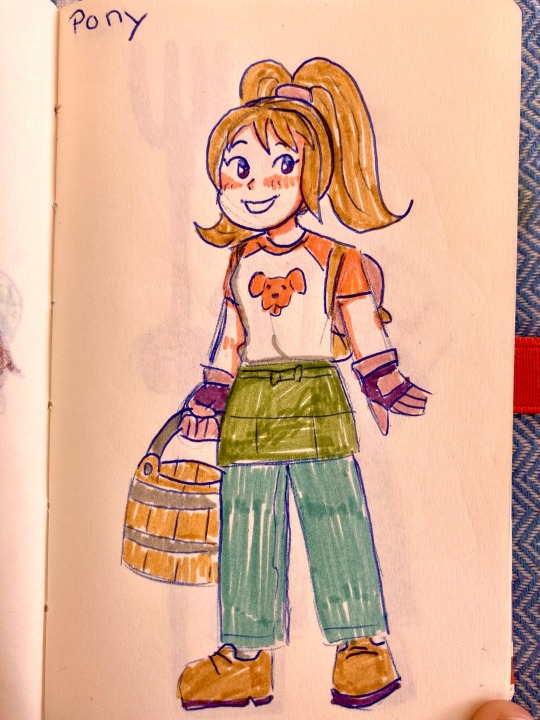
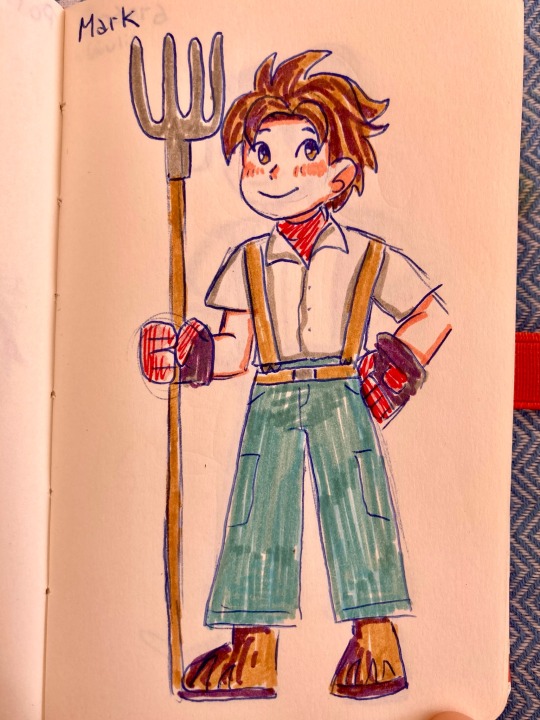
This weeks prompt for #awonderfuljune23 is Heart Event
It’s obvious Gustafa is my favourite, so I drew two versions with Pony and Mark!
#story of seasons#harvest moon#bokujou monogatari#sos awl#bokumono#my art#fan art#digital art#video games#Gustafa#pony#mark#art prompt#art challenge
447 notes
·
View notes
Text
My page illustration for the recent @lifeinthevalley zine! It was a lot of fun to go back to this game. I hope I can try out the remake soon!
#harvest moon a wonderful life#story of seasons#hm awl#harvest moon#awl mark#awl pony#fanart#mine#my art#digital#illustration#zine#the gamecube color palette is fun to work with
55 notes
·
View notes
Text
fan character thingy? i decided to design an ancestor design for steiner\skye, since that's a thing hm ds has going on
but instead of making him look identical to steiner, like with every other character, he looks kinda like a cartoon henchman. because contrast funny


#he has a moustache cuz i was thinking about that awl concept art where mark had them and i am still upset it was not in the game#anyways uhh i named crag.bc steiner is a stone themed name. i may or may not draw him more#craig would make more sense as a name since it's a stone themedname but crag funnier#(anyways for the comic(?) thing the joke is that his cartoon henchman nature got to him even at a sensitive moment like this)#my doodle#bokumono#мої персонажі
9 notes
·
View notes
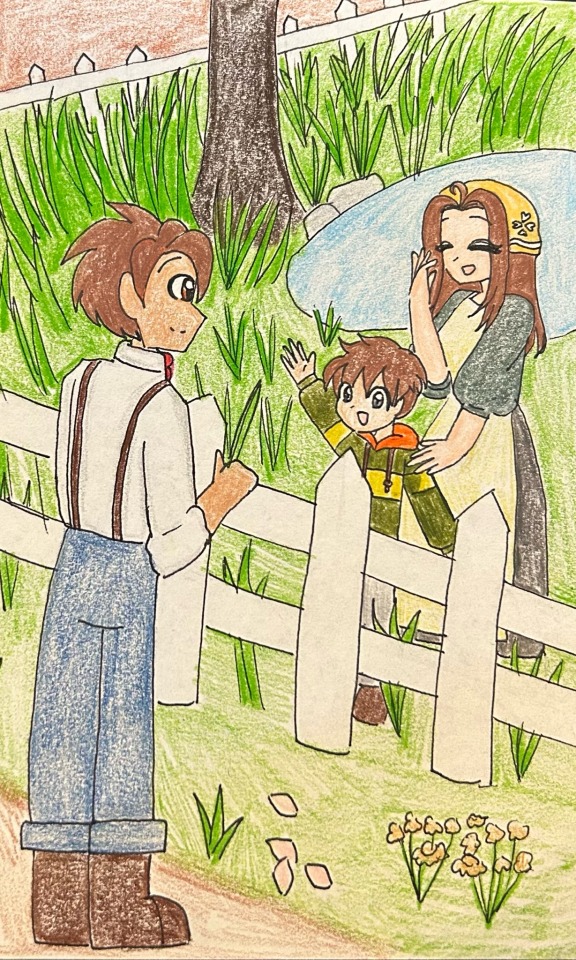
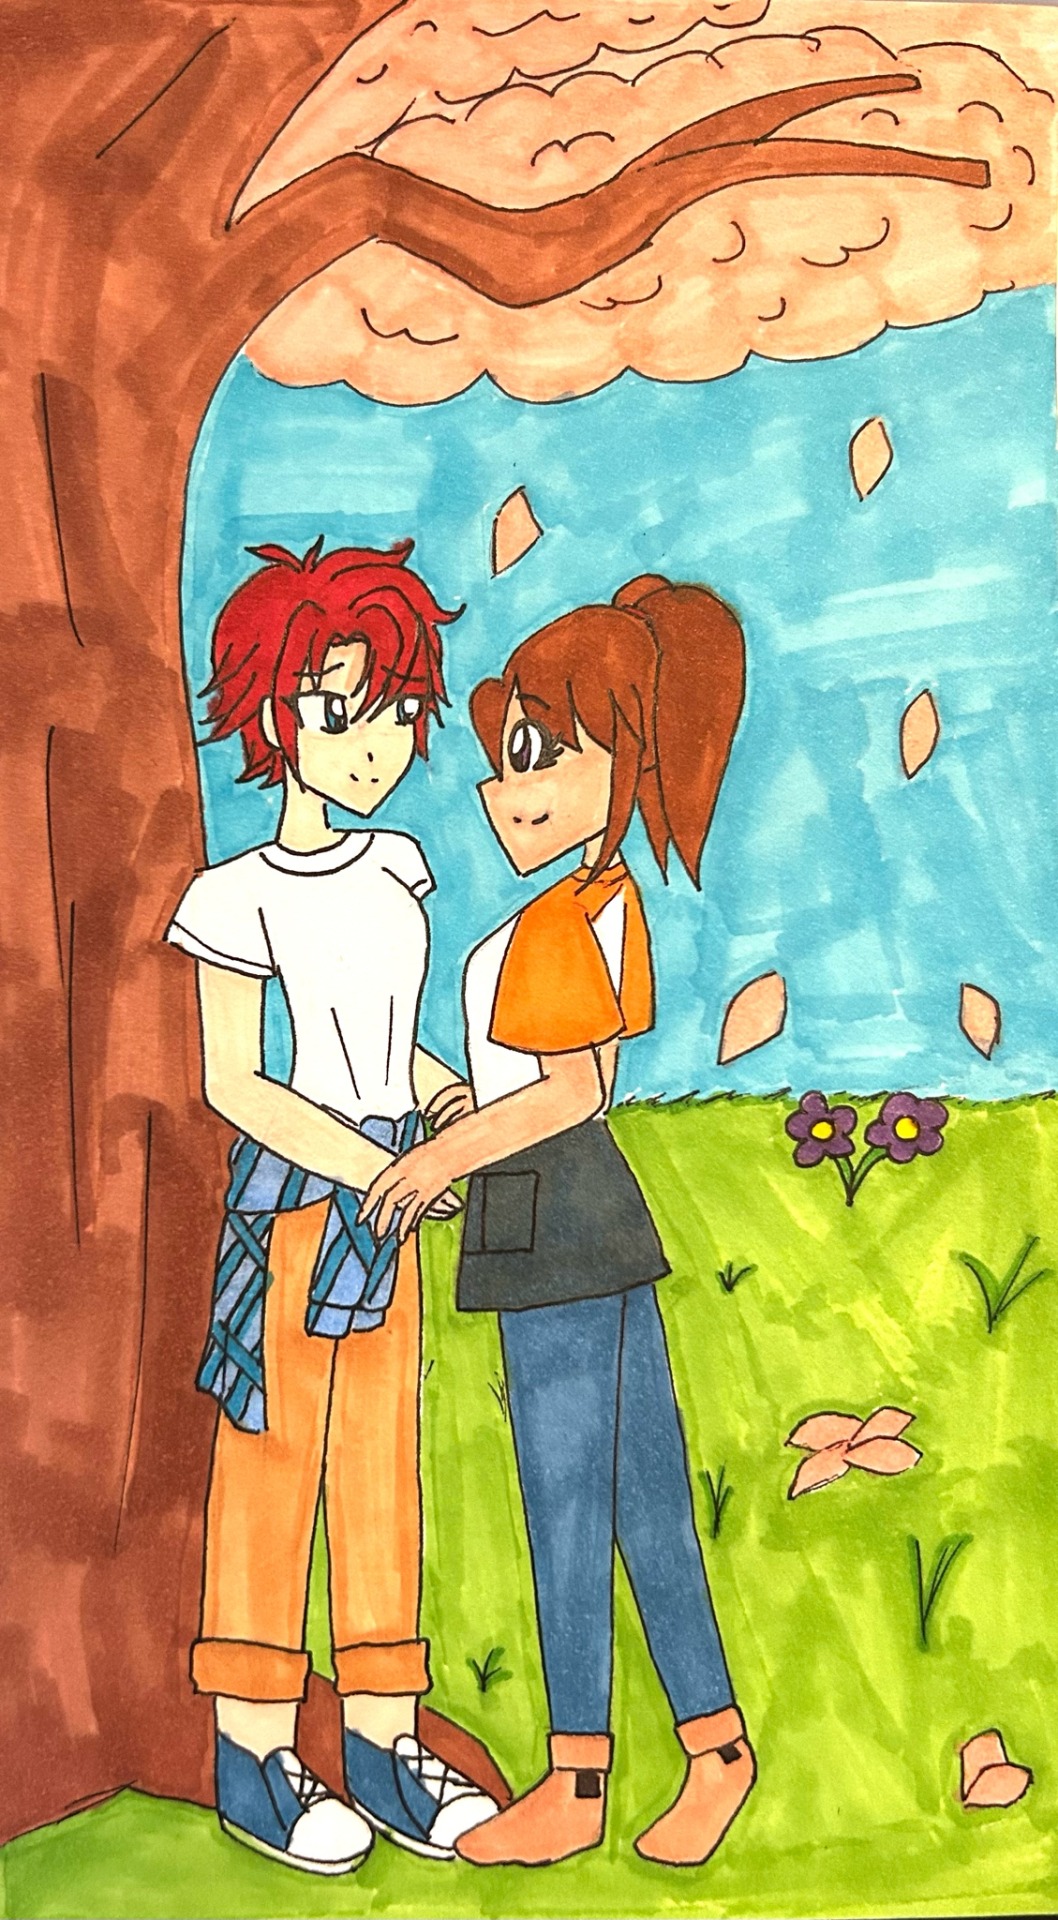
Text
Something i forgot to post last year💀 I love Harvest moon/SoS a wonderful life and I always have shipoer the male farmer and Rock together heh


#sos awl#harvest moon#story of seasons#story of seasons a wonderful life#harvest moon awl#harvest moon a wonderful life#Sos awl rock#awl rock#harvest moon rock#mark x rock
4 notes
·
View notes
Text
hair cc pack coming this week!
Based on the bachelors of Harvest Moon & Story of Seasons A Wonderful Life!

#the sims 4#the sims#sims 4#ts4#s4#s4cc#thesims4#hair cc#joshseoh#jo_se_oh#harvest moon another wonderful life#story of seasons awl#story of seasons a wonderful life#bokumono#mark#rock#cody#grody#marlin#matthew#gustafa
77 notes
·
View notes
Text
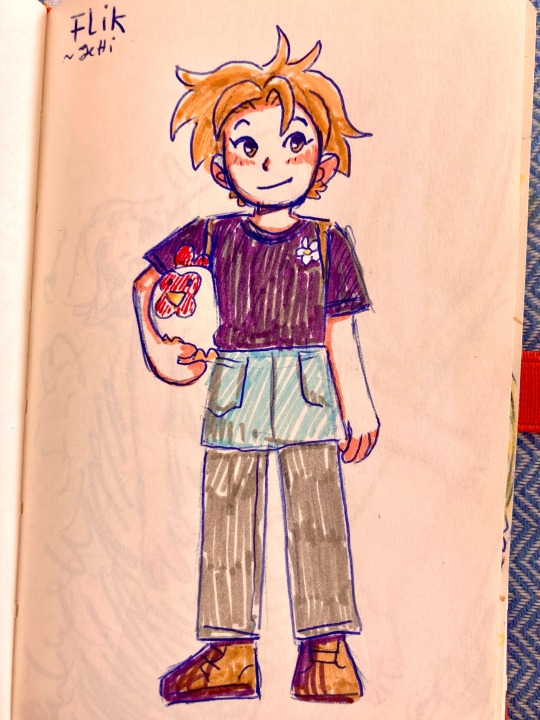
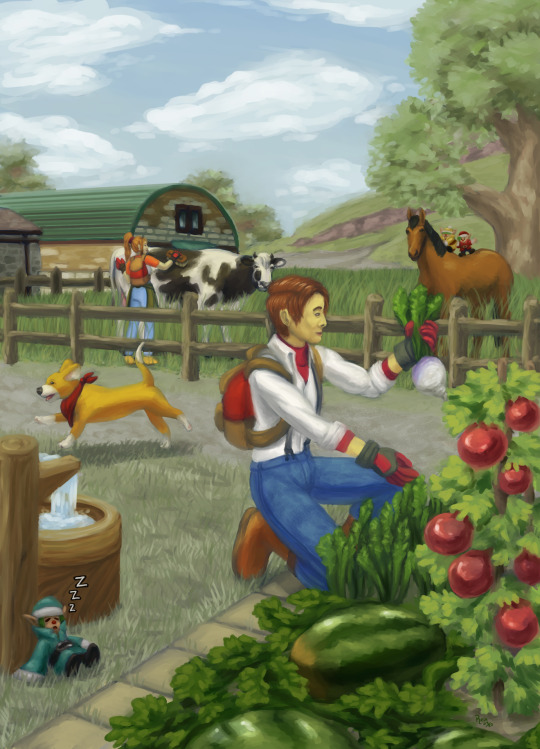
Some AWL Farmers💕
#myart#my art#art#drawing#fanart#sketch#sos awl#harvest moon awl#harvest moon a wonderful life#harvest moon oc#harvest moon pony#harvest moon mark#hm awl#story of seasons awl#story of seasons#story of seasons a wonderful life
37 notes
·
View notes
Text
My artwork for the SoS AWL Fanworks contest!!!
I tried to submit more than one but it only let me fill out the form once lol so I only got to submit the first one. I know I’m not a great artist, but I love AWL so much so I thought I would try!
47 notes
·
View notes
Text


The first Story of Seasons: A Wonderful Life character reference is the amazing Mark!
(at least I think that's still his name 😅)
#story of seasons a wonderful life#sos awl#story of seasons#cosplay reference#story of seasons a wonderful life mark#screenshots#3D model
8 notes
·
View notes
Text
10 grommets set, 22 to go
#RRD cosplay#my cosplay#my sewing#poking holes in a silk dress you've been working on for 6+ months is SO DIFFICULT#ugh#but hey the armscyes are DONE#the placements for the grommets at center back are all marked#just taking a break before I start poking my awl through the center back too#I've done all the pattern matching during the marking phase so I shouldn't have to do much here#but I know I'm still going to be obnoxiously fastidious about it#I definitely need a break but I don't want that to turn into procrastinating it just because it's stressful lol
4 notes
·
View notes
Text
30 days of Harvest Moon day 23 - wedding / rhythm
these are the genders apparently i don’t make the rules (natsume and xseed rock makes the rules)
#30 days of harvest moon#my art#pssst. these were all translating the same word in japanese…#it has different ‘connotations’ when used towards a woman which is probably why natsume went with ‘babe’ for anwl#based on that ed elric meme because he and rock share very superficial similarities#rock is larry butz if he was bi and no one wanted him#sos awl#bokumono#story of seasons#harvest moon a wonderful life#harvest moon#hm awl#hm anwl#story of seasons a wonderful life#rock tumbling (sos)#harvest moon another wonderful life#rock (awl)#fanart#art#marlin (awl)#matthew (awl)#molly (awl)#nami (awl)#muffy (awl)#hmanwl#awl pony#mark (awl)#muffy x pony#nami x maya#matthew x shion
184 notes
·
View notes
Text
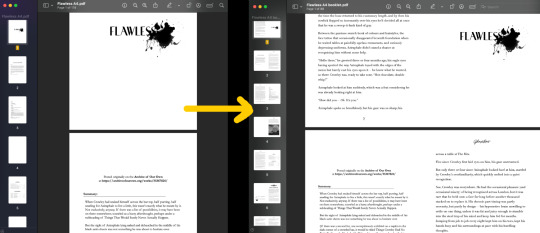
Pause the video to read. Sorry for the crappy videos and awkward setting, I am moving and HAVE NO TABLE, so I am on the ground.
Here is part 1: from AO3 to printing
Part 2: Folding and stitching together the booklets
You will now have a pile of printed sheets (pages), front and back, previously organized in booklets. I used an 8-page booklet, which means that I will need to fold together 2 sheets, one inside the other.
Follow the numbers, so that you will have the lower number on the outside (on the starting point of the booklet, so on the left) and the higher number on the outside at the end of the booklet (on the right). Each booklet will basically be a "mini book" of only 8 pages.
Fold all the booklets and make sure to pile them in the correct order. Your pile will be your printed book!
Now that you have everything folded make sure to check that your first page and your very last page are blank. I forgot so I added a blank sheet (folded) at the start and at the end of my pile. The blank pages will be needed because they will be glued to the cover!
Now you can use a pencil to mark where to poke your holes. I usually choose 2,5 cm from each border and then divide the remaining page by marking every 4 cm, but it is up to you!
Next you will need to mark each single booklet. You can do that by measuring each with a ruler, or just using the rule while poking the holes - or, you can pile them all up, make sure they are well aligned, use a ruler as a guide to mark a vertical line that follows your previous measurements.
In this video I did a mix of the two, as some of my mark were not too visible, so while I was poking the holes I guided myself with the ruler.
Now, time to poke the holes! You will poke each booklet (two sheets, one inside the other) together. Open the booklet facing down so you can see the pencil marks. Make sure to add a soft surface underneath (I used some foam), and then use a needle or an awl to poke the 5 holes. At the end you should have a pile of booklets, all with 5 holes that can more or less (more is better!) align with each other's.
TIME TO STITCH THE BOOKLETS TOGETHER.
Stitching is probably the most time consuming step.
There are different way to stitch the booklets together but each one is fundamentally a version of a thread passing inside and out the holes you made in a booklet and then connecting to the next booklet and the next and the next. For this reason it is important to make sure you are stitching your booklets in the correct order.
As I said, there are different stitches so it is up to you what to choose. I personally use:
youtube
The video will also teach you:
How to start with the first booklet
How to change the thread when you finish it
How to secure the thread at the end
Other examples are the French stitch (video here) which is particularly pretty so probably best to use if you do not fully add a cover (covering the spine) but stitch a cover at the start and end like you see in the video.
The thread you use also depends on what you prefer. I personally use a waxed thread (more resistant) if I have very big paper. In the example I filmed I have extremely thin paper so I am stitching the booklet together with a simple embroidery thread.
I also recommend using a small curved needle!
177 notes
·
View notes
Text
Some Tree-related Vocabulary

for your next poem/story
Achene - Small, dry and hard one-seeded fruit.
Afforestation - Establishing a forest on an area which has not previously had trees growing on it.
Allelopathy - The adverse effect on the growth of plants or microorganisms caused by the action of chemicals produced by other living or decaying plants.
Annual rings - a layer of wood (including spring-wood and summer-wood) grown in a single season; best seen in the cross-section of the trunk.
Awl-like leaves - Short leaves that taper evenly to a point; found on junipers and red cedars.
Bole - The main trunk of a tree.
Calyx - Outermost whorl of modified leaves in a flower, usually green, but sometimes showy colored.
Cuneate - Wedge-shaped.
Cyme - Flat-topped flower cluster, central flower opens first.
Defoliation - The loss of leaves or foliage on a plant or tree.
Den tree - A hollow tree used as a home by a mammal.
Drupe - Fleshy fruit with a single stone or pit.
Evergreen - Trees and shrubs that retain their live, green leaves during the winter and for two or more growing seasons.
Heartwood - Nonliving wood (often dark) found in the middle of a tree's stem.
Leaf scar - The mark which remains where a leaf falls off a twig.
Legume - Fruit that is a dry, elongated pod that splits in two, with seeds attached along one edge inside.
Peduncle - Primary flower stalk.
Persistent leaves - Leaves that remain on the tree during winter.
Phloem - Inner bark of a tree that carries food and sugars from the leaves to other parts of the tree.
Pome - Fruit with a fleshy outer coat and a stony layer (similar to plastic) within, with seeds inside the stony layer (apples, pears, etc.).
Samara - Dry fruit with one or two flat wings attached to a seed (as on elms and maples).
Sapwood - Living wood, often light colored, found between the bark or cambium and the heartwood, usually darker colored.
Softwoods - Usually refers to trees that are conifers or cone-bearing; conifers generally have softer wood than angiosperms or hardwoods, but there are many exceptions.
Spring-wood - Wood on the inside of an annual ring, formed during the spring; cells are often thinner-walled.
Summer-wood - Wood on the outside of an annual ring, formed during the summer; this wood is sometimes dark and cells are often thicker-walled.
Sources: 1 2 ⚜ More: Word Lists
#tree#terminology#nature#writing reference#spilled ink#dark academia#writeblr#langblr#studyblr#linguistics#words#creative writing#writing inspiration#literature#writers on tumblr#writing prompt#poetry#poets on tumblr#light academia#albert bierstadt#writing resources
117 notes
·
View notes
Text
Let's talk about our fanbinding mistakes
Based on the responses of 135 fanbinders, my very informal consultation indicates that the most common errors we make are
Taking the wrong measurements. 23.7%
Messing up the case in. 20%
Finding a typo after all is said and done. 20%
Staining the book with adhesive. 17.8%
Plus, a 4,4% that said Case upside down (after making the inquiry I realized that it should be part of item n° 2 and not an independent item; duh my fault. So it is plausible to think that "messing up the case in" might be a 24,4%).
Now, let's talk about these mistakes and share our strategies to prevent them.
From my amateur experience:
To get the measurements right, in addition to measuring two or three times, I use an awl, a ruler and a square: I mark what I will cut with a fine pencil or with the awl. When I have used a thick lead pencil, sometimes I fail in a mm. The square is to make sure the angles are straight before cutting. My mistake is not always that I score wrong, but that it is not necessarily straight. Another very obvious tip is to make sure you have good lighting when measuring.
For the adhesive stains, it has helped me to always have two clean wipes within reach, one wet and one dry. I also have a Residue Eraser Rubber Cement Cleaner for when I discover it late.
And you? What helps you to overcome these mistakes? (or make fewer of them)
@renegadeguild
#fantastic ficbinders and where to find them#fanbinding#ficbook#fan art#ficbinding#fic binding#fic binders#fanbind#fanbook#fic books#mistakes we all made#fanfiction bookbinding#fan fic binding#renegade bindery
113 notes
·
View notes
Note
since we’re on the topic of bookbinding, i’ve been wanting to get into it but i haven’t actually done any research (yet) other than vibes, so do u have any tips for complete beginners?? :)
@geminibookbinding is who inspired me to finally look up the whole process and figure out where to start! this is the super helpful tutorial i got from them
i had dabbled with binding before though, using Sea Lemon's tutorials to make blank sketchbooks yearsss ago. i still use her text block and diy hardcover videos as a refresher/reminder while i bind!
the biggest thing that stopped me from learning to bind printed fiction was not understanding how to print the text from home, specifically how to get the pages in the right order for signatures. it's actually so easy with some very simple to use programs: QuantumElephant for PC users (free), and I use BookletCreator on Mac ($20)
i want to go into more detail about my process and supplies from a beginner perspective, i hope this helps:
format the text in a word processor
export your document as a single page PDF
enter that PDF file into Quantum Elephant or BookletCreator, to rearrange the pages for your signatures. your program will give you a new PDF file that you can then print.
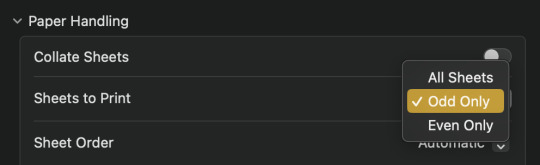
4. double sided printing: i was so so scared of this at first, but it's incredibly simple. no matter what printer you have, somewhere in your print settings will be an option to print even or odd pages.
print all the even pages first, then when the stack is finished printing, flip them over, insert them back into the paper feed, and print the odd pages.
5. fold the signatures together so you have a stack of little booklets, then mark on the spine where your sewing holes need to be. manually punch the holes using an awl, or diy an awl by stuffing a cork on the end of a straight needle.
6. sewing: take regular sewing thread and run it over a block of beeswax. this makes the thread easier to manage and holds it in place better while you sew. a curved needle is also much easier to use than a straight one, especially for a kettle stitch (using Sea Lemon's tutorial)
7. gluing: glue decorative pages (or plain, but thicker paper) to the front and back to create your end pages, then press the book flat to apply PVA glue to the spine. press it overnight so the glue dries flat. (optional: glue a ribbon to the top of the spine, then sew on headbands) finally glue an additional piece of paper (or mull) around the spine to strengthen it.
8. optional: trim the edges of your book down to create a smooth edge. this one's given me the most trouble because it's very hard to get right with a knife, and the proper supplies are expensive. check your local stationery shop (i.e. Officeworks, Staples) for an industrial guillotine service
9. cover: once you have the final measurements of your text block you can start making the cover. this is essentially gluing cardboard, binders board, or plywood etc to a sheet of fabric. the fabric either needs to be bookcloth, or have some kind of non-porous back so the glue doesn't seep through. you can diy bookcloth from any fabric with tissue paper. then glue the decorate end pages to your cover to attach the textblock!
125 notes
·
View notes
Text

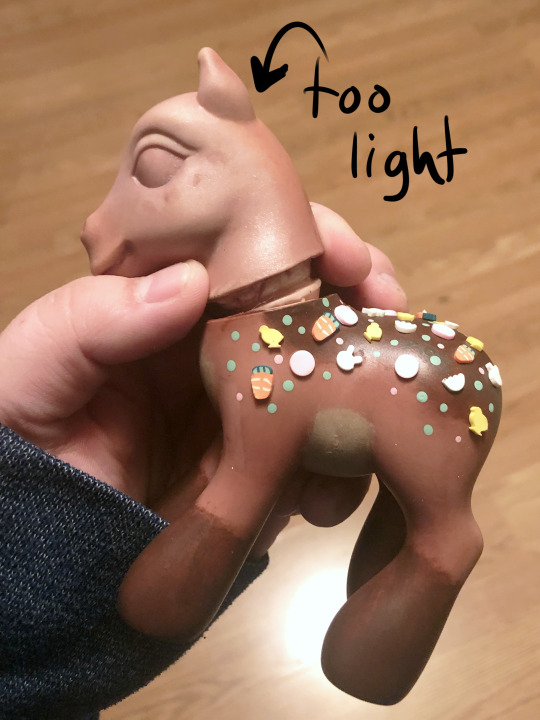
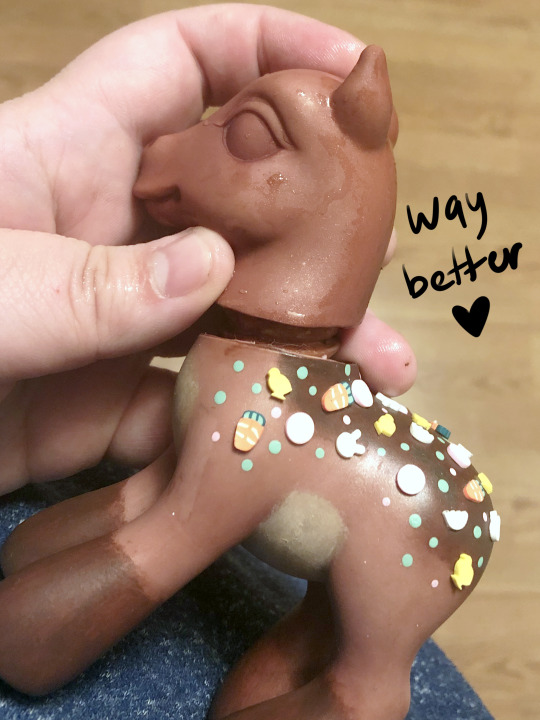
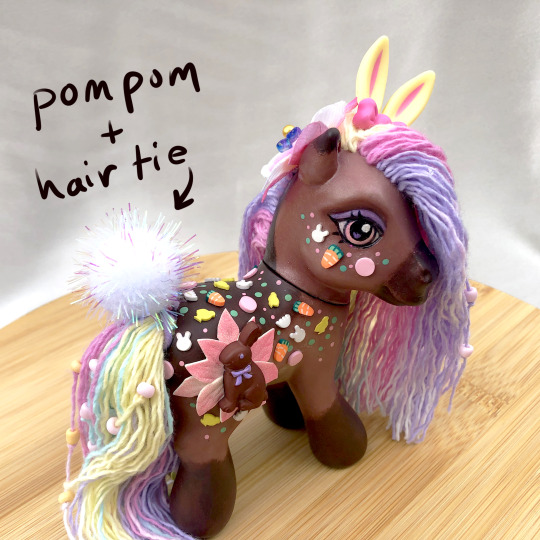
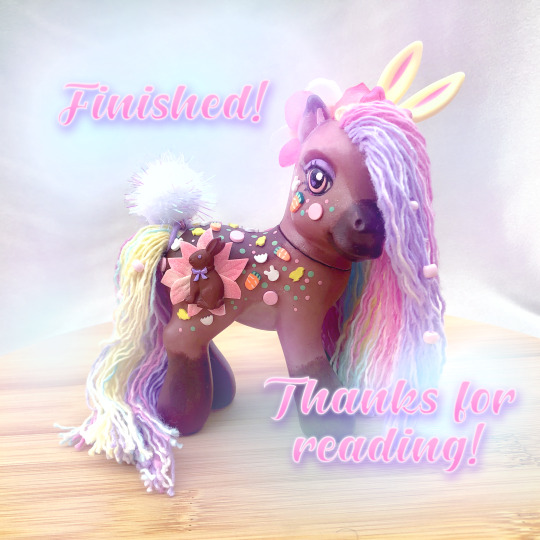
Hello! I wanted to share my process of how I made my Easter Pony! She is my second ever custom and she made all the trouble I had with the first one seem like a walk in the park in comparison ಥ_ಥ Let's begin!
DISCLAIMER: Custom ponies like this one are not to be played with by children nor made by children. This pony was made with the use of nail polish remover (acetone) which is toxic. You need to wash your hands throughly after use and use in a well ventilated area. This pony was also made with sharp tools such as an xacto knife, sewing pins, rehairing needles, and an awl.

First, the concept art! Trial and error caused her to look a little different than the concept art but I still love the end result!
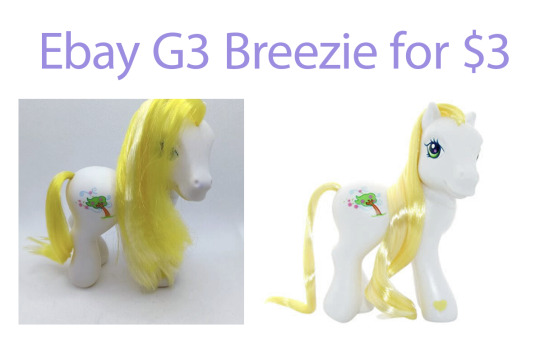
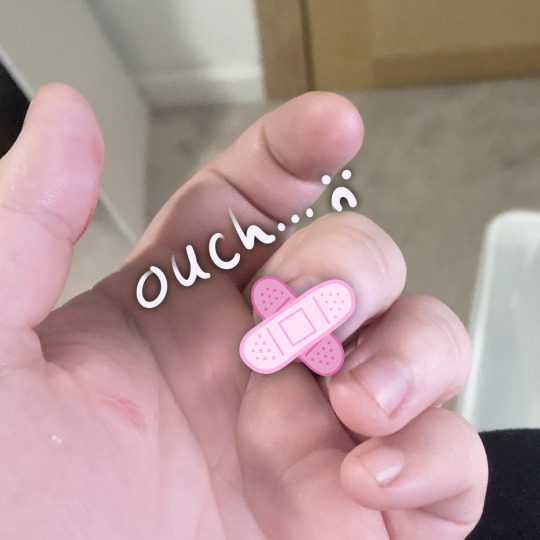
I wanted to start with a white base to give myself a clean canvas for dyeing so I got this G3 Breezie off Ebay for only $3. I decided to first remove her mane and tail which requires removing the head. If you know anything about G3 pony customzing, you know their heads are difficult to get back on once they come off. Even when you run them under warm/hot water. So to get it back on for dyeing, I tried trimming a little excess of vinyl off the neck ring with my xacto knife. It slipped and got me right under my nail! Bad omen for what's to come!
After getting her prepped (removing her mane and tail, cleaning her, using acetone (nail polish remover) to remove her cutie mark) she was ready for a dye bath! I used Rit DyeMore as regular Rit Dye won't dye the vinyl material that ponies are made of. This was my first ever time dyeing anything that wasn't fabric so I was thrilled when she came out this warm rich brown! So pretty!

I read online that dyed ponies will leach dye onto other ponies if they touch, so I wanted to try and prevent this as much as possible with some matte sealer. Lesson #1: Even though she was dry, the matte sealer reactivated the dye! The smallest touch left a print! :(

I pushed forward! And tripped immediately after! I thought, "Surely matte Modge Podge will seal her just that much more" and to my dismay, the Modge Podge kept every brush stroke I made when it dried!! She looked like a leather hand bag! ˚‧º·(˚ ˃̣̣̥᷄⌓˂̣̣̥᷅ )‧º·˚ I learned later you can buy matte Modge Podge spray online but all I had was the type you brush on to your surface.
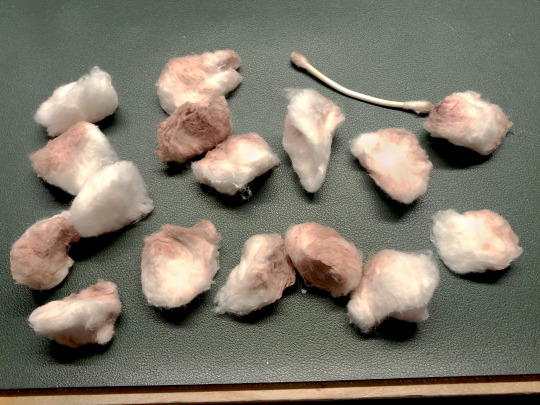
Thankfully, with the help of sixteen cotton balls and a q-tip with acetone, I managed to remove all the sealer but she was no longer that nice rich brown. Oh well I still loved her!
And whoever said the paint will protect the eyes from the dye has clearly never dyed a dark pony! Her eyes were so brown after this lol


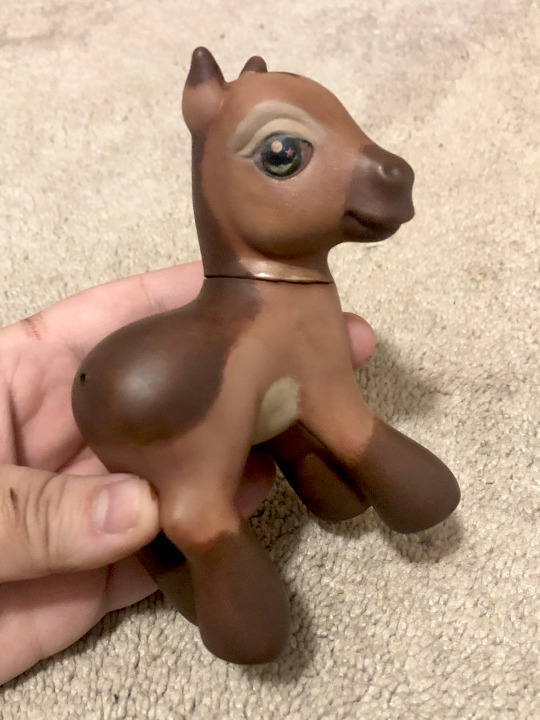
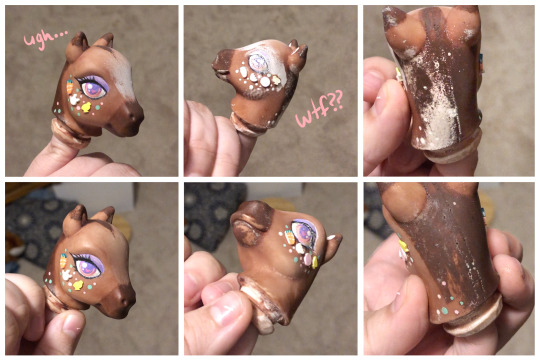
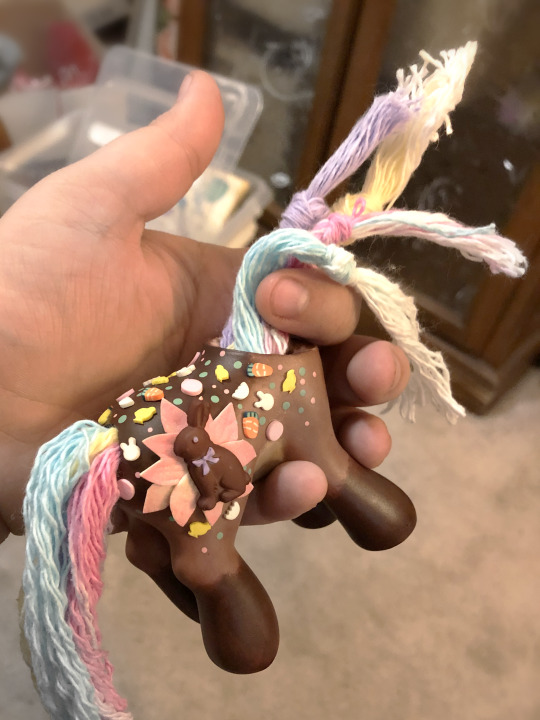
Painting, adding of polymer clay easter themed confetti, and adding her 3D chocolate bunny cutie mark went great! It was all going well until the eyes.
I had never fully painted pony eyes before so the first attempt was pretty bad. Not even my multiple attempts at glitter and using clear nail polish as a cheap gloss on the eyes could save them.
It was so bad that I almost didn't take any pictures but when I went to seal her head, this weird white powder covered half of her face?? I had never seen this before and it freaked me out thinking I just ruined her. I managed to get it off with a cotton ball and some acetone but her paint was fully damaged.
Turns out this was caused because I didn't shake the can of sealer well enough. I needed a break....
While I took a break for a few days, I decided to watch tutorials on how to paint doll eyes and learned that it's actually pretty common to use high quality watercolor pencils; either Faber Castell or Derwent (which is what I ended up buying).
When I came back, I made the hard decision of removing all the paint and decorations from the head and starting over. Hours of work gone but it was so worth it! 🩷 Removing the paint with acetone ended up making her head lighter than her body so I had to redye her head lol. This time I mixed Derwent pencils with acrylic paints for her eyes.


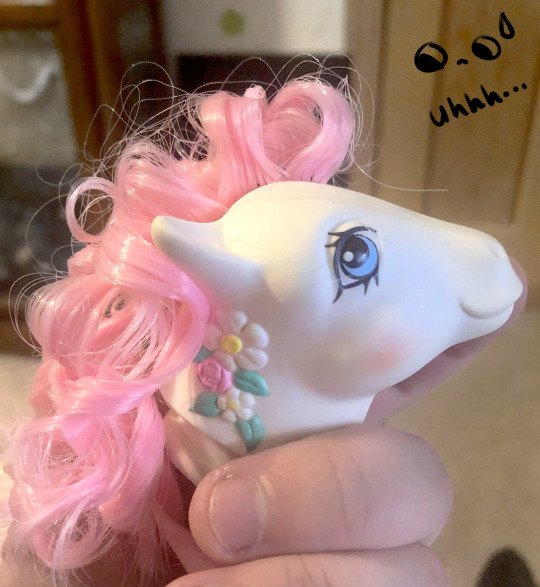
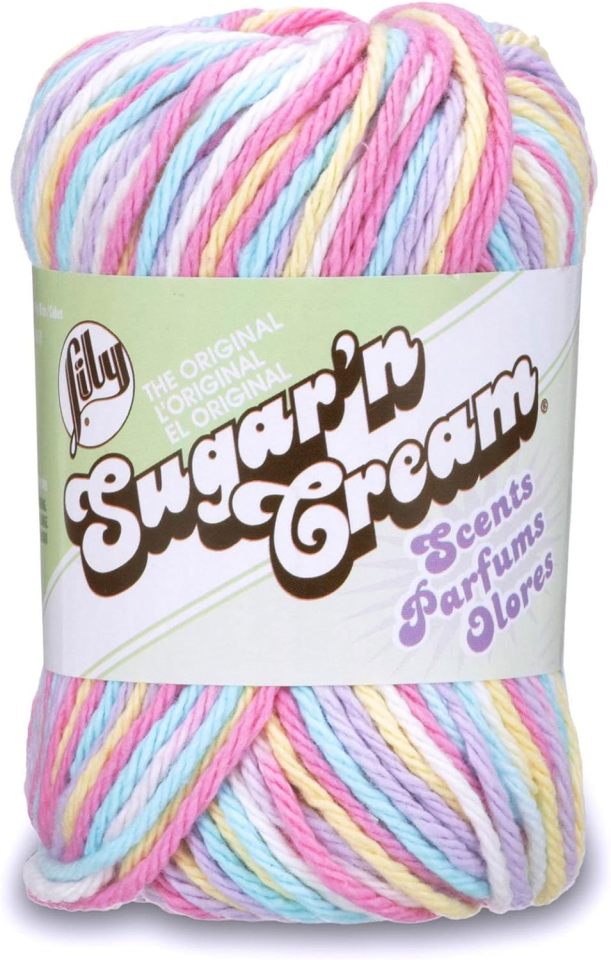
Time for the hair! I've never done curls before and my original plan was to buy curly hair online but it's so hard to find in the color and curl size I wanted.
So my second idea was to buy small curlers to use on regular nylon doll hair bought from ShimmerLocks on Etsy. But when I tested them out on poor Flower Bouquet it looked so bad ಥ_ಥ
I discovered a Youtube channel you may know called Dollightful where in one of her Stock Box videos she used yarn that she unraveled to make super cute tight wavy hair for a doll. It was a perfect solution! It looks so good but omg it was tedious haha! I used it for her tail too; sectioning off the colors hoping they'd stay separated (they didn't lol).
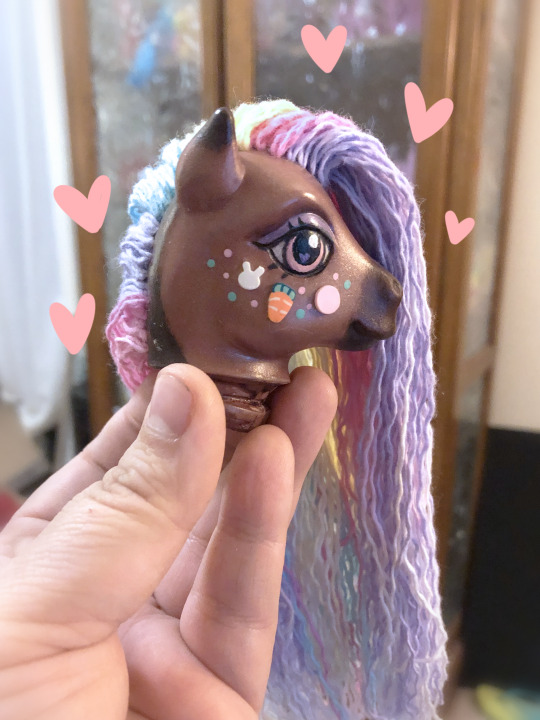
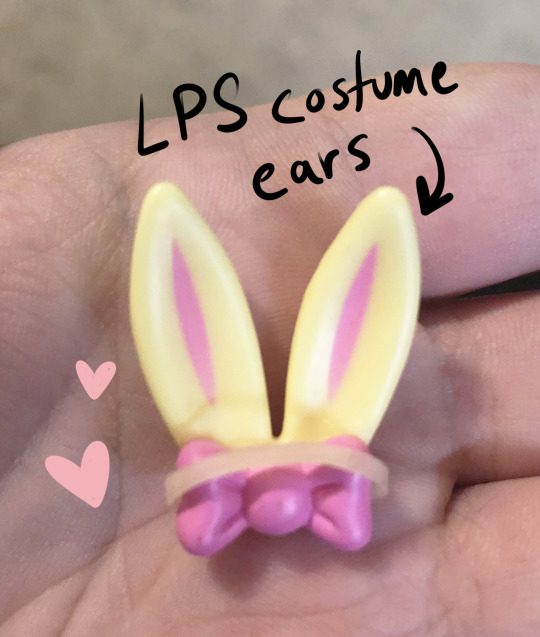
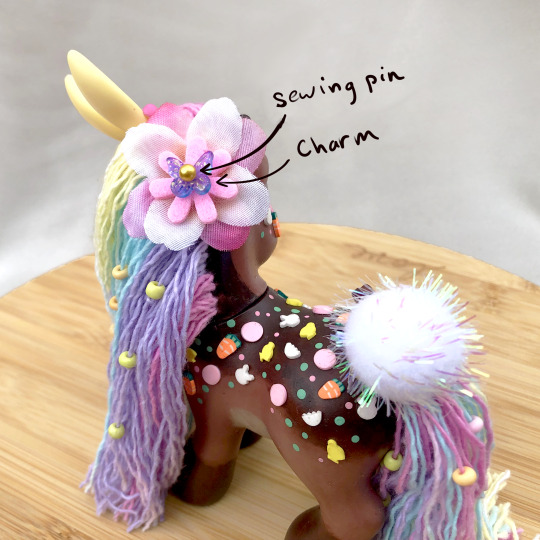
She's nearly complete! Time for small decorations! I tried so many different ears from air dry clay to stealing some from bunny decorations I bought at the store and nothing was working! But I had one last idea...
I gave these old Littlest Pet Shop costume bunny ears some use with a flat top sewing pin and some glue so now my pony has bunny ears! Yay!
I forgot it in the concept art, but I originally wanted to add flowers to her mane but I couldn't figure out how to do that without glue which I didn't want to do, too permanent, so I opted for some beads I had on hand. I didn't have any light blue so I made some with the use of acetone (nail polish remover in my case) and boom! Light blue beads! Then I washed them off so the acetone wouldn't damage anything :)
I used a gold topped sewing pin, a butterfly charm, a felt flower and two faux flowers to create a cute hair accessory!
Finally I sewed a hair tie to a puffball to give her a removable cottontail if I ever wanted to take it off.

And DONE! She looks so good after so much time and effort! I worked on this girly for two weeks I think? She actually had a partner I designed but I've run out of time to make her :') Maybe next year? 👀 🩷🩷
#my art#art#horse#pony#equine#equine art#artist on tumblr#mlp#mlp art#mlp g3#my little pony g3#g3 mlp#custom pony#ooak#ooak doll#ooak mlp#ooak my little pony#custom mlp#my little pony#my custom ponies#easter#bunny#pastels#pastel rainbow#walkthrough#custom
131 notes
·
View notes