#large 3D printing
Explore tagged Tumblr posts
Text
The Role of Large 3D Printing in Modern Trophy Manufacturing
In the heart of Dubai’s bustling innovation scene, C3D is setting new standards in trophy manufacturing with large 3D printing. This advanced technology has opened up endless possibilities, enabling us to create custom trophies that are as unique as the achievements they represent.
Traditional methods of trophy production often come with limitations in design and scalability. However, with large 3D printing, we can overcome these barriers to deliver bespoke creations tailored to your specific needs. From intricate geometric patterns to lifelike figurines, the precision and flexibility of this technology ensure stunning results every time.
Dubai’s reputation as a global hub for innovation aligns perfectly with our mission to revolutionize the trophy industry. At C3D, we combine creativity, technology, and craftsmanship to produce trophies that not only reward achievement but also serve as lasting symbols of excellence.Looking to make your next award ceremony truly memorable? Explore the potential of large 3D printing and discover how C3D can bring your vision to life. Contact us today for bespoke custom trophies crafted with precision and style.
0 notes
Text

#custom 3d printing near me#custom 3d printing services#custom 3d printing#3d print service near me#3d printing companies near me#3d printing cost#online 3d printing#3d printing online services#3d print vase#fused deposition modeling#3d printer service near me#large 3d printing services#sls 3d printing service#fused deposition modeling 3d printer#large industrial 3d printer#rapid prototyping 3d printing#3d scanning services cost#3d scale model maker#High resolution 3d scanning#Industrial 3d scanning#Reverse engineering services#Rapid Prototyping#Scale modeling#3d printing services#large 3d printing#best 3d printing service#large format 3d printing#3d model printing service#sls printing service#large scale 3d printing service
0 notes
Text


behold the Boy
#myart#pikmin#3d printing#he was meant to be able to hold a plant but turned out too small so may make a second Boy (large edition)
68 notes
·
View notes
Note
One very very very neat thing I noticed in Forgotten Land is how every single Gotcha Figure can feasibly be made (and quite a few have been!) irl; so therefore, I shall scour all of Etsy to find them, especially that Fecto Forgo (larva) figure!
Oho~! Well, we always appreciate fans of the drippy rat here! XD
It's true that it's impressive how they even went to the effort of rendering things like the fire similar to how it would look on a real figurine! It's good inspiration for ambitious crafters too! (And Etsy's not a bad place to check, since I was there recently and noticed a lot more 3D prints for sale than I remember. Probably wouldn't be too difficult to rip one of the models and create one yourself!)
...I do still have two alternating wishes for the figures. One is that they were more like the collectible keychains/stickers they were clearly inspired by and so, had more legacy content in there. (Though Dream Buffet tried to make up for that with the cookies. Even having some real deep cuts! But the whole game, I was praying to unlock a secret fifth machine that would let me pull the missing friends from Star Allies. The fact that they built in the option to admire the FL figurines made me miss that all the more...)
LET ME TURN MY BLORBOS AROUNDDDDDD
My other wish is that, if they couldn't go legacy with it, they would at least include descriptions for all the figures. Why yes, I want lore for the old car, and Bouncy, and the tulip, and the animal sand sculpture, and the ear of corn, and Handmade Kirby.
Even if they were simplistic descriptions with no deep lore attached, some text would have enhanced the appeal of pulling one of them. Instead, I found myself just spamming the button through the ones without any text, quickly forgetting their existence.
#Kirby#Kirby series#Kirby and the Forgotten Land#Fecto Forgo#If Dess ever finishes learning 3D sculpting...watch out!!#(Large 3D printed statues of all my favorites I can then pose attractively on my desk...someday...you will be MINE!!)
22 notes
·
View notes
Text
i got some insanely soft gold yarn (chenille home slim polyester 6/super bulk #chs19) (putting it here to find later and also bc im having a weirdly hard time finding it Now) to make a Big Penelope with and im really excited
#beloved friend of mine made a Little penelope that i dont have yet but am excited for#and i have a little 3d printed gold dragon from a ren fair#but im going to make him Large#hopefully. gonna try at least. real soft yarn.#pc: ulysses mora#crocheting
2 notes
·
View notes
Note
I wanna see the necklace omg! That’s so cool of y’all
THANK YOU FOR ENABLING ME you are my favorite
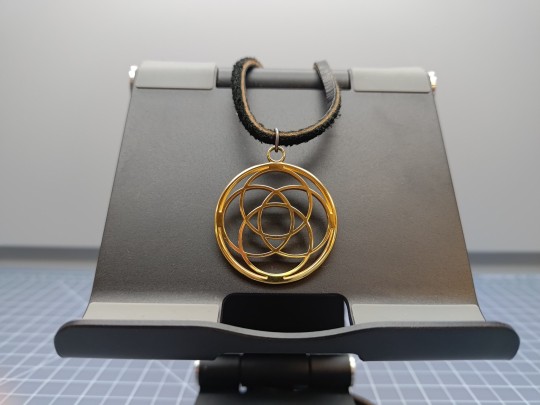
we used to have a silver otherkin star that we wore daily, but the top fixture snapped. rather than replace it, we figured the plural rings were a little more accurate for us now, anyway.
a friend ended up doing the model (albeit while we sat behind and gave feedback), we paid shapeways for the printing, for speed & just to save us the trouble of actually producing something to "daily wear" standards. would recommend.
#tekkapost#i think shirou deserves 90% of the credit for this one#it's possible saïx had a hand in it also but i can't recall.#gold was almost certainly a shirou choice though. (sip emote.)#it's stood the test of time like a fuckin champ.#skin oils. various manufacturing grimes. god knows what it's on our body 24/7.#it is quite large also!#it hasn't been RECOGNIZED yet#we have had folks ask what it is and uh#don't have a good answer for that still!#we're not out at work as a system but we work mainly with nerds so!#as a sidenote since i'm talking work & processes:#i do have access to various forms of 3D printing at work including MJF#that would not have been suitable for this kind of part though#talking slightly out my ass here but this was almost certainly SLS#while we do have 2 CNC mills onsite they're not open to staff requests like our printers are#for good reason#though our machinist is the one who got me that job.#jesus christ i owe him one.#several. many.#anyway.#we genuinely couldn't find any plural symbol charms that werent either#absolutely tiny or like...a printed image in a container#so we took matters into our own hands.#this picture was taken shortly after it was made it has sustained some wear since.
6 notes
·
View notes
Text
Portrait - Painting & 3D Cont.


We later started again with an even larger piece of brown paper. We restructured the machine and used different shades of blue paint this time to create more circular shapes and patterns. After we were happy with the result we used a squeegee type contraption and used it to move around the paint. We then got a little chaotic and poured large amounts of more blue and white paint on the squeegee and flung the squeegee so that the pai€nt would fly on to the page. This was an incredibly fun process and at one point we even played “spin the donkey” where we spun each other around and then tried to get paint onto the page.
This collaborative process with my peers was immensely fun, incredibly rewarding and was a great way for us to loosen any boundaries we had about paining.
2 notes
·
View notes
Text

Spent an evening designing a lens board to hold my 1850 Voigtlander & Sohn Petzval lens in my 4x5 camera. Based on caliper measurements of the lens board mount and the lens, it should hug the barrel of the lens at the back within the camera body, and have enough material to allow me to drill holes to bolt the mounting flange to.
5 notes
·
View notes
Text
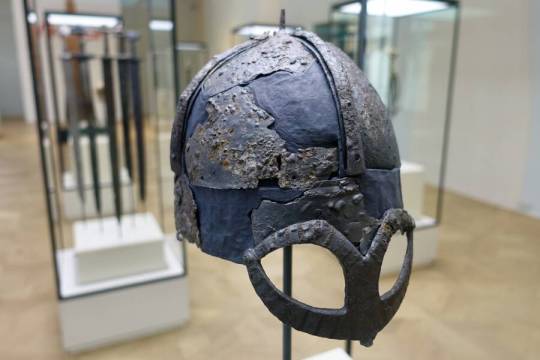
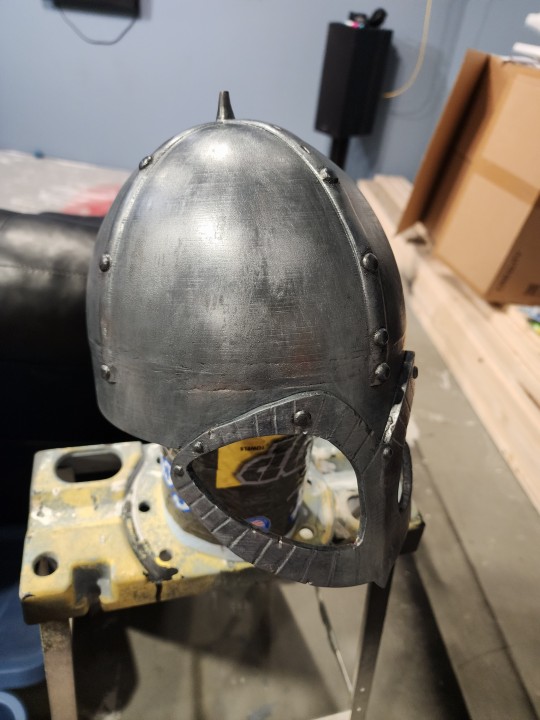
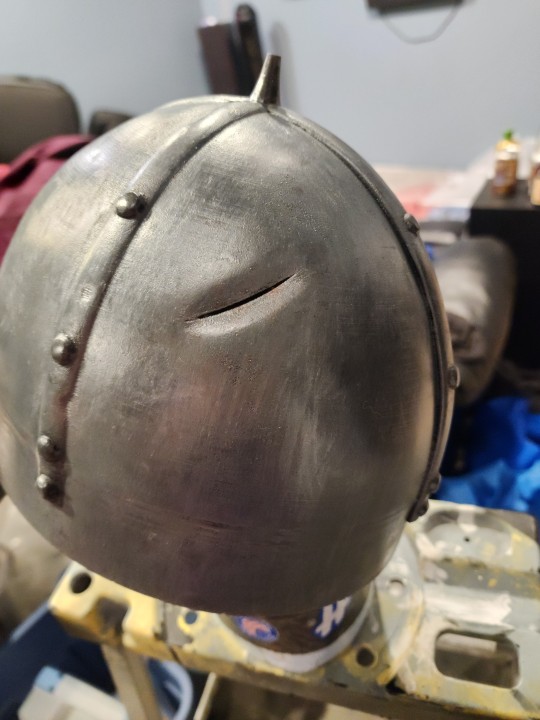
3D printed a replica of the Gjermundbu Viking helmet (from this file by AyathTheLoafer on thingiverse)
Not totally happy with the end product (next go around gotta do a better job on joining the two pieces and try to get a seamless look), and not 100% sure on the paint job yet but we'll see if I come up with anything else before I get the finish and put that on. I'm hoping a satin finish will tone down the reflectiveness somewhat cause it's a bit too shiny for my taste.
The reddish spots aren't a reflection, they're faint "rust" spots. First photo is the recreation of the actual Gjermundbu helmet (what bits remained glued onto a "form"), and the rest follows my replica through the process
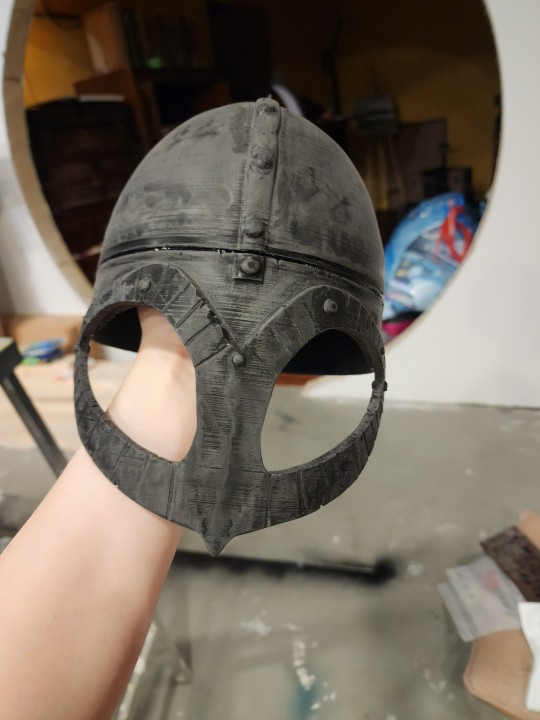
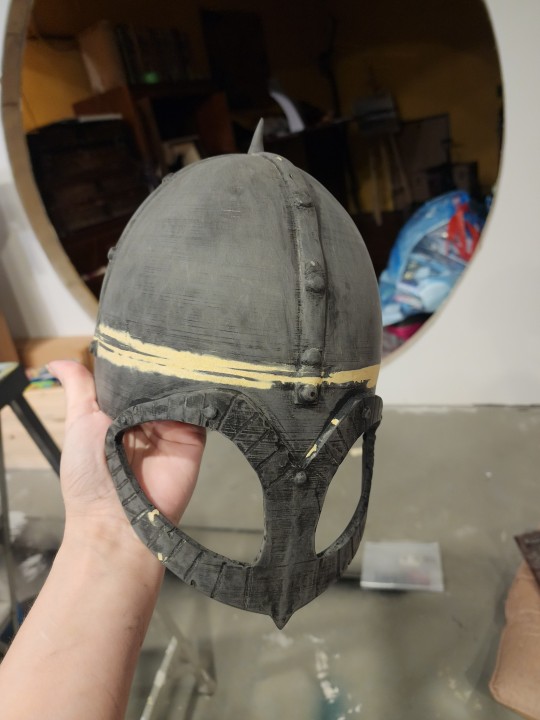
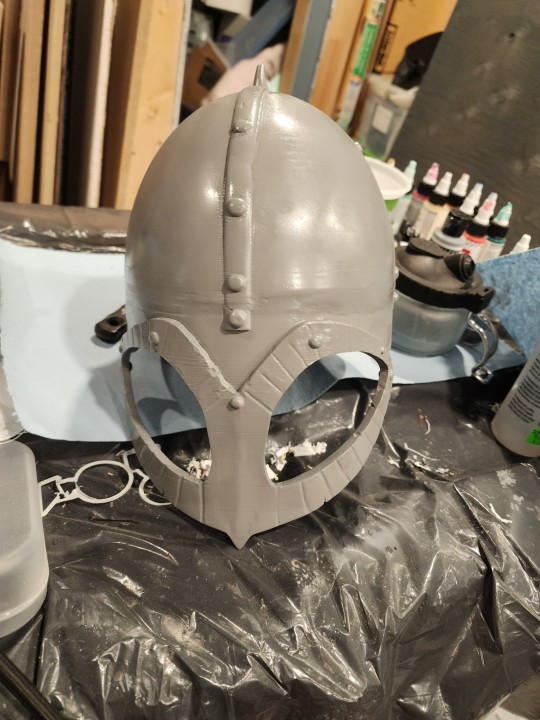
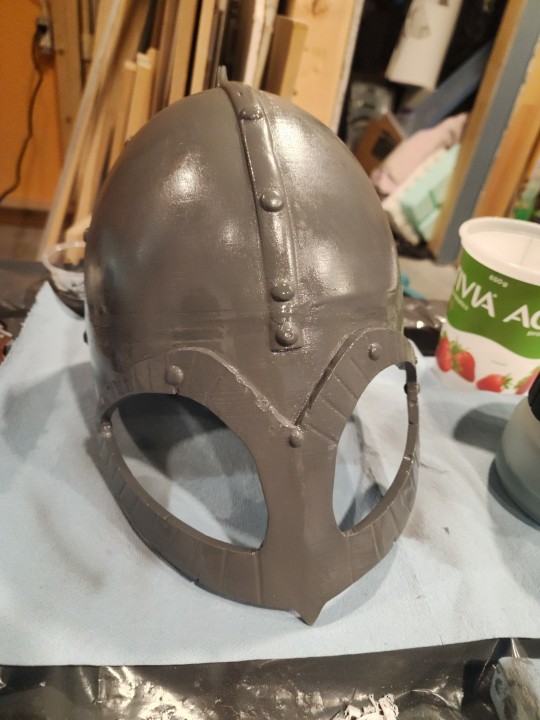

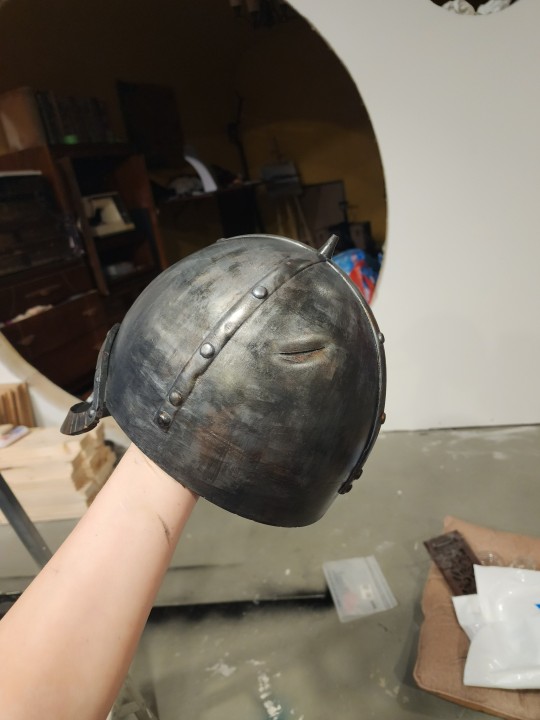
And the final product (well final minus the protective coat)
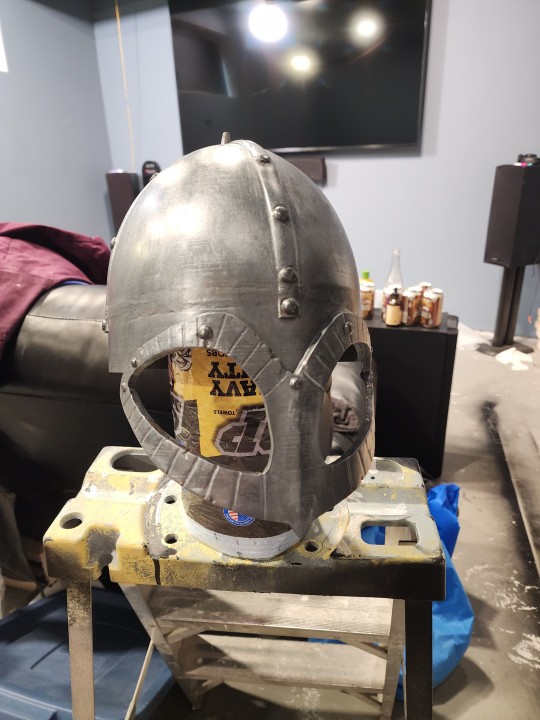
#3d printing#viking helmet#look ma no horns#it's too large for me#so I'll be making myself a smaller one#and probably selling this one#the one I keep I'm gonna add chainmail to the back of#like they believe the original had
2 notes
·
View notes
Text
In the comments of the Reddit post the maker of Boaty has links to two different sites where one can download Boaty
there's a really funny 3d printing controversy going on btw.
if you don't know, there's a very popular 3d printing model out there called "benchy". this is used for benchmarking your 3d printer because it's a difficult print and will help test it out.

this is so widely used that people make their own little versions of it, remixing the 3d model to make benchy look cooler and stuff. however, a new company owns the benchy license. they are sending copyright takedowns to all those who wrongfully uploaded the benchy model.
of course, this is pissing off the 3d printing community greatly. everyone loved benchy and have used it for years. so someone on reddit decided to make a new model that is designed as a 3d printing stress test. one that works a lot like benchy, and people are freely able to edit it as they please. you know what they called it?

boaty.
#3d printing#boaty#benchy#controversy#I am absolutely going to download boaty#I hold large amount of malice for large companies
104K notes
·
View notes
Text
Elevate Creativity with Large 3D Printing
When it comes to thinking big, there’s no better solution than large 3D printing. At C3D, we empower individuals and businesses to bring their ideas to life on a grand scale.
From oversized sculptures to functional industrial designs, large 3D printing offers limitless possibilities. Unlike traditional manufacturing methods, 3D printing provides exceptional accuracy, speed, and cost-effectiveness, making it the ideal choice for creating unique and complex designs.
C3D stands out in the Dubai market by combining technical expertise with a flair for innovation. We also excel in crafting custom trophies in Dubai, giving our clients stunning and memorable designs. Whether you’re planning a large installation for an event or an elaborate product prototype, our large 3D printing solutions will exceed your expectations.
Let your imagination run wild with C3D as your partner in creative excellence.
0 notes
Text
A Comprehensive Guide to Banner Prints and Their Benefits
In today’s fast-paced digital world, banners continue to be a powerful and effective tool for advertising, branding, and communication. With a variety of banner printing options available, businesses and individuals can select the type that best suits their needs. This article explores the different types of banner prints and highlights their unique benefits.
Types of Banner Prints
1. Vinyl Banners
Vinyl banners are among the most popular and widely used types of banners due to their durability and versatility. They are made from polyvinyl chloride (PVC), which makes them resistant to weather conditions like rain, wind, and sunlight.
Benefits:
Durability: Vinyl banners can withstand harsh weather conditions, making them ideal for both indoor and outdoor use.
Vibrant Colors: The material allows for high-quality, vibrant color printing, which can capture attention effectively.
Cost-Effective: Vinyl banners are relatively affordable, providing excellent value for the cost.
Customizable: Available in various sizes and can be customized with graphics, text, and logos.
Reusable: Easy to roll up and store, vinyl banners can be reused for different events or promotions.
2. Mesh Banners
Mesh banners are made from a perforated material that allows air and light to pass through. This type of banner is especially useful in windy conditions, as it reduces the risk of tearing and damage.
Benefits:
Wind-Resistant: The mesh design allows wind to pass through, preventing damage and increasing longevity.
Clear Visibility: The perforations do not significantly affect the visibility of printed graphics.
Durable: Ideal for long-term outdoor use in challenging weather conditions.
Lightweight: Easier to transport and install due to their lightweight nature.
3. Fabric Banners
Fabric banners are made from materials such as polyester or satin, offering a sleek and professional appearance. They are typically used for indoor events like trade shows, conferences, and exhibitions.
Benefits:
High-Quality Printing: Provides sharp and vibrant images with excellent color reproduction.
Elegant Appearance: The fabric material gives a sophisticated look, enhancing the visual appeal.
Wrinkle-Resistant: Many fabric banners are resistant to wrinkles, ensuring a polished presentation.
Washable: Fabric banners can often be washed, making them easy to maintain and reuse.
Environmentally Friendly: Fabric materials can be more sustainable compared to some plastic-based banners.
4. Retractable Banners
Retractable banners, also known as roll-up banners, are portable and easy to set up. They consist of a banner graphic that retracts into a base or stand, making them ideal for quick assembly and disassembly.
Benefits:
Portability: Lightweight and easy to transport, making them ideal for traveling events and trade shows.
Quick Setup: Can be set up and taken down in seconds, saving time and effort.
Professional Look: Offers a clean and organized appearance suitable for professional settings.
Space-Efficient: Takes up minimal floor space while providing maximum visual impact.
Interchangeable Graphics: Some models allow for graphics to be changed, offering flexibility for different events or campaigns.
5. Step and Repeat Banners
Step and repeat banners are commonly used as backdrops for events, featuring repeated logos or graphics in a pattern. They are popular at red carpet events, photo booths, and press conferences.
Benefits:
Brand Visibility: The repetitive design ensures that logos and branding are visible in every photograph.
Versatile Use: Suitable for a wide range of events, from corporate functions to weddings.
Enhanced Photos: Provides a professional backdrop that enhances the quality of event photography.
Customizable Sizes: Can be tailored to fit various spaces and event needs.
Choosing the Right Banner for Your Needs
When selecting a banner print, consider the following factors to ensure you choose the right type for your needs:
Location: Determine whether the banner will be used indoors or outdoors, as this will influence the material choice.
Durability: Consider how long the banner needs to last and choose a material that can withstand the required conditions.
Portability: If the banner needs to be moved frequently, opt for lightweight and portable options like retractable banners.
Visual Impact: Consider the quality of printing and appearance required to make a strong impression.
Budget: Balance the cost with the desired quality and features to find a banner that fits your budget.
Conclusion
Banners remain a powerful medium for communication, offering a range of options to suit different needs and environments. Whether you need a durable outdoor sign, a professional indoor display, or a portable solution for events, there is a banner print to meet your requirements. By understanding the benefits of each type of banner, you can make an informed decision that enhances your brand visibility and effectively communicates your message.
By choosing the right banner print for your specific needs, you can effectively enhance brand visibility, attract attention, and communicate your message to your audience. Whether for business promotion or personal events, banners continue to be a valuable and versatile tool in the world of marketing and communication.
#custom printing#custom fabrication#printing company#event signages#dye sublimation printing#digital printing#meter boards#large banners#retail rollouts#3d printing
0 notes
Text
3D printer is such a good white noise machine <3 I love my new toys
#good news : I am employed#bad news : I was fired from my job where I had access to toys for free#result : buying my own toys#by toys I mean the 3D printer#and a 110 year old sewing machine (is going to become my new embroidery machine)#a ~50 year old serger (not currently functional)#the serger just needs a new belt and a pedal#I needed the printer so I can print the parts for the gantry of the sewing machine so I can strap an arduino to it and hopefully#hopefully#have my own large format embroidery machine#eaii
0 notes
Text
The Leading Digital Printing Company in Dubai,UAE
MEGACOM MEDIA is the Leading digital printing company in Dubai since 2011.This company is not just any digital printing service; it's a testament to quality, innovation, and comprehensive digital printing solutions that cater to a vast array of needs across the GCC. We do all kinds of Large Format Printing which includes Fabric, Vinyl, PVC Banner (Single sided & Double sided), Artistic Canvas, UV Flat Bed, Signage Fabrication, wood works and we have even introduced the 5-meter UV Printing Machine. Also we providing high quality services of digital signages, Indoor Led Screen and Outdoor Led Screens .
Contact us today to learn more about how we can help bring your vision to life through our digital printing services.
#3d printing#Digital printing#Digital printing services#large format digital printing#Digital signages in dubai#led screen#led display#indoor advertisement#indoor led screens#outdoor led#outdoor led display
1 note
·
View note
Photo

On the wall!!
Well, that didn't take long! I just had to figure out a way to display this print! What better way to be reminded of my favorite doggo than giving this nice print a frame to be on! This took about 40 minutes to engrave and cut on my laser engraver. I'm getting quite good at scaling prints for different sizes in terms of details. It's like, LOD's, but for real life XD Honestly a lot of fine to tune settings to get just the right amount of detail for the specific use case it will be used for in real life. Actually making a second one of these today, of my So's pet. These are so fun to make. I always like adding some color into my engravings, and I've experimented with so many different methods of doing that. Using a 2d printer is so boring when you have access to a suite of tools that can do color with some artistic creativity. Ironically 2d printers are more frustrating to get working than 3d printers. 2d printer tech is stuck in the 90's change my mind.
Posted using PostyBirb
0 notes
Text
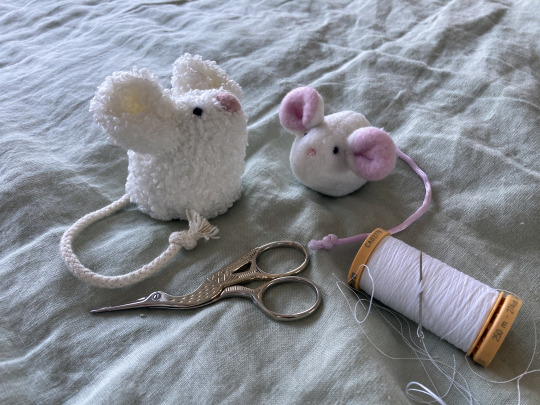
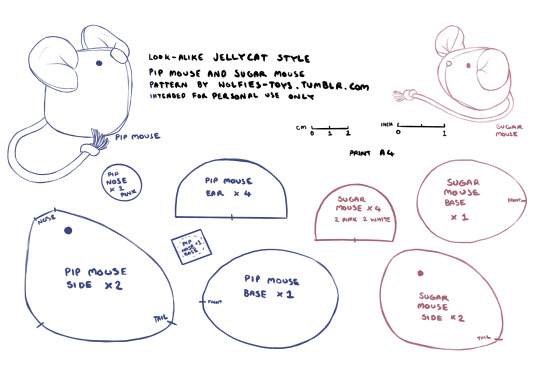
I've been sitting on this pattern and tutorial for a while now! so time to finally share it with you! I was lamenting that the jellycat pip and sugar mice were long retired and difficult to get your hands on unless you are willing to pay much more than they retailed for each mouse, so i decided to try and eyeball a pattern and make some myself! they're not exact as i only used constructed visual references but they're close! please note that this pattern set is intended for personal use only. Rough tutorial under the cut!
This pattern is for printing onto A4 but you can check your scale with the measurements I've provided or just play around with how big or small you want to try and make them! i didn't really get any wip photos of pip mouse but it's method is largely the same with the nose being the major change, which i will detail in text in the instructions below.
for sugar mouse i would recommend using polar fleece as it will act the right way for the ears to do their squishy marshmallow looking thing. but minky should also work or other similar fabrics! for pip mouse if you can find a similar curly looking fabric with a thin backing that'll be ideal but fleece will also work well, you just wont get the furry texture, you want a fabric with a little bit of stretch to it. i however would not recommend fabrics like felt or non stretch cotton for these guys as it's likely to not take shape the same as there's no give to the fabric.
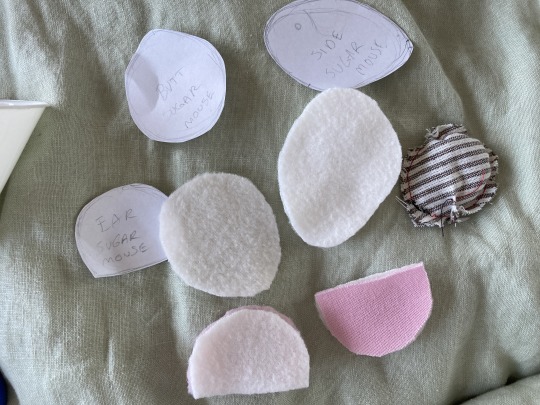
once you have printed out the pattern and cut the pieces in your fabric, you'll want to sew the ears up and turn them inside out, then put them aside for later. just leave them as is for now but here you can see i was playing around with pinching the turned through ear into shape.
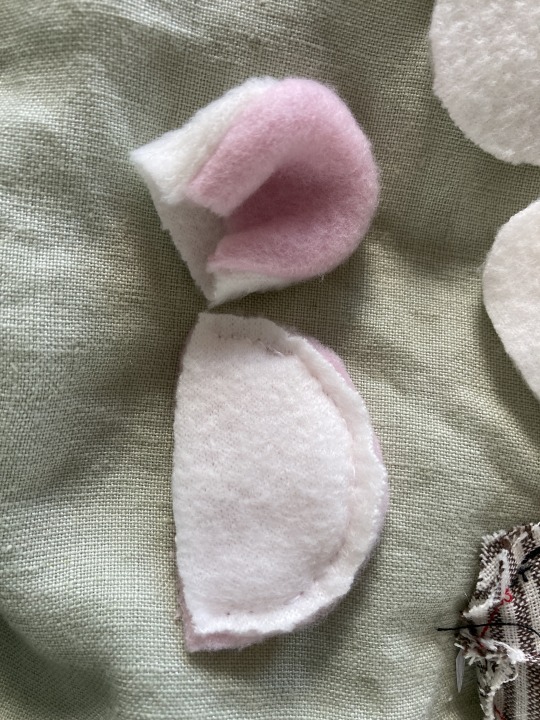
Then moving on, sew the back pieces together along the spine and front of face. you then want pull the bottom open ends apart gently and place the open sides flat up against the base piece so that they're aligned, it can be good to pin this in place so it doesn't shift.
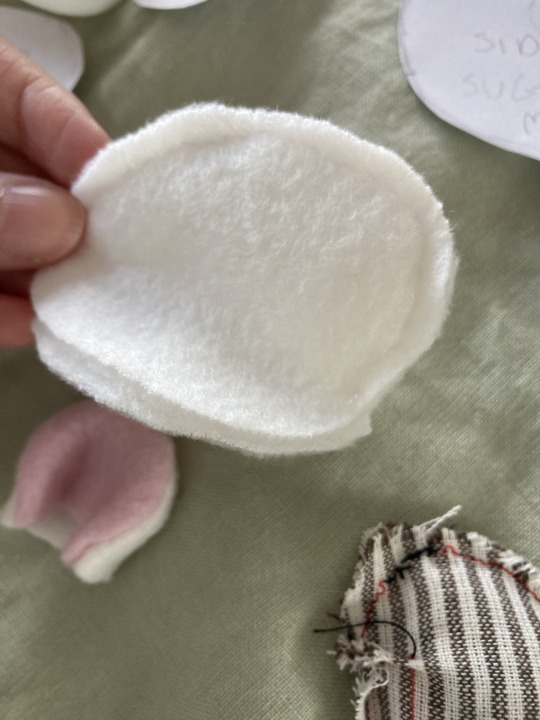
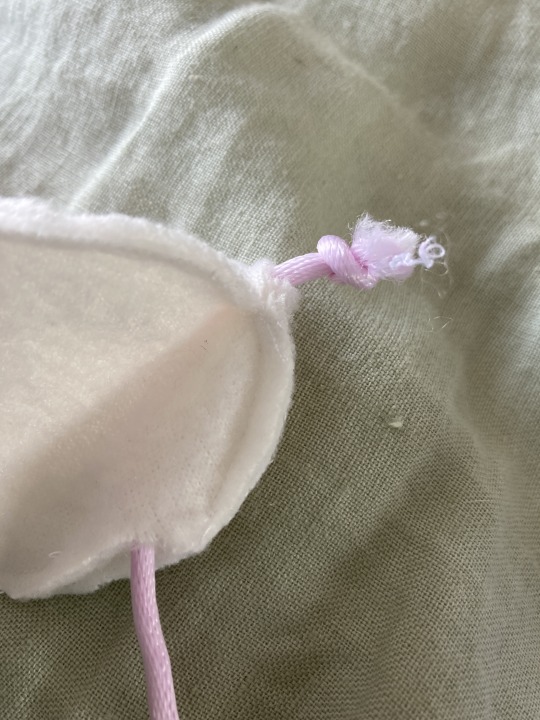
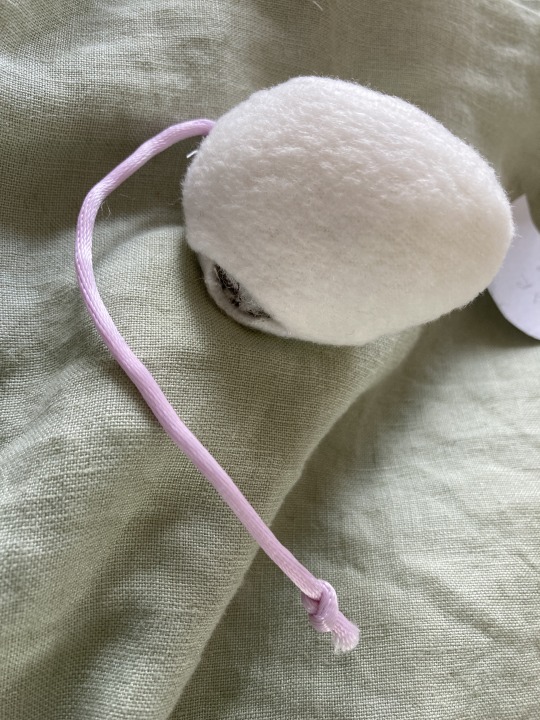
then, get your tail rope, and tie a knot at either end, placing the base of it inbetween the seam at the butt so that it'll sit in the right place, then sew the seam up directly with the tail in place, make sure you sew through the rope to secure it and make sure it doesnt shift. Sew around the bases seam leaving a hole in one side so that you can then turn your mouse through.
once turned through you will want to stuff your mouse with polyfill quite a bit so it takes shape! i like to put weighted beans in mine for extra effect, you can use dried rice or wheat too, just sew a little circle pouch a bit smaller that the mouses base with scrap fabric and fill and seal! then insert into the turning hole while you stuff. once stuffing is done you can sew the hole up with a ladder stitch. the weight from the beads will allow your mouse to sit up quite well.
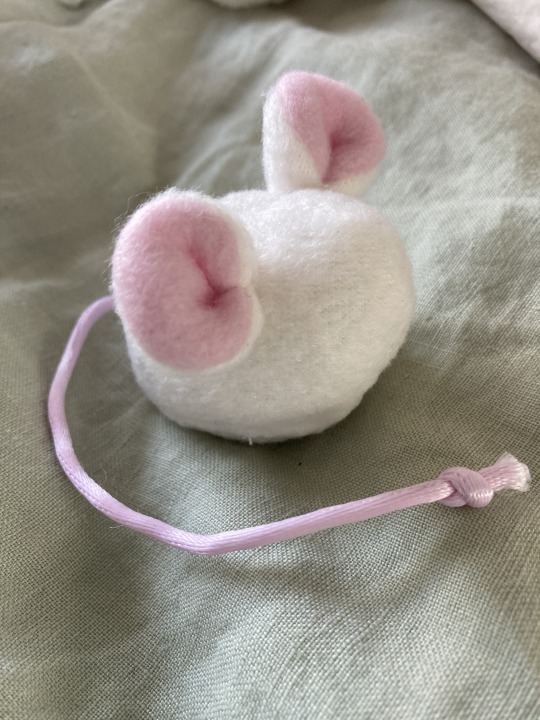
next you will want to get those ears you put aside, take each corner and bring the ends together in the middle. then sew them gently together at the ends with one or two stitches in about the same spot. you want them to look 3d so dont sew the ends to the back of the ear, just end to end so they meet in the center.

Then pin the ears in place on the head
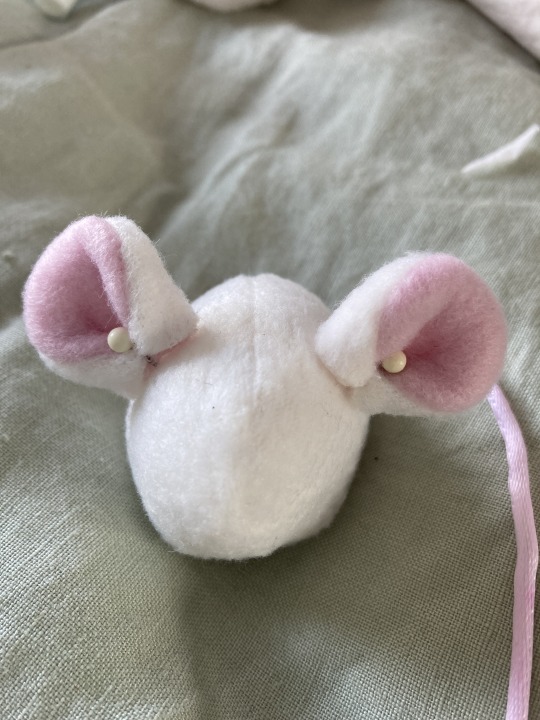
then you need to ladder stitch the ears in place while they're pinned so they dont shift around, go all the way around the outside edge of each.
now you're almost done! next they just need a face! sugar mouse only needs embroidery by way of a french knot for both the eyes and nose (you can find good video tutorials on how to sew a french knot online), pip mouse will also need a french knot for the eyes but has a separate process for it's nose. (for the pip mouses nose you will need to leave the marked nose hole open and then stitch the nose fabric to the square nose backing in line with the dotted direction on the pattern, (it should look kind of baggy when it's unstuffed) sew it up completley with no hole, then cut a tiny slit in the backing and add polyfill there before closing with a basic stitch, then you ladder stitch the nose directly to the marked nose hole)
in order to hide the embroidery anchor knots i find the best way is to start by going down through the middle of the ears and then coming back up where you want the eye to be, and then going back down and up through the ear for the finishing knot, as it creates a very easy cover for them and looks nice and clean!
then you have yourself a little buddy!
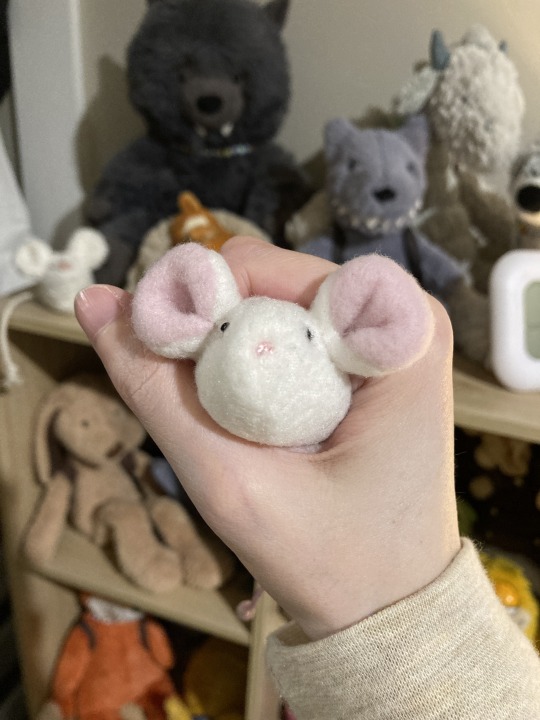
haha they're great to squish! if you use this pattern i'd love to see your results!
5K notes
·
View notes