#kosher tangie
Text


[ID: A thick white stew topped with a symmetrical pattern of fried garlic, minced parsley, and 'meat' chunks in a bright blue bowl. End ID]
كرناسة / Karnasa (Palestinian yoghurt and rice stew)
Karnāsa, or لَبَنِيَّة ("labaniyya") is a Palestinian dish of short-grain rice cooked in لبن ("laban") and topped with a tadka of fried garlic. "لبن" in Palestine refers to لبن زبادي ("laban zabādi,") or thickened sour milk (aka yoghurt). Laban is used to make a variety of sauces that are served with meat dishes, stewed vegetables, and maḥshis (stuffed dishes); it may also be strained and preserved as labna. Past batches of laban are traditionally used as a starter to ferment new batches from fresh milk.
Karnasa may be made plain, or with fried cauliflower or green beans; the latter variation, called لبنية الفول ("labaniyya al-fūl," labaniyya with beans) is often eaten during the winter.
It is an older custom to prepare karnasa in the morning, then serve it with meat as a lunch forعِيد اَلْأَضْحَى (Eid al-Adha), the Festival of the Sacrifice. Eid al-Adha celebrates the willingness of إبراهيم (Ibrahim) to sacrifice his son at God's command: the أضحية ("uḍḥiyah"), or sacrifice of livestock, occurs accordingly on the first day of the three-day festivities. Families may purchase livestock—often goats or sheep—and share the meat with neighbours, friends, and extended family.
Karnasa is sometimes served alongside khubbiz tabūn, a fermented flatbread, which is torn and dipped into the stew. In this recipe, the robust sourness of the flatbread melds with the tangy, creamy yoghurt and tender, savory seitan to produce a satisfying meal that's delicious hot or cold.
Donate to an evacuation fundraiser
Donate to Help Gaza Children
Ingredients:
Serves 4.
For the dish:
1kg (4 cups) vegan yoghurt (لبن زبادي)
1 Tbsp cornstarch
190g (1 cup) Egyptian rice, or other short-grained rice
225g (8oz) meat substitute such as seitan chunks; or cauliflower
1 Tbsp kosher salt, or to taste
1 cup vegetable stock, or 'meat' stock from cube or concentrate
1 Tbsp olive oil, for frying
Parsley or dried mint (optional)
For the tempering (ṭsha / طشة):
1/2 head garlic, chopped
3 Tbsp olive oil
For best results, use a thick yoghurt such as soy or coconut, rather than a thinner one such as almond.
To make your own cultured cashew laban, follow my cultured vegan labna recipe, but double the amount of water and skip the pressing in cheesecloth step.
Instructions
1. Rinse your rice once by placing it in a sieve, putting the sieve in a closely fitting bowl, then filling the bowl with water; rub the rice between your fingers to wash, and remove the sieve from the bowl to strain. Fill the bowl with fresh water and submerge the rice to allow to soak for 30 minutes to an hour.
2. Whisk laban and starch together and heat in a thick-bottomed pot on low until simmering, about 10 minutes.
3. Add rice and stock and mix. Cook, stirring often, until the rice is fully cooked and the texture of the stew is a little thinner than what you want (it will thicken as it cools).
4. Meanwhile, heat 1 Tbsp oil in a skillet on medium. Fry meat substitute, stirring occasionally, until browned. Set aside.
5. Make the tsha: In the same skillet, heat another 3 Tbsp olive oil on low. Add garlic and fry, stirring often, until a shade lighter than desired. Remove from heat.
6. Stir in salt and tsha. Ladle into individual serving bowls and top with meat; or, cut meat into small pieces, add into the pot, and simmer another minute or two before serving.
7. Top with parsley or dried mint. Serve hot or cold, with flatbread.
188 notes
·
View notes
Text
One of Israel’s best-loved desserts is a no-bake cake made with tea biscuits. You’ve likely seen Israeli tea biscuits in your local grocery store kosher aisle; they typically come in a bright colorful plastic sleeve and inside the packets are golden, flat rectangles with ridged edges and a warm hint of vanilla. They are thin and crumbly, buttery and not too sweet.
Israeli biscuit cake (ugat bisquivitim in Hebrew), is Israel’s version of an icebox cake or tiramisu. It requires zero baking and is designed to be thrown together on a whim, with simple products found in most kitchens. Recipes vary from family to family; aside from tea biscuits, ingredients typically include instant vanilla pudding, heavy cream, and milk. Many recipes call for gvina levana, a white cheese we call quark in the States and Europe. Quark is a fresh dairy product that tastes like a cross between sour cream and Greek yogurt, and adds a delicious tanginess to the filling. Instant vanilla pudding offers its unmistakable flavor and helps the cake set in the fridge. While it’s in the fridge, this cake transforms from a loose creamy consistency into a sliceable layered cake. The biscuits soak up and expand with the custard filling, creating a decadent celebration of dairy from the land of milk and honey.
Notes:
Kedem brand biscuits are ideal for this recipe as they are thinner and more delicate, Osem brand biscuits may create a drier cake.
Dipping the biscuits in coffee adds subtle flavor, but you can use milk instead if desired.
If you can’t find quark, full fat 5% Greek yogurt will work as a substitute.
Lastly, brands of vanilla pudding mix vary, any packet that is around 2.8-3.1 oz will work, or you can measure out 5 Tbsp from a larger packet of pudding mix.
6 notes
·
View notes
Text
02/07/23 - Kosher Tangie 💨🌲
26 notes
·
View notes
Text
Breaking Down the Labels: Understanding Hot Sauce Ingredients
In the realm of culinary delight, hot sauce has secured its place as a versatile and flavorful condiment. As the demand for unique and bold flavors grows, it's crucial to understand the key components that make up this fiery concoction. In this blog post, we will break down the labels and delve into the intricacies of hot sauce ingredients, shedding light on what goes into crafting this beloved condiment. Whether you're a hot sauce enthusiast or a curious consumer, join us on a journey to unravel the mysteries behind your favorite spicy companion.

The Spice Evolution
Hot sauce, a culinary staple in many cultures, has evolved from being a mere condiment to a key ingredient that adds depth and character to a wide range of dishes. The surge in popularity of hot sauce has given rise to a diverse array of options on the market. From mild and tangy to explosively spicy, hot sauces cater to a spectrum of taste preferences.
Hot Sauce Ingredients: A Comprehensive Guide
1. Peppers – The Heart of the Heat
At the core of any hot sauce is the pepper – the primary source of heat and flavor. Various pepper varieties contribute to the unique profiles of different hot sauces. Common peppers used include jalapeños, habaneros, serranos, and Thai chilies. Each pepper brings its own distinct heat level, flavor nuances, and sometimes even fruity or smoky undertones.
2. Vinegar – The Tangy Twist
Vinegar plays a dual role in hot sauce, serving as a preservative and contributing a tangy kick. Distilled white vinegar, apple cider vinegar, and rice vinegar are popular choices among hot sauce manufacturers. The type of vinegar used can influence the overall flavor profile, with some hot sauces boasting a more pronounced tanginess.
3. Salt – Balancing Act
Salt is a crucial ingredient that not only enhances the overall flavor but also acts as a natural preservative. It helps balance the heat of the peppers and the acidity of the vinegar, creating a harmonious blend. Sea salt, kosher salt, or specialty salts can be used to add depth to the hot sauce's taste.
4. Sweeteners – Taming the Fire
To counteract the heat and acidity, many hot sauces incorporate sweeteners. Sugar, honey, or fruit juices are commonly used to add a touch of sweetness. This not only provides a more rounded flavor but also helps in mellowing out the intense heat, making the hot sauce approachable to a broader audience.
5. Garlic and Onion – A Flavorful Foundation
Garlic and onion are often included in hot sauce recipes to impart a savory and aromatic base. The subtle flavors of these ingredients complement the heat of the peppers, contributing to a well-rounded and complex taste profile. Roasted or raw, garlic and onion can add depth and richness to the hot sauce.
Hot Sauce Manufacturers in India: Crafting Culinary Excellence
In the vibrant landscape of hot sauce manufacturing, India has emerged as a hub for diverse and innovative flavors. Hot sauce manufacturers in India are known for infusing traditional spices and regional influences into their creations, offering a wide range of options for spice enthusiasts.
Private Labelling in Vadodara
For those looking to venture into the hot sauce market with their unique twist, private labeling companies in Vadodara provide a valuable service. These companies specialize in creating customized hot sauce formulations and packaging, allowing businesses to establish their brand identity in the competitive market.
Hot Sauce Supplier in Kuwait: Global Spice Fusion
Kuwait, with its rich culinary traditions, has also embraced the global fascination with hot sauces. A hot sauce supplier in Kuwait bridges the gap between the diverse world of hot sauce manufacturing and the Kuwaiti consumer market. These suppliers ensure a steady flow of premium hot sauces, catering to the diverse taste preferences of the Kuwaiti population.
Conclusion
As we unravel the labels of hot sauce bottles, it becomes evident that this fiery condiment is a harmonious blend of heat, tanginess, sweetness, and savory undertones. Understanding the intricacies of hot sauce ingredients allows consumers to make informed choices based on their flavor preferences.
For those looking to explore the world of hot sauce beyond the typical offerings, the burgeoning hot sauce manufacturers in India, private labeling companies in Vadodara, and hot sauce suppliers in Kuwait open up exciting possibilities. Whether you prefer a milder tang or an explosive heat, hot sauce has something for everyone, making it a truly universal culinary delight.
#Hot sauce#Hot sauce manufacturers in India#Hot sauce supplier in Kuwait#Private labelling company#Hot sauce manufacturing companies in Vadodara#extracts#flavor#ketchup#canned foods#bottled items#Kitchen#business#restaurant#hotel#fast food#India#Kuwait
6 notes
·
View notes
Text
Easy to Make Fried Green Tomatoes Recipe - Chicken Fried Receipe
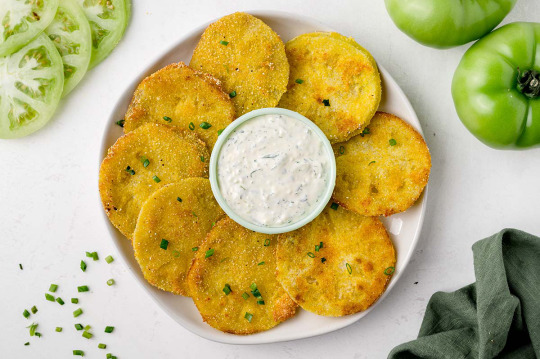
Easy to Make Fried Green Tomatoes Recipe
a timeless favorite!
Green tomatoes are unripe regular red tomatoes that haven’t yet matured on the vine. For the crispiest, driest fruit imaginable, the majority are purposefully picked before they are fully mature. Since they contain less water and have significantly harder flesh and tart, biting flavor, green tomatoes are excellent for sautéing and frying.
Fried green tomatoes have a crunchy exterior and a juicy, tangy core. They make an excellent appetizer on their own, as well as for salads, as a side dish, and as a topping for sandwiches and burgers.
We have a recipe for everyone! so give it a try and add a healthier twist to your monotonous life whether you’re a novice cook or a seasoned pro.
How to make fried green tomatoes?
http://chickenfriedrecipe.com/wp-content/uploads/2022/11/download-18-2-2.png
PREP TIME : 15 mins
COOK TIME : 5 mins
TOTAL TIME : 20 mins
INGREDIENTS
3-4 unripe green tomatoes sliced into ¼-inch thick discs
½ cup flour
½ cup buttermilk
1 egg beaten
½ cup cornmeal
½ cup panko breadcrumbs
1 teaspoon kosher salt plus additional for seasoning the tomatoes
½ teaspoon black pepper plus additional for seasoning the tomatoes
½ teaspoon onion powder
Pinch of smoked paprika
vegetable oil for frying
INSTRUCTIONS
Wash the green tomatoes and cut into 1/4-inch-thick slices. Place flat on a baking sheet and sprinkle both sides with salt and pepper.
Put the flour in a pie plate or shallow dish. Combine the cornmeal, breadcrumbs, salt, pepper, onion powder, and smoked paprika in another shallow dish or pie plate. In a larger bowl, whisk the egg and buttermilk together.
Shake off any excess flour before dredging the tomato slices in it. After that, submerge the tomatoes in the buttermilk concoction. Finally, coat the piece in the cornmeal/breadcrumb mixture and place it on a cutting board or baking sheet to cool. Continue by using all the tomato slices.
In a large frying pan, heat 2 cups of oil over medium-high heat until the oil reaches 375 degrees F or, when you dip a wooden spoon into the hot oil, the oil instantly bubbles around the handle. The pan’s oil level should be about 12 inch.
The tomatoes should be fried for 2 minutes on each side, or until crispy and golden, before being removed to a wire rack to drain. Batch your work to avoid overcrowding the pan.
Serve with your favorite dipping sauce.
Fried green tomatoes: How to Store Them?
Frozen fried green tomatoes can be kept for one to two days in the refrigerator, though they are best eaten while still hot and crisp. Reheat them in an oven, air fryer, or oiled skillet while keeping them in an airtight container.
Nutrition Facts
(per serving)
Calories : 510
Fat : 27g
Carbs : 56g
Protein : 13g
We have a recipe for everyone! so give it a try and add a healthier twist to your monotonous life whether you’re a novice cook or a seasoned pro.
More Link: Frozen fried green tomatoes
green tomatoes
Fried green tomatoes
2 notes
·
View notes
Text
Horseradish Mashed Potatoes
Chef’s Note: Horseradish is subtle, but still tangy! So good!
Original recipe: link
Makes: ~2 quarts mashed potatoes
Ingredients
3 lb potatoes {{ russet or Idaho potatoes work }}
Kosher salt
8 tbsp (1/2 cup) unsalted butter
1/2 cup milk
1 cup sour cream
3 tbsp prepared horseradish
Freshly chopped chives, for garnish
Instructions
0. Scrub potatoes clean. Cut the potatoes in quarters lengthwise. Cut into 1/4-inch pieces.
I don’t peel them because the peel adds more flavor
1. Add potatoes to a large pot. Cover with water and season with salt. Bring to a boil and cook until potatoes can be easily pierced with a fork, 16 to 18 minutes.
2. Drain potatoes and transfer to a large bowl. Use a potato masher to mash potatoes until smooth.
3. Meanwhile, in a small saucepan over medium heat, melt butter with milk until warm
4. Pour milk mixture over potatoes and stir until creamy.
5. To potatoes, stir in sour cream and horseradish. Season with more salt.
6. Garnish with some chives before serving
1 note
·
View note
Text

It’s a party in the U.S.A. with star-spangled banners set to wave and fireworks ready to burst in air for Independence Day next Thursday, July 4th. What better way to celebrate the land of the free and home of the brave than by supporting our regional farmers and local food producers this weekend? In keeping with this patriotic spirit, here is a foursome (naturally!) of iconic Fourth of July holiday dishes to serve up using a bounty of fresh, seasonal ingredients from your Down to Earth farmers market.
Creamy, Tangy Potato Salad
Classic potato salad pairs handsomely with just about every Fourth of July main dish from hotdogs to burgers to barbecued chicken and everything in between. This tasty recipe delivers plenty of creaminess, savory crunch and a dash of brightness via a soupcon of freshly squeezed lemon juice.
Ingredients
3 lbs Great Joy Family Farm Yukon Gold potatoes, cut into 1/2" pieces
1 small Lanis Farm red onion, finely chopped
¼ cup chopped Dr. Pickle dill pickles
4 hardboiled SOVA Farms eggs, chopped
¼ cup thinly sliced Great Joy Family Farm chives
1 tbsp Dijon mustard
1 ½ cup mayonnaise
1 tbsp fresh lemon juice
½ tsp paprika
Freshly ground black pepper
Kosher salt
Authentic Greek Salad
Now is the moment to indulge in salads galore to squeeze every juicy drop out of the growing season while it lasts. Thanks to the ongoing heatwave, an abundance of summer produce–including field-grown tomatoes, bell peppers and traditional cucumbers–has matured a couple of weeks early. These sun-ripened goodies are arriving at farmstalls in droves just in time for the July 4th holiday.
This authentic Greek salad captures the irresistible taste of summer in a bowl. Plus, you can easily source the bulk of its ingredients at the farmers market:
1 medium Lanis Farm red onion, thinly sliced into half moons
4 medium juicy Newgate Farms tomatoes, sliced into bite-sized pieces or wedges
1 Newgate Farms English cucumber, partially peeled to make a striped pattern and sliced into half moons
1 Lanis Farm green bell pepper, cored and sliced into rings
1 handful Dr. Pickle Kalamata olives
¼ cup Kontoulis Olive Oil extra virgin olive oil
1-2 tbsps red wine vinegar
1 (7 ounce) block Maplebrook Farm feta cheese in brine, torn into slabs
1 ½ tsps Kontoulis Olive Oil dried oregano
Kosher salt
Smashing Smash Burgers
Smash burgers have become all the rage in recent years! A smash burger is made by smashing a ball of ground beef onto a grill or skillet with a spatula to produce a thinner, crispier patty that fans proclaim to be far tastier than a traditional burger. Patties are often double- or triple-stacked and served with melted cheese and caramelized onions.
Make your July 4th cookout a smashing success by picking up sweet onions from the farmstalls and pastured ground beef to give this smash burger recipe a whirl. Don’t forget to grab some classic burger buns from the bread vendors too.
Patriotic Puddings
It’s a berry good idea to top off your holiday with a red, white and blue-themed fruit salad made with locally grown strawberries, raspberries, blackberries, blueberries and apples from the farmstalls. This patriotically fun recipe features star-shaped apple cutouts, mixed berries and a honey lime poppy seed dressing. And now, a Berry Important Holiday PSA: Black raspberries are currently available from Newgate Farms so scoop up some of these deliciously hard-to-find, dark flavored beauties while you can as they have a very short-lived season.
Of course, our baked goods vendors will bring plenty of ready-made treats for your festivities. Catch Little Bit O' Love Bakery’s July 4th vibes with their gluten-free, dairy-free blueberry muffins and their regular favorites including sourdough, focaccia, and pain au chocolat. Plus, they now offer gluten-free bagels so be sure to try this newly launched menu item that comes in plain, everything, and cinnamon raisin.
And that’s a wrap on our all-American holiday edition. We wish you a very happy Independence Day and look forward to seeing you in the markets this weekend.
#downtoearthmkts#farmersmarket#farmersmarkets#buylocal#shoplocal#eatlocal#eatdowntoearth#harvest#localfood#agriculture#4th of july#4th of july recipes#Fourth of July Food
0 notes
Link
0 notes
Text
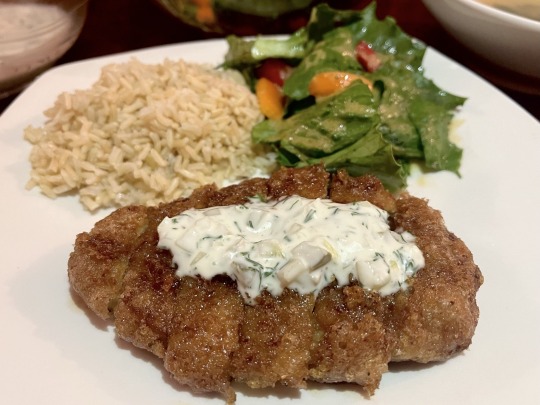
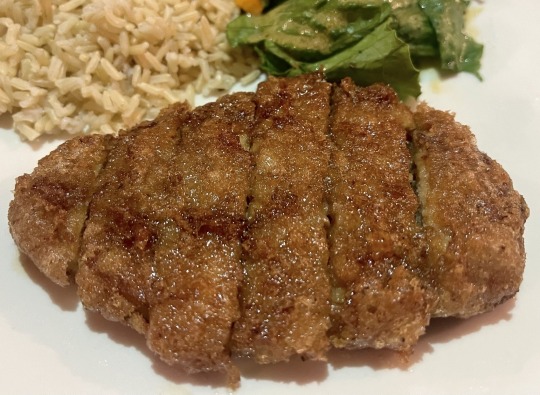
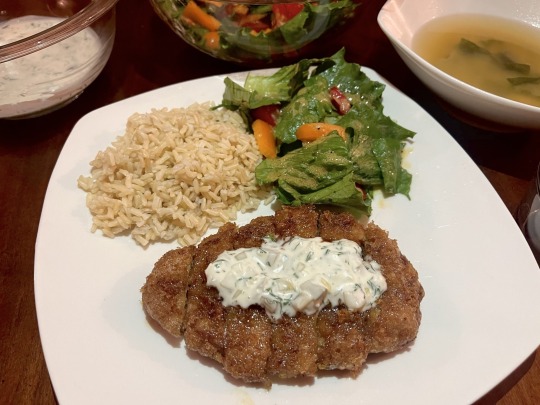
[ID: A fried 'chicken' cutlet topped with tartar sauce and served with rice and a green salad; bowls of tartar sauce and miso soup are in the background. End ID]
チキン南蛮 / Chicken nanban (Japanese fried chicken with sweet-savory sauce)
Chicken “nanban” (南蛮; "barbarian" or "foreign") is a classic example of 洋食 (yoshoku)—Western-style food adapted to a Japanese palette. Chicken breast is breaded, deep-fried, and coated in a mixture of soy sauce, sugar, and vinegar to create a crispy, tangy, savoury-sweet dish.
The method of breading and deep-frying used in making chicken nanban, tempura, and other Japanese dishes was introduced by the Portuguese during the Muromachi period (16th century). Chicken nanban itself, however, is far more recent: Nao-chan diner in the Miyazaki Prefecture of Kyushu is credited with having invented it in the 1950s. Nao-chan's version of the dish does not include tartar sauce, but it is often added to provide a sharp, creamy complement to the savoury chicken.
Chicken nanban works well as a main dish served with sides of rice, soup, or salad. If you're using pre-made chicken breasts, it comes together in around half an hour.
Recipe under the cut!
Patreon | Tip jar
Serves 4.
Ingredients:
For the chicken:
4 Gardein chicken breasts, or other chicken breast substitute, thawed
1/4 cup (30g) all-purpose flour
2 Tbsp potato starch or cornstarch (optional)
2 Tbsp egg replacer (I used Bob's Red Mill)
Water
Pinch kosher salt
A few cracks of black pepper
Oil to deep fry
For the nanbanzu / 南蛮酢 (nanban sauce):
3 Tbsp Japanese soy sauce, such as Kikkoman's
3 Tbsp rice vinegar
3 Tbsp granulated vegetarian sugar
1 1/2 Tbsp mirin (for a low-alcohol version, use aji-mirin; for an alcohol-free version, replace with 1/2 Tbsp rice vinegar and 1 Tbsp sugar)
For the tartar sauce:
1/2 cup vegan mayonnaise
1/2 tsp mild Dijon mustard
2 tsp rice vinegar
1 tsp dried ground shiitake mushroom, or kombu dashi powder
1 tsp vegetarian sugar
A few small sweet pickles or 1 Japanese or Persian cucumber, diced
1/2 small yellow onion, minced
Pinch kosher salt
Pinch of MSG
Minced dill or parsley (optional)
If you eat eggs, you can replace the first five ingredients with 1/2 cup Kewpie mayo (キューピーマヨ).
Instructions:
For the nanbanzu / 南蛮酢 (nanban sauce):
1. Heat sugar and soy sauce in a small pot over medium-low heat until simmering, stirring to dissolve.
2. Add vinegar and mirin and heat for another 30 seconds. Remove from heat.
For the tartar sauce:
1. Mince the onion. If you prefer, you can submerge the minced onion in cool water for 10 minutes or so and then drain to remove some of its sharpness. Seed and mince the cucumber.
2. Whisk mayonnaise, mustard, sugar, salt, black pepper, MSG, rice vinegar, and mushroom powder together to combine. Add onion and cucumber and stir. Top with herbs. Refrigerate while preparing the chicken.
For the chicken:
1. Mix flour, starch, salt, and black pepper together on a plate or cutting board. In a small bowl, combine egg replacer with water according to package directions and allow to thicken.
2. Fill a deep fryer or medium-sized pot with several inches of a neutral oil and heat it to 340 °F (171 °C). A chopstick placed in the oil should slowly form small bubbles around its tip.
3. Coat chicken breasts with egg replacer; if it is too thick, you may need to whisk in an additional 1-2 Tbsp water.
4. First deep fry. Carefully lower one chicken breast into the oil and fry without disturbing for about 2 minutes, until the egg coating on the bottom side is cooked through and lightly golden brown. Flip over and continue to fry for another 2 minutes. Use chopsticks or a slotted spatula to remove the chicken breast onto a wire cooling rack or paper-towel-lined plate.
5. Use a slotted spoon to remove any bits of batter from the oil and re-check the temperature. Repeat with each chicken breast.
6. Second deep fry. Increase the heat slightly to raise the temperature of the oil to 355 °F (179 °C). Re-fry each chicken breast for about a minute, flipping once halfway through. Set aside.
7. Coat with nanban sauce. Place the fried chicken breasts in a shallow rimmed baking dish or tray and spoon most of the nanban sauce over them, turning over several times to coat. Reserve the rest of the sauce for serving.
8. Slice each chicken breast widthwise and transfer to an individual serving plate. Serve with additional nanban sauce, tartar sauce, rice, a green salad, or soup.
105 notes
·
View notes
Text
Mingari-Spiced Owlbear Milk
Makes 4 cups
Ingredients: 1/2 Cup old-fashioned oats, 1 Cup water, 4 Cups milk, plus more as needed, 2 1/2 Tablespoons granulated sugar, 1 1/2 Tablespoons light brown sugar, 1 Pinch kosher salt, 3 Cinnamon sticks, plus ground cinnamon for sparkling
In a dry medium saucepan over medium heat, toast the oatmeal, stirring constantly, until very fragrant, 4 minutes (take care to avoid burning it). Remove from the heat, add the water (it will spatter), and gently swirl the pan. Add the milk, both sugars, salt, and cinnamon sticks and stir to mix. Return the pan to medium heat and bring to a low, steamy simmer, stirring often, 7 minutes. Adjust the heat to low and continue to simmer, stirring occasionally, until cooked through and soft, 5 minutes. (If the mixture threatens to boil over, remove the pan from the heat until the foam recedes and then continue.) Remove the pan from the heat and let the mixture cool to room temperature. Scrape into a large wide-mouth jar with a tight-fitting lid, seal, and refrigerate until well chilled, 4 hours and up to 24 hours.
Remove the mixture from the refrigerator. Remove and reserve the cinnamon sticks. Scrape the mixture into a blender (keep the jar handy) and blend on high speed until as uniform and smooth as possible. Strain through a fine-mesh strainer back into the jar, working it with a flexible spatula until just a couple of teaspoons of oat paste remain. Discard the paste, return the cinnamon sticks to the jar, cover, and refrigerate until cold, 1 hour.
Remove the jar from the refrigerator and vigorously shake it. Adjust the consistency of the mixture, if desired, by adding up to 3/4 cup milk, 1/4 cup at a time, shaking after each addition to blend. Remove the cinnamon sticks and pour the milk into glasses (over ice, if desired). Sprinkle each with ground cinnamon before serving.
Note: Any type of milk from skim to whole is fine depending on how rich a drink you want. If you fancy a light tangy drink substitute 1/3 cup buttermilk for the same amount of regular milk.
0 notes
Text
Chinese Keto Pork Belly with Spicy Cabbage
New Post has been published on https://eazywellness.net/chinese-keto-pork-belly-with-spicy-cabbage/
Chinese Keto Pork Belly with Spicy Cabbage
Embark on a culinary adventure to the bustling streets of China with our tantalizing recipe for low-carb crispy Chinese pork belly paired with spicy cabbage. This dish is a celebration of bold flavors and textures, with succulent pork belly coated in a crispy, caramelized exterior infused with the warm spices of five-spice powder and tangy rice vinegar.
Complementing this is a side of spicy cabbage, featuring tender green cabbage sautéed to perfection with garlic, rice vinegar, and fiery chili paste. Together, these elements create a harmonious symphony of taste that will transport your taste buds to the heart of Asia.
As you sink your teeth into the tender yet crispy pork belly, you’ll be greeted by layers of flavor that dance on your palate — smoky, sweet, and tangy all at once. Paired with the fiery kick of the spicy cabbage, this dish offers a tantalizing contrast of textures and tastes that is as satisfying as it is memorable. Whether you’re a fan of Asian cuisine or simply looking to add a bit of excitement to your dinner table, our crispy pork belly with spicy cabbage is sure to pack a punch!
Yields 6 servings of Chinese Keto Pork Belly with Spicy Cabbage
The Preparation
Pork Belly
28 ounce pork belly
1 tablespoon rice vinegar
1 tablespoon five spice powder
1 teaspoon salt
1/3 cup coarse salt
Spicy Cabbage
20 ounce green cabbage
1 tablespoon butter
2 teaspoon garlic, minced
1 tablespoon rice vinegar
2 tablespoon sambal olek, or any chili garlic paste
salt and pepper, to taste
The Execution
1. Gather and prep all ingredients. Pat the pork belly dry with paper towels.
2. Place the pork belly skin-side up on a cutting board. Score the skin using a sharp paring or chef’s knife. Try your best to cut through the skin, leaving the fat and meat untouched. Make cuts 1/4 – 1/2 inch apart, as this will create crispy crackling.
3. Flip the pork belly so that the meat is facing up. Brush with vinegar, then season with spices and salt (leaving a big portion of salt for the skin).
4. Wrap a baking dish or tray in aluminum foil, then place the pork belly skin-side up. Fold the foil around the edges of the pork, covering the sides completely. Place the baking dish or tray in the refrigerator for 12-24 hours. This will help dry the skin out and make it crispy when cooked.
5. When ready to cook, preheat oven to 400F. Sprinkle the coarse salt over the skin, creating an even layer of salt over it. Bake until a thermometer shows the meat portion at 160F, or about an hour.
6. Once the meat is at 160F, remove the pork from the oven. Pour any rendered fat and juice out to save for soups/stocks if desired. Scrape salt off the skin of the pork, then place the pork in a new baking dish or tray. Switch the oven to broil and cook for another 20-30 minutes or until the skin is golden brown, bubbling, and crisp.
7. Remove the pork from the oven and let rest while preparing the cabbage. Rinse cabbage, then chop coarsely.
8. Place a skillet over medium-high heat. Add the butter, then add in the cabbage, garlic, sambal olek, and salt and pepper to taste. Fry until the cabbage is soft and golden, stirring often.
9. Slice pork belly and serve alongside the cabbage. Enjoy!
This makes a total of 6 servings of Chinese Keto Pork Belly with Spicy Cabbage. Each serving comes out to be 440 calories, 31g fats, 4.1g net carbs, and 32.2g protein.
NUTRITION CALORIES FAT CARBS FIBER NET CARBS PROTEIN 28.00 ounce pork belly 2318 170.74 0 0 0 182.65 1.00 tablespoon unseasoned rice vinegar 3 0 0.01 0 0.01 0 1.00 tablespoon chinese five-spice powder 19 0.62 4.27 2.28 1.99 0.7 1.00 teaspoon salt 0 0 0 0 0 0 0.33 cup kosher salt 0 0 0 0 0 0 20.00 ounce green cabbage 142 0.34 32.89 14.17 18.71 7.2 1.00 tablespoon butter 102 11.51 0.01 0 0.01 0.12 2.00 teaspoon fresh garlic 8 0.03 1.87 0.12 1.75 0.36 1.00 tablespoon unseasoned rice vinegar 3 0 0.01 0 0.01 0 2.00 tablespoon chili-garlic paste 44 2.88 2.19 0.18 2.01 2.34 0.00 none salt and pepper 0 0 0 0 0 0 Totals 2639 186.1 41.3 16.8 24.5 193.4 Per Serving (/6) 440 31.0 6.9 2.8 4.1 32.2
Chinese Keto Pork Belly with Spicy Cabbage
This makes a total of 6 servings of Chinese Keto Pork Belly with Spicy Cabbage. Each serving comes out to be 440 calories, 31g fats, 4.1g net carbs, and 32.2g protein.
The Preparation
Pork Belly
28 ounce pork belly
1 tablespoon rice vinegar
1 tablespoon five spice powder
1 teaspoon salt
1/3 cup coarse salt
Spicy Cabbage
20 ounce green cabbage
1 tablespoon butter
2 teaspoon garlic, minced
1 tablespoon rice vinegar
2 tablespoon sambal olek, or any chili garlic paste
salt and pepper, to taste
The Execution
Gather and prep all ingredients. Pat the pork belly dry with paper towels.
Place the pork belly skin-side up on a cutting board. Score the skin using a sharp paring or chefs knife. Try your best to cut through the skin, leaving the fat and meat untouched. Make cuts 1/4 – 1/2 inch apart, as this will create crispy crackling.
Flip the pork belly so that the meat is facing up. Brush with vinegar, then season with spices and salt (leaving the big portion of salt for the skin).
Wrap a baking dish or tray in aluminum foil, then place the pork belly skin-side up. Fold the foil around the edges of the pork, covering the sides completely. Place the baking dish or tray in the refrigerator for 12-24 hours. This will help dry the skin out and make it crispy when cooked.
When ready to cook, pre-heat oven to 400F. Sprinkle the coarse salt over the skin, creating an even layer of salt over it. Bake until a thermometer shows the meat portion at 160F, or about an hour.
Once the meat is at 160F, remove the pork from the oven. Pour any rendered fat and juice out to save for soups/stocks if desired. Scrape salt off the skin of the pork, then place pork in a new baking dish or tray. Switch the oven to broil and cook for another 20-30 minutes or until the skin is golden brown, bubbling, and crisp.
Remove pork from the oven and let rest while preparing the cabbage. Rinse cabbage, then chop coarsely.
Place a skillet over medium-high heat. Add the butter, then add in the cabbage, garlic, chili garlic paste and salt and pepper to taste. Fry until the cabbage is soft and golden, stirring often.
Slice pork belly and serve alongside the cabbage. Enjoy!
3.1
https://www.ruled.me/chinese-keto-pork-belly-with-spicy-cabbage/
Copyright 2023 | Ruled.Me
Source link
0 notes
Text
Slathering the bread with toum instead of butter instantly gives it garlic bread vibes. Though you can purchase toum at many supermarkets and Middle Eastern specialty stores, making it at home gives it a more vibrant punch. It lasts for months and can be used anywhere a tangy, garlicky wallop is needed. Use in salad dressings, as a rub on roasted meats, as a sandwich condiment, or even as a dip for crudités.
INGREDIENTS
Yield: 1 sandwich, plus 1¾ cups toum
1 medium head of garlic, peeled (about 12 cloves)
2 tablespoons lemon juice (from 1 lemon), plus more to taste
2 teaspoons kosher salt, plus more to taste
1½ cups neutral oil, like grapeseed oil
2 slices bread, preferably from a rustic loaf, no more than ½ inch thick
3 slices Muenster cheese
4 cornichons, thinly sliced lengthwise
2 tablespoons toum (prepared or homemade), plus more for dipping
Kosher salt
PREPARATION
Prepare the toum (or proceed to Step 4, if using store-bought toum): Place garlic, lemon juice, kosher salt and 1 tablespoon water in a tall, narrow container; blend with an immersion blender until smooth. Let sit for at least 10 minutes to mellow out some of the raw garlic’s bite.
Dump the neutral oil on top, then lower the immersion blender to the bottom of the container. Turn the blender on, but don’t yet move it. Once the mixture starts emulsifying and thickening, slowly tilt the blender to introduce more oil to the mixture and very slowly pull the blender to the top of the mix. Plunge the blender up and down until the toum is fully emulsified and thick. (This streamlined toum recipe sacrifices fluffiness for ease by using a stick blender. If you want to make perfectly fluffy toum, prepare this recipe using a food processor.)
Stir well and adjust the toum with more salt and lemon juice as needed. (The toum recipe makes about 1¾ cups.) Transfer to a container with a tight-fitting lid and refrigerate, if not using immediately.
Prepare the sandwich: Divide the cheese evenly between the two slices of bread, tearing one piece in half to split it. Shingle the cornichons in one even layer on one side. Carefully close the sandwich. Evenly spread 1 tablespoon of toum on one side of the sandwich.
In a medium nonstick skillet, place the sandwich, toum-side down. Press the sandwich firmly with a spatula to compress. Cook over medium-low until lightly golden underneath, 5 to 6 minutes.
Spread 1 tablespoon of toum on the top side of the bread, then flip the sandwich over and press firmly. Cook until bread is lightly golden brown, 3 to 4 minutes, then flip back over. Since toum is made of mostly garlic, it burns easily. Take your time, reducing the heat to low, flipping and pressing the sandwich often to ensure that the cheese melts evenly and the bread doesn’t burn, about 3 more minutes. Lightly season both sides with salt and serve immediately, with a side of toum for dipping.
0 notes
Text
This is the best completely pareve, me-friendly vegan sour cream I've found. I can't eat dairy or much soy, and commercial kosher vegan sour creams, if they're even available in stores, tend to be either tofu-based or dairy equipment. I need a completely pareve one as a condiment for some meat Mexican dishes. This isn't a perfect substitute, but it's pretty good. I find that it works better with 2T lemon juice, not 1, and that you're better off starting with 1T apple cider vinegar and adding more in small increments if it tastes like it needs it. It almost certainly won't need more than the recommended 2T. I don't add the yogurt because I have yet to see a completely pareve non-dairy yogurt.
0 notes
Text
Brussels Sprouts Salad with Apples, Walnuts, and Dried Cranberries
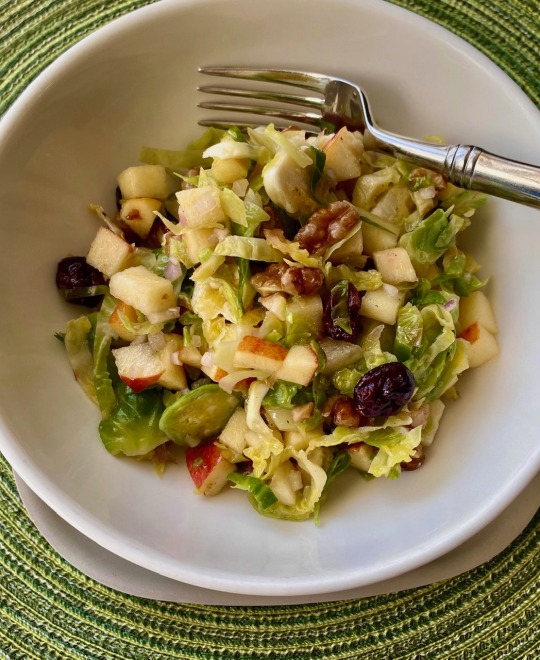
I had purchased a large bag of Brussels Sprouts some time ago to roast with dinner one evening. It was just my husband and myself having dinner, and he does not eat Brussels sprouts!
However, I sometimes make things he doesn't eat because I have a craving for whatever it is, and I had a craving for roasted Brussels sprouts.
After cleaning them I realized I had bought too large a bag so I only used half to roast and stuck the remaining wrapped well in the fridge.
After some time had gone by , and the Brussels sprouts still looked very fresh I decided it was time to do something with them.
Trying to think of some way to get my husband to try them it dawned on me I had never made a salad with shaved fresh raw Brussels sprouts as you see so often today.
My husband does love salad, and in looking at different recipes, I adapted one which included other ingredients he likes, and a tangy dressing, and left out what he doesn't. I threw in some dried cranberries which added even more texture to the crunchy salad.
Since the raw sprouts alone really don't have a strong flavor, especially shaved or sliced thinly, I had a feeling he would be at least willing to try it. Everything about the recipe told me it would be a yummy salad, and a welcome change.
I was correct because he not only enjoyed a serving, he had several helpings. I will definitely be making it again cause I really loved it, too, and even beat him the next day to the leftover salad!
Here's the original recipe below...(with my notes as mentioned above, I omitted the cheese, but added some dried cranberries)
Brussels Sprouts Salad with Apples, Walnuts and Parmesan from Once Upon a Chef by Jenn Segal
Ingredients
1 and 1/2 pounds Brussels sprouts, shredded (Note: I used the slicing blade in the food processor to shred the Brussels sprouts, you could also slice thinly with a knife)
1 large tart-sweet red apple, such as Honey Crisp, cored and chopped (no need to peel) (note: I used an organic Envy apple)
3 tablespoons minced shallots, from 1 large shallot
1/4 cup extra virgin olive oil
1/4 cup vegetable oil
1/4 cup plus 2 tablespoons apple cider vinegar
3 tablespoons honey
1 teaspoon salt ( I use kosher salt)
1/4 teaspoon freshly ground black pepper
3/4 cup walnuts, toasted and coarsely chopped
3/4 cup thinly sliced and crumbled Parmigiano-Reggiano
Instructions
Preheat the oven to 350 degrees F and set an oven rack in the middle position
Place the walnuts in a single layer on a baking sheet. Bake, checking frequently, until lightly toasted and fragrant, 6 to 10 minutes. Transfer immediately to a plate and let cool.
In a large bowl, combine the shredded Brussels sprouts, apples, shallots, olive oil, vegetable oil, apple cider vinegar, honey, salt, and pepper. ( Note: I mixed the olive oil, etc. in a jar and shook thoroughly before adding to the salad ) Toss well.
Cover with plastic wrap and refrigerate for at least 30 minutes and up to 4 hours to allow the sprouts to soften and the flavors to marry.
When ready to serve, toss the walnuts and Parmiagiano-Reggiano with the salad. (Note: I omitted the cheese, and added the dried cranberries with the walnuts).
Taste and adjust seasoning if necessary, then serve.
Enjoy!
0 notes
Last Seen Blogs

ayumixv
cigarettes after sex

gogift710
Untitled

verareids
✧.* vera ☽。⋆


akamarafilmfestivals2019
Film Festivals