#if you would like your own copy of the pattern used i have an etsy coupon currently 👀
Text


First hoof! Now to focus long enough to make a pair…..
#fun with fursuit frick ups#i have to fill in the middle of the toes but yeah#i could do with scaling up a little because i am bigger than US size 9- unexpected! i thought uk 7 would be okay#no worries it’s all part of the learning process#if you would like your own copy of the pattern used i have an etsy coupon currently 👀
1 note
·
View note
Note
Do you sell versions of your embroidery designs? I'm obsessed with your Solas patterns and would love to try them!
Hello!
So, short answer is yes, while the first digital mockups I made were designed just for my own reference and as color guides for transferring the designs painstakingly by hand, I ended up going back to them and turning them all into digital vectors. This means they can be printed onto transfer paper or directly onto stabilized fabric for stitching, which is MUCH easier than drawing by hand. Lots of people asked me if I could sell the designs so I figured this part out and was able to test it myself--the tower embroidery was an example of printing the vector directly onto the fabric and worked out great!
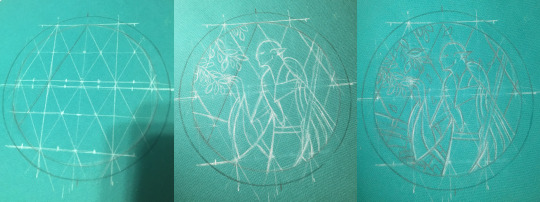
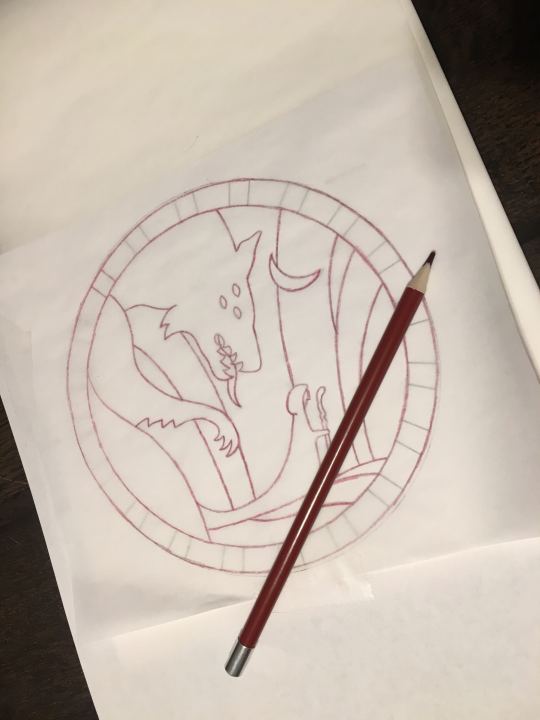
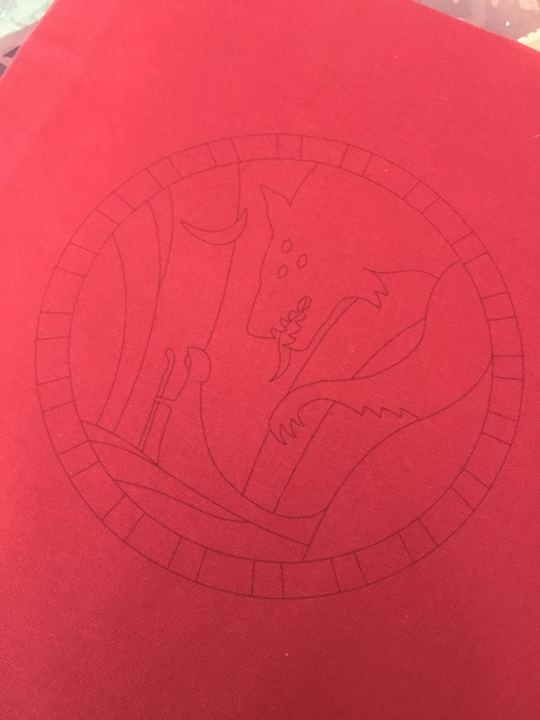
(above: tedious hand-drawing process for the Hierophant design, vs my failed attempt at transfer pencils that did not work at all for the Tower, vs printing directly onto fabric which did work in the end)
Long answer is after I did that, I uh, never figured out how or where to list them for sale online. Or what all to include with them--like what level of written instruction to include, should i also make notes on the thread colors I picked, should I include my colored-in-versions as color guides or just let everyone free-for-all it, in the case of the Tower embroidery i also hand-dyed a lot of grey thread that was crucial for it coming out how i wanted it to look--is it deceptive to sell a pattern when other people can't necessarily recreate it the same way because of that? Should I list in general the dye instructions if they wanna recreate it, or for people who want some of my extra thread or for people who don't have an inkjet printer so can't print the design onto the fabric themselves, should i think about selling full "embroidery kits" that include the printed pattern sized for a display hoop and the thread needed? etc etc etc
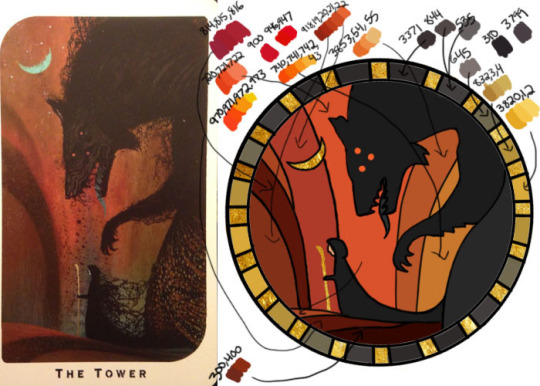
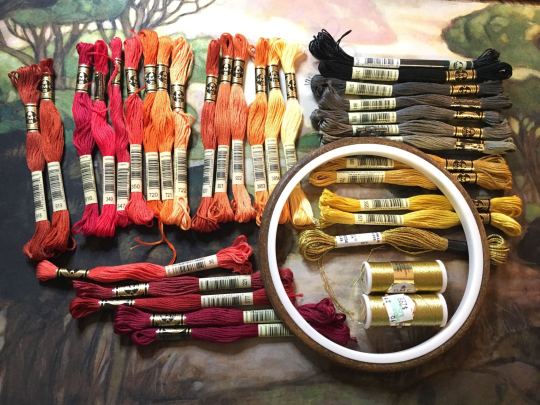
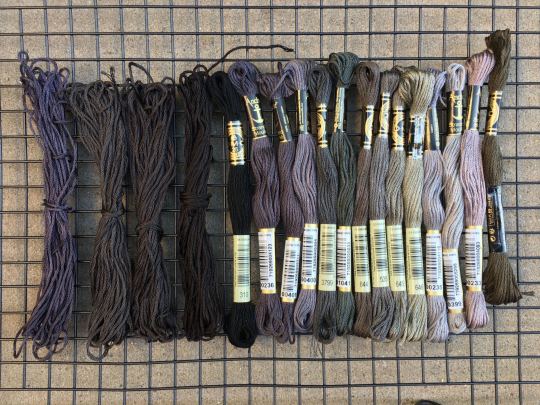
(above: photo of the color guide I made myself with tentative thread color selections (warning NOT the ones I actually ended up using), photo of my pile of threads I picked from, and photo of some of the threads I ended up dying myself to get closer to the design I wanted)
Anyway that was all a lot of thinking and work to do, so i put it off!!! and uh here we are 2 years later and I have still not posted them anywhere. I really gotta get around to all that still...
But in the meanwhile, if anyone reading would like a pattern, just let me know directly what you're looking for and I can save the versions of the files as needed for your plans and send them over. like for a digital only version (so no threads or me printing for you) i would probably make a zip file with a transparent png of the design (so you can put it in a word doc to print at whatever size you desire), as well as a pdf with a few copies of it already pre-sized for a display hoop for ease of printing or transfer, the colored-in version i used based on the tarot cards, photos of my finished versions, etc (note to self i must remember to include the design both normal for direct printing and horizontally flipped for anyone who plans to use transfer paper for it since those are mirrored...). Oh and a quick explanation of how i managed to get my fabric through a standard printer if you wanna try that.
But yeah i'm happy to work out something with kofi or paypal or venmo and sell the digital ones for like $20 each or something for now, if you don't mind not having written step-by-step instructions accompanying the patterns and example photos. Or if anyone has suggestions on where to host them for sale, for someone not interested in maintaining a dedicated storefront like etsy or storenvy long term. Maybe Gumroad? If i stuck to digital-only sales something like that might work. I'm open to input for sure. If you want something more than digital like a pre-printed fabric (since it's kind of weird to do yourself), I'm still open to trying, it just would be a little more $ to account for the fabric/stabilizer and cost of shipping, and probably take me a few more days to do.
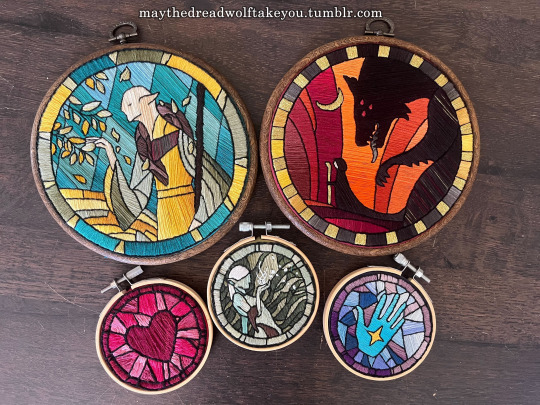
(above: example of finished DA themed embroideries)
But regardless, thank you for your interest at all!! I'm so glad people have enjoyed my embroidery series :) While I'd love to make lots of copies to sell to whoever wants one, I simply don't have the time, and they are SO labor intensive to make it really is like 80-90% of the cost is manhours. I spend anywhere from 5-15 hours making the patterns and vectors, but the stitching and rest of it itself is easily the bulk at 40-100 hours depending on complexity and number of threads used. So WAY more feasible to sell the patterns than make more to sell myself, and then anyone willing to put in the time can have one too :)
#ramblings#my stuff#my embroidery#dragon age embroidery#dragon age#replies#sparrowposting#dear tumblr PLEASE do not eat this one as i post it 🙏
25 notes
·
View notes
Text
🎅🏽 20% OFF Commissions are Open! + The Final Holiday YCH is Here + Society6 Shop Closing! 🎅🏽
Hello everyone, are you doing well? How has Thanksgiving prep week been treating you if you live in the United States? Or for anyone in other countries, how is the holiday prep for Christmas and what is it like over there? Mine is chaotic like most years, I hope yours isn't too bad either.
Speaking of preparation, my holiday prep is going smoothly! The final YCH is added with the menu now updated for the holidays and...
🎅🏽 Art commissions are in their annual 20% off Holiday Sale! 🎅🏽
From regular anime style, to chibis and RPG icons, all commissions sheets are at a 20% discount. Click on the Google Drive links below to view and save them for the holiday season or you can save my updated commission form. These commissions are on sale starting today and ending on January 6th (Three Kings Day). It's a sweet extension to add onto the festivities.
🤶🏽 Commission Form:
https://forms.gle/wCnA1XpnDBzEP5xVA 🤶🏽
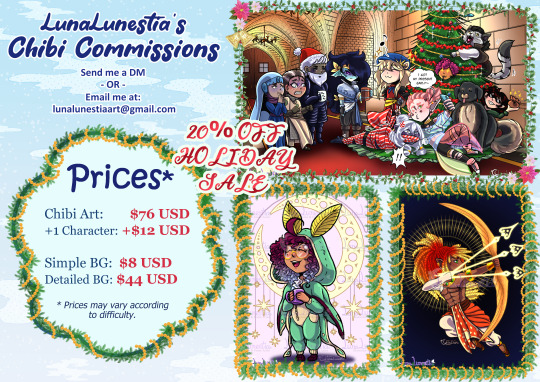

🎁 The final Holiday YCH is added at last! Ready to deliver gifts to all the children in the world! 🎁
Santa's coming to town-- wait, someone else is instead! With a driver and someone checking the list, they're making their way across the sky with a flying reindeer at the lead. Unlike the other YCH with a more simple background or prop with the use of assets or 3D models to help, this one is completely hand drawn with no assets to assist me in drawing the sleigh or chibi-fied reindeer, along with facing my challenge: perspective.
For this YCH, you can also choose the color of the sleigh and reindeer and any little patterns you wish to see that'll fit your characters of choice. Also! If you want the reindeer to be changed to another four legged steed, the price does increase for the adjustments.
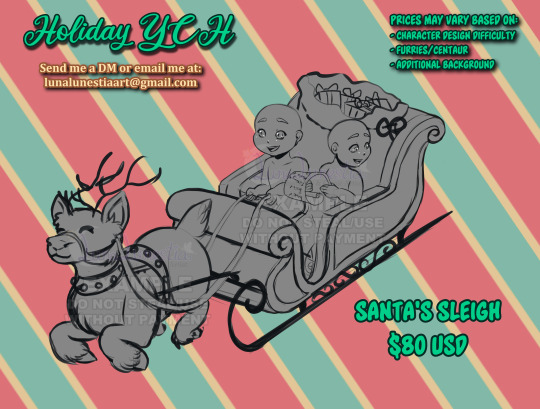
🎁 All Holiday YCH can be found on my Ko-Fi, Etsy, and Gumroad. 🎁
NEW! Santa's Sleigh: https://ko-fi.com/s/0d90f731ac
Musical Snow Globe: https://ko-fi.com/s/e58dcfa2f7
Nice vs Naughty: https://ko-fi.com/s/c7a1162236
All Wrapped Up: https://ko-fi.com/s/984e1e489f
Snow Angel: https://ko-fi.com/s/ba57cf47fa
Ice Skating Couple: https://ko-fi.com/s/ad2da47d34

🎄 Society6 Shop Closing on January 6, 2023 🎄
After a long time consideration, I decided between RedBubble and Society6, that I would prefer to keep my RedBubble store open and shut down Society6 instead. Mainly because it's much easier to upload new works onto RedBubble without creating dozens of copies so it could fit into Society6's products and Society6 really does limit you on what or where you can upload your artwork on, including cropping your work on their products. I will keep Society6 open for the holidays and it will be closing on January 6th, 2023.
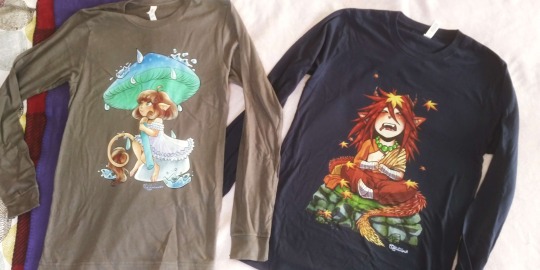
I have used RedBubble more often and bought my own works to test their quality, from stickers, mugs and shirts especially that brought a great impression. They turned out really good! Here's a photo of two RedBubble shirts I bought with my artwork on! (Sorry for the bad picture quality and setup. I'll do a better one next time.)
RedBubble Store: https://www.redbubble.com/people/LunaLunestia?asc=u
Society6 Store (closing January 6th): https://society6.com/lunalunestia
Whew! I think that was everything! Thank you guys for reading all the way to the end in today's mail* and have a Happy Thanksgiving to those who live in the USA and have a Happy Holidays to all. For those who signed up to see adoptables; keep a lookout for the next letter as I will be soon releasing A set of 4(?) Holiday Adoptables! Also in case one character design suddenly decided to have an attachment to me, I will make up with a new holiday prompt. Maybe a reindeer theme? Hint hint.
* People who sign up for the mailing list get priority updates.
If you want to share my links on your socials, to friends or by word-of-mouth, I would be tremendously grateful during this time of year! 💜
Once again, thank you all for sticking around, I really appreciate it and until then, see you all (who signed up for adoptable mails) in the next update! If anyone else would like to join the adoptable mailing list, please let me know.
Have a wonderful time,
~ LunaLunestia
#art#artist#art blog#update#shop update#holiday#christmas#small business#digital art#online store#redbubble#society6#I make shirts now#holiday shopping#Small Business Saturday#ych commission#your character here#ych#ych art#commissions#commissions open#commission info#commission sale#art commission#drawing#chibi#anime#fantasy#dnd#FFXIV
4 notes
·
View notes
Photo

There are a TON of different sites selling bootlegs. I’d seen two different variations before, one that looked like they seam ripped an original and photocopied then printed the pattern onto fabric, and another version that looked like it was from a FNAF jumpscare game. There’s no quality control when it comes to bootleggers, so they could all be coming from the same person or group. It’s pretty easy to create multiple identities online, or listing with well known auction or shopping sites as a seller. There’s just one thing to ask yourself when trying to figure out if it is a fake:
Are you buying it directly from Felissimo or a shipping service who will buy it directly from Felissimo? No? It’s a bootleg.
The sites you shared specifically had additional variant designs I hadn’t seen before. I have no idea where the original photo came from, though it is obvious that they are copying the design of the Yuki/Arale plush. You may think ‘well this is cute, it’s different but I like this design’ but please remember the scammers do not give you what is in the photo! They “bait and switch”. So while the photo has a very cute design, this photo is also being used across a lot of different sites, who knows which one, if any, will actually send you the design pictured. Sometimes the scammers will buy an original to take new photos with- as one way people tell if an item is legitimate is if the seller is using their own photos or stock photos of an item. They don’t send you the original though.

That’s... That’s not how 10% off works. If you cannot do basic math I doubt your legitimacy as a seller.

This still isn’t how numbers work. WHAT DID YOU DO TO YUKI?! Yuki-gets-a-bad-dye-job-at-the-hair-dresser version bootleg? Yuki BATMAN edition???

Aww, the FNAF Horror seal finally found love.

FINALLY you figured out how math works.
This photo features the actual Yuki and Arale plushies- but since they aren’t being sold on Felissimo and the price is WAY too cheap you won’t be getting what’s in the photo. While some items on the internet can be bought cheaper at stores because the person online bought the items in bulk at a much lower price, Felissimo does not sell their pillows in bulk to other stores. Any seller would need to buy them at the original price and take a massive loss- which they won’t do! Instead they’ll show you a photo of the original (or a photo they got off another site- maybe someone’s Etsy or DeviantArt where they made their own version) then send you their own knockoff which will probably look like FNAF Horror or the version that looks like it was hit by a truck.

This site included the originals for sale, but you know you won’t get what’s in the photo- you can’t trust ANY of their listings.
For anyone who missed the posts about the bootleg seal plushies please see these posts for more in depth info: bit.ly/yukibootleg
#bootleg#merch#scam#scams#seals#I tried to tag tala but Tumblr wouldn't let me#I had to block out the URLS as I didn't want followers going to those sites and possibly being tempted and getting scammed#The top most photo is really cute#But I don't know where you will actually get it#batman#FNAF#yuki
64 notes
·
View notes
Note
Psssst do you happen to have any tips or beginners links for newbies who are interested in getting in to the BJD hobby? 👀
*SOFT SCREECH* ALICE COME DOWN THE RABBIT HOLE WITH ME... /CLAMBERS FOR
This is a very slap-dash tips post, because a full fledged crash-course would take me much longer than a day to assemble. I think this could get someone started, but I can always answer specific questions if you have them in the future. ❤️
BJD 101: For a rundown of definitions, terminology, and origins of the hobby, I highly recommend checking out the Wikipedia article. (Warning for old vaguely spooky doll photos) I honestly wish I just read this when I got started, haha. It’s not everything, but it’s definitely a start.
Study! Read as much as you possibly can!! Especially terminology and maintenance. I highly recommend watching a bunch of unboxing and review videos- it might seem silly, but they're really helpful to get an idea of scale, how they function/pose, and how they look and feel when handled by a human. I also recommend trying to find owner photos of dolls you’re interested in, because sometimes the store photos are limited!
Join a community! Consider joining a forum like den of angels or a facebook bjd group like BJD Addicts! Exposure to the hobby is really helpful and you learn way faster. It’s fine if you’re shy, you don’t have to interact if you don’t want to- I like lurking DoA for the valuable tutorials and threads on doll brands I'm interested in. Tip: You can view some of DoA’s threads without an account by searching "[subject/doll of choice] den of angels" in google, but i got tired of that pretty fast. Signing up takes a few weeks to get approved but it's worth it for all the knowledge, even old archived stuff.
Window-shop until you drop!! I think the number one regret in the hobby is 'too many dolls, not enough time to love any of them'. So I HIGHLY recommend making wish-lists. These help a lot with avoiding impulse purchases and buyer’s remorse. There are a loooot of dolls out there, so if you've seen a huge majority of them, you'll be more picky.
For me, wishlists include both dream/grail dolls, tentative desires i’m not sure about but want to remember the name of, dolls I could never afford but feel validated writing down somewhere, and also cataloging info- measurements, wig/eye/shoe sizes, resin colors, price, current availability, dealer websites, etc. it becomes such a godsend when you shop for them. you’ll thank me later!!
I spent a lot of time browsing dealer websites like Alice's Collections, Legenddoll, Denver Doll, DOLK Station, etc- I linked some of those here. This is to see what my tastes are. Not EVERY doll company will go through all or any dealers, but it’s a good start!
If you’re the social type, going to conventions or local bjd meetups can help with getting an idea of your preferences! I accidentally walked by one at sakuracon last year and got to hold an MSD and an 11cm tiny, and that was REALLY helpful for me to realize I DID like those sizes. If other doll owners will let you hold theirs, I totally recommend it! (Always ask first, of course! Not everyone is comfortable with it!)
Go!! Slow!!! if you think you're taking it easy, go even slower. i'm so serious. it's so easy to get dazzled, over-eager, or totally overwhelmed by this hobby. especially if you have a habit of hyper focus/special interest tenancies like i do.
Patience is a virtue anyway: If you’re not buying second-hand or in-stock dolls, you will be waiting a while for your doll. Anywhere from a few months to a year, depending on the company and how backlogged they may be at any given point. Dolls are usually pre-order and take time to be made.
Some people like to just buy sculpts and let a character ‘come to them’, which is absolutely valid so if you wanna just go on a feeling that’s great!! i totally can’t afford that route most of the time, so I spend a lot of time mood-boarding for my potential dolls using pinterest and my own art to see just how in love with an idea i am and highly recommend it. I’ll ramble about this in another post soon.
Budget! They are not very cheap like 10-20$ fashion dolls at wal-mart, so those new to the hobby may be shocked.This hobby is an investment and an indulgence/luxury, as with most Nice Things. But don’t be discouraged! There are affordable dolls out there, a lot of Dealer websites offer layaway plans, and the second-hand market is always circulating things!
Here is a DoA list of dolls that are under 300$.
Note: Size of dolls often scale with price, so the bigger it is, the more expensive (and HEAVY) it will be. Some videos on BJD sizing here and here, but Flickr is crawling with height comparisons as well.
Craft or Not To Craft: Are you team 'i'm gonna sew/craft stuff/do wigs/eyes/faceups for my doll' or team 'i'm gonna buy clothes/props/faceups/wigs/etc from other artists!'? I know most people end up being a little bit of both, but these things both cost time or money (or both) so you wanna think about that in the overall price when you're considering a doll. It seems intimidating, but really, it’s the responsible thing to do. I’d rather plan for it than have a naked sad doll to feel bad about. Some personal recommendations below helped me get started:
Wigs: Monique Gold Collection wigs are affordable in the 20 dollar range, and have incredibly soft fiber! (You can find a lot of these available through ebay sellers as well)
Eyes: Lemonjellyshoppe and CandyKittenEmporium have some incredible eyes and also do custom orders!
Sewing Patterns: DGRequim on etsy and SproutyDoll have both been very nice to use and easy understand and modify to fit your doll!
When you’re savvy on the sizing of your dolls and if you’re comfy with secondhand sales, Facebook groups like BJD Addicts Sales & Commissions, BJD Lovers Sales, and BJD Adoption has a lot of people selling BJDs and accessories, oftentimes discounted for de-stashing or collection overhauls!
In addition to the other dealer sites I linked before, Dollmore (which also has an ebay shop) has a lot of options on everything!
Rec@sts and the community- This is a veeery hot button topic, but you’ll probably see a lot of it the more you get into the hobby. I don’t want to talk about it a lot because of the negativity it attracts, but to sum it up: BJDs are essentially commissioned art pieces. They are hand sculpted by an artist or small group of artists, and then cast in resin and refined and strung by hand. There are people that will cast copies of them and sell them for a very cheap profit. To put it simply, it’s theft, and it effects the livelihood of people that make a living of their art. A lot of companies stop making dolls because they can’t compete anymore. Most official doll/art related conventions (LDoll, Resin Rose, etc) ban rec@sted dolls, as well as DoA and several of the facebook groups. Be sure to read all the rules of groups/forums you join them.
A lot of people come into this hobby unaware of this and buy a bootleg doll on sites like Ebay or Aliexpress, and then get turned away from the community without understanding why. There are understandable circumstances that cause someone to end up with a bootleg doll, but it’s also important to respect the artists and creators that share their art with the public.
On that note: Sometimes people will resell 2nd hand dolls as legit when they are not. Be careful about who you buy second-hand dolls from. Also, keeping certificates of authenticity (CoAs), receipts, and original packaging is must if you ever plan to resell your doll!
I... think that’s everything major I can think of... at least enough to get someone started? I know a lot of it is a bit vague, but if you wanted my opinion on a certain brand or size of doll or budgeting tips if money is tight, I’d be happy to give my personal preferences on that separately!! But otherwise, good luck and happy treasure hunting! ヾ(^-^)ノ
28 notes
·
View notes
Note
Hi, when you say that you understand completely the reasons why people don't like the better binder project you're being very presumptuous. It's not the same as well-meaning but ignorant abled people attempting to solve highly complex and expensive problems of access for disabled people. And furthermore, the way you talk about this is really condescending and frankly just...you make assumptions that you understand the intimacies of how people think and feel that are just not true or analogous.
Like I mean this in the nicest possible way, but cisgender people’s relation to trans people is just not the same, and it would be a lot less patronizing and transphobic of you to *not* characterize every possible negative and/or critical reaction to this blog as being a reflexive anger and automatic rejection instead of being a justified and/or reasonable wariness. Like I absolutely hope this project succeeds, but there’s no reason to think that you’re qualified to make it succeed.
I’m going to use this also as a way to respond to your post, which didn’t show up on my Acitivity, so I’m glad someone pointed me to it.
1. My ability to listen to criticism
For the last couple weeks, I’ve been monitoring the activity of my posts, especially looking for people saying things like, “This will never work”, “this is a bad idea”, “won’t work for me” and so forth. Then a lot of the time I’ve messaged them to say, “Hi, I want to hear about your thoughts and experiences, do you have time to talk?”. I’m in a little bit of a backlog with this because some really smart and informed people have been commenting on it but I’ve been busy. For example, if I got the chance to listen to @the-scottish-costume-guy at greater length and in greater detail in the next couple days, I’d be really happy.
So while some criticisms have been reflexive rage or despair, others have been completely on point and I’ve already integrated them into my design (for example, recommendations to slope the boning diagonally down and to the outside). And others have been logical on the surface, but don’t apply to the specific thing I am trying to do (eg. “corsets are expensive”)
2. My credentials
I’ve been sewing seriously for the last 20 years. In some of that time, I’ve been paid for my work. For much of it, I’ve both been reading academic sources on the topic, and sewing in the workshops of vastly more experienced sewists. Over and above all my other sewing experience, I’ve made and worn numerous corsets. There is no set certification for a “professional tailor” but yes, if I wanted to do that as a job, I do have the resume and portfolio for it.
Tailoring isn’t actually the field you want here, though. Since beginning this project, I’ve located and contacted several researchers in the fields of human ecology, mechanical engineering, and biomedical engineering, who have relevant expertise. None have yet gotten back to me, probably partly because it’s summer. If someone more qualified than me wants to work on this project, I am 100% willing to collaborate with them, or hand the project off to them.
3. My profiting from this project
I’ve already made some very particular and pointed decisions about this. If I wanted to significantly profit from this project, I would:
Keep my R&D process secret
Patent and license the design
Sell patterns of the design I made for individuals wanting to make their own, individual, copy
Sell binders I myself made, or possibly outsource their production and then sell the result
Send cease&desist letters threatening to sue anyone selling copies of my binder, or any other binder on similar design principles, or any pattern for such a binder
Demand that anyone wanting to profit from the use of my design principles pay me a licensing fee.
Meanwhile, my plan right now includes:
Publicizing my concepts and progress in a way freely accessible to anyone with an Internet connection
Maintaining a record of my progress to keep anyone else from claiming to be its inventor and licensing it in exploitative ways
Encouraging feedback from as many people as possible and seeking out trans, nb, and genderqueer perspectives
Coming soon: Creating a survey about wearer experiences and health outcomes, asking anyone involved in this project to report back so the data can be disseminated and analyzed. If this project and my design are a failure, I will say so.
Making design concepts, and in the future, patterns and tutorials, freely available to anyone with an internet connection, and agreeing to their republication to reach other audiences
Only receiving donations from people who understand that this is an experimental venture, posed as the question, “What if I tried this thing,” and only profiting from items that I have ensured people could get for themselves some other way. (eg “Here’s a free tutorial on making this binder using items from the dollar store. However, if you want to buy a $20 kit of high-quality items pre-cut for your convenience, here’s my Etsy”)
Providing prototypes to their intended wearers for free in return for feedback about the wearers’ experiences, instead of selling half-baked designs for a profit
Openly encouraging other sewists to suggest design improvements, make their own versions, or make binders for other people without paying me
In the future, I’m very open to stepping back in my own role in this project, and handing it off to trans people who have taken the idea and run with it.
From a legal perspective, I have probably already ruined my chances of making big bucks from this project, and I did that on purpose. From the beginning, I realized that it is very possible for me to be exploitative in how I handle this project.
I honestly asked for money because I can’t pay for medications, groceries and utilities right now. I got about $300, which was enough to cover most of my monthly medical expenses. Most of the clients I see as a psychotherapist are disabled, living on extremely limited incomes, and cannot pay me much more than the cost I pay to rent the room we meet in. I’m trying to survive and find a better job. If I had a full-time job and made a decent income, I would be funding this project out of my own pocket. I know how to market and monetize a project like this, and have, from the first, deliberately chosen not to, in large part because I’m cis and this isn’t my issue.
4. Binders over top surgery
This project has largely been inspired by a trans person with whom I have worked, whose parents were involved in a custody dispute beginning when they were 14. At 14 they realized they were trans, but they required the consent of both parents for medical procedures until the age of 18. One parent was extremely transphobic and would not consent to top surgery, although they didn’t see their child on a regular basis and didn’t know how they dressed and presented. During those 4 years, they used a binder as a way of dealing with the dysphoria that made them suicidal. Despite its negative physical health effects (pain, trouble breathing, rashes, etc) the binder was an essential aid to their mental health.
Yes, binding is a “stopgap” method compared to top surgery. However, one of my major areas of work is as a mental health therapist with LGBTQ people, especially teenagers. Not everyone can get top surgery, and not always as quickly as it is needed. Sometimes there is a gap you need to stop.
5. Why do we need better binders at all?
I didn’t go into this because I, frankly, had considered the need for improvements in binder technology so well-documented as to be completely obvious. Just today someone tagged this blog talking about how much they want it to work because “binding gives me rashes, makes my already shitty lungs hurt, makes my back hurt, and doesn’t actually work for me“ Would you like me to curate the research and accounts of people who have problems with the current models of binder available? Is that proof you in fact need?
7. Corsets are unsuitable/super gendered
Yep! That’s why I’m not making corsets. I’m trying to use the engineering elements from corsetry that would make the binder better, and make everything else as un-corset-like as possible.
How possible this is is an open question right now. For example, corsets need to be fitted so precisely because they go from the bust to the hips, and therefore need the correct bust, waist, and hip measurement, and the correct height, and the correct ratio of all things to each other, and to have the correct vertical profile. My current hypothesis is that by making a binder that covers only the bust, I can eliminate many of these complexities. However, many informed observers of the project have told me that they think I’m wrong, and that the binder will need to extend to the waist to more evenly distribute the load of compression, and a garment that only goes around the chest will cause too much back pain over the long term. This is a question I think can honestly only be answered when I ship my prototypes to my genderqueer friend in Georgia, who shares my measurements and is eager to try each model out for hours/days/weeks and report back.
At present, I am experimenting with adaptations to sports bras, which I also know can be too gendered and induce dysphoria. I’m using them because my current project is aimed at people who have very little experience sewing, and therefore would benefit from only having to add a few elements to an already-constructed garment. After this, I want to see if I can transition those adaptations to something less gendered, like a tank top. After that, I can begin work on drafting a binder entirely from scratch, which, one hopes, I can make as ungendered as possible.
My askbox is open!
54 notes
·
View notes
Text
on cosplay planning and research
So, for those of us who opt to hate ourselves make our own cosplays, starting a project can be hugely overwhelming. A lot of characters are amazingly and intricately designed and in being so are difficult to duplicate and can be very stress making, but, as with any large task, the best way to go about it is to break it down into multiple build/buying goals. For illustrating my point during this post, I’ll be walking you through my process and occasionally using bits and examples from the research I did while building my Infinity War version of Steve Rogers.
And yeah, I know. This is a long post. It’s going to be a decent chunk of work before you even start building your cosplay. BUT, the better you prep, the smoother the rest of the process will go. Plus I find that having a record of all this is surprisingly useful in future cosplays- they might have similar elements or pieces to them, so if you can just reference the work you’ve saved from before you won’t need to do it all over again. So put on a playlist, make yourself a nice cup of tea, get comfy and let’s start this process together~
Step 1- Reference Photos and Window Shopping
The first thing you need to decide (after you’ve chosen your character) is if you’re going to try to replicate the costume as closely as possible, or if you’re going to make it your own. You’ve got to keep in mind that the closer you want your costume to be to the original, the more difficult (and most likely expensive) it is going to be fore you. Having a screen accurate cosplay is hugely satisfying, don’t get me wrong- but if you’re the type of person who likes to cosplay a bunch of different characters, it might not be the best choice for you financially or in terms of time commitment.
So once you have in your head how you want to go about it, you’re going to want to collect as many reference images as you can. If you’re doing an original design/mashup/taking liberties, sketch it out! You don’t have to be a skilled artist, but draw out a few versions of what you’re going for. If you’re genderbending, find fan art and other cosplayers who have done the same and take inspiration from them. If you can watch the show/play the game/own the original source material, go through it and save as many stills/photos from the character at every angle you can possibly find. This’ll take a few watches through but when I was researching for my Infinity War Steve Rogers cosplay, that meant I got to sit and look at Chris Evans all day (week) soooooooo it was worth it. Some companies release in depth art books or reference images (like Blizzard’s “cosplay kits”), so if you can access those, take advantage of them. If, like when I started this project, your source material hasn’t actually been released yet, be creative. Cap has similar suit designs throughout his trilogy, and his IW suit is a damaged version of one of his prior uniforms, so I pulled reference images from Civil War. I looked at all the promo posters and trailers, I even pulled from toys and other promotional products. You’ll notice (especially when it comes to toys) that the design might change slightly between that and the real deal, but you can never have too much information. At the very least, you want a full body shot, from a minimum of four angles- front, back, and from the sides. Print out the pics for when you’re actually making the cosplay, and save them all in one doc/folder so you can come back to them if you need to.
Step 2- Window Shopping
EVEN IF YOU STILL WANT TO MAKE YOUR COSPLAY after looking over the design in great detail, don’t skip this step. Trust me.
Now, companies that manufacture these cosplays have to have slight variations on their final products from the original design, but for the most part they’ll be decently accurate. If you look at the way they’ve constructed theirs, you might get some ideas on how to go about building yours.
This next bit kind of morphs into step three so bear with me
Your next stop is Etsy. There are tons of talented seamstresses, foam smiths and prop makers on there, and I absolutely believe in supporting them. You might fall in love with someone’s work and decide to commission your cosplay from them instead, and that’s great! Support artists within the community and all that. But if you still would like to make your own, be sure to look up the individual props and pieces instead of searching for the cosplay as a whole. If you’re lucky, you’ll find someone who sells blueprints or tutorials to their work, and you can support them by purchasing those and it’ll be hugely h*cking useful when you’re making it!
Step 3- Tutorials
AWW YE, hit up google, youtube, and the rpf. (in that order usually works best for me, but to each their own.) you’d be surprised how often searching <character’s name> + cosplay + tutorial can help you out, the cosplay community is amazing and a great source of information. If your character hasn’t been turned into a tutorial yet, or you can’t find a tutorial for every aspect, don’t worry! There’s always SOMETHING out there for you. If your character has similar aspects to another character, search for a tutorial on that character instead. Or if you can’t think of a character that’s remotely close, try to think of something from real life that might prove to be similar in design (while researching my Twilight Princess Zelda cosplay, I ended up on a lot of wedding dress forums.). If you really loved a piece on etsy but that shop hasn’t listed patterns or tutorials, write in to them and ask if they’d be willing to sell you their pattern/draft notes. If they do have them for sale, buy it! Being able to skip out pattern drafting when you can is a huge blessing. You can also ask other cosplayers, but
MAKE SURE you’ve actually researched and tried to find it on your own before asking them how to do it. Nothing was more annoying to me than when I had a flood of questions asking how I made my MJ/spiderman shirt, when in depth tutorials and walkthroughs are easily the first 124788 results if you google that question. I would absolutely love to help if you need it, but at the same time I’m not your search engine. (I feel I need to apologise to my BestFriendMikky™ right now, because when it comes to these things I absolutely use her as my own personal encyclopedia. Especially with sewing stuff. I’m sure it’s h*cking annoying to her do’t be like me, kids)
They might not have it? The first year I cosplayed, i didn’t keep any of my notes/patterns/wip pics (which i highly regret now), or they might not go about making these things in a conventional way, so their pattern might not exist in their head so much as it does in their brain. So sometimes when people ask me how I did something, I can only talk them through it rather than give them actual pictures/patterns/examples.
MAKE SURE you’ve actually researched and tried to find it on your own before asking them how to do it. Nothing was more annoying to me than when I had a flood of questions asking how I made my MJ/spiderman shirt, when in depth tutorials and walkthroughs are easily the first 124788 results if you google that question. I would absolutely love to help if you need it, but at the same time I’m not your search engine. (although, I feel I need to apologise to my BestFriendMikky™ right now, because when it comes to these things I absolutely use her as my own person encyclopedia. Especially with sewing stuff.)
They might not have it? The first year I cosplayed, i didn’t keep any of my notes/patterns/wip pics (which i highly regret now), or they might not go about making these things in a conventional way, so their pattern might not exist in their head so much as it does in their brain. So sometimes when people ask me how I did something, I can only talk them through it rather than give them actual pictures/patterns/examples.
Once you’ve found about 200 sources, bookmark them all. Start reading them. Save them, even. Print some of the ones you’re partial to out. Decide if you want to follow one of them verbatim, or mix and match steps and methods to make your own plan. Even if you have a pretty good idea of how you want it to go, you might want to save your other findings just in case something doesn’t go according to plot during the building process.
Step 4- Break up your plan
I like to do this on graph paper. I have a notebook that I’m partial to using during these projects, and a system of binders that the writings transfer over to once the project is finished. If you aren’t partial to a particular method/prefer technology, the cosplanner app might be a good way for you to go. It has spaces for you to do everything I’m about to describe, but in a convenient, cloud using app, and is a lot more mobile than your phone. Tbh I tend to use both, but my physical copy is always much more in depth than whatever I list out on the app.
The first thing I do is list out every piece of the cosplay, from head to toe. This doesn’t mean “shirt + pants + prop”, it usually goes a little something like
(we’re using my IW steve research, again, for reasons)
Wig/hair
Shields (x2)
Shield Harness
Shirt
main shirt/base
Shoulder/overlay piece
Gloves
Belt
main/base (buy)
buckle (make)
utility pouches (make)
Pants
Boot Covers/Shinguards
Boots (buy)
So if I already know I’m going to buy a certain piece I make a note of it, if I already know that one piece is going to be broken up into multiple components, I separate them out... you get the idea.
Next, you break these down individually. If you’re going to buy some of the pieces (I pretty much always buy things like boots/shoes/wigs,) on the cosplanner app you can move them into the “to buy” section, and everything will be separated out in terms of what you need to buy and make. (This is kind of cool on the app, because it has a place to save how much you spent on the purchased pieces and how much time you put into the making of each specific piece)
For each piece, you kind of start this whole process over again. Choose a piece, and google where you can buy it. If you did a good job with your tutorial research, I’m sure you have some you found that are for specific pieces of your build (ayyyy all that step 3 work paid off!) Start searching for sewing patterns and figure out what type and how much of the fabric you’ll need. Write it all down in it’s own little subsection/within the app so that when you’re shopping you can easily reference the list.
Now when it comes to timing this out- just a quick observation- I find that I do better quality work when I don’t have a due date, but those projects tend to sit unfinished for longer than I’m willing to admit. And the projects that I assign due dates for definately get done faster/on time, but usually aren’t my best work. Just something to think about.
If you’re on a time budget, now’s the time to figure that out and set goals. Look at the due date and estimate how much time you’ll need for each aspect of the costume, how much free time you’ll have to work on it, and plan accordingly. I’d recommend leaving extra cushion of time, especially if you’re using tools or techniques you’re not familiar with, so that if it goes slower than you expect or if you need to remake a piece you’ll have the ability to do so. And be sure to figure out what you’d like to do first! If you’re waiting on funds for the bulk of your project, start the cheaper pieces first. If you get overwhelmed by the larger pieces, start the smaller ones first. I mean, the order is really up to you, but I personally like to take a log of the materials I already have and start whatever I can finish whatever smaller pieces I can with what I have on hand >.< I also like to leave my wig purchasing/cutting/styling for the very last thing, it doesn’t usually take more than a couple of hours for me and it’s a nice low-stress thing to have to do if your project has been pushed into con crunch.
Of course, I started practicing this method as a way to combat con crunch, but it always seems to end up right around there, doesn’t it?
#cosplay#cosplayer#cosplay research#cosplans#infinity war#infinity war cosplay#capsicle#steve rogers#rant#tutorial#wip#tips and tricks
8 notes
·
View notes
Text
Welcome to the webpage of Storied Stitches! Our goal is to create a knitting zine for our generation of knitters that doesn't focus on the commercial side of knitting. This zine is about the DIY spirit and knitting by the people, for the people.
Where to Find Storied Stitches
Online, the zine is available through Etsy.
Dharma Trading Co.
1604 4th St, San Rafael, CA
Pegasus Books
2349 Shattuck Ave, Berkeley, CA
California College of the Arts Holiday Fair (December 2nd)
5212 Broadway, Oakland CA
------------
Upcoming Events:
November 20th, 2017
Submission deadline for Vol 2!
Submit to [email protected]
December 2nd, 2017
California College of the Arts Holiday Fair
5212 Broadway, Oakland CA
December 16th, 2017
Volume 2 release!
------------
FAQs:
How can I read Storied Stitches?
Physical copies will be available through Etsy, as well as Venmo and Paypal (you can message us for more details on the latter two).
You can access a digital copy for free via Google Drive .
We will also have physical copies at the California College of the Arts Holiday fare in Oakland, CA (more details coming soon).
Where is my money going if I pay for Storied Stitches?
All money made from this zine are going back into the production of the zine. This includes printing and shipping costs, Etsy posting costs, etc. We want this zine to be accessible to as many people as possible, so we are not building in any profit in producing this zine and we have a free digital copy available.
Will contributors be paid for their submissions?
At this point, we are a two woman operation and funding this zine with our own money. Once we grow a bit more, we plan on compensating contributors! All contributors will receive three free, physical copies of the finished zine.
What about copyright?
We expect that you submit your own work, so everything you submit will belong to you and we will only reproduce your work in the zine. We expect you will edit, test patterns, etc to your satisfaction. If you have further concerns please email us directly at [email protected] and we will help to the best of our ability. If you have read Storied Stitches and would like to reproduce any works/images/writing in the zine we ask you contact the creator directly!
1 note
·
View note
Text
Mandi’s Board and Batten Study Makeover
.When we purchased our home last year, I knew the front room would be a perfect place to put a study. The little room was tucked away from the rest of the house and had a door to separate it from the hustle and bustle of family life. It was the perfect space to house our library with a cozy spot to get lost in a book. I’m happy to finally be able to share with you all of the design considerations for this space, as well as how easy it was to DIY an inexpensive board and batten wall treatment.
Style Considerations
I considered so many options for this room, as far as style, paint color, furniture selection, and arrangement goes. The look I finally settled on is a sort of mod take on a traditional masculine study. Think: mid-century cabin meets surf shack meets Gatsby’s mansion. That’s a logical combination of styles, right?
Next, after much deliberation, I settled on Benjamin Moore’s Oil Cloth as a wall color. It’s a medium-toned grayish green that takes on different hues depending on the time of day, but always to me as if it’s channeling a movie set from the ’50s. After deciding on a wall color, I chose this seasalt gray Burrard sofa from Article that had a subtle mid-century silhouette and slim arms to fit perfectly in the narrow room. The smoky quartz womb chair I chose from Rove Concepts obviously has mid-century styling and also closely matched the gray of the sofa. Both furniture colors offer very little contrast with the wall color, which was an intentional choice. I wanted the room to feel calm and unified, as our book collection is quite colorful and would add an element of visual chaos, particularly if paired with contrasting colors and patterns.
To lend some of the casual California mood that had been part of my style inspiration, I chose woven wood shades from blinds.com. The color I selected (Terra Oak) brings out the wood tones of the window and helps warm up the generally cool feeling from the grays and metals in this space. The art over the sofa is an original mid-century porcelain piece I purchased on Etsy, which alongside the globe floor lamp also adds to the “surf shack” vibe. The morroccan-style rug from Lulu & Georgia feels more bohemian, while the vintage coffee tables I got from my friend Susie in a swap add a modern take on the art deco Jay Gatsby look. (I always think of Jay and his uncut books when I think of a traditional study!)
Before & After
I’m afraid the “before” photo of this room isn’t a true before. The month we moved in, I ripped out all of the carpet on the first floor, and didn’t think to stop and take a before picture of this space first. Just imagine a shaggy brown carpet in here, which tied in nicely with the brown walls and oak trim. (Not sure “nicely” is the best word to describe it, but you get the gist!)
The study is somewhat narrow, and it became even more so when I added bookshelves* to one of the longer walls. I figured the room didn’t need to feel spacious, right? After all, we wanted a cozy study to house our library. Further enhancing the cozy vibes, I decided at the last minute to paint the ceiling too. I hadn’t been happy with the stark contrast of the medium-toned walls with a bright white ceiling. So we rolled Benjamin Moore’s Gray Horse onto the ceiling. Funny enough, the gray sort of reads as white in the daylight in context with the darker walls.
*The boxes on the floor in the before image are IKEA Billy Bookcases! They’re what we used as a base for our built-in bookcase—a DIY project which I’ll be sharing with you very soon!
Board and Batten Installation Process
Adding board and batten moulding really took this room makeover to the next level. I love the monochrome look of painting the walls, bookshelves, and trim all the same color. But the empty walls (without bookshelves) definitely needed something to bring it all together. I knew I wanted to add some type of applied moulding, but for a while I was stuck on the style. Finally, I decided that vertical board and batten would be an easy and inexpensive way to add texture, also in keeping with the mid-century cabin vibe I like so much.
I’ve created a board and batten wall treatment before in our bedroom, but using vertical strips only was much less work and significantly less expensive. This time around, I used pre-primed lattice moulding. Lattice moulding is very thin (about 1/8″), so it will add a textural element to the wall, but won’t stick out so far as to be an impediment for hanging art or to be a collector of dust. Getting pre-primed lattice moulding saved us lots of sanding (and the mess that goes along with sanding), but I have seen treated lattice moulding available at hardware stores for about $1 per 8′ strip. This take on a board and batten look ended up being a super affordable way to dress up a room!
Prepping the baseboards: If your baseboards have a curve on top that is thinner than 1/8″ at any point, you will need to address that before adding the board and batten strips. I had already removed my baseboards before beginning this project, so it wasn’t difficult for me to address this issue. I simply glued lattice strips to the back of my baseboards at the top and bottom so they would come out from the wall far enough to perfectly meet the batten strips. Then I primed and painted the baseboards before putting them up on the wall.
Step One: Before gluing up the strips, I calculated spacing between strips to be as close to 1′ as the wall width allowed. (One wall is a bit more than 1′, another wall is a bit less than 1′ between strips.) Then I took a scrap piece of lattice and marked where each long strip should be mounted. I did use a level when making the marks to make sure they weren’t drawn crookedly on the wall.
Step Two: Apply a bead of construction adhesive to the back of your board and batten strip and use a level when applying it to the previously marked spot on the wall. These strips are lightweight enough that construction adhesive should probably be enough to hold it in place, without the strips pulling away from the wall as the glue dries. However, I’m not one to take chances, so we also nailed them up after placing each strip. We used an air nailer for this, but a hammer and nails would do the trick just fine!
Step Four: After each board is in place and the glue has dried, apply paintable caulk to where the batten strips meet the wall. Caulk is a flexible filler which should not crack over time and will fill the gaps between the board and the wall nicely. I used my pinky to run along the line of caulk to remove the excess, then used a damp cloth to remove any extra smudges of caulk on the wall and batten strips. If you have nailed your boards into place, this is also the time to fill any nail holes with spackling.
Step Five: Paint! After everything was glued and all of the cracks were filled, my husband graciously taped off the walls for me. I added plastic sheeting to the windows and floor then spray painted this entire room! You can check my highlighted “study” story on my Instagram profile if you’d like to see more behind-the-scenes footage of this endeavor.
Let’s just say the spray painting job did not go super well. The process itself went smoothly, and I thought I had done an amazing job, until the next day when I noticed the sheen varied all around the room. I mentioned it to my dad and he said, “Yeah, spray painting is definitely an art. You have to hold your gun in the same direction evenly across the surface or the sheen will vary.” Ugh, would’ve been nice to know before I began! I was just worried about getting even coverage and avoiding drips. Oh well. I ended up hand brushing and rolling around the board and batten to give the room a final pristine coat of paint.
Creating a Workspace
Finding a desk that wasn’t too bulky for our small study was also quite a challenge. My husband works from home occasionally and needs a dedicated office space in the study to set up his laptop and make calls. He also is a mentor for some of his peers, so he needs a private room for confidential meetings, with comfortable seating and access to his library. I decided we could nix a desk with a file cabinet if he was happy with keeping file boxes on the bottom shelf of the bookcase, so then we could get this more minimal desk from Lulu & Georgia. The chair is a vintage find from a local favorite of mine in Canton, Ohio (Main St. Modern), and provides a comfortable place to sit and work for an extended period of time.
I’m so happy with how the library aspect of this room makeover turned out! I’ll be sharing this bookshelf DIY soon. Adding color to the wall that also encompassed the bookcases really helped make the contents of the bookshelves feel more unified. I don’t have the prettiest book collection of all time, but I did integrate several vintage books to the mix to add a more timeless feel. Most likely I won’t read many of those vintage ones, but who knows—maybe a 1950s book called A Career in Fashion may provide useful to me one day? While thrifting one day, I did stumble on an old copy of The Fountainhead, which I couldn’t resist, even though I already own a newer copy.
Now that this space is finally completed, I’m excited to set down the power tools and work at my summer reading list instead! Any favorites I should add to my list?
As always, I have included a link list to all of the materials I used in this room. Check it out below. Let me know if you have any questions! – Mandi
I worked with a few brands to gather some items for this space. Those items are noted with a c/o in the list below to signify that they are gifted “courtesy of” items.
Material Sources:
Wall color: c/o Benjamin Moore Oil Cloth
Blinds: c/o Blinds.com
Flooring: Lumber Liquidators
Rug: c/o Lulu & Georgia
Sofa: c/o Article
Floor Lamp: c/o Article
Table Lamp: vintage
Desk: c/o Lulu & Georgia
Desk chair: vintage from Main Street Modern in Canton, Ohio
Coffee Table: vintage
Lounge chair: c/o Rove Concepts
Glass side table: c/o Rove Concepts
Bluetooth speaker: Amazon
Gray marble vase on coffee table: 31 Bits
Art & accessories: all other acessories + art is vintage
Bookshelf Boxes: DIY (blog post coming soon!)
Credits: Author and Photography: Mandi Johnson. Photos edited with A Color Story Desktop.
from RSSMix.com Mix ID 8265713 https://ift.tt/2MeaDM4
via IFTTT
0 notes
Text
Custom Made Footie Pajamas
For those of you who aren’t conversant in Onesies Down Under, they're a shop from Australia (wager you didn’t see that coming!) that makes a speciality of premium ABDL products. When Bruno sees folks in striped pajamas throughout a fence that he assumes marks the boundary of a farm, he questions his father and is instructed that the they are inferior beings and never worth being thought-about as folks. In desperation for pajamas (Grayson outgrew them so fast!), I went to my local Carter’s and bought 3 pair of their 1-piece jersey pj’s. Nursing pajamas are a wardrobe essential for brand new moms, as you wish to be comfortable for those midnight feedings. However now they're again and extra widespread than ever! Discover Carters Children Matching Christmas pajamas etsy, Charter Membership Matching Christmas Pajamas and extra at Macy's. Click the button below so as to add the children Sully Monster Inc. Onesies Hoodie Animal Pajamas Kigurumi Costume to your wish list.
A infant can never have sufficient pajamas and this choice has loads to choose from with various colours and prints which can be adorable for each woman in your purchasing listing. With the huge number of child clothes at Daily Low Costs from Walmart, constructing a wardrobe to your baby is easy. Baby clothes are sometimes worn simply once or twice, but the lower value manufacturers are so readily readily available that they haven't got the identical resalable top quality. I’d virtually carry a baby . If you’re one of many thousands of people passing by a UK airport this half time period to flee the UK chilly snap for some winter sun, you’re prone to witness a brand new pattern sweeping the nation - travellers in Onesies. Ends images teal is one onesies. One can readily perceive why the ebook has had such a strong impression on countless readers, develop into required reading in highschool Holocaust courses round the nation, and is about to be released as a significant movement picture. Alexa International Rank. Alexa is one in all the commonest webpage tracker. Not solely is it risky to ship your laptop along with you as a consequence of theft, however it really won’t be essential until you’ve been instructed to take action.
What you need: Paper, pens and a pc and printer or copy machine. Google, Inc. is attempting to draw those younger individuals. Need to carry out for a better worth on the favored garment? Inexperienced readers can have it learn to them and if they want to determine a phrase on their very own they'll simply pause the narration and take as lengthy on every web page as they should. Actually, researchers at the Lighting Analysis Heart at Rensselaer Polytechnic Institute discovered that two or extra hours of exposure to backlit units can suppress melatonin by up to 22%. The chemical melatonin helps promote sleep within the physique. This could cause you to far more profitable and place you in a improved physique of mind. And the way far away is it? Bruno now not feels happy with his father. If mother and father are unable to have a while to chill out, they are going to change into extremely harassed out, that isn't useful to anyone within the family.
If you're getting the child prepared for mattress, keep on with a program that you've got set up every night. When Lyndon B. Johnson assumed the presidency, he set out to pass an especially formidable legislative agenda, together with a warfare on poverty, the safety of civil rights, the commencement of public works, and the chopping of taxes. Use it as a information in chopping the fabric. They may also use information about your visits to this and other websites to target ads for goods and providers. Use a hook tool to peel away the destructive house of your design. Reasonably than make you are taking a look for them, you'll be able to check out my day by day offers round up under! You can even get matching boxers for couples for an important gift for any occasion. The sleeveless top makes this an excellent choice for hotter weather, yet the robe allows it to work simply as well as the weather cools. However Friday and the weekend are an excellent time to experiment with the casual style.
When you're blue and down, it is difficult to focus as well as tough to finish your work tasks correctly (if in any respect). Drawstring elastic waistband. Facet seam pockets. Drawstring waist. Cotton. Imported. How a lot do the teenagers on teen mom on mtv get paid per episode? As I labored on this piece I started to have doubts in regards to the fabric selection, but it surely was too late to show back, so I continued. But it surely didn't. It shied away from the whole lot that would have meant one thing. Give your PajamaGram an additional private contact by including our Joyful Valentine's Day reward tag embroidered with the recipient's name. This adorably enjoyable pink onesie with three rows of icing trim red ruffles isn't just for Valentine’s Day! Prep the siblings with this fun announcement. And who wouldn’t like one thing sweet? Billington, Michael (13 Could 2014). "The Pajama Sport review - ardour collides with politics in dynamic revival". The folks at Organizing for Action (often known as @BarackObama) won’t rest till everyone spends this holiday season talking about health insurance. Bleaching and dying really would convey little to those garments. Remember the 2 fast checks as a result of they will let you confirm the company’s claims about security and privacy.
0 notes
Text
Forever21 “Woman” fashion faux pas
If you’ve been following my blog for a while, you would know that I’ve discussed the difficulty in copyrighting clothing designs. Clothing was once considered a useful piece thus it once met patentable standards. But that was so long ago that generally articles of clothing have entered into the public domain. Most patterns or certain ways to wear one’s clothing are also in the public domain. So most fashion design companies can only copyright or claim intellectual property protection in designs that meet specific copyright standards which is often subjective. For example, the US Supreme Court upheld a ruling that cheerleading uniform designs were copyrightable where the design was separable from the product’s utilitarian aspects. The earlier federal appeals court determined that the cheerleading uniform company’s designs were conceptually separate from the uniforms. Congress has steadily declined to provide broader copyright protection to the fashion industry and while this case has provided a small way for designers to their ornamental designs, most clothing designs will automatically be considered part of the public domain outside trademarking the company name. For example many cartoon and book characters meet copyright standards outside of the article of clothing so they are protectable on their own. Secondly those characters can serve as trademarks for their companies. Prime examples include Mickey Mouse, Hello Kitty, Spongebob Squarepants, just to name a few. Often clothing designers of today feature clever slogans or phrases on shirts or statement shirts.
But often those designs are not copyrightable. Fashion is one of those areas where “copying” is for the most part legal or not illegal though most people have morally based reactions to copying. Louboutin is a very expensive shoe brand and often other less expensive shoe designers copy them creating a similar design and it’s perfectly legal. The thorn in every designer’s side, Forever 21 is presently involved in a trademark lawsuit against luxury brand, Gucci, to cancel its trademark on its well-known color block stripe of blue, red and green. While scrolling through my Twitter timeline, I stumbled across a series of tweets accusing Forever 21 of copyright infringement for copying another clothing designer, called the Word Agency. The designer created a basic statement t-shirt featuring the word “Woman” in different languages centered all the way to the bottom of the shirt. The shirt was created as part of a charity campaign for Planned Parenthood but it's unclear whether Planned parenthood actually commissioned the project. Of course other Tweeters were upset and believed that what Forever21 had done was in fact morally and legally wrong. but again based upon the analysis the courts have determined, it is my legal opinion that Forever 21 is in the legal clear though not the moral one. Forever21 is known for its fast fashions including copying bigger brands with cheaper alternatives. Forever21 has since removed the shirt though for legal grounds. One Tweeter even noted that the designer’s t-shirt concept was not new and there were similar t-shirts featured on Etsy. I haven't located a similar design yet but will update if I do. Etsy even details the policy on certain t-shirt designs “Copyright does not protect titles, names, short phrases, slogans, familiar symbols or designs, mere variations of typographic ornamentation, lettering, coloring, or mere listings of ingredients or contents. Copyright does not protect the mechanical or utilitarian aspects of a design.”
Noting Etsy’s research on the issue, it would appear that the designer’s statement is in fact a slogan or short phrase that does not meet copyrightable standards and would likely have a difficult time meeting trademark standards as well under a concept called ornamental refusal. More on that later. As a lawyer, I often have to sift through emotions to get to the facts and the law. I wanted to be upset with Forever21 as well but in this case, it does not appear that they done anything outside of the bounds of the law. Agree or disagree? Let me know your thoughts
EJLee Law is a boutique law practice specializing in Entertainment, IP-Copyright and trademark, and Small Biz matters located in Metro Atlanta. You can follow EJLee Law on Twitter @ejleelaw or FB EJLEE LAW PRACTICE LLC
***THIS BLOG POST IS NOT TO BE CONSIDERED LEGAL ADVICE. ALWAYS SEEK INDEPENDENT LEGAL COUNSEL FOR YOUR SPECIFIC SITUATION.***
https://www.bloomberg.com/news/articles/2017-03-22/cheerleading-uniform-copyrights-backed-by-u-s-supreme-court
http://www.hollywoodreporter.com/news/gucci-v-forever-21-legal-experts-weigh-stripe-trademark-battle-1028928
https://www.etsy.com/help/article/263
0 notes
Text
Palm tree dress


I actually made this dress last summer. But the armholes did not fit comfortably. I had used a facing cut from the same fabric which did not lie comfortably. So a year later, I finally changed the armhole finishing to one made with a strip of bias tape, which I also made myself. It’s not hard and very practical to have some on hand!

From the last two posts the reader can see that I regularly go back to improve finished projects to make them better. Call me a perfectionist. I have the ability to make things better, to make them really great, so I do. Who cares how long it takes.
I spend so much time altering my own clothes--taking them in, etc, to make them fit me just right. I can’t help myself. And I seem to have trouble stopping myself from acquiring projects! Every time I go to Goodwill I tell myself I will not acquire any new projects. Inevitably I will come across a great brand or a great fabric that is not my size but which I cannot pass up because it would be a great price for the quality.
So my to-do pile piles up. I have it all over the house, mostly in the dining room. The rest is spread all around the basement which is my sanctuary. I hang a lot of to-do projects on a dining room closet door. I find it relaxing to spend a few moments with my morning coffee doing some unpicking or some pinning.
I don’t have time when actually sewing to get up and down from the machine to unpick or pin long seams. I need to make the most of my sewing time by doing my prep work at other times. Seam ripping. I find it relaxing. Go figure.
One by one. That is how I attack my projects. This would work if I didn’t keep adding to them. But this is my passion.
I recently read about the concept of having a capsule wardrobe of just 37 items to simplify your life. With just 37 items, you are supposed to be able to get dressed more easily because you have fewer decisions to make. This system is supposed to make you feel better about a minimalist life style. Apparently the French already do this.
Could I live with just 37 items in my wardrobe, which is supposed to include shoes? Should I? For someone like me who revels in textures, styles and for whom fashion is such a form of self-reflection, I think that system would steal my joy. I am sure it is a good idea, if you espouse minimalism. And I do espouse minimalism in other parts of my life--just not in dress. I don’t think I’d subject myself to such deprivation. Nice idea, though. I will definitely try it when I travel.
Through style, you can communicate to the world who you are and what you stand for.
--Solange Knowles
Seeing that is close to 100 degrees this week, I am only wearing sleeveless items like this dress. The pattern is this one:

I just omitted sleeves altogether.
The fabric is quite heavy--some kind of cotton twill. I got it either off eBay or Etsy when I was on a palm tree theme kick. I can’t remember which. Since it’s quite heavy, there was no need to line it.
I’m working on a coordinating sweater. I liked this one from Brooks Brothers.

To copy it I bought a mint colored lambswool sweater from Gap and am in the process of creating the motif with duplicate stitch. This is a time consuming process.
I’m so itching to get to my projects. They bring me joy. I wake up early to sew. I itch to sew in the evening, but am usually too tired. Sewing is my lifeblood.
0 notes
Last Seen Blogs

hiddensoulsecret1
soul

arquitecturayvideojuegos
Arquitectura y Videojuegos

quotefeeling
Quotefeeling
andreino87
No limits...

maevemckaig-blog
visual journalism