#i'm sorry for making this new post...
Text
youtube
if it's wrong to love you
then my heart just won't let me be right.
[reupload.]
❣:
@a-slut-for-vegaspete @pxvvar @kxttxnkxttxn @forcebook @ellasaru12 @vecchiozooeee @shakakalaka @forcebookish @topapologist @fuckingcrescendos @first-kanaphan @25shadesoffebruary @burnsuncomet @vhsbabyxx @topmewera @itsmelb @topmeow @forcebookbrainrot @topmewbot @sailingsnow @littlegrittle @alcairsei @frostluvrs @themainlightfragrance-blog @omarandjohnny + every topmew enjoyer on this app <3
#only friends#only friends series#only friends the series#ofts#only friends fanvid#only friends fmv#ofts fanvid#ofts fmv#mew only friends#top tanin#topmew#book kasidet#force jiratchapong#forcebook#fmv#fanvid#song: my all - mariah carey#i'm sorry for making this new post...#but i just noticed a slight error in the first version of the edit#so this is the edited one...#i hope everything's ok now#ahhhh i'm sorry for the inconvenience caused :(#everything is still the same as the original#just very VERY small errors (that i personally can't tolerate)#anyway thank you again for watching this#and sorry to anyone who doesn't want to be tagged in this...#na edits#for topmew#Youtube
33 notes
·
View notes
Text
Oh look, it seems everyone has been opted into the unfortunate "experiment" now. For everyone who has been blissfully using the old UI up until now, welcome to hell :)
Do you not like hell? Do you want to leave and crawl back up into the sunlight of the old UI? Well, have I got a link for you! A beautiful tumblr user (who is not me) has gone and fixed things beautifully for you already: https://github.com/enchanted-sword/dashboard-unfucker
You will need to have Tampermonkey installed on your browser of choice, and once that's done, just go to the github link above, and peruse the readme to install. And voila! You have your old dash back!
The authors of XKit Rewritten said during the experiments that at the time, since this was an "experiment" they weren't going to implement anything to revert to the old UI (although who knows if they'll do it now). And the dashboard unfucker has worked beautifully enough for me to where I genuinely couldn't tell if they had ended the experiment or not.
#EDIT: pinning this for a few days so muts can find it if needed#EDIT: but also because i'm muting notifications because my phone is now dying#i foresee me possibly having to mute the notifications on this post#but whatever#(update: my prediction came true faster than i anticipated before i could even fix link mistakes or typos 🤷♀️ SORRY)#(when posts you make for your muts get a little further out than expected)#psa for anyone who the new ui winds up bothering#here's a way to basically revert to ye olden times
20K notes
·
View notes
Text


The Pantheon of Discord
#i stayed up way way too late to make this#i'm so sorry i didn't find a better gif for the mara but i'm tired and it's making me laugh far too much#it's dancing to my music#doctor who#dw spoilers#new who#classic who#doctor who spoilers#the toymaker#the trickster#the maestro#the mara#the gods of ragnarok#sutekh#the legend of ruby sunday#i'm so tired that i almost typed “the legend of ruby tuesday”#my posts#my gifs#gifs#okay good night
4K notes
·
View notes
Text

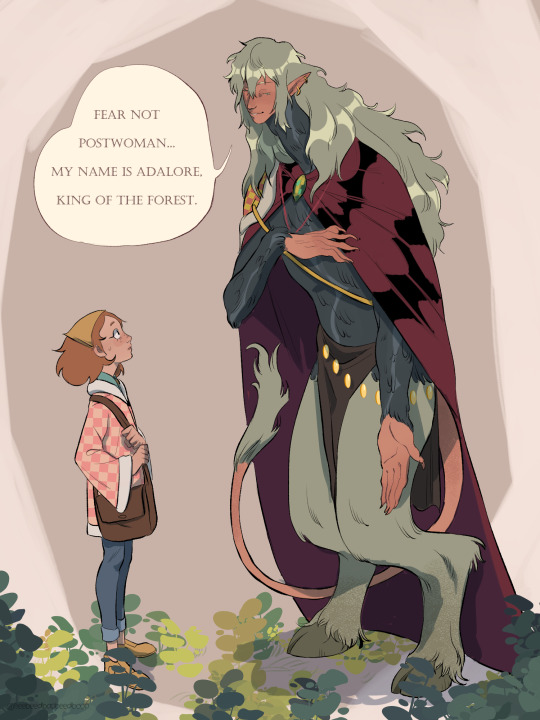
The forest king and the postwoman
#artists on tumblr#art#illustration#character design#oc#digital art#SORRY for reposting but I wasn't satisfied with the sketches so I'm making a new post without it#postwoman#the postwoman#adalore#king of the forest#original#original character#Ill draw more of him because I love him#also he is beautiful to any human but for all natives of the world the postwoman lives in he is UGLY AF
12K notes
·
View notes
Text
five days until the state of georgia is scheduled to execute willie pye
#death penalty#death penalty action#prison abolition#petitions#i can't remember my other tags right now i'm sorry :(#i've been pretty sick so this post is both late and low effort if someone wants to make a better one i wholly encourage it#i'm just signed up to death penalty actions mailing list and crossposting the petitions/other important news on here when i can
3K notes
·
View notes
Text

Ebonix- Deji Locs
All credits goes to@ebonixsims! Original here!
Hair for For Teen ➜ Elder Males
27.5K Poly
2048x texture
Under Hats, 1 channel
Fully recolorable rubber bands at the top and end of each loc
Texture: Ebonix
Custom Thumbnail
includes all LODS and is disabled for random
The rubber bands on the end of the hair cast weird shadows on the face in CAS but they're fine in game.
Larger Pics and color channel breakdown under the cut
tagging: @pis3update, @sssvitlanz, @kpccfinds
[DOWNLOAD]
#ts3cc#s3cc#ts3 cc#ts3 download#ts3#s3 cc#ts3 dl#s3 dl#sims 3#4t3#black simblr#ebonixsims#black sims cc#elite posts#[mine]#for the love of god please ignore how bad this new reshade preset washes out my baby Virgil#look how they massacred my boy#also color channels on this are ASS bro😭 I'm genuinely so sorry#i have to make custom controls for pretty much everything i convert and this texture WOULD NOT PLAY NICE#hopefully the retexture girlies can figure it out cuz i sure as shit couldn't 😔
1K notes
·
View notes
Text


Sinosauropteryx available for $200~
Sold!
#sculpture#feathered dinosaur#paleoart#for sale#faux taxidermy#sorry I'm gonna be really annoying with sale posts all this month#can't take on any new commissions until I finish my current 2 so all my other time is going straight to making little guys#I budgeted so good this year to survive the summer but unexpected circumstances have conspired against me
564 notes
·
View notes
Text

✨ Simple Gif Colouring for Beginners ✨
I wrote up my basic gif colouring process for a friend recently, but a couple of people here mentioned they'd also find it helpful! so, as requested, this is a beginner-friendly walkthrough of the way I colour my gifs :) it's aimed at brand new gif makers with no prior experience with photoshop or photo editing.
when I first started gif making I found colouring and photoshop in general suuuper daunting, so I've tried to simplify everything here as much as possible. hopefully this will be relatively easy to follow and not too intimidating!
a couple of things to begin with:
I'm only talking about colouring here - this is not a full gif making tutorial. I've linked to some of my favourites of those here!
I personally like to make bright, 'clean' looking gifs with vibrant but natural colours, so that is the style of colouring this tutorial is geared towards. most of gif colouring is subjective and about personal taste - the only thing that I'd say is possible to get wrong is skin tones, which I talk about a lot in this guide.
as I mostly gif Thai dramas, most of the advice is geared towards colouring for East Asian/South East Asian skin tones - but the techniques should be fairly universally applicable (and here are some tutorials that talk about gif colouring for other skin tones).
I'm not an expert! I'm not claiming this is the best or the only way to colour gifs - it's just how I do it.
this post is very image-heavy. if the images aren't loading (or the gifs are running slowly or cutting/looping weirdly), then try viewing the post in its own tab (rather than on the your dash or someone's blog) and refreshing the page.
okay, full walkthrough beneath the cut!
contents:
1. intro
a. natural gif colouring goals
b. very very basic colour theory
2. super simple colouring (the essentials)
a. curves
b. selective colour (and skin tone correction)
c. hue/saturation
d. saving and reusing colouring
e. another simple colouring example
3. other adjustment layers
a. brightness/contrast
b. levels
c. vibrance
d. colour balance
e. channel mixer
4. troubleshooting
a. curves
b. saturation
5. fin!
1. intro
the colouring part of gif making can be super overwhelming, especially if (like me when I first started!) you're completely new to photoshop and/or have no experience with colour theory or photo/video editing.
if you're opening photoshop and making gifs for the first time, I highly recommend getting used to making a few basic, uncoloured gifs to begin with. just to practice, rather than post anywhere (though you can always come back and colour them later if you want) - but it'll make the rest of the process much easier if you're already beginning to get used to working in timeline mode of photoshop. give yourself a bit of time to practice and get a feel for things like how many frames you tend to like in a gif, where you like to crop them for the best loop, what kind of aspect ratio you like etc* - so that you're not trying to navigate all of that for the first time on top of everything else!
* frames: for me between 60-90 frames is ideal, but 40-120 frames is the absolute min-max I'd personally use in a normal gifset
loops: for the smoothest loops, try to avoid cutting someone off mid-movement or mid-word if possible.
aspect ratio: for full-size (540px) gifs, I tend to go for either 8:5 (slightly 'skinnier' gifs), 7:5, or 5:4 (particularly big, thick gifs lmao)
✨ natural gif colouring goals
part of what can be so daunting about starting gif making is not knowing where to start or what you want to achieve. this is definitely something that gets easier with practice - the more gifs you make, the more you'll get a feel for what kind of look you like and the more instinctively you'll know how to get there. it also helps to see if any gif makers you like have made "before and after colouring" posts - these can help with getting a sense of the kinds of changes made through gif colouring. here's one I made!
in general, I like to make my gifs bright and 'clean' looking, with vibrant but natural colours. these are the things I'm usually hoping to achieve with colouring:
brighten dark scenes
remove muddy, yellowish lighting or filters
saturate colours
correct any skin lightening filters or overexposure
make lighting and colours as consistent as possible between gifs within a single gifset, especially gifsets featuring gifs from multiple scenes/episodes/videos
this guide is focusing on natural colouring, but of course there are many cool ways to make stylised/unnaturally coloured gifs. imo you'll need to master these basics first, but if you want to learn how to do things like change the background colour of gifs or use gradients or other cool effects, then @usergif's resource directory has loads of super helpful tutorials!
✨ very very basic colour theory
[disclaimer! I don't know shit about fuck. I do not study light or art. this is just an explanation that makes sense to me exclusively for the purposes of gif making.]
the primary colours for light/digital screens are red, blue, and green. having all three colours in equal measures neutralises them (represented by the white section in the middle of the diagram).

so to neutralise a colour within a gif, you need to add more of the colour(s) that are lacking.
in practice this usually means: the scene you want to gif is very yellow! yellow is made of red and green light, so to neutralise it you need to add more blue into your gif.
it can also mean the reverse: if you desaturate the yellow tones in a gif, it will look much more blue.
looking at the colour balance sliders on photoshop can make it easier to visualise:

so making a gif more red also means making it less cyan.
removing green from a gif means adding magenta.
taking yellow out of a gif will make it more blue.
tl;dr:
neutralise yellows by adding blue (and vice versa)
neutralise reds by adding cyan (and vice versa)
neutralise green by adding magenta (and vice versa)
2. super simple colouring (the essentials)
starting with a nice sharpened gif in photoshop in timeline mode. (these are the sharpening settings I use!)
some scenes are much harder to colour than others - it helps to start out practising with scenes that are bright/well-lit and that don't have harsh unnaturally coloured lights/filters on. scenes with a lot of brown/orange also tend to be harder.
I usually save a base copy of my gif before I start colouring just in case I end up hating it, or find out later that it doesn't quite fit right into a set and need to redo it etc.
so here is my base gif!

it's an okay gif, but it has a bit of a yellow tint to it that I want to reduce.
colouring is easiest to do in adjustment layers, which can be found under layer -> new adjustment layer - or for me they are here:

there are lots of different types of adjustment layers that do lots of different things - but for me the absolute essentials for colouring are curves, selective colour, and hue/saturation.
I also use brightness/contrast, levels, exposure, vibrance, colour balance, and channel mixer sometimes, depending on the gif - but I use curves, selective colour, and hue/saturation on every single gif.

✨ curves layer
the first thing I always do is a curves layer. when you first open one it will look like this:

first I usually click the ‘auto’ button, just to see what happens. sometimes it makes a big difference (it usually brightens the gif a lot) - but on this gif it didn’t do much.
if it had made the gif look nicer then I would have kept it and added a second curves layer on top to do the rest of these steps.
the next step is selecting the white and black points with the little eyedropper tools.
the bottom eyedropper lets you pick a white point for the gif. click somewhere super light on the gif to see what happens - for this gif, I clicked on the lampshade on the left. if it looks weird, I just undo it and try somewhere else - it usually takes a few goes to find something that looks good.
here's what that did to the gif:

then I pick the top eyedropper and use it to pick a black point by clicking somewhere really dark, again playing around until I find a black point that looks good.
here's what the gif looks like after picking the white and black points:

this can take some experimenting, but you can make super easy drastic changes to your gif just with this. in this case, the curves layer took out a lot of that yellowy tint.
and this is what the curves graph looks like now:

you can click and drag those lines to make further changes if you want - I usually leave them alone though. the colours of the lines indicate which colours have been changed in the gif - for example, you can see from that steep blue line on the graph that blue has been added to neutralise those yellows.
next I usually do another curves layer and just press the ‘auto’ button again to see what happens. usually it brightens the gif a bit more, which I like.
‼️if nothing is working: usually with a bit of fucking about a curves layer works well - but sometimes you can’t find a good white and black point anywhere, and instead your gif turns wacky colours and nothing looks good. this happens more often with very heavily colour tinted scenes :( the troubleshooting section at the end goes over some options, including starting with a levels layer instead.
✨ selective colour (and skin tone correction)
skin tones are made up of a mixture of yellow and red.
removing yellow (or adding blue or red) to a gif will make the skin-tones too red - and removing red (or adding cyan or yellow) to a gif will make the skin-tones too yellow.
adding blue to this gif with the curves layer took out the yellowy tint, which I wanted - but it also took the yellows out of Kim's skin tone, which I don’t want. so I need to put yellow back into the skin tones specifically - without putting it back into the rest of the gif.
selective colour layers let you select an individual colour and adjust the levels of other colours within that colour. you can change how yellow the green shades are, or how much cyan is in the blues, for example.
I need to add yellow back into the red tones to correct the skin tones on this gif. this is the case for most gifs in my experience - the vast majority of the time, unless a scene is very heavily tinted in another colour, a curves layer will add blue/remove yellow.
in the 'colors' dropdown, select the 'reds' section and drag the 'yellow' slider higher - this will add more yellow into just the red shades within the gif.

the amount of yellow you need to add back into the reds depends on how much yellow was taken out of the gif initially - I just play around with the slider until it looks right. if you're not sure, it helps to have some neutrally-coloured (not white-washed!) reference photos of the people in your gif to compare to.
here's the result. Kim's skin is a lot less pink toned and much more natural looking:

✨ hue/saturation
this adjustment layer lets you adjust the hue and saturation of the gif as a whole, and also of each colour individually.

I don't use the hue or lightness sliders unless I'm trying to do something more complicated with the colouring.
clicking the dropdown menu that says 'master' lets you edit the saturation of each colour individually. this is useful if your gif is still super tinted in one colour.
I thought the yellows on this gif were still slightly too bright, so I switched to the yellow channel and desaturated them slightly. (remember if you do this then you need to go back to selective colour and add more yellow into the red skin tones to balance out the desaturation!)
then I increased the 'master' saturation of all the colours to +5:
I usually find the right amount of saturation is somewhere between +5 and +12, but it depends on the gif.
‼️if the gif feels undersaturated, but the saturation slider isn't helping/is making the colours worse, try a vibrance layer instead.
done!

✨ saving and reusing colouring
you can copy and paste adjustment layers between gifs to make your colouring even across each of your gifs for one scene - so if you're making a set of multiple gifs of the same scene, or you think you might want to gif the same scene again in the future, you can save it as a psd so you can reuse the colouring again later.
each gif's colouring will then still need tweaking - different cameras/angles/shots of the same scene can still start out with slightly different colouring.
I recommend uploading the gifs as a draft post on tumblr so you can see what they all look like next to each other and catch any inconsistencies.
✨ another one! (speedrun!)

HI KEN!
the white point for the curves layer was in the window behind them.
the curves layer removes the muddy yellow tint, but again it makes their skin tones (especially Ken's) very red toned, which is adjusted by the selective colour layer.
3. other adjustment layers
imo many many gifs can be coloured really nicely with just those three adjustment layers, but some need different adjustments.
✨ brightness/contrast

pretty self explanatory!
I personally usually avoid using the 'brightness' slider because I rarely like the effect - I only tend to use the 'contrast' one.
the 'auto' button is sometimes useful though, especially if you’re struggling with the curves layer.
✨ levels

levels alters the white and black points of the gif, like curves - but unlike curves it doesn't also alter other colours.
use the sliders beneath the graph to alter how dark/light the gif is. you can slide the black slider further to the right to make the blacks darker, and the white slider to the left to make the whites lighter.
levels is a good place to start if your curves layer isn't working.
(I'm going to hit the image limit for this post lol so here are some screenshots of a table I made to demonstrate this rather than actual gifs. sorry!)


on both sides, I dragged the sliders up to where the big jumps are on the graph - this is usually a good place to start!
✨ vibrance
vibrance... makes the colours more vibrant. it's more subtle than saturation.
it's really helpful for gifs that feel grey. sometimes adjusting saturation just makes the greys kind of weirdly tinted, but a vibrance layer can fix that.

vibrance is much more subtle!
✨ colour balance

colour balance affects the overall balance of colours within a gif.
it's good for scenes with heavy tints.
I tend to stick to the 'midtones' dropdown, but you can also alter the colour balance within the shadows and highlights if you want.


✨ channel mixer
I avoided channel mixer for such a long time because it scared me. but it's great for scenes that are very heavily tinted in one colour.
basically, it works with the levels of red, green, and blue within a gif. you select an output colour and then play around with the levels of the colour you selected within each other colour.
kind of the reverse of selective colour?

so in the 'blue' channel, the levels of blue are at 100%, and the levels of red and green are at 0% - but you can impact how much blue is in the reds and greens and blues.
this tutorial explains it well - but imo the best way to get to grips with channel mixer is just to play around with it a bit (sorry)
(when I made this guide for my friend, I also made a slightly more complicated gif colouring walk-through that included using channel mixer. there isn't space to include it within this post, but if anyone is interested I could always upload it as an 'intermediate' gif colouring tutorial - lmk!)
4. troubleshooting
‼️curves
usually with a bit of fucking about a curves layer works well - but sometimes you can’t find a good white and black point anywhere, and instead your gif turns wacky colours and nothing looks good. this happens more often with very heavily colour tinted scenes :(
for example, with this base gif:

using many of the brightest points as a white point turn it wacky colours, like this:

yikes :(
some options for these cases:
try brightening the gif first with the 'auto' button on the curves layer or with a levels layer. having a brighter gif to start with can give you better options for picking a white point.
try finding an alternate, whiter/brighter white point. look for places the light reflects - on this gif, using the light on Porsche's cheekbone works well as the white point. it also helps to find places that would be white if the scene wasn't tinted - the lightest part of a white shirt is often a good place to start, for example.
skip the curves layer, and instead use a levels layer to alter your white/black points, and colour balance or channel mixer to balance the colours.
‼️over/undersaturation
if your gif (especially the skintones) is looking a little washed out or lifeless, it might be undersaturated. boost that saturation - or if that's not working, try a vibrance layer.
oversaturation is often easiest to spot in the mouths and ears of any people in a gif. if the mouths are looking unnaturally, vibrantly red, then you've gone too far with the saturation.
5. fin!
and done! I hope this was coherent helpful to somebody.
if there's anything that I've missed or that doesn't make sense pls feel free to shoot me an ask or a message and I'll do my best to help! I've also collated a bunch of additional reading/resources below.
happy gifmaking 🥰
✨ some links!
photoshop basics by @selenapastel
gifmaking for beginners by @hayaosmiyazaki
gifmaking guide for beginners by @saw-x
dreamy's gif tutorial by @scoupsy-remade (includes instructions on how to blur out burned-on subtitles or annoying video graphics)
beginner's guide to channel mixer by @aubrey-plaza
how to fix orange-washed characters by aubrey-plaza
colour correcting and fixing dark scenes by @kylos
does resampling matter? by usergif
how to put multiple gifs on one canvas by @fictionalheroine
watermarking using actions by @wonwooridul
resource directory by @usergif
#i got a couple of asks about this so i figured i'd type it up as a post#it's been sitting in my drafts for a while now though i'm so sorry omg.#i had to replace my laptop and it took me a while to get round to downloading photoshop on the new one#but i hope this is helpful!!#gif making#tutorial#photoshop tutorial#colouring tutorial#coloring tutorial#gif colouring#gif coloring#photoshop resources#gif tutorial#gif resources#userbunn#uservik#darcey.txt#darcey.gif#usergif
622 notes
·
View notes
Text
Pac: What is this, man?!
The relationship of Sims Hideduo is too strong for even Pac to sabotage, despite his best efforts 😅
#Pactw#Pac#Hideduo#FitPac#Sims#June 13 2024#Just straight up twisted his arm so Pac wouldn't slap him then IMMEDIATELY dip-kisses him#QSMP and Stardew Fit (or Fabio) could never#I know I'm posting things a bit out of order / delayed (sorry)#but I'm genuinely SO enraptured by this stream it's making me a bit more distracted than usual#I've never played Sims before so everything's new and charming to me#Pac also just set his house on fire 🔥👍
260 notes
·
View notes
Photo
sunrays and quiet moments
instagram | shop | commission info
#artists on tumblr#animated illustration#animated gif#digital art#2d animation#illustration#environment art#background art#art backgrounds#environment illustration#sunset#sunrise#myillust#cozy rooms#hi!! it's been a really long while and firstly - happy new year!#i hope you've been well and that things have been good for you#i'm sorry for not posting for so long - last year has been quite hectic and i've had to put personal art on the shelf for a while;;#but i really do hope to make more personal art and share them this year! i really do miss making them#thank you thank you thank you for sticking around for my art despite my inactivity - i can't thank you enough really
3K notes
·
View notes
Text
fireworks show 🎆
material preview version is very cute also :)
i struggled with the lighting on this one so badly, but it turned out alright in the end.
i actually started it last year for new years 2023 but never got around to finishing it, hence no progress pictures this time sadly lol. i do have a very low-res, first draft, test gif though
stills 🥳
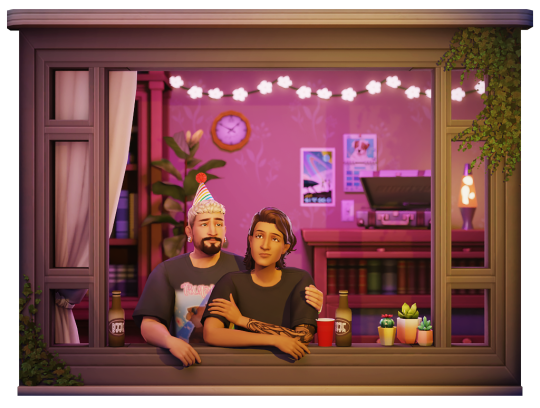

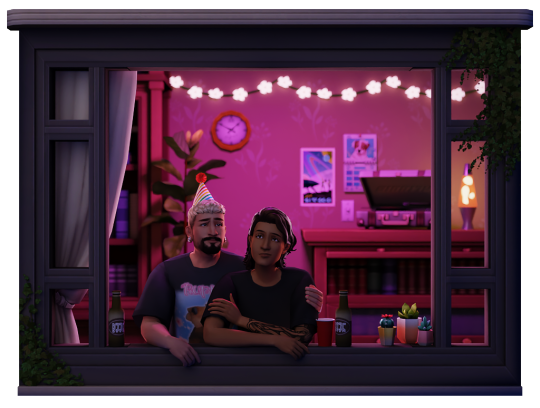
#first post of 2024 hi happy new years 👋🎉#ts4#ts4 render#tw flashing#flash warning#< please let me know if i need to put any other tags#it took me a whole 90 minutes to jump through every loophole possible and make this gif under 10mb....#and now the qualitys shit#for the love of all things good please do not look at this on mobile#thanks for stickin with me through 2023 :)#i know i don't respond to comments or asks half the time but i read every single one and they make my day#sorry#haven't even started gameplay with them yet and i'm already making renders#spoilers for what relationships may form 👀#the urge to design the bands first album and photoshoot and everything is strong#but calm down girl you haven't even given them a name yet#i'll try make a sim dump for anon in the next 2 weeks some time#edits#for now goodnight
965 notes
·
View notes
Text
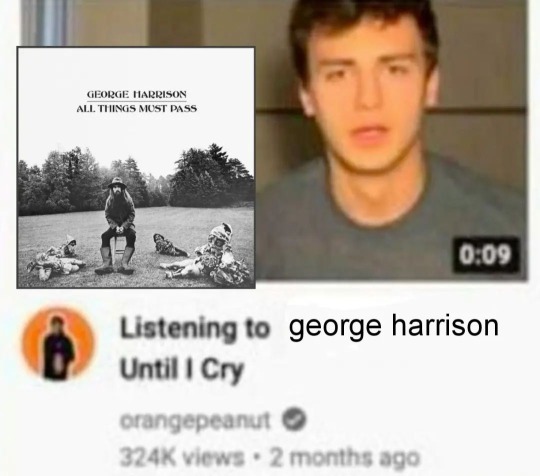
#not lasting more than 3 seconds MAX#that man has a way with words fr#george pls make new music#the greatest post beatles album of all times#I'm sorry RAM but it's true#the beatles#george harrison#paul mccartney#john lennon#ringo starr#beatles#all things must pass#wah wah is my favourite track of all time#he ate on that one#memes
268 notes
·
View notes
Text
New Ordis dialogue in the drifter camp for all those Ordis enjoyers out there
#warframe#warframe posting#warframe ordis#cephalon ordis#ordan karris#should I use that tag ???? man idk#jade shadows#jade shadows spoilers#my video#EDIT: IM SO SORRY I FORGOT THE LINE OF#“Some societies are yet to master tools! That one over there appears yet to master consonents!” FROM HIM#ALSO EDIT. I'm gonna make a part 2 with more of his dialogue bc stupid me didn't think about there being new dialogue in the shop
150 notes
·
View notes
Text


Some memes I made for A Father’s Love, A Child’s Determination
#I'm new to meme making#but i had fun#sorry in advance#ninjago#lloyd garmadon#lloyd ninjago#brad tudabone#ninjago lloyd#lord garmadon#lego ninjago#my post#zebaji-posts
183 notes
·
View notes
Text
I feel like I should say since there's been a recent uptick in a lot of communities I'm in/see stuff from a lot of white people pretending to be Asian, but you are not welcome here if you are in anyway stealing from Asian cultures for clout or the aesthetics of it
This includes if you're white and you give your self inserts Asian names, I truly do not care if your f/o is from an anime, you should not be using an Asian name under any circumstances. I hate that whenever I see someone using an Asian name online, I feel like I have to start searching their account to see if they're actually Asian or just a white person who likes the aesthetic of it bcs far too many white people will use Asian names here just bcs it sounds cool, with no regard for the actual cultural meaning behind it. Meanwhile actual Asian people will be mocked for their names, or treated like their names are too hard to learn to pronounce, or discriminated against based on their names
Asian cultures are not a fun little costume for people to dress up with. They aren't just a nice aesthetic, they aren't just a thing you can borrow from bcs you think it sounds cool
#my posts#selfship community#anti asian racism#like it's definitely a perpetual problem of white people not seeming to realize asian names are like#a thing that are tied to culture and identity#but it's gotten crazy lately with people pretending to be asian online for clout#just in the past like 3 weeks of things i've seen#we had the white woman pretending to be a japanese woman on comic twitter#the white woman who pretended to be korean to get a 'ownvoices' book published#(who btw. named herself kim chi. you cannot make this shit up)#and then the white guy pretending to be japanese to try to justify his hate of the new assassin's creed game using stuff around yasuke#like it's so draining. i hate how much this is a never ending problem#i hate how casually white people will use asian names#like worstie. i am a korean woman. but i am whitepassing and mixed so i never use korean names for my self inserts#bcs i have the privilege of looking white and people generally only knowing i'm asian if i say it#it feels inappropriate to me for me to name my self inserts a korean name#bcs that would then mean they experience the world in a different way than i do#even being whitepassing bcs of the way people treat korean (and other asian) names#if you are white you have no fucking right to asian names#idgaf if your f/o's an anime character. stay away from asian names bcs they are not yours to dress up in#vent a little bit sorry team#i've been dealing with white people doing this shit and being assholes to me about it for well over a year now. it's exhausting
185 notes
·
View notes
Text
lukewarm take of the evening: y'all care too much about being ""outdated"". fellas this smp moves inhumanly fast. it is ok to CHILL holy shit CHILL. y'all are like "(posts BANGER ART) super late guys sorry" friend i am hitting you with a blanket i am snapping you with my metaphorical towel WHAT DO YOU MEAN SORRY. "(posts BANGER FIC) rip this is outdated now" WHO CARES???? I LOVE YOU, OK. ohhhh woe is us as the fandom at large for having MORE HAPPY PILLS ARC CONTENT oh no how outdated!! how could you be writing speculative fiction about how forever felt during happy pills :( slash SARCASM!! WHAT DO YOU MEAN!!!! THERE ARE SO MANY BANGER ARCS, WHAT, YOU THINK WE'RE COMPLAINING????? FOR GETTING MORE OF THE CONTENT WE LOVED????? oh no we're past the period where everyone thought green gay ninjas were like Dead Dead, my work is now outdated and noncanon :( WDYM. GIMME. A BANGER IS A BANGER IDC IF IT TAKES THREE MONTHS. you think rome was built in a day?? fuck you, baltimore, GIMME. my ass has been cooking a goddamn backflipo family fic since july when it was ALREADY outdated do you think i fear god??? "oh no, you're making an edit of slime's (attempted) egg murdering spree?? how could you, that was months ago it's irrelevant" SAID NO ONE EVER.
save your wrists kidlings ok carpal tunnel is no joke. CHILL!!!!! CHILL!!!!!!!! TAKE YOUR TIME SHEEEEEESH OK LOVE YOU <3
#qsmp#shut up vic#block game brainrot#IT IS OK TO NOT ALWAYS POST SHIT THIRTY SECONDS AFTER IT HAPPENS!!!!!!!#for god's sake we have MONTHS of lore and bangers ok???#i still have a mental image of an art i wish i could make from BOBBY'S NIGHTMARE#HE HAS BEEN GONE FOR M O N T H S and you bet your ass if i can make it I WILL BE POSTING IT#SO. MUCH. SHIT. HAS. HAPPENED. who cares if it was months ago!!!!!!#it's ok to be a few days late!!! it's ok to be a few months late!!!!! don't tell me sorry for feeding me!!!!!!#part of me still lives in I'M NOT HOLDING A FUCKING FUNERAL CHAT#part of me still lives in maxo's final song for his son!!!!#part of me still lives in the day we thought ramón was gone for good#part of me still lives in cellbit sprinting to his son only to be ripped away back to the feds just as richas turns to write a sign#part of me still lives in the flooding of the copacabana ocean#THESE ARE BANGERS. REMEMBER WHEN FIT FOUND PAC E MIKE IN PRISON. BANGER.#oh dear new work expanding on a canon moment i super liked that happened months ago how late smh SAID NO ONE EVER#TWO CAKES!!!!! TWO CAKES MOTHERFUCKER!!!!!!!! WE LOVE PASTRIES DON'T EVEN WORRY ABOUT IT#COME ON Y'ALL. METAPHORICAL KISSES. LOVE YOU. HAVE A GOOD WEEK.#long tags
293 notes
·
View notes
Last Seen Blogs

shouseichan-blog
白昼夢備忘録

showyourhand
Show Your Hand

advyen1445
無標題

adyinglily
Formerly withering-and-wilting (deleted)

vineetv
Untitled