#i still haven't looked into fixing my sewing machine
Explore tagged Tumblr posts
Visit Tumblr Blog
Explore Tumblr blogs with no restrictions, modern design and the best experience.
Last Seen Tumblr Blogs


Fun Fact
There were a total of 171.5 billion posts on Tumblr in 2019.
Text
Hoo hah...
Well, this project is probs gonna take me a *little* longer than a few days to finish since I have to redo an entire part, but I don't wanna tease y'all too long without sharing a little bit about it, so here's the latest bits I've finished.
Probs totally gives away what I'm doing now, but the real delight is in the final product, right?

Some tiny shorts, and a tiny mask. I wonder who they're for...
#gbunny makes#i'll retag this later when the final project is posted#as to not give away too much#but i think if you're aware of this hobby in the slightest#then you already know what i'm doing#well the mask *might* throw you off if you haven't been here that long#but it's a reference to some very old art#but speaking of the mask i might redo it#and/or just seal it#because i put the black down with oil pastels to better achieve the messy look of the original art#but oil pastels don't really get dry#so it stains pretty much anything the face touches#which isn't great#like the look though#the shorts were also a nightmare#i still haven't looked into fixing my sewing machine#so i'm still hand sewing everything#which is very time consuming when i have to draft the patterns myself#and i have next to no experience with that#anyway i'll tell y'all the full story when i finally post about this
2 notes
·
View notes
Text


This is Celandine! Made for @vetiverfox in early 2024. :)
This plush is made using hand-dyed minky, minky, and brushed out acrylic yarn for the fur details. The accessories are made using satin fabric and decorative cord. I can't recall the exact measurements, but I believe this plush was 18 inches tall from the top of the head to the bottoms of the feet. Details on this plush were machine embroidered and appliqued. The wings contain a mixture of wiring and ball jointed armature to make them poseable. Their bell necklace is removable.
Fun facts! I wanna keep this relatively short because I remember prepping a very long write up of this sweetheart when they were originally post.
The fur detail was the first time I tried the technique to brushing out and sewing the tufts as patches of fur on a stripe! As full as the fur details looks, there is some patchy-ness that I wanted to work on ironing out but as of right now, haven't has the chance to practice the technique again.
One edit I absolutely do not regret was fixing the nails RIGHT BEFORE final photos were done. I think the IG reel has how the nails originally looks, pointing every which way when set down and requiring readjustments every time they were moved! Absolutely helped this little one look more finished!
And thats all for now! Still working on catching up, but current commissions are still my priority. <3
-----------------
Ko-fi: https://ko-fi.com/appledew
Trello queue: https://trello.com/b/FZKSnMo7/plushie-commission-to-do-list
Twitter: https://twitter.com/AppleDew_
Instagram: https://www.instagram.com/apple.dew
Tumblr: http://appledew.tumblr.com/
Furaffinity: http://www.furaffinity.net/user/appledew
deviantArt: https://www.deviantart.com/appledew
#plush#plushie#commission#handmade#customplush#handmadeplush#fibre arts#fiber art#art#sewing#handcrafted
350 notes
·
View notes
Text

Song: Novacaine - The Unlikely Candidates
CW: possessive behavior, yandere tendencies (it's Levi what did you expect tbh)
Day 3: Leviathan
Levi is doing his best to summon the courage to go knock on your bedroom door. He wouldn't do this for anyone else, you know, but he can't go too long without his player two, and you haven't been responding to any texts or in-game chats. He makes his way down the hall and pauses in front of your door. Should he just… go for it?
Wait. What if there's a password?? He had never bothered to ask if you had one. What would you think of him if he didn't even know the password to your room?!
He catches himself before he starts to hyperventilate. He has to be strong for you. Before he can talk himself out of it, he knocks on your door.
Your voice sounds out, muffled from the other side. “Who is it?”
“L-levi.” He curses himself silently for stuttering. It's silent for a while, and he thinks he hears you sniffle through the door.
“Fine, come in.”
Victory! He cracks open the door and steps through, shutting it behind him quickly. You sit on the floor surrounded by a mess of pink and white fabric, a dress mannequin toppled over in the corner of your room. You won't make eye contact with him, and he's fairly sure you've been crying.
“What happened?” That was a stupid question, wasn't it? He cringes and waits for you to yell at him.
“I, um… it's embarrassing.” You drop your head and fidget with one of the fabric strips on the floor. “I knew you were going to that F3 anime con in a couple months, and you talked about how excited you were for your Mister Boss costume from the Circle games, and I thought maybe you would let me go with you if I dressed up too. So I tried to make Ruri-chan’s costume. And… you can tell how that went.”
Levi listens intently. There's a lot of feelings making a mess of his brain right now, namely embarrassment, hope, and adoration. But the one that shone through all of those is sheer determination.
He knows exactly how devastating costume errors can be. He's been doing this for millennia and sometimes things still come out wrong. Right now you look like him when he had just started. He’d wanted so badly to look like his favorite character from Deathly Fight X that he had nearly given up on cosplay when the costume failed. If there was one thing he could help you with, it was this.
“We can fix this.” You look up at him, questioning. “Trust me. You have me on your side. I'd never let my Henry be defeated by a couple of petticoats.”
You laugh, and he decides that no matter how many hours it takes, he'll hear that sound from you again when all of this is done.
He makes an executive decision to move the project to his room, since the sewing machine would be too much of a chore to lug down the hall. He organizes your fabric onto the pattern you'd printed out online and gets to work. Layers of fabric whoosh by you as he focuses, using his tail to hold a pincushion. He uses the dress form for the first bit, but opts to have you wear it while he sews the details so that he can tailor the dress to you.
You blush furiously as his hands skim over your waist, pinning small pieces in place. You know he would never dare to be this close to you if he wasn't so concentrated. You try to breathe as quietly as possible, hoping to not break this spell over him.
After a few hours of work, silence only broken by Levi's muttering to himself, he asks you to put the dress on one final time. You catch a few quiet words about “no way it'll work”, but you choose to ignore them. You step into the bathroom to change, and when you come out, you're met with a stony-faced Leviathan.
Even his tail has stopped moving as his eyes rove over you.
You're just too cute. He doesn't miss the way a blush heats your cheeks, or the way you fidget with your hands as he inspects you. He wraps his tail around his legs to keep it from knocking anything over. He doesn't move, doesn't smile, doesn't say anything. If he lets even one action slip, he might just end up keeping you in his room forever.
How could he let you go to F3 now? All those nasty gamers, drooling all over you. They would love you, love to have you. But they couldn't have you. Just him. Him, you, and that dress.
He'll go to the convention with you, if it's what you really want. But he thinks it's well within his rights to growl at anyone who looks at you for too long. And if you ask, he'll just tell you that's what any self-respecting otaku would do for a Ruri-chan cosplayer as cute as you.
#obey me#obey me swd#omswd#obey me shall we date#obey me leviathan#obey me levi#obey me levi x reader#obey me levi x mc#om leviathan#omswd leviathan#i had so much fun coming up with stupid game parody ideas#ephie writes#omadventcalendar
80 notes
·
View notes
Text
sewing other things
OK so. I have talked about the Loftus Bralette so much on here that one could be forgiven for chuckling gently when i said I should sew other things. But I do actually have several other projects I've been wanting to work on. And i have actually cut some of them out.
Also when I was last at the farm my niece brought me some of her t-shirts and said "I really like this one can we cut it apart and re-sew it bigger so I can still wear it", and I remembered that her BFF's mom, who works at the farm twice a week doing the books and managing store inventory, owns a serger she didn't know how to thread, so I texted her to ask if I could borrow it and indeed she had accidentally unthreaded it and there was a stuck lever and needed me to fix it anyway, and maybe I mentioned that on here but I did actually make my niece a couple of tunics while I was last at the farm. Including hand-sewing a whole bunch of details on the last one while the family was driving on a road trip one weekend.
So I brought all that stuff home with me and was hoping to get to work on it this week. All I've sewn has been the bralettes but I still have today. We'll see what I can get done.
I measured Farmkid and she's ten years old so her shape isn't the same as that of an adult woman, but she's five feet two and like 130 lbs, and some of her measurements put her in a women's size 12. So. She expressed interest in a garment I wear frequently, a Studio Tunic from Sew Liberated. I printed off the pattern in a size 12 and have assembled it, but I'm stuck deciding what fabric to use for her. I should decide that today. She's ten, her favorite color is ostensibly yellow but she mostly wears pinks and purples, she's a grubby kid who wipes her hands on her shirt and always winds up with stains on the belly of her shirt still, and she wants this tunic I think largely so she can cram her tablet into the pocket and go climb trees while listening to audiobooks on speaker. So I want a bright color but not too pale, and I want a tough fabric but not unbreathable, and I'm just. Deciding, still.
Probably what I should do is use some undyed fabric I own, and then bring my supplies and let her tie-dye it. I have a couple other things I could tie-dye, or will by then. That would be a fun bonding activity. I don't know if I'll have time to do it this trip though. So maybe I'll postpone the project and ask her for help once she's on summer break. (Good luck catching her, kids these days have so many summer camps.) As a bonus I bet I could loop her BFF and BFF's Mom in on the tie-dyeing, they're both into that shit.
Hell we could do ice-dyeing, the farm has a 1000-lb ice machine that is very frequently turned on (weekly for the market, biweekly for chicken processing-- there could be ice available at pretty much any time lol).
So anyway. I know she wants me to make a tunic out of a trio of large-print cat shirts she's outgrown, and she wants to wear it for her 5th grade moving up day ceremony, and I looked at it while I was home but I haven't done it yet. I need to get my shit together.
What I might do is print off a size 12 version of the t-shirt pattern I own, it's just that it's designed for busty women because I'm a busty woman, and she's Not, yet (oh, she will be. soon. but not yet.) so I have to kind of. Well, I own a pattern for a swing tunic that's close to what she wants actually. Oh, I should just print that one off. (The joy of the Cashmerette Club subscription patterns is that you get all the sizes, 0-30, and I've now made a couple of them for smaller friends, because like. I mean I own the pattern! PDF patterns are so great because you can reprint them in the smaller size instead of trying to trace it off. I never ever got the hang of tissue paper patterns.)
Yeah here this one, the Wexford Top/Dress, would be easy enough to kind of carve out the bust curve a little and make it fit a kid, because it's not meant to be that fitted. I'll just sort of use that as a general guideline and then make the cut-out-and-patchworked t-shirts fit into that approximate silhouette. The way I made the other tunics for her, I just used a shirt whose neck and shoulders still mostly fit her. But these cat shirts she's thoroughly outgrown, so making a new neck/shoulder area would be best.
Orrrrrr.... I could use one of the zillion old t-shirts of mine that I've saved to cut up. The neck/shoulders of a fully adult-sized garment are no longer too big for her. That's easier.
I also have a bunch of garments I want to make for myself, as I don't seem to buy clothes much anymore (I can't bring myself to pay $40 for a dress off the clearance rack that won't fit me and will mostly be polyester and won't be that interesting and will pill the first time I wash it). The Club's latest pattern is a skort/shorts/skirt dealie, and I need more shorts all the time-- I've largely given up on underpants and just wear boxer-briefs or anti-chafe shorts and I just don't see the point now of wearing a pair of panties and then shorts over the top under my skirt. Like. Just wear the shorts! So being able to choose the materials and print and look of that would be pretty great. And the Cashmerette one is inseam-less, like my favorite anti-chafe shorts are.
So I have cut out a pair of just the shorts in a clearance cotton mesh from Dharmatrading, and I even have the correct elastic for the waistband, so that kind of rules. I will sew those up as soon as I get a chance. I would like to make several skorts as well, probably from synthetic ponte or something, but my ideal would be to get some decent merino/nylon jersey and do a few from that. You never see merino skorts but I would wear the shit out of those.
I also have a lovely underpants pattern from the Club from ages ago, and while I rarely wear underpants of that style anymore, I would like having some cute matchy ones to go with the bralettes. Also, I have a shitton of foldover elastic, and I suspect I could use foldover elastic in some of the bralettes I want to make, so I want to get proficient in its use, and there are directions for applying it in the underpants directions, and it seems like a good way to practice. So I cut a muslin of those from the same cotton mesh as the shorts, and just have to sew the pieces together.
I also want to make myself more pretty dresses, and I have parts of a new Studio Tunic for myself already cut out, but not the rest.
And I recently made myself the button-up shirt from the Club, I know I posted about it on here. And I wanted to immediately make myself several more, and I got out some fabric and prepared it and cut out one pattern piece and then ran out of time. So yesterday I finally cut out the rest of the shirt from this fabric, a print from Mood covered in tiny dinosaurs. So I have that all ready to go in a plastic baggie too, just waiting for me to have time to sit and sew it. (Once I do that, I would really like to make myself a dress version of it from the cool green not-quite-seersucker I got from that remnant bolt at Promenade Fabrics in New Orleans.)
AND. i also have resolved to make my BFF, the one in Rochester who I lived with for a bit in the pandemic, with the little kids-- MM-- I am going to make her a sloper, before I see her next weekend, or maybe while I see her next weekend if i don't get to it in time argh, and I am going to at least try that on her and figure out approximately what shape she is so that I can put together a master pattern for her to make herself dresses from. I took her measurements ages ago, and she's a 14CD bust, a 16 waist, and an 8 hip in Cashmerette's sizing, and so I think just making a sloper with those sizes all graded together will be a huge start. And then we can mildly tweak the fit for her frame, and-- the thing is, she's always buying custom dresses on Etsy because what she wants is very specific and not usually available in stores, and then the dresses come and don't fit her so she has to get them tailored, and then they were just made of cheap quilting cotton from Joann's so they wear out after she washes them a few times, and she's had to add on pockets anyway because they didn't have them.
So I just feel like if I could get her a paper master pattern that fit her... heck i could even just make her dresses if *I* had the pattern. It would be easier and more efficient. I could do the basic construction and then turn over the pockets and embellishments to her, which is what she does anyway. So that's my goal there, and we'll see if I can reach it.
Anyway. If only I didn't have to work at all and could just sew all the time. I am not the first person to say this, LOL.
I have a lot of irons in the fire but at the moment am trapped under a cat so those irons are not going anywhere.
24 notes
·
View notes
Text
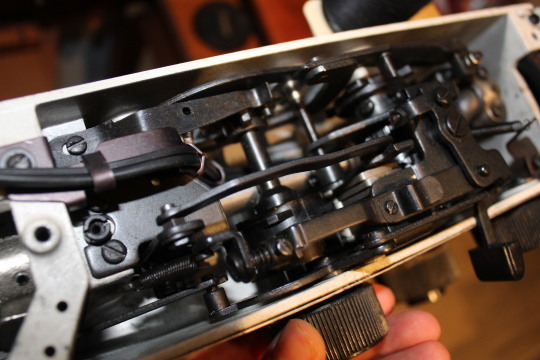
further thoughts on old sewing machines
I've read the replies and comments on the thing I reblogged about sewing machines and planned obsolescence / "they don't make 'em like they used to." You know me, I have more words to offer, and the basis here is the people saying "damn, I want one", "wow, how can I get one for reasonable?" and "you can get parts?" Read on...
First, let me show you what my friend sent me yesterday in a text. She was so jazzed that she wanted me to see it, and she doesn't even know I run a blog like this.
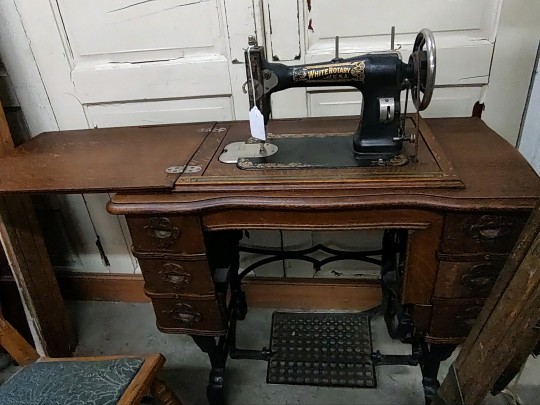
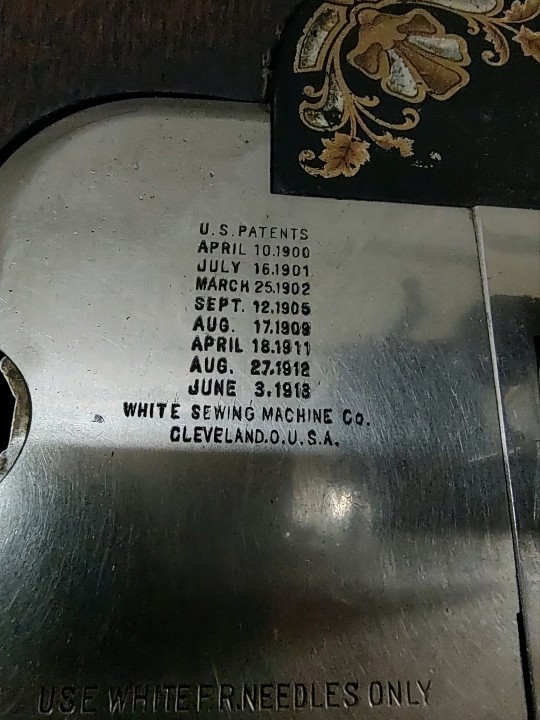
So here you see a White trundle sewing machine from the late 1910s to early 1920s. You can also see that it was either taken very good care of or completely restored, or both, and you have little doubt in looking at the first picture that it'll put together a prom dress or hem your cuffs at a moment's notice, and this isn't just a museum piece. In the below, I'm not just talking about the big ol' centagenarians, I mean pre-1990 Singers and everything inbetween.
You ask: Where can I find a hardy old sewing machine? The obvious answer of antique stores aside, you can find them in thrifts. Not necessarily Goodwill because they're capitalists who have tried to get away from furniture and heavy stuff, but most of the others have them and I warn you that you may have to cut a bitch (or be cut) if one shows up at Deseret Industries. I wish I still had the photo of the time a now-departed St. Vincent de Paul near me had TWO different White models on the floor, each for less than what some people pay for Starbucks in a week, and my memory says that if they didn't spin like a top right that second a couple hours with household products and maybe a Google search plus shipping time would have these things in a functional state your great-grandmother would approve of. It's a regular thing that I go into thrifts and there's a sewing machine case on a low shelf near the electronics that is older than your mother and twice as reliable.
You ask: How much will this set me back? Depends upon where you're shopping. Obviously antique stores will have them for more than thrifts, and sometimes you find them at estate sales (again, expect to cut a bitch) for either an antique price or a "take it away" solid price. Consider it a great day if you spend $10-$25 to get this off someone's shelf and out of someone's life.
You ask: Repairs and maintenance, what about that? I don't know a lot about the mechanics but the older they are, the simpler they get. Resources are out there on how to fix problems (books and YouTube videos) and obtain parts, and professionals exist who live to do both. You probably know someone who has machine sewed for decades; you could ask them for insight on how to get things back into shape. People in comments on that post named some sources for replacement parts after others said they were stymied by trying to find the doodad they needed.
You didn't ask: You seem to have some passion about this despite not being a sewing machine owner or user. What machines did you grow up with? My sainted grandmother had a 1960s Singer 401A. (Photos are NOT of her machine, I nabbed them from teh interweb.)
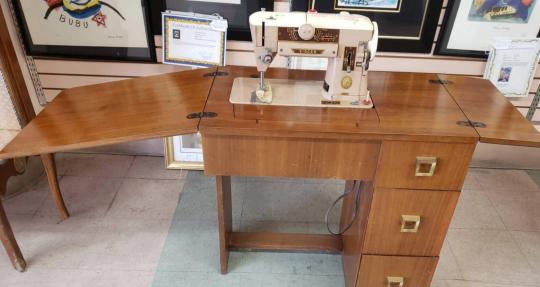
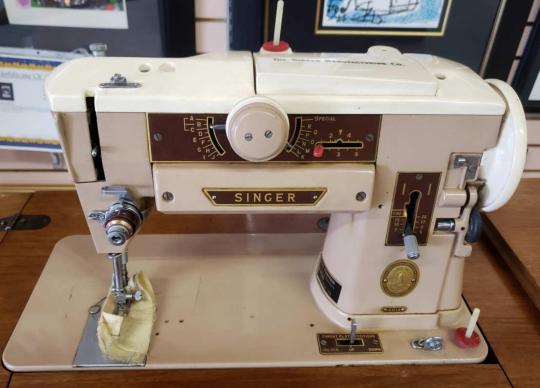
My mother still has and uses periodically her 1970s Singer 758. (Again, not my photo and I haven't seen hers out when I've visited lately.)

52 notes
·
View notes
Text


Thought I'd take some pics of my newly acquired machines. This is a Dressmaker of an unknown model (it only came with the front cover of the manual, so, uh, thanks for that I guess) but definitely made in the 1970s. This is when they started replacing metal parts with plastic, and you can see the gear I'm holding in the last pic has a plastic cam selector attached to it inside the machine. This is not ideal, but at first glance it seems the cam selector and the cams seem to be in working condition (I won't know until I run the machine). This is why people recommend Kenmores only if you're buying 1970s machines, but tbh this is still higher quality than anything under $300 you're buying new these days, as long as the plastic isn't broken. The rest of the machine is metal, including the exterior. I think she's fun and funky looking. This is the exact machine I'd recommend for a beginner, because it has the 5 stitches you actually use (buttonhole, blind stitch, zig zag, overlock) plus the free arm. People think having 100 computerized stitches is a plus, but you rarely use those, if ever.
Next is the teal White Model 463 I bought for myself as a treat after Trump won lol. Like fuck it, I'm replacing my beautiful baby that broke a year ago, because I haven't seen a single one of these show up on ebay and when this one showed up for $80 I was like hell yeah. I don't need it, and I can't get the front closed, but I have my other one still, so I can figure out how to fix it. Feels good to have her back (in a sense). You get attached to these machines, I swear to god. She really was a fantastic machine.
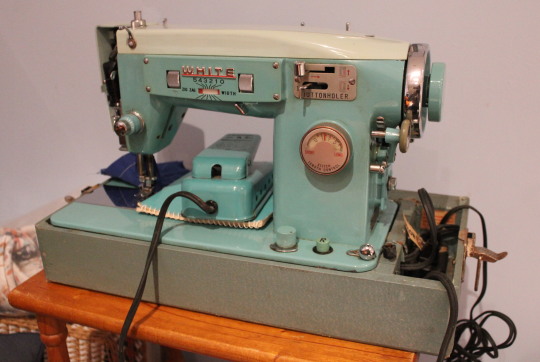
Lastly, I finally took some nicer pics of my Kenmore, lol. When I was hanging out with my brother last weekend, he came with some work uniform pants that had holes in them, and the free arm really came in handy for sewing pockets high up on the pant leg. So she's in my rotation now. I still think they made these buttons overly complicated (especially compared to the Dressmaker), but maybe there was some mechanical reasons for it. This would be another great machine for a beginner (or anyone, really), and they're cheap because they're ugly as sin and only people in the know know how great they are. Some people prefer these things over Bernina, so that's how nice they are. I bought this for like $20 (plus shipping) lol. Hence why I get mad when people buy shitty machines for $80. You can get fantastic machines for CHEAP if you're willing to search on FB Marketplace and not just going straight to Amazon.

#this is a sewing machine blog now I guess#sorry :/#if anyone needs a machine I will sell you one cheap lol#i am a 1960s Japanese machine disciple#everyone should have one
2 notes
·
View notes
Text
Gremlin update supplemental September 12th 2024
It's September and it was getting really cool at night so I was under the impression I could take my air conditioner out for the year...
Wrong.
It's over 30 degrees in here and I was already sweating because of the pain I am in.
Had to put the stupid thing back in with every joint in my hands and wrists swollen to all fuck.
I got a call from my landlord today because they somehow already misplaced my registration e-mail and were trying to let me know that if they needed entry in an emergency or otherwise, they're only willing to e-mail me about it for warning, even being told I don't check my email even daily, let alone often enough for an emergency.
Really hoping this isn't step one of them pulling some bullshit.
Still trying to watch through all the old x-men cartoons and movies at once while recovering from full body gout and the dermatomayositis.
Mostly, I wake up with slightly sore knees and wrists and hands that are swollen to all fuck. I do not know what my hands think they are doing, but my left wrist was so swollen this morning I kept getting pins and needles in my fingers.
The blister on the back of my finger is an inflated blister again. It seems to fluctuate with hydration levels, but it isn't bothering me.
I am eager to get back to doing some serious cleaning and organizing again. At least I have been doing laundry to get that all caught up with the machine, but from the moment I was like "okay this step is done and it looks presentable so I can chill for a bit now" I have been horribly sick with autoimmune attack and gout and that doesn't feel very fucking much like taking a break... And yet... And yet I am chomping at the bit to be able to just do something fucking useful with my body because it has been uncooperative for so long.
At least i don't have to do laundry in the sink anymore.
I shrank the list of "life improvement purchases" down to 1 batch under 500, and a secondary batch for good storage options I haven't gotten yet, but probably will once I downsize more [also under 500]. The rest I may never get -at least not living here- because there isn't room between the cabinets for most counter top dishwashers, and other things like that. So, really under one month's rent to fix every problem I have that can be fixed by throwing money at it, including all my pants being threadbare and beyond any reasonable repair. Without dipping into savings for that or my winter groceries.
And yeah, I was getting a kick out of repairing the same 3-4 pairs of fast fashion pants for over 10 years and simply refusing to ever buy more... But they were getting threadbare enough that too much flexing any muscle or moving around would tear them back open along new lines, and yes, if my hands were working I could keep repairing them and I could keep wearing stretch leggings under them so my ass doesn't show, but at some point you are just walking around in full werewolf aesthetic because it is obvious you have ripped out of your clothes like 20+ times and it just starts to become absurd not to buy new clothes.
I got to buy men's jeans this time. No they are not cut to fit my body but I can sew. I mean I am still going to do some elaborate patching of the other 4 pairs of pants, but at this point those other pants pretty much ARE the patches for the next set I ruin.
I was doing so good last time until i had to lift my cart into the house. I still plan on making a ramp but that's going to take time.
I am so fucking tired and my nerves are raw from being in screaming pain all over my body for about a month on end now... But I have been enjoying many fried proteins and home-cut fries.
I'm recovering, really, just not nearly as fast as I used to and it makes me cranky and I am sorry. I promise I am still fun and chill T~T
3 notes
·
View notes
Text

I lived in Bangkok for almost a year in 2001-2002. To get one's visa renewed with the least amount of hassle, we'd rent a taxi for the day to go to Poipet, Cambodia. I don't remember how long it took at the time; Google says the drive takes almost four hours now. The van — the taxi was always a van — dropped us off at what was commercially and visually and cinematically a border outpost.

The point was to wade through this on the Thai side — I don't remember the name of the Thai town — cross a little wood and stone (I think) bridge to Poipet, get the passport stamped to show we'd left Thailand, then hop back in the taxi for BKK.
Everywhere in Asia was wild to me, Poipet no different. There was a row of homes on the Cambodian side that were mainly open-air sweatshops, rows of women in what looked like garages bent over sewing machines. We were told that to get the wares across the border without paperwork, a posse of kids would dress themselves in as many layers of the newly stitched clothes that they could still function in, walk across the little bridge into Thailand, and undress, giving the clothes to a businessman on the Thai side. Nobody taxes the clothes you're wearing, right?
Skip the rinsing, just repeat.
But man, if these weren't the cutest kids.

There were all kinds of little'uns on the border, many of them tending to babies, the heart gently weeping for all of them.
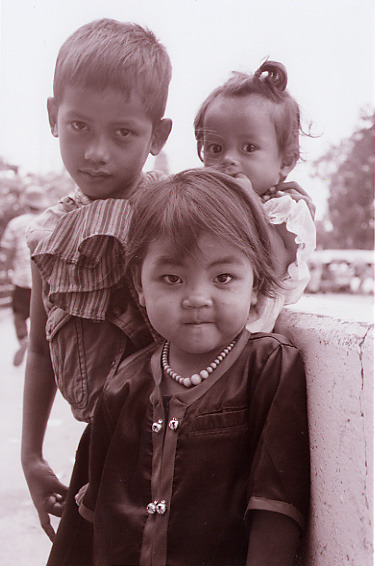


They all knew how to pose and smile, because that helped get money from tourists making the same run I was. Cambodians, though, are unreasonably happy considering their history over the past half century, so I'd have a hard time telling pose from artifice.
Strolling through Poipet, I heard some kids yell, "Hello, mister! Hello!" I turned to my left, and there was a small group of younglings on a hill not far away, waving and beaming. Having got my attention, they leveled up with, "Hello, mister! Fuck you, mister!"

To my right there was a small concrete structure, a school. The teacher emerged to explain that kids learned English from the DVDs that found their way to this hole-in-the-jungle, so they repeated what they saw and heard. Swear words are always the most fun to say. They're made for emotion, feeling, theater.
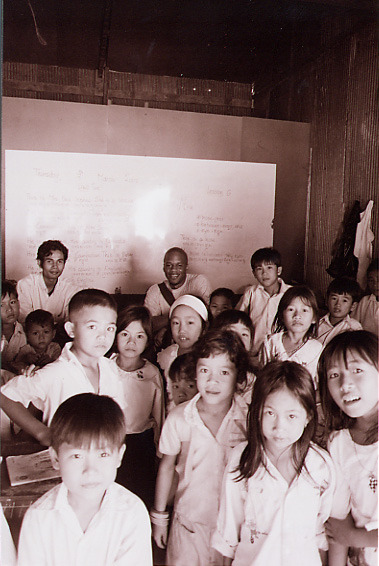
Teacher in the background left, yours truly background right, with all those wily kids ready to teach me more about how culture got exported before the Internet.

Cutest goddamn kids ever.

I haven't been back to Poipet since 2001. Going to fix that this year.
1 note
·
View note
Text
Nov 5
Still haven't opened the m1000 mending machine, and don't know when I will, but who's going to pass up a good price on something? It only does strait and zig zag in several sizes and that's about it. All I wanted was something to do simple stitches to put together quilt tops and occasional crafts. The only "real" machine smaller than this one is the one that takes batteries, and has a plug, but I just felt this one would do me better. I don't do thick or complicated fabrics. I'd honestly do it by hand if I could but I know the strip quilt top will go better with a machine.
And only I will touch it as all past "oiling" and "servicing" resulted in all machines suddenly having extra parts and being fucked up. But apparently the lady across the way was able to fix the one we gave her and put it to use.
Also if I join a sewing circle the little mending machine with stickers (eventually) on it is less likely to get borrowed and disappear.
My grandsmother and half sister would take and hide things so I come by it organically.
I have been quite surprised by the amount of squares I got out of the strips. Just about half way thru making the first unit and it looks like there's going to be enough for two. As it's an around the world style I'm going to just add one boarder row at a time for this one.
There are plans to do a something tomorrow, something I'd like to do but for some reason I have a weird anxiety about it. I have to remember we have a car that can do things like that. We can afford to do it. We deserve to do it.
Half of it has to be the feeling of things being out of my control because of the move. I've been to that place before.
Another part is when there was a chance to see an important part of stuff surrounding it was when the engine was stolen from our car and Blarney pup was poisoned. After that the Life Ruiner got steadily worse and... We'll just say things I am under no obligation to forgive anyone about.
Lovely day to have woken up extra early and feel that time is passing really slowly.
0 notes
Text
Knowing very little about clothing construction beyond the basics of how to hand sew in a straight(ish) line, combined with machine made fast fashion garments that fall apart easily, means it takes me waaaay longer to fix a button or a ripped pocket than it really should
#Everything's always hidden by something else#I'm not undoing an entire lining just to get at the back of a button so yes this piece of clothing now will never sit right I'll live#Also my dad's stuff is mostly tennis clothing and WHY IS THERE SO MUCH MESH#WHY IS THERE ALWAYS MESH STUFF OVER EVERYTHING THERE DOESN'T NEED TO BE#I can't fix a pocket because there's mesh in front of it#And the pocket was already going to be a bugger because it's that awful stretchy wafer thin sporty material#That rips if you so much as look at it#I don't know enough about clothes for this I just want to salvage a perfectly good coat or pair of shorts#I understand hiding the constituent parts of a piece of clothing if it's good quality but if you haven't sewed the buttons on properly#Why the hell did you even bother covering them up I shouldn't have to do open heart surgery on a cheap jacket#Rule number 1 should really be if it's poorly made it should be easy to access the bits to fix it#But that would be too much#Obviously this is not the machinist's fault they're doing their best at probably shit wages and again they have a machine#Something which I am too scared of to even use let alone buy#But it frustrates me#I have to fix all this by hand it takes time I can't just rip out a lining for a button#Literally the only thing I own that doesn't make me want to rip my own arm off when attempting to fix are denim dungarees#Like the only piece of women's clothing that are easy to repair and even better if I do a shit job it's still fine because they're dungarees#They're sort of supposed to look patchy and worn
7 notes
·
View notes
Text
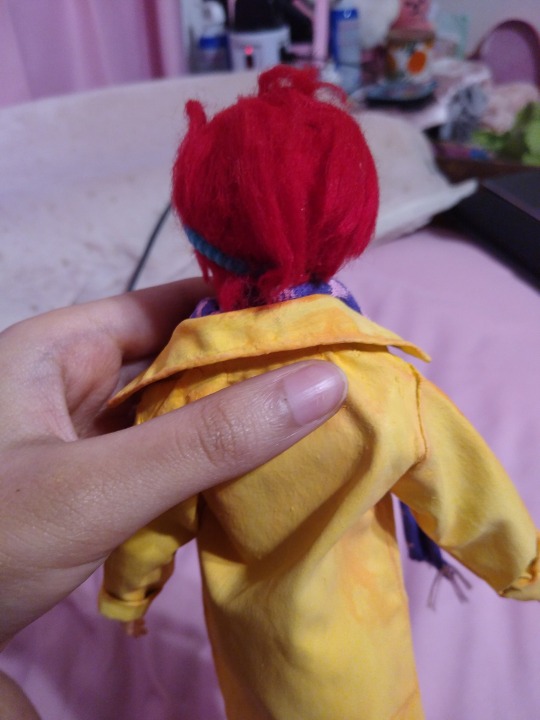
Let's Just Rip Off This Band-Aid (Kliff Doll Repaint)
I still haven't finished adding the fringe to his scarf, but at this point, I don't think y'all will actually care that much. It's a personal project anyway, so I'll just finish it on my own time. Right now, I want to be released from the shackles of this project.


Once again, my poor camera and lack of editing do him no favors (he's got a real bad case of jaundice in that first pic. I PROMISE he's not that yellow-orange IRL ;o;), but he is (mostly) done.
Well, he was (mostly) done like a week ago, but just yesterday I decided to redo a few things to try and "fix" what was really bothering me about him, so I really made recursive progress. That said, I do like him more now than I did a week ago, so I'm not mad about it.
A little backstory: Alongside Kun3h0, I've been working on him for the past month, so I've been pretty occupied with this project for a while. Now, I do wonder to myself why exactly I thought making this would be a good idea. All I can really say is that my impulsive tendencies drive me to do things against my better judgement.
But, I will still give y'all my documentation and thoughts on the process + more pictures.
(I'll talk a little more about it later, but for those of you that aren't going to go through the long-ass readmore, the Neon J. mask is a reference to an old comic I drew.)
(It's so old, I was still writing everything by hand~)
So, the "real" answer to "why" I made this is really as simple as "because I could." As I said in the Kun3h0 post, I've been wanting to repaint dolls for a long time, years even, so in the back of my mind, I'm always thinking of ways I could finally start one.
Well, recently I just finally put together the ideas and motivation I needed to start. And of course, that was with Kliff.
I don't remember *exactly* how I stumbled across everything, but I do recall looking at doll clothes online and stumbling across this trench coat (pictured with the other clothes for this project).
(I took this pic mostly because I thought I was going to take pics of every major step of the process, but that didn't end up happening).
I thought it was pretty darn close to Kliff's coat, and I got the horrible idea that, "I could def make a Kliff doll to go with this coat as long as I can repaint it."
I feel like usually people would think the other way around, but that is basically the truth of this project: I didn't find clothes to fit the doll, I made the doll to fit into the clothes. Because for me, customizing the doll wasn't really the intimidating part: it's making the clothes. I don't know how to use a sewing machine, and currently lack the patience to learn (and due to some personal trauma that I don't really want to get into), but I can hand-sew, so starting any project that involves it requires me to be willing to set aside a lot of energy for me to do it, which I don't often have.
But, if I could find ways to cut down on the sewing, then I'd be more willing to start. And somehow, I was able to find just about everything I would need for a potential Kliff doll without having to sew anything. In the end, I only sewed together one thing, and it's the one thing that isn't actually finished: the scarf.
So, I blame the trench coat for the entirety of this project: if I'd never seen it, I would have never made a Kliff doll. In fact, I got the clothes before I even had the doll.
Since I was brainstorming this project, one of the most important parts is of course the base doll, which was tricky. Male doll repaints are fairly uncommon, especially of older men, so there weren't a lot of resources or places to get inspiration for this project.
From what I found, most male (fashion) dolls were very youthful, and the ones that weren't usually took heavy modifications to achieve, which was out of the question. Kliff was supposed to be an "easy" project, so on top of not wanting to sew any clothes for him, I also didn't want to have to alter the doll that much to make it look like him. This was a lot to ask for without putting in any personal work, but in a way, this goal was supposed to keep me from actually starting this project: really this whole thing was supposed to just live in my head as a fantasy as most things do, but then I just stumbled into the right set of things, so I couldn't stop myself from going through with it.
The doll I landed on was a BTS Mattel doll. Now I've said before that I know basically nothing about BTS, and that is still true, but that's beside the point. In my research for finding a suitable doll to work with, I found out that a popular base were these BTS dolls. At first, I wasn't into it because I was still running into the "youthful face" problem that I was with other brands: most of them had pillowy lips and nice soft faces, but I did eventually find one that I thought was close enough: J-Hope.

(It's not the worst match up.)
I don't have pics of my doll before I started working on him, but it was pretty close to the stock photo. He has much thinner lips than the others, and a taller, more angular head shape that I thought would work best for Kliff. I did worry a bit that the nose wasn't "strong" enough to really be Kliff (and IMO, it wasn't XP), but it was the closest I found yet, so I decided to bite the bullet and get one, and if I had one, that meant I needed to start gathering everything I would need for this project.
So, no backing out now.
Now, actually acquiring this doll was a whole other song and dance, but here's the part that's important for how the process went:
Due to a miscommunication with the seller I eventually got him from, there was a delay with shipping, so I didn't actually get him until weeks after "officially" starting this project. In the meantime, the clothes and things for Kun3h0 (who I started as an impulse project within the impulse project) had already been gathered.
The original plan was that I was going to work on and subsequently post about Kliff first since he was a comparatively simpler project. All the things I was avoiding for Kliff: sewing clothes and making modifications to the doll, were all going to be incorporated into Kun3h0, so she was theorhetically going to take longer and be posted later, thus telling a small story of "starting simple, ending complex." But since I didn't have his doll, but didn't want to delay working on Kun3h0 just to wait on him, I started on her and repainting his clothes anyway.
So, I don't have any pics of the doll or his clothes from when I was working on them, unlike the sparse ones I had for Kun3h0, I only have pics from after he was finished.

But I'll still tell y'all what I can to at least preserve the story.
For starters, repainting this coat was probably the most time-consuming part of this process.
I really thought that it would take one or two days maximum to turn this coat bright yellow, but I think it actually took over a week. And I really should have known; the coat was a medium tone, and I know that yellow takes a while to build up on anything that isn't light. I lost count at some point, but I swear that thing has over 20 coats of paint on it. Mind you, the first 10 or so coats were watered down with the textile medium, which also contributed to how long it was taking for the coat to take color, but at some point I just got so frustrated that I stopped mixing in the medium and painting directly onto the coat to get the color to layer faster. This is a huge no-no for painting acrylics onto fabric, lest the paint crack from creasing the fabric, but I just couldn't be bothered anymore. I needed this thing to be dandelion yellow NOW or I was gonna lose it.
There were consequences for taking that shortcut, such as the paint cracking in high motion areas and the coat getting stiff, but it's not terrible. In the end, I accepted the trade-offs or else I might still be painting the coat. Perhaps one day I'll reverse engineer the pattern for the coat and make him a new one, but I wouldn't count on it. In retrospect, I wonder if I would have had an easier time if I had thought to bleach the coat first?
As you might notice, I contoured/shaded part of the coat in orange. That's something that I actually *just* added yesterday and added another couple of hours to the work time. It was just bothering me that the doll was essentially a giant slab of yellow, and was part of the reason I didn't like it very much. But I got inspired by this repaint to try contouring the coat to give it more depth.
youtube
(I also used this person's videos to modify the hands. He has one deidcated to just reshaping the BTS hands.)
In the end, I'm pretty happy with the results.
The rest of the clothes weren't as difficult to deal with.
The pants took the paint a lot better, likely due to being dark paint on a light surface. Since I used less paint, it's not as stiff as the coat and still go on very easily. Though, they are VERY high waisted, and I'm not sure if that's normal XP
The shoes are also painted (and slightly modified), though I had to paint them twice because the first time, the paint got stretched off when I tried to put them on the doll's feet: the shoes were just *slightly* too small for the feet of the doll, so they really get stretched to fit his feet, and his heels don't actually go in all the way XP.

He's still capable of standing on his own, but I try not to remove the shoes, so I can avoid having them crack again.
In my "initial clothes" pic, I put down a different shirt than the one he's wearing. The original plan was to repaint the shirt black, but my work space is very limited, so I couldn't really repaint three pieces of clothes at once without significantly risking that I would stain other things. In the end, after getting scarred by how long it was taking for the coat to take color, I decided to just give him one of the black shirts that came with the coat. This does make him somewhat inaccurate since the current shirt has flowers/plants on it, but I'm gonna say that they make up for the lack of flowers on his scarf. Maybe someday I'll make him a new shirt from an old sock or something, but for now, I don't think it's a bad look.
Other clothing of note is the scarf, but since it's not technically finished I didn't take any close pics of it. It's actually made of an old headband of mine that I just cut and painted to look like his scarf.
Originally, I had actually glued on ribbon to it for the stripes, which took a couple days for the drying, but because I couldn't flatten out the scarf to easily glue the ribbon, it turned into a mess and bulked it out too much: since the scale of the doll is already small, I really needed to keep the fabrics thin. This was especially important for the scarf since it was going to wrap around his neck: if it were any thicker, it was going to practically eat up his face, which it still does, just less so.
Speaking of face...
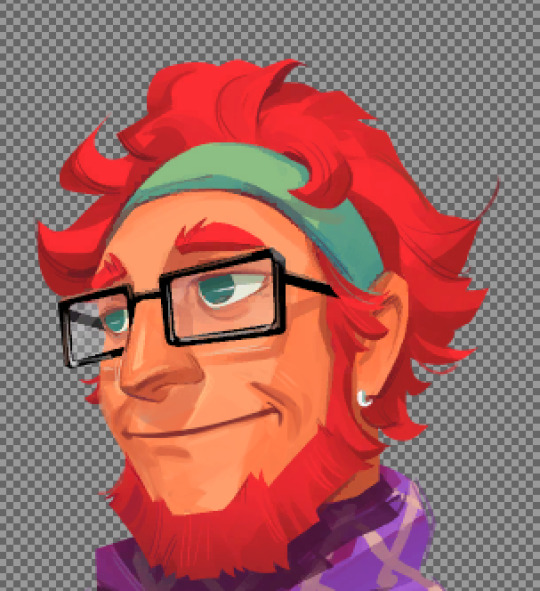
When I finally got the doll in the mail, I started working on him right away, so I don't have any "before" pics of the doll.
After I did the usual "wiping off the face and pulling out his hair," I started with repainting the entire body and head.
Despite Kliff being ambigously "WHITE 🫵," Kliff isn't as pale as the original doll. I'd say even the stock picture I posted above has more warmth than the actual doll did. So, I got the base to be "coral" all over, dusted him in light orange chalk pastels for contouring, and most of his details are outlined in shades of burgandy. I didn't take any nude pics of this doll, but he is countoured all over his body and you can rest easy knowing I gave him some nips XP. But maybe someday I'll show y'all doll!Kliff's washboard abs XP.
TBH, I did want to detail some tattoos and some body hair too, but I just didn't trust myself to do either of those well with the tools I have (my brushes aren't thin enough, and my hand not steady enough for those kind of intricate details). Maybe someday I'll at least get his tattoos in (and after I've actually designed them XP), but we'll see. I don't plan on having the doll in short sleeved clothes very often, so details like that are the least of my concerns.
TBH, I was pretty proud of how the face paint originally went on. I really took my time to make sure it went down flat. It really was beautifully smooth~
But disaster struck.
I had painted the head while it was still separated from the body, and when it finally came time to reunite them, the paint on the head cracked and peeled when I shoved it back on. And, foolish fool that I am, instead of accepting my losses and starting over from a perfectly clean head, I just peeled the lose ends and repainted the exposed parts, which of course made the paint uneven. I somewhat justified this with the idea that most of it would be covered by other details, but in retrospect, I really should have just started over properly.
But, after that ordeal was over with, it was time to actually work on the face.
I can't clearly remember if I worked on Kun3h0 or Kliff's face first. I think I worked on them simultaneously because it took me a LONG time to actually get the courage to work on Kun3h0's face.
I thought I did a decent job on Kun3h0 since I really only had the 1 eye to repaint (the hidden eye is painted, but it's basically just a void with no details), and it was a bigger "canvas", so it was easier to paint. Besides having 2 eyes that I would need to make nearly identical, they were also a lot smaller, so it took a lot longer to paint them in a way that satisfied me (and since it's not easy to "redo" acrylic paint, his eyes lost a lot of smoothness too).
Again, I don't have any "before" pics, so it won't be easy for me to convey my troubles about it, but I do want to say that I think Kliff with a closed mouth is very cursed.
:I
He just looks like he's itching to say something heinous and that is no different for the doll.

It was so difficult for me both match his expression on a face that wasn't *completely* his and still look like him. Although I chose this doll because he most resembled Kliff, he was never gonna be a perfect likeness of him, but despite knowing this, it still bothered me that the face was still just very "young" looking.
Granted, I don't think the original Kliff looks *that* old either (if I didn't know any better, I would assume he was in his 30s, not his 50s, especially compared to other characters around the same age), but still not as *smooth* as the doll is (even with my paint mishaps).
If you can believe it, the face actually used be worse. I don't have pics of it, but like the coat, I actually repainted his face yesterday to again try and fix what was making me dislike it before. I think the problem is that I didn't outline the eyes as much as the final one (like, I don't think I lined his undereye at all), so he was lacking depth. The mouth was also a little more off. Instead of being like "<--->" it was more like "|-|"
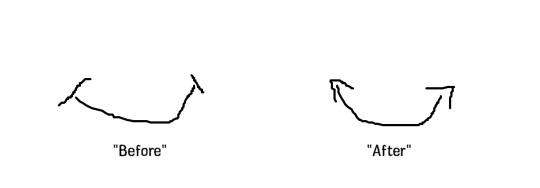
(A rough illustration of what I'm trying to describe.)
So, while it's still not perfect, I do like him more today than I did a week ago.
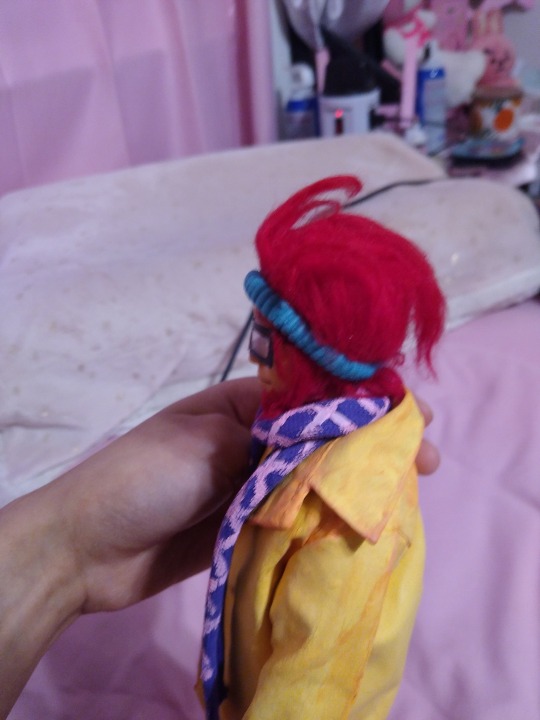
I think the only things left to talk about are his accessories, starting with his wig:
I'm not actually a big fan of the color. When I started this project, I wanted to try and make him as accurate as possible, and the original Kliff design has a very "cherry jolly rancher" hair color.
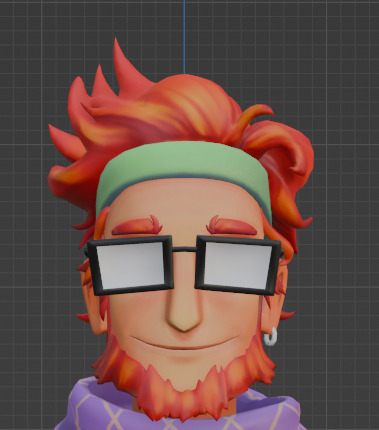
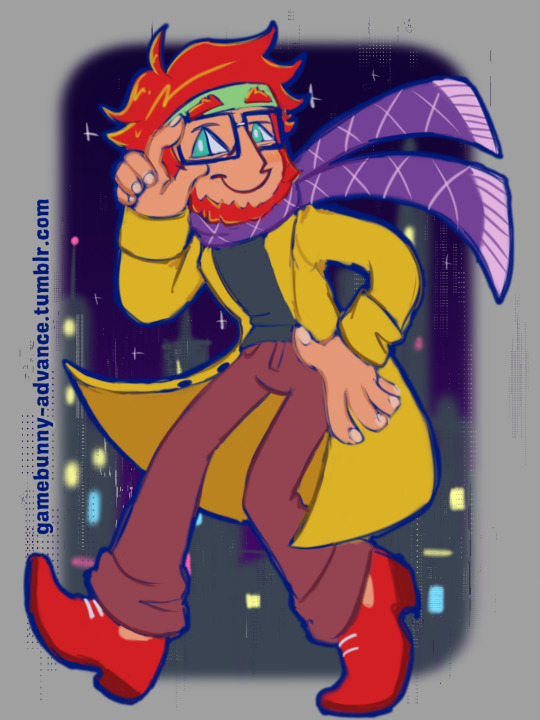
However, how I draw him and how he appears in Encore Edition gives his hair a more red-orange tone which isn't as intense. In the end, I opted for accuracy towards his first design since that's the one I was technically most familiar with and wanted to replicate, but in retrospect, I should have realized that I was never gonna be able to seperate my personal quirks from this personal project, so I should have gone with a color that was more accurate to how I interpret him. (I dunno if I would have gone as far as to give him triangular eyes, but one of my biggest takeaways from this project has been that I should have just allowed this to be "my take" on the character instead of trying to be "accurate," meeting in the middle, and satisfying neither condition.)
I don't think I really got across how much I HATED brushing out yarn for the wigs when I posted Kun3h0. It was just such a tedidus process, from brushing it out, to straightening it, to gluing it down. It was such a mess. I'm still finding loose wisps of yarn hair floating around my home since I made them.
Since I had more than had my fill from making Kun3h0's wig, I once again started taking shortcuts when it came to Kliff: I really should have made more wefts for him. I figured since his hair was (compartively) shorter, that I wouldn't need to make as many, but in the end his wig turned out both too thin and too thick.
Since his hair is so messy, I didn't follow any kind of guide for his hair like I did Kun3h0. I basically just glued around the perimeter of the cap, horizontally on the inside, and made sure it would fold over in the front.
Part of the problem is that I made the wefts too thick: instead of just gluing down what could actually touch the surface of the work area, I wound up gluing layers on top of each other, so the wefts would be like a mm thick when they should have been less than half of that. So, I barely got enough coverage for the scalp, and the parts that I did get down are very thick. I think it makes his head look bigger than it should which kinda adds to the uncanniness of him.
I did try to style it as close to canon as possible, but there are some things that just aren't (easily) possible in certain mediums, and Kliff's wild hair is one of them.
In retrospect, I probably should have just sculpted his hair with clay or something: it probably would have been more accurate, but I don't have much confidence in my sculpting ability, and again, I didn't want to modify the doll that much, so I stuck with the yarn.
I might suck it up and try and make him a new wig, I still have a LOT of red yarn left over, so maybe I can make him some new styles too. But the tedium of going through with it makes it very unlikely that I'll follow through~

(The wig from other angles.)
Since the beard is made from the same yarn, I'll lightly talk about that. There aren't too many resources about bearded dolls, but I've seen people root it, glue it, and even just paint it if they weren't supposed to be thick. In the end I used this repaint for reference (suggestive content warning) and glued it on.
youtube
The scarf covers most of it, but I think it turned out okay. I need to add just a *little* more to his left cheek, but otherwise I feel like I was successful.
Next, it's usually hidden due to all the crap that's on his head, but I did give him an earring.

I didn't think about it until way too late in the process, and I tried to poke a hole through his ear so he could actually wear it. However, when I tried to do so, I almost ruined his head paint a second time. Saying, "fuck that," I decided to just glue it on.
If I had been more brave with modifying this doll, I might have just resculpted his ears entirely, because, being based on a real life human being, the doll's ears don't flare out that much, so they're easily covered by other things.
His glasses are just a piece of painted plastic that hold to his face using some plastic cord. They fit well while his wig is off, but putting them on with everything else is a goddamn nightmare.
Since his ears are so small, and his hair is so short, there's nothing for the glasses to "grab" onto without the cord, but the cord is too short to fit around the wig once it's on, but I can't make the cord longer to sit over the wig, because the glasses need to go over the headband, and it's a pain in the ass trying to layer everything like that.
So, I have to put the glasses in place first, TAPE the cord to his scalp so they don't move, put on the wig, then put on the headband. It's really such a hassle, but I don't think I can truly convey the annoyance of having to do it all without showing you. So, unless I absolutely have to, I'm never taking any of those things off him again.
I think the last things are the headband, mask, and tablet.
The headband is just a spare scrunchy that I have. I don't have one in the *exact* same color as the real one, so I went with the closest one I had, which was this teal color.
I didn't feel comfortable repainting one since it's essentially an elastic band, I don't think the paint, even with the textitle medium, would be able to hold up to all the stretching I have to do to even get it on his head.
If I happen to find a white one somewhere in my stash, then I might try dyeing it using water and acrylic paints to see if I can get it green, but for now, I think this works. A little thick, but it works.
The tablet is just a piece of foam painted with paint markers and the mask is a piece of cardboard. I wasn't planning on really recreating any scenes with this doll, but since I remembered that comic, and thought it would be easy enough to make, I went ahead and made it as an in-joke to myself.
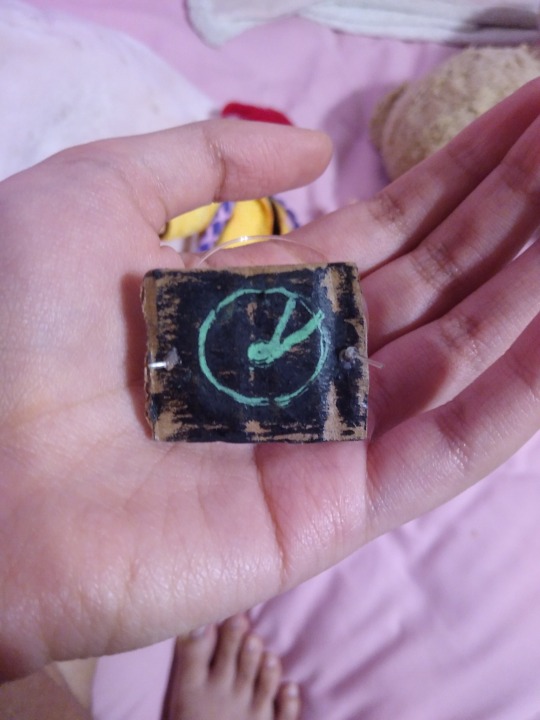
Honestly, I think it's the most charming piece of the entire ensemble. Plus, he can wear it without me having undo/redo any of his other head accessories, so it's easy to make him wear it whenever.
My final comments about the doll itself are that he's fucking huge. I should have taken a pic of him next to Kun3h0, but he is too tall to even fit on my display shelf without sitting.
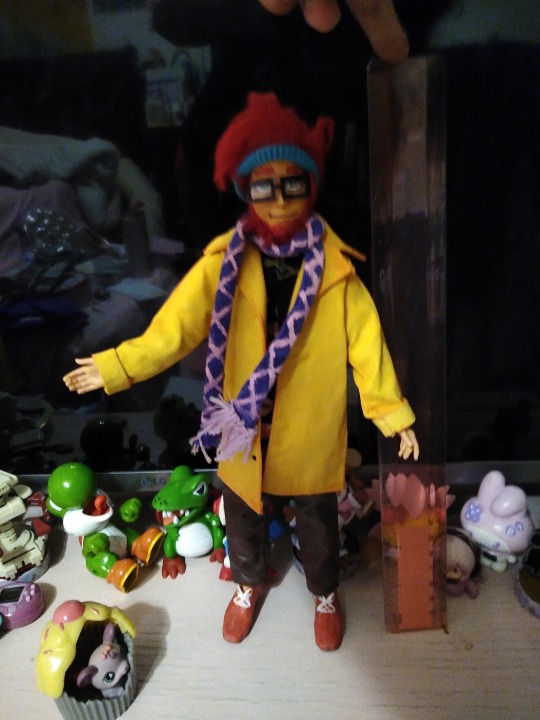
(Please ignore any mess you might see in the reflection. This is just one of the only flat pieces of furniture he can stand on without me standing on something to take a pic.)
Despite my interests, I don't actually collect dolls (I'm more into figures and plushies), so I wasn't expecting him to be so big. In fact, Kun3h0, who would be considered a small to medium doll in collector's spaces, was also bigger than I thought she'd be, so you can imagine my surprise when I got my hands on him.
So... I don't really know where I can put him. He obviously can't live in front of my TV, but beyond being too big for my shelf, he also doesn't fit in with any of my other collectibles. And I'll be honest, the contrast of him "clearly not belonging" among my more "kawaii" items was a motivator in starting this project, I live for the gap moe after all, but in practice he really just sticks out like a sore thumb. (This is also why his first pics are in a slightly different location without many props. I just couldn't put together anything from my collection or find a spot among my things to take a good thematic pic with. The magazines/CDs he's with are from my dad's collection.)
I do have space at higher elevations in my room, but it's kinda off putting to have him staring down my room, looking like he's plotting something (my space is too small to ignore it). So I dunno what I'm gonna do with him. I did have plans to make him some... cuter outfits so he wouldn't stick out as much, but that requires sewing, and I'm kinda worn out from this project.
In conclusion, despite my troubles with this project, I'm not entirely displeased with the results. At the very least, it was an experience, and one that I might even be willing to do a third time 👀...?
But for now, I'd like to rest and maybe go back to drawing again. I feel like I haven't drawn anything "real" for a while now. We're inching closer and closer to the next follower milestone (4 digit number BA-BY!), so I'd like to at least get back to being good enough to sketch some stuff for y'all soon~
#gbunny makes#gbunny draws#custom doll#doll custom#doll repaint#kliff#nsr#no straight roads#for the record i do find this project thoroughly embarrassing for me#but i can't justify its existence without sharing it. so here it is.#like. i wish i could have been obsessed with somebody else.#anybody else.#well. someone who's socially acceptable to obsess over i guess#but i'm not. i'm obsessed with him so i'm going to make things of him#and they're gonna make me happy#despite the embarrassment#Youtube
36 notes
·
View notes
Note
Whats it like doing fiber art?
It's simultaneously the most relaxing and most frustrating thing you can do. For one, doing and planning and enjoying your own fiber art is the most satisfying thing I've done in my life. Progress is both immediate and visible, mistakes are in general relatively easy to fix or cover up, and you can turn on music or video essays or podcasts in the background. When I was making my wedding pumpkins, I watched the entirety of Queer Eye and learned a lot about trauma via varied video essays. It was actually pretty useful for my own healing process - and at the end I had 180+ crochet pumpkins! (Which is too many. I'm still getting rid of them and it's been literal years.)
I love how forgiving crochet is, how versatile sewing is, the satisfying repetition of knitting, the vicious yet enjoyable stabbing of rug making and needle felting, the artistic thought put into weaving, the free-form 3 dimensional fuckery of macrame... I haven't had the capability to do enough lately and I'm excited to finally get back to it! 😃
However, once you start fiber art, you also start noticing just how... bad. Standard fiber craft is around you. I make a lot of bags and coasters for myself and sale - so interesting bags and coasters catch my eye in stores and often I'm frustrated with the quality and materials used. Like for example - what's the point of a market bag bought new, made of plastic, and unwashable except by hand? Market bags get a lot of mess in them (onions my nemeses) and are supposed to be helpful to the environment! They should be easy to wash and non-plastic. And for coasters - why would you want a coaster that just collects and then pours water off of it onto the table?? Doesn't that defeat the purpose???
Clothing is made with little care for how it will be used and how it will hold up. I got a very cute sundress recently that has giant, scratchy, badly machined seams (they look like the seams on my guinea pig's old fleeces! Which I got at Walmart for $5 for her to pee on - nowadays I bought her these lovely sturdy & absorptive reusable fleece pads from another crafter... omg I'm judging the quality of Walmart blankets) directly up both nips - I assume to force me to wear something underneath? The chafing!
Certain new clothes will start falling apart at the slightest concept of wear. I test everything I make at every stage to make sure it's going to withstand getting stretched and pulled, and that it's... comfortable? Which seems like it should be standard but what do I know? Corner cutting cheapskatery! Absolute lack of pride in craftsmanship! Disgraceful!
And holy hell the prices. I can't even begin to compete with standard pricing because it takes me at least an hour to make most of these things, and at 15 an hour plus the cost of materials, packaging, and shipping (trying to do more in person to offset that - but that means paying rent for tables), I've got no chance. Sometimes I go into stores and stare at the granny square cardigans being sold for $25 and wonder who's going without dinner for that price. Maybe it's just knitted on a machine, but still - it's wild. And since wages are damn depressed where I live, normal folks can't afford decent things - much less handmade decent things! Chewing glass over here.
Anyways it's an excellent hobby and I regret none of the time spent on it, I just wish for the downfall of capitalis- companies to do better at it so I don't get stressed in stores lol
Also more soft yarn and pretty fabric and shiny thread and-
Thank you for the q!
#long post#HI! HELLO! MY FAVORITE THING! SOMEONE ASKED ABOUT MY THING! 🥲🥲🥲🥲#fibercraft#and the downfall of capitalism#lol
15 notes
·
View notes
Text
Mori kei for dolls - Part I


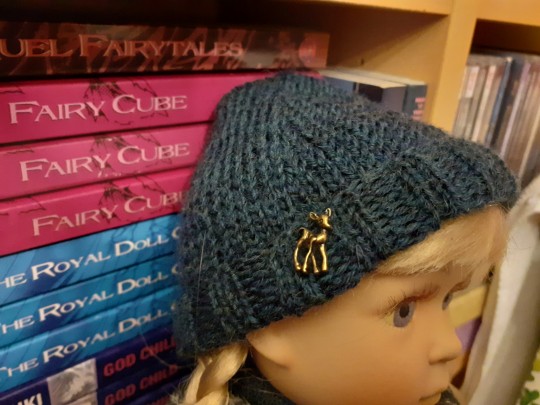
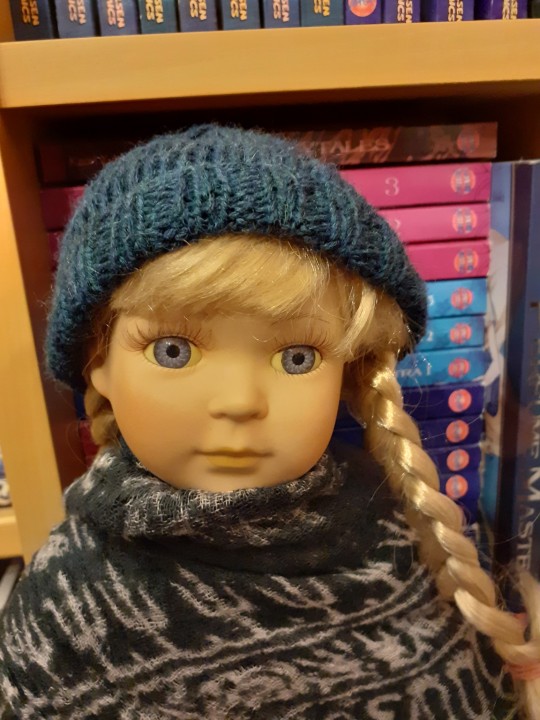
While it was still cold outside (and my sewing machine was broken and away to be fixed) I started a makeover project for my porcelain dolls. I started collecting them as a young teenager. My collection is very modest with four dolls, but maybe I'll add some more eventually.
For now I wanted to give them all new outfits and decided on Mori Kei (my big j-fashion love besides lolita fashion). As I have four dolls I want to give each of them distinct looks. For my big blonde doll I decided to go with more darker earth tones. Think dark mori but a bit colourful still (had fun with fabric scraps).
As it was winter I started with winter clothes (haven't finished all the outfits though). Everything is handsewn or in this case knitted. I had lots of fun making this tiny adorable hat! The deer pin is an old ear stud. I felt the hat was still missing something and voila it needed a little deer! So precious.
#diy#handmade#eglcommunity#dark mori girl#mori fashion#mori kei#mori girl#doll clothes#mori kei for dolls#j fashion#clothes for dolls#knit hat#knitting for dolls#doll knits
15 notes
·
View notes
Text
This is mostly for my benefit, so I stop internalizing all of these & also because listing stuff out helps me organize/prioritize; I would read more this but I'm on mobile.
Problems I am having list:
- My skin is in some of the worst shape it's ever been, and is severely broken out all over my back, chest, arms, and butt. I am a habitual nervous picker, which makes things WAY, WAY WORSE, and I have been unable to heal a break out that has been continuing for over a month. It is to the point where it upsets me to wear anything less than a crew cut neckline, and a pool party I have coming up at the end of July practically makes me cry to think about.
- One of my cats keeps pooping outside the litterbox & has extremely bad breath (both signs of illness) but I do not have the money to take her to the vet.
- I have several noticable cavities that are extremely cold/sweet sensitive, but have not had the money to go to the dentist. (My insurance doesn't cover dental, but my mom actually solved the money side of this when I told her, I just have to now find a dentist and make the appointment)
- My rent, bills, and mandatory living expenses nearly equal my monthly income.
- I have credit debts on top of that.
- Stuff around my apartment keeps having issues, and having them fixed is horrifically slow. I didn't have a ceiling in my laundry room for almost three weeks because of a leak, which drove the humidity indoors up to almost 60%.
- Not that it matters, because my washing machine is broken, and I haven't had the money to get it fixed.
- The atmosphere at work is topsy turvy, because we got a new chief of staff who has been firing fulltime staff almost at random it seems, and nobody feels secure in their position. This is apparently due to budgetary reasons, and they aren't hiring people to replace them in most instances, so their tasks get split up and given to the remaining staff, overburdening us.
- I have to talk to my dad (who I have been estranged from for years) and have been putting off calling him for a month because I don't know how to start a necessary conversation.
- My apartment is still a mess.
- My sleep schedule seems impossible to fix, and I have been late to work A LOT recently. I stay late to compensate though, so hopefully that balances out.
- My kitchen and fridge are a wreck, and I get home so late I buy food instead of making it, which hits my finances even harder.
- My ADHD meds have been losing their effectiveness with alarming speed recently.
- All my energy and time go to work, worrying, or staring into the void, and I haven't been drawing or getting to play video games.
- So many of my worries are financial, but due to everything else, I haven't been able to open up commissions and help myself out like I know I can.
- I lost a lot of weight, so much so that a lot of my clothes no longer fit. I can't afford to replace them, and while I can sew and COULD tailor them all, the thing about time and energy pops up again, which is to say I don't have them.
- Between my skin being shit and my clothes not fitting, my self-esteem is six feet under.
- I want to go back to school to finish a degree, but can't cut back on hours at work or I'll lose my position. That leaves night school, but I am barely coping with the task load I have right now, so how the fuck??? Then there's the financial aspect, which is one of the things I need to talk to my dad about (he's a right bastard, but willing to help me pay for school at least), but I was supposed to have started on this process last year and the fact that I haven't is one of the holdups I have in contacting him.
- Without a degree, my career is in peril because I either A. Will have a hard time advancing from where I'm at or B. Can't go elsewhere for a job/am shit out of luck if fired, because museums are super judgy about what your qualifications on paper look like.
Okay, I feel better now. Word vomiting all that out in a "public" way helps to clear my head.
I'm depressed as shit I suspect, and was tipped off by the realization that I am not motivated to watch Stranger Things S3 OR 3Below S2, both shows that I REALLY REALLY LOVE.
It's kind of funny though, because I am not at all the un-energetic, mopey kind of depressive, in fact the knowledge that I'm probably depressed fills me with RAGE and SPITE, and I am actively combing through possible ways to circumvent this shit.
Suck my dick chemical imbalance, I'm gonna do some stretches, maybe some skincare, and figure out how to fuck you up.
#ohkotalks#i have limited capacity to keep up with conversations right now too#i'm sorry to anyone I have left hanging recently#also DbD Discord I love y'all and i'm not gone#just temporarily mia
11 notes
·
View notes