#i hand sewed the bias tape on first
Explore tagged Tumblr posts
Text

my stays are done. :) If you wanna know how long it takes to hand whipstitch tabs on a pair of stays, I rewatched the entirety of Arcane S2 while working on those tabs. So... there's that.
#they're also machine sewn#i hand sewed the bias tape on first#then sewed over it#then hand sewed the other side#then sewed over it again#so four rounds of sewing#there's a reason these things are a pain in the ass to make lol
3 notes
·
View notes
Text
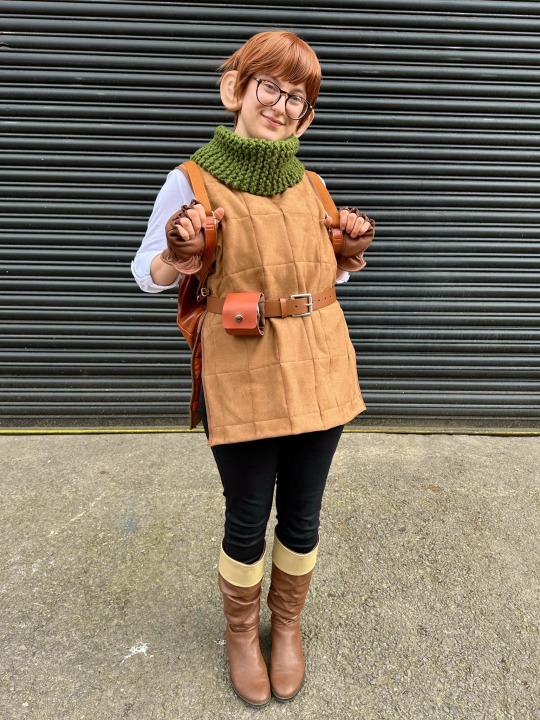
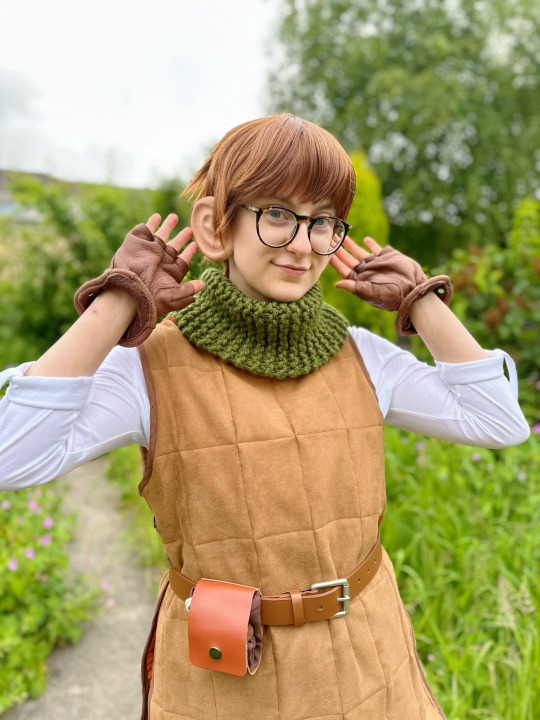
chilchuck cosplay rundown / tutorial! I say tutorial loosely cause I didn't take any progress photos...but hopefully some of this helps someone!
I received a couple messages on instagram about this cosplay so I thought it'd be easier to make a post about it! here's a little rundown for anybody who needs it...!
I only had a week to make this costume so there isn't a ton of actual sewing involved! (I got most of the materials in advance)
the main part's essentially just a big quilt - I used a faux suede fabric (which was a little stretchy, I really don't recommend this but it was the best colour match I could find with my time limit! I think it would've come out a lot smoother using something without stretch!) I used 2 ounce wadding/batting! the process is just measuring a bunch of rectangles, using stick and spray to glue the wadding between the two fabrics, and then sewing along all the lines. time consuming but it's not hard!
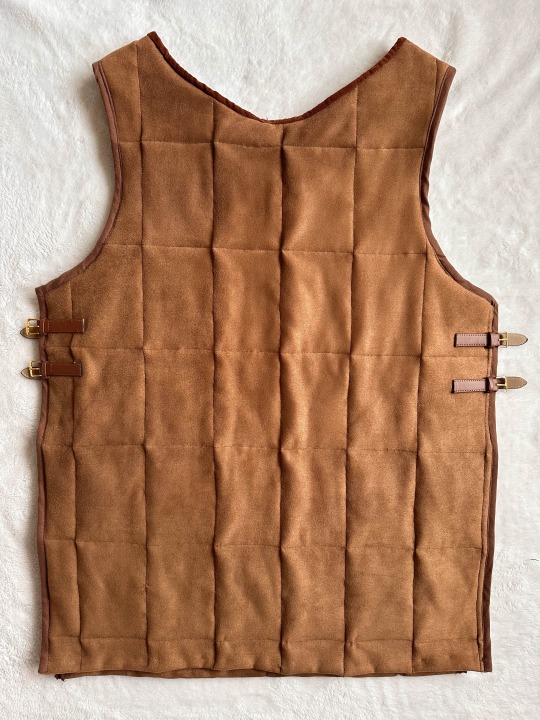
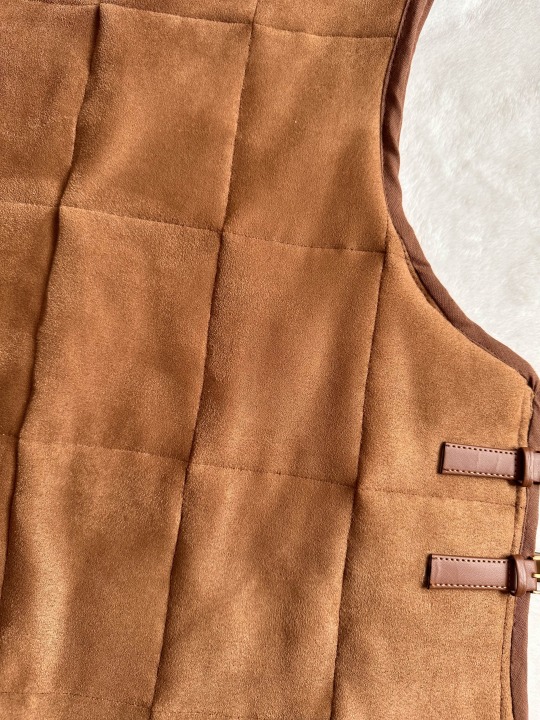
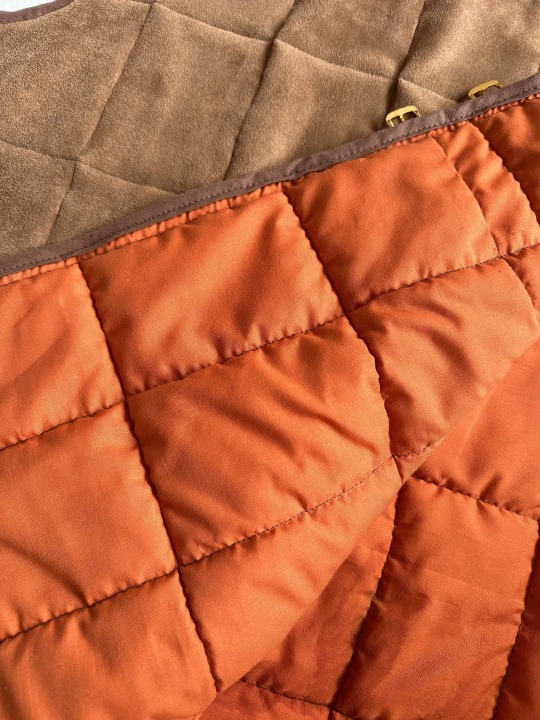
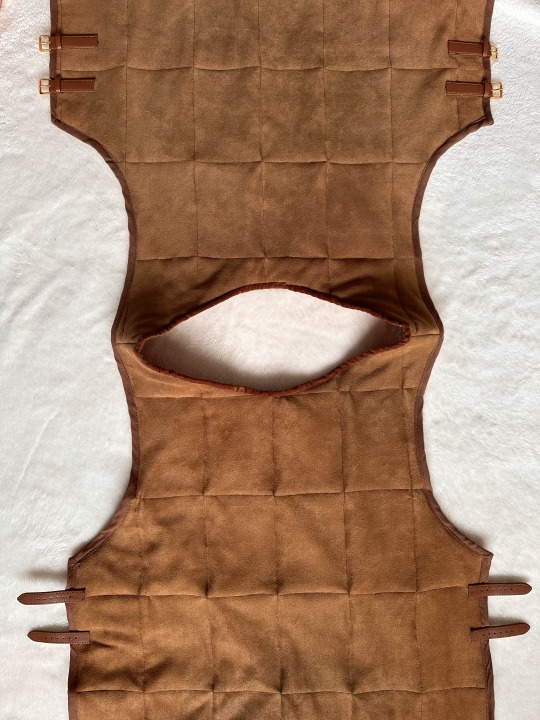
I cut the quilt I'd made into two rectangles, essentially you have two blankets - then I measured the neck and armholes based on a tank style dress I owned. if you're a little unsure about this you can make a mockup first before cutting the real thing! then I sewed the shoulders together, now it's just one long blanket with a head hole!
I ended up trimming the sides of the front half before the next bit to help it conform to my body a little better but I had to wear it backwards on the day for reasons I'll explain in a minute T__T
next I sew bias tape down the sides and around the neck hole, I folded the bottom ends and sewed them by hand to hide the stitches. you could probably just use bias around the whole thing but I was low on materials!
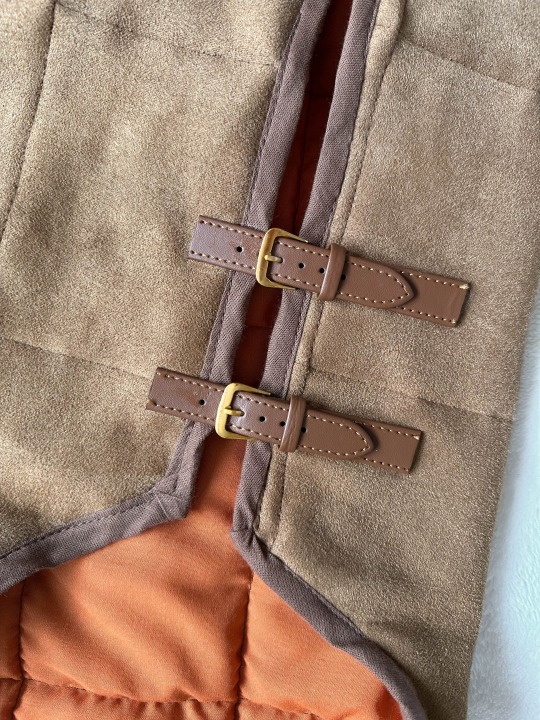
the buckles at the sides are literally just watch straps. the original listing I bought from's gone now but I'm pretty sure these are the exact same thing. I bought 16mm and trimmed the ends a little, I attached them using gorilla superglue!
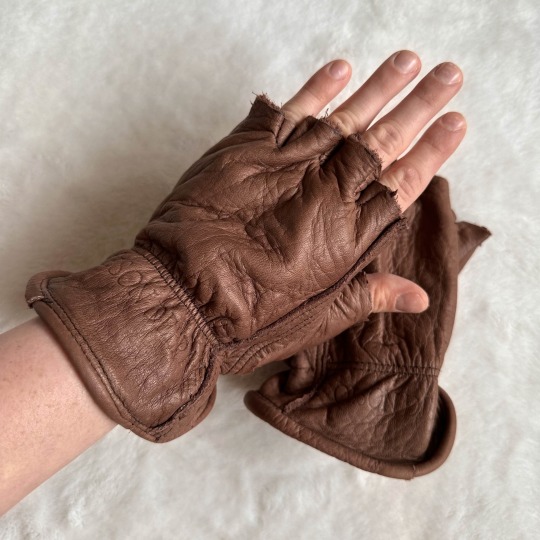
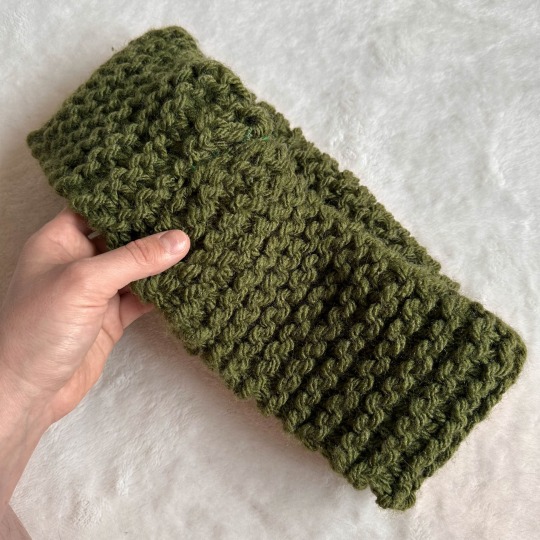
the gloves are these gloves with the fingers cut off, any brown leather gauntlet style glove will do, and the scarf's one I found on vinted. it was a long scarf originally, I zigzag stitched down where I wanted it to end, cut it, then sewed the two ends together. the stitching's a little wonky but you can't really tell when it's folded over!

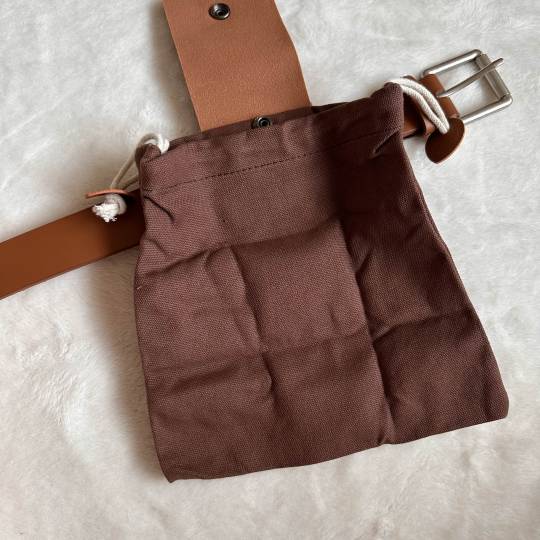
the belt's from amazon and the pouch is this one from aliexpress - I already had one of these for casual wear, it's a little foraging bag! it folds out into a bigger pouch!
I didn't take photos but the shirt's just one I found on vinted and the jeans are topshop joni jeans I'm pretty sure! the boots are just a pair I found secondhand and hot glued a strip of pleather to!
my wig is this one in chestnut brown, I always use coscraft for wigs they're my favourite! I trimmed it a little shorter and used thinning scissors over the whole wig!
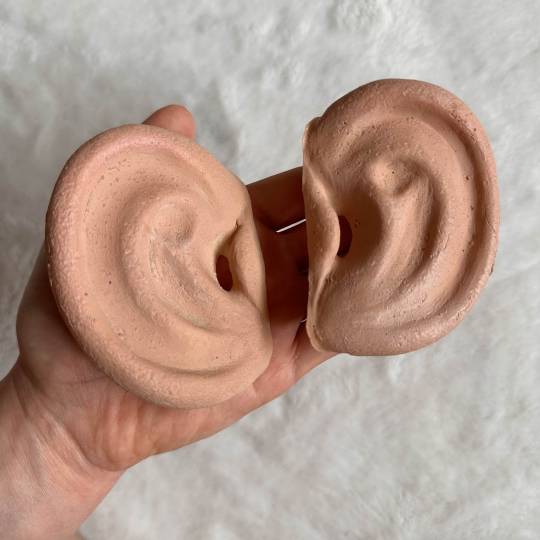
last but not least is the ears. I almost didn't use these and I'm so glad I did! I felt so silly and cute wearing them! I used these ears, but searching "prosthetic big ears" should come up with others if you do a little digging! I don't have any experience with prosthetics aside from a pair of hobbit ears I wore a few years back for halloween but they're not too tricky to apply.
I trimmed the edges down a little and applied my foundation to them, powdered them to seal it and then added a little blush to the tips. I used ben nye prosthetic adhesive to glue them on! glue on my ears and onto the prosthetic ears, let it get tacky then just held them in place until they stuck.
be careful with the adhesive when you're applying it because my sibling accidentally spilled it down my costume... that's why I ended up wearing it backwards on the day...
I was worried I wouldn't be able to hear with them on but it's not too bad! cons are loud anyway and I'm autistic so the slight noise cancelling effect wasn't bad at all!
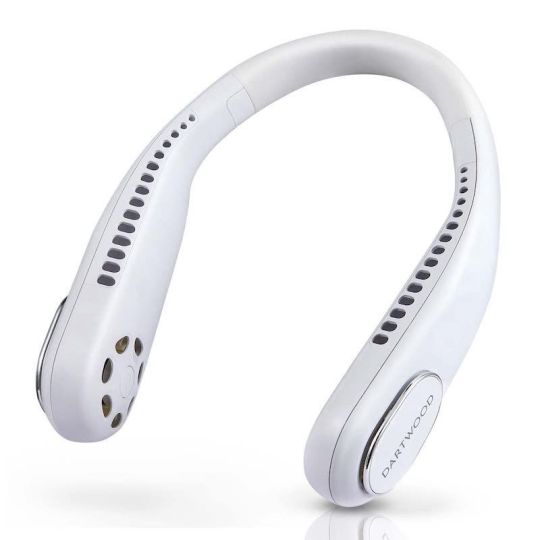
another piece of advice I'd give is to buy one of these style neck fans, you can buy them on amazon! I wore this during the day underneath my scarf and it helped a lot!
#cosplay#my cosplay#should I put this under the main tag...uaa...#dungeon meshi#be nice please!#long post
67 notes
·
View notes
Note
Care to tell us more about your tshirt quilt?
Oh, sure!


The "T-Shirt" quilt actually contains t-shirts, two hoodies, a jersey, one pair of pants, and my beloved pink and purple plaid shirt that I wore so much it frayed apart after seven or eight years. It's got two shirts I designed (one of those shirts has both the front and back on the quilt), one shirt I've owned since I was 11, and many shirts with either sentimental value or specific memories attached that I couldn't bear to part with, even as they shrunk in the wash or I outgrew them. I made it in 2021 to celebrate getting my masters after losing my father. This was truly the first quilt I made, and it shows-- the new one is much more technically proficient and about twice or maybe 2.5 times the size. You might be able to see that I had no idea what I was doing with the binding! It's fake silk bias tape that I just sewed over the edges and wadded up in the corners. (I'm all proud of the mitered corners on the new one which don't photograph well.) The new one also had invisible hand-stitched finishing on it for the binding, whereas this one was machine sewed all the way around. It's only quilted horizontally along the lines of the shirts, and has no batting! Even so, as mis-matched as it is, I'm glad I made it so I could keep all of these memories.
37 notes
·
View notes
Text
Making of The Gentlethem Pirate: The Stays
Since I screwed up the pants the first go round and had to wait for the new fabric to wash and dry I started on the stays.
I used the most excellent Custom Corset Generator from ElizabethanCostume.net and some alphanumeric paper (that I discovered wasn't accurately spaced to an inch like it was supposed to be) to create my pattern and transferred it to sturdier Ikea paper after a quick mockup.

The elder niblet decided on this burgundy/gold brocade and I was able to find a remnant of burgundy duck canvas for the lining.

Since I had the pattern and time I was able to order bones to the right length from Wawak.com. I marked and sewed all the boning channels (by machine because I don't hate myself). I also opted for grommets over hand binding eyelets in case they outgrow it.

However, I couldn't completely avoid hand sewing since I didn't leave enough room for the bones to not be in the binding so I spent the evening sewing down bias tape.
Et voila, stays and a shirt done.


Tomorrow we tackle pants 2.0.
The Shirt
140 notes
·
View notes
Text


Remaking Lenalee's Uniform - Part 2
Bias Tape.
The last time I applied it onto her uniform it took me 2 days and the frustration was endless. I mean the outcome in the end was okay but I used different tape for the other uniforms and had learned a lot and it's the main reason why I wanted to redo it.


The first parts here were easy, I didn't have any trouble to attach that the first time. This time I decided to use the normal tape and not recutting and reironing it for like 2mm ... it's effort you don't really see.


I added the collar and noticed I needed to resew the one patch I added earlier but okay, ironing everything and then I let it sit for one night as I was super tired already (to be honest I didn't sleep much the night before because there was a party behind my house... I know that's somehow a theme when I sew OTL it's a curse I swear).


The difference is visible, it took me 5 minutes to sew on before I left for .. work.
Seriously. Before work, just like that. It's not perfect either but better than before and the overall style is the same as the other uniforms and that is the most important part for me.
I had to tweak the design a bit, the collar is a bit out of scale but I was able to attach the tape a better because of that.


Preparing the last machine parts. Next is adding buttons, decorations, pearls... and sleeves. All by hand.


Two more days in... adding details really eats time.
Up to the last day, hopefully.


The belt was the last part that was left... I am done.

Here a little comparison with the first variant, I will do a better shot with Allen's uniform as that one will be the most recent one then.


Done by 25/05/24.
13 notes
·
View notes
Note
sorry about your ankle and wishing you a quick recovery!
i've been meaning to get into mending my clothes more, but i'm not very confident about it and also sensory issues are a thing so it's a bit of a work in progress, one might say.
if you're up to it, i'd love to hear about your general mending process! what steps you usually take and how you make different decisions and whatnot. what tools and materials you commonly use. any tips and tricks you have for mending with a sewing machine. that kind of stuff.
also maybe how to be more confident about mending (besides practice, obviously 😁)
Hi Nessie!
I have all kinds of sensory issues too, and I feel you about the mending difficulties! If I didn't wear boxers, I wouldn't be able to stand thigh mends, and I'd rather chew sandpaper than walk on a darned sock.
I just answered @jimahalangel's ask about mending, patching, and reinforcement, so the post right before this one has a lot of relevant info about that!
Some of my favorite random tricks:
-Anywhere that thread knots will bother me, I almost always use a patch. That way I can hide the knots between the two layers of fabric, and the patch is smooth against my skin.
-Hand sewing: Use a little needle for thick fabric. It'll slide between the fibers easier.
-Machine sewing: Use a big needle for thick fabric. The machine can easily punch through; it just needs a sturdy needle to take that pressure.
-Mends are less visible when you match the grain of the fabric. Denim especially wears most on the vertical grain (the blue threads) and leaves the horizontal grain (white threads) behind.
-Most types of seam binding or bias tape have one side just a little taller than the other. Put the tall side on the back. Then, as you machine along the short side on the front, you're almost guaranteed to catch the back as well.
-Mend denim with blue thread on top and white thread in the bobbin. You use up half as much blue thread, and even if the white thread pops up and shows a little, it's camouflaged in the denim.
-Practice mending on your pajamas first. Seriously. If you think your stitches look wonky, practice on stuff the world will never see. It's also a great place to find out stuff like "my machine's zigzag stitch will literally never balance the two threads properly" or "this fabric must be hemmed" or "wow, I hate lace around my neck."
-When projects are being super difficult, it's okay to have an "out of my sight" pile. Some things need to go to time out to think about their crimes.
-Everything can be undone or covered up. Seriously. If you hate it, unpick it and try something else.
#sewing#diy#cj sews#solarpunk#mending#beginner sewing#it's not waste until you waste it#use it up wear it out make it do or do without
12 notes
·
View notes
Note
Hello from Canada! – Sorry for the out-of-the-blue ask but your Medicine Seller cosplay has been living rent-free in my head since I was creeping the Mononoke tags a couple of weeks ago. I’m slowly gathering the materials for my own and I have been mesmerized by how dang smooth the designs on yours are. Is that just regular bias tape you used for the white edging around the separate pieces? If so, how on earth did you stitch it down without having 3,000,000 wrinkles? No pressure to share, of course, but this would seriously save my ass haha. Love your work!
Hellohello! and WAHH thank youu! ;u; <3 It warms my heart that my favorite cosplay still receives some love <3<3<3 (hope you don't mind me posting this publicly, love to document useful wip stuff)
YES it's just cotton bias tape I cut to smaller size, it can take sooooo much bending abuse so the smallest round parts were possible to do. I don't know what beginners madness drove me with this costume.. but to sew those on was... a slow chore with a lot of trial and error :, D LOT'S OF IRONING IS THE KEY.
My memory is a bit hazy (it's been 10 years jfc) but I think I attached them in place first with this iron-on fusible tape (my best friend!!!) to make the top stitching easier. Pinning them down didn't work, just bended the bias tape out of place and pulled the fabric. This is a millimeter job. I also used iron-on interfacing to reinforce and/or attach the small fabric parts first.
If I ever redid this costume I think I'd just hand sew them on, less stiff, no visible seams. Because damn the sleeves got STIFF with all the stitches and interfacing : D But at least it made 'em look neat and straight in the end.
Found these WIP pictures of my messy floor for you, hope it helps some <3


GOOD LUCK WITH YOUR COSPLAY! More Medicine sellers to the world, YES PLEASE~ <3
12 notes
·
View notes
Text
Boxes of delights
Other family members have been sorting through the belongings of a deceased family member and the question comes my way of 'do you want her sewing stuff or should we just bin it?'
'Oh yeah, just bin it' said no craft inclined person ever
So I'm now in possession of two bonus boxes of mysterious and unknown content
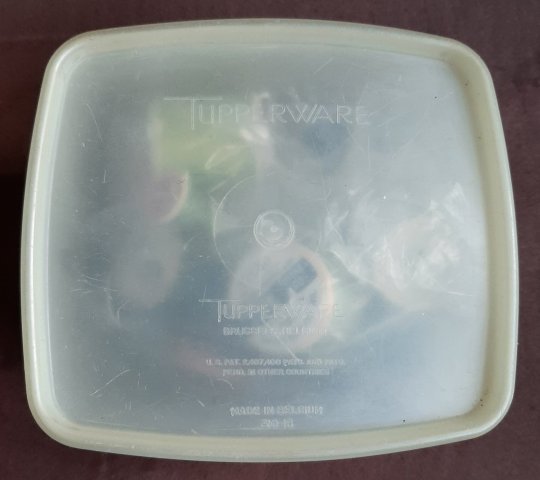
This one is a small and slightly greasy feeling Tupperware box of unknown age
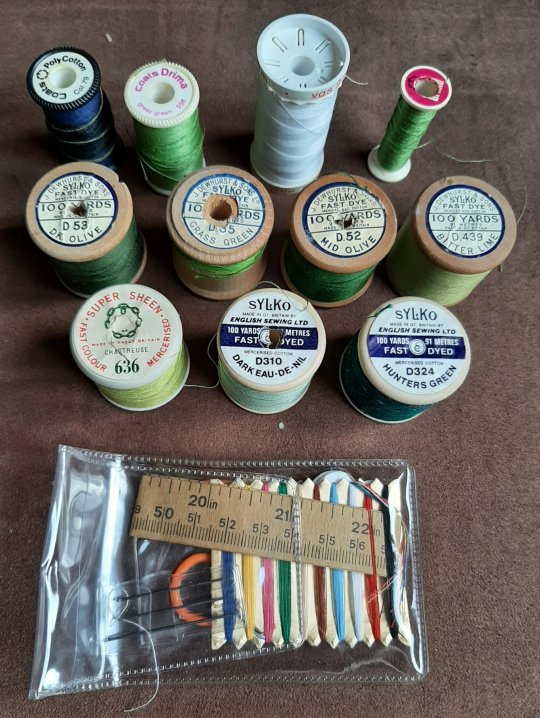
Contents: 11 reels of sewing thread of varying vintages and brands, some likely older than I am, and a travel type sewing kit in a clear plastic wallet complete with mini scissors, needles, and a tape measure

This one reel appears to have a tiny bit of surface mould, but I'm hoping it'll clean up with no issues since it appears so minor. I'll separate it from the rest and see how it goes
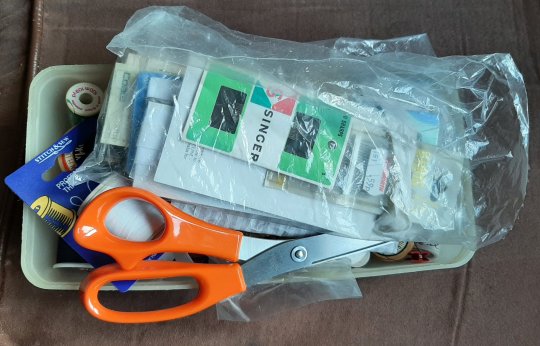
This box is much larger than the first
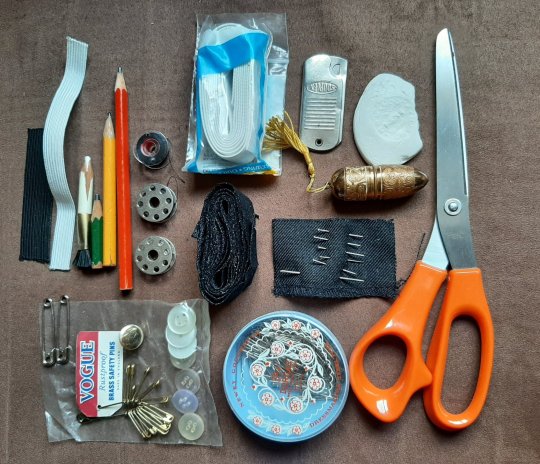
Here we have pins, needles, safety pins, scissors, 3 sewing machine reels, pencils, buttons, a pieces of tailors chalk, various bits of elastic, and two other items
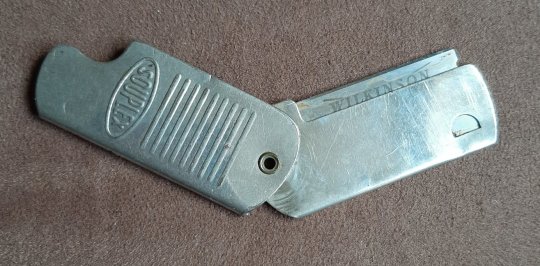
One is this 'sewers switchblade', a thread/fabric cutter consisting of a razor blade held in a folding case that makes it's own blade cover and handle
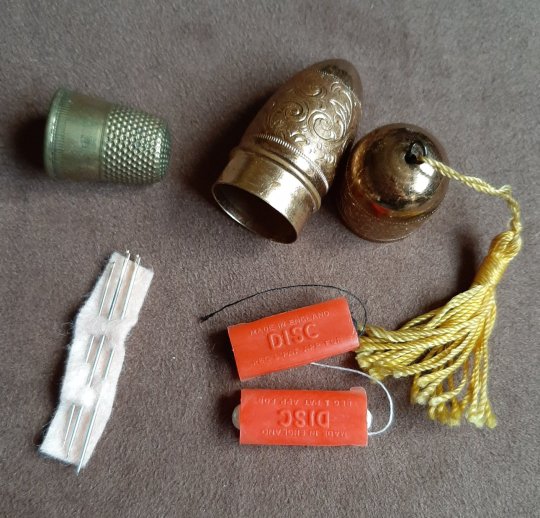
And the other is this small bullet shaped emergency sewing kit which contains a thimble (in need of a good clean) a strip of felt holding 3 sewing needles, and two small reels of black and white thread
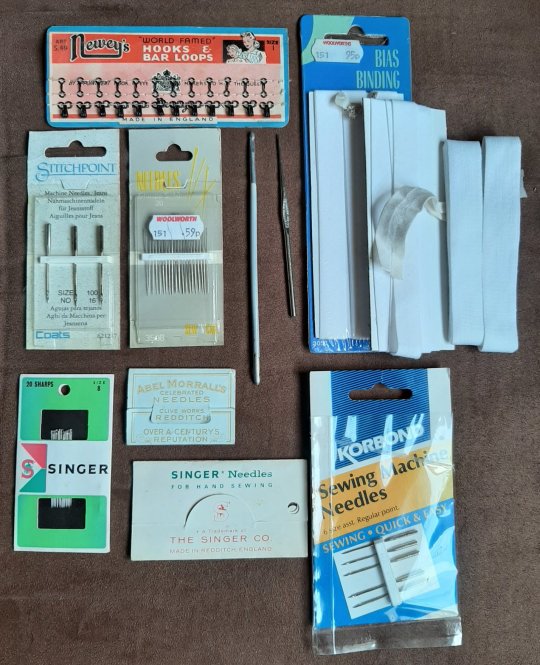
Also in the box are this assortment of machine and hand needles, some hooks and eyes, white bias binding and two well used crochet hooks of as yet unknown size
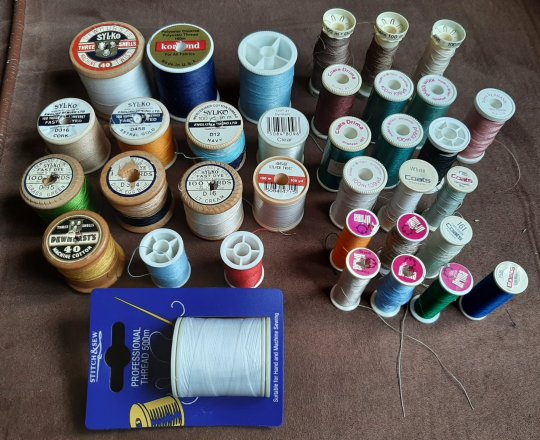
And under all of that are 35 reels of sewing thread of varying vintages and brands
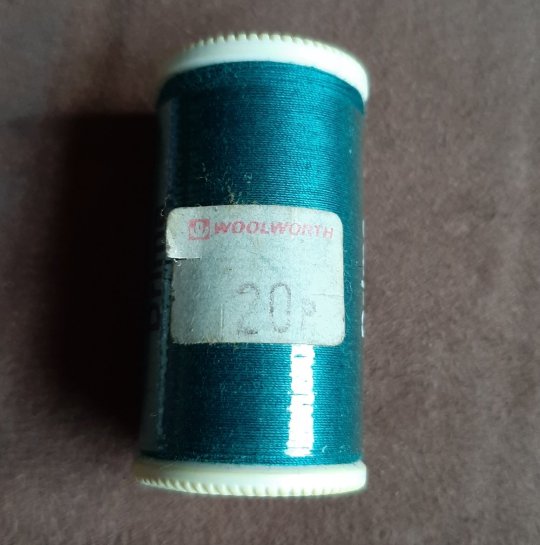
Idk just how old some of these supplies are, but this reel of thread has a Woolworths price sticker on it and not only did Woolworths shut it's UK stores in Dec 2008/Jan 2009, but with the older logo on the sticker and a price of 20p marked on it I'm pretty sure it predates that closure by a broad margin
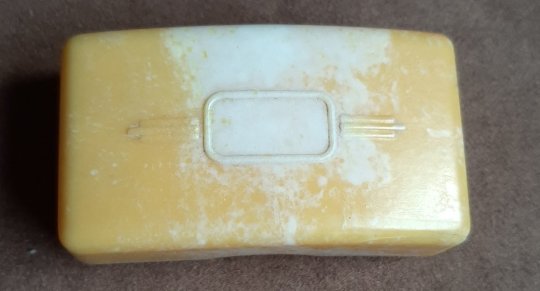
This small case was also in the bottom of the box with the thread reels
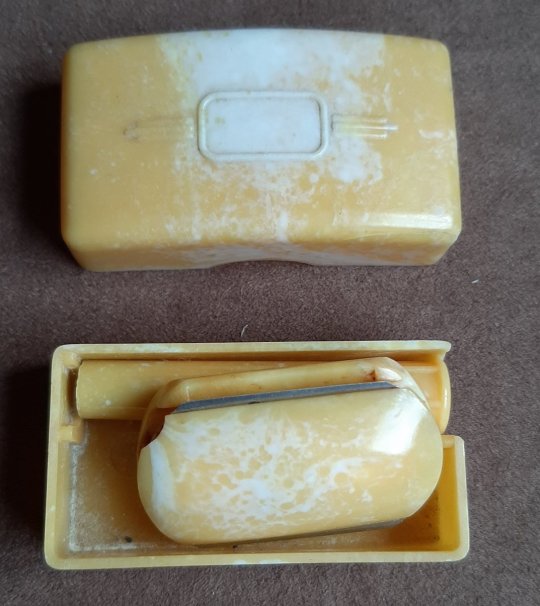
Opening it up reveals this
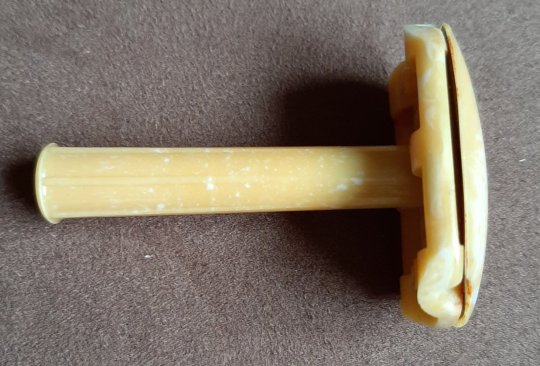
which assembles into a travel razor.
Why that was stored with the sewing supplies I have no idea
RIP Dorothy, I shall use your sewing supplies to the best of my ability and think of you when I do so. But I think I'm happy to let the razor go.
13 notes
·
View notes
Text

My fifth and final look from my collection for school!
This design is very different from my other four because of how our classes work - basically, the first four looks are ones we design specifically for this class, while our fifth look is actually one we made from a previous class to showcase a different design style for us.
The corset self is satin (from SalTexFabrics).The corset lining and the pants are both denim (from Joann).
The corset is an overbust corset with a peephole held closed by a 2” frog closure (not pictured, I added it later), a busk front closure, and a lacing back closure. The edges are bound with satin bias tape (from PacificTrimming). The pants have a fly front zip and lace all the way down the outseams. The grommets on the pants and the corset are gold, size 0.
The fly on the pants is too short. It wasn’t an issue for the model, but it was my first time ever doing a fly zip (both drafting and sewing) and I didn’t have time to redo it. I also accidentally doubled the size of the waistband at one point and didn’t notice until after I had cut the fabric and sewn it together, and this was literally the day before our runway show so I didn’t have time to redo it, so I rocked with it. I never want to put grommets in anything ever again *shutters in 120 grommets*.
Materials for the corset cost $59.81, cost including labor was $236.85. For the pants, materials were $26.24 and total cost was $191.62. If I were to sell these, the corset would be $355.27 and the skirt would be $287.42. I love doing corsets, but after these pants I never want to do grommets again. And yes, I used a hand press, I can’t even imagine doing this with a hammer.
#sewing#fashion#fashion design#fashion design student#corsetry#denim#satin#grommets#too many grommets#i can do grommets in my sleep now though
2 notes
·
View notes
Text
I don’t own a dress form, so some unaesthetic pics of the first successful dress I’ve sewn (including a liner!) and some sewing geekery under the cut.


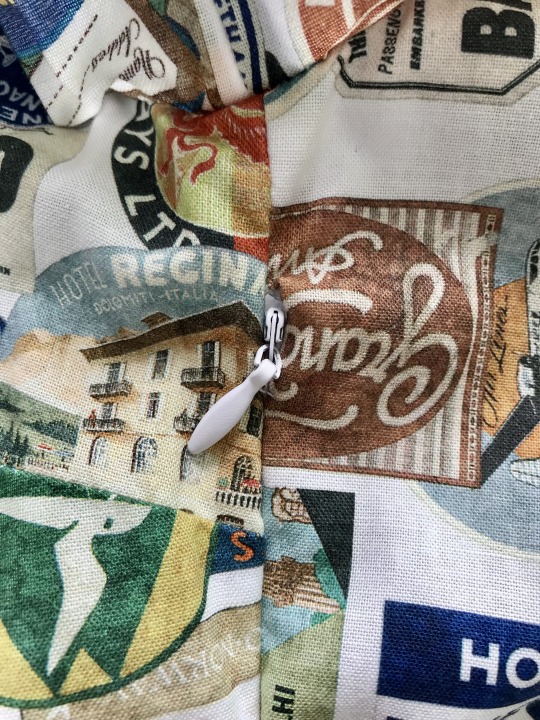
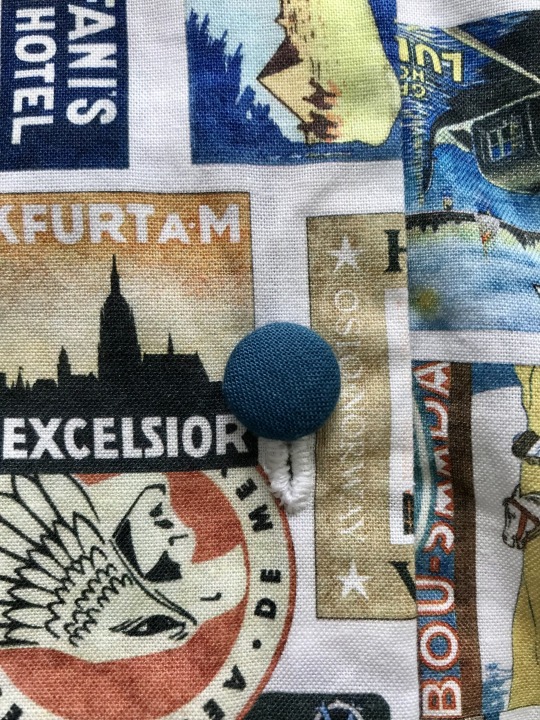
Fourth ever zipper installation and first invisible zipper. I misaligned the tops of the zipper, which resulted in a small gap at the top and the waist seams being slightly off, but I’m pretty happy with how it turned out (and no special zipper foot involved). And I don’t know where the buttonhole guide for the old Kenmore sewing machine is, so hand sewn buttonholes for me. I ordered a pack of covered button blanks to make matching fabric buttons.
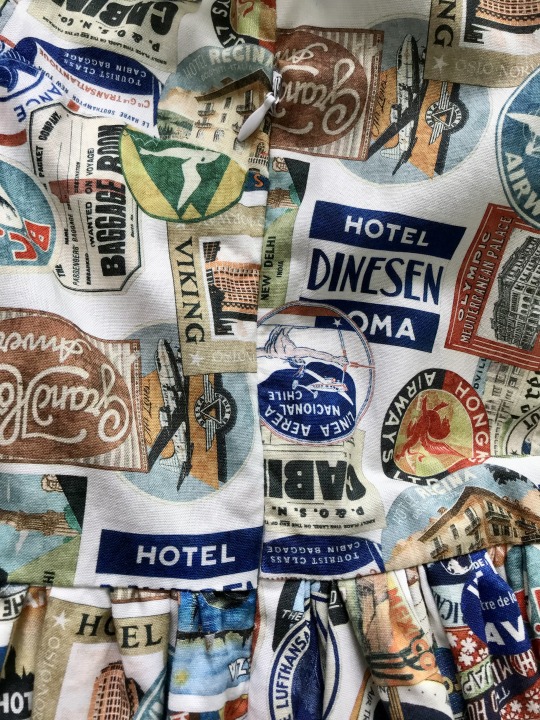
I hand gathered the waistline for the skirt, but the layers of fabric were so thick in places, that the Kenmore was like “wtf are you doing to me” and skipped stitches in multiple areas when it was time to attach the skirt to the bodice. I ended up doing a weird version of a backstitch by hand to reinforce the waist. And because I don’t care if the inside looks a little weird since no one will see it, I hand stitched bias tape to close up the raw edges.

I used dress option A from Simplicity Pattern 9164, and modified it to include a side seam pocket, a skirt liner, and I didn’t use the included pattern for the skirt itself. Instead I just used the entire width of the fabric, one panel for the front and one for the back. Overall, this pattern was easy-ish to follow as a beginner, but one does have to read the directions pretty well. For background, this is the third rectangle/dirndl-style skirt I’ve done, so that wasn’t very difficult. I’ve attempted making a bodice before when I tried to make a collared shirt for my mom’s dog and one too-big 40s style dress, so I had a little bit of experience with that.
It might be me being a beginner at sewing, but the instructions for the collar were on the confusing side. What the instructions said vs the diagrams showed and what would make sense when actually sewing the collar didn’t match up. I ended up remaking the collar according to how I did it with the dog shirt and then following Simplicity’s directions to attach the collar to the neckline. The inside still looks a bit weird, and I’m going to veer a little from the pattern directions the next time I make this dress to see if it makes things easier because there was still some awkward hand sewing. Thankfully the sleeves included multiple points to match up with the armholes, so that made setting them a breeze compared to doing the collar.
There’s some weird sections but I’m very happy with how it turned out. I ordered a belt making kit, so once that arrives I’ll be making a matching belt using the leftover fabric I used for the collar and sleeve cuffs.
14 notes
·
View notes
Text
Just finished sewing my own 18th-century-inspired chemise and stays! I am so excited to finally have completed this project and am really proud of how it turned out. It was my first time making something like this so I learned some things:
making gathered pieces like on the neck and sleeves is way more difficult using cotton instead of materials like polyester (so much more difficult that I cheated a bit and used elastics to gather the fabric at the sleeves)
sewing sleeves was way easier than I had expected
sometimes it is better to just hand-sew some parts (the bias tape around the stays in particular)
Since I decided that I wanted to be able to put the stays on without help I opted for front and back lacing. I also decided to save time and instead of hand-sewing eyelets, I used metal grommets.


I test-wore these pieces for a bit and they are surprisingly nice to wear, the stays give a lot of support (even though they are not fully boned) and the cotton fabric is really comfortable as a bottom layer.
5 notes
·
View notes
Text
Not much to show of late. But I've spent all day in my sewing room and working on my hoop petti. But we also did some running around as well.
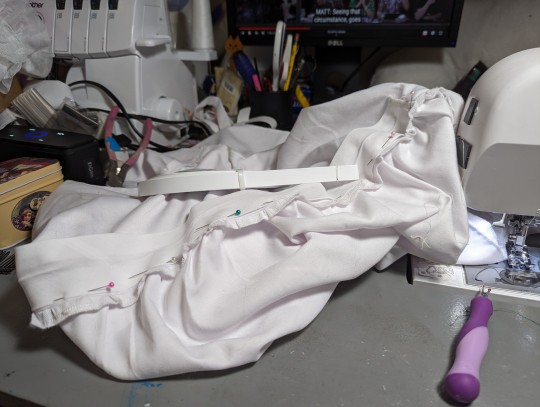
This is where I'm at with my hoop skirt! I cut the first hoop earlier after wasting at least 3 hours with some really low quality twill tape that meant a trip to the fabric store for bias tape instead. With that in hand I then, instead of working further decided to tackle my organization instead, going through my sewing supplies and sorting through them and finding new homes for them.
Now, as for the other running around, we finally got the male fosters neutered!
No chance of our female kitten providing us with **even more** kittens. So that's good at least!
For now I'm gonna try to actually get this skirt going again before I do some more pattern work.
#homemade lolita#lolita sewing#lolitafashion#pattern drafting#plus size lolita#lolita sewing blog#sewing#lolita fashion#sweet lolita#lolita hoopskirt#tall lolita
3 notes
·
View notes
Text
The Good, The Bad, The Short Stays
February 13, 2019
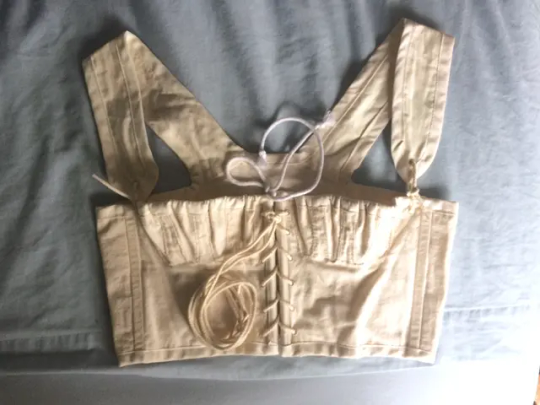
[Image ID: a flat photo of Regency-esque short stays made of unbleached muslin]
I started my Regency fashion journey back in the summer of 2017 and I… have not made it very far. All I have right now are a chemise that I can’t get over my shoulders (whoops!) and a set of nice looking short stays with some dark secrets. I’m disappointed with my progress - it’s hard not to be - but I’m trying my best to look at this as a learning experience. So, without further ado, let’s dig into my stays!
These are the designs and pattern pieces I started with. I drafted the pattern myself, which was a first for me, and the pattern turned out surprisingly well! The finished product even fits well!
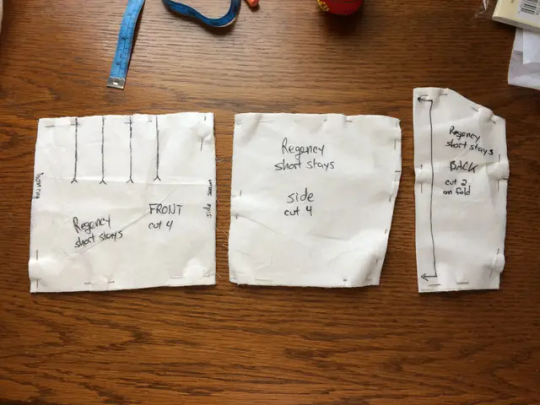
[Image ID: three mostly rectangular sewing pattern pieces labeled, from right to left, "front", "side", and "back"]
In the original designs, I had planned to have boning on either side of the center front lacing. I was forced to scrap that, as my chest just isn’t that wide. I also changed the number of gussets in each cup to four, instead of three, and made each gusset the same shape. They seem to work fine, but I’d be curious to see if shaping them would make much of a difference.
The gussets did not turn out well at all. I had never sewn gussets before, and didn’t bother doing any research before I jumped into them. I admit I still haven’t read up on gussets, but I suspect that part of the problem was that I had mis-measured the gussets and made the seam allowances too small, so when I folded in the seam allowances for the front panels and sewed them down, the gussets didn’t catch in some places. To remedy this, I hand sewed them using what could, on a technicality, be called a whip stitch, I think. The quality of my stitching isn’t very consistent, but it is very nice to run my fingers along in some places, and it serves to reinforce the seams there, which is probably a good thing.
The eyelets were also a first for me, and most of them turned out very nicely! There are 14 eyelets total, all hand-bound, with metal jump rings inside them for reinforcement. You can definitely tell which eyelets were my first if you look closely, but I’m very happy with how they turned out!
The body of the stays is just two layers of unbleached muslin. Something sturdier would have been better. The edges are bound in off-white bias tape, which seems to have worked well enough. The boning is heavy-duty zip ties, a carry-over from my cosplay days. The boning at both sides of the center front, where a busk should be, is actually just a wooden dowel. Doubling up the zip ties wasn’t giving me the support I needed for the bust (lift and separate!), so I had to find an alternative. Obviously, neither zip ties nor wooden dowels (or the jump rings in the eyelets) are ideal or washable, but they do, technically, get the job done.
Each cup has a drawstring at the top for adjustability. The shoulder straps tie to the front, also for adjustability. I ordered the cord I used for those and the front lacing from Wm Booth Draper. I had never heard of them before, but they seemed to be well-established and had lots of good reviews on their Facebook page, so I took the chance and was not let down!
To finish off, since this has gotten to be a lot longer than I meant it to, I’m not completely happy about how these turned out, but they fit and have been a very good learning opportunity for me, so I am content. I do plan on remaking them in the future, but that might be very far into the future, at this rate.
Stay warm, stay safe, stay dry.
#wnn projects#regency era#regency wardrobe#regency sewing#regency stays#regency corset#regency short stays
3 notes
·
View notes
Text


Caesar A. Zeppeli. Making Caesar was quite fun. I was inspired by this piece of fanart (And I can't find it again and if you know the artist please let me know so I can properly credit them!)


Got my fabrics for the jacket. I went with a vinyl snake skin and sunflower lining to take inspiration from that picture.


Using a Burda pattern (I hate burda with a passion but I use it anyways) I laid out my pattern pieces onto the fabric. When laying your pattern pieces out, there's a long arrow on the pattern piece. This shows you the direction of the fabric grain to follow. Always lay and cut your patterns following the grain of the fabric unless you are making bias tape.

With the shell sewn, I then made the lining, turning the shell inside out, I put the lining in.


Lining was stitched into place by hand using a ladder stitch.


Jacket sewing complete, onto the button snaps.


The buttons I used the shell of those buttons you make by covering them with fabric, you know? I punched a hole in them and put in a snap then glued a large claw back (Claws removed) rivet to the top, Covered with worbla, primer/filler then gold paint. These are two for the front of the jacket, two for the front of the pants and two for the back of the pants.

Speaking of pants. His pants are..weird. Pants on pants. I first made a pair of knee length shorts. Then the pant legs with front and back drops were pattered and using another set of snaps that are washable, these were then put on top of the shorts attaching under the waistband at the belt loops.


The knee pads will then wrap around your knee creating giant pockets you can store all your stuff in.

Gloves were then made. Pay attention to the stretch of your fabric if it stretches. If it's only a 2 ways stretch, lay your pattern pieces so the stretch will be around your hand horizontal and not vertical up your arm. I made this mistake. I then added claw-back rivets for the knuckles.

Next came the covers made with 6mm foam sheet and worbla. Attached using industrial velcro.

The cuffs were also made. Primer/filler'd


Painted and complete.

2 notes
·
View notes
Text


WiP - Pre Black Order Glove for Allen
aka another basic I will use for several costumes to be added.
I have started the sketches for this back in July as I was in Bavaria and was not sure what to work on next but then decided to go for the sword, then came the Level 4 and all the cons and yeah... it took me a while to get back to it. I overall worked a weekend on the glove as I was (lol surprise) once again completely sleep deprived on the first day and had to push finishing back to the next one.
It was due the fact I attended a concert and my sleep schedule f'cked me over once again.


First of all I made a base pattern and then I did something I ... usually don't do. I made a mock up with fabric. Luckily I was able to use the Innocence arm I made back in spring to test around. And I don't trust gloves therefore I needed the mock up.


After some more testing I decided to work on the button next, that one was once again casted by @adragonstale for me, based on the master I made for the first Uniform last year.


I then pinned down my beloved (urgh) bias tape and made the mistake to start sewing. It looked nice, but .... i started sewing on the wrong side so I had beautiful corners on the ... hidden side and the others were not that nice...
I opened up the seams pinned everything down again and stopped for the day.


After a good hand full of sleep I continued the next morning, this time it went way better... I really should know I am horrible in regards of sewing when I didn't sleep enough.


Last bits were done by hand again C:
Here we are:


And worn with Innocence:


Done by 25/08/24
4 notes
·
View notes
Text
fully forgot i had created this blog very specifically to share my creations (most of them fiber or needle related) so i just spent the past couple of days mortifying every single one of my 20-ish bluesky followers with the saga of my sewing the megan cami top by loveless jamie in size 6


ive come to correct that mistake and hopefully start a diary of sorts of the projects/art/whatever i get to do this year and onwards
id been dreaming for a while of making a halter-grey-patchwork thing heavily inspired by jogakbo (a certain type of korean patchwork), more specifically these examples by youngmin lee:


so when i saw the megan cami pattern i kinda put two and two together and decided that 2025 would be the year i would get over my fear of fucking shit up and actually get to use my sewing machine for its intended purpose starting with a garment that felt simple enough for me to not be intimidated about it and complex/beautiful enough that id actually want to add it to my wardrobe
the pattern itself is very clear, instructions are easy to follow and i honestly had zero issue on that account, which surprised me because it was my first time actually printing, taping and following a pattern! i sized up on my measurements just to be safe and went for size 6 instead of 4, and the top fits me really well; still i might try to make one in size 4 just to check the fit for that one too
for the patchwork itself i gathered some grey/black linen and linen-like fabric and scraps i had gathered thinking about this precise project, and just got onto sewing tbh; i had some little prior experience with patchwork because last year i made some curtains for my house in this style but i mostly just went with the vibes for this step


(look at my curtains i love them)


some pictures of the patchwork coming together. i just kept adding pieces until the pattern fit on the fabric, taking care of avoiding seams where the darts were going to be, and trying to minimize them on the neckline as well to avoid unnecessary bulk.
the pattern itself asks for the top to be lined but a) im sweaty and b) i dont really like lined garments for the most part, and in this particular case i wanted for this top to feel breezy and light, so instead of closing the seams with the lining and sandwiching the straps between those layers, i made things unnecessarily complicated for myself and did the whole thing with homemade bias tape. i also ignored the strips instructions and chose to use the bias binding of the armholes as ties to adjust how high/low i want the neckline to be on any given day


it mostly went well! i looked up how much sewing allowance the pattern had, cut that up, pinned the shit out of the things, and even if there is a bit of gaping at the armholes i feel really happy about the result!


and that was that! its still missing my hand embroidered tag where i put my name and the date of completion (which i will update once its done), but otherwise i begun and completed a fully wearable garment in 2/3 days :] pretty pleased with myself over this one and pleasantly surprised to discover i can manage to make alterations to a pattern and still end up with something nice
1 note
·
View note