#i had to resize these for tumblrs file limit so they might not be the best quality.
Explore tagged Tumblr posts
Visit Tumblr Blog
Explore Tumblr blogs with no restrictions, modern design and the best experience.
Last Seen Tumblr Blogs


Fun Fact
Tumblr was created by web developers David Karp and Marco Arment.
Text
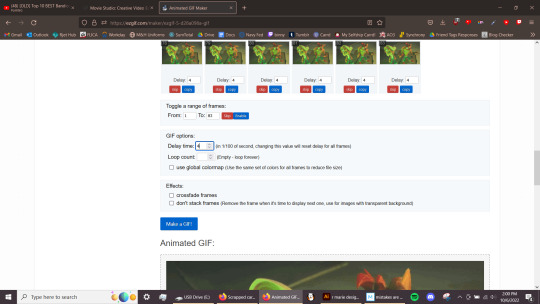
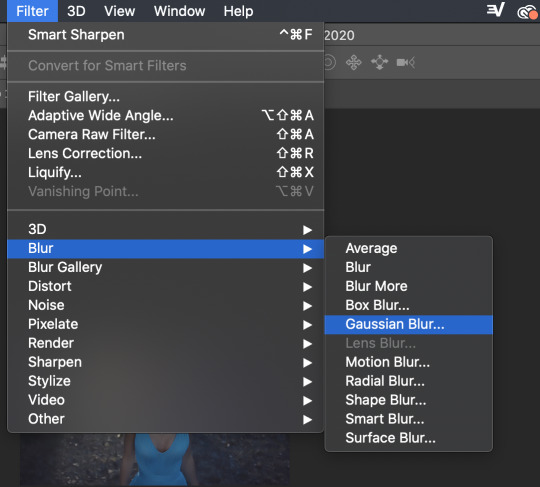
GIF MAKING IN PS
i've never done anything like this before so hope it makes some kind of sense.
so before you get into making gifs first thing so will need is some sort of editing software (i use ps 2022) and some raws obviously. most of the shows i gif are on yt so its pretty easy to get them and you can use any kind of yt to mp4 converter.
so once you have all of this i guess we can get started!!! on a daily basis i do not follow all these steps because you can easily turn them into actions on ps, which means that it would take just seconds. so although it may look lengthy its pretty simple
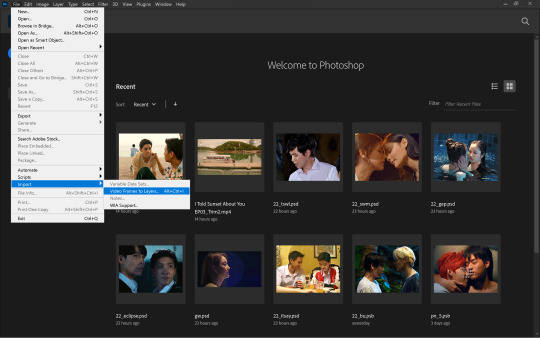
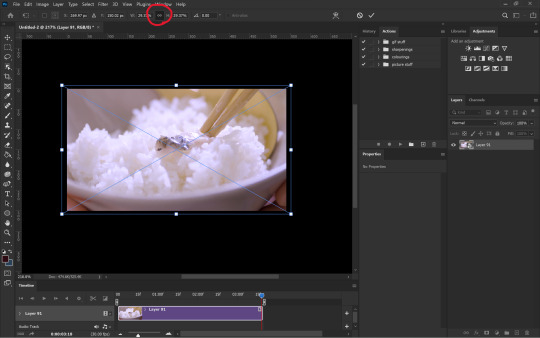
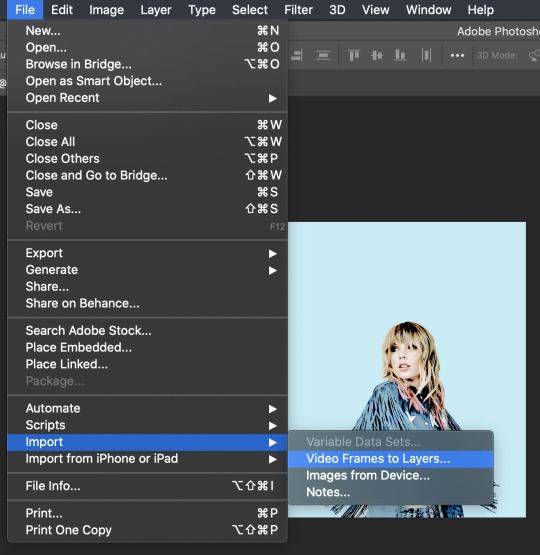
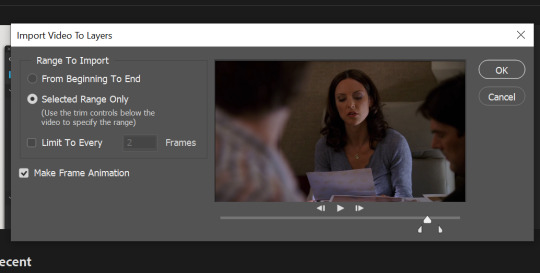
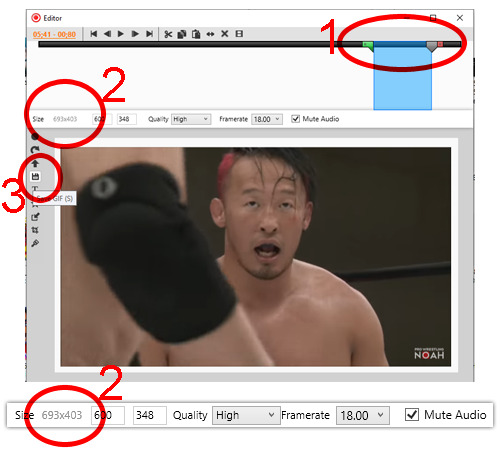
the first step to making gifs is importing the raws. you first want to go to file>import>video frames to layer. this will open up your file explorer from where you can choose your desired file. you may want to make sure your file isn't an mkv one but an mp4 before you do this. also if your raws are large, perhaps a whole episode or longer than 30 minutes, it might help to trim it down beforehand to make it easier to work with.
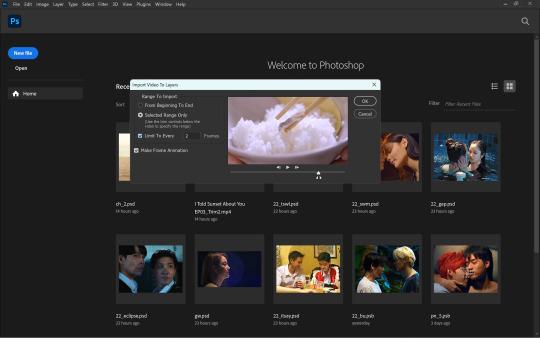
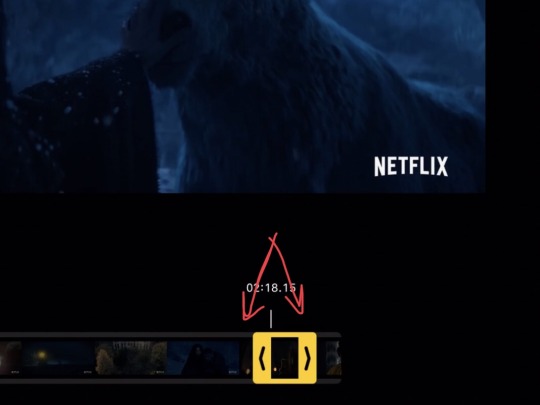
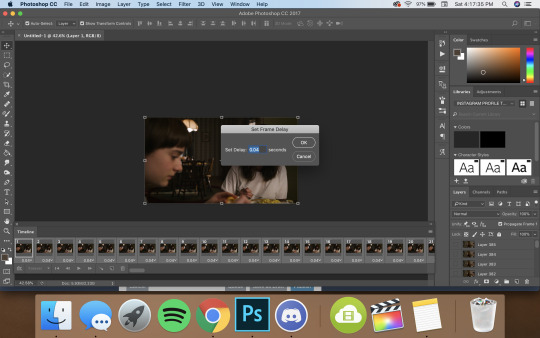
once you select your file, this window will open up. here, you can move the sliders to select the exact part of the clip you want for your gifs. (when files are larger, it would be more difficult to capture smaller parts of the clip using the sliders) although optional, selecting the limit to every 'x' frames will help reduce the size of your gifs while not making it look too choppy. i do 'every 2 frames' for regular scenes and leave it unchecked for anything in slow-mo. more than 2 usually makes the entire thing look sped up and choppy so i wouldn't recommend it. although it depends on the raws ideally you want something around 80 frames for one gif.
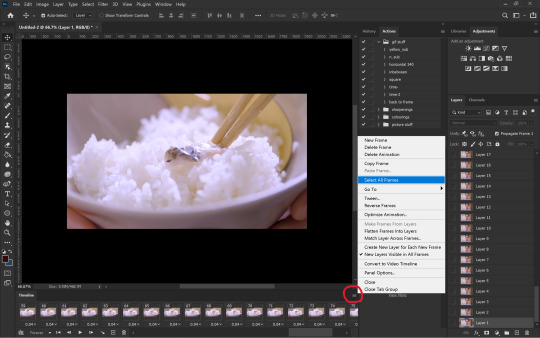
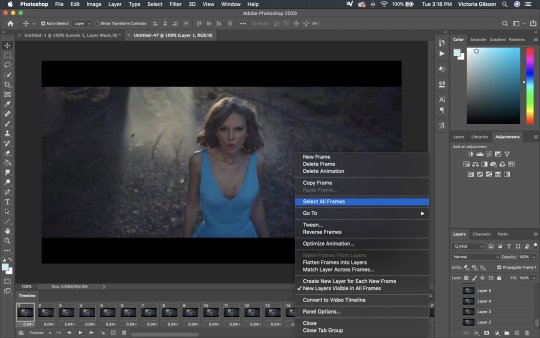
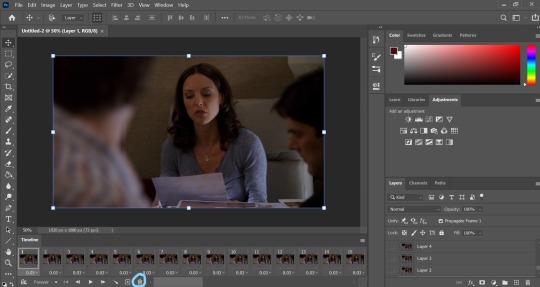
once you press okay on the above step, your workspace will open up and from here we can start making the gif. the first step would be to set the time delay. this is two ensure that the gif doesn't look sped up. for this you want to first select all the frames as shown above.
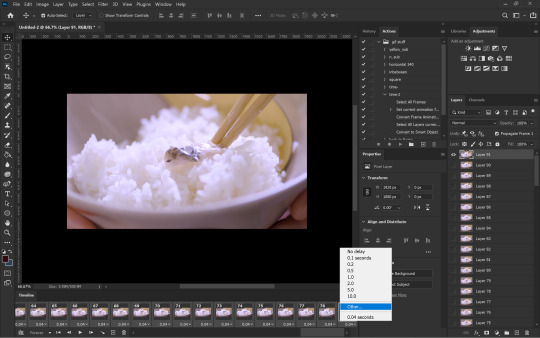
next, you can click on the downward arrow on any frame to change the time delay. i usually prefer 0.07s which you can set in other...
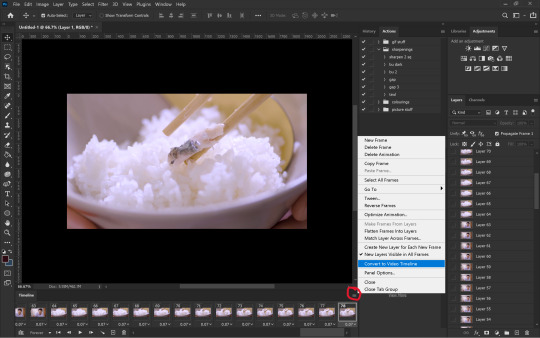
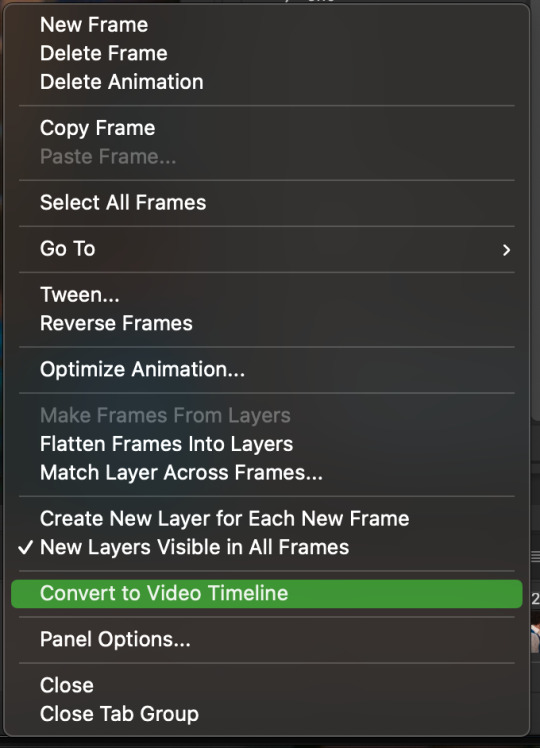
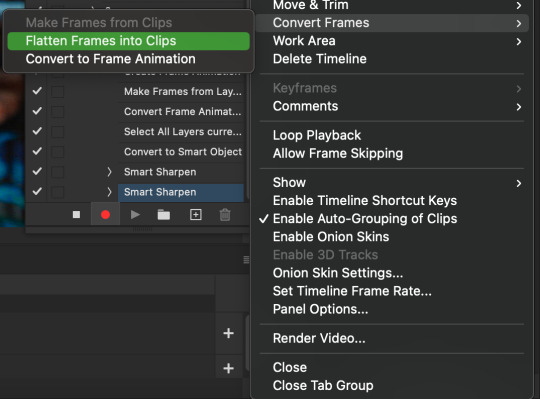
once you've set the time delay, you have to convert the frames into timeline as shown above.
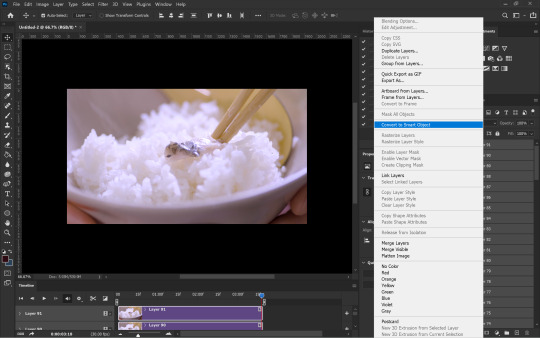
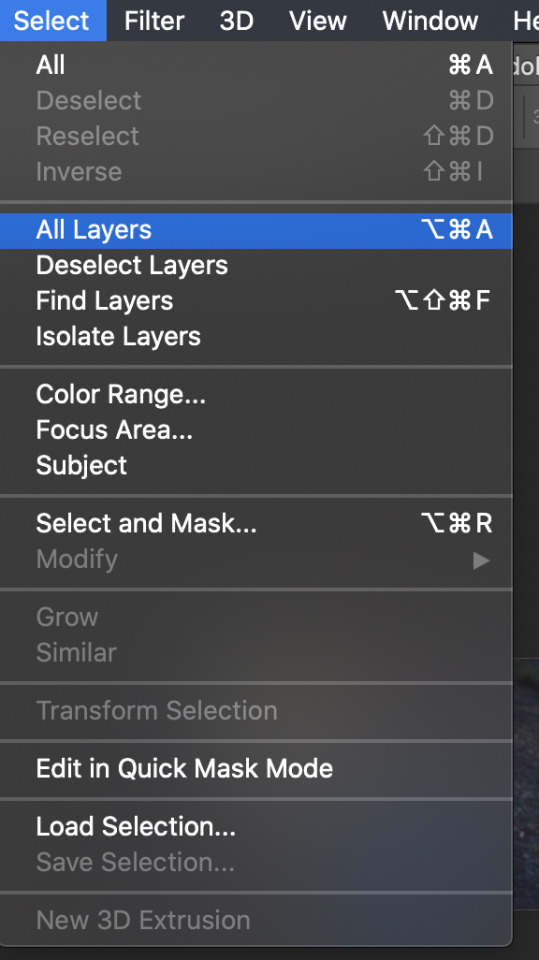
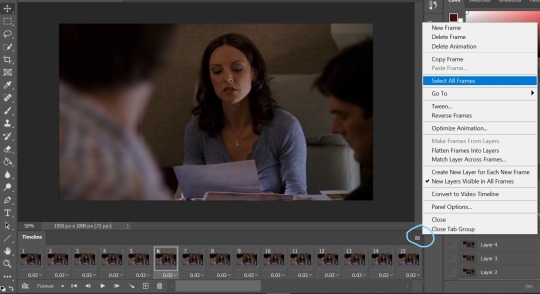
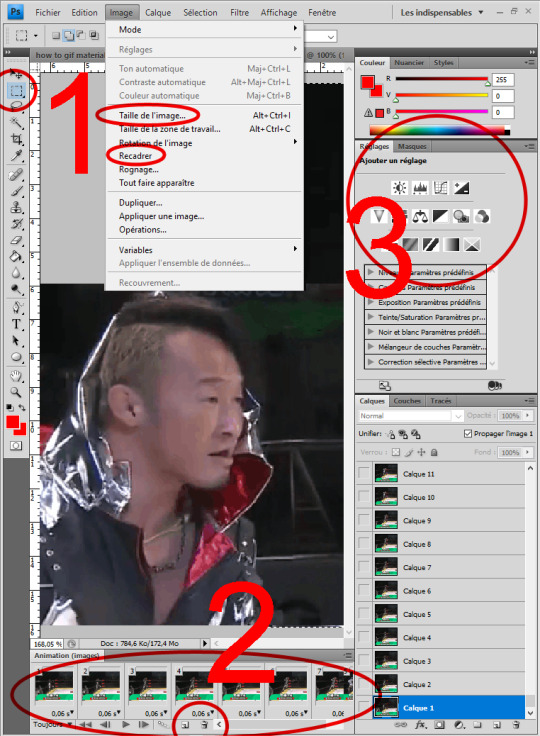
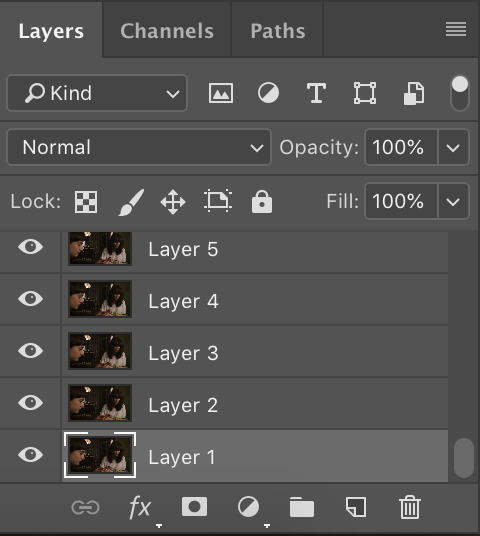
now that you have your timeline as seen on the left side, all you have to do is convert everything into a smart object. for that you have to first select all the layers using the shortcut Ctrl+Alt+A and then right-click on the layers followed by convert to smart object
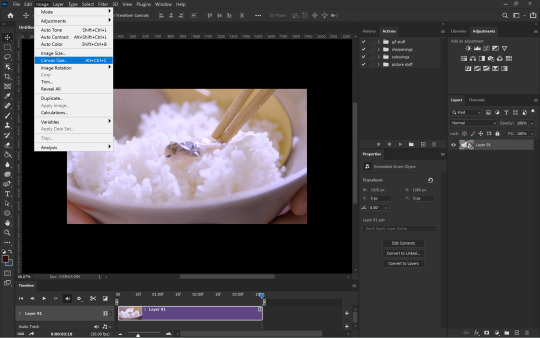
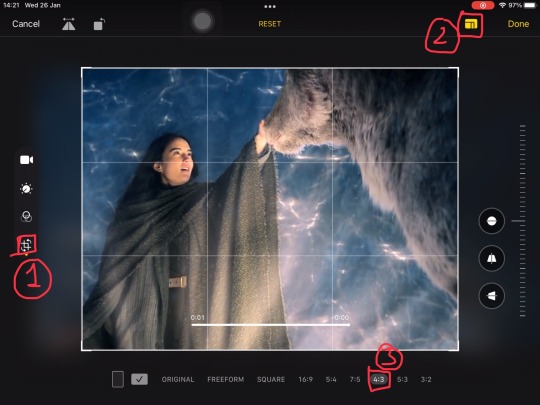
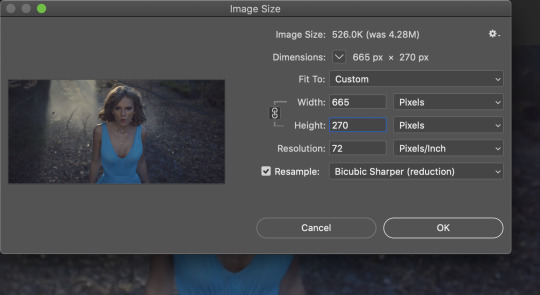
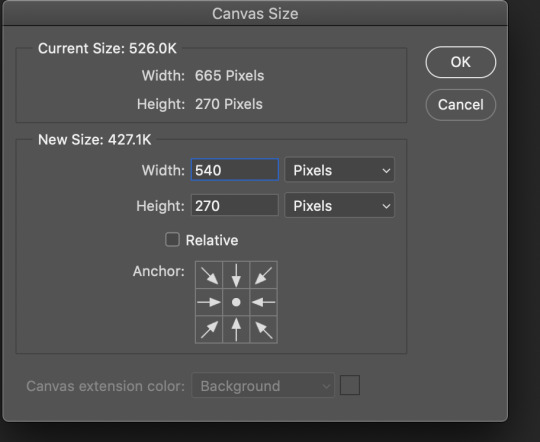
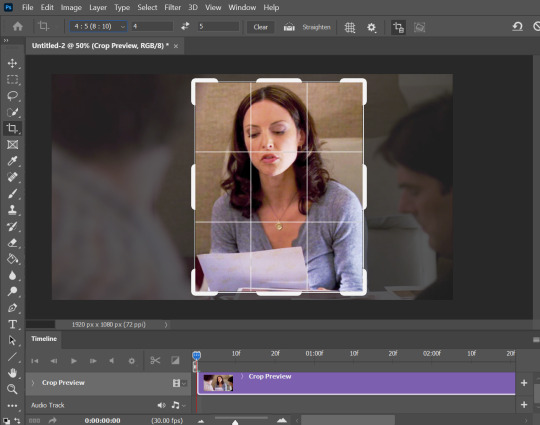
now you can see that the many layers have been converted into one layer making it easier to work with. the next step is to resize the gif. the original dimensions would make the gifs too large to fit tumblr's size limit, this can be done by going to image>canvas size
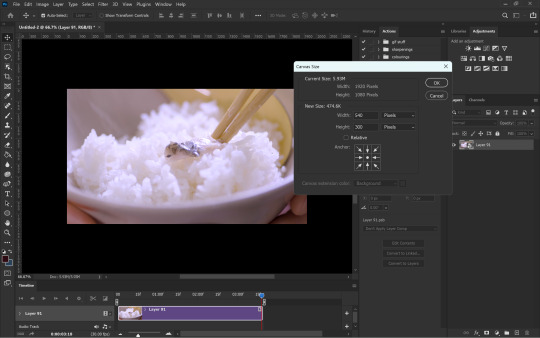
to ensure that tumblr does unnecessarily crop your gifs you want to make sure width is always 540px if there's going to be only one gif in a row. the height can be anything depending how you want your gif to look.
you can adjust the gif onto the new canvas using Ctrl+T to transform the layer. always ensure the height and width are linked to make sure you don't squeeze the image weirdly.
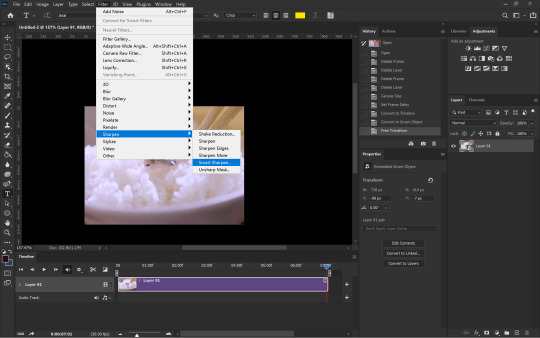
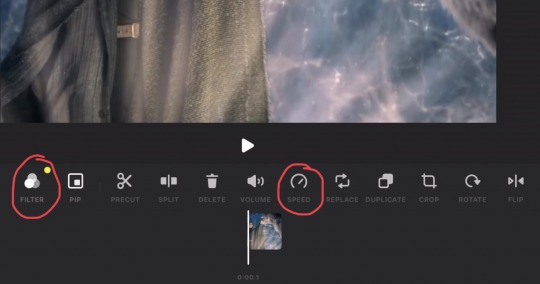
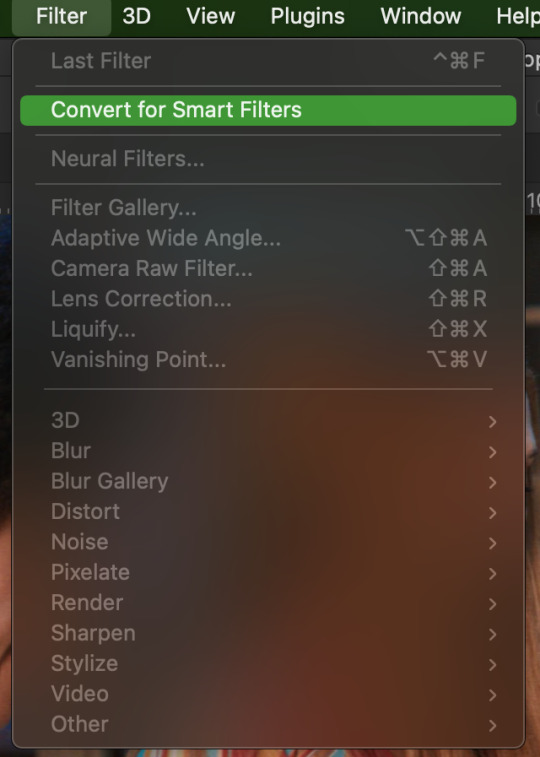
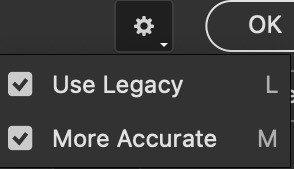
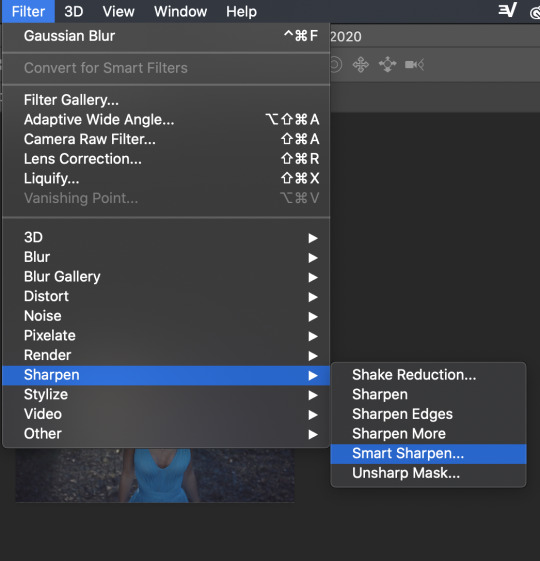
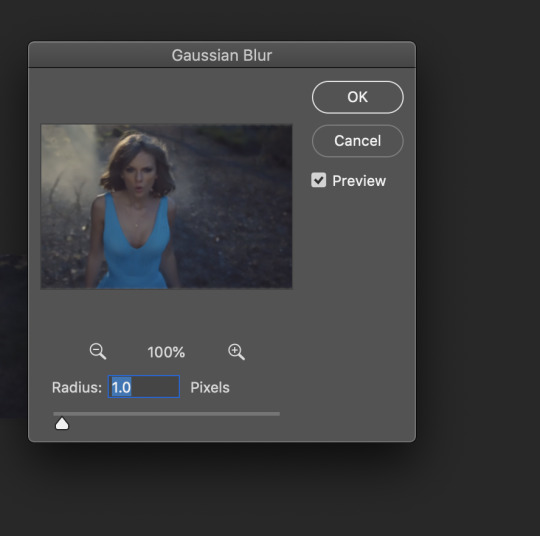
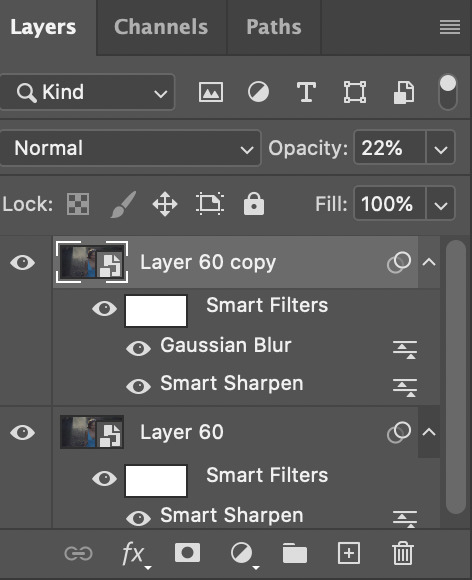
after resizing the gif, i next sharpen the gif (which is my least favourite part). you can sharpen by going to filter>sharpen>smart sharpen while the noise filter is in filter>noise>add noise
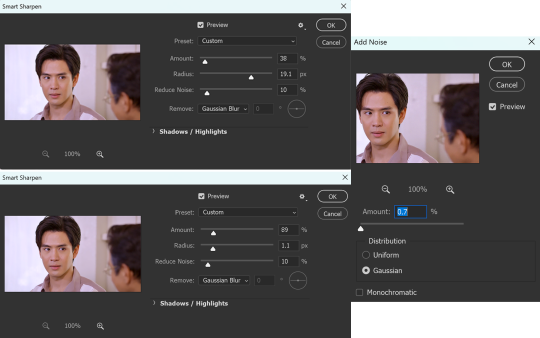
although i don't always stick to the same sharpening, these are the settings i use the most.
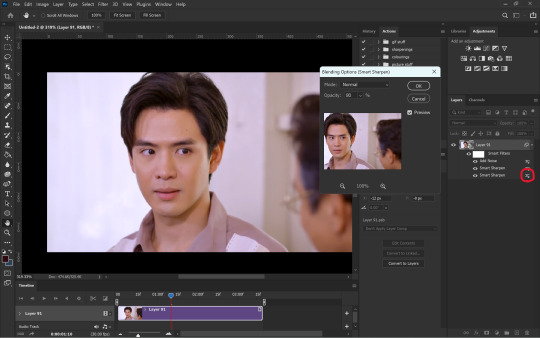
once i'm done with the sharpening i like to soften the first smart sharpen filter. for this i change the blending option of the first filter to 80%. this is entirely optional.
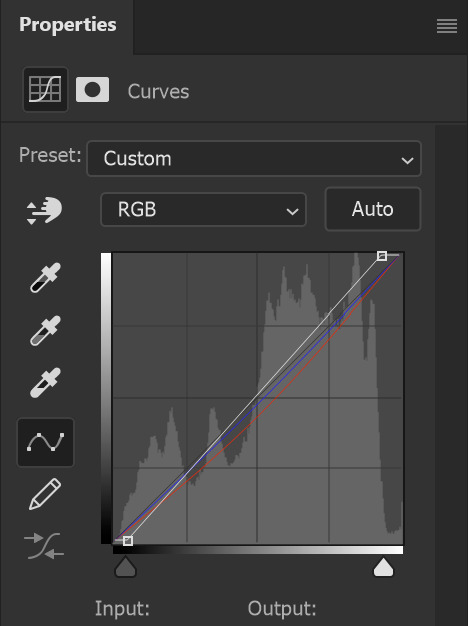
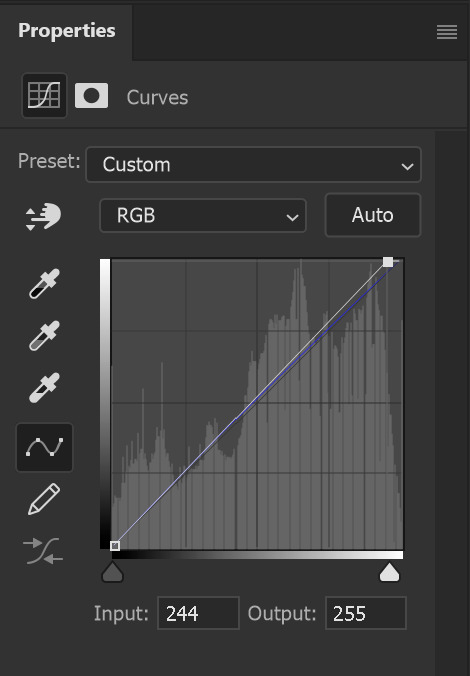
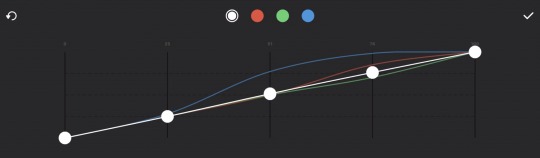
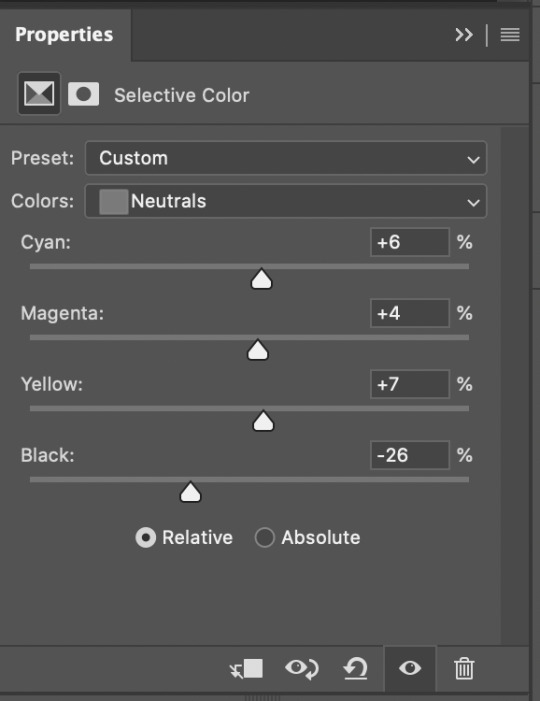
once sharpening is done, you can colour and edit however you like using any of the adjustment layers. i mostly prefer curves and selective colour. these are the curves i used for this particular gif to remove the purple/redness it had going on. in RGB mode the white slider adds brightness and the grey one darkness/contrast. then you can individually use the red, green and blue modes to adjust the colours. i only used selective colour here to adjust the skin tones a bit so i haven't added that.
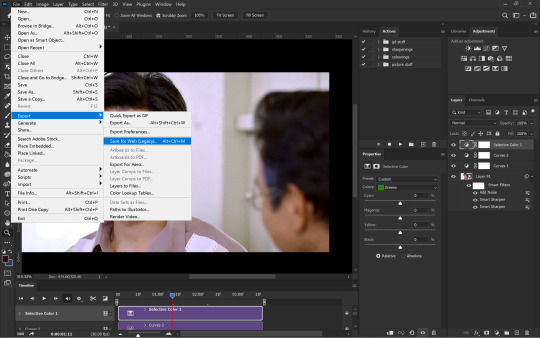
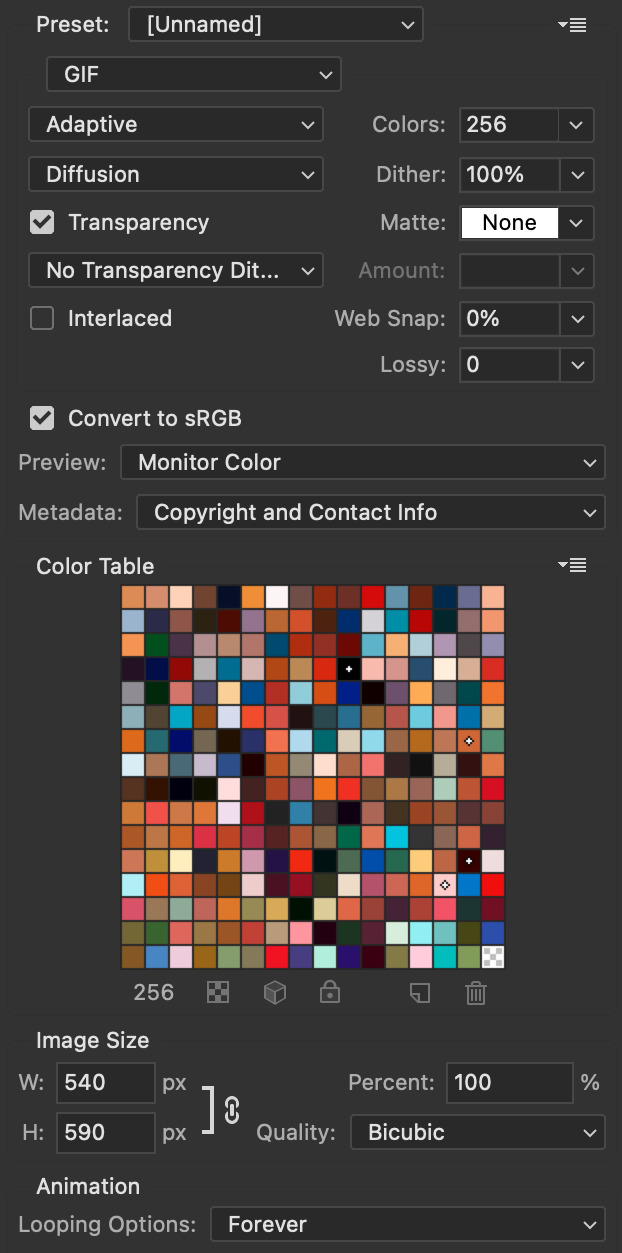
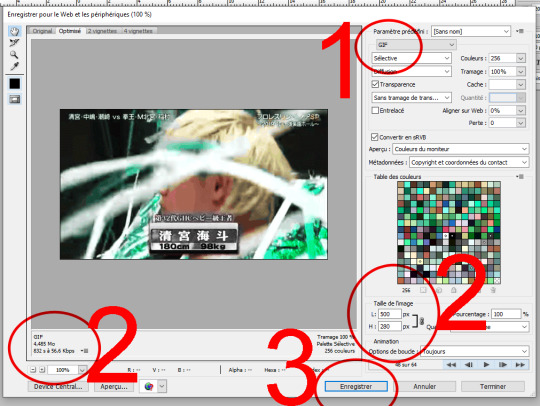
once done with colouring all you have to do is export the gif from file>export>save for web (legacy)
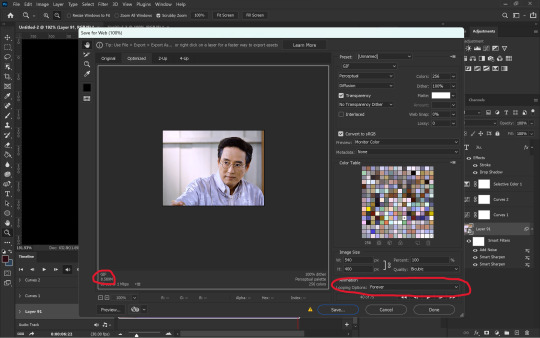
in the last window you have to make sure your looping is forever and that your gif is below 9.5MB. although tumblr says max gif size is 10MB, at least for me nothing over 9.5MB uploads.
and THAT'S IT (i say after a whole one page essay) your gif is ready!!! honestly i don't know if this is the easiest or most convenient method but this is just how i do it. also i use actions for everything other than colouring so it isn't as time consuming as it looks. you can also set shortcuts for importing and exporting to save time. this can be done from edit>keyboard shortcuts
since you made it to the end here is an extra bit on captioning
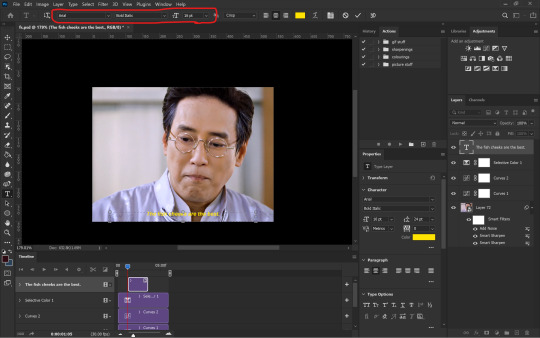
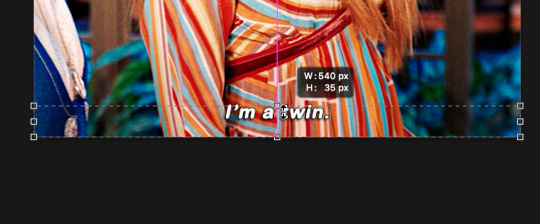
you want to start with a normal text layer and center it at the bottom of the gif. i use arial bold italic in size 16. next to make it look better we can add an outline and shadow to it through the layer style. and you can open up this window either by clicking the fx option at the bottom right or double-clicking the text layer.
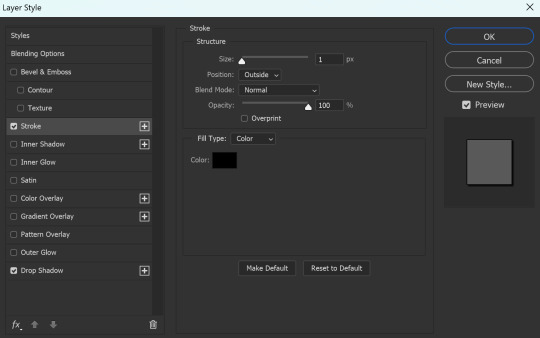
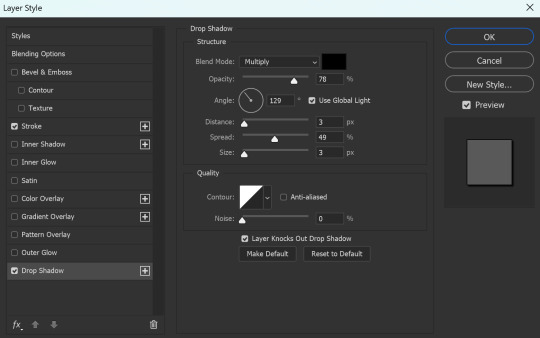
these are the settings i use for the stroke as well as the shadow
now it is ACTUALLY the end!!!
#gif making#ps tutorial#gif making tutorial#photoshop tutorial#hope this makes some sense 😭#i made the important stuff bold so that you don't have to necessarily read through the whole thing#i had to go take a look at my actions cause i had actually forgotten my settings in the first place
91 notes
·
View notes
Text
hello all! so i’ve been making gifs on my sad little ipad air 2 for almost 2 years now, and i’ve learned quite a lot in those times, often through trial and error. i know there’s lots of people out there wanting to learn how to gif, but not being able to afford a laptop, or not being able to download photoshop, etc. so i thought i’d share what i’d learned about giffing on iOS devices! note: i don’t have and have never had an iphone, so i am not certain about what works for them, but i guess that anything which works on an ipad, will also work on an iphone! so with that said, let’s get into it :)
this is going to be quite a long and image-heavy tutorial, so i’ve put the rest under a read-more :)
you will need:
an iOS device (not sure how this works on all devices, but i think as long as it’s still receiving software updates, you’ll be fine!)
app: inshot
app: vont
optional: a VPN
youtube app or download folders (will be explained!)
these are all the steps i go through when making a gif and the apps/websites i use for them. in this post, i’ll be explaining all of them:
choose & download video (youtube/mega/gdrive)
trim & crop video (photos app)
colour & overlay (inshot)
text (optional) (vont)
convert video to gif (ezgif)
resize (optional) (ezgif)
post! (tumblr site)
without further ado, let’s get into it!
1. CHOOSING AND DOWNLOADING THE VIDEO
there are two ways to find and download a video to gif: through youtube or through download links like mega or google drive. here, i’ll be explaining both of them.
1.1. downloading via youtube
first, find the video that you want to gif. always make sure the quality is high enough! 1080p is the best, and you should always try to find it. 720p is also doable but really the minimum, anything below that is basically not worth it.
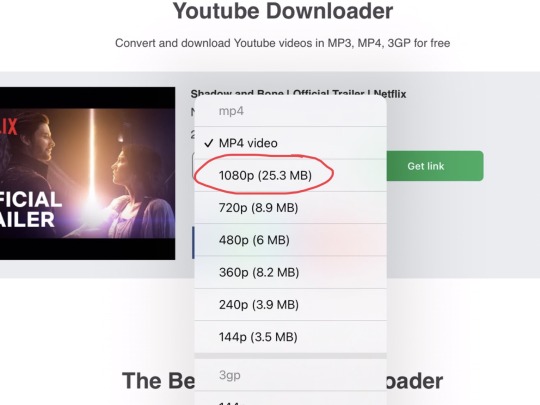
copy the link of the video you want to gif, then go to https://yt1s.com/en130 to download it. (you may need an adblocker to block the popups, but clicking them away works as well, for the rest the site is super clean!)
paste the link into “search or paste youtube link here” and press convert, then in the drop down menu, select the highest quality possible (preferably 1080p, as said before).
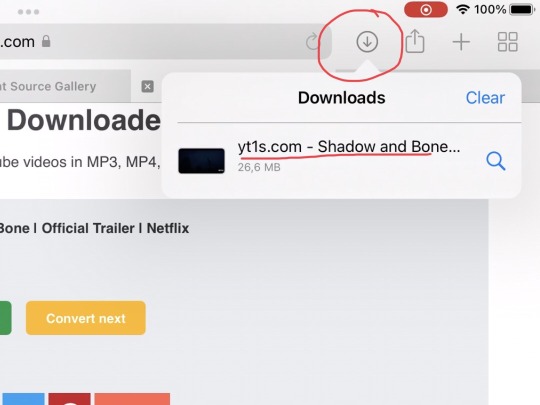
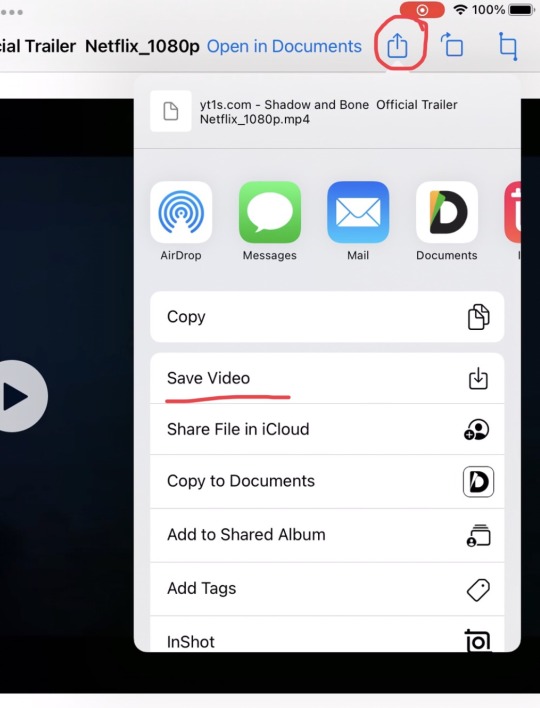
press “get link” and then press “download”. a popup will appear, asking you to press download again. if you press this, an arrow symbol will appear next to the search bar at the top. press this symbol, select the video, then press the “send” symbol and choose “save video”. the video is now saved to the photos app!
1.2. downloading via download folder
download folders work in a pretty similar way to downloading youtube videos, the hardest part is just finding the folders! for this, i recommend either asking some friends or mutuals (especially if they make high quality gifs – very likely that they’ll have some hq torrented shows or movies) or look around on several download or logoless twitters, like downloadinhd, logolessdesires or logolesspro. these accounts do often compress the files, so the quality might be a bit lower than it should be, but it’s definitely better than nothing!
both mega and google drive folders work basically the same way: select the file you need and find a download button somewhere. after this, it’s basically the same steps as the last part – find the video in the download part next to the search bar and save to photos.
TIP: if mega stops you from downloading because you’ve exceeded the download limit, you can use a vpn to mask your IP address! some free ones are windscribe, justvpn and urbanvpn, but if you have some money to spare, there’s excellent paid ones like expressvpn, surfshark or freedome.
2. TRIMMING AND CROPPING VIDEOS
we’ve found all the episodes or videos we want to gif! cool, now it’s time to find all individual scenes so that we can start editing. to trim and crop the videos, you don’t need a new app, this can just be done in the normal photos app!
if you already have an exact scene in mind, you can just go to that timestamp immediately, but if you’re still not sure, just scroll through the video to find some good ones. to trim the video down to the scene that you want, use the edit function and move the arrows at both sides of the video to the exact start and end point of your scene. if you want to be more accurate, press and hold the arrows to lower the timespan that they are editing at that moment.
after you’ve trimmed the scene you want, go to the cropping setting and choose a predetermined ratio to crop the video in – this way, all the gifs you crop will be the same size. i usually use 9:16, 4:5 or 3:4, but anything works!
3. EDITING (COLOURING/OVERLAY) editing!
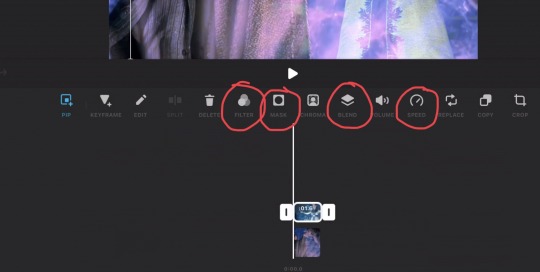
now we’ve done the boring stuff, we can start having fun !! we’re gonna start colouring the video now and optionally adding an overlay, which we’re going to do with the app “inshot”, which you can download just from the app store! this app has a pro-version which unlocks some of the editing options and removes ads but it works just fine without – i would only consider buying it to remove the ads but just putting your device in airplane mode fixes that as well, so it’s not really worth it imo! this app does both editing and overlays, so i’ll be explaining how both of those work.
first, start by pressing “create new video” and choosing the clip you just trimmed and cropped.

3.1. editing and colouring the video
all actions to edit the video can be found at the bottom. first, start with slowing down the video to about 80-60% of the original speed, it looks much smoother and nicer in a gifset!
after this, you can start colouring, by going to filter > adjust at the bottom. this gives you a new set of actions to use.
first, put up the sharpness to about 20-30, depending on what looks best. don’t go much higher than this though, it won’t look great lmao.
then play around with the brightness, contrast and saturation. you can do a lot with these already: to make a black and white gif, for example, turn down the saturation completely and up the brightness and contrast a bit, it’ll look great already! if you’re not satisfied yet, though, don’t worry, all will be fixed in the next step.
we’re getting to curves now! they are the best thing in this app and pretty good for a photoshop replacement as far as i know. for this part, i can’t really tell you how to do it, you’ve just gotta play around with it for a while and get a feel for it! it takes some time, but practice definitely pays off.

3.2. adding an overlay
to add another video to the video you’re editing, press the “PIP” (picture in picture) action in the main menu. choose the video you want to insert and also slow this down to about 80-60% of the original speed. try to make sure both videos are about the same length, so you won’t have to trim it down again after you’re done.
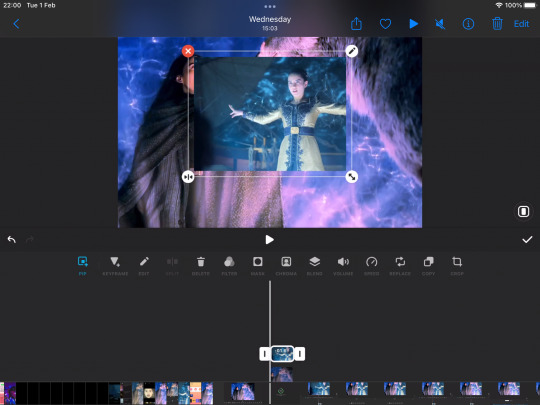
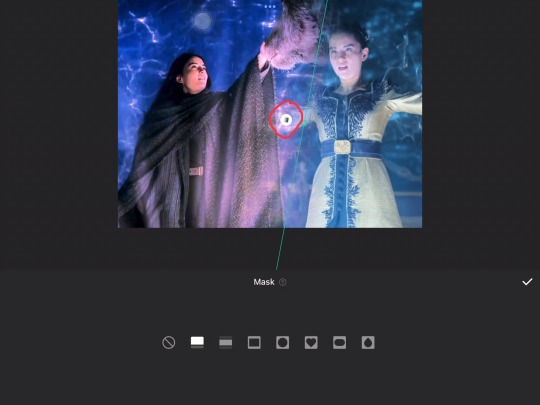
after this, size the video and move it to where you want it, then use the “mask” function to make sure only the part of the video that you want to see is shown. dragging the little symbol at the edge (shown below) lets you “blend” the edge of the video so it’s less of a line, more of a gradual transition
optional: you can also use the blend function on the PIP video to make it blend with the base vid! it doesn’t always look nice but there’s loads of different options to work with.
once you’ve positioned, masked and blended the video how you like it, you can edit it in the same way as the base video! once again, choose filter > adjust and follow the same steps used for the other video.
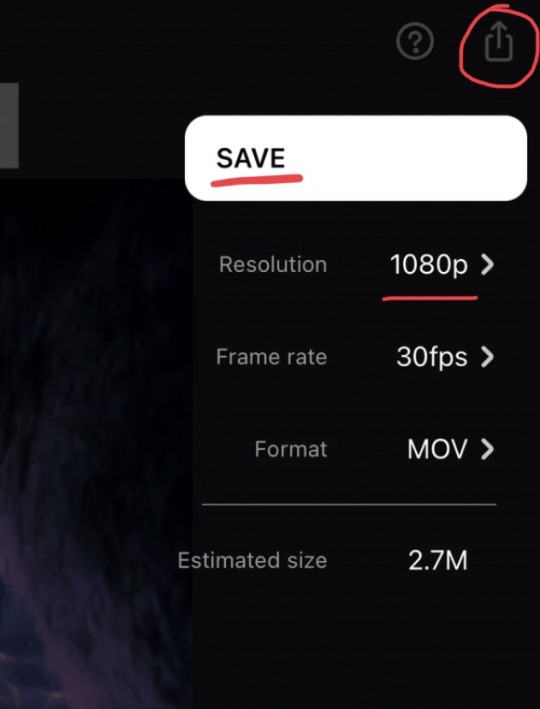
once you’re satisfied with the entire video, press the “send” icon at the top right, make sure the resolution is set to 1080p, and save! now you’re done colouring, it’s time for the next part (which is optional but very fun): adding text to your video.
4. ADDING TEXT
this is my favourite part! for adding text to your gifs, download the vont app from the app store. once again, this app has a pro version, but unless you really need to add more than 4 textboxes per gif, the free version works fine! the ad problem can again be fixed by just putting your device in airplane mode, and even the four textboxes per gif problem can be worked around by clever placements and multiple sentences in one box. now, let’s start!
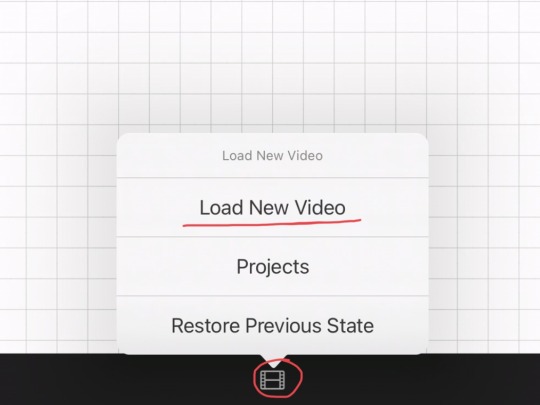
open the app and press the video icon at the bottom, then choose “load new video” and select the video you edited in the previous step
press anywhere on the video; a pop-up saying “add text” will appear. press this and type the text you want in the textbox that pops up
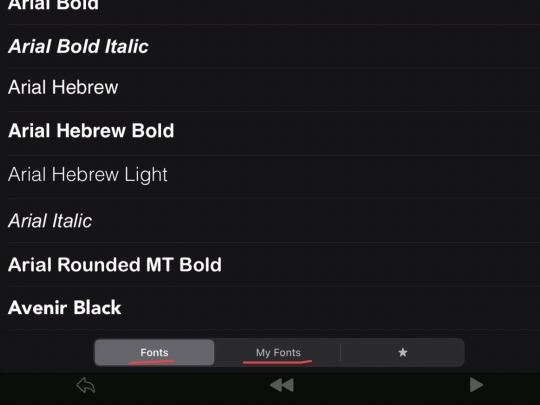
choose the font you want in the “font” menu - there are not going to be any fonts in the “my fonts” section when you start, these can be downloaded from various font packs readily available on tumblr (i recommend checking @fontarchive out for something to start with! if you would like more, feel free to hmu, i am sure i have some links laying around)
to download a font, get a dropbox link or any other link, press a download button somewhere on the page and it will be saved to the “files” app
to add the font to the vont app, find the font in your downloads, open the file, press the send icon at the top and then choose “open with vont”
the app will give you a button saying “add to vont”, press this button and you’re done!
change the size of the text with the “size” button, then slide it around or use the “move” option to position it to where you want it (tip: use “layout” to get a text to be positioned exactly in the middle)
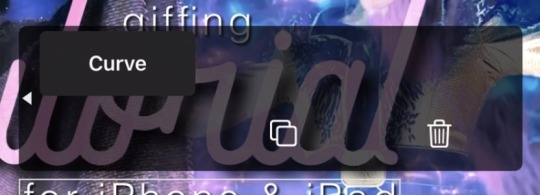
you can tilt the text as well, and curve it to form a circle if you want (make sure to swipe the actions menu, the curve option will show up!)

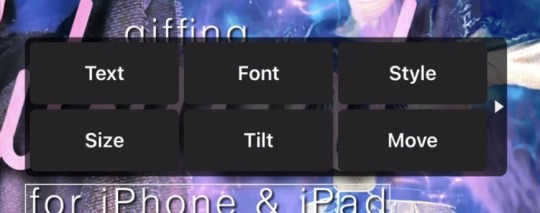
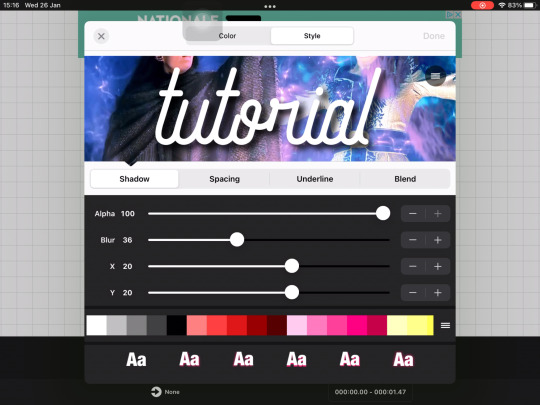
use the “style” option to change the colour, drop shadow, stroke, background, spacing and blending option of the text (another tip: always add a drop shadow to the text! it makes it so much easier to read, and if you change its colour, it can be part of the colouring of the set as well)


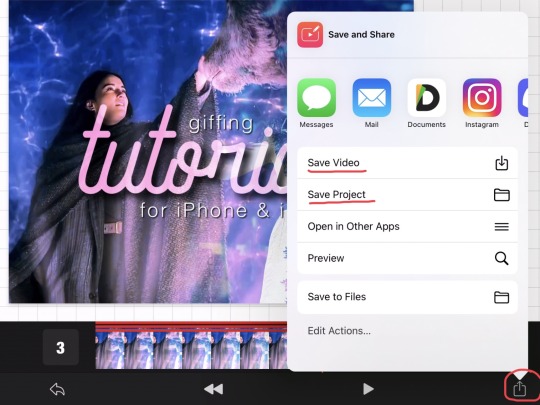
when you’re done, press the send icon in the bottom right corner. first, press “save project” – this will save your progress in the app itself, so that if you notice something wrong after you’ve saved the video, you can always go back to change it. after that, press save video, and the video with text will be saved to the photos app!
5. CONVERTING TO GIF
now we’re done with the fun parts sadly, here comes the tedious part lmao: converting videos to gifs! this is one of the last parts, we’re almost there :)
open the website https://ezgif.com/ and go to the “video to GIF” tab in the header
upload your gif in the “Select video from your computer” box (then press “upload video”)
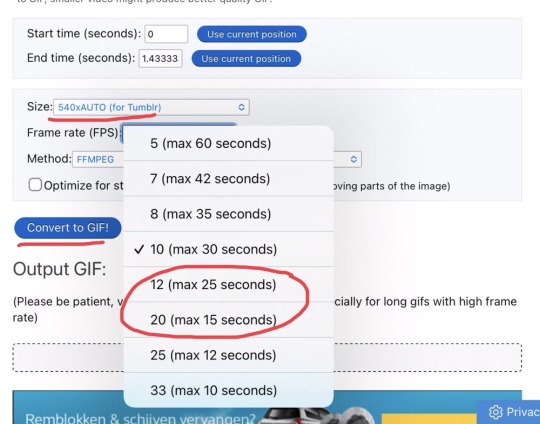
under the video, there is a drop-down menu to choose the size. now this depends on what size your gif is going to be in the gifset, but if you want only one gif per row, choose the 540xAUTO option (this also has “for tumblr” behind it, so it’s easy to find slfjdslk) if you are going for more gifs per row, just leave the setting as is, we will fix this next
under that is the frame rate option. i usually switch between 12 and 20 FPS, depending on the size of my gif in the end (it has to be under 10Mb for tumblr to upload it to a post)
if you’ve done this, press convert to GIF and longpress the converted gif to save to your photos app!
6. RESIZING (optional)
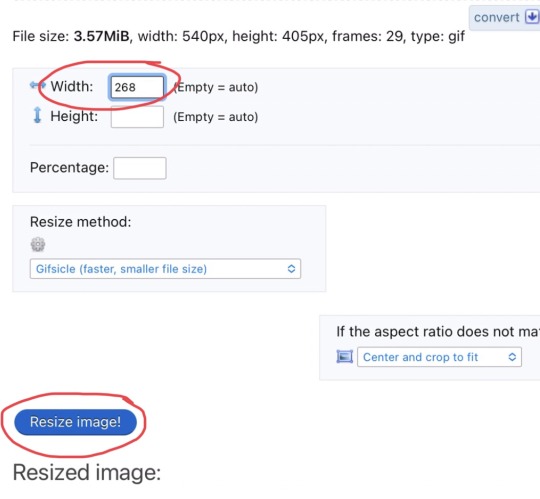
we’re almost done, just hang in there!! now we’re going to resize the gif if needed. this is because if you want to put multiple gifs in one row, they need to be a certain size, otherwise tumblr will compress the gifs and they will show up in a much lower quality. this post shows exactly what the dimensions should be per amount of gifs per row!
to resize the gifs, you can stay on ezgif, but this time choose the tab at the top that says ��resize”
upload the gif in the “upload image from your computer” box
fill in only the width dimension (the height one is not needed!) and press “resize image”
once again longpress the resized gif to save it to your gallery
7. POSTING
the final part! this part i also love, especially because i love editing the caption hehe, though deciding what to tag the post is not my favourite part lmao. for this part, a tumblr app is not recommended, as it does not have the different post types needed for a gifset, so we’re doing it on the website!
go to the tumblr website and log in
press the new post button and choose “photo”
upload your gifs to the post
if you have a laptop available, save the post as a draft on your apple device, and edit the caption and tags further on that laptop (it works much better!)
if you don’t, editing on mobile works fine as well, but it won’t let you add html captions (so the nice colourful gradients some people have, etc) but it’s obviously not required to do that, so this works fine as well!
tagging the post can be quite tricky, my go-to strategy is tag all the characters, ships and fandoms first, and then tag all sourceblogs that apply (some general ones are bbelcher, chewbacca etc. but there’s tons of sourceblogs for almost every fandom out there if you know how to look for them!) and lastly, tag some friends who will definitely like the post, so that they will surely see it :) it’s also smart to use a tag for your creations like mine, mygifs, *mine etc. so that you can easily find them all back!
when you’re completely satisfied with your caption and tags, press post, and.. you’re done!
i really hope i’m able to help people with this ! i spent a lot of time on this so even if you won’t use it, i would very much appreciate a signal boost <3 if anyone has any questions feel free to send me an ask or a dm, i’d be happy to answer all your questions!
lots of love and happy giffing, sas <3
#gif tutorial#tutorial#gif resources#completeresources#don't know if there's anything else i could tag sdlfkjdsk#*#resources
55 notes
·
View notes
Note
Hello! How are you? I'm sorry to disturb you, but I discovered your Tumblr profile not so long ago and I love your gifs, they're so beautiful! I wanted to ask you how you make them, what programs do you use and how to do them in order to upload them on Tumblr and make them work. I used to upload myself lots of gifs back in the day, but they were so bad and I always had problems with them not moving on the post.
I hope I'm not bothering you with this question. Thank you in advance for your response and I hope you have a great day!
oh, hello! 🥰 i'm doing alright! thank you sooooooo much for appreciating my gifs, it really means a lot to me 🥺 of course i will help you, as much as i can and don't worry you could never bother me!
first things first, i will provide you with some links to tutorials, my own gif making process was built on a bumpy road and by a method of trial and error LOL but don't worry if it happens to you too yeah? we're here to learn. here is my tag where i post or reblog photoshop/gif related stuff (there is not a lot but i will have to reblog all the tutorials i have in my likes, but that for later LOL) personally i use photoshop cc which i downloaded here, but in the tutorials i will leave for you you'll have a lot more of the versions and links to choose from. i use avisynth to resize my gifs without losing quality (download and tutorial) and a software called topaz denoise and clean which is a plug-in for photoshop, for quality control of my gifs, to get rid of ugly noise (download). and here is a tutorial how to use both in order to sharpen gifs properly. here is the first tutorial i would like you to check out, it's most similar to my own process because it includes both things i just mentoned, next two tutorials i recommend are this and this, they are amazing and everything here is basically covered, with exception there is a different process to it than mine because i rarely use screencaps to upload clips into photoshop, but it's a great way as well so definetely give it a try because you might like it more. as to why your gifs did not move after uploading, there might be a lot of reasons, starting from too large file (the limit is now 10mb) or lack of loop on the gif etc., but hopefully these tutorials will help you figure out what went wrong, i'm sure they will answer all your questions! 💞
here is also some additional tutorials for coloring: 1, 2, 3, 4
and something that might help with the issue you mentioned: 1
if you had any more questions in the future i will be always happy to help 🥰 have fun! thank you again and have a wonderful day as well please! ❤❤❤
#earlier today i had a small breakdown over my gifs and here you are complimenting me AND asking for advice!#how could i be sad ever again when people like you exist 🤧🤧#LOL sending you muuuch love!#anonymous#answered
9 notes
·
View notes
Note
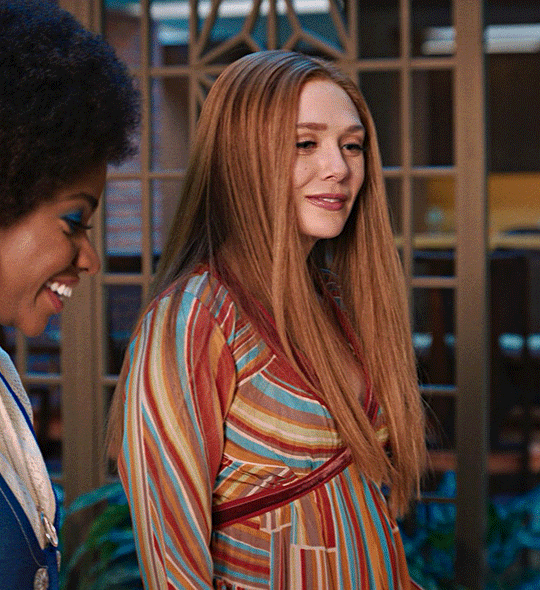
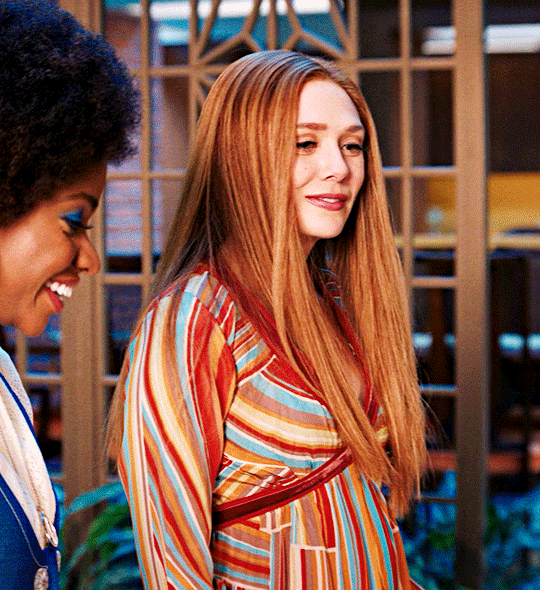
Hi Nia! You're gifs are so pretty! Is it possible for you to show how you get your WandaVision gifs too look so clear and hd? And how do you do your colorings too? (specifically the wanda maximoff in episode 3 gifset ITS GORGEOUS) I'm new to giffing and all the tutorials are kind of old. It's okay if you don't want to though! I understand it may be time consuming.
omg no! never feel intimidated to ask!! i don’t mind at all!
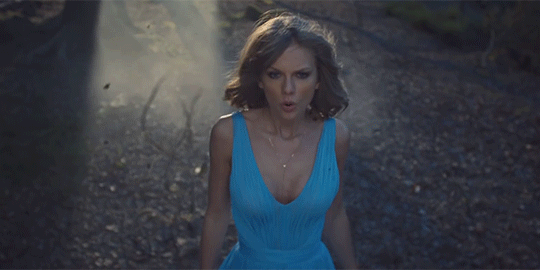
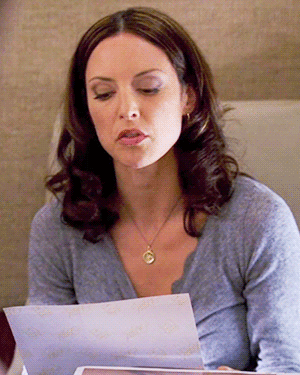
so, i’m going to show you how i made and coloured this gif
mostly bc it’s the only gif in that set w text and i’m going to share my text settings too!
tutorial is below :)
WHAT KIND OF VIDEOS ARE BEST?
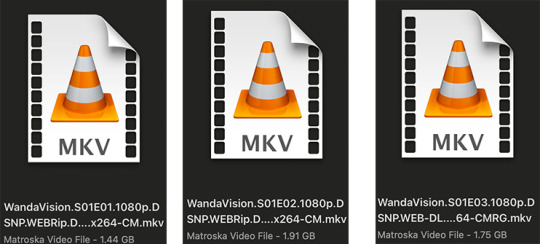
.mkv files (the bigger the better BUT i usually think anything above 5 gb is excessive and unnecessary for an episode of television BUT for a movie worth it) itunes downloads (logolesspro on twitter, hd-source on tumblr, live-action-raws on tumblr have some DEPENDING on what you’re looking for) (also, there’s a chance that if you search "show/movie hd download tumblr” you’ll find a tumblr with its itunes download available)
THAT IS IT NO OTHER TYPE OF FILES MAKE YOUR GIFS LOOK GOOD
- my suggestion is always if its new (like just came out the past month) t*rrent it! it’ll be downloaded quickly and .mkv files look the best! BUT if not check the sources above see who has the BIGGEST file if they even have what you’re looking for and then if not then you look to t*rrenting!!
here are the wandavision files i use so you can see!!
SCREENCAPPING
-if you have windows use potplayer! i have a mac so i can’t show you how to use it and it’s not available for me :( HOWEVER back when i had a windows potplayer was the best method in screencapping!!
-I HAVE A MAC! so i use mpv!! (go to mpv.io and follow the directions) BUT DON’T DOWNLOAD THE LATEST ONE (it has a bug that skips frames) try each before the latest one bc from what i heard different ones work differently for everyone!! and i don’t know which one i use (yikes!) THERE ISN’T THAT MANY I PROMISE AND IT’S WORTH IT BC MPV IS THE BEST (i used to use adapter but they didn’t take impressive screencaps in my opinion and it was evident in my gifs you can see it too! )
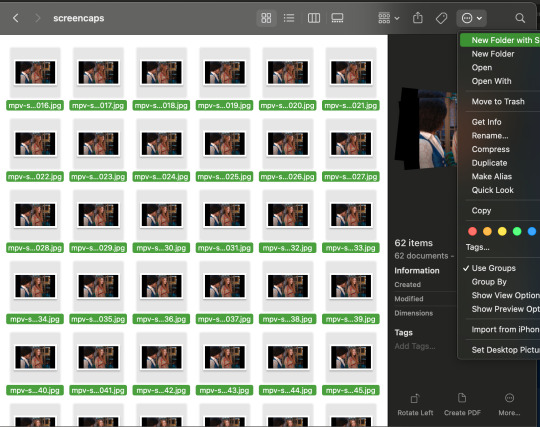
create a folder for your screencaps! and make sure to rmb the directory order! now we want to create a text file on our built in textedit app on mac! type up all this down below (i like jpg but you can replace jpg w png if you want) AND SAVE THE FILE AS mpv.conf THIS IS IMPORTANT SO DON’T FORGET IT! save it somewhere you’ll find easily and NEVER delete it until you don’t use mpv anymore
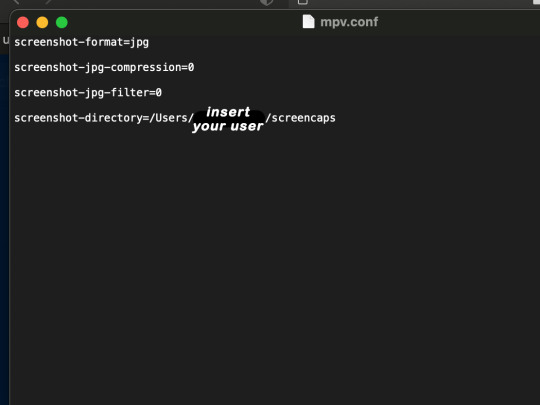
just in case you don’t know what to insert after, go to your screencaps folder
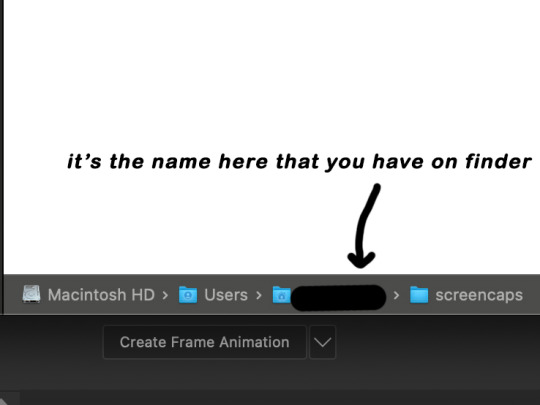
now you want to open mpv and go to the corner towards mpv -> preferences and they’ll tell you that there is no .conf file SO GO LOOK FOR THE TEXT FILE WE JUST MADE AND DRAG IT TO THE FOLDER THEY OPENED FOR US AFTER SAYING THERE IS NO .CONF FILE
(i learned all this from @kylos tutorial!! so if any of what i just said about setting up mpv makes NO SENSE to you check out their tutorial at kylos(.)tumblr(.)com/post/178497909311)
now we can screencap!
so let’s find the scene we want RIGHT BEFORE and MAKE SURE SUBTITLES ARE OFF
i pause and then press (option/alt + s) and then SCREENCAPS ARE BEING TAKEN!! and to end the screencaps being taken you once again press (option/alt + s)!!
now we want to delete the excess frames! and put it all into one folder!! DO NOT DELETE FRAMES IN THE MIDDLE OF WHAT YOU WANT TO GIF!! WHEN YOU SKIP FRAMES IT WILL BE NOTICEABLE!!

MAKING THE GIF
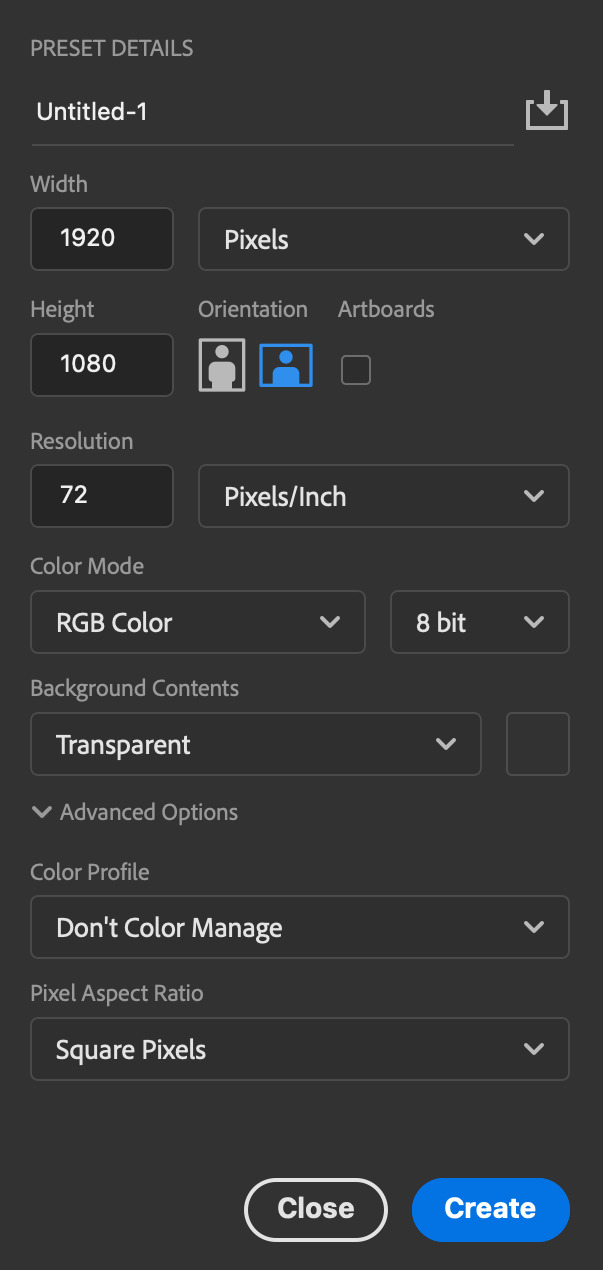
this method isn’t used that much BUT I LOVE IT so this is how i put my frames in! first i check to see the size of my frames: 1920 x 1080

so i create a NEW file on photoshop with those dimensions w these settings
now i set my tool on photoshop to path selection tool bc if you have it set on smth like move tool or crop tool at the end you might end up moving or cropping frames you don’t want to!

ok so now we select ALL our frames and drag it on top of our new file on photoshop and the MOMENT we see our first frame in photoshop JUST KEEP CLICKING ENTER until all the frames are loaded!!

you can do file -> scripts -> load files into stack but it is WAYYY slower in my opinion!
now i crop out the excess BUT i don’t resize the gif yet! the dimensions wandavision is filmed in is 4:3 so i go to crop and set the settings to this:

MAKE SURE IT’S ON RATIO SO WE’RE PRESERVING THE ORIGINAL SIZE JUST CUTTING OFF THE BLACK EDGES!! We are going from 1920 x 1080 to 1440 x 1080 this is the dimensions after i cropped

WE ARE KEEPING THE QUALITY BY NOT CHANGING THE DIMENSIONS OF ANYTHING INSIDE !!
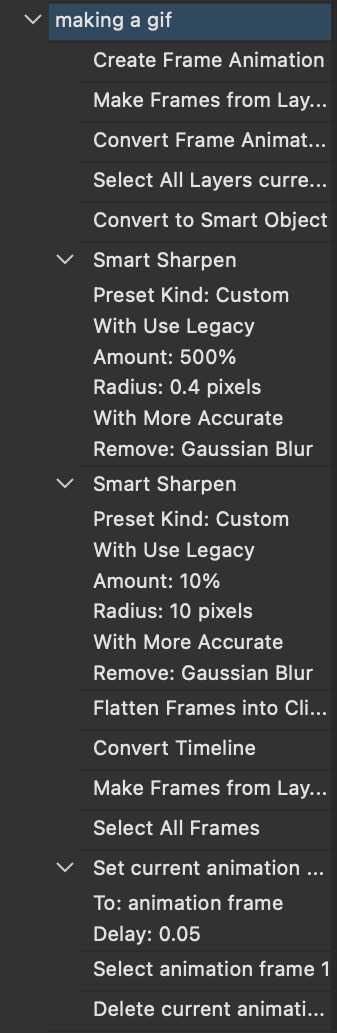
now we want to go to actions and create an action!! open up actions w one of these two depending on what your dash looks like!!


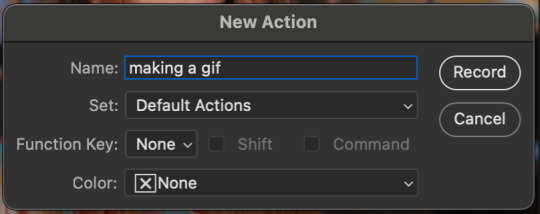
so we create an action with this button on the bottom of actions and we’re gonna title it making a gif and hit record!!

NOW LET’S GOOOOO!!
1. make sure you have timeline on your dash!

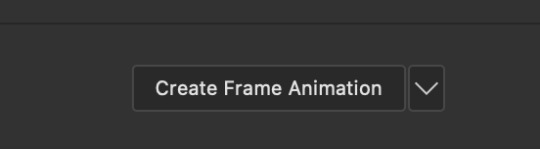
2. create frame animation (if you see create video timeline just click the arrow next to the button to see your other option which is frame animation!!)
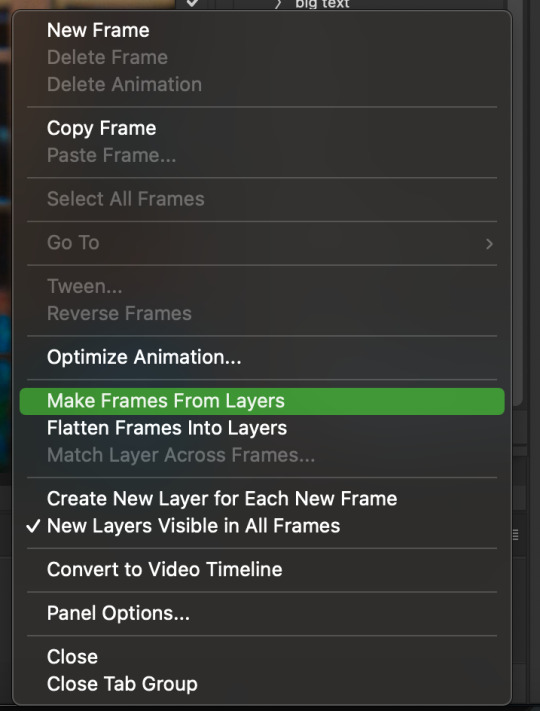
3. now let’s meet our best friend!! the little bar in the top right corner that has all the commands for making our gifs and MAKE FRAMES FROM LAYERS
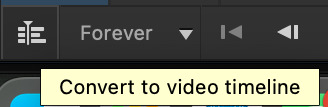
4. WE HAVE TO SHARPEN OUR GIFS NOW BUT TO DO THAT WE NEED TO CONVERT TO A SMART OBJECT SO NOW WE ARE GOING TO CONVERT TO VIDEO TIMELINE there are two ways: the button in the bottom left corner or the button in the top right corner w all the other commands!
5. select -> all layers DON’T MANUALLY SELECT THEM ALL BC THE ACTION WILL ONLY SELECT THAT SAME NUMBER OF FRAMES SO IF THERE ARE MORE FRAMES YOU WON’T GET THEM IN THE SMART OBJECT!!

6. filter -> convert for smart filters
7. NOW WE SHARPEN!! (filter -> sharpen -> smart sharpen) i sharpen twice!! first, make sure we are on legacy w more accurate and remove gaussian blue! the first sharpening will be 500% with 0.4 px radius. NOW SHARPEN AGAIN (filter -> sharpen -> smart sharpen) also w legacy, more accurate and remove gaussian blur BUT this time 10% with a 10.0 px radius!


8. it’s hd now!! so let’s flatten frames into clips!! go to the top right magic button again!! and you should see a pop up saying layers are being made

9. now we convert back to frame animation w either the bottom left button or our magic top right command center!

10. make frames from layers

11. select all frames w our magic command button
12. set the animation delay to 0.05 THAT IS THE BEST ONE ALWAYS ALWAYS ALWAYS only use 0.06 when the character is moving really fast in the video itself and it makes the gif itself look awkward BUT NEVER GO ABOVE 0.06 it’ll look slow and laggy and we don’t want that and don’t go below 0.05 bc then it’ll be tooo fast and we don’t want that either!


13. now delete the very first frame on the timeline bc it is an oversharpened duplicate of the second frame! end the recording w this button!

this is what your action should look like expanded! if you made mistakes on the way and it shows up you can just click the specific step and press the trash can on the action tab to delete in from the order!!
NOW AFTER LOADING YOUR FRAMES AND CROPPING THE EDGES OF YOUR FRAMES IF YOU NEED TO JUST PLAY THE ACTION AND THEN YOUR GIF WILL BE MADE FOR YOU!!!!
now i delete some unnecessary frames in the beginning and end and this is what my gif looks like (the size was 46 mb and the limit is 10 mb so the dimensions of the gif are 540 x 405 to get it to 5 mb BUT I HAVEN’T CROPPED IT YET SO THIS IS ME CROPPING JUST TO SHOW YOU WHAT IT LOOKS LIKE)

CROPPING THE GIF
in my opinion if you want your gif to look hd you shouldn’t crop before you sharpen!! i believe that if you crop before you sharpen you don’t allow photoshop to sharpen all the pixels whereas if you crop beforehand there is less to work with!!
dimensions is all up to you!! just make sure to go by tumblr rules!! 540 is the max width and if you want to make two gifs per row then my suggested width is 268 and for three gifs per row my suggested is 177 px! Just have the right width and the length can be whatever you want!!
now i’m going to crop my gif to 540 by 590!!

NOW THIS IS WHAT MY GIF LOOKS LIKE!
COLOURING BASICS
let me show you the best adjustment tools in my opinion and a brief explanation for what they do!!
brightness/contrast: pretty simple increase/decrease the brightness/contrast BUT one of my techniques for when i first start colouring a gif is i select all my frames and do nothing to the settings of the adjustment but i set the layer to screen LIKE THIS

curves: ik others use curves to change brightness/contrast w the squiggly thing BUT i like it to set a white point and black point, this is also a technique i use when i first start colouring a gif when screen doesn’t look good for me SO you use white point to select a pixel on the gif to set as the lightest color on the gif (setting the white point) and you use black point to select a pixel on the gif to set as the darkest colour on the gif (setting the black point) usually the white point makes it TOO bright and that’s why we use the black point to counter it and same goes for when i use screen with brightness/contrast, it gets too bright so i use black point to counter it below is the button for white point and the button for black point, respectively they are shaped as color picker tools


vibrance: generally, i never use this except for color p*rn sets but they work really well in making colors seem more strong
hue/saturation: like vibrance, i never use this except for color p*rn sets but this adjustment is to help change the colors or hue of a color for example: turn blue into purple or turn a blue into a little lighter shade of blue
color balance: I ALWAYS USE THIS!! except for in black and white gifs BUT THIS IS MY GO TO AND IF I DON’T USE IT MY GIFS ARE JUST BLAND i feel like color balance is what essentially balances the colors on your gif and adds dimension to it, it makes your gif go from looking way too yellow to a more golden neutral look and it is an essential adjustment in my opinion
channel mixer: i rarely use channel mixer BUT it is so so useful when you are working w a dark scene just play w the settings and all of a sudden all the blue in a dark scene will be a little more yellow and red and your scene will kind of just look brighter and more visible
selective color: THIS IS ALSO AN ESSENTIAL this helps SPECIFIC colors pop you’re working on a scene where there is too much red on someones face you use this tool to remove the magentaness from the yellow section OR when you feel someones face is TOO yellow and needs more blush you add more magenta in the yellow section of selective color
gradiant map: gradiant map is perfect when you’re lazy if you feel like your gif looks more neutral and you want some red in it but you don’t want to mess with any other adjustments just set a red to black gradiant on soft overlay with a very low opacity and BOOM slightly red but not too much red added!
NOW TO COLOR THE GIF!
today i have decided to start with a brightness layer set on screen
and this is what we got!

now that’s a little to bright and washed out in my opinion SOOOO to counteract it, i’m going to use my black point tool in curves and i’m going to select this point on the gif (it’s better to choose smth in the background and not smth that’s paid attention to such as monica’s hair or either of their eyelashes)

now my gif looks like this! the base color is complete!

now i think i need to balance all this yellow and red! SOOOO WE GONNA USE COLOR BALANCE!!
i think the best way to use color balance is to keep swinging the balancer until you see what you like and then keep going midtones i think i want more red and i don’t want a cyan midtone and then for shadows i think i want more cyan to counter the redness of the gif but highlights i don’t touch that much NOW HERE ARE MY SETTINGS SO YOU CAN SEE

and this is what my gif looks like

now you can stop here if you want but in my opinion i think the gif looks a lil too dead still SO IMMA USE SELECTIVE COLOR
i think there needs to be a lot lot more RED so i amp up the yellow magenta and black in the red! but i also think the yellows need to be LESS RED so i remove magenta from the yellow! and bc there’s some cyan and blue bc of monica and the flowers in the background im going to make the cyans more cyan and the blues a lil more black! i’m going to remove some yellows from the magenta!! and i add more black to the neutrals and black!! i think it’s always important to add more black to neutral and black bc it adds more depth to the gif by not just making it a bunch of bright colors and having dark colors to contrast to!! my settings are below!

and the result!
now let’s see everything together!

and the before and after!

I HOPE MY COLOURING EXPLANATION MADE SENSE!! if not you can always ask me more questions i don’t mind!!
ADDING SUBTITLES
we want to grab the text tool!
make a text box from anywhere in the middle from the left to right edge. this is so we can make sure our text is centered and will be in the same place for when we have sets w more than one gif w text!

type your text out and make sure you highlight the whole text so that all the settings apply to EACH character! you can find the alignments (for center) in the paragraph tab!

now lets right click on the text layer and go to blending options! add stroke and drop shadow!


now drag it to the desired height you would like and make sure to keep it in mind for when you have more than one subtitled gif in a set!
NOW TO MAKE SURE THE TEXT STAYS IN PLACE AND THE BLENDING STAYS YOU HAVE TO CONVERT TO SMART OBJECT!!

if you want to only have the text applied to certain frames instead of all frames, select the frames you don’t want by clicking the first frame in ur don’t want section ON THE TIMELINE and WHILST HOLDING SHIFT click the last frame of ur don’t want section and then toggle the eye switch next to the text layer
now you see the text

now you don’t

tip: use opacity to fade the text in and out!
the text is going to be on all my frames so i don’t need to toggle the eye but i just wanted to show you just in case!!
now here’s my FINAL RESULT

save for web (file -> export -> save for web)
your gifs have to always be under 10 mb! so, if your WAYYY overboard YOU HAVE TO DELETE FRAMES! or you can divide the gif in two and have two gifs instead of one! however, if you plan on going the deleting frames route MAKE SURE YOU DELETE FROM THE BEGINNING OR END OF YOUR SELECTION i promise you that most of us won’t notice that your characters dialogue is being cut off BUT WE WILL NOTICE IF FRAMES ARE BEING SKIPPED so, don’t delete frames in the middle of ur gif!! idc how little you do it IT WILL RUIN YOUR GIF AND I SAY THIS FROM EXPERIENCE i would delete every fifth frame to cut down my gifs and that may seem like not that big of a deal BUT IT IS my gif looked choppy and poor so it is way better to cut from the end/beginning of the gif
ANOTHER LAST PIECE OF ADVICE in the bottom left of when the save for web menu shows up THERE’S A PREVIEW BUTTON click on it! it’ll show you your gif on your default browser and show you what it’ll look like once uploaded! this is perfect to check the speed of ur gif and the colouring and to notice if there’s a problem with your subtitles or maybe there’s an obvious jump in frames you never noticed before!! i always use preview bc the built-in photoshop viewer of ur gif shows the colors differently and the speed is NEVER ACURRATE!
I USED THESE SAVE SETTINGS!! many say to use selective pattern but i DISAGREE and i think these save settings are the ✨ best ✨
OK NOW THAT IS THE END OF THIS VERY LONG GIF TUTORIAL!! I HOPE THIS IS WHAT YOU WANTED!! IF YOU HAVE ANY QUESTIONS DON’T BE AFRAID TO ASK I SINCERELY DON’T MIND!! JUST DON’T BE RUDE OR ANYTHING BC PPL HAVE BEEN RECENTLY :(
I WISH YOU ALL THE LUCK AND FUN IN YOUR GIFFING ADVENTURES !!
#tutorials#asks#sourceblog#allresources#completeresources#itsphotoshop#dailyresources#resourcemarket#chaoticresources#onlyresources#hisources#sibylresources#dailypsd
417 notes
·
View notes
Note
How do you make good quality gifs? What tools do you use, and what's your process?
Aww are you saying my gifs are good quality? Thank you Lex! 🥺💝 Now I apologize in advance if I got a bit carried away here but I do really love explaining how I make things! I find it fun! :3 So I made a gif just for this post so I could show my step-by-step process! Enjoy, I hope this was helpful and please feel free to come back at ANY time with more questions! :3 Here's my process for how I made this gif here:
So I suppose step 1 would be downloading the source of whatever you wanna gif as an mp4. I already had all the Crash 4 cutscenes downloaded, but back when I got them off Youtube I used this website here. It can also be used for mp3s! Just make sure you've got your uBlock Origin ;3
Next I'll pop it into my video editing software of choice, Movie Studio Platinum. It's a simple but efficient editing software and I mostly chose it cuz it's a one-time purchase and not a subscription, plus I got it on sale for only $50. Right now its full price is $99 but its still a very good program and even has a cheaper alternative (albeit with less features.) Go check 'em out, I've been using em for years and have been pretty happy with it.
Anyways, with the mp4 in the timeline, I'll highlight the moment I want saved in the Loop Region, and then render it as a sequence of images. Here's what that looks like (this might be hard to understand if you've never used the program but well. There you go :P )

The bottom line here is I turned a clip into a sequence of images, and while this is my preferred way to do it, you can also make gifs out of mp4 clips, so it's up to you on how you wanna do it!
Next is the fun part- finally making the gif! One of my favorite gif making websites was actually taken down recently, so I've been using EzGif.com for a while and it's pretty quality, plus I already used it to optimize gifs after making them so it's nice as a one-stop shop of sorts :3
Once I upload the images onto the site, it will automatically take me to the page seen below, where it will ask how many frames I've uploaded I want included in the gif (uhh, all of them, duh), and at what speed I want it to go at, called the Delay Time. I think the normal delay time of 30fps gifs is about 3 or 4, but I like making mine a little bit slowed down so you can really savor the animations.
At this point the gif has been created, and I'll make some little last minute tweaks to the colors. For this one I raised the brightness and contrast just a little bit.
The gifs are usually pretty big when first made (this one started at like 20mb) and Tumblr's limit is, I believe, only 10mb. I like to shoot for making my gifs around 5mb cuz the smaller they are, the quicker they load and smoother they run. I'll usually start with downsizing it - this gif I downsized from 1280x720 to 720x405, and that already cut the file size in half! I might resize it more if I feel like I need to do so, but next I'll optimize it with lossy compression and that typically gets the job done. I typically only have to set the compression to between 10 and 30 and it compresses it the rest of the way. All that's left is to download my finished gif, and voila!
Thanks for reading, I hope this was helpful and again, feel free to ask any more questions you may have! :3
#ruby answers#lex!🍄#put it under a read more cuz it got kinda long#especially more mobile users ehehehe ur welcome for not having to scroll thru all that#but for anyone who actually reads all this thanks ily 🥺💝
3 notes
·
View notes
Text
GIF Making/Sharpening/Colouring Tutorial
hi all! i’ve been asked many times to talk about how i sharpen and colour my gifs so today i will be doing a step by step tutorial on how i do
what you need:
photoshop (i use a constantly updating one)
a video of some kind
space in your computer
difficulty: medium
before:
after:

step one: download a video that is 720p-1080p
this is a fairly simple step, however, DO NOT DOWNLOAD IN 4K. what this tends to do is make the frames longer and blurrier whenever you’re attempting to sharpen them than they actually are. i usually pull videos from youtube or use quicktime to screen record videos. there are also lots of resources for videos that are kept on google drive.
step two: in photoshop, go to file - import - import frames to layers
to import frames to layers, you want to have a .mp4/.mov of some kind. i prefer the quality of mp4 over mov because it tends to create better spacing between frames, but mov still looks good!
step three: in import frames to layers, pick the relative part you want to gif.
only pick the first gif you want to make. a lot of times photoshop will run slower on older computers due to the processors within the computer. if you stick to only giffing one at a time, your computer won’t slow down as much.

step four: create the frames, but don’t select “limit to every __ frames”
many people do this and will limit to every 2 frames. while this used to be needed because of tumblr only allowing a 1mb limit back in the day, the limit on gif size has increased to 10mb. the chances of you making a gif that is 10mb is pretty small unless it is large with a lot of frames. if you’re wondering why your gifs aren’t as smooth, it’s usually because you are limiting frames.
step five: make all of your frames .03/.05 sec long
usually at this step after creating the frames they will come out to be .04secs or .02secs long. if you save a gif at this level it’ll look too fast. instead go to the far right of the timeline and select the three lined box, in this box you will see an option that says “select all frames.” after pressing it all of the frames will be selected and you can go to where it says .02/.04 and change that time. click “other...”, then type in .03/.05. you can chose to change this at your discretion and personal taste. this is just what i NORMALLY do.


step six: now you want to crop and resize your gif as well as remove frames
these are the different proportions that i usually use:
for large full-width: 540x270
for 8 gif edits: 270x152
for longer looking full-width: 540x230
for full body: 270x330 or 270x300
for headers: 700x374
to crop, select the crop tool and get rid of any black edges or any part you don’t want of the image. then go to edit - image size. either do 540px or 270px and adjust the canvas size afterward based on if you had to input the width or the height to get the start of the proportion you want. this is also where you can test your gif to see if the frames are too many and can delete whatever you don’t want.

step seven: creating a timeline
now that you have the start of your gif, you would think we would move onto colouring, wrong. now we have to make your framed gif into a timeline one instead. in the animation toolbar there is a button next to where it says “forever” and you will click this button to convert the animation to timeline.

step eight: sharpening the gif
okay now this is where it gets a little trickier. what you want to do is go to the top and pick select - select all frames after this all of the frames will be reselected. then click filter, convert for smart filters. this will make your animation all into one single layered smart object.

after creating this smart object go back into edit and select smart sharpen. the settings i use are pictured below but i will also list them out here: amount: 500%, radius: 0.4px, reduce noise: 50%, shadows and highlights: fade amount: 0, tonal width: 50%, radius: 1px

now, click onto the layer you just sharpened. then right click and select duplicate layer. the shortcut for this is command+j. add a guassian blur to the object of 1px. then, make the layer 22-33% opacity. what this does is blur how sharp the effect is to make it seem more natural and clear.
step nine: colouring
now that the gif is sharp, we can actually colour it. whenever i colour the first thing i do is make a selective colour layer. within this layer you want to go to neutrals first. change these settings based on how you want the environment and colours to look. less black makes the scene lighter, more makes it darker. also go to the white and black categories within the selective layer. i tend to put the black at nearly 100% depending on how dark the scene is, (if it is lighter i usually don’t want to darken it too much), because what this does is keep the noise out from the darker areas of the gif. i almost always also always put white and -100% black to get rid of any black that might be within the white parts of the gif to take the noise out.


after this, i always add a curve layer to brighten and harden the gif. i then add another selective colour gif and adjust according to what just makes the gif look sharper/more colourful. obviously settings are going to be different for everyone, but i almost always use these at the beginning for a good base gif. after this selective colour layer in this scene i added a levels layer and defined more of where i wanted the light to go and the darkness/neutral light shifts. next i added a colour balance layer and changed midtones/highlights/shadows to sort of warm up the gif as well as make certain colours more defined. i then placed a vibrance layer to let the colours other than black and white stand out more. after this i added in another selective colour layer and i used this to brighten the cyan of the dress as well as change some of the red and yellow in the skin to make it darker and more defined. for some reason there was a hue of a blue shadow around the dirt and i wanted it to be black so i went to hue/saturation and changed the blues to being 100% black instead of blue so that the shadow would look darker.

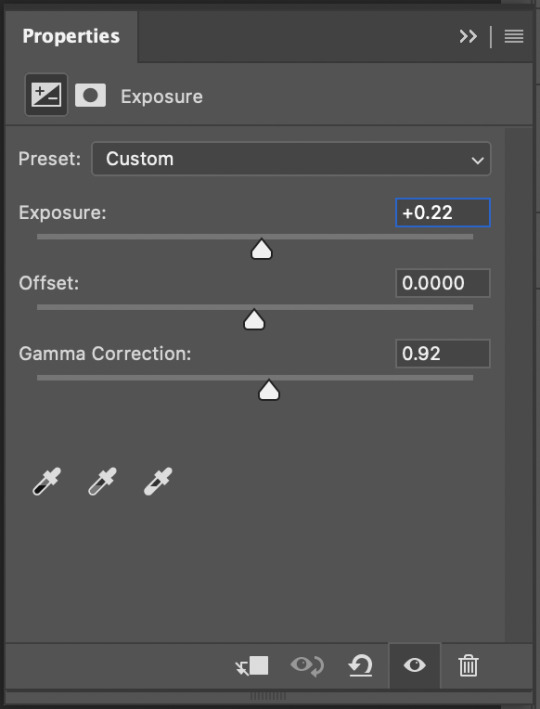
finally, as with any of my gifs, i added an exposure layer the settings for this layer are in its screenshot below. very rarely do i ever change from these settings but you can play around with them as you please
step ten: saving the gif
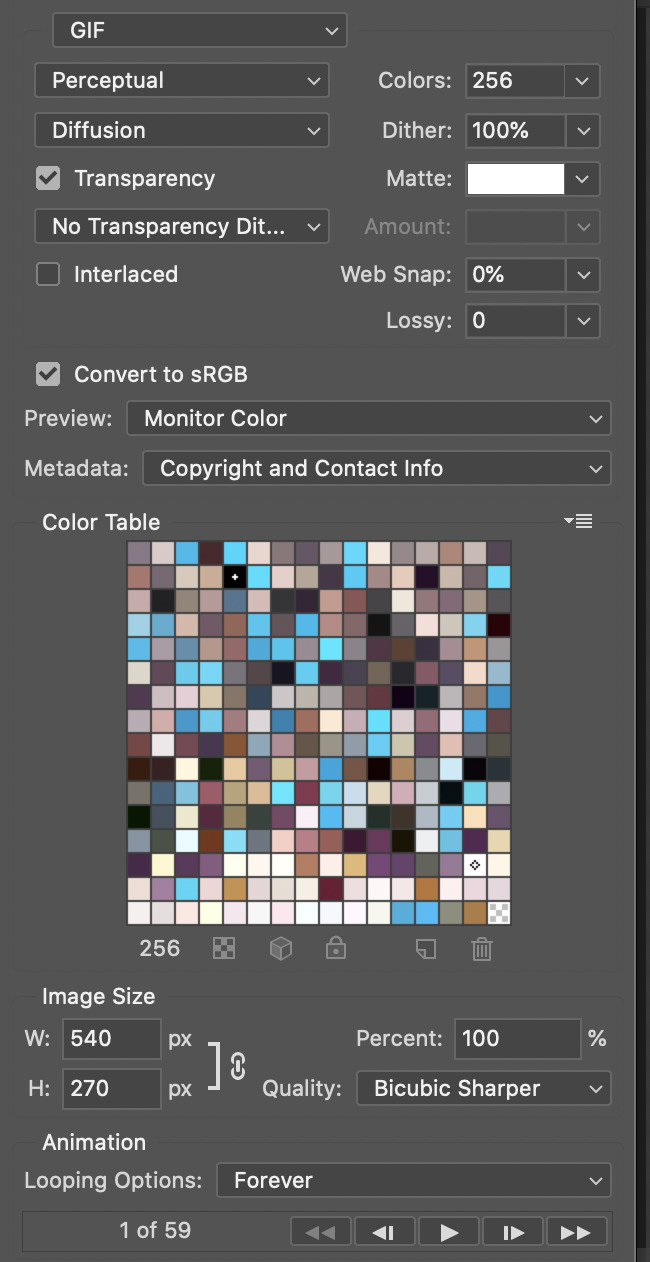
i was asked many times how i save my gifs and the settings i use so here is how. to save, go to file - export - save for web (legacy). (it may take a moment for your gif to be ready to save but don’t worry this is normal.)

make sure that within the save for web you have perceptual and diffusion selected for how you save your gif. at the bottom you also want to have bicubic sharper as the quality of the gif. as long as your settings look like mine, you’re good to save!
step eleven: you may or may not need this step
occasionally, photoshop will play a trick where even though you saved your frames as .05secs it changes them automatically to .07secs per frame instead. to check this, reopen your gif, convert it to a frame animation, then look to see. you can easily just change the .07 back to a .05 and save for web again right after then replace the slower gif with the faster one


and thus we have:
#tutorial#gif making#gif tutorial#yeahps#photoshop help#theme hunter#itsphotoshop#chaoticresources#completeresources#allresources#mine#tutorials
224 notes
·
View notes
Text
how i make gifs
@robins-gf asked if i could make a tutorial on how i gif, so here’s my best shot! this is just going to cover the physical act of gifmaking; if you want to know how to download videos and make your gifs as high-quality as possible for uploading, i’d suggest this tutorial!
this is also a photoshop exclusive tutorial because that’s what i have. a good windows link for photoshop is here! download 7zip and you should be able to open the file (still looking for a good mac link though) 12/13/20 unfortunately this link no longer works
[edited to say: i forgot cuts were a thing when making this post lmao, so the rest of it is under the cut to save y’all from having to scroll through it]
1. record your video. the shows i watch are all on netflix, so i record individual clips, although i know some people have entire videos downloaded. be aware that itunes goes black if you try to record it. if you don’t know how to screen record, google [your operating system] + screen record

2. open photoshop and click file -> import -> video frames to layers, then select your video

3. select the part of the video you want and click ok. if it’s a long portion, you’ll want to click “limit to every 2 frames,” but because i’m only capturing a small moment, i’ll leave it unclicked
4. your workspace should look something like this! if there are frames you don’t want, now’s your chance to delete them: just select the frame in the timeline at the bottom and click the garbage can icon
5. after you’ve trimmed your gif, you need to change the frame rate (otherwise it will go really quickly)
click the three little bars at the top of the timeline and hit “select all frames,” then click the little arrow below any individual frame and change the rate. my go-to is 0.07, but you might want to fiddle around depending on length
6. with all the frames still selected, click “convert to video timeline” (in the bottom left of the timeline)

7. once your frames have been converted, click select -> all layers, and then click filter -> convert to smart filters


8. now technically at this point you’ve made a gif (remember to save it!) but i’m guessing at least some of you are interested in how i edit my gifs, so to start out, i add a bunch of adjustment layers (if you can’t see the adjustments panel in your workspace, click window -> adjustments)
my first step is usually levels, just to brighten the gif. sometimes i add curves or vibrance on top of that, and then i usually finish things out with a selective color layer. this is the part of the tutorial where you really want to rely on trial and error more than anything else.
9. once you’ve recolored your gif, you’ll want to crop and resize it. 9/10 times i crop my landscape gifs to 16:9 and my portrait ones to 4:5, but that’s totally up to you.
after cropping, i click image -> image size to resize the gif. my go-to is usually 300 or 600 pixels, depending on how many gifs i want to have in a row, but as long as it doesn’t exceed the tumblr size limits, you should be able to upload it
10. to export your gif, click file -> export -> save for web. i can’t remember if i had to change my settings from the default, but you should make yours match mine

11. et voila! you now have a completed gif to proudly post everywhere! i hope this was helpful, and if you have any questions or would like tutorials on specific things (captioning, adding text, etc.) please let me know!
33 notes
·
View notes
Text
How to gif ~
(a very partial tutorial)
Hey everyone, I’m Milo, fandom contributor since 1887. It had been brought to my attention that some of you might want to learn how to do gifs so I’m here to share the knowledge. Of course it’s only how I do gifs, and it’s not the only way, probably not the simplest way but heh, it’s mine.
First of all: you need to choose the couple of seconds you want as a gif. Seriously, it’s half the work. Think about how your gif will loop, what the first image (and thumbnail) will be and most importantly: work with your platform of choice’s limitations. 1 gif at a time on twitter, 440×220 min, 10 gifs on tumblr, 500px wide, 5Mo, etc.
Material:
Giffing Tool: a powerful tool, free of use but if you have a couple bucks to spare, it’s Pay What You Want.
Photoshop: The portable CS4 version by Majax31 exists. It’s old but it does a tremendous job, also, it’s light, ready to use and easy to find. It’s still not legal though. I happen to use Photoshop CS4.
Let’s say you want to gif a close-up of some Pro Wrestling Noah boys like any other sane person. Well, excellent choice!
Pause your vid a couple of seconds before the right moment, open Giffing Tool. GT works as a way to record your screen.
New > Hold your click to select the zone
Play your vid, don’t move anything. It looks like nothing is happening but GT is recording. When the scene you want is finished, tap esc and GT will compile your gif, give it a bit of time. The closer you are from the actual size you want, the less time it will take.
In GT’s window, you select the length of your gif a bit better (1), click the size to avoid losing quality in an unwanted resize (2) and save it with the appropriate icon (3, shortcut is S). Step 2 is super important, you need the actual size to be the same as the size your gif will get out. If GT change the size, you will lose quality.
Saving with GT takes time, you can continue to use your computer normally while it does, be patient.
If you bought the full version of Giffing Tool, you can decide to resize your gif here and be done with it! But if you didn’t GT will add a banner you might want to cut with Photoshop or of course you might want to play with colors, size and decide on all the frames you want or don’t want, to the next level with you!
So yeah, now’s the time to edit your gif in photoshop! Hooray! After a lot of trials and error, I found some secrets to make this work. First open Photoshop then it goes like this:
File > Importation (down there) > Video frames to layers
I don’t know about the newer versions of Photoshop but you’ll need to write the name of your gif (with the extension) in the File Name to find it, it will not appear otherwise. Write it when you’re already in the right folder. By the way I remember now that you need Quicktime for this to work but it’s a pretty basic log so I guess this shouldn’t be a problem. Anyway, import it even if it does not appear (as long as you have the name of the file right, it will work): [Mark frame animation] must be checked in the next window and we’re good!
Now comes some work with Photoshop. Before you get started, you’ll need to get the animation window (Window > Animation). You only have to get it once, it stays in your setup for later uses. In that window you can check your gif frame by frame, delete duplicates (fair warning though, deleting too many duplicates will make your gif lighter but also will alter its rhythm, again, trials and errors, test everything!), decide on how fast you want your gif,
Another warning: what you change on the first image of your gif will apply to all the frames. If you wants to change only one, select the one and the layer associated with it. If you wanna change only the first, duplicate it (first icon in 2).
1/ You must use that tool to select the part of the image you’ll need. If you didn’t pay for Giffing Tool, you can use that tool to cut the banner they add. Once your image is selected, use Crop (here Recadrer). With Image Size (here Taille de l’image) you can resize your image depending of your platform’s limitations (on tumblr 500px wide).
2/ The animation window as I already said is super useful, you can delete, duplicate, move around frames.
3/ Don’t get there too fast but this is where you can edit colors and light. Experimentation is key here. Only one thing I can add: remember to select the first frame in the animation window if you want your edit on all frames. BUT put your edit on an empty layer on top of all the other layers in the layer window. If you know nothing about photoshop, a word on layers: here Layer/Calque 1 is hidden, you can make it visible by clicking the empty square next to the preview. If you do that then do the same on Layer 2, layer 2 will hide layer 1. The layer on top is always the one showing first. You can also erase some parts of a layer to show the one under it. Everything is possible in photoshop! Add a frame on the first layer so it shows on all the other layers! Add stickers! Most importantly: try things! fail! learn from it and do it again! If you have questions, I’ll answer them as best I can.
Last thing I’ll add is how to save your gif. You need to use Save for Web... in the file menu. You’ll get a preview, on the upper right corner, change the second setting as GIF.
1/ Check the format
2/ This is where you can check the size of your gif, super important depending on where you want to publish it.
3/ Save... You did it!!!!
It might sound complicated but it really isn’t that much, all the work you’ll do the first time will be useful forever, you’re learning a new skill but thankfully that skill is super easy to remember. And allows all sorts of awesome things! A whole new horizon is opening!
@kazuchikaokada 😌 i’m not sure you’re gonna learn much with all that ‘cause your gifs are already so nice?! it depends a lot on vid quality I guess but really you’re probably already doing all that? Maybe if you don’t use photoshop yet it could give you a whole new set of possibilities?! Anyway, sorry if this didn’t help, I hope it’s still useful for someone out there anyway!
10 notes
·
View notes
Note
hi!! i just started out making gifs and bc yours are so lovely, i was wondering if you had any advice?? ty!! 🥰
yes of course ! under the cut ! these are just some tips,,, i might do a full blown gif tutorial if someone really wants me to lol
video quality:
i feel like the most important thing that people may not know is that when you’re making gifs, esp. for tumblr, the video quality is super important ! downloading the best quality videos is always the way to go :))
i use 4k video downloader for youtube videos and the rose bay for broadcast vids (these are tp files though so you need specific video processing software to run them)
1080p or better is what i always use but if i’m desperate i’ll use a 720p vid too :’))
downloading directly from youtube is often better quality than twitter or insta vids so if you find a vid from there, looking for its youtube equivalent is mostly better in terms of quality !
video processing:
i don’t recommend using a video processor until you know how to make gifs in just photoshop ..? idk when i first started gifmaking it caused a lot of confusion and you don’t need them to make decent gifs necessarily
if you do though it’s avisynth for windows and vapoursynth for mac, vapoursynth has more options / tools in terms of denoise and sharpening but i don’t use it so i wouldn’t be able to tell you much
what they do is resize your video files to a smaller size, video sizes are huge usually ! but tumblr optimizes for very specifically small gifs (which is why downloading the best video possible is so important, when you reduce the file size you lose quality, so having the best quality video ensures the quality is as nice as possible) and these processors allow you to use tp/ts files as well as select 30fps vs. 60fps, and they reduce the file size for you, minimizing the reduction in quality better than just photoshop
sizing:
remember tumblr sizes are 540px wide for one gif, 268px wide for two gifs in a row, and 177px / 178px / 177px for three in a row !
coloring & adjustments:
gifmakers spend a majority of their time here because original videos are very rarely how you view gifs
find your own style and what you like and experiment lots ! coloring is fun and no two people do it the same way so test out everything and see what adjustments do what!
levels adjustments and exposure can be your best friend in terms of avoiding wh*tewashing ! if you keep saturation and vibrance high that helps a lot too !
again i think trial n error are the best ways to learn how you want to color ? there’s literally no limits in photoshop, you can do a whole heck more than you think !
sharpening:
i know a lot of people use topaz for cleaning and sharpening and i have like… not patience for topaz but it is honestly really helpful in certain instances
topaz denoise is what i usually use if i have to, it cleans up any noise or grainy gifs but it also removes details so it’s important to be very careful
i also just like photoshop’s smart sharpening function..? it has a noise reduction adjustment built in so it can help if you have no patience for topaz like i do
frame rate delay:
i was legit just talking about how important frame rate delay is on twt lol
for 60fps vids the frame rate delay i use is 0.02 or 0.03, the slower (so bigger) your frame rate delay is, the possibility of the movement being slower and blurrier is higher as well
for 30fps i usually use 0.05 but 0.04 works too (sometimes i think the movement is too fast but this is one of those personal preference things)
i hope that was helpful anon… sorry for writing you an essay LOL
#look at me talking as if i know what i'm doing :'))#trust me anon 90% of everything i said here i learned the hard way#through hours and hours of frustration and tears and trying and trying again#but that's what i think was the most important#learning from my mistakes and trying to improve lol
11 notes
·
View notes
Note
hello meredith! your winona ryder gif pack was gorgeous, and it made me wonder if you would ever be willing to do a giffing tutorial? i'm trying to learn how to make my own resources, and i would love to be able to make gifs in the same high quality/gif pack style you do them in! hope you're doing well, and thank you for taking the time to read through this message!
thank you so much !!! i did .... not really think any of my gifs were good enough to illicit a request for a tutorial ASJDKF but what i do is fairly simple, i’ve included steps under the cut. i don’t know how well versed you or anyone else is in ps and making gifs, so this is a very comprehensive tutorial that goes through each painstaking step.
first i make sure my download is in 720/1080p, preferably the latter as it just makes for better gifs. usually i use download (mega) links from logoless accounts, but sometimes use piratebay, and those are pretty much a guarantee for good quality video. if i’m downloading from youtube, i use 4k video downloader as an app on my computer.
i then open imovie, or whatever the equivalent would be for a windows computer, and begin clipping. usually my clips are around ~20-40 secs of just my faceclaim to keep it simple when im importing. don’t worry if you get a pop up that tells you it will take a long time, but make it smaller if you get the one telling you frames will be limited to 500.
then, i open photoshop and select import > video frames to layers > my file ... after that, i use the little sliders that show up to bring in a part of the clip, it should look like this when you open it if you have the essentials & timeline as part of your ps
then, i resize my gif. if there’s black bars around your video, crop it down to whatever section of the actual video you want in the ratio of 16:9. if there are no black bars, chances are your video is already in that ratio. in that case, resize it! i personally use 245x138, but you can use whatever suits your fancy.
then i retime my gif, by clicking on the three white bars over in the corner of the timeline. once you click on that, select ‘ select all frames ’ now, all of your frames should be selected. then you can click on any one of those frames ( specifically, the little drop down area by what would read 0.04 ) and your screen should now look like this
change that 0.04 to 0.07, and then click the leftmost corner of the timeline box. it looks like this.

it might take a while to load, but that’s okay. now you’re in timeline mode, and this is where things get more creative. first, select all your layers on the side of the screen. these formerly were your frames.
with either the first or last layer selected, command + shift + select the opposite of whatever the layer you had selected was — ex. if you had the first layer selected, then choose the last one, and vise versa. now all your layers should be selected.
right click with all layers still selected, and choose the label that says ‘ convert to smart object ’
now it’s time to sharpen. you can either use actions ( here’s a tutorial for that, an old one but it all still works the same, and feel free to im me if you need additional help! ) or you can choose to sharpen yourself by going to filter > sharpen > smart sharpen. another good thing to use is filter > blur > gaussian blur. now, i don’t really have good ideas or settings for these because this isn’t how i make gifs. if you want the action i personally use, come to me off anon and i’d be more than happy to give it to you. if you don’t care and want any good actions, i recommend just hunting through the tags on blogs like yeahps or itsphotoshop.
now comes the fun part ... and the tricky part. coloring. first, i always adjust the levels of my gif. i do this by doing layer > new adjustment layer > levels. when that pops up, pick the dropper icon that has the white coloring. then, select the spot on your gif you want to be white. in my case, it’s the white on winona’s shirt, but it could be brightness from a window, a particularly shiny spot on a forehead, snow ... whatever.
that brings you from the first gif to the second gif. better, but still not pretty. now, experiment with all the other types of adjustment layers that there are. i can’t really adequately explain what a specific gif needs unless i .... see it, so if you ever need help coloring a specific scene, feel free to message and and i’d be more than happy to help you out, though i am ... far from an expert. with all the adjustment layers added, my gif goes from this
and there you have your gif ! to get it to be that length instead of the entirety of what you imported, drag the grey bars of your timeline over to shorten the gif. only whatever is between them shows up as the gif. so, instead of mine spanning the entire thing, when i exported, it looked like this

after that, go to file > export > save for web. make sure your gif is under 3mb, because that’s the limit for tumblr.
and that’s that! if you need anything else, lmk!
19 notes
·
View notes
Text
How to Use Avisynth For Gif Making
This detailed tutorial will show you how to use avisynth to convert, resize and crop videos in high quality for gif making. This is not a tutorial on how to make gifs in photoshop. I have also made a video tutorial in case you are a more visual/auditory learner.
Things you will need:
Windows OS
Avisynth installed with the video and plugin folder from this post.
*Optional* review original setup post (This may be hard to understand)
Photoshop or program that can export gif from video
Video
Patience
*WARNING PICTURE/GIF HEAVY*
This may seem like a lot, but when you practice, the process goes by much faster than what it may seem now.
Step One: Open your video with the .Bat file-
After every file is placed correctly and Avisynth is installed, you want to drag your video file into one of the .bat files in the video folder.

You will probably not use the .bat files that are highlighted in red, but if you want me to explain their uses, message me.
.Bat Files Highlighted in Green:
Normal.bat
Drag .ts/.tp video files into it
Creates 17 second video with original dimensions
You will have to Crop and resize in photoshop
Normalwebm.bat
Drag .ts/.tp video files into it
Creates 17 second video
You can crop video and resize using Html Resizer
Normalwebmrange.bat
Drag .ts/.tp video files into it
Creates a custom trimmed video
You can crop video and resize using Html Resizer
Reencode.bat
If you make a mistake when saving your avs.avs script, edit and save it, and then double click on this bat to convert it to an .avi file
x264Lossless.bat
Drag any video file into it (.mp4, .mkv, .avi, etc)
Creates 17 second video with original dimensions
You have to crop and resize in photoshop
Use this if you got an error using the other .bats
x264Losslesswebm.bat
Drag any video file into it (.mp4, .mkv, .avi, etc)
Creates 17 second video
You can crop video and resize using Html Resizer
Use this if you got an error using the other .bats
*NOTE: You will usually get an error with the normal .bats if your .ts/.tp file is not mpeg-2 format so use x264Lossless .bats for those videos.*
I use Normalwebmrange.bat most of the time.


Drag your video into the .bat you want to use. After opening your video with whichever .bat you want, a command prompt window will pop up. Here you enter the start timestamp. This is where you want your video to start. For normalwebmrange.bat, it lets you choose what time you want the video to end too. The rest of the .bats make a 17 second clip from your start time.
*NOTE: Make sure you type the timestamp in HH:MM:SS format*
After the the command prompt is done (it takes about 40-60 seconds ), Google Chrome will open the resizer.html and here you will resize and crop your video
Step 2: Resizing and Cropping-
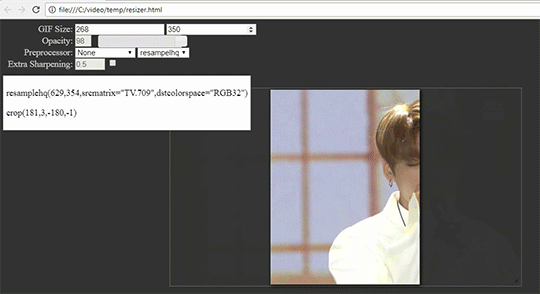
In the Resizer you want to choose your gif size. By default it is set to 268px width by 350px height. You can set the width to any of the the Tumblr sizes and have the height be whatever you want. Then drag the lower right corner to scale the video and drag the video to fix the position. The opacity slider helps you to better visualize what your video will look like cropped.

After cropping and resizing the way you want, you need to choose a Preprocessor:
None
Use this if you are using files that are not .ts/.tp files
QTGMC 30
Keeps original frame rate
QTGMC 60
Doubles frame rate which produces a smoother gif
*NOTE: I would use this option for 178px and 268px width gifs because more frames = higher file size. You might go over the Tumblr 3MB limit with bigger gifs*
Fast vs. Slow
Fast of course takes less time but is lower quality
Slow takes a lot longer but it is higher quality
Sometimes there is not a lot of difference in quality between the two. Test and see which one you like better. I use qtgmc 30 slow most of the time because i love placebos ):

Then choose one of the three resizers: resamplehq, debilinear, and dithertools. I normally choose “debilinear” because it makes the video sharper than the other options.
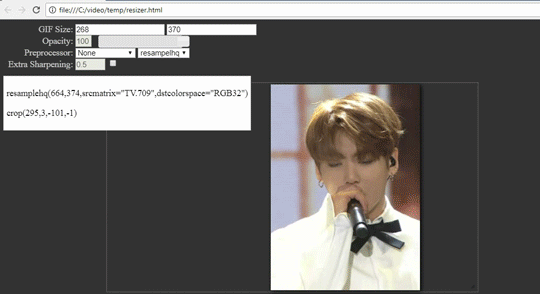
Choose your desired options, add extra sharpening if you wish, and copy the text in the white box. If you want to crop in Photoshop instead, Do not copy the last line of text
Close the Html Resizer and the program Avspmod should open if it has not already done so
Step 3: Avspmod Trim Video and Save Script-
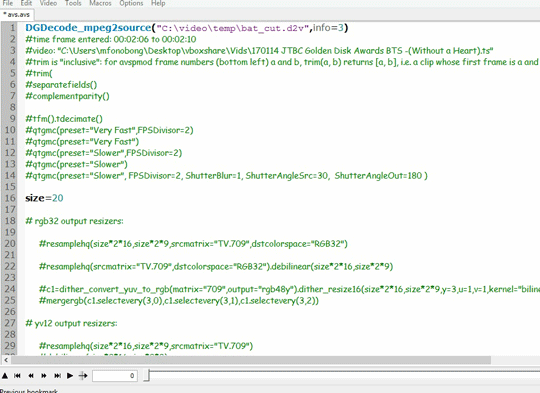
Paste the text that you copied from the resizer in google chrome (on line 17)
*SUPER IMPORTANT NOTE: PLACE A “#” BEFORE QTGMC ON LINE 17. IF YOU DO NOT, WHEN YOU TRIM, AVSPMOD WILL FREEZE AND STOP RESPONDING*
And then if you selected QTGMC 60 in the resizer, remove the “#” from line 7. This will make sure that your video moves smoothly.

Now trim your video. Click on the up arrow in the bottom left corner to show your video, and then scrub through the video to find where you want your gif to start and end. Press the home key on your keyboard (or go to Video > Trim Selection Editor > Set Selection Startpoint) to set the start, and then find where you want to end and press the end key on your keyboard (or go to Video > Trim Selection Editor > Set Selection Endpoint).
In the trim editor make sure you have my settings shown in the above, then click on line 8, and lastly press “Apply”
remove the “#” from qtgmc and save the script by pressing CTRL + S and close out of Avspmod
*NOTE: ONCE YOU REMOVE THE “#” DO NOT CLICK ON YOUR VIDEO AGAIN OTHERWISE AVSPMOD WILL FREEZE*
Step 4: Wait for VirtualDub to Process and Open the Output in Photoshop-

After you close Avspmod, Virtual dub will start to process your video. If you want to see the progress, click on the virtualdub icon in the taskbar go to View > Show Status Window and you should see the current frame being processed, the time that has elapsed, and the estimated time it will take to finish.
*NOTE: IT USUALLY WILL TAKE 1-3 MINUTES TO CONVERT. Mine took longer because I had multiple programs running and I was screen recording*
After VirtualDub is done processing, you can find the output video in the folder titled “temp”


Here is your video.avi file. Now you can open it in Photoshop, color it, use topaz, etc, and then you can export your gif.
*NOTE: If you want to run this process again, rename the video.avi file to something else so that it doesn’t get deleted*
Final Gifs:

These two gifs will be in my Edit Gallery. You may use/edit them as you please. I have put psds of the un-altered gif frames in my Tutorial Resource Folder
Thank you for reading this crap. I hope that you guys could understand. Ask me any questions and Have Fun Gif Making!
97 notes
·
View notes
Note
Really like the look of your Catwoman Hunted gif set! The colors pop, the gifs are sharp, the files aren't huge. Would you maybe share how you made it? :) Thank you!
Thank you for saying that! I was actually not super satisfied with them, so it's a relief that someone thinks they're nice :')
As for the process, I gif with photoshop. I actually didn't do a lot with them at all, but I'll elaborate more below:
I wanted to keep the coloring pretty close to the original, so I actually didn't change that at all. So this what my layers look liked, which is far more simple than I usually do it for live-action stuff, where I do fiddle a bit with coloring usually:


And most of that was basically increasing the contrast & brightness until I was happy with it. The exposure was the same:

The reason I sometimes use exposure specifically is because it's a lazy (?) way to bring out the extreme lights and darks lol. So exposure really brings out the light and offset the dark, to give an image more contrast/punch.
As for the sharpness: I just do the usual "smart sharpen" at radius 0,3px with remove gaussian blur + more accurate.

But, I made the gifs 600px wide, which is wider than tumblr's normal 540px width for gifs. That might seem like a strange decision! I just find that for animated stuff, normal sharpening & size makes gifs seem a bit too sharp or crispy, and I don't like the look of that. So if you make the gifs larger than normal, the tumblr resizing* makes them automatically look sharp in a smooth pleasant way. The only risk with making gifs larger than normal, is of course, the file size limit.
(*except tumblr resizing on mobile, I've never been able to figure out how to make anything nice on mobile dashboard at all, except keeping the file size really low i guess)
I would have taken a width of say, 650px or more, but these gifs were a bit long because they were action scenes, plus I wanted to keep the frame rate of the original to really maintain the fluidity in the gifs. So I had to make do with 600px :p.
I think that's it? Thank you again for the message haha. x
#inbox#also i hope this roughly is a similar version of photoshop as you have#or if you work with photoshop at all#ajfgdlgkdfkg#askbox
0 notes
Note
A giffing tutorial would be great! I'm not at home atm and its been a while since i tried giffing so i dont have any specific qs to ask yet but i think i struggled with how to put them into frames? I think they sometimes froze and wouldnt move haha but yeah thx for much for the links and advice! I also rly struggled with finding good basic tuts so thats why i came to ask ^^
PLEASE DO A TUTORIAL ON GIFFING BC I SUCK AT IT SO MUCH PLEASE
fkdsjlfds alright!!! hopefully this is able to help u guys i know im not the best at explaining this but hopefully this will give you an idea :-) im going to do it using only photoshop (no kmplayer/vlc or any other software) and i use photoshop cs5 so depending on what version u have things might look a little different but it’ll be the same concepts!! anyway here’s a crash course in making a gif for the first time
1. get the video!!
this seems like a simple step i know but if u wanna just use photoshop and not any other software as well it’s a LOT easier if you download a shortened clip of the gif! usually i download clips between 3-10 seconds long in order to make sure i get the whole scene i want. the two best websites to trim and download into an mp4 in one step are clipconverter and video-download, they both work for youtube videos and vlive and a lot of major video websites! and of course downloading the highest quality of video available (preferably 1080p or 720p) will make your gifs look nicer
2. importing it into photoshop
file > import > video frames to layers ! i believe u need quicktime installed for this to work properly!

since your clip is already pretty short, you should be ok by just keeping it from beginning to end! if for some reason you were unable to shorten it or if you want to shorten it even more, you can select the range. dont limit the frames though! it will make the gif look choppy and less fluid!
3. adjust frames/timing
you should now see all of your frames in the animation bar at the bottom (if u dont see an animation bar go to window > animation and make sure its checked) and all of the frames as their own layers off to the right! on some part of the animation toolbar you should see something that looks like this:
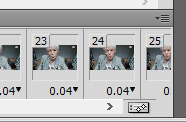
when you click on the four lines with the arrow, you should see a list of options! play through the frames you have and determine if you need to delete any of them at the beginning or end and u can do so by selecting the frames u wanna delete and under those options select delete frames. once u have just the frames you want for the gif, select all frames and then on any frame click on that 0.04 with the arrow and for the delay, select “Other” and put in 0.05s (or whatever value u want but usually 0.05s looks the best once you save it!)
4. cropping

you can adjust the cropping size options at the top (it will look Something like this but it’ll depend on your version of photoshop!)

the width dimensions for tumblr are 540px for one gif, 268px 268px for two gifs next to each other and i Believe 177px 178px 177px for three gifs next to each other! so here i’ll assume i’m doing a 268px width gif and you can set the height to whatever you’d like. if you set the resolution to 1px/cm like it shows right there, it’ll automatically crop and resize the gif for you!
so at this point with the cropping and timing it’ll look something like this:

5. convert to smart object + sharpening
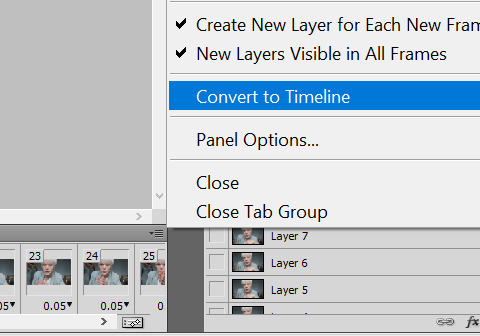
this might be where u had a problem with the frames freezing? so first using that menu in the animation toolbar convert to timeline animation! then, after this, select all of your layers on the righthand side and then right click convert to smart object!
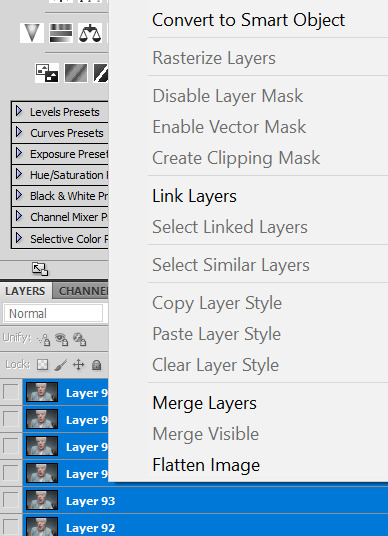
after u convevrt to smart object it should only show as one layer! u should still be able to preview and play through the gif, if it’s frozen then u messed something up with the timeline animation part! so to sharpen here were the settings i used to use:
filter > sharpen > smart sharpen

a lot of people use 500% and 0.3px … personally i never liked that but its up to u to play around with it!!
here’s what the gif looks like after this:

if you compare this to the one above this one looks much nicer!
6. coloring
ok honestly i dont even Know enough to give u a coloring tutorial but that’s pretty much the only step remaining for ur basic gifmaking! honestly a lot of the time i only use brightness/contrast and color balance unless im trying to make a compilation set where everything looks super different but it’s mostly up to u to try different things out and see what looks good :-) or! you can find psds online where other people have shared their coloring settings!
7. saving settings
honestly the only important thing is that ur gif Has to be under 3 mb or it won’t play right on tumblr! other than that u dont really have to worry about anything here as long as your settings look something like this
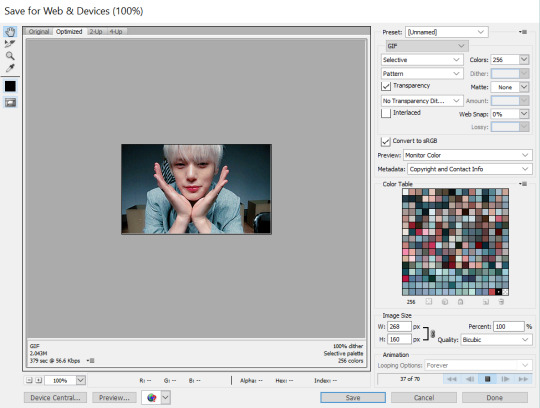
and then ur done! u have a gif! :-D

i know i use a lot of words fdmsfds but trust me once you’re able to get through it once you’ll be able to go through the whole process in minutes!! and there are lots of other ways to go about these methods as well (tbh i dont even really do this anymore) but this is a good starting point and as u can see the gifs look pretty nice (in my . humble opinion)
happy gifmaking !!! and again if u had any more questions about this or anything else let me know!!
#Anonymous#JFKDLSMFDSFDS why is this so long i barely even said anything.\#this is so funny i really dont know how to do tutorials
20 notes
·
View notes
Note
gif god Amira, how do you gif live performances??? They're so clear :0)
mMMM LMAO IM NOT A GIF GOD SINCE I STILL HAVE SO MUCH 2 LEARN BUT IM STILL SMILING A LOT GJAKDJA thats rly cute im v appreciative … :^) anyways !!! since i use a mac, i had 2 come up w my own process on how to gif live performances since avisynth ? too Slow 4 my old mac and stuff like topaz is too …. me, staring into the sun: maybe not …
buT ANYWAYS hgjsh under the cut is basically how i gif my live performances, i use
a mac
ps cc 17 (i think this will work on other versions ??? im not sure :( )
vlc player (i have version 2.2.2)
ts files of the performance (u need ts files otherwise the quality looks :/ even if it’s a 720p mp4 file,, also dont take performances from youtube u’ll end up w a walmart lookin gif when u want gucci gifs)
okay so first u need to get ts files of your performance and i get mine from _helloflora on twitter or from kpopexciting! since i … only ever gif mx i’m gonna be giffing mx again 4 this and i’ll be giffing shownu as an example from the 170507 performance of beautiful.
so first, load up ur ts file into vlc player and Basically what we’re gonna do is we’re gonna clip the video and get the part that we want !!! i would recommend starting a few seconds before the scene u actually want bc vlc is dumb like that …..
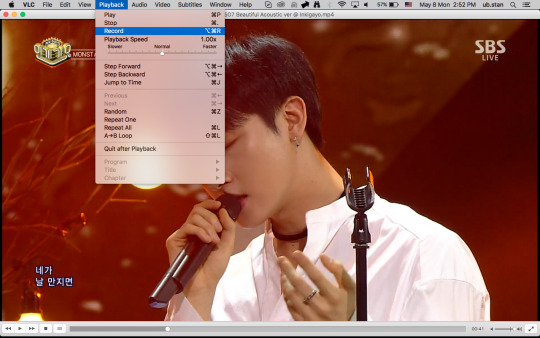
so get ur lil clip (mine is in the movies folder on my laptop bc … idk . it put it there and idk how 2 change it so i just keep it there)

make sure ur vlc is still open bc now u need to convert this little clip into an m4v file so ps can . load it … and basically what u do is u go into file > convert/stream or shift + cmd + s to open up the window. then drag ur clip into the window and on “choose profile” click customize and make sure ‘mp4/mov’ is selected. on the video codec tab, make sure u have ‘h.264′ selected then click apply and close the window and open it again just so u know it’s saved. then click ‘save as file’, save it where ever u want (i have a handy folder called ‘caps’ where i keep all my converted clips) and let it convert. the indicator that it’s converting is the play bar (streaming bar?? the bar)

^ that thing. so you let it convert (dont touch anything i learned this the hard way) and once it’s done, load it into ps!
i use the video import way so just go to file > import > video files to layers and select your converted clip, then drag the arrows to the clip you want giffed. this part is mostly trial and error to get what you want but i would recommend taking your time with finding the start of the clip and the end of it, also don’t make the space in between ur arrows too big bc then u get too many layers and that for me really slows down my mac :(
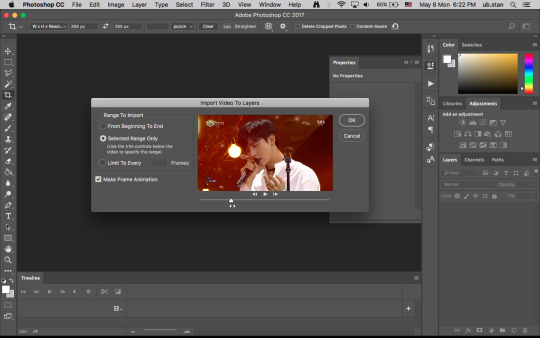
(also i literally . broke my own rule abt layers bc i messed up my recording of the clip and i was too lazy 2 do it again but CONTINUING !!!) now u have ur clip opened in ps!! i usually use around 50-60 frames so it doesn’t exceed tumblr’s 3mb limit, but also it depends on the size of your gif. the bigger the gif, the less layers you want. i’m making this test gif 268 x 270px (which is my go to sizing for gifs that i want side by side)
now what you wanna do is go to the little 3 lined bar thing on the timeline
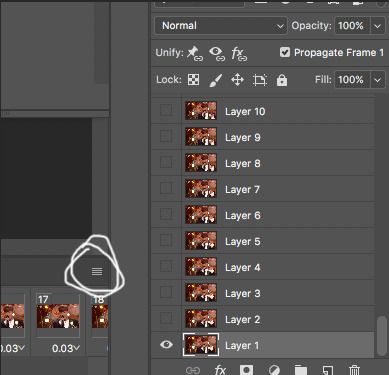
click that and select “select all frames”, then click the timing (the 0.03 numbers) and change it to 0.05! then while all your frames are still selected, click the 3 bar thing and select “flatten frames into layers”. you’ll get two sets of layers now, one titled with “layer 1″ and the other titled with “frame 1″. delete all the layers called “layers”

this is where i crop my gif !! my crop settings are at 268 x 280px, and once it’s cropped i go to image > canvas size and resize the height to 270px. then click the “convert to timeline mode” in the 3 bar menu or as the little icon next to the “forever” setting.

(my timing settings are still at 0,03 bc i was getting ahead of myself jahgkds) but ! u should have this

now so what u wanna do is select all ur layers/frames (i’m gonna call them layers so we’re not confused w the frames in the timeline) and right click and convert them to smart object! now we’re gonna sharpen them, and i used sharpening actions from @k-psds! i would recommend downloading a couple and just experimenting with which one you like best!
once you’ve applied your action, here comes the coloring part!! i never use psds because each gif usually needs a different way of coloring, but i do have a basic process for performance gifs. i use curves, levels, a tiny bit of brightness (either going down or up depending on the performance) and selective coloring with black, neutral and sometimes red (and depending on the performance, i’ll look into using the other colors)
this is what my layers look like
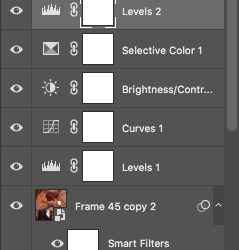
and this is the process of the gif from unsharpened + uncolored to sharpened to sharpened and colored


and that’s basically !!! how i gif performance videos !!!! it seems a little time consuming at first but the more you do it, the easier it becomes :D
SOME TIPS & TRICKS I LEARNED
when giffing performance videos, always go for close ups and clips where they’re not moving so much. it makes cropping so much easier and your gif doesn’t look as grainy
avoid flashing lights !!! it brings down the quality of the gif
use as little adjustment layers as u can! using so many makes the gif grainy (how many times have i said this) and you rly just wanna focus on making the gif bright enough 2 be pretty but not so bright u have idols looking like 2% milk
in selective coloring w the black tab, i usually bring it up to abt +15 or +10. idk why i do it tho someone told me in a tutorial and it’s been part of my process ever since.... makes the gif look nice tho so im not complaining
lastly !!! do a lot of messing around in photoshop !!! u might make a walmart looking gif but in no time ur gonna be making some nice Gucci gifs !!
if u have any questions feel free 2 send them my way and i’ll do my best 2 answer bc i know this tutorial was a Mess .... but i Tried :’)
#anonymous#gif tutorial#ps help#mine**#uH idk hagdsjhg#if u have any qs or w/e hmu !!! im always willing 2 help ghajhgd
19 notes
·
View notes
Text
Kawaii Project Evaluation
Introduction:
Kawaii is the term for cute, childish cute and kid friendly characters and animation first created in Japan in the 70s that refer to humans and non humans, certain examples include handwriting, manga and Hello Kitty, Kawaii became so popular that it became a aspect of japanese culture in animation, food, clothes and music.
This is a evaluation about the kawaii project that has been done, and it will have information about the Research, Idea Generation, Production, Reflection, and how did went.
Research:
Secondary Research: I have researched the general term of kawaii at first, what kawaii means and where it originated, I have researched where could it appear, for example different artist, models and fashion, drawings and illustration, how many variations of kawaii there could be, I have then research my artists, example; Takashi Murakami, and other artworks of various artists, this was done in order so that I could have some refrence or influence and inspiration of how I would like to create my own little kawaii characters, this has made me think about the colors that I would like to use or think about the tone.
Secondary Research; Involved me actually taking photographs of the fruits and vegetables that I actually wanted to create them in adobe illustrator, I have also taken photo of my kitchen that I had at mine home, primary research has also included my ideas and group work and consideration of what would have looked well with what. As well as creating many pages of different character sketches and faces and kitchen objects so that would have more knowledge of how to base things of and experience with things, that you might not necessarily experience with whilst actually doing the work on adobe illustrator.
Ideas:
The idea was that I would create my own brainstorming with what ideas go into my mind if I think about the term kawaii, after that we have done some research and look at the artists artworks, so that we can take more thought process, drawing our own characters and kitchen on a piece of paper so that we can have some more ideas of what we could make, to make things look much better.
Production:
First I have took a sketchbook and have created over five pages of different vegetables and fruits as my kawaii characters, and some kitchen items, such as a fridge and a oven, and I have experienced how it could look like if I would do a different fruit or vegetable. This was done so that I can have more Ideas and thought process of how things could look and to get more ideas than it was planned. I have drawn of a A5 sketchbook with a ink pen and a HB pencil.
Then I would start to work on my characters in Adobe illustrator, tools I have used was the layers tool, this was done in order for me to be able to navigate through out the things that was important the most, in Illustrator I have also used the straight line tool, this was done to create my character outline and be able to have the body drawn at its first place, I have then used the paint brush tool, so that I could have my basic colors made in my characters, lastly I have also used the curve tool to create my arms and legs. The faces with the eyes was made separately using shapes such as a circle and straight lines including curve lines to make out the face, then this was copied over to another illustrator files, so it could be placed on my character.
When the Illustrator has been done, I have tried to open Adobe effects. I have created a new composition, I have imported my illustrator files into my after effects, after that was done, I have start to playing around with the program so that I know some basics to use the program, when I figured some things out my first character that I have animated was the cucumber, I had no idea how thing worked so at first I have made him shake around, I have done this by selecting all the layers in the file, and rotating it gently, each time I had to move the blue cursors on the render distance, each time it moved to and and rotated a bit it would create a animated movement in that specific area. Then I have a eggplants but a few of them did not work well as I have planned so I was forced to create on a single eggplant, this was more efficient and easier to work with it around, this time I have played with the scale, rotation, and position, so that I could have my character move around and to jump a bit, obviously if something is jumping the object is rotating a bit, therefore I also made him rotate a bit. I have then made my apple character, this was my second character and one of the easiest, I have only played around with the position, this was done like this because, I wanted him to fall down and then bounce around a bit, from the impact he experienced.
I have played around with the composition in illustrator, this was made so that I would have a better knowledge of navigation to decide what would look better and to see that how simple could look better at times, the tools used to play around with the composition was squares and circles, this was done specifically to make me think what I could do with the limited amount of items to make them look interesting. Whilst i was doing that I was experiencing with my own poster of the kawaii characters and I end up creating multiple pages of different posters, I have used text and transformation to resize the text and the characters, I have copied over my characters from another illustrator files, later to create different posters I have used more tools such as circle and some squares, re sizing the text, but then I have made posters without the text itself and make it simpler but still creative so I then have used squares only, and played around with colors to find out how they would look.
I have then worked in a group to create our poster, I have worked on Adobe illustrator, each group member had a specific task to do, for example one would do the kitchen furniture, one would do the tiles and the others would do other things, I was creating kitchen objects, and after we have done that, we would share our stuff and decide on the how would the final piece look like, combine them into one kitchen, with all of our characters and designs, to find out what colors we would like to use, we used adobe colors cc to create our color pallet and then decide as a group what colors we all agree on upon to use. The was that I have made my kitchen cupboards was by regular shapes such as squares, cubes. And then we would look at each-others work to see how it all turned out to be.
Lastly I have started to create my final animation in Adobe after effects, I have imported my image of the kitchen we made in the group, and then i have dragged down my three characters into after effects, I have placed my characters where I would like them to be, but I did have to resize them in order to fit in, all that had to be done was the placement of the characters, when that was done I have added a new layer from the layer menu, and I have added adjustment layer, in that adjustment layer I have played around with the noise level, this would add a sort of grain/practicles in the animation itself, then I have added a vignette this would add a layer of shadows in the corners, the intention behind this was so that it would not look too cartoonish with simple colors but more of a film with a classic style feel to it. I just had to adjust my apple because it was going out of the animating area so a little positioning tweaks had to be made so that it falls and bounces properly on the cupboards. After that has been done, I send the animation to be exported as AVI file, so I could place it into my tumblr blog.
What went well and what didn’t:
what went really well was the creation of the characters in illustrator, it was very enjoyable and fun to work with, same as playing around with the composition and creating a poster.
Things that went awful was the after effects, it would just not work on my profile, and at time if it would work on other account it would just lag a lot, which this has made made me not work as fast as I intend/planned. I missed out 3 days worth of working in after effects because of the computer failure, I have overcome this issue by switching to another account.
What I’ve learnt and what to improve on:
I have learnt how to expand objects in illustrator and I have learnt some basics of animation, but also I have learnt how I could layout my poster designs and the composition to make them look more interesting.
improvement;
Illustrator- I would like to have some more help laying out my composition and designs.
after effects- I need to learn more how use the program, as it was my first time ever, I would need help navigating and further help with export options.
illustrator- I would like to improve my typography and navigation through out the work-space area.
What I would do differently:
I would decide on different colors, because Color is important to tone and shading also where the light would come in the color would be much lighter, as well as make my work look more realistic by adding the tones, color, and drawing out the details, this would show more details which could help me experience and build up my skills in digital technologies, this asset would help me in the future process of works.
1 note
·
View note
Link
The following blog post, unless otherwise noted, was written by a member of Gamasutra’s community. The thoughts and opinions expressed are those of the writer and not Gamasutra or its parent company.
In this post, we’ll talk about how we create GIFs for our game Lake Ridden. This post was originally posted on our developer blog. As the person in charge of our marketing assets here at Midnight Hub I’ll walk you through our current process for creating crisp and catchy GIFs; which tools we use, as well as offer you some general tips and tricks for improving the quality of your fancy moving images! In this Gamasutra post I'm linking to our embedded tweets showing you the GIFs I'll be referring to. In other words, if you are on a tight bandwidth diet – fear not, no GIFs in this post will load unless you choose them too! Let’s go!
— Sara Casen 🏔 (@saxen8) February 15, 2017
A GIF showing the atmosphere in Lake Ridden. Here I use a static camera and let the particles and fog communicate movement, making it a nice mix between serenity and details. This GIF was posted on our social media and generated a lot of reactions.
When marketing your game photos are nice. But images and screenshots have their limitations when you’re showing off something that’s essentially a moving medium. I find that moving images and snippets of film are often better at delivering the message, compared to screenshots alone. GIFs are quick series of images displayed so that they look like video.
The “art form” has been around almost as long as the Internet itself (and usually contain a lot of cats doing funny things). A GIF can last anywhere between 1 – 30 seconds, depending on the quality, what you want to show and the platform you are sharing them on. A lot of GIFs on Reddit nowadays are really long, almost like YouTube videos, the same goes for Facebook. On Twitter and Tumblr however, people post a lot of 1-3 second long GIFs instead. And some GIFs are looped in such a smooth way it’s hard to tell how long or short the GIF really is.
I think the firelies in Lake Ridden are starting to look very nice now :O #gamedev http://pic.twitter.com/vTGvl9zJW0
— Sara Casen 🏔 (@saxen8) February 9, 2017
Keep your GIFs short. I usually aim for 3-4 seconds. This keeps the file size down and the interest up! This GIF is playing backwards, giving it a nice little twist with the fireflies in Lake Ridden
To spread the word about Lake Ridden we’ve used both images, videos, and GIFs in various combos. I’ve done this to communicate the environments, the gameplay, the color palette, the feeling or something from behind the scenes. For us a good GIF almost always gets more reactions and attraction on our social media channels, compared a simple photo or screenshot. Also, I greatly enjoy making them since it’s kinda creative! There are two main things that make a GIF great; the very content it is showing to the viewer and the tech behind the GIF itself. Not all GIFs are born equal. Let’s start with looking at the tech behind the images.
Technical Settings For Recording A Good GIF
Talking with a lot of developers posting GIFs about their games on Twitter, I noticed that almost all had their own preferred workflow, which I find interesting. Some people used programs like Fraps to capture the raw footage in-game, others used quick and small programs like GifCam, and used tools they had hacked together themselves. It seems like the method you choose is depending on a mix of factors; how much time you have, the desired picture quality and your game. If you want something fast and dirty, and don’t obsess over the quality you usually go with quick tools such as ScreenToGif. But if you want super crisp snippets with perfect color then you might invest in a more complicated workflow.
My advice here is: look at your game, does it have a lot of different colors/details in it? Or is the art style more simple? The more complicated art/colors you have (and if you want to keep them as sharp as possible in the final GIF) go with Fraps. Fraps give you really good raw material when recording your project.
You need to pay attention to the file limits on the platforms where you aim to spread your GIFs. Twitter has a limit of max 15 MB. If your file’s too big, resize it or make it shorter. I use a mix of Fraps and Photoshop to create our GIFs.
Second advice: determine how much time you want to put into making your GIFs. If you just want to capture, edit and throw it out in the wild, then go for a solution that’s quick and doesn’t offer you hundreds of post-processing options (suggestion: LiceCap). If you want to edit and tweak your GIFs extensively, consider using Photoshop + Fraps (YES you can edit video in Photoshop!!1).
A rule of thumb is to make the pixel quality of the GIF as good as possible on your computer, because a lot of platforms will compress it even further when you start spreading it, making the colors bleed or reducing the pixels. Twitter will take your GIF and secretly convert it to a .mp4 when you post. Facebook doesn’t allow for GIFs to be posted at all unless you link them trough a GIF-service like Giphy (more on that later).
Our Technical Pipeline For GIFs
Here are the steps I’m using to capture the raw material for our GIFs and how I tweak the file size if the GIF comes out too big. I use a mix of Fraps and Photoshop.
Our night sky now features a moon! 😍Wanna try Lake Ridden at GDC or Game Connection? Drop me an email to: [email protected]! 🌙 http://pic.twitter.com/l5rPGoWluK
— Sara Casen 🏔 (@saxen8) February 16, 2017
Remember that a lot of people will probably view your masterpiece in a social media feed. I've noticed it's generally a good thing to tweak the lights and color in Photoshop when you edit the source materials. Small GIFs tend to get overly dark otherwise, especially if they depict a dark scene like this one showing the night sky and its stars.
I make sure to run our game with the maximum graphics settings on my computer. The game should look as good as possible. No lag, no frame rate dips or weird loading/LODs. All hiccups or similar will be extra obvious in the final GIF.
To capture the raw footage I use Fraps. This software has been around for ages and is a faithful workhorse. Consider chipping in a few dollars to get the premium version (I also used Fraps to record our alpha teaser trailer in-game, it’s awesome for capturing anything moving on a screen).
I make sure all the video snippets I record go into the same folder on my desktop. This will make it so much easier when sorting your raw footage and deciding what to cut into a GIF. I have different folders for all GIFs.
When I have decided which of the raw footage I want to make into a catchy GIF I open it up in Photoshop. Photoshop is really simple and straightforward to use for smaller video editing. You don’t have to invest in After Effects or that other advanced stuff unless you want to.
In Photoshop I edit the video, cropping, dragging and adjusting colors, then export it. Go to File->Export->Save For Web and a dialog window should pop up (I use PC).
There are a few things to consider in this window. At first, be aware of the technical limitations of the platform where you’ll be posting your GIF. If you’re aiming for Twitter, make sure the GIF is a maximum of 15 MB. If the GIF file size is too big, resize the image by tweaking image size at the right. The second option is to check or uncheck the box named “Transparency”. Sometimes this reduces the file size but does not affect the quality of the image (?). If the GIF’s still too large, go back into Photoshop and trim down the GIFs length in seconds. This will cut down the size of the file. When you’re happy with all the settings in “Save For Web” make sure to click “Forever” in “Looping Options” if you want your masterpiece to loop into infinity. Then press “Save”. Done!
Our Artsy Pipeline For GIFs
Let’s move on to the fun part! Creating a good GIF is more than perfect picture quality. What you’re showing (or not showing) in your snippet is even more important. Here’s my process when shooting materials for our Lake Ridden GIFs.
After recording raw material in-game I use Photoshop to edit the clip, tweak brightness, add a small water stamp (so people can find the game if the GIF goes off into the wild and people get curious about where it came from). In this stage, I crop the video material to focus on the most important thing in the GIF. It needs to be readable in a thumbnail size (compare to the final results below).
Our demo of Lake Ridden is done!! Can't wait to show it at GDC next week! Wanna try it? Let me know! #gamedev http://pic.twitter.com/XnIoUkxJsR
— Sara Casen 🏔 (@saxen8) February 23, 2017
The final GIF showing an important, creepy location found in the game.
Make sure the game runs as smoothly as possible on the computer you’re using to shoot the raw footage. Again, all artifacts, lag or loading will show even more in a 5 second GIF.
Decide what you want to show and why. A good rule of thumb is to stick to one main thing with each GIF. Decide if you wanna show off a cool animation, or perhaps a battle effect or the mood of the game. What will be the star of your GIF?
Record a lot of small snippets in-game, just a few seconds long. I usually have like 15 small videos when I’m done, showing the same thing in different angles, using the camera in different ways, zooming or not zooming etc.
I sort trough the raw material and open my best clips in Photoshop, cut them up and minimize them to really small windows. This way you can decide if the GIF will look good when it’s displayed on a small screen (aka smartphones). In other words; is the image readable? The GIF needs to look good as a really small image since a lot of people browse these things in their Twitter or Facebook feeds. They should be able to tell instantly if they are looking at a face or a dog or a house. If not, people tend to get confused and you missed your chance to evoke their curiosity and eventually reaction to your game/project.
I cut the canvas. Focus on what’s important in the image. Again, it should be readable.
I tweak the brightness/colors and saturation. A lot of the times it’s better to make the image a little bit brighter since I’ve noticed it tends to get even darker when posting to a feed.
For Twitter, I like to keep the GIFs to 3-5 seconds and always go for looping. For Facebook, I go a bit bigger, like 5 – 8 secs. People have very short attention spans and a GIF should be very straight to the point. When in doubt – make the GIF shorter.
Posting GIFs for Twitter and Facebook
If you want to post your GIF to Facebook then you have two options. You can’t post a file in the GIF-format straight to Facebook (this is 2017 like what why?!). You can either use a third party service like Giphy (beware the quality will suffer) and post the link, OR you can be much more elegant and save your GIF in .mp4 format and post it straight to FB. Facebook accepts videos in the format of .avi and .mp4 to be posted straight to your page/wall. This is what we did when we posted our teaser trailer on Facebook.
The water is staring to look really good. Super excited having people try it on GDC! :) http://pic.twitter.com/vHGFdVEPOI
— Johan Bernhardsson (@jbernhardsson) February 13, 2017
This GIF post by our code lead Johan focuses on the water in Lake Ridden. This was made to showcase one specific item in the game: the water effect. Try to limit your GIF to showing one thing, otherwise things tend to get confusing and messy. Decide on one component and make it your "star of the show". This could be a funny bug/a new animation or the day/night cycle in the project.
We did not post a link to Youtube but the trailer in .mp4 format on my own personal Facebook page (as an experiment to track the number of views ‘a la Facebook). To post in .mp4 you can use a tool to convert your Photoshop-made GIF to .mp4, or if you’re using a more advanced video editing software like After Effects you can save the video as .mp4. Simply converting your GIFs to .mp4 using GIF-2MP4, a free online tool that does the trick according to my experience!
Get Creative!
Use what you got! I use the player’s default camera in Lake Ridden when recording our GIFs. I tilt the camera, I use the crouch, I walk backward, I stand still shooting moving objects etc. I highly recommend you use different ways of movement/vantage points if possible. This offers variety to the people watching your GIFs and you’re able to do more with less. Try to convince your programmers to implement a special camera for shooting videos and taking screenshots if possible, since that will help out a lot in the long run!
Lake Ridden is starting to have a nice contrast between night and day. This week we're also working on puzzle design and story. :) http://pic.twitter.com/THKUGmYPlt
— Johan Bernhardsson (@jbernhardsson) April 6, 2017
Often you need to find new, interesting ways to show the same content but with a twist. In this GIF I made the camera go out of the scene (compare it to the next GIF below).
Quick GIF showing the lights and colors of a sunset in Lake Ridden. Still needs some tweaking : ) #gamdev http://pic.twitter.com/8eHDmjgaYi
— Sara Casen 🏔 (@saxen8) April 6, 2017
Here the camera does a drive by of the scenery instead, which creates a different feeling. Get creative and play around with the tools you have ingame! Just make sure not to post too similar content back to back on your channels or people will find it dull.
A lot of the time I’m working on stuff in the game that I can’t show, so I have to think of new, exciting ways of showing things that I might have posted before. It’s not only about how you’re showing something, it’s also about what you’re showing. A lot of developers also post fun bugs or glitches from behind the scenes or inside the game engine. Think about your audience and ask yourself what they might enjoy. Reddit/gaming usually enjoy insane bugs or humor, while other developers like to see a nice tooltip. Players perhaps want to get a tease on the mood inside your game or your main character in a cool animation. If you have some questions regarding GIFs or know of a better way of doing some of these steps, please let me know in the comments!
Sign up for the Midnight Hub Newsletter or follow Facebook for more news and screenshots. Follow us on Twitter where we GIFs and behind the scenes stuff! Until next time!
Cheers, Sara & The Team
0 notes