#i copied my copy of my copy of my original for that chromatic effect
Explore tagged Tumblr posts
Text
pspsps chronicle 0 art pspsps (design by overtireddoodlr, pose reference by mellon_soup on tiktok)
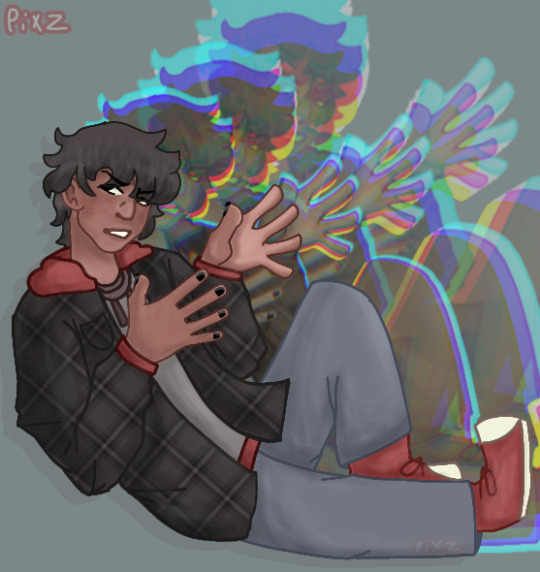
#chronicle 0#generation loss fanart#genloss fanart#gen loss#generation loss#ranboo liked this on twt thats cool i guess hahahaahaahaaaaaaaaa#ive been perceived oh dear oh lord oh no#i copied my copy of my copy of my original for that chromatic effect#oh my god i wonder whats that called#anyone wanna guess
98 notes
·
View notes
Note
Looking back at your aurora and sage besties comic (its one of my favorites, only being beaten by were amy and sonic being a Simp) and I've got to ask, HOW DID YOU DO SAGES GLITCHING SO FRANKEN WELL??? IT LOOKS AMAZING AND I PERSONALLY LOVE HOW THOSE GLITCHS TURN RED WHENEVER SHES ON NEFARIOUS TIMING ARVDGDBABA
YOU ARE MY FAVORITE SONIC ARTIST.
...just wanted to say and ask.
You are so kind, thank you! I'm so happy you like them!
I do a lot of experimenting in Procreate until I find a technique I like. To achieve Sage's glitch, especially if she's doing something a little more wicked so her "red" side is showing, I'll start by drawing her in her blue version and her red version:

I'll select random rectangles from the red version and mask them/cut them out, so she's mostly blue but some red is showing:
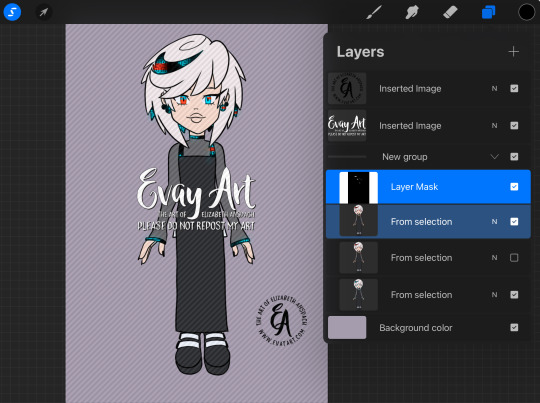
I'll duplicate this layer and keep a copy of the "clean version" and apply effects to the duplicate. In Procreate, I'll use the "Glitch" effect and use the “Artifact” setting and mess with it until it achieves a result I like:

This may take several passes.
I duplicate the layers again, because again I always want to be able to go back if I don't like it. Then I'll play around with "chromatic aberration" under the “displacement” setting. She only needs a little for a subtle glitch effect, but if she's meant to look more menacing then I can go hardcore with it:
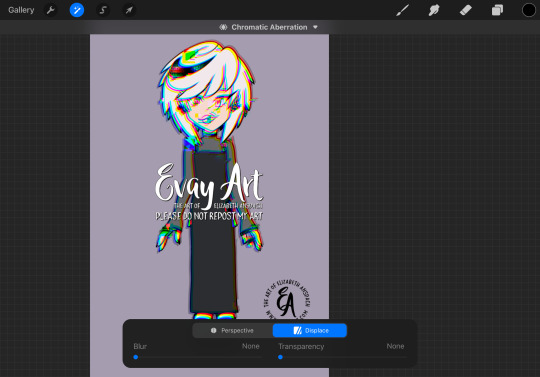
Then, I'll turn that original "clean" layer back on and I mask out the effect layer so only parts of it are coming through. When computers glitch, normally most of the image stays in tact and only some parts are scattered/messy so that's why I only have the effect in some areas.
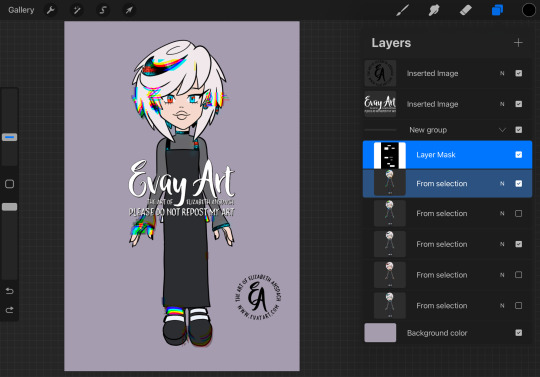
I might even slide bits of those rectangles to the left or right. It's just a matter of playing with it until I like how it looks.

I hope that explanation was easy enough to follow along!
Again, thank you so much! I'm really really happy you enjoy my art and stories 🥰 (and I'm delighted to hear you're a fan of Were!AmyXSimp!Sonic hehehe)
#ask me#evayQA#tutorial#procreate#procreate tips#sage the ai#sage robotnik#sonic trash#art tips#glitch effect
154 notes
·
View notes
Text
I feel like Ashlyn and her parents WERENT dragged into a rift on the night of her birth, actually. Based on the way rifts work with the sbg kids and their injuries not transferring over from one dimension to the other, I guess I could see how Ash got her hearing altered as a tiny baby if she was fully born in the phantom dimension, because there wasn’t any body of hers to shift back to when the rift closed so the hearing damage copied over from the ‘original’. But there’s a discrepancy with the idea that I haven’t seen anyone point out yet: Mike.
He did not have his iconic facial scar before the encounter!

If this attack happened in the phantom dimension, then logically, the wound would have disappeared when they shifted back into the human reality.
So either there was something different about the nature of this rift than the one in the weed sorrel house, or, in my opinion: the Banners didn’t shift at all that night.
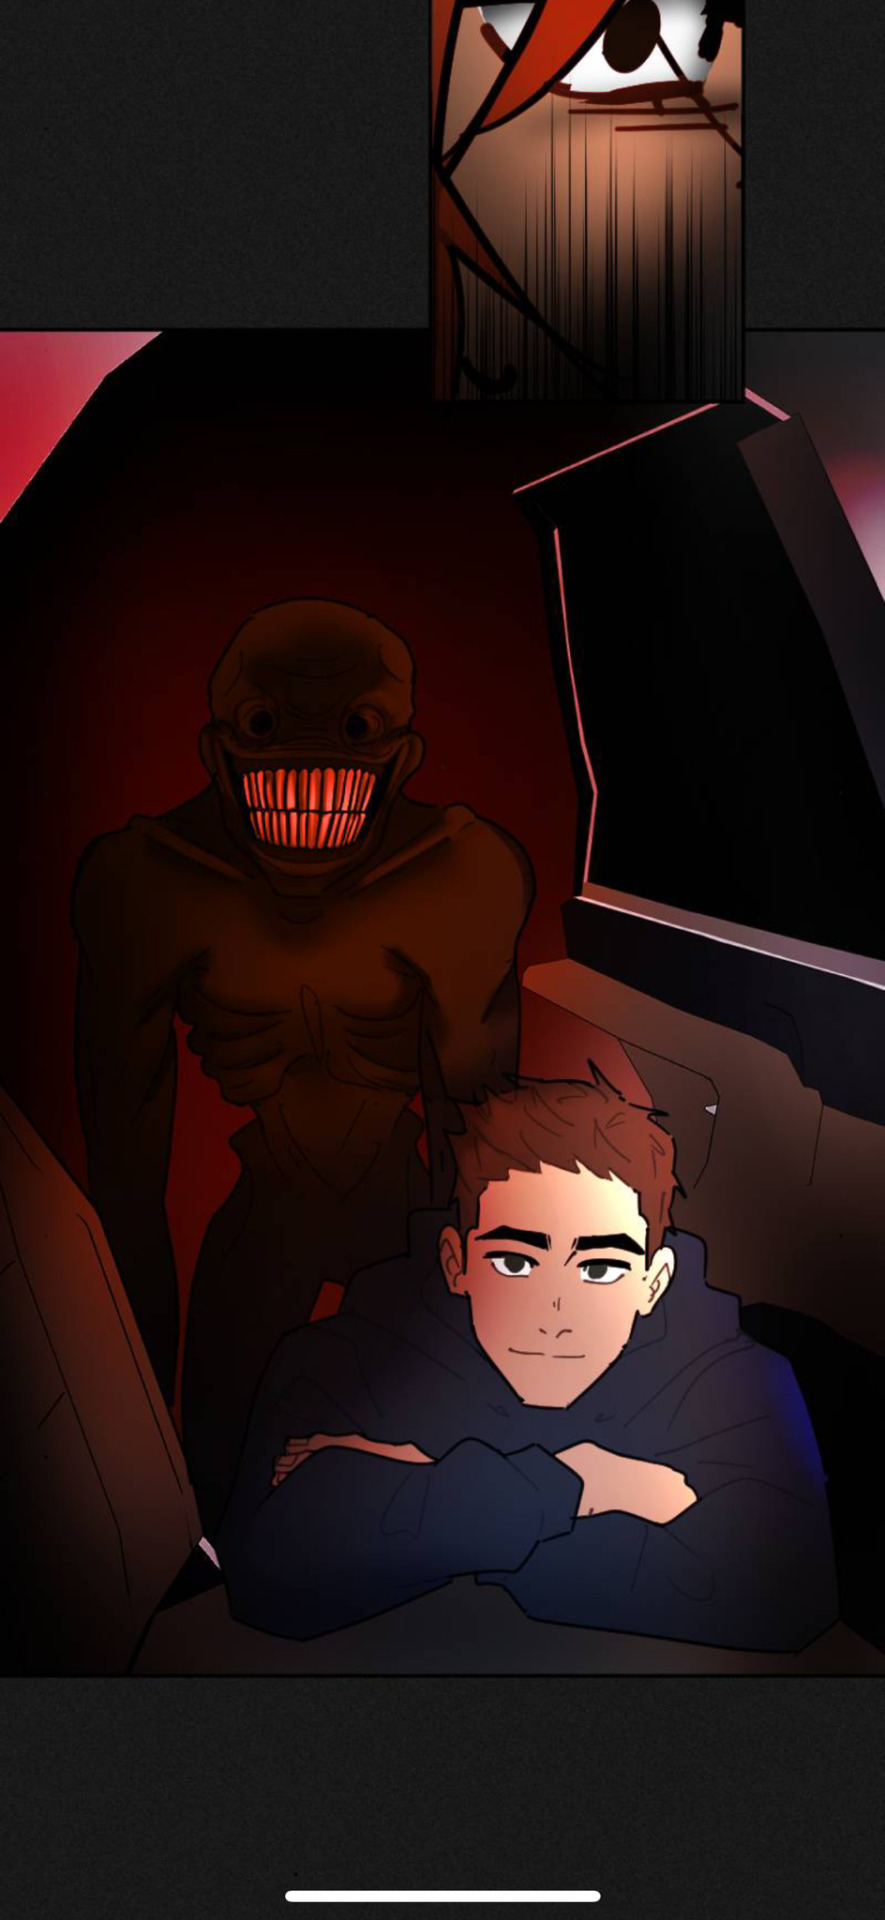
This is the first panel where a phantom shows up, and based on the red lighting, you could infer that they went into the phantom realm. BUT, the lighting at the abandoned building doesn’t have a solid blue to solid red chromatic abberation, like shifts are indicated earlier. Instead, there’s a much more gentle gradient.

Combined with the lack of the 3-D effect on the family, and Mike’s permanent facial scar as well as Ashlyn’s hyperacutitus being present always, not just when reality thins out, I don’t think they went into the phantom dimension at all! Instead:

This thing came out
#sbg#sbg (webtoon)#school bus graveyard#sbg theories#fun fact younger children can hear sounds at higher frequencies than adults can!
72 notes
·
View notes
Text
MTG Math: Dealing massive finite damage with 10 cards on turn 1
MTG can hit some pretty big numbers. There are a lot of ways to create infinite loops, as well as ways to hit strikingly large non-infinite numbers.
Perhaps the best-known example of the latter is the Turn 1 megacombo posted in 2015. Using 60 carefully chosen cards, it sets up a complicated chain of token generation that spirals out into unimaginably huge numbers, while avoiding unbounded loops to keep the achievable damage finite.
Following some recent discussions about it, I decided to try my hand at something a bit more compact, to see what we could accomplish with a smaller number of cards. In particular, I wanted to try avoiding some elements I've seen objections to: the inclusion of Omniscience, and the use of "nearly infinite" loops that only fall short of infinite due to unusual downsides some of the cards were specifically selected for. Personally, I've never been bothered by those things, but it got me thinking about ways to deal massive damage on turn 1 that wouldn't use them.
This strategy uses 10 cards, the smallest number I've found that can reach the scale I'm looking for. 10 in the starting hand, plus a 3 card library - or the top three cards of our library, if we assume there's a full deck under it. Both Omniscience and the "nearly infinite" loops are absent - with such a small number of cards, I'm not even sure how viable it would be to use those effectively in the first place. Here, our cards go from library to hand, hand to battlefield, hand to graveyard, battlefield to graveyard, and graveyard to exile, never reversing direction. But they'll be doing some pretty wild things as they go.
The overall goals are still the same: we're working with a Vintage-legal card pool (updated with another 7 years' worth of cards), and assuming that we draw our perfect hand, aiming to have the maximum possible turn 1 damage be huge but finite. We're not going to get numbers quite as high as the 2015 megacombo, but it should be a bit easier to follow and still deal some pretty enormous amounts of damage. In particular, we'll be taking some inspiration from this recent "3 cards + unlimited mana" strategy, but going a bit bigger.
That all said, let's begin!
---
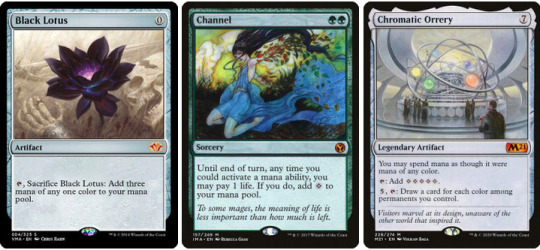
Step 1: Black Lotus + Channel + Chromatic Orrey
We play Black Lotus for free, sacrifice it for three green mana, and spend two of it to play Channel. A classic start for doing ridiculous stuff. We'll be leaning heavily on Channel to convert life to mana, but it's all colorless, so we use our remaining mana and 6 life to play Chromatic Orrey and allow us to use the colorless mana to pay any mana costs.
This puts us at 14 life, 4 cards in hand, and 3 cards in our library.
---
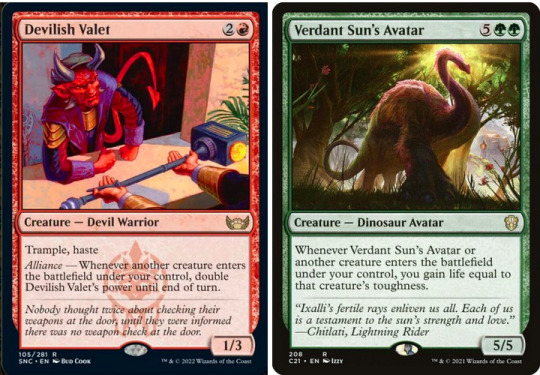
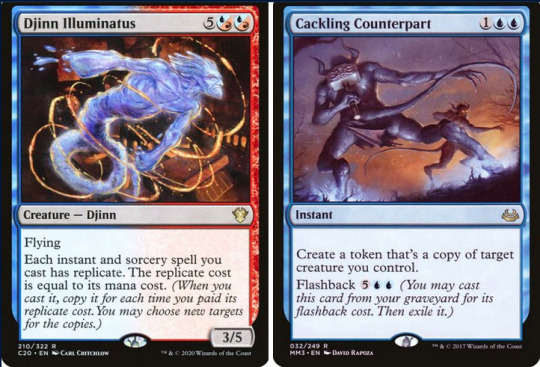
Step 2: Devilish Valet + Verdant Sun's Avatar + Djinn Illuminatus + Cackling Counterpart
Now we use that life to cast the remaining cards in our hand. Devilish Valet doubles its power every time another creature enters the battlefield, which will be key for racking up our numbers. Verdant Sun's Avatar, meanwhile, gives us life equal to the toughness of each creature that enters, which we'll be feeding into Channel. Casting those two costs 10 life, then the Avatar immediately gives us 5 back, putting us at 9. We spend 7 on Djinn Illuminatus and gain 5, putting us at 7.
We're getting low on life, but Cackling Counterpart can increase our lifegain rate by copying the Avatar. Meanwhile, since it's an instant, Djinn Illuminatus gives it replicate, letting us duplicate it by paying its cost repeatedly. It costs 3, so we can afford to cast it twice, getting two more Avatars. Each one triggers all of our Avatars, so the first gives us 10 life and the second gives 15. (The replication window is at the point when we cast the original spell, so we can't just turn that additional life into more duplicates.)
We now have creatures of three colors (red, green, and blue), so with our hand empty, we can now use the Orrey to draw our last three cards. This costs 5 life, putting us at 21.
---

Step 3: Elemental Mastery + Coercive Recruiter
We pay 4 life to put Elemental Mastery on Devilish Valet, allowing it to tap to make Elemental tokens equal to its power. Then we pay another 5 to play Coercive Recruiter, which lets us untap a creature every time it or another pirate enters the battlefield. We'll point the Recruiter's trigger at the Valet, but while it's on the stack, we've got something else to take care of.
Since playing the Valet, five more creatures have entered the battlefield: three Avatars, a Djinn, and a Recruiter. This lets us double its power five times, to 32. We'll have the doubling trigger resolve first, then tap the Valet to make 32 tokens. This causes the Valet's power to double another 32 times, to 137,438,953,472.
At this point, the Recruiter's trigger resolves, untapping the Valet. We could attack for 137 billion damage and win the game instantly, but we're aiming higher than that. Instead, we tap the Valet a second time, making 137 billion more tokens and doubling its power another 137 billion times. This takes us out of the territory of numbers Wolfram Alpha will let me calculate, but what I can say is that the Valet's power is now billions of digits long. (For comparison, the number of elementary particles in the universe is less than 100 digits long.)
Meanwhile, between those two rounds of tokens and the Recruiter, our trio of Avatars has gained us a ton of life, putting us currently over 412 billion. Which is good, because we're just getting started.
---

Step 4: Djinn Illuminatus and Cackling Counterpart (again)
These two first showed up in step 2, but now it's time to see what they're really capable of.
Cackling Counterpart has flashback, so we can play it one more time from our graveyard. Djinn Illuminatus's replicate effect stacks with flashback, and while the flashback costs 7, the copies go by Counterpart's base cost of 3. So by sinking as much of our 412 billion life as possible into Counterpart, we can copy Counterpart 137 billion times, and use them all to clone Coercive Recruiter.
Every time we get a new Recruiter, all of our Recruiters trigger, letting us untap and re-tap Devilish Valet that many times. Considering that we got this far by tapping the Valet just twice, even describing the numbers in terms of how many digits they have isn't going to keep working. Like with the 2015 megacombo, we'll turn to Knuth arrows.
Tapping a Valet with power N doubles its power N times, which means multiplying it by 2^N. Multiplication is getting insignificant at this scale, so we can pretty much represent the Valet's current power as 2^2^32. 32 is a bit more than 2^2^2, so we can approximate this as 2^2^2^2^2. Repeated exponentiation is also known as tetration or superexponentiation, which Knuth arrows let us show by increasing the number of arrows. So five 2s stacked like this become 2^^5. Which is a bit of an underestimate, since 2^^5 only has 19,729 digits. But 2^^6 has 10^19,727 digits, and we're not there yet. That is, not until we tap the Valet for the third time.
Making 137 billion Recruiters gives us about 0.5*(137 billion)^2 untap triggers, which works out to a bit over 9 sextillion. Tapping the Valet 9 sextillion times puts our (lowball) estimate for its power at 2^^(9 sextillion). This also means that we've created about 2^^(9 sextillion) Elemental tokens, and gained about 2^^(9 sextillion) life from our Avatars.
This sets us up perfectly for our final card.
---
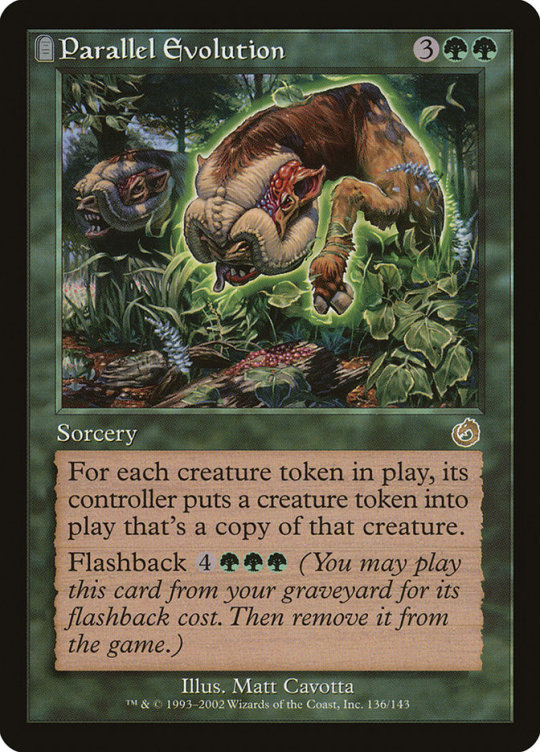
Step 5: Parallel Evolution
Parallel Evolution doubles all of our tokens - the 137 billion Recruiters we just made, the two Avatars from the first time we used Cackling Counterpart, and also the absurd number of basic elementals our Valet has made. And it's a sorcery, so like with Counterpart, we can replicate it. To double our tokens 2^^(9 sextillion) times.
To be honest, I don't actually know enough about numbers this large to have a good idea of how to represent them. I think it might involve further increasing the number of Knuth arrows, but I'm not even certain of that much.
Once the last of the copies resolve, we have about 2^2^^(9 sextillion) Avatars, about 137 billion times that many Recruiters (like all multiplication, pretty much insignificant at this scale), and the Valet has untapped an unfathomable number of times to raise its power to even more unfathomable numbers and spitting out that many elementals each time. Also, each of our tokens trigger all of our Avatars, raising our life to absurd heights.
The enormous amount of lifegain has one more chance to be significant, because Parallel Evolution also has flashback.
Our initial volley of 2^^(9 sextillion) copies of Parallel Evolution is nothing compared to the number of times we can copy it now. Again, I literally don't know enough math to even know which notation to use to keep describing this. (If you do know, please tell me.)
Whatever the numbers are, eventually the dust settles. We're left with a ridiculously huge Valet and its enormous army of elementals to swing with, far beyond any conventional definition of overkill.
As enormous as these numbers are, they're still nowhere near the ones achieved in the 2015 megacombo, let alone the more recent revisions. The 2015 megacombo's final damage count has 408 Knuth arrows compared to the handful here, and even after several attempts, I still can't fully wrap my head around half the things it does. In comparison, this is more of a tame, straightforward counterpart - but still plenty ridiculous in its own right!
I don't know if anyone has posted better strategies for this or similar conditions, but if you've seen any, let me know. Thanks for reading, and I hope you enjoyed it!
40 notes
·
View notes
Photo
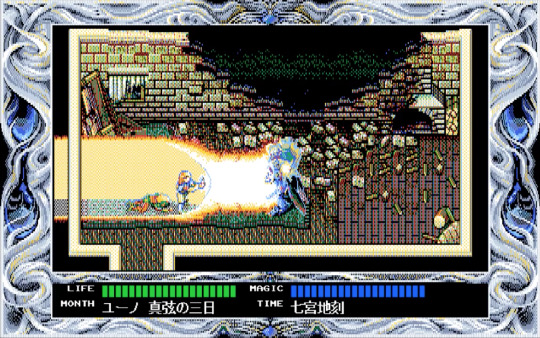
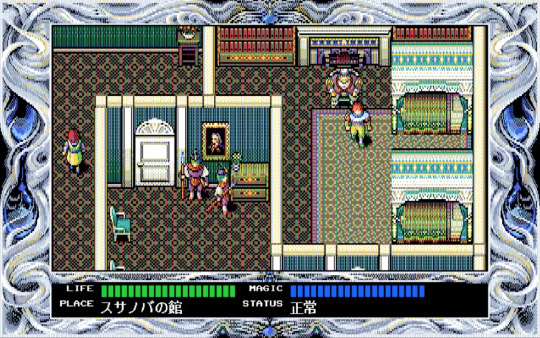
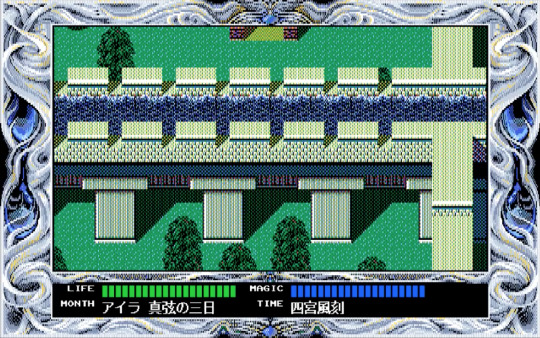
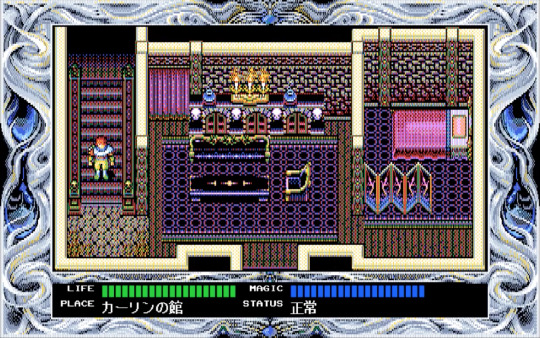
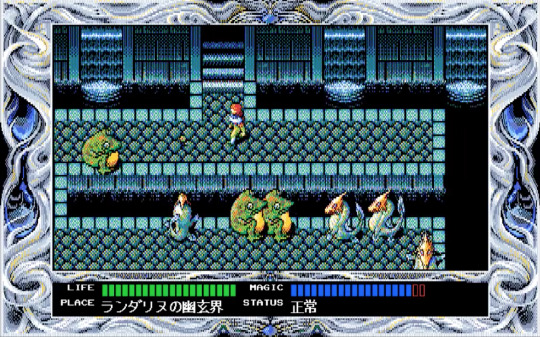
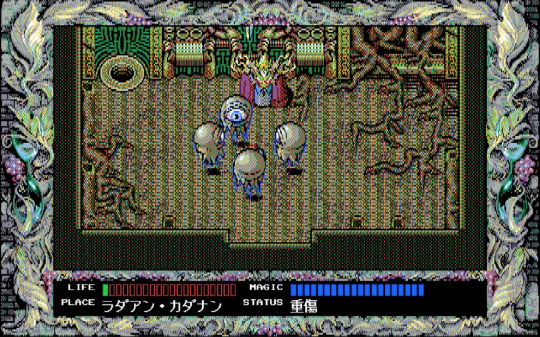
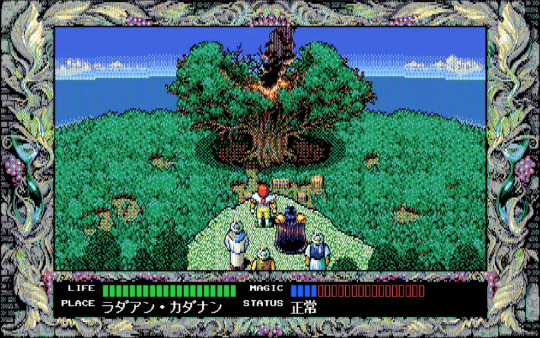

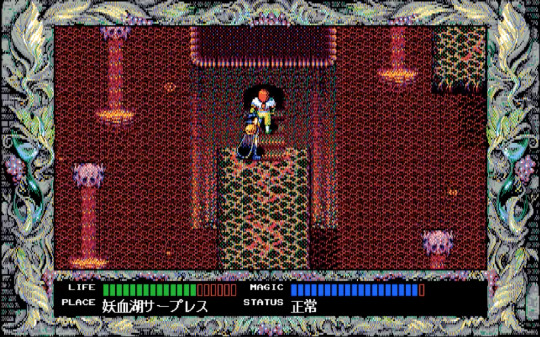
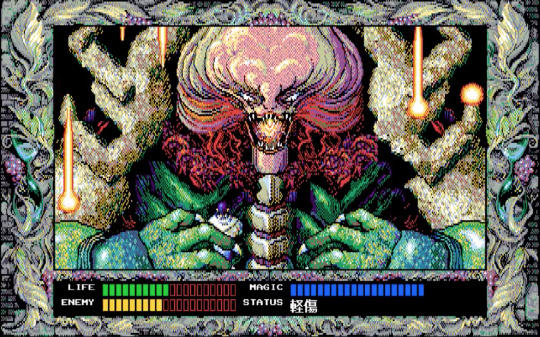
Most English-speaking people today who are aware of videogame developer T&E Soft only know of them through two titles: the first Hydlide (specifically the, by 1987, dated/inferior NES re-release) and Virtual Hydlide. Both of these have acquired a pretty undue notoriety, mostly encouraged by the exaggerations of e-personalities intent on making everything out to be either AWESOME or LMAO TERRIBLE, since that’s what gets the most attention. It’s better to see Hydlide in its PC-6001/PC-88 context as an innovator of the action-adventure-RPG genre, and the influence for the first two Ys games’ format (also little-known: Ys III: Wanderers from Ys was modeled on the design of Tritorn 2, a game by developer Sein/Xain/Zain Soft; it even copied some of the settings!). Understood as such -- compare the PC releases of Hydlide to, e.g., the original Dragon Slayer, also released for the PC-88 in 1984 --, we can also begin to understand its popularity as a consequence of something more than millions of Japanese citizens being deprived and deluded. Virtual Hydlide is noteworthy too as a strange and perhaps unique attempt at crafting a lightly randomized, score- and time-based 3D arcade game for a home console using the overworld + dungeon crawler format. Its most significant downside is a miserable framerate. I get why this would put people off from playing it, especially since it’s always conflicted with the design’s speedrun-like emphases. But if this were the worst thing you could knock a game for, the medium would be specially positioned among all others for a minimum of faults (hint: it isn’t).
With that preamble out of the way, I’d like to bring to unaware readers’ attention Rune Worth 2 and 3, released for the PC-98 in 1991. As usual, if your only resources on the English-speaking Internet for videogames are Wikipedia and MobyGames, you would probably never know about either of these (Wikipedia cites the first Rune Worth (1989) for the MSX, but says nothing of the sequels; MobyGames does not even cite the former). The Rune Worth series was, by all appearances, T&E Soft’s successor to Hydlide, and while it is formally organized as a trilogy, the three-months-gap between the second and third installment’s release, their discounted price, and the way in which 3 picks up right where 2 leaves off (to the extent of being able to transfer your character data from one to the other), means that, really, there are two full entries. Much of this information was laid out on a dedicated stream for both these games by Macaw45, who has dedicated years to researching, cataloguing, and exposing people to lesser-known videogames. If you can’t read Japanese, or just don’t want to play the games yourself, the embedded video would be your best bet for seeing them in action.
There are many things to say about Rune Worth 2/3 -- the dramatic introductory sequence preceding the main menu, the luxuriant sprawl of its public spaces (one can, for example, go out to the first castle’s rooftop, partitioned into a little pseudo maze, despite no requirement for doing so), its equal emphasis on setting, story, and action -- but since I’ve elected to make this into an image-based post, I want to illustrate how amazing these games look. Even from a distance, many PC-98 games have a distinct and highly abstract composure; and, looking at them up close, where the unlikeliness of certain chromatic and textural decisions make themselves known, it’s a wonder over and over again how representation emerges from what I described in a post about Super Hydlide as “an ornate and time-worn carpet.” The resemblance to a tapestry is especially obvious with Rune Worth 3 and its faded floral border depicting a grape vine. The overall visual splendor of these mosaics on a PC-98 monitor would, of course, be all the subtler and greater.
Over time, a handful of early- to mid-90s Japanese PC videogames have gotten more exposure in the West as the consumption of anime and nostalgic sentiment have grown hand-in-hand (not infrequently to pathologically anti-social effect). The bulk of these have tended to be of the visual novel/eroge type. YU-NO: A Girl Who Chants Love at the Bound of this World, released in 1996 for the PC-98, is a particularly popular example, in part because of its soundtrack by Ryu Umemoto. For me, the in-game artwork for these titles can be technically commendable, but is otherwise not very exciting. When I look at Rune Worth 2 or 3, it sometimes reminds me of looking at artist Kathleen Ryan’s beady sculptures of rotting fruit and marveling at the surprising vibrancy and coloristic range within putrefaction: the intersection of the beautiful and ugly, and its fructifying of the grotesque. This extends to a number of PC-88 titles too, like Sorcerian (Falcom, 1987) and DIOS (Zain Soft, 1989). In some cases, there is a remarkable convergence of visual grit/granularity and fidelity, maybe exemplified best of all by the PC-98 release of Xak III: The Eternal Recurrence (MicroCabin, 1993). But even there I find myself missing the marvelous polychromaticism of these two Rune Worth games. The intention for, say, Super Nintendo games to be played and seen on CRT TVs has never been an impediment to contemporary indie developers mimicking their look for modern LCD monitors. Even if it feels unlikely, then, I wonder if we will one day see a small revival of that fibrous, loom-woven PC-88/PC-98 look.
﹌﹌﹌﹌﹌﹌﹌﹌﹌﹌﹌﹌﹌﹌﹌﹌﹌﹌﹌﹌﹌﹌﹌﹌﹌
You can support my writing, music, and artwork on Patreon.
177 notes
·
View notes
Text
Making the Screenshot/TV look
I ended up compiling this for a Discord server but I’ll share it here too.
Imgur version: https://imgur.com/a/LREsOA9

alright so you got your drawing all nice and finished up but you wanna give it that tv look for an extra pop, eh? This tutorial will be for Krita but the majority of the techniques can be applied to other programs. I'll try to include the workarounds for the odd Krita specific thing.

As you could see, I had things segmented into quite a few layers. To make things easier on yourself, group things up based on how close they'll be to the viewer/camera. In this instance, closest was the ground (labelled Ground Merge), then Elec Man (char merged), and then lastly the backdrop (bg merged). While layer naming isn't necessary, it'll save you a lot of headaches further down the road. What I've done is duplicated the components and merged the duplicates, and put the originals all in a folder labeled Master. Some of my filtering requires merged components, and some requires individuals, and this'll make it easier to grab them as they're needed.

First, you'll duplicate your character merges 3 times. In Krita, apply each of the Copy layer types to them, normally found in the Misc category. I've moved them to favourites because I use them so much.

You also move each layer in a different direction, I generally move the CR and CG layers 1-2 px to the right and left, and then the CB layer 1 px down. You want it to just be visible to give that sort of screen burn look. While I haven't made new layers for this tutorial, you will end up with a particularly sharp looking image.

To remedy the sharpness, on each one you'll be applying a 1-2 px Gaussian blur, depending on your canvas size/dpi. You want it just to start looking out of focus. ( Filters > Blur > Gaussian Blur)

ALTERNATIVE METHOD: Some time after I started doing it this way, Krita added in a filter that does more or less the same thing in the G'MIC-QT filters. I'm not sure what other programs also feature this, but I know there are a few. (Filters > Start G’MIC-qt)

Navigate to the Degradations drop down and select Chromatic Aberrations. You'll prolly want around 2px for each of the values so it just shows like the long method I mentioned above. Again, you'll want to do this on a single duplication of your merged character. You will also apply the small Gaussian Blur to this layer as well. For other programs which are unable to do either method, I -believe- what you can do is a triple duplicate of the merged layer, set each one to Exclusion, shift them so the colour distortion becomes visible, then remerge. It's been awhile, but I -think- that's what I used to do in Photoshop.

To solve the out of focus issue, re open your Master files and duplicate JUST your ink layer. Move said duplicate to be above the burn layers, and drop it to around 75% opacity. Sometimes setting it to Overlay makes for a more optimal look, usually with overall darker lines. You can experiment with a 1ish px blur if you find it's too sharp, but I don't usually find that necessary.

These methods are then also applied on the background elements. To push for a feeling of distance, simply apply a heavier blur on the Copy/Chromatic layer(s).

These were also duplicate layers, each with a different blur applied to them. I don't mess with my base duplicates as it makes it easier to continue duplicating off them instead of remerging the master copies each time.

The bg DOF (Depth of Field) layer had exactly that applied to it, then dropped down to 60% range opacity. I wanted it to gradually fade off and not overpower the background as a whole. This can also be achieved by using layer masks and a Gaussian Blur... whatever suits your fancy. I also applied this to a duplicate of the foreground concrete he's sitting on.

If your character has any cool glowy bits, you can put these in here. I place it above the filtered layers and use an Airbrush to get the effect. Usually a more intense version of the colour I want glowing with a lighter core. I tend not to use whites/near whites unless I really want it to come off as piping hot or frigid cold.

Next, you'll either take a circle gradient or your airbrush in a dark colour (I tend to use blues as I find black to be a bit flattening) and darken the edges. You can set this to either Multiply or Overlay, depending on what kind of vignette you want. This helps sell a camera look, or perhaps an old tv. I rarely leave them on 100% opacity and it's completely fine if you find yourself fiddling with the value to get it just right. I shouldn't have to say it, but I hope you've saved at least a couple times at this point.

Create a new layer folder and set it to Pass Through, or whatever allows it to apply effects to things below it. Folders simply allow you to turn on and off clumps at your will, which is exactly what I've done to make this image into a tutorial instead of redoing the whole process ;). Create a new layer and fill it with white, and use your HSV (Hue Saturation Value) Adjustment window to drop it to exactly 50% gray. Common Shortcut is Crtl+U. Set the layer to Overlay and it'll basically disappear... you want this for your Noise/grain layer. (Filters > Other > Random Noise)

I tend to leave it at the default settings and use the Opacity to dictate how intensive it actually is. I want it visible in this case, but not so much it feels like an eye migraine. However, there are some cases you may want stronger ones.

Next, plop a big ol rainbow circular gradient over your image. The width of the loops doesn't matter too much.

Set this layer to Soft Light (in this case I used Photoshop's Soft Light specifically, though it doesn't matter too much. It's just whatever one I happen to click on.) and drop it to a very, very low opacity, usually under 20, if not 10%. This adds a slight colour distortion over the image, something subtle you don't even usually notice on older TVs.

For subtitles, type them out in white Arial, centered formatting.

Then simply add a black outline, either through a Stroke layer style - which I don't believe was actually working at the time I made this image. I instead duplicated the white text layer and flattened it, lowered the value to pitch black and expanded the fill by a pixel or few to get the outline. Whatever suits your workflow.

And sign your work, you’re done!

sidenote: While I didn't use scanlines on this image (or film streaks), they're really quite simple to do. You can make a pattern with one 50% gray pixel and one white, vertical and apply that, then resize as needed. Setting it to Overlay will make the gray pixel invisible. If you feel the need, you can blur it a bit so they're not quite so harsh... it all depends on how exactly you want it to look. Experiment! For vertical running film streaks like you'd see in really old cartoons, I just use the Krita Filter.
These methods aren’t concrete, this is just my workflow to achieve the effect.
66 notes
·
View notes
Text
Flame vs Katy Perry

So, a terrible thing has happened in the music world and that makes my calling of not pursuing a commercial career more and more evident due to the latest ruling between Katy Perry vs Flame case. First of all let’s go over the points again what it means when it comes to copyright in music.
What can you copyright?
You can copyright lyrics and melodies. That’s pretty much it. Anything else are the building blocks of a song that makes up the genre.
What CAN’T you copyright?
In music we say that melody is never complete without the ornamentation surrounding it, that will say the building-blocks that are required to make up the genre. If we start copyrighting a genre, we wouldn’t have genres to begin with.
A genre is built up with the following things besides the melody:
Chords
Chord-structure
Bass-line
Rhythm (Percussion and drum-patterns, now included MPC based hiphop rhythms)
+ plus any orchestration techniques spanning from the last 300 years.
Music is not a SPORT, it should be enjoyed!
When it comes to writing music, most commercial artists are moving around the circle of 5ths, a kind of a chord-relation-chart that tells you basically which chords are connected that could lead to other 5 chords surrounding the song. But other genres like jazz basically goes beyond the circle of 5ths, trying to explore new grounds. And just like with jazz, in the early days, it all started with taking already existing songs and twists them in a certain way so they became something very different from it’s source. For many people this is a challenge that gives people, who are good at their craft, when crafting a cover, respect. For me, privately, I was never a big Beatles-fan, but I find arranging their simplest songs into something more complex exciting and fun! And if I can take their pop-song like “Day Tripper” and turning it into a slick funk-jazz version, with new harmony and melody and keeping the lyrics, I’m honoring the original material. And of course, when I perform the song I let the audience know that I’m doing a cover, not a copy-band project. And with that said, I contribute to The Beatles royalties by honoring them with a new version of their song.
But taking a 4-chord song like Day Tripper means I can change so many things about the song, but the most important thing I try to not to disturb too much, is the melody, but I do have to compromise with a new voicing, changing the line to match up with the new harmony. But the lyrics have not been changed. So no matter what, this is still “The Beatles” copyright I’m dealing with.
If I would pass this on as my own “original” work, oh boy would I be in trouble.
Song vs Song
There are a few similarities in the song, but also those similarities are broken when we start listening for the things more in detail. Let’s break it down really easily with the first thing that hits our eardrums first.
THE OSTINATO
An unbroken rhythm in 1/8 division. In Flame’s song it starts on C and crawls down to an A on the keyboard, chromatically in the key of A minor (The C-major’s little brother, all white-keys on the piano. The rhythm looks like this: CCCCBBBA.
Katy Perry has a similar thing, but not in a synthlead but with a voice-based synth. It’s in a different key, but let’s pretend that it’s in the same key, her ostinato goes like this: CCCCBBAA
Verdict: Not the same. I consider this to be a RIFF, not a melody.
THE TEMPO
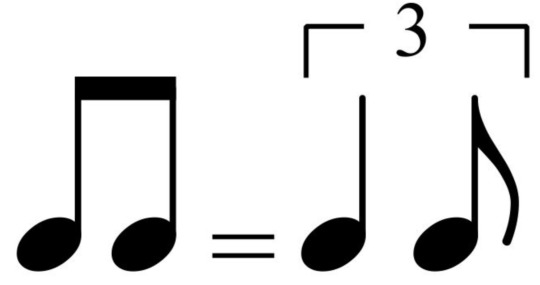
Tempo comes from the Italian word, that basically means “TIME”. You can’t copyright time. Tempo really determines the feel of the song and sets up all the instruments way to be played. On a score-sheet you will see a designated tempo in bpm: 120 bpm (120 beats per minute, or 2 beats per second.) Besides the tempo, you might even get an indication how the beat/tempo should be felt. Like in swing music we usually notate it with 2 8th notes, tied together with a triplet indicator. But to write it all out like that, to simplify the notation with usually write 2 8th-bar notes, then an = sign telling the result on how to read it as a dotted 8th tied to a 16th note, explaining a shuffle-feel.
In this case, both songs are played STRAIGHT. No shuffle what so ever.
Verdict: not the same, but you can’t copyright a TEMPO.
INSTRUMENTATION
Flame’s instrumentation is sparse, very simple. Using prominently a saw-tooth synth with a slow-portamento (glide effect between 2 notes) that actually obscure the “true pitch” in the ostinato.
Katy Perry has a more full-fledged arrangement with more instruments, harmonies and different sound-sources. Her ostinato consists of a more organic, voice like quality sample.
Verdict: This would be silly if we all could copyright instruments. We can’t.
Melody
This would be THE MOST IMPORTANT thing to see if the songs are similar. But they AREN’T.
In Flame’s case, majority of the verses are being RAPPED, without any melodic content to the voice.
Katy Perry actually sings a real melody.
Verdict: Not EVEN CLOSE! Katy Perry is in the SAFE ZONE on this one.
Lyrics
Tightly connected to the voice are the lyrics. Are they the same? Thematic content? DO they line up EXACTLY THE SAME?
In Flame’s song, the lyrics is about Religion.
In Katy Perry’s song it’s about Friendship, wins and gains, not making enemies, of course looking at the video it kinda contradicts the message in a fun way, but that’s what video-producers do.
Remember the fight scene in The Punisher (2004) between The Punisher and the tall Russian? The music behind it is a classic Italian opera, which really turns the gruesome battle into a dark comedy.
Verdict: Katy Perry is SAFE on this one as well.
SAMPLES
On this note, it gets a little bit hairy. The biggest question is, did they use the same phrase, the same wording from FLAME’s recording?
Is it a common phrase used in that genre of music? If so, Michael Jackson would sue everyone for using his classic -”c’mon!” from millions of other artists.
Where the phrase lies in the song is about the same, it’s like the introduction before the artists start singing in both songs.
Biggest question of them all, DID TEAM PERRY STEAL a sample, from a song they claim they haven’t heard? The voice who introduces the song also include Katy Perry and the Rapper Juicy J in his voice. Another voice-actor and not the singer from FLAME’s recording? This is a tough one to break. But it’s only 4 words we are talking about. And it happens in the same area of the song.
It just happens that sometimes, songs overlap each other like stars in the sky, making a perfect line. I know a lot of songs that sounds alike, but nowhere close to be copyrighted because of LYRICAL and MELODIC content.
VERDICT: This is the only point that’s of interest of the discussion. Would love to hear the process of how they both ended up with the same wording and a similar voice on both of the recordings. The voices sounds really close to each other, but the other voice still extends the recording, making me believe it is NOT a SAMPLE but an ORIGINAL RECORDING specially made for KATY PERRY’s SONG. 50/50. But I’m pretty sure it’s an ORIGINAL RECORDING. And copyrighting a COMMON PHRASE would be LUDICROUS. Then Shakespear would OWN THE ENGLISH LANGUAGE!
These were my thoughts.
1 note
·
View note
Video
instagram
Here is something new and different. A Rogue Sitar Guitar, which is a direct copy of the Danelectro original Sitar Guitar. Still getting a feel for it but I thought it sounded cool enough to do a quick post. . . This is my Rogue Sitar Guitar, tuned to Drop D, going through the Marshall DSL40C and Marshall 2 12 cabinet. . Pedals in order: Boss TU-3 Chromatic Tuner, Boss CS-3 Compressor Sustainer, MXR Micro Amp, Boss LS-2 Line Selector; in the effects loop: MXR EVH Flanger,, MXR KFK Ten Band EQ, Electro-Harmonix Stereo Memory Man, Boss RV-6 Reverb. I also have two TC Electronics Bona Fide Buffers, one on each board. This is all into the clean channel on the amp, gain on 4, volume at 4, running at half power. Drum machine is a Boss Dr. Rhythm DR-660 going into my old Acoustic 320 bass head from the 70s, into a 4 10 cab with the unblown speakers left from my old SVT cab. . 🎶🎵🤘 . #rogueguitars #roguesitarguitar #marshallamps #marshalldsl40c #ibanez #mxr #ehx #tcelectronics #bosspedals #guitarist #bassist #musician #originalmusic #metal #rock #goth #doom #popmetal #sludge #prog #shoegaze #blackmetal #stoner #ambient #lookingforaband @marshallamps_uk (at Ocean County, New Jersey) https://www.instagram.com/p/BqLtGoGnNSR/?utm_source=ig_tumblr_share&igshid=187ba2gtp0v6r
#rogueguitars#roguesitarguitar#marshallamps#marshalldsl40c#ibanez#mxr#ehx#tcelectronics#bosspedals#guitarist#bassist#musician#originalmusic#metal#rock#goth#doom#popmetal#sludge#prog#shoegaze#blackmetal#stoner#ambient#lookingforaband
1 note
·
View note
Text
Autotune Adobe Premiere

Free VST Plugins, Free AAX and AU Plugin Download 15 Free VST plugins, audio DAW music production AAX and AU plugins by Voxengo, with plugin download links. 'Free' in our case does not assume 'inferior': our free plugins are based on the same best technological base as our paid plugins. Amazing autotune VST plugin GSnap, by Graham Yeadon, is arguably the best free autotune / vocal harmonizer vst effect there is! It can be used subtly to correct the pitch of a vocal or instrument, or, with more extreme settings, it can be used to create the famous robot-voice effect.
Adobe Premiere Crack
Adobe Premiere Free
Autotune In Adobe Premiere
For most common pitch problems, Auto-Tune https://montrealfox426.tumblr.com/post/656952918105358336/one-password-firefox. Evos Automatic Mode instantaneously detects the pitch of the input, identifies the closest pitch in a user-specified scale (including minor, major, chromatic and 26 historical and microtonal scales), and. .
File Name:Auto-Tune Evo VST forWindows
Author:Antares Audio Technologies
License:Shareware ($399.00)
File Size:17.34 Mb
Runs on:Windows Vista, XP
This plugin allows CoolEdit / AdobeAuditionAntares efx 3 torrent. to read AC3 and DTS files and write AC3 files AC3Filter Audition plugin allows CoolEdit / Adobe Audition to read AC3 and DTS files and write AC3 files. Here are some key features of 'Adobe Audition Plugin':- Built on AC3Filter 1.
File Name:ac3filter_audition_0_1a.zip
Author:Vigovsky Alexander
License:Shareware ($)
File Size:204 Kb
Runs on:Win All
Add surround sound panning and encoding to your Adobe Audition! Add Surround sound panning and encoding to your Adobe Audition. After installing the PanHandler, you'll be able to precisely control the positioning and movement of the sound elements in any of your audio tracks.
File Name:PanDemoCEP.exe
Author:Kelly Industries
License:Shareware ($99.95)
File Size:1.15 Mb
Runs on:WinXP, Win2000, Win98
Record, mix, edit, and master digital audio files with powerful tools that bring flexibility and control to your desktop studio. Easily create music, produce radio spots, and restore imperfect recordings. Bring audio and video together using smart. .
File Name:index.cfm
Author:Adobe
License:Shareware ($149.00)
File Size:225 Mb
Runs on:Win Vista, XP
Cool Edit Pro (now AdobeAudition) is a digital audio editor computer program from Adobe Systems featuring both a multitrack, non-destructive mix/edit environment and a destructive-approach waveform editing view that has been referred to as the. .
File Name:Cool Edit Pro
Author:Adobe Systems
License:Shareware ($)
File Size:19.34 Mb
Runs on:Windows XP, 2000, 98, Me, NT
From the company that revolutionized vocal production with Auto-Tune comes AVOX 2 - the second generation of the Antares Vocal Toolkit. Building on the power of the original AVOX plug-in bundle, AVOX 2 adds an additional five state-of-the-art vocal. .
File Name:AVOX_2_RTAS_PC_v100.zip
Author:Antares Audio Technologies
License:Shareware ($599.00)
File Size:53.56 Mb
Runs on:Windows Vista, XP
ClickFix for AdobeAudition is a click and pop filter plug-in, specifically designed for Adobe Systems AdobeAudition and Syntrilliums Cool Edit 2000 and Cool Edit Pro. ClickFix is ideal for cleaning up vinyl LP recordings before transferring them. .
File Name:ClickFix for Cool Edit
Author:Jeffery Klein
License:Shareware ($45.00)
File Size:169 Kb
Runs on:Windows XP, 2000, 98, Me, NT
VAC is intended to connect several audio applications together in real time. It's like a sound card with hardwired input and output. Thus, you can record and process output of almost any audio application by almost any other audio application.
File Name:vac460.zip
Author:Eugene V. Muzychenko
License:Shareware ($25.00)
File Size:726 Kb
Runs on:Win7 x32, Win7 x64, WinOther, WinServer, WinVista, WinVista x64, WinXP, Other
Does not require Adobe速 Acrobat速. Only $995 and you can try before you buy. Will it work with my scanner? Try it and see. Numerous plugin options available. Link ScanPODToPDF to your application via APIs. Option to append customer documentation.
File Name:scanpodtopdfsetup.exe
Author:O Imaging Corp.
License:Shareware ($995.00)
File Size:1.9 Mb
Runs on:Windows All
VinylStudio makes it easy to digitise your vinyl albums and cassette tapes. It handles the entire process: recording, looking up track listings on the Internet, splitting recordings into tracks, burning CDs and copying tracks to your MP3 player.
File Name:VSInstall.exe
Author:AlpineSoft
License:Shareware ($19.95)
File Size:607 Kb
Runs on:Windows2000, WinXP, Windows2003, Windows Vista
Convert Vinyl LPs to CD 2.0 provides users with a perfect guide to converting cassettes and records to CD, MP3, or WMA.Major Features:Starting with hardware requirements, this eBook steps through the process of converting records and cassette tapes. .
File Name:Convert Vinyl LPs to CD
Author:Ludington Media, Inc
License:Trial ($17.00)
File Size:3.1 Mb
Runs on:Windows Me, Windows XP, Windows 2000, Windows
A new audio salad containing more than 400 exotic audio ingredients in the form of unique sounding flavors, fresh drum beats, twisted and vintage synth riffs, grooving basses, fast arpeggios, acid lines, esoteric chords, chaotic sequences, evolving. .
File Name:ks-loops-salad-lite-free.zip
Author:Kreativ Sounds
License:Freeware (Free)
File Size:24.1 Mb
Runs on:Mac OS X 10.1 or later
Hi Experts, I want to download auto tune for adobe 1 5. Please write down the process step by step. Please help with images if possible. Antares Auto-Tune VST is a Shareware software in the category Audio & Multimedia developed by Antares Audio Technologies. It was checked for updates 126 times by the users of our client application UpdateStar during the last month. The latest version of Antares Auto-Tune VST. Adobe Audition 1.5 (어도비오디션1.5)오토튠. 3.첨부파일 압축을풀고 vsT2 폴더안에 Autotune Evo.dll 을 넣습니다. 그후 Effects 메뉴를 보면 Add/Remove VST Directory. 6.이렇게 나오면 Add. C:Program Files (x86)Common FilesSteinbergVST2 이위치를 픽합니다. May 03, 2019 Adobe Audition 1.5 Free Download Latest Version for Windows. It is full offline installer standalone setup of Adobe Audition 1.5. Autotune For Adobe Audition 1.5 Free Download; Adobe Audition 1.5 Overview. Download the version of Auto-Tune you want from the Antares Auto-Tune and vocals processing website. Ensure that Adobe Audition is closed. May 18, 2012 Hi. I installed Adobe Audition CS6, and VST plugins and VS3T don't appear in Effects Windows, only the names VST and VST3. I've been in 'Audio Plug-in Manager' and selected the folder where the plugins are 'C:Program FilesAdobeAdobe Audition CS6Plug-insVST3' and 'Scan for plug-ins' and don't a.
Adobe Premiere Autotune; Adobe Audition 3.0 free. download full Version; Read character and show information. Browse our online music resources. Here you will find links to schools, scholarship information. An auditioned 50-member chorus that performs a broad repertoire of. Free Download Adobe Premiere Pro Crack Latest Version 2021. Adobe Premiere Pro Crack 2021 is an ideal application for video editing. Adobe premiere pro Crack Free Download is the best software for video editing and it can use it edit TV, films, web and many many more.This application has so many features and creative tools, like integration with other Adobe apps and services, and the power of. Auto Tune Effect Adobe Premiere 1. Restart Adobe Audition and deselect the plug-in from the VST plug-in manager. Stability issues can arise if a plug-in fails to initialize properly.
Related:Vst Adobe Audition Auto Tune - Vst Adobe Audition Eq - Adobe Audition Vst - Auto Tune Vst - Vst Auto Tune
For most common pitch problems, Auto-Tune Evos Automatic Mode instantaneously detects the pitch of the input, identifies the closest pitch in a user-specified scale (including minor, major, chromatic and 26 historical and microtonal scales), and. .
File Name:Auto-Tune Evo VST forWindows
Author:Antares Audio Technologies
License:Shareware ($399.00)
File Size:17.34 Mb
Runs on:Windows Vista, XP
This plugin allows CoolEdit / AdobeAudition to read AC3 and DTS files and write AC3 files AC3Filter Audition plugin allows CoolEdit / Adobe Audition to read AC3 and DTS files and write AC3 files. Here are some key features of 'Adobe Audition Plugin':- Built on AC3Filter 1.
File Name:ac3filter_audition_0_1a.zip
Author:Vigovsky Alexander
License:Shareware ($)
File Size:204 Kb
Runs on:Win All
ClickFix for AdobeAudition is a click and pop filter plug-in, specifically designed for Adobe Systems AdobeAudition and Syntrilliums Cool Edit 2000 and Cool Edit Pro. ClickFix is ideal for cleaning up vinyl LP recordings before transferring them. .
AnyDesk: Always Free for Personal Use, Now Free for Students! At AnyDesk, we don't believe in forcing personal users to purchase a paid plan to be able to occasionally help friends and family. That's why we provide a free version for personal and student use. Now we're making the free version available to all students, so they can maintain a seamless learning environment in today's changing education. Connect to a computer remotely, be it from the other end of the office or halfway around the world. AnyDesk ensures secure and reliable remote desktop connections for IT. Anydesk personal use free. We offer the best tools for personal use that ensure a smooth workflow. Even if you’re on the go, working on your personal projects from your laptop, it’s as if you’re right in front of your remote device. Need to print out a document from your remote device? Use our Remote Printing feature. The AnyDesk printer sends a print job to your local printer.
File Name:ClickFix for Cool Edit
Author:Jeffery Klein
License:Shareware ($45.00)
File Size:169 Kb
Runs on:Windows XP, 2000, 98, Me, NT
Cool Edit Pro (now AdobeAudition) is a digital audio editor computer program from Adobe Systems featuring both a multitrack, non-destructive mix/edit environment and a destructive-approach waveform editing view that has been referred to as the. .
File Name:Cool Edit Pro
Author:Adobe Systems
License:Shareware ($)
File Size:19.34 Mb
Runs on:Windows XP, 2000, 98, Me, NT
Audition is a small utility that will allow you to play sound files located in a disk directory. A play list is created of all sound files found in the selected folder. Sound files can be played individually, or the entire play list can be played one. .
File Name:AUDITION.ZIP
Author:Gregory Braun
License:Shareware ($12.95)
File Size:1024 Kb
Runs on:Windows All
Add surround sound panning and encoding to your Adobe Audition! Add Surround sound panning and encoding to your Adobe Audition. After installing the PanHandler, you'll be able to precisely control the positioning and movement of the sound elements in any of your audio tracks.
File Name:PanDemoCEP.exe
Author:Kelly Industries
License:Shareware ($99.95)
File Size:1.15 Mb
Runs on:WinXP, Win2000, Win98
Watch the latest video tutorials for Adobe products and learn from the best! Photoshop, Illustrator, InDesign, Dreamweaver, After Effects, Adobe Premiere Pro, Adobe Muse - whatever you want to learn - just use Tutorials for Adobe. .
File Name:Tutorials for Adobe
Author:Tutorial Apps
License:Freeware (Free)
File Size:
Runs on:Handheld, Mobile Other, Windows 8, Windows Phone 8, Windows RT, Other
Watch the latest video tutorials for Adobe products and learn from the best! Photoshop, Illustrator, InDesign, Dreamweaver, After Effects, Adobe Premiere Pro, Adobe Muse - whatever you want to learn - just use Tutorials for Adobe.
File Name:Tutorials for Adobe for iOS
Author:Tutorial Apps
License:Freeware (Free)
File Size:
Runs on:iPhone, iPad, iPod, iTouch
Record, mix, edit, and master digital audio files with powerful tools that bring flexibility and control to your desktop studio. Easily create music, produce radio spots, and restore imperfect recordings. Bring audio and video together using smart. .
File Name:index.cfm
Author:Adobe
License:Shareware ($149.00)
File Size:225 Mb
Runs on:Win Vista, XP
Psi status with current tune in Amarok psi-publish-tune is a basic script that enables you to publish the currently playing tune via Psi XMPP instant messenger.It does this by simply writing a ~/.
File Name:91136-Psi_Publish_Tune_2-2.2.amarokscript.tar.gz
Author:Bernhard T.
License:Freeware (Free)
File Size:10 Kb
Runs on:Linux
Another distorted sound with bite and auto panning.
File Name:RS ReQuire VST v1.0.zip
Author:Retro Sampling
License:Shareware ($)
File Size:1.03 Mb
Runs on:WinXP, Win2000, Win98
Vinyl Boyis a VST plugin that brings DJ scratching directly to your studio, with the advantage of precise midi treatment for the exact results you need.
File Name:vinylboydemo.zip
Author:Musicrow
License:Shareware ($25.00)
File Size:1 Kb
Runs on:Win95, Win98, Windows2000, WinXP, Windows2003, Windows Vista
Download Autotune Vst For Adobe Audition 1.5 Crack
Related:
Download Autotune Vst For Adobe Audition 1.5 Free Download For Windows 7
Vst Adobe Audition Auto Tune - Vst Adobe Audition Eq - Adobe Audition Vst - Auto Tune Vst - Vst Auto Tune
Download Autotune Vst For Adobe Audition 1.5 Audition 1 5 Gratuit
Adobe Audition Autotune Plugins Free
Pages : <1 2 3
Editing audio can be a tedious task and to obtain professional results, proper pitch must be accomplished. With Auto-Tune Evo VST, you've got a set of tools to properly test, tweak and perfect the sound output.
The program provides a clean interface with all of the tools to toggle pitch amount, amplitude and formant. It can also retune the speed, 'humanize' and add a natural vibrato to the target audio track. Along the top of the interface, you'll also find options to change the key of the audio, scale, scale detune, transpose and modify the throat length to provide natural sounding audio.
As an audio plug-in for Antares Auto-tunes, it really does provide a world-class editing option for getting the perfect pitch with a bunch of different corrections for different types of audio tracks not limited to instrument playback and professional and amateur singers.
The graphical mode of Auto-Tune Evo VST can meticulously adjust wave-forms and zooming in and out can provide minuscule corrections.
In terms of options and program preferences, different options can be tuned such as the buffer size, number of undo actions and the window size.
All in all, Auto-Tune Evo VST is certainly worth a look as its really professional tools can make a world of difference in optimizing and perfecting the sound of audio tracks.
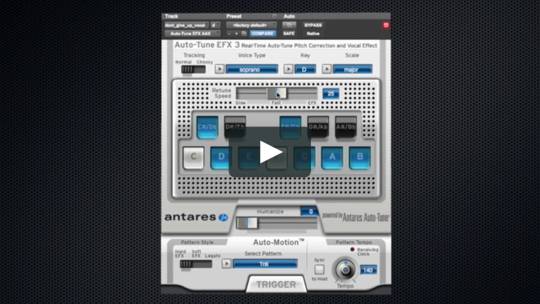
Auto-Tune Evo VST 6.0.9.2 on 32-bit and 64-bit PCs
Adobe Premiere Crack
This download is licensed as shareware for the Windows operating system from audio and video editors and can be used as a free trial until the trial period ends (after an unspecified number of days). The Auto Tune Evo VST 6.0.9.2 demo is available to all software users as a free download with potential restrictions and is not necessarily the full version of this software.
Adobe Premiere Free
Filed under:
Autotune In Adobe Premiere
Auto-Tune Evo VST Download
Major release: Auto-Tune Evo VST 6.0
Pitch Correction Software

0 notes
Text
BEAUTY IN THE MUNDANE REMEDIATION.
I started to manipulate my image digitally using Procreate.
Image 1 - I copied the image, flipped it and blended it using Multiply. I then distorted the image using the Liquify effect.
Image 2 - I copied the image twice, scaled them down and rotated them to fit on top of the original layer. I then blended them using Subtract.
Image 3 - I copied the image twice, scaled them down and rotated them to fit on top of the original layer. I then blended them using Exclusion.
Image 4 - I edited my original image, increasing the saturation to bring out the colour and also show more of the grain from the scanned image. I then copied and pasted different sections of the image and blended them together using Multiply.
Image 5 - I created this image using two different effects, Halftone to make it look closer to a screen print and Chromatic Aberration. I played around with the scale of the Chromatic Aberration until I got it to a result I was happy with.
My favourites out of these are 2 and 3. I love the dark colours and contrast, it's pretty different to the other work I've done for this brief but I do think it works well.


#glasgow college#hnd year 2#online sketchbook#digital media#development drawing#zoom class#beauty in the mundane#printmaking#bm_hndcpm2
0 notes
Text
Budget Mana Base for Commanders: 5 colors decks.
How many times have you heard that a good deck needs to have all original dual lands and fetchlands so its mana base is fine? As long as you are a millionaire or you're playing on Cockatrice that is really easy and possible to do, but, for the rest of us whose budget is limited we have to come up with something else.
In this article I will show you how you can get an effective mana base for a 5 colors commander without having to sell a kidney to do so. It can be used for any kind of deck (2 colors, 3 colors, and 4 colors) but i’m focusing more on 5 colors. A brief disclaimer: This is only my opinion on what works best, so don't take it as a final word, and you can make any changes you like, fitting your needs.
First, we have to cover the basics of every commander deck: Land-No land ratio. I like to run my decks with approximately 34 lands. Recommended are around 36/38, but with mana accelerators i find 34/32 lands fine, 32 the lowest. It really depends on how many accelerators you have and your average CMC for the deck.
The second important point to consider are mana accelerators, which are divided into three: Ramp spells, mana creatures (which I wont cover, as it depends totally on your deck), and mana stones. Some colors have a better chance to ramp than others, being green the master of ramping, so you have to take that into account.
Third are mana fixers, because running 5 colors can get you one color screwed.
And finally, before actually starting, you have to check your commander's color ratio, and see which colors predominate.
Now, the mana base. We're going to start from the most expensive to the cheaper.
First: The lands.
Yeah, believe it or not, the lands end up being the most expensive cards in a deck (well, there re some ridiculous expensive cards that do not count.) Lands can be divided into:
Multicolor lands: Lands that produce multiple color.
Fetch Lands: Lands that search for other lands.
Utility lands: Lands that can be used for other things beside generating mana.
Basic lands.
For multicolored lands we have 2 color lands, 3 color lands, and all color lands. I find the all color lands the most important for 5 color commanders, as they can generate any color for anything in your hand or your commander. Depending on your deck, you could have better chances of getting this lands than other decks. Allies decks have Ally Encampment, Dragons have Haven of the Spirit Dragon, Elementals have Primal Beyond , and so on. Among all colors lands we have some really REALLY expensive (Cavern of Souls, and Glimmervoid) that if you have them you can include them, but those are 0 budget friendly.
Lands that are a total must:
City of Brass
Command Tower
Mana Confluence
Exotic Orchard = Unless playing against a monocolor deck, this usually generates from 3 to all colors.
Forbidden Orchard = If you don’t mind giving a token to an opponent.
Grand Coliseum = Enters tapped, but still really helpful.
These generate any color mana with no restrictions, which is great.
Conditioned Lands:
Ally Encampment = For allies tribal.
Ancient Ziggurat = Only for creatures.
Haven of the Spirit Dragon = Only for Dragons
Pillar of the Paruns = Only for Multicolored
Primal Beyond = Only for Elementals
Sliver Hive = Only for Slivers
Spire of Industry = Only if you have artifacts, which you will probably have.
Thran Quarry = It must be sacrificed if you have no creatures.
Helpful Lands:
Aether Hub = If you use energy counters.
Crucible of the Spirit Dragon = For dragons.
Gemstone Caverns = To head start.
Lotus Vale = It's not too cheap, but if you can untap target land…
Mirrodin's Core = Putting a counter on it can be really useful.
Opal Palace = Your commander enters with +1/+1 counters.
Tarnished Citadel = If you don't mind the 3 damage.
Undiscovered Paradise = For landfall or if you can play more than one land each turn.
Depending on the ammount of lands and the speed of your deck, you can add the Vivid cycle (Vivid Crag, Vivid Creek, Vivid Grove, Vivid Marsh, and Vivid Meadow) if you think you will need them.
To avoid:
Transguild Promenade, Rupture Spire = Enters tapped and cost 1 mana. If your opponent blinks them…
Henge of Ramos, Holdout Settlement, School of the Unseen, Shimmering Grotto, Unknown Shores = Those are just filters, don’t fill your mana base witht that.
Tendo Ice Bridge = A single counter isn't worth it, unless you proliferate a lot.
Multicolored lands are nice, they can generate 2 or 3 colors, which is very versatile. 3 colors are the the most versatile, but they are not fetchable. I would include 2 or 3, with the most predominant colors in my deck.
3 color lands:
Arcane Sanctum
Crumbling Necropolis
Frontier Bivouac
Jungle Shrine
Mystic Monastery
Nomad Outpost
Opulent Palace
Sandsteppe Citadel
Savage Lands
Seaside Citadel
The exception for this is Murmuring Bosk, which can be fetched.
The Lair lands can be used, but they slow a little bit the game.
The 2 colors lands are a LOT, but useful budget lands are not that much. Shocklands are very useful, but the price of them is not budget friendly, so, if you have some add them to your deck, otherwise you should include these:
Canopy Vista
Cinder Glade
Prairie Stream
Smoldering Marsh
Sunken Hollow
Then, some other useful 2 colors lands:
Choked Estuary
Foreboding Ruins
Fortified Village
Game Trail
Port Town
Adarkar Wastes
Battlefield Forge
Brushland
Caves of Koilos
Karplusan Forest
Llanowar Wastes
Shivan Reef
Sulfurous Springs
Underground River
Yavimaya Coast
Tainted Field
Tainted Isle
Tainted Peak
Tainted Wood
Temples are really good if you want to scry, even if the slow the game a little bit.
To avoid:
Lands that enter the battlefield tapped with no other effect and add 2 colors. Also Gates, unless you're playing them all and Maze's End. Bouncelands can be fine, for fewer color decks, but 5 colors are not worth it.
Fetch Lands are really important lands, and something I didn’t really understand when I started Magic. It not only helps you fixing your mana, but also reduce the number of lands in your deck so later on in the game you wont be drawing lands. There are some really good fetchlands that are overlooked and budget friendly:
Ash Barrens = Not really a fetchland, but its cycling is really helpful.
Bad River
Bant Panorama
Blighted Woodland
Esper Panorama
Evolving Wilds
Flood Plain
Grasslands
Grixis Panorama
Jund Panorama
Krosan Verge
Mountain Valley
Myriad Landscape
Naya Panorama
Rocky Tar Pit
Terramorphic Expanse
Terrain Generator = Not fetching, but helps ramping.
Utility Lands really depend on your deck. So you have to search them depending on your needs. However, there are some basic utility lands you have to consider:
Arcane Lighthouse = No hexproof or shroud for your opponents.
Bojuka Bog = I always add this. Because you don’t know when are you facing a reanimate deck.
Cathedral of War = Exalted.
Crystal Quarry = A 5 colors filter is not that bad.
Cascading Cataracts = A 5 mana filter and indestructible.
Darksteel Citadel = Indestructible.
Ghost Quarter = Because we are mean and your Cabal Coffers is not fair.
Llanowar Reborn = Graft.
Mage-Ring Network = Mana storage.
Mirrorpool = Copy things.
Nephalia Academy = Discarding to Top.
Nykthos, Shrine to Nyx = Devotion.
Reliquary Tower = No maximum hand size.
Riftstone Portal = Put it in the Graveyard.
Scorched Ruins = Untap it somehow.
Shrine of the Forsaken Gods = Extra mana with 7 lands.
Temple of the False God = Extra mana with 5 lands.
Thespian's Stage = Copy land.
Unstable Frontier = Turns any of your lands into any basic land.
Untaidake, the Cloud Keeper = 2 colorless only for legendary creatures.
Wirewood Lodge = Untap target elf.
Not super Budget but if you can have them…
Urborg, Tomb of Yawgmoth
Vesuva
Hideaway lands are excelent depending on the deck you're running.
Manlands are cool too.
Basic lands should be considered last, but you should keep at least one of each type, specially for ramp spells and fetches.
With a land base done, everything else depends entirely on your deck. Here are some sugestions you can cosider.
5 colors commanders have the benefit of using all mana stones, so it wouldn’t be a problem. The number of mana rocks really depend on you, but here are some that you must include:
Sol Ring
Chromatic Lantern = Not too cheap, but it is a must.
Commander's Sphere
Fellwar Stone
Darksteel Ingot
Gilded Lotus = Went up in price, but it's worth it.
Mind Stone
Star Compass = If playing enough basic lands.
Coalition Relic = Not budget friendly, but it is a good card to consider.
If needed, these are fast accelerators and also generate color if needed:
Talisman of Dominance
Talisman of Impulse
Talisman of Indulgence
Talisman of Progress
Talisman of Unity
Thought Vessel
Ramp Spells are usually green, but there are not only green ones.
The green ones:
Cultivate
Explosive Vegetation
Farseek
Harrow
Journey of Discovery
Kodama's Reach
Mwonvuli Acid-Moss = This one is forest only, but the land destruction is good.
Nature's Lore
Peregrination = Not too recommended for the cost, use only is necessary.
Rampant Growth
Shard Convergence
Spoils of Victory
The non green:
Expedition Map
Gem of Becoming
Gift of Estates
Knight of the White Orchid
Kor Cartographer
Oreskos Explorer
Solemn Simulacrum
Sword of the Animist = An equipment, yes, but very useful.
Tithe
Wayfarer's Bauble
For the mana fixers I only have a couple of suggestion
Prismatic Omen = Not budget friendly, but it is really good.
Celestial Dawn = Beware of Iona.
Pulse of Llanowar
The already mentioned Chromatic Lantern for this.
Again, you don’t have to include everything you see here, but you can get a nice diea on how to fix the mana of your deck :)
So, what do you think? :D
12 notes
·
View notes
Text
Gallery and impressions: The Tamron 100-400mm F4.5-6.3 is light, sharp and stabilized
Shot on the Canon EOS 80D. ISO 800 | 154mm | 1/200 sec | F5.6
The Tamron 100-400mm F4.5-6.3 Di VC USD is a well-priced ($800) telephoto lens with a useful zoom range. Available in both Canon EF and Nikon F mount, this lens is useful on both full-frame and crop bodies, offering a 150-600mm equiv. field of view on the latter. We first saw it at PPE 2017 and were impressed by its reasonable size and weight given its reach – at 1.11 kg / 2.45 lb - it is the lightest lens in its class.
See our Tamron 100-400mm F4.5-6.3 sample gallery Optically, the 100-400mm is constructed of 17 elements arranged in 11 groups, including low-dispersion elements to correct for aberrations. It also features multiple coatings to reduce ghosting and flare, as well as a protective fluorine coating on the front element. Image stabilization is crucial when it comes to long zoom lenses and Tamron's optical Vibration Correction system offers the equivalent of 4 stops of correction (CIPA rated).
Shown with the optional tripod collar attached, sold separately for $130.
Key Specifications:
100-400mm zoom range
150-600mm equiv. field of view on APS-C
F4.5-6.3 maximum aperture
VC Image stablization
Dust and moisture resistant
Silent AF
Florine coating on front element
Minimum focus distance: 1.5m
Maximum magnification ratio: 1:3.6
Filter thread: 67mm
Available in Canon EF and Nikon F mount
Wildlife and outdoor sports shooters can take solace in the fact that this lens is moisture resistant, with eight rubber gaskets, including one at the base of the lens mount. It's compatible with Tamron's TAP-in Console, allowing users to update firmware and/or fine-tune AF. It can also be used with the company's 1.4X and 2X teleconverters. An A035TM accessory tripod collar is sold separately for $130.
Shot on the Canon EOS 5DS R. ISO 200 | 100mm | 1/1600 sec | F4.5
Design and Handling
According to Tamron the lightweight design of this lens is mostly due to its magnesium alloy internal construction, though it is worth noting the outer shell of the lens is plastic (the lens mount is metal). The lens telescopes when zoomed, increasing in length about 50%. At its most compact it is about 20 cm / 7.8 in long.
Well-constructed, solid feeling and well-balanced, nothing rattles around inside the lens when shaken (my favorite test). Zooming from 100mm to 400mm requires a one quarter turn of the large rubberized zoom ring (located at the front of the lens).
Zooming from 100mm to 400mm requires a one quarter turn of the large rubberized zoom ring
'Lens creep' is an annoying fact of life when using telescoping lenses, fortunately it was not an issue during field testing. Just in case, there is a lock on the lens barrel (which can only be used when the zoom is retracted in to 100mm).
Toward the base of the lens barrel you'll find an AF/MF switch as well as as a controller for selecting one's VC (vibration compensation) mode: Mode 1 is for normal stabilization, Mode 2 is for use when panning. Users can also turn off VC completely, which useful if you're on a tripod. Just below the focus ring is the focus distance scale window.
Performance
Hand-held at 400mm, shot using a 1/125 sec shutter because I live in Seattle and it is always dark outside. Shot on the Canon EOS 80D ISO 800 | 400mm | 1/125 sec | F6.3
Tamron is pitching this lens as appropriate for sports and wildlife shooters, two groups that require reliable AF and effective stabilization. Fortunately, our real world usage shows the 100-400mm excelling in both areas.
The image stabilization system proved effective at helping to eliminate camera shake at shutter speeds I'd ordinarily not feel comfortable using, given the focal length used. The moment you engage AF the IS system kicks in – with one's eye to the finder the effectiveness of the compensation is immediately apparent.
Autofocus is both silent (hello ultrasonic drive) and fast (powered by two processors). Acquisition is nearly instant in AF-S and it's equally fast and impressive in AF-C. Users can expect it to maintain focus on the moving subjects they point it at, assuming their camera body is up to the challenge.
Image Quality
The lens is sharp through the zoom range, out of focus areas are also inoffensive. Shot on the Canon EOS 5DS R. ISO 400 | 400mm | 1/500 sec | F6.3
Though this lens has a slow maximum aperture and is best used for daylight shooting, all signs point to it being optically very good. Our copy of the 100-400mm was well-centered and universally sharp across the frame at all focal lengths we shot. Ghosting and flare are rare.
[It is] universally sharp across the frame at all focal lengths we shot
Chromatic aberration is also really well controlled, though it does appears in some images. Lateral CA is easy to correct in Adobe Camera Raw and other Raw processing programs.However axial CA, which you can see in this shot, is much more difficult to correct for. We also noted some vignetting when used on full-frame, but that is also fairly easy to correct in post.
Bokeh is about what we would expect for a complex telephoto lens. It can look nice toward the longer end, when there's good subject separation, but closer to 100mm, it can look a little busy, as is the case in this shot.
Conclusion
For travel photographers looking for a casual, lightweight telephoto lens to explore with, the Tamron 100-400 F4.5-6.3 is a solid choice. Shot on the EOS 5DS R. ISO 400 | 143mm | 1/1250 sec | F5
The Tamron 100-400mm F4.5-6.3 is a great telephoto lens for daylight photography, whether your subjects are moving or not. It offers fast, silent autofocus, good stabilization and is optically impressive at all focal lengths. All that comes in a weather-resistant package that also happens to be the lightest in its class.
We feel comfortable giving it our recommendation
Priced the same as the Sigma 100-400mm F5-6.3 DG OS HSM, the most obvious difference between the two is the Tamron is faster on the wide end, F4.5 vs F5 (and it's also a hair lighter). That aside, the two offer very similar features like image stabilization, multi layer coatings and special elements for dealing with CA. We'll have to revisit the Sigma to see just how well the two compare. But having spent a good amount of time with the Tamron, we feel comfortable giving it our recommendation.
What we like:
Sharp, versatile zoom range on both APS-C and full-frame
Lightest lens in its class
Moisture and dust resistant
Impressive image stablization
Silent AF is fast and accurate
What we don’t:
Slow aperture range
Pricey tripod collar sold separately
Vignettes on full-frame (though easy to correct)
[Read More ...] Gallery and impressions: The Tamron 100-400mm F4.5-6.3 is light, sharp and stabilized was originally posted by proton T2a
0 notes
Photo


Lightroom Workshop
We had a Lightroom workshop with Scott which taught us how to edit our photos in Adobe Lightroom after we have taken our raw photos for our portfolio. The benefits of using Lightroom are that you are able to keep all of your photos together in one place and it is a convenient way to store all of your images. Scott described Lightroom as being a cross between Bridge and Finder.
To start using Lightroom you need to create a new catalog and import your photos from your computer or hard drive. The ideal way to import your photos is to copy them from the destination. This way, if you take the memory card out, they’ll still be available on the computer and wont be lost. You then have to choose the destination and can create sub folders for your photos to sit in. Lightroom has different modules but the most relevant are your Library (where you store your photos) and Develop (where you edit your photos). By adding key words to your photos or to a series of photos, it means that you can search for these and find them instantly which is useful when you are looking for a specific project or series. The types of files that you can edit in Lightroom are JPEGs, TIFFs, PNGs, PSDs and Raw files, however you can’t edit Illustrator or InDesign files. Lightroom is unlike the other Adobe programmes in the sense that it doesn’t work with layers, however, you can still turn on and off different effects that you have added.
Snapshots are a feature where you can save a version of an edited photo. This is useful as you can then save multiple versions and decided between them without loosing some versions that you had previously created. You can crop images using the crop overlay on the right hand panel. If you press O whilst doing this you can scroll through different cropping templates. If you click the transform options, you can select “constrain crop” which eliminates the white space around the photo if you’re rotating it.
Depending on which lens you use when taking your photographs, it may distort the image slightly. To rectify this you can enable profile corrections which reduces these distortions. You can also select “remove chromatic aberration” which fixes the colour distortions. There is also an option to change the white balance, however, Scott suggested that it was best to leave this option as “as shot” since you can then edit the exposure and contrast more easily.
Scott told us not to use the sliders when making changes since this could cause you to make drastic changes to the photograph which wouldn’t look realistic. Instead, he suggested to use the up and down arrows once you have selected the value on the right hand side of the slider to change each value notch by notch. If you hold shift whilst you’re using the arrows, you can change each value by an increment of 10.
The next thing Scott talked to us about was curves and told us that the most commonly used curve is an “S” shaped curve. He explained that above the line represents the darks and below the line represents the lights. If you press backslash, you will be taken to your original photo and if you press “Y”, the before and after versions will be displayed next to each other which is useful as you often forget what your original image looked like.
We also learnt about HSL (hue, saturation, luminence) and the fact that there is a joystick feature which lets you click on each section and move up and down to increase or reduce an effect. Scott explained that luminence is the brightness of individual pixels.
Lightroom has a feature where you can select a certain section of the photo and then alter the sharpening of that section. With this feature you can make certain areas seem more detailed than others which is useful if you want to show one particular area more clearly. We then learnt about the Effects section of the right hand side panel which offers effects such as “post crop vignette”, “grain” and “dehaze”. Another feature of Lightroom is the ability to sync effects to more than one photo which is useful if you have shot a series of photos in the same environment and with the same light and background.
There is also the option of applying a graduated or radial filter which can be used to remove vignettes from photos that you didn’t want. This can be done by changing the exposure and creating a mask over the photo. The graduated filter is linear where as the radial filter is radial.
The adjustment brush can be used to brush on effects. The size of the brush can be changed by using the “[” and “]” keys. There is also the option to show the selected mask overlay which makes it clear to see where you have applied the effect to. Finally, we looked at the clone tool which can be used to remove or replace sections of the photo - similarly to Photoshop.
To export a series of photos, you have to select the ones you want to export and then click File -> Export. There are then three options: export, export with previous and export with presets. Scott mentioned that setting up a present is really handy for our portfolio as ideally we want the photos to look similar in their style. You would then export to hard drive and choose “burn full sized JPEGs”. You can then choose a specific folder that you want to export to or you can export to the same folder as the original photo. You can also rename the photo to a custom name and apply a sequence so that the photos are numbered. When exporting, you can also limit the file size which is useful if you are using the photos in emails or on the web as you don’t want it to take ages to load the images. If you are exporting for print, you should keep the original file size as there won’t be any issue with having to load the image. The colour space that you should choose is sRGB. You can also choose the output sharpening for either paper or screen which is vital.
A very useful workshop as I had never used Lightroom before. I learnt a lot from this and feel confident that I could use Lightroom to edit my photos for my portfolio.
0 notes
Video
instagram
Here's a little snippet of the next tune for the list. I posted the origins a few weeks back when I came up with the original riffs, and now I'm finishing what I started. Finishing it off tonight, but still ironing out a couple of the newer bits. I want them fairly clean for the full play through. *fairly* being the operative word. 😅😅 . . This is my Hardluck Kings Outlaw, tuned to C# standard, going through the Marshall DSL40C and Marshall 2 12 cabinet. . . Signal Chain: Boss TU-3 Chromatic Tuner, Morley Volume Pedal, MXR Micro Amp, Boss LS-2 Line Selector, Ibanez TS9DX Turbo Tube Screamer; in the effects loop: MXR Black Label Chorus, MXR KFK Ten Band EQ, Electro-Harmonix Silencer, MXR Carbon Copy Bright Analog Delay, Electro-Harmonix Cathedral Stereo Reverb. I also have two TC Electronic Bona Fide Buffers, one on each board. This is all into the lead channel on the amp, gain on 5ish, volume at 2, running at half power. Drum machine is a Boss Dr. Rhythm DR-660 at 66 BPM (half speed) going into my Peavey TKO 115 and a 2-10 ext cab. . 🎶🎵🤘 . #hardluckkings #emgpickups #marshallamps #marshalldsl40c #ibanez #mxr #ehx #tcelectronic #bosspedals #guitarist #bassist #musician #originalmusic #metal #rock #hardrock #heavymetal #gothic #doom #popmetal #prog #shoegaze #blackmetal #ambient #nevertooold #cruellogicband #cruellogic @marshallamps_uk @peaveyelectronics @bossfx_us @jimdunlopusa @ehx @tcelectronic @hardluckkings @emgpickups (at Ocean County, New Jersey) https://www.instagram.com/p/ByL65m4HZWE/?igshid=ojps3ig294d7
#hardluckkings#emgpickups#marshallamps#marshalldsl40c#ibanez#mxr#ehx#tcelectronic#bosspedals#guitarist#bassist#musician#originalmusic#metal#rock#hardrock#heavymetal#gothic#doom#popmetal#prog#shoegaze#blackmetal#ambient#nevertooold#cruellogicband#cruellogic
0 notes
Video
instagram
I've been working on this one for a few weeks now, on and off. It is hard for me to play smoothly, so I keep slowing it down, and now I'm used to it at this tempo. I listened back to the original, and it was much faster. Now I'm confused 😅😅 . . This is my Chapman MLV Pro, tuned to Drop C, going through the Marshall DSL40C and Marshall 2 12 cabinet. . . Signal Chain: Boss TU-3 Chromatic Tuner, Morley Volume Pedal, MXR Micro Amp, Boss LS-2 Line Selector, Ibanez TS9DX Turbo Tube Screamer; in the effects loop: MXR Black Label Chorus, MXR KFK Ten Band EQ, MXR Carbon Copy Bright, Boss RV-6 Reverb. I also have two TC Electronics Bona Fide Buffers, one on each board. This is all into the lead channel on the amp, gain on 6, volume at 2, running at half power. Drum machine is a Boss Dr. Rhythm DR-660 going into my Peavey TKO 115 and a 2-10 ext cab. . 🎶🎵🤘 . #chapman #mlvpro #marshallamps #marshalldsl40c #ibanez #mxr #ehx #tcelectronics #bosspedals #guitarist #bassist #musician #originalmusic #metal #rock #hardrock #heavymetal #gothic #doom #popmetal #sludge #prog #shoegaze #blackmetal #ambient #lookingforaband #cruellogicband #cruellogic @marshallamps_uk @bossfx_us @jimdunlopusa @ehx @chapmanguitars (at Ocean County, New Jersey) https://www.instagram.com/p/BuulpRXn0p9/?utm_source=ig_tumblr_share&igshid=cq6662oh91jh
#chapman#mlvpro#marshallamps#marshalldsl40c#ibanez#mxr#ehx#tcelectronics#bosspedals#guitarist#bassist#musician#originalmusic#metal#rock#hardrock#heavymetal#gothic#doom#popmetal#sludge#prog#shoegaze#blackmetal#ambient#lookingforaband#cruellogicband#cruellogic
0 notes
Text
Reviews 101: Isorinne
I almost missed this one, only acquiring it through the sincere generosity of the folks at Origin Peoples, who included the LP as a bonus in a recent order. This was incredibly fortunate, as the Wave Stuff of Michel Isorinne is utterly spellbinding. In some respects I am reminded of label mates Tommy Awards, given that Isorinne explores a similarly wondrous mix of cold space music, classic chill out, and Kranky indebted post-rock. But Wave Stuff is also its own thing, adding shades of neon hued 80s pop and meditative new age as well, with each side flowing together and wrapping the body in narcotic layers of synthesizer and drum machine bliss.
Isorinne - Wave Stuff (Origin Peoples, 2018) The droning bass synths of “Wave 1” underly chords ascending in slow motion prog majesty, with arpeggios gentle as morning dew fading in alongside. Repeating bass guitar notes sit far back in the stereo field and towards the end, the entire mix is swallowed in cavernous reverb. Then comes “Wave 2” with a cell phone ringing in isolation over woven layers of heart-aching pads locked into heroin paced polyrhythms. A hypnotic chill-out beat led by double time clicks and atonal cymbals pushes things into cinematic territory, with sparkling high pitched leads and fat spacious synth melodies hovering overhead in a neon pink haze…think Cliff Martinez, Angelo Badalamenti, and even Chromatics. For “Wave 3,” kosmische clouds swirl around a skipping robotic breakbeat while head spinning arp webs flow at the speed of glaciers and twinkling synthesized pianos evoke youthful fantasies. Contrast this with “Wave 4” and its lonely synth arpeggio drifting over the sounds of the ocean…as if placid blues and seashore greens have been mysteriously transformed into sound. The first half of our journey ends with “Wave 5” and a sharp cut into a another skipping beat. Cymbals and snare lock in harsh syncopation over an off-time kick flow, while feverish deep house pads wrap starlight sequences in a melancholic fog. There are strong shades of Maricopa to my ears, especially when those siren like synth wails fall down from the celestial heavens.

“Wave 6” is my favorite moment here, so strongly does it evoke the early days of Mogwai (Young Team and EP most specifically). Cold wavering bell tones waft in dreamy ambient progressions, while melodic bass lines sit aside skittering primitive drum machines. There are abstract snippets of conversation floating about and high pitched euphoric tones circling in the golden sky, everything coming together and hitting me square in the chest with waves of nostalgic emotion. The whole effect is overwhelming, beautiful, and transcendent, recalling as well those blissed out horizontal sections from Tommy Awards’ Sessions II. This mesmerizing post-rock maximalism is countered by the walking synthesized jazz bass of “Wave 7” and pads locked into peaceful arpeggiations. Clipped tambourines and cymbals keep time, while twinkling Twin Peaks atmospherics spread across the ether. It’s a romantic dance for sunrise and solitude, with fading memories of heartache glowing softly around the edges. Then come the torrential thunderstorms of “Wave 8,” forming a fittingly ominous backdrop for shining Italo basslines and epic vocal pads soaring like a choir of angels. Propulsive cymbals enter while the bass filter opens up, resulting in some pounding and anthemic synth pop glory with kick marching in steady anticipation and pads and chiming new age leads racing towards eternal victory. But the constant and triumphant build never arrives at a climax, with the act of crescendo itself becoming the focus, everything floating and floating with an irresistible energy.

(images from my personal copy)
#isorinne#michel isorinne#origin peoples#bandhagen#wave stuff#wave#tommy awards#mogwai#chromatics#synth pop#ambient#space music#kosmische#new again#romantic#blissed out#minimal#cinematic#twin peaks#angelo badalamenti#cliff martinez#album reviews#vinyl reviews#vinyl#music reviews#sun lounge#octagon eyes
0 notes