#how to sew flap pockets
Text
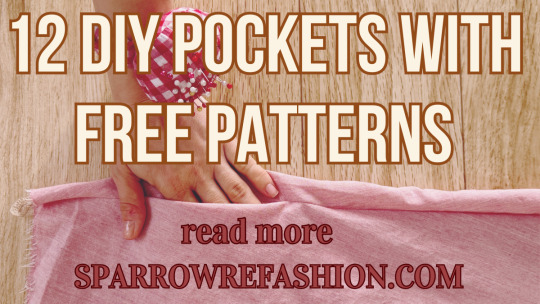
Learn How to Sew 12 Types of Pockets for Dresses, Jackets, Coats, and More (Free Patterns Included)
In this post, you will learn how to self draft and sew 12 types of pockets with free PDF patterns.
Pockets are one of the most useful and versatile features of any garment. They can add style, functionality, and convenience to your clothes. Whether you want to store your essentials, keep your hands warm, or make a fashion statement, pockets are the way to go. But how do you sew pockets? And what…
View On WordPress
#how to sew cargo pockets#how to sew flap pockets#how to sew hidden pockets#how to sew inseam pockets#how to sew kangaroo pockets#how to sew patch pockets#how to sew slanted pockets#how to sew welt pockets#how to sew zipper pockets#sewing pockets for beginners#sewing pockets for coats#sewing pockets for dresses#sewing pockets for jackets#sewing pockets patterns#sewing pockets tutorial
9 notes
·
View notes
Text
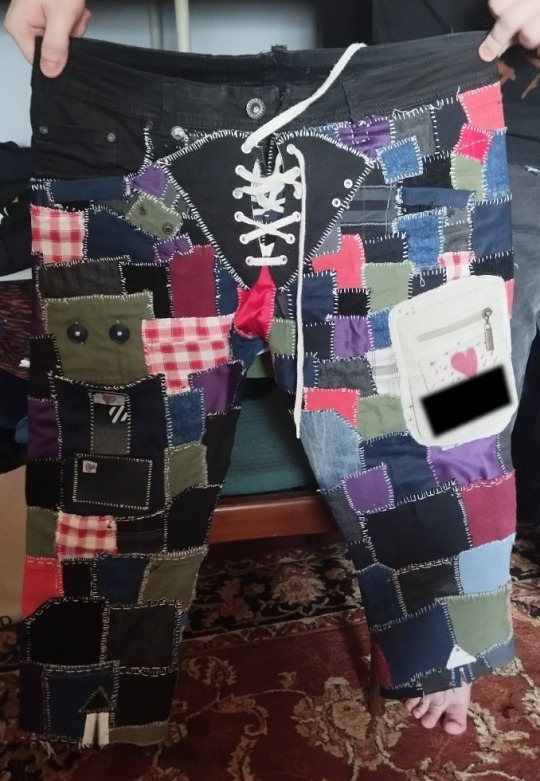
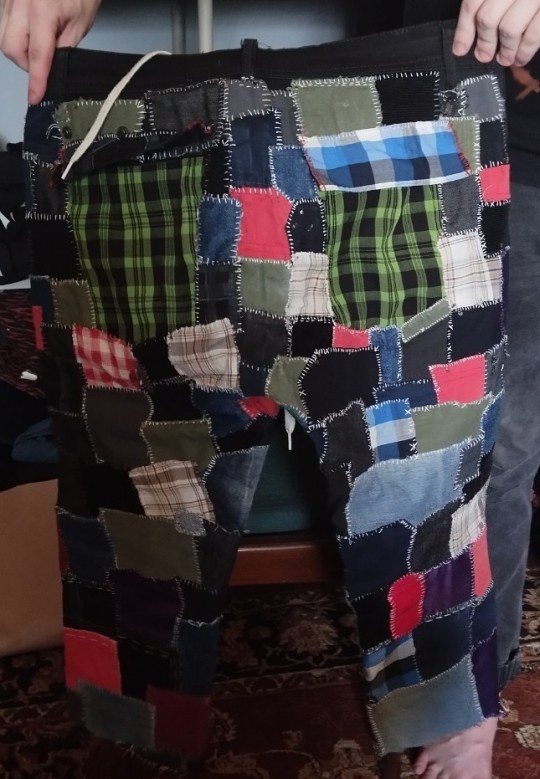
I come once more to show I am no fraud and do in fact possess both patches, as well as pants. This is my very first pair, to be more specific. Actually, not just the first pair of fucked-up pants, but also the first sewing project I've ever done. Back in 2021, its second half, I decided on a pair of crusties, so I looked to the interwebs searching for inspiration, asked my grandma if we had some old pants in the back of the closet perchance, and then started going around the family members inquiring for other old clothes and fabric.
Because of that, these cost absolutely nothing, besides time, effort, and blood. There's some random corduroy found in the attic, a t-shirt, skirts, multiple pairs of pants, mainly jeans, dresses, even a chunk of hoodie I found on the street. They alone taught me more about sewing than any other project I've done since, or video I might've watched prior, trying to learn theory. In a few places, I didn't know how to proceed and had to come up with some strange workaround, such as the little 'belt loops' for my thumbs, in the absence of pockets, or the flaps on the back to cover the space on the edges of the back pouches, for sewing actual patches there would've been a small nightmare.
#alt style#altfashion#diy punk#punk diy#punk#alt#punk aesthetic#alternative#alternative fashion#alt fashion#alt aesthetic#alt diy#punk rock#crust#punk 101#punk girl#punk guy#crust pants#mine#crust punk#crust punx#feetpics
45 notes
·
View notes
Text
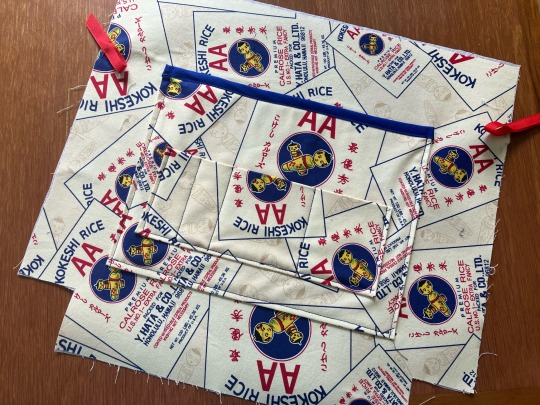
The messenger bag I made in 2019 finally started to wear to pieces after four years of faithful service. Time for a new one!
I made the original bag without a pattern, but this time I had something to work with. I took the old bag apart and made a pattern from the pieces.


It took me a while to find the right material. I wasn’t sure what it would look like, I just knew I’d know it when I saw it. I finally found this double-sided Japanese cloth in a shop in Portland.
Once I had the right cloth for the exterior, I found a fun pattern for the interior bag in a local shop. (I always use a lighter material for the interior so it's easier to find things).
The first bag was a struggle—I had no idea what I was doing! I expected the second bag to be difficult as well, but the process went surprisingly smoothly. I got stuck a few times and had to take a day or two to figure out a solution, but the solutions always worked better than I expected!
For instance—in spite of carefully measuring each piece, the outer flap ended up being too small. I ended up constructing a border to extend the edges.

With heavy interfacing and waterproof lining, the walls were very thick and tricky to work with. Having a better sewing machine than last time helped!
Lots of pockets and hooks on the inside—essential.


I found a leather camera strap I haven't used since college and added a couple of decorative wooden buttons a friend gave me and I'd been saving for the right moment. The blue webbing along the sides that support the leather strap are repurposed from the original bag. I like that a little bit of the old bag is worked into the new.
The whole process took... weeks—but I’m so happy with how it all came together!
#long post#pictures i took#stuff i made#i am not a sewing expert#i've been slowly learning and teaching myself to do things with a sewing machine over the last ten years#it's hard and i still struggle#but make no mistake: i am very fucking proud of myself#there are a few small quirks that i didn't get right and annoy me but overall it came out so well#i love it#and i'm glad it's done this project has been eating my brain for like a month
217 notes
·
View notes
Text
A bond beyond flight
CW: Blood, Broken wings, Tiny Whump
Word count: < 2 k
On a warm spring evening, Eleonore was tending to her garden, as usual and at this time of the year, most of her flowers had already spread their blossoms. Different scents lay in the soft evening breeze as the old woman finished her work of weeding and stretched her aching back a bit.
Day by day, she's getting older, Eleonore thought. And in fact, she clearly wasn't the youngest anymore but in her mid sixties, having her sweet years behind. Her husband had died 10 years ago, since then she barely went out to talk to other people. Her only son lived far away and had his own family to care for, only visiting her on her birthday and Christmas. And sometimes, when she's all alone, on quiet evenings like this, she noticed how lonely she actually was.
Eleonore let out a long sigh and put the last strands of weed in her basket before bringing it into her shed. No doubts, her backyard looked good like this, at least one thing she's good for in her age. She had admired her work for a while now and then slowly went up on her porch, sitting down in a rocking chair with a short breath, panting. The old woman sat there for a moment, letting the thoughts flow through her head as the birds and crickets filled the silence with their melody.
But somewhere in the distance was a squeaking.
No, actually quite nearby.
Eleonore sharpened her ears, though her eyes may not be the best anymore, her good hearing still remained, for a woman her age. She looked around the backyard and slowly stood up from her chair. The sound was coming from behind her flower pots, which were standing not far away from the porch door. Carefully, the elder shoved one pot away, to see what caused that noise.
And on the wood, right beside the wall, she saw a little moth cub. Eleonore leaned down a bit to take a closer look at the tiny one, when she realized it was wounded. One of its brown wings was so damaged that the poor thing probably will never fly again. It must've gotten into a light trap as the lamp was hanging right above.
Very slowly, the woman kneeled down and took the moth cub into her hands. With a sad frown, she looked down on it as there sure wasn't any hope it could survive without its wings. But the little one was still breathing and slightly moved on her hand, revealing its tiny body. And from this angle, it looked like a young boy, around 12 years, with fluffy chestnut hair, one side slightly lighter than the other. He was wearing some kind of green cloth, one could merely call a shirt, his freckled skin was covered in dried mud and his tiny nose bloody.
Eleonore couldn't believe her eyes. She has never seen a tiny creature like this and wondered where the boy came from. He looked so worn out and scrunched up his tiny face, squeaking helplessly.
"Poor little thing...", she mumbled to the boy in her hands.
As carefully as she could, the elderly woman put the child in her apron's large pocket and went inside her home. On a desk, she placed down her sewing pillow and took out all the needles, putting them in a jar. Eleonore took the moth cub out of her pocket again, feeling that he's slowly getting back his consciousness, and placed him on the pillow.
"There you go, little one."
The boy flapped his eyes open and stirred on the pillow, trying to push himself up but gnashed his teeth in pain. Eleonore held her hand for support, one of her fingers gently stroking his head.
"Careful, sweetheart, careful", she said softly, watching the child sitting up on the fabric, his wings hanging down helplessly.
Eleonore heard a thin little voice from below, a squeal sounding so bitterly, but the word, the child said, stinged the woman's heart even more.
"Hurts..."
And that's when she saw his tiny face for the first time. Hazel eyes, full of fear and agony, met hers. The little one must be so scared and confused. Unfortunately, Eleonore didn't know what to do to help the boy. Losing his ability to fly has to be one of the most awful things for a little moth like him.
"I know, dear, but you're safe now", Eleonore reassured, hearing a few sniffles and sobs from the child, "Shhh, it's alright. Please, don't cry."
The woman was soothing and shushing the boy, while one of her fingers kept stroking his head. Soon, he calmed down a bit, steadying his breath. But the child still looked very pale and so unnaturally thin, almost emaciated. There was a stinging feeling in her chest and for a moment, Eleonore remembered when her son had been a little boy and barely ate anything as he was sick of fever. So she didn’t hesitate, went to the kitchen and came back with a pipette, a plate of leftover pie and a bowl of water, carefully placing it on the desk right beside the sewing pillow, the boy lay on. He was wiping away the dirt and tears on his face and Eleonore thought of giving him a good clean-up later on, too - very softly and carefully of course. But for now, the child needs to be fed.
She took the pipette with two fingers and brought it to the boy's lips. First, he backed off but Eleonore's veiny hand behind his back reassured the situation and a few drops of water flowed into his mouth, dripping down his throat pleasurably. Eleonore let out a relieved sigh when the child finally swallowed the water like a needy little bird baby getting some food from his mother. Not only because of his size but how he looked right now, so young and vulnerable, as if he would break if Eleonore just touched him.
The old woman put away the pipette again and broke off a crumb from the pie, helding it out to the boy. But the child turned away, shaking his head slightly and creased his forehead.
"Come on, dear, you have to eat something", Eleonore said softly, "you're only skin and bones."
She tried it once again and finally the boy opened his mouth and started eating. Although the crumb looked so tiny in her hand, it probably was enough for the child, considering he was literally tiny too, the old woman thought.
"That's fine, little one. Eat."
Eleonore couldn't help but draw a soft but sad smile when the moth cub ate it all up and big round eyes met her gaze. She always liked the feeling to see her grand-children enjoying the food she cooked for them. But that was so long ago... By now they sure all grew up and would never look up to her with those big children's eyes.
And this one was probably the first child in years that gave her the feeling to be needed. Because who needs an old frail granny nowadays?
A small squeak interrupted her thoughts in a sudden when she saw that the boy tried to move his body. He let out some helpless whimpers, probably in pain of his torn wing. Eleonore thought about fixing it in a way but didn't come up with any. It just had to be nature's way and the boy was way too weak and frail to survive on his own. Good thing was that there weren't any predators nearby when he was wounded. And if Eleonore hadn't heard him, the child probably didn't have a chance.
Pity flooded the old woman's heart at the sight of the crying boy. She reached out her hand towards the child that recoiled, still in fear. The boy didn't seem to trust her yet even after she fed him. But it was more than understandable and Eleonore couldn't blame him. Very very slowly she put her hand down on the desk next to the pillow and slightly shoved the child on her palm with the other free hand.
The boy gave a few further squeaks and whimpers when he lay on the giant palm. His tiny hands, feet and proportions fascinated Eleonore even more now and again, she was staggered by their extreme size difference. Though he was terrified, the woman took a bit of water out of a bowl and slowly poured it over the boy's head and back, while her thumb was brushing his tiny body for comfort and to get at least a bit off the dirt on his skin. The water seemed to cool his wounds, now that the child relaxed a bit in Eleonore's palm and seemingly enjoyed the procedure by closing his eyes and letting himself get cleaned.
After the 'bath' she patted him dry a bit with a washcloth and for once, she saw the freckles all over his skin, which were covered by dirt before and the little nose was no longer bloody. His hair was now clean too and a few light brown strands even shimmered in the light of the desk lamp.
By now it has gotten dark outside and a cold breeze blew through the opened window of her bedroom, making the child shiver a little bit, which Eleonore felt in her hand.
Well, his hair was still a bit wet and the cloth he wore also hasn't dried yet. The woman couldn't help but look down on him in compasion, when he curled up on her palm, rubbing his tiny arms.
"Are you a bit cold, huh? Well, it is a bit chilly outside tonight", she remarked and put the tiny one down on the sewing pillow again.
Eleonore stood up from the chair, feeling a twinge in her back and slowly went to the window to close it again. She really overworked herself today and deserved some good rest. But the thought of the little boy didn't leave her alone now. She felt responsible for the child because it didn't seem like he had anyone else. Maybe he is lost and his parents are searching for him in vain or he is orphaned and nobody will come look for him... Eleonore couldn't know what happened to the boy unless he is willing to tell her himself. For now the child only said a word and it was mostly the woman who was talking to him. Maybe someday he will eventually tell her his name, where he is from and how he got here in the first place but it still had time.
Luckily, she still had some scraps of soft fabric left over and took it from her sewing box. There was also a little piece that would fit perfectly for a new tiny top and little pants. Maybe she asks the kid tomorrow whether he wants some new clothes and this way, Eleonore would finally take all of her supplies out of the drawer, as she hasn't sewn anything for a while now.
The boy, curled up on the pillow like a kitten, eventually stopped shivering when the old woman pulled the makeshift blanket up to his chin, a finger stroking down his shoulders once more before she let the child sleep in peace.
Eleonore observed the tiny one for a while, before she stood up and would head to her bed too. Just when she had turned around and clicked off the light, she heard a soft mumble coming from the desk.
"Thank you."
And even though it was just these two words, it still was everything to her. Said so quietly and tired but meant so sincerely, it truly made Eleonore's heart soar. That night, for such a long time in her life, she no longer felt alone.
#g/t#giant/tiny#parental g/t#g/t writing#g/t fluff#g/t fiction#giant tiny#gt community#g/t community#original writing#original story#OC: Eleanore#OC: Corey#tiny whump#tiny whumpee#winged whumpee#whump writing
14 notes
·
View notes
Text
I finally finished putting patches on my pencil case/art bag! Some I made myself, some I purchased, and some had been sitting in my mom's sewing kit for 20+ years so I just took them. 😂
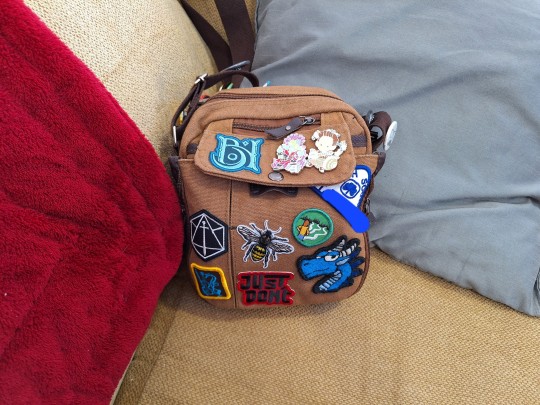
[ID: A brown canvas purse with embroidered patches all over it. Individual patch descriptions in the next image. End ID.]
The front. I have a lot of Critical Role stuff on this bag, as it's my current hyperfixation.
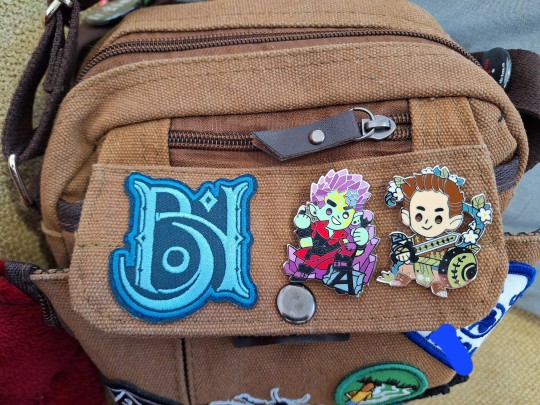
[ID: Top - The top flap of the front pocket. Has a blue embroidered patch of the Bell's Hells logo from Critical Role on the left, and enamel chibi pins of two of the Bell's Hells characters, Ashton and Orym, on the right.
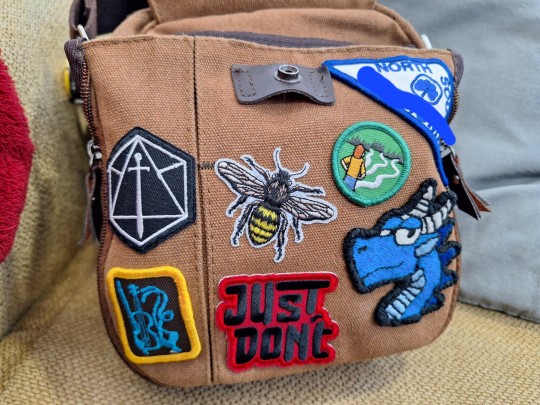
Bottom - The bottom flap of the front pocket. There is a triangular, blue and white Girl Guides patch; a round, green patch with a person considering 3 roads before them; a homemade patch of a blue, cartoon dragon head: a honeybee patch; a red and black patch that says "Just Don’t"; a rectangular, black patch with a yellow border and a blue violin; and a black and white patch of the Critical Role logo. End ID. ]
Close-ups of the front patches and pins. I'm pretty sure the green one and the violin patch are badges from my Girl Guide days. The triangle patch is from the Guiding troop I was in in my hometown, but I've blanked out the town name for privacy reasons. The dragon patch I made myself.
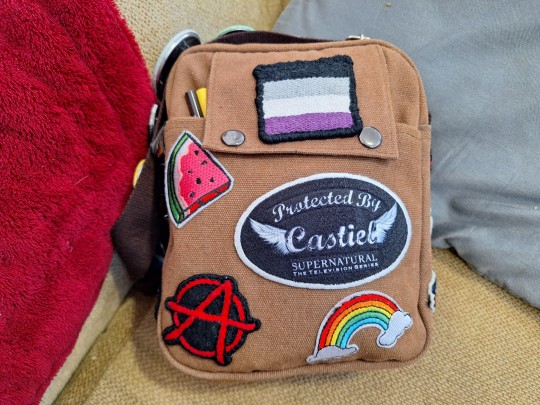
[ID: The back of the purse, featuring more embroidered patches. There is a rectangular Asexual Pride flag patch; a watermelon slice patch; a black and white, oval-shaped patch from the TV show Supernatural that says "Protected by Castiel"; a rainbow with clouds patch; and a black and red patch that features the Anarchy symbol of an A inside a circle. End ID.]
The Ace Pride patch and the Anarchy patch are handmade. I've had the Castiel patch sitting around for a while, and just had to figure out what to put it on.
[ID: A side panel of the purse. On top there is a patch shaped like a mushroom that has a red cap and white spots. On the bottom is a colourful Ashari symbol from Critical Role that resembles 2 stacked hourglasses with a diamond in the center. End ID.]
These two are both handmade. The mushroom was the first patch I ever made myself. The second is the symbol of the Ashari, a druidic culture from the world of Exandria in Critical Role.
[ID: the other side panel of the purse. On top is a rectangular patch featuring a white Trillium flower and "Ontario" printed in yellow letters. Underneath is a round patch with the Antifascism symbol of a black flag and a red flag waving together on a white background. End ID.]
The top one is a patch I found in my mom's sewing kit. I decided to use it because I'm from Ontario, and the trillium (the provincial flower) is pretty. The other one is an Antifa patch that I made myself.
[ID: Photos of each side of the purse's shoulder strap. A series of colourful pin-back buttons runs the length of each side. End ID.]
I also have a bunch of buttons pinned to the strap. Most of them are fandom buttons for Pokémon, Doctor Who, Supernatural, and Undertale. Some have funny sayings printed on them. A couple are for different causes, like environmental protection, and free university education.
I'm pretty pleased with how it came out! There's a little bit of space under the front flap that I could potentially put a couple more patches or pins on, but I'm happy to take a break from this one for now. It was actually pretty challenging to get them all sewn on. 😅
#embroidered patch#patches#patch making#punk patches#handmade#diy#upcycled#critical role#customization#punk diy#diy punk#punk#solarpunk#solarpunk aesthetic week#sew on patch#sewing#embroidery#embroidered#long post#id#image id in post#image id
39 notes
·
View notes
Text
My mom had two linen-cotton blend shorts she wanted pockets put in, and after my aunt said she would and then realized she didn't know how, I was called in. And I said yes, because, hey, it's pockets. Those take like maybe half an hour per pair. Easy peasy. Right?
Did she have fabric? Uhhh.. no. She'd go to the store last week. This week. Thursday. (It was Friday afternoon.) Matching thread? Eh, we'd find something.
When I got there, it was three shorts. One of them a true fuchsia that resisted matching any purple or pink thread in three seperate sewing stashes. But definitely, definitely cotton linen, all natural fibers. Except they stuck to the iron if you had it on too high. And wouldn't take a crease no matter what. Also, no idea what the bought fabric's fiber content was. Something slinky. Aaaand in the last few weeks, the butt seams were starting to stretch weird.
Turns out the entire thing was assembled on an overlock-type machine using "thread" that dissolves into fluff if it comes loose in any sense of the word. The stitches were so loose, one snip of the seam ripper had 7 cm coming undone.
Had I lugged along my 8 kilos of overlocker? I was told it's 4 pockets, of course not.
Did I mention all 3 shorts had been a "steal" at 20 bucks? Oh, and that they sparkle like Christmas tinsel under my sewing machine in a way no linen or cotton has done ever? The bought fabric was less plasticky than the shorts, and despite not being expensive either, would have probably made for twice as expensive shorts.
Whatever, at least my aunt had already printed the pocket pattern and we just... She had not. Fine. I copied the one off my mom's favorite pocketed dress, since those pockets met with approval. My aunt is the queen of scissors, so she cut pocket flaps, I undid side seams and reinforced some butt seams.
I pinned them on, sewed the first one and... Wrong side of the fabric. Whatever. Unpick, repin all 6 flaps, sew again. Aunt points out, these fabrics look like they'd fray in the wash; run a zigzag over it.
These wibbly wobbly bitches warp like I insulted their mothers the second they meet a zigzag in any capacity. Whatever. Aunt takes them away to be ironed out so I can pin and sew again.
One of the pocket flaps is up upside down. No one noticed this while sewing or ironing. And my machine apparently has very small stitches. Oh, and this thread came from my great-aunt, who never skimped on sewing supplies' quality. That seam is the strongest part of the entire pair of shorts at this point.
Aunt takes out the seam ripper and I work on the other two shorts. My mom comes back from an appointment and asks what's up. Can she help zigzag on her machine? Yeah, sure, but what's up? Please don't ask painful questions and just zigzag.
Those two other shorts? Zero issues. Straight seams, no messed up fabric sides, all pieces matching beautifully and blending into the original design like we had barely modified them.
That first pair? It took two hours to undo that one double-sewn seam. My uncle had to tap on to come help at one point. The unpicking stretched out one side of a half-sewn seam. And the pocket piece. The pattern markings, despite being just two and high contrast, disappeared twice. The fudging to get those seams even-ish was epic.
My aunt's knee is messed up. My hip is messed up. My mom's sewing machine resents being rethreaded. No one was having a good time by the time that pocket was done.
We spent 7 hours from start to finish, with two breaks for food. I have finished entire dresses in that kind of time frame. I have no idea what went wrong.
Oh, and I still had to shorten something for one of the nephews after. Which my aunt, blessedly, had ironed into shape for me.
It took 10 minutes.
And after all of that, my aunt tells me "I'm still not entirely sure how you put in pockets..."
#sewing#hubris gets punished#my hatred for polyester grows worse daily#my mom sews with blank steel pins on a gray floor#those pins tried to crawl into my machine#magnetic pincushion? whatever for?#“I see you prefer thicker thread like your great-aunt” I DO NOT IT IS JUST WHAT WAS THERE#brb crying into a pillow#my aunt got punished by having forgotten some mending she needed done#and also getting hella behind schedule despite doubling my optimistic “two hours at most”#crafting is good for your mental health#long post#rant#i just don't know what went wrong
9 notes
·
View notes
Text
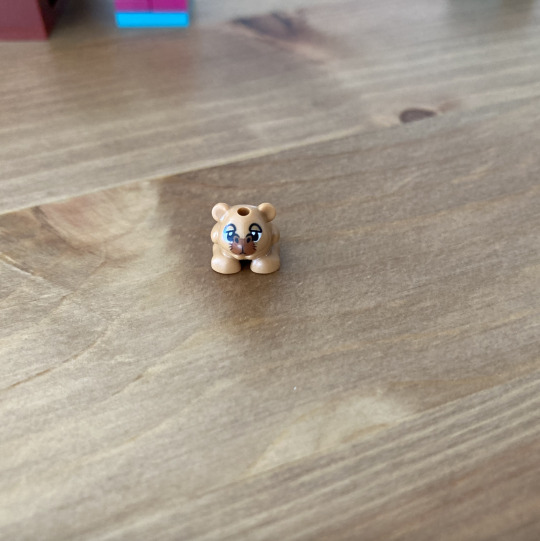
KOSHI favourite octo agent junior 

I don’t like how I did her pigtails but I can’t fix them because that is the best I can do for pigtails (I will work on it but not right now cause I don’t wanna) but I did add some details and I’m am talk about em.
Since she likes to explore and I noticed her pants actually go over her shoes I figured they should have some dirt or mud on them (her shoes don’t look like they have on them because the mud/dirt stained her pants and overall skirt thing idk), she has some bracelet on but those one are thicker than other bracelets because those were the first few bracelets she made, with her pockets the big one didn’t have enough room for all her erasers (she has many all with a different purpose) so she looked up on YouTube how the sew a pocket and sewed on other pocket just for her erasers, and on her bag on the front top she has written on it ‘Koshi Octo agent junior’s bag’ in case she losses it and written on the strap of the bag is the octonauts signatures also Koshi wanted the professor to sign the bag it’s self (like the main part not the flap) cause she thinks the professor plays one of the most important roles (which he does) so she wanted a special signature from him and originally he didn’t want to cause he didn’t really think that he played an important part since he doesn’t really go out on missions but the whole crew told him otherwise so he singed the front of the bag (that whole interaction help his confidence and self esteem) also it does look at bit weird but the darker parts are actually her ears I have a little head canon that the kids at school pick on her and would pull her ears so she looked up some tips on dealing with bullies but nothing helped but she remembered that some animals have false eyes so she made herself have false ears until something could be done about the bullying it still hurt when they pulled the false ears but it hurt less and didn’t affect her hearing but eventually her mother took Koshi out of school and started homeschooling her.
17 notes
·
View notes
Text


I made a simple reference sheet for Rythian and Zoeya through the Blackrock Chronicles!
Zoey actually used a lot of skins through the series, but they were mostly just changes in accessories so I just picked one per season.
Mostly compliant to the actual skins from the series, but with some liberties taken.
Sadly, no Teep. Maybe someday.
Thank you @yogurtyogitup for your post, I don't know what I'd have done without it LOL
Design notes that line up with the numbers on the pic are under the cut because they got long.
the only thing I actually added to Rythian's Adventure outfit was changing out some black pauldrons (?) his skin had for a mantle in the same colour as his trousers. Everything else I just tweaked, or left out altogether (certain bits on the legs I literally could not figure out, for example)
his cloak pins are dark matter. it's a flex.
I think the yellow bit on Zoeya's scarf was meant to be some kind of ring clip, but for the life of me I could not manage to draw that so I replaced it with a mushroom badge.
I decided tassel scarf ends looked good and added visual interest.
Embroidered mushroom on the pocket =)
I think if anyone has a collection of fun socks, it's Zoeya. These ones are directly based off a pair from Accessorize - just google 'mushroom socks' on images and they should pop up.
another pop of colour, this time a simple rainbow =)
I meant this to be an archery brace but now that I'm thinking about it I think it's on the wrong arm, oops. I just wanted asymmetry!
he dyed his boots while he was in his edgy period lmao
mushroom pocket is now a bit patchy looking - implication is, she took it off while in the mushroom rebel base and sewed it back on after leaving
star socks! I think Zoeya started leaning towards socks with purple in them during and after the mushroom rebels arc.
sealant on the rainbow was scratched off a bit at some point so the paint is patchy. She probably intended to fix it up at some point, but was always too busy.
I… didn't want to draw sleeves so I gave his coat a cape instead. Sorry.
the eyes follow him no matter where the scarf flaps
he got new boots this time! ignore how similar the style is.
Fun to design but a pain to draw. Like all hands, really.
almost forgot to add this thing so it looks a bit bland
skin asymmetry wasn't a thing yet when this series was coming out, so as a result Zoey's Blackrock Rising skin had two cyber arms. Cool, but apparently not canon - only one of Zoeya's arms was lost. So on the other arm, I put a wrist mounted computer, because it's awesome.
patch in the scarf, and it's shorter since it looks like it's knotted behind her on the skin rather than just loose down. Neat!
new mushroom embroidery for new trousers! Four different types to foreshadow the Twilight Forest arc.
these boots were fun to colour and I unironically want boots that look like this irl.
#mcytflashbackfest#mcyt#yogscast#blackrock chronicles#rythian#zoeya#yogscast zoey#my art#I had to edit that third pic twice bc I realised I'd forgotten to add something. like Zoeya's tattoo.
112 notes
·
View notes
Text


Once again
LBT-1961AF Chest Rig, Gen.1, OD Green, 2002 Buckles, No Labels
Very similar to the AWS Strike Vest in terms of layout and construction, but definitely loaded with lots of little force multipliers and creature comforts that make this rig more contemporary despite being a 20+ year-old design at this point.
More capacity for mags, an 'okay' map pocket, and lots of additional pouches really push the format to its limit for the overall size. If one were to make a swiftclip-able/PC placard-style version of this design, it would not be out of place in the modern age.


The outer radio pockets each have a generously-sized utility pocket, which have a removable elastic 'lid' to use as a dump pouch as well as a small frag grenade pocket on the inner sides.
The rig has four double M4 mag pouches (holding 8 mags total in the dedicated pouches) and a double pistol pouch that can either hold two double stack or four single stack mags. Also good for holding multitools.

The 'AF' in the designation refers to 'Air Force' as this variation of the LBT-1961 was designed with three dedicated pockets for MS2000 Strobes for CCT guys to mark landing strips.
Also notice how the flaps are sewn with a box stitch to hold the velcro in place - later generations of these rigs would sew the flap velcro with a third horizontal line rather than an 'X' shape.

Inside the map pocket, there's an 'envelope'/EDC style holster that simply velcro's in place. An extended 'wing' off the leading edge of the holster holds one or two extra mags.
Honestly, this is probably the least usable feature on this rig given how awkward it is to access. Still neat that it was included all the same.

The H-Harness, while simple, was revolutionary for the time and elements of which like the velcro-adjustable rear cross-strap can still be observed with modern chest rig designs. The cable management flaps aren't spectacular, but it's good that they're there.
Note how the rear ends of the shoulder pads are 'squared' and simply terminate to 1" webbing, rather than folding off to the sides - this is another one of the ways you identify these as Gen.1 rigs.

Copious amounts of drain grommets on all the pouches.
It's very jarring to notice the difference in pricing for these rigs depending on the color you have - for instance, the 'pinky tan' versions of these oldschool rigs were used extensively by Navy Seals and AFSOC and currently go for several thousand dollars when they pop up.
But because this one is OD, and almost nobody has been seen using them, they're only worth about $300 at most and I actually ended up trading a helmet for mine lol.
#oldschool gear#vintage tactical#chest rig#lbt chest rig#london bridge trading#lbt-1961af#od green#special forces
6 notes
·
View notes
Text

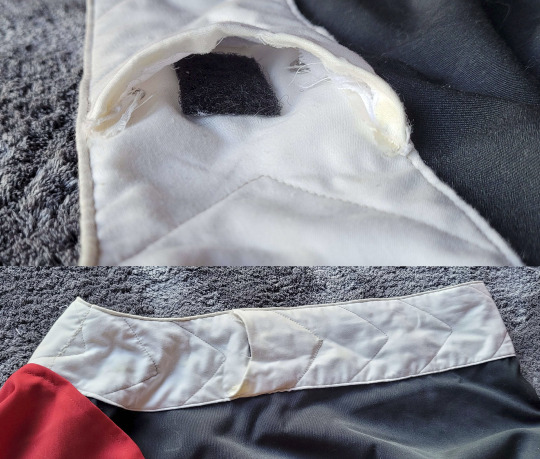
Last night I did a little test run of the Aurebesh lettering style (drawn on in chalk, then inked over with a Sharpie) for the exterior of my lightsaber carrying case. In the last week I also finished the padded interior, and got the carrying straps attached and the little pocket for the blade retention screws and wrench sewed to the exterior. Besides getting this lettering done, the only thing I have left for the exterior is to sew on a little fake pocket flap that will allow me to close the bag at a shorter length when it's just holding the blade without the hilt.
The word in the lettering test is Samæni, the name of my Star Wars OC. Not sure if I'll end up using that scrap of fabric somewhere, but I like how it came out so I might try to find a place to use it. The full phrase that will run the length of the carrying case is: fragile antique handle with care -- the photo is from the lower end bag, showing just a bit of 'handle' and then 'with' (using the digraph for th) and 'care' between the carrying strap and the pocket. The full phrase will look like this:

I'm working from right to left at the moment, because fitting 'care' into the limited spacing between the strap and the pocket was what determined the size of all the letters. I haven't gotten to the first words in the phrase yet (gotta pace myself because of my rotten hand strength), but I think I've managed to lay it out in such a way that when the whole saber is in the case and the flap is closed and velcro'd shut, it'll read fragile antique handle with care -- but when I take the hilt off and just have the blade in the bag, and the bag is velcro'd shut at the lower (false flap) point, it'll read as just fragile handle with care.
It's such a tiny ridiculous detail that can really only be appreciated if you can read Aurebesh in the first place, but it's exactly the sort of tiny ridiculous detail that I just live for in costuming. If it works out, I'll take photos of it both ways to show it off.
Once the lettering is done, I'll sew on that false flap/second velcro location (in between 'antique' and 'handle'), and then I'll be able to sew the exterior into a tube and attach it to the padded interior I posted about last week. I have the crossbody carrying strap itself sewn, but I need to attach the hardware that it'll clip to the rings that I've already sewn to the bag. Not a ton of steps left to go, but sketching in the letters in chalk and then going over them with Sharpie is something I can't do a ton of in one go, so it may still take me awhile to finish this up.
We haven't gotten tickets for Star Wars Nite yet, but we're still talking seriously about going, probably to one of the earlier nights in April. This is the major project I want to get done for if/when we go, along with a couple of tiny glue repairs on accessories. If I have time, I would like to do a weathering pass on my lightsaber hilt, and maybe even customize the soundfont a bit before I take it out in public. But I expect it will spend most of the night inside this case, and only come out now and then for specific activities, so getting the bag functional and looking good is really my priority.
8 notes
·
View notes
Text
ao3 patch!!!

[ID in alt text]
I'm working on making patches to go on a jacket and I'm really pleased with how this one turned out! I'm planning on putting it on one of the flaps that closes those top pockets (I'm not sure what they're called), but this is subject to change.
Notes and musings under the cut :)
The materials used for this are unbleached muslin, red embroidery thread, and some denim scraps for the backing. The other supplies included fabric scissors, pins, a clear ruler, and a blue colored pencil (I couldn't find my chalk).
I cut the denim out to match the shape I wanted, and then pinned it to the muslin and cut that to have an excess of about 3/4" (2cm) so I'd have enough to fold under after doing the embroidery. I then repinned it for the actual sewing.
I drew out the design with a blue color pencil, which worked surprisingly well. The embroidery is primarily a modified version of a twisted reverse chain stitch, where I added another twist to make it slightly less bulky. There are also some single stitches thrown in in order to fill in some of the gaps so it has a more solid look.
As of right now, I've pinned the muslin back so I can have a good sense of the finished size, and I'll fully finish it when I sew it on.
All in all, it took multiple hours, which was longer than I was anticipating since it's not that big, only about 2" by 2" (5cm by 5cm). My guess is that this is due to a combination of having to use small stitches in order to match the curvature of the design and some sections needing to be doubled to get the right variations in thickness.
13 notes
·
View notes
Text
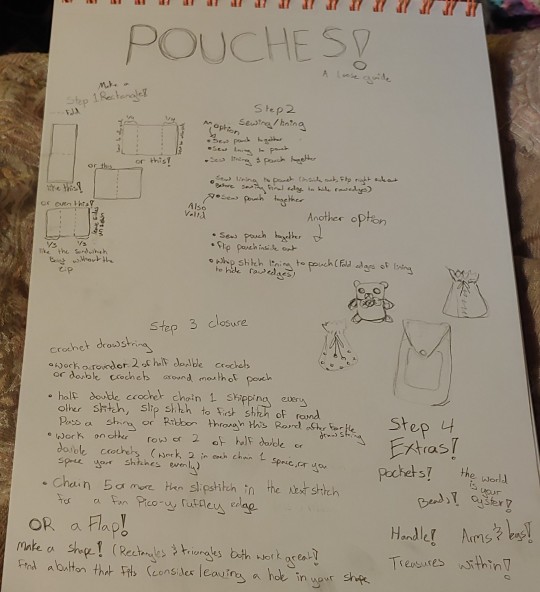
Pouches! A loose guide
I love making little pouches, they take up so little yarn, and there are endless ways to make one. Hopefully this guide will inspire you to make some little pouches of your own!
vague recipe-esq instructions and examples below cut!
You will need:
yarn
the means and know how to turn yarn into a rectangle (be it knit, crochet, or any other method)
a bit of fabric for lining
sewing needle & thread, and a smidge of know how
ribbon or a button (only a maybe on this one (depends on your pouch))
Step 1: Make a Rectangle!
You can knit or crochet it. Most of the pouches in this post as examples were knit, with crochet closures, because that's my favorite way to do it. I like 2 row stripes, or mosaic knitting my rectangles for a bit of visual interest. Mosaic knitting is a technique where you strategically slip stitches while changing colors every 2 rows. I recommend it especially if you are wanting to try out knitted colorwork for the first time, as unlike other methods of knitted colorwork you don't have to worry about floats or working with both colors at the same time. The mosaic knitting charts I use are from Gannet Designs.
Since little pouches are one of my relaxing projects I don't plan them out really, I just make a rectangle and mess around with folding after the rectangle is done. Different ways of folding the rectangle will result in different proportioned pouches, find the shape you like best!
Step 2: Sewing/ Lining
Knit & crochet will stretch, so to prevent losing any treasures I put inside I like to line my pouches. Lining is also a great way to practice your hand sewing so you aren't too rusty when it comes time to repair your favorite shirt that just got a tear.
you can:
sew pouch together
sew lining together
sew lining and pouch together
or
sew lining to pouch (inside out, flip right side out before sewing final edge to hide raw edges)
sew pouch together
or
Sew pouch together
flip pouch inside out
Whip stitch lining to pouch (fold edges of lining to hide raw edges)
Step 3: Closure
If you want to plan out you pouch ahead of time, you can incorporate a flap or drawstring holes while you are making your rectangle.
For knit drawstring holes *knit 2 together, yarn over* where you want the drawstring to be.
For crochet, *half double crochet, chain 1, skipping every other stitch*
I think it looks nicer if there's a bit of fabric on the edge of the pouch after the drawstring hole row. For my drawstring pouches I tend to add all the drawstring stuff at the very end. I crochet around the mouth of my pouch for a couple rows, do the drawstring row, a couple more rows, then finally a round of chaining 5 or more and slip stitching in the next stitch for a fun ruffle at the edge.
you can also knit an after thought drawstring, similar to the crochet one I describe (a few rows, drawstring row, a few more rows, a fun bind off). You will want to work in the round, so having familiarity with dpns or the magic loop method will be useful.
Flaps are also an option! and there's a a lot to explore. Just make any shape, rectangles and triangles are both great picks, but you can get super creative with flaps. Find a beautiful crochet leaf applique? Perfect flap! Circle? Why not! A rectangle where you cast on and bind off stitches on one side for a chunky fringe? I only just thought if it as an example and now I think I gotta try it, cus it sounds super cool!
Step 4 Extras!
Pockets have all the same fun & potential as flaps
String beads on your yarn before you make your rectangle. You can add the beads as you work in a pattern or let it be more random, either way you have a lovely glitzy pouch! You can also add beads to the ends of your drawstring
Give your pouch a face, arms, legs, tail, wings, to turn them into a fun and functional companion for your adventures.
make a long rectangle for a carrying strap, or smaller loops to loop the pouch onto a belt of off the strap of a larger bag. You can make extra long friendship bracelets for a strap that doesn't stretch, and marcrame has a ton of potential for cool patterns!
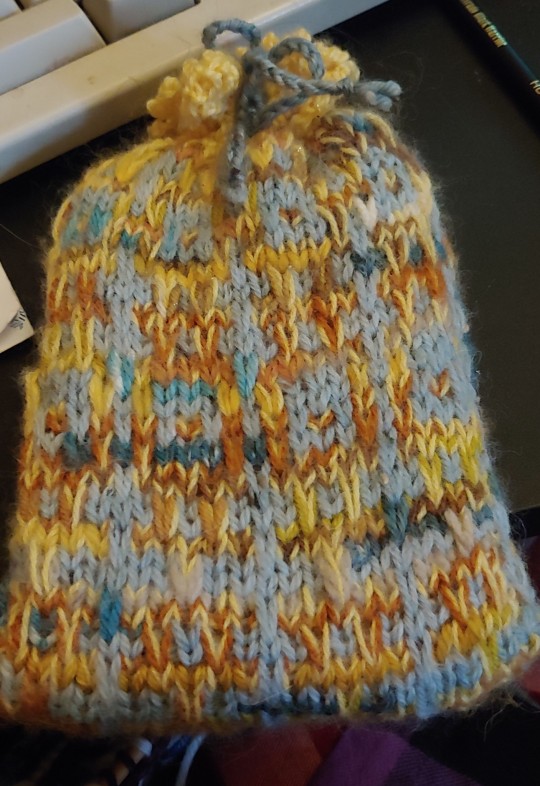
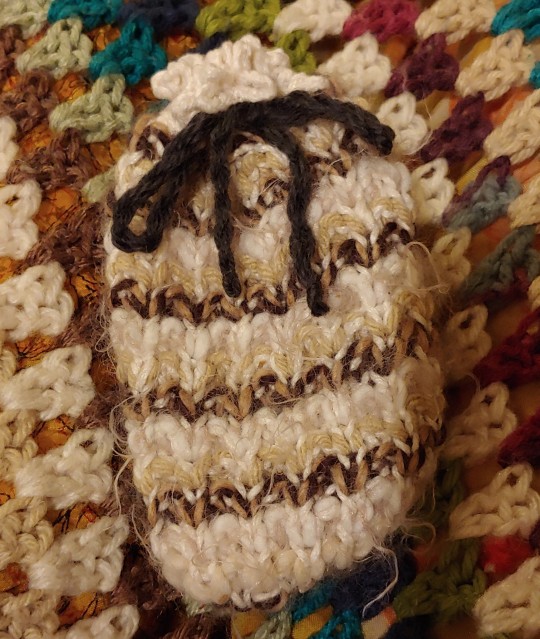
Examples!


33 notes
·
View notes
Text


Pondering the Blue Watercolor Dress: Vogue 8013
This shirtwaist dress has so much to recommend it for a summer dress. It is a 1950s sewing pattern which came one size too big which is very easy to fix. The raglan sleeves make it easy to sew as does the simple collar which is merely sandwiched between the front bodice and its attached facing. The short sleeves and the flared skirt make it more comfortable during the hot summer months by catching any passing breeze. This silhouette, a modified hour-glass, was very popular during the 1950s and is still easy to wear; the slightly shorter hemline--upper rather than lower calf--tells you is dates to the late 1950s.
Notice how the button front only goes part way down the skirt, only enough to allow you to get into it. This avoids the wearing problem of the skirt flapping open near the hemline, but it creates a design problem as the buttons stop abruptly in the middle of nowhere.
So I ended the button front at the waist and opted for a side snap placket instead. I also eliminated the pockets as when they are set in the side seam they are awkward to use. The first time I made this, I used a gingham fabric which made the most of its crispy cuffs. This time I had a softer kind of print, a blue floral blurred like a water color.
I still had several construction issues to ponder now as the original did not recommended interfacing anywhere, not the collar, not the attached front facing, not the sleeve cuffs. And the problem was compounded because the blue watercolor fabric, a cotton/linen/lycra blend has a definite crinkled texture in its natural state which disappeared when ironed.
So I did an experiment with 2 fusible interfacings: weft, which is usually used for tailoring, and a cotton/polyester. Neither seemed an improvement over a non-woven fusible from Pellon that I usually use. Interfacing the collar with the Pellon resulted in such wrinkles, that I redid the collar without any interfacing (I suspect silk organza might have been an option too). I did interface the front facing, which is cut in one with the front bodice because of the buttoned opening, and is barely visible.
You can see the pondering of buttons too. I decided that the darker color, #3, was best as they were the least obtrusive, but wanted a slightly larger size. I will show you the final results tomorrow.
#sewing#dressmaking#vintagefashion#vintagesewing#vintagedressmaking#1950sfashions#1950s#making#makers#sewingconstruction#garmentdesign#historyofgarmentdesign#shirtwaistdress#Vogue8013#dresshistory#fashionhistory#costumehistory
13 notes
·
View notes
Text
Lego Casita Mini-Review
Done in the style of my Bruno Figure Mini-Review, but slightly(?) less inane. Image-heavy post!
Anyway, I built my first house. It's magic and came with an old lady.
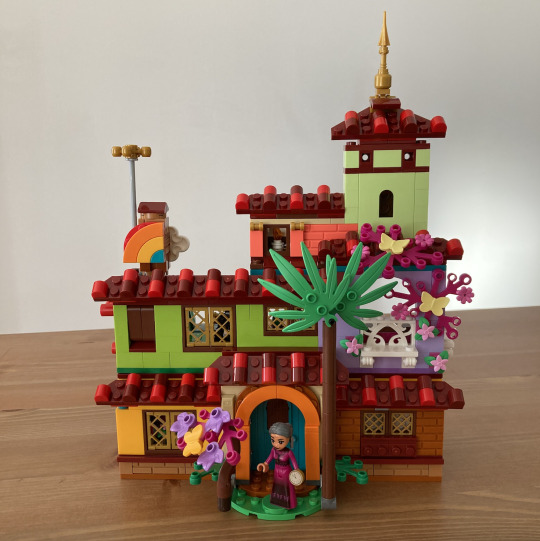
Alright, so this is the first Lego set I've ever owned myself. When I was a kid, I played with my older brothers' Legos, which was fun and everything but mostly boring. And already built. I liked the horses though. And there was probably a cool plane or two?
Anyway, this was an exciting thing for me!!! Apparently I hadn't even looked closely at the box when I bought it because a lot of the details and accessories were a total surprise to me 😅
Oh—and the tiled roof parts are hinged so that you can have them "flap" up and down. And the weathervane can be rotated too!
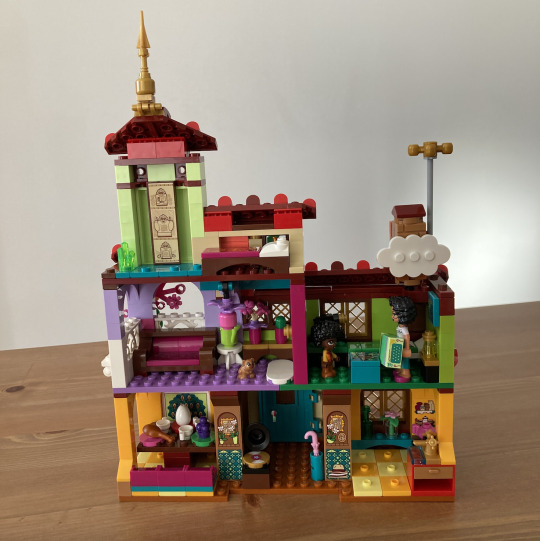
The back view! ⬆️ The rooms!
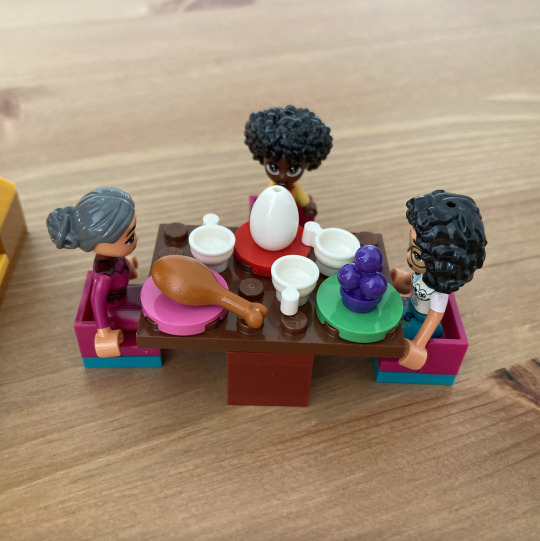
Mirabel and Antonio are recreating scene where she gives him a present.

Here's the nursery/Mirabel's room.
There's a cute sewing machine! And a little lever on the outside of the house that tips the bed from side to side, so it's like Casita is waking Mirabel up!
Very cute.
The little blue picture says, "Hola."
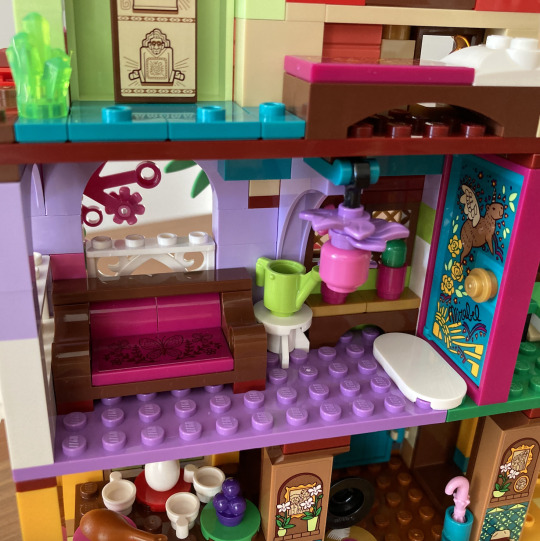
Isabela's room is right next to Mirabel's. (The capybara with wings, on the door, is very cute.)
It even has a cactus! And a watering can.
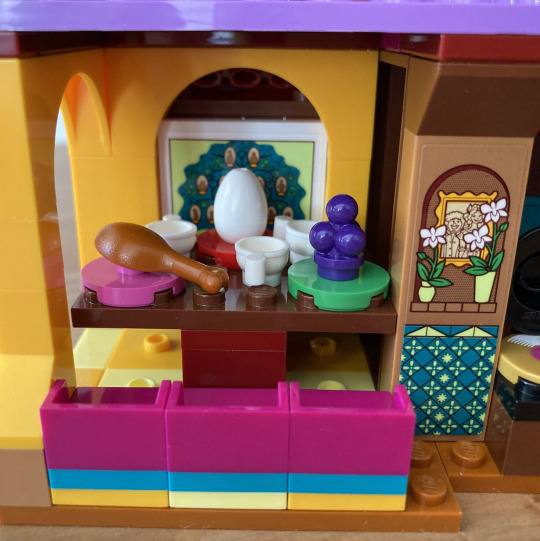
Here's the dining room! Things I wasn't expecting: stickers with the family tree and that photograph of Pepa and Félix! You can also remove the table and chairs...
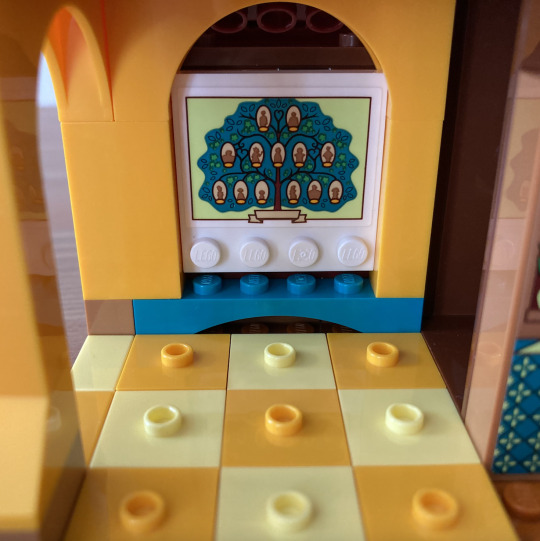
For a better view of the family tree!

The kitchen...
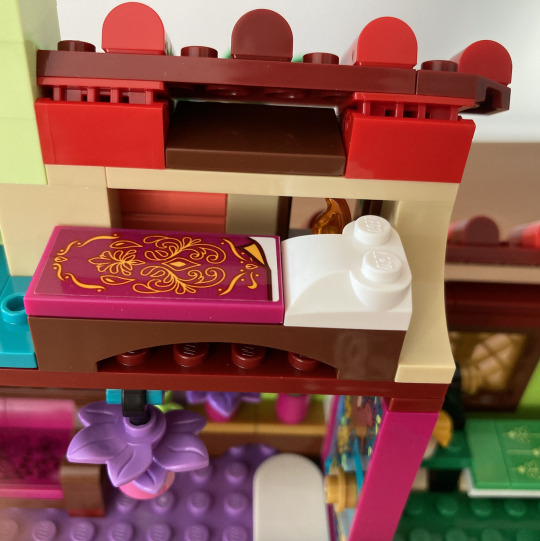
Again, love the details: the photographs of Julieta and Agustín, and Mirabel. The pink umbrella and stand! The forks in the drawer!
Alma's room! You can just make out the candle behind her bed (the candle is visible from the front of the house).
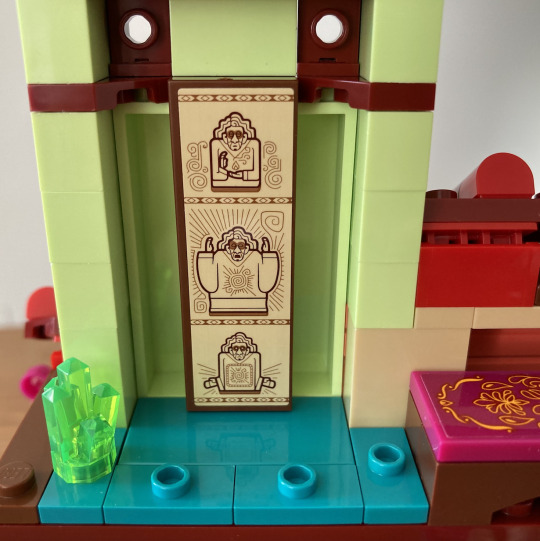
And finally, Bruno's tower! I wasn't expecting this either 😅 The emerald crystals!
Also, I think it looks like he's wearing sunglasses 😎
Moving the table "outside" creates a comida al aire libre (al fresco dining) situation.
Are those supposed to be grapes...?
I was going to joke about how this is *Camilo voice* not a capybara. But in a close-up photo, it actually does kinda look like one...
Nope. Scratch that. I just looked at it again. It's sitting back on its hind feet with its front paws raised. Like a squirrel.
It's like a jaguar and a squirrel had a baby.
Anyway, more accessories! Mirabel's present, which is... a paw print? Cookie? Thing? Also, Mirabel's accordion, Alma's pocket watch (part of her chatelaine probably), and the barely-a-capybara.
Grade: 🐿️ 🐿️ 🐿️ 🐿️ 🐿️ (5/5 squirrels)
In all honesty, I really do love this set! It's cute and colorful. Recommended 😌
#encanto#mirabel madrigal#alma madrigal#antonio madrigal#lego sets#casita#official encanto#my writing#stuff i've posted
28 notes
·
View notes
Text
in light of that horrendous, overpriced Cult of Individuality jacket I saw today I want to share my vests from over the years
i dont even want to know how much money has gone into them. The vests are all jackets I got from thrift stores and chopped the sleeves off of, but patches and spikey bits add up quick. Cant really tell from the pictures but holy crap have my patch sewing skills improved over the years.
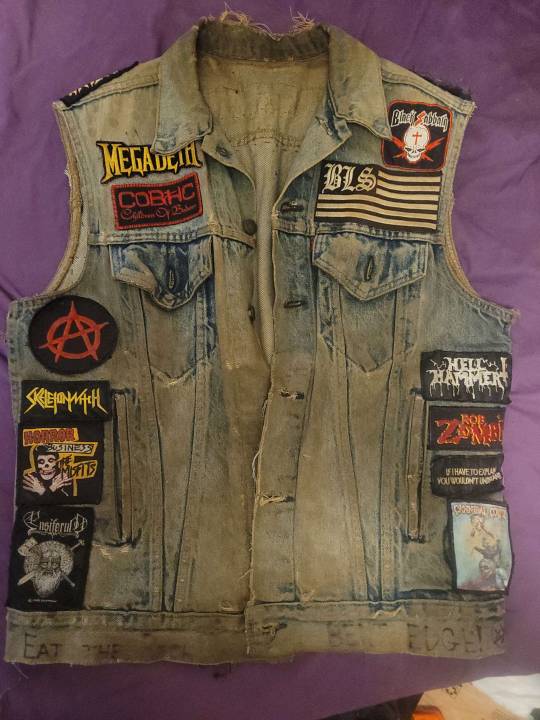

Late 2000s/Early 2010s: My first vest, my thrasher jacket. From my "heavy metal is my only personality trait because everything else is buried in the closet" phase. Pretty much refused to be caught without it on for most of high school and a couple years beyond, starting with just the vest and the Slayer patch. Picked up a few of the patches at shows (Black Label Society, Children of Bodom, Nightwish, Misfits, Judas Priest) the rest were from eBay or random 2000s websites. its had various layouts of spikes/studs over its life, but all got removed to make room for patches. The big blank space is because I couldnt figure out how to sew patches over pockets, at the time. I dont wear it anymore both because its beat to shit and I definitely wouldnt rep some of the patches on it anymore. (ex the confederate flag skull Pantera patch) There were signs of things to come though. I found this, hiding behind the Ensiferum patch. X3

I intend to hold onto this thing forever. I forgot it also has Eat The Rich on it.
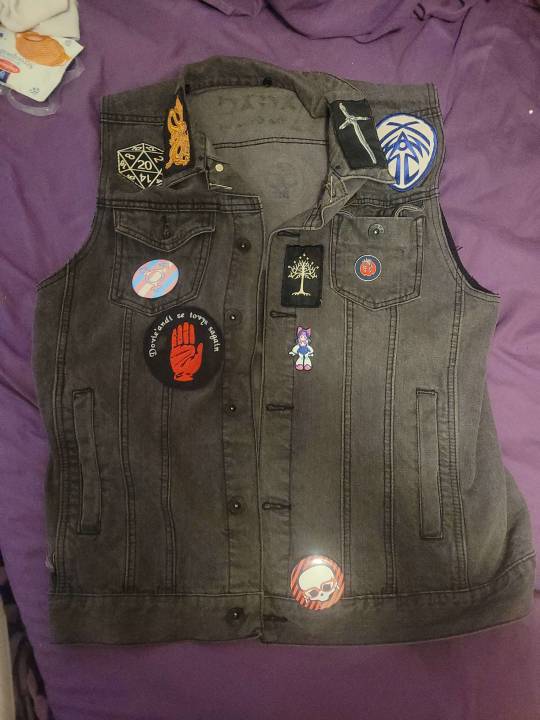


2010s-Now: These two are more recent, and still get some wear. I started the black one after I retired my kutte, and the blue one shortly before coming out ver2.0 dropped, a couple years ago, then immediately abandoned. I will probably transfer a lot of the patches to the black vest. Some will also go to my primary vest. No idea what Im going to do with the blue one. I love the back patch but the vest is kind of bulky and doesnt go over crop Ts very well, like the black one does. The Donkey Kong patch is probably my favorite. It was either a gift, or I bought it, from the retro gaming guy, at my local flea. Its in amazing condition for being 40+ years old.

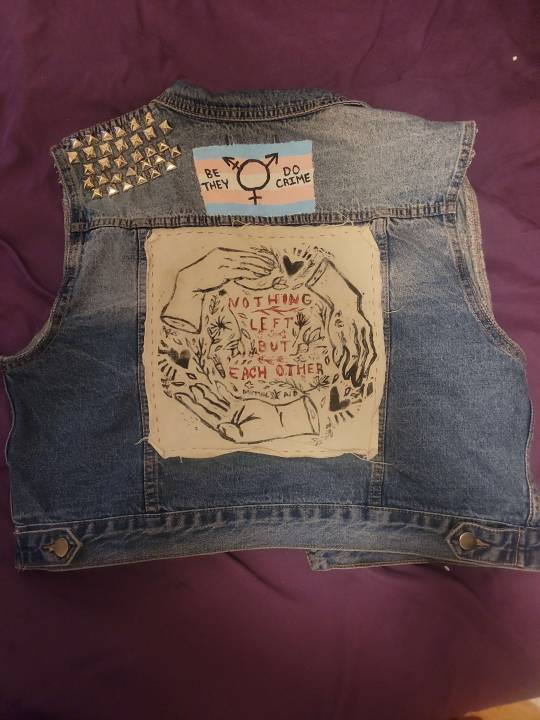
My primary vest right now is this crop job. I plan on making it my magnum opus. Once I get patches situated I plan on filling the rest of the space with pins and paint. The backpatch and the Cisn't patch on the front are from @lakemichiganbaby (SturgeonsDesigns on etsy). [currently on a break for February 2023] The bows are from @genderpunks (GreerMarsCo on etsy) I plan on sewing them somewhere else, probably on the pockets themselves, because I have Ace and Nonbinary colors painted on the pocket flaps. The button holes are a convenient spot right now because they were originally intended as hair clips. Lots of work left to do on it, but Im in no rush to be done with it as a project. Hoping this one looks are rough as my old metalhead battle jacket by the end.
#vest#patch vest#battle jacket#patch jacket#battle vest#kutte#patches/pins/paint/studs/spiky bits#patches pins paint studs#sturgeonsdesigns#greermarsco#diy#diy projects
15 notes
·
View notes
Text
"I know how to sew!" I said.
"I've made my own patterns before, this doesn't even have sleeves so it'll be easy, right?" I thought.
It turned out great in the end but I definitely underestimated how much trouble I'd have with it
(Full process under the cut)
[Skull pauldron] [Belt] [Greaves] [Toga + sash] [Wig + Laurels] [Armbands] [Flaming feet] [Satyr Sack] [Stygius v1] [Stygius v2] [Nectar]
Part 1 - The toga
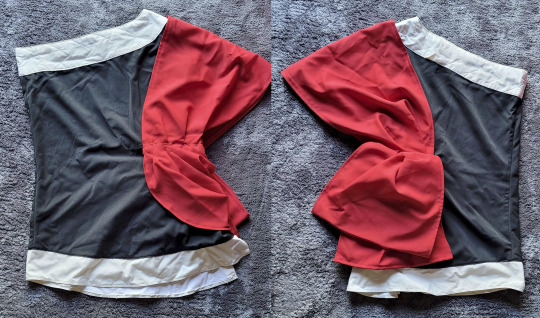
The first thing I had to do was decide on the cut of the toga - I opted to move the trim to armpit level because I would definitely get in trouble at con if I went for the full tits out look. If you're going to use a binder like I did, it's best to wear that while making your patterns and making adjustments, as your bust can effect how the fabric sits, and with such a draped piece (especially if you're using a thinner material) it's important to account for that. I don't have binder recommendations, as I made my own sleeveless binder for this cosplay.
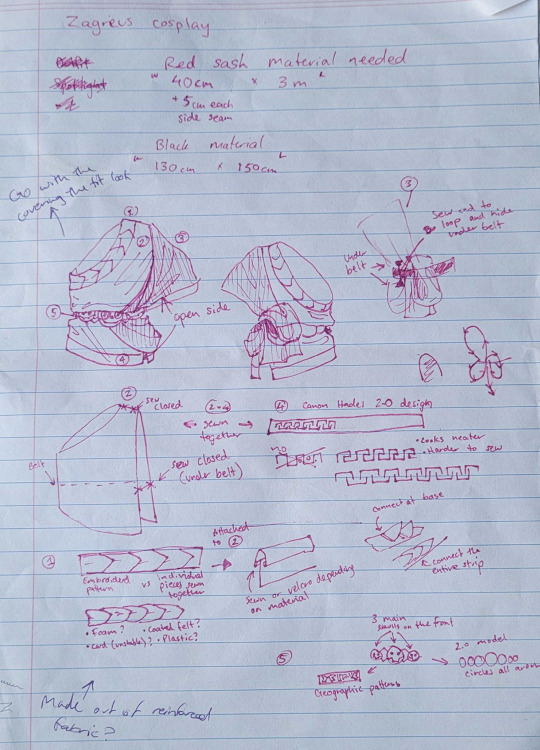
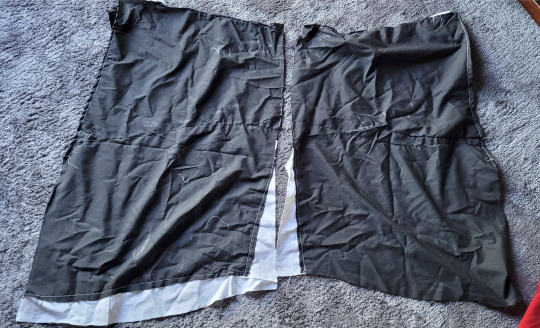
What materials did I use? The ones that were the right colour and not too expensive. I barely look at fabric types when I'm buying them for costumes, yes I am ashamed, yes I know it matters, no I will not change my ways. To make the pattern for the toga I used some black poplin I had on hand, and used the professional method of guessing what the pattern should be like and then spending a whole day yelling as I tried to pin and adjust the fabric to sit right. Making the belt before the toga really worked in my favour for this part.
Part 1.5 - The trim and the pauldron attachment
I should have bought a thicker fabric so you can't see the black underneath - as it is, this is 2 layers, one white scrap material I had lying around, and the nice off-white I originally bought for the trim. The top edge was sewn directly onto the edge of the black toga since I measured where it was meant to sit. The bottom was sewn along the edge to get the right length. To get semi-consistent lengths for the spine pattern I cut out a paper pattern, traced it onto the trim, then used my cream thread to sew the pattern on.

The attachment point on the skull pauldron isn't quite at the right angle, but it has yet to fail as I made the attachment point on the toga very secure. It's mainly held on with a section of velcro, secured in position by two snap buttons in the side corners, and had a material covering to hide any flaws and keep it secured. The covering was attached with a mixture of hand sewing and hot glue.
Part 2 - The sash
I originally wanted to do the sash in one continuous piece. However, official art lied to me, and fabric doesn't drape like that. My main measurement was from the shoulder to where it sits on my arm, and then the length was guessed based on mockups. I also included a tiny pouch at sits at the waistline that I could use to store a few bottles of nectar to hand out during the con. From there, I then had to do the most painful section of the whole toga - hand sewing tiny sections of the side material to get it to have a draping look and not leave any spaces. It took forever and needed some wire to stop the front edge from flapping around, but I didn't want to chance cutting it off and making the section from a separate piece of material so close to the con. However, that didn't stop me once the con was done and I had a few months to the next one.

Part 2.5 - side section v2 and hidden phone pocket
Using the correct amount of material ended up with a much nicer drape! It was a painful, painful day as I don't actually know how drapery works and this was all guesswork and trial and error (if that's not obvious by the amount of pins present).
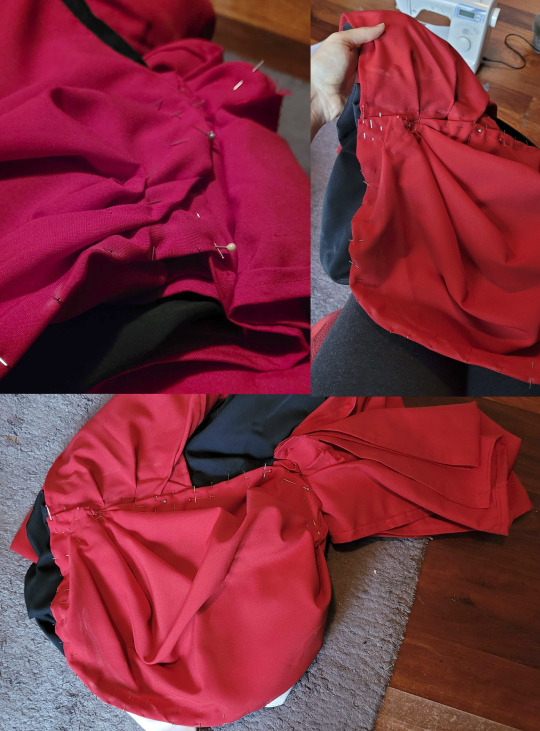
The phone pocket was roughly measured, and made from a few layers of the same red I used for the sash to blend in. I also used a bit of stiff felt to give it more shape to bulk out that back loop section. A bit of velcro to keep the phone in and it's done!

#my cosplay#cosplay process#hades game#zagreus cosplay#look I made this mostly through trial and error and trying it on repeatedly while making adjustments#so there's no easy measurements I can share#but if you want exact size details I can give them to you
5 notes
·
View notes
Last Seen Blogs

gypsy-crusader
Gypsy crusader

aidesinha-blog
"se berimbau tocar tu me chama..."

passtheworld
"the world as we see it passing" Paul of Tarsus

diejai-ameisen
Diejai Ameisen
