#how to sew binders
Explore tagged Tumblr posts
Visit Tumblr Blog
Explore Tumblr blogs with no restrictions, modern design and the best experience.
Last Seen Tumblr Blogs


Fun Fact
Tumblr.com rank in the US is 25.
Text
Big Update Post
Hiya, shapeshifters!
We have some announcements to make this evening.
Here’s the short of it:
The Shapeshifters website will be temporarily down this Sunday evening, March 3, 2024 at Midnight EST.
When it comes back up, you’ll find a shiny new website that is organized the same way with a couple of exceptions.
The Off-the-Rack Sale and Holographic listings will be temporarily delisted.
The Goth listings will be renamed. You will find Rainbow Constellations, Monster Mouths, and a couple of new options listed under Cosmic Horror.
The Skin Tone listings will have brand new additional color skin tone options!
The Island Time listings will also have a new option available.
The Binding 101 FAQ will be rolled into its own section in the FAQ.
There will be a brand new Events Page!
The blog will be temporarily disabled.
If you’re curious about the long of it, keep reading.
For everyone else, we appreciate your patience during this transition! Like so many other transitions, we’re delighted about where it’s going.
Website Downtime
Shapeshifters is finally moving to Shopify! We’ve done a lot of work over the past few months building a more organized, streamlined website that will be easier to access for you and update for us. On Sunday night, we’ll shut down the current website to pause orders so that we can migrate everything cleanly.
Off-the-Rack and Holographic Listings
The Off-the-Rack listings will be delisted to give us a chance to reorganize the remaining stock so we don’t accidentally double-sell anything.
The Holographic listings will be delisted while we assess our fabric options. Long-time customers might notice that we’ve removed Liquid Metal and Oil Slick from the Holo listings; we’re sourcing replacements and new options throughout spring. Once we know our options, we’ll either re-launch the Holo listings, or move the currently available fabric Prism to another home so it won’t be all alone anymore.
If you’ve been eyeing either Prism or an Off-the-Rack, buy it before Sunday if you can!
Expanded Skin Tone Range
We’re very excited to announce three new skin tone options will be available after the website migration: Pine, Chestnut, and Laurel! Pine is a pale shade, while Chestnut and Laurel are both on the darker end of the spectrum.
And, the new and improved Skin Tone listings will be the perfect place to see the results of our latest photoshoot! We’re excited for y’all to get to see these photos around the site and on the listings. We sought out models of color with darker skintones both to fill a gap in the modeled photos in our listings, and to show off our darker skin tones. All of our models were amazing, our photographer was great, and the photos are fantastic! We really leaned into the cozy Vermont vibes for this one.
Events Page
We’re going to events again! Hooray!
And we’re not just going to conventions and conferences and Pride festivals. We’re also talking queer markets, fashion shows, and binder sewing workshops!
That’s right, some lucky folks in the New England area will have the opportunity to take an in-person class with Eli, our head tailor and the developer of our DIY Binder Sewing Kits. They will walk you, step-by-step, through sewing your own custom-sized binder and help you troubleshoot along the way. These workshops are designed for sewists of any level and do not require you to own a sewing machine.
If you’d like to host a sewing workshop or would like to have us at any other event, educational, celebratory, fashionable or otherwise, please contact us!
Thanks once again for bearing with us during this transition and we can’t wait for you all to see the new site!
#chest binders#shapeshifters#events#pride#skin tone chest binders#sewing workshops#how to sew binders
47 notes
·
View notes
Text
trying to singlehandedly revolutionise the men's fashion industry but my heat resistance is zero and im boiling alive call. that a fried faggot ❓ i think i have heatstroke
#SLASH JAY IM LOOKING AFTER MYSELF but its like 35°C (95°F) and rising bro i was made for the cold helpme#seriously need to get top surgery purely so i can shed the binder fighting for my lifee. fauck.#i should start making my own clothes tbh im good at designing them i should learn how to use a sewing machine
10 notes
·
View notes
Text
even after top surgery i'm gonna be short as hell and i'll probably gain weight when i start t so tbh i need to just learn 2 make my own clothes. bc the problem of never having clothes for my body type is not going to go away ever. unfortunately making ur own clothes is expensive bc fabric is expensive and sewing machines are expensive and fucking up is expensive
#text#and i dont know how to use a sewing machine#and i dont know where i'll buy a new binder once the ones i have like. dont bind anymore#and idk if makingmy own binder would be safe and idk how id learn 2 make a safe one#Actually wait i think shapeshifters has a diy kit u can buy? i might look in2 that
19 notes
·
View notes
Text
Everyone should take a sewing class if they're given the opportunity
Sewing is such a useful thing you can know how to do, you can learn how to repurpose old fabrics into something new if possible, you can learn how to repair damaged things!
Can't find a specific thing? Try to make it yourself!
It especially comes in handy for my day to day life, I'm a younger trans guy, and I grew out of my first proper binder a long ass time ago, and those fuckers aren't getting any cheaper.
So I looked into how and why a binder is constructed, then fucking added a non stretchable panel of fabric into a form fitting stretchy tank top! It's a very functional binder and is genuinely more comfortable than my previous one.
You want to fight off planned obsolescence in clothing? LEARNING TO SEW HELPS YOU PROLONG YOUR CLOTHINGS LIFESPAN! I've been offering to fix my friends clothes for free just because I know I have the means to, and they'll get more time to love that garment.
Learning to sew is one of the most versatile skills you can have, highly recommend
#sewing#transgender#transmasculine#transmasc#hobbies#clothes#binder#but seriously research how to make a binder properly before you make one#punk#diy
27 notes
·
View notes
Text
i dont want to give in to Modern Shapewear but i really hate when im trying to have a Fun Outfit and theres fucking Distinct Lines from various under wear bands (bra, undies, maybe a pair of tights?) all at separate points? that are impossible to hide bc the outer wear is fucking form fitting spandex
#toy txt post#if it were easier to make bespoke structured underclothing to create a smoother silhouette. god. i would. but thats so much more investment#in time and money and materials and hours to probably fuck it up at least the first coupke times vs just buying a fucking tummy control#camisole or some shit. but i cannot fucking stand the marketing around it. i dont want to put money to that. im not trying to Look Thinner#im trying to achieve a specific smoother silhouette w my clothing to look like a little clown and vintage silhouettes#rely so often on structured underclothing that the closest analogue to today is: fucking shapewear! unless i go out and get an actual#corset. but those tend to be more expensive. and im not aiming necessarily for the classic corset look i feel like a lot of the ones for#sale offer which seems to be very......booby. but the flatter more smoothing silhouette that was consistent between both menswear#and womenswear. the lengths it takes to be a nonbinary fucking clown. sighs deeply#also thinking again about the stupid fucking gold harley quinn jumpsuit i got like the movie that i Want to like and it Isnt Bad#but the material of the one in the movie is much thicker so its doesnt BEHAVE the same way as fucking form fitting spandex. and i know why#they did spandex. cos like. easier to sell cheaper to make fits a wider range etc. but i just want a fucking piece like that as an Actual#Garment of Clothing not a fucking spandex Halloween costume and couldnt find anything like it for less than $500. which is honestly#probably a reasonable price for labor and materials but not one i can justify? its just frustrating cos its So Close to good but the fuckin#Material just Ruins it for me and not even necessarily cos of like lack of shapewear lumpiness but like the way it drapes on the body the#way it stretches as spandex just looks Wrong. aaaaaaagaghgghghghggh#rage. anger. etc. need to learn how to sew my own shit at least a little. maybe a full length binder like 1 size up for comfort? scary#for context i also struggle with breathing from the lightest amount of Too Much Chest Compression. like sometimes bras will Get Me#so thats the other factor here. i dont know that this is necessarily looking for advice mostly im whining and complaining while doing#Nothing. ugh#also how much of this issue could be avoided if the form fitting spandex stuff had like. a lining. idk
3 notes
·
View notes
Text
update on the codfather cosplay, i am now learning to crochet so i can make my own codfather head. this cosplay WILL exist and when it does im going to go feral.
#my sister didnt know how to make the head#so im going to free style it and make one myself#jimmy solidarity#the codfather#empires smp#empires smp season 1#cosplay#with this addition everything in this cosplay except my binder#will be homemade#either sewed together or crocheted by me
14 notes
·
View notes
Text
hOLY SHIT IM BEAT i am SO lucky we dont have schoolwork anymore and we're only left with musical practice, but I just had to walk to the market to buy myself some boy shoes and a black tie for my Musical costume (win for the boy community tbh), and just walked back HOUGH i am TIRED
but then i still have to make a diy binder (<-IMPULSIVE DECISION BTW), create a keychain for my friend's birthday tomorrow (can someone help me with that-) AND try to bake brownies for the same birthday. oh my god...
#rennikorambles#and it's aLREADY 5 PM!!!!#MANNN OUGHUAUHGH#maybe the binder can wait...#i still have to SEW for god's sake...#but ohhh boy how do you make keychains without using money-#(just used up 680 pesos-)#and i do not think i have the energy to bake but.... my guy loves brownies... he'd love some brownies......#(we all have to sing for the musical)#either way WHOOF
8 notes
·
View notes
Text

finally started drawing the last pages of the my silly dragon age comic and accidentally drew the binder of my dreams🔥💥🐉 🐲
3 notes
·
View notes
Text
yO i just realized i could make several different outfits made of entirely DIYed clothes complete with accessories
#ofc not socks and underwear cause how would i do that#but I've DIYed at least 5 shirts two pairs of shoes a hat a pin and one pair of pants#also one of my two binders has been sewed tighter does that count
6 notes
·
View notes
Text
Next day reblog of the pattern list, now with baby blanket!
Links to my free sewing patterns! - big manta ray - smaller manta ray - monster friend (those monsters with horns I’ve been making lately, but without horns) - pie slice - Fred, the Fish of Minimal Effort - tiny cat (aka Jiji) - mini mothman - whale shark/donut whale shark - juggling frog/toad (aka my smallest, simplest frog pattern of the three I’ve made) - large frog - tiny hedgehog - minecraft bee - minecraft zombie - blorbo - Strawberry Hearts quilt pattern - starfish - little octopus - canvas tote - basic bat and ghost - flannel baby blanket tutorial
#free sewing patterns#I currently have a poll going on what free pattern I should share next#I have...no idea how many patterns left I have already written but not shared#a lot it's a lot of patterns#an entire three inch binder's worth of patterns#and I'm almost at the point where I'm going to have to get another binder for them
11K notes
·
View notes
Text
The Best FTM STP Packers for Your Transition
The Best FTM STP Packers is designed especially for transgender men who are discovering their gender identity and have started accepting the changes in testosterone hormones. The hormone is an essential part of every transmen’s life. We start feeling so much physically that changes are made to save our lives. STP Packer is a stand-to-pee device built to help transgender people make public…
#best stp packers#best stp packers ftm#foam packer ftm#ftm packer airport#ftm packer cleaning#ftm packer coloring#ftm packer diy#ftm packer knitting pattern#ftm packer pouch#ftm packer sewing pattern#ftm packer swim trunks#ftm packer swimming#ftm packer tsa#ftm packers#ftm packers amazon#ftm packers Australia#ftm packers binders#ftm packers canada#ftm packers Europe#ftm packers for swimming#ftm packers nz#ftm packers on amazon#ftm packers south Africa#ftm packers uk#ftm packers with adhesive tab#ftm stp packer#ftm wearing packer#how does a transgender person transition#lgbt packer#lgbtq packers
1 note
·
View note
Text
How to Make Your Own Binder that Fits Well and Looks Good
A while back I was in need of some new binders and thought hey, I bet I can make one way cheaper than buying it from somewhere (especially cus some of the ones I’ve bought in the past didn’t really fit right). Except when I started looking for a binder patterns online, I was very surprised that I really… couldn’t find many that looked very nice lol. Most of them had really wrinkled necklines, or didn't bind well, or just overall looked weird. A lot of the patterns also required a serger, which I don't have.
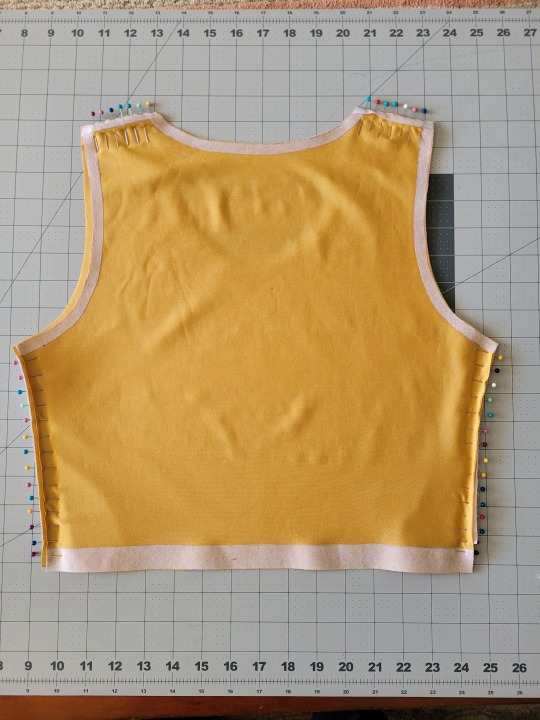
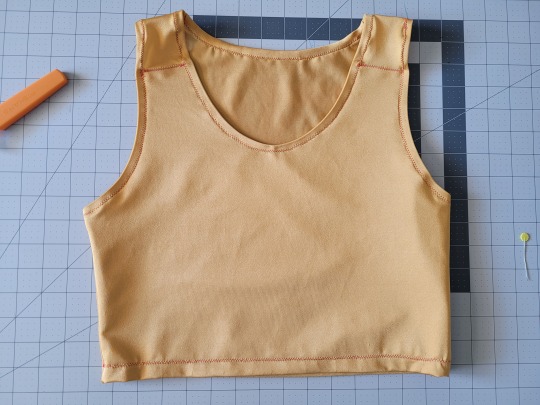
So I just said fuck it and made my own pattern! And it ended up being relatively easy! And the binders fit REALLY WELL and are comfortable to wear, even for long periods. The neckline doesn't show under shirts with loose collars, and the bottom hem doesn't gap or stick out. Here's me wearing one:
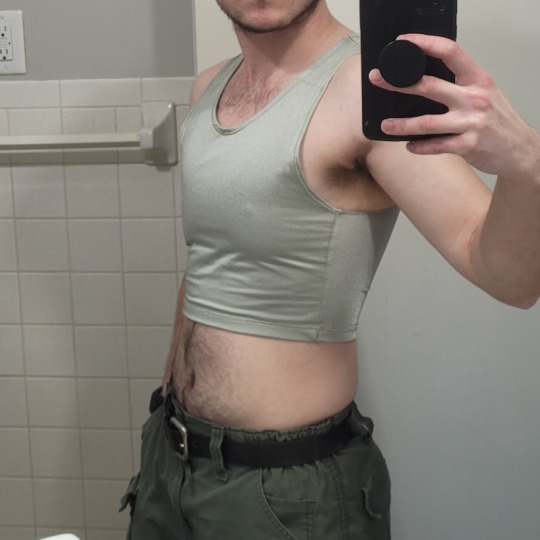
(plus I was able to make myself 5 of them for a total of like ~$50.)
So I figured I could throw together a guide to help out anyone else who wanted to make their own binder but was dissatisfied with the patterns available!
Disclaimer: This tutorial is going to assume a baseline level of sewing experience, and also will require access to a sewing machine. It is not a complicated pattern, but it will most likely require some tweaking and adjustments after you make the first one. Don’t be afraid to make alterations to make it fit better!
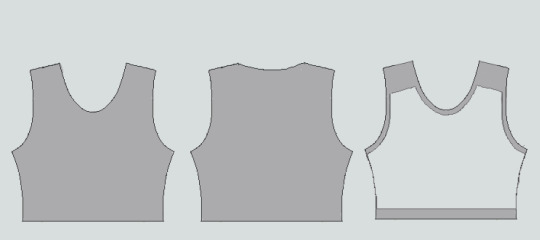
This tutorial is for a gc2b-style half-tank binder. It could be altered to be a full-tank binder, but all instructions will be for the half-tank design.
Materials needed:
Stretchy fabric, probably listed as 'athletic fabric' (I use this kind from Joann’s. Most athletic stretch fabrics should work, look for around 80% nylon/20% spandex blends)
Stiff fabric (I use this shirting cotton because I like how lightweight it is. If you want something a little stiffer with more structure, you can use a cotton or cotton/poly blend twill like this. gc2b binders use twill for theirs.)
Lightweight fusible interfacing (I use this kind) (get FUSIBLE not sew-in)
Fusible webbing like Pellon Wonder-Web (this is technically optional but it WILL make your life easier when you’re sewing - just make sure to get the kind with the paper backing!!!)
“But kiwisoap thats 4 whole kinds of materials, surely I don’t need that many!” Ok sure, you can probably get by without the fusible web and interfacing, but consider: they are both dirt cheap (im talking like $1-2/yard), they will make it much easier to sew the final product, and will give you an overall better-looking result. This tutorial is written with the assumption that you’ll use them.
"How much fabric will I need?" Measure the circumference of your chest below your armpits. Add 6 inches just to be safe. This is the yardage of stretch fabric you’ll need, and should give you enough material to make at least 3 binders without much excess left over. You will need around half as much stiff fabric.
Other supplies:
Big Paper (for drawing the pattern)
Flexible measuring tape
Sewing machine
Iron
Pins
Step 1: Measuring
You will need 4 main measurements for this pattern.

A) Measure the circumference of your chest just below your armpits, then divide the number in half. This will be the widest part of the pattern.
B) Measure from the top of your shoulder down to where you want the binder to end. For most folks, this will usually be around the natural waist (narrowest part of the torso), about 3-6 inches above the belly button. This will be the overall height of the pattern.
C) Measure the distance from below your armpit to where you want the binder to end. This will determine where the arm hole starts.
D) Measure the circumference of your waist where you want the binder to end, then divide the number in half.
So for example, after dividing A and D in half, my measurements are 17", 15", 7", and 14.5".
Next:
Subtract one inch from measurement A - This will help provide some compression. You might need to take it in even further depending on how it fits, but one inch is a safe starting point. I take mine in around 1.5 inches.
Subtract half an inch from measurement D. This will help prevent the bottom edge of the binder from gapping. Again, you may need to take it in more or less, depending on your own body.
Add 1.5 inches to measurement B and one inch to measurement C. This is to account for the hems and armhole placement.
This makes my final measurements
A = 16"
B = 16.5"
C = 8"
D = 13.5"
From here on out, we are only going to be working with the measurements that we have added/subtracted to, NOT the ones we initially took.
Step 2: Drawing the Pattern
You will need a piece of paper large enough to accommodate the entire pattern. This may involve taping multiple pieces together, or using a piece of newsprint, etc.
I recommend folding the paper in half to ensure that you get a symmetrical pattern. However, this means you will need to divide measurements A and D in half again, or else you’ll end up with a pattern that’s twice as wide as it should be!
Also note: the pattern is drawn with the seam allowance built in! You don’t need to add any seam allowance.
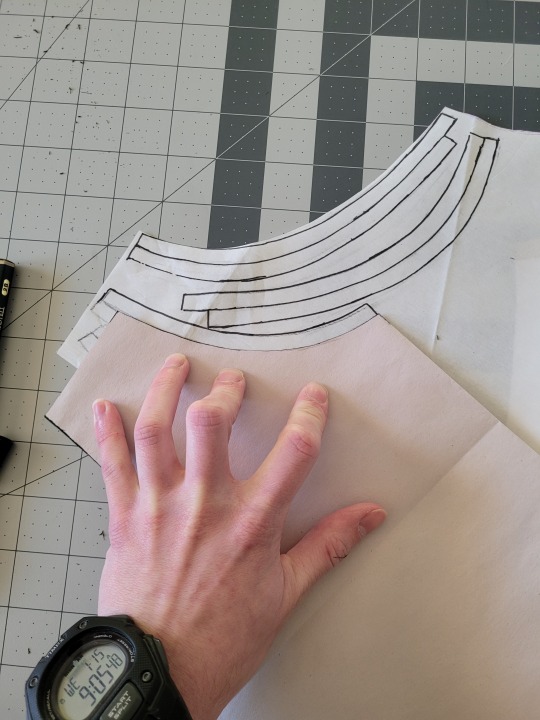
To draw the pattern:
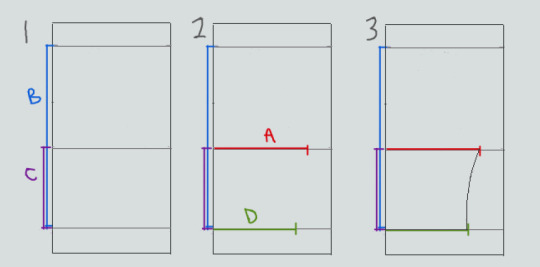

Begin with your folded paper. Measure and mark B and C on the paper, and draw a line extending across the paper. These will be your guidelines.
Measure and mark A and D along the middle and bottom guidelines, respectively. Remember, the paper is folded, so you only use half of the measurement for A and D.
Draw a loose curve connecting the endpoints of A and D. If needed, you can also just draw a straight line between the two.
Mark the opening for the neck hole. Depending on your size, it will measure around 6-8 inches across at the top (remember to divide this in half for the folded paper) and about 5-6.5 inches deep. (mine is 6.5" across and 5.5" deep) Draw a curve to connect the two points. This part will take some tweaking and adjusting to get it to look right lol.
Measure the width of the strap - this should be somewhere between 2.5 - 4 inches wide. They will end up about 1/2” to 3/4” narrower once you sew them. Draw the line at a slight angle, as shown.
Connect the endpoint of the strap to the endpoint of line A with a curve like in the diagram.
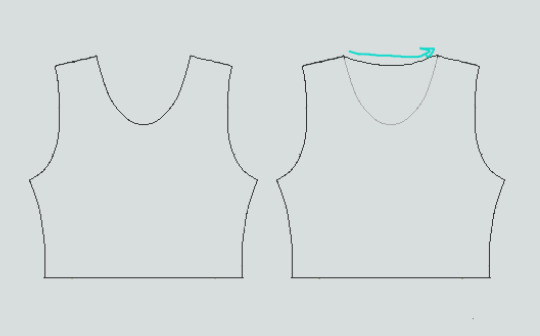
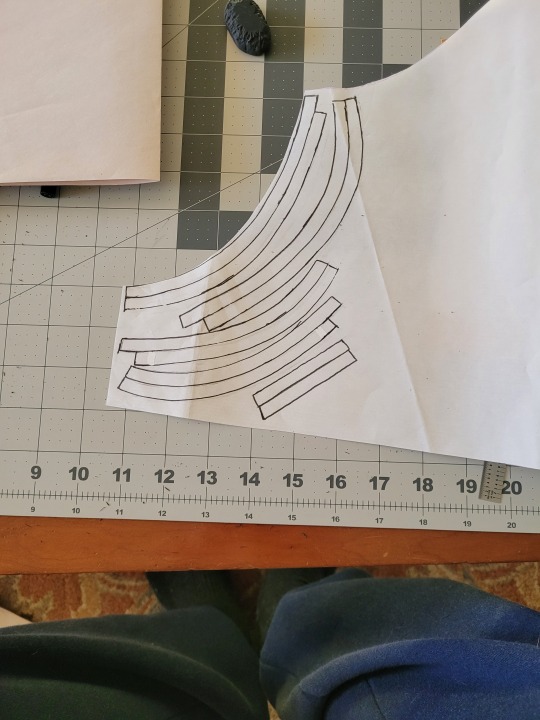
This will be the pattern for the front piece.
To make the back piece, trace the front pattern, but make a very shallow curve for the neckline instead of a steep one, as shown:
The last piece is the stiff front panel. This is what provides the flattening effect of the binder. To make the pattern, trace the front pattern again. Trim 3/8” in on the sleeves and neckline, and 3/4” to 1” along the bottom. This gives a flatter hem. Then trim the straps shorter by a few inches. This helps the binder lay flatter along the shoulders.
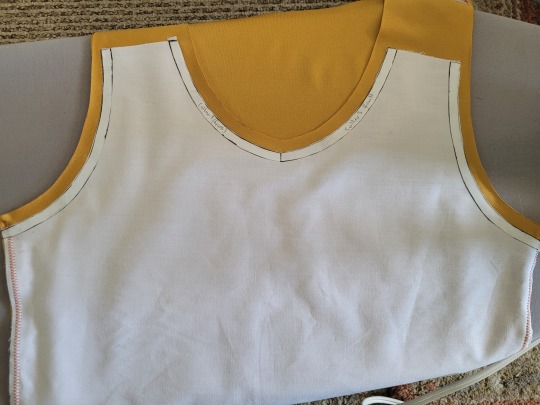
When you're done, you should have 3 pattern pieces that look approximately like this (stiff panel shown overlaid on the stretch fabric to show how it fits together).
NOTE: If you want more compression or just want to make it a bit sturdier, you can add a second panel of stretch fabric to the back piece. Just use the bottom half of the back pattern (from the widest part down to the bottom hem) to cut out another piece of stretch fabric. Attach it to the back piece with a strip of fusible webbing and a zig-zag stitch along the top.
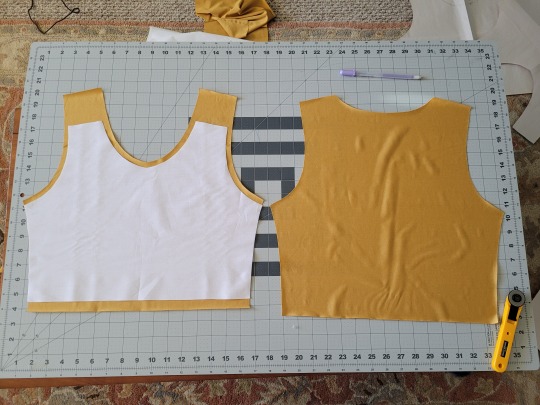
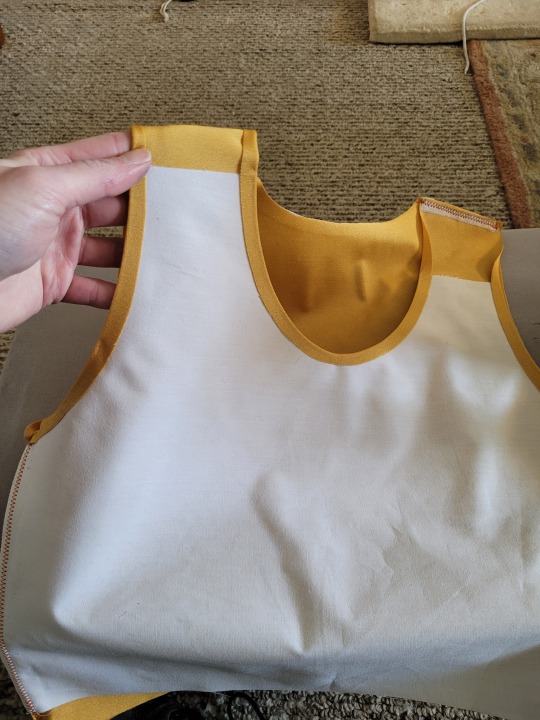
Step 3: Putting It All Together
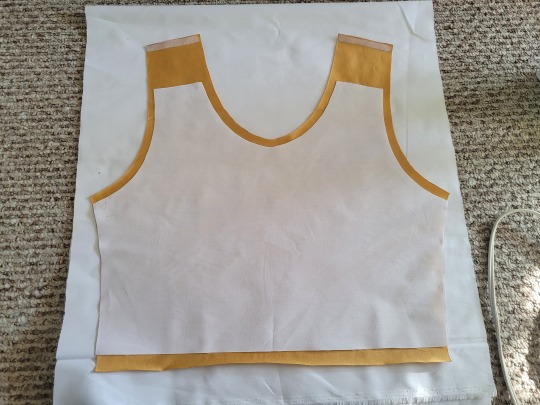
Once you’ve made the patterns and cut out the pieces of fabric, you should have something that looks like this:
The next step is adding interfacing and fusible webbing. Use your pattern to cut out 3/8" strips to fit on the top of the straps for both pieces, and to the neckline, sleeves, and bottom hem of the back piece, as shown:
If you want to add it to the bottom hem of the front piece, it will help keep that hem flat when sewing it down later, but it's not essential.
If you choose to also use fusible webbing (WHICH I RECOMMEND), you will apply it to the stiff front panel similarly to how the interfacing was applied, ~3/8” strips along the neckline, sleeves, and top of the straps. Cut out two strips for the neckline and sleeves, because we'll use those later too.
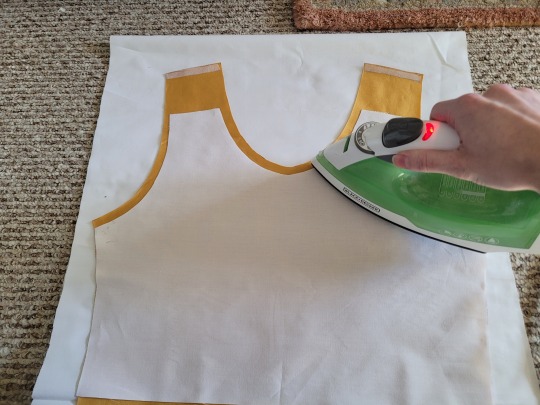
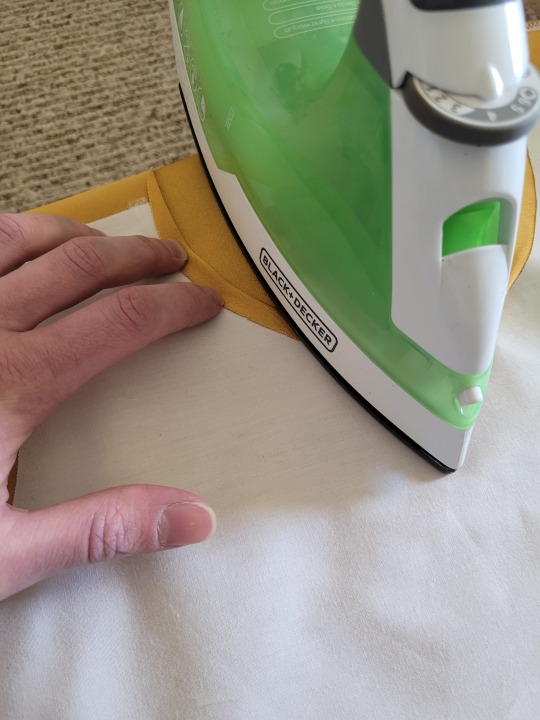
Iron the strips onto the front panel as shown:

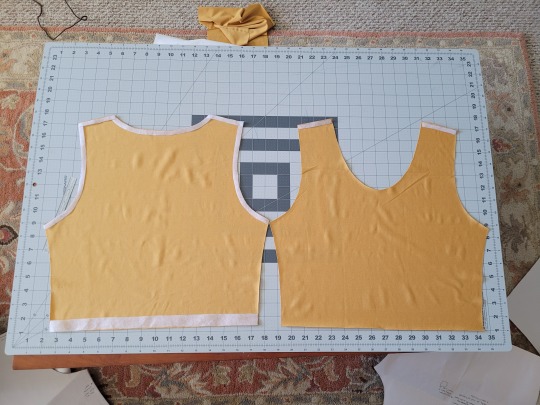
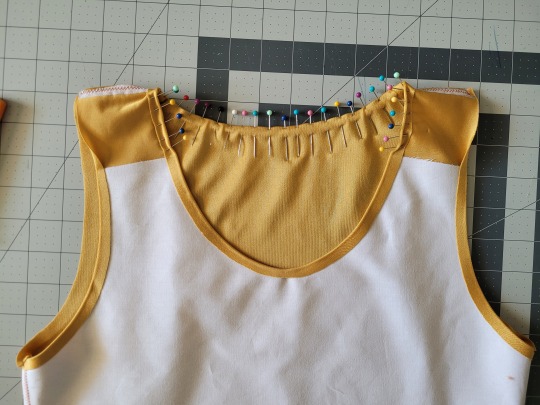
Once it's on, just peel off the paper, position it webbing-side down on the stretch fabric, and iron it to fuse the two pieces together so everything stays in place while you sew. THIS MAKES IT WAY EASIER TO SEW.
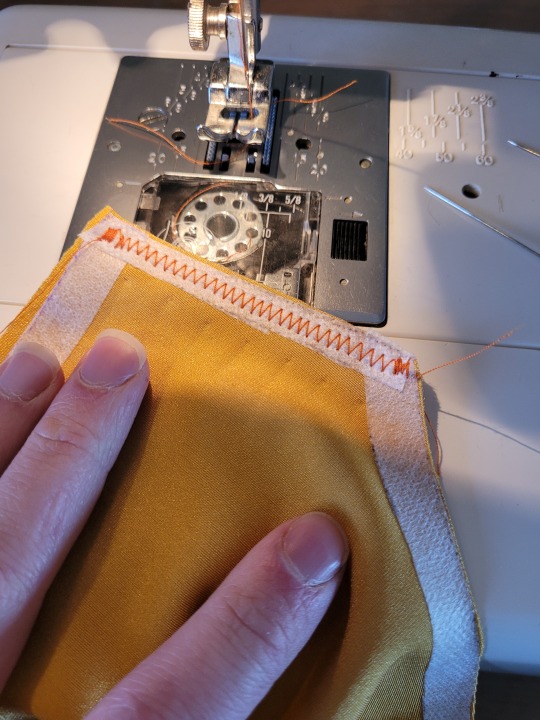
After the stiff front panel is fused to the stretch fabric, you’ll sew the straps of the front and back pieces together, then join the pieces along the sides. Pin the hell out of it to keep everything in place -this type of material is VERY prone to puckering.
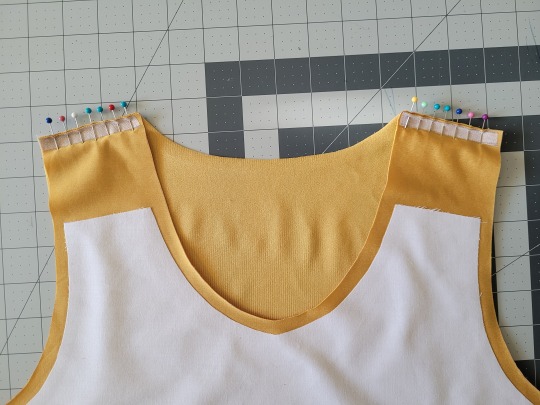
When sewing, USE A ZIGZAG STITCH. A straight stitch will NOT WORK for stretch fabric. I adjust mine to 1.3mm long and 3.5mm wide which has worked well. If your machine doesn’t let you adjust stitch length or width, well. That sucks, I don’t really have any advice.
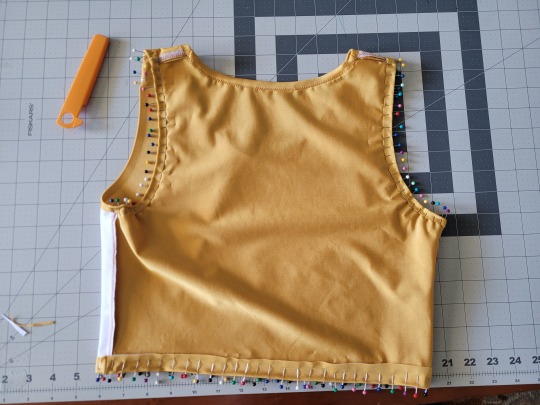
After you sew the front and back pieces together, you can add more fusible webbing to the front panel to help hold the hem down flat and prevent it from puckering while you sew it. Just add the strip, peel the paper off, then fold the hem over and iron it down. This part isn’t really necessary, but it does make the hems look nicer. If nothing else, I would recommend adding it to the neckline.
After that, you just fold & pin all the hems and sew them up with a zigzag stitch, then go over the raw edge at the top of the stiff panel (where we cut the straps shorter).
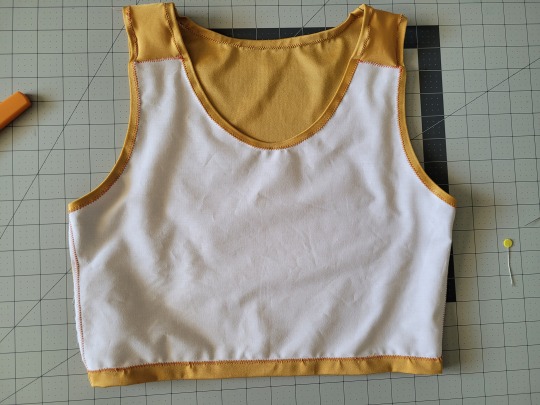
And that’s it! You’re done! And now you can make your own binders whenever you want!
And hey! If you used this tutorial and wanna throw me a dollar or two on ko-fi, I wouldn't complain.
848 notes
·
View notes
Text
hi gremlins on the website
motivation is dead so thought id do this shit y not
green - done
orange - working on it
red - postponed doing this till like next month
✨ note goals ✨
10 notes - ill drink a small cup of water for the first time in like three months (does flavoured water count? i hope so)
20 notes - ill try to eat three decent meals a day for like a week
30 notes - attempt to lessen how often i apologise (its a problem)
40 notes - stop trying as hard to bury my feelings
50 notes - tell a friend when i feel like relapsing
75 notes - try to eat decently for a month
100 notes - attempt to start drinking water more often
150 notes - ill try to tell one or two close irls im gender fluid (funny story my irl actually found this post so thats fun???)
200 notes - stop making as many suicide jokes
300 notes - attempt sew a binder for masc days
500 notes - ill try to tell my parents im lesbian (they're not unaccepting or anything i just have a shit ton of anxiety) (dont get hereeee)
dont think this'll go that far so not putting any limits have at it weirdos <- that was a mistake
672 notes
·
View notes
Text
Book binding 101: Materials
I’ve decided to do a series of posts on how to book-bind since I talk about it a lot, and I think it’s a really fun process. This post will include various inexpensive alternatives to “professional” supplies, many of which you will have at home. Not everyone can afford a cricut and that’s ok! I will also be listing more expensive materials for people who want to invest a bit more into the craft, but they absolutely are not a must.
This first post will focus on a list of supplies you can use to make books, but will not yet get into the instructional part of it. That will come later!
Anyway…
Bookbinding Materials: Essentials
These are items you need to bind, but many you can find around your house!
Sewing thread: Any thread will work for bookbinding, though waxed threads can help reduce tangles. You can also double up thread as another way to prevent tangling if you so choose. Waxed thread is definitely more expensive, so it can be good to use what you have starting out. Here’s a link to the waxed thread I used for those that are interested. You can buy it in a lot of different colors! (White is good if want an “invisible” thread).
Sewing needle: A lot of people say to use a curved needle for binding, but I’ve never found it to be much different from using a regular needle. If you have one, I would recommend a larger needle, however, since it’s better for piercing through signatures (aka the stacks of pages you bind together). In other words: there’s no special needle you need to bind books.
Ruler: I’d recommend any metal ruler since it’s better to use as a straight edge for cutting. There’s a good chance you already have one. It’s just used for measuring and being a straight edge. Nothing fancy.
Paper: Any paper will work. What you wanna use depends on your project really: if you’re binding together a work of text you’ll want to use some kind of printer paper (of course). If you’re making a sketchbook, you can fold up some sketching paper. I like to get sketchbooks with perforated edges so I can tear them out easily if I want to use a blank page for bookbinding. You can also buy large sheets of paper made for any medium. For example, if you want a sheet of water color paper, just search “large watercolor paper sheet”.
Awl (or all alternative): An awl is a tool used to poke sewing holes. It’s nice because it’s sharp and ergonomic, but you can totally also use a pushpin or even a sewing needle.
Bone folder (or a bone folder alternative): A bone folder creates sharp creases when you fold your pages, making them lay flatter. It also helps define the hinge gap on finished books, making it open easier. You can use a ruler if you don’t have one.
PVA glue: PVA glue is what to look out for when it comes to binding glue. There are some designed specifically for bookbinding, which spread out a bit faster than ones that aren’t. You can also use tacky glue which IS a PVA glue.
Book board: Also sometimes called chip board, Davey board, or mat board. This is what you’ll use for hard cover books. It is important to use book board specially, as cardboard will warp. You can buy book board directly, or you can cut the covers off of old textbooks or binders, unwrap the paper/plastic around the board, and use that!
Box cutter or utility knife: for cutting the board
Decorative paper and book cloth: For wrapping around cover boards and for endpapers. Book cloth can also be used to cover boards. You can also draw your own designs on Bristol paper if you want (or any paper with a similar thickness/durability). When it comes to decorative paper I like to either get scrapbook paper or rolls of fancy handmade paper (you can get those on Etsy, through paper source, or through bookbinding websites).
Bookbinding materials: Optional (and not crazy expensive)
These are supplies that you don’t need for binding but that can make the process easier and/or help with the decorative elements of your books. I’d recommend these things for when you’ve been binding for a while and feel these things could be helpful!
Paper trimmer: can cut a few sheets of paper evenly—I find it really helpful for endpapers
Stencils: Super helpful if you want to add text on the covers
Stamps: Good for adding text and also great for adding illustrations if you’re not able to draw them on your own. You can buy ink pads for them or use markers by coloring over the stamp lightly and using the stamp immediately so it doesn’t dry (I’ve tested this with alcohol markers and it works very well)
Paint markers: great for drawing directly on the cover. Since they’re opaque they can imitate the look of vinyl. You can also get them super painterly if you want. The internet usually talks about poscas but there are tons of different brands. Do some research, figure out what you like & can afford.
Hot foil pen & heat transfer foil: Perfect if you want to add foil to your covers but don’t want to spend a ton of money on a cricut. A lot of binders uses the foil quill brand, but there are ones that cost less and work the same (I have both a cheaper one & an actual foil quill because I wanted some nib variation. As long as the pen has good reviews that aren’t from bots you should be good). Also remember: don’t use foil designed for going through laminators (I.e. decofoil) . It doesn’t work the same way.
Bookbinding Materials—Expensive
These are materials I’d recommend for people who have been bookbinding for a while & feel that it’s something they really want to invest in. To be fully transparent, I’m a college student and don’t own these and have little personal experience with them. However, I know a lot of binders who love them!
Cricut machine—Cricuts are cutting machines that can make precise cuts into paper, wood, bookboard, or vinyl. A lot of binders will cut designs out of vinyl and apply them to the covers using a heat press.
Book press—What it sounds like. The pressure helps the pages lay flat and stay even. That being said you can stack heavy books on top of your projects, it just may not have the same even pressure. I also know some people will DIY these, so if you’re skilled with power tools you can give it a go!
Paper guillotine—like a paper trimmer but bigger and can cut more sheets of paper at once. I believe really good ones can also be used to cut bookboard!
Those are all the materials I can think of! Hope this can work as a good starting point for those interested in the craft. I’ll definitely be posting more info about bookbinding for people who are interested :)
-Zoë💗
#bookbinding#book binding#fan binding#craftblr#information#tutorial#book binding resource#resource#book binding 101
752 notes
·
View notes
Text
Chest binding is a form of body modification.
Like all forms of body modification, it comes with its risks and drawbacks. That does not make binding bad-- but it means you need to be informed about what is and is not safe.
I've gotten a couple of people on my 'don't buy Amazon binders' PSA trying to claim that warning people about the risks of binding is transandrophobic TERF fearmongering. And it's true that TERFs will often overstate the risks of binding to make younger/newer trans guys afraid to try it. But here's the thing.
Binding your chest is like dyeing your hair, or getting a tattoo, or gauging your ears. It's a process that modifies your body for cosmetic and psychological benefits. There are 'right' and 'wrong' ways to do it-- and generally, the 'wrong' ways to do it are the ways that can cause you serious injury.
If you dye your hair with a box kit, it can damage your hair- possibly permanently. You can wind up with hair that's the wrong colour (say, green instead of blonde), you can wind up with frizzy or thin hair, or you can wind up with a permanent bald spot. If you get a tattoo from your friend Steve on his kitchen table with a sewing needle, you can get a tattoo that doesn't look like it should (because of bad ink or technique), you can get permanently scarred, and it can even theoretically kill you from blood poisoning.
These are the 'cheap' ways to get a body mod, and some people still do them. For some people, they even turn out okay! But you are taking a risk when you dye your hair with box colour or when you get a tattoo from your friend Steve. It might be a small risk; it might be a big risk. The people warning you about these things aren't trying to tell you that you should never dye your hair or get tattoos- most of these folks are heavily dyed and pierced, and many of them have made these mistakes! But they're trying to tell you to get body mods in a way that minimizes risk.
Similarly, the people warning you about chest binding being dangerous are generally older transmascs who have messed up with binding in the past. If we tell you, "don't bind with ace bandages" or "don't buy amazon binders" or "don't bind for more than eight hours at a stretch", it's not because we want you to stop binding! It's because we've made these mistakes with binding, or we've seen our friends suffer from the consequences of these mistakes.
Just like your tattoo friends don't want you to die of Steve-induced blood poisoning, your transmasc friends don't want you to break ribs or start getting asthma attacks. You are free to listen, or not-- but we just want you to know what the risks are so you can choose how to live your life.
#general malarkey#trans stuff#transmasc#trans man#chest binding#being a gender is awesome#being a gender is suffering
1K notes
·
View notes
Text
Loving Lies | Cassian x Reader
Summary: Only a few days after the war with Hybern ends, Cassian discovers that you, the “male” that’s been his Second in Command for nearly a decade, are a female in disguise.
Word Count: ~ 1.2k
Warnings: Mentions of war and death, injuries, reader is Illyrian, possessive cass
A/N: This is basically just the mulan movie on crack, hope you enjoy<3
@cassianappreciationweek (yes I know I’m late)
Requests are open!

You, one of his most loyal men, one who’d been by his side for nearly a decade by now. You’d always been relatively kept to yourself, only sharing the barest details that you’d grown up in Windhaven like all the other males, father an unknown male, and mother just another female whore in the camps.
Or at least, that’s what he’d believed. He’d had no reason to question you, and why would he when you’d completed almost every task he’d thrown your way, clawing your way up the ranks until you had your little squadron of males to order and handle during the war with Hybern. Not too many, because your main power wasn’t with your strength, no, it was your mind.
Sometimes, he thought that you could rival Azriel with the ways you managed to challenge his plans and put every perspective into his mind, forcing him to change and adapt until it was as foolproof as could be.
The war had taken a chunk out of the Illyrian army, Cassian knew that better than anyone considering he’d watched the Cauldron blast a third of the army into dust firsthand. But even in the aftermath, you had somehow survived, supposedly barely avoiding the numerous blasts, and sustaining nearly fatal injuries that you were recovering from now.
It had only been a few days since the battle had laid to rest, and Cassian finally let himself visit you. He stood outside the thick white tent’s flapping entrance, candlelight shining out from the inside. Swallowing down any emotion, he carefully walked in, ducking under the entrance and tucking his wings in to not disrupt anything inside of the tent.
However, what he saw inside confused him.
You were bare, which was normal for any injured male when they were being treated, save for bandages around your chest, not because of any injury, but to conceal.
“What is..?”
He trailed off to the little female in the tent, who looked a bit pale as she sewed one of the wounds in your wings, but not pale from seeing the blood and gore. No, she had seen far worse in the war. She glanced up at him, then back down at your unconscious body.
“Your Second is a female.”
The nurse said quietly, almost as if frightened of his reaction. His mind went blank at that. The bandaging wasn’t because you’d suffered some sort of injury to your chest, it was because you had tits.
His Second in Command was a female.
It made sense, looking back. How you were always more scrawny than the other males, nimble while they were muscular. Or how you were much smarter than the rest of the uncivilized brutes, or the way he’d seen the littlest of straps underneath your leathers, almost like a binder. He’d been stupid not to realize it sooner.
With a sigh, he plopped down on the ground next to the low table you were placed stomach-down on.
“Will she wake up soon?”
She. The word tasted odd in his mouth when regarding you. The nurse seemed to relax a little bit.
“The sleep tonic might wear off soon, by the looks of it.”
She replied, and her words rang true as only a few minutes later, you began twitching and mumbling things. The nurse quickly finished up with your wings, and as you woke up, helped you to sit upright, putting a spare block of wood behind your back that was meant for a fire.
Your eyes groggily opened, hazy until you blinked a few seconds, your gaze snagging onto his and widened, glancing down at your chest, before back up at him, and you sighed.
“Well, I guess you were bound to find out eventually.”
You said in a resigned tone. His hands went running through his messy hair in a stressed manner before he finally stood so he could look down at you properly.
“Why didn’t you tell me?”
He asked in a tone full of what sounded like betrayal. You inwardly winced at it.
“I..couldn’t, this was the only way to keep my wings and not end up like the other females in the camps.”
You said, not having the gall to even look him in the eye after lying to him for a decade. Surprisingly, you felt his hand brush against your cheek as he cupped it, kneeling to be at eye level with you. He gently moved your face, so you were looking into his now soft eyes, yours brimming with held-back tears.
“I..understand, but you know I’m not like the other males, right? I wouldn’t have let them touch you.”
You sighed, knowing that he was a good male.
“It’s not about that, Cassian.”
“Then what was it about? I can understand it for the first few years, clawing your way up the ranks, but you could’ve told me. It wouldn’t have changed anything.”
He then demanded an answer, tone firm but also trying not to push too far. Pushing an injured soldier too far was a mistake he’d made only once, and never again.
You sighed again, this time seeming more resigned to admitting whatever was still keeping your body tense like you were hiding something from him.
“Because we’re mates, and the bond snapped for me, but never for you. And if I told you, then I knew it would snap for you, and you’d know everything and..”
Another sigh, this time at his silence and wide-eyed stare. Your prediction had been dead on, the moment you revealed it, it snapped on his end. He was angry that you, his perfect half, his Cauldron-deemed partner, had hidden it, but a more rational side of him understood. And empathized.
Still, the possessiveness already creeping in, he huffed.
“You’re coming to Velaris with me.”
He said bluntly, and your eyes widened.
“You can’t just-“
“The Illyrians would throw a fit if a single word of you being female gets out, which it soon will, and they’re already unruly after the war. You know that.”
And you did know that, because as much as you hated to admit it, he was right, and had outsmarted you this time.
“Territorial Illyrian bastard,”
You grumbled as you slung your legs over the side of the table, struggling to sit up on your own. The possessiveness didn’t fade, but he gave you a lazy grin that exposed his pointed canines.
“Scared of a night alone with me?”
He teased, despite the obvious strain lurking beneath his words. You shot him a half-assed glare, and the nurse was then again at your side, checking on wounds while encouraging you to “relax” while she poked and prodded you.
“When’s the earliest she’ll be able to travel?”
Using ‘she’ was more natural now. The nurse glanced up at him, then at your wings that had been patched together with hundreds of stitches.
“She won’t be able to fly for at least six months, but if you carried her…I’d give it a week or two.”
She answered in that quiet tone, and Cassian gave you a smug grin that you scowled at.
“Hear that? You’ll be in my arms in no time at all..”
He said with that idiotic, shit-eating grin he always wore.
“Oh, burn in Hell.”
#acotar fandom#acotar fanfiction#writers on tumblr#acotar x reader#cassian#Cassian acotar#Cassian x reader#cassian comfort#cassian fluff#cassianappreciationweek#a court of thorns and roses#acotar fluff
702 notes
·
View notes