#how to install vmware
Explore tagged Tumblr posts
Visit Tumblr Blog
Explore Tumblr blogs with no restrictions, modern design and the best experience.
Last Seen Tumblr Blogs


Fun Fact
The “We are the 99%” Tumblr blog became the slogan for the Occupy Wall Street movement.
Text
How to Install Kali Linux in VMware in Just 4 Simple Steps (Easiest Way)
In this guide, you will be able to learn the easiest way of how to install Kali Linux on VMware in Just 4 Simple Steps, I hope this helps a lot!
To keep in mind: Obtaining unauthorized access to another’s computer system or systems is illegal under the Computer Fraud & Abuse Act. Here you will find a step by step guide on how to install Kali Linux onto VMware. The main purpose of this blog tutorial is to educate others on cyber security tools, technologies, and techniques with the intention of creating consciousness for others on better…

View On WordPress
#best cybersecurity tools#Cybersecurity#cybersecurity course#cybersecurity jobs#ethical hacking#How to#how to code#how to install#how to install kali linux#how to install vmware#how to learn cybersecurity#how to learn linux#how to use a virtual machine#Kali Linux#linux#linux jobs#virtual machine#VMware
0 notes
Video
youtube
How to Install and Set Up Ubuntu 24.04 on VMware Workstation Pro 17 in Windows 11
Overview:
Setting up Ubuntu on VMware is a crucial skill for DevOps professionals who want to create isolated environments for testing, development, and automation workflows. VMware allows you to run multiple virtual machines (VMs) on a single system, enabling you to experiment with different Linux distributions without altering your primary operating system. In this hands-on guide, we’ll walk through the steps to install and configure Ubuntu on VMware, covering the key settings and best practices for optimizing performance in DevOps environments.
VMware: Getting Started
Step 1: Install VMware Workstation
To begin, you’ll need VMware Workstation or VMware Player installed on your system. Here’s how:
- Download VMware: Visit the official VMware website and download either VMware Workstation or VMware Player depending on your preference. Workstation is a paid tool with advanced features, while Player is a free option that’s perfect for basic VMs. - Install VMware: Run the installer and follow the setup wizard. Once installed, launch VMware.
Step-by-Step: Installing Ubuntu on VMware
Step 1: Download Ubuntu ISO
- Go to the [official Ubuntu website](https://ubuntu.com/download) and download the LTS (Long Term Support) version of Ubuntu, ensuring you have a stable version for long-term usage in your DevOps workflows.
Step 2: Create a New Virtual Machine in VMware
- Open VMware Workstation or VMware Player and select “Create a New Virtual Machine.” - Choose the ISO image by selecting the downloaded Ubuntu file, then click Next.
Step 3: Allocate Resources
- CPU: Assign at least 2 CPUs for smooth operation. - RAM: Allocate at least 4GB of RAM for optimal performance. You can assign more if your system allows. - Storage: Provide at least 20GB of disk space, especially if you plan to install DevOps tools.
Step 4: Installation of Ubuntu
- Start the VM, and Ubuntu’s installation wizard will appear. - Follow the prompts: choose language, keyboard settings, and select Install Ubuntu. - Choose installation type (erase disk if it’s a fresh VM) and configure time zones, user account, and password. - After installation, update your system by running: ```bash sudo apt update && sudo apt upgrade -y ```
Step 5: VMware Tools Installation
Installing VMware Tools improves VM performance, enabling better integration with the host machine.
- In VMware, go to the VM menu and select Install VMware Tools. ```bash sudo apt install open-vm-tools open-vm-tools-desktop -y sudo reboot vmware-toolbox-cmd -v ``` Verify VMware Tools Installation:
```bash vmware-toolbox-cmd -v ```
Step 6: Post-Installation Setup for DevOps
- Install Basic DevOps Tools: ```bash sudo apt install git curl vim ``` - Enable SSH Access: ```bash sudo apt install openssh-server sudo systemctl enable ssh sudo systemctl start ssh
Best Practices for Installing and Setting Up Ubuntu on VMware
1. Resource Allocation: Ensure you allocate sufficient CPU, RAM, and storage based on the workloads. For most DevOps tasks, assign at least 2 CPUs and 4GB of RAM for optimal performance. More demanding workloads may require additional resources.
2. Snapshots: Regularly take VM snapshots before major changes or installations. This allows you to revert to a stable state if something goes wrong during configuration or software testing.
3. VMware Tools Installation: Always install VMware Tools after setting up the OS. This ensures seamless mouse integration, smoother graphics, and better performance, reducing potential bugs and lag in your virtual environment.
4. Partitioning: For better performance and management, use custom partitioning if needed. This helps in allocating different parts of your virtual disk to `/`, `/home`, and `/var` partitions, improving system performance and flexibility in future updates or installations.
5. Automated Backups: Set up automated backups or export your VMs periodically. This practice is particularly important if your VMs store critical configurations, applications, or databases.
6. Networking Configuration: Ensure that your virtual machines are correctly configured to access the internet and your local network. Consider using NAT or Bridged Network options, depending on your networking needs. NAT works well for internet access, while Bridged is ideal for networked environments.
7. Security Considerations: Configure firewalls and SSH access carefully to secure your VMs from unauthorized access. Set up strong user permissions, enforce password complexity, and enable SSH keys for secure remote access.
8. Regular System Updates: Frequently update Ubuntu systems to ensure they are protected from vulnerabilities. Use the following commands to update packages: - For Ubuntu: ```bash sudo apt update && sudo apt upgrade ```
9. Monitor Resource Usage: VMware allows you to monitor CPU, memory, and storage usage. Use these tools to ensure that your VMs are not consuming excessive resources, especially in shared environments.
10. Test Environments: Use VMs as sandbox environments to test and experiment with new DevOps tools like Docker, Kubernetes, Jenkins, or Ansible before deploying them in production.
Conclusion:
By installing and setting up Ubuntu on VMware, you gain the flexibility to experiment with DevOps tools, test automation workflows, and learn Linux system administration in a safe and isolated environment. This hands-on tutorial provides you with the foundation to run and manage your Linux VMs effectively, setting you up for success in DevOps tasks ranging from development to deployment automation. Follow along in this video as we guide you step-by-step to mastering Linux installations on VMware for your DevOps journey.
how to install ubuntu 24.04,vmware player,windows 11,vmware workstation player,how to install ubuntu 24.04 lts desktop,How to Install and Set Up Ubuntu 24.04 on VMware Workstation Pro 17 in Windows 11,vmware workstation,vmware workstation 17 pro,ubuntu linux,cloudolus,cloudoluspro,linux,free,How to Post-Installation Setup For DevOps,How to Update and VMware Tools Install in Ubuntu 24.04 LTS?,Linux for DevOps,ubuntu installation,ubuntu 24.04,ubuntu,install ubuntu,
Linux Install and Setup Overview,Install and Setup VMware Workstation Pro 17,Installing Ubuntu on VMware Workstation Pro 17,Installing CentOS on VMware Workstation Pro 17,Linux Install and Setup Best Practices vmware,virtual machine,how to download and install vmware workstation pro,Hands On Guide: How to Install and Set Up Ubuntu and CentOS on VMware,centos 7,download and install vmware workstation on windows 11,the reality of using vmware,vmware tutorial,install centos 7 on vmware,installing centos 7 on vmware,ubuntu installation on vmware workstation 17,Linux Install and Setup Best Practices,cloudoluspro vmware,linux for devops,handson ubuntu,open source,linux terminal,distrotube,ubuntu is bad,linux tutorial,linux for beginners,linux commands,Linux installation,Linux beginner guide,Linux setup,how to install Linux,Linux for beginners,Linux distributions,Ubuntu installation,Fedora installation guide,Linux tips,Linux,Linux basics,DevOps basics,cloud computing,DevOps skills,Linux tutorial,Linux scripting,Linux automation,Linux shell scripting,Linux in DevOps,Ubuntu,CentOS,Red Hat Linux,DevOps tools,ClouDolus,DevOps career,Linux commands for beginners,Linux for cloud,Linux training,devops tutorial Linux,Linux commands for beginners ubuntu,cloud computing Linux for DevOps
***************************** *Follow Me* https://www.facebook.com/cloudolus/ | https://www.facebook.com/groups/cloudolus | https://www.linkedin.com/groups/14347089/ | https://www.instagram.com/cloudolus/ | https://twitter.com/cloudolus | https://www.pinterest.com/cloudolus/ | https://www.youtube.com/@cloudolus | https://www.youtube.com/@ClouDolusPro | https://discord.gg/GBMt4PDK | https://www.tumblr.com/cloudolus | https://cloudolus.blogspot.com/ | https://t.me/cloudolus | https://www.whatsapp.com/channel/0029VadSJdv9hXFAu3acAu0r | https://chat.whatsapp.com/D6I4JafCUVhGihV7wpryP2 *****************************
*🔔Subscribe & Stay Updated:* Don't forget to subscribe and hit the bell icon to receive notifications and stay updated on our latest videos, tutorials & playlists! *ClouDolus:* https://www.youtube.com/@cloudolus *ClouDolus AWS DevOps:* https://www.youtube.com/@ClouDolusPro *THANKS FOR BEING A PART OF ClouDolus! 🙌✨*
#youtube#Linux Install and Setup OverviewInstall and Setup VMware Workstation Pro 17Installing Ubuntu on VMware Workstation Pro 17Installing CentOS o#how to install ubuntu 24.04vmware playerwindows 11vmware workstation playerhow to install ubuntu 24.04 lts desktopHow to Install and Set Up#ClouDolus ClouDolusPro#ClouDolusPro
0 notes
Text
How to Fix EFI Network Timeout, when VMware install Windows 11
How to Fix EFI Network Timeout, when VMware install Windows 11
A virtual machine enables you to run an operating system in an app window on your desktop that behaves like a full, separate computer. With VM, you can boot different operating systems and test software not supported in current OS in a safe environment. However, when you are trying to install Windows 11 on the Vmware workstation, you may have this error VMware EFI network timeout.


The fastest way to fix this error is just to disconnect your network , then try to install it again, then choose “Boot Normally”, and click “Enter”

And if you need a Windows 11 Product key to activate the Windows 11 in the Vmware station, you can try to get it the Microsoft Partner store keyingo.com, it can save your pocket
0 notes
Text
youtube
SOPHOS XGS SW-19.5.3 MR-3 Firewall | First Time Configuration | Step by Step in Hindi | By Sachin
#firewall#sophos xg firewall#network security tutorial#sophos xg firewall complete overview in hindi#how to setup sophos firewall in hindi#how to create rule in the sophos xg firewall#how to install sophos firewall#how to install sophos firewall on vmware#sophos xg v19#sophos xg firewall v19#xg firewall#setup sophos xg v19#configure sophos xg v19#configuring sophos xg v19#v19#xg firewall v19#sophos firewall#what is firewall#firewall explained#network firewall#Youtube
0 notes
Text
What is Active Directory?
What is Active Directory? Active Directory (AD) is a directory service developed by Microsoft Corporation for managing user accounts, computers, and other resources on a network. It is used in Windows-based networks to provide a centralized authentication and authorization mechanism. AD stores information about users, groups, computers, and other resources in a hierarchical structure called a…

View On WordPress
#active directory#AD#Backup and Recovery#Google AdSense#How to Install Active Directory In Windows Server#How to Promote windows server to Domain Controller#How to setup Active Directory (AD) In Windows Server#Hyper-V#Install and Configure Active Directory#Install and Configure Active Directory in Windows Server#Installing AD DS roles in Windows Server#Microsoft 365#Network Security#server 2019#virtualization#VMware#windows server#windows server 2016#windows server 2019#windows server 2022
0 notes
Text


Resources and study tips to get you in cyber forensics
Master post • Part1 • part2
let's get you prepped to be a cyber sleuth without spending any cash. Here’s the ultimate tips and resources.
Ps: you can't become one while doing these pointers but you can experience the vibe so you can finally find your career interest


### 1. **Digital Scavenger Hunts**
- **CTF Challenges (Capture The Flag)**: Dive into platforms like [CTFtime](https://ctftime.org/) where you can participate in cyber security challenges. It's like playing *Among Us* but with hackers—find the imposter in the code!
- **Hunt A Killer (Digitally)**: Create your own digital crime scenes. Ask friends to send you files (like images, PDFs) with hidden clues. Your job? Find the Easter eggs and solve the case.
### 2. **YouTube University**
- **Cyber Sleuth Tutorials**: Channels like *HackerSploit* and *The Cyber Mentor* have playlists covering digital forensics, cybersecurity, and more. Binge-watch them like your fave Netflix series, but here you're learning skills to catch bad guys.
- **Live Streams & Q&A**: Jump into live streams on platforms like Twitch where cybersecurity experts solve cases in real-time. Ask questions, get answers, and interact with the pros.
### 3. **Public Libraries & eBook Treasure Hunts**
- **Library eBooks**: Most libraries have eBooks or online resources on digital forensics. Check out titles like *"Hacking Exposed"* or *"Digital Forensics for Dummies"*. You might have to dig through the catalog, but think of it as your first case.
- **LinkedIn Learning via Library**: Some libraries offer free access to LinkedIn Learning. If you can snag that, you've got a goldmine of courses on cybersecurity and forensics.
### 4. **Virtual Study Groups**
- **Discord Servers**: Join cybersecurity and hacking communities on Discord. They often have study groups, challenges, and mentors ready to help out. It's like joining a digital Hogwarts for hackers.
- **Reddit Threads**: Subreddits like r/cybersecurity and r/hacking are packed with resources, advice, and study buddies. Post your questions, and you’ll get a whole thread of answers.
### 5. **DIY Labs at Home**
- **Build Your Own Lab**: Got an old PC or laptop? Turn it into a practice lab. Install virtual machines (VMware, VirtualBox) and play around with different operating systems and security tools. It’s like Minecraft but for hacking.
- **Log Your Own Activity**: Turn on logging on your own devices and then try to trace your own steps later. You’re basically spying on yourself—no NSA required.
### 6. **Community College & University Open Courses**
- **Free Audit Courses**: Many universities offer free auditing of cybersecurity courses through platforms like Coursera, edX, and even YouTube. No grades, no stress, just pure learning.
- **MOOCs**: Massive Open Online Courses often have free tiers. Try courses like "Introduction to Cyber Security" on platforms like FutureLearn or edX.
### 7. **Scour GitHub**
- **Open-Source Tools**: GitHub is full of open-source forensic tools and scripts. Clone some repositories and start tinkering with them. You’re basically getting your hands on the tools real investigators use.
- **Follow the Code**: Find projects related to digital forensics, follow the code, and see how they work. Contribute if you can—bonus points for boosting your resume.
### 8. **Local Meetups & Online Conferences**
- **Free Virtual Conferences**: Many cybersecurity conferences are virtual and some offer free access. DEF CON has a lot of free content, and you can find tons of talks on YouTube.
- **Hackathons**: Look for free entry hackathons—often universities or tech companies sponsor them. Compete, learn, and maybe even win some gear.
### 9. **DIY Challenges**
- **Create Your Own Scenarios**: Get a friend to simulate a hack or data breach. You try to solve it using whatever tools and resources you have. It's like escape rooms, but digital.
- **Pen & Paper Simulation**: Before diving into digital, try solving forensic puzzles on paper. Map out scenarios and solutions to get your brain wired like a detective.
### 10. **Stay Updated**
- **Podcasts & Blogs**: Tune into cybersecurity podcasts like *Darknet Diaries* or follow blogs like *Krebs on Security*. It’s like getting the tea on what’s happening in the cyber world.
### 11. **Free Software & Tools**
- **Autopsy**: Free digital forensics software that helps you analyze hard drives and mobile devices. Think of it as your magnifying glass for digital clues.
- **Wireshark**: A free tool to see what's happening on your network. Catch all the data packets like you're a digital fisherman.
### 12. **Online Forensics Communities**
- **Free Webinars & Workshops**: Join communities like the *SANS Institute* for free webinars. It's like attending a masterclass but from the comfort of your gaming chair.
- **LinkedIn Groups**: Join groups like *Digital Forensics & Incident Response (DFIR)*. Network with pros, get job tips, and stay in the loop with the latest trends.
### 13. **Practice Cases & Mock Trials**
- **Set Up Mock Trials**: Role-play with friends where one is the hacker, another the victim, and you’re the investigator. Recreate cases from famous cybercrimes to see how you'd solve them.
- **Case Studies**: Research and recreate famous digital forensic cases. What steps did the investigators take? How would you handle it differently?


There you have it—your roadmap to becoming a cyber sleuth without dropping a dime. You don't have time find your interest after paying pennies to different ppl and colleges. You can explore multiple things from comfort of your home only if you want to.

#light academia#study blog#academic validation#academic weapon#student life#study motivation#study with me#study#studyblr#studyblr community#masterpostjam#codeblr
28 notes
·
View notes
Text

Tools of the Trade for Learning Cybersecurity
I created this post for the Studyblr Masterpost Jam, check out the tag for more cool masterposts from folks in the studyblr community!
Cybersecurity professionals use a lot of different tools to get the job done. There are plenty of fancy and expensive tools that enterprise security teams use, but luckily there are also lots of brilliant people writing free and open-source software. In this post, I'm going to list some popular free tools that you can download right now to practice and learn with.
In my opinion, one of the most important tools you can learn how to use is a virtual machine. If you're not already familiar with Linux, this is a great way to learn. VMs are helpful for separating all your security tools from your everyday OS, isolating potentially malicious files, and just generally experimenting. You'll need to use something like VirtualBox or VMWare Workstation (Workstation Pro is now free for personal use, but they make you jump through hoops to download it).
Below is a list of some popular cybersecurity-focused Linux distributions that come with lots of tools pre-installed:
Kali is a popular distro that comes loaded with tools for penetration testing
REMnux is a distro built for malware analysis
honorable mention for FLARE-VM, which is not a VM on its own, but a set of scripts for setting up a malware analysis workstation & installing tools on a Windows VM.
SANS maintains several different distros that are used in their courses. You'll need to create an account to download them, but they're all free:
Slingshot is built for penetration testing
SIFT Workstation is a distro that comes with lots of tools for digital forensics
These distros can be kind of overwhelming if you don't know how to use most of the pre-installed software yet, so just starting with a regular Linux distribution and installing tools as you want to learn them is another good choice for learning.
Free Software
Wireshark: sniff packets and explore network protocols
Ghidra and the free version of IDA Pro are the top picks for reverse engineering
for digital forensics, check out Eric Zimmerman's tools - there are many different ones for exploring & analyzing different forensic artifacts
pwntools is a super useful Python library for solving binary exploitation CTF challenges
CyberChef is a tool that makes it easy to manipulate data - encryption & decryption, encoding & decoding, formatting, conversions… CyberChef gives you a lot to work with (and there's a web version - no installation required!).
Burp Suite is a handy tool for web security testing that has a free community edition
Metasploit is a popular penetration testing framework, check out Metasploitable if you want a target to practice with
SANS also has a list of free tools that's worth checking out.
Programming Languages
Knowing how to write code isn't a hard requirement for learning cybersecurity, but it's incredibly useful. Any programming language will do, especially since learning one will make it easy to pick up others, but these are some common ones that security folks use:
Python is quick to write, easy to learn, and since it's so popular, there are lots of helpful libraries out there.
PowerShell is useful for automating things in the Windows world. It's built on .NET, so you can practically dip into writing C# if you need a bit more power.
Go is a relatively new language, but it's popular and there are some security tools written in it.
Rust is another new-ish language that's designed for memory safety and it has a wonderful community. There's a bit of a steep learning curve, but learning Rust makes you understand how memory bugs work and I think that's neat.
If you want to get into reverse engineering or malware analysis, you'll want to have a good grasp of C and C++.
Other Tools for Cybersecurity
There are lots of things you'll need that aren't specific to cybersecurity, like:
a good system for taking notes, whether that's pen & paper or software-based. I recommend using something that lets you work in plain text or close to it.
general command line familiarity + basic knowledge of CLI text editors (nano is great, but what if you have to work with a system that only has vi?)
familiarity with git and docker will be helpful
There are countless scripts and programs out there, but the most important thing is understanding what your tools do and how they work. There is no magic "hack this system" or "solve this forensics case" button. Tools are great for speeding up the process, but you have to know what the process is. Definitely take some time to learn how to use them, but don't base your entire understanding of security on code that someone else wrote. That's how you end up as a "script kiddie", and your skills and knowledge will be limited.
Feel free to send me an ask if you have questions about any specific tool or something you found that I haven't listed. I have approximate knowledge of many things, and if I don't have an answer I can at least help point you in the right direction.
#studyblrmasterpostjam#studyblr#masterpost#cybersecurity#late post bc I was busy yesterday oops lol#also this post is nearly a thousand words#apparently I am incapable of being succinct lmao
20 notes
·
View notes
Text
Retro computer emulation/virtualization resources
Not too long ago, it was one of my hobbies to recreate and emulate old machines and try to use them in a somewhat 'legit' way in order to experience how using them in an accurate time-period might have felt like. While it's always better to use a real machine, it's also important to note that time-accurate machines are essentially a 'ticking bomb'. Some of the electronics inside can go bad at any given time, like capacitors, and other critical components might also go bad due to humidity, moisture in the air, changes in temperature, etc. Plus, they are not always cheap and they take space that you might not have.
This is why I prefer using emulators and virtualization software in order to virtualize a time-period accurate machine that I can use. This is the software I found that I like the most, and what systems I use them for.
DOSbox-X

This is a modified version of DOSBox that includes support for multiple video devices including 3dfx emulation (Voodoo), networking, and even printer support (emulated, but AFAIK it only prints in black and white). It's perfect for MS-DOS and Windows (1-3.11) emulation. Technically you could even install Windows 95 in it.
86-box

This is the way to go if you want to emulate old retro systems. No questions. The best part of it is how flexible it is. You can select the motherboard, the processor you want to emulate, the video card, you can also enable 3dfx support up to the Voodoo 2 (but it also emulates a Voodoo3 and the Banshee), sound card, literally every detail. It's like building a PC, but virtually. And it has hardware from the old 8086 IBM PCs to more modern Pentium 2 machines. It also has network and printer support.
The downside is that since it's low-level emulation, you need a 'beefy' CPU with very good single thread performance in order for more modern systems like Windows 9x and ME to run more smoothly. Another flaw is that for some reason the FP emulation for older processors doesn't work properly for some reason, so you might prefer to use DOSBox-X if you want DOS emulation. The 3dfx emulation is also 'so-so' and not very great, but it works.
It also requires valid ROMs, but you can search for a valid ROMset online (check Github) if you want to use it. For legal reasons, I can't provide links to them, but they are not hard to find.
VMWare Workstation Player

I choose VMWare over other virtualization solutions because of it's graphic drivers capable of running relatively new games from the mid 2000s, and because unlike VirtualBox (since version 6) it still supports old Windows versions, including XP, 9x, ME and old NT systems.
Broadcom wants you to buy a license for the Pro version so they hide the links to the free Workstation Player version. But they are still available and they even release updates once in a while (yes, it's free of charge).
In the link I'm providing, go to the 'player' folder and select the latest version (higher number, now it's 17.6.1) and your system to download VMWare Workstation Player. Then go to the 'ws' folder and select the same version and system, but then select 'packages' to download a matching copy of vmware tools.
Finding software
If you need software, there are three places you need to look for. One is archive.org, the other is WinWorld PC, and the other is Vetusware (requires an account). I can't provide links so search for them on your own. I also browse sites like oldversion.com, but I don't trust these too much, so go at your own risk (or better yet, don't). Naturally you should always buy the software you use, whenever it's possible, and use backups of your legally owned software.
Did you like this post?
I will make more posts in the future about how to set up these emulated machines and how I work with them.
2 notes
·
View notes
Note
Yooo how'd you get Windows XP in 2023, are you using some kind of VM (Virtual machine)??
Hi Maggie!
I'm using VMWare Workstation 17. I'm using a Service Pack 3 ISO that I was able to get from the Internet Archive. I can send you the link to the download page (which includes the needed serial number during OS installation) if you'd like.
I'm still trying to figure out how to get the Internet to work on the machine.
10 notes
·
View notes
Text
Boring Blog Episode 2
Hello ladies and gentlemen. So this unexciting blog continues my never ending waffling about computers that no-one really gives a flying fuck about.
So as I mentioned last issue. I bought a new Dell Inspiron 3525 laptop before Christmas. I ran Linux on it for two weeks and then I returned it to windows 11 which its where it is currently.
A friend asked me was I annoyed at Windows yet and to be honest I really don’t have any major issues. Do I miss Linux well lets just admit I can’t say I miss at all.
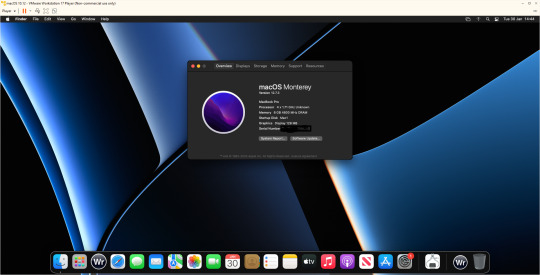
So what nonsense have I been messing with. Well as the Macintosh 128k was 40 I was going to do something Mac based. So I could have downloaded Basilisk II/Sheepshaver but nope. Mini Vmac would be appropriate given the Mac in question, once again no.
I was playing with VirtualBox trying to get it to run Mac OS 12.0 (Monterey) I was following various guides and after 5 hours of playing about I still couldn’t get it beyond the EFI boot kept failing.
I had tried many different fixes and it really wasn’t working. I then moved to VMWare Player. Originally I went to version 15 but upon changing the vmx file to apply the fix it crashed the player and refused to let it go on.
I found WMware Player could be updated to version 17 which I did and the fix allowed the installer to work. It then took forever to install. Then I let it upgrade to 12.7.3 which took another 2 hours.
This was a project I intended to be an hour ended up being over 9 hours playing with various virtual machines.
Now I have managed to install WriteRoom 3.21 on it also now considering this is a Ryzen 7 5700U system. It runs Monterey about the speed of a Pentium. You can literally type and watch the delay as the buffer updates.
So 9 hours for the slowest VM in history. That’s with it set at 8GB Ram and using 4 processor cores. Ridiculous.
Also while I was playing with emulators. I have been playing with PCSX2 (Playstation 2) emulator and have been playing most of the Burnout franchise.
It works fine but when I tried using EPSXE (PlayStation 1) what a nightmare as half of the plug-ins just refused to work.
I did try Xemu(Xbox emulator) I did try running Project Gotham 3 Racing but it wouldn’t even get above 15 frames per second making the game unplayable.
Given this is a Ryzen 7 I was thinking what the hell does it need to get it working better. My suspicion is the Vega 8 graphics card is just not up to snuff. Once again potato graphics cards used in laptops.
I was going to try Xenia (XBOX 360 emu) but given how bad the Xbox emu was I thought against it.
So one day I will get a decent desktop and run a decent video card but I am sure that’s going to be a cold day in hell before that.
Any way that’s enough waffle for now until next time … Take care
3 notes
·
View notes
Text


Order Now 60% Off
Nespresso Original Line Coffee Pod with 1 Storage Drawer Holder, 50 Capsule Capacity, Black
Available at a lower price from other sellers that may not offer free Prime shipping. Color Black Material Plastic Brand Amazon Basics Product Dimensions 14.9"D x 9.1"W x 2"H Number of Drawers 1
#amazon fba,#amazon,amazon sale,#how to sell on amazon,#amazon fba for beginners,#amazon next sale 2024,#amazon fba tutorial,selling on amazon,#amazon fba step by step,#sell on amazon,how to sell on amazon fba,#upcoming sale on flipkart and amazon,#amazon sale 2023,amazon new sale,#amazon returns,how to sell on amazon for beginners,#alibaba to amazon,next sale on amazon,#how to start selling on amazon,#amazon summer sale 2023,#amazon great indian sale #private ai,#chatgpt offline,#vmware,#nvidia,#fine-tuning ai,#artificial intelligence,#privacy in technology,#zombie apocalypse survival,#vmware private ai foundation,nvidia ai enterprise,wsl installation,llms,deep learning vms,custom ai solutions,#gpus in ai,#rag technology,#private gpt setup,#intel partnership,#ibm watson,#vmware cloud foundation,#networkchuck tutorials,#future of tech,#ai without internet,#data privacy,#because science,#engineering #best product from every brand at sephora,#best hair product,#best product management books,#best product development books,#product research,#best products,best product books,#best trim product,#amazon best products,#best products for eyes,#best product landing page,#best product landing pages,#best matte hair product,#best at sephora,#best way to sell a product,#hair product,#best products for eye bags,#best product development tips,#best products for puffy eyes
#viralpost#viral news#viral products#trendingnow#trendingtopics#trending#viral#amazon#amazing body#affiliate#sales#business#networking#strategy#online shopping#online shop uk#online shops offer#online store#online business#shopping state
3 notes
·
View notes
Text
Conversion Therapy
Like Captain Hook and his temporal detectable crocodile, this graph haunts me and I hear a ticking clock when I open it.

Way back in the fall of 2020, three months before the election, the events in MAGA world were getting complex. I opened Maltego, pasted in a URL, used the Named Entity Recognition transform that accesses IBM’s Watson, and the initial graph filled with a dozen names. Now a thousand days have elapsed, there are 1,088 URLs in there, and an astonishing 2,908 names. The 5,672 entities and 13,011 links connecting them have become a sort of Rosetta stone, a thing that gets opened when reporters I know are fact checking complex flows of events.
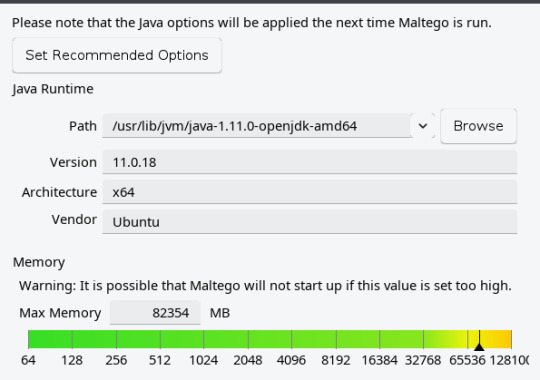
But there’s trouble here. Maltego is a Java application and that graph is enormous. When you give Java more than 31 gigabytes of memory it switches to using 64 bit pointers and your actual usable space yield declines. If you need more than 31 gig, the next sensible number is not 32, it’s 49. A couple months ago I upped the allocated memory to 64 gig and that helped for a while. Now it really does need 80 gig if I’m going to work with that graph and pull a slice of it out in order to share with someone else.

There are other subtle problems that can’t easily be depicted in a screen shot. Twenty one Date/Time entities have crept into the graph.

And this is the real circus. There are 189 events … and an event is a child entity of … Location. They have timestamps as an internal attribute, but Maltego doesn’t really have any tools to handle temporal data.
This situation is untenable. That graph won’t work reliably on my desktop and only hardcore gamers have more capability than my setup. There are four other tools I use that can handle data relationships:
Gephi can handle a quarter million nodes in a graph but it lacks features for handling geospatial, temporal, or diverse entity data.
Graphistry is a web accessible GPU driven commercial alternative to Gephi, but with similar constraints on data types.
Tulip is an intriguing Gephi competitor, but more a framework for doing serious artwork with smaller datasets and richer network layout needs.
And that leaves Sentinel Visualizer. This is a full featured link analysis package meant for corporate fraud investigation, law enforcement, and intelligence activities. It’s Windows only, which pains me a bit, as I changed careers twenty five years ago to get out from under Microsoft’s marketing weasel driven chaos. But I think I’ve got something workable here:

So that’s Windows 10, and I’ve got it treed in a VirtualBox VM. I gave it 40 gig of memory and ten of twelve cores. I spent an evening Googling and fiddling with virtualization settings and I’ve finally got something usable in terms of speed.
Every other OS you can install in a VM, give it some resources, and it’ll just run. Windows seems to need the Guest Additions installed, a couple reboots, cursing in English and one other optional language of your choice, another install of Guest Additions, and then giving up and walking away in disgust overnight. Complete this ritual and you’ll be left with an operational system.
If this were an actual physical system we would not be having this conversation. Microsoft’s utter disrespect for the value of my time in the 1990s was intolerable and in this area I have not mellowed with age. But with a Linux host and VMware I can do essentially instant backup and restore using the ZFS snapshot feature and it’s possible to export the machine in OVA format as an offline backup.

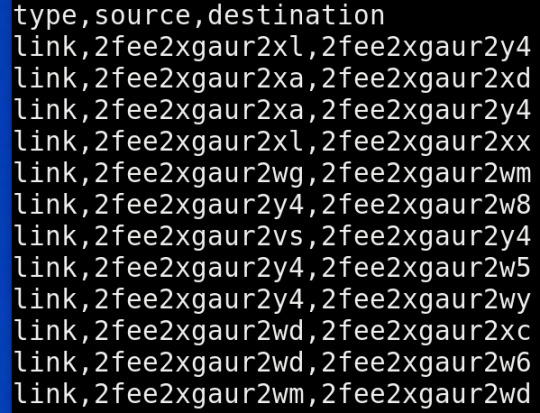
And that's the first step data wise. I fed it an export of names, then some URLs. I'm puzzling over how to use Maltego's internal UUID with Sentinel Visualizer, without smearing an endless blur of visually very similar strings all over the display.
I have a couple projects in mind with this:
The MAGA world meltdown graph has to be either moved or abandoned.
There are a LOT of interesting datasets from Ukraine that involve both geospatial and temporal data.
There are famous historical battles that are well documented enough to make for a nice graph, but I've yet to see a source that offers both geospatial and temporal data in tabular form.
So that's the direction we're headed for the second half of 2023. If I get something worthwhile put together, I will make it available for use with Sentinel Visualizer Reader.
2 notes
·
View notes
Video
youtube
Hands-On Guide: How to Install and Set Up Ubuntu and CentOS on VMware
Overview:
Setting up Ubuntu and CentOS on VMware is a crucial skill for DevOps professionals who want to create isolated environments for testing, development, and automation workflows. VMware allows you to run multiple virtual machines (VMs) on a single system, enabling you to experiment with different Linux distributions without altering your primary operating system. In this hands-on guide, we’ll walk through the steps to install and configure both Ubuntu and CentOS on VMware, covering the key settings and best practices for optimizing performance in DevOps environments.
VMware: Getting Started
Step 1: Install VMware Workstation
To begin, you’ll need VMware Workstation or VMware Player installed on your system. Here’s how:
- Download VMware: Visit the official VMware website and download either VMware Workstation or VMware Player depending on your preference. Workstation is a paid tool with advanced features, while Player is a free option that’s perfect for basic VMs. - Install VMware: Run the installer and follow the setup wizard. Once installed, launch VMware.
Step-by-Step: Installing Ubuntu on VMware
Step 1: Download Ubuntu ISO
- Go to the [official Ubuntu website](https://ubuntu.com/download) and download the LTS (Long Term Support) version of Ubuntu, ensuring you have a stable version for long-term usage in your DevOps workflows.
Step 2: Create a New Virtual Machine in VMware
- Open VMware Workstation or VMware Player and select “Create a New Virtual Machine.” - Choose the ISO image by selecting the downloaded Ubuntu file, then click Next.
Step 3: Allocate Resources
- CPU: Assign at least 2 CPUs for smooth operation. - RAM: Allocate at least 4GB of RAM for optimal performance. You can assign more if your system allows. - Storage: Provide at least 20GB of disk space, especially if you plan to install DevOps tools.
Step 4: Installation of Ubuntu
- Start the VM, and Ubuntu’s installation wizard will appear. - Follow the prompts: choose language, keyboard settings, and select Install Ubuntu. - Choose installation type (erase disk if it’s a fresh VM) and configure time zones, user account, and password. - After installation, update your system by running: ```bash sudo apt update && sudo apt upgrade -y ```
Step 5: VMware Tools Installation
Installing VMware Tools improves VM performance, enabling better integration with the host machine.
- In VMware, go to the VM menu and select Install VMware Tools. ```bash sudo apt install open-vm-tools open-vm-tools-desktop -y sudo reboot vmware-toolbox-cmd -v ``` Verify VMware Tools Installation:
```bash vmware-toolbox-cmd -v ```
Step 6: Post-Installation Setup for DevOps
- Install Basic DevOps Tools: ```bash sudo apt install git curl vim ``` - Enable SSH Access: ```bash sudo apt install openssh-server sudo systemctl enable ssh sudo systemctl start ssh ```
Step-by-Step: Installing CentOS on VMware
Step 1: Download CentOS ISO
- Visit the [official CentOS website](https://www.centos.org/download/) and download the CentOS 7 or 8 version (or CentOS Stream, depending on your preference).
Step 2: Create a New Virtual Machine in VMware
- Open VMware and choose “Create a New Virtual Machine.” - Select the CentOS ISO image and proceed to the next step.
Step 3: Allocate Resources
- CPU: Assign at least 2 CPUs. - RAM: Assign at least 4GB of RAM for smooth operations, especially if you’re installing enterprise tools. - Storage: Allocate 20GB or more, depending on your intended use case.
Step 4: Installation of CentOS
- Start the VM, and the CentOS installation wizard will load. - Choose your language and keyboard settings, then proceed to the installation screen. - Configure disk partitioning (choose automatic for simplicity). - Set up a root password and create a user account. - Follow the prompts to install CentOS. Once done, reboot the VM.
Step 5: Install VMware Tools
For better performance, install VMware Tools:
- In the VMware menu, select Install VMware Tools.
- Update Your System: ```bash sudo yum update -y ``` - Install open-vm-tools: ```bash sudo yum install open-vm-tools -y ``` - For graphical environment: ```bash sudo yum install open-vm-tools-desktop -y ``` - Start the vmtoolsd Service: ```bash sudo systemctl enable vmtoolsd.service sudo systemctl start vmtoolsd.service ``` - Verify Installation: ```bash vmware-toolbox-cmd -v ```
Step 6: Post-Installation Setup for DevOps
- Install EPEL (Extra Packages for Enterprise Linux) and Basic DevOps Tools: ```bash sudo yum install epel-release sudo yum install git curl vim ``` - Enable SSH Access: ```bash sudo yum install openssh-server sudo systemctl enable sshd sudo systemctl start sshd ``` - Verify installed tools: ```bash git --version curl --version vim --version ```
Best Practices for Installing and Setting Up Ubuntu and CentOS on VMware
1. Resource Allocation: Ensure you allocate sufficient CPU, RAM, and storage based on the workloads. For most DevOps tasks, assign at least 2 CPUs and 4GB of RAM for optimal performance. More demanding workloads may require additional resources.
2. Snapshots: Regularly take VM snapshots before major changes or installations. This allows you to revert to a stable state if something goes wrong during configuration or software testing.
3. VMware Tools Installation: Always install VMware Tools after setting up the OS. This ensures seamless mouse integration, smoother graphics, and better performance, reducing potential bugs and lag in your virtual environment.
4. Partitioning: For better performance and management, use custom partitioning if needed. This helps in allocating different parts of your virtual disk to `/`, `/home`, and `/var` partitions, improving system performance and flexibility in future updates or installations.
5. Automated Backups: Set up automated backups or export your VMs periodically. This practice is particularly important if your VMs store critical configurations, applications, or databases.
6. Networking Configuration: Ensure that your virtual machines are correctly configured to access the internet and your local network. Consider using NAT or Bridged Network options, depending on your networking needs. NAT works well for internet access, while Bridged is ideal for networked environments.
7. Security Considerations: Configure firewalls and SSH access carefully to secure your VMs from unauthorized access. Set up strong user permissions, enforce password complexity, and enable SSH keys for secure remote access.
8. Regular System Updates: Frequently update both Ubuntu and CentOS systems to ensure they are protected from vulnerabilities. Use the following commands to update packages: - For Ubuntu: ```bash sudo apt update && sudo apt upgrade ``` - For CentOS: ```bash sudo yum update ```
9. Monitor Resource Usage: VMware allows you to monitor CPU, memory, and storage usage. Use these tools to ensure that your VMs are not consuming excessive resources, especially in shared environments.
10. Test Environments: Use VMs as sandbox environments to test and experiment with new DevOps tools like Docker, Kubernetes, Jenkins, or Ansible before deploying them in production.
Conclusion:
By installing and setting up both Ubuntu and CentOS on VMware, you gain the flexibility to experiment with DevOps tools, test automation workflows, and learn Linux system administration in a safe and isolated environment. This hands-on tutorial provides you with the foundation to run and manage your Linux VMs effectively, setting you up for success in DevOps tasks ranging from development to deployment automation. Follow along in this video as we guide you step-by-step to mastering Linux installations on VMware for your DevOps journey.
#youtube#Install VMware Workstation#Step-by-Step: Installing Ubuntu on VMware#ubuntuGetting Started with Linux Installation and Basic Setuplinux tutorial for beginnersopen sourcelinux terminaldistrotubeubuntu is badlin#vmwareubuntuHands On Guide: How to Install and Set Up Ubuntu and CentOS on VMwarevmware workstationcentos 7download and install vmware works#Linux Install and Setup OverviewInstall and Setup VMware Workstation Pro 17Installing Ubuntu on VMware Workstation Pro 17Installing CentOS o
1 note
·
View note
Text
How to Install KVM on Ubuntu 24.04
This article explains how to install KVM on Ubuntu 20.04. KVM (Kernel-based Virtual Machine) is an open-source complete virtualization solution for Linux systems, including Ubuntu. Like VirtualBox and VMware Workstation, KVM is a virtualization infrastructure for the Linux kernel that turns it into a hypervisor. Since KVM is part of the Linux kernel, it benefits from its features, security, and…
0 notes
Video
youtube
🚀 Big News in Tech! 💻💚 Did you hear? VMware Workstation Pro is now FREE! 🎉 Thanks to Broadcom's acquisition, VMware is making their powerful virtualization tool accessible to everyone.
🤔 Why did Broadcom make this move? What are the benefits of using VMware Workstation Pro? And how can you download and install it?
Find out in my latest video where I break it all down!
Check it out here: [Insert YouTube link].
💬 What are your thoughts on this big change? Drop your comments below! ⬇️
#VMware #Broadcom #Virtualization #TechNews
0 notes
Text
The Ultimate Beginner's Guide to Learning Linux
Linux is an open-source operating system that powers everything from smartphones to supercomputers. Unlike proprietary operating systems like Windows and macOS, Linux is freely available to everyone. It’s known for its stability, security, and flexibility, making it an ideal choice for developers, system administrators, and tech enthusiasts.
Why Learn Linux?
1. High Demand for Linux Professionals Learning Linux opens up numerous job opportunities in fields like system administration, software development, cloud computing, and cybersecurity. Linux is the backbone of many cloud services, data centers, and tech companies.
2. Open-Source Nature Linux is open-source, meaning it is free to use, and its source code is available to modify. This is a key reason why it’s favored by tech communities worldwide.
3. Flexibility and Control Linux gives users full control over their system. It is highly customizable, allowing you to build an operating system tailored to your needs.
4. Learn Command-Line Skills The command line is a powerful tool in Linux, and mastering it will help you become more proficient in navigating and managing your system efficiently.
What You Will Learn in This Linux Course
Here’s a breakdown of the essential skills and concepts that would be covered in a comprehensive Linux course.
1. Basic Linux Commands You’ll start with basic commands like ls, cd, pwd, and mkdir. These are the building blocks that help you navigate the file system and manage files.
2. File Permissions and Ownership Learn how to manage file permissions and ownership to secure your system and ensure that users and groups have the correct access rights to files.
3. File System Structure Understand the Linux directory structure, including root directories (/, /home, /etc, etc.), and how to efficiently navigate through the filesystem.
4. User Management You’ll learn how to create, delete, and modify user accounts, as well as manage groups and user permissions.
5. Process Management Linux gives you full control over running processes. You’ll learn how to manage processes with commands like ps, top, kill, and how to use nice and renice to control process priorities.
6. Package Management Linux distributions use package managers to install, remove, and update software. Learn how to use package managers like apt (for Debian-based systems) or yum (for Red Hat-based systems).
7. Networking Basics Linux provides a variety of networking tools. You’ll learn how to configure network interfaces, troubleshoot connections, and use tools like ping, netstat, and ifconfig.
8. Shell Scripting One of the most valuable skills in Linux is shell scripting. You'll learn how to write scripts to automate tasks, save time, and enhance productivity.
9. System Logs and Monitoring Linux systems generate logs that are crucial for troubleshooting. Learn how to read and interpret system logs, and use tools like dmesg and journalctl to monitor system performance.
10. Security Practices Linux is known for its security features, and in this course, you’ll learn how to harden your system with firewalls, SELinux, and user authentication mechanisms.
How to Get Started
Step 1: Choose a Linux Distribution There are many flavors of Linux to choose from. For beginners, distributions like Ubuntu, Fedora, or Linux Mint are excellent choices. You can download and install them on a virtual machine (VM) or set up a dual boot alongside your main OS.
Step 2: Install VirtualBox or VMware If you prefer to learn without changing your current system, installing a Linux distribution on a virtual machine is a great option. VirtualBox and VMware are free tools that allow you to run Linux on top of your current OS.
Step 3: Use Linux Regularly The best way to learn Linux is by using it regularly. Install it on your computer or run it from a USB stick to get hands-on experience. The more you use it, the more comfortable you will become.
Step 4: Join Linux Communities There are active Linux communities where you can ask questions, share knowledge, and collaborate. Websites like Stack Overflow, Reddit's rlinux, and Linux forums are great resources.
0 notes