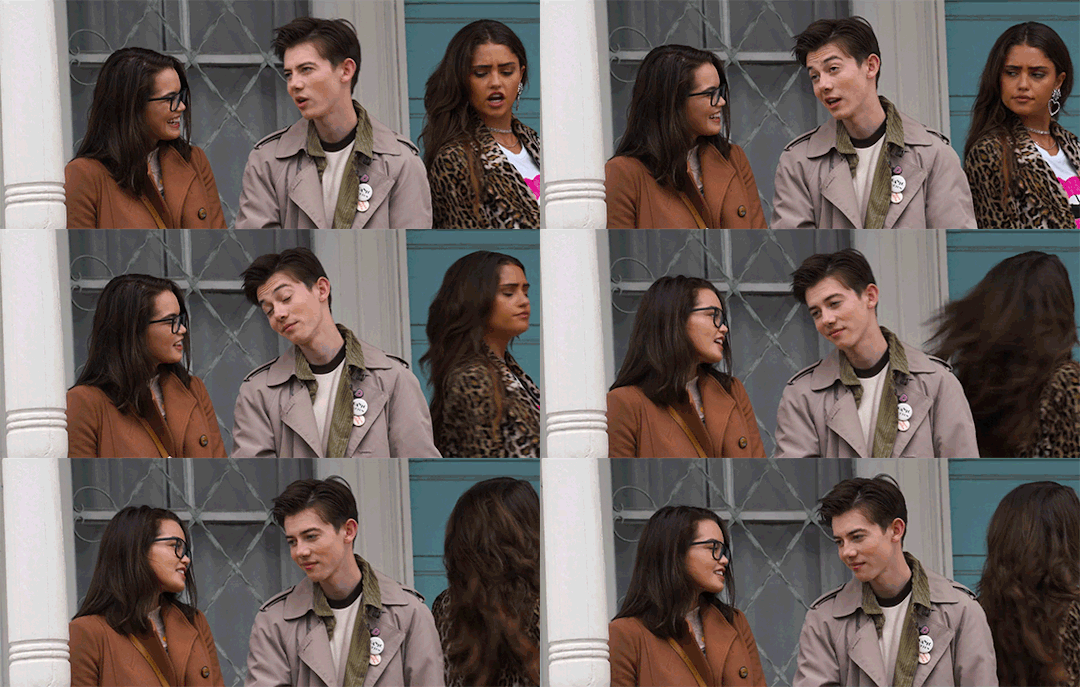
#has tumblr always cropped images if you stack them side by side?
Explore tagged Tumblr posts
Note
would you be willing to share some tips on gif making? your gifs are always so pretty i feel inspired to start making my own, but i dont even know what program to use 🥲 please master yoda, teach me your ways 🙏🙏🙏
ahhh thank you so much, that’s so kind of you to say. i can share some tips sure yeah! first of all i use photoshop, their most recent edition, I think it’s 2020. i pay for it cus i keep meaning to find a download and not doing so but you can find them sometimes in the tumblr tags but it might be an older version!
in terms of tips, the main one is to always use high quality clips when you screencap! you should be aiming for 1080 but if the scene is well lit then you can get away with 720. my top trick here is to use Firefox because you can actually record directly from proper streaming sites without it being blacked out eg netflix apple prime etc etc. On a PC you can hit the windows button + g and it brings up a control panel which allows you to screen record. I’m not sure how you do this on a Mac but I’m sure there’s a way. I never torrent episodes to gif, I always do it like this and the quality is extremely good. But if you’re able to torrent, that’s another option too.
mostly really it’s just about playing around in photoshop until you get comfy with how it all works. the more you play about in it, the more each adjustment you can use makes sense instead of being overwhelming. my way of making gifs is just using adjustments to increase/decrease brightness/contrast/colours until i like the way it looks and that’s really the most important thing, finding your style and what you like! i can honestly pick certain gif makers out without seeing a url by seeing how the gif is coloured and sharpened. for me, i really like strong a strong contrast when im colouring, so i play around a lot the brightness/contrast and levels adjustment layer to get the contrasts where I want them to be. the adjustment layers i tend to use the most are the aforementioned ones and then colour balance/selective colour/vibrance. really, just play around and it soon becomes less overwhelming and starts to make more sense. also if you’re ever stuck tumblr has a wealth of tutorials! I usually just google what I’m specifically looking for and so many come up.
in terms of how i make my gifs, i always load my caps (cap using potplayer and again you can find so many tutorials on how to do this and what settings to have but if you want I can share my settings when im on my computer next - just shoot me another ask and then load them in using ‘load files into stack’ in the windows menu in photoshop) and then crop, colour, sharpen. some ppl sharpen first and then colour - again it just depends on what you wind up preferring! for cropping, don’t use the change image size, always change the canvas size to what size you want your gifs to be being mindful of tumblr sizes (if you Google tumblr gif sizes a lot of templates will come up showing you what sizes to stick to but in general one gif should be 540 in width and if you want 2 side by side it should be 268). from there you can hit the shift + t button and then adjust your gif to how you want it to look without messing up the proportions.
always always sharpen your gifs! you can do this in so many ways and again it’s about finding how you like it to look in terms of what sharpening settings you use. again there are so many tutorials out there explaining how to do this and the different settings you can use so really it’s just again playing around until it makes sense and you find the way you like it to look! i actually use a sharpening action i found on tumblr that i use twice on all my gifs but i can’t find the original place i found it now but you can search ‘tumblr sharpening action photoshop’ and they will come up.
im sooo bad at explaining things which is why ive suggested googling for tutorials because there are so many people who have such useful and well written tutorials that helped me so much when i was trying to learn things on photoshop. i found it SO overwhelming at first but the more you use it, the easier it becomes like anything else, so my main advice would be don’t be intimidated and just play around and have fun. the more you play and click around with things, the more sense it will start to make and you will find your style and way of doing things!! if you have any other questions, feel free to shoot me another ask and i will try to help ���
7 notes
·
View notes
Text
the world waking up, 1/2
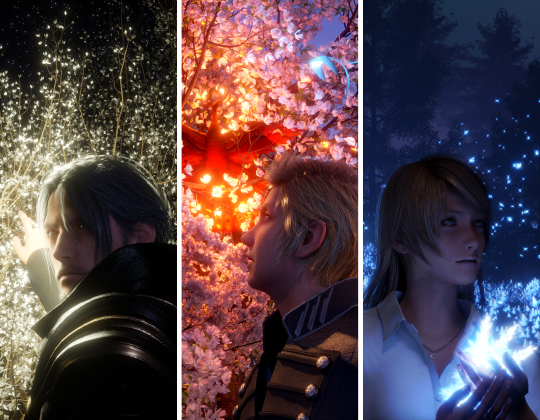
When Noctis does not die fulfilling the prophecy, the gods rise up against Bahamut and the Six destroy each other. Their aether returns to the world, perhaps never to be contained again. For the days immediately following the dawn, everyone is too preoccupied with the return of the sun and the absence of demons to notice much. The first few sprouts prompt excitement and hope, of course, but it isn’t until a week has passed that everyone realizes that the plants are growing fast. Too fast.
Noctis has been recovering in Hammerhead. He made it back to Insomnia Base under his own power -- his father’s long-ago parting words ringing in his ears -- but was bedridden for weeks after. When Insomnia’s citizens begin gathering at Hammerhead to return to their home, Noctis insists on leading them himself. The trip takes longer than they’d planned, as the return of the sun also meant the return of the weather, and many of the roads have become impassable. They don’t reach the Citadel until late at night. In the uneven beams of the flashlights, the strange shadows in the heart of the city could be anything, even demons -- Gladio grabs his arm like he’s going to shove him behind him -- but Noctis raises his hand and calls to the Lucii with a simple request: light. The power of the ring sings, briefly, rising in waves like bells. And so he’s the first to see the blooming trees sprouting around the base of the Citadel, responding to the Ring with their own soft glow.
Prompto agrees to help explore Leide and the Duscae a few months later, to see how things are recovering. Without Noct and the others’ eyes on him, he finds himself dragging, the dark lethargy of the past ten years clinging to him like dirt that won’t wash off. He drives from location to location, taking photos and trying to feel something, anything, other than anxious dread. It’s as he explores a cluster of blooming trees that a friendly little bluebird flies up to him, chattering and dancing in place. It wrings a smile out of him, but only briefly. When he lapses back into grim silence, the bird divebombs him -- twitters laughingly at his yelp -- and then leads him further into the trees, only re-appearing to swoop and dive whenever he falls behind. Maybe it’s hurt? he thinks. Or has a nest trapped under a branch, or.... Wait, are bluebirds carnivores? Is he about to be someone’s lunch? A flash of light sends him jumping back and then spinning in place, guns materializing. But he doesn’t shoot. Instead, he watches in amazement as a phoenix -- extinct for over a century, disappearing as the Scourge spread -- spreads its wings and takes into flight. The bluebird lands nearby and watches him, seemingly satisfied at the amazement and hope rekindled in his eyes.
Luna left Noctis to his recovery before he even left Insomnia, called back to Tenebrae as a flood of refugees desperate to reclaim their homes threatened to overwhelm their food stores. She promised she would return soon, but finds herself pulled endlessly away. And then, as normalcy begins to reassert itself, she finds herself hiding instead, feeling unworthy to exist in the world when so many have died. When she almost led Noctis to follow a prophecy that would have killed him. But a strange dream of Gentiana awakens her one night, and she finds herself drawn to the sylleblossom fields. She gathers some fallen blooms, marveling at how fast they’ve grown but despairing, too, at what this victory cost them. Sorrow has carved itself on her bones, she thinks, and she will never be free of it. As if in response to her thoughts, a cold wind blows in from what remains of Niflheim -- now referred to mostly as Shiva’s Wrath, as the frozen wastes of the Ghorovas Rift expanded over the years. Luna turns her face to it, wondering if she’s to receive a message from her old friend. And if so, what kind of message will it be? No more prophecies, please, I am so tired of fighting.... Around her the mist begins to lighten, and the blossoms to sway and glow. She looks down at the collection resting in her arms and is nearly blinded by the light. With her eyes closed, she swears she can hear them murmuring in Gentiana’s voice: a soft song of memory and love.
#ffxv#ffxiv reference#some subtle endwalker spoilers#noctis lucis caelum#prompto argentum#lunafreya nox fleuret#been fascinated with light and shadow lately#and i wanted to use some trees#and radical cropping#so here we go#mostly pleased with these#prompto's image uses some assets from ffxiv (the peacock mount recolored and a certain starbird)#trees from cgtrader#has tumblr always cropped images if you stack them side by side?#i don't remember it doing that before#not sure if its a bug or a new 'feature'#but it makes me want to kill something either way#i ended up stitching them together in PS and uploaded as a single image to get around the ugly cropping#hence the links to DA with the single images#ANYWAY#it's been a while since i posted#been going through it lately#it was nice to finish something tho#my art#my fic
43 notes
·
View notes
Photo

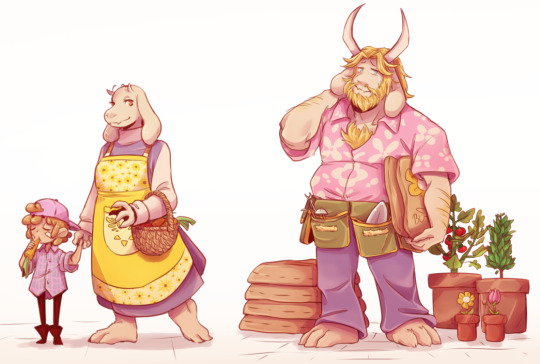

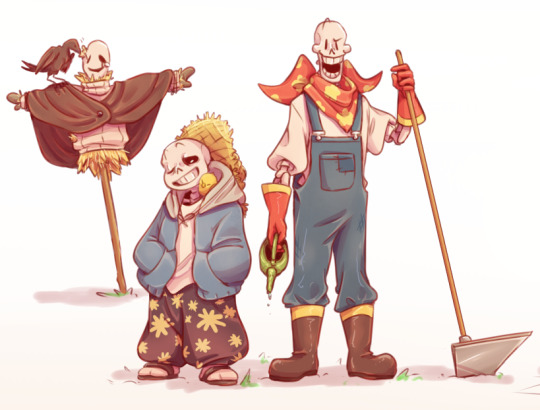
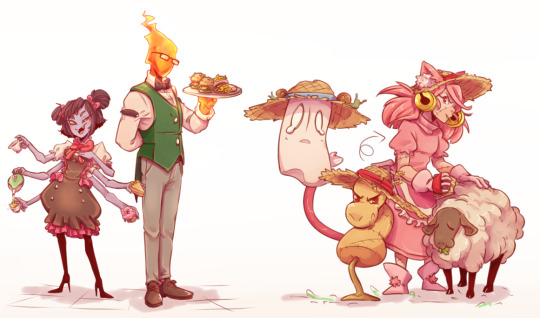
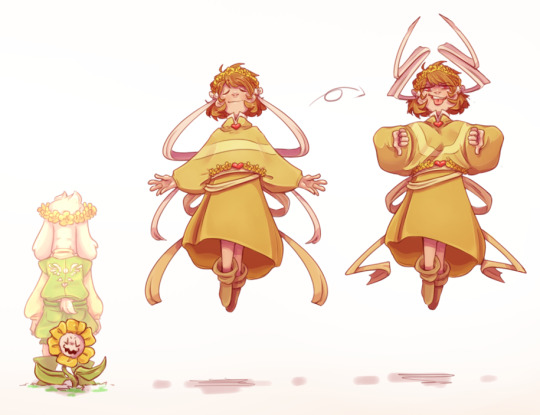
What do you do when there’s not much to an AU? You make up your own stuff, ofc. And as is per usual when I make Character Designs, I make up a shit ton of lore too.
The ramblings under the cut, but what I’m really interested in, is what you guys think. Do you guys have any headcanons/ideas for this AU? Let me hear them! Also, if you don’t wanna read on tumblr, here’s the Google Docs link: https://drive.google.com/file/d/151yshHxnb_--P6eMKkwkI2dee9xC_Llb/view?usp=sharing
Before I get into the characters’ roles, here’s some general facts and backstory of their town:
- Basically, it’s Undertale meets Harvest Moon / Stardew Valley. Well, kinda. I at least used that approach for coming up for the jobs for the characters. You know, how there’s always a general store, a doctor, a smithy, etc.
- The usual story of a HM game is that you come to a town that’s way past its glory days and you, as the player/farmer, help them get back to that. The “backstory” of the town is that that already kinda happened. I’ll get into it more in the character description, but basically when Asgore was still mayor, the town got really popular. Then yadda yadda, a certain tragedy happened, two kids died, and the town suddenly got very bad publicity. There was a lot of stuff going on back then, bad reputation being spread and also a lot of law stuff, cos, you know, supposed child murder ‘n all, so Asgore made the decision to shut off the town to ppl from outside. This was in the interest of most monsters living there, because as fun as it is to have a lot of people coming there, most just wanted to live a quiet life. Not everyone was happy with that though, so many moved away from town and some others are trying to get the town back on its feet. But more on that later.
On to the characters:
I’m just gonna start with the skelebros, cos it’s their fault in the first place I got so invested.
Basically, they are what the player is in hm/sdv. They just showed up one day, took over the abandoned farmhouse and began their life there. The two came to town way after it was “closed” and since then a new mayor has opened the possibility for new residents to move in. Their farm helps the economy of the town a lot and the mayor, like usually in hm games, is trying to use that to make the town more known again. The skelebros aren’t really working towards that goal however.
So, now a bit more detail on them individually.
Papyrus:
- The design is mostly based on what’s “canon” in this au.
- He works mostly on the fields and is in charge of the crops. Their fields aren’t spectacularly big, but still big enough to plant a few dozen rows of veggies.
- Paps also helps out a lot in town when he has the time. He helps Asgore with his plants, he goes fishing with Undyne, helps Toriel carry crates around and so on. This is inspired by the part-time job mechanic in HM ToT.
- Unbelievably, in this AU Pap is not an absolutely awful cook. Since he helps out at Muffet’s and Grillby’s a lot, they tend to show him some tricks to cooking. Even though Pap’s not a big fan of the greasy or overly sweet cooking those two do, he picks up a lot.
Sans:
- Again, design mostly based on the “canon” look. Maybe a bit more baggy.
- This is finally an AU this dude gets to rest. Since there are no resets and he doesn’t have to see his bro die again and again, for once in his life, he’s not a sad ball of depression. He’s just a chill and lazy dude that loves to make puns. Though, since he’s not too experienced with the feelings of loss, helplessness or grieving, he still tends to hide behind puns and fakes smiles if he does feel bad.
- Sans is in charge of the animals on the farm. Papyrus begrudgingly gave him that role since Pap’s loud demeanour and hectic movements usually scare the animals. Sans’ relaxed attitude draws the animals to him naturally and even if Pap mostly finds him sleep against a tree, in a stack of hay or on one of the sheep, the animals are always fed, healthy and relaxed, so Sans seems to be doing his job.
- Sans always has a small chic sit inside his hoodie or hat. Is it always the same one? Who knows, maybe.
- Sans also, somehow, can produce eggs out of thin air. Grab into his hoodie pocket, in his pants pocket, in his hat, in his slipper, there’s suddenly always an egg there. On good days he can even make butter or cheese appear.
Gaster:
- He’s literally just a scarecrow in this. Though, if you ask any of the bros why they designed their scarecrow that way, they won’t have an answer.
Frisk&Toriel:
- Frisk is mostly based on what I wore myself as a kid in summer. Just a loose shirt with a cappy. Toriel basically has her ut gown, just with an apron on top.
- Frisk just appeared outside the “magical” forest one day. Napstablook and his cousin found them and brought them to Toriel, who has been taking care of them since.
- Toriel runs the general store in town, but also often takes care of the few kids that still live there.
- Frisk usually helps out in Toriels store, plays with the other kids or sits around at Asgore’s. They’re notorious for nabbing small snacks, mostly from Asgore’s plants. You’ll always find them munching on something.
- Frisk was in town before the skelebros. Since they’d moved in, Frisk often went to spy on their farm. After a small incident with angry chicken, Frisk got to know the two better and now they see them as something between brothers and uncles.
- But Frisk honestly gets along with everyone. Just like in UT, they’ve not only been adopted by Toriel but literally everyone.
- Toriel and Asgore’s relationship is not as bad as in the main game, since, you know, Asgore didn’t kill literal children, but there’s still tension between them. Back when Asriel and Chara died and the whole thing with the bad rep for the town began, Toriel felt betrayed by Asgore focusing more on the town than giving their deceased kids the grieving they deserved. They’re not divorced, but Toriel still moved out and said needed space to think. Now that Frisk is in the picture though, the both of them are slowly coming to even ground and may even be able to talk things out and clear up the uncertainty of their decisions.
Asgore:
-Asgore has his UT Ending / Deltarune clothes, just with a gardener’s belt.
- He’s the previous mayor of the town, but after all the crap that happened, he stepped down from the position. Now he has his own little shop and sells seeds, saplings, homegrown veggies and fertilizer. So, basically what e.g. the Marimba Farm is in HM AP
- His main customer is Papyrus and they’re on friendly terms. Asgore is worried about how much and how hard Pap works, so he often gives him a discount.
- Since his family’s past tragedy, Asgore is kind of nervous around kids. So, when he first met Frisk, he hoped they’d not visit him too often. But to his chagrin, Frisk took an instant liking to him and spends a lot of time at his shop (and steals eats the fresh grown veggies). Now, he’s really grateful for that, because for one, he loves Frisk as dearly as he had his own children, and also because now the tension and mistrust between him and Toriel seem to grow smaller day by day.
Undyne&Alphys:
- I gave Undyne a pretty basic fisher’s outfit. Alphys basically has Elli from HM’s outfit, just a bit more doctory stuff added. She still has her canon lab coat too.
- In essence, Undyne and Alphys have 2 completely different jobs. Alphys is the resident doctor and Undyne runs the fish market.
Two things. Yes, I know Alphys is more a mechanic than a doctor, she fits the aesthetic though, so she’s the doc now. And no, Undyne being a fisherwoman is not cannibalism, think of it more as a shark hunting smaller fish.
- The reason I lump them together is because they act as the local “smithy”. Alphys is still really tech savvy in this (I mean, Mettaton is still part of this AU), so she takes on most problems with electronics and stuff. For Undyne, I didn’t want to lose her Royal Guard’s Captain image, so she’s really good at handling tools (and weapons, but Al doesn’t let her make them anymore). So basically, if there’s a broken tool, you can be sure that either Undyne or Alphys can fix it.
- As for relationships, those two are still an item. Alphys is still really shy and a shut-off, but since Undyne and Pap become best friends, she gets to know the skelebros better. She and Sans especially get along well, since most of the time Undyne and Papyrus are let loose, they sit back and talk about science-y stuff. (no, Sans doesn’t have a background in science but he’s still into sci-fi)
- Alphys has a bit of a strained relationship with both Asgore and Mettaton.
Back when Chara and Asriel died, it was because of “illness” (maybe poisoning?). Alphys feels awful because with her back then limited knowledge on medicine she couldn’t help the two. Asgore doesn’t hold anything against her but Alphys can’t help but feel guilty.
Alphys still built Mettaton’s body in this one. The two had a really big disagreement, because Mettaton hated the fact the town was going to close, and he couldn’t understand how Alphys could feel otherwise, even more so endorse the idea.
Mettaton, Napstablook, Mad Dummy/Mew Mew:
- Napsta and Dummy are pretty self-explanatory, they got straw hats. Mettaton’s outfit is a bit of a joke cos it’s a play on “work at the top and party at the bottom”. The tie has two different sides, one with the yellow red pattern, the other completely red. His “top part” is the business part, because when he’s on tv or in the mayors’ office, you don’t usually see his feet. The bottom is his party/dance part, cos his dancing/entertainment channels mostly feature his legs.
- Mettaton, still a robot, Napstablook and Mad Dummy are all still cousins in this AU.
- Originally, they all lived and worked at the Blook Farm, the Animal Farm of this AU. Mettaton, however, despised that simple live and after befriending Alphys and her building him a body, he left the Farm to pursue bigger things.
- Mettaton runs the local tv network. From weather to game shows, he does it all. He also runs the tailor shop in town that sells his designer clothes and merchandise. After Asgore stepped down, Mettaton also took over the role of town’s mayor and now works towards making the place more known again. Not everybody is happy with him doing that though.
- One of those people is the Mad Dummy. He can’t stand people anyways and he always claims that history would just repeat itself.
- Since the whole family is made of ghosts, they have different dummies and scarecrows they can use to take care of the animals. To mock Mettaton and kinda get back at Alphys for giving MTT such an opportunity, Mad Dummy found the blueprints for the Mew Mew robot and now modelled one of their scarecrows after it.
- Napstablook isn’t fond of taking over obejcts like his cousins do, so he mostly takes care of the snails. Somehow, he can interact with them even when incorporeal.
Muffet&Grillby:
- The two of them run the Inn together. Muffet cooks in the daytime and makes desserts, Grillby manages the bar in the evening.
- The two still can’t really stand each other but working together like this benefits them both because their rivalry just spurs them on more.
- Even though Grillby is a patient person, somehow Muffet is the only person who riles him up enough to retaliate. (Well, maybe except for Sans, he’s a strong second).
So, basically everything between those two is a challenge in some way. Even if Papyrus doesn’t notice, even his cooking lessons are a challenge for them.
- Even though they’re constantly bickering, after working together for so many years, there’s a strange level of respect and trust between them. Even if back when they first started this business, they’d pour salt into an already open wound, nowadays they’d know better and just take a step back from the other or even comfort the other (on very rare occasions only).
Asriel&Chara:
- They be dead. Kinda.
Some Characters that’d live in that town too but that I haven’t made designs for:
- Gerson is the original smithy of the town. He’d grown up in a family of smiths, but he’d always had an appreciation for the sea. That’s why, when the town became more deserted and Undyne had a good enough skill level as smith, he took up the Captains hat and now mostly spends his days out on sea. He also ferries people to places if they need him to. Oh, and just like in canon, Undyne learned most of her skills from him.
- Burgerpants is a poor dude Mettaton basically kidnapped when he was trying to get fame in the city. Now Burgerpants works wherever MTT needs him to, be that as cameraman for the tv shows, cashier in his tailor shop or his slave secretary in the mayor’s office.
- MK is Frisk’s best kid friend. MK’s parents are in charge of shipping the goods out of town and paying the individual people. MK’s the one that usually collects the goods at the end of the day.
- Other than that, there are only a few people in town. I’d imagine the older folks or the really young families stayed in town after it was closed. I think the librarby dude would still run the library. Some Snowdin residents like the stone family or the dogs also might still live there.
#undertale#au#farmtale#fanart#character design#lore#frisk#toriel#asgore#undyne#alphys#mettaton#gaster#sans#papyrus#muffet#grillby#napstablook#mad dummy#mad mew mew#asriel#flowey#chara#feels good to finally be able to tag them all
4K notes
·
View notes
Photo
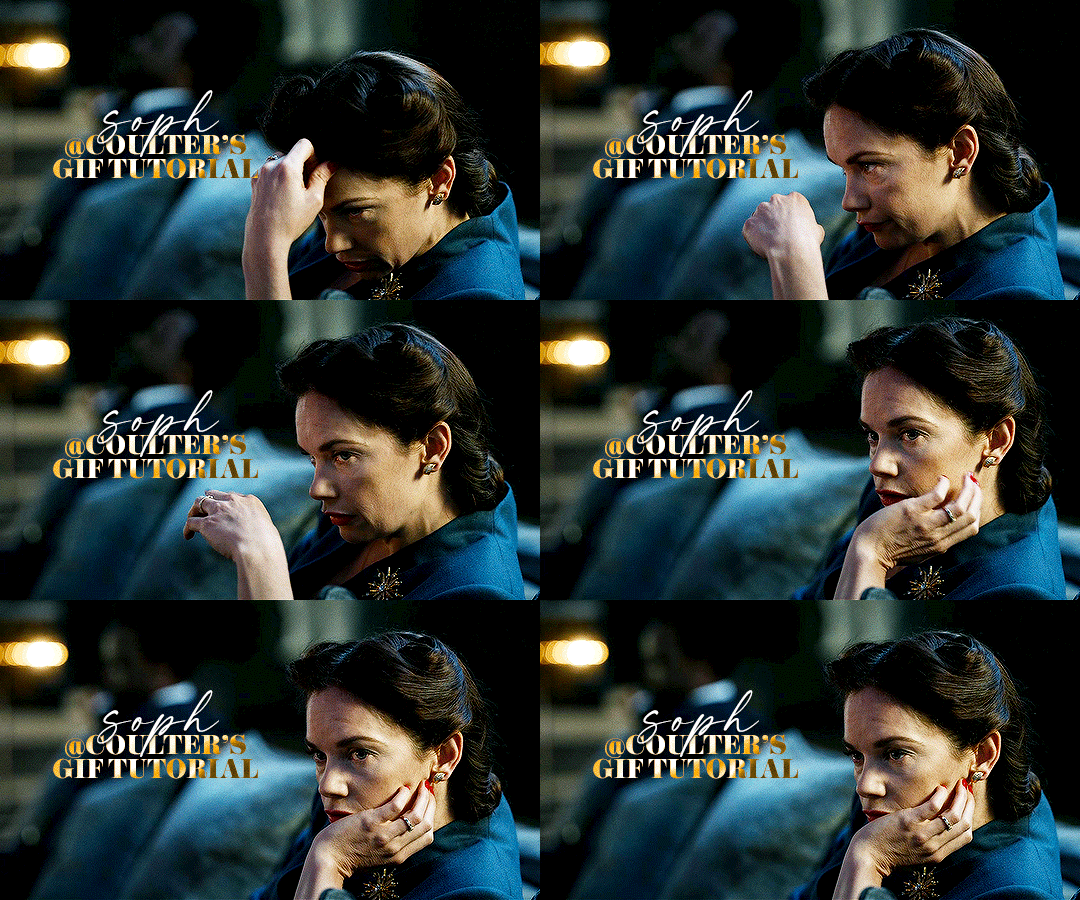
Hello! As requested, here is a tutorial on how I make my gifs. I would like to preface this by saying there are many ways to make gifs, and there’s no right or wrong answer imo. This is just how I personally go about doing so!
I will be using PS CC 2017, but as long as you have the video timeline option, it shouldn’t matter too much; on any version of PS, you should be able to adapt anything I mention here! You will also need some kind of screen recording software. I’ll talk a little more about that under the cut.
To start, you need the source material you will be making the gifs from! I get mine from snahp(.)it (avoiding links so tumblr hopefully doesn’t banish this from the tags lmao) and I always opt for either 1080p or 2160p. Not all laptops will support 2160p as it’s 4K, but either works great! You just want your gifs to be the best quality possible.
Next is where the screen recording comes in. I don’t use the screencapping method to make my gifs (where you use a program to cap a clip and then load those caps into a stack in PS). This isn’t for any particular reason… it’s just how my friends, (who very kindly taught me to gif), had always done it, so it’s now how I do it too. Personally, I find the quality to be just as good as the screencapping method, and have never noticed a difference between the two.
As I have a PC, I use the software built into it for screen-recording. If you go here: theverge(.)com/2020/4/21/21222533/record-screen-pc-windows-laptop-xbox-game-bar-how-to – you can see how to use the XBOX screenrecorder to record from files you have d*wnloaded. This also works on some streaming sites, but I think it depends on what browser you use. Personally, I recommend Firefox, as that seems to bypass a lot of the blocking and ads that occur when trying to do this sort of thing.
For MAC users, I have been told handbrake works well, as it converts MKV files to MP4, which can then be used to make gifs. You only need to convert part of the file to MP4 depending on how much you want to gif, and this also bypasses the screenrecording stage, as you can edit MP4 clips on Quicktime. I am told you can split them into smaller clips by going to edit > trim and it saves the new clip!
I have also used anyvideoconverter for small clips, but I can’t say what it does to the quality of your video, or how big of a file it lets you put in! With the XBOX screenrecorder, it doesn’t matter what type of video files you get, as the recording will save to MP4 anyway.
LOADING YOUR FRAMES
Now, go ahead and record whatever clips you want to gif. Make sure you have the video timeline open, by going to window > timeline. Then, go to file > import > video frames to layers.
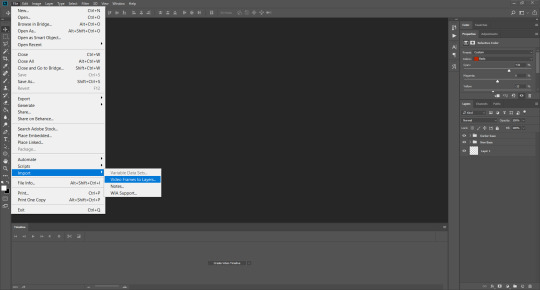
Next, select and open your clip from where it has saved (with the XBOX recorder, it saves in video > captures). You should see a little window pop up, where you can move the sliders back and forth to clip your recording to whichever part(s) you specifically want to gif. I recommend trying not to load a lot of frames into photoshop at once, but I would be a hypocrite to say that, since I do it a lot lmao. Just be patient if you do!
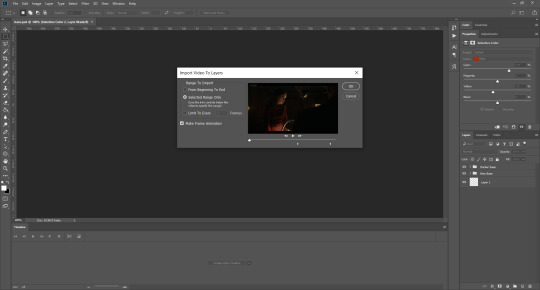
Once you have chosen the length, click okay. Never, EVER, I repeat NEVER click the button that says “limit to every __ frames”. This really ruins the flow and quality of your gif—it’s better to have shorter, but smoother gifs, I promise. And with tumblr’s new 10 MB limit, it shouldn’t be a problem anyway!
Then, your frames should open up. What we want to do is make them into a smart object, so we can edit all the layers at the same time. To do this, click the small button in the left-hand corner. ALWAYS click this first. If you don’t, it will only convert the first frame to a smart object and the gif won’t work.

Give it a second to sort itself out, then, on the right-hand side, select all your frames at once using the shift key.
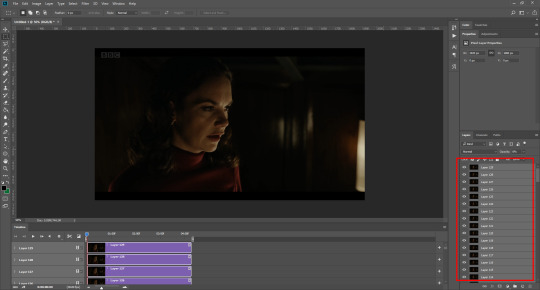
Then, go to filter > convert for smart filters. This might take a minute. Don’t click anything else in case PS gets angry lmao, just leave it for a second and it’ll do its thing. The more frames you have, the longer it takes! Now we have our gif, but it needs to be cropped, sharpened and coloured!
CROPPING
You want to start by selecting the rectangular marquee tool on the left-hand side, then drag it across by clicking and highlighting the area you would like to crop your gif to, like so:
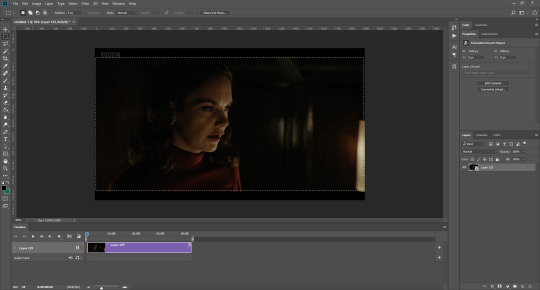
What I tend to do is select everything inside the black lines you sometimes get around your gif (this depends on what file you d*wnload), and also the tiniest bit inside the sides. This is because I’ve found if you crop it right up to the edge, you get a tiny bit of transparency on the sides of your gifs, which I’d rather avoid.
Once you have your desired selection, go to image > crop. Now, the dimensions for tumblr are 540px width, so all your gifs have to be that width. However, the length is up to you. I really like big gifs, so sometimes I even make a full square, or even longer. It’s entirely up to you, and what kind of set you want to make.
For the purposes of this gif, I will stick to what I usually go for, 540px by 350 px. This will mean you’ll have to crop some width off, but that’s okay, since Marisa isn’t central anyway. The cropping is always trial and error for me, as sometimes people move out of the frame within in the gif. The best thing to do is just try it, and then move the slider in the timeline window at the bottom to see if the person stays inside the gif, and if not, adjust accordingly.
Next, go to image > image size:
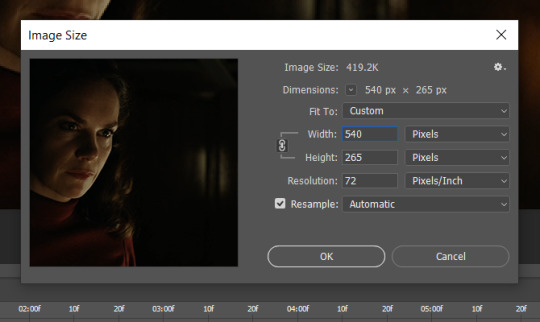
In this box, if I put the width as 540, the gif is a smaller height than I want, as it keeps to the dimensions of the gif when you load it into PS. That’s okay, just put the height you want instead, and we’ll crop off the excess.
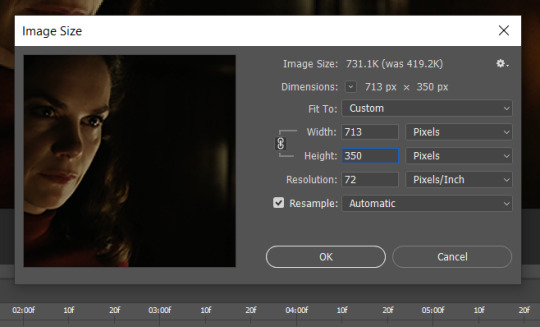
Then click OK. Using the rectangular marquee tool again, we need to remove the excess width. Part of the reason I like this version of PS is that it tells you the width of your selection as you do it, but you can always use the ruler as a guide, and check the size of your image by going to image > image size again.
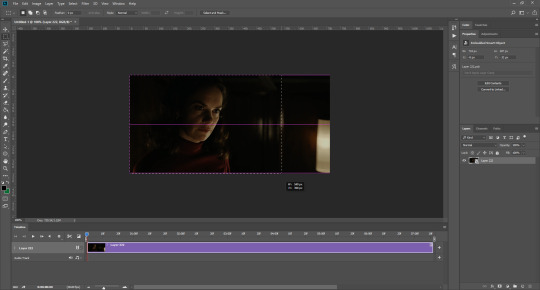

Again, use image > crop, and your gif should now be the correct size!
You can also use the crop tool in the timeline window to crop the length of your gif:
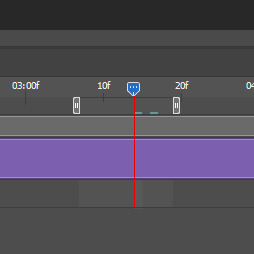
However, I tend to wait until later on to do this (which will be explained further down!)
SHARPENING
Next you want to go to filter > sharpen > smart sharpen.
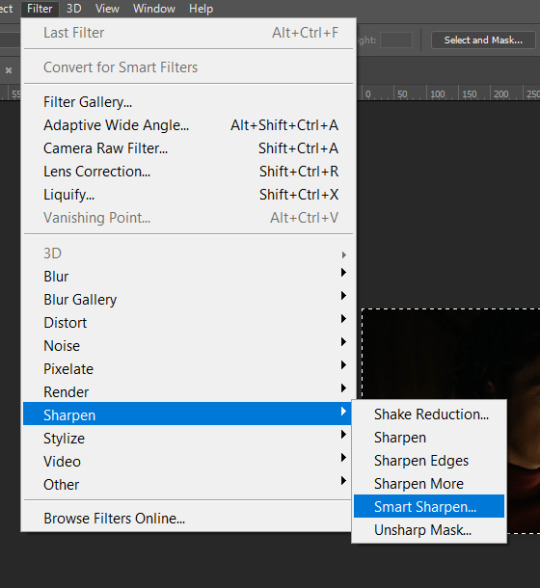
These are my settings. However, 0.4px is very sharp, too much so, but that’s easily fixed.
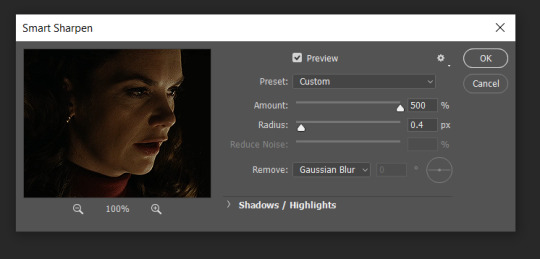
Go to filter > blur > Gaussian blur and then set it to 1.0.
Now on the right-hand side, we need to reduce the blur, so double click the little adjustment button, and change the opacity of the blur. I usually go for 20-30%!

Then click OK, and that’s your sharpening done!
COLOURING
I picked this scene on purpose as it’s dark, so good for showing how to colour a gif. I have a base psd which consists of some very basic adjustments, but it mostly exists so I don’t forget what adjustment layers I like to use. I adjust them every time I make a gif, essentially colouring each gif from scratch.
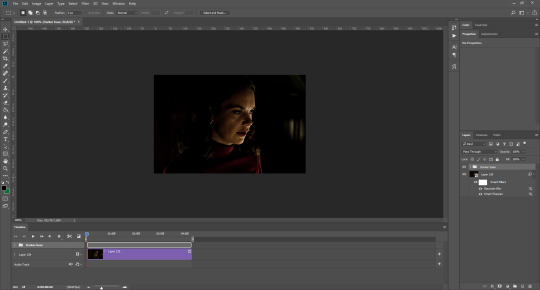
In this case, the psd actually makes it darker. So, what I will do is turn each layer off, and adjust as I go. A lot of people say using lots of adjustment layers ruins the quality of your gif… I have never found this to be true, as long as you are gentle with them. If you whack the brightness right up to the top, it’s going to ruin your gif no matter if you use 1 adjustment layer or 100. I would just say use your common sense, and adjust a little at a time!
I start with a simple black to white gradient map set to soft light, because I think it helps you see depth once you add some brightness to it. I usually do this on about 10%, or more if needed. It’s probably unnecessary, I just like how it looks!
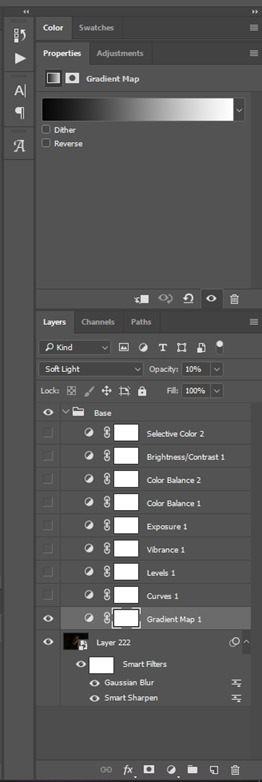
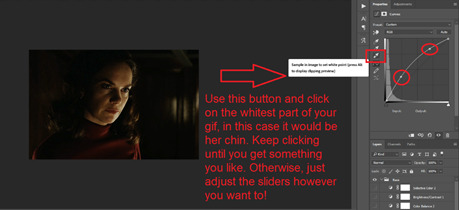
Then, I move onto using curves and levels. This is where things can diverge depending on who you’re colouring. If this person is white, it doesn’t matter too much. If they’re not white, you don’t want to white wash them. My best advice is to play around with it. By adding vibrance and other (usually the red) selective colour settings later, you can ensure you don’t change the person’s skin tone from what it originally was. You can also use layer masks at varying opacities (various shades of grey), on your curves and levels, to remove some brightening so that you’re not changing anyone’s skin colour. Just brighten slowly and check in with yourself honestly about how your gif looks.
Some people don’t like using levels, or curves. It’s completely up to you. I tend to use both because levels are good for bringing depth, even if not brightening (though I like to use them for that as well).
One thing you can do is use the white point of the gif to make PS adjust the curves itself, however I like to drag the sliders myself and see what it looks like. Just make sure it’s not too bright, as we will be using further layers to brighten more, after.
Next is levels. The slider on the left controls the black point, the one in the middle controls the midtones, and the one on the right controls the white points. The black brings depth, the midtones adjust the overall brightness, and the white points produce stronger highlights. Again, you’ll get a feel for how this works as you practice. Just don’t use the white point excessively, especially if your characters are not white.
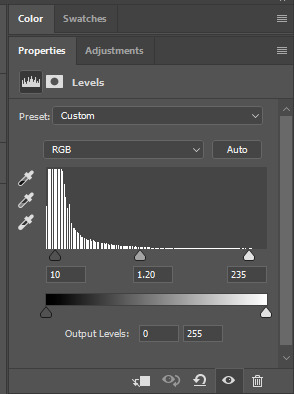
Then I add vibrance (+20!), because we’ve removed a lot of it when lightening the gif. Next is exposure, which I find brings out the highlight and shadow areas more effectively:

Then colour balance! This helps with scenes that might be a certain colour, i.e. too blue, too green, too red, etc. Moving the sliders in the opposite direction of the colour your gif is will counteract it. The best thing to do when accounting for different colours, is to make a new layer every time you change colour, so that you don’t get confused. I always add a new layer for colour balance and selective colour if I want to change more than one thing. So one for red, one for yellow, one for pink, etc.
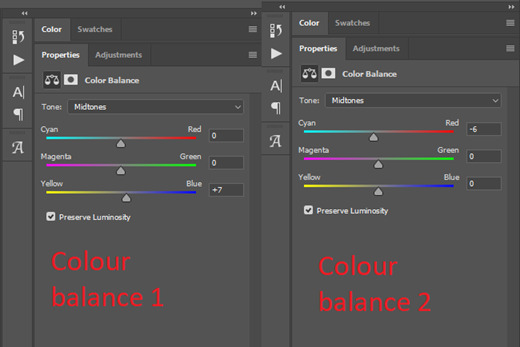
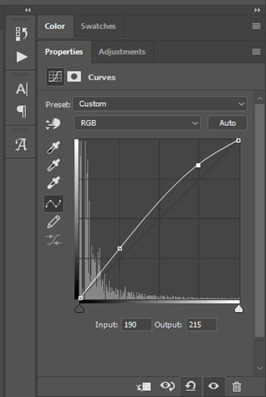
A layer of brightness just to make the gif pop, and because the scene is extra dark, I added a very gentle extra curves layer:
SAVING YOUR GIF
Time to save the gif. You can go ahead and file > export > save for web (legacy) now, but then you’ll have to reopen the gif to reset the frame rate from 0.07, to 0.05. Instead of doing that, I use a modified action. The original was made by the very talented @elenafisher! So I do not take credit for that at all. You can find the original here: elenafisher(.)tumblr(.)com/post/190817437374/gif-sharpening-action-2-preview-download and in my resources tag. Please reblog it if you’re going to use this!
To use an action, first make sure you have actions turned on in window > actions. To load in your action, go to the little lines circled, and then load the action from your downloads:
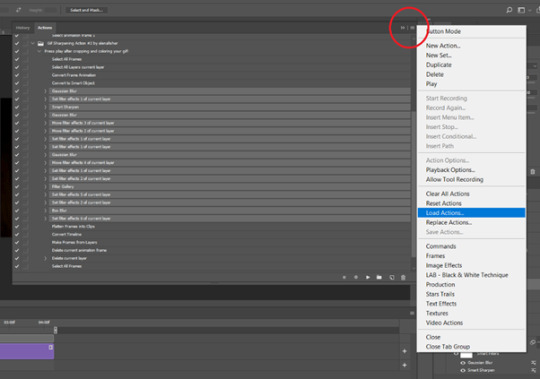
Obviously if you don’t want to sharpen your gifs yourself, you can use the action as it is, and it will give you a beautiful glowing effect. If you’d just like to use it to flatten your gif into frames like I do, make sure to take out all the items I have highlighted:
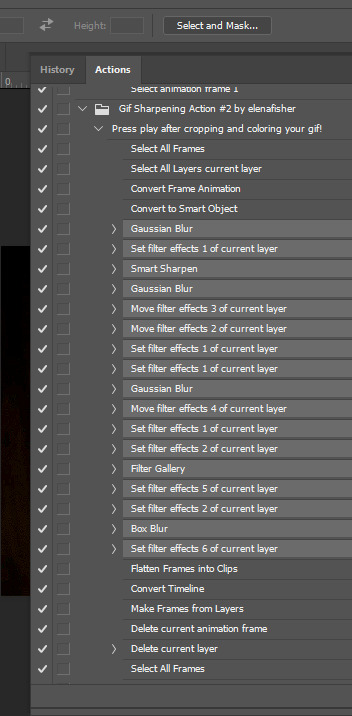
Until it looks like this!
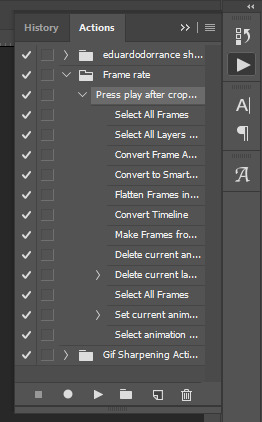
Make sure you have the layer under the file name highlighted, and then click the play button at the bottom! (If you get a screen saying select all frames cannot be found, don’t worry, just click continue!) You can delete the layer that does that if you want, I just keep it in case I realise I’ve forgotten to do something, because you can click cancel and edit your gif before you flatten it. Of course you can undo the steps to get back to the smart object version of your gif, it just takes longer!
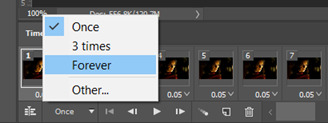
And now your gif is in frames and set to 0.05 already, so you don’t have to change the speed! All you need to do now before saving is change the gif cycle to “forever” in the bottom left-hand corner:
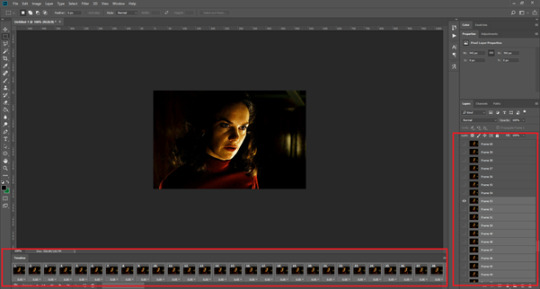
Then to save the gif go to file > export > save for web (legacy). Sometimes, the gif is bigger than the tumblr 10MB limit. You’ll be able to see this in the bottom left-hand corner of the gif save settings. If this is the case, I like to preview the gif, to see whether it would be best to cut frames off of the beginning or the end, or both. When you’ve decided, you can select the frames at the bottom, and in the right-hand side panel, and delete them both using the little bins/trash icons.
I keep checking and deleting frames until I get the gif under 10 MB! Just don’t delete frames from the middle, as then you’ll have the same issue as if you selected “every other frame” when making the gif: it won’t flow!
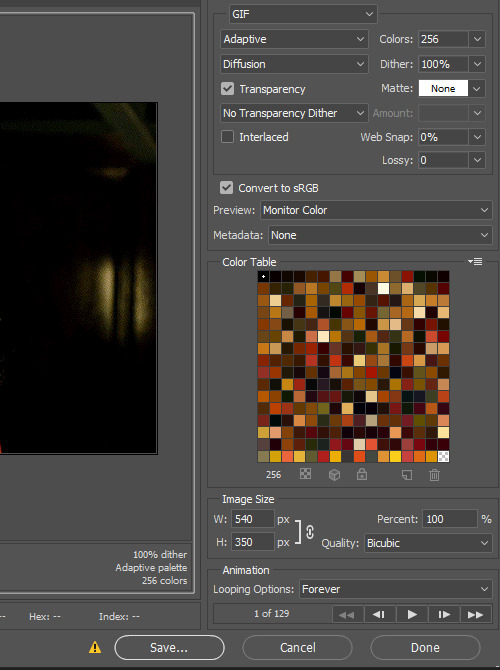
Lastly, these are my save settings:
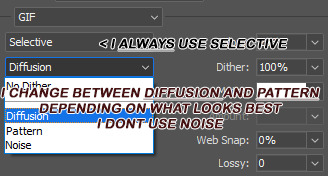
So that’s it! That’s how I make all my gifs. Blending I do when the gifs are in the grouped, smart filter stage, whereas text I add on during the framing section above! Really hope this is helpful, please feel free to ask any questions you may have! 💖
#gif tutorial#tutorial*#completeresources#yeahps#chaoticresources#allresources#mikesmom#usergeo#userava#usertix#usersmile#usertom#if you'd like me to cover anything more advanced just shout#i wanted to show how i add text too but tumblr wouldn't let me add any more pics#but people can let me know if that's something you'd want!
516 notes
·
View notes
Note
hello! i absolutely adore your gifsets and you've honestly inspired me to start gifmaking. may i ask for any tips you may for gifmaking or what programs to use for a beginner gifmaker?
ty so much that’s so sweet 😭 but honestly i'm just winging it skjfnkj i open photoshop and simply hope for the best! there's a few good tutorials floating around tumblr (this one has some good basic information, including how to sharpen, etc)
(if you have no experience with photoshop at all i would highly recommend going to youtube and watching a couple of videos covering the basics/explaining what every tool in order to familiarize yourself! it can be overwhelming (or it was for me, at least) in the beginning, and until you find your rhythm, it will really help to have a reference.)
my personal process is using potplayer to get screencaps to make gifs. this is how i first learned and i started doing it again at the end of last year because my other method (cutting clips from videos then importing into photoshop that way) always felt a little dull/fuzzy and personally i think screencaps provide a clearer image! but! you can work with straight video if you're patient + good at ps. i am neither
my steps:
open potplayer (download here)
get to the part of the video you want to cap. pause it, then hit control + g on your keyboard to bring up the screencapture menu. i have a folder just called "potplayer" where my caps go. my settings:

("10,000" is just so i make sure i get all the caps i want. i hit stop once it's moved past what i want to gif on screen.)
open photoshop
file > scripts > load files into stack. this can take a while depending on how many frames you're loading in at once. when it's done, go to window > timeline > create frame animation. in the corner of the timeline box will be four horizontal bars; click on it, and use make frames from layers, then hit reverse.
this is where i start editing. first, i crop; make sure you're cropping to tumblr dimensions, i.e. 540px for a single column, 268px for two. (i never put three gifs side by side, and i can’t seem to find an up-to-date post that confirms the size for it, but i think it’s 178px, if you’re curious). my most common ratios are 540x540, 540x500, 540x338, 540x304. depends on the scene, what i'm giffing, if there's dialogue, etc. for a lot of my dialogue sets, like here, i use 540x338; for these john-117 gifs, i used 540x540. it’s all about what looks best to you, what you want to achieve, etc. i never use 540x540 for dialogue, i reserve it for movie sets or just “x as y” sets.
next comes coloring, which is the most painful part of the process. most of the time i really just spam color balance because i’m a mess, but it’s what works for me since i prefer vibrancy for gifs. it can help you change colors and create nice sets like these when used alongside selective color; you can either enhance what’s already there, or change the colors entirely. take, for example, this john set: there were some nice colors to work with already:

i didn’t have to add too many adjustment layers to make it vibrant!
the purple john set required a little more work (and the purple adjustment layer was gifted to me by @aldensutton because i suck at making purple in ps, it always turns pink)

it really just comes down to practice and finding what works for you/what you’re giffing. here and here are two tutorials you can use as starting places from people who seem to know a lot more than me. googling “giffing coloring tutorials for photoshop tumblr” will bring up more. you can also find premade psds across various photoshop blogs on tumblr; i make all of mine myself these days, but i used to use a lot from this creator as bases. searching any kind of “free psd” “gif psd” should yield some good results in the tumblr search - just remember you will need to manipulate them regardless for what you’re giffing. no two shows are alike. no two scenes from a single show are alike. this is where it can become really frustrating.
once you’re satisfied with your coloring, though, it’s time to sharpen. the first tutorial i linked goes a little bit into the basics of how to sharpen, but it’s not my method, which is inconsistent and different for every gif. i don’t know about other people, but i just sharpen the frames, not the adjustment layers, which is probably dumb but <3 to sharpen, you go to the same menu you used when creating frames from layers. choose “convert to video timeline”, then select all the frames of the gif, group them using ctrl+g, then convert to smart object, then go to filter > sharpen > smart sharpen. my base sharpening is always 500 for amount, 0.3 for radius, and 0 for reduce noise. sometimes i double up on 500, sometimes i sharpen again at just 200 or 150, depending on what looks best. there’s also this method that i like for certain gifs. sharpening is very important for giffing.
for some gifs i will add noise, but that depends on my personal preference and isn’t something i’ll get into since it’s not standard/is just a personal aesthetic i enjoy.
i suppose i should mention that for dialogue, you select text tool then click in the left-hand corner, then drag to create a box that your text will show up in. it’s the easiest way to center/ensure text aligns on all frames. all you have to do is lower it to the bottom half of the gif. my font preference is arial rounded mt bold; font size depends on the size of the gif.
once everything is cropped, colored, and sharpen, you save by going to file > export > save for web. my export settings change somewhat from from gif to gif:
and that’s pretty much it! at least for what i can offer. i learned just by doing, trying things out, getting frustrated, etc... sknfkj i also get a LOT of help from @aldensutton as i mentioned before, she provides a lot of insight and opinions for me, and has really helped me to where i am now <3 it just takes a lot of trial and error to find what works best for you. it took me a while to get to where i am now; i feel like the gifs i was making just a year ago are so terrible, honestly. i can try to help further if you need it, there’s undoubtedly some things i missed, and there’s tons of blogs on tumblr that provide photoshop help, run by people far more knowledgeable than me! once again ty so much for the compliment <33 i hope you have fun gifmaking! it really is fun for me
10 notes
·
View notes
Text
how I make my gifs: a tutorial
Hi everyone! Just in case someone asks in the future + for those curious, I'm here with a tutorial on how I make gifs! If you have any questions whatsoever, please do send me an ask! I’ll be glad to help! The gif I made with this tutorial is the one right here!
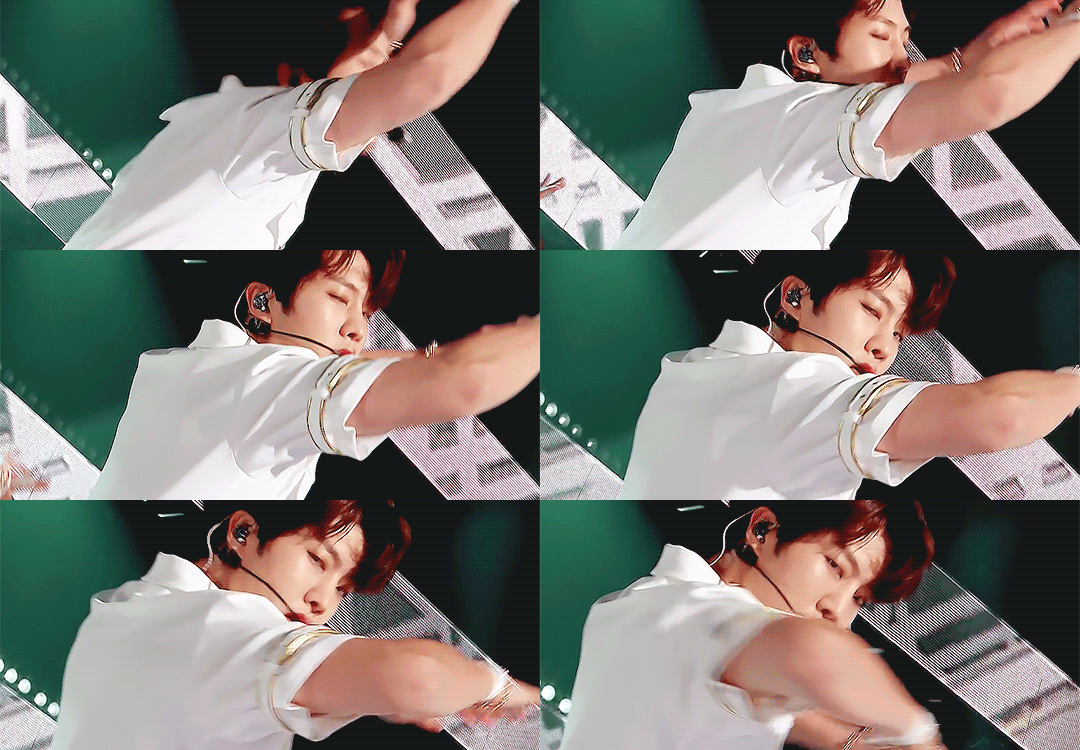
So... let’s start this tutorial with the programs I use.
Adobe Photoshop 2020 - To make the gifs, majority of the work is done in this program.
TopazLabs (Topaz DeNoise 6 and Topaz Clean 3) - To "denoise" and "clean" the gifs, as the names would suggest. Links for download: Topaz DeNoise 6 & Topaz Clean 3
KMPlayer (an alternative would be PotPlayer, or any other video playing program that allows you to capture the frames) - To capture the frames. - I use an older version of KMPlayer, though I don't know which exact version that is.
Now let’s continue onto how I use these programs to create gifs!
Step 1: After you’ve downloaded the necessary programs, download your video. The way to get the best gifs? Quality videos. That’s the first step. For K-pop performances, I recommend this website (the hq files are in .ts form, KMPlayer should be able to open these). Bookmark it! It’s really handy :) Get the video you want to make a gif from and open it in KMPlayer (or PotPlayer or any other program, but for this tutorial I’ll use KMPlayer). Open your video in said program and look for the part you want to make a gif of. Then press CTRL+G (I apologize because I cannot for the life of me remember if this was a standard shortcut or not)
Step 2: After pressing CTRL+G, you’ll be met with this screen:

I’ll briefly explain the numbered parts, but before that, these are my standard settings and just make sure you have them all the same and it should be good!
1: This is where your captured frames will be extracted to. I have them extracted to the standard folder, but you can change this if you want to. You’ll need this folder later when opening the frames!
2: Like it says, this is the image format. I use PNG in the highest quality, as the name would suggest, for the quality.
3: These are the amount of frames the program captures. Say you put in every 2 or 4 frames, you’ll get more choppy gifs. To get the smoothest gifs, put “every frame” (this in turn will increase the gif size as the amount of frames will obviously be bigger).
Once you’ve put in the correct settings and you’ve put the slider where you want the capturing process to start, press “start” (now, before you do this I recommend putting the video on mute as the audio will start to get kinda demon-y the longer you record lol save your ears pls). Then, when you’ve captured all the frames you need, pause the video, press CTRL+G again and click “stop” and close the pop-up/program.
Step 3: It’s time to open up Photoshop! Then go to File > Scripts > Load Files into Stack... (for older versions/another version I used in the past this one didn’t work and I had to use the “Load Multiple DICOM Files...” instead. It should work similarly though, if I remember correctly).
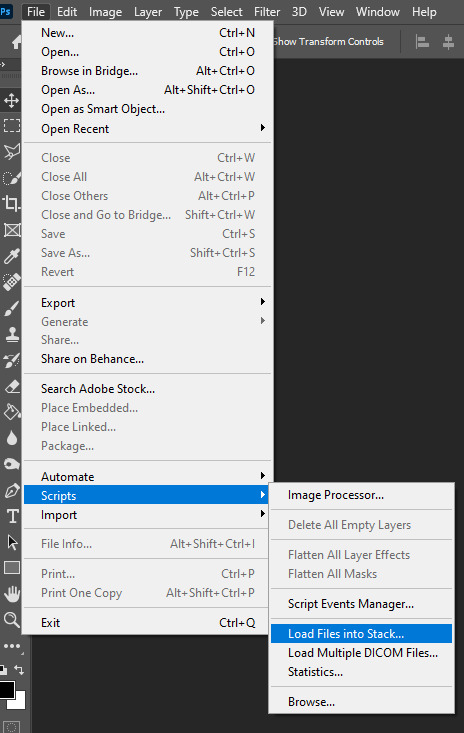
You then get a little pop-up that looks like this:
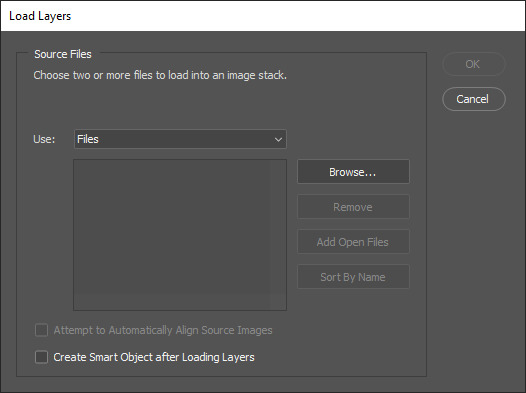
All you have to do here is click “browse” and navigate to the folder where your captured frames have been saved in. Select all the frames you need, wait for them to load in and then click “OK”!
Step 4: Depending on the amount of frames you’ve selected to load in, as well as the beefiness of your PC/laptop, the frames loading part might take a little while. Photoshop is importing every frame as a separate layer into one file, so just... grab a drink or something and wait a bit! When you’re done waiting, if you haven’t already, go to Window > Timeline. This will show you the animation timeline. For older Photoshop versions this is slightly different (I believe it’s called animation). Then click “Create Video Timeline” and click the 3 squares on the left bottom side (in older versions it’s on the right bottom side, not sure).
Step 5: After you’ve done all that, you’ll want to select all your layers. You can do this by pressing ALT+CTRL+A or going to Select > All Layers. With all the layers selected, you have to go to Layer > Arrange > Reverse. You only have to do this if you used the “Load Files into Stack” option!
Step 6: After reversing all your layers, you’ll want to go to the three lines you see in the following screenshot, and click “Make Frames From Layers”.
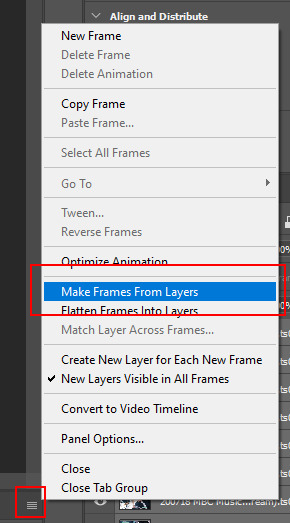
As the name suggests, this turns all the layers into frames. I don’t know why but the first frame will always be 5 seconds long, so to make it easy on yourself when you want to check your gif while editing, just put that on 0 for now. You can do that by clicking the seconds under the frame and clicking “No delay”. After this, check to see if you have the right frames and if you need to delete some (you can do this at any point in the process but I didn’t know where to put it in the tutorial oops).
Step 7: Time to crop the gif to the correct size! For this gif I’m using as an example, I’m making it specifically for Twitter, so the sizes aren’t that obvious (for Twitter I usually use a width of 850 px to keep it sharp, for long size gifs (more height than width for example), I add a background so that it eventually still becomes 850x850 pixels). There’s many posts on Tumblr about the correct sizes for gif/photosets, but a brief rundown of my most used sizes: one gif spanning the entire width of the post has to be 540 px in width. Two gifs next to one another need to have a width of 268 px. I use these dimensions the most! For others, you can Google!
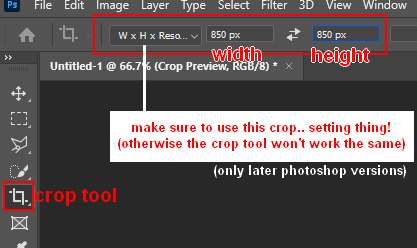
Step 8: After you’ve cropped the gif, you can do either of two things: either you first add the coloring of your choice and then sharpen the gif OR you do it the other way around. I usually switch these two around depending on how sharp the gif already looks before sharpening because I can’t stand looking at 2 pixels while coloring (lmao). For this one I’ll do the sharpening first.
The whole sharpening process is actually quite simple but you need to make sure that you do the following little steps in the right order or else it won’t work! Select all the layers (CTRL+ALT+A or Select > All Layers) and then click this little thingy:
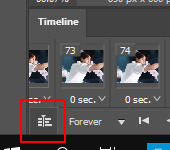
Then you’re going to Filter > Convert for Smart Filters
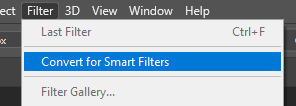
If you don’t do it in this order, your gif will end up... well, not being a gif and not moving. If that happens, track back in your history to see if you did it in the correct order! :)
Step 9: The actual sharpening process! After clicking the “Convert for Smart Filters”, you’ll want to go to Filter again and find the Topaz Labs tabs. Personally, I usually do it in the order of DeNoise first and then Clean, but this is a personal thing, really.
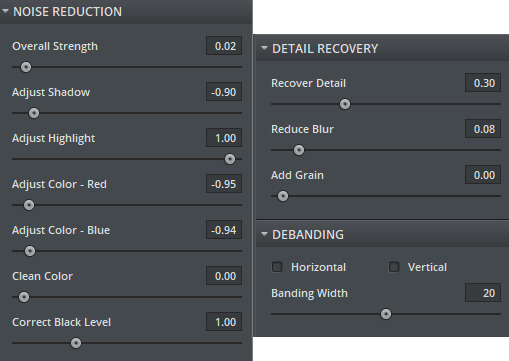
I recommend playing around with the settings to see what fits the gif but here are my go-to DeNoise settings (tip: save these as a preset so you only have to click that for faster giffing!):
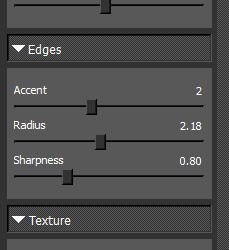
And my Clean settings:
Press OK when you’re done with these and then go to Filter > Sharpen > Smart Sharpen. These are my SS settings (just copy these, and again, save as a preset!):
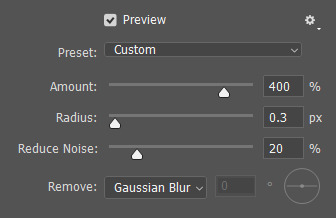
Depending on how sharp you want the gif to be, you can input the same settings or go to this in the layers and change the percentage.

Now that we’re done with these... it’s time to flatten it! Just follow these little steps:
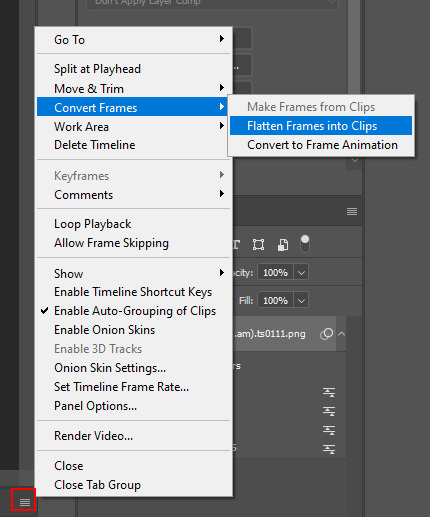
And then you wait. Again. I know.
Step 10: After playing the waiting game, you’ll click the three little squares again and do the same thing you did earlier: “Make Frames Into Layers”. Delete the first frame. Add a coloring of your choice (can be a PSD, can be your own coloring, etc. this is honestly just... playing around with things and see what it can do). After you’ve done coloring, select all your frames (same lines as previous screenshot except now you’ll see a “Select All Frames” option, click it!) and change the time to whatever you like (I usually go for 0.05, 0.06, or 0.07. Again, just play around with this!! Try different things!)
Step 11: Final step! Saving :) I use shortcuts a lot to make things faster so either press ALT+SHIFT+CTRL+S or go to File > Export > Save For Web. Not much to do here, just copy the following settings and save the file!
!!! NOTE: After making a new gif today I realized there’s a weird dotted border on the top of my gifs, it’s a bit difficult to explain but I had no idea what it was. Turns out that the reason why this showed up was because, as shown in the screenshot below, I had “Transparency” selected. If you’re experiencing this too, UNSELECT the transparency and it should be all good!
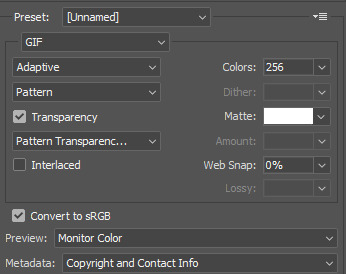
Also make sure that the “Looping Options” is set to Forever, or else your gif will play only once and then stop!
Tip: While making gifs for Twitter I at one point noticed that if I added in a white background, no matter what I’d do, it’d show up as yellow-y in the preview box. After googling I found that going to the options (1 in the screenshot) and then clicking “Sort by Luminance”, then double-clicking the lightest color (not the transparent one, 2 in the screenshot) and selecting white (or FFF) will get rid of this! This likely won’t be that useful for Tumblr gifs but just in case you ever want to have a white background...!
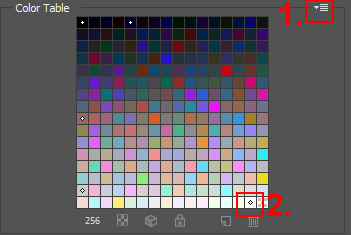
Then just... save, and upload to Tumblr! :)
Final note: Tumblr has a mix gif size of 3MB. If you have a gifset of 4 gifs you want to upload, all 4 gifs can be max 3MB each. Keep this in mind! If you’re over 3MB, delete a few frames and try again, or resize/crop your gif!
As it turns out, Tumblr has increased their gif size to 8MB, however, the quality tends to get compressed with larger gifs like that so per recommendation: keep them below 5MB! (thank you @yeoli for letting me know!)
I hope this helped! If you have any questions, feel free to send me a message and I’ll try my best to answer them.
75 notes
·
View notes
Note
Hi! Can I ask how you make your gifsets? (program, process)? Hope you have an amazing day, your Daisy gifs are gorgeous btw ❤️💔
hello!! hope you also have a great day, and thank you!! and sorry this took a little longer to put together than i thought it would!!
i'll try to explain my process as best i can, and hopefully it makes sense.
program(s)
first, i use photoshop 2021 to make gifs, and i use mplayer osx extended for screencaps. also, i try to avoid using clips from YouTube because the quality usually isn't as good, but if I do have to use that I use 4k video downloader
process
first, first thing you need is the clip that you want to make gif from. the easiest way to find this (in my opinion) is just to search "[...] scene pack" or "[...] mega link." I usually try to make sure the clips i use are 1080p because anything less than that is lower in quality and the gifs aren't as sharp.
second, i open the clip in mplayer to get the screencaps ill use to make the gif. i do this by pausing the video right before the part i want to gif, then pressing and holding command+shift+s (for mac) until ive got the full scene. if you want, you can create a folder on your desktop for screencaps, but I usually just leave them there and delete them once im done.
the next step is when i actually open photoshop. to start, go to file>script>load files into stack
this is where you're going to load in the screencaps you just took. go to browse, then select the first screencap and hold down shift until you select the last screencap, then hit ok
after that i usually crop my gifs. in general, i use 540px x 400px, but that changes based on what exactly im giffing. the way i crop gifs is by clicking the crop icon on the left side, then, above the workspace, selecting W x H x Resolution > 540 px x 400 px > px/in
the next parts so the most complicated part to explain so im gonna use a picture for reference
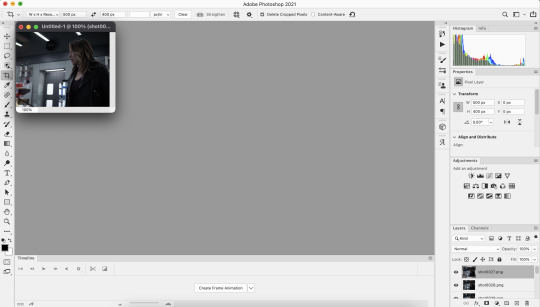
click create frame animation

next, go to the three horizontal lines across from the word “timeline” at the bottom. once that menu opens, click “make frames from layers” at this point the gif is backwards, so you’ll want to go back to that same menu and click “reverse frames.”
now that your gif’s frames in the correct order, you can set frame delay. select all the frames in the timeline, then right click so get a box that looks like this:

i almost always set frame delay to .05, but if i have less than ~20 frames ill set it to 0.06
next, click the symbol in the bottom left corner (you can see it in the photo above) to convert the frames to a video timeline
after this, on the bottom right side, select each layer of the gif under the “layers” tab. right click, then select “convert to smart object.” this will allow you to sharpen your gifs. to do that, at the top of the screen go to filter>sharpen>smart sharpen. the settings i use are 500% at 0.4px, then i sharpen again 10% at 10px
here's the gif before sharpening:
sharpened 500% at 0.4px:
sharpened 500% at 0.4px then 10% at 10px
coloring
once this parts done you can start coloring your gifs/adding adjustment layers. the main ones I typically use, in order, are curves, brightness, levels, selective color, and vibrance. the first three adjust the lighting of the gif and the last two adjust the color. other layers i use are saturation, color balance, and photo filter, which all adjust color.
to add adjustment layers, you can either 1. go to layer>add adjustment layer>select the layer type 2. pick a layer type from the icons on the right side (above the layer list)
honestly, the easiest way to do this part is to just select “auto” and photoshop will automatically adjust curves, brightness, and levels, but i usually slightly tweak it from here until im happy with it.
curves: use the white dropper to select the lightest part of the gif and the black dropper to select the darkest part. you can manually adjust the curve within the little graph too, but typically you don't need to (i only do when the actual scene the gifs from has a tint i don't like, ex. if its really green ill go to the dropbar, go to green, then adjust it until ive mostly neutralized it)
brightness/contrast: brightening too much will sometimes decrease the quality, where increasing the contrast will sometimes help increase the quality
levels: honestly you can almost always get away with not using this unless the lighting in a scene is really bad/weird. use auto then adjust as needed
this is what the gif looks like after adding adjustment layers: curves: input 85, output 92 brightness: brightness 19, contrast-32 levels: 0,1.11,255

now you can get to actually playing around with colors!
the first thing i do is add a layer of selective color, go to black, then increase black. this is one of the last ways to increase quality slightly, as it can make the gifs look a little sharper.
next i add vibrance. typically, unless the scene itself is already pretty colorful, ill increase vibrance almost fully, and slightly increase saturation. the issue with increasing saturation too much, especially when your giffing people, is the colors start to look really unnatural
for this particular gif, i added a hue/saturation layer, then decreased red and increase blue and cyan, because there was a lot of both of those colors in the background and i wanted it to stand out more. i then added another selective color layer and increased cyan for both blue and cyan.
these are the specific adjustments i made: selective color: black>black +9% vibrance: vibrance +76, saturation +10 hue/saturation: red -15 selective color: blue>cyan +75%, cyan>cyan 49% hue/saturation: blue +4, cyan +5
saving
once you're done coloring, you can save your gif. to do this, go to file>export>save for web (legacy)
these are the save settings i use:
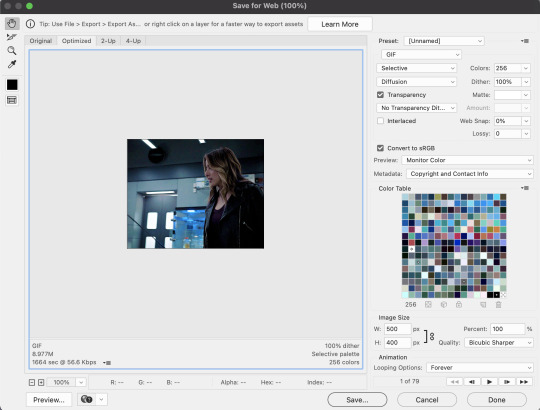
also, the gif size limit for tumblr is 10M, so make sure your gifs are all under that size. if they're too big, you can either adjust the image size on the save page (or while making the gif) or shorten the gif
and here's the final product!
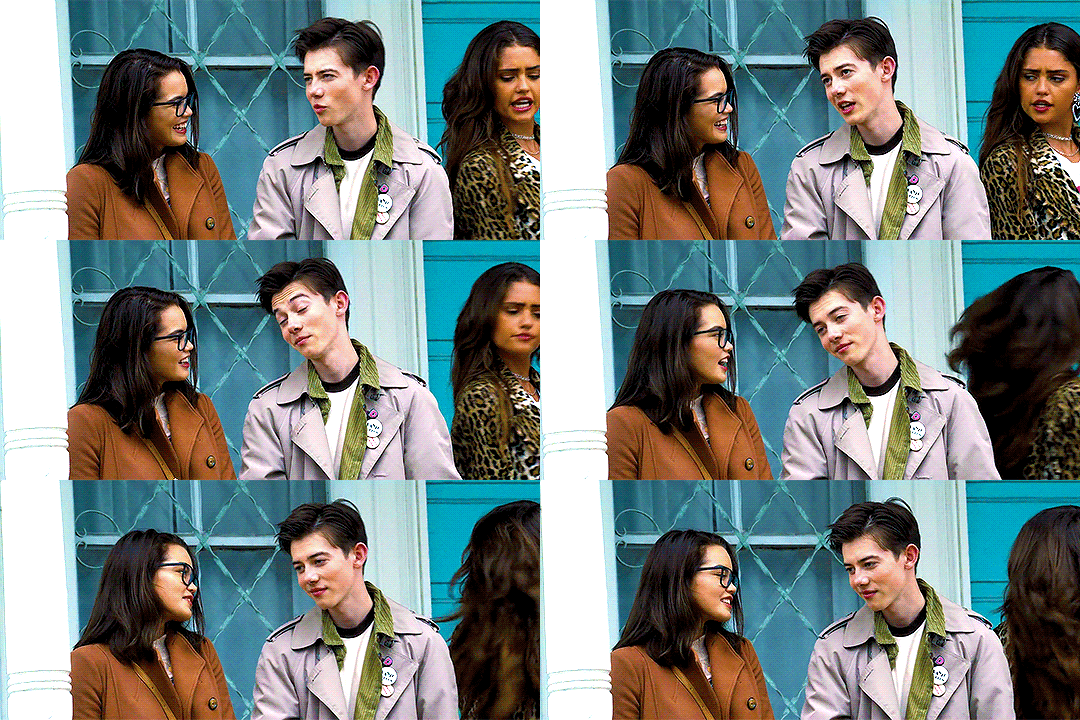
i hope this was helpful :)
5 notes
·
View notes
Note
How do you make a gif?
What a fantastic question.
This will be a full-blown tutorial, and I’m going to do my best to keep this as beginner-friendly as possible, but if anyone has any questions, feel free to ask via inbox or DMs or whichever way suits you.
You will need Photoshop to be able to follow this tutorial. I will be using this particular gif as an example:
The rest of the tutorial is under the cut.
Step 1. Download
First we download the video we’re going to gif. It always has to be in HD quality, preferably 1080, but sometimes 720 can work too, but no less. Gifs will not look good if the video you’re giffing is in bad quality.
The idea is to use torrent as little as possible because of the consequences, so, depending on what I want to gif, my method of download will vary. If it’s a relatively recent and well-known movie/tv show, then I usually check out this website for movies, and this one for tv shows.
If it’s something more obscure than that - say an old movie - you’ll have to use torrent, unfortunately.
For youtube videos, I use this app.
Step 2. Screencaps
Now that you’ve downloaded your video, you’ll need to make screencaps. The app I use is MPlayer OSX Extended - it works only for Mac. For both Mac and Windows, you can use MPEG Streamclip, but I prefer the former because it can be used for any format, whereas MPEG Streamclip only works with mp4.
I actually don’t have MPEG Streamclip anymore, so this tutorial will only show how I personally make screencaps, so with MPlayer.
The steps are simple:
Open the video
Find the scene you want to capture
Pause the video
Hold ‘command + shift + S’ until the scene ends
Make sure you choose a folder in which you want your screencaps to save (before you start capturing). To do this, while your video is open, go:
Mplayer OSX Extended > Preferences

This window will open:
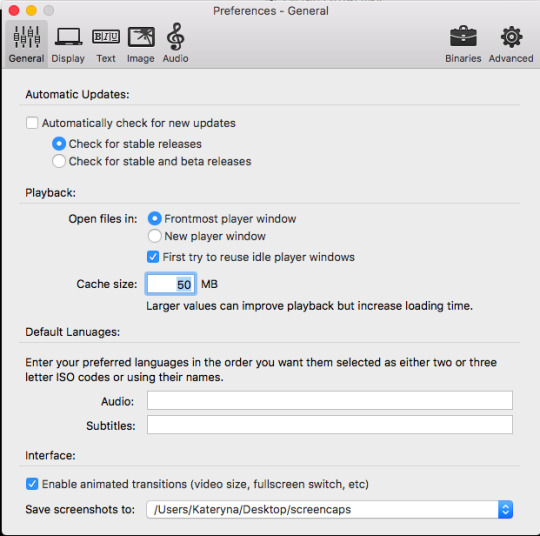
At the bottom, where it says “Save screenshots to”, you can choose your location.
Step 3. Importing Screencaps
Once the screencaps are done, we open Photoshop and go: File > Scripts > Load Files into Stack

Next it’ll open a browsing window, and you find the folder in which you saved your screencaps. At this stage I like to make sure I only upload the shots that will be on my gif, leaving out the extra ones I may have captured (like the beginning of the next scene, for example).
Use Shift to choose a lot of shots at the same time:
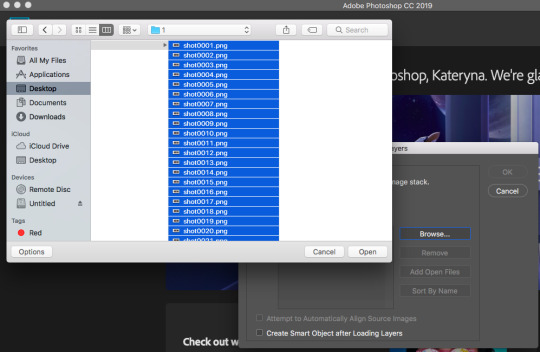
Then click OK.
While they’re uploading to photoshop, make sure you don’t click anywhere until the process is finished because otherwise it might not upload all the shots.
Step 4. Editing
Once your screenshots are in, the first thing you need to do is decide on the size of the gif. There are specific sizes which tumblr supports so that your gifs don’t appear blurred. I’m going to make a list of all possible combinations that I know. This will go from largest possible size a gif can be to the smallest and will show how it will look in gifsets (all the gifsets will be mine, sometimes from sideblogs).
Any number of gifs, one in a row:
540x540 (example)
540x450 (example)
540x320 (example)
540x240 (example)
An even number of gifs, two gifs in a row, side by side:
268x404 (example)
268x350 (example)
268x300 (example)
268x268 (example)
268x220 (example)
268x192 (example)
268x150 (example)
9 gifs:
177x177 for side gifs and 178x177 for the middle gif in each row (example)
In this case, I will be making a standard 540x240 gif.
First we resize the image. Because these are caps from a movie and not a TV show (resolutions are different for TV), the cap is wide but short, that means that I change the size of the image by height. To do this:
Image > Image Size

This window opens:

Where it says “height”, we type in 240 and click OK.
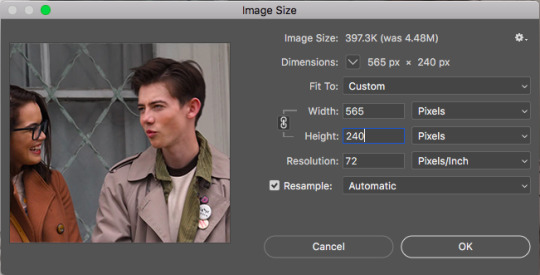
Then we zoom in to a 100%.
Next, we make sure the timeline is open. To do this:
Window > Timeline

Once that’s done, down at the timeline, we click “Create Frame Animation”:
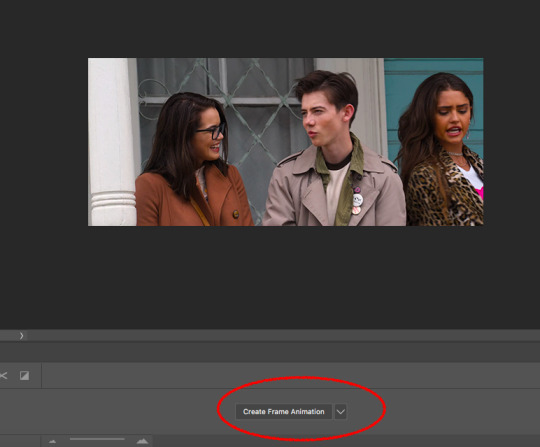
At the right of the timeline, right under the layers, we click on this little thing:
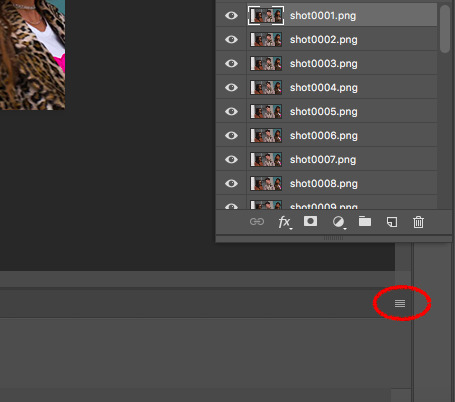
And choose “Make Frames from Layers”

The frames will now be in reversed order because that’s how the layers always upload, so we click on that little four lines thing in the upper right corner of the timeline again and choose “Reverse Frames”:

And now is the time to have a look at your frames and see if you need to delete any. Make sure that if you delete a frame, you delete a corresponding layer as well. The gif will have to be under 3mb for tumblr to display it correctly, so make sure there aren’t too many frames. But this isn’t a huge issue because once you’ve saved the ready gif, you can always reopen it and delete some frames.
In this case I have 36 frames, and I’m going to take it down to 34 just to be safe. This is what the gif looks like at this stage:

Once that’s done, the next step is to set the delay. Every giffer does this according to their personal preferences, but I personally do this. If your gif doesn’t involve any talking - so you won’t be adding text, then set the delay to 0.07. If it involves adding text later, don’t touch the delay at all at the moment, it’ll have to be done later.
Because this gif doesn’t involve adding any text, I’m setting the delay to 0.07. Again, hold Shift to choose all the frames.


The slowed down gif looks like this:
Now it’s time to crop! Choose the cropping tool and type 540x240 where it says “ratio”:
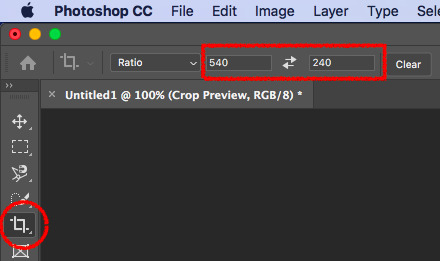
Choose the crop positioning to your liking and press enter.
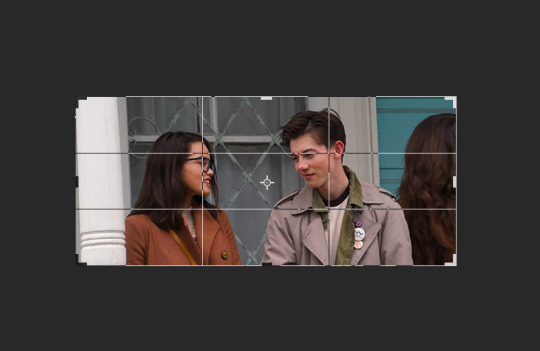
The gif at the moment:

Now we do last preparations before colouring. For this, click at the little four lines again:

And choose “Convert to Video Timeline”.
Then choose all the layers and go Filter > Convert for Smart Filters.

Then go Filter > Sharpen > Smart Sharpen:

Which will open the window for smart sharpening, and here are my settings:
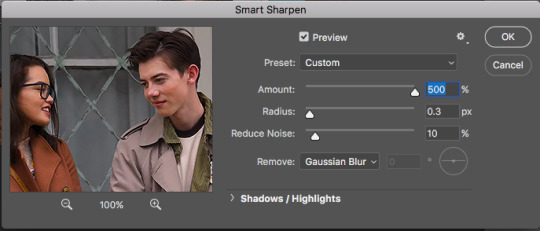
This is another one of those things that is down to each giffer, but what I usually do is, if it’s a really small gif, like 268x150 for example, I set radius to 0.2. If it’s a huge close up to a person’s face or a really big gif, like 540x540, I set the radius to 0.4. For all other gifs I always keep it on 0.3.
Then click OK.
Next, go Filter > Noise > Add Noise. Here are my settings for this:

Then, move the noise layer under the sharpening layer (I don’t know if this changes anything, but I always do it this way lol):
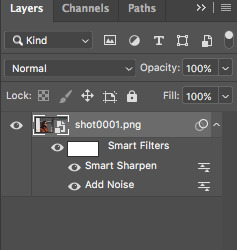
The gif ends up looking like this:

Now the editing is done, and it’s time to colour!
Step 5. Colouring
This is by far the hardest thing a giffer has to do, so if you don’t immediately get the hang of it, don’t be upset. You’ll learn eventually. I’m still learning, personally.
Again, all of this is very much down to each giffer, but here’s the way I do it.
Press the little “fill layer” button and choose Curves:

So the way I use curves is to even out the entire shot’s colouring. So if the scene is too red or too green or too blue or too yellow, it gets rid of the excess of that colouring and brings it down to normal. Can help so much in some cases.
What you do is choose the middle pipette in the window, which is to sample image to set grey point.

There’s also the option to set white point (bottom pipette) or black point (top pipette), but I don’t use those because it screws with your lighting too much.
To choose a point, I usually use the person’s eyebrows or hair. Sounds ridiculous, but it does work. In this case clicking on Dunkleman’s eyebrow makes the image too green:

So what I do instead is click on his hair, where it’s reddish brown, somewhere here.

This makes the image noticeably less red compared to the original:

But also, it made the image less vibrant, so we’re fixing that next. Fill layer > Vibrance:
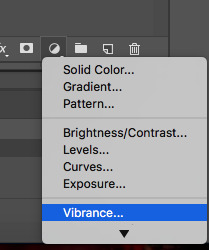
And then I set Vibrance to 100, always. If the image is still not vibrant enough for my liking, I set saturation (in the same window) to 10 or 25 in some cases. And for this gif, I will set saturation to 10.
Here’s how the image ends up looking (just make sure it doesn’t make their faces ridiculously red or something, but if there’s some excess of colour, don’t worry):
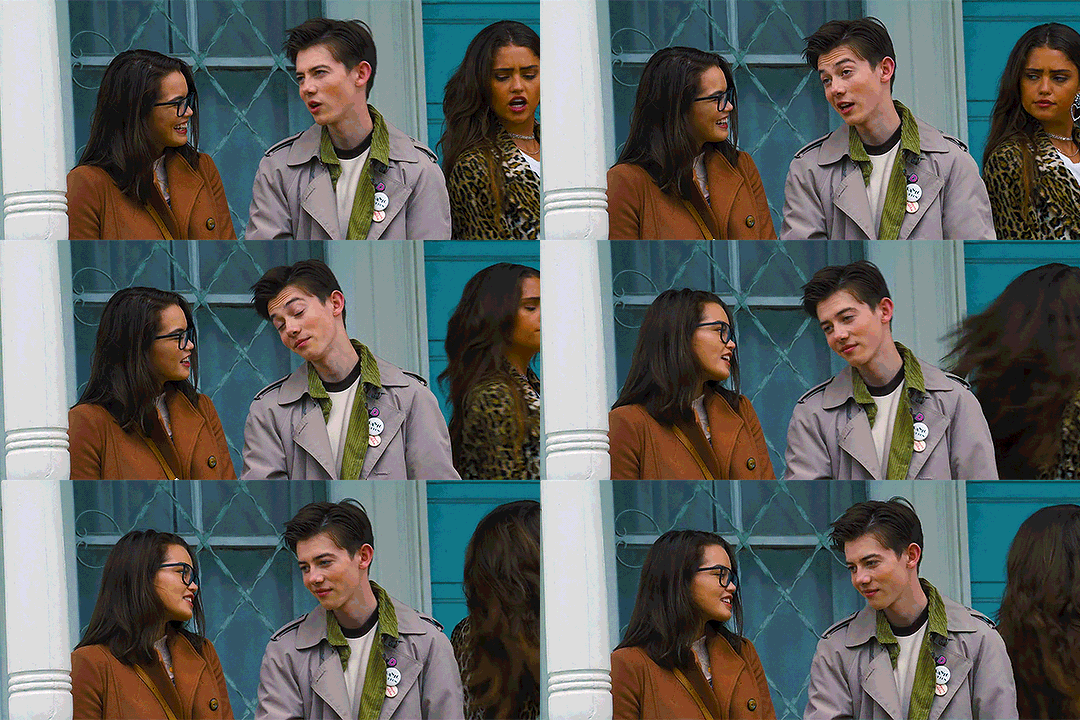
Now go Fill layer > Exposure.

Here are my settings for this gif:
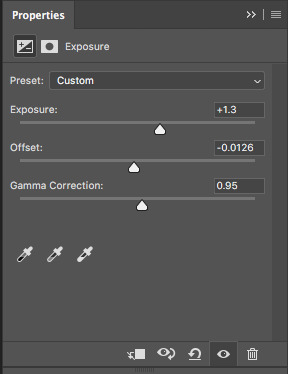
With exposure, it’s just a matter of keeping that balance between lightening it as much as possible but without their faces or bodies looking as bright as a christmas tree, and then adding offset and gamma correction to return normalcy to the picture.
Here’s what the image looks like now:

It’s obvious right now that their faces are a little too red and too yellow, so we’re going to fix that. Go Fill Layer > Selective Colour:
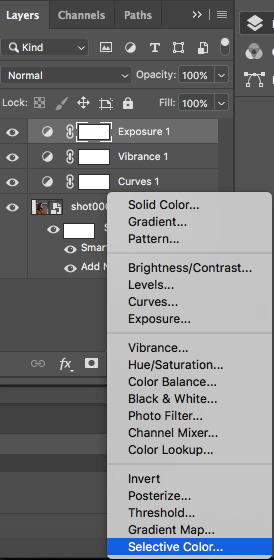
The task here is to make their faces appear as if they’re stood in normal daylight with no other filters. So as close to normal skin colour as possible. Be careful when giffing people of colour so that you don’t whitewash them.
In this case, I’m adding cyan in reds:

And taking down yellow in yellows:
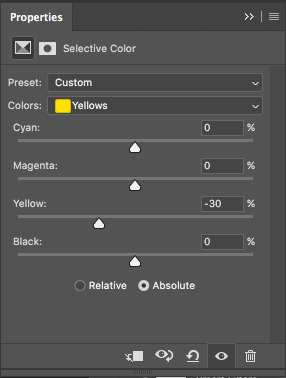
And here’s what the image ends up looking like:
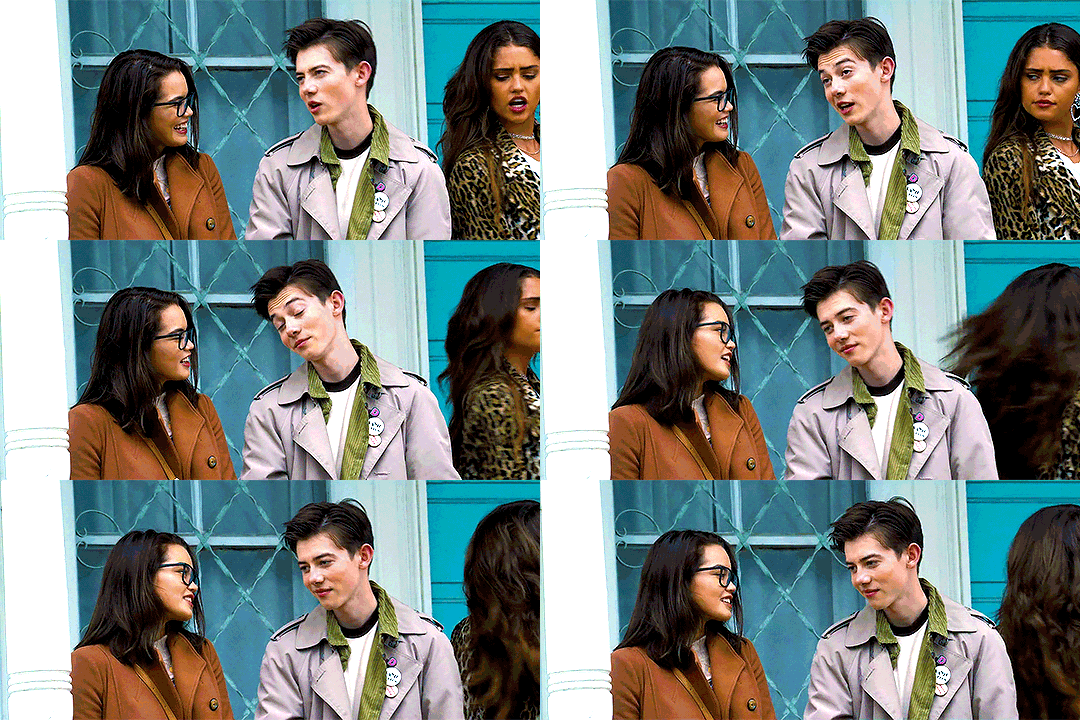
I’m quite satisfied with this result, so I’m going to leave it how it is, but sometimes I will tweak things more and use colour balance and other things.
Step 6. Add Text
Make sure you group your colouring layers at this point and then add your text as the top layer.
Step 7. Save the gif
To save a gif moving, you go File > Export > Save for Web:
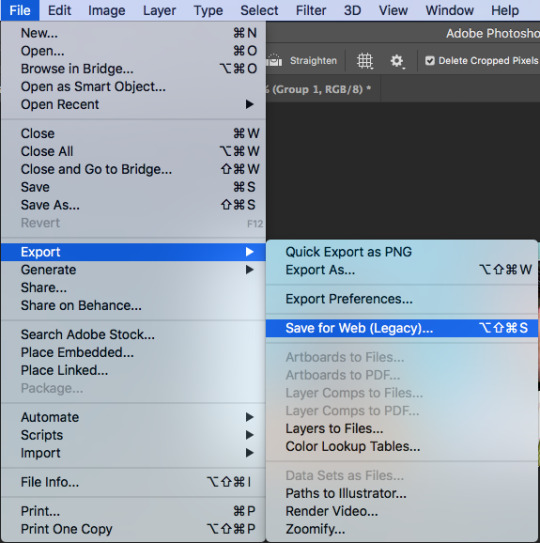
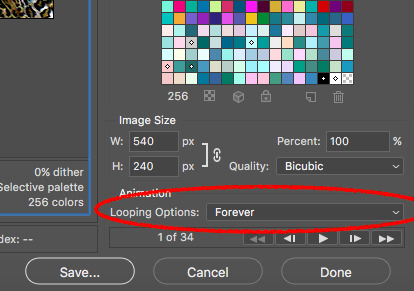
This window opens up, and make sure that in the bottom right corner, where it says “looping options”, it’s set to “forever”:
As the last step, I add dither because it evens out the edited colours in the background. I tend to use “pattern”:

Then we press “save” and our gif is done!

Step 9. Reopen
If you added text to the gif and followed my advice, you wouldn’t have touched the delay back at the beginning. This is because converting to video timeline kicks the delay either into 0.03 (too fast) or into 0.07 (too slow for speaking gifs). So you have to reopen the gif now and set the delay to 0.06 (that’s the speed I like for my gifs where someone’s talking on them).
This is also a good time to delete some frames if your gif is 3mb or over. Remember it won’t move if it’s not under 3mb!
Hope all of this makes sense, and let me know if you have any questions!
146 notes
·
View notes
Text
ashlee’s gif making tutorial
@amysperalta has requested a gif making tutorial from me and i’m happy to oblige! everyone has a different way to gif and some ways don’t work for some people, so this is just how i personally make them. i’ve also never made a tutorial before, so let’s hope this doesn’t end badly.
this is the gif i’ll be making for the purposes of this tutorial:
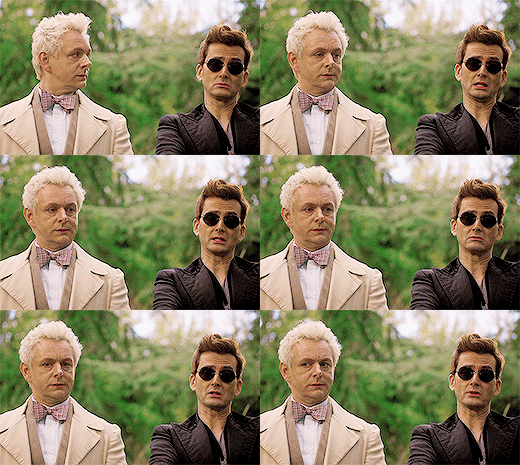
things you’ll need:
a version of photoshop
some way to get frames from a video file (i’ll give some options)
patience
step 1: getting your frames
there are many, many ways to do this. there are multiple different programs to do this with (kmplayer, uplayer, gom player) but i personally use mpv (via @kylos lovely tutorial here; which i also highly recommend as a gif tutorial since it gives a different way to create a gif file) because my mac doesn’t accept any other type of program.
note: BE SURE THAT WITH ANY PROGRAM YOU USE, IT IS SET TO SAVE EVERY FRAME. some people may lie to you and say a program grabbing every other or every third frame is fine, but it’s 2019 and we don’t do that any more. the tumblr gif limit is 3mb, which means we can have smooth, non-choppy gifs by gathering every frame from a scene.
okay, so i gather my frames, and typically keep them in a folder, separating scenes cut-by-cut so it’s easier to handle. for example:
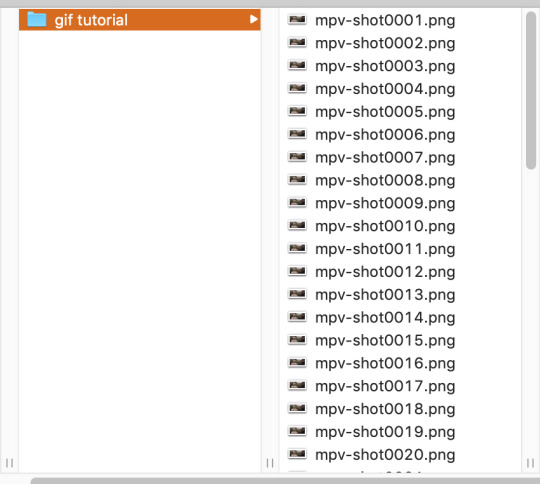
from there, i import them into photoshop using: File --> Scripts --> Load Files into Stack; this screen pops up, in which you browse for your frames hit OK. this will automatically upload all the frames into the same file for you. be patient! depending on how many frames you choose, it can take a few minutes to upload all of the frames.
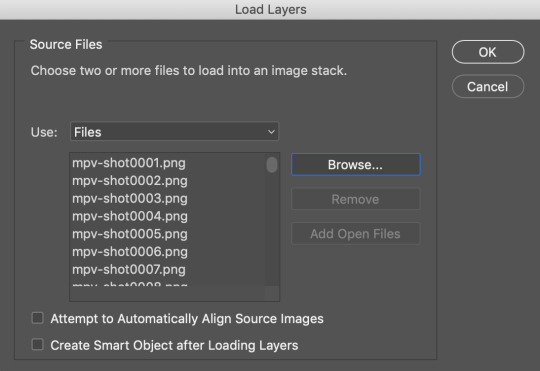
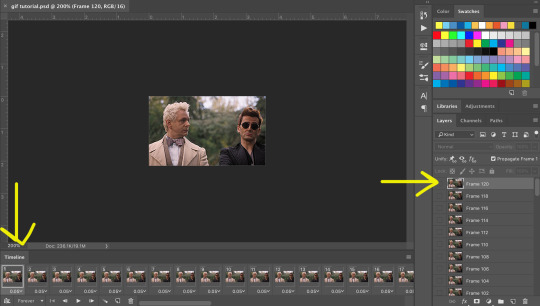
i always save my work after every step. so once frames are uploaded i save the file. be sure to have “timeline” (or “animation” on some versions of photoshop) opened in your view. my photoshop looks like this when i open the file:

now, i’m going to click “Create Frame Animation” at the bottom. This will give me a timeline to work with at the bottom. Next step, go to the three little lines on the right side of the thingy that says “Timeline” and go through these steps:

and then

now, you have a working gif! you can hit the little play button at the bottom left of the screen and it should play for you.
step two: cropping and sharpening
there is plenty you can do for sizes on tumblr. the general widths are 540px (big), 268px (normal) and 177/178px (small). it’s all a matter of the type of set you’re making. also be aware that the gif limit is 3mb. the bigger the gif, the fewer frames you can have. most of my 540px gifs have between 20-35 frames, while some of my 268px frames can have 75-90 depending on the coloring of the scene.
but for the purpose of this tutorial, i’m making one 268x160. i go to the crop key at the left side, and set my ration up top to 268 and 160.

then i crop the gif! (note: sometimes, files will have a black line on one side of a video file; typically the bottom or on one side. the black line will be no more than 2px big and sometimes hard to see until you’ve cropped it. be sure to drag the cropped area away from the edge of the files that have this dark line, as it when appears on the final gif and looks bad. one of my more recent sanditon gifsets fell to this and i didn’t realize until i had posted it. 😖)
now we have to size it. you do do this by going to Image --> Image Size or using the keyboard shortcut. it should automatically keep the aspect ratio, thus when you change width to 268, the height should change to 160 automatically.

hit OK and now you have your base gif!
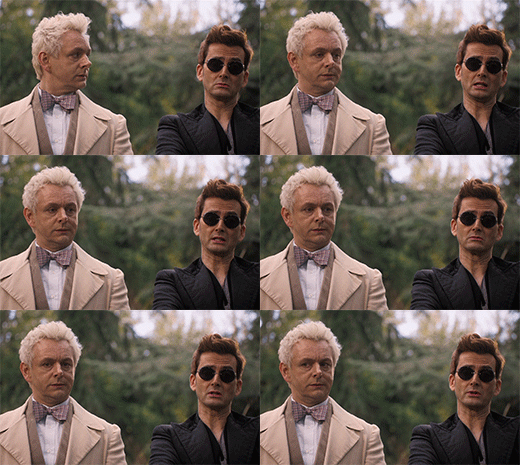
next, we’ll be sharpening and setting the frame rate, two very important things. to sharpen a gif, there is no way you want to go do it frame by frame, so you can use an action! these are really helpful. i have one i use for most gifs, and one i use for lesser quality. the one i use for this gif is this one here. to use this, you’ll have your photoshop open, you can go to your actions in your barthingy on the right by color swatches which should look like this:
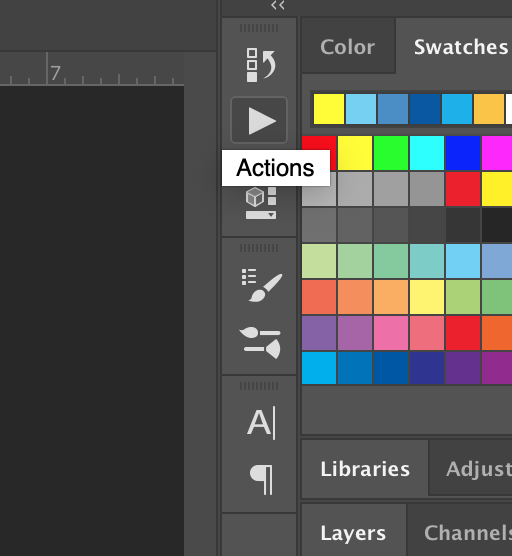
click that and find the three grey lines at the top right. click them and this will pop up. you’ll go to “load actions” and then browse for the action you downloaded.

once loaded, it will show up like this and have a nifty play button!
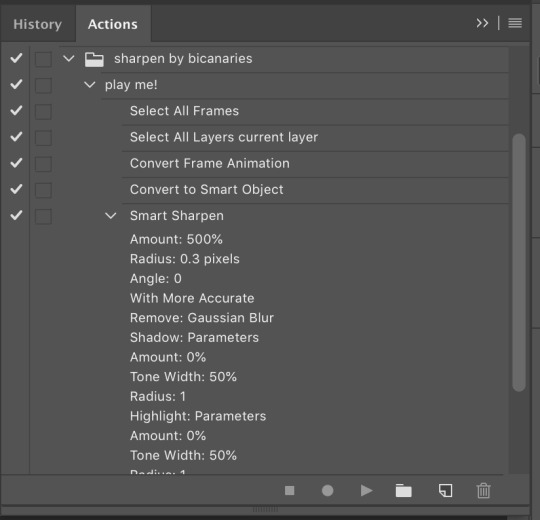
make sure you click on/highlight the “play me!” line and then hit the play button on the bottom of the box. it will go through the motions for you and sharpen your gif. once that’s done, you can hit the big action button to close this box to get it out of the way. now, to set a frame rate, you’ll go down to the timeline and highlight all of the frames and then click while holding shift and this will pop up.
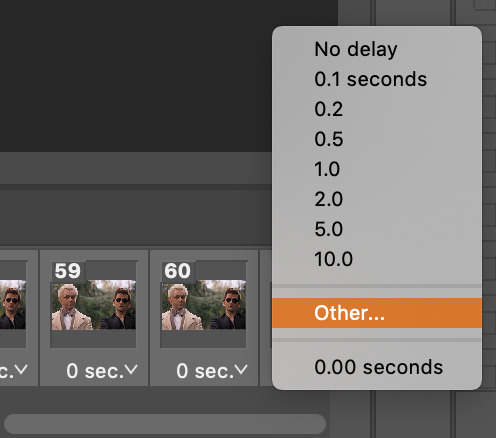
you’ll select “other” and type in “.05″. this is the most commonly used frame rate. most movies and tv shows will look fine using this for scenes, especially ones with subtitles, etc. for more artistic scenes, sometimes i’ll use “.06″ to slow it down just a hair. also make sure that your gifs are set the loop “forever”.
and there you go! a gif fully sharpened and moving at the proper speed:
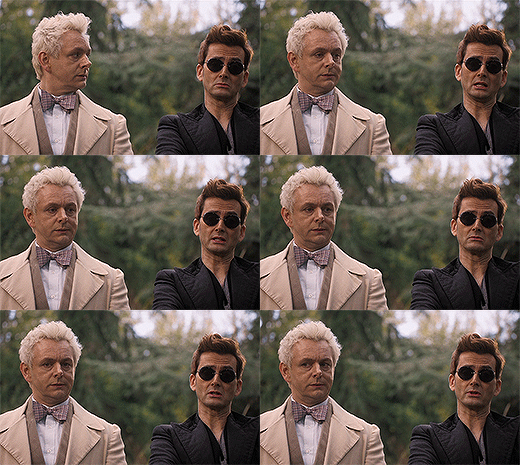
this is also the time you can choose your frames. meaning if you uploaded like 200 frames and only wanted to use 50 of them, you can go through and delete them in the timeline. there’s a little trashcan button there.
note: once you’ve sharpened and set your frame ratio, be sure to go into your levels box and click the top frame. it is also useful to have the first frame in the timeline always highlighted as you’re editing the rest of the gif.
step three: coloring
there are endless ways to color. there’s loads of people offering psd colorings. (psd means an editable photoshop file btw) you can also make your own. i have a whole slew of psds i’ve made for certain scenes that i’ve kept and reuse, tweaking each time. this isn’t a coloring tutorial, but i’ll show you a quick way to make a simple coloring. (i purposely chose a well lit scene for this gif tutorial for this reason. making dark scenes look good, or scenes with bad color balance is a whole other tutorial lol)
first off, make a folder above your frames. you can name it whatever you want; it will automatically call itself “group 1″. this is where you’ll be putting all of your coloring layers so they stay together and you can also save it to use again.
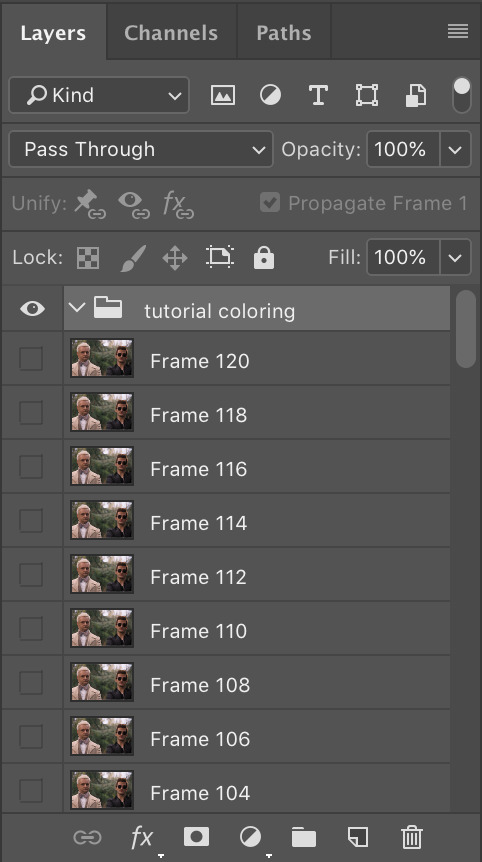
from here on out, we’ll be adding layers, using the half black/half white circle down at the bottom; just click on it and it’ll pull up a list of things you can use. note that when you add coloring layers, you start at the bottom and add other layers on top of it.
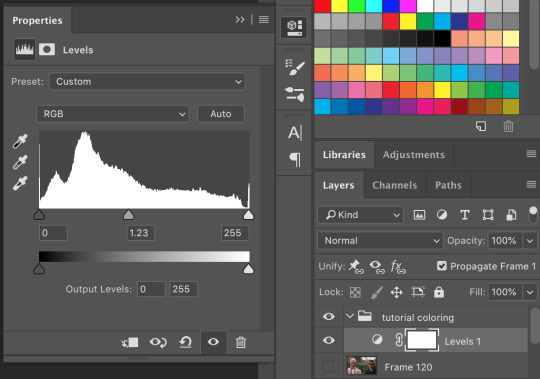
always start with “levels”. i lighten up almost every scene i gif, since it gives me the chance to play with contrast on my own terms.
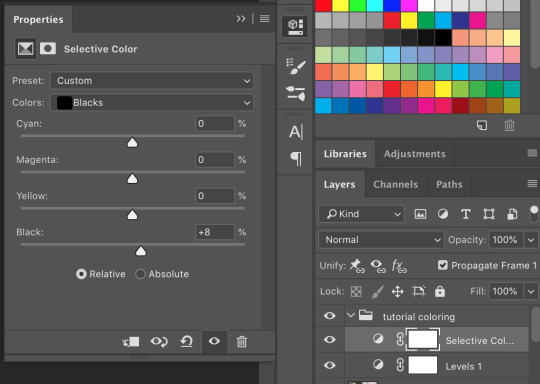
then we’ll do a “selective color”; this one is just to set some blacks while giving contrast. be sure to select “blacks” at the top and change just what’s below:
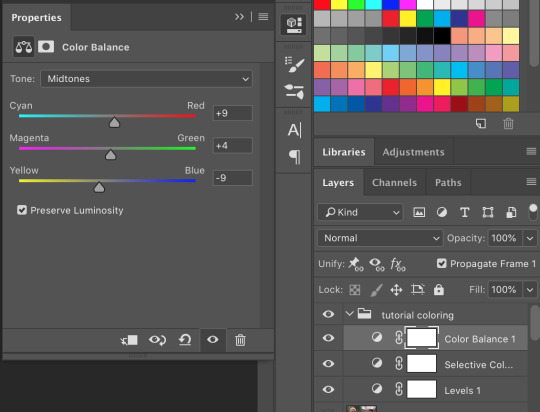
most gifs also need some “color correction” at this point. (this is a layer you’ll keep coming back to to tweak as you add more above it fyi.) for this one, i’ll make it a bit more green and red.
the gif right now looks like this....which isn’t perfect, but i can see where it will get to from here:

now we’ll add a layer of 100% “vibrance”

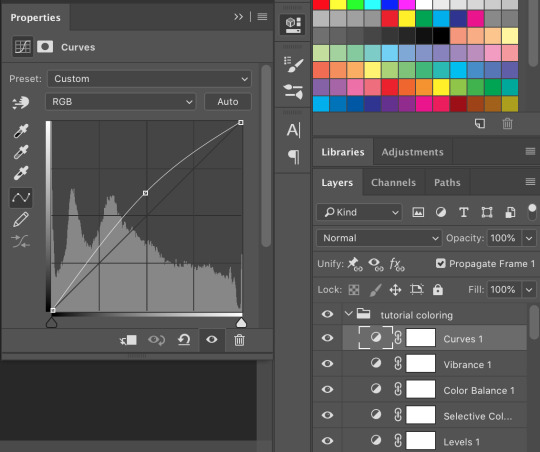
not every gif needs 100% vibrance, but i tend to like how colors look when i use it and we can fix any weird colored skin in later steps. and now some curves for contrast:
the gif now looks like this:
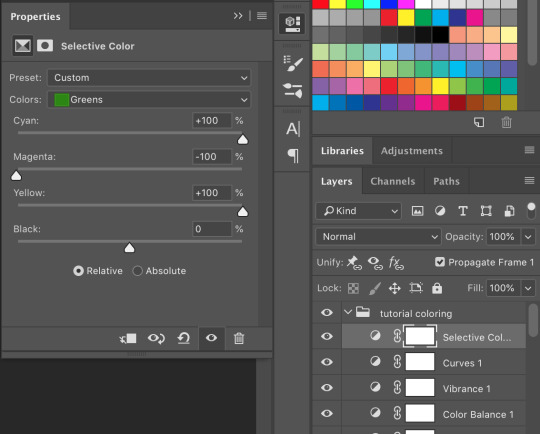
which is much too yellow certainly, but gifs always look worse before they look better when it comes to coloring! next, we’ll make another layer of “selective colors”. this is when you’ll play with each color within the same selective color layer. i’m guessing i’ll utilize more blues and less yellows under “yellow” and “red” but let’s see what happens:


now it looks like this!

which is a lot better. i’ll probably up the blacks +10 (using the same selective color layer) just a bit so crowley can be his angsty self entirely. i also want to up the greens because i love bright gifs.
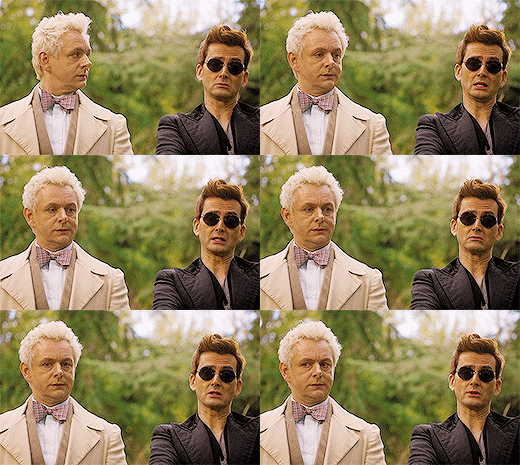
the great thing about selective colors is that they’re easy to manipulate. and you can even have multiple of them over one another to really zero in on one color. and if you find that you can’t get the gif to look right at all, you can also return to your color balance layer and tweak it until it looks better and is easier to manage.
so now, my finished gif looks like this:

(this is not the most exciting gif ever, but it works to show how to play with colors in a well lit scene).
there is a number of other things i do/can be done in making gifs, but these are the basics.
be sure to go to File --> Export --> Save for Web and follow my settings to save your gif. (there are many ways to save a gif, and each gif tutorial will give you different settings. i recommend trying them out and see which works best for you.) pay attention to the “bicubic” quality at the bottom. and when your gif is small enough (under 3mb), be sure to click on the “original” tab at the top and save it while on that screen.


and, because i’m feeling nice, let’s have a quick subtitles moment:
bonus step 4: subtitles
i know there are easier ways to make subtitles but this is how i do mine. using the ruler around your photoshop space, drag one vertical line over your gif. the program should automatically “snap” them to the middle of the gif to create your perfect center.

then take the text tool and write something in it, no matter where or what size, just so you have something to manipulate. you’ll find that it too will snap to the center to match the ruler line, giving you a centered text box! you can have it whatever distance you want from the bottom (don’t go too close or tumblr will cut it off) and then you can edit the text color/font/etc. these are my settings.

and i also have an added stroke and drop shadow to it which you can get to from Layer --> Layer Style:

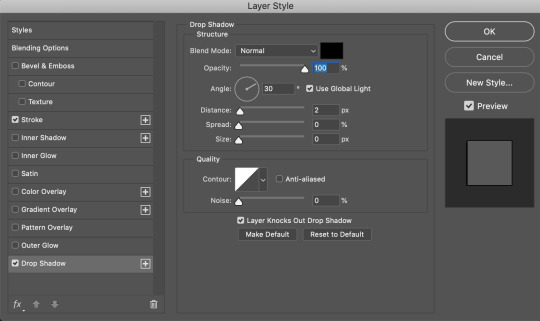
and so it looks like this:
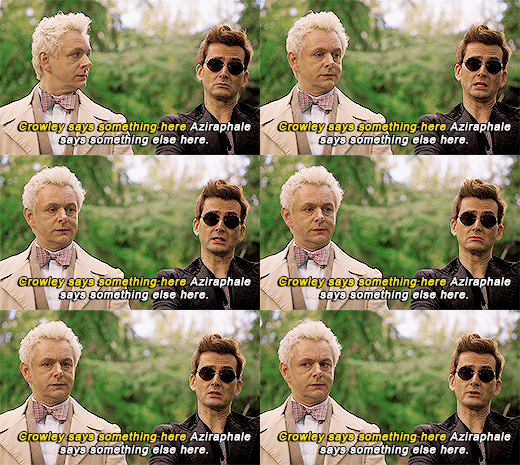
it is important to add your text layer ABOVE your coloring folder, otherwise the coloring will affect the text. and it’s good to have different colors for different people talking.
i hope that all made sense! feel free to send me any questions (i’m sure i must have made you confused or missed a step or something), or if you have any other tutorials you’d like to request.
#gif tutorial#photoshop tutorial#photoshop#itsphotoshop#tutorial#my tutorial#thanks for requesting this!#it's very long but i hope it helps
68 notes
·
View notes
Note
How do you make your gifs grainy but not pixelated? 😱
Honestly, it’s a byproduct of the way I edit coloured gifs, especially if the existing footage has dark lighting conditions! At some point I do actually want to learn alternative ways of editing that don’t involve creating as much grain because I’d rather my gifs be smoother, to be honest (if any editing folks see this, and can point me to tutorials, I would be super grateful! I use a different method for grayscale gifs that don’t produce as much grain so alternatives must exist.)
Aside from that I have just realized that the main editing monitor I use is not properly calibrated and a tad desaturated so I’ve been over-zealously brightening/vibrant-ing up my gifs. Whoops. Probably adds to the grain and makes some of my gifs look really oddly balanced.
But for now here’s a quick static overview of my process that ends up creating grain, if knowing how it comes to be assists in whatever way: (under the cut because there are images making the post a long’un)
(full disclosure: I use this gif psd tutorial’s steps, but change the settings on each layer to my preference, and omit steps if it doesn’t quite fit the style I’m going for. It’s probably not the best way of editing, but I’m fairly recently self taught and never learnt graphic design formally so I took what I could find!)
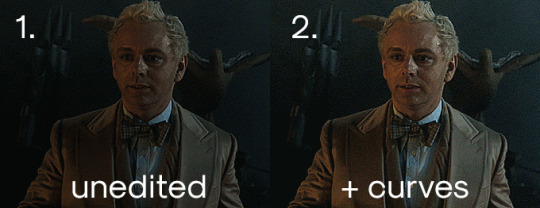
I start with a 1080p video, export the section of video I want to gif with Instagiffer, and crop it down in Photoshop to the desired dimensions (usually 540px across, or 268px if two gifs are to be side by side because of tumblr dash restrictions)
Then I add a Curves layer and pump it up close to my final desired brightness (this might be adjusted again later, after all the other layers are added)
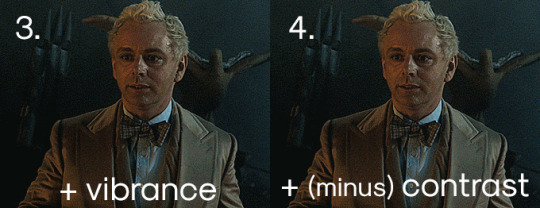
I add a Vibrance layer, usually +70 to Vibrance, and adjust it downwards if it’s too much (here it is +30, because there is a flickering of orange light cast on his face from the flames. Too much, and it starts looking weird).
Brightness/Contrast next. It depends on the gif I’m making and the effect I’m trying to achieve, but usually go either -10 for contrast (this brightens the gif slightly, and is what I used here), or +20 (if I want deeper shadows). I leave brightness alone.
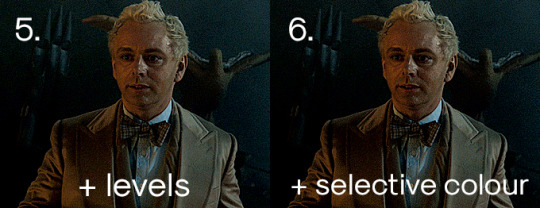
Then Levels - it depends wildly on the gif, but I usually move the black slider first to about 20, then grey/middle slider to about 1.15 and adjust both from there to achieve the balance I want.
Finally, I throw a Selective Colour layer on top - I usually start with +20% each to magenta and yellow on the Reds, and adjust them downwards accordingly. Then I usually add +3-5% on the Blacks for darker blacks.
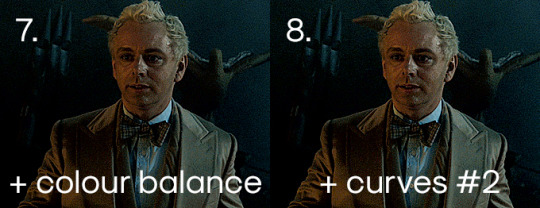
Optional 1: I may add a Colour Balance Layer to the bottom of my adjustments stack and make subtle changes to midtones if I can’t get the skin colour the way I want using Selective Colour alone.
Optional 2: I may put an extra Curves layer to the top of my editing stack, and give it the tiniest upward bump. Sometimes this improves the gif, sometimes it does not. If it doesn’t I just delete the layer.
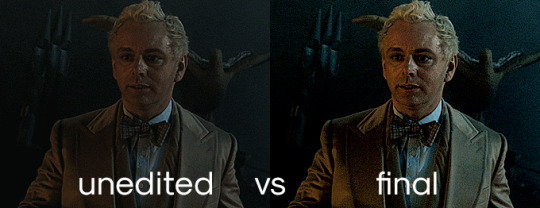
As you can see, a lot of grain gradually gets added as part of the process. I wish I knew how to minimize it!
This by no means produces the nicest edits, nor do I always end up using all of these layers - this is just the way I usually do it. I hope it explains the grain!
#ask#hope this explains things#honestly I consider myself an extreme amateur#and literally only started gifmaking when I got into good omens 2-ish months before#so I could use better tutorials!#Anonymous#vicsfam#maybe you guys have resources that are helpful for anon?#or for me re: less grain-creating methods of editing?
2 notes
·
View notes
Text
Big ass gif tutorial
It’s been a while since I made a coloring tutorial, and I thought it would be useful if I made a full tutorial on how I make my gifs. I will go over:
how to screencap
making your gif in ps
sharpening
coloring that gif
putting subtitles on a gif
saving that gif
you will need
a hd copy of the episode/movie you want to gif
potplayer (or kmplayer)
a version of photoshop (I use CC)
a sharpening action
A psd or patience to color your own gif
end result:

Everything will be under the cut. Warning: this will be picture heavy and text heavy. English is my third language so there will probably be some mistakes in here.
If this is the first time using photoshop, your startpage will look pretty blank. I’ll show you what you need to make visible to gif.
Click on “window”. The screencap I made of the settings is pretty big so click here if you need to see it.
Not seen in the picture but useful: actions, properties, character, paragraph
STEP 1: THE FILE
Okay first of all, you’ll need your file. I recommend downloading µtorrent, then going to a torrent site (like rarbg.to) and searching for your episode or movie. ALWAYS choose 1080p and web dl if possible (web dl means logoless) Example: wynonna earp s01e01, then in your search results, look for one that has both 1080p and web dl in the title. 720p is also good.
You can also find twitters that post logoless episodes and movies, this is better if you don’t like using torrents or if you live in a country that gives you fines for torrenting (I’m lucky, Belgium doesn’t care). If you want a list of a bunch of twitters that share logoless episodes and movies, message me off anon so I can link you privately.
STEP 2: CAPPING
When you have your file, download potplayer (or kmplayer). Open the program and open the file you want to cap.
Search for the moment you want to gif. Tip: hover over the playline thing to see what scene is at what time. Normally it looks somthing like this:
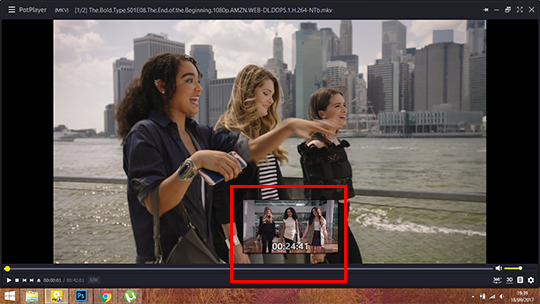
Press ctrl + g when you have the moment you want This window opens:

Change your settings to mine ^^. I made a new folder in my Pictures folder where all my caps go bc it’s easier to go to. It’s up to you where you save all of them, but I suggest you pick one you can easily access. Click start.
Click escape and start your video. Pause again when you have what you wanted (this can be a whole scene or a moment, depends on what kind of gifset your making). Press ctrl+g again and click “stop”, then close.
Now go to the folder where you saved your caps. I always make another new folder inside that one, put all the captures in there (unless I’m doing a scene, then I’ll make 6-8 new folders and distribute all the captures in those folders. Note that with the 3mb limit you’ll be able to use about 60-120 captures per gif, sometimes more. You can always delete layers of your gif in case it goes over 3mb)
Tip: make all your screencaps before opening photoshop. If you’re making a general character/ship gifset, that can take a while, but it’ll save you time if you seperate the two actions.
After you have taken all your caps, open photoshop. You can download it on any photoshop tumblr like yeahps or itsphotoshop. I cannot give you the link to mine because it doesn’t exist anymore, but I got it from kickass (rip).
STEP 3: OPENING AND MAKING THE GIF IN PS
We have our caps and our ps open, but now we have to open those captures in photoshop. Do not use ‘open’, but Files > Scripts > Load multiple DICOM files
I know a lot of people choose ‘Load Files into Stack’ but Load Multiple DICOM files is SO much faster.

This window will open
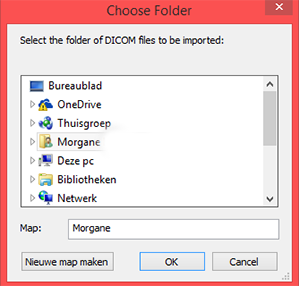
Now you go to the folder where you saved all your caps, choose the file with the screencaps for 1 gif and open it.
It might take a little bit for everything to load, especially if there’s a lot of screencaps, so just wait.
When you have everything, click on “Create video timeline”. It might be called something different if you have another version of PS, but whatever it says here:
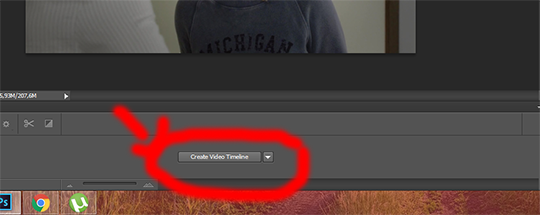
(I know I know, I make pretty arrows lmao)
Then click those 3 boxes on the left side

Next step is ‘make frames from layers’, after that click “flatten frames into layers”

STEP 4: CROPPING
Obviously our gif doesn’t have to be as big as it is in ps right now, so we’ll crop to make it smaller. For this, you need to know the dimensions Tumblr uses:
540px for 1 gif in a row
268px for 2 gifs next to each other
177px - 178px - 177px for 3 gifs in a row (this is something annoying à la tumblr, and because it’s hard to predict which gifs you’ll put in the middle when cropping, I make them all 178px in width and then crop the ones I won’t use in the middle to be 177px after)
You can choose to use the old dimensions which are 500px, 245px and 160px.
These are the widths, you can choose the heights yourself. For this gif I’ll be cropping 268 x 150
This is the cropping tool

click it and you’ll see this on the topbar of your screen. Type in your dimensions

Then crop as you wish. This is my result.
STEP 5: CHANGING YOUR IMAGE SIZE + SHARPENING
The gif is way too big at this moment, so go to image > image size, this window opens:
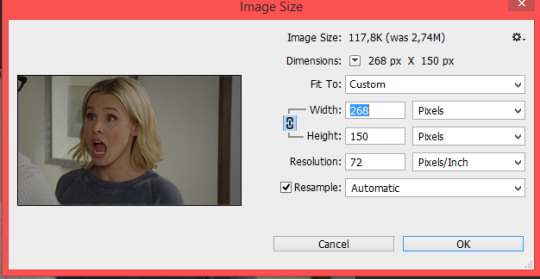
Click “okay” and your gif will be a lot smaller. Use ctrl + “+” to make it bigger
This is what our photoshop looks like right now

These steps look like A LOT of work but as soon as you’re used to the steps, it’ll take you about a minute to do all of this.
Next is sharpening. I use a sharpening action made by ilanawexler but it’s pretty complicated, so I do not recommend it if you’re a beginner. I will however explain it fully here. Note: I had to do something different than the directions the blogger gave, so what I get might not work for others and you might have a different outcome
Select all your frames (from 1 -)

then click “convert to videotimeline” (it’s possible it’s called differently in your ps)
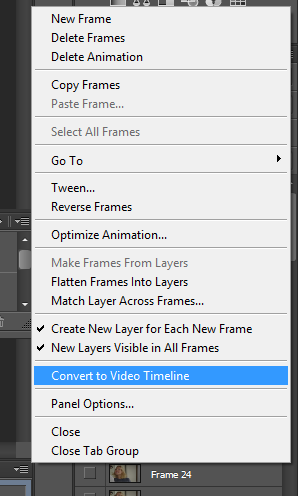
when you did that, add two layers on top of your other layers
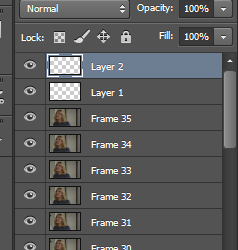
Select all your frames (frame 1 to layer 2), right click and click “convert to smart object”
Then, go to your actions. If you just downloaded your action, you have to add it.
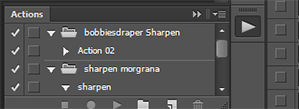
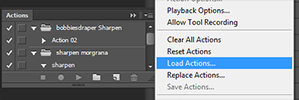
When that’s done, open the bobbiesdraper sharpen and click “action 2″. Thn click the play icon
It’ll a LOT of stuff, but just let it be.
Warning: if you changed anything to the frames in the timeline section, this won’t work. I noticed that if I delete frames or change the delay, ... before sharpening, it won’t work.
If it worked, you now have this
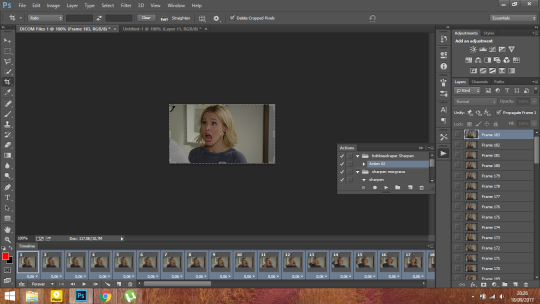
I’m not sure if it’s normal, but I now have twice the frames I had before, but only the SECOND amount is sharpened. So I delete frame 1-35 now in the timeline section.
This is my gif after sharpening (you can use this to practice coloring or to follow along with my coloring tutorial below)

this psd automatically sets the delay for your gif to 0,05, I always change it to 0,06 (sometimes 0,07). Just select all your frames, then click on the 0,05, ‘other’ and choose whatever you like. The max I would go is 0,08 (0,07-0,08 is the speed the episodes go btw when you watch them)
STEP 6: COLORING
Now the fun part!! You can either choose to use a psd (here are my psds) or you can color it yourself.
For this tutorial, I’ll be doing a basic coloring. (that means: steps I always use to start my colorings).
We start with curves. For this gif, these are the settings: (this is a pretty bright gif so for darker scenes you’ll have to use more, but don’t start with too much, build it up)
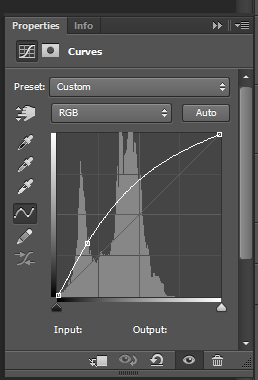
then some levels to give the gif more depth
I usually enter 10 for the black (unless it’s a very dark gif) and I’ll move the arrow of the white to where the little line starts.

Some brightness
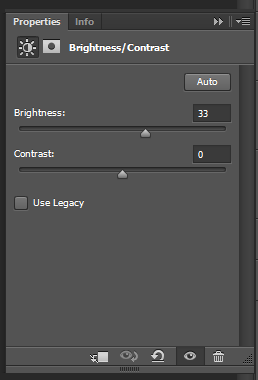
Some black selective color (I always enter 10, unless it’s a dark gif)

Color balance (also usually start with this, unless it’s a blue gif, then I’ll move the arrows to red, magenta and yellow). If the gif is VERY yellow, I’ll add more in cyan and blue.

Then I’ll add a vibrance layer, +100 vibrance.
This is what I have now (with a pretty watermark). These are the layers I will always start with.

You can stop here, but I like to add some more to my gif so I’m continueing
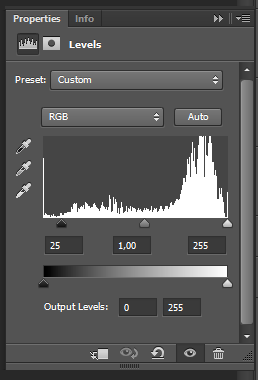
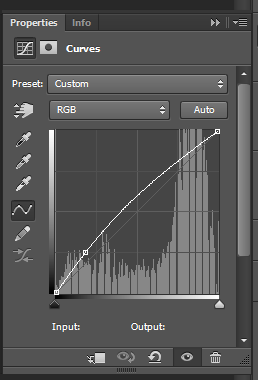
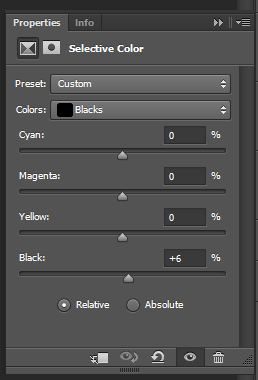
I like adding more blues so I’ll add a selective color layer: (you can also decrease magentas is the “blue” ones to make the blues more cyan)

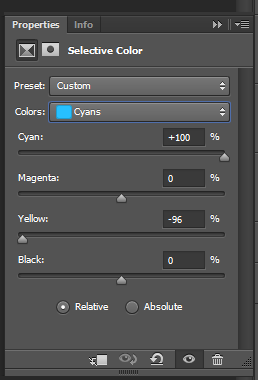
For blondes, I like making their hair stand out more so I’ll add a selective color layer for the yellows:
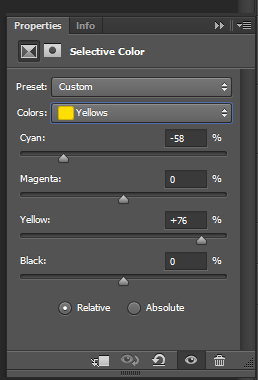
Of course, there’s a lot of yellow in the skintone so chances are the skin will look very yellow now, I add a color balance layer and change the highlights. (In darker gifs you might need to change the midtones instead)
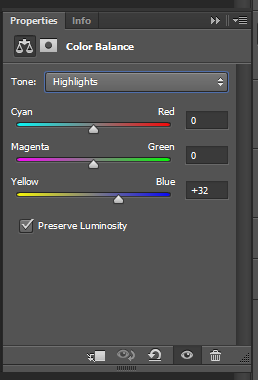
Some magentas to make the lips stand out
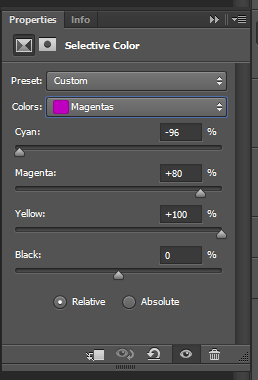
and some contrast
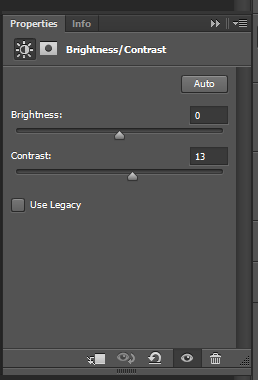
That’s all for coloring. This is what my gif looks like right now:
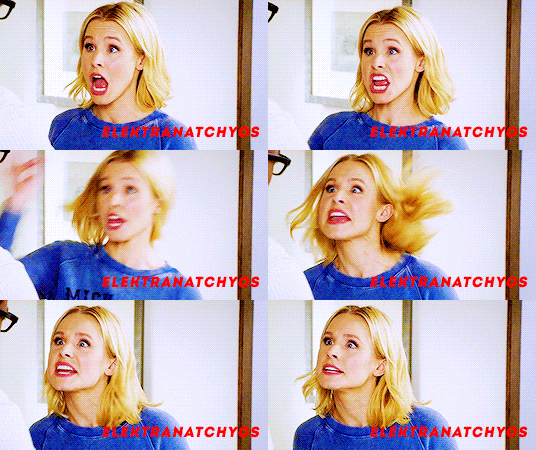
STEP 7: SUBTITLES
If you want to add text, click this icon

these are the settings for my text


Then we’ll add some other adjustments to make the text more visible:
click on the fx icon

then click ‘stroke’
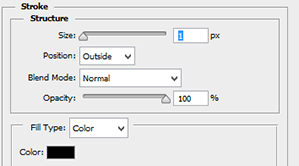
click okay, and click on the FX icon again, then click “drop shadow”

when you added all your adjustments, duplicate the textlayer and delete the first one (if not, your adjustments will only show on 1 layer instead of the whole gif)
If your text isn’t in the middle of your gif. Click your text layer, then click this icon

then in your topbar, adjust with these tools

this is what the text looks like now:
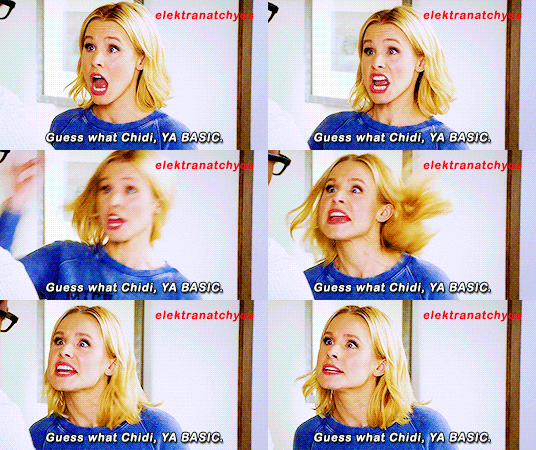
here is the psd for the text
STEP 8: SAVING
Of course, you have to save your gifs. Go to File > Save for web and this window will open

Make sure your settings look like these:
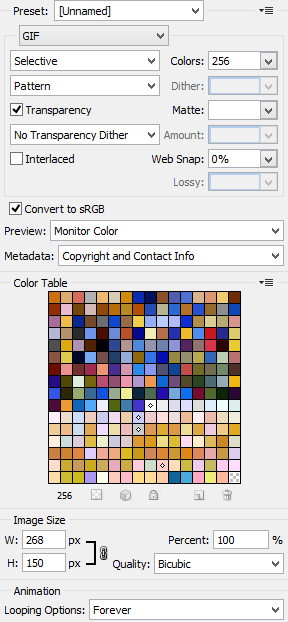
Make sure this number isn’t above 3 mb

That’s all!!! If you have any questions, you can always come ask me. I’m sorry if this wasn’t clear, but I hope it made atleast a bit sense.
916 notes
·
View notes
Text
.gif tutorial for survivor
the thirty-fourth season of survivor, survivor: game changers, is premiering this wednesday, so i figured now’s a better time than ever to post another one of these things for people who are just getting into .gif making, or would like to get in on the action!
this will be a step-by-step tutorial, presented via screenshots. at the end of the post, i’ll have a .psd download available to use on gifs!
here’s what you’re gonna need, kiddos:
KMplayer; this is a frame extractor/video player. this is what you’ll use to capture frames from episodes and videos.
Photoshop. I use Photoshop CC for Windows. you’ll need to torrent photoshop. here’s a link from piratebay for it. please keep in mind that this is not the same link that i used when i dl’d photoshop a couple of years ago, but it should work fine. the download process is simple. other links for photoshop downloads can be found here: [x] [x] [x].
a survivor episode with 720p or 1080p quality. i usually torrent from rarbg, 1337, and piratebay. the piratebay link directs you to episode one of mvgx. when searching for episodes, search “survivor s(number)e(number)”, for example, for the game changers premier, i would search “survivor s34e01”.
feel free to message me if you’re confused about anything and i’ll help you out as soon as possible!

first, you need to open up your KMplayer and your video. i tend to torrent .mkv files because of the quality, and i settle for .mp4 if it’s a youtube video.
kmplayer - to open your file, right click and select ‘Open File(s)…’ and choose your video. it may take a while for the video to load, depending on the quality and length.
now, get to the part of the video you’d like to gif. you can use the left and right arrow keys to skip through the video faster. now, open up the frame extraction window. (CTRL + G)
select the folder you want your frames to go in. i have 10 different folders titled ‘GIF1′, ‘GIF2′, ‘GIF3′, etc… i find it much easier to just capture all the frames you want at one time, and then turn them into gifs.
these are my settings:

you always want to have “original size” selected, unless you’re dealing with a higher quality episode they may open in kmplayer looking like the image below. if this is the case, select “specified size” instead and make sure its 1280 x 720!

make sure you’re at the scene you’d like, and click ‘Start’, KMplayer will start capturing each frame. it may lag a little bit, but let it capture the scene you want before clicking ‘Stop’.
it’s okay if you got frames you didn’t want, it happens to me all the time! locate the folder in which your frames went and simply delete the ones you don’t want. my gifs are usually 30-75 frames long (sometimes even longer, thanks to the new gif size limit), it may not seem like a lot, but it is!
once you’ve gotten all your frames, you can open up your version of photoshop.
BEFORE YOU DO ANYTHING, click on the ‘Window’ tab at the top and make sure ‘Animation’ is checked.
alright, now go to File > Scripts > Load Files into Stack… and select the folder where your frames are. it may take a while for your frames to load up, just be patient.


when all your frames are loaded up, it should look like this:

then click “create frame animation.” after that, you’ll click the small tab at the bottom right, and then click “make frames from layers”:

it will look like this, and then you have to click the tab again + reverse frames. this is important because you don’t want your gif playing backwards:

click that same button again and click on ‘Select All Frames’, this will, well….. select all your frames.
click on the ‘0 sec’ on any frame and select ‘Other…’ and type in ‘0.05′. this is the speed i always use, but you can use any speed you wish, though i feel that 0.05 looks the best!
now this is where the fun begins. you’re gonna crop your gif. for 8 or 10 gifs posts i usually do 268x145.

After you crop, you’ll go to Image > Image Size (make sure your setting match here so your gif is resized properly!):

once you’re done with that, you will convert your frames to a video timeline:

and then you will select all of the layers on the right side. once you have those selected, you will have to click Filter > Convert to Smart Filters. this will speed up the sharpening process, essentially, so you don’t have to do it one frame at a time:

after that, click Filter > Sharpen > Smart Sharpen:

make sure your setting match this:

after you sharpen, you color your gif, or add a psd.


i usually like my gifs to be pretty bright and blue because they look nice like that imo! but everyone should develop their own coloring style over time. but just as a starter, the download link for this psd will be provided below! i might make a coloring tutorial eventually!
you’re also going to add your text! i have a psd saved so i can just automatically drag texts over and just type the new caption. you may need to adjust the timeline at the bottom because text layers sometimes add additional frames to the gif.

now that all of that is done, you can click File > Save for Web. NEVER save gifs with ‘Save as…’
here are my save settings (i feel like this is the most crucial part to making your gifs look nice, crisp, and as high quality as possible):

you can change Selective to Adaptive if it looks better for your coloring! i’d suggest always using Pattern! i’m not kidding, use pattern or i’ll flag ur gifsets as inappropriate and have ur blog shut down.
YOUR GIF MUST BE UNDER 3MB, OR IT WON’T PLAY ON TUMBLR. as of now, 3MB gifs work fine in photosets, but still don’t load in text posts, so if you’re making a gif just to post in a text post, it has to be under 2MB.
if your gif is over 3mb you can either delete some frames, or lower the colors by choosing one of the numbers here:

don’t select anything lower than 64, because then it looks grainy and desaturated. or save it, reopen it and delete some frames (not too much though)
after saving your gif, close everything and reopen it normally. the frame delay speed is usually set back to 0.07 (because it was converted to a video timeline). so just select the very first frame, scroll to the end of your frames and hold SHIFT while selecting the last frame and change the delay to 0.05. then save again with ‘Save for Web & Devices’
PSD DOWNLOAD LINK
because i just made that psd for that scene, it probably works best on the marooning of s34e01. every psd will usually need adjustments, so make it your own and make it look good to you!
that’s about it really! please like/reblog if you use the psd and if the tutorial helps! and again, feel free to message me about anything!
67 notes
·
View notes