#hand embroidery. DMC
Explore tagged Tumblr posts
Text

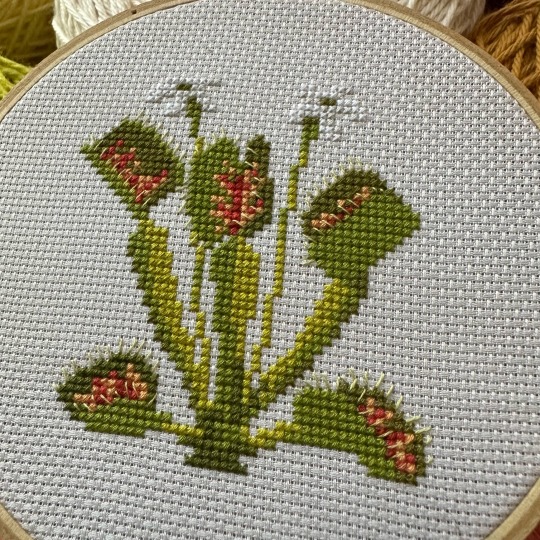
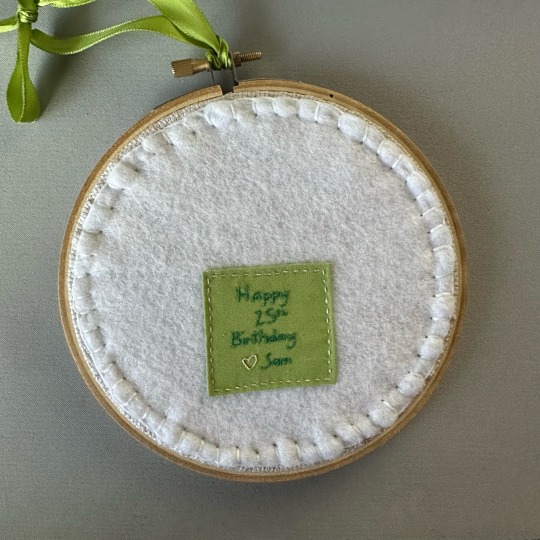
Venus Fly Trap 🪴
I made this one for a friend the other week and absolutely love how it turned out! I also hand sewed a little patch with a happy birthday so it would always be there! 💕
Pattern: @sirithre (https://www.etsy.com/listing/1291762632/)
#embroidery#xstitch#dmc#floss#dmcembroidery#cross stitch#venus fly trap#carnivorous plants#back stitch#fibre arts#crafts#hand crafted#hand sewed#plants#plants of tumblr#fly trap#green#nature#handmade#pincushionsam#sirithre
209 notes
·
View notes
Text
What is your favourite DMC floss colour ? Mine is 959 (Sea Green Medium)

9 notes
·
View notes
Text

First ever post on Tumblr and still struggling to figure out how it works but here goes. Charity shop dress that I'm embroidering to make into my very own DHMIS dress! Using the animated sequences in the Transport episode as reference cus the guys are too cute. Can't wait til I'm finished and can wear it EVERY SINGLE DAY.
#Dhmis#don't hug me i'm scared#dhmis red guy#dhmis duck#dhmis yellow guy#embroidery#hand embroidery#dmc thread#customisation
52 notes
·
View notes
Text


After people asked about my V chibi plush, I couldn’t resist posting him!
Made entirely from felt and leather! Hand embroidered with love last spring during my week off!
Fun fact: embroidery string has a brand called DMC, and this DMC plush was made using DMC branded string!
13 notes
·
View notes
Text
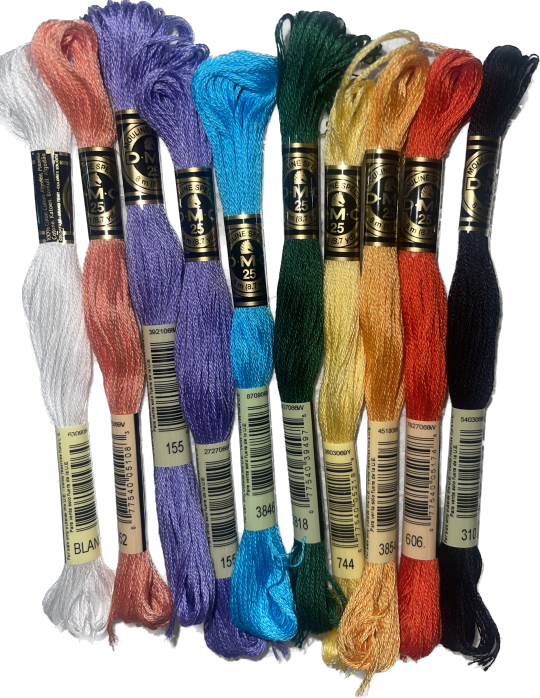
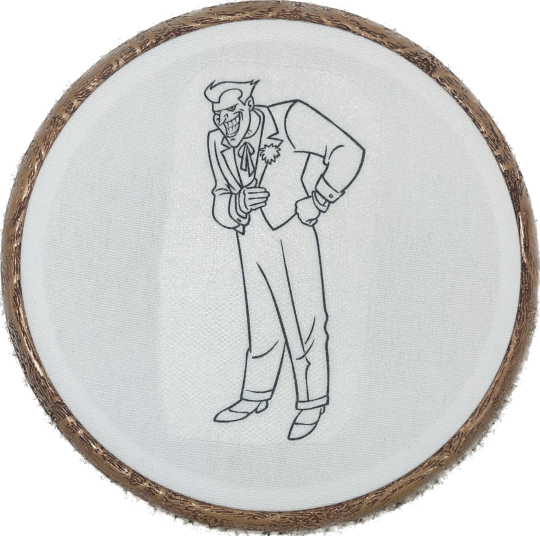

Starting work on a birthday present for my brother. We loved watching the Animated Series together when we were younger. Our favorite episodes were, of course, the ones featuring the Clown Prince of Crime himself. Pretty happy with my chosen colors.
#batman animated series#joker#the joker#embroidery#hand embroidery#dmc thread#batman#crafts#hand stitching#dc comics#dc universe
4 notes
·
View notes
Text
Enjoy this finely crafted tiktok of my process
Both this embroidery piece and a pattern to make one yourself are in my shop!
#tiktok#embroidery art#hoop embroidery#embroidery#hand embroidery#donut#sprinkle donut#process#pop art#dmc embroidery#art#my art
7 notes
·
View notes
Text
I know I swore I wouldn’t do another one but I’m getting the itch again 😬


#crossstitch#cross stitch#crossstichlove#portrait#stitch witch#needle and thread#thread art#dmc floss#embroidery floss#hand stitching#slow stitching
2 notes
·
View notes
Text


[ID: A tatreez piece in shades of jade green, with orange accents. A central line of Pasha's tents is surrounded by clove, chicken's teeth, sword, and heart motifs; a star of Bethlehem fills the top square, and a row of cypress trees is at the bottom. The first photo shows the piece with a large painting and a pair of slippers to show scale; the others are close-ups. End ID]
Tatreez raffle to benefit a Palestinian family
You know the drill! This tatreez piece is stitched in cotton embroidery thread on sage green linen, and is suitable as wall art, or to be repurposed as a cover for a cushion, tote bag, &c. A winner will be randomly selected in October, 2024.
You can get your hands on this piece in one of two ways:
Enter the raffle by sending me proof of a donation of at least $10 USD to Muhammad Abu Hamam's campaign.
Send me proof of a donation of at least $500 USD (I know, but this took a lot of hours!) and I will stitch another one, or something similar, just for you.
Send proof of a donation of at least $7 USD for a link to the pattern.
This is a physical product and you will need to be willing to give me a shipping address.
Design is 7.5" x 16" (19 x 41cm)
Cotton on linen
Stitched 2 over 2 on 32 count linen evenweave (16 stitches per inch)
Colors are: DMC 564, 563, 562, 505, 561, 722
2K notes
·
View notes
Text
Happy Pride Month!

There’s no official list, but these are the DMC floss colors I use for pastel rainbows:
❤️Red- 818🧡Orange- 744💛Yellow- 445💚Green- 14💙Blue- 162💜Purple- 26
25 notes
·
View notes
Text
This tip is a real life saver especially when you are working on a large scale project.
PLEASE NOTE: THIS ADVICE ONLY APPLIES TO DMC THREADS OTHER BRANDS MAY BE DIFFERENT
19 notes
·
View notes
Note
Any tips on learning to make buttonholes? I've been putting it off for.... *checks notes* like three years.... but better late than never and all that. I don't have any fancy machines so I gotta do it by hand but that seems right up your alley.
Thanks!
It IS up my alley, yes, I do most of my buttonholes by hand!
I'm actually part way through filming an 18th century buttonhole tutorial, but I expect it'll be a few more weeks before I finish that and put it on the youtubes, so in the meantime here's the very very short version. (The long version is looking like it'll probably be about 40 minutes maybe, judging by how much script I've written compared to my last video?)
Mark your line, a bit longer than your button is wide. I usually use a graphite mechanical pencil on light fabrics, and a light coloured pencil crayon on dark ones. (I have fabric pencils too, but they're much softer and leave a thicker line.) You may want to baste the layers together around all the marked buttonholes if you're working on something big and the layers are shifty and slippery. I'm not basting here because this is just a pants placket.
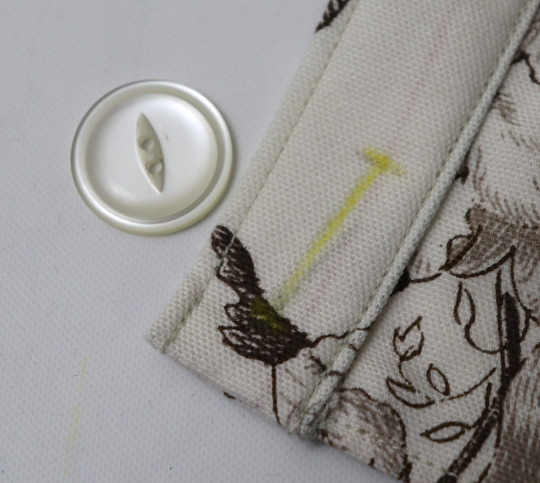
Do a little running stitch (or perhaps a running backstitch) in fine thread around the line at the width you want the finished buttonhole to be. This holds the layers of fabric together and acts as a nice little guide for when you do the buttonhole stitches.
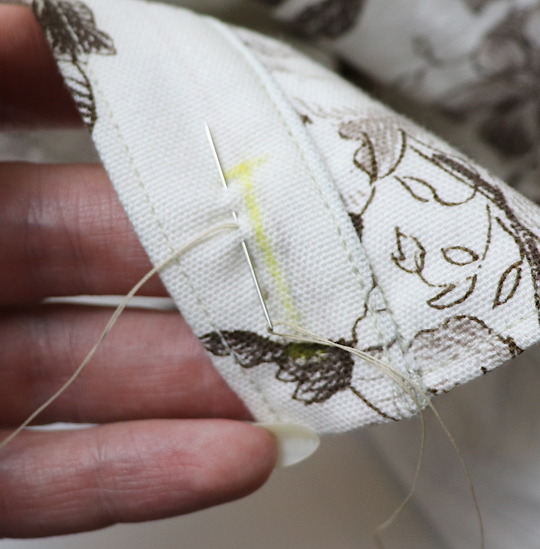
Cut along the marked line using a buttonhole cutter, or a woodworking chisel. Glossy magazines are the best surface to put underneath your work as you push down, and you can give it a little tap with a rubber mallet if it's not going through all the way.
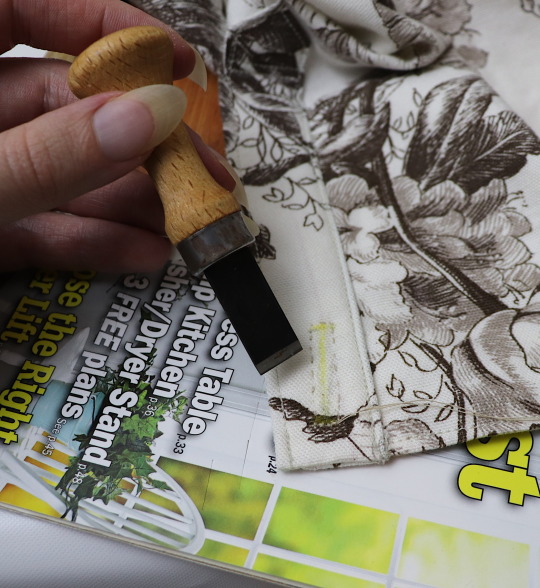
I'm aware that there are some people who cut their buttonholes open using seam rippers, and if any of them are reading this please know that that is abhorrent behaviour and I need you to stop it immediately. Stop it.
Go get a buttonhole cutter for 10 bucks and your life will be better for it. Or go to the nearest hardware store and get a little woodworking chisel. This includes machine buttonholes, use the buttonhole cutter on them too. If you continue to cut open buttonholes with a seam ripper after reading this you are personally responsible for at least 3 of the grey hairs on my head.
Do a whipstitch around the cut edges, to help prevent fraying while you work and to keep all those threads out of the way. (For my everyday shirts I usually do a machine buttonhole instead of this step, and then just hand stitch over it, because it's a bit faster and a lot sturdier on the thin fabrics.)
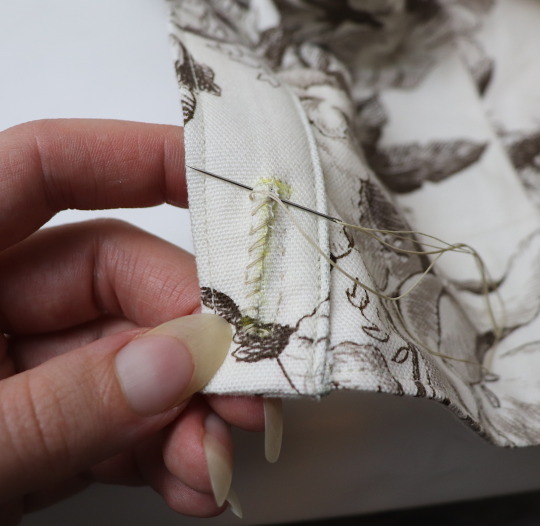
I like to mark out my button locations at this point, because I can mark them through the holes without the buttonhole stitches getting in the way.
For the actual buttonhole stitches it's really nice if you have silk buttonhole twist, but I usually use those little balls of DMC cotton pearl/perle because it's cheap and a good weight. NOT stranded embroidery floss, no separate strands! It's got to be one smooth twisted thing!
Here's a comparison pic between silk buttonhole twist (left) and cotton pearl (right). Both can make nice looking buttonholes, but the silk is a bit nicer to work with and the knots line up more smoothly.
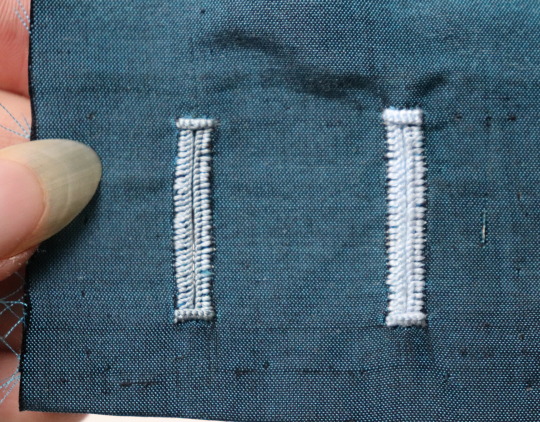
I've actually only used the silk for one garment ever, but am going to try to do it more often on my nicer things. I find the cotton holds up well enough to daily wear though, despite being not ideal. The buttonholes are never the first part of my garments to wear out.
I cut a piece of about one arm's length more or less, depending on the size of buttonhole. For any hole longer than about 4cm I use 2 threads, one to do each side, because the end gets very frayed and scruffy by the time you've put it through the fabric that many times.
I wax about 2cm of the tip (Not the entire thread. I wax the outlining/overcasting thread but not the buttonhole thread itself.) to make it stick in the fabric better when I start off the thread. I don't tend to tie it, I just do a couple of stabstitches or backstitches and it holds well. (I'm generally very thorough with tying off my threads when it comes to hand sewing, but a buttonhole is basically a long row of knots, so it's pretty sturdy.)
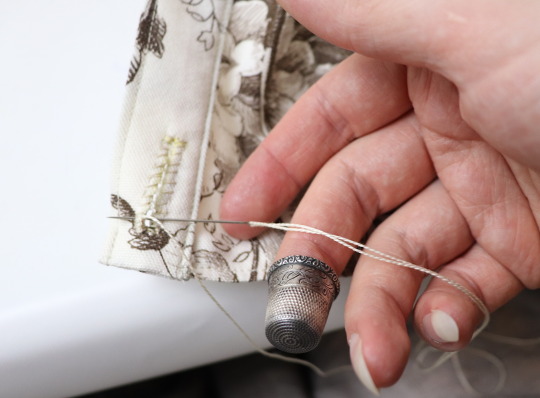
Put the needle through underneath, with the tip coming up right along that little outline you sewed earlier. And I personally like to take the ends that are already in my hand and wrap them around the tip of the needle like so, but a lot of people loop the other end up around the other way, so here's a link to a buttonhole video with that method. Try both and see which one you prefer, the resulting knot is the same either way.
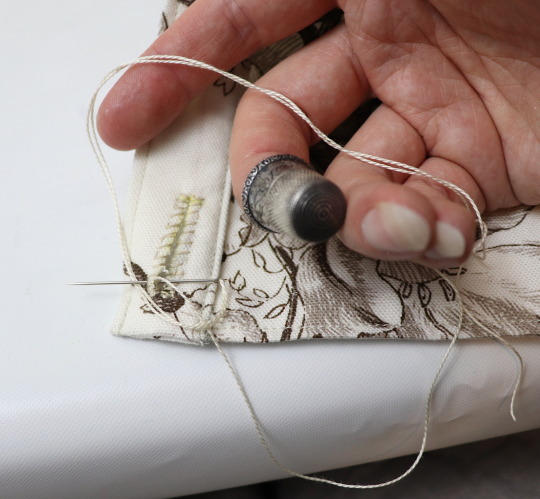
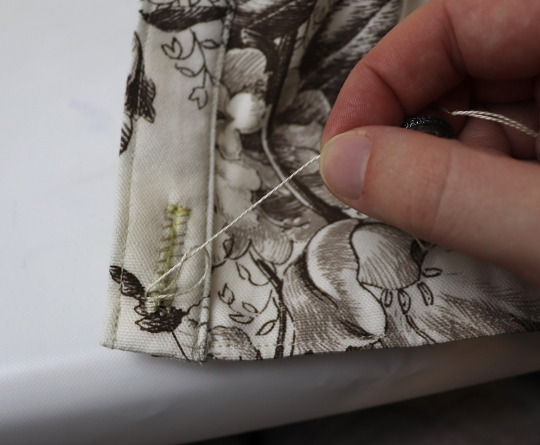
Sometimes I can pull the thread from the end near the needle and have the stitch look nice, but often I grab it closer to the base and give it a little wiggle to nestle it into place. This is more necessary with the cotton than it is with the silk.
The knot should be on top of the cut edge of the fabric, not in front of it.
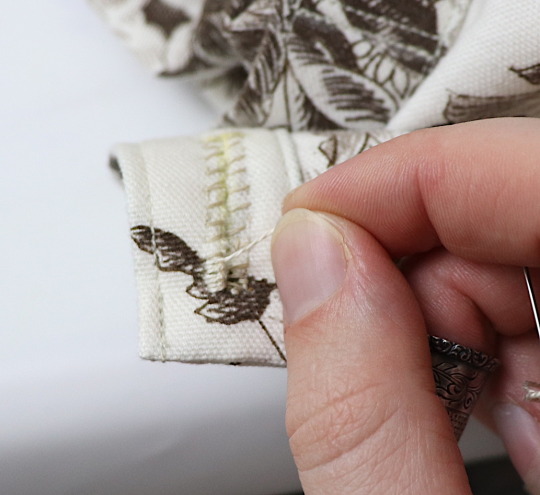
You can put your stitches further apart than I do if you want, they'll still work if they've got little gaps in between them.
Keep going up that edge and when you get to the end you can either flip immediately to the other side and start back down again, or you can do a bar tack. (You can also fan out the stitches around the end if you want, but I don't like to anymore because I think the rectangular ends look nicer.)
Here's a bar tack vs. no bar tack sample. They just make it look more sharp, and they reinforce the ends.
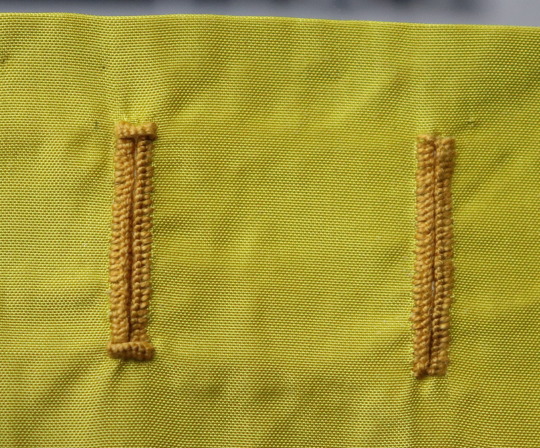
For a bar tack do a few long stitches across the entire end.
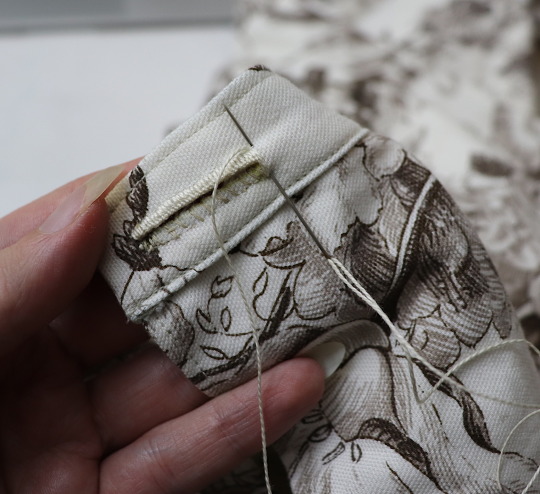
And then do buttonhole stitches on top of those long stitches. I also like to snag a tiny bit of the fabric underneath.
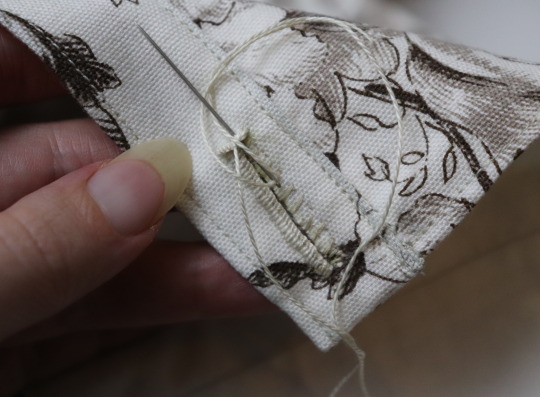
Then stick the needle down into the fabric right where you ended that last stitch on the corner of the bar tack, so you don't pull that corner out of shape, and then just go back to making buttonhole stitches down the other side.
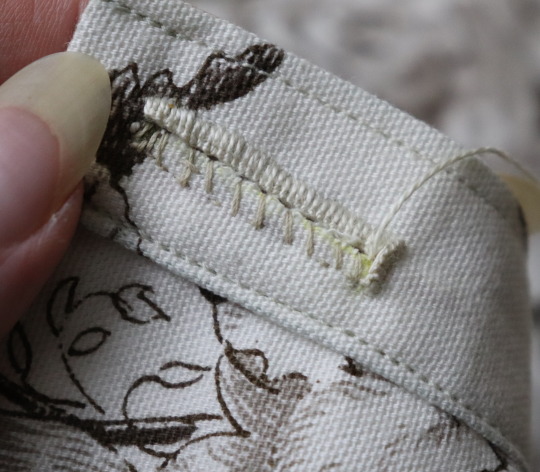
Then do the second bar tack once you get back to the end.
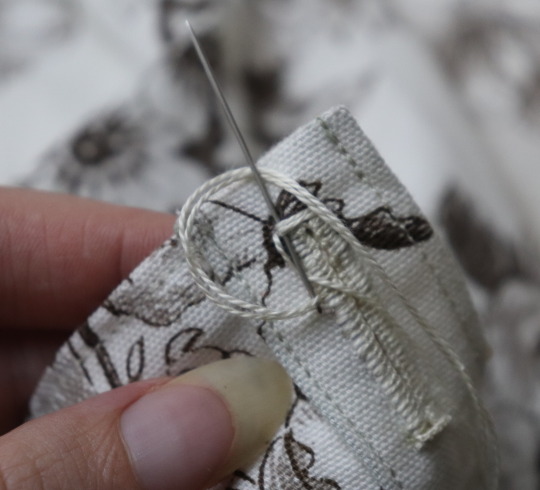
To finish off my thread I make it sticky with a bit more beeswax, waxing it as close to the fabric as I can get, and then bring it through to the back and pull it underneath the stitches down one side and trim it off.
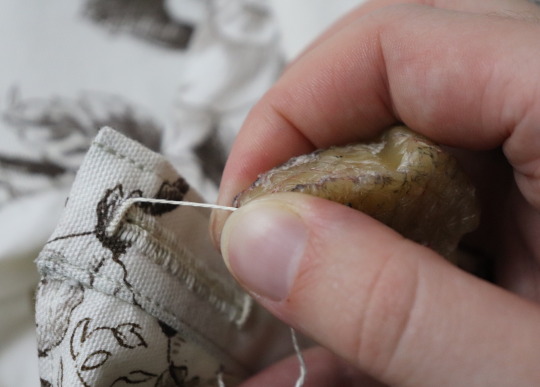
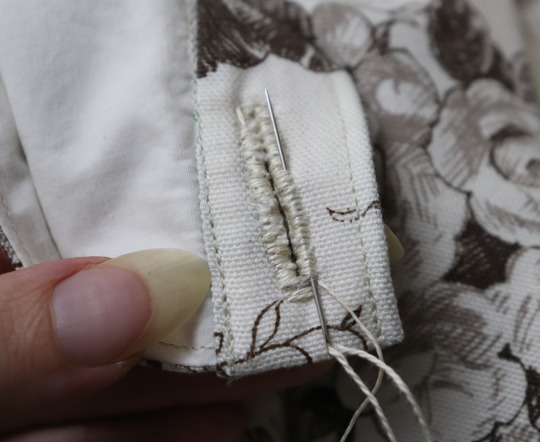
In my experience it stays put perfectly well this way without tying it off.
Voila! An beautiful buttonholes!
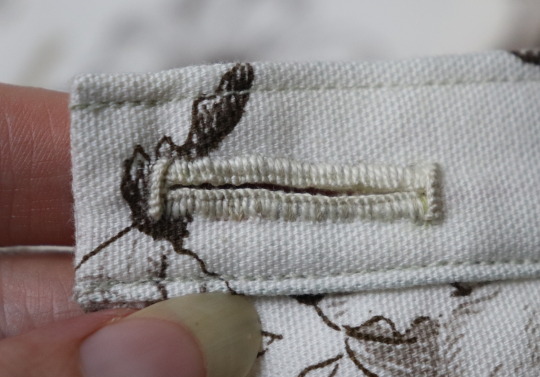
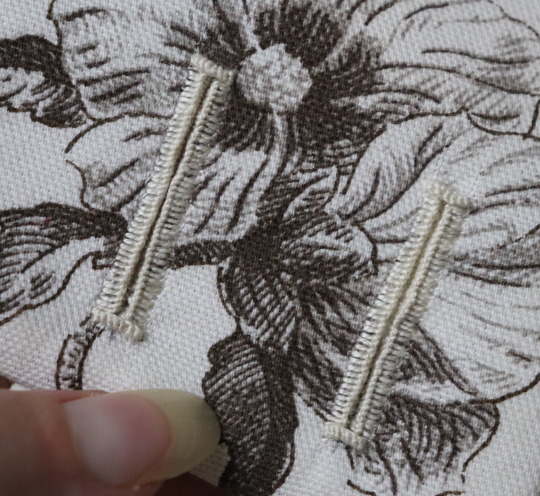
If you want keyhole ones you can clip or punch a little rounded bit at one end of the cut and fan your stitches out around that and only do the bar tack at one end, like I did on my 1830's dressing gown.
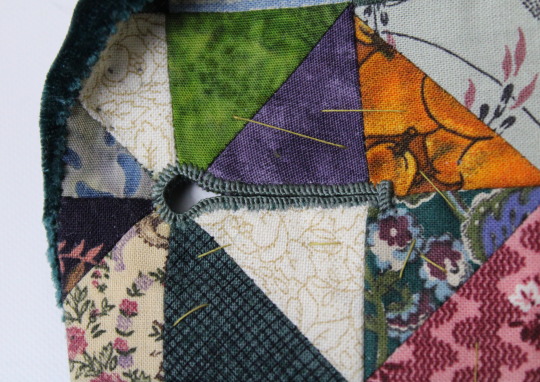
(I won't do that style in my video though, because they're not 18th century.)
Do samples before doing them on a garment! Do as many practice ones as you need to, it takes a while for them to get good! Mine did not look this nice 10 years ago.
Your first one will probably look pretty bad, but your hundredth will be much better!
Edit: Video finished!
youtube
And here's the blog post, which is mostly a slightly longer version of this post.
#ask#buttonholes#sewing#hand sewing#sewing tutorial#I've been procrastinating on the video this week#I want it done! I don't want to work on it I want new projects! I want to cut out more gloves!#currently forcing myself to do the last few buttonholes on these pants and then maybe I can cut out new gloves? as a treat?#but I hope I get some filming done tomorrow too
4K notes
·
View notes
Video
youtube
Vibrant Embroidery: A Look at Peruvian DMC's Flower Border Design
#youtube#peruvian embroidery#hand embroidery#Peruvian DMC#Flower Border Design#Handcrafted#Traditional techniques#handcrafted textiles#textile art
0 notes
Text
icymi, I’m running a holiday sale until dec 1st. 20% off everything even original art pieces like this hand embroidered evil eyed polyphemus moth!
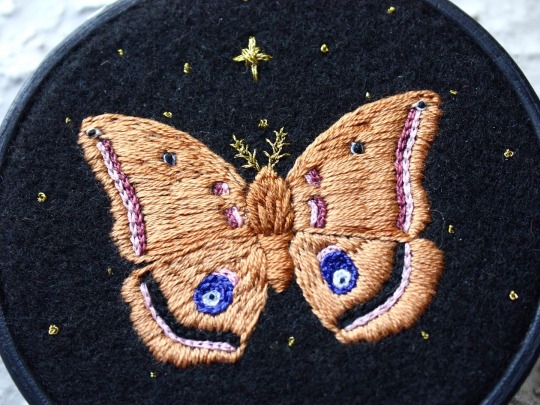
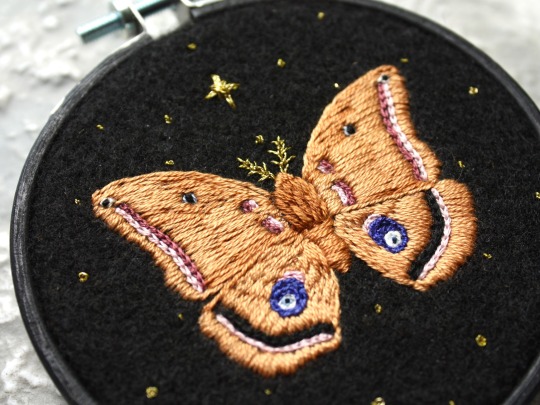

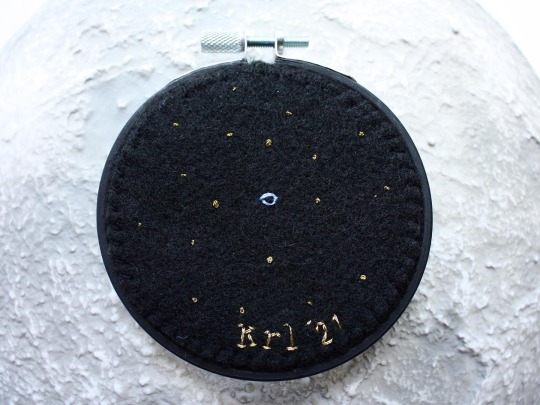

hand embroidered evil eyed polyphemus moth ✨🧿✨
#holiday sale#cyberweek#etsy#etsy gifts#fiber art#antheraea polyphemus#polyphemus moth#original art#embroidery#lepidoptera#moth#nature art#fiber artist#starry sky#evil eye#unique gifts#ooak#etsy artwork#mini embroidery hoop#dmc thread#embroidery artist#art for sale#wall decor#support handmade#handmade gifts#etsy shop#handmade#hand embroidery#needle craft#needle arts
104 notes
·
View notes
Text


[ID: Cross-stitch in various shades of red, pink, and green with bird, flower, cypress tree, and flower pot motifs. It is photographed alongside red glass lamps and perfume bottles, and a red ceramic pomegranate. End ID]
Tatreez raffle to benefit Palestine
This is an original design assembled from tatreez motifs typical of Ramallah, Palestine. It is stitched in cotton embroidery thread on cream linen, and is suitable as wall art, or to be repurposed as a cover for a cushion, tote bag, &c.
You can get your hands on this piece in one of two ways:
Enter the raffle by sending me proof of a donation of at least $5 USD to any evacuation fundraiser (check https://gazafunds.com/). Each multiple of $5 = 1 ticket! A winner will be randomly picked on Sunday, June 23rd.
Send me proof of a donation of at least $75 USD and I will stitch another one just for you.
This is a physical product and you will need to be willing to give me a shipping address.
Design is 10.5" x 4" (27 x 10cm)
Cotton on linen
Stitched 2 over 2 on 28 count linen evenweave (14 stitches per inch)
Colors are: DMC 321, 524, 523, 522, 3805, 3806
496 notes
·
View notes
Text
this has been getting likes and i realized i never updated my etsy URL 🙃🙃 this is still available in my etsy shop below!
- etsy shop
- instagram

hand stitched + hand painted modern baseball embroidery hoop still available in my etsys shop!
#modern baseball#mobo#pop punk#pop punk art#defend pop punk#citizen#turnover#the wonder years#hot mulligan#jake ewald#ian farmer#brendan lukens#sean huber#the front bottoms#embroidery shop#hand embroidery#embroidery#mine#art#my art#etsy#handmade#small business#hand stitching#dmc thread
72 notes
·
View notes
Text
Reblog for a bigger sample size
#craft poll#dmc thread#hand embroidery#embroidery floss#embroidery thread#Intermittent Stitcher Poll
1 note
·
View note