#gif to converter software
Explore tagged Tumblr posts
Visit Tumblr Blog
Explore Tumblr blogs with no restrictions, modern design and the best experience.
Last Seen Tumblr Blogs


Fun Fact
Tumblr was attacked by a cross-site scripting worm deployed by the Internet troll group GNAA on Dec 3, 2012.
Text
Guess we’re homeless now :(
Take two of this post because the last one didn’t loop properly and it bothered me.
#Also making this literally took ten years off my life since the quality would tank every time I tried to export it#i ended up just screen recording the frames and using another software to convert it to a gif#but oh my god did it cause such a headache#this is what dream buzzing his head does to people 😔#if it still doesn’t work im gonna krill myself#dreamwastaken#dream
288 notes
·
View notes
Text

COLORING + SHARPENING TUTORIAL
someone asked for a coloring tutorial and my sharpening settings, so here it is! there are also a few tips to achieve more HQ gifs. :)
tutorial under the cut!
FOR HIGH-QUALITY GIFS
FILE SIZES
it doesn’t matter what your sharpening settings are if the file you’re using to gif is too low quality, so i tend to look for the best that i can get when downloading stuff.
usually, movies (+2h) look better if they’re 5GB or more, while an episode (40 min/1h) can look good with even 1GB. the minimum definition i try to find is 1080p, but i gif with 2160p (4k) when available. unfortunately, not every computer can handle 4k, but don’t worry, you can gif with 1080p files just fine if they are big enough. contrary to popular belief, size does matter! which means sometimes a bigger 1080p file is better than a smaller 2160p one, for example.
SCREENCAPPING METHOD
this can too influence the quality of your gifs. as a gifmaker, i’ve tried it all: video frames to layers, directly opening video clips, loading files into stack, and i’ve finally settled down with opening screencaps as an image sequence. with bigger files, it doesn’t matter much what technique you use, but i’ve noticed with smaller files you can do wonders if you screencap (either by loading files into stack or opening as an image sequence) instead of using video clips. for example, this gif’s original video file was only 4GB (so smaller than i’ve usually go for), if you can believe it!

here’s a tutorial for setting up and screencapping with MPV, the media player i use to screencap. again, you can keep using video clips for bigger files, but you’ll find this useful when dealing with dire causes. i don't file loads into stack, though, like the video does. i open as an image sequence (open > screencap folder > select any image > click the image sequence button). just select OK for the speed. this will open your screencaps as a video clip (blue bar) in timeline mode (i'm a timeline gifmaker, i don't know about you). you will need this action pack to convert the clip into frames if you're a frames gifmaker. i suggest you convert them into frames even if you're a timeline gifmaker, just convert them into a timeline again at the end. that way you can delete the screencaps right away, otherwise you will delete the screencaps and get a static image as a "gif".

ATTENTION if you’re a Mac Sonoma user, MPV won’t be an option for you unless you downgrade your system. that is, if you have an Intel chip. if you have M1 Max chip (or even a better one), here’s a fix for MPV you can try while keeping that MacOS, because nowadays MPV is skipping frames in its latest build. or you can use MPlayer instead for less hassle. here are two tutorials for setting and using MPlayer. Windows users are fine, you can use MPV without trouble.
FOR EVEN MORE QUALITY
ADD NOISE
here’s a tutorial for adding noise as a way to achieve more HQ gifs if your original material is too low quality.
REDUCE NOISE WITH CAMERA RAW
instead of adding noise, you can reduce it, especially if your gif is very noisy as it is.
the path is filter > camera raw > detail > nose reduction. i do this before sharpening, but only my video file isn't great to begin with. because it’s a smart filter, you can reduce or increase its opacity by clicking the bars next to its name in the layers panel.
TOPAZ AI
i use Topaz Photo AI to increase the quality of my screencaps when i need to. it’s paid software, but there are… ways to find it for free, usually on t0rrent websites. if someone’s interested, i can make a tutorial solely about it in the future.
SHARPENING SETTINGS
here are my sharpening settings (filter > sharpen > smart sharpen). i sharpen things twice: 500% 0.4px + 10% 10px. here's an action for it, for more convenience. here's a tutorial on how to use Photoshop actions. for animated stuff, i use this action pack.

COLORING
here’s the gif i'm gonna use as a base. it’s already sharpened like the way i always do it.

LIGHTNING THE SHOTS
half of the secret of a good coloring is good lightning. i always useCurves (layers > new adjustment layer > curves) and Brightness & Contrast (layers > new adjustment layer > brightness & contrast). the settings depend on the scene you’re giffing, but i always try make my gifs bright and with high contrast to make the colors pop.
CURVES
besides lighting your scene, the Curves adjustment layer has four automatic options that will color-correct it for you. it’s not always perfect and it doesn’t mean you won’t need to do further coloring, but it’s a great start. it’s a lifesaver for most ridiculously yellow scenes. look at the difference! this gif uses the 3rd automatic option (the screenshot below isn't mine btw so that's why the fourth option is the chosen one), from top to bottom. what automatic option you need to choose depends on the gif.


sometimes i like to tweak my Curves layer. not everybody does that, it’s not that necessary and if you’re not careful, it can screw your gif up. to modify your layer by hand, you will need to click and drag points of that straight line in the position you desire. this is the concept behind it:

basically, the lower part of the line handles the shadows, while the upper part handles the highlights of the image. if you pull a highlight point up, the image’s highlights will be brighter. if you pull it down, it will make them darker. same thing for the shadow points. you should play with it to get a grasp of it, that’s what i did when i first started giffing.
BRIGHTNESS & CONTRAST
then i added a bit of brightness and contrast.

CHANNEL MIXER
the scene looked a bit too yellow, so i used the Channel Mixer (layer > new adjustment layer > channel mixer) adjustment layer. here’s a tutorial of how it works. not every scene needs the Channel Mixer layer though, i mostly use it to remove heavy overall tints. in this particular case, the Curves layer got rid of most of the yellow, but i wanted the gif to be just a bit more blue so the Channel Mixer tweaks are very minimal.

SELECTIVE COLOR
now, this adjustment layer i always use: Selective Color (layer > new adjustment layer > selective color). this is THE adjustment layer to me, alongside the Curves one. this is how it works:

ie, you can separately edit a color this way, giving it tints. for this gif, i wanted to make the colors more vibrant. to achieve that, i edited the selected colors this way:

for the reds, i added even more red in them by moving the first slider to the right, making the color more vibrant. for his hat to have a more warm tint, i added yellow to the reds (third slider, moving it to the right). finally, to make the reds stronger, i moved the last slider to the right (more black).
for the yellows, i made them brighter by adding white to them, thus making the tile wall and Paddington more bright as well.
for the cyans and the blues, i just added the maximum (+100) of black that i could.
i wanted for Paddington's nose to be brighter, so i added more white to the whites.
lastly, i added depth to the blacks by increasing their own blackness.
you should always play with the Selective Colors sliders for a bit, before deciding what you want or need. with time, you will automatically know what to change to correct the color grading. it all takes practice!
HUE/SATURATION
i don’t know if you noticed, but there are some green spots on the blue wall behind Paddington. to correct that, i added a Hue/Saturation adjustment layer (layer > new adjustment layer > hue/saturation) and made the saturation of the greens 0%, making that unwanted green disappear from the background.

while the green spots on the wall are specific for this gif, i use hue/saturation a lot to tweak, well, hue and saturation. sometimes someone’s skin is too yellow, i made it redder by tweaking the reds and the yellows, or vice-versa. the hue bar follows the rainbow bar, so the maximum settings (+100 and -100) give the selected color to change its hue to something more red or pink (the rainbow extremities). changing hue can give pretty whacky results, like turning someone’s skin tone to green, so you will need to play with it to get the hang of it. you can also tweak the opacity of your hue/saturation layer to further improve your gif’s coloring. i didn’t do it in this case, the opacity is still 100%. the reds and the blues had their saturation increased to make them pop just a bit more, without affecting the other colors.
COLOR BALANCE
the highlights of the gif still had a green tint to it due to the automatic correction of the Curves layer, so i used Color Balance. this is how it works: instead of giving specific colors some tints, you can give them to the shadows, highlights, and mid-tones. if your shadows are too blue, you counterbalance them with the opposite color, yellow. same thing with the cyan-red and magenta-green pairings. in my case, i added a bit of magenta.


B&W GRADIENT MAP
now, if this gif was a dish, it’s time for the salt and pepper. i always add a Gradient Map (layer > new adjustment layer > gradient map) (black to white gradient) with the Soft Light blending mode, thus giving my shadows more depth without messing with the mid-tones and highlights. it also doesn’t “deep fry” (you know those memes?) the gif too much by adding even more contrast. usually, the opacity of the layer is between 30% to 70%, it all depends on the gif. it always does wonders, though!

COLOR FILTER
finally, i like to add Color Filters (layer > new adjustment layer > color filter) to my gifs. it’s very handy when giving different scenes for the same minimalistic set because it makes them kind of match despite having completely different colors. in this gif’s case, i added a “deep blue” filter, opacity 50% density 25. you can change the density and the opacity of the layer for further editing, again, it all depends on the gif.

VIBRANCE
if i feel like it, i add a vibrance layer (layer > new adjustment layer > vibrance) to make the colors pop. this can ruin your coloring sometimes, especially when regarding skin color, so be careful. i didn't do it in this gif because i felt i didn't need it.
TA-DA! 🥳
AN OTHER EXAMPLE
the color grading of the original scene it’s pretty good as it is, to be honest. let’s see a worse scenario, a VERY yellow one:


no channel mixer this time because the automatic curves option dealt with the yellowness, but you can see it made the gif too green. i needed to correct that with the following adjustment layers:
curves (automatic option) (gif 2) >> same curves layer (tweaks) (gif 3) >> brightness & contrast (gif 4) >> hue/saturation (tweaked cyan+blue+green) >> selective color >> color balance (gif 5) >> b&w gradient map >> (sepia) filter >> vibrance (gif 6)
i added a hue/saturation layer to remove the blues & greens before my selective color layer because i thought that was more urgent than tweaking the tint of all colors. color balance (gif 4) was the real hero here, though, by removing the green tint. the selective color layer was meant to make the red pop more than anything else, because the rest looked pretty good, especially her skin tone (despite the green tint). you can notice that tweaking the curves layer (small gif 3) also helped A LOT with the green problem.
tl;dr 😵💫😵💫😵💫
here's a list of my go-to's while coloring and lightning gifs. it's not a rule, just a guide. there are gifs in which i don't use all these adjustment layers, or use them in a different order. it all depends!
1. curves (automatic option + tweaks) 2. brightness & contrast 3. channel mixer 4. selective color 5. hue/saturation 6. color balance 7. b&w gradient map 8. color filter 9. vibrance
i'll suggest that you study each adjustment layer listed for more info, either with other Tumblr tutorials or YouTube ones. the YouTube ones focus on images, but you can translate what they teach to gif making very easily. you can ask me to further explain any adjustment layer, too! i was brief to keep this short (which i kinda failed lol).
feel free to ask me for clarification or something else about gifmaking wise, i always like to help. ❤️
#*#*tutorials#gifmaker tag#resources#resource: tutorials#ps help#uservivaldi#tuserjen#userrin#userelio#useralien#userzaynab#userchibi#userbuckleys#usertj#userbess#tuserlucie#useraljoscha#userdavid#usershreyu#usernolan#userhallie#userisaiah#tusergio#tusergeo#userjesslynn
658 notes
·
View notes
Text
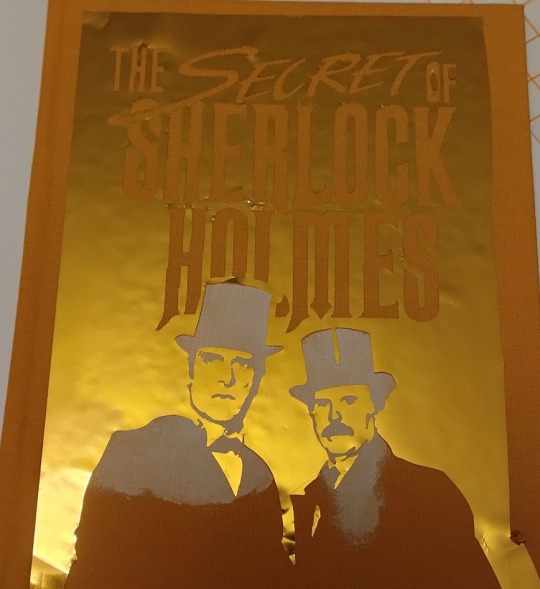
The Secret of Sherlock Holmes bookbinding project!
I've really wanted a hard copy for a while of 'The Secret of Sherlock Holmes' play by Jeremy Paul, which was performed by Jeremy Brett and Edward Hardwicke (and is very high on my list of things to go and see if I get a time machine, because there aren't any video recordings of it.)
ANYWAY it's long out of print and very expensive to buy so I figured... I can just make one myself!
First I bound the text block. It's so slim, at a grand total of 75 pages.
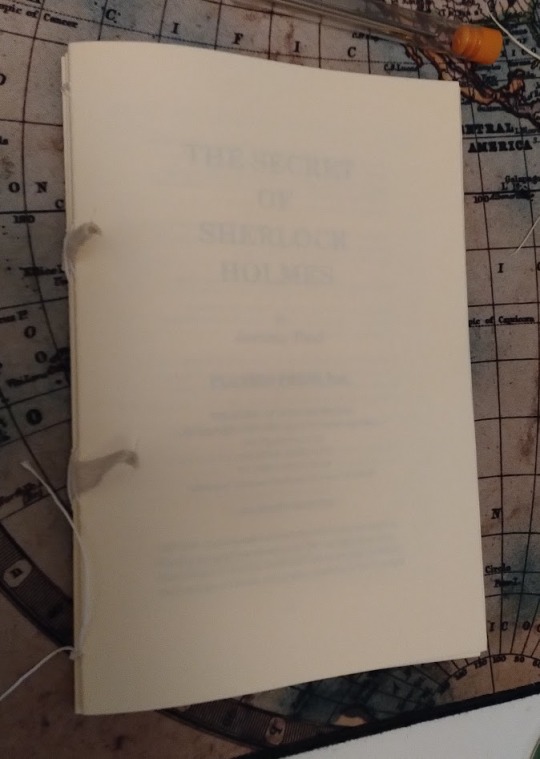
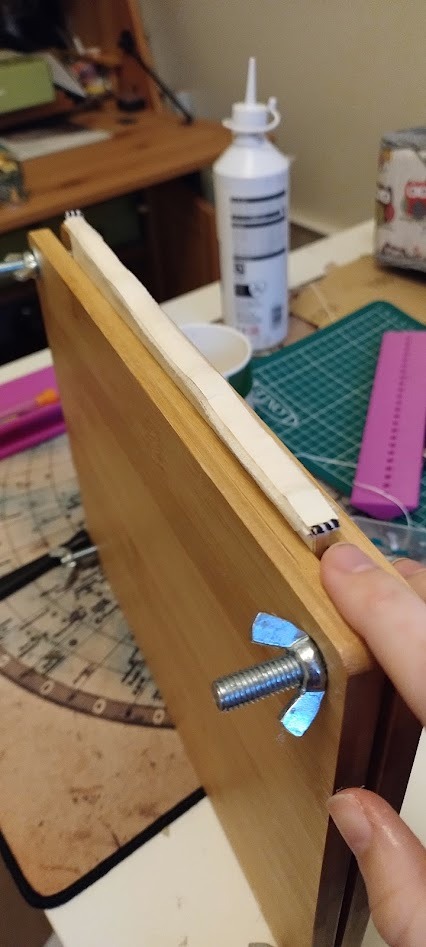
I bound the cover in honey-coloured book cloth, and then set about creating a cover design.
I wanted to use the official logo of the play and this amazing publicity photo, so I went into my paint package of choice (clip studio) and tweaked the photograph until I was happy I'd got a likeness of the actors only using black and white. I think Jeremy Brett lost a little of his handsomeness, alas.


A while ago I bought a cutting machine, a Silhouette Portrait, which comes with some great software which can automatically convert an image like this into a path for the cutting machine to follow, although I usually tweak it manually too.
For example, I figured the weave on Hardwicke's tie was too intricate so I removed it.
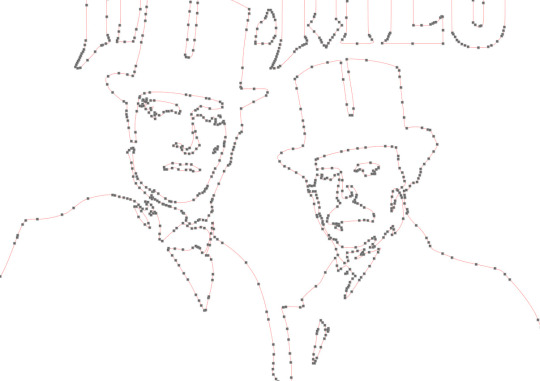
Then I set the cutting machine to work!
For a while I tried using self-adhesive vinyl to make covers, but I found that it wasn't very hard-wearing and would start peeling off. These days I use self-adhesive vinyl to make a stencil, and then paint onto the book cloth in acrylic. The fact that the stencil is self-adhesive reduces the chances of any paint sneaking in underneath!
(The stencil is gold just because I have a lot of spare gold vinyl - it's probably not the best colour to use.)
For this project I did something I've never done before, which is doing two layered stencils, a white layer underneath, and then a black layer on top.
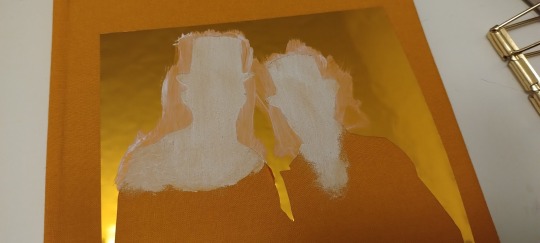
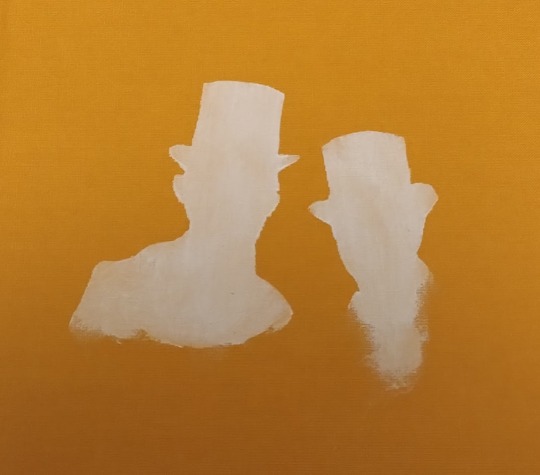
I kind of regret not painting all of the figures in white because if you squint you can see the line where the white stops on the final piece.
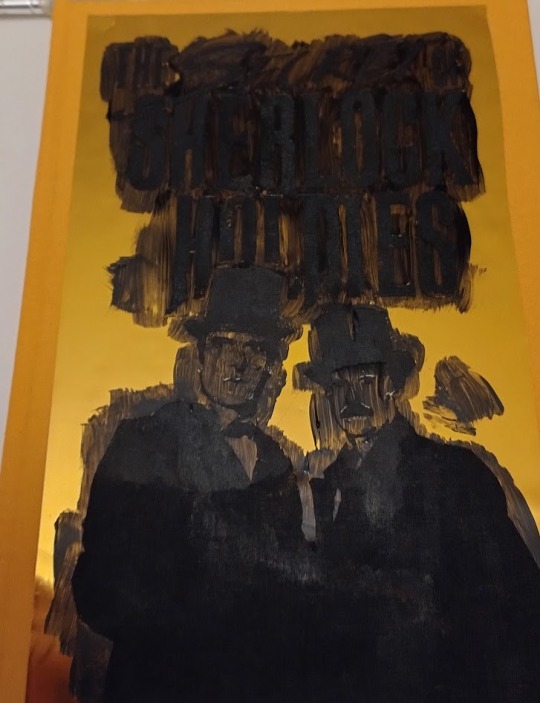
And now for the really satisfying bit - peeling of the stencil when everything has dried!
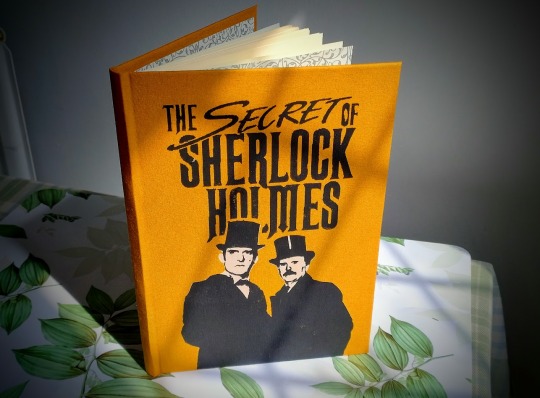
I'm really pleased with the finished book, and it's so fun to possibly have the only hardback version of this play... ever...???


569 notes
·
View notes
Text

Kinktober Day 7: Secret Relationship
Spencer Reid x you
Contents: fem!reader x Spencer Reid (Criminal Minds), oral sex fem receiving, flashbacks, ooey gooey feelings
W/C: 3.2k
Ok so I’m behind again, oops, but I’m proud of this one! Again, not the kinkiest but I got carried away with the fluff and I also got into a cipher-related rabbit hole so I hope you enjoy regardless :))
PS: This is also a love letter to pre-boyband hair season 5 Spencer, AKA my favourite hair era, as depicted below
Kinktober Masterlist | General Masterlist | AO3


“Do you want to grab some coffee?” A voice whispered beside you, a touch too close to be just colleagues. You smiled uncontrollably, heart rate picking up as his hand brushed across your back.
“Sounds good.”
That’s how you found yourself pressed against the door of the copy room, Spencer’s lips on yours, his hand up your skirt.
“We’ve got time, baby…” He practically whined between kisses, bucking his hips into yours.
“Spence! We have…“ you checked you watch absentmindedly, “5 minutes until briefing.” He grinned.
“I take that as a challenge…”
His head started to dip, moving to kneel down, but you grabbed his hair with a fake gasp of disbelief, pulling him back up to his usual height, looming over you.
“Oh honey, I don’t doubt you could, but I’m not sure these walls are soundproof.” Your fingers moved to his cheek, and he sighed into your lips, his hands returning to your waist and squeezing.
“But you left so early this morning, I didn't have time to start your day right…” You were grinning ear to ear, noses bumping into each other clumsily, and you whimpered into his mouth as his teeth grazed your bottom lip.
“I know, I know, I’ll make it up to you later, I promise…” You kissed him one last time with finality, pushing off the door and smoothing your skirt, but he was slightly less keen to leave, pressing himself against your hip as he helped straighten your hair and lip gloss. “I should probably leave first. You clearly need a minute.” He huffed behind you, but you had already slipped out of the room, heading into the bullpen as if nothing had happened.
You’d had a crush on him for a long time before anything happened. You joined the team a couple of years ago as a linguistics and code-breaking expert - something that was surprisingly helpful in the cases the BAU took on. You’d harboured years of butterflies, coy glances, occasional hand grazes… and you thought you’d done a pretty good job at hiding it. You’d known it was unrequited - he never so much as looked in your direction unless he was asking your opinion on something he was working on. It was starting to get to you. Your feelings had slowly been growing, swelling in your chest as you watched from afar, to the point where you had considered transferring departments. And then it all changed.
It was a case in California; a serial killer who was carving encrypted messages into his victims posthumously, only you had no idea what cipher he had used. You and Spencer had been working tirelessly for days to crack it while the rest of the team were searching for physical evidence, and it was a distraction you were grateful for. Even though you were working alone with him in close quarters, it was one of the few times you could briefly forget about your feelings, too consumed with your work to allow yourself to think about him.
It was night 3 of sleeping at the station. JJ had predicted it was going to happen, moving your go bags from the hotel to the precinct on the first day, and you and Spencer had been taking turns napping on the small couch whenever you physically couldn't keep your eyes open. You were sleep deprived and strung out, but you were close. You could feel it. You knew it wasn’t a shift cipher or some kind of alternate alphabet converted back and forth - you had exhausted every possibility of that days ago. You had been testing more complex ciphers, Garcia running everything imaginable through software to attempt to decipher it, but with no luck.
“What haven’t we tried?” Spencer muttered, pacing the room after a last ditch attempt at some kind of converted polybius square. Garcia was on speaker, confirming that she had tried every option available to her twice over.
“I mean, at this point, it could only be some kind of complex Vigenère cipher that somehow hasn’t been deciphered through Garcia’s software, or…” You didn’t even want to say the other option aloud - just the thought that three days work would’ve been completely wasted sent a shiver through your body.
“Or it’s a one-time pad.” Spencer said what you were too scared to, collapsing on the sofa with a sigh.
“A one-time pad? Is that the…”
“Unbreakable cipher. Yeah.” He confirmed.
“Unless…” A thought struck you, and you stood to the whiteboard you had set up in the room, scribbling down the ciphertext from the first body and converting it to numbers. “We need to think about this from the unsub’s point of view. He wouldn’t use a true OTP because if he truly wanted to hide this code, he wouldn’t carve it on his victims. But, the key might not be random.”
“Yeah, but then it would’ve been picked up on Garcia’s systems…”
“Not if each body had a different key….” You had written and converted the next two bodies’ codes while you were speaking, and you stood back briefly, showing Spencer what you had written. “We’ve been collating the messages and running them as a whole, but…do you see a pattern?” He paused, eyes scanning over the board frantically, and then he calmed visibly, a wave of realisation hitting his features. You smiled as he saw what you did, standing quickly and grabbing another pen to scrawl the keys beneath each.
“The Bible.” He whispered. “A Vigenère is hardest to break if the key is as long as the plaintext. Seven letters. Six letters. Nine letters. Genesis. Exodus. Leviticus.”
“It might work.” He nodded, brow furrowed in thought as he stared at the lettering.
“Let’s try it.” He wrote the corresponding letters as you did the sums, converting them back to the alphabet and - to your shock and relief - it was making sense.
P. L. E. A. S. E. H. …
E. L. P. M. E. I. …
C. A. N. T. S. T. O. P. J. …
“Garcia, can you read the last body please? The one we don’t have photos for yet…”
“No need.” Spencer muttered, writing it down without glancing up. You forgot how immaculate his memory was sometimes.
“Thank you.” It was seven letters. Perfect. You wrote numbers, he converted, you did the sum and muttered the letters aloud…
A. M. E. S. T. O. L.
“James. James ‘tol’? Is that a name, or the start of one?” Garcia asked over the speaker, but Spencer wasn’t listening, muttering to himself as he moved to the files quickly, flipping through them.
“No, I…” You answered for him, “I think Spence is onto something Pen…”
“Get Hotch on the line.” He barked, finding what he was looking for and bringing it to you.
“Hotch here…” A tired voice rung out in the small room just as you realised what Spencer was showing you, a gasp escaping your lips.
“It was David.” He breathed immediately, his words tumbling out at a breakneck speed. “The message on the bodies said something about James followed by T-O-L, and that reminded me of your interview…”
“David kept referring to a colleague throughout the interview, a James, that ordered him around a lot…”
“If he kills again, I bet the phrase would be completed. James told me to, maybe?” You mused, and Spencer nodded.
“Garcia, have you got his file.”
“Yes, I’m opening it now and… oh my god.”
“What is it?”
“He had a brother called James. Hung himself when David was 11.”
“And all of his victims died from strangulation.” The pieces had fallen perfectly into place.
“Address?”
The unsub’s home had been closer to the hotel, so Hotch and the rest of the team went to his listed address, leaving you and Spencer to wait nervously in the precinct. You were pacing frantically, knotting your hands as the sound of your heavy boots echoed throughout the room. Spencer cooed your name calmly, and you turned to him, blushing lightly. He was sitting on the edge of the sofa, leant forwards with his arms on his knees looking up at you with… a look you’d never seen before. Concern mixed with something else, something foreign to you. But it was gone as quickly as it had appeared, replaced with a kind smile.
“Just sit for a minute. Try and relax.” You nodded weakly, perching on the edge and trying to still your racing heart, leg bouncing and hands still twisting in each other with nervous energy.
“Sorry, I… I know we’ve done our bit now but I hate not being there when the team are apprehending him…”
“I know what you mean,” he muttered. You sat in silence for a few minutes, mind racing with what might be happening. What if he was armed? What if he’d decided to shoot his way out? They could all be dead right now, and you would have no idea….
Spencer’s phone rang. He stood, answering it quickly. It was Emily, and you heard him mutter a few affirmatives, smile playing across his features.
“Did they…” You asked as soon as he hung up, and he nodded.
“Yep, it went perfectly. He’s in custody, and they’re on their way back now.” The relief you felt was palpable, a sigh falling from you as he sat back down on the sofa next to you, sinking into it and resting his head back, mirroring your position.
You hadn’t realised your leg was still bouncing until his hand fell to it. Your breath caught in your throat as he squeezed lightly, stilling you effortlessly. He was so warm, slender fingers fanned out across the space just above your knee, and it took a moment for you to compose yourself. You turned your head, and he was already gazing at you, the mysterious expression from earlier back, his dark eyes meeting yours with warmth.
“You were incredible today…” He muttered, hand still resting on his leg, and you couldn’t help but blush. He was the most intelligent person you knew, and likely would ever know, and even without your feelings being involved, a complement from him was about the highest praise a person could get in your line of work.
“Thank you, but I couldn’t have done it without you…”
“Bullshit.” He whispered, and you laughed.
“Ok, maybe I could’ve, but it would’ve taken me twice as long.” He chuckled then, eyes scanning over your face with an intensity you only saw when he was trying to analyse something. It felt as though his eyes were boring into your skin, and you had to look away, heart near beating out of your chest. His hand shifted slightly on your leg, and oh sweet Jesus you just remembered it was still there. It had a strange affect on you - like when you put a harness on a cat and they suddenly couldn’t walk. You were frozen solid, trying to breath and staring at the ceiling.
Then his hand touched your chin. It was light, delicate, just guiding your eyes back to his and it wasn’t until that moment you finally realised what that look had been, the one you couldn’t identify. It was a reflection of what you had been feeling for months. The longing, the restraint, the need that swirled up inside you every time you stole a glance at him, and now, seeing those same emotions in his soft eyes, it was sobering. He wanted you too.
He moved first, gently pulling your lips to his and kissing you, light as a feather. It was tentative and sweet, so unsure and your body took a second to process that the thing you had been imagining for years was actually happening. And then you smiled, hands moving to the base of his neck, fingers twisting into his gorgeous hair and you pulled him back to you, lips clashing in a kiss full of years of pent up desire and desperation. You felt his body relax under your touch as the kiss deepened, his hands wandering to trail your waist and hips, before tangling in your hair and holding tight, pulling you closer. You had twisted until you were practically on his lap, hands falling to his shirt and bunching it up as his tongue finally hit yours, every bone in your body turning to jelly as you tasted him. It was magnetic, everything you had wanted for a long time finally coming to fruition and you couldn’t even break away for a second of air, so lost in him that breathing was no longer important.
And then the Precinct door banged open, and you jumped away as though you had been electrocuted. You laughed, cursing quietly as you tried to smooth your hair, tousled from his hands, while he just smiled, gazing at you.
“Spencer!” You whisper-shouted at him, still grinning uncontrollably, and he finally moved, straightening his shirt and placing his jacket over his lap. You giggled like a school girl, standing and moving to the whiteboard to try and convey a more believable working situation, and to put some distance between you and him, not sure how well you’d be able to hide your smile if he was so close to you.
You still jumped when Rossi opened the door to the room, although, you were more surprised when he didn’t speak. You turned to him, confused, and he pointed at Spencer. When you followed his eye line, you realised he was pretending to sleep, head slouched to one side and mouth slightly parted. He looked beautiful.
It had been six months, and you were stronger than ever. You honestly weren't sure how you were still keeping it a secret. You had had years of practice when you were just pining after him, sure, but it was a hell of a lot harder to not give anything away when every time you looked at him, you got flashbacks to the night before. Even if the team somehow did suss out a vibe, no one said anything, which was something you were grateful for. Spence was a lot better than you at masking his feelings, so anyone who noticed something probably assumed you just had a crush on him. Which was true enough.
You had managed to avoid looking at him the entire briefing, which was honestly a miracle, but your mind was ever so slightly distracted by your rendezvous in the copy room. As JJ spoke, you heard something about male victims, and she might have mentioned Tennessee, but all you could think about was that travel meant your date night plans were cancelled. And you were always cautious in hotels - too close to your other colleagues. It was hit or miss; sometimes, the fear of it was fun, the idea that someone could knock and catch you in the act, but if you had adjoining rooms with any of your teammates… well, them hearing you scream his name might just be a bit awkward. So, naturally, all you could think about now was finishing what you started earlier. You wanted this meeting to be over, to get him somewhere private and to let him completely wreck you before the long plane ride, to get this idea out of your head so you could focus on the case at hand. And then, at last, came the magic words…
“Wheels up in 20.”
The team dispersed quickly, and you caught Spencer’s sleeve just before he left the room.
“My car?” You muttered, earning a grin.
“Change your mind, baby?”
“Shut up.” You smiled. “I’ll meet you down there…”
“What’re you doing?” You practically whimpered, as he opened the passenger door instead of joining you in the backseat. He chuckled.
“Just making space.” You were about to ask what for, when he deftly moved the seat forwards, before getting in the back. Oh. You grinned as he pressed his lips to yours with hunger, backing you into the corner and you let yourself be dwarfed by him. His fingers trailed your collarbone, to your waist, and gripping onto your thigh with urgency. You whined as his lips left yours, earning another soft laugh. He managed to fit his tall frame mostly in the footwell, pushing your skirt up to your hips as you bit your lip, admiring him. He was so beautiful, the way his hair fell over his face, his earnest eyes, almost pleading in the way he looked up at you, his long fingers that so deftly moved your panties to one side.
“Can you…” he muttered gesturing to his hair, and you giggled, hand running through the front locks and holding them away from his face. Your leg draped over his back as his head dipped, tongue going straight to your folds, lips circling your core and kissing your sensitive bud with a hum of contentment. Your body relaxed into him, moan escaping your lips. He’d always been enthusiastic about eating you out, and you’d never complained about it. He was good. Really good. And today was no different.
He was lapping you up, relishing every taste and you were getting closer to your orgasm with every circle around your clit, cunt clenching around nothing.
“Spence…” you managed to gasp out, writhing in the seat, “fingers…” He didn’t hesitate for a second, one of the hands firmly holding your thighs apart trailed down to your centre, two fingers slipping into your soaking core. Your groan was filthy as he found that spot that made your toes curl with such perfect precision it was blinding.
“Oh god Spencer…” you choked out between moans and pants… “baby I’m so close…” Your hands tightened in his hair, pulling him closer, and he groaned into you, sending a wave of pleasure through you that sent you over the edge into that searing hot pleasure you were so used to receiving from him. He held onto you as you rode it out, his tongue still circling you until you were finished, finally stopping when you started to whine and squirm from overstimulation.
“Fucking hell, Spence.” You muttered, as he gently returned your panties and carefully let your skirt fall back around you. You watched in awe as he quickly licked his fingers clean, but it was mostly pointless, as his lips and chin were covered in your slick. You giggled.
“You might have to rinse your face before you join the team.” He grinned, pressing his lips to yours with force, and you could taste yourself on his tongue, making you hum into him.
“Now you will too.”
After a quick clean-up in the parking lot toilets, you both joined the rest of the team, entrances tactically staggered. For once, you couldn’t help but look at him, stealing glances as much as possible, watching as his hands scanned pages as he read and all you could think about is what those hands were doing to you just minutes earlier.
When you started looking into the case, you would be focussed, fully invested, but… you just wanted to stay in this headspace a moment longer. A happy one. A scary one still, for sure, but a fun kind of scary. A hopeful kind of scary. It was peaceful. And peaceful moments were rare in your line of work. His eyes caught yours, sending you a soft smile, and you knew you were in for the long haul, no matter how many people you had to lie or, or how much time you had to hide it for. It was all worth it for the moments of peace with him.
Taglist 🩵 - @emma-e-a
#kinktober 2024#kinktober#fanfic#spencer reid#spencer reid x you#spencer reid fluff#spencer reid smut#Spencer Reid soft#spencer reid fanfiction#criminal minds
240 notes
·
View notes
Text

Katara: ...what did you wish for?
Did I download and teach myself a new animation software solely so I could animate Zuko and Katara watching floating lanterns? Yes, yes I did. It was quite a learning curve, but I enjoyed the challenge! I'm excited to keep experimenting.
I may share the clip in video format later, since the animation itself is high res, but converting it to a small file gif for Tumblr really impacted the quality.
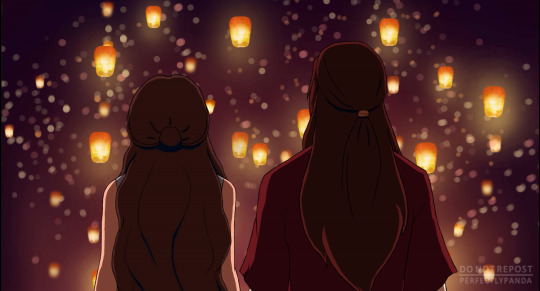
♥ Please do not repost. If you like it and want to show people, share a link to this page instead. Thank you!
#zutara#zuko#katara#fire lord zuko#ambassador katara#atla#pandaverse#zutara pandaverse#look I made a thing
2K notes
·
View notes
Text
Bar Crawl
Kyle "Gaz" Garrick x Female Reader
Content & Warnings (per the warnings MDNI): swearing, suggestive themes, dirty thoughts, flirting, alcohol, kissing
Word Count: 1.5k
On a night out, Kyle takes a chance and makes a move.
ao3 // taglist // main masterlist // summer 2024 masterlist

It’s late, and the alcohol is buzzing beneath your skin like a drone of angry bees.
You rarely go out with the rest of the SAS crowd. It’s not like you’re actually part of the organization. This is a simple transfer. A few months at the most before you head back home. And you’re not in the field anyway. You’re behind the desk, drowning in paperwork.
There is no bloodshed. No metallic tang with a burst of lead.
You only know ink, computer screens, and editing software.
This entire outing is a treat. A way to let loose. Something you haven’t really done since you set foot in England.
And it isn’t only a night out. Someone has their eye on you.
It’s subtle, and you don’t think anyone else notices. But you do. How could you not? Kyle Garrick—also known as Gaz—is incredibly handsome, and entirely sweet on you.
Right now, he’s across the pub with his team, a beer in hand. Captain Price and Sergeant MacTavish are talking while Kyle and Lieutenant Riley listen. While Kyle’s body is turned in their direction, his gaze keeps drifting. It floats away, landing on you every time.
At each meeting of your gazes, Kyle smiles. It’s not sweet exactly. It’s knowing. Nearly seductive. A teasing look from across the room. Perhaps Kyle is feeling the alcohol as you are. Feeling the heat and buzz beneath the skin. The growing sense of need that won’t seem to abate.
The pub is dark, and the lighting only comes from candles and small lamps on the walls. This place was once an old house, but the interior as been converted, and the rooms gutted. Most of the space is just a series of rooms packed with tables. The walls are covered in paintings and all sorts of oddities. It’s eclectic. Fun. But no one is really paying attention to the pub around them.
You really aren’t either. But you’re also not including yourself in the conversation around you. All you can think about is Kyle. He is absorbing into your blood just like the alcohol. Every time you glance away, you find him, no matter where he is in the room.
It is electric. Magnetic.
Building like a brewing storm.
Your heart is hammering. It’s so loud the rest of the pub seems distant. And Kyle is right there, as if you’re looking at him through binoculars. Everything is out of focus. Except him. Only him.
“Are you listening to me?”
You turn abruptly, and give your best smile to Jane, one of the secretaries. “Sorry,” you sigh. “A bit tired.”
Jane and the rest of the women are you nod in agreement. She brings her glass to her lips. “I hear that,” she mutters, taking a long drink, grimacing slightly as the glass returns to the table.
Work has been hell the last couple weeks. It’s a slew of never-ending paperwork. You’ve been stuck at a desk, pouring over reports, consuming more coffee than you probably should be.
A reply begins to form your lips, but then you hear your name being called in a voice you recognize. Everyone at the table startles, turning in the direction of the voice. For a second, you do not follow their movements, only staring down at the table.
But you hear your name again, and this time the urge to glance in Kyle’s direction is instant.
“Sergeant,” you say in greeting.
He grins at you, and then flashes that stunning smile at the women sitting around the table. “Don’t mind if I borrow her for a bit?”
“Not at all,” says Jane quickly.
The other women shake their heads, gazes astonished as you abandon your drink and take Kyle’s offered hand. While his hold is strong, there is gentleness there. You like it. You want to sink down into that feeling forever.
Kyle leads you out into a little hallway, and the clamor of the pub disappears slightly.
“Heard you’re leaving soon,” says Kyle, stepping to the side to allow an employee to pass.
It’s true. You likely only have a couple weeks left before you head home.
“Did you?” you ask. “Who from?”
You haven’t told anyone. Not really. But it’s not a big secret.
Kyle shrugs. “Does it matter?”
You mimic is shrug, and Kyle laughs softly. “Not really. This post was supposed to be temporary anyway. But you know that.”
Kyle shifts a bit closer. His heat is everywhere, warming your limbs. Kyle’s fingers playfully pull at the hem of your shirt. “Planning to leave without saying goodbye to your favorite sergeant?”
You lightly tug on his jacket in response. “Bold of you to think you’re my favorite.”
Kyle barks a laugh, and you smile demurely at your boldness.
This is nice. This is fun.
The two of you have always been a bit sweet on each other. Kyle is always making a point to come see you when he can. He knows your coffee order, and occasionally brought you snacks and lunch. The two of you would hang out and talk. He checks on you, and it softened you to him.
Eventually, you offered up a few kisses, and Kyle greedily seized them.
“Been kissing MacTavish?” asks Kyle.
“Maybe,” you tease.
Kyle tugs on your shirt, and the momentum brings you closer to him. “Maybe?” he replies, tone dropping to something dark and heated. His brow creases in the middle, and you suddenly sense a change in him. “You like his kisses better than mine?”
No.
But you haven’t actually kissed Sergeant MacTavish. He’s cute, but not your type. Kyle is. Kyle is who you want.
You shrug. “It’s been a while. Might need a reminder,” you say softly, leaning in.
The corner of Kyle’s mouth quirks with amusement. “You want to kiss me where everyone can see?”
“Nervous, Garrick?” you counter.
“Never,” smirks Kyle.
Then his hand is on the back of your neck. Kyle’s lips meet yours, and then you’re drowning in him, remembering all the ways you want to be with him.
Kissing isn’t enough. It’s not nearly enough.
You want this man between your legs, to know what he’ll feel like inside you, to have him own you body and soul. Kyle is who you’ve wanted these last few months, and all this flirting and tension has come to this.
The pub seems so distant. A far speck on the horizon. Just an annoying buzz in the background. Right now, all there is for you is Kyle. It’s delicious. Sweet, but with honey on the tongue. All those previous kisses were rather chaste and soft. This is nothing like those. It’s passion laced with salt.
These kisses drip with need, and you breathe it in, wanting more. The warm buzzing beneath your skin is transforming into an inferno.
Kyle pulls away, and you nearly stumble forward when he draws back. The loss of his lips is starling.
“I’ve been wanting to kiss you all evening,” he says, voice husky.
You feel your cheeks heat. You’re suddenly hot everywhere. Burning internally. Ready to explode.
Glancing around, you find the hallway empty. But there are people nearby. Anyone could walk into this hallway and find the two of you wrapped in each other’s arms. While you want to take this further, you don’t want to do it here in the open where people can see.
Wanting Kyle is a deep desire that sits in your ribcage, but you do not want others to be part of this. This connection is only for the two of you.
Kyle’s hand brushes against your cheek, and he guides your gaze back to him.
“Want to get out of here?” he asks, as if reading your mind.
“And go where?” you laugh.
People expect the two of you to be present. But then again, the two of you have been at this function for over an hour. You’ve made a proper appearance. Do you really have to stay for the whole thing? Will anyone actually miss either of you?
“Wherever you want.”
“Wherever I want?” you ask, slightly confused. “You don’t want to stay here?”
Kyle shakes his head. “Fuck everyone else,” he says sharply. “This might be my last night with you. Want to make the most of it.”
It’s true. With everything going on at work, this might be the only time the two of you can properly have together before you’re sent home. You can get his number, but finding time seems daunting.
Kyle is giving you the rope, and all you need to do is take. To take the leap and trust him.
He draws you in for another kiss, and this one is slow and sweet.
“Let’s go,” you murmur against his lips.
He smiles, and you melt.
“Where to?”
taglist:
@km-ffluv @glitterypirateduck @tiredmetalenthusiast @miaraei @cherryofdeath
@enarien @saoirse06 @ferns-fics @unhinged-reader-36 @miss-mistinguett
@ravenpoe67 @tulipsun-flower @sageyxbabey @mudisgranapat @ninman82
@lulurubberduckie @leed-bbg @yawning-grave81 @azkza @nishim
@haven-1307 @voids-universe @itsberrydreemurstuff @spicyspicyliving @keiva1000
@littlemisscriesherselftosleep @statixx-x @umno-yeah @blackhawkfanatic @talooolaaloolla
@sadlonelybagel @kadeeesworld @iloveslasher @sammysinger04 @dakotakazansky
@suhmie @jaggersinclair @jackrabbitem @lxblm @beebeechaos
@no-oneelsebutnsu @kidd3ath @certainlygay @thewulf @lovely-ateez
@arrozyfrijoles23 @gingergirl06 @eternallyvenus @smileykiddie08 @vrb8im
#kyle garrick x reader#kyle garrick cod#kyle gaz garrick#kyle garrick#cw: alcohol#cw: suggestive#kyle garrick fanfic#kyle garrick x you#gaz fanfic#gaz cod#gaz call of duty#kyle gaz x reader#gaz x you#gaz x reader#kyle garrick fic#kyle garrick fanfiction#kyle garrick x female reader#kyle garrick fluff#kyle gaz garrick x you#kyle gaz garrick x reader#kyle gaz garrick x female reader#gaz fanfiction#gaz fic#kyle garrick x fem!reader#kyle gaz garrick fic#kyle garrick smut#kyle gaz garrick smut#kyle gaz garrick fluff#gaz smut#gaz fluff
207 notes
·
View notes
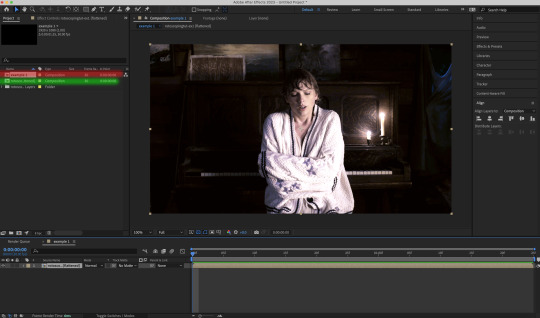
Photo


Rotoscoping Tutorial by @antoniosvivaldi
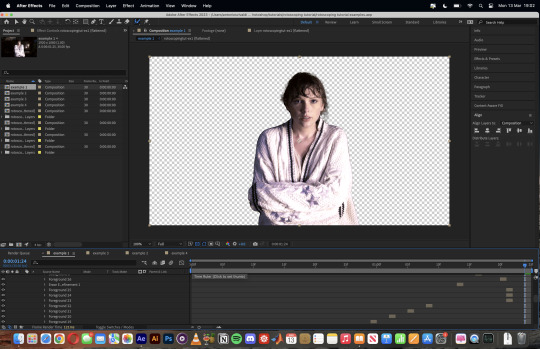
Hi everyone! I’m excited to announce my long-delayed Rotoscoping Tutorial - requested by a number of people over the past calendar year.
In this tutorial, I will show you how to create the cutout gifs like this (and seen in most of my gifsets under this tag) with Rotoscoping on After Effects. I’ll also provide additional examples and a number of things that I do to optimise my giffing / Rotoscoping workflow (e.g. useful shortcuts & other things to be aware of).
This is the structure of the tutorial:
Why Rotoscoping? Photoshop video timeline’s limitations
Photoshop workflow pt 1: Preparing your gif
After Effects workflow: Interface, shortcuts, and Rotoscoping tools
Photoshop workflow pt 2: Assembling your gif; with multiple examples
Bonus content: Rotoscoping tips* & workarounds to common issues
For quick reference, here are example gifsets (and where Rotoscoping is used in the posts) that I will mention in the tutorial:
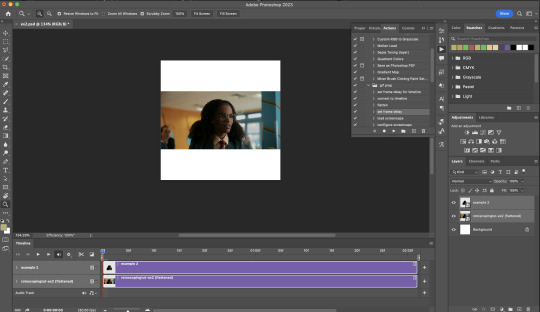
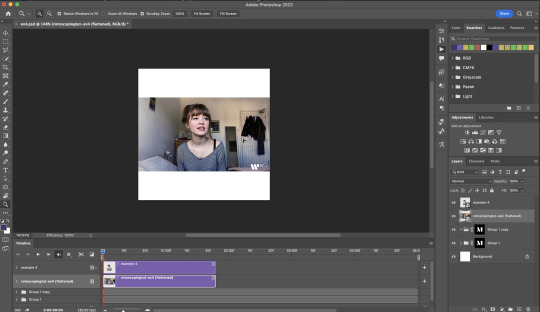
Example 1: Cutout gif effect | panels 2 + 4
Example 2: Changing a gif’s background colour | all panels
Example 3: Cutout gif effect in a shape | all panels
Example 4: Putting it all together | panels 1, 3, & 5
What you need & need to know:
Software: Photoshop & After Effects (After Effects 2021 or later for Rotobrush 2.0)*
Hardware: 16GB RAM required to run later versions of AE*
Difficulty: Advanced; Knowledge in making gifs, applying layer masks, and using video timeline interface assumed
Key concepts: Rotoscoping (AE) / Video Timeline (AE+ PS) / Layer Masks & Groups (PS)
Supplementary files: tutorial resources
*I’m currently running the latest version of PS & AE on an M2 Mac, but I’ve also used older versions (CC 2015 & 2020) on Intel-based Macs. I’ll outline some known compatibility & performance issues, and workarounds later in this tutorial that could help streamline your giffing workflow.
Tutorial under the cut. Like / Reblog this post if you find this tutorial helpful. Linking this post / the example gifsets in your post caption, will be greatly appreciated if you read this to create effects seen in Examples 3 + 4.
1) Why Rotoscoping?
My Rotoscoping journey is motivated by the shortcomings on Photoshop - namely the limited options to manipulate the Layer Mask keyframes in the video timeline interface, as well my need to gif more efficiently.
Suppose I want to cutout this subject or recolour the background of a gif on Photoshop: I personally classify the gifs that I prepare on PS into 3 types based on the motion of the subject
These are the common Photoshop-only approaches when attempting to mask the subject in the gif.
Case 1: minimal motion in the subject → a simple layer mask will do the trick
Case 2: some linear panning of the subject in the gif → using the Layer Mask Position keyframes in the video timeline interface will do the trick
Case 3: subject moves around a lot (e.g. zoom motion) → Unfortunately this is where a Photoshop-only workflow will require frame by frame masking. Layer Mask Position keyframes only apply positional translation (but not transformation / rotation) on the layer mask
Enter Rotoscoping on After Effects: Instead of resigning to frame by frame procedure on Photoshop, I opted to make my life easier by learning to Rotoscope on After Effects. This essentially provides me an opportunity to cutout / recolour a wider range of gifs with relative ease.
2) Photoshop pt. 1: Preparing your gif
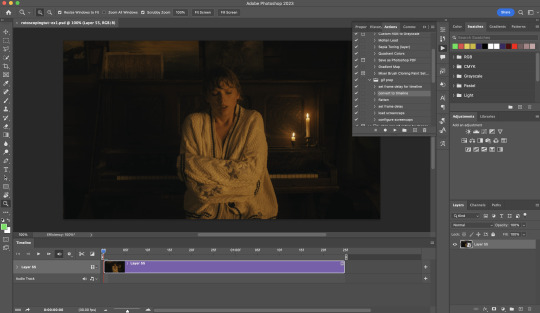
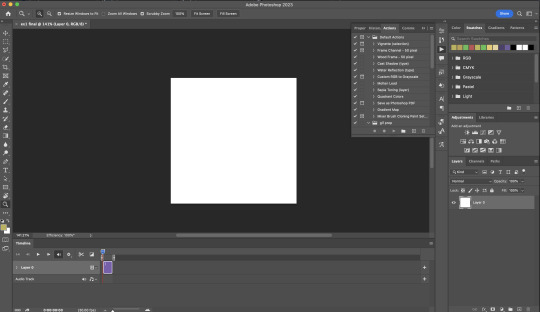
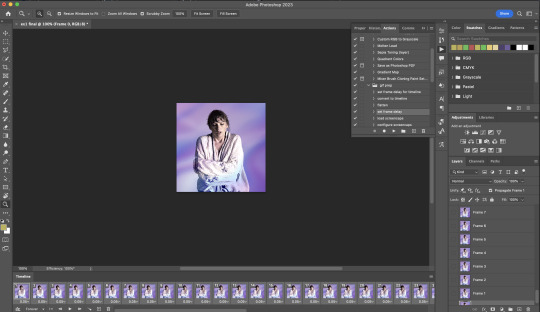
Prepare your gif the usual way - whether you screencap or import frames from video.
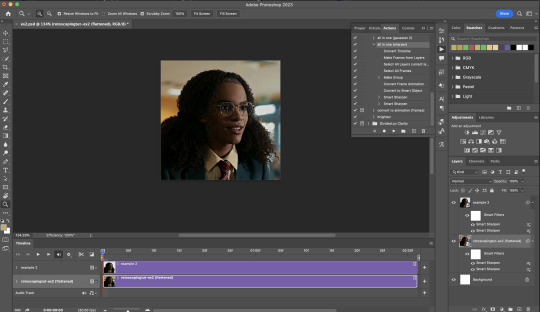
Then your Photoshop should look like this:
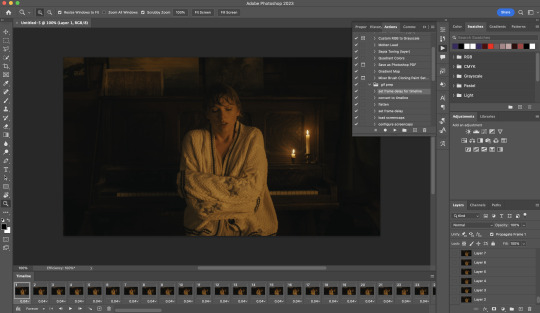
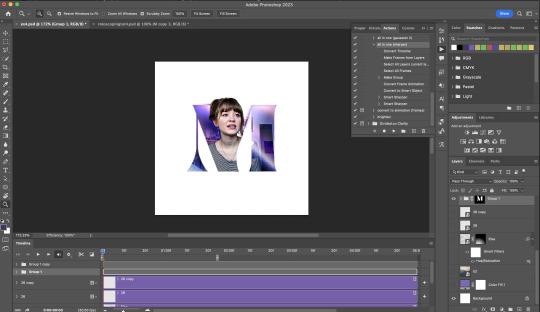
Now, I shall walkthrough & explain my personal giffing workflow (as of 2023) after loading the gif frames. To speed up the process, import my gif prep action file to Photoshop.
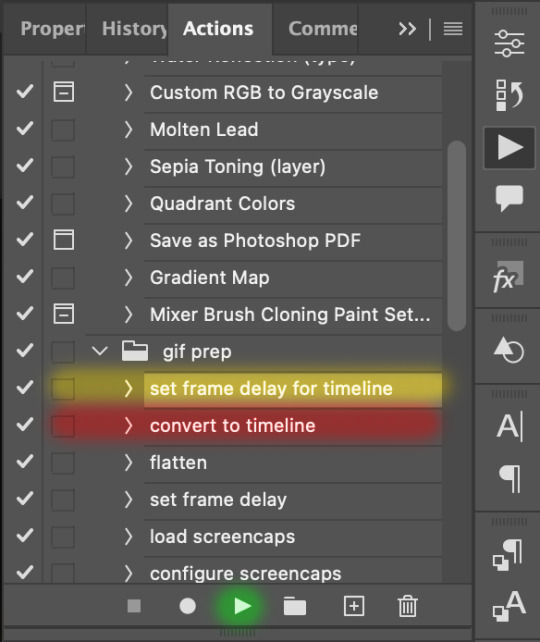
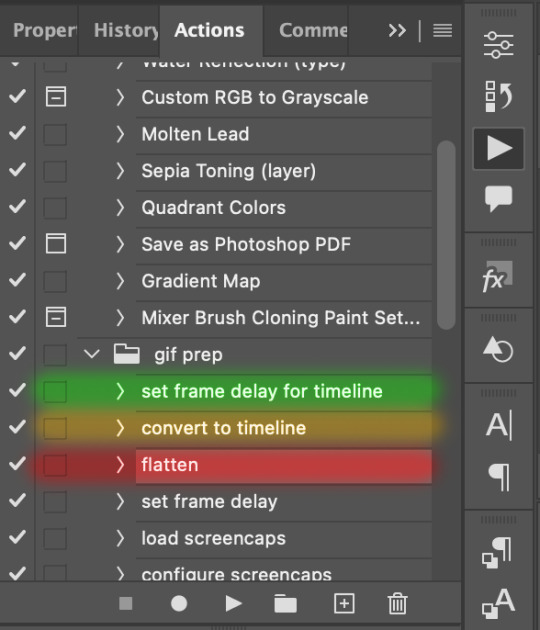
Going to Window > Action, you’ll see a set of actions under the “gif prep” folder.
"set frame delay for timeline” (highlighted in yellow) will set all of your entire gif’s frame delay to 0.03s
“convert to timeline“ (highlighted in red) will take you to the Video Timeline interface
To play an action, press on the Play button (highlighted in green)
i. Set the frame delay of the entire gif to 0.03s. (play “set frame delay for timeline” from my gif prep action pack)
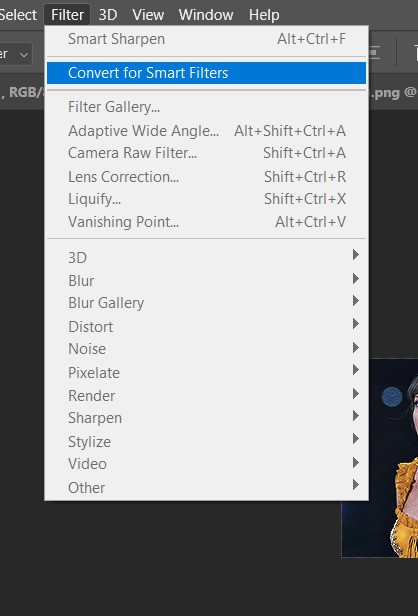
I work with everything in 0.03s frame delay (or equivalently 30fps) at first. It’s always possible to change the frame delay of the final gif to 0.05s before uploading onto Tumblr.
ii) Convert this gif to a Smart Video Layer (play “convert to timeline” from my action pack)
Note: I personally don’t resize the gif just yet. That’s because Rotoscoping in full video resolution will render higher quality details around the edges as well as more flexibilities later on in the editing process.
Performance optimisation: If your computer has 8GB of RAM or less, you might find it helpful to crop / resize your gif to Tumblr dimensions now for a less sluggish performance in After Effects later on.
(I have giffed on a desktop with 8GB of RAM and it’s quite slow at rendering individual frames of a 1080p short clip on AE)
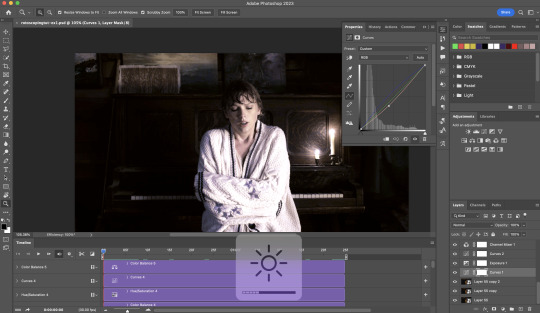
iii) Add colouring adjustments on the gif. This will save you A LOT of time when you Rotoscope gifs that are originally very dark / poorly lit (e.g. the uncoloured Taylor Swift gif shown just above).
If you usually colour your gifs at the very end of your giffing process (i.e. after sharpening), this will be a bit of a change.Nevertheless I still highly recommend adding some base colourings now to at least increase the contrast between the subject and the background.
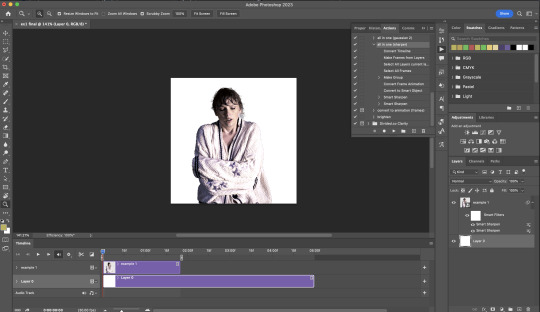
iv) To minimise lagging on After Effects, simplify this gif file as follows:
Flatten / Unsmart this gif file back to frame animation mode: play “flatten” (highlighted in red) from my gif prep action pack
Set the frame delay to 0.03s: play “set frame delay for timeline” (highlighted in green)
Convert the simplified gif file back to the video timeline interface: play “convert to timeline” (highlighted in yellow)
After “unsmarting” and converting back to the video timeline, your interface should look like this

And voila! This gif PSD is now ready to be imported to After Effects for Rotoscoping work!
3) After Effects: Interface and useful shortcuts
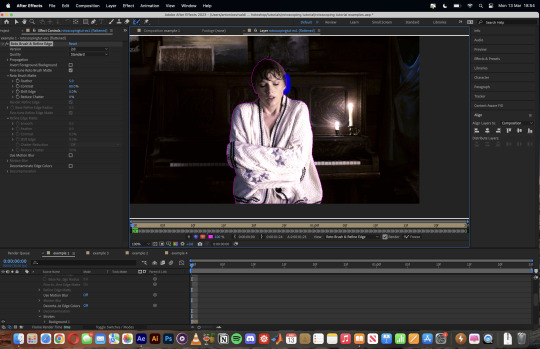
Open After Effects and Import (Cmmd / Ctrl + I) your gif PSD that you’ve just prepared.
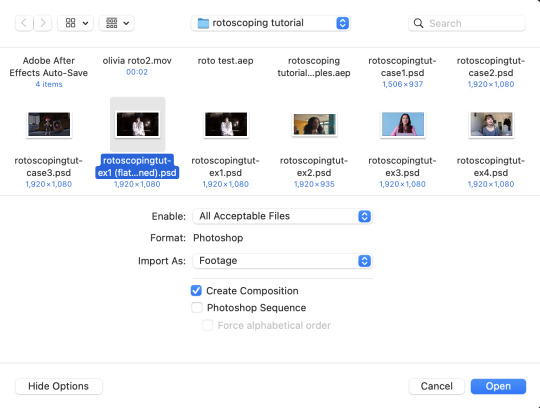
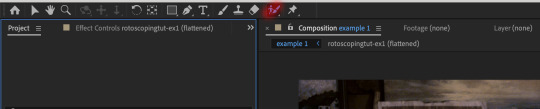
After importing your gif PSD to After Effects, the interface should look like this.
In the screenshot below, there are two compositions: the imported gif (highlighted in green) & another composition file made from selecting the imported gif (highlighted in red)
For the rest of the workflow, we will edit from the clone composition (the one highlighted in red), so select this one.
Before we take our plunge into the Rotoscoping, here are a few useful shortcuts to remember. I’ll explain the Roto Brush tool in the next section.
Preview the previous: fn + up arrow
Preview the next frame: fn + down arrow
Add to Roto Brush selection: holding Shift while you’re using the Roto Brush Tool
Subtract from Roto Brush selection: holding Alt while you’re using the Roto Brush Tool
Change Roto Brush size: while holding Cmmd / Ctrl, click + drag your mouse left / right
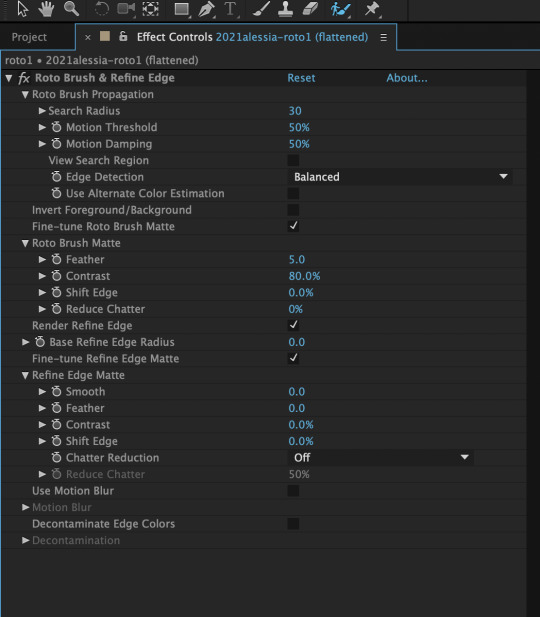
4) After Effects: The Rotoscoping Process
To access the Rotoscoping tools, click on the Roto Brush icon (highlighted in red in the screenshot below)
Then you’ll get the following dropdown options with two Rotoscoping Tools
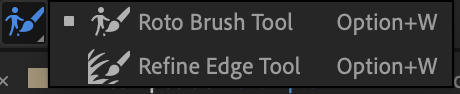
Roto Brush Tool: This is where you add / subtract your Rotoscoping selection in your composition
Refine Edge Tool: Paint around the edge of your selection for more refined edges. Very helpful for Rotoscoping fuzzy edges / hairs
To make some Rotoscoping selection, first grab the Roto Brush Tool and click on the subject you want to cut out from your composition.
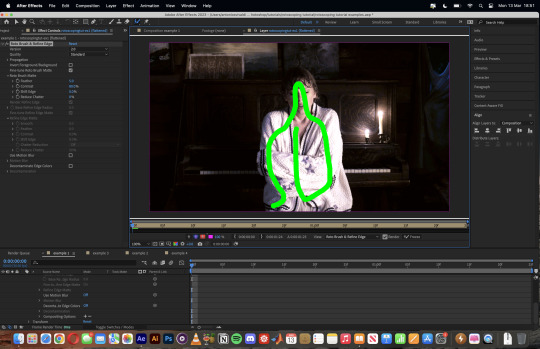
When you’re Rotoscoping you’ll see this in the Effect Controls panel.
There are two versions of Roto Brush:
Version 2.0: The Rotoscoping selection is powered by AI for higher accuracy when you propagate the frames.
Version 1.0 (Classic): This is the legacy Roto Brush Tool that uses a lesser algorithm. Recommended only if Roto Brush 2.0 is unstable on your machine due to RAM issues.
And two quality settings for Roto Brush 2.0:
Standard
Best
Note: I am currently unable to use Roto Brush 2.0 with Best quality model on my machine to compare the differences myself, so I’ll link this page that explains the two quality settings.

Note: if you’re using an older version of After Effects you’ll see this instead. This corresponds to Roto Brush 1.0 / Classic in the newer versions of AE.
When you’ve made a selection using the Roto Brush Tool, you’ll see the pink lines around the subject. This is the region that you’ve selected to Rotoscope!
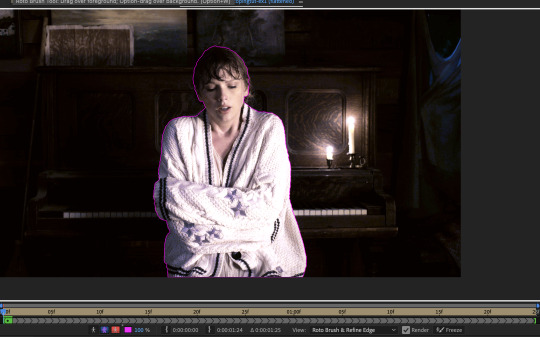
To bring out some details around the edges, grab the Refine Edge Tool and paint around the edges
Then the interface will look like this

To view the Rotoscoping selection that you’ve made more intuitively, you could click on the following buttons.
Personally I like the viewing my selection using Toggle Alpha (the second box from the left) & Toggle Alpha Boundary (the 3rd box from the left)

Toggle Alpha
Toggle Alpha Boundary

Note: If you aren’t happy with the initial Roto Brush selection, you can always add (press Shift while using the Roto Brush Tool) / subtract (press Alt / Option using the Roto Brush Tool) your selection.
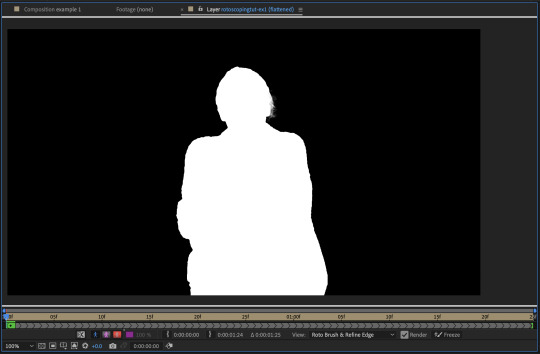
After you’re happy with your Rotoscoping selection in the first frame of your composition, press fn + down to view the next frame.
Repeat pressing fn + down and fix the selection along the way (e.g. I subtracted a small area from my Rotoscoping selection with the Roto Brush tool to make the edge look cleaner).

After fixing the selection along the way, go back to the composition file (select the clone composition again) and you will see that a cutout gif is made!
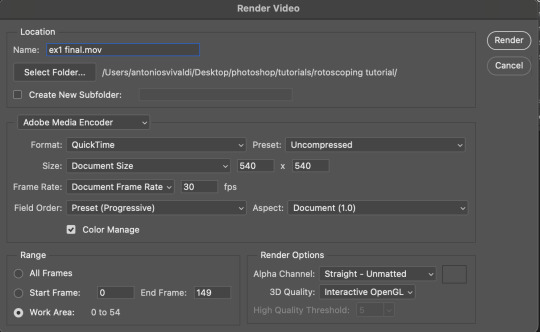
To export this, go to File > Export > Add to Render Queue. You’ll be redirected to the Render Queue panel at the bottom of After Effects.
Highlighted in red: click to change export setings
Highlighted in green: click to change save destination
Highlighted in yellow: click to render video

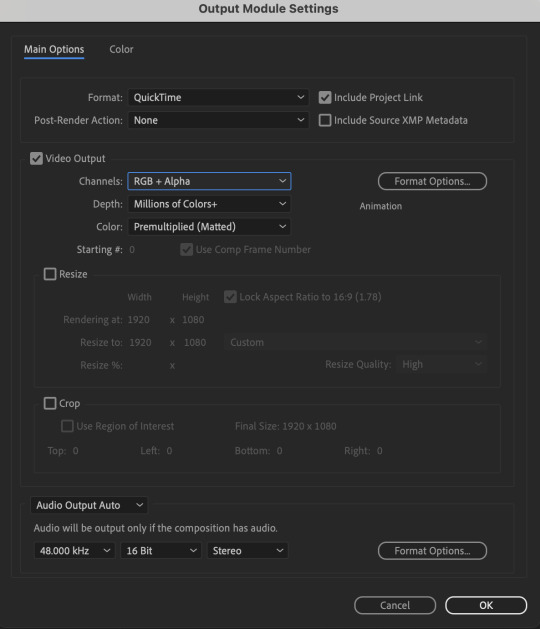
To preserve the transparency of your cutout gif, you need to change your export settings in the Output Module.
Under the Video Output section, change your Channels to RGB + Alpha. Press OK. Then Render the video.
5) Photoshop pt. 2: Assembling your final gif
The essence is to drag the cutout gif (aka the video file that you’ve just rendered on AE) into a new PSD composition file. This will be where you’ll do the rest of your giffing. Your workflow will contain the follow steps:
Make a new blank PSD composition file in Tumblr dimensions
Enable the Video Timeline
Follow the instructions detailed in the individual examples i.e. drag the cutout gif into the PSD & adjust the timeline start / end points
Exporting the final gif. If you’ve worked in 0.03s frame delay all the way up to here, just play the action that I’ve provided in the tutorial in the following order to set the frame delay to 0.05s.
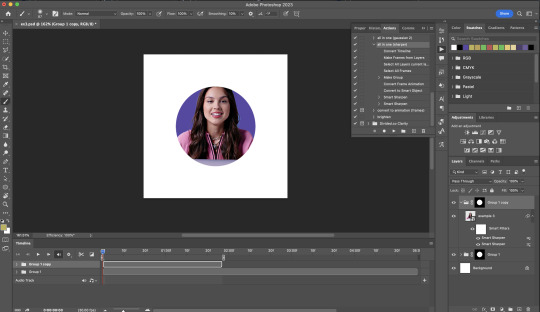
EXAMPLE 1: finalising your cutout gif | sample gifset
After enabling the Video Timeline in your PSD composition file you’ll see something like this
Go to your folder, drag the cutout gif you’ve made on After Effects, resize / reposition, then press Enter.
And also make sure to adjust the Video Timeline’s start / end values.
Add some finishing touches. Because I did the Rotoscoping at full HD resolution, I’ll also need to sharpen my gif in this step.
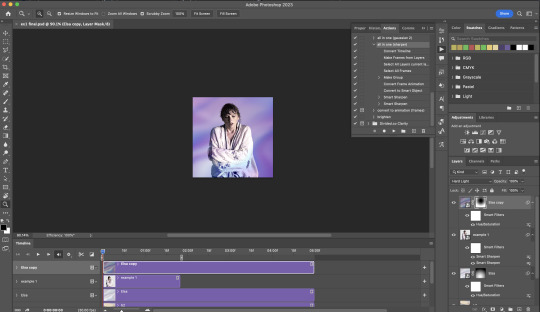
After you’re happy, you can export this into a gif file and do what you usually do to change the frame delay to 0.05s.
Notes on my “Unsmarting” approach:
To prevent accidentally writing over a PSD composition file that I’ve spent time editing, I personally render this into a short video (File > Export > Render Video) and use the following export settings (to prevent quality loss)
Then I open the rendered clip and play the actions in my gif prep action pack as follows:
flatten: this “Unsmarts” the clip / video
set frame rate: this sets all frames to have 0.05s frame delay
This is the final interface that I get before I pull up the Save For Web window.
EXAMPLE 2: changing your gif’s background colour (for Case 3 gifs) | sample gifset
From your folder, drag BOTH the cutout gif (rendered on AE) and the original gif to your blank composition.
Important: you need to make sure that both layers are properly lined up in the composition file (i.e. selecting both layers when repositioning / resizing)
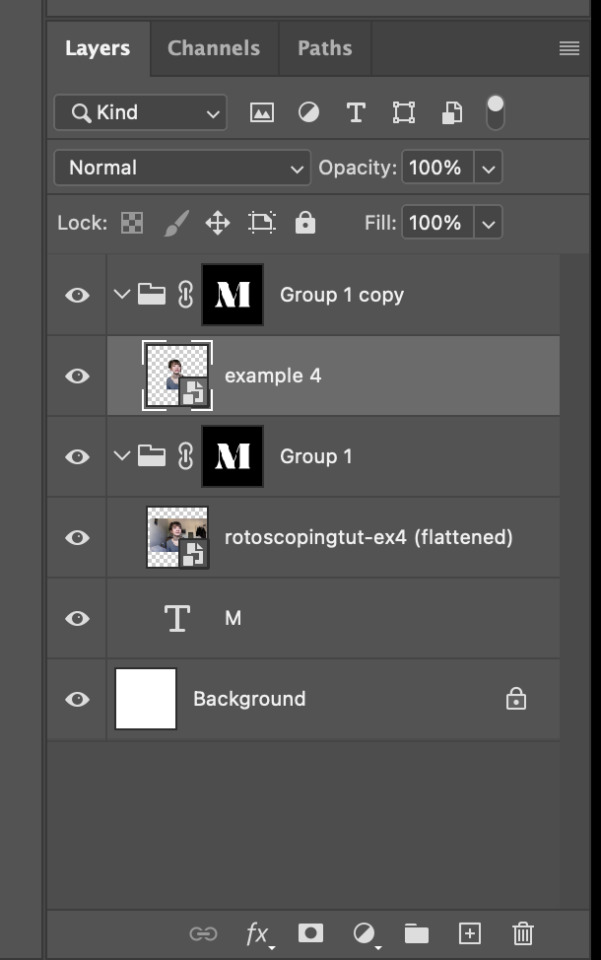
On Photoshop, press Enter twice and place the cutout gif on top of the original gif from the Layers panel. Then you should get something like this
Select both layers and resize / reposition them in your PSD composition until you’re satisfied with the placements.
The basic idea here is to add some adjustment layers / other things in between the cutout gif and the original gif. To do this, select the original gif layer in the Layers panel.
Then you can start adding.a bunch layers e.g. textures, onto the composition.
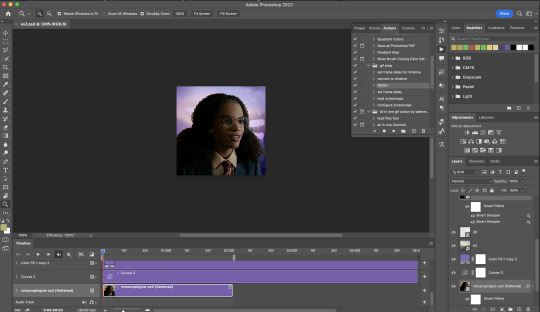
And then here’s the exported gif!

6) Fancier Rotoscoping examples
Note: knowledge in using layer masks / groups and making shape / text layers assumed
In the next two examples, I’ll show you how to combine the two previous examples with shape / text layers.
EXAMPLE 3: Placing your cutout gif into a shape / text layer | sample gifset
Add a text / shape layer to your blank PSD composition
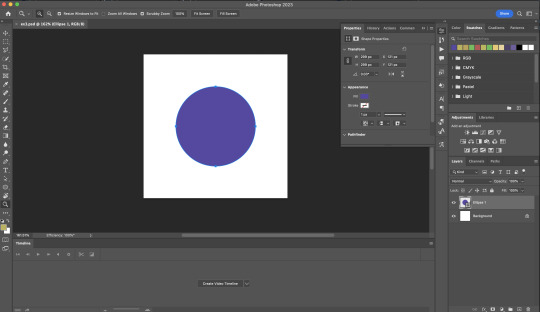
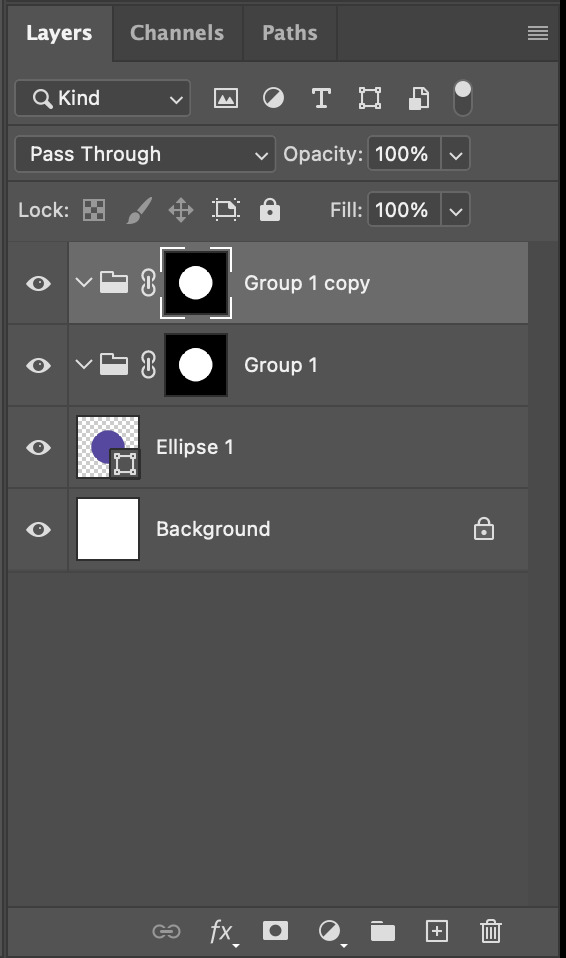
We want to prepare a masked group so in the Layers panel:
Make selection from layer: Cmmd / Ctrl + Click (highlighted in red)
Make a new group: click on the folder icon (in yellow)
Create layer mask: click on the icon (in green)
After duplicating the masked group you’ll get something like this in the Layers panel
Drag your cutout gif into the PSD composition

Place the cutout gif into the masked group on top
Select the mask of the top group and paint (in white) over the region you want to reveal for the cutout gif
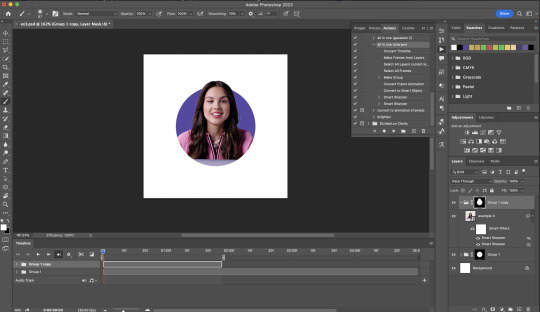
Add some finishing touches & export the gif!
EXAMPLE 4: Putting it all together | sample gifset
You follow the same approach as in Example 3 to prepare the masked groups, but you need to drag two gif layers in (and resize them using the approach outlined in Example 2)
Place the gif layers as follows
While selecting the mask of the group on top, paint (in white) over the region that you want to reveal in the cutout gif
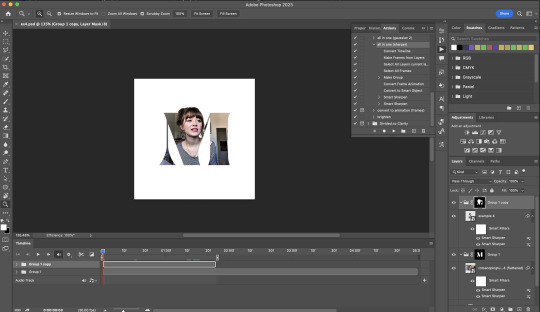
Now select the original gif (placed within the other group) and add some adjustment layers
After adding some finishing touches & exporting the gif, I get this!
Note: you can do even more overlay effects in the background portion of example 4. There will just be more masked groups + adjustment layers
7) Bonus: Some useful Rotoscoping / giffing lifehacks
GIFFING LIFEHACKS:
— Use best quality footage that you could find & Rotoscope in full video resolution, for better details around the edges
— Poorly lit scenes & low contrast edges are harder to Rotoscope (e.g. Toy Story set / TS evermore set).
If you’re new to AE, I would recommend choosing videos with well-lit gifs with simpler backgrounds and high contrast edges (e.g. Maisie Peters Cate’s Brother set)
— Use Rotobrush 2.0 if you’re using After Effects 2021 or later. It’s more difficult to Rotoscope / change background colour for gifs with a lot of movements with the classic Rotobrush tool. If the scene is tricky, you might want to switch to the “Best” quality model.
HARDWARE-RELATED PERFORMANCE OPTIMISATION:
— The recent versions of Photoshop require at least 8GB of RAM. If you have less RAM, it will still work provided you have enough scratch disk space. For better performance, it’s best to close other applications when you’re using Photoshop.
— The recent versions of After Effects require at least 16GB of RAM. If your machine has less RAM than this, there are some workarounds to prevent your machine from hanging:
Essential: close other applications that you’re running on your computer
Resize your gif down to Tumblr dimensions & sharpen it before importing to After Effects.
Install an older version of AE
8) Bonus: Some known software + hardware issues, and workarounds
KNOWN ISSUES ON PHOTOSHOP:
I currently have minimal issues in my giffing workflow, but I’ll nevertheless outline a few common known Photoshop issues for anyone who needs some workarounds.
— Video Timeline interface missing: this affects Apple Silicon Macs (i.e. M1 / M1 Pro / M1 Max / M1 Ultra / M2 / M2 Pro / M2 Max)
Update to newer version of Photoshop (updated 2022 or 2023)
Open Photoshop with Rosetta
— Scratch disk full error: This is a common issue with machines that lack RAM & have nearly used up internal storage. Editing video layers in the timeline interface uses a lot of memory hence will require a lot of scratch disk space.
Make sure that you have enough free storage space while using Photoshop. Alternatively you can use an external hard drive as a scratch disk.
KNOWN ISSUES ON AFTER EFFECTS:
These are a few issues that I have personally ran into over the course of giffing on multiple devices & multiple versions of After Effects.
Note: Inputs from M1 / M2 Mac users with regards to experiences on using the After Effects Rotoscoping tools are welcome!
— Rotobrush 2.0 set to “Best” quality model causes AE to crash: this affects anyone who’s using MacOS Ventura
I’m currently experiencing this issue on my M2 Mac. The workaround right now is to change the Roto Brush 2.0 quality setting to Standard.
This is due to some software compatibility issues on Adobe’s side specifically with MacOS Ventura. Fingers crossed that they will properly fix this bug in the future updates!
— Cannot re-open project files with Rotoscoping: this affects anyone using the initial release of After Effects 2020 (I had installed this on an Intel-based machine and it sucked)
The only option here is to update to a later version of After Effects.
8) More useful Rotoscoping resources
Rotoscoping + Keyframes Tutorial by @jenna--ortega
Rotoscoping + Masking Tutorial by @usergif
Rotoscoping For Beginners in After Effects | Motion Graphics Tutorial
I hope you enjoy reading this! If you have any questions / need any help related to this tutorial, feel free to send me an ask!
#after effects#tutorial#gif tutorial#photoshop tutorial#dearindies#tusermelissa#usernik#useryoshi#usershreyu#usercim#userrobin#useralison#userannalise#userkosmos#userisaiah#usergiu#userives#*#my resources#my tutorials
2K notes
·
View notes
Text
Hi, everyone! @reputayswift asked me how I made this gif where I put several gifs in one using shapes, so I thought I'd write a quick tutorial. Under the cut, just a heads up, this is very screenshot-heavy!
Difficulty level: Easy, basic gifmaking skills are required
Software being used: Photoshop CC 2020, but any version is fine, and I'm sure this can also be adapted to Photopea.
Firstly, you have to pick which shape/png you want to use. For this gifset, I used this maple leaf png that I got from cleanpng.com , a website that I highly recommend for getting transparent pngs.
After picking the png, make your gifs. Just remember that the smaller gif and the base gif need to have the same number of frames. And that the shape/png and the smaller gif need to have the same dimensions.
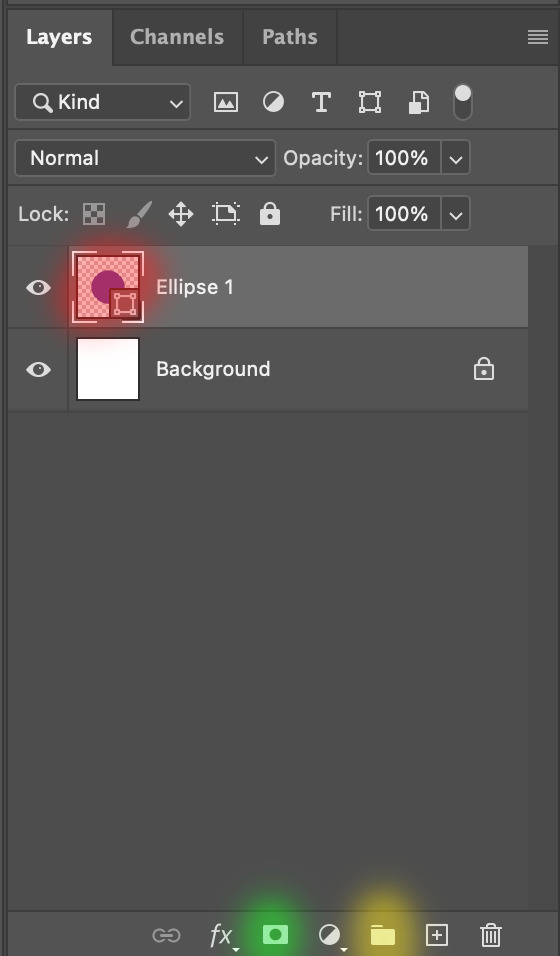
Okay, so after you've made both gifs, go to the smaller gif and convert it to a smart object. It will make it easier to put it inside the shape, since it will convert all the layers into one. Just follow these steps: select > all layers > filter > convert to smart filters:

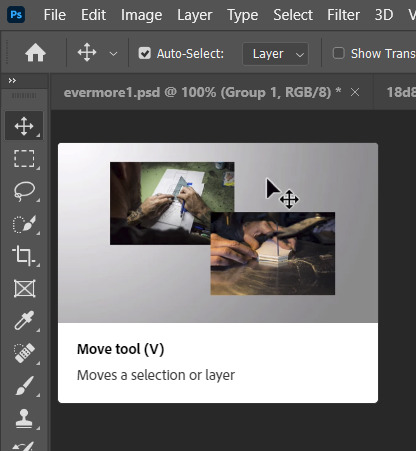
Okay, now open the png you've picked on Photoshop and resize it, so that its dimensions are the same as the smaller gif's. After you've resized the png, select the move tool (shortcut: V key in your computer keyboard), drag the png and drop it on top of the smaller gif:
Now, drag the png layer underneath the gif layer:

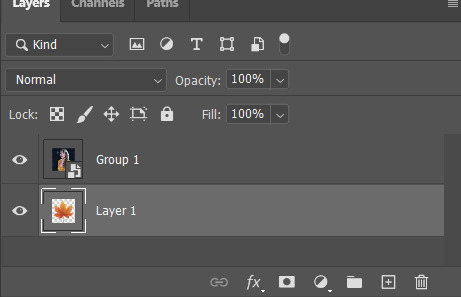
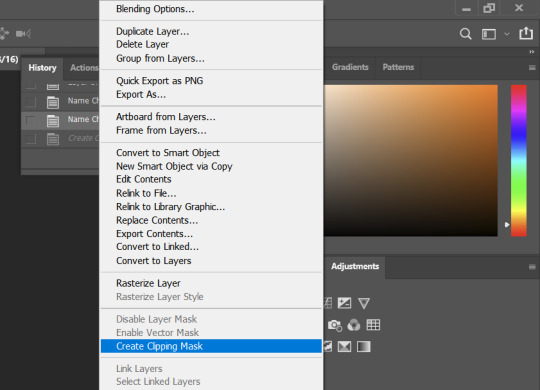
After that, right-click on the gif layer (not the png layer) and then select "create clipping mask":
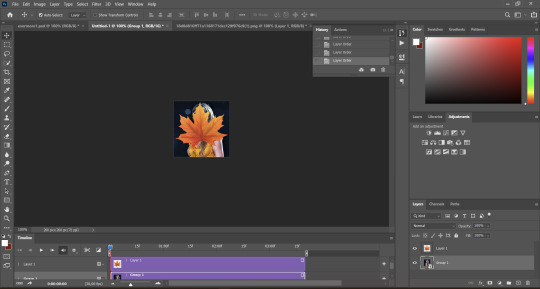
And here's what we're left with:

Now, it's time to put the smaller on the base gif, which is pretty simple. Select the move tool (shortcut: V key on your keyboard), drag the smaller gif and drop it on the top of the base gif:

And here's our final result:

I hope this helps! Feel free to reach out if you have any questions <3
45 notes
·
View notes
Note
hi! i was wondering if you have any advice/certain programs or anything you use for making gifs, because there’s something i really want to make but i have zero experience 💔💔
hello hello!
ah, yes, I have a TON, let's hope this ADHD girlie can give a somewhat concise description lmao. I will answer this publicly, in case it's useful for anyone else.
Software I use:
To make the screenshots: - for single scenes: KMPlayer 12.22.30 (the newer versions are trash) - for shorter videos, or something you want to get all the screenshots out of Free Video to JPG converter is awesome.
To make the gifs: - Adobe Photoshop 2021 (I don't recommend much later versions, because of the Cloud connection they have)
General gif-maker wisdom: "we spend more time on making sure that something looks serviceable, not pixelated, and good quality, than to get it moving and shit" - Confucius, probably
Useful stuff to make your life easy:
- Squishmoon's action pack for sharpening your screenshots. You can also find their detailed use explained here. - If you are planning to gif Wicked, some scenes are a bit tricky, ngl. But I have two PSDs that you can use, while you're perecting your own craft, and you can edit and update them to make them more "you".
A neutral PSD for mostly indoors and lighter scenes | download

A blue-enhancing PSD for darker scenes | download
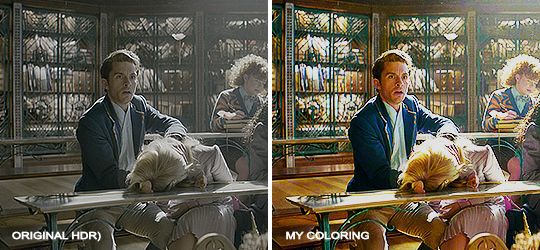
Some info on videos to use: - always, always (ALWAYS) use at least HD videos. Otherwise your gif will look like shit. This should be ideally at least 720p in resolution, but go with 1080p for the best results. Coloring gifs in 1080p is easy, but... - if you want to go pro *rolls eyes*, you could go for HDR (2160p) quality. However HDR is a mf to color properly and I would not recommend it for a beginner. When you extract frames from an HDR video, the image colors will end up being washed out and muddy so you will always have to balance those colors out for it to look decent, however, the quality and number of pixels will be larger. If you ar okay with making small/medium sized images, then stick with 1080p. (Storytime, I spent a lot of time making HDR screenshots, only for me to realize that I really hate working with them, so I'm actually considering going back to 1080p, despite that not being "industry standard" on Tumblr lmao. I'm not sure yet But they take up so much space, and if you have a laptop that is on the slower side, you will suffer.)
See the below example of the image differences, without any effects. You will probably notice, that HDR has some more juicy detail and is a LOT sharper, but well... the color is just a lot different and that's something you will have to calculate in and correct for.

The ✨Process✨
Screencaptures
I like to have all screenshots/frames ready for use. So as step one, you need to get the movie file from somewhere. This should definitely be a legal source, and nothing else (jk).
Once I have the movie. I spend a lot of time making and sorting screencaps. Since I mostly work in the Wicked fandom only atm, that means I will only need to make the frames once, and thats awesome, cause this is the most boring part.
For this, I let the Video to JPG Converter run the whole movie while I was aleep, and by morning, it created gorgeous screenshots for me and my laptop almost went up in flames.
You need to make sure you capture every single frame, so my settings looked like this:
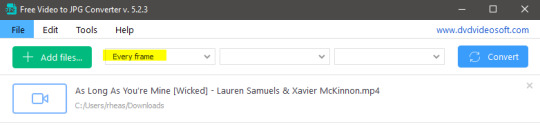
Screenshots do take up a lot of space, so unless your computer has a huge brain, I suggest storing the images in an external drive. For Wicked, the entire movie was I think around 200k frames total. I reduced that to about 120k that I will actually use.
And then I spend some time looking through them, deleting the scenes I know I won't do ever (goodbye Boq, I will never gif you, I'm so sorry :((( ) and also, I like to put them into folders by scene. My Wicked folder looks like this:

If you don't want this struggle and you only need a few specific scenes, there is this great tutorial on how to make frames from KMPlayer. Note that some of the info in this tutorial on gif quality requirements and Tumblr's max allowance of size and # of frames are outdated. You are allowed to post a gif that is a maximum of 10 Mb and 120 frames (maybe it can be even more, idk, said the expert) on Tumblr. But the process of screencapturing is accurate. Also ignore the gifmaking process in this tutorial, we have a lot easier process now as well!
Prepping the images
I have a folder called "captures", where I put all of the specific screenshots for a set I want to use. Inside this folder I paste all the shots/scenes I want to work on for my current gifset, and then I create subfolders. I name them 1, 2, 3, etc, I make one folder for each gif file I want to make. Its important that only the frames you want to be in the gif are in the folder. I usually limit the number of images to 100, I don't really like to go above it, and usually aim to go lower, 50-70 frames, but sometimes you just need the 100.
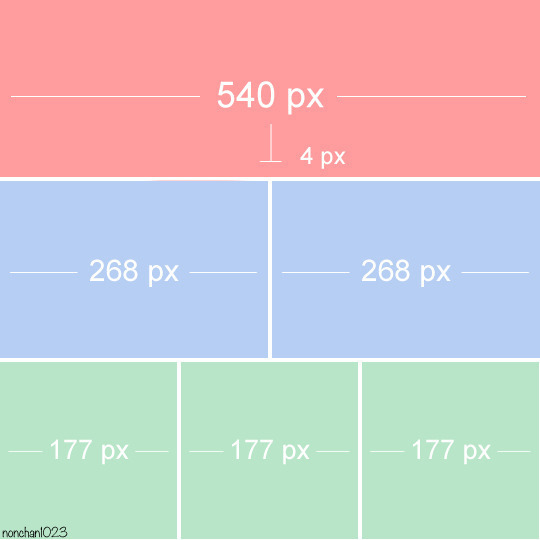
Sidetrack, but: Keep in mind that Tumblr gifs also need to be a specific width, so that they don't get resized, and blurry. (Source) Height is not that important, but witdth is VERY. But since there is a limit on Mb as well, for full width (540px) gifs you will want to go with less frames, than for smaller ones.
Once you have the frames in folders, you will open Photoshop, and go to: File > Scripts > Load files into stack.
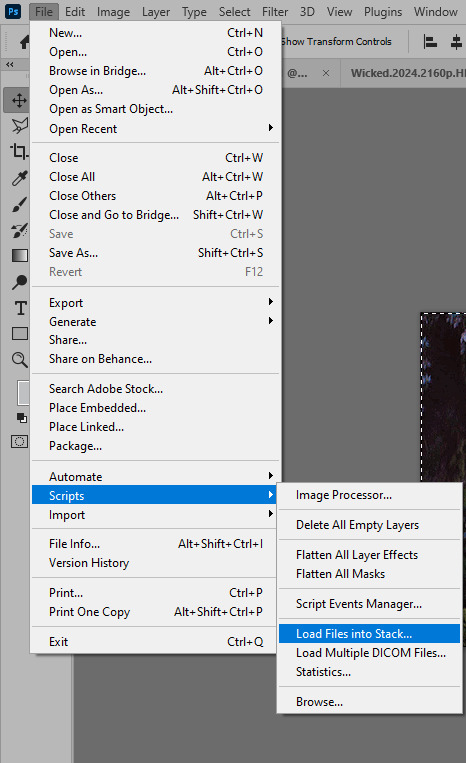
Here you select Folder from the dropdown menu, and then navigate to the folder where you put the frames for your first gif. It will take a moment to load the frames into the window you have open, but it will look like this:

You click "OK" and then it will take anther few moments for Photoshop to load all the frames into a file.
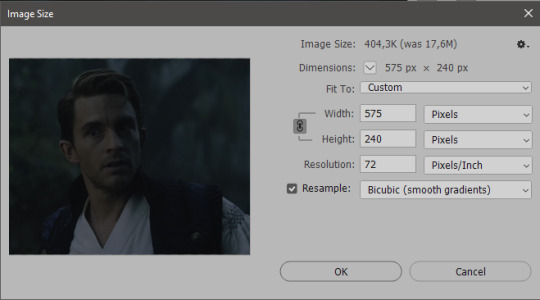
But once that's done, and you have the frames, you next have to resize the image. Go to Image > Image size... When you resize in Photoshop, and save as gif, sometimes you do end up with a light transparent border on the edge that looks bad, so, when you resize, you have to calculate in that you will be cutting off a few pixels at the end. In this example, I want to make a 268px width gif. I usually look at heights first, so lets say I want it to be a close-up, and I will cut off the sides, and it will be more square-ish. So I set height to 240px. Always double check that your width doesn1t run over your desired px numbers, but since 575 is larger than 268 (can you tell I'm awesome at math?), I should be good. I click OK.
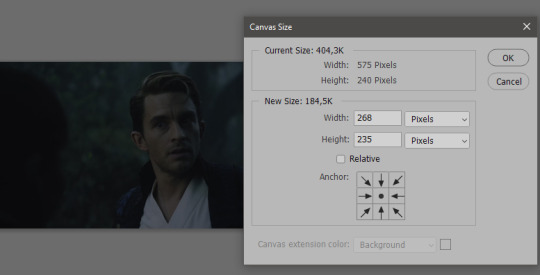
Next, you have to crop the image. Go to Image > Canvas size... At this point we can get rid of those extra pixels we wanted to drop from the bottom as well, so we will make it drop from the height and the width as well. I set the width to 268px, and the height to 235px, because I have OCD, and numbers need to end with 0 or 5, okay?
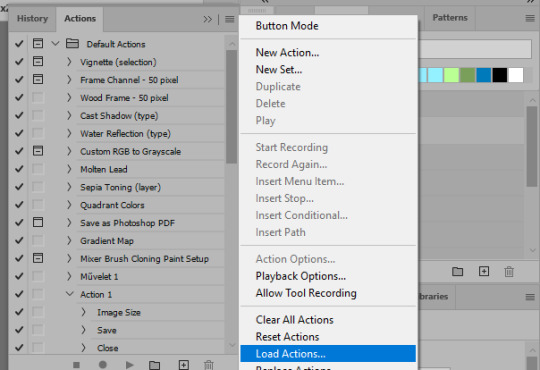
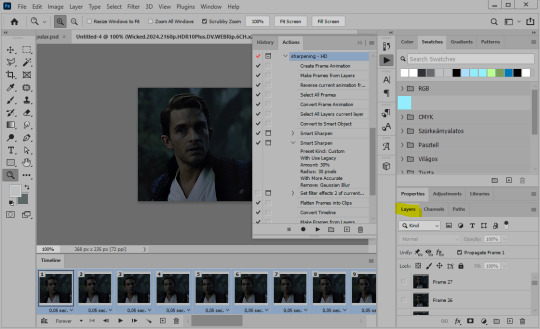
And now, the magic happens! First, go to Window > Actions to have the actions window show up. While you're at it, in the Window menu also select Timeline (this will be your animation timeline at the button) and also Layers. Once you have the Actions window showing up, on the menu in the upper right corner click the three lines menu button, and from the list select "Load Actions". I hope you downloaded the Squishmoon action pack from the start of this post, if not, do it now! So you save that file, and then after you clicked Load, you... well, load it. It will show up in your list like so:
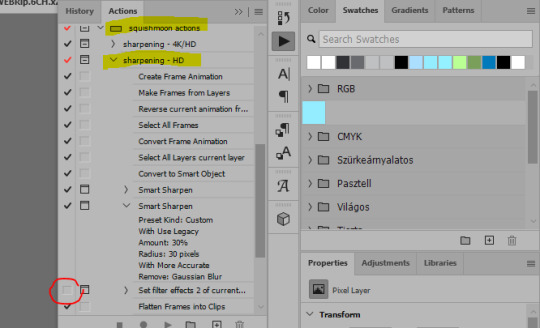
You will want to use the sharpening - HD one, BUT I personally like to go, and remove the tick from the spot I circled above, so leave that empty. This will result in the image having more contrast, which is very much needed for these darker scenes.
When you have that, you select the action itself like so, and click the play button at the bottom. The action will do everything for you, sharpen, increase contrast and also, create the gif and set the frame speed. You won't need to edit anything, just whatever window pops up, click "OK"

Now it should all look like something like this:
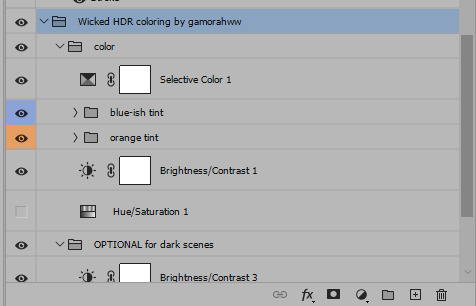
In the Layers window on the side, scroll all the way up to the top. The frame on the top is your last frame. Every effect you want to add to the gif should go to here, otherwise it won't apply to all frames. So at this point I open my PSD for darker scenes, and pull the window of it down, above the gif I'm working on like so:

And then I grab the folder I marked with yellow, left click, hold the click down, and drag that folder over to my current gif. And bamm, it will have the nice effect I wanted! You can click the little play button at the button to see a preview.

Once you have it sorted, now its time to extract it, but first, here's our before and after view:

Now, if you are happy with this, you can just save and close.
If you want to add subtitles, you can do that as well either manually with the text tool (remember, to add as the TOP layer as we did with the coloring) or you can use a pre-set PSD for that as well, here's mine.
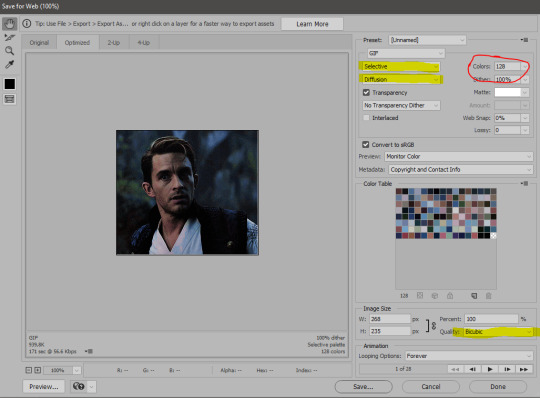
Now, we just need to export it. Go to File > Export > Save for Web (Legacy) and copy my settings here. Others may use other settings, but these are mine, so! I hope you are happy with them :3
In this case, for colors, I picked 128 colors, because on dark sscenes you can get away with using less colors, and the larger that number is, the bigger the filesize. If you use lighter images, you will need to bump that shit up to 256, but that will make your file larger. You can see at the bottom of the screen, how large your file will end up being. So long as you are under 9 Mb, you should be good :3
Conclusion
Look, Gif making and Photoshop in general is a bit scary at first. There are a lot of settings you can mess around on your own, a lot to play with, and also a lot can go wrong. This is a very basic tutorial, and also my current process and preferred coloring. However if you look at "gif psd" or "gif tutorial" or similar tags on Tumblr, you can find a LOT of great resources and steps, for many-many things. Usually people are not too antsy about sharing their methods either. You make 4-5 gifs, and you will have the steps locked down, and then it's all about experimenting.
After you have some muscle memory, your next step should be to explore what is inside a PSD coloring folder that you use. Open them up, try clicking around, click the little eye, to see what happens if they are turned off, and double click them, and play around with the sliders, to see what each does. Most people on Tumblr don't really know what each one does, we all just pressed a few buttons and got really lucky with the results, lol.
If anything is unclear, don't hesitate to ask, I'll gladly help!
Good luck <3
30 notes
·
View notes
Text
how i make my gifs
recently i had a couple people who were interested in my gif-making process, so i thought i'd share in case anyone else is interested or wants to learn how to make them! tutorial is under the cut!
things you’ll need for this tutorial:
OBS (or some other software to capture your footage, but i find OBS works best for me)
photoshop (i’m using photoshop 2024)
optionally, the otis_inf photomode mod for bg3, which isn’t free but helps for more interesting footage!
after you have your footage recorded, open up photoshop and in the top tabs, select window > timeline to bring up the timeline at the bottom of your screen. this is where you’ll do a lot of editing for your footage. also, make sure you have your layers window open as well, which for me is hotkeyed to f7 by default.

next, we’re going to input the footage into photoshop. my footage is in .mp4 format. in the top tabs, click file > import > video frames to layers. click on the clip you want to make a gif of and hit open.

this window allows you to select the part of the footage you want to import using the sliders beneath the video. basically everything between the two sliders at the bottom is what you’ll be importing. you can change the settings to whatever works best for you, but make sure you have the “make frame animation” checkbox ticked. once you’ve selected the part of the video you want, hit okay. you’re limited to 500 frames, so keep that in mind!

once the footage loads, you should see something like the image above, with your frames in the timeline and reflected as layers in the layers panel on the right hand side. the first thing i do is adjust how quickly the frames play.

if you look closely (red arrow), you’ll see that the frames will play every .02 seconds, which is too fast for me personally. I usually set it to .03 seconds or .04 seconds. you can do this by selecting the three little lines indicated by the green arrow and selecting all frames. then click the little down arrow next to any of the .02 numbers, click other, then you can input your custom frame delay.
now you want to select all the frames in the layers window. to do that, click the first layer, scroll up to the last layer, hold shift, then click that as well to select everything in between. you should now have all your frames and layers selected, which you can see here as they’re all highlighted.

next, click the little icon in the bottom left corner of the timeline.

it’ll take a moment to load, but once it does you should see something like this:

now in the top tabs, select filter > convert to smart filter, and hit okay to convert it into a smart object. once that’s done, you’ll see something like this, with only one layer of animation.

congrats, you’ve made a gif! you could resize/trim it and call it a day there, but i like to do a little more editing. the first thing i’m going to do is resize the gif. pick whatever works for you, but tumblr’s dashboard is still 540 px wide, so that’s usually what i do. keep in mind that the larger your image, the larger the file size - you’re capped out at 10mb, which is always smaller than i think it’s going to be. basically, the smaller the gif, the more frames you can have.
i resize the whole gif with ctrl + alt + i. whatever you want to set it to is your choice, but i usually aim for 50% and below if i want most of the footage to be the gif, but if i'm only using part of the footage i'll obviously keep it a bit larger. i want most of astarion to be in the gif, so i resized to 40%.

from there i’ll resize the canvas with ctrl + alt + c and set the dimensions to 540 px in width and whatever i want for the length, depending on the composition of my image. you can also trim the frames down by dragging the purple bar in from either side to pinpoint the exact footage you want.
once i have the size right, i move on to coloring. there are a lot of ways you can go about doing this! 95% of the time i use adjustment layers because they’re easy and work best for me. the ones i use most frequently are highlighted below, and can be accessed quickly through the little half-shaded circle at the bottom of the layers tab. i also like to add a smart sharpening layer to crisp up some of the finer details.

after coloring and sharpening, this is my before and after result:


once you’re done with that, all that’s left to do is save (unless you want to add text, but we’ll be skipping that this time). my default hotkey for that is ctrl + alt + shift + s. you can also find this under file > export > save for web (legacy), but i find the hotkey faster. a window will pop up showing you information about your gif before you save it.

i honestly don’t know what half of these settings do; the only thing i really pay attention to here is the size, and as long as it’s under 10mb you’re good to go. you can preview the way your gif will play, which i always do just in case there’s something i didn’t catch. hit done to save, and that’s it!
this is the first time i’ve written anything like this, so if there’s anything that doesn’t make sense, feel free to ask!
24 notes
·
View notes
Note
Do u have any tips/tutorial how to make gifs so smooth if there's movement? Mine are always choppy and weird :(
Hi anon, ty for sending this ask. I'm sooo honored!! (and plz don't call your gifs choppy or weird i have a feeling they're very lovely 😌)
✨ Gif Tutorial: making movements in ur gifs as smooth as possible✨ (updated)
↳ aka: speed management in gif making
Remember to always source your content responsibly!! Process in this tutorial is simply what works best for me. Every creator has their own preferences and imo there is no right or wrong. We should always make content in the way we enjoy 🤍 Outline: 1. Remove duplicate frames 2. Repair missing frames 3. Speed management in Photoshop 4. Smoother slomo using Video Frame Interpolation
1. Remove duplicate frames
Obviously, if there're duplicate frames in a video, our gifs will end up with lil lags here and there (since some frames get more screen time than others). Although the dup frames are likely barely observable once compiled into gifs, imo this is what makes the difference between smooth and butter smooth. the two daniel gifs above (guy with big brown eyes, if ur not from our fandom 🤍) can hopefully showcase this difference**.
**technical explanation for this that you can totally skip: the persistence of human vision is approx. 0.1s, ie everything we see stay on our retina for this amount of time. since gifs refresh faster than this (eg. 0.04s on every frame for a 25 fps gif), we usually can't pinpoint exactly which frame is a duplicate just by looking at a gif. however. by definition, a duplicate frame will slow down a gif, by making it pause longer than it should. as a result, a movement during this lil chunk of time will move less pixels than your brain would've expected. and this is where we perceive the not-so-smoothness.
ok, now that we've established that we don't like duplicate frames -- I know it's common practice to handle this by looking for an optimal output frame rate to offset the dupes. to me this feels chancy. bc it's a process where you don't have control over exactly which frames to keep or discard. Personally, I prefer making sure my videos are dupe free before everything else. (Again, this is just what works for me. Everybody has their own process and imo there is no right or wrong :)
To remove duplicate frames, the first thing I do with a clip is to play the first few seconds frame by frame to see which one of the following scenarios it falls into:
a. no duplicate frames ↳ best case scenario! congrats!! plz proceed directly to step 2 b. there is a duplicated frame once in a while ↳ This happens most often with (but not limited to) videos from social medias ↳ Reason behind this is frame rate conversion. For instance, instagram/tiktok has a default frame rate of 30 fps. However, many media sources (eg. no brakes, sharl's vlogs) produce at 25 fps. When these videos are uploaded, instagram/tiktok convert them from 25 to 30 fps by duplicating 1 frame every 5 frames, hence twitchiness in gifs when slowed down. ↳ Solution: in photoshop, go through the clip frame by frame, delete dupes manually (recommended) ↳ Alternative solution: use duplicate frames remover softwares (see next bullet point) c. almost every frame has duplicates ↳ This will almost always** be the case with screen record. ↳ What not to do: When there are many duplicates, we may be tempted to use photoshop's 'import 1 out of every n frames' function. this is not ideal bc, the dupes are rarely uniformly distributed. you could end up losing frames you don't want to lose (resulting in choppy gifs) or end up with dup frames still in the mix (resulting in laggy gifs) or, most likely: both. ↳ A better way: is to import all frames into photoshop, adjust the output frame rate to offset the dupes (here is a good tutorial on this) Pros: efficiency; yields decent results in most cases. Cons: again, in my experience this is a process where you don't have precise control over the frames. Therefore runs the same (albeit smaller) risks as the method above. It can also limit how much you can slow down a gif, and generally doesn't work well if the target frame rate (of the clip you're trying to gif) exceeds your computer's recording rate**. **More on this statement: when target rate is comfortably lower than recording rate (~ 55 fps for many), chances are most to all frames will be captured. It is therefore more tolerating towards skipping a unique frame from time to time. However, when target rate (i.e. anything 60 fps) nears or exceeds recording rate, you will be dealing with dup frames as well as missing ones. Using the method above can therefore subject you to the possibility of losing two unique frames in a row, making the gifs noticeably choppy. ↳ Solution: we always have the option to trim dupes by hand in photoshop. But in this case, it can be time consuming, even with keyboard shortcuts. as a result, here is where we can really use a: ↳ Dup remover software: google search 'dup frame remover software' will give you several options and tutorials (here a plug-in for after effects). i've heard good things about some of these but unfortunately can't give recommendations (they do cost money sooo i wrote my own)
Demonstration:
This is a frame-by-frame animation of an ad Charles did for apm. It was produced at 25 fps & uploaded to socmed where the default is 30 fps. You can see that: i. With screen recording, every frame has an unpredictable amount of duplicates. ii. Original clip from instagram has 1 dup frame every 5 frames. iii. After deduplication, the movement becomes lag free and continuous.

2. Repair missing frames
At this point, our video clip is (hopefully) free of duplicate frames, which makes our gifs lag-free (yayy!!). At the same time, we don't want choppiness in our gifs either. Choppiness in a gif is usually caused by missing key (unique) frames. To check if there is any, replay the clip, look out for the sudden jumps/fast forwards in movements. Three possible scenarios:
a. no missing frames ↳ best case scenario! congrats!! plz proceed directly to step 3 b. a lot of missing frames ↳ This is usually the case if the target frame rate (of the clip you want to gif) exceeds the screen recording frame rate. ↳ Solution, imo: (surprise!) is to leave things be. Reason is that something like this would be quite tedious to fix, but not that noticeable if made into a gif that's fast enough ↳ Alternative solution: Record at 120 fps c. occasional missing frames If a video clip misses frames, but not a lot, chances are it's only gonna happen very occasionally, i.e. 1 or 2 occurrences in total. A frame-miss in this case is usually due to either the screen recording skipping a frame by mistake, or that the original video misses frames/contains bad frames to begin with. ↳ Solution (for screen recordings): record again, find missing frame (chances are it will be captured on a second try), insert frame back into original timeline in PS ↳ Solution (if video misses frames or contains bad frames to begin with): Let's talk about ✨ VFI ✨. VFI (Video Frame Interpolation) is the process of synthesizing in-between images from a given set of images. It can increase videos' frame rates (i.e. 30 fps to 60 fps), achieve smoother slomos, and by definition, also help with missing/bad frames. There are many software products that let you use VFI by simply dragging videos into the app and clicking 'export'. Afterwards, all we need to do is to find the missing frame generated by the app & insert it back into the original timeline in PS (ahh technology). For more info on VFI, see "4. Smoother slomo". ↳ Note that VFI processed footages will likely differ slightly from the originals in terms of colors & lightings. This may be tuned out using clipping masks (allow a group of adjustment layers to only apply to one frame/layer, keyboard shortcut: Command+Opt+G)
3. Speed Management in Photoshop (✨ updated ✨)
At this point, our clip is without dupe or missing frames (or at least as close as can be). Whether you dodged the first 2 steps like a breeze or freshly emerged victorious from photoshop covered in blood to get here, good news is, things will be very straightforward for this point on. congrats!!!
🎉🎊🎉
As mentioned before, in terms of smoothness, our clip is now in ideal shape. The important thing is to keep it this way throughout the rest of the process. My workflow looks something like this:
Open file, crop, resize, sharpen, color, export gif, reopen gif in photoshop (which won't compromise quality), assign frame delay, export finalized gif
If you're used to finding a comfortable frame delay or speed/duration combo at the beginning, this process might feel unnatural. But it's so so so so important to leave the speed related settings alone until right before exporting. Here's why:
By not converting frames with modified delays into timelines with fps, we avoid having to give our finished product a frame rate (which photoshop timelines have to specify). This is crucial bc, there is no such a thing as frame rates in gifs. According to the syntax of GIF89a (the current '.gif' format, screenshot below), gifs control their speeds through (and only through) how much time to wait in between frames, aka delay time. Our process above does exactly that. It compiles frames directly into gifs, and avoids expressing frame delays (a gif concept) through frame rates (a photoshop concept), a conversion where dupe frames and missing frames come from**. In other words, using frame delays to control speed is simply more natural to a gif's syntax. **Why would this conversion cause dupe frames? ↳ On paper, frame delays should translate into frame rates seamlessly (i.e. 1 second ÷ 0.06s per frame = 16.67 fps). In reality, photoshop does not support direct translations like this. When converting frame animations into timelines, PS defaults outputs to 30 fps, regardless of frame delays. This disagreement between frame rates is where dupe frames come from. ↳ Some examples: i. Consider a frame animation where frame delay = 0.04s (25 fps), to convert it into a timeline defaulted at 30 fps, 5 out of every 25 frames will be 'duplicated' by photoshop (30-25=5) ii. Now, consider a frame delay = 0.06s (16.67 fps roughly 17 fps), to convert it into a timeline defaulted at 30 fps, 13 out of every 17 frames will be 'duplicated' by photoshop (30-17=13) ↳ (the 'duplicated' was in quotes bc photoshop achieves this thru assigning a frame roughly twice it's original screen time instead of actually adding another) ↳ (afaik, currently there's no way of changing the default 30 fps as long as u start with frame animations. If anyone does know how please let me know 😳) **Why would this conversion cause missing frames? ↳ This happens when one tries to reverse the harm done by photoshop in prev step by changing the 30 fps frame rate back to what it's supposed to be (using function 'Set Timeline Frame Rate') ↳ Let's use the last example again. As mentioned, to go from 16.67 fps to 30 fps, 13 out of every 17 frames will receive roughly twice its original screen time (0.033s * 2 ≈ 0.07s). On the other hand, 4 out of every 17 frames' screen time will remain the same (0.03s). to go from 30 fps back to 16.67 fps, photoshop resamples frames from its 30 fps timeline in 0.06s intervals. As a result, any frame with screen time less than 0.06s runs the risk of 'slipping through the cracks', namely ones whose screen time remained 0.03s ↳ (gifs require frame delays to be rounded to the nearest hundredth of a second) ** What if I open the file as video object, instead of importing as frames? ↳ Indeed, when opening as video object (i.e. command+o instead of command+i), photoshop inherits its frame rate as is. We would then have the option to manipulate it's speed by right-click ➡️ adjusting the percentage (of how much to speed up or slow down). ↳ Here, if we slow down a gif without changing its frame rate, we risk introducing duplicate frames into the result (since frame rate is now higher than needed). If we slow down a gif and lowered the frame rate, but the math didn't check out, we also risk losing unique frames (frame rate not high enough). The same (opposite) goes for speeding things up. Therefore the best and easiest approach is, again, leaving speed related settings alone until right before exporting.
(the block of GIF89a syntax responsible for graphic control:)
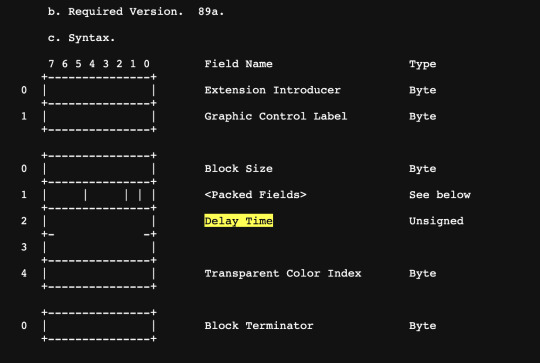
Ok in hindsight this probably isn't exactly like. the most straightforward thing ever but the execution part is very much so 😳 here goes:
1. Open file in PS via Command + O note the (25 fps) on bottom left
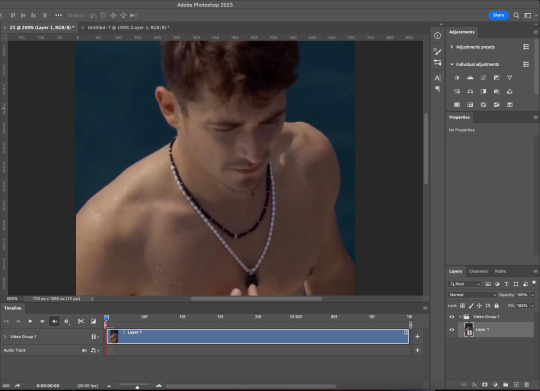
without changing speed, duration, or frame rate: 2. Trim ✂️ 3. Crop 4. Resize 5. Sharpen 6. Color

(Updated!!!) 6. Export gif, and then reopen it in Photoshop **Compare to the original method (timeline into smart object, smart object back into frames), the updated method has the following benefits: i. Avoid lowering gif quality by converting into smart objects ii. Reopening gif into frames and reassign frame delay saves time (bc less steps) and won't hurt the quality at all (bc no image processing required)
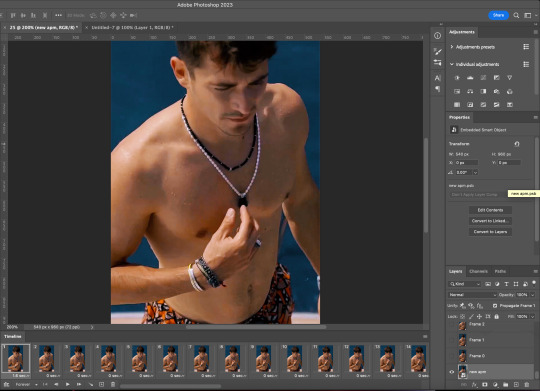
7. Assign Frame Delay (i usually go with original frame delay + 0.01s) 8. Export ✨

Tada!! Speed = managed!!
This ad actually came out last December where I was aware of like, maybe 5% of what's in this post. Here is what my original gif looks like. I'd say what we have rn is a big improvement :)
Now, imo there are situations where it simply makes more sense to start with frame animations (imported using command + i). For instance: when we need to remove duplicate frames by hand, when there is a missing frame/bad frame that needs to be repaired, etc. My workflow would then look like this:
1. Command + i 2. (do things to frames) 3. Set frame delay to 0.03s 4. Convert to video timeline 5. (the rest will look exactly like the workflow above)
This works bc when frame delay is set to 0.03s, photoshop will treat your video timeline as a "natural" 30 fps timeline and leave your frames alone. Therefore maintains its uniform speed.
4. Smoother Slomo using Video Frame Interpolation
As mentioned above, VFI (Video Frame Interpolation) is the process of synthesizing in-between images from a given set of images. It can increase videos' frame rates (i.e. 30 fps to 60 fps), hence smoother slomos. There are many software products that let you use interpolation by simply dragging videos into the app and clicking 'export'. I've had very good experiences with Topaz and After Effects.
Let's talk about After Effects first. If you have Photoshop, chances are you have AE as well. To use AE's Keyframe Interpolation:
i. Import ii. Set speed to half iii. Click square twice until you see lil arrow iv. Export

Topaz is a production grade video enhancing software. It's capable of enhancing frame rates (i.e. 30 fps to 60 fps), increasing resolutions (i.e. 540p to 4K/2160p) and more. Unlike AE who uses only the two neighboring key frames to generate an in-between frame, Topaz takes the whole sequence into account, hence better reliability. It's also more user friendly than AE imo.
Here is a before-and-after interpolation using Topaz.

That's all 🎉🎉🎉
To sum up: remove dupe frames (if any), repair missing frames (if any), use and only use frame delay to control speed, and software enhance frame rate if needed.
This post got way longer and more technical than I had planned and I honestly have no idea where all this stuff came from lol. But it was really fun and I hope you'll find it helpful. Feel free to message me if you have any questions. Have fun moving-picture making!!
#f1edit#gif tutorial#asks#*#my gif tutorials#photoshop#dailyresources#allresources#completeresources#this was. 3k words?????? what?????
224 notes
·
View notes
Text
i was requested by anon to make a tutorial for this gifset and here it is!
DIFFICULTY intermediate/difficult. basic giffing knowledge is definitely required.
while my gifset has a fair amount of animation, the only handmade animations can be found in the second and fifth gif. the rest are assets (the checkmarks, the sharpie circles) (either gifs or videos) i found on the internet and pasted over my gif.
THE BASICS OF TIMELINE GIFFING
if you gif with frames, you will need to use a timeline for the animation to work (keyframes). i’m a timeline giffer anyway so this was another Tuesday for me. if you never used that method of giffing, however, it can be confusing, especially if you never used a video editing software before (the timeline works like video editing).
so, here’s a breakdown of what is the timeline:
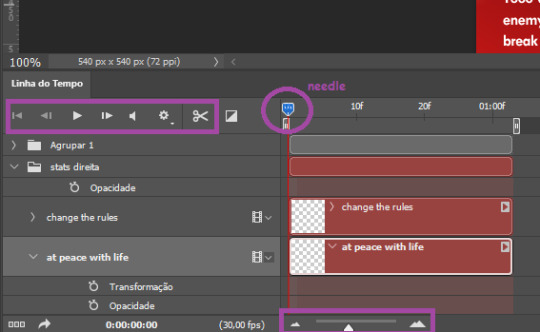
the player icons work like any video/music player in existence. ignore the volume icon.
the gear icon indicates the quality of the reproduction while editing it, not the quality of the end product. think like it’s Youtube reproduction settings on a video in order to save your 4G data, but with RAM power instead. this is very useful if your computer isn’t very powerful to begin with and gifs with VFX are very heavy to handle.
i always click the loop option inside the gear panel because i like to see how the gif will be viewed by the public, i find watching to play only once isn’t very productive. you can stop and restart the reproduction by pressing the space bar on your keyboard.
every layer of your PSD file will have its own bar. the length of the bar means the duration of the gif, so a longer bar means a longer gif and a shorter one, a shorter gif. for everything that isn’t your gif/screencap-based (ie, coloring, typography, lightning, shapes, etc) can be dragged by the extremities as much as you want, making the asset last as long as you want. the only layer that is limited by its maximum duration is naturally your gif, but you can also drag it to make it shorter.
you can also drag a whole layer bar by clicking it and dragging it, making the start and finishing point different from the rest. be careful while doing that otherwise you will end up with blank frames, messing up the looping of your gif completely.
there’s a needle you can drag across the timeline and it works just like on a vinyl disc, the moment the needle drops, it’s the moment/frame Photoshop will show you.
you can also trim your stuff by cutting and deleting snippets of the bar. for that, you will drag your needle to the desired moment, use the scissor tool and then press delete to erase the unwanted bit.
it’s important to point out that the timeline only allows 0.03x or 0.07px speed, no matter what the speed the gif was before converting to that method. if the original speed is closer to 0.03x, then PS will define the new speed as 0.03x. if it’s closer to 0.07x, then it’s 0.07x. i always change the speed to 0.03x before converting to timeline for the sake of not screwing stuff up, which means i see my gif looping while editing in a faster way than Tumblr users will see when the gifset is posted. this takes a while to adjust to if you’re new to timeline giffing, but eventually you don’t think it’s jarring anymore.
that also means you will need to correct the speed after your gif is completely finished. to do that, i use this action.
you can zoom in and zoom out using the little mountain sliding bar. this will be useful later in the tutorial.
if you zoom to the max, you will see all the numbers above your layer bar. these are time marks. the thing is, they seem a bit weird at first. the bigger numbers indicate SECONDS (01:00f, 02:00f, 03:00f, etc), while the smaller and repetitive numbers indicate frames (5f, 10f, 15f, 25f). that means that the smallest drag of your needle possible (from point A to point B) refers to an interval of 1 frame. you will need to take this into consideration while animating stuff.
you can color code your layers, if you think that makes it easier for you to see what you are doing. this is something i do, not only in Photoshop but every Adobe product with a timeline. to change the color of a layer bar (the default is purple), you can right-click on your layer in the layer panel and click the color you want. the colors are the very last thing in the list when you right-click it.
another organization tip is the use of folders. if you create a folder in the layers panel, a folder is created inside the timeline and any layer inside of that folder will disappear from the panel until you click the little arrow next to the name of the folder in the timeline panel. you can color code your folder as well, making every layer inside of it the same color or even different colors.
THE BASICS OF KEYFRAMES
every change related to any property selected (transformation, opacity, style, text warp, position of the layer mask, activation of the layer mask) will be computed in the exact moment in the gif you change it. if that doesn’t happen, you can force Photoshop to do it by clicking the small diamond next to the property name.
let’s say you want an animation to start 0.5 seconds after the gif starts, so you will drag your “needle” to 0.5 seconds and then make the change (making a text bigger, moving a shape, etc).
Photoshop will automatically bridge the gap between the state of the gif at 0 seconds and 0.5 seconds, thus animating your gif.
to start animating, you will need to click the little clock next to the property you want to animate. make sure you click the clock while your needle is at the exact beginning of the gif.
every change (keyframe) will be marked with a small diamond under the layer bar, at the exact moment you changed it. that means if you make jarring changes in a short amount of time/frames, the animation will be quick and abrupt. if the interval is very long, the animation will be slow and smooth.
the selected(s) keyframe(s) will have their diamond painted yellow, while the unselected ones will be grayed out.
you can right-click the diamonds to delete or copy them. if you have many diamonds and want to delete them all, you can click and drag to form a square and select all of them just like when you do to select many files at once on a PC folder. there’s also the option “select all” under the right-click panel.
you can also drag them and change their timing that way. if you have more than one diamond selected, if you drag them, their interval will remain the same, but the starting and finishing point of those two diamonds will change.
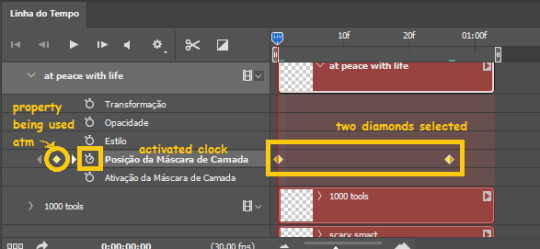
THE SQUARES BAR
the easiest of the two animations. this one doesn’t require keyframe animation, but i put this in the last bit of the tutorial for the sake of its flow.
first, i added the empty squares. they last as long as the gif lasts. after 6 frames, i added the first colored square and made that square last until the end of the gif. i repeated this in a staggered manner (+2 frames delay each colored square) so the colored squares appear at equal intervals.
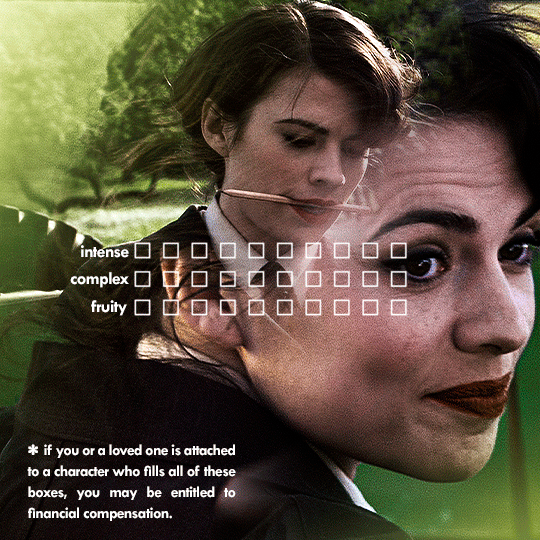
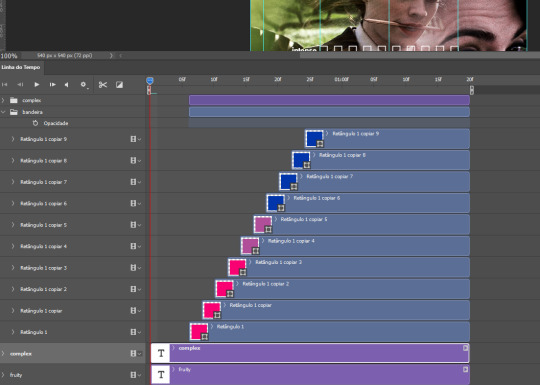
THE STATS BAR
the most difficult of the two, but don’t worry, you got this.
first, you will need to structure your stats, ie, add the text, the dividing line and the pointed lines. that is, if you want to follow the exact design i used in my gif, but you don’t have to if you don’t want to.
next, you will create rectangles that fill the entire stat bars. you will add a layer mask to each one of them and with a layer mask selected, select a rectangle about the size of your original rectangle, then paint it black. you will notice the original rectangle will disappear. if you delete the layer mask, the original rectangle will appear again. that is because you didn’t delete the original rectangle, you just hid it by using a layer mask.
there’s a chain icon between the layer and the layer mask in the layers panel, click it to unlink them.
click the clock next to “layer mask position” with your needle at 0 seconds/frames. drag your needle to the moment you want the stats to end and use the arrow keys to move the layer mask. you will notice the original rectangle will slowly be revealed by you moving the layer mask. you will also notice that a small diamond will appear in the “layer mask position” line in the timeline. you created a keyframe!
if you press play, you will see the animation from the bar going from null to full!
FURTHER READING/VIEWING
this tutorial uses layer mask animation to reveal text too!
a video tutorial for better visualization!
another keyframe tutorial, this time focusing on coloring!
if you still have any questions, feel free to contact me!
and if you (or anyone) else want, i can go in depth in animating each property, i just did a quick overview + explained the stats animation.
#*#*tutorials#completeresources#usergif#useralien#uservivaldi#usereme#userbess#userelio#usershreyu#userisaiah#useraljoscha#usersanshou#usermona#tuserju#userjaelyn#userabs#tusermalina#userbuckleys#tusermimi#tuserlucie#tusermira
251 notes
·
View notes
Text
hi everyone! I've gotten several requests to make a tutorial on how to make gifs for someone just starting out and I finally got around to slapping a tutorial together.
This tutorial will cover:
software recommendations
choosing what to gif
creating a gif step by step with probably a lot of unnecessary detail
some tips and tricks:)
(This particular tutorial will not cover how to find tv and movies to download and gif, or any specific instructions on coloring. only the basic gif making process.)
so for the purposes of this tutorial, we will be using Adobe Photoshop, which is the most common program for making gifs, and the one I recommend. the version you have doesn't make a major difference in terms of capabilities but the interface may be slightly different looking if you have an older version or a different type of device. you cannot make or edit gifs in any mobile version of the photoshop application. Optionally, we will also be using Adobe Premiere Rush/Pro or another video editing software of your choice. wherever you are downloading Photoshop, whether from Adobe or a third party, you should easily be able to acquire Premiere as well. I am aiming to be as detailed as possible in this tutorial, so it may sound more time consuming than it really is. once you get the hang of things, it goes fast. the most time consuming part by far is the editing and coloring. in my opinion, one thing that majorly saves time while giffing is knowing your keyboard shortcuts and using your mouse/trackpad as little as possible. I will be going over these in this tutorial as well.
before we begin, some general tips:
gifs of single shots that do not cut between angles or subjects generally will look the best, barring exceptions
for a single gif set, choosing scenes and shots with similar lighting will be easiest to get to look uniform when compiled together, since editing wildly different looking scenes to have similar coloring and lighting is hard and takes some practice!
avoid shots that will require you to majorly crop or zoom to properly frame the subject, as this will greatly diminish quality
speaking of quality, gifs will look best using 1080p video, but you can get away with 720p as well. I would not recommend giffing with anything lower resolution than that
Tumblr's upload capacity for image and gif files is 10mb. be sure when exporting your finished gif that it is under that size. if it is a bit over, you can try trimming a few frames off your gif in the video timeline.
if you get frustrated, don't give up! giffing is hard and complicated especially if you are new to photoshop. I tried to make this tutorial as detailed as possible so it's easy to understand (although im sure I still forgot some stuff)
ok onto the tutorial!!!
STEP ONE: choose what range of frames you want to gif, and how.
once you have decided what you want to gif, there are two main way to convert your episode into a range of frames to make into a gif. the first is by screencapping. this involves downloading a program like mplayer or vlc which can be used to convert video files into "stacks" of screencaps, which can then be separated into whatever range of frames you want and imported into photoshop. this is seemingly by far the most common method I have seen amongst gifmakers*, but personally I don't care for it and I think it's more confusing and time consuming overall, so I will be explaining the second method: importing video frames to layers.
now, normally what this would mean is opening the full episode in photoshop and using the pathetic little playheads on either end of the scrub bar to trim the file into a clip. this is where your video editing software comes into play.
open whatever episode or movie you want to gif in your program. if it is a large file like a long movie in 1080p, this may take a few seconds. like I said, I am using Premiere Rush. I will be using a random episode of 9-1-1 for my example gif.
in your media browser, hover over whichever episode you want (you can also just add the whole episode to your project and scrub through, but that can take longer unless you know what time stamp you're after). click the fullscreen button by the bottom righthand corner.
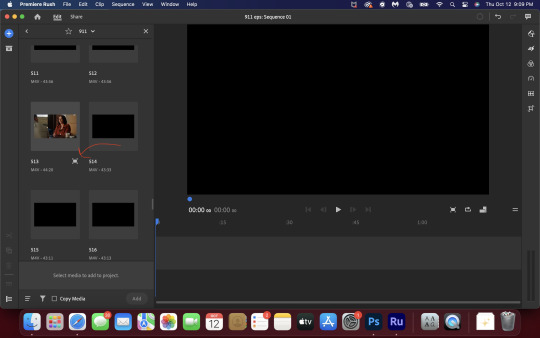
now you can scrub through and trim the episode before you even import it to premiere. this makes trimming your clip even easier.
use the trim bar (yellow outlines) to trim as close as you can around the scene you want to gif.
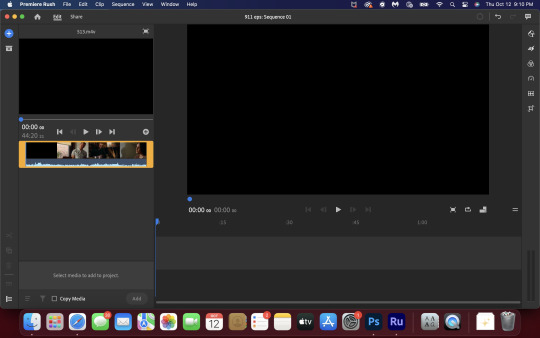
then click this plus, and then "add" below. this will add the clip to your project.
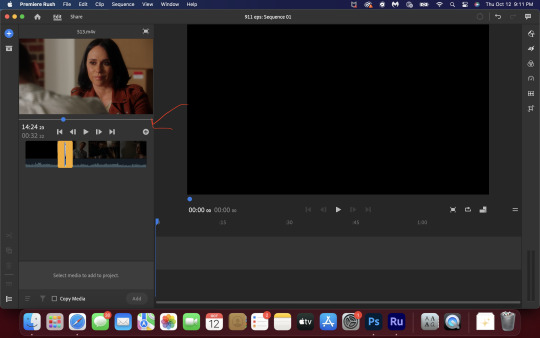
now, move the blue playhead up to the frame you want your gif to start on. then, use the scissors button off to the left to slice the clip. select the portion before the playhead, and delete it.
now move the playhead to where you want the gif to stop. a good length for most gifs is around 1.5-2 seconds in my opinion. some may be shorter depending on how long the shot is, or longer if you plan on making them smaller (remember, the uploading capacity on Tumblr is 10mb per file.) trim again, now delete the portion after the playhead. you can also use the left and right arrows beside the play button to move frame by frame, and you can adjust the side of the horizontal scroll bar below your clip to “zoom” in on it and make scrubbing easier.
once you have your clip, go up to where it says "share". your clip will be rendered, and then you can click export to save it.
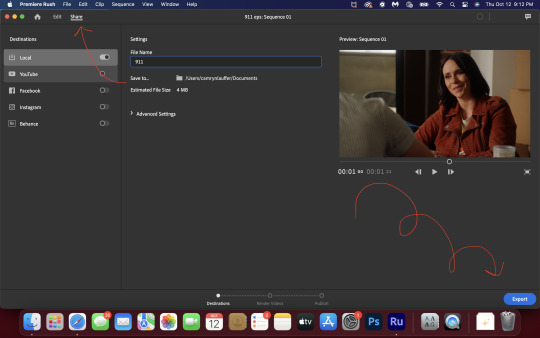
repeat step one as many times as you want for each gif. I know this may sound complicated, but like I said above once you get in the rhythm this step takes only a few seconds.
STEP TWO: create your gif!
close premiere. open photoshop. head to the control bar at the top. select file > import > import video frames to layers.
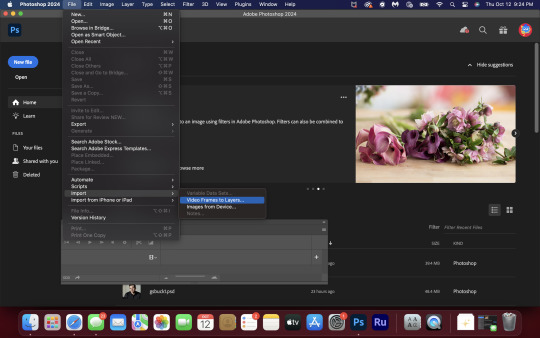
navigate to whatever folder you exported your clip to. select it, and hit enter. a second popup will appear asking you to select your range of frames. since you have already trimmed your clip to your liking, simply hit enter a second time.
now your screen looks like this, and we are going to crop and resize our gif! (troubleshooting: if you do not see the timeline bar at the bottom, select window from the control bar, scroll down, and make sure timeline is selected as part of your workspace. Adjustments and layers should be there automatically but if not add them too).

Tumblr posts are 540px wide, so in order to make my gifs as small as possible while maintaining quality, I typically crop my gifs to be around 550-600px wide, with varying heights depending on what shape I want the gif to be. experiment with this a little and decide what works for you. just don't make the width lower than 540px. once you have the portion of the frame you want inside the cropping grid, hit enter again. sometimes you have to hit it twice.
here are the measurements I am using for this gif
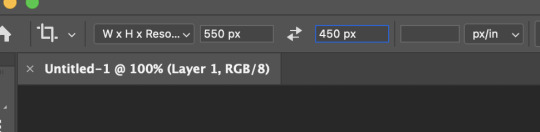
now in your timeline, select frame 1. hold down the shift key and scroll to the end to select the very last frame, thereby highlighting them all. from here we will edit our frame delay rate. photoshop will automatically set it to .03s, which will make your finished gif awkwardly fast. I typically use .05s, or .06s if I want a gif to be subtly slower (this comes in handy if the shot you are trying to gif is very short). anything longer than .06s will look weird though. choose "other" from this menu and type in your delay rate. make sure not to miss the zero after the decimal.
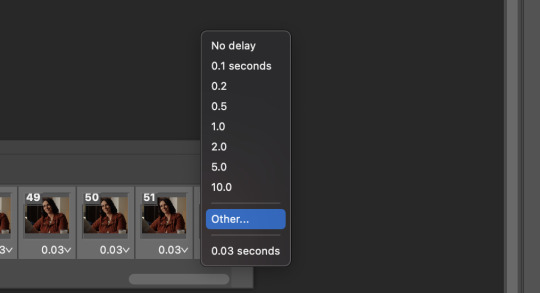
once you've set your frame rate, go to the other end of your timeline and click here to convert your frames into a video timeline.

then press option + command + A (on Mac) or windows + alt + A (on PC) to select all layers. then right click (control + click with a trackpad) on any one of the highlighted layers in your layers tab off to the right. scroll down in the popup menu and select Convert to Smart Object.
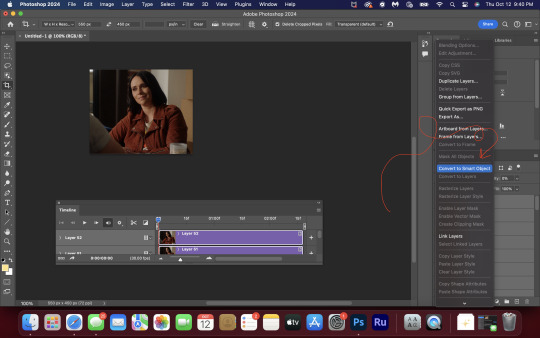
THAT'S IT!! CONGRATULATIONS!!!!! WE HAVE GIF!!!
from here comes the fun part!! you will begin adding action filters like sharpening as well as adjustment layers to color and edit your gif. experiment with different adjustments and styles until you find something you like. too many adjustment layers will up the size of the finished gif though, so I tend to keep mine to 3-4 layers max unless its a really hard to color scene. if anyone is interested in a separate coloring tutorial, please let me know!
once you are finished editing your gif, click file > export > save for web (legacy) OR hit shift + option + command + S. play your gif in the export window to make sure it looks okay, and then hit save!
I hope you guys find this helpful and informative! please hit up my in box if you have any questions or if anything doesn't make sense. happy giffing!!!
*one reason people seem to prefer screencapping to this method, is saving all the individual clips as video files does take up a lot of space on your scratch drive, which in turn can cause your computer to work slowly or crash programs. this can be rectified by making sure to delete the clips from your computer once you are done making the gifs. another space hoarder to look out for is the proxy files of your episodes that will be automatically saved to your hard drive whenever you add an episode to your project in Premiere. Periodically, go through your storage and delete all the .proxy video files. this will not delete the original episode files, only the proxy files created by Premiere.
tagging some mutuals to sb hehe: @shitouttabuck @lover-of-mine @honestlydarkprincess @eddiediaaz @compactdiscmp3 @eddiebabygirldiaz @bigfootsmom @callaplums @athenagranted @firemedicdiaz @sibylsleaves @loserdiaz @buck2eddie @diazass @eddiediaztho @giddyupbuck @monsterrae1 @icecreampotluck @sunflowerdiaiz @swiftfootedachilles @singlethread @aziraaphales @911onabc
139 notes
·
View notes
Note
a gifmaking tutorial would actually be super appreciated :)
Okay, this is gonna get long and it might not be great but I will do my best to make it understandable.
Put under a read more cause we're not forcing anyone to look at all this.
We're gonna make this gif:

First of all you'll need 3 software programs downloaded.
4k downloader (to download videos)
Gomplayer (to get the frames from the videos)
Photoshop (I pay for it but there are other ways)
Some things to keep in mind
better quality video = better quality gifs
if you want videos in 4k you have to download them in MKV format as MP4s can't be 4k.
gifs can only contain 256 colours so gifs with a lot of different colours might get grainy.
if you use low quality videos or upscaled videos they sometimes have duplicate frames which will make the animations look weird, but you can easily remove those extra frames.
tumblr only accepts gifs under 10mb in size so all gifs have to be less than that (photos less than 20mb)
you can put up to 30 gifs/images in one post
ok here we go
Step 1: Download video
Step 2: Get the frames from the video
You will play the video using Gomplayer
Find the part you want to GIF
Press CTRL + G to bring up this menu

I haven't experimented much with these settings but you'll want to choose the place you want your frames to end up so you can find them later
4. Have the Capture all frames box checked (unless it's 60fps then do 0.03). You can capture up to 999 frames in one go.
5. Press "burst capture" and it will start getting the frames (video has to be playing) it will look like this.

6. Great you have your frames.
Step 3. Making a GIF
Open Photoshop
Load Files Into Stack

This will open the folders on your computer so navigate to where you put your frames and select the frames you want by clicking on the first and holding shift while clicking on the last.
3. Wait for PS to load the frames
4. Once it's all loaded the first thing you'll do is crop it. Press 'C' on your keyboard. There are a couple presets you can use or you can 'clear' that and crop however you wish.

I always crop out at least a little of the top and bottom cause there can be dark lines there.

5. Resize: for optimal quality on tumblr there are three sizes to keep in mind.

For sets like this with 3 gifs next to each other the width should be 177p, height does not matter.

For sets like this with 2 gifs next to each other the width should be 268p

And for a set like we're doing today with just 1 gif it's 540p
You'll want to memorise these numbers for future use.
177p, 268p or 540p will be the width of your gifs.
To open the resize menu you press CTRL + ALT + i

Change the width to in this case 540p (p as in pixels)

It will auto match the height to keep the same proportions.
Click OK and wait until it's done.
6. Make sure you have the 'timeline' window up at the bottom of your photoshop

7. Click 'create frame animation' (button might say video timeline but change that by pressing that little arrow next to it)

8. Press the button with three lines in the top right of the 'timeline' window and press 'make frames from layers'

9. The frames will have loaded in in reverse order so open the same menu and click 'reverse frames'
Step 4. Blurring the logo/text (optional)
Since we have a logo in there I will want to blur it but you might not have one or you don't care if there's a logo or text in your gifs.
First we have to make the gif into a smart object.
Select all layers by pressing CTRL + ALT + A
Convert into a 'video timeline' by pressing the button in the bottom left of the timeline window

3. Right click on your layers and click on 'convert to smart object'

4. Press Z to switch to the zoom and zoom in on your logo/text.
5. Press L to switch to the lasso tool and select your logo/text

there should now be a line where you selected.
6. Open 'Gaussian Blur'

7. Click OK
Now we have to get our GIF back to the frame timeline.
8. Click 'flatten frame into clips' using the timeline menu

9. Press 'delete' once to remove the smart object

10. Convert back to frame animation

11. Make frames from layers

No need to reverse this time. But now your logo/text is blurred, as long as it doesn't move but that's a topic for another day.
Step 5: Sharpening
If you didn't have something to blur let's go over smart objects again.
Select all layers by pressing CTRL + ALT + A
Convert into a 'video timeline' by pressing the button in the bottom left of the timeline window

3. Right click on your layers and click on 'convert to smart object'

5. Camera Raw Filter (Optional)
I use this for base editing of colours and the overall clearness of GIFs, it's not made for that tho it sometimes gets buggy. Works best on photos.
Press CTRL + SHIFT + A to open this.

It's best to do as little as possible in here as it can bug out.
I mostly mess with the effects, light and detail settings in here, don't touch the sharpening though cause we will use smart sharpen for that.
6. Smart Shapening
Most people have a sharpening action they use, including me. But you can also do it manually. You can find my actions in here.
To do it manually and make your own settings. This is how you open smart sharpen.

If you use my sharpening action remember it can be a bit much sometimes, in that case hide the second layer

Use an action or mess around to find a sharpening setting that looks good on your gif, usually don't need much.
Now we have to get our GIF back to the frame timeline.
7. Click 'flatten frame into clips' using the timeline menu (I'm low on images to use check the blur section for images)
It might take a minute since it has to process the new settings.
8. Press 'delete' once to remove the smart object
9. Convert back to frame animation
10. Make frames from layers
11. Select all your frames to set the framerate

You can click on any frame for this. Click 'other' and set it to 0,06.
12. Press CTRL + SHIFT + ALT + S to open 'Save for Web'

these are my save settings.
Click save and name and place it wherever you want it saved.

Congrats you've made a gif.
Step 6: Colouring
Now we have a problem cause there's already 30 images in this post.
For colouring I have a psd I use and adjust to the individual set. It's in my google drive you can find it here along with my actions.
If you're making several gifs from one video you'll want to adjust to the first and then copy that over to keep things matching.
We can go more in depth on this but that would have to be a different post since I can't put more images in this one.
Step 7: Watermark (optional)
A lot of GIF makers have watermarks these days as there's a lot of people who repost GIFs without credit. Make your own so people know the GIFs are yours even when posted elsewhere.
Step 8: Post
Post your hard work on your tumblr, use a bunch of tags so people have a higher chance of seeing it.
I hope this post was understandable and clear, let me know if you have any questions and if you want a proper colouring post.
30 notes
·
View notes
Text

i made some cute food themed mouse cursors! read more if you want them for yourself

you guys can use these for anything btww idgaf also feel free to request more and i may get around 2 them eventually
[*NOTE: the pixel art above has been resized and is NOT the same as the .cur files, you have to download and use those. Link below.]
cursor file download (WeTransfer) (dm me if link expires)
Cursor replacement tutorial for a Windows PC (sorry mac users):
Open the Start Menu or press the Windows button
Type "Mouse" and hit enter
Click "Additional Mouse Options"
In the pop-up, go to the tab labeled "Pointers"
Download the .cur files (Cursor files) from the link above ^
Select which pointer you want to replace, and click "Browse..."
Find where you downloaded the .cur files
Select them, and hit "Apply"
and boom, you're done! If you don't like them you can re-select the ones you want to change, and hit "Use Default" To revert back to your computer's original settings.
How to make your own:
If you would like to make your own cursors, you can download any small .png image (has to be .png because .jpg doesn't support transparency). You can also use any image editing websites or software to shrink/tweak larger images - I use Aseprite for my pixel art, and I highly recommend it for no compression or pixel loss when resizing images, but I'm sure there are free alternatives out there.
After you somehow acquire a small transparent image you can convert them using this handy online tool. Convert it to .CUR for image cursors, or .ANI for animated/gif cursors.
Have fun! Thanks for reading <3
26 notes
·
View notes
Text
A Skinner Aha Moment
So here's one of those scenes that just sticks in my head as a Skinner moment that got me... Seriously, the man pulls off his glasses and I'm done!
It's done with such command and vigor - you know he means business... or just needs to use a pair of binoculars... but I digress-- It was sexy!

On a side note... I'm searching for some decent open source GIF making software. Recs welcome. Specifically software that will convert a short video clip to a GIF.
Found a decent online maker, but... meh, the navigation is so clunky. This gif was made with Microsoft ClipChamp - and I swear it's like going back in time using it - and not in a good way! This thing is so antiquated it's not funny. Quality is horrible!
#walter skinner#the x files#xfiles#the xfiles#skinner#end game#Walter Skinner's glasses are a character
15 notes
·
View notes