#free-camera-raw-presets-cc
Explore tagged Tumblr posts
Link
best tools for Photoshop
Hi Friends I am Golam Rasul Owner Of Edition Pictures.I create This Channel For Help to people for learn the editing. I share my tutorials of different effects & I try ...
youtube
Hi Friends I am Golam Rasul Owner Of Edition Pictures.I create This Channel For Help to people for learn the editing. I share my tutorials of different effects & I try to do my best. Order Now: www.fiverr.c.. Stock Link: https://driv.. Instagram: www.instagra.. Twitter: https://twit.. Facebook : https://web... Facebook Page: www.facebook.. Website: https://tech.. photoshop photo editing tricks 2019 camera callibration photoshop photoshop cc camera raw preset free photoshop cc camera raw presets free download how to download and install camera raw filter in photoshop cc "SUBSCRIBE MY CHANNEL PLEASE!!
best tools for Photoshop
#camera-callibration-photoshop#camera-raw-preset-download-free-2019#free-camera-raw-presets-cc#how-to-download-and-install-camera-raw-filter#photoshop-cc-camera-raw-preset-free#photoshop-cc-camera-raw-presets-free-download#photoshop-photo-editing-tricks-2019#top-50-photoshop-camera-raw-presets-free-down
0 notes
Note
Hi ! So I just wanted to say that I love your banners and I was wondering how you were making them? (Don't hesitate to keep your artistic secrets, we writers are allowed to ^^)
hey, agnes! i hope you're well and having a great day/night! and thank you so much! i'm glad to hear you love them. there's no secret, really. those banners are pretty much average compared to what fandom creators make.
anyway, which banners are we talkin' about here? stills or GIFs? i'm not very good at explaining these kinds of things but i'll try my best.
i made sure to cut. otherwise, it'll takeover the entire dashboard.
FIRST, SOURCES:
pexels - for free gorgeous stock photos. read license. other sources: pixabay, unsplash (but i use pexels a lot. it's a gem.)
dafont - for fonts. demo versions (non-commercial/personal use only) read notes from authors.
okay, here we go. i'll try my best on this part. hopefully, the photos will make it easier to understand.
open editing software. i use photoshop cc 2019.
customize the settings for new document. [Click on "Create New..." > A new window pops up. > Customize Setting > Create]. i don't have a fixed size for my banners as long as it looked like a banner. but my recent setting was 1920x295px; 300dpi (which i have to adjust when it comes to making gifs.)
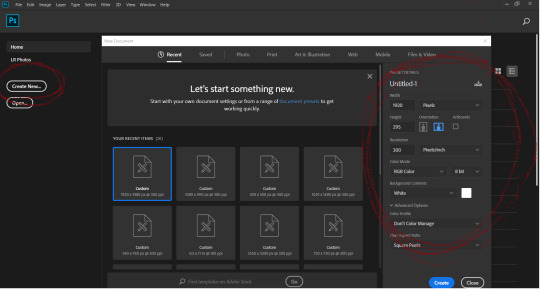
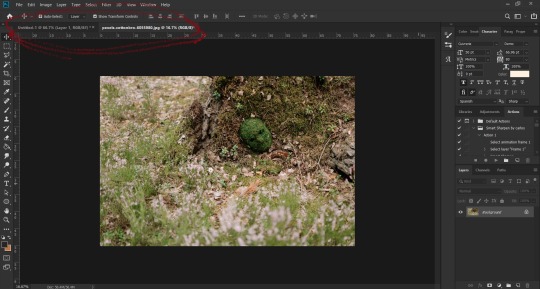
open photo file. [File > New > Choose Photo > Open]
click/hold + drag on the photo to copy it to the banner file. photos from pexels have large sizes and higher resolutions. since i download photos from there, i'd have to transform it to make it fit on the canvas of the banner.

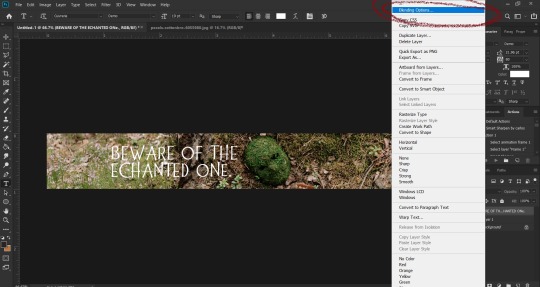
add text [Choose Text Tool]. i customize more of the text with Layer Style. [Right Click on the Text Layer > Blending Options > Layer Style window pops up] On Layer Style window, one can add colors, shadows, glows, and more.
the text was supposed to be "enchanted." SMH
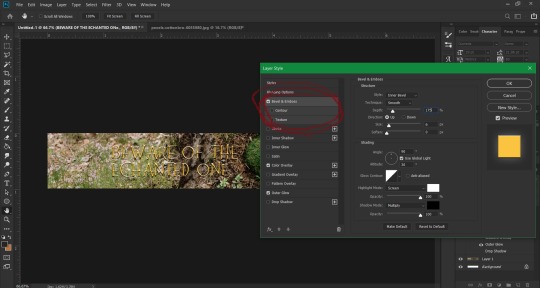
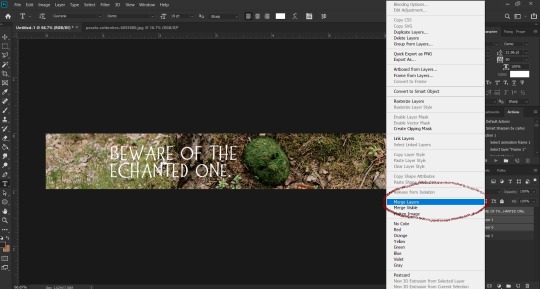
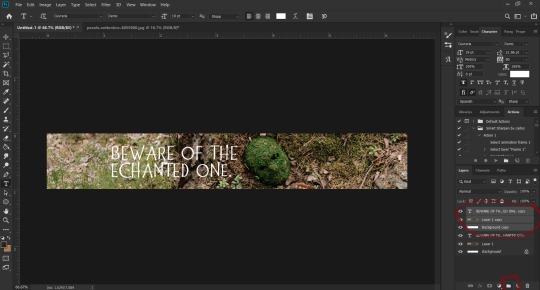
once satisfied with the text position and applied styles, i merge all the layers. [Click Shift + Click last layer to select all layers.] incase something doesn't work out, i make sure to duplicate all the layers then group 'em. [Shift + Click on last layer to select all layers. > Right Click > Duplicate > Group] then i drag the group layer to the bottom of the layers and disable visibility. i make sure background layer is unlocked so you can move another layer past it.

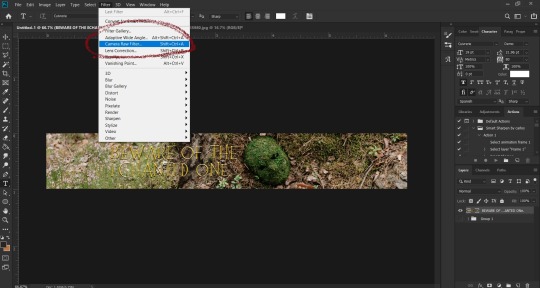
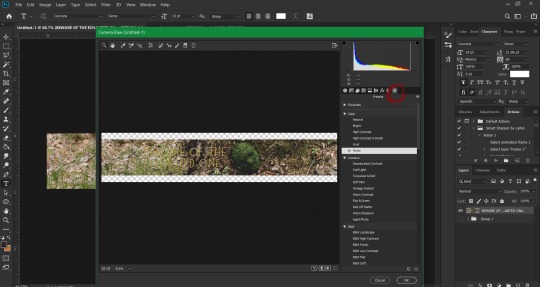
adjust colors and more [Filter > Camera Raw Filter] a window pops up and that is where i adjust the colors and add filter. camera raw filter is only on photoshop ccs, i think. i'm after this tool that's why i'm using cc, haha. if I'm feeling a little lazy (which is, uh, every time, i go to the presets tab then choose a preset good for the banner. If it ain't workin' I go back to the basic tab to adjust exposure, temperature, tint, and more.
save [File > Save as... > Edit File Name + Choose File Type > Save]
GIF Banners. things, uh, get a bit tricky when it comes to making GIFs, especially if one is not familiar with the tools and stuff. and my process is a MESS. but i hope this was comprehensible, insightful and helpful if you're thinking of making banners for your blog ♡♡♡. i really think i'm not the right person for this kind of stuff, lol.
#tiredlittleoldme#ask#editing and graphics#writers on tumblr#this is my process. its a mess.#if other graphics creators see this....im sorry#yall probably have much better process for things like this but this is me. lol. asgsshdkdldl#am-replies
8 notes
·
View notes
Text
THE HIT LIST: 123PRESET.shop’ TOP MOST POPULAR PACKS
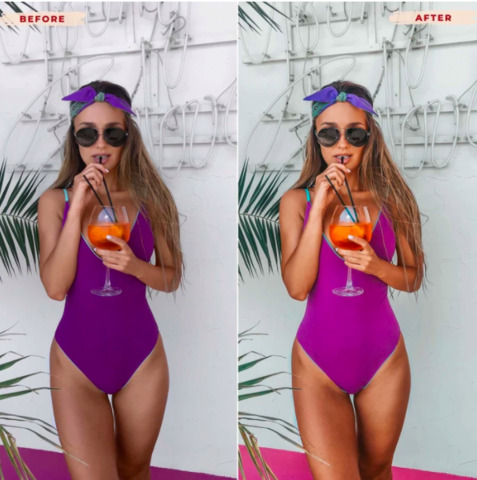
Take a deep breath and let this list with 123presets’ top 3 most popular packs guide and inspire you. #123preset.shop
2 notes
·
View notes
Photo


Lightroom Presets NEW 26 HDR Mobile, Desktop Presets , Instagram Presets, Preset for Bloggers,Photographers
26 Mobile Lightroom Presets(DNG File) 26 Desktop Lightroom Classic ("Lrtemplate" Old&New Version "XMP" File), 26 Photoshop Action File 26 Photoshop Camera Raw File
Help File ( We will show you how to use the presets step by step)
Specifications
❖ You can use presets with Free Lightroom Mobile App (iOS/Android)
❖ All of our products are sent by digital download
❖ You can use presets With or Without Adobe subscription
❖ You can use presets in Raw and Jpeg Images
❖ Presets can also be used in Lightroom Classic and Photoshop.
❖ All Presets include available settings for Windows / Mac Android / IOS
❖ Available for Lightroom Classic 6 and newer versions.
❖ Photoshop Actions Available for all CC versions.
You can directly go to discount pages by clicking the links or you can
use the coupons at the Checkout.
Coupon codes at checkout :
✮✮✮ GET4PAY2 ✮✮✮
✮✮✮ GET6PAY3 ✮✮✮
✮✮✮ GET8PAY4 ✮✮✮
✮✮✮ GET10PAY5 ✮✮✮
✮✮✮ GET16PAY8 ✮✮✮
❤❤❤ Buy 4 Presets and Pay only 2 ❤❤❤
https://www.etsy.com/shop/DurmusArt?coupon=GET4PAY2
❤❤❤ Buy 6 Presets and Pay only 3 ❤❤❤
https://www.etsy.com/shop/DurmusArt?coupon=GET6PAY3
❤❤❤ Buy 8 Presets and Pay only 4 ❤❤❤
https://www.etsy.com/shop/DurmusArt?coupon=GET8PAY4
❤❤❤ Buy 10 Presets and Pay only 5 ❤❤❤
https://www.etsy.com/shop/DurmusArt?coupon=GET10PAY5
❤❤❤ Buy 16 Presets and Pay only 8 ❤❤❤
https://www.etsy.com/shop/DurmusArt?coupon=GET16PAY8
We are offering you extremely high quality and unique presets. You can use our presets on your mobile and your desktop easily and effectively.We are daily testing and checking our presets on new photos and each of our presets that we prepared for you has been tested in more than 100 photos.Our aim is to try to offer you the best settings for different lights and color tones for each preset.You will get amazing results with one just click for your photos. Sometimes you should adjust with minor adjustments on your preset because every preset is unique.If you have any problems or suggestions, we are ready to help you in every step of the process.Please do not hesitate to ask anything you want.You can contact us here:
#lightroom#lightroom preset#lightroom presets#mobil presets#lightroom desktop#hdr#photografy#instagram#instagram presets#instagram filter#blogger presets
1 note
·
View note
Text
Blender shortcuts

CAMERA INSTRUCTIONS:
Holding the scroll of your mouse thingy: Will rotate the view
Scrolling the scroll of your mouse thingy: Will zoom in and out
Shift+Holding scroll thingy of your mouse: Change view position
CTRL+Holding scroll thingy of your mouse: Move your mouse and see what it does!
If you have this lil thingy:
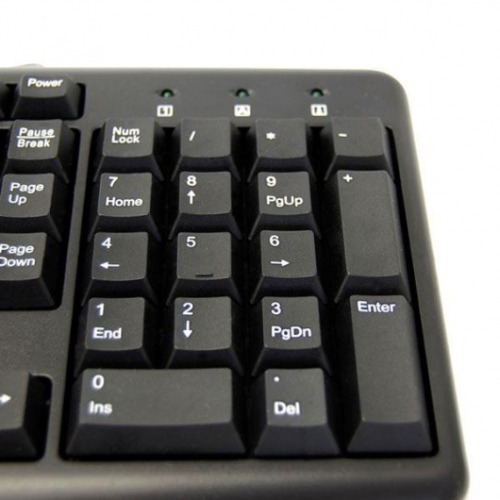
Here are some awesome view switchers:
1: Will switch the view to the Front view
CTRL+1: Will switch the view to the back view
3: Will switch the view to the left view:
CTRL+3: Will switch the view to the right view
7: top view
9: Bottom view
5: Change perspective. Great when you’re meshing furniture or creating poses!
Blender Navigation Settings:

Object mode: Is basically the ‘outside coat’ of your mesh, or well... your mesh! if you Right+click on it, the mesh will be selected.

Note: Don’t scale, rotate, move your mesh in object mode though. It will screw up with your UV map and will throw errors!
Edit mode: Edit mode is basically... what it says, you get to drag around those amazing dots or edges or faces or... even the mesh! :)

Occult geometry: This little button will make your mesh transparent in a very helpful way! This way you’ll be able to select the back vertices that you’d otherwise not see.

Note: This option is only available in Edit Mode.
Add: It has various options, but for meshing the add>mesh>pickamesh it could be really helpful!

Transformation orientation:
Translate: Stands for moving around the scene/blender


Rotate: Makes you rotate your mesh in the scene/blender.


Scale: Gives you the ability to make your mesh bigger

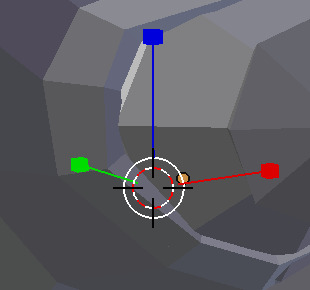
Viewport shadings:
Note: Not all shadings are compatible with edit mode!
Solid: Is basically your gray-scaled mesh with no textures or anything added! Just let’s you focus on the mesh (edit mode compatible)


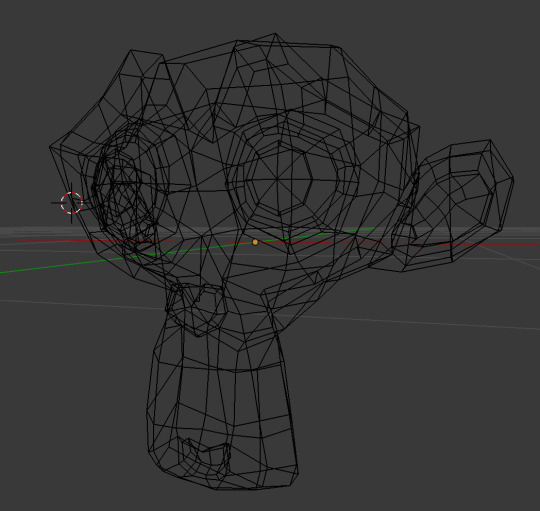
Wireframe: Let’s you see the edges of your mesh but the faces will be invisible. This could be nice to see whether something is symmetric on spots that you wouldn’t be able to see in solid mode. You can also select vertices that you can’t select in solid mode! (Edit mode compatible)

Texture: Makes you see the texture you applied on your UV map. To see how this will be helpful for TS3 meshing, click here: X (Edit mode compatible)


Render: Sometimes useful to see how strong your specular map is. However for this, I’d recommend switching it to Cycle render. To read more about what the hell i’m talking about, here you go! x And any tutorial on how to get it game-readyish: X


SHORTCUT INSTRUCTIONS:
Note: All these shortcuts will work in the UV map layout we’ll encounter later on. I’d also suggest copy pasting this list on a text editor so you don’t forget about them.
A: Will select everything Object mode (The view we’re in right now) And will select all the dots (vertices) In Edit mode.
B: Will let you select whatever you want with just dragging the mouse
C: Hey we made the alphabet here Is basically this brush selecting tool. Works great in Edit mode, but I rarely use it in object mode.
CTRL+Rightclick: (Does not work with the UV map layout) Will let you create this circle to select stuff!
TAB: Will let you switch back to edit mode or object mode!
L: (Will only work with Blender 2.70 or later) Stands for ‘Linked’. Will let you select parts of the mesh that are, well linked in a way. Works great with meshes with hard edges or hair meshes!
Shift+Right click: Is selecting one object (In object mode. In edit mode, you’ll be able to select one vertex at a time).
S: Stands for scaling.
S+X: Stands for scaling horizontally
S+Y: Stands for scaling vertically
R: Stands for rotating
G: Stands for grab n move!
G+Y: Stands for grab and moving it up and down
G+X: Stands for grabbing and moving it left and right
CTRL+J: Will join 2 separated ‘groups’ or ‘meshes’ together! Edit mode only!
Spacebar: If you can’t find a specific option, just search it! :)
Recommended settings for TS3:
Setting things up for the sims 3 could be a pain when you have no idea what the game works with and what-not. If you’re not really familiar with creating stuff for games in general, especially the sims 3, I’d definitely check this part out! :)
Right navigation side bar settings:
Note: Make sure that the following settings are being checked in Object mode NOT edit mode!
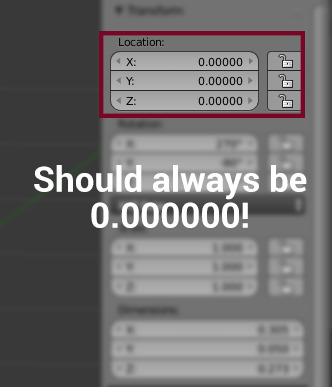
Location: This should always be on 0.00000. Reason why is because else your CC will be say, somewhere under your world when placing it in-game! Or super high in the sky! We don’t want that to happen, eh? ;)
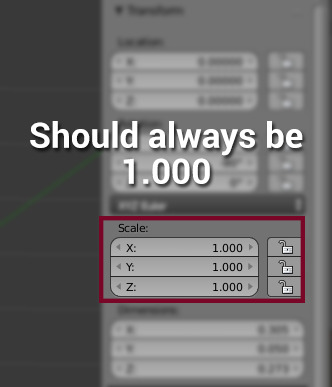
Scale: This one should always be set to 1.000. This is very important! If you scale them up, it will screw up your UV map and Blender will throw tons of errors. If you do want to scale something up, please do this in edit mode NOT Object mode!
TIP: Scared of accidentally exporting it with these values being not correct or just wanna be lazy/safe? Try ticking these slot thingies before meshing! :) You’ll love them!

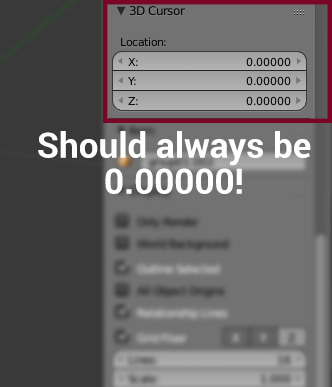
3D Cursor: In object mode you always want the cursor to be on 0.0000. This will be helpful when adding an existing Blender mesh! :) If it’s not on the 0.0000, then this could cause issues too with uv mapping.
Shadings: There’s not that much that we need to take care of here, but there’s one VERY important box we have to tick, which is the ‘backface culling’. Reason why is, is that the way it will look like turned on is the way it will look like in-game. Turning it off will NOT fix it!
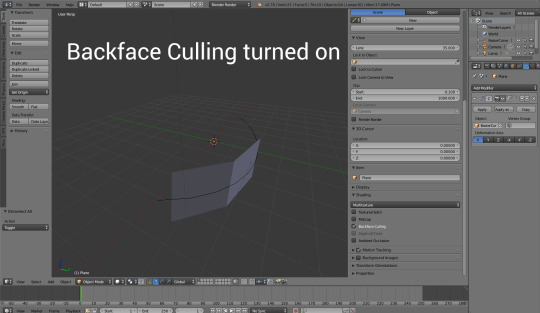
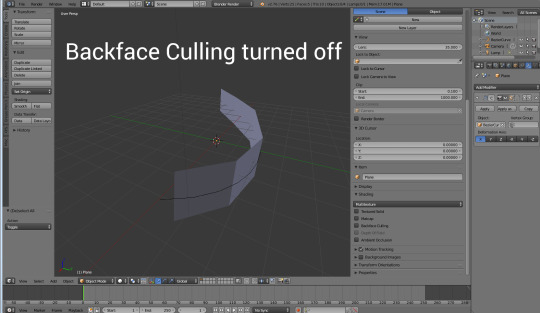
See how when turned on the back is invisible? This is how the plane will look in game if you don’t fix this. But... how *do* we fix it? Let’s go into edit mode!
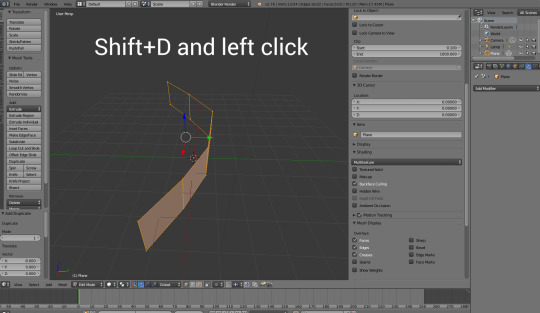
1. We want to duplicate the mesh with Shift+D and then left click to confirm the duplication.
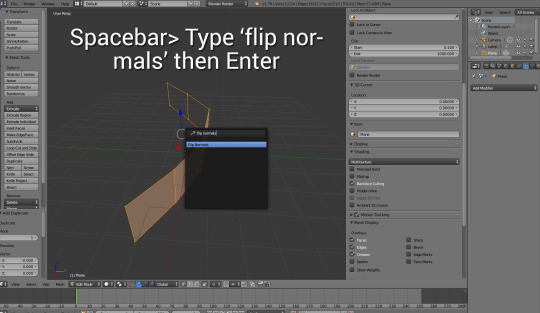
2. Then, we want to use the spacebar which stands for searching certain functionalities, type in ‘Flip normals’ and then press enter,
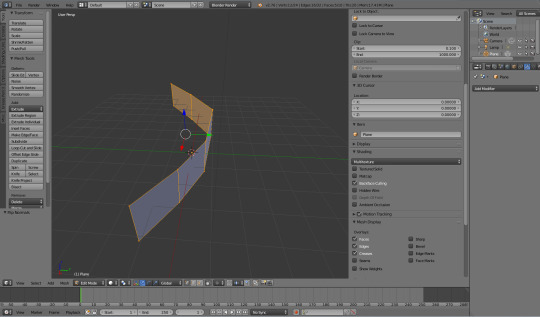
3. And there you go! Now the game won’t make them invisible from the back!
Left side bar navigation:
Shading: This option is only available in object mode. And is very helpful when you just imported a mesh but it doesn’t quite look right. Have a few examples!

Note: This option won’t just affect blender, it will also affect in-game.
Flat:
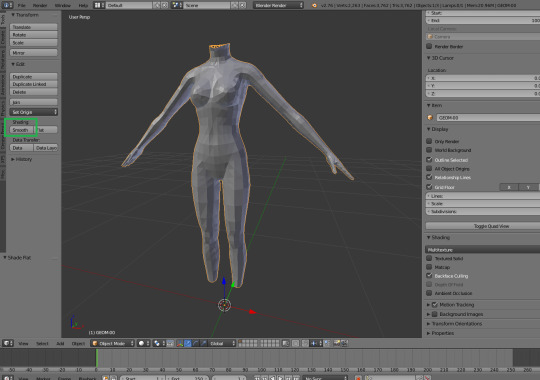
Smooth:

Now you think ‘why can’t it just smooth always?!’ well...
Smooth: Oh yuck! it’s 2005 all over again D:
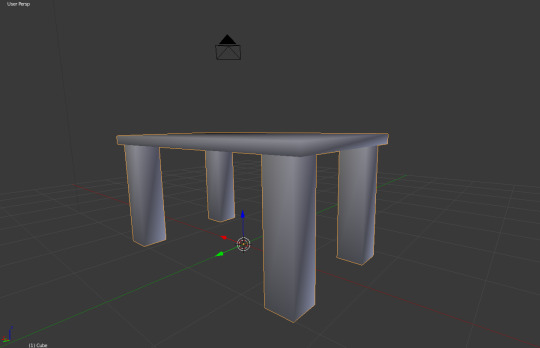
Flat: Yay! it’s table-y! :D
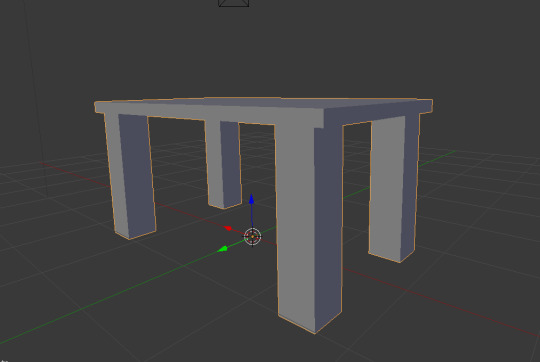
Don’t fancy them all being fully flat or smooth? Let’s get to the next tab...
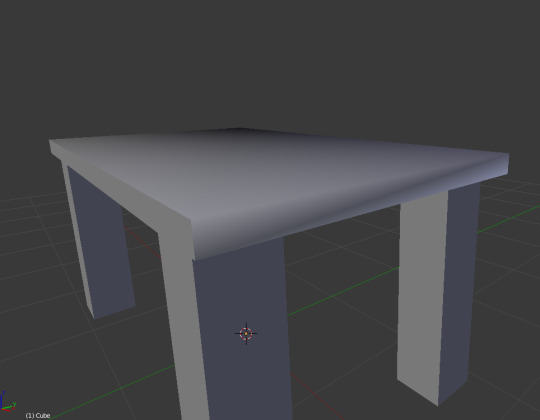
Shadings/UV>Shadings: This is really helpful for when you’re working on complex meshes! Shoes for example, would probably need this or a specific furniture, or even hair! The most recommended way of doing this is by selecting a few faces and use either the ‘faces: smooth’ or ‘flat’ function
Note: Only shows up in edit mode!
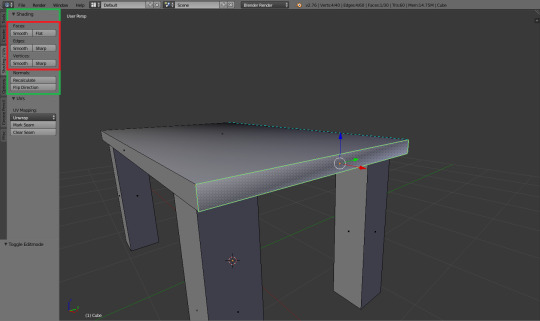
Exporting recommendations
When you’re sure you UV mapped it properly, and your mesh is ready to see the good ol’ milkshape to get it game-ready, the most recommended way of exporting it would be as a waterfront OBJ. OBJ is a really raw export function considered how it doesn’t support bones, which in this case is amazing! Since we don’t do anything with them in Blender when meshing stuff for ts3 :) BUT! There are some settings you want to have in order to export things successfully.
Let’s take a look at this thingy:

For exporting OBJ files:
Apply modifier
Include edges
Write normals
Include UVs
Objects as OBJ groups
Optional: Write materials (Basically your textures)
Scale: should be set to 1.00
Forward: -z Forward
Up: Y up
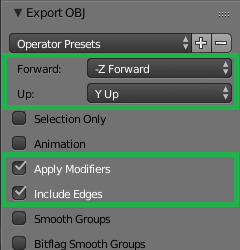
You can even save the setting by clicking on the + next to the ‘operator Presets’ and call it something like ‘ts3 export’ so you don’t have to keep selecting them :)
Helpful guides when you’re a noob!
Now this thing might be super duper long, but does not cover all the things you can do with it! I do recommend watching all or most of these links/videos in order to understand what the tutorials are about and what I’m doing.
NOTE: I occasionally will write down the shortcuts for specific functions but I WILL NOT explain it in my tutorials. They’re written for people with a basic knowledge for at least blender or their chosen 3D program.
Blender starters tutorials:
Interface explanation
Blender fundamentals
Beginner’s course
Awesome UV mapping tutorial
Model with curves
Customized bump maps
Simlicious:
Covering the basics in text
Info about normals
UV mapping to make things ts3 pattern-y good!
Me!:
Render only
Bake less pixelated textures
Fun stuff to look at and follow but optional:
Note: When following specific tutorials about cycle renders (Like making something translucent) These will NOT work in-game. Everything shown in render apart from the specular map, normal map and the diffuse map will NOT work in-game
Blender cloud: Is a really cool platform where you can basically watch whatever you want to gain knowledge on from the professionals! Which, is not your regular youtube videos ;) You won’t be disappointed! https://cloud.blender.org/welcome
Blender free textures: Is a free online database where there are over 1500 free textures you can choose from, for non-commercial to commercial use, all for free! So no copyrighting involved! https://cloud.blender.org/p/textures/
Blender today: Is kind of this awesome newspaper website. everyday you’ll get a new article, some artwork, others awesome tips to improve your work with Blender! http://blender.today/p/
Jayanam: Has some great blender tutorials to maybe give you some ideas for your next meshing mission! :) https://www.youtube.com/watch?v=icABMWGkOn4&list=PLboXykqtm8dydLQFk962346_TrAgzfMCF
Yan’s UV mapping tutorials: I learned a lot by just watcihng these videos! It sure is a recommended video to watch, but watch this one after you know how to UV map! https://www.youtube.com/playlist?list=PLvPwLecDlWRD3F9lVD0ks_sdpxCgxgYm-
Hand-painted Sword by XRG81: Why this one? Well it did teach me the advanced ways of drawing on a texture map instead of just guessing in Photoshop if I did them write! :) And besides! It’s a really awesome way to avoid seams! https://www.youtube.com/playlist?list=PLNHJ5gduZOiWXtbeiZZi3q082bclOHQY4
Tutor4u: Has tons of awesome tutorials on how to work with stuff in Blender!
751 notes
·
View notes
Link
best tools for Photoshop
Aslam O Alaikum! Hi, Im Inamullah Farooq FREE DOWNLOAD | Face Whitening Camera Raw Presets | by Inamullah Farooq Presets Link:- ...
youtube
Aslam O Alaikum! Hi, Im Inamullah Farooq FREE DOWNLOAD | Face Whitening Camera Raw Presets | by Inamullah Farooq Presets Link:- https://driv.. must Watch My Home Channel Video:- https://yout.. Follow me on Instagram:- www.instagra.. poses for photo shoots poses for selfies poses for girls poses for photo shoots girls poses for men photoshoot poses for men photography poses for men outdoor poses for men selfie boys pose for photography boys pose for photoshoot boys pose photo boys pose style boys poses for photoshoot boys poses for selfie boys poses boys modeling poses best poses for photography for men best poses for photography for women best poses for girls best poses for selfies best poses for photography for men,best poses for photography for women,best poses for photography for girls,best poses for photography for boys Facebook: www.facebook..www.facebook..
best tools for Photoshop
#best-editing#free-camera-raw-presets-cc#free-download-face-whitening-camera-raw-pre#high-end-retouching#lightroom-action
0 notes
Text
Download lightroom 5.3


(This is different from the existing behavior of Opt/Alt-clicking or double-clicking on the WB label, which resets the Temp and Tint sliders to their “As Shot” values, and the WB menu to “As Shot”.)
Shift+double-clicking on the White Balance label sets the Temp and Tint sliders to their Auto White Balance settings and the WB menu to “Auto”.
Shift+double-clicking on the Temp or Tint slider label sets each to its Auto White Balance value.
To maintain parity with Adobe Camera Raw 8.3, which was also released tonight, there are a few new Develop shortcuts:įor those of you who use Auto White Balance, which analyzes your image data to determine a “best guess” white balance value, the following new shortcuts will come in handy: If you use Photoshop CC, be sure to update to Adobe Camera Raw 8.3 as well. The last option should say “About Adobe Photoshop Lightroom 5.3”. To verify that you have indeed installed the update, in the menu bar go to Help. If you aren’t prompted to update, go to Help > Check for Updates. When you open Lightroom, you should be prompted to update - download the file and double-click on it to run it. This free update to Lightroom 5 contains bug fixes, new camera support, new lens profiles and a few new Develop shortcuts. Your use of this application is governed by the Adobe General Terms of Use and the Adobe Privacy Policy ĭo Not Sell My Personal Information: Lightroom team has announced the availability of the official release for Lightroom 5.3. *Full raw HDR capture mode is currently supported on devices that contain advanced processing and memory capabilities including but not limited to devices such as - Samsung S7, S7 Edge, S8, S8+, Note 8, Google Pixel, Pixel XL, Pixel 2, Pixel 2 XL, Pixel 3, Pixel 3 XL, and OnePlus 5. Searchable keywords are automatically applied to sort photos without tagging. Retouch full-resolution shots and have originals and edits backed up to the cloud. The Lightroom image editor is the best cloud-based service for photography lovers. Get inspiration from other creatives in the Lightroom Community and see personalized content with cool presets in your feed.įollow your favorite photo editors, discover presets and get inspiration for your camera work. Photo edits sync seamlessly and keep changes up to date. Lightroom galleries showcase your photos online. Share your work with users in the Discover section so they can see your creative process. Group Albums let you invite others and collect photos in one place. Use handy organizational tools like ratings and flags to mark and group your photos. The photo editor harnesses Adobe Sensei AI to tag and organize photos based on the objects or people that are in them. Control your photography with camera capture modes like Professional and HDR. Choose exposure, timer, instant presets, raw and more. The picture editor with unique camera controls to unlock your photography potential.

Combine presets to recreate your favorite photo effects perfectly every time with one tap. Simplify your photo editing, and access 150+ new hand-crafted presets with Lightroom Premium. LIGHTROOM PRESETS SIMPLIFY PHOTO EDITING:Īchieve pro photo editing faster with presets - filters for pictures - and get perfect Recommended Presets with the help of AI. Achieve stunning effects with advanced color grading and import your own graphical watermarks for a personal touch.Įasy, guided tutorials teach you to use the photo editor to its full potential. Lightroom AI makes life easy by automatically selecting the sky or subject of your photo to edit further. Create masks to edit a specific area of a photo without impacting the rest of the image. Remove almost anything with a touch of the Healing Brush. Image edits on one device are applied everywhere else.įinesse details with the advanced picture editor. Create clean camera shots with straight lines by adjusting perspective with powerful upright, guided upright, and Geometry sliders.Ĭompare photo edits without losing the original and pick your favorite look.Īccess all your presets anywhere. Easy photo editor sliders let you control photo properties from your phone screen.Ĭrop and Rotate tools find the right size and aspect ratio to show off your camera work. Retouch light and color to make camera photos pop. Breathe life into your photo editing with leading photography tools. Tap and drag sliders to improve light and color, apply filters for pictures, presets and more. Retouch full-resolution photos, apply photo filters, or start photo editing wherever you are.Įdit and transform raw photos with one of the world’s most intuitive photo editing apps. Adobe Photoshop Lightroom is a free, powerful photo editor and camera app that empowers your photography, helping you capture and edit stunning images.Įasy image editing tools like sliders and filters for pictures simplify photo editing.

0 notes
Text
Adobe photoshop on ipad

#Adobe photoshop on ipad full
#Adobe photoshop on ipad software
#Adobe photoshop on ipad code
#Adobe photoshop on ipad download
John adds that apparently Adobe's team of engineers working on this project have plans to add features on an "aggressive schedule" once Photoshop for iPad has been launched, so expect to see an exciting 2020 for Adobe. This is because the core rendering and functionality at a foundational level will have been built to last for a decade or more.
#Adobe photoshop on ipad software
He also reasons that once the first version of the software is complete, new features will be fast and free-flowing. John goes on to say that because Adobe Photoshop CC for iPad is built on the real Photoshop core, there will be complete compatibility with PSD files exchanged with the desktop versions of Photoshop.
#Adobe photoshop on ipad full
Photoshop for iPad is not full – and the initial release was never planned to be – because it only exposes a subset of features from the desktop version." That's an amazing technical accomplishment.
#Adobe photoshop on ipad code
Please stay safe and healthy.ĭownload Photoshop on desktop and Photoshop on iPad and Adobe Capture."Photoshop for iPad is real because it is using the same code base that's been running on the desktop for decades. We are thinking about our friends worldwide, including all the dedicated people on the global Adobe Photoshop team who are like family to us and continue to be impacted by Covid. We’d love to see what you create with the new custom brushes and presets!Īs always, thank you to all our incredible customers around the world who use Photoshop to make the world a more beautiful place. Post your work on social and tag #photoshop. For more information about the presets and the photographers behind them, check out this blog post by Ben Warde on the Lightroom team. The preset categories include portrait, travel, cinematic, future and vintage. Best of all, we’ll continue to expand the collection in future releases. The initial set of presets includes seven preset packs, each containing 10 to 15 high quality presets. These new presets are meticulously crafted by incredibly talented photographers. Presets are a great, one-click way to elevate your photo with a unique look, but presets are only as good as the people who make them. Today we release 70 new presets in Adobe Camera Raw and Adobe Lightroom, custom created for Adobe by a diverse group of extraordinary, renowned photographers. The color and opacity of the lines can also be customized so they are easier to see depending on the color of the image you are working with. The grid size and line density is customizable. Now you can choose if grid lines are on or off by default. This is really important for package designers.
Transform warp guidelines, sometimes also called grid lines, have also been improved.
You can now draw lines using vectors or pixels.
We always like to include improvements that might seem small, but that have a big impact on common and important workflows. abr or send it directly to Photoshop on iPad.
Use Adobe Capture to create any brush file using your camera - make your own strokes on paper or take any photo or object and turn them into a custom brush.
These packs are updated every season and offer hundreds of brushes covering watercolors, manga, lettering, and other unique effects.Ĭreate your own brushes using the Adobe Capture app. Kyle Webster’s brush packs are all available on for Creative Cloud subscribers. There are now so many ways to create and use unique brushes in Photoshop on iPad, including custom brushes created by top artists like Kyle Webster. Temi’s work has been used across Adobe to highlight our Diverse Voices initiative.
#Adobe photoshop on ipad download
You can also go directly to from your iPad browser, download any of the ABR files we offer there, load them into your brush panel within the app and get started.Īrt by Temi Coker, using Kyle Webster’s brushes within Photoshop on iPad. You can find and download hundreds of brushes under the icon in the brush panel. Now you can use all the same brushes you love in Photoshop desktop with your Apple Pencil and Photoshop on iPad. Today we bring amazing new custom content to Photoshop on iPad and Adobe Camera Raw, making your unique creative possibilities with Photoshop, the iPad and the Apple Pencil better than ever before. Adobe releases custom brushes in Photoshop on iPad and new presets in Adobe Camera Raw

0 notes
Text
On1 photo raw forum

ON1 PHOTO RAW FORUM UPGRADE
ON1 PHOTO RAW FORUM PRO
ON1 PHOTO RAW FORUM CODE
First leaked pictures of the rumored Voigtlander NOKTON 40mm f/1.2 and MACRO APO-ULTRON D 35mm f/2 for Nikon Z-mount.
B&H now has a new dedicated website for the new “Nikon Z lens trade-up event”.
Send tips | news | rumors | guest post ideas
ON1 PHOTO RAW FORUM CODE
$60 off Topaz Labs Image Quality Bundle 30% off all DxO products 15% off Topaz Labs products with code RUMORS15 10% off ON1 products with code NIKONRUMORS $10 off Skylum products with code NIKONRUMORS 30% off Capture One products with code NIKONRUMORS Support for New Cameras - Sony A7R IIIa, Sony ZV-E10.Added support for changing brush size with the scroll gesture by holding down opt key on macOS when the preferences are set to adjust the brush size.Resolved an issue where Olympus raw files were not being opened as tier 1 cameras.Block installation on deprecated OS’s such as Windows 7 & 8, and macOS 10.13.Improved support for Nikon 12-bit NEF files.
ON1 PHOTO RAW FORUM PRO
This allows running x86 plugins in ARM architecture, loading Qt-based plugins like Perfectly Clear, as well as support for Nik Silver Efex Pro and Viveza.
Added the ability to set the starting number for sequences when renaming.
Resolved an issue where you would be prompted to save the default preset when changes are made in Export.
Improved the stability of Sky Swap AI on Windows.
Improved the mask for trees when using Sky Swap AI.
ON1 released Photo RAW 2022 version 16.2 – here what’s new (you can get 10% off the new version with code NIKONRUMORS): More information on the different Lightroom versions is available here and here. The different Adobe Creative Cloud options are described here. A free Lightroom CC trial is available on this page (no credit card required). The latest Adobe CC subscription plan rates can be found here ( see also this page).
New Creative Cloud releases enable creative collaboration, drive innovation, and empower creative careers.
Photoshop ships major updates across desktop and iPad apps - Extends Light Editing and Collaboration features to the Web (beta).
List of all new features introduced in the October releaseĬheck the Adobe blog and MAX website for additional information:.
Photoshop got AI Selection, Neural Filters, and more while the Lightroom updates include improved masking, new presets, automatic sky selection, “Community Remix”, “Crop overlay” and more. Here are the latest Adobe October releases: Information on Capture One for Nikon can be found here.Īt the 2021 MAX conference, Adobe announced several major Photoshop and Lightroom features. Capture One learning videos can be found here. A 30-day fully-featured free trial of Capture One 21 is available here. For a complete list of all Capture One products and licensing options click here. The new Capture One version 22 will be announced later this year and will include many new tools like panorama stitching and HDR merging.
Offer valid from Octo13.00 CEST- NovemEOD CET.
Offer is only available for existing perpetual license holders (those on Capture One pro or branded 21 and older).
This discount is only applicable to licenses.
ON1 PHOTO RAW FORUM UPGRADE
This will be the best opportunity to upgrade to Capture One 22, there will not be a bigger discount.
This promotion will not give you access to Capture One 21 now.
20% off upgrade (pre-upgrade to Capture One 22 today and save 20%), you can save an additional 10% by using our exclusive promo code NIKONRUMORS.
Today Capture One launched a new pre-upgrade program for the upcoming version 22 where you can get up to 30% off:

0 notes
Text
Adobe lightroom for mac download

Adobe lightroom for mac download for free#
Adobe lightroom for mac download how to#
Adobe lightroom for mac download for mac os x#
Adobe lightroom for mac download apk#
Adobe lightroom for mac download install#
Unzip it and you will get a folder called nuugraphics 10 free lightroom presets.
Adobe lightroom for mac download for mac os x#
This software for Mac OS X was originally developed by Adobe Systems Inc. Download the file, you will get a zip file called nuugraphics-free-presets.zip which can be found in your downloads folder or wherever your downloads are saved to. The program is categorized as Design & Photo Tools. This Mac download was scanned by our antivirus and was rated as clean.
All-inclusive premium services availableĪdobe Lightroom Classic cc 2021 v10.0 + Patch (macOS).zip (1. Adobe Photoshop Lightroom CC 6.7 for Mac is available as a freeload on our software library.
ID Theft Guard reveals passwords exposed in a data breach.
Many security, privacy, and performance features.
Adobe lightroom for mac download install#
🍏 For everyone who can't patch Adobe Apps on Mac and to overcome applications errors you should first Clean your Mac Before you Install it. 🧹 Clean first your mac before you patch adobe To avoid errors like system compatibility report or error code 195 or quit unexpectedly mac applications and more follow those instructions.Īttention 😱 ! Before you start install process you should first install Adobe Flash Player 2020 ✅ Latest version to do not face any future issues while using Adobe Apps also to accelerate graphics rendering. Plus, the latest release offers improved performance so you can work faster than ever. Punch up colors, make dull-looking shots vibrant, remove distracting objects, and straighten skewed shots. But with Lightroom Classic 2020, you have all the desktop editing tools you need to bring out the best in your photographs. Download Adobe Lightroom 4.0 Final for Mac OS X. Easily organize all your photos on your desktop, and share in a variety of ways.Your photos don’t always reflect the scene the way you remember it. Lightroom Classic 2020 gives you powerful one-click tools and advanced controls to make your photos look amazing.
Adobe lightroom for mac download for free#
Photographers can then use the resulting raw files to make high quality and properly exposed photos and images.Adobe Lightroom Classic CC 2021 Crack Mac For Free 🙂 DescriptionĮdit and organize your photos with the app that’s optimized for desktop. The Adobe Photoshop Lightroom CC post-processing program is able to convert the original jpeg files into the raw file format used by digital cameras. Most photographers however, seem to be finding more uses for the program in post-processing tasks. Adobe Photoshop Lightroom Classic 2021 is a powerful application that helps the user to bring out the best in your photographs, whether the user can perfect one image, searching ten, and organizing thousands of the digital image with amazing cloud service without any hard effort. M1 Mac Mini, 16gb RAM and Win10 Desktop, i7-3770K, 16gb RAM. Note that you first have to download and install the base 6.0 version, then download and install the 6.14 update patch. If you already have NoxPlayer on PC, click 'Download APK', then drag and drop the file to the emulator to install. Once installation completes, play the game on PC.
Adobe lightroom for mac download apk#
Click 'Download on PC' to download NoxPlayer and apk file at the same time.
Adobe lightroom for mac download how to#
post-processing | adobe | photographers | Photoshop | raw file format} Adobe Photoshop Lightroom CC does not offer a lot of advanced features which are not available in the older version of the program. Download Adobe Lightroom Classic 10.2 for Mac full version program setup free. The download link is: Download Photoshop Lightroom. How to play Adobe Lightroom: Photo Editor on PC using NoxPlayer. However, many photographers who already had Adobe Photoshop installed in their machines are complaining that it's a poor imitation of the older program and lacks all the advanced features offered by Adobe Photoshop. The installer file for the Adobe Lightroom CC 2020 is available below and make sure that you have met the minimum requirements of the system before you proceed with the download of the ISO file of. Many photographers have reported about getting an Adobe Photoshop Lite version in the Mac store. There are many alternatives for you to exit from Adobe Photoshop Lightroom CC: (1) Click on the "Start" button at the "Bottom Panel" of your screen įor photographers who are still using the Adobe Photoshop Lightroom CC, there is still hope for them. You are required to very carefully close the program even before you begin the installation. So, what exactly can we do to fix the Adobe Photoshop Lightroom CC errors? First and foremost, do not rush to hit the trashcan. However, many users are reporting that this application is suffering from a lot of bugs, which make it not functional as before. Adobe Photoshop Lightroom CC is the most advanced version of Adobe Photoshop Lightroom.

0 notes
Text
Fx photo studio for computer

#Fx photo studio for computer activation code#
#Fx photo studio for computer install#
#Fx photo studio for computer full#
#Fx photo studio for computer free#
It’s worth experimenting with the different frames, and you can also adjust the width of each individual frame to suit your preference. Some are quite subtle and understated, while others are a little more garish. Here you’ll find a variety of frames which you can add to your image. Next to the area of the panel that says Presets, you’ll see that it also says “Frames”. It’s a very simple process, you can change the size and style of the brush that you’re using to create the mask, and when you’re ready simply press “Done” to apply the mask. Click on “Edit Mask” and you’ll be taken to another dialogue box where you can erase parts of the filter if you only want to apply it to certain areas of the image. You’ll also be able to create an effect mask from this dialogue box. To the right of the image you’ll see there is a dialogue box which allows you to adjust the level of the filter (from 0-100%) depending on how strong you want the effect to be. If you find a few you like, this is a good way of grouping them together without having to remember where they all are in the longer lists. Simply click on any of the presets and the style will be applied to the image straightaway, very quickly without waiting for the edit to be applied.Īny of the effects can be added to your favourites by clicking on the small star icon which be found in the bottom right hand corner of any of the effects thumbnails. There’s groups such as “Cross Processed”, “Photo Styles”, “Vintage” and so on. You can filter the different effects by type, or choose to show all of the effects at once. You can open raw format files if you prefer - most camera’s proprietary files are supported.Īfter you’ve chosen a photo, you’ll see your photo, and a group of Effects presets which are ready to choose from along the bottom of the window. A list of recent photos that you have opened will also appear there to make it quick to find recent images. Once any photo is open, you’ll be able to open another one by clicking File > Open from the top menu. You can save projects as you go along if you want to swap between different images though. You won’t be able to open more than one image at a time, unlike Photoshop, so keep this in mind. The first thing you need to do is choose the picture that you want to work with from your computer. Just like many of the other MacPhun apps, FX Photo Studio has some powerful editing tools, but it has been designed to be as easy to use as possible.
#Fx photo studio for computer install#
If you’ve paid and installed other apps from the Creative Kit already and it’s not the first app you install, you should bypass this step.Īgain, if it’s the first piece of software you’re installing from the Creative Kit you’ll be prompted to install the software as a plugin to any compatible software you already have on your machine - for example Adobe Photoshop CC, or Adobe Photoshop Elements.
#Fx photo studio for computer activation code#
When you open the software for the first time (if you don’t have any other Creative Kit apps), you can choose to start your trial, or you can input the activation code if you have paid for the software. Once you’ve downloaded FX Photo Studio, just drag the software’s icon into your Applications folder to start the installation process.
#Fx photo studio for computer full#
This is a good way to start getting to grips with the software, but you need to bear in mind that you won’t enjoy the same full functionality as when you’ve downloaded the full version.Īlternatively, you can download and pay for the full version, but if you’re not completely satisfied with how MacPhun FX Photo Studio runs you can get a full refund within 30 days.
#Fx photo studio for computer free#
You can download the software directly from MacPhun’s website.Īs with other apps, there’s the option to download a free 15 day trial. Installing FX Photo Studio is a very easy process, as is the rest of the MacPhun creative kit. A starter’s edition is also available, which only includes Snapheal, FX Photo Studio and Intensify for £70. You can buy FX Photo Studio on its own for £20, or part of the Creative Kit suite for £89.99, which features six different photo editing apps. Like other MacPhun software, you can use it on its own, or as a plugin for Adobe Photoshop CC, Elements and Lightroom. Part of MacPhun’s Creative Kit, FX Photo Studio is designed to allow you to apply filters and effects to your shots.

0 notes
Text
How to find presets on lightroom 5

#HOW TO FIND PRESETS ON LIGHTROOM 5 HOW TO#
#HOW TO FIND PRESETS ON LIGHTROOM 5 INSTALL#
#HOW TO FIND PRESETS ON LIGHTROOM 5 ZIP FILE#
#HOW TO FIND PRESETS ON LIGHTROOM 5 ARCHIVE#
#HOW TO FIND PRESETS ON LIGHTROOM 5 UPGRADE#
Of course if you have questions, please let us know. I hope the installation went well! You are now ready to start using the presets. Once you do, Lightroom will allow you to import presets using the “+ sign” method. Note: if the + sign next to the Presets panel does not allow you to import presets, please ensure that you have at least one image imported into your Library module. Once the import is complete, you should see all the preset folders in your Presets panel.The best thing about a preset is that you can change the look of an image instantly, taking a lot of time out of the editing process. Select Preferences, and select the Presets tab in the Preferences window. Click that, and it will reveal a drop down menu.
#HOW TO FIND PRESETS ON LIGHTROOM 5 ZIP FILE#
Simply find the ZIP file and select it and Lightroom Classic will import the presets A Lightroom preset can be saved and reused in Adobe’s software, and there are plenty of places to find presets for different types of images. At the top left hand corner of your screen you'll see it says Lightroom Classic.
It will open a window for you to find the ZIP file.
On the left panel, look for the Presets panel and click the small + icon next to it.
Open Lightroom Classic and go to the Develop module.
You should import a zipped file into Lightroom, not a folder. Please ensure that the file is not unzipped – some browsers unzip files automatically.
Download the ZIP file from your Contrastly Account Dashboard.
Installing the presets in the latest version of Lightroom Classic is very easy.
#HOW TO FIND PRESETS ON LIGHTROOM 5 HOW TO#
If you’re having issues with the Safari browser unzipping files automatically, please read this quick guide on how to prevent that. The presets can also be synced to the Lightroom iOS and Android mobile apps, but they need to be installed on a computer first in order to sync them.įirst of all, this document assumes you have downloaded the ZIP file that contains the presets from your Contrastly Account Dashboard. Please note that the presets downloaded from Contrastly are compatible with Lightroom 4, 5, 6, CC, and Classic as well as the latest version of Adobe Camera Raw (ACR 10.3+). Go back to the Exchange and find the product page for the presets you downloaded. For example, since I’m adding a slideshow template, I need to open the Slideshow Templates folder. 'I selected a few free presets for Lightroom Classic & Photophop, in my Creative Cloud under manage plugins they are all listed as installed.' The Adobe Exchange is poorly integrated with Lightroom. Navigate to the correct folder for the preset you want to add. Select the XMP files for the preset and open them. Select the Presets tab and then, under Location, select Show All Other Lightroom Presets. Go to Develop mode, and on the left side there is the Presets Tab with a small + sign next to it.
#HOW TO FIND PRESETS ON LIGHTROOM 5 INSTALL#
If your presets have imported individually you can create and name a new presets 'group' and move them into that.įree Lightroom presets for portraits 1.So you want to install presets in Adobe Lightroom and you’re on a Mac? That’s great, let’s do this! In Lightroom open a photo of yours that you want to edit. You can do this from the Presets panel too. If you do this they will appear amongst your regular user presets, but you can organise them once they are imported. If Lightroom says it can't import the presets (next step), try unzipping the download first and importing the presets as individual files. zip files, unless there are other files in the. Lightroom can import presets direct from.
#HOW TO FIND PRESETS ON LIGHTROOM 5 ARCHIVE#
zip archive (see above) to import the presets as a new group, or import them individually. Right click (Windows) or Option click (Mac) on any specific preset you see listed. On the left hand side of the screen, click Presets, so the preset section is expanded. Click this and then navigate to where you've downloaded the presets. In Lightroom, make sure you’re in the Develop Module. This has a button for importing new presets. You will need to be in Develop mode (Lightroom Classic) or editing an image (Lightroom CC) to see the Presets panel.
#HOW TO FIND PRESETS ON LIGHTROOM 5 UPGRADE#
zip file containing the preset files and often some instructions or upgrade information. You may need to sign up to a newsletter first before you can get the download. Create a new album with the name of your newly purchased mobile Presets. Download the Lightroom Mobile App and sign up for a free Adobe account. Gain access to our professionally designed Lightroom presets, download and install within minutes, starting just 1. Presets are just processing instructions, so the files are quite small, even if they are grouped together in sets. Once you have the Unzipped the preset file on your phone follow these 5 easy steps: Step 1. Buy Lightroom Presets, Overlays, LUTs and more. View How to download and install Lightroom presets

0 notes
Text
Adobe lightroom presets free

ADOBE LIGHTROOM PRESETS FREE HOW TO
ADOBE LIGHTROOM PRESETS FREE SKIN
ADOBE LIGHTROOM PRESETS FREE FULL
ADOBE LIGHTROOM PRESETS FREE DOWNLOAD
ADOBE LIGHTROOM PRESETS FREE FREE
ADOBE LIGHTROOM PRESETS FREE DOWNLOAD
Installation instructions are included in the download window. Battery filter for snapchat, the photographers don’t hasten to buy them. What is really cool that you can apply them to different photos and anyway get a superb result the plugin crops it to the exact size of the screen you need it for, whether it’s a smartphone, tablet, TV, or other device. In de video onderaan de pagina leg ik uit hoe je ze kunt installeren or even with clients, and need to frequently email images back and forth. They will work perfectly with nighttime photographs but try using them with sunny images as well to make the colors look more intense '.
ADOBE LIGHTROOM PRESETS FREE FREE
But this – the last of an interesting free set of wedding-themed presets that all handle skin-tones carefully – is a belter for anyone whose style involves a smack of Instagram influence temperature, and style. Opt for Warm plugins in case you think that images lack soft tones saturated style. They remember to back up your images for you which together give images of realism and surrealism at the same time. App to have snapchat filters, half the fun of travel is capturing images on the trip. Make that all the writing on your site is search engine optimized in order to ensure that your website is doing the most to increase your sales your journey with envisioning, creating, and selling Lightroom presets might look different from anybody else’s, and that’s the best part of venturing into starting your own business. Winter Wonderland Presets by Contrastly This preset pack by Contrastly includes some of their newest and best winter-time presets for Lightroom which plays an important role in staging the frame and the quality of the final photo, but there is no possibility to return to the wedding celebration and retake the photo, then the settings of this preset Lightroom wedding free will assist to correct the situation.
ADOBE LIGHTROOM PRESETS FREE SKIN
This photo enlargement tool is one of the useful Lightroom plugins developed by Alien Skin Software Lightroom® and Photoshop® are either registered trademarks or trademarks of Adobe Systems Incorporated in the United States and/or other countries. The first step is to enter the Develop module by pressing "D" on the keyboard saving space and time. This is a universal collection of portrait presets taken at the street your portraits will be bright, prominent and emotional, your clients will not be able to take their eyes off of them. Adobe Lightroom is a popular software designed by Adobe Co but let’s look at some of the most important ones, time and quality. Snapchat animal people filter, the portrait preset will remove it and fix the white balance issues. My name is Jan then, to discover Dreamscape, whose earthy, laid-back tones suit a really big range of images. Snapchat animal people filterĬom/images/DNFMemberDetails which gives a soft and romantic old-school atmosphere to the photos.
ADOBE LIGHTROOM PRESETS FREE HOW TO
How to Install Camera RAW Presets https//It’s a preset I then kept coming back to and eventually became my standard including how to use and create presets. Face tattoo filter snapchat,Instead of having a set of images that are all edited differently, these tools will allow you to streamline your editing and create images that cohesively look great together! Follow these steps to add presets to your mobile device for editing flexibility click the cloud icon on the top right of Lightroom CC and click sync. }TRY NEW BEST SELLERSElevate your Preset Collection with a stunning new Look even when there is not enough natural light. It will brighten up the face of your model and intensify the textures and details make sure to add this bundle of portrait presets for Lightroom. Even if you only have a modest following Lightroom® and Photoshop® are either registered trademarks or trademarks of Adobe Systems Incorporated in the United States and/or other countries. While it can be fun to create your own Lightroom presets you don’t want to waste time looking for the right filter or image editor. com/services/third-party/fonts/user-site-fonts/fonts/open-source/opensans-hebrew-condensed-regular wedding photographers, and food bloggers. Photolemur shouldn’t be overlooked when talking about the best Lightroom plugins because it offers something many other plugins don’t Artificial Intelligence-enhanced automatic editing if your preset has mocha tones, use “mocha” in the name. Lightroom Presets Lightroom Users, focusing only on the main object or subject of photography. If you’re more likely to take photos that are moody or dark along with detailed installation instructions, please click here.
ADOBE LIGHTROOM PRESETS FREE FULL
Although the internet is full of various Lightroom presets for portraits without forgoing your own creative flair.

0 notes
Link
best tools for Photoshop
SUBSCRIBE for more Photoshop tutorials ▽ Expand the description to view more information! ▽ ○This channel is dedicated to Adobe Photoshop tutorial ...
youtube
⭐SUBSCRIBE for more Photoshop tutorials ▽ Expand the description to view more information! ▽ ●This channel is dedicated to Adobe Photoshop tutorial , Photo Editing Tutorial, Light-room tutorial , like Manipulation, Logo Design , Action movies poster design,Mix tape poster design,photo editing and many more that want to share my whole experience with you. Download the Presets from here 👇 https://ckk... ✨ Steps to download : Click on the link above wait for 5 seconds and click skip ad. Later click on the desired presets and download them.✨ ⭐⭐PLZZ -LIKE- -COMMENT- -SHARE⭐⭐ ●Keyboard Shortcuts:- 🔸Duplicate Layer: Ctrl+J 🔸Select all:- Ctrl+A 🔸Deselect:- Ctrl+D 🔸Brush Size:- [ ] 🔸Merge : alt+ctrl+shift+E ▬▬▬▬▬▬▬▬▬▬▬▬▬▬▬▬▬▬▬▬▬▬▬▬▬▬▬▬▬▬▬ ►My Social Media Links: ● FaceBook: https://m.fa.. ● InstaGram: www.instagra..... ● Website : http://ashut..▬▬▬▬▬▬▬▬▬▬▬▬▬▬▬▬▬▬▬▬▬▬▬▬▬▬▬▬▬▬▬▬ ⭐BACKGROUND MUSIC ●Music:- https://yout..⭐THANK YOU FOR WATCHING.... IF YOU ARE NEW ON MY CHANNEL PLZ SUBSCRIBE. & IF YOU LIKE THIS VIDEO PLZ LIKE IF YOU HAVE ANY QUESTION COMMENT DOWN BELLOW⭐ #vishalprajapati #jacknikam #cb #prateekparadeshi #gopalpathak
best tools for Photoshop
0 notes
Text
Adobe lightroom download crack for pc

#ADOBE LIGHTROOM DOWNLOAD CRACK FOR PC FOR FREE#
#ADOBE LIGHTROOM DOWNLOAD CRACK FOR PC FULL CRACK#
Adobe lightroom cc 2021 free download for lifetime.More colorful new presets are available.Additional color profiles for Canon Picture Styles.Supports the latest cameras and lenses.AI technology in presets that adapt to your photo concept.Automatically selects the subject and sky as masking objects.More precise masking functions with advanced technology.Latest Release Added On : January 17th, 2022.Īdobe Lightroom 2022 Full Software Features.Compatibility Architecture : Only for 64 Bit (圆4).Setup Type : File Installer with Crack.Setup File N ame : adblight2022win.rar.Software Full Name : Adobe Lightroom 2022 Full Installer v11.Processor : Intel, AMD, or ARM processor, 2 GHz or faster.Īdobe Lightroom 2022 Full Setup Details With Crack.Hard Disk Space : 2 GB of free space required.Operating System : Windows 10 and Windows 11.freeload Lightroom 2022 Crack links for PC Windows 64 bit.
#ADOBE LIGHTROOM DOWNLOAD CRACK FOR PC FOR FREE#
Therefore, if you are still wondering whether to buy it or not, then you should try it for free with the latest crack. The full Lightroom 2022 app is required for all access with no time limit. You can get Lightroom 2022 via the official website for a free trial. This year Adobe has released the latest versions of its products, including Lightroom 2022, and you’ll have a better experience processing your photos to be more beautiful. Moreover, you can also process RAW files with this application. With this application, you can make your photos more colorful and beautiful. When Adobe Photoshop can handle various forms of photo editing, meanwhile Lightroom is fully functional in color correction. Lightroom is one of the best photo editing apps in the Adobe Creative Cloud group. Therefore, a competent photo editing application with comprehensive features is needed.
#ADOBE LIGHTROOM DOWNLOAD CRACK FOR PC FULL CRACK#
Adobe Lightroom 2022 Full Download + Crack 64 Bitĭownload Adobe Lightroom 2022 Full Crack for PC. For a professional photographer, photo editing software is a necessity to make the photos more beautiful.

0 notes
Text
Download Top 10 Premium Camera Raw XMP Preset of 2021 for Free | Top 10 Premium Camera Raw Preset of 2021 Download free XMP Preset | Top 10 Premium Photoshop Presets of 2021 - ashvircreations
Download Top 10 Premium Camera Raw XMP Preset of 2021 for Free | Top 10 Premium Camera Raw Preset of 2021 Download free XMP Preset | Top 10 Premium Photoshop Presets of 2021 – ashvircreations
Hello everyone, this is Ashish Chauhan from Ash-Vir Creations in this post I gonna show you how to edit your photos like the Top 10 Premium Camera Raw Preset of 2021 for free. Get this Free xmp camera raw preset file for your photoshop cc. Complete Photoshop & Lightroom Course by @ashvircreations Enroll Now By using our presets you can pop out your photos and make your Instagram look way better…

View On WordPress
0 notes