#food processor brioche
Explore tagged Tumblr posts
Text
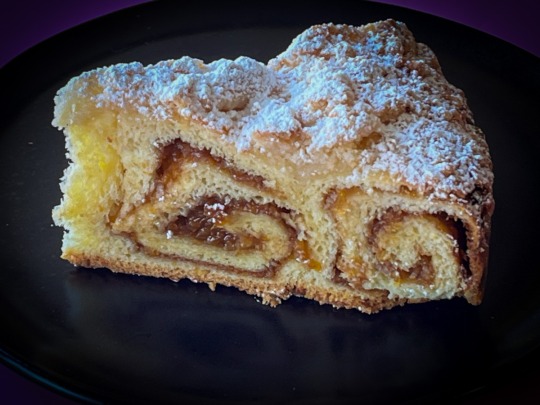
APRICOT CRUMB COFFEE CAKE
Is it a cake? Is it a sweet bread? Is it heaven on a plate? Yes to all! Another amazing recipe from Helen Fletcher, this is a bit involved but absolutely worth it… Slicing through it to reveal the coiled pattern inside is just too cool! APRICOT CRUMBLE COFFEE CAKE(from Helen Fletcher’s Pastries Like a Pro) ¾ cup unsalted butter (170 grams)1 teaspoon active dry yeast3 tablespoons warm waterPinch…
View On WordPress
0 notes
Text

'Tis the season of farting about in the kitchen. Quite delighted with how these vegetarian nut roasts came out. Uncooked, ready for the freezer, another thing I don't have to prepare on Christmas Day. I would drop a recipe, but I was just busking with these, I'm afraid. I took a package of Merchant Gourmet peeled and roasted chestnuts, a brioche bun from clearing out the freezer yesterday, maybe 100g of mixed nuts (almonds, walnuts, cashews), and pulverised the lot in the food processor. Then I added a whole minced yellow onion for moisture, and an egg to bind. For seasonings I went with warm Christmas spices - cinnamon, nutmeg, and allspice, along with plenty of salt and fresh ground black pepper. Oh, and some dates. I finely chopped three or four pitted dates and stirred them in just to add a pop of sweetness to accompany the sweet spices. Not too much, though, because the chestnuts add sweetness of their own. This is a savoury dish, but I like to lean into the Christmas flavours. A spoonful of dried cranberries would also work well, I think, but I only had dates on hand.
I usually stuff this into a lined loaf tin to bake, but I had to do two this year, so instead I lined a large round cutter with greaseproof paper, brushed it with sunflower oil, and stuffed the mixture down hard. Then they went into the freezer. Not sure what comes next as regards them keeping their shape while baking, but I might construct a foil collar to sit on top of the paper wrap. Will probably defrost them Christmas Eve then bake for about 20-25 minutes at 200C on Christmas Day itself.
20 notes
·
View notes
Text
Definitive list of my favorite appliances
1. Espresso machine
- Incredibly ill behaved
- instantly improved my daily quality of life
2. Oster stand mixer/“kitchen center”
- the first appliance I ever got. My mom had to find it on Craigslist because they don’t make them anymore.
- my child. My beloved. My poor worn out granny.
3. Kitchen scale
- how did I live without you
4. Food processor
- incredibly well behaved
- easy to find a spare part when I accidentally broke the lid
5. Electric kettle
- the last one caught fire briefly
- the new one is a really pretty copper color
- boils water SO fast
6. Kitchenaid stand mixer
- my beloathed
- I have a mile long list of complaints but goddamn if it can’t mix brioche dough like it’s nothing
7. Toaster
- decrepit
8. Air fryer
- this appliance isn’t actually mine
- good at rehearing fries
88 notes
·
View notes
Text

I tried to make brioche and it broke my food processor???
49 notes
·
View notes
Text
This spectacular Lemon Cheesecake Bread Pudding is based on the Lemon Cheesecake I make at the restaurant. It is extremely popular and very unusual. This version of a bread pudding is very quick and easy to make. The ingredients take a few turns in the processor, are poured over the bread cubes, and into the pans it goes. Not much work at all for this uncommon bread pudding. While I've chosen to show it with the Blueberry Sauce from the Lemonade Cake, a couple of others would be perfect to serve with the warm Lemon Cheesecake Bread Pudding. The Lemon Soaking Syrup from the Lemon Strawberry Cake or the Lemon Rum soaking syrup from the Lemon Rum Bundt Cake would make an ideal accompaniment to this remarkable dessert. Why you'll love this recipe It's really easy and quick to make. This bread pudding can be in the oven baking in about 30 minutes. The ingredients are all readily available with the exception of the citric acid which is optional. There is no water bath needed for this dessert. This is packed with lemon flavor with lemon zest, lemon juice and citric acid which adds a bit of the tartness that make lemons so appealing. These can be made ahead and frozen, thawed and reheated for a quick dessert. Recipe ingredients FRONT ROW: Lemon juice, lemon zest, vanilla MIDDLE ROW: Granulated sugar, sour cream, cream cheese BACK ROW: Bread, eggs, half and half Key Ingredients Either Brioche or Challah that has been purchased work well in this recipe. Citric Acid powder is used to add the tartness of lemons to the bread pudding. It can be omitted if desired but it does up the flavor. While not commonly found on store shelves it can be found on line including Amazon or just google "food grade citric acid powder" for more choices. Make sure you get food grade. Be sure to see the recipe card below for the exact ingredients & instructions. Step by Step Instructions Step 1. Slice the bread about 3/4" thick if the loaf is whole. Dry the slices until it feels stale but not dry. This can take 4 to 6 hours depending upon the bread. I place mine on cooling racks so both sides can dry at once. Once dried, stack several slices up and cut them vertically. Step 2. Cross cut them into about 3/4" cubes. There should be about 8 cups. Set aside. Step 3. Place the cream cheese and sugar in the bowl of a processor. Step 4. Process until completely mixed. Scrape down and into the corners of the processor bowl to make sure it is all combined. Step 5. Add the eggs, lemon zest, vanilla, sour cream and citric acid to the processor bowl. Step 6. Process until smooth, scraping as necessary. Step 7. Add the half and half and lemon juice. Process again to complete the mixture. Step 9. Pour the liquid over the bread cubes making sure to stir it well so the liquid is contacting all the cubes. Step 10. Let it sit 15 to 30 minutes until the bread is soaked through and no liquid is sitting on the bottom of the bowl. Stir several times to make sure it is evenly soaking. The bread should not be mushy. Step 11. Spray a 9" pan with a non-stick baking spray and pour the mixture into the pan. Step 12 . Or, for individual servings, spray six 6-ounce ramekins or a Jumbo Muffin tin with a non-stick baking spray and divide the mixture between the cups filling them all the way to the top. Bake for 30 to 35 minutes or until a tester comes out clean. They will most likely rise during baking but will deflate as they cool. Recipe FAQS What constitutes bread pudding A custardy base is combined with stale, cut up bread to which many different ingredients can be added depending upon what is wanted. The bread should be soft having absorbed the custard. How do you know when the bread pudding is done baking? There are a couple of ways. One, insert a cake tester in the middle of the pudding. If it comes out clean it is done. The second method is to press the center of the bread pudding and if liquid comes up it needs to bake longer. When was bread pudding first made? English cooks in the 11th century repurposed stale bread.
In later centuries it became known as "poor man's pudding" because food was scarce at times and the pudding was made only with boiling water sugar and spices. Today's version is much richer with eggs, milk or cream, spices and any number of additions. Expert Tips The bread used should be stale but not hard or completely dried out. While any bread can be used, Brioche and Challah are often used for their taste. The liquid base can be made in a mixer by following the same steps as for the food processor. Make sure the cream cheese is at room temperature so it mixes without lumps. If another type of bread is used, it may require more or less liquid so add 3/4 of the half and half first. If the bread is not completely coated, stir in the rest of the half and half. While citric acid powder is listed as an ingredient, it can be omitted. Other scrumptious desserts If you love this Lemon Cheesecake Bread Pudding, It would be hugely helpful and so appreciated it if you would take a moment to leave a rating below. Thank you. Lemon Cheesecake Bread Pudding This spectacular Lemon Cheesecake Bread Pudding is based on the Lemon Cheesecake I make at the restaurant. It is extremely popular and very unusual. This version of a bread pudding is very quick and easy to make. 9x9 square pan or6 cup Jumbo Muffin Pan or6 ounce ramekins 3/4 pound Brioche or Challah (340 grams)4 ounces cream cheese, room temperature (114 grams)1/2 cup granulated sugar (100 grams)2 large eggs2 tablespoons lemon zest1 teaspoon vanilla extract1 teaspoon citric acid powder, optional1/3 cup sour cream (75 grams)1 cup half and half1/3 cup lemon juice, freshly squeezed If the bread is whole, slice abut 3/4" thick. Dry the slices on cooling racks for 4 to 6 hours until stale but not dried out. This can take 4 to 6 hours. Once dried, stack several slices up and cut them vertically. Cross cut them into 3/4" cubes. There should be about 8 cups. Place them in a large bowl. Set aside. Place the cream cheese and sugar in the bowl of a food processor. Process until smooth, scraping as necessary. Be sure to get to the bottom of the bowl and into the edges so there will be no lumps. Add the eggs, lemon zest, vanilla, citric acid, and sour cream processing until smooth. Add the half and half and lemon juice. Process until smooth and all is combined.Pour the liquid mixture over the bread cubes, stirring well to make sure all the bread is coated with the liquid.Let the bread mixture sit for 15 to 30 minutes until the bread is soaked through and no liquid is sitting on the bottom of the bowl. The bread should not be mushy but wet all the way through. Stir several times to make sure the liquid is evenly soaking the bread.Preheat the oven to 350°F. For a single bread pudding, pour the mixture into a 9” square pan that has been very well sprayed with a non-stick baking release.For individual bread puddings: Use six 6-ounce ramekins or Texas muffin cups. Spray very well with a non-stick baking release and divide between the ramekins, filling them all the way to the top.Bake 30 to 35 minutes until set and a tester comes out clean.If using the individual ramekins or muffin pans, cool for about 10 minutes and turn out. Serve warm with the one of the following sauces: The Blueberry Sauce from the Lemonade Cake, the Lemon Soaking Syrup from the Lemon Strawberry Cake or the Lemon Rum soaking syrup from the Lemon Rum Bundt Cake Serves 6 individual bread puddings or 6 to 8 from the 9" pan. There is always an abundance of photos to guide you in the post above. As always, I recommend using a scale for accuracy and consistency. Flour, in particular, is difficult to measure by volume. For my recipes, I use 140 grams per cup of unsifted all-purpose, bread or whole wheat flour and 125 grams of cake flour. Others may use different weights so use whatever they suggest. _____________________________________________________ The bread used should be stale but not hard or completely dried out.
While any bread can be used, Brioche and Challah are often used for their taste. The liquid base can be made in a mixer by following the same steps as for the food processor. Make sure the cream cheese is at room temperature so it mixes without lumps. If another type of bread is used, it may require more or less liquid so add 3/4 of the half and half first. If the bread is not completely coated, stir in the rest of the half and half. While citric acid powder is listed as an ingredient, it can be omitted. Bread PuddingAmericanbread pudding, easy to make, Lemon Bread Pudding
#BLOG_INDEX#BREAD#CHEESE_CAKES#RECIPE_INDEX#BLUEBERRY_SAUCE#BREAD_PUDDING#CHEESECAKE#DESSERT_SAUCES#EASY_BREAD_PUDDING#EASY_CHEESECAKE_BREAD_PUDDING#LEMON_BREAD_PUDDING#LEMON_RUM_SAUCE#LEMON_SAUCE
0 notes
Text

brioche is easily my number one when it comes to bread. buttery, sweet, soft AND crunchy at the same time. i totally suck at baking so if i can do it, so can you babes<3
25g fresh yeast (or 7g of instant yeast)
200ml of room temperature milk
5g of sugar
360g all purpose flour
5g salt
20g sugar
1 egg
40g soft unsalted butter
1 egg
a splash of milk
1. Make a starter by combining 25g of fresh yeast (or 7g of instant yeast), 5g of sugar (white or cane), and 200ml of room temperature milk. Mix well until combined.
2. Put the starter in a warm place for 20-30 minutes. The yeast should create bubbles at the top of the starter.
3. Combine 360g of all-purpose flour, 5g of salt, and 20g of sugar in a food processor and mix well on low speed.
4. Add the starter to the dry ingredients. Mix well on medium speed.
5. After the starter and dry ingredients are well combined, add 40g of soft unsalted butter and 1 egg. Mix well on medium speed for at least 8 minutes.
6. Remove the dough from the food processor and knead it a little to form a ball. The dough should be very sticky. If the dough is too sticky and liquidy, knead in a bit more flour.
7. Put the dough in a bowl, cover it with a kitchen cloth, and leave it to rise in a warm place for 1 hour.
8. After 1 hour, take the dough out of the bowl and knead it by hand a little. Form a ball, and cut the dough into 6 pieces.
9. Form 6 buns and lay them on a baking tray covered with parchment paper. Cover them with a kitchen cloth and leave them to rise for another hour.
10. After 1 hour, combine 1 egg and a splash (1 tbsp) of milk in a bowl and mix well. Spread the egg and milk mixture on the buns. There should be no dry spot left on any bun (except for the bottom part, of course).
11. Bake them in the oven at 200°C (400°F) for 18-20 minutes.
12. Take your brioche buns out and wait for at least 30 minutes before consuming!
0 notes
Text
Tavern "Steak"
Serves 4
Ingredients: Dill-Yogurt Sauce: 3/4 Cup plain Greek yogurt, 2 Tablespoons dill pickle relish, 2 Tablespoons minced shallot, 1/4 Cup finely chopped fresh dill, Kosher salt and freshly ground black pepper.
Black Olive and Fig Sauce: 6 Dried figs, stemmed and quartered, 1 Cup pitted Nicoise or Kalamata olives, rinsed and drained, 1 1/2 Tablespoons capers, rinsed, drained, and squeezed dry, 2 Garlic cloves, finely chopped, 1 Teaspoon minced fresh thyme, 1 1/2 Teaspoons fresh lemon juice, 2 Tablespoons extra-virgin olive oil, Kosher salt (optional), 3 tablespoons chopped fresh parsley.
Tavern Steaks: 2 Tablespoons olive oil, 1 Small yellow onion, finely chopped, Kosher salt, 7 Garlic cloves, finely chopped, 1 1/2 Tablespoons finely chopped fresh thyme, 12 Ounces ground lamb, 12 Ounces ground beef chuck, Freshly ground black pepper.
Make the Dill-Yogurt Sauce. In a small bowl, whisk together the yogurt, relish, shallot, dill, 1.2 teaspoon salt, and pepper to taste. Taste and adjust the seasoning with additional salt and pepper, if necessary. Cover and refrigerate until needed.
Make the Olive and Fig sauce. In a bowl cover the figs with 1 cup boiling water and set aside to soften, 15 minutes. Reserving about 1/3 cup of the soaking water, drain the figs, dry and finely chop.
In a food processor, combine the olives, capers, garlic, thyme, and lemon juice. Process until finely chopped. With the motor running, slowly add the olive oil. Stop to scrape down the sides of the work bowl and continue pulsing or processing to a desired consistency. Scrape the mixture into a bowl, add the figs, stir, and set aside to blend the flavors, 15 minutes. Taste and adjust the seasoning by adding salt to taste; adjust the consistency by adding some of the reserved fig soaking liquid, about 1 tablespoon at a time, if necessary. Set the sauce and parsley aside at room temperature.
Make the steaks. In a small skillet over medium heat, warm the oil until shimmering. Add the onion and a pinch of salt and cook, stirring until softened, 4 minutes. Add the garlic and thyme and cook, stirring, until fragrant, 1 minute.
In a large bowl, break up the ground lamb and beef into rough chunks. Add the onion mixture, 1 1/2 teaspoons salt, and 1 teaspoon pepper and toss lightly with your hands to distribute the seasonings. Divide the mixture into 4 6-ounce portions and, with a light hand, gently form them into patties roughly 4 inches in diameter and 1 inch thick. Press a divot into the top of each patty, if desired. Cover and refrigerate until you are ready to grill.
Prepare a medium-hot fire in a charcoal grill or preheat a gas grill on high for 15 minutes. Clean and oil the grill grate. Grill the patties until grill-marked on the bottom, 4 minutes. Flip the patties and continue grilling for 3 minutes, until the meat is medium-rare (125 to 130 on an instant read thermometer), or for 6 minutes for medium (135 to 140), or for 9 to 10 minutes for well (155 to 160_.
Transfer the patties to a plate, cover loosely with foil, and let rest for 3 minutes. Meanwhile, stir the parsley into the olive-fig sauce. Serve the steaks hot with the sauces passed at the table.
Note: If you choose to serve the tavern steaks with bread, brioche buns or English muffins are excellent options, particularly if you grill them, cut sides down, while the cooked tavern steaks rest.
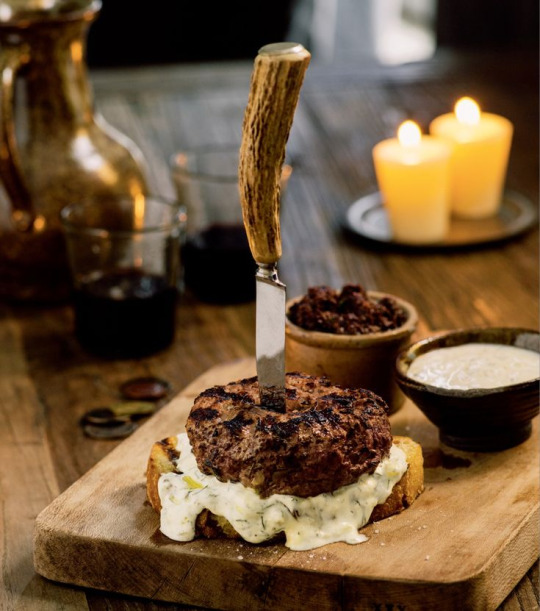
Source: Heroes Feast
0 notes
Text
Best 5 Amazing Electric Knifes Available in the Market 2023, Read the Full Review Here.
Electric knives have two camps. Many childhood memories involve a family member using one to swiftly and expertly cut meat or a Thanksgiving turkey. Nevertheless, some of us don’t know what an electric knife is or why you’d use one. I’m in the second camp, honestly. My father never used one because he liked sharpening carving knives (the hardest part of carving, he always said). I hosted Thanksgiving dinner the same way—the apple must not fall far from the tree! I never considered electric knives till this project.
Why choose an electric knife over a carving knife? Before testing these six top-rated electric carving knives, I could have told you they’re loud, pricey gadgets that will clutter your gadget drawer. After using the Black and Decker EK500B 9-Inch Electric Carving Knife (available at Amazon for $21.60), our favourite tool, I may have changed my mind. It showed me how to slice delicate bread, carve chickens, and hog loins in minutes using an electric knife.
How Electric Knives Were Tested

A Tester
Chef Lindsay Mattison here. I’m a manual chef, so I’ve never had an electric knife. I’ll hand-knead bread dough next to a stand mixer or carefully cut veggies instead of using a food processor. I fell in love with our winning electric knife after testing these six. It’s likely in my gadget drawer when you visit.
The Tests
Tested six electric knives. We tested each electric knife’s blade sharpness, simplicity of use, safety, and noise level.
We had them carve a rotisserie chicken, thinly slice baguette into crostini, slice soft brioche bread into sandwiches, and slice a block of hard cheddar cheese to test their everyday use. These tests revealed the blade’s sharpness and ability to cut smoothly. We deducted points for jagged knife cuts. Nonetheless, any knife that could slice cheese well earned additional points (the test that most of the knives struggled with).
Then, we tested the knives’ use and safety. We used chicken grease-covered knives without reading the directions. After a few minutes, the finest knives stayed cold and didn’t vibrate. We needed a lengthy lead to keep out of the way when cutting and a safety lock to prevent inadvertent knife activation.
Lastly, we monitored knife noise. Our testers prioritised this. A buzz saw at the dinner table would destroy the mood. Our attention to this crucial detail will please the family dog.
Rapala HDEFAC
While our top two knives were in a close race for first, the Rapala Heavy Duty Electric Fillet Knife came in a far third. Like our top performing knives, the Rapala had a comfortable handle and felt safe to use. When it came to performance, it neither excelled nor failed the majority of our tests. Instead of slicing the cheese, it created a coarsely grated product. While it was able to slice the chicken and bread, it created jagged edges that didn’t look as nice as they could. It wouldn’t be our top pick, but we wouldn’t avoid using it, either.
Pros
Comfortable handle
Cons
Doesn’t cut neatly
Hamilton Beach 74275
We absolutely love that the Hamilton Beach 74275 Electric Carving Knife is the only knife in the group to come with a storage case. That makes it easy to bring over to a friends house or safely pack away in your gadget drawer. The set also came with a carving fork, which is great for anyone stocking up a starter kitchen. Unfortunately, its performance struggled, especially on the crusty baguette. It sort of hovered over the crust instead of piercing through the tough exterior. The large handle was also particularly difficult to hold, especially when our hands were covered in chicken grease.
Pros
Includes carrying case and carving fork
Cons
Mediocre cutting ability
Difficult to grip
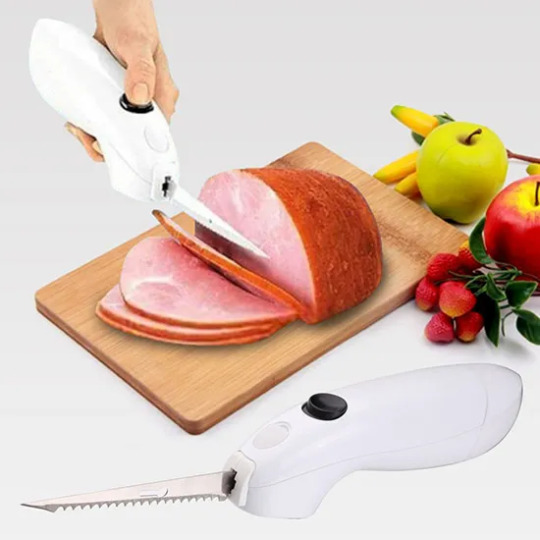
Cuisinart CEK-40
The Cuisinart CEK-40 Electric Knife came in a close second to our top pick, acing all the same tests as the Black and Decker. But, the latter rose to the top by performing more quietly than the Cuisinart. That being said, we liked the Cuisinart overall. It certainly wasn’t the loudest knife in the group and it made quick work of carving the chicken. The handle was comfortable and slip-free, and it had no problems taking down both types of bread. It was also one of two knives to actually slice the cheddar cheese, earning it bonus points. And, while we didn’t notice that much of a difference between the blades, it does come with a meat blade, a bread blade, and a nice wooden butcher-block holding tray.
Pros
Comfortable, slip-free handle
Can swap blades for different jobs
Includes butcher-block holding tray
Cons
Not whisper quiet
NutriChef PKELKN8
You’ll immediately notice that the NutriChef Electric Knife doesn’t share a design with the other electric knives. Instead of being a long handle, this product almost looks like an iron. That odd-shaped handle was actually surprisingly easy to hold, and we enjoyed the two-button safety feature that ensured the knife wouldn’t accidentally go off when we weren’t ready. Sadly, it struggled to do anything except carve the chicken and it sounded like we turned on a table saw every time we clicked it on. Since it had a short cord and an odd smell when in use, it dropped to the bottom of the pack.
Pros
Unique and easy-to-grip handle
Two-button safety feature
Cons
Loud and emits an odor
Not very sharp
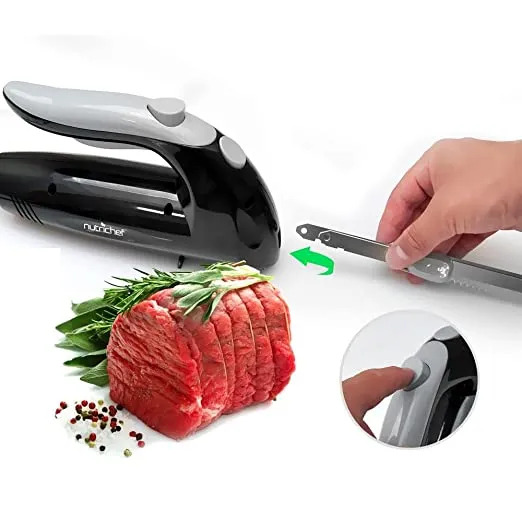
Black & Decker EK500B
There were two stand-out factors that made the ergonomically designed Black and Decker EK500B 9-Inch Electric Carving Knife our favorite knife in the group. First, its serrated blades (which are dishwasher-safe when removed) aced all of our performance tests, creating a presentation-worthy carved chicken and perfect slices of bread (both from crusty baguette and soft brioche sandwich bread). It was also one of two knives that could actually slice cheese! But, that’s not what impressed us the most. The Black and Decker was the quietest knife we tested and its ergonomic handle was the most comfortable of the group. The round handle fit perfectly in our hands and stayed put, even when our hands were covered in chicken grease. The knife created little to no vibrations, making it easy to keep our finger locked onto the trigger without slipping. And its quiet profile made it the most pleasant to use.
I would happily use this knife regularly to slice homemade bread or quickly break down a roast.
Pros
Slices a variety of foods with ease
Great grip with minimal vibration
Quiet
Cons
None that we could find
Read More: 5 Amazing Electric Knifes Available in the Market 2023.
0 notes
Text
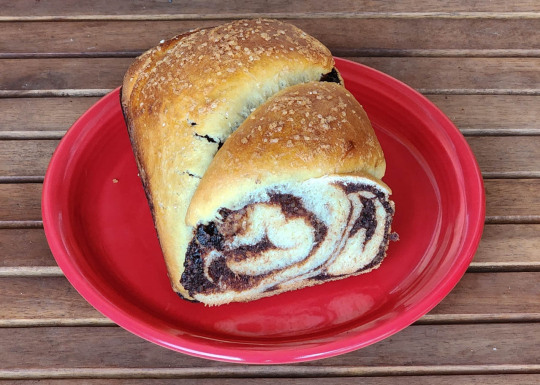
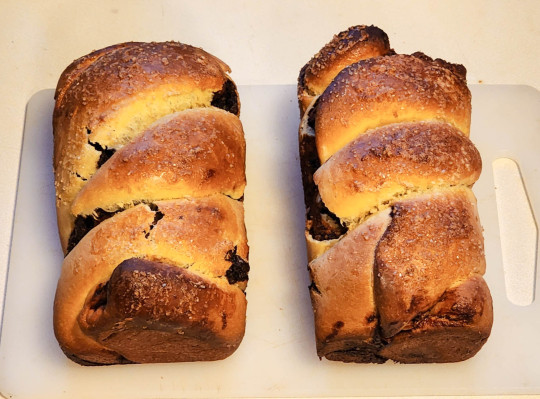
Cozonac
This is a traditional Romanian bread made for my neighbors around the block. It is essentially a brioche with a rum spiked chocolate walnut filling. Pretty easy to make.
It starts with a pre-ferment (or maia). This is made from 30 grams of flour, 60 mls of warm milk, a teaspoon of sugar and a couple teaspoons of yeast. Set it aside in a bowl and thirty minutes later it is all bubbly and about three times the size.
The dry ingredients consisting of 550 grams of flour, 100 grams of sugar, a teaspoon of salt and a tablespoon of yeast are whisked together in the bowl of the stand mixer. The mixer is started and 120 ml of warm milk are added along with the pre-ferment. This is followed by a tablespoon of vanilla extract and two tablespoons of rum (nice). Once it starts to come together six egg yolks are added one at a time, followed by a stick of room temperature butter, one tablespoon at a time.
The dough is kneaded with the dough hook for a good ten minutes giving a nice soft dough, very easy to handle. It is transferred into a bowl and set in a warm place to rise for about two hours.
While the dough is doing its thing, you make the filling. Using the food processor, 250 grams of walnuts, 40 grams of cocoa powder, three tablespoons of instant espresso powder, and 150 grams of sugar are ground together. This is transferred to another bowl and stirred together with 5 of the egg whites and two tablespoons of rum (nice). This gives a nice spreadable filling.
After the dough has risen it is divided it into four portions. Each section is rolled into a rectangle about a foot square. One quarter of the filling in spooned on top and spread out evenly leaving a space at the far edge and the sides free for sealing. It is rolled up into a log and the free parts are used to seal the roll. Each log is rolled on the counter a bit and stretched out another four inches or so.
Two of the logs and twisted together into a spiral. The spiral is placed into a well buttered loaf pan. The same is done with the other two logs filling a second loaf pan.
The dough is allowed to rise in the pans in a warm place for about 90 minutes. It should expand considerably. The breads are baked for 20 minutes at 375 degrees and then for another 15 minutes at 350 degrees. The top of each loaf is covered with aluminum foil for the last 15 minutes.
When the pans are turned over, the breads will pop out. They are cooled on a wire rack.
Give one to the neighbors and eat the other one. It goes fast. It is pretty good stuff. Try it with a bit of rum (nice).
0 notes
Text
🚨 Most of my recipes are hidden from you!! ☑️If you see this recipe, say (delicious). Otherwise, we will completely disappear from your news feed. 🚨🚨🚨
👇👇 Thank You For sharing 😍😍
☑️buchty brioche🤤
For 6 persons
Preparation: 30 mins
Cooking: 30 mins
500g flour
15 g fresh baker's yeast
20 cl heavy cream
60g of sugar
2 eggs
100ml with milk
1.5 tsp salt
Place the salt then the flour in the bowl of the food processor, put the crumbled yeast and the sugar in the centre. Add the beaten eggs, milk, cream.
Knead the dough for about ten minutes then cover it and let it rest for 1h30 in a warm place so that it doubles in volume.
buchty brioche
buchty brioche
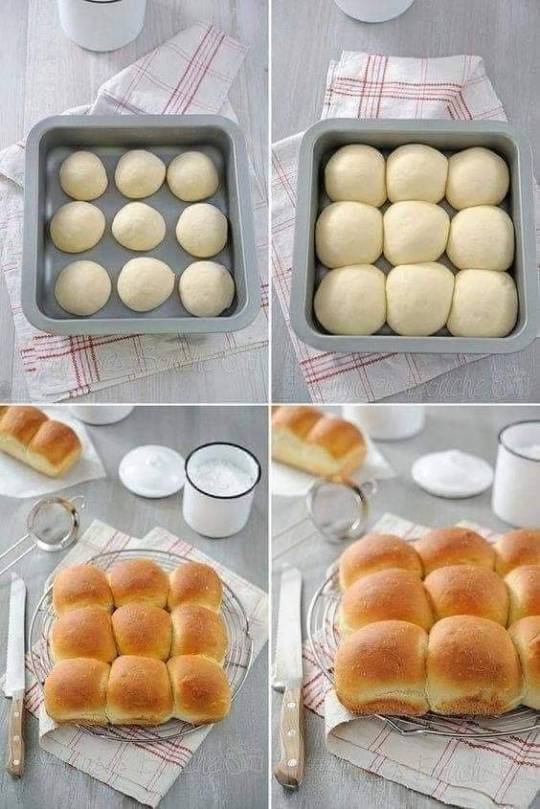
Degas then pour the dough on a flour work surface. Divide the dough into 12 equal parts and shape into balls. Place them in a square or rectangular dish (but rounds are not prohibited). Space them well. Cover and let rise again for 1h to 1h30, they will end up touching each other.
buchty brioche
Bake for 30 minutes in a preheated oven at 150°C (th.5).
Leave to cool on a wire rack and sprinkle with icing sugar.
#easyrecipeschallenge
#firstpicchallenge
9 notes
·
View notes
Text
i think i burned the engine on my food processor. this better be the best brioche i've ever had because it's also going to be the last one.
5 notes
·
View notes
Text
Phast Pho Recipe

By popular demand, here’s the recipe for what I like to call “Phast pho”
Ingredients
3.5lb (1.6kg) bone-in beef short ribs
1 small apple
1 small pear
4 carrots
1 onion
1 head of garlic
1/4 cup (50g) brown sugar
1/4 cup (60mL) soy sauce
1 cup (240mL) white wine or sake
(optional) 1 big spoonful gochujang (korean chili paste)
1/8 cup (30mL) vietnamese fish sauce
7 whole star anise pods
3 cardamom pods
4 whole cloves
1 cinnamon stick
Juice of 1 lime or lemon
5 egg whites (save the yolks for making ice cream, brioche, lemon curd, pound cake, etc.)
2.2lb (1kg) noodles (rice noodles, ramen, udon, etc. all work fine)
Garnishes: sliced white onion, cilantro, siracha, cabbage or bok choy, sliced jalepeno, etc.
Directions
Turn oven to 300F (150C) and put a sheet pan in the oven middle rack
Remove cores from apple and pear, peel the carrot and onion
Put the apple, pear, 2 carrots and half the onion in a food processor and pulse until finely chopped (you can do this by hand too, but food processor is much faster)
Cut of the top quarter of the garlic head to expose the cloves
Find a big pot or dutch oven (~8qt / 8L) with a oven safe lid. Put 2T vegetable oil in the pot and brown the beef well on all sides. Liberally salt and pepper the meat while browning
Dump in your apple/pear/carrot/onion mixture. Stir it around until the vegetables get soft, then deglaze the pot with your wine
Add soy sauce, brown sugar, gochujang, the whole garlic, and enough water to come within 2 inches (5cm) of the top of the pot
Bring the liquid to a boil, turn off the heat, put the lid on the pot and place the whole thing in the oven, on the sheet pan (the sheet pan will catch drips and make sure the bottom doesn’t scorch)
Cook the meat for ~4hr. until falling off the bone
Cut your garnish while the meet is braising, and get a pot of water going to cook your noodles
When the meat is done, put the pot on the stovetop. Line the sheet tray with aluminum foil. Use a slotted spoon to extract the meat from the braise. When cool, shred the meat with your hands and remove any big tough pieces, or chunks of fat. Save these bits, but discard the bones. Create a packet with the foil for shredded beef and put it back in the oven to stay warm
Strain the braising liquid into a bowl. When the strained liquid has settled, skim off most of the fat with a spoon
Rinse out your pot and put the strained, skimmed braising liquid back in the pot. Add enough water to make 4 quarts of broth (~4L). Heat over medium flame until simmering
Put the remaining half onion, 2 carrots, and all the fatty tough bits of meat in the food processor along with the star anise, cinnamon, cloves, and cardamom, the lime juice, and the egg white. Pulse/blend into a thick paste. *note* you must have the lime/lemon juice in your raft, or the clarification will not work
Dump your egg white paste into the simmering broth. Give it a stir, then do not disturb for at least 15min. An egg raft with form and all the cloudiness, fats, etc. will be captured
Place a sieve over a 4qt (4L) saucepan, then gently press the bottom of a ladle into the raft to collect the clear stock (consommé). Ladle through the sieve to capture any bits of the raft that you get by accident. Repeat until you have collected 90% of your broth
Heat your broth to a gentle simmer. Add fish sauce and then salt to taste. Cook your noodles.
Serve by placing noodles in a bowl, spooning hot broth over them, then garnishing with beef, veggies, etc
2 notes
·
View notes
Text
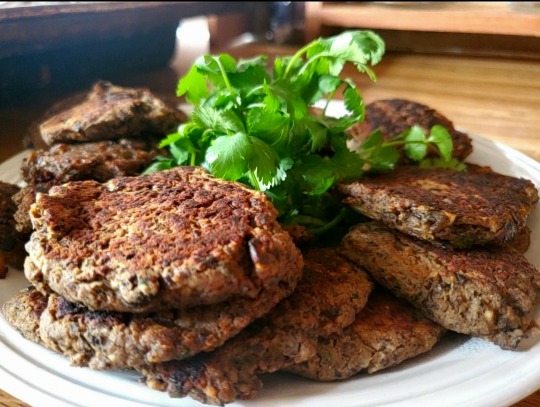
Tuesday, October 20th 2020 - A Recipe for Black Bean Burgers
Really well seasoned from both the herbs in the breadcrumbs and the generous handful of cilantro in the mixture. Burgers aren't dry or crumbly, with an egg added to help bind everything together. This is by far the best bean burger recipe I've tried.
Ingredients-
3/4 cup onions, diced
3 cloves garlic, minced
3 T olive oil
1 3/4 cup black beans, either from scratch or canned, drained and rinsed
1 egg
1 cup cilantro
1 1/2 teaspoons each cumin, coriander and smoked paprika
1 T Chipotle in adobo sauce
1/3 cup seasoned bread crumbs
Salt and pepper
Directions-
Saute onion for 5 minutes, until starting to caramelize. Add a couple pinches of salt and black pepper. Add garlic and cook 1 minute.
Put beans, onions and garlic, cilantro, spices and egg in food processor. Pulse into a paste.
Mix in bread crumbs.
Using oiled hands, form 4 large or 8 smaller patties.
Pan fry over medium heat, 3 minutes per side, or until golden brown.
Serve on buttered brioche, with lettuce, tomato, Ketchup and mayo for a vegetarian burger or serve with rice, flour tortillas, lettuce, salsa, chopped avocado and sour cream for a hearty rice bowl or burrito.
2 notes
·
View notes
Text
Cranberry and Raspberry King’s Cake
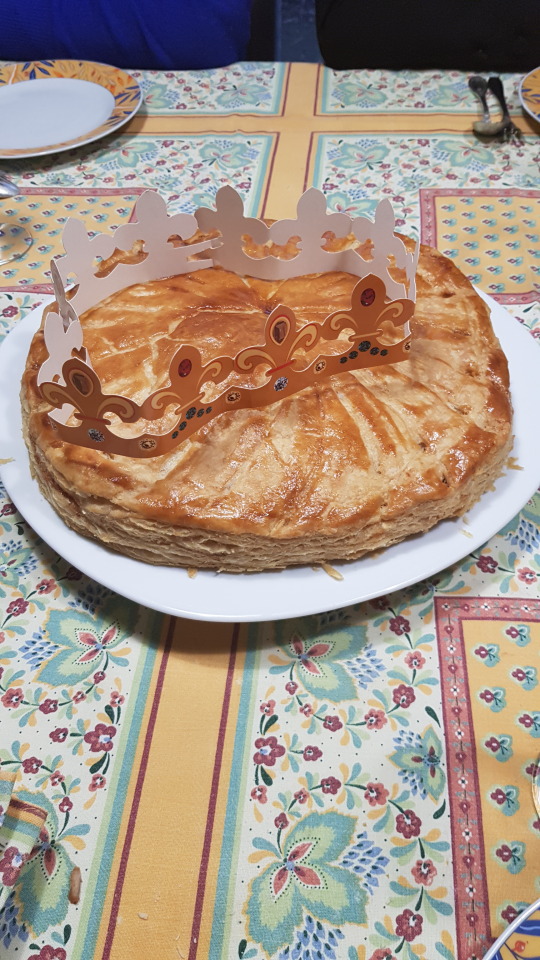
If you think January is the perfect time to return to a normal diet after the Holidays, then don’t come to France at the very beginning of the year! Here, on the Twelth Day of Christmas, we celebrate Epiphany with a Galette des Rois or King’s Cake. In Southern regions, we do it with a brioche crown, which I prefer to the galette. I’m not sure why, because I like almonds (and butter and sugar), but I’ve never be too fond of frangipane. Unless I make it myself, so yesterday, we ended our family gathering luncheon with this Cranberry and Raspberry King’s Cake, the sharpness of the berry jam agreeably cutting through the almond filling, avoiding a war between sisters by surreptitiously adding a second fève into Eva’s slice after her big sister Sarah found the first fève in hers, and crowning two queens!
Ingredients (serves 8):
1 1/2 cups Blanched Almonds
1 cup unsalted butter, softened
1/2 cup caster sugar
1 large egg
1 teaspoon Vanilla Extract
2 tablespoons Limoncello
620 grams/1.35 pounds Rough Puff Pastry
3 heaped tablespoons Ginger Cranberry and Raspberry Jam
1 egg
1 porcelain fève, to hide
Place Blanched Almonds in a food processor, and process until finely ground. Set aside.
In a medium bowl, energetically cream butter and caster sugar with a wooden spoon, until pale yellow and fluffy. Whisk i, the egg, until well-blended. Stir in Vanilla Extract. Finally, stir in freshly ground almond meal and Limoncello. Place in the refrigerator, to chill, 15 minutes.
Line a baking tray with baking paper. Set aside.
Divide Rough Puff Pastry into two equal portions. On a lightly floured surface, roll each Rough Puff Pastry portions into two 22cm/8.65“ circles.
Place one Rough Puff Pastry circle onto prepared baking sheet.
Stir chilled frangipane energetically, and spoon into a pastry bag fitted with a plain nozzle. Set aside. Spread Ginger Cranberry and Raspberry Jam generously onto the Pastry circle, leaving a centimetre on the edges. Then, pipe frangipane filling in a spiral (starting in the centre) onto the Jam, . HIDE THE FEVE IN THE FRANGIPANE FILLING!!!
Lightly beat the egg, and brush the edges of the Pastry circle with egg wash. Gently place the second circle of Rough Puff Pastry onto the frangipane filling, pressing gently but firmly on the edges to seal. Place baking tray in the refrigerator and chill, 30 minutes.
Preheat oven to 190°C/375°F.
Retrieve baking tray from the refrigerator and trim the edges -not too close to the filling- with a sharp knife. Brush again generously with egg wash and using a knife, draw a pattern on the surface. Place in the hot oven and bake, at 190°C/375°F, 35 to 40 minutes.
Remove from heat and let Cranberry and Raspberry King’s Cake cool slightly, if you can, before eating!
#Recipe#Food#Cranberry and Raspberry King’s Cake#Cranberry and Raspberry King’s Cake recipe#King's Cake#King's Cake recipe#Galette des Rois#Galette des Rois recipe#Puff Pastry#Rough Puff Pastry#Homemade Rough Puff Pastry#Frangipane#Almonds#Blanched Almonds#Butter#Sugar#Caster Sugar#Vanilla Extract#Pure Vanilla Extract#Limoncello#Homemade Limoncello#Ginger Cranberry and Raspberry Jam#Cranberry and Raspberry Jam#Jam#Epiphany#Epiphany recipe#Celebratory Food
9 notes
·
View notes
Text
This Orange Almond Tea Cake is one of the simplest, easiest cake you'll ever make. Redolent of almond paste and orange rind with few other ingredients, this cake has incredible flavor like no other. This marvelously moist and flavorful cake was inspired by a recipe from the late Flo Braker’s book, The Simple Art of Perfect Baking - one of the earliest and best books on baking to be found. Oranges and almonds have an affinity for each other. I first used this flavor combination in my first book, The New Pastry Cook and it remains one of my favorites. I have included a processor version and a mixer version – both work equally well. Be sure to take a look at How to Make Almond Paste to make your own. There are two recipes. My favorite is the one with the simple syrup. If you are a lover of almond paste, be sure to check out: Apricot Crumb Coffee Cake, Orange Almond Petit Fours, Almond Macaroons, Blueberry Crumb Muffins, Caramelized Peach Tart, Brandied Chocolate Cherry Almond Garmish, A Quick and Easy Summer Teacake, Twice Baked Brioche, Amaretti Cookies. Why is it called a Tea Cake A Tea Cake is what it sounds like. In the olden days when the pace of life was a lot slower, afternoon tea was often served. While English tea cakes include buns of some kind, the cake version is usually a single layer of a straight forward cake simply finished which is why it needs to be perfectly balanced and packed with flavor, which this cake is. Now it is, most likely, a snack or dessert cake. Why You'll Love This Tea Cake It is super simple and fast to make, especially in the food processor. The depth of flavor is amazing. It stays moist for days and days if it lasts that long due to the almond paste It has only a few ingredients. It makes a great gift sure to please. Recipe Ingredients FRONT ROW: Baking Powder, unsalted butter MIDDLE ROW: Almond Paste, orange zest BACK ROW: All-purpose flour, eggs, granulated sugar Key Ingredients The almond paste can be purchased or easily made at home. My post on How to Make Almond Paste - or Not shows you two ways to make it. My preference is the simple syrup method. Finely grated zest of an orange gives this tea cake a deeply satisfying flavor. Unsalted butter gives the purest taste and is recommended. Be sure to see the recipe card below for the exact ingredients & instructions. Step by Step Instructions Step 1. Spray the center only of a 9" round cake pan with a non-stick baking release. Step 2. Line it with parchment paper and spray the center of the paper. For a complete explanation of how to bake flat cake layers, please see my post on How to Bake a Flat Cake. Step 3. Tear the almond paste in pieces and place it along with the sugar and orange zest in the bowl of a processor. Step 4. Process until it is very fine. Step 5. Cut the butter into pieces and add it to the processor. Step 6. Process until the butter is completely mixed in. Step 7. Add the eggs. Step 8. Process to incorporate. Step 9. Add all of the flour and baking powder to the processor bowl. Step 10. Process to combine. Step 11. Pour the batter into the prepared pan. Step 12. Some of the batter will want to remain in the bowl. Step 13. To easily remove the batter, place the top back on the processor and pulse several times. The batter will be slung off the blade. Remove the blade and add the remaining batter to the cake pan. For more really useful information see my post on Food Processor Tips When Baking. Step 14. Using a small, flexible metal spatula go around the edge of the baked cake being careful to keep the spatula to the edge of the pan so it doesn't tear the cake. Release the cake onto a serving dish keeping it upside down. Step 15. For a pretty finish to the top of the cake, a cake stencil can be used. I have a set of Kaiser stencils that can be found on Amazon. Step 16. Place the stencil on top of the cake, dust powdered sugar fairly heavily covering the stencil.
Carefully, lift the stencil, leaving only the design on top. A paper doily can also be used. No stencil? Just dust it with powdered sugar. Recipe FAQS When were Tea Cakes served? In the 1840's simple cakes known as tea cakes which were served with tea, hence the name, were served in the afternoons to keep hunger at bay until the dinner meal. What's the difference between Tea Cakes and regular cake? Tea cakes are generally more dense than regular cakes and made in single layers. What are some other versions of Tea Cakes? The name tea cake is also given to cookies, small cakes, buns or simple sweet rolls. Storage and Freezing The cake, without the powdered sugar, can be frozen, wrapped well and kept frozen for several months. Thaw at room temperature, then apply the powdered sugar. The cake can also be held, covered, for several days at room temperature. Expert Tips The cake can be made in a food processor or a mixer. For the mixer version, follow the same directions as for the processor but in a mixer. Either purchased or homemade almond paste can be used. The cake can be served as is or with fresh fruit. More simple but delicious cakes If you love this Orange Almond Tea Cake, It would be hugely helpful and so appreciated it if you would take a moment to leave a rating below. Thank you. Orange Almond Tea Cake This Orange Almond Tea Cake is probably the simplest, easiest cake you'll ever make. Redolent of almond paste and orange rind, this cake has incredible flavor like no other. 1 cup +2 T almond paste (290 grams)1 cup granulated sugar (200 grams)10 tablespoons unsalted butter, room temperature (140 grams)4 large eggs1/2 cup +2T all-purpose flour (85 grams)1/2 teaspoon baking powder1 orange zest Preheat the oven to 350 degrees. Spray the center bottom of a 9x2 inch round cake pan. Line the bottom with parchment; spray the center only and set aside.Processor MethodPlace the almond paste, sugar and orange rind in the processor bowl. Process until mealy. Add the butter; process until mixed. Add all the eggs at once and process until smooth. Lastly add the flour mixture and process until completely combined. Pour into the prepared pan, level and smooth the top. Mixer MethodPlace the almond paste and sugar in a mixing bowl fitted with the paddle. Beat until large crumbs form. Add the butter and orange rind beating until well combined. Add the eggs, one at a time and beat until smooth. Combine the flour and baking powder whisking to mix. Add all at once to the above and mix on low just until completely combined. Pour into the prepared pan, level and smooth the top.Bake for 35 to 40 minutes until a tester comes out clean. Cool for 15 minutes, release edges and remove from the pan. Place on a rack, bottom side up to cool completely. Place a stencil or doily on top of the cake and sprinkle with powdered sugar fairly heavily. Carefully remove the stencil or doily to retain the design. There is always an abundance of photos to guide you in the post above. As always, I recommend using a scale for accuracy and consistency. Flour, in particular, is difficult to measure by volume. For my recipes, I use 140 grams per cup of unsifted all-purpose, bread or whole wheat flour and 125 grams of cake flour. Others may use different weights so use whatever they suggest. ____________________________________________________ The cake can be made in a food processor or a mixer. For the mixer version, follow the same directions as for the processor but in a mixer. Either purchased or homemade almond paste can be used. The cake can be served as is or with fresh fruit. This cake will keep well at room temperature if covered for 30 or 4 days. It can also be frozen and then wrapped without the powdered sugar for several months. If you don't have a stencil or doilie for the powdered sugar decoration, just sprinkle it lightly with powdered sugar. This is a simple, unfussy cake. CakeAmericancake, easy to make,
Tea Cake
#BLOG_INDEX#CAKES#RECIPE_INDEX#ALMOND_ORANGE_CAKE#CAKE#EASY_TO_MAKE_CAKE#FEW_INGREDIENTS_CAKE#TEA_CAKE
0 notes
Photo

Chickpea and Quinoa Burgers with Halloumi
¼ cup dried quinoa
1 can of chickpeas, drained and rinsed
1 tsp. ground cumin
a handful of flat leaf parsley leaves
a handful of mint leaves
1 Tbsp. olive oil
a good “splash” of pomegranate molasses or regular molasses
1 egg
salt and pepper to season
grilled halloumi slices
brioche buns or buns of your choice
Preheat your oven to 180 deg C (350F) and line a baking tray with baking paper.
Cook the dried quinoa according to package instructions and set aside.
Combine the chickpeas, cumin, herbs, olive oil, molasses, egg and seasoning in a food processor and process until combined. Transfer this mixture to a bowl and add in the cooked quinoa and combine. Shape into six patties measuring approx. 8-9cm in diameter.
Place the patties on the baking tray and cook for 30 mins. ensuring to turn them over halfway.
Construct the burgers with your choice of salad on the bottom, followed by the chickpea and quinoa burger, grilled halloumi and relish.
#angelkin#food#lunch#dinner#burger#quinoa#vegetable#chickpea#cumin#parsley#mint#olive oil#molasses#cheese#bread#vegetarian#gluten free#demonkin#dragonkin#herokin#kitsunekin#merkin#mountainkin#summer#winter
8 notes
·
View notes