#flashpoint xplor 600
Explore tagged Tumblr posts
Visit Tumblr Blog
Explore Tumblr blogs with no restrictions, modern design and the best experience.
Last Seen Tumblr Blogs


Fun Fact
Users from the US are the majority of Tumblr visitors.
Photo
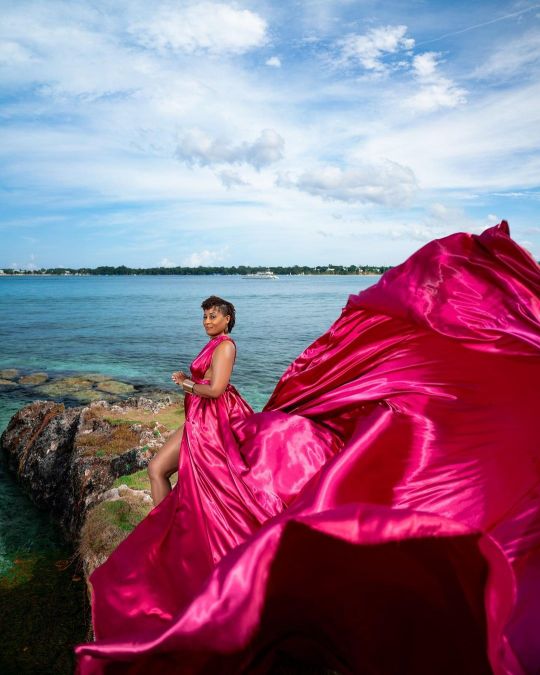
💃🏾@herdressjamaica + #andredesignz Camera: Sony a7C Lens: Tamron 20mm f/2.8 Settings: 1/640 | f/4 | ISO 200 Light: Flashpoint XPLOR 600 (at Royalton Negril, Jamaica) https://www.instagram.com/p/CpsVAt4Oufw/?igshid=NGJjMDIxMWI=
0 notes
Text
Canon Project Part #2- Creating Color with Off Camera Flash- Canon EOS R with the RF 28-70mm lens by Jason Lanier
Welcome to Part 2 of the Canon Project, a series of videos related to our time using the Canon EOS R. In Part 2 we showcase a workshop and shoot we did in Helen, Georgia in conjunction with an event we were doing for PPA (Professional Photographers of America) for their Georgia Chapter (GPPA).
**Links to Gear Used in This Shoot**
*Canon EOS R- https://bhpho.to/2U8W4Cd
*Canon RF 28-70mm lens- https://bhpho.to/2FCH9pI
*Godox AD 600 Pro- https://bhpho.to/2FH9gnu
The location for this video was the Bus Graveyard which is a REALLY cool place to shoot. This was Day 3 of our 4 day workshop that I was teaching for the PPA members and on this day the group asked me to demonstrate a shoot from start to finish as well as give them a heads up on how I recorded my Youtube videos.
So, that’s what my Assistant/Muse Emily and I did! You can follow her on Instagram at www.instagram.com/em.explores
For this shoot we used the Canon EOS R with the RF 28-70mm lens. A lens that quickly found it’s way into my creative heart. It’s one of my favorite lenses on the planet at this point.
But we just didn’t shoot in a cool location with a great model and a new camera/lens. We also wanted to illustrate the difference that using flash can make when shooting in conditions that aren’t ideal for lighting. There is nothing better than the best natural light. But that' only exists for about 1 hour a day. And that’s only if it happens to be facing the direction that you want to shoot.
So sometimes you need to have the ability to ADD light to your scenes to be able to capture what you or your clients want or need to create. Sometimes we don’t have the luxury of picking the time when we shoot. Sometimes we have to make our own light.
In this video I show the difference between the two, demonstrating images side by side showing images taken with flash vs. images taken with natural light. Take a look for yourself by checking out the images below:
The images with flash have much more light and color. Because color = light in the world of photography. I purposely chose to make this Part 2 of the project because Part 1 shows a natural light shoot done correctly which has plenty of color and light. But that’s only because it was shot at the ideal time of day.
Below are images from the shoot:
For this shoot I have to say the Canon EOS R did exceptionally well. Focus wasn’t as fast as I’m used to with my Sony cameras, but for a portrait session like this one it was more than fine. The color rendering and effect on skin tones is really nice.
And that LENS. WOW, the RF 28-70mm f/2 is just a pleasure to shoot. There will be people who complain about it’s size and weight. But for me if you want awesome results you shoot awesome glass. And that’s one thing that Canon has done right with their mirrorless system. They are bringing out ultra professional, high grade glass. Far better than the offerings made by the Nikon Z system and far better than what Sony brought out when it first rolled out it’s mirrorless cameras.
The Canon also did much better shooting flash than the Nikon Z. It didn’t require me to do anything special to shoot in HSS (High Speed Sync) mode which was great since all of these images were taken in HSS with the exception of the natural light shot.
I truly hope you enjoy the content. If you missed Part 1 of the Canon Project which is a Natural Light Shoot done in Death Valley using the RF 24-105mm lens, you can check it out now by clicking below:
Thank you so much for watching and make sure to check out our upcoming parts of the Canon Project where we explore things like Black Light, LED, LED flash and more! We thank you for joining us and invite you to click on NOTIFICATIONS and the SUBSCRIBE button on my Youtube Channel.
See you next time!
Jason
#Canon RF 24-105mm f/4L IS USM Lens#Canon EOS R Mirrorless Digital Camera#canon eosr#canon mirrorless#canon full frame mirrorless#godox ad600 pro#flashpoint xplor 600#jason lanier photography#canon rf 28-70mm#canon rf lenses#off camera flash#high speed sync#jason lanier#jason lanier photography images#ppa#gppa#georgia professional photographers of america#professional photographers of america
1 note
·
View note
Text
One of the best photo locations in Rochester
Cobbs Hill Park, located in the south section of Rochester offers some of the best locations for family portraits. It has fantastic lighting during the early morning and late afternoon. You don’t have to walk too far to find another location for another perspective. If you looking for a natural background, leading lines, or roman columns, Cobb’s Hill has them all.
Robyn contacted me to do a family portrait session while they were in town visiting family with their two new additions to the family, Lena and Anna. They were so full of energy and an absolute joy to work with. It was one of the best sessions I have had with teenagers in a long time. Their carefree attitude was a breath of fresh air and really wanted me to be a teenager again.
#family photographer#rochester family photographer#Cobbs Hill Resevoir Park#Summertime#family portraits#Nikon D850#Nikkor 50mm#Nikkor 85mm#Elinchrom Octabox#Flashpoint XPLOR 600 PRO#Spider Camera Holster#summer family portraits#Sorrells Photography
2 notes
·
View notes
Photo
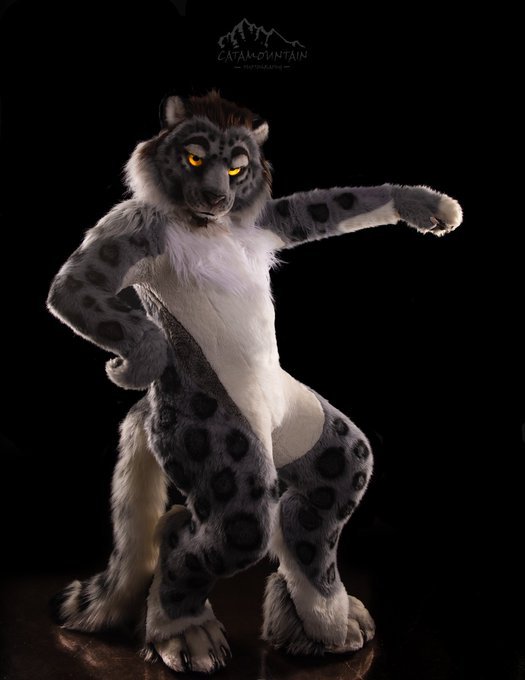
RT @Catamountain13: Find @JaseSpots rocking his superior cat-form. It's worth a see, wouldn't you agree? Taken in small home studio with strip hair lights and my sexy Flashpoint XPLOR 600. #bybeetlecat #fursuit #cosplay #bigcat #Mondaymotivation https://t.co/whvVVhWOfM (Source)
103 notes
·
View notes
Video
instagram
“Lockdown ⚡️”- Thank you @dannybatista; a San Antonio, Texas based photographer for this shot and bts of model @keepchambers via #pursuitofportraits - Check out ✨his profile to get up-close to the final edit. - “I’m doing everything in my power to give you all so many different styles, techniques, thoughts, helpful info, and real world techniques you can use in all your photography and editing endeavors. I hope y’all find some inspo in this somewhere” - @dannybatista - HOW IT WAS SHOT ------------------- Nikon #z7, Nikkor 24-70 2.8 @ f2.8 and a 3ft Westcott Lighting gridded rapid box switch strip around a flashpoint xplor 600 Capture One Pro for initial raw edits, Photoshop for frequency separation and merging, Adobe Camera Raw for toning, and then Capture One for final skin tone adjustments. - Thank You, Team PoP (at New York, New York) https://www.instagram.com/p/B-E-szyHM8b/?igshid=1gly7n33zqte8
1 note
·
View note
Photo
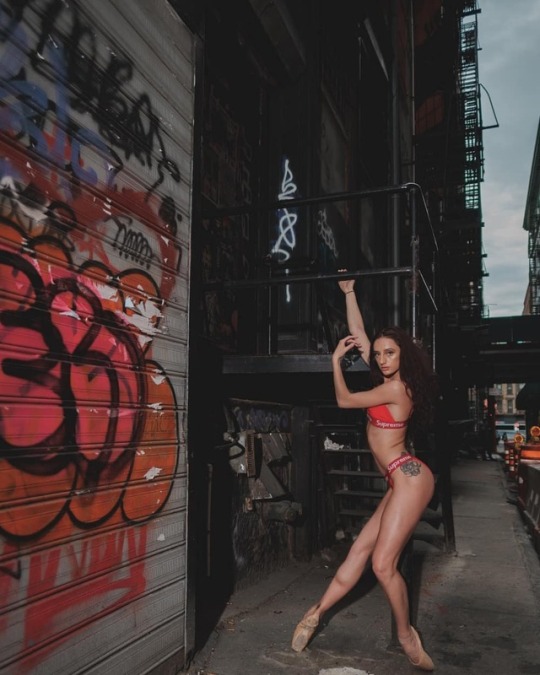
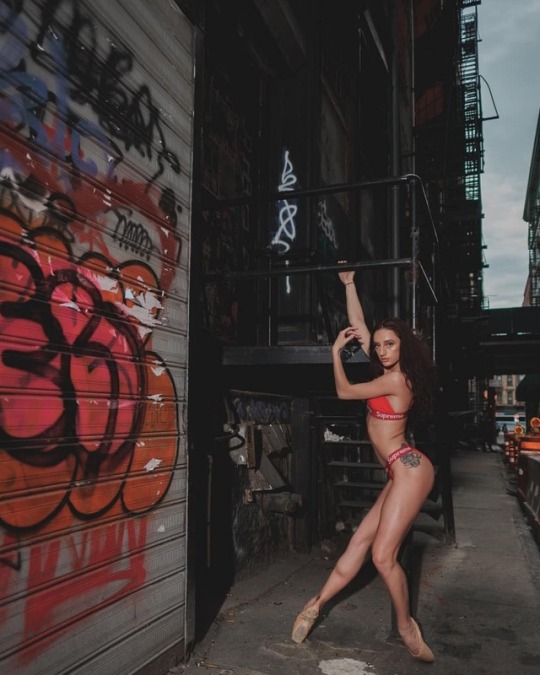
@giannatolotta there’s not a single winner on earth that took it easy 🏁🏁 . . @fujifilm_northamerica XT2 #xf16mmf14wr F1.4 1/1000 ISO200 shot with flashpoint xplor 600 hss ttl . . #collectivetrend #dopeports #portraitsnyc #portraitmood #portraitsquad #ballerina #ballet #pointe #pointeshoes #worldwideballet #balletdancer #tutu #balletpost #instaballet #fujifilm #myfujifilm #agameof10k #theimaged https://www.instagram.com/p/BxtBDt9BM0D/?igshid=1ue5uq2393pkr
#xf16mmf14wr#collectivetrend#dopeports#portraitsnyc#portraitmood#portraitsquad#ballerina#ballet#pointe#pointeshoes#worldwideballet#balletdancer#tutu#balletpost#instaballet#fujifilm#myfujifilm#agameof10k#theimaged
1 note
·
View note
Text
Uncovering the Secrets of a Professional Photographer's Equipment: An Insider Look with Jack Robert
Join Greenville, SC based Editorial, Commercial, Branding, and Lifestyle photographer Jack Robert as he takes you on a journey of his equipment choices, the reasons behind them, and where he buys them
Comprehensive List of Equipment (Click each subject title to jump to my reviews and how I utilize each piece)
Click here to Jump To Cameras Review
Canon R5, Canon R6
Click here to jump to Lenses
Canon RF 35mm f/1.8 Macro IS STM Lens
Canon RF 50mm f/1.2L USM Lens
Canon RF 85mm f/1.2 L USM Lens
Canon RF 70-200mm f/2.8 L IS USM Lens
Tamron 17-35 2.8-4
Click here to jump to Computer review
MacBook Pro 16" Laptop - Apple M1 Max chip - 32GB Memory - 1TB SSD - Space Gray
Click here to jump to lighting reviews
Flashpoint XPLOR 600 R2 Manual HSS Battery-Powered All-In-One Outdoor Flash
Flashpoint Portable 600ws Extension FlashHead For The XPLOR 600 (Bowens Mount)
Backup Bulb Flashpoint Flash Tube for XPLOR 600 Flash Head - AD-H600
Flashpoint R2 PRO 2.4GHz Transmitter for Canon (XPro-C)
Click here to jump to Stands & Accessories
Flashpoint Heavy-Duty Air-Cushioned Light 3-Stand Kit (9.5') (Lightweight)
ROLLING BASE Kupo Runway Stand Base (AMAZING)
Flashpoint C-Stand Riser Column (9' Silver)
10.5' Turtle Base C-Stand and Grip Arm Kit, Chrome
Super Clamp with Ratchet Handle
Click here to jump to Modifiers
Westcott 7' Parabolic Umbrella, White/Black
Godox Softbox with Bowens Speed Ring and Grid (13.8 x 63")
Westcott Rapid Box Switch Octa-S with Bowens Switch Insert
48" EZ Lock Octa Quick XL Softbox with Bowens Mount
Click here to jump to memory and hard drives
SanDisk 128GB Extreme PRO UHS-II SDXC Memory Card
Samsung - T7 1TB External USB 3.2 Gen 2 Portable SSD with Hardware Encryption - Titan Gray
WD - My Passport Ultra 4TB External USB 3.0 Portable Hard Drive - Blue
Click here to jump to Compression and Archiving Software
Rawsie (Get 10% off using code JACK10)
Carbon Copy Cloner
Why I buy all of my equipment at Best Buy
As a professional photographer in Greenville, SC, with over ten years of experience, Best Buy is my go-to destination for all of my photography equipment needs. One of the main reasons I choose to shop at Best Buy is their amazing damage policy as a Total Tech Member. Accidents happen, and it's comforting to know that if I accidentally damage a product while handling it, Best Buy will take care of it.
In addition to their damage policy, Best Buy also provides annual maintenance for my DSLR or mirrorless camera. If there's ever a failure from normal wear and tear, they'll repair it at no extra cost to me. This peace of mind is invaluable to a professional photographer like myself, as it allows me to focus on what I do best - capturing beautiful images - without worrying about the reliability of my equipment.
Another perk of shopping at Best Buy is their priority customer service. Best Buy's team is always ready to assist me with any questions or concerns I may have. As a professional, my time is valuable, and I appreciate receiving prompt and efficient service when I need it.
I've also taken advantage of their "My Best Buy" credit card, which either gives me 5% back or allows me to pay for things over 12 or 18 months with zero interest (for the love of god, only use credit cards if you pay them off EVERY MONTH IF THEY DONT HAVE ZERO PERCENT INTEREST).
Lastly, Best Buy's return policy is a game-changer. As a Best Buy Totaltech™ member, most products are eligible for a 60-day return, which means I can shop confidently, knowing that if I'm not completely satisfied with my purchase, I can return it hassle-free while not worrying about damaging the products due to their generous accidental damage coverage.
Best Buy is my go-to destination for all of my photography equipment needs. Their damage policy, annual maintenance, priority customer service, credit card options, and return policy make them the best choice for me as a professional photographer.
What if Best Buy doesn't have what I need?
While Best Buy is my go-to destination for most of my photography equipment needs, I also rely on Adorama and B&H for those niche pieces of equipment Best Buy may not carry.
Adorama and B&H are great websites to purchase equipment, and I have had great experiences with customer service from both companies. They have a wide range of options, and their prices are competitive.
One downside to B&H is that they are closed online quite a bit throughout the year. This can be an inconvenience when I need to purchase something urgently or if I am looking to buy something online. But overall, the customer service, pricing, and variety of options make it worth dealing with their closures.
In conclusion, as a professional photographer, it's important to have a variety of reliable equipment sources. Best Buy, Adorama, and B&H are all great options, each with their own unique perks and downsides. I highly recommend considering them all when making your next equipment purchase.
Cameras
Canon R5
Canon R6
Unleashing the Power of the Canon R5: The Ultimate Tool for Professional Photography
As a professional photographer, having the right equipment is crucial. That's why I rely on the Canon R5 for all my photography needs. This camera is a game-changer, packed with features that make it the ultimate tool for capturing stunning images.
One of the most impressive features of the Canon R5 is its advanced eye-tracking technology. This allows me to capture portraits quickly and easily, even on the run. The camera's autofocus system tracks the subject's eyes, ensuring that they are always in focus, no matter how fast they're moving. This is especially useful when working with children and animals, as they tend to move around a lot. How the Canon R5's High-Resolution Sensor is a Game-Changer
As a professional photographer, editorial work is a big part of my portfolio. And when it comes to capturing images that tell a story and convey a message, the Canon R5's high-resolution sensor has been a lifesaver. With 45 megapixels, this camera can capture incredible detail and clarity. The high-resolution sensor allows me to see every detail in the image, which is essential when working on editorial projects where the image needs to tell a story and convey a message. This means publishers can print large-format photos without losing any quality.
Additionally, the camera has a wide dynamic range, which allows me to capture images with a lot of depth and dimensionality. This is especially useful when working in challenging lighting conditions, such as bright sunlight or dark interiors. The wide dynamic range allows me to capture images with a lot of detail in the highlights and shadows, which is crucial when working on editorial projects where the image needs to be as detailed and accurate as possible.
Another advantage of the Canon R5's high-resolution sensor is that it allows me to crop images without losing quality. This is particularly useful when working on editorial projects, where the image may need to be cropped or resized to fit a specific layout or format. But it's not just about the technicalities. The Canon R5 also has a great design and ergonomics; it's comfortable to hold and easy to navigate through the menu, which makes it a pleasure to work with. The Canon R5 is an essential piece of equipment for any professional photographer. It's packed with advanced features that make it the ultimate tool for capturing stunning images. Whether quick on-the-run portraits or high-resolution stills, the Canon R5 has everything you need to take your photography to the next level.
Why I use the Canon R6
When it comes to capturing stunning images and videos, photographers and videographers are always on the lookout for the latest and greatest equipment. And while the Canon R5 has undoubtedly made a splash in the world of photography and videography, its little brother, the Canon R6, is also a camera worth considering.
One of the most significant advantages of the R6 is its smaller file size. Hard drive space can quickly become an issue when working with large files. The Canon R6's smaller file size means that you can store more images and videos on your hard drive, making it easier to manage your workflow. Additionally, the smaller file size also means that the Canon R6 is less demanding on your computer's processing power, allowing you to work more efficiently and with less lag.
When it comes to image quality, the Canon R6 doesn't disappoint. The camera has a 20.1-megapixel full-frame sensor that produces stunning images with rich colors and sharp details. The camera also has a high-speed autofocus system, making capturing fast-moving subjects easy. Additionally, the Canon R6 can shoot up to 12 frames per second, making it perfect for grabbing action shots and sports.
Lenses
Canon RF 35mm f/1.8 Macro IS STM Lens
Canon RF 50mm f/1.2L USM Lens
Canon RF 85mm f/1.2 L USM Lens
Canon RF 70-200mm f/2.8 L IS USM Lens
Tamron 17-35 2.8-4
Canon RF Lenses: A Greenville, SC Photographer's Review
As a photographer based in Greenville, South Carolina, I've had the pleasure of working with a variety of Canon camera lenses. But there are a few that stand out as my absolute favorites. Allow me to share my personal experience with these amazing lenses.
Starting off strong with the Canon RF 35mm f/1.8 Macro IS STM Lens
The ultimate tool for capturing awe-inspiring close-up shots. The macro capability allows me to get up close and personal with my subjects, while the f/1.8 aperture creates a mesmerizing bokeh effect. The Image Stabilization (IS) feature is a game-changer, ensuring I can capture sharp images even in dimly lit conditions. This lens has also become my go-to travel companion, paired with my Canon R5. The 35mm focal length is the perfect balance for capturing landscapes, architecture, and cityscapes without distorting the faces of the people I want to photograph. I've used it for street photography, macro photography, landscapes, and architecture and I love that it's lightweight and super sharp.
Up next is the Canon RF 50mm f/1.2L USM Lens, a game-changer for portrait photographers. The f/1.2 aperture serves up the ultimate bokeh and makes capturing dreamy, ethereal portraits a breeze. The USM autofocus is lightning fast, never letting you miss a shot, and the 50mm focal length is a perfect balance for full-body and headshot portraits. This lens is the default on my camera, and it's so versatile and sharp I want to cry. I've had the EF versions of this lens, including the 50mm 1.8, then the 50mm 1.2 for my previous cameras, and now the RF 50 1.2. I didn't think the 50 1.2 could get any sharper, but with this RF version, they've really blown my mind.
The Canon RF 85mm f/1.2 L USM Lens is another new favorite of mine. I've resisted for the longest time getting this lens, but I've finally made the dive after five years of debating it- and I'm not disappointed. I was initially planning on just trying this lens out for an event and returning it- however, its 1.2 aperture was stone-cold amazing for low light situations and getting candids. Not only is it a powerhouse in low light- it's probably the best portrait lens if you have the physical space to be quite a distance from your subject. The f/1.2 aperture creates an incredibly shallow depth of field and produces a beautiful bokeh effect. The lens is a bit on the heavier side, but the build quality is top-notch, and the image quality is second to none.
Finally, the Canon RF 70-200mm f/2.8 L IS USM Lens is an absolute powerhouse. The older EF version was the most reliable and loyal lens I have ever used. It never missed focus and always gave me a fantastic image. I trust it with my life. The new RF version is lighter, so I went with it instead of just using the EF to RF adapter. On the RF Version, the lens extends out when zooming, and I don't particularly enjoy that- but it's not a deal breaker. Is it my go-to lens? No, but I will 100% recommend having it in your bag for many cases. This lens is perfect for capturing family photos, portraits, couples, sports, nature, and wildlife. The long focal length allows me to capture distant subjects easily, and the f/2.8 aperture creates a beautiful bokeh effect. The Image Stabilization (IS) feature is a lifesaver when working in low-light conditions. The build quality is top-notch, and the image quality is simply outstanding.
In conclusion, these four Canon lenses are my go-to choices for capturing stunning images and videos. These lenses have never let me down, from portraits to close-ups to architecture and nature. They are versatile and reliable and produce some of the most beautiful images and videos I've ever captured. I highly recommend them to any photographer looking to expand their lens collection. Whether a professional or hobbyist, these lenses will help you take your photography to the next level.
The last honorable mention is my Tamron 17-35 2.8-4. I bought this on a whim because I needed a wider-angle lens for interiors. It's a bit on the cheaper side, but I've been satisfied with it. I use it on the regular for interior photoshoots when I need that extra view and don't have the physical space to back up. At 17mm, it doesn't distort the edges enough for it to be a bad photo, but I'd be careful when shooting architecture to watch those edges. I also utilize this lens for low, wide-angle shots of models and buildings. It creates a cool effect, giving the subject an automatic power angle over the viewer.
Computer
MacBook Pro 16" Laptop - Apple M1 Max chip - 32GB Memory - 1TB SSD - Space Gray
Do I really need a MacBook Pro!? Yes. I'm also slightly biased towards Apple and know other photographers that use windows computers just fine, but Apple products' premium and luxury experience draw me in. The seamless transitions between iPad, iPhone, and Mac are absolutely magic. Did you know with Apple, you can copy text on your phone and then hit paste on your computer, and it appears there!? It's in the small details that make Apple really stand out.
Regarding the M1 Pro Max laptop, I wanted a portable powerhouse, and Apple delivered what I needed with this laptop. When I upgraded to the Canon R5 with 50MB files, I HAD to upgrade my computer to slay large file sizes with ease. When editing thousands of photos, having a photo even take .5 seconds to load wastes A LOT of time. I needed the fastest computer I could get, not the cheapest or the most bang for my buck. The M1 Pro Max Processor and 32GB of ram easily handle my 50 MB file sizes.
I know Apple products are premium. I know you can build a windows laptop or PC for WAY less and have it be WAY faster- but I put a strong emphasis on the whole ecosystem of Apple and its seamless, luxury experience.
Lighting
Flashpoint XPLOR 600 R2 Manual HSS Battery-Powered All-In-One Outdoor Flash
Flashpoint Portable 600ws Extension FlashHead For The XPLOR 600 (Bowens Mount)
Backup Bulb Flashpoint Flash Tube for XPLOR 600 Flash Head - AD-H600
Flashpoint R2 PRO 2.4GHz Transmitter for Canon (XPro-C)
The Power of Lighting Equipment
My go-to: Flashpoint XPLOR 600 R2 Manual HSS Battery-Powered All-In-One Outdoor Flash. I have three of them, but you having just one is more than enough for most situations. The Flashpoint XPLOR 600 is a powerful and versatile light that, if used correctly, can perfectly balance natural and artificial light. With its 600ws power output and fast recycling time, this light allows me to capture stunning images in even the most challenging lighting conditions. I can overpower the SUN with this bad boy.
One of the best features of the Flashpoint AD600 is its ability to be used wirelessly and portably due to its detachable battery, which gives me the freedom to move around and capture the perfect shot. The Flashpoint XPLOR 600 also has a built-in 2.4G wireless X system, allowing me to control the light remotely and make adjustments as needed. The Flashpoint XPLOR 600 is an essential piece of equipment for any professional photographer. It gives me the power to overcome any lighting challenge and capture beautiful images no matter where or when. With this light, I can unlock the full potential of my Canon R5 and achieve the desired results every time.
Another key accessory, the extension: Flashpoint Portable 600ws Extension FlashHead For The XPLOR 600 (Bowens Mount)
The Flashpoint XPLOR 600ws 8-foot extension head is a powerful addition to any photographer's gear. It transforms the XPLOR600 series monolight into a versatile powerhouse, perfect for use with softboxes or as a gridded hair light. The extension head connects easily to any XPLOR by unplugging the glass shielded flashtube from the monolight body, locking the pronged cable link in place, and then inserting the original flashtube on the head extension sockets. This simple process allows for a quick and easy setup, making it an excellent option for photographers who need to work efficiently and quickly. I don't leave home without it.
Another wise choice is to purchase Backup Bulbs for this light. Yeah, I know they aren't cheap, but I've had one rattle out of the socket and smash on the ground when rolling it along on my Kupo Runway Rolling Base.
You also need to have a way to trigger your strobes, and I use my trusty Flashpoint R2 PRO 2.4GHz Transmitter for Canon (XPro-C) Godox and Flashpoint are the same exact equipment, just different names. You can control multiple strobes and adjust them individually from this transmitter. It's a gamer changer, so you don't have to go to each strobe and change their settings physically. I've been using this trigger for years, and I've had zero issues with it.
Stands & Accessories
Flashpoint Heavy-Duty Air-Cushioned Light 3-Stand Kit (9.5') (Lightweight)
ROLLING BASE Kupo Runway Stand Base (AMAZING)
Flashpoint C-Stand Riser Column (9' Silver)
10.5' Turtle Base C-Stand and Grip Arm Kit, Chrome
Super Clamp with Ratchet Handle
Let's talk about photography's often-overlooked but essential aspect: stands and accessories. They may not be the most exciting topic, but trust me; they can make or break a photoshoot. I rely on the Flashpoint Heavy-Duty Air-Cushioned Light 3-Stand Kit for lightweight, on-the-go situations. The plastic and metal construction keeps it lightweight without sacrificing durability, making it perfect for quick in-and-out photoshoots. But be warned, if you're planning to use it outside, weigh it down with sandbags or have an assistant hold it. Otherwise, it will topple over faster than a game of Jenga. Trust me, investing in the right stands and accessories will make your photography experience smoother and more efficient.
When it comes to stands, my go-to and best purchase has been the combination of the Kupo Runway Stand Base with the Flashpoint C-Stand And an added boom arm. The rolling base feature is a game changer, making loading in and out of photoshoots a breeze by allowing me to hang equipment from the stand rather than carry it all. And during the shoot, the convenience of easily rolling the light, modifier, and stand is unbeatable. If I had to pinpoint any regret in my photography gear purchases, it would be not investing in a rolling base for my c-stand earlier in my career. I cannot recommend this combo enough; it's truly essential for any professional photographer looking to streamline their workflow and save their back from carrying heavy equipment.
Having a variety of stands and accessories at your disposal is crucial for any professional photographer; it allows you to adapt to any situation and get the perfect shot. In addition to my rolling base c-stand combo, I also have a trusty 10.5' Turtle Base C-Stand and Grip Arm Kit, Chrome. This classic c-stand is perfect when I need an extra spot to place a light or modifier. The added boom arm is essential for versatility in positioning and placing the modifier at any angle. And let's remember the importance of sandbags. They are crucial to keeping your stand and equipment safe and secure, so invest in a good set.
Light Modifiers
Westcott 7' Parabolic Umbrella, White/Black
Godox Softbox with Bowens Speed Ring and Grid (13.8 x 63")
Westcott Rapid Box Switch Octa-S with Bowens Switch Insert
48" EZ Lock Octa Quick XL Softbox with Bowens Mount
The Westcott 7' Parabolic Umbrella is an excellent option for creating a large, soft light source. Its 7' span provides ample coverage, making it perfect for achieving a natural-looking catchlight in the eyes. Additionally, the umbrella's white interior helps diffuse the light, producing a soft, even glow. Don't even think you will utilize this in small spaces, though! A tall ceiling and a must if you want to place this modifier in a way that is flattering to the subject. Using this modifier is nice if you have more than one person or groups of people you need to photograph. On another note, the umbrella is also collapsible and easy to transport, making it a convenient choice for photographers on the go. I use this modifier 20% of the time.
The Godox Softbox with Bowens Speed Ring and Grid (13.8 x 63") Can be an excellent modifier for your photography or videography, but it can be pretty tricky and time-consuming to set up. The softbox features four poles that need to be inserted into the corners of the fabric and then into the center ring, which can be a hassle and requires some muscle to assemble. It may not be the best option if you're in a rush or don't want to be seen struggling to set it up. Despite its inconvenience in setup, the rectangular shape of the softbox, measuring 13.8 x 63 inches, makes it ideal for side lighting and backlighting, allowing you to achieve beautiful and natural-looking results. It is a versatile tool that can be useful for portraits, product photography, and videography. You can still consider keeping it in your arsenal as it can be a great addition to your lighting setup, but be aware of the setup time and effort required when using it.
The Westcott Rapid Box Switch Octa-S with Bowens Switch Insert with Bowens Switch Insert is a fantastic addition to any photographer's arsenal. This is my most recent modifier, and I am thrilled that I have it in my collection. It is a portable and collapsible beauty dish that is versatile and can be used in a variety of situations. It's been especially helpful in architectural photography due to its small size- as I use it to light different parts of the subject (room, building, etc.) to combine them all in photoshop into one beautiful and seamlessly lit photo. It's also been great for fashion and editorial portraits. The octa shape of the softbox provides a beautiful wrap-around light, perfect for creating a natural and flattering light on the subject. The Bowens Switch Insert makes it easy to attach to a wide range of strobe lights, making it a convenient option for on-location shoots. All in all, the Westcott Rapid Box Switch Octa-S with Bowens Switch Insert is a great investment for any photographer looking for a portable, compact and versatile lighting solution.
The 48" EZ Lock Octa Quick XL Softbox with Bowens Mount is my ultimate go-to modifier. It's an excellent choice for any photographer looking for a versatile, portable lighting solution. Its 48-inch size is just the right size for creating beautiful, soft light that can cover a wide range of subjects. The octagon shape of the softbox provides a natural and flattering light that is perfect for portraits, product photography, and more. The EZ Lock design makes it quick and easy to set up, so you can spend more time taking pictures and less time fiddling with equipment. The included Bowens mount makes it compatible with a wide range of strobe lights, making it a convenient option for on-location shoots. Additionally, the grid that comes with the softbox allows you to control the light and direct it exactly where you need it, making it even more versatile. Overall, the 48" EZ Lock Octa Quick XL Softbox with Bowens Mount is an excellent choice for anyone needing a portable, easy-to-set-up, and versatile softbox.
Memory Cards and Hard Drives
SanDisk 128GB Extreme PRO UHS-II SDXC Memory Card
Samsung - T7 1TB External USB 3.2 Gen 2 Portable SSD with Hardware Encryption - Titan Gray
WD - My Passport Ultra 4TB External USB 3.0 Portable Hard Drive - Blue
The SanDisk 128GB Extreme PRO UHS-II SDXC Memory Card
As a professional photographer, I am always looking for the best tools to elevate my craft. That's why I love the SanDisk 128GB Extreme PRO UHS-II memory card. This little powerhouse allows me to easily capture stunning cinema-quality 8K, 4K, and Full HD video (not that I ever do as a photographer, but anyway), as well as raw photos and continuous shutter bursts. The storage capacity of 128GB gives me plenty of room to store all of my precious shots, and the UHS-II bus supports lightning-fast read speeds of up to 300 MB/s and write speeds of up to 260 MB/s. The V90 Video Speed Class rating ensures that my write speeds will never drop below 90 MB/s, giving me peace of mind when shooting in high-pressure situations.
What sets this memory card apart from the rest is its reliability. I've been using Sandisk memory cards for years, and they have never let me down. Even my card from five years ago still works like a charm. I've even tried other memory cards like CFExpress, with its impressive 1200mb/s read and write speeds, but I couldn't see any difference when it came to shooting or loading images onto my computer. The SD Card is also a convenient size and fits perfectly in my MacBook Pro's SD card slot. I don't have to lug around a card reader and cord, which is a huge plus in my book. In short, if you're a professional photographer or videographer, the SanDisk 128GB UHS-II SDXC memory card is an absolute must-have in your kit.
My working hard drive, the Samsung - T7 1TB External USB 3.2 Gen 2 Portable SSD with Hardware Encryption - Titan Gray
After a killer photoshoot, I like to transfer my shots straight to my trusty Samsung SSD. Why? Because editing on a lightning-fast hard drive is where it's at, plus it gives me the added bonus of being able to take my SSD on the road with me. That way, if my computer gets jacked, my precious pics are safe and sound. Plus, it keeps my MBP running smoothly by not clogging up valuable internal HD space. Once my edits are complete, and I send the photos to the client for approval and further edits, I use Rawsie to compress them and then back 'em up on three different hard drives. #backupqueen #workflowwinning
The WD - My Passport Ultra 4TB External USB 3.0 Portable Hard Drive - Blue
After loading my photos onto the Samsung SSD, I back them up to a larger, slower HD - like the WD - My Passport Ultra 4TB. And not just one, but two of those bad boys. Because let's face it, you can never be too safe regarding the photos you shoot for a client. Is it overkill? Maybe, but as a photographer, my job is to capture, edit, deliver and preserve photos, which means being as backed up as possible. Plus, there have been a few times where files got misplaced during transfer and having those extra hard drives saved the day. The WD 4TB is the perfect size for a year or two of content, and when it's full or two years have gone by, I put a date frame sticker on it and archive it in a fireproof safe for added protection.
file compression
RAWSIE
Picture this: you're out in the field, capturing stunning shots left and right, and then you get back to your studio and realize your hard drive is bursting at the seams with RAW files. Sound familiar? Well, not anymore. Introducing Rawsie - the ultimate raw image compression app that packs a punch. With up to 5:1 file size reduction, it's a game-changer for photographers like us who shoot with Sony, Canon, Nikon, Fujifilm, and more. And the best part? It's lossless, which means no lossy artifacts, no resolution change, no bit count change, and no color loss—just pure, pristine image quality.
But that's not all; Rawsie is incredibly user-friendly and straightforward. It's like having a personal assistant for your image compression needs. Plus, it's a money-saver in the long run. Trust me, I've been using it for a while now, and it has been a lifesaver.
So, if you're ready to revolutionize your workflow and reclaim valuable storage space, head on over to Rawsie's website and use the code JACK10 upon checkout for an extra 10% off your purchase, trust me, you won't regret it.
archiving
Carbon Copy Cloner
Having a reliable backup solution is crucial, and that's where Carbon Copy Cloner comes in. This software offers a plethora of options for creating backups. Whether it's on an external drive or another Macintosh, you have the flexibility to choose what you want to back up, be it an individual folder or an entire external hard drive.
I've been using CCC for some time now, and I have to say, it makes creating a carbon copy of my files incredibly easy. However, I did run into an issue where deleting files off of one hard drive resulted in them being deleted off the hard drive I was carbon copying to. This is something to keep in mind, but overall, CCC has been a solid choice for me.
In conclusion, if you're looking for a comprehensive and flexible backup solution,Carbon Copy Cloner is definitely worth checking out. Just be aware of the potential pitfall I encountered with file deletion.
Final thoughts
And there you have it, folks. I've just laid out all the nitty-gritty details of the tools and equipment I rely on to get the job done. But this is just the beginning. I want to hear from you too. What are your burning questions? What would you like to know more about? Let's start a dialogue on our work processes, the gear we trust, and any experiences we've had with similar equipment. We can all learn from each other and improve our workflow. So, please don't be shy, leave a comment and let's get this conversation started!
Disclaimer: All the equipment on this page has been tested and approved by yours truly. I've spilled the tea on real-world usage and am sharing my faves with you. The links provided are either the exact products I own or similar alternatives. Bonus: Using the links will support my blog and biz - love you for it!
Hello, World!
0 notes
Text
Flashpoint streaklight 360 ws creative collection

Flashpoint streaklight 360 ws creative collection manual#
Flashpoint streaklight 360 ws creative collection full#
Flashpoint streaklight 360 ws creative collection portable#
The Flashpoint StreakLight 180Ws is available now for $405.95 or bundled with the Blast Pack battery for $599.95. Shop Flashpoint StreakLight 360 Ws Creative Collection - AD360 online at best prices at desertcart - the best international shopping platform in Honduras. The Flashpoint StreakLight 360Ws is available now for 549 USD or bundled with the Blast Pack battery for 749.95 USD. The perfect example being the Streaklight 360ws I reviewed earlier this year and have used extensively ever since. But new battery technology has changed what I use and how I shoot. This set of 8 custom cut, high temp gels are made to wrap over top of the bulb of both your Godox AD360 and AD200 / Flashpoint Streaklight 360 and eVOLV 200.
Flashpoint streaklight 360 ws creative collection portable#
StreakLight is also compatible with other leading manufacturers’ portable power packs, but Flashpoint is available at far more affordable prices than other brands. 12 months ago I was using my Elinchrom flashes in the studio and my collection of Speedlights on location. Blast Pack is extremely lightweight and features replaceable, rechargeable batteries for continuous shooting with just one pack. Flashpoint StreakLight is compatible with accessories from other well-known brands including Quantum and Lumedyne.įlashpoint StreakLight is perfect with its companion portable battery pack, the Flashpoint Blast Pack. Photographers can choose a bundled package such as the Flashpoint StreakLight Creative Collection, which includes a dome diffuser, four color filters and grid, a flash grip, and cables among many other useful accessories, or purchase Flashpoint StreakLight accessories à la carte.
Flashpoint streaklight 360 ws creative collection full#
A full line of compatible Flashpoint light modifiers, from snoots to beauty dishes, is also available through Adorama. The Flashpoint Wireless Remote & Receiver is just one of many optional accessories that make this light even more versatile while shooting on location. The StreakLight flash has two sync jacks and overheating protection circuitry, and also features a wireless remote control USB port. Photographers get control from the large LED panel with adjustable output from 1/128 to full, in 1/3 stop increments, and soft, even light from using the included standard, parabolic reflector and diffusion panels. The Flashpoint StreakLight features high-speed sync, built-in optical slave, four shooting modes and auto-focus assist. Perfect for location and wedding photographers, StreakLight is available now, in 180 or 360 watt second versions, in Adorama’s NYC store or online. Compact and extremely lightweight, Flashpoint StreakLight provides powerful, even lighting from any angle thanks to its articulated head and options for on-camera hot shoe or light stand mounts. The 360ws bare bulb tube design allows for greater cooling and light spread,delivers beautifully even and soft light from its standard stippled parabolic.
Flashpoint streaklight 360 ws creative collection manual#
The results might surprise you! Related Product at Adorama: Olympus OMD E-M5 Mark ii Olympus Zuiko Digital ED 12-40mm f/2.8 Pro Flashpoint StreakLight 360 Ws Creative Collection Black rapid RS-7 Strap Flashpoint Zoom Li-on Manual On-Camera Flash Linco 8’ Light Stand Glow ParaPop 38" Portable Softbox Westcott 32” Rapidbox Duo Sekonic L-308S Flashmate Flashpoint XPLOR 600 HSS TTL Battery-Powered Moonlight Photos by Gavin Hoey Like, share, and comment on the video below.let's get the conversation started! If you have questions, please share them below.Adorama has released the Flashpoint StreakLight, a brand new portable strobe light for on- or off-camera use. In this video Gavin Hoey tests three portable flashes ranging from a small speedlight to a full sized 600ws studio flash, to see which performs best on location. But with battery powered flashes becoming ever more powerful, it's never been easier to overpower the ambient and create great photos. Blue sky days can make for very bad location portraits, especially if you have to shoot in harsh sunlight. Flashpoint StreakLight 360 Ws Creative Collection (Includes flash, battery, trigger, boom etc) Canon 5D Mark 2 Canon 24-105L Frio Cold Shoe Black rapid RS-7 Strap If like me you like to keep a visual record of you’re lighting set ups then this image should come in very handy.
0 notes
Photo

I did headshots today at the Sacramento County assessor's office, @Christina Wynn. They will have a great looking annual report for next year! Also Flashpoints XPLOR 600 are great for location shoots! . . . . . #sacramentophotographer #sacramentoheadshotphotographer #sacramentobusiness #sacramentocounty #xplor600 #flashpoint #locationshoot #businessportraits (at Sacramento County Assessors Office) https://www.instagram.com/p/Chs2w7vJWiW/?igshid=NGJjMDIxMWI=
#sacramentophotographer#sacramentoheadshotphotographer#sacramentobusiness#sacramentocounty#xplor600#flashpoint#locationshoot#businessportraits
0 notes
Photo
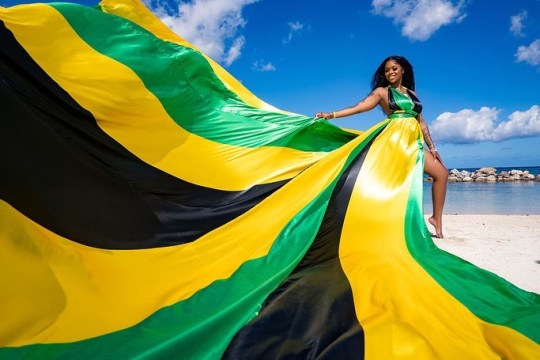
It’s #JAMAICADAY 💃🏾@herdressjamaica + #andredesignz Camera: Sony a7C Lens: Tamron 20mm f/2.8 Settings: 1/640 | f/4 | ISO 200 Light: Flashpoint XPLOR 600 https://www.instagram.com/p/CpV--1zOl6X/?igshid=NGJjMDIxMWI=
1 note
·
View note
Text
6 Bowens Mount Modifier Challenge- Cheetah QSB 34, 42, QRB 36, Glow, Magbox and Westcott Rapid Box XXL
Join me for a challenge of 6 Bowens Mount Modifiers where I show you the differences in light output going from small 24’ modifiers all the way up to 48” modifiers using the same light, same model, and same distance from the light. PLEASE THUMBS UP, SHARE, LEAVE A COMMENT AND SUBSCRIBE!
To see the video from this shoot and the corresponding results please click below:
How much does light modification REALLY matter? That’s the question that was posed to me at my workshop in Orlando, Florida in November 2019. So what did we do? We gathered up all of the Bowens mount modifiers that the group of workshop attendees and I had and combined them to do a 6 modifier challenge shoot out.
In this challenge we used the following modifiers:
*25” Glow Octa XL
*24” Magmod Magbox
*34” Cheetah QSB
*36” Cheetah QRB
*42” Cheetah QSB
*48” Westcott Rapid Box XXL
Camera was the Sony A7iii using the Sony Zeiss 50mm lens.
The rules of the challenge were simple. We used a Flashpoint Xplor 600 keeping it in the same spot and at the same distance from the model for all 6 modifiers. The only thing we slightly changed was the light output to be fair to the different modifiers and to practice good lighting technique.
For the smaller light modifiers with less diffusion like the Glow and Magbox we shot the light at 1/8 power. For the larger modifiers like the Cheetah and the Westcott brands we shot the light at 1/4 power. We even did a bonus shoot using a Godox AD200 at the end shooting it at 1/1 power to show what that looked like as well. So even though I did change flash output a little to adjust for diffusion, it wasn’t much.
So what were the test results? To really see how it was done please check out the video above. But to give you a sneak peek please check out the finished images below to show what the different modifiers produced. The video also includes images edited using Photoshop and Lightroom so you can see what the developed and finished output was from these modifiers. Check out the shots below:
Glow 25:
Magbox 24:
Cheetah QSB 34:
Cheetah QRB 36:
Cheetah QSB 42:
Westcott Rapid Box XXL:
We thank you in advance for being here and for taking the time to be with us here at Jason Lanier Photography. We look forward to seeing you at a future event where we can help you with your photography journey as well!
Thanks,
Jason Lanier Photography
#Glow 25 Octa XL#Magmod Magbox#Cheetah QSB 34#Cheetah QRB 36#Cheetah QSB 42#Westcott Rapid Box XXL#Light Modifiers#Jason Lanier#Jason Lanier Photography#Orlando#Turkey Lake#Bowens Mount#Flashpoint Xplor 600#Godox AD 200#Sony A7iii#Sony Zeiss 50mm
0 notes
Text
Fall Wedding In Letchworth State Park
Letchworth State Park in the fall is always packed with park guests enjoying the fall colors. This year was no different even with the pandemic. Visitors were enjoying nature and the love of the outdoors more than years before, so to keep everyone safe the state mandated a capacity limit on the park. This provided a new challenge for me, I needed to get inside the park before they close.
Sabina and Matt’s wedding was scheduled for 2pm, my plan was to arrive by noon. As I turned onto the road to the south entrance, the line of cars was already 1/2 mile long. Slight panic sets in, but we were prepared for this. Sabina and I planned on texting each other to make sure we were able to enter the park. We let each other know our progress during the wait. The only thing that was keeping me calm was the serenity of the farm fields.
I was about 4 cars away from the entrance, when they closed it due to reaching max capacity. I check to make sure my wedding contract was still sitting on my passenger seat, ready to show the gatekeeper as my ticket to get in.
As I approached the turnaround before the gate, I rolled down my window and let the gatekeeper in the neon orange vest know that I was there to photograph a wedding. Luckily Sabina and Matt made reservations for the middle falls so everything was good to go. As I drove into the park I breathed out a sigh of relief, and my heart rate dropped back to normal.
Driving through the park was different, the side of the roads were free of parked cars that would normally be full. Barricades were in place to direct traffic, and social distancing in full effect made finding a parking spot easy. I was able to locate Sabina and Matt easily with the lack of crowds.
We located a spot for their first look, a nice open space that allowed me to maneuver around them. I love first looks, the simplicity, the intimateness. It’s really the only part of the day that the couple has time to be alone with each other until the end of the night. A quick embrace, a kiss and a private conversation, just the two of them to get centered and calm before the ceremony begins. As a photographer, it allows me to capture an intimate moment that would be extremely difficult to do when surrounded by a wedding party and congregation.
We proceeded down to the Middle Falls for the ceremony. Sabina was worried about the people not moving for the ceremony. I told her no worries, everyone gets out of the way when they see a gorgeous couple heading their way. Also with the help of using my outdoor voice to gain their attention over the sound of the falls.
The ceremony was short and beautiful. The sun played hide and seek behind the clouds, and I played gently with the bees buzzing around the late blooming native flowers surrounding the ceremony site. The groups of park visitors lined up on the path offered their applause after the final kiss and congratulations as they walked by. Such a perfect day in the middle of a chaotic time.
Congratulations Sabina and Matt!
#Fall Weddings#Letchworth Wedding#intimate wedding#Rochester Wedding Photographer#Rochester Weddings#wedding photography#park wedding#Letchworth state park wedding#Sorrells Photography#Sorrells Photo#Fall Wedding#autumn wedding#Indian Wedding Dress#outdoor wedding#Finger Lakes Weddings#Nikon D850#Flashpoint XPLOR 600 PRO#Elinchrom Octabox
0 notes
Video
youtube
Portrait Junkies with Alyson Arechavala - Behind the Scenes footage. Model Alyson Arechavala https://ift.tt/2A6Qkit Photographers Jay Marable https://ift.tt/2Oj9BQG... Daniel Shawell https://ift.tt/2A6vDU3 Majiq https://ift.tt/2Oj9CnI Flashpoint Xplor 600 Westcott Rapid Box XXL Sony A7RII by JerseyTurntUpEnt
1 note
·
View note
Photo
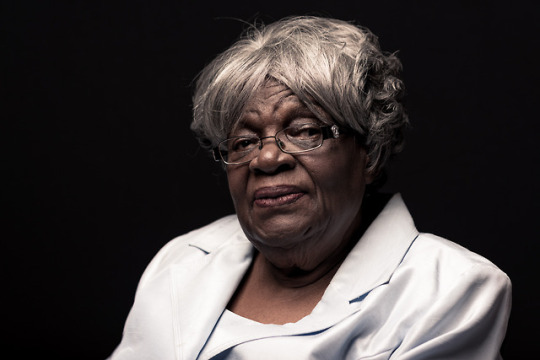
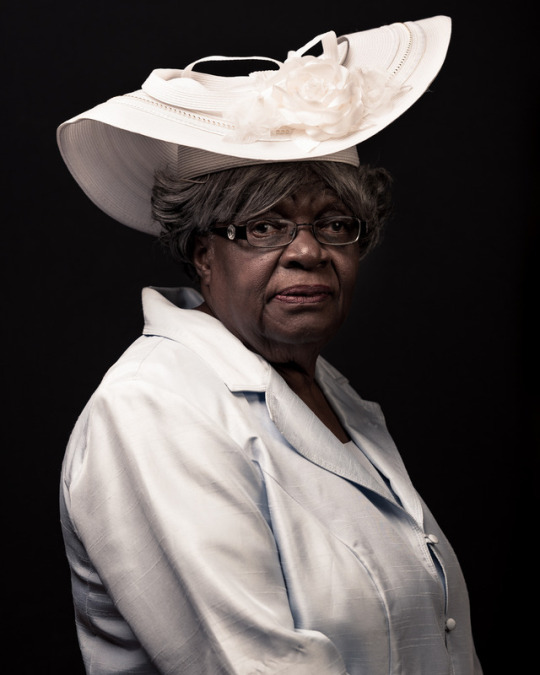
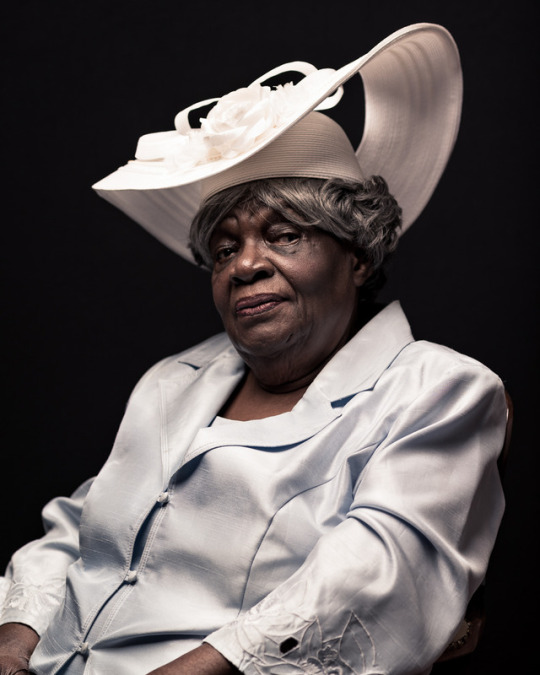
Ms. E poses for her 85th birthday portrait in her home in Cambridge, Ont. Saturday evening.
Gear: Flashpoint Xplor 600 | Flashpoint R2 Transmitter (Nikon) | Glow Parapop Softbox 38" Double Diffused | Savage Reflector (White) | CowboyStudio Background (black) Softwar: Lightroom CC
#AWP#Alicia Wynter Photography#Cambridge#Canada#Cowboy Studio#FlashpointXplor600#Flashpoint Xplor Extension Head#Glow Parapop Octobox#Nikon#Nikon 24-70mm#Nikon D600#Ontario#Portrait
3 notes
·
View notes
Photo
@giannatolotta they opinion doesn't count, we the only thing that matters 🏁🏁 . . @fujifilm_northamerica XT2 #xf16mmf14wr F1.4 1/1000 ISO200 shot with flashpoint xplor 600 hss ttl . . #collectivetrend #dopeports #portraitsnyc #portraitmood #portraitsquad #ballerina #ballet #pointe #pointeshoes #worldwideballet #balletdancer #tutu #balletpost #instaballet #dancer #nycphotographer #nycmodels #fujifilm #myfujifilm #agameof10k #theimaged (at Six Cortlandt Alley) https://www.instagram.com/p/Bxry_R_hHEZ/?igshid=obnm0ilgxqqm
#xf16mmf14wr#collectivetrend#dopeports#portraitsnyc#portraitmood#portraitsquad#ballerina#ballet#pointe#pointeshoes#worldwideballet#balletdancer#tutu#balletpost#instaballet#dancer#nycphotographer#nycmodels#fujifilm#myfujifilm#agameof10k#theimaged
1 note
·
View note
Photo
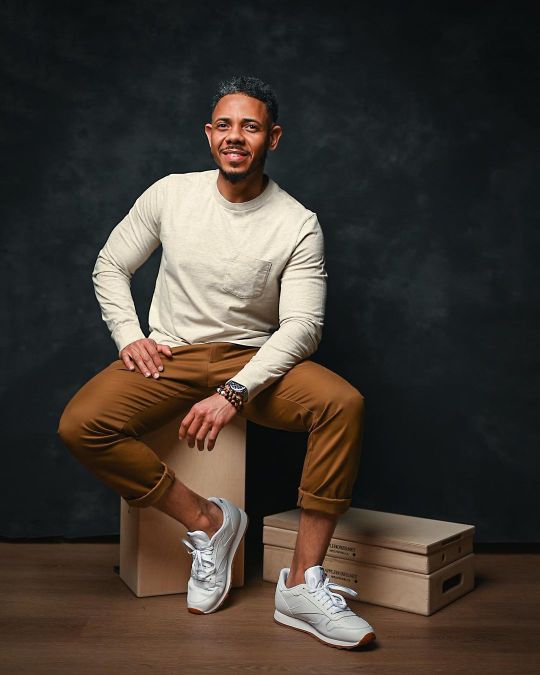
Spring Is In: Late Lunch Spring is here and Covid restrictions are lifting, it’s time to enjoy the outdoors again! Let’s do it responsibly and fashionably! Outfit: featuring the new kicks @reebok classic with shirt and khaki @gap, bracelets @beadedbylaurenalexis, watch @citizenwatchus. This is the first photos from my newly acquired @nikon Z6ii which was back ordered on @bhphoto for some time now. The autofocus is much better than the it’s predecessor the Z6, especially with eye tracking. Should out to @adorama for the speedy delivery of this new Savage backdrop and apple boxes. This image was shot with the Nikon Z6ii, Nikon 35mm 1.8 at f1.8, and lit with a single Flashpoint (Godox) Xplor 600 diffused through a @paulcbuffinc gridded octobox from above camera left. #fashion #springfashion #mensfashion #springmensfashion #style #mensstyle #joelfinnigenphotography #joelfinnigen #selfportrait #reebok #gap #gapfactory #nikon #godox #godoxlighting #casualwear #newyorkportraitphotographer #newyorkphotographer (at Mount Vernon, New York) https://www.instagram.com/p/COLqScCBnqs/?igshid=1wki1jkppl1p5
#fashion#springfashion#mensfashion#springmensfashion#style#mensstyle#joelfinnigenphotography#joelfinnigen#selfportrait#reebok#gap#gapfactory#nikon#godox#godoxlighting#casualwear#newyorkportraitphotographer#newyorkphotographer
0 notes