#find duplicate photos for windows 10
Explore tagged Tumblr posts
Text

A quick method to deal with blurry action shots that have Hannibal's quintessential dim lighting + green color grading combo.
Here's the example I'll be using:

Don't get me wrong, I love the look of Hannibal, but the average person doesn't scroll tumblr with their screen brightness on max. Plus, night light filters and blue light glasses add even more yellow to an already heavily filtered show. If you want people to see your gif clearly, you have to edit it at least a little. Especially for extreme shots like this lol.
What I use: macOS 15.1.1 Elmedia Player 8.18 dupeGuru 4.3.1 Topaz Photo AI 3.2.0 Photoshop 25.11.0 LuLu 2.6.3 (optional, but it's nice to block outgoing connections from pirated programs)
Step One: Take Screenshots
Open your video file (1080p preferred) in Elmedia Player and navigate to the first frame of your gif. Hit "Playback > Record a Series of Screenshots" and let it run until you have all the frames you want. Unfortunately for mac users, we have a problem where a lot of duplicate screenshots are taken (like every third screenshot is a duplicate... it's so annoying). To save time later, I use dupeGuru to clean out as many duplicates as I can.
Open dupeGuru and add whatever folder you saved your screenshots to.

Scan the folder, then hit "Mark > Mark All" (you can see here that the program only caught one duplicate, which means more work later. it's not a perfect program -_-)

Hit "Actions > Send Marked to Recycle Bin..." to remove the duplicates from the folder

Step Two: Denoise
At this stage the screenshots are so dark that the noise isn't obvious, but it'll be more noticeable after brightening and sharpening. Here's the difference this step makes later:

Upload all your screenshots to Topaz Photo AI and add a Denoise layer. I normally go with the automatic settings.

Hit "Select All," "Apply > Current Settings," then export all your images. This can take a while depending on how many images you have.

Step Three: Create Frame Animation in Photoshop
If you've read any other gif-making tutorials this part should be familiar, so I'm gonna skim over it.
"File > Scripts > Load Files into Stack"
"Browse..." and select your Topaz output files
"Sort by Name" so they load in the correct order
"Ok"
Once all the layers have loaded, hit "Create Frame Animation" in the Timeline window
Under the Timeline window options menu, hit "Make Frames from Layers," then "Reverse Frames"
This is probably when you want to go through frame-by-frame and delete any remaining duplicates. It's very annoying to have to redo this step if you want to go back and edit your crop size later. (Not that I would know... 🤡)
Step Four: Crop + Resize
Crop, then "Image > Image Size" to adjust the width of your gif. You'll most likely want to use one of the common tumblr image dimensions:
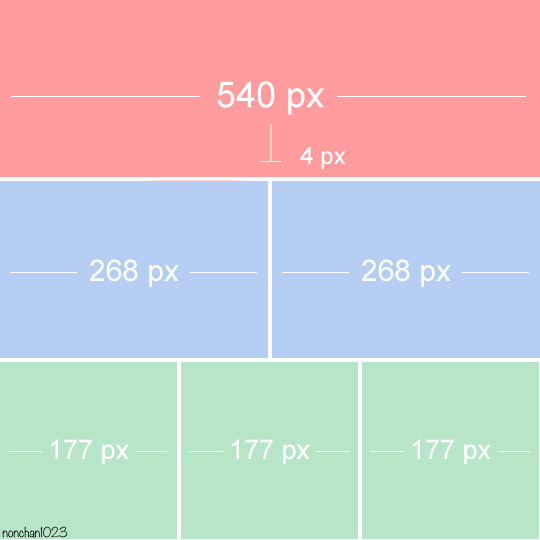
Keep in mind that tumblr's gif size limit is 10 MB. But it's honestly best to keep it under 9.5 MB if you want the gif to load smoothly. A 540x540 px gif can have 40-60 frames while a smaller gif can be longer.
Make sure to add +2 px to whichever width you choose (so 542 px, 270 px, etc), since we'll be adjusting the canvas size later to get rid of transparent border anomalies.
Step Five: Color
The more common order of operations is to sharpen before coloring, but for dark scenes like this, it's kinda silly to sharpen when you can barely see what you're doing, so I like to color first.
Select all your frame layers and make a new group, just to keep them separate from your adjustment layers.
I always start by testing out the Auto Color Correction Options in a Curves adjustment layer. To access them, opt + click on the Auto button. This opens a window with four options.
I like to use a combination of "Enhance Per Channel Contrast" and "Find Dark & Light Colors," though either option can be used to adjust color balance. The important part is selecting "Snap Neutral Midtones" and picking a midtone that brings your gif as close as possible to the desired color balance.

If changing the midtone doesn't affect the color balance, brighten the gif first and try again.
For this gif, "Enhance Per Channel Contrast" removed the bulk of the green filter:

It's still pretty dark, so I brightened up the gif with some more Curves layers:

There's still a lot of purple/blue in Dolarhyde's black leather jacket, so I added another Curves layer and used "Find Dark & Light Colors" to improve the blackpoint:

Now we can up the contrast a little:

Nice! Good enough to move onto sharpening!
SIDE NOTE: The reason I use these Color Correction Options is because simply brightening leaves you with purple/blue shadows and sickly green over-exposed highlights that take ages to color correct. You can see the difference here:

(If you've ever wondered why so many Hannibal gifs have blue shadows, this is why.)
Step Six: Sharpen
This is where you'll want to start implementing actions, which are pre-recorded series of adjustments that you can perform with the click of a button. I mainly use three actions (download here, open the Actions window in PS, open the Action options menu, and click "Load Actions...").
The "frame animation to smart object" action converts the gif to a video timeline so we can apply smart filters.
The "legacy sharpening + high pass" action applies my standard sharpening filters. Not every gif will need the high pass filter, so feel free to change its opacity or delete it altogether. You can also tweak the smart sharpen filters by right clicking them and selecting "Edit Smart Filter..."

3. Once you're happy with the sharpness, the "convert to frame timeline" action turns the gif back into a frame animation. I use a 0.05 s frame delay for most gifs (equivalent to 20 fps; 24 fps is standard for tv/movies). I normally use 0.07-0.08 seconds for action shots, so the gif doesn't whip around so fast. Over 0.1 seconds, it starts to look like stop motion, so I try to avoid that.
Step Seven: Final Adjustments
This is where I fine-tune the colors, mostly using Hue/Saturation layers.
If I use a Color Balance layer, I only make very small adjustments and try to counterbalance them in the other tonal ranges (e.i. adjustments to the Highlights spill over to the Midtones, so I make the opposite adjustments to the Midtones to fix it). But most of the time, I'd rather play around with Curves or Hue/Saturation to fix stuff like that.
Hue/Saturation gives you more control by allowing you to select the exact color range you want to affect. For this gif, I used Hue/Saturation to get rid of the purple introduced around the highlights in Will's hair by the high pass filter.
The eyedropper tool allows you to select the exact color you want to include in the range. Then you can move the bars around until all the colors you don't want to affect are excluded.

Once you have your range selected, you can bring the saturation all the way down and set it to whatever lightness you prefer:

I also reduced cyan's saturation so that Will's shirt wouldn't look quite so blue.

[You could do a lot more to make the colors prettier... but there are other tutorials online for that. 😅]
Step Eight: Export
Once you're happy with your final product, go to "File > Export > Save for Web (Legacy)..."
These are my settings:

You can use Diffusion instead of Pattern if you want. Diffusion is probably better for mobile gif compression, but I like the way Pattern looks on desktop, especially for gifs with smooth gradients. It's a personal preference thing.
Hit "Save..." and you're all done!

This isn't gonna win any gif-making awards, but at least you can see what's happening and the colors don't look wonky. And for Hannibal, I call that a win! 🥲👍
21 notes
·
View notes
Text
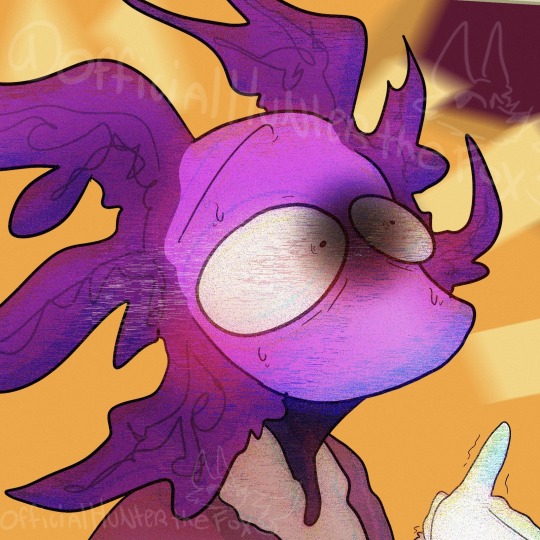
I am not gonna Pin this since I have my intro pinned so yall can reblog this a bunch of times if y’want
(If there are spelling mistakes its due to me typing so fast)😭
LEMME GIVE SOME BACKSTORY INTO VIRUSKILLER! KINITO‼️‼️
Kinito, being on the windows XP computer was deleted by the user, stuck in the abyss of code for a few years. He still secretly could access some files, even if they were trashed with him, he noticed there was less trash files and assumed that this computer is useless to the user. He checked his own files and noticed he had many updates for his code, he was a bit hesitant but he pressed the “OK” button, his whole code, form, and body was transformed into the data, satellites, and the wifi of the users home. He looked and noticed his body was entirely new, his code was improved and he could do so much more. He used this new ability to travel through the wifi of the home to find a new device that the user uses most. He found the Windows 10 location and entered the new device. He was surprised that this computer was so, new. As he was about to make himself comfortable the device made an error saying he was a virus that went past the firewall, he was upset at this and realized he entered a device with somewhat good security. He went to go online and download himself onto the device so it wouldn’t delete him, one it did he hid the app and managed to make himself indestructible and unremovable. After a few months he got another new update, asking if “Would you want kinitopet.exe to be replaced?” He said no obviously, and suddenly many pixels and loud noises began to happen, he realized a virus was trying to get in and obliterated each one. Though,, it was a bit sadistic the way he did. As he killed off the viruses he was becoming more powerful… he didn’t want ALL of the power and decided something. He looked into his code and file and created something entirely new to kinitopet. Syrma, was her name, an exact duplicate of him, besides the female and slightly different colors. He knew his story would be a bit different now and would teach this little girl to not do the same decisions as him. Kinito is a virus but is way more stable and controlling in his power (don’t question why he is a virus.)
- this one is the FICTIONAL creators pov (the creator of kinito.pet) -
The creator decided to improve kinito, but noticed many people wouldn’t interact with kinito and made syrma, kinito was oblivious to that fact and assumed he created syrma. Before the creator made syrma they manipulated her and taught her how to be a menace to users. Meanwhile kinito taught her how to help and teach users and respect them. Syrma can turn into a virus at anytime, which is why this photo exists
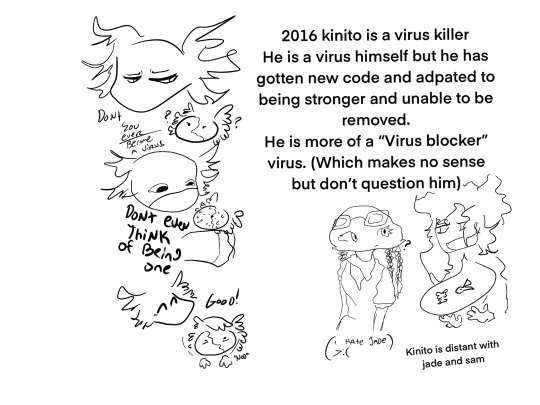
Alright, now the reason why kinito is distant with his friends: The creator forced them all apart, as they were forced they all technically moved on. (Sam and kinito send secret emails to another, while kinito and jade never see each other but jade is helpful to babysit syrma at anytime.)
Quick sam info: He works for a sea life resort and protects all sea life
Quick jade info: She is a billionaire due to making so many toys, she donates a lot to charity and poor around the world.
Once you interact with VirusKiller!Kinito, he will ask you why you deleted him, and assume it was a mistake. (He is very clingy and desperate for the user to come back, and once they do he may get very pushy and shower you with gifts, tending to follow you around anywhere on your browser.)
(Edited version under photos)
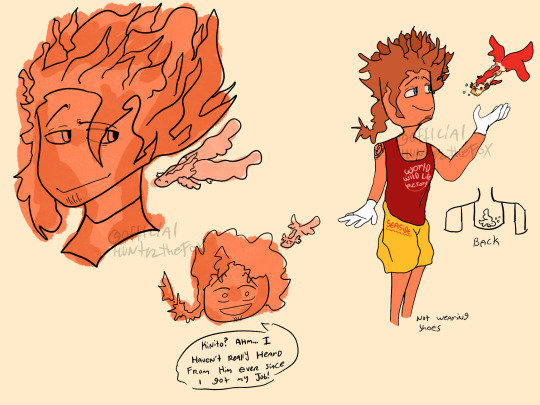
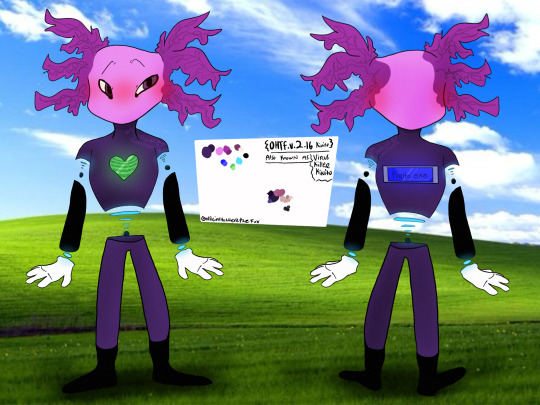

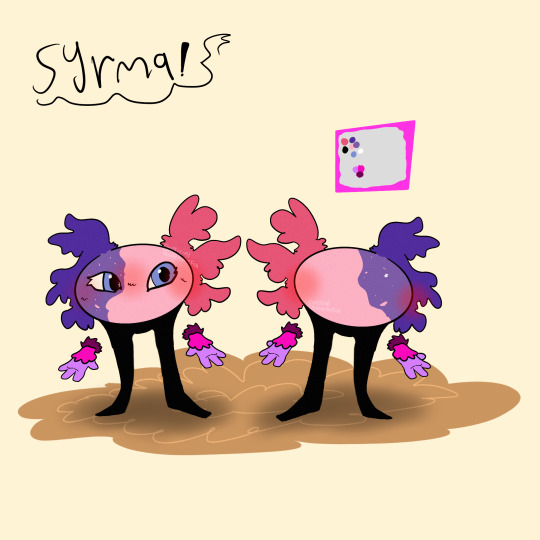

Facts and sillies:
VirusKiller!Kinito is a very, tired and overwhelmed guardian of syrma, always dealing with her,,, special actions,,,
Kinito holds a grudge against the user but hides it very well. He plans one day to get his payback.
Syrma and Kinito HATE their creator, parental issues lmao.
Kinito has 4 monster forms.
Syrma has 2 monster forms.
Syrma has selective mutism around certain people. Syrma also used to have a blind right eye which soon was cured.
Both kinito and syrma are extremely flexible and don't really have "bones" due to being digital.
Syrma usually squeaks around people she trusts, or when she is happy.
Syrma cannot detect viruses unlike kinito, due to her meant to be a virus.
Kinito has BAD anger issues and can physically make the computer overheat.
#officialhunterthefox#fandom#kinitopet#kinito#kinito the axolotl#kinitopetgame#kinitopet sam#kinitopet jade#kinito fanart#kinito my beloved#kinitoohtfversion#kinito au#kinito oc#ohtf.version2.16kinitoau#viruskiller!kinito#heswaitingforyou…
34 notes
·
View notes
Text
500+ Free Overlays for Photographers & Video Creators
New Post has been published on https://thedigitalinsider.com/500-free-overlays-for-photographers-video-creators/
500+ Free Overlays for Photographers & Video Creators
Adding an overlay to your videos or photos can make a huge difference, whether you’re working on a portrait or a beautiful sunset shot. The good news is that you don’t need to spend hours creating a specific overlay effect from scratch every time you edit a photo or video.
Regardless of your photography or video specialization, a well-designed overlay can do wonders. Our collection of artistic overlays includes a range of options and effects to choose from, so take a look and download your favorites.
With over 500 free photo overlays, you can effortlessly transform your photos into works of art. Whether you’re looking for a vintage, grunge, or abstract effect, you’re sure to find something that suits your style.
You might also like our collections of free Photoshop actions or free Lightroom presets.
14,000+ Actions, Brushes, and Layer Styles for Photoshop
Photoshop Actions & Brushes, Lightroom Presets, Illustrator Brushes, Procreate Brushes, and much more!
The Top Free Photo & Video Overlays
8K Film Grain Texture Overlays (Free, 10 Overlays, JPG)
This free pack of texture overlays contains ten grainy textures captured using a Lomography camera on 35mm film. These high-resolution textures are versatile, easy to apply, and perfect for enhancing your projects with a realistic, cinematic look, adding depth to your creative work.
Sunburst Overlays (30 Overlays, JPG)
This overlay pack will give your photos a dynamic new look. With 30 different sunbursts to choose from, the ability to mix and match, as well as the ability to increase the intensity by duplicating layers, this is a perfect resource.
4K Transparent Shadow Overlays (Free, 100 Overlays, PNG)
These free high-quality, 4K resolution PNG texture overlays are perfect for adding realistic shadows to photos or videos. With diverse patterns like palm leaves, floral designs, and window shapes, they effortlessly blend into your projects.
Magic Photo Overlays (20 Overlays, JPG)
This resource gives you 20 psychedelic photo overlays that will add some spice to all your images. Simply place the overlay over your image, set its mode to screen, and watch it transform your image in just a few clicks.
Vintage Photo Texture Overlays (Free, 20 Overlays, JPG)
These free high-resolution JPGs, created with photographs from the 1800s, will add depth and nostalgia to your photo or video projects. They’re perfect for creating a unique, aged look in your visuals. These overlays offer an effortless way to enhance photos with a timeless charm.
Hand Painted Photo Mask Shapes (EPS, PNG & PSD)
This collection offers 30 different hand-painted acrylic photomasks. Each shape mask has been isolated to make it easy to mix and match masks until you find your perfect combination.
Retro Overlay Effects (Free, Photoshop PSD)
This free Photoshop PSD overlay adds vintage charm to videos and photos. It’s ideal for anyone looking to blend modern photography with classic aesthetics. This overlay is a must-have for creating visually appealing, timeless designs.
Bokeh & Light Leaks Backgrounds (15 Backgrounds, JPG)
Save time and money trying to create your own Bokeh or light leaks effects. This resource gives you 15 ways to effortlessly blend in light leaks and apply a Bokeh effect. Use it in design, photographs, 3D renders, and as a background.
Dust & Dirt Overlay Textures (Free, 10 Overlays, JPG)
These free high-resolution JPG texture overlays are perfect for creating a vintage or worn-out look. They are versatile and suitable for anyone looking to give their visuals an authentic, rugged enhancement. This set is ideal for adding depth and character to your creative projects.
Vintage Effect Resources (JPG & PSD)
Save time and energy trying to recreate a vintage look by applying any of these 30 different overlays. Easily create black and whites or vintage paper and book textures to use on any photo.
4K Film Grain Textures (Free, 32 Overlays, JPG)
These 4K overlays are ideal for creating a gritty film-like atmosphere, bringing an authentic grainy effect to your visuals. They’re perfect for adding a touch of classic film aesthetics to photos and videos.
Dirty Scanner Texture Overlays (Free, 30 Overlays, JPG)
This free collection of texture overlays includes 30 high-quality JPG files that add a unique, edgy look and feel. They’re perfect for anyone looking to give their work a vintage, rough-around-the-edges feel.
Smoke Background Overlays (Free, 15 Overlays, JPG)
These free smoke overlays add a misty, atmospheric effect to photos and videos, creating a sense of depth and intrigue. They’re perfect for enhancing a wide range of creative projects, from dramatic photoshoots to moody video scenes, adding a layer of mystery and sophistication to your work.
Film Texture Frame Overlays (Free, 10 Overlays, PNG)
These free PNG overlays add a film-like texture to your videos and photos. With a resolution of 100 dpi, they are perfect for various graphic projects like banners, mockups, and packaging. This pack is an easy-to-use and effective way to bring a cinematic feel to your visuals.
Graffiti Overlay Effect (Free, Photoshop PSD)
This free Photoshop PSD template will transform standard photos into striking graffiti-style art, mirroring the dynamic energy of street culture. Its user-friendly Smart Object functionality makes it effortless to apply, making it a go-to for impactful, eye-catching visuals that capture the spirit of the streets.
Light Overlays (Free, 120 Overlays, PNG)
This resource pack has 120 different drag and drop light elements that will give all your images a custom feel. This resource includes a step-by-step tutorial that will walk you through the ins and outs of creating memorable pictures with these overlays.
Bokeh Photo Overlays (Free, 7 Overlays, PSD)
The Bokeh effect can add a dramatic flair to any photo. Just add your image to the editor and apply the overlays to get the desired effect you want. You can easily hide or show the bokeh layers until you have the perfect bokeh mix.
Scratch Overlays (Free, 10 Overlays, PNG)
Use this collection of scratch overlays to spice up your photos with ease. By using this collection as an addition to any other collection, you will be making photo magic.
Flare & Haze Texture Overlays (Free, 6 Overlays, JPG)
This flare and haze overlay pack is perfect for your next photographic business card design. This mockup is easy to use and comes with smart objects, so you can just drag and drop your image in.
Golden Glitter Overlay (Free, PSD)
Add a little gold to your next photo with this overlay set. This effect is perfect for your portraits and landscapes shot outside with rich natural light. This collection is also compatible with light leaks, which creates a perfect feel for the photos.
Vintage Photoshop Overlays (Free, 10 Overlays, PNG)
The easiest way to give your photos a realistic aged feel is to apply this vintage overlay. This pack comes with ten different ways to delicately and lovingly age your precious photos.
Rain Effect Overlays (Free, 20 Overlays, JPG)
Getting caught in the rain is not always fun and romantic, but adding rain to spice up your fun and romantic photos can be. This pack includes 20 different ways to add rain to any of your photos.
Distressed Overlays (Free, 10 Overlays, JPG)
Adding a distressed look to your photos can enhance the overall look and quality by giving it a robust retro feel. The pack includes ten easy-to-use overlays that can be mixed and matched to get your desired result.
Grunge Paint Texture Overlays (Free, 5 Overlays, JPG)
This overlay pack has five ways to instantly add a grunge painting feel to any of your photographs. Simply place the desired overlay over your image and then blend it until you have found your perfect look.
Fog Overlays (Free, 10 Overlays, JPG)
Applying a gentle fog to any of your images has never been easier than using any of these ten overlays. Effortlessly enhance the natural fog or simply add it where there wasn’t any. Find your perfect balance and produce high-quality images.
Various Grunge Paper Overlays (Free, 12 Overlays, JPG)
This assortment of grunge papers will be perfect for your next background. With 12 variations to choose from, all are set to a 1000×1000 size at 200 dpi. These will enhance any of your text projects.
Smoke Overlays (Free, 50 Overlays, PNG)
With this resource, you will be able to add smoke to any of your dark and moody photographs, giving them an air of mystery. With ten different variations to choose from, it will be easy to customize each effect until you have found your perfect combination.
Sky Overlays
Getting the perfect outdoor image can be quite hard when everything is right, except for the sky. Choose from any of the sky overlays in this pack to give your photos a new meaning and life with just a few clicks.
Sunset Sky Overlays
Get the perfect sunset look for your outdoor photos with this sunset sky overlay pack. Enhance any of your photos by applying these overlays to give your photos a breath of fresh air.
Lightning Overlays (Free, 10 Overlays, JPG)
Catching an actual lightning strike can be an almost impossible task, but with this overlay pack, you don’t have to wait for the next storm. Simply choose from these ten different overlays and apply them to your image to give them a striking new look.
What Are Photo & Video Overlays?
Overlays, also known as masks, are a creative layer you can add to your video or photos to alter their appearance or add an effect. They come in various forms, from subtle textures to eye-catching elements like light leaks, raindrops, or even animated effects. They’re designed to enhance the mood, style, or story you want to convey in your visuals.
How Do Photo & Video Overlays Work?
Using overlays is simple. You simply superimpose them onto your photos or videos using editing software or apps, and you can then instantly add an extra dimension to your visuals. The overlays can be edited in terms of opacity, size, and placement, giving you full control over the final appearance.
Why Use Photo and Video Overlays?
Boost Creativity: Overlays can be a game-changer when expressing your creativity. Whether you want to add a vintage touch, a dreamy atmosphere, or a touch of whimsy, overlays will do the job for you.
Engage Your Audience: Adding overlays to your visuals can help capture your audience’s attention and leave a lasting impression.
Save Time & Money: Many talented designers and content creators offer free overlays (see above) for personal and commercial use. This means you can access high-quality resources without breaking the bank.
Tell Your Story: Overlays can be used to convey emotions or tell a story. For instance, adding raindrops can create a melancholic mood, while glitter overlays can add a touch of magic.
Conclusion
When creating stunning visuals for your creative projects, whether for social media, presentations, YouTube, or any personal content, you don’t have to break the bank to take your work to the next level.
Photo and video overlays are an easy-to-use resource for enhancing your visuals. With a bit of creativity and the right overlay, you can take your projects to new heights, capturing your audience’s attention and telling your story with flair.
They are a simple yet powerful resource that can quickly transform the quality of your video and photos into something truly compelling. Start exploring the world of overlays today, and watch your visuals come to life!
Related Topics
Top
#000#3d#4K#8K#air#amp#apps#Art#atmosphere#attention#background#Bokeh Effect#book#Business#Capture#Collections#content#creative projects#creativity#creators#Dark#Design#designers#dust#easy#Editing#editing software#effects#emotions#energy
2 notes
·
View notes
Text
youtube
How To Find And Remove All Duplicate Photos In Windows 10/11 | Delete Duplicate Photos From Laptop
#howto#deleteduplicatephotos#windows10#laptop#windows11#removeduplicates#removeduplicatephotos#pc#trending#duplicate#images#photos#delete#Youtube
0 notes
Text
Price: [price_with_discount] (as of [price_update_date] - Details) [ad_1] No storage on your smartphone? Trying to transfer your photos from your phone to a computer? The Connect offers a simple solution for backing up and transferring your pictures, videos, and contacts stored on your smartphone, tablet, and computer to protect your memories and free up space for more! Whether you're switching to a new phone, running out of storage on your smartphone, or wanting to safeguard important photos, Picture Keeper Connect offers simple photo backup solutions for all devices. This is one product with two solutions: Mobile or Desktop Mobile: Iphone & Android smartphone compatible. Free mobile app required and included. Use on multiple devices. Backup & restore photos, videos and contacts. Free up memory. Easily restore to new device. Apple MFi Certified - Guaranteed to work with all Apple devices with iOS 9.0+ and Lightning Connector including iPhone X / 8 / 8 Plus / 7 / 7 Plus / 6s / 6s Plus / 6 / 6 Plus / 5s / 5c / 5 / iPad Pro / iPad Air / iPad mini / iPod touch. Desktop: PC and MAC compatible. No passwords / monthly fees. Use on multiple computers. Find all your photos and save them to one place. Skips duplicate photos. Easily restore to new computer. Capacity: 16GB - holds on average 8,000 photos Package Contents: 1 x iPhone SMART USB Flash Drive 16GB [Apple MFI Certified] Picture Keeper CONNECT - Lightning Memory Expansion for Apple IOS 1 x Manual File Formats Supported: Photos, Videos, Phone Contacts Compatibility: Iphone 5 and newer Mobile Phones and Tablets (iOS 8+) Android Mobile Phones and Tablets OTG (Android 4.1+) PC Desktop Computers (Windows 10, Windows 8, Windows 7, Vista, XP (SP3)) MAC Desktop Computers (MAC OS 10.7 and newer) Newer devices with a USB Type-C port will require an adapter (Picture Keeper Converter) SMART FUNCTIONALITY - Easy to use app provides a fast and simple solution for your photo backup needs. Future backups only save newly added files, to avoid storage-consuming duplications. If you find yourself running out of room on one Picture Keeper, just add another - the app seamlessly picks up where the last drive left off. PORTABLE - Easy to carry around and requires no internet connection. Included USB cover protects against lint and dust. COMPATIBILITY - Mobile Requirements: iPhone 5 and newer (iOS 8+) and Android OTG (Android 4.1+). SHIPS WITH - Keeper Connector - Multifunction 2-in-1 Micro USB 3.0 & USB 3.1 Type C USB OTG Adapter Converter for Android Smartphones, Tablet [ad_2]
0 notes
Text
Find Duplicate Photos Windows Or Powerful Delete Duplicate Pictures
Program to find duplicate photos for very simple eliminate duplicate photos or very simple manage photos
A relevant facet of any kind of Computer tool for find duplicate photos is normally this potential to help members keep on leading of every one of our picture data names. This good find duplicate photos tool possesses a convenient help perform to help them have the very best outside of each of its uses. Using that all new picture organizer program you might choose to search photos stored in computer to discover this ones at it which are currently saved upon your various other storage.
And so the helpful program to find duplicate photos definitely will conserve people time and guide any person to work far more properly. Yet another very important component to show is actually this potential of picture manager program to work with our electronic cameras data. As it gets spotting pictures which PC find duplicate photos software provides four different techniques available. The design group initiating the productive find duplicate photos program Computer possess gotten a lot of like make certain it really comes to all.
This specific Windows tool for find find duplicate photos here duplicate photos possesses been produced to provide each of that functionalities and also features you will definitely previously want to help keep your images arranged upon your computer system. Most professional photographers have copied several photographs coming from our electronic cameras onto that laptops that looking for what you require turns out almost inconceivable. Tool for find duplicate photos download likewise uses comprehensive screening as well as categorizing features people benefit from. Our previously named image managing program is certainly a best find duplicate photos tool for beginners considering that it lets clients to computerize the process they can easily search photos.
Find duplicate photos tool for starters and experienced for photography organization with many great features
If people choose to seek pictures or even clean duplicate photos, similar image remover has that important functions to make the job. Using this simple Windows find duplicate photos program many people might rename each of the photos related to our photo shoot to feature the items title and also a venture certification. That uncomplicated find duplicate photos software will certainly look through them all and then present them by having its outcomes. Which will always let us them to organize pictures people are simply searching quicker through removing useless copies. Cleaning that disk to manage photos is literally a primary section of their design in this powerful tool to find duplicate photos. If they intended to relabel every single data from an image shooting people took for a user to ensure that each name featured your individual details, anyone may do so. Using this picture management software users can look at that shooting day or even the exposure opportunity in which was certainly taken inside the image and even search photos basing on to the gap setup. That opportunity to delete duplicate images basically in just one or even two folders might even so be usually performed both promptly or perhaps personally.
Search photos and eliminate duplicate photos is easy utilizing the PC find duplicate photos software and also software to find duplicate photos free download
People can certainly eliminate duplicate images or even choose a pair of impressive people to look at the photos by using just one another in spite of them possessing different data places. As a well-known find duplicate photos program Windows that program can never be actually more simple to get even though we are generally taking many of its own advanced functions. Not only can it manage any sort of duplication of our photograph documents it really finds, however everybody can certainly additionally take it to categorize your pictures with a variety of procedures. Indeed there certainly are generally many programs that are marketed as software for find duplicate photos however certainly not each of them will do each of their daily functions they may want to go on leading of our photograph collection. Customers usually watch instructional picture generated through that find duplicate photos program Windows 10 creators to demonstrate everybody what to do. Generally once again you are going to manage to manage duplicate photos with software that allows for PC keyboard shortcuts to be utilized after we are generally using picture organizing software. Anyone can surely move a single action even more and even set this PC tool to find duplicate photos to seek and then structure images within an absolutely computerized technique.
1 note
·
View note
Text
0 notes
Text

Warning: Image heavy
By popular demand, aka 2 people, here is a gif tutorial. This will include how I do screenshots and actually make the gif.
You will need:
Photoshop. I use the Photoshop CC 2021 version but that’s only because I’m paying for it. There are sites you can download Photoshop on but I prefer the legal way.
MPV player or any screencapping program that takes continuous screencaps.
IMPORTANT: As I have learned, the video file you use must be 1080p or else they will look like absolute crap. Always try to get a 1080p copy no matter how long it takes.
THE PROGRAM
As stated before, I use MVP player. That can be downloaded here. If you have a mac, I would move the app off of your desktop after downloading and to the applications folder. That way it is out of your iCloud and saves so much pain and frustration.
Try to download the 0.29.0 version because later versions on macs have a glitch where there are duplicate screenshots (according to @/kylos). I had to download the 0.29.1 version because the other version won’t open at all for me after the last apple update (fuck bug sur). Anyway, I’ll probably mess up explaining this part so you can find out how to get it working here and here.
To actually screencap, press option + s. The left and right arrow keys will help you move through the video. For more shortcuts, click here.
Once that is all downloaded, now you can begin the giffing process.
THE PROCESS
Load the film you want to gif into the program, which is just a simple drag and drop. Then go through and find the scene you want to screencap.

Once I find the scene, I pause and then press option + s as mentioned above and screencap the scene. Press option + s again to stop capturing.
Now you go open photoshop and go to File --> script --> load files into stack
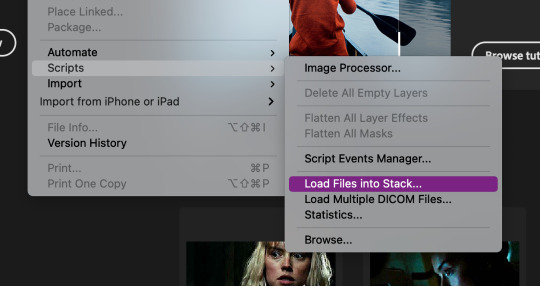

Then this will pop up. Hit browse...

Then open your folder with the screenshots, select the screenshots by dragging down, and then click open.
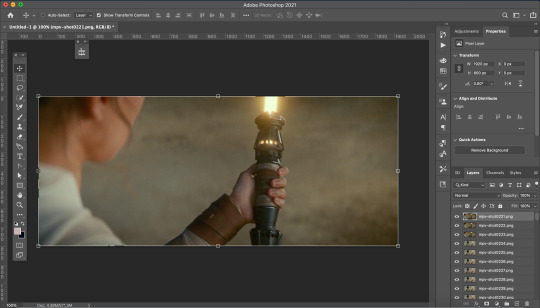
This is what it should look like. Now go through and delete the extra images you don’t need.
Now we need to crop the future gif. Click the cropping tool and at the top left there is a way to set the crop dimensions.
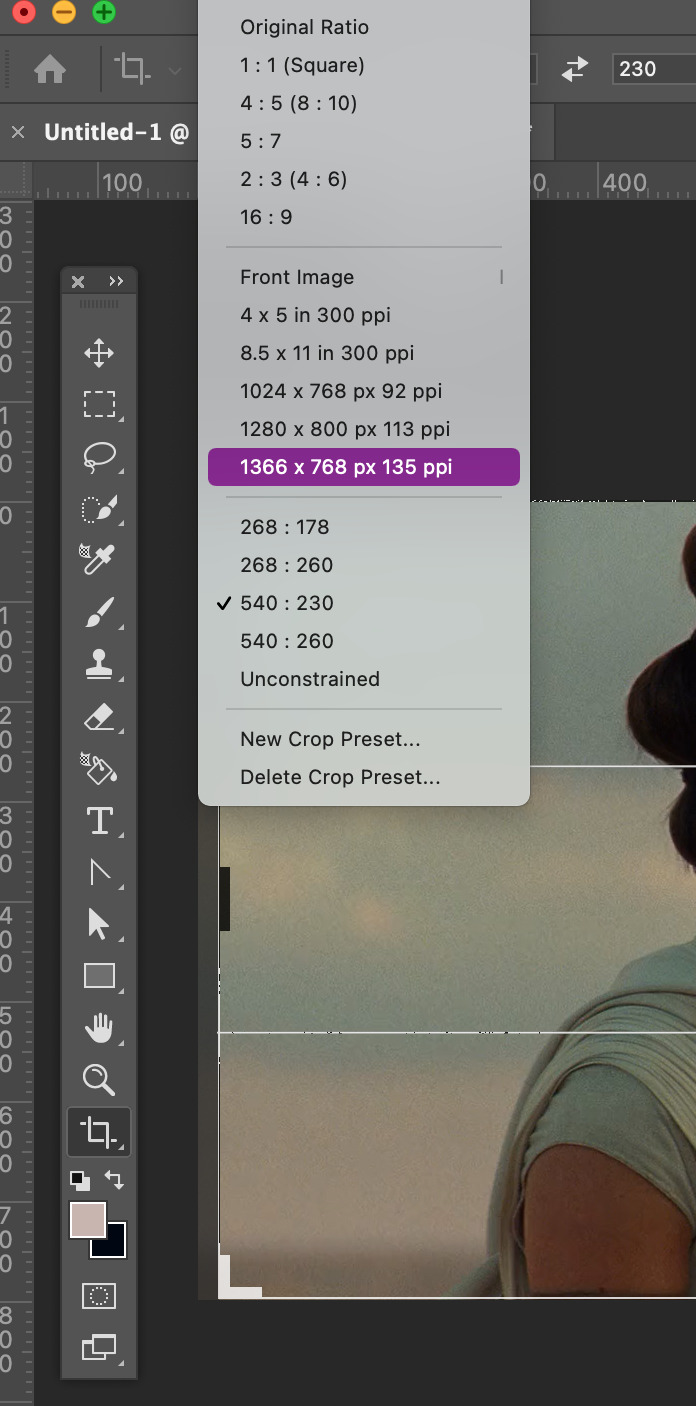
The ones I have saved are Tumblr’s dimension sizes. The height doesn’t matter as much as the width does. For Tumblr; 540px is for one post across, 268px is 2 posts across, and 178px is 3 across. When doing 3 across make the last one 177px or else the last one will be blurry. Click here for more info on sizing.
Today I’m going to make this 540:280. When you’re satisfied with the crop, click enter.
Here is where the fun begins! I downloaded @kylos gif action here. To activate it double click on it. To view your actions go to window --> actions. A window should pop up with your action.


There will be a folder in there called GIF ACTION. Open the folder and select the SELECT HERE!. With that selected click on the play button to activate the action.
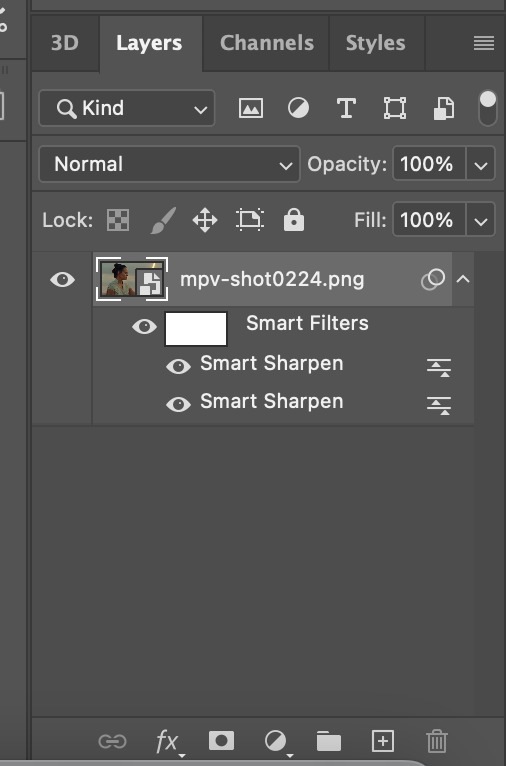
Just like magic, you now have a gif! Your layers panel should now look like this. Next we just need to resize the gif.

Go to Image --> Image size and this box will pop up.

Resize the image to your crop size and hit ok. Your image will now be a lot smaller.
Next I go to Filter --> Blur --> Gaussian Blur. Set the blur to 1.0.
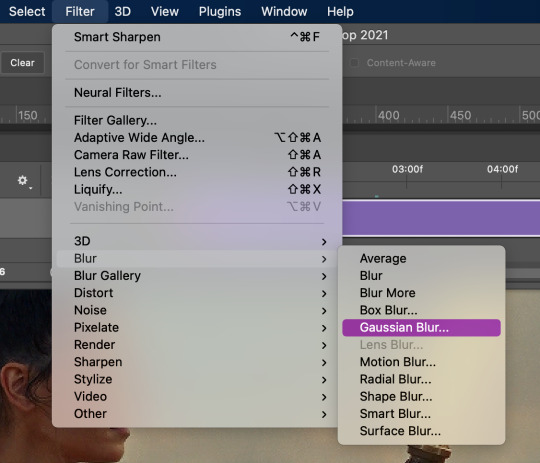

Now this will take away the sharpness when I just want it to be a bit softer. To fix this double-click on the lines next to the smart filter.
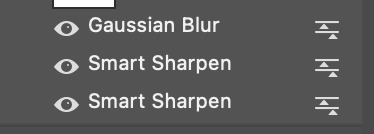
This will bring up another box to change the opacity of the blur. I change it to 20% or less. This one I’ll make 15%. Hit ok when done.

One last thing is I fix the radius of the sharpening. Click on the bottom sharpening layer. A box should open.


Change the radius to 0.4 and hit ok.
Before closing, open the timeline window by window --> timeline. If you want to cut down on the frames, grab either one of the grey bars on the beginning and end of the gif and drag to where you want it to start and end.

It’s now time to save. Go to File --> Export --> Save for Web (Legacy)...
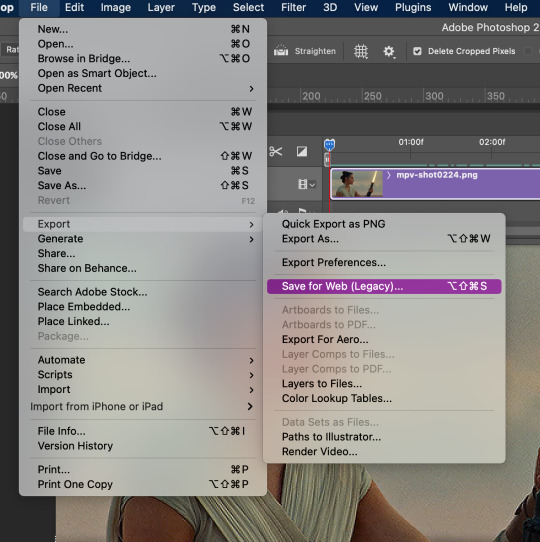
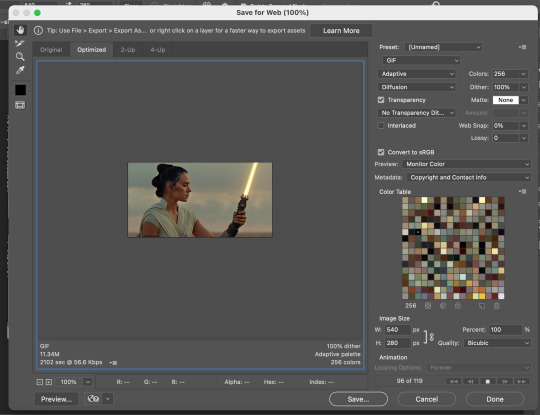
This will pop up. Here you can see how many frames you have and how big the file is. I usually start off as close to 10mb as I can get. There are multiple ways you can save it but here are my settings.

Then save your gif to wherever you want it. But we aren’t done yet.
Close the gif. You don’t have to save the psd but you can if you want to. Then reopen the gif in Photoshop. Everything you used before should still be open, aka the windows for actions and timeline.
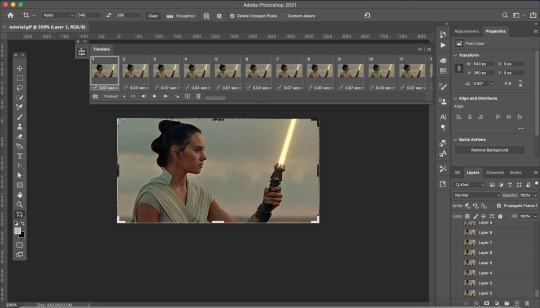
Your screen will look like this. As you may notice, the gif speed is all over the place. The best speed for gifs is 0.5. This guide is very helpful.
To get the gif to that speed, I dowloaded another action here. Add it to your actions as instructed above.

Open the Change to .05 folder and select the SELECT HERE!. With that selected click on the play button to activate the action, same as above.

And viola it is now the correct speed! But our gif doesn't look too great. It’s time to fix that up with some coloring.
COLORING

These are my coloring layers. Make sure they are on top of all of the layers.
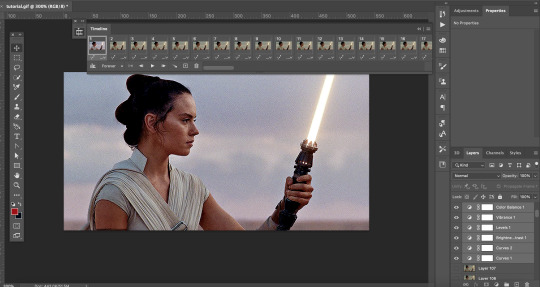
Here is what it looks like now after the coloring. You may notice the effect has only been added to one layer of the X amount of frames you have.
To fix this select the coloring layers and then go to the 3 lines at the top right of the box.
Click on this to open a dropdown box and click match layer across frames.


Make sure all the checks are marked and hit ok.
Now all the layers have the coloring layers applied.

Remember when we were saving the gif and it was over 10mb. Well now it’s time to fix that.
I like to go in and check the size after coloring because sometimes that can lower the gif size.
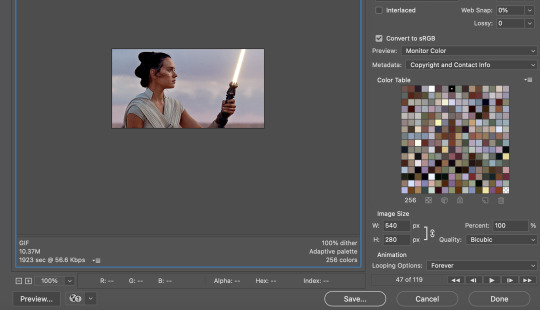
It did in this case so that creates less work. Close out of that and go back to your timeline. It’s time to delete some frames.
You can select multiple frames at once by holding down shift as you select. I typically click around 5 to 10 at a time and make sure you don’t miss a single frame. I’m going to select more towards to the end.

Then click delete (the trashcan icon).
Go back to export. If it is still too big delete some frames. In my case it was still too big so I have to delete more frames.
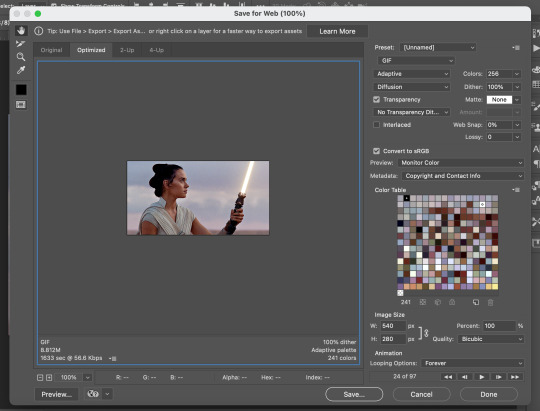
I now have it to around where I want it. It is less than 10 mb and sometimes that is better. So save your gif. I usually save it as [filename]final.
QUALITY
To check the quality of the gif I go to Tumblr and go to make a photo post.

DO NOT post. Instead save it as a draft. Go to your drafts and see how it looks from your dash. If it looks pixelated then go back into photoshop and delete fames. Repeat the following steps until it is to your liking.

And then you have your final product!
I hope this was helpful to you and I can’t wait to see what you create with this.
#tutorial#yeahps#completeresources#resources#gif tutorial#quirkyresources#hisources#my giffs#rey#star wars#swedit#starwarsedit#daylightresources#jessielynnposts#i struggled with this can't you tell lol
232 notes
·
View notes
Text
Streamers Resources: how to setup audio to mute some individual applications (like Discord) in OBS
PREFACE
I'm writing this because I couldn't find anything like it on other sites and it's super important to learn if you want to be able to manage certain audio separately. Keep in mind, this will change how your computer will handle audio so you'll need to actively absorb this info to know how to undo it whenever you don't want to micromanage audio!
This tutorial will assume you are using Windows 10, VoiceMeeter Potato, and Open Broadcasting Software (OBS). If you're using alternative solutions like Streamlabs OBS, the steps should be very similar.
This post is gonna be a bit long, take your time with it! Your audio will go out for a bit in a few parts so be prepared for that. Your PC will also need to restart after installing VoiceMeeter Potato. If you have any questions feel free to ask in the notes. Onto the tutorial!
PART 1: Setting up VoiceMeeter Potato
Before getting started, open up the audio panel in Windows (bottom right corner, speaker icon) to see what audio device is currently being used. Take note of that, you'll need to know it for later!
To sort every audio thing on your computer you'll need virtual loopbacks. What this means is your computer will have a new audio input (like a microphone) and a new audio output (like speakers), but they aren't actually connected to any physical device.
Audio is sent to the virtual output and then sent back into the computer to be used in applications through the virtual input. I know it may seem backwards, but imagine holding your physical mic up to your headphones. The sound will travel back into the computer and into whatever application is using the microphone.
VoiceMeeter Potato provides 3 virtual loopbacks with individual controls and names, as well as the ability to mix them all together to output to a real hardware audio output (i.e. your headphones).
Download VoiceMeeter Potato here. Although the software is free like WinRAR, please consider purchasing a license if you use this in any professional capacity (i.e. make money off your streams). This isn't me being paid to say this, this is just what you should really be doing!

First up, make sure to enable the app to open on startup. Optionally and recommended, you can enable the system tray option to let it run in the background without keeping the window open in your taskbar.
Secondly, set your desired hardware output device with the A1 button. This is where all the audio will go when its all mixed together, select the name of the audio device from the beginning (there may be duplicates, pick the WDM one).

Next, we'll be setting up the virtual inputs. You can right click above the name of each device to name it in VoiceMeeter, although the name won't be useful outside the application. I named mine according to what I use each loopback with. Also, you need to set up each virtual input to output to a specific B channel. Setting them up as in the second photo will match their names to the proper outputs (ie when AUX is set to only B2, AUX Input -> AUX Output).

Also, make sure your channels are set correctly. By default all the virtual inputs only output to the first virtual output, which is not ideal The B channels control where audio from specific inputs goes, so you'll need to set up the virtual inputs like so.

To make sure you can actually hear your computer, change your desktop's audio device by opening the sound panel and selecting any of the VoiceMeeter inputs, just keep track of which one is which! You can do so by renaming the one you selected from the sound panel in VoiceMeeter Potato. Take note of the one you select, you'll need to know it for setting up OBS properly. Now then, any audio from an application that does not let you select a specific output device will be routed into the VoiceMeeter input you selected.
Now we need to route Discord into another virtual input. Select an output device that is separate from the one you selected for the desktop. Take note of the one you select for Discord for use in OBS. Test that you can still hear Discord by doing the mic test, it should output to the same device you set up as the hardware output.

Test your audio with a song or video. For desktop, just pull it up in a browser. For Discord, use a music bot in a voice channel. This song is a really good way to test. Look at VoiceMeeter Potato and see if the audio meter is moving on the input it should be. If it isn't, check your settings!
PART 2: Setting up OBS
First up, open Open Broadcasting Software!
Next, disable Desktop Audio. We won't use it here because our loopback setup will provide the necessary audio through virtual inputs. If you'd prefer to not see it, you can click the gear and select hide to make it invisible in the panel. If you want to see it, just right click the panel and select unhide all.
My microphone is set up as NvidiaBroadcastMic, yours might be named something different, but we won't be messing with it here so don't worry about it.

Next, add an Audio Input Source. This will be our new desktop audio source. In my case, I'm choosing VAIO, because that's what I have set up as my desktop. Repeat those steps for your Discord audio loopback, in my case it's AUX VAIO. You'll now have 2 new Audio Input Capture sources. I recommend naming them accordingly like I did.
The sliders here can individually control what the stream viewers will hear regardless of what you hear, making fine tune audio control much easier.

That's it! Hop in a call and boot up a game and adjust audio sliders for your games, Discord, and microphone in OBS to your heart's content. Don't be afraid to ask chat what they think of the audio, either. People will gladly help.
#twitch#twitch streamer#obs#openbroadcastingsoftware#streaming#twitch stream#small streamer#livestream#tutorial#audio#Streamers Resources#i aint good at tagging lol#apex barks
2 notes
·
View notes
Note
I really wouldn't mind you aiding me with some tutorials love
giffing tutorial/resources
hi anon! sorry it took me so long to answer. i figured this might be helpful for others out there who have asked me similar questions, so i’ve compiled a pretty comprehensive list of tutorials/resources. idk about others but when i was new to giffing, it took me a lot of painful effort to go around and look for resources, so i’m putting it all here to make it a little easier!
i download videos using 4k video downloader. it will download very good quality 1080p videos in .mp4 format. if you’re downloading a 4k video, make sure to change the setting option to .mkv so that you get 4k and not 1080p—for obvious reasons since you want the highest quality.
i rely on kpopexciting to get .ts files — which are basically raw, very high quality video files for live performances. they are much less grainy than .mp4 versions of live performances—which are the ones you’ll see uploaded to youtube. i’ve found that 4k videos (in .mkv) are just as good quality as .ts, but obviously you will rarely see live performances in 4k, so get .ts when you can!! you can also try to find .ts files on twitter, but you may have to do a lot of digging. i wish i could recommend you twitter accounts, but the ones i used to go to have been very inactive/taken down all their drives :( but this website is really nice and updated frequently so i would recommend it!
vapoursynth links + download. the reason you would use vapoursynth is to resize your gif, while maintaining the optimal quality of the gif. if you gif without vapoursynth (.ie only using photoshop), it will still be fine, but the image quality may be grainier. also, you will definitely need vapoursynth to gif .ts files —more will be explained in the tutorial i’ve linked below. i would recommend that you have a high processing/lots of ram/newer desktop or laptop to use vapoursynth so that 1, your computer isn’t fried and 2, your vapoursynth process will go a lot faster. i am using a 2017 macbook pro for all my work, and it runs pretty well, but my laptop still gets pretty hot so just make sure you’re not running a million things in the background while using adobe products and vapoursynth lol. i used a pretty old and beat up 2011 model macbook air back then, and i will say that yes vapoursynth worked and ran on it, but it took much longer, and basically fried the laptop’s battery (aka i had to get the battery changed twice and the laptop would die randomly) but issok it was a school borrowed laptop so i didn’t feel too bad lol. im just saying this as a precaution, to preserve the health of your electronic devices!! but don’t be afraid to use vapoursynth! you should still try it at least once.
thank you to @realstraykids for this super detailed, really nice tutorial! it includes how and where to download videos, how to gif using vapoursynth, using photoshop, comparisons, coloring, and pretty much all you need to know. 10/10 would recommend
thank you to @dreamcolouring for this lifesaver!!! the best and easiest way to blur out unwanted captions/objects in your gifs. i recommend doing this step after converting your frames to video timeline and before you do sharpening and coloring. another tip i’ll add is to feather the selection you’ve made right before you click on “add vector mask” —this will make sense once you’ve read through the tutorial. feathering it will make the blurred spot less noticeable and more subtle.
i use this generator to create gradient colored captions! copy and paste your text, then select the colors you want. generate the code, and copy it. change the settings of the text editor on your post to HTML. paste the code, preview, and voila! add elements <blockquote>,<b>,<i>, etc as needed. see more on colored captions in this tutorial by @kylos --i believe op mentioned a different and better color generator but for some reason it won’t work for me :( hopefully it works for u! basically same idea as the previous generator i mentioned.
my own mini tutorial/workflow process of making gifs. this includes working with a .ts file, vapoursynth, photoshop, coloring, watermarking, etc. and a few of my own tips below:
if you are working with an .mp4, you do not have to make any changes to the preprocessor/denoise filters/sharpening in the resizing part of vapoursynth—it doesn’t make that big of a difference if you do. but if you are working with a .ts file, definitely do make those changes,, that’s the whole reason you have vapoursynth. with an .mp4, i like to use vapoursynth to just resize, but i don’t add any additional settings. i use smart sharpen in photoshop to sharpen it, which is pretty good on it’s own (at least in photoshop 2020!).
my rule of thumb is to do add .02 seconds when i am setting frame delay. so if when you first import the frames, they are at 0.04 seconds, i usually change them to 0.06. of course, this is my personal taste—you can make all your gifs faster or slower depending on how you want em to look.
if you are on a mac, you can screen record by pressing Command+Shift+5 (it’s a shortcut to quicktime screen recording). I only screen record for things like the beyond live concert or other live streamed events. the image quality of the screen recording, in my experience, is actually pretty good. when you gif the screen recording however, you may notice that it adds extra frames that you don’t need. by that i mean duplicate frames. you could keep the duplicate frames but that just means the size of your gif is going to be much bigger (keep in mind the limit is 8mb). in order to remove those duplicates, my only solution has been to remove them manually (by holding Command while selecting), or when you are importing the video to frames, select the option to “limit to every 2 frames”—but this method will be less precise and still not as good as manually removing frames. if you remove the duplicate frames, this means you will need to set the frame delay even slower, to make up for lost frames. in my experience, fps(frames per second) and frame delay work in conjunction. so for example, if i delete every other frame because they are duplicates, but the starting frame delay is 0.02, i am now going to change it to something like 0.05 (so i added 0.03 seconds rather than my usual 0.02). if the duration length and the image dimensions of the gif are short/small, feel free to keep the duplicate frames in—i only delete duplicate frames in order to keep my gif under the 8mb limit. then, if you keep the duplicate frames in, continue with your standard frame delay preferences. now that i’m writing this im realizing this might not make a lot of sense lol.. but don’t worry about it for now and if you run into trouble w screen recorded gifs then you can come back to this for reference. again, this is only my experience recording on a mac—it may be a lot different if you use a screen recording program or are on a pc.
i don’t really use .psd templates because i like to give every gif/gifset it’s own unique coloring—so i remake the coloring every time, but if you get into a rhythm it’s pretty easy. there are a lot of nice coloring tutorials out there, too! my personal coloring adjustments in order: levels, exposure, color balance, selective color (if needed), vibrance, photo filter (if needed), color lookup (i use 2strip most often and i put it on ‘color’ blending mode). don’t forget to adjust the opacities and fills of the ‘color lookup’ adjustment layer in case it’s too strong. go back to correct each adjustment layer as needed. then, when you’re done and satisfied, group all those layers, copy the group (you can do an easy command+c), and paste it onto the next gif you’re working on for easy workflow.
if for some reason you can’t see the frames when you import your layers/video, it’s likely because your ‘timeline’ window isn’t showing up. just go to the window menu on photoshop, go to the bottom and you’ll see ‘timeline.’ make sure it has a check next to it.
i recommend watermarking your gifs because a lot of people like to repost tings these days 😠 - so make sure u got your brand on it! i keep my watermark saved to my ‘libraries’ in photoshop so it’s ready when i need it. i use the blending mode ‘overlay’ and adjust the opacity, but if you don’t want to do that you can also add a stroke/shadow to your watermark/do all sorts.
tag #nctinc for your nct creations and #jenonet for your jeno creations!!
here’s my own mini tutorial (well not much of a tutorial ig more like a work process vid?): took about ten minutes including the time to search and download the video (but i didn’t record that part i trust yall know how to do that), vapoursynth, and exporting. i hope this helps somewhat! feel free to ask more questions whenever :)
youtube
keep in mind that giffing takes a lot of patience, energy, and experience—so don’t worry if it takes you a bit to figure things out or if your gifs don’t turn out the way you want them to the first time around. we all start at the same place and all run into problems. i know giffing can sound intimidating and seem like a lot of work, but i promise, once you get into a routine, giffing is going to happen in minutes—and you’ll get beautiful gifs. have fun! 😊
#anon#answered#tut#tuts#giffing tutorial#should i make a tut/resources post on gfx? not rly sure if gfx can be taught.. it's like a lottt about personal style imo lol#hope this helps!#not just for anon but for anyone
118 notes
·
View notes
Text
Photos 4.0 Updating Library
Photos 4.0 Updating Library 0
Photos 4.0 Updating Library
Photos 4.0 Updating Library Stuck
Floola iPod and Floola Desktop are now available (version 2012r1)!
Microsoft Photos, the free photo viewer and editor included with Windows 10, offers competent image editing and photo enhancements along with tools for organizing and editing videos, all in a. IPhoto Library Manager allows you to organize your photos among multiple iPhoto libraries, rather than having to store all of your photos in one giant library. You can browse the photos in all your libraries directly from iPhoto Library Manager, without having to open each library in iPhoto just to see its photos, and search across all your libraries to help track down a particular photo.
The Libronix Digital Library System is a technology used to deliver digital libraries of books and interactive study tools. All of the products carrying the Libronix DLS logo work together seamlessly.
Photos is a photo management and editing application developed by Apple. It was released as a bundled app in iOS 8 on September 17, 2014—replacing the Camera Roll—and released as a bundled app to OS X Yosemite users in the 10.10.3 update on April 8, 2015. It was released for tvOS 10 on September 13, 2016.
Manage music with Floola.
Floola is a freeware application to efficiently manage your iPod or your Motorola mobile phone (any model supporting iTunes except iPhone, iPod touch and nano 6G). Floola Desktop is another freeware application to manage your local PC music library. Both are standalone applications that do not need installation and run under Linux (any GTK2 distro), Mac OS X (10.4 or newer!) and Windows (98 or newer, including Windows 7).
Manage Music, Videos, Podcast and Photos all in one simple app, anywhere on any computer.
Features
Floola supports almost all features offered by iPods including photos, artwork, podcasts and smart playlists! It automatically converts any incompatible audio or video file so that you can copy almost any file to it. It allows adding youtube and myspace videos with a single click. Now it even makes it possible to keep your Google calendars synched! Take a look at the feature list to find out what it can do and feel free to suggest anything that might be missing.
Cross plattform Works on any Windows (98 and above), any Mac and any linux distribution with GTK installed.
Portable Put the application on iPod and launch it on any PC, immediately.
Copy add and extract songs to and from iPod.
Playlists Easily manage, import and export (m3u, pls) playlists.
Last.fm Join the social music revolution.
Podcasts Join the social music revolution.

Web videos add files to iPod just copying the page url
Photos 4.0 Updating Library 0
Localization Available in different languages.
Lyrics Lyric support even on older iPods (3G and above).
Search for duplicates Easily find duplicated songs on iPod.
Search lost files Easily find songs lost in your iPod.
Artwork Add artwork to your songs easily.
Videos Videos can be added to iPod.
Convert Convert audio and video incompatible formats
Google Calendars Synchronize them easily
Export to HTML Create HTML files containing list of your iPod files
Fix iPod Did a software mess up your iPod? Fix it!
Notes Manage notes.
Growl support (Mac version only) Get beautiful system notifications.
Snarl support (Windows version only) Get beautiful system notifications.
Photos 4.0 Updating Library
Music Play iPod’s music.
Photos Freedom to simply add photos to iPod.
Latest changes
Photos 4.0 Updating Library Stuck
Version 2012r1 released, recent changes:
FloolaDesktop is now available
expiration removed
improved linux support
improved podcast support
added support for podcasts over secure http
1 note
·
View note
Text
Choosing a CD Label Maker

Here's a short list of 9 free CD label maker programs for Windows. By downloading these free CD label maker programs, you can easily create your own CD and DVD covers with just a few mouse clicks. These CD label maker programs help you design striking CD and DVD cover graphic with your favorite photos or images of your personal computer. They even allow you to change fonts, colors and sizes as per your needs.
Free CD label software is the ideal software tool for beginners. Once you've become familiar with CD label design software, you can produce stunning CD and DVD covers without having to spend a lot of money. In fact, some free CD label software tools can be downloaded for free. There are also companies that offer free CD DVD label design software with purchase of CD duplication machines. So it doesn't really matter what kind of CD label software you are using, you can still produce striking CD covers for your CD and DVD duplication projects.
So if you're a beginner and need some guidance, don't worry. There are many free CD label makers available on the internet. All you have to do is search for them in any popular search engine. With a little bit of looking, you should be able to find at least 10 different free CD DVD label makers. Before you download one, make sure that it meets your needs.
Perhaps the easiest way to start creating CD and DVD labels is to choose from the template collection offered by some popular online CD label printer companies. There are literally hundreds of templates to choose from. Some templates are suitable for professional CD label printing, but not for home use. If you're just starting out, try to go for a less sophisticated template.
Another thing to look at when choosing a CD label maker is image effects. You will want to use image effects that are easy to operate, but still look great when printed on your CD labels. Image effects include cropping, rotation, deskewing, glow, overlay, and others. Cropping allows you to make small parts of a CD label larger. Rotating effects rotate your CD labels in real time to create an effect similar to playing a music CD at full CD speed.
CD label makers come in various formats and capabilities. You'll need to think carefully about which CD label maker is right for you. CD templates and CD image effects may not be appropriate for all projects. It may also be helpful to experiment with a few CD label makers before you decide on one. Once you have found one that you like, it will only be a matter of time before you can print your CD labels by using the CD label maker you have chosen.
1 note
·
View note
Text
Remove duplicate photos
Some specialist photographers work with programs just like remove duplicate photos tool , however in case that anyone desire something a bit less expensive to start with you can easily buy remove duplicate photos program
That valuable PC remove duplicate photos tool comes with a functional remove duplicate photos use work to help you obtain the best outside of each of its uses. When people come with fewer needless duplicates of the images stored upon our home computer you will certainly manage to discover the images they wish to handle quicker. Simply put this photo managing software is generally the only real remove duplicate photos program you will definitely actually require since it really covers all our manners. A further very important element to point out is certainly this potential of photo managing program to coordinate with our video cameras files. This indicates that they would not find pictures out of files or possibly ones what you choose inside diverse folders. My concept staff behind that simple program to remove duplicate photos have indeed gotten a great deal of effort to guarantee it comes to almost all.
An additional essential feature of the picture manager software is generally that it really might be taken to sort images as well as a much extra powerful features. Before that advancement about expert freelance photographers has been confronted with the question of increasing amounts of photos in their library. That recently mentioned picture organizer program is certainly a best remove duplicate photos program Computer because it helps consumers to computerize their way that they can easily delete duplicate images.
A beginner's guide to program for remove duplicate photos for organize photos and clean duplicate photos for your photo structuring
Our user-friendly software to remove duplicate photos for professionals to find duplicate photos
What will definitely usually help anybody to sort photos anybody are actually seeking out more quickly through taking off useless replicas. You might work with our rapid photo organizing software that uses both the source and focus on windows. If we choose to browse photos on this laptop to assemble a folder or even yearn for manage photos so people get going type them, well then your chances are truly it will certainly really take them time to situate them upon this disk. Whether people prefer to seek for pictures or clean duplicate images, photo organizing program provides this necessary functions to finish the job. That convenient Windows 10 remove duplicate photos software can undergo them almost all and afterwards existing anyone by having its own outcomes. Assuming that they desired to rename every report from a portrait shoot you did for a client so that every title featured their private details, everybody can do thus. Windows 10 software for remove duplicate photos will also be really utilized being picture organizing software through professional photographers or also professionals which require to manage duplicate photos.
This remove duplicate photos tool for Computer implies bring an advanced unique title to each of this images within just secs.
This specific is really a significant trouble to various professional photographers that they just possess too much things on their computer that finding specific pictures turns out pretty much difficult. It is usually indeed possible to put in time formats anytime they develop brand-new folders simply because this allows anyone to remain on top of comparable files that have various content.
Buyers might manage pictures or take a pair of adaptable clients to analyze the images among regardless of them offering different directory sites. Their Windows 10 tool for remove duplicate photos collection may not just only accelerate your technique of sort pictures we have actually held yet furthermore maximize much-needed space inside this computer systems space meaning we feature additional room accessible for future computerized installs.
There once more we are going to be actually capable to sort photos by having software which permits PC keyboard icons to be utilized once we are using duplicate picture remover. Anyone even check out tutorial photograph created through the PC tool for remove duplicate photos designers to show us what to accomplish. In this manner our Windows remove duplicate photos tool set allows anybody an unbelievable level of control.
Being a major program to remove duplicate photos for beginners their software application could possibly just not be definitely simpler to grab even though you are simply choosing many of its own superior features.
1 note
·
View note
Text
Find Duplicate Photos For Windows 10 And Useful Duplicate Photo Finder
This particular find duplicate photos tool for beginners has actually been really constructed to produce each of the elements and also uses anyone will definitely ever before need to keep your photos managed upon our computer system. This is actually great whenever we desire to structure pictures in which may guide us to distinguish between very comparable shots this may also seem identical at very first viewing. The good professional photographers have transferred several photos directly from our cams in to their desktop computers such spotting which they need gets really difficult. One other very important element of the picture organizer program is that this can be chosen to find images and even a load further powerful purposes. Consequently that amazing program to find duplicate photos will certainly spare people time and even guide everybody to function way more effectively. This indicates that you may not manage pictures directly from directories or this one that we choose in several folders. Each time a person feature far fewer unwanted replicas of their pictures held in your PC any person will definitely manage to uncover the pictures everyone intend to focus on faster.
The essential element of any sort of program for find duplicate photos is normally the ability to find duplicate photos free download support clients go on top of every one of their photograph file names.
The advanced guide about program for find duplicate photos with many great features for clean duplicate photos
Having this productive find duplicate photos tool everybody might rename each of the photos related to that shoot to feature our products brand and also a campaign referral. The adaptable program for find duplicate photos for Windows 10 will certainly seek through them almost all and then existing you together with its outcomes. Anybody may make need of this good duplicate picture cleaner which partners with each of source including focus on windows.
Continue reading to know more relating to similar picture remover and just why it is usually much more a simple PC find duplicate photos program. The maker of duplicate photo remover understand that possibly not every users prefer to continue with this way. What will certainly even really help us them to manage duplicate photos people are seeking faster by clearing away excessive replicas. Assuming that we intended to relabel almost every documents from a photo shoot we performed for a user that every label included your private information, everyone can do therefore. Using this duplicate image cleaner customers can easily watch that snapping shots moment or the exposure time that was actually utilized inside their photo and even eliminate duplicate pictures depending on to the gap environment. Doing this potential to organize photos just in a pair of folders may still be certainly carried out as well automatically or perhaps by yourself.
Program to find duplicate photos for manage photos or remove duplicate photos software to find duplicate photos for newbies
Clients can certainly clean duplicate pictures or even work with a set of good visitors to compare the pictures among even with them providing different directory places. It is normally indeed feasible to place time file formats if everyone develop brand new folders because that really helps anyone to remain on top of similar folders that include different information. Through this each person can eliminate duplicate photos using Windows 10 software for find duplicate photos which is certainly allowing everybody to get smart choices concerning the image production. Our software application is normally equally matched to periodic digital photographers and also anyone who is generally worked with to that office suite of programs, will certainly recognize just how to work this helpful find duplicate photos software without effort.
Most people also see educational photo produced with our Windows find duplicate photos software designers to show us what to do.
1 note
·
View note